

Page 1

User Manual
EGT7828CK
EGT7838CK
EGT9229CK
EGT9239CK
EGT9239CKB
EN Gas Cooktop
□
Hướng dẫn sử dụng
VI
Bếp gas âm
Page 2

Contents 2
Safety instructions
Safety instructionsSafety instructions
Safety instructions ................................
................................................................
................................................................
................................................................
................................ 3333
Parts identification
Parts identificationParts identification
Parts identification ................................
................................................................
................................................................
................................................................
................................ 4444
Installation instructions
Installation instructionsInstallation instructions
Installation instructions ................................
................................................................
..........................................................
....................................................
.......................... 6666
Installation procedure ...............................................................
6666
Gas connection ........................................................................
7777
Operation
OperationOperation
Operation ................................
................................................................
................................................................
................................................................
.............................................
..........................
............. 8888
Ignition burners .........................................................................
8888
Using the hob correctly .............................................................
8888
Maintenance and
Maintenance andMaintenance and
Maintenance and care
carecare
care ................................
................................................................
..........................................................
....................................................
.......................... 9999
Glass top ..................................................................................
9999
Burner - caps & crowns ............................................................
9999
What to do if
What to do ifWhat to do if
What to do if ................................
................................................................
................................................................
................................................................
........................................
................
........ 9999
Technical specifications
Technical specificationsTechnical specifications
Technical specifications ................................
................................................................
....................................................
........................................
....................
10
1010
10
Warranty conditions
Warranty conditionsWarranty conditions
Warranty conditions ................................
................................................................
............................................................
........................................................
............................ 10
1010
10
Thank you for choosing and using Electrolux home appliances.
Electrolux Group of Sweden is one of the world largest home appliances companies. With more than 65 million Electrolux products
being used by millions of households worldwide each year, it is also the world largest manufacturer of kitchen electrical appliances.
The group has sold more than 55 million kitchen products, which is equivalent to the combined heights of 5 Mount Everest. Besides
that, more than 2/3 of the world star hotels use Electrolux professional kitchen equipment.
Clearly, the excellent achievement of Electrolux over the last 80 years has been widely recognized by 450 million families all over
the world. Now, we are pleased to make some of the best products from this renowned brand available to consumers in Southeast
Asia. To us, not only is Electrolux one of the most reliable brands in dealing with home appliances, it is also a brand that promises to
bring innovative lifestyles to all families through its cutting edge technologies and excellent designs. For not only do they add a touch
of elegance to your kitchen, but Electrolux products also makes cooking easier, more enjoyable and something to share with. Enjoy
happy cooking now with Electrolux kitchen appliances!
Once again, we would like to extend our heartiest thanks to you for your trust in choosing Electrolux products!
Before installing or using this appliance, please read this instruction book carefully and pay particular attention to the safety warnings
in the following page.
Should you have further enquiries regarding this appliance, kindly contact our Customer Care for advice.
Please keep this instruction book for future reference and pass it on to any future owners of this appliance.
Page 3

3 Safety instructions
Safety instructions
Do not use gas other than that which is specified on the
label attached.
Do not place anything, e.g. flame tamer, asbestos mat,
between pan and pan support as serious damage to the
appliance may result. (Fig 1)
WARNING:
WARNING:WARNING:
WARNING:----
••••
In the event of the burner flames being accidentally
In the event of the burner flames being accidentally In the event of the burner flames being accidentally
In the event of the burner flames being accidentally
extinguished, turn off the burner control knob and do not
extinguished, turn off the burner control knob and do not extinguished, turn off the burner control knob and do not
extinguished, turn off the burner control knob and do not
attempt to re
attempt to reattempt to re
attempt to re----ignite the burner for at least 1 minute.
ignite the burner for at least 1 minute.ignite the burner for at least 1 minute.
ignite the burner for at least 1 minute.
Do not remove the pan support and enclose the burner with a
wok stand not supplied by Electrolux as this will concentrate
the flame and deflect the heat onto the top plate. (Fig 2)
Do not use large pots or heavy weights which can bend the pan
support or deflect the flame onto the top plate.
(Fig 3)
Locate pan centrally over burner so that it is stable and does
not overheat the appliance. (Fig 4)
Use only wok support supplied or recommended by the
manufacturer of the appliance. (Fig 5)
Wok support to be used for wok and other trivets for flat bottom
pot.
The unit to be used for cooking only. Do not dry towels, clothes,
etc., over it. If this is done, there is danger of fire.
If a gas leak is found, close stopcock, open up all windows and
call your dealer. Do refrain from turning an electric switch on or
off, lighting a match, smoking or using a lighter.
Use the appliance in a well-ventilated room.
Do not use vinyl gas hose. It is liable to be softened by heat.
Use only a rubber hose.
Be sure to turn off the ignition knob and regulator of the
cylinder after use.
Avoid touching the burner, pan stand etc., immediately after
use. Otherwise you will get burnt.
Ensure that the rubber hose does not touch any part of the unit
or lies underneath it.
Connect the rubber hose to the gas inlet and fasten it with a
hose clamp.
The pan stand leg nearest to the flame will have discoloration
after use. Such phenomenon is normal.
• For burner fitted with a flame supervision device, if after 15
For burner fitted with a flame supervision device, if after 15 For burner fitted with a flame supervision device, if after 15
For burner fitted with a flame supervision device, if after 15
sssseconds of ignition operation the burner has not lit, stop
econds of ignition operation the burner has not lit, stop econds of ignition operation the burner has not lit, stop
econds of ignition operation the burner has not lit, stop
operating the device and open the compartment door and
operating the device and open the compartment door and operating the device and open the compartment door and
operating the device and open the compartment door and
wait at least 1 minute before attempting a further ignition of
wait at least 1 minute before attempting a further ignition of wait at least 1 minute before attempting a further ignition of
wait at least 1 minute before attempting a further ignition of
the burner.
the burner.the burner.
the burner.
• If nozzle holes are blocked, use a thin wire or pin to pierce
If nozzle holes are blocked, use a thin wire or pin to pierce If nozzle holes are blocked, use a thin wire or pin to pierce
If nozzle holes are blocked, use a thin wire or pin to pierce
and clean the nozzle holes.
and clean the nozzle holes.and clean the nozzle holes.
and clean the nozzle holes.
•
Page 4

Parts
identification
4
Page 5
5 parts
identification
The Class of the appliance: Class 3
The Class of the appliance: Class 3The Class of the appliance: Class 3
The Class of the appliance: Class 3
These instructions are only valid if the country symbol appears on the appliance.
If the symbol does not appear on the appliance, it is necessary to refer to the technical instructions which will provide the
necessary instructions concerning modification of the appliance to the conditions of use of the country.
Prior to installation, ensure that the local distribution conditions (nature of the gas and gas pressure) and the adjustment
of the appliance are compatible
The adjustment conditions for this appliance are stated on the label (or data plate).
This appliance is not connected to a combustion products evacuation device. It shall be installed and connected in
accordance with current installation regulations.
Particular attention shall be given to the relevant requirements regarding ventilation.
Avoid using of cooking vessels on the hotplate that overlap its edges.
The use of inappropriate hob guards can cause accidents.
Hob guards cannot be used.
The use of a gas cooking appliance results in the production
of heat, moisture and products of combustion in the room in
which it is installed.
Ensure that the kitchen is well ventilated, especially when the appliance is in use: keep natural ventilation holes open or
install a mechanical ventilation device (mechanical extractor hood).
Prolonged intensive use of the appliance may call for additional ventilation, for example opening of a window,
or more
effective ventilation, for example increasing the level of mechanical ventilation where present.
CAUTION:
CAUTION:CAUTION:
CAUTION:
“
In case of hotplate glass breakage:
_ shut immediately off all burners and any electrical heating element and isolate the appliance from the power supply.
_ do not touch the appliance surface,
_ do not use the appliance.
”
Page 6
installation
instructions
6
Installation instructions
• Have the installer show you the location of the gas shut off
valve and how to shut it off in emergency.
• Be certain all packing materials are removed from the hob
before operating to prevent fire or smoke damage that could
be caused by the presence of these materials.
• Observe all instructions for minimum clearance to any
combustible surfaces. These should be in accordance with
information on the rating plate and with national fire laws.
• If the hob is installed near windows, proper precautions
should be taken to prevent curtains from blowing over
burners creating FIRE HAZARD.
• When choosing a location for this hob consider, availability
and position of gas and electric supply paths.
• Any openings around gas and electric service outlets shall
be closed at the time of installation.
• Do not install another hob next to this unit.
• The underside of the hob must be checked to ensure that
there are no projections which might foul the hob. Make sure
that the countertop is solidly supported and can withstand
the weight of the hob.
• Check that the cabinet is leveled from side to side and from
front to back in its installed position.
• Cabinet ventilation can be improved by the provision of air
holes to the cabinet. Care should be taken to ensure that
ventilation holes are not obstructed.
• When fitting a vent hood above the hob, refer to the
manufacturer own installations relating to that product.
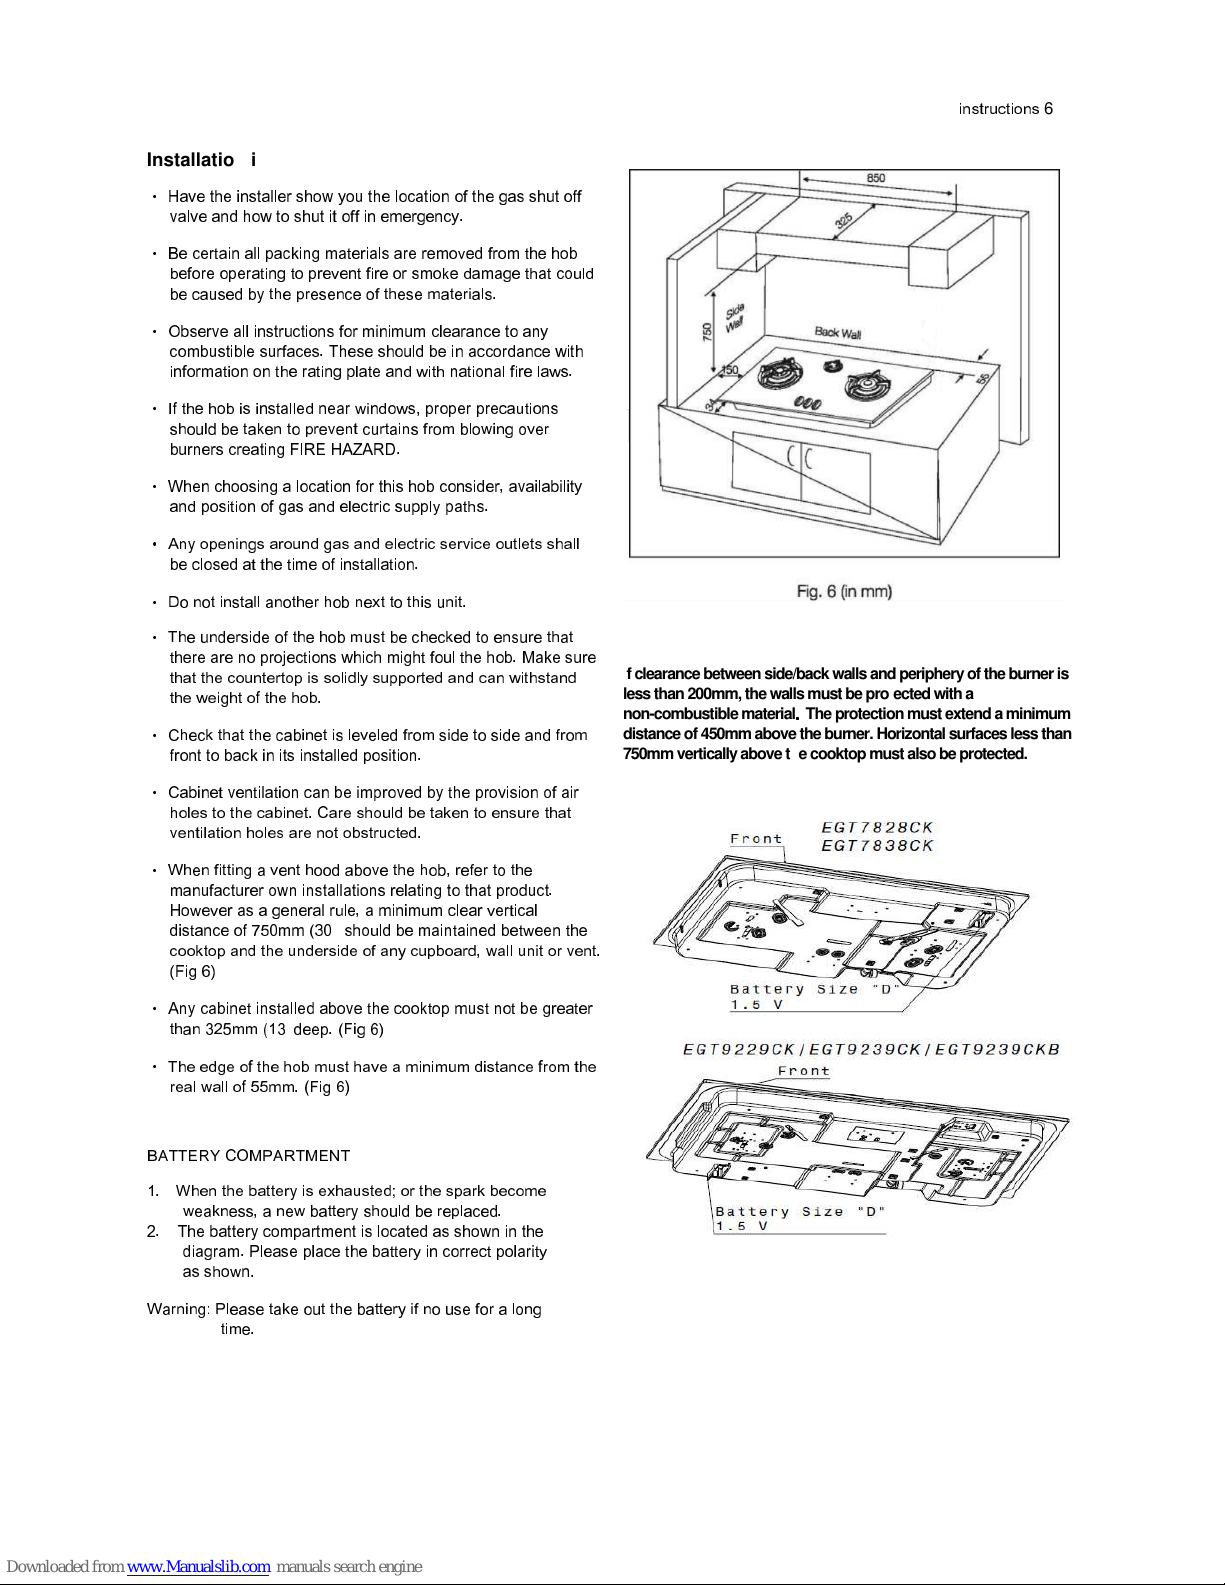
However as a general rule, a minimum clear vertical
distance of 750mm (30” should be maintained between the
cooktop and the underside of any cupboard, wall unit or vent.
(Fig 6)
• Any cabinet installed above the cooktop must not be greater
than 325mm (13”deep. (Fig 6)
• The edge of the hob must have a minimum distance from the
real wall of 55mm. (Fig 6)
If clearance between side/back walls and periphery of the burner is
less than 200mm, the walls must be protected with a
non-combustible material
....
The protection must extend a minimum
distance of 450mm above the burner. Horizontal surfaces less than
750mm vertically above the cooktop must also be protected.
BATTERY COMPARTMENT
1. When the battery is exhausted; or the spark become
weakness, a new battery should be replaced.
2. The battery compartment is located as shown in the
diagram. Please place the battery in correct polarity
as shown.
Warning: Please take out the battery if no use for a long
time.
Page 7

7 installation
instructions
Installation procedure
• Before installing the appliance, check that the location
provides the required clearances from combustible
materials and check if necessary to provide protection to
adjacent surfaces as required by the regulation. Make
provision for the gas supply to be connected to the
location.
• Cut the opening in the bench top by the cardboard -
template given in the hob packing or to the dimensions
shown in Fig 7.
• Remove the hob from the carton.
• Install the hob in the cut-out (Fig 7)
• Connect gas supply to inlet of hob. Turn the gas on
and check for leaks using soap solution and brush
around all the joints and connection.
• Test the appliance; depress the control knob and turn to
full flame setting to activate the electric igniter. The burner
will ignite. Adjust control knob to the desired setting. On
initial usage you may have to repeat this ignition function
several times (to allow air to be purged from the gas
supply system). No adjustment should be necessary. If
any problem occur, refer to the servicing instructions or
the fault finding chart.
• Ensure the manual is left with the user. If any of the above
procedures do not produce satisfactory results, the agent
service department should be consulted for more
specialized assistance.
Bench cut-out size viewed from front of bench, i.e. control panel at front.
If clearance between side/back walls and periphery of the burner
is less than 200mm, the walls must be protected with
non-combustible material. The protection must extend a
minimum distance of
450mm above the burner. Horizontal
surfaces less than 750mm vertically above the hob must also be
protected.
•
Flexible connection
Flexible connectionFlexible connection
Flexible connection
• The supply hose must be visible for its entire length (max.
one meter) and must be secured with a hose clamp X (Fig
8). The sealing washer must be fitted.
IMPORTANT SAFETY INSTRUCTION:
IMPORTANT SAFETY INSTRUCTION:IMPORTANT SAFETY INSTRUCTION:
IMPORTANT SAFETY INSTRUCTION:
Upon completion of gas installation connections, it is
Upon completion of gas installation connections, it is Upon completion of gas installation connections, it is
Upon completion of gas installation connections, it is
compulsory to check for gas leakage
compulsory to check for gas leakagecompulsory to check for gas leakage
compulsory to check for gas leakage at the joint.
at the joint.at the joint.
at the joint. (Soap test)
(Soap test)(Soap test)
(Soap test)
Soap test procedure
Soap test procedureSoap test procedure
Soap test procedure
•
Turn the burner controls off and turn on the gas supply.
•
Apply soapy solution to each joint. (Figure 8)
•
Formation of bubbles indicates leakage and must be tightened.
•
Repea
t soap test
USE ONLY LOW PRESSURE REGULATOR
USE ONLY LOW PRESSURE REGULATOR USE ONLY LOW PRESSURE REGULATOR
USE ONLY LOW PRESSURE REGULATOR
AND
AND AND
AND
UNADJUSTBALE PRESSURE
UNADJUSTBALE PRESSUREUNADJUSTBALE PRESSURE
UNADJUSTBALE PRESSURE MAX 30mbar FOR
MAX 30mbar FOR MAX 30mbar FOR
MAX 30mbar FOR
THIS APPLIANCE
THIS APPLIANCETHIS APPLIANCE
THIS APPLIANCE
Fig.7 (in mm)
Page 8
operation 8
Ignition burners
1. Check to make sure that the gas supply is accessible and set
up with the necessary and appropriate fittings/connectors.
2. Turn all control knobs to off position.
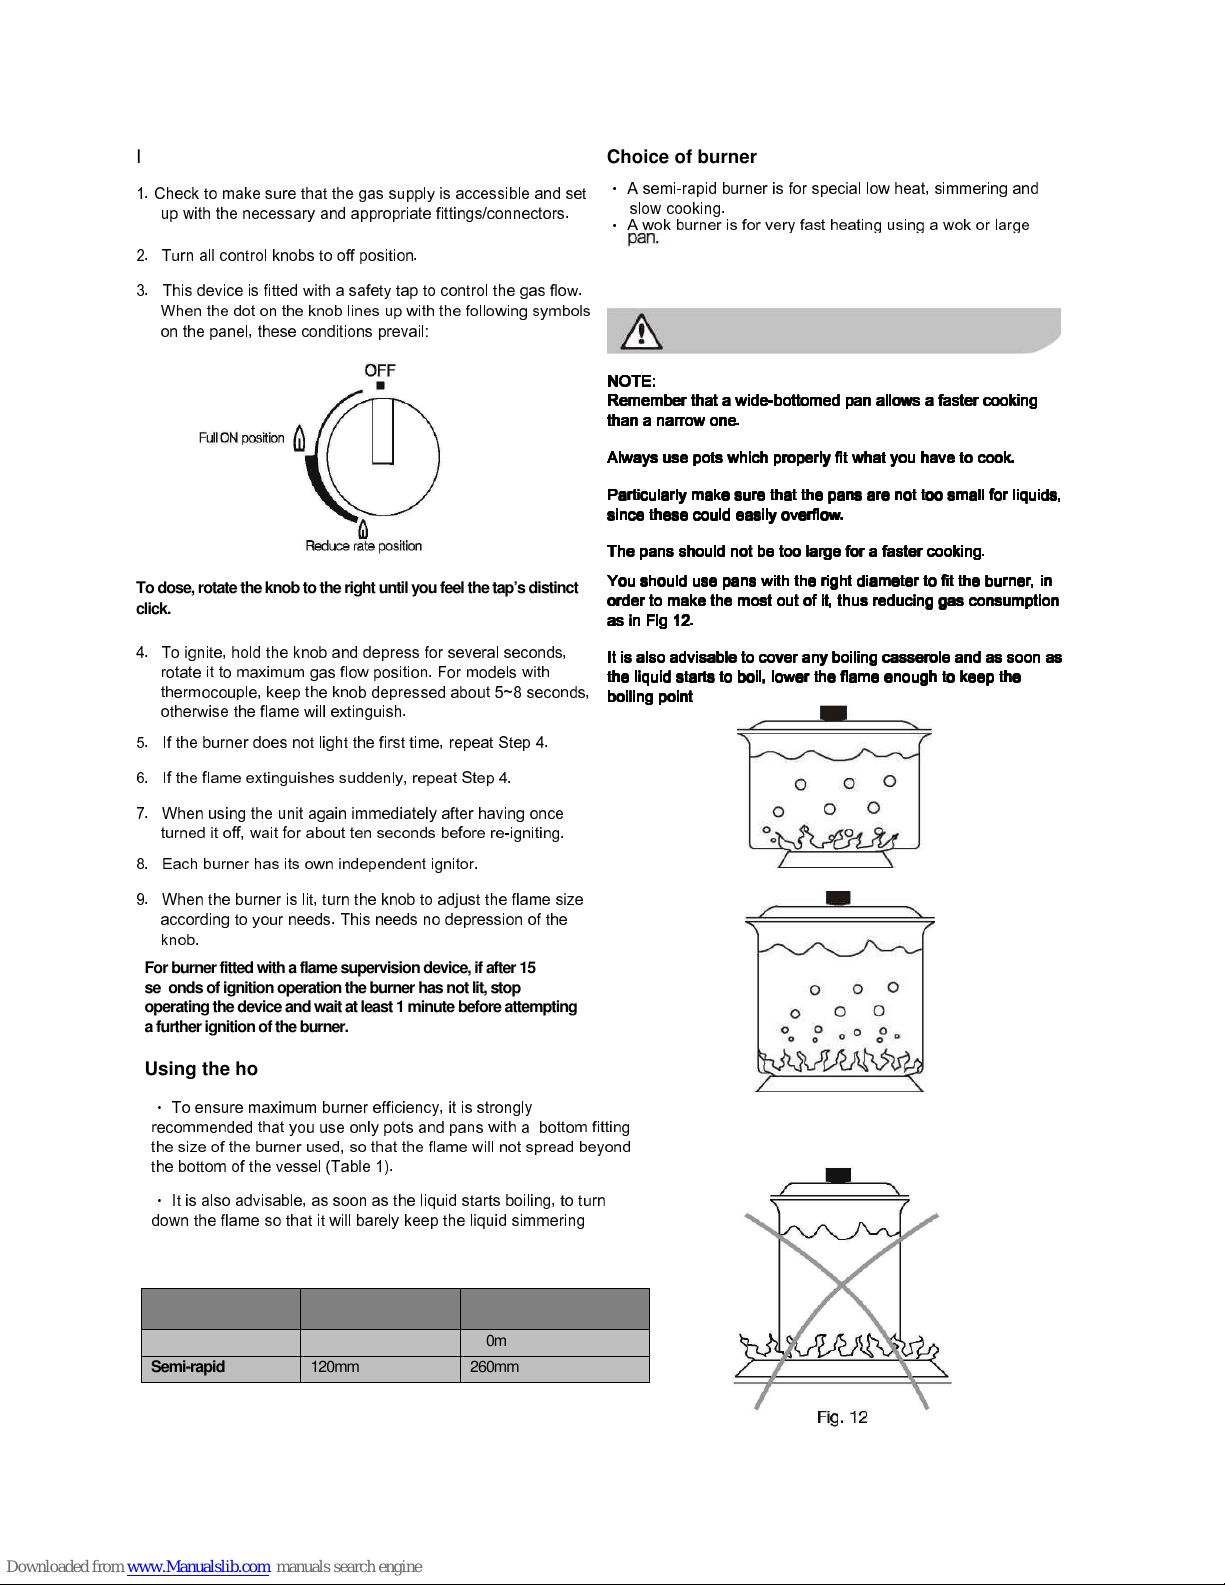
3. This device is fitted with a safety tap to control the gas flow.
When the dot on the knob lines up with the following symbols
on the panel, these conditions prevail:
To dose, rotate the knob to the right until you feel the tap’s distinct
click.
4. To ignite, hold the knob and depress for several seconds,
rotate it to maximum gas flow position. For models with
thermocouple, keep the knob depressed about 5~8 seconds,
otherwise the flame will extinguish.
5. If the burner does not light the first time, repeat Step 4.
6. If the flame extinguishes suddenly, repeat Step 4.
7. When using the unit again immediately after having once
turned it off, wait for about ten seconds before re-igniting.
8. Each burner has its own independent ignitor.
9. When the burner is lit, turn the knob to adjust the flame size
according to your needs. This needs no depression of the
knob.
Choice of burner
•
A semi-rapid burner is for special low heat, simmering and
slow cooking.
NOTE
NOTENOTE
NOTE::::
Remember that
Remember thatRemember that
Remember that a wide
a widea wide
a wide----bottomed pan allows a faster cooking
bottomed pan allows a faster cooking bottomed pan allows a faster cooking
bottomed pan allows a faster cooking
than a narrow one.
than a narrow one.than a narrow one.
than a narrow one.
Always use pots which properly fit what you have to cook.
Always use pots which properly fit what you have to cook.Always use pots which properly fit what you have to cook.
Always use pots which properly fit what you have to cook.
Particularly make sure that the pans are not too small for liquids,
Particularly make sure that the pans are not too small for liquids, Particularly make sure that the pans are not too small for liquids,
Particularly make sure that the pans are not too small for liquids,
since these could easily overflow.
since these could easily overflow.since these could easily overflow.
since these could easily overflow.
The pans should not be too large for a faster cooking.
The pans should not be too large for a faster cooking.The pans should not be too large for a faster cooking.
The pans should not be too large for a faster cooking.
You should use pans with the right diameter to fit the burner, in
You should use pans with the right diameter to fit the burner, in You should use pans with the right diameter to fit the burner, in
You should use pans with the right diameter to fit the burner, in
order to make the most out of it, thus reducing gas consumption
order to make the most out of it, thus reducing gas consumption order to make the most out of it, thus reducing gas consumption
order to make the most out of it, thus reducing gas consumption
as in Fig 12.
as in Fig 12.as in Fig 12.
as in Fig 12.
It is also advisable to cover any boiling casserole and as soon as
It is also advisable to cover any boiling casserole and as soon as It is also advisable to cover any boiling casserole and as soon as
It is also advisable to cover any boiling casserole and as soon as
the liquid starts to boil, lower the flame enough to keep the
the liquid starts to boil, lower the flame enough to keep the the liquid starts to boil, lower the flame enough to keep the
the liquid starts to boil, lower the flame enough to keep the
boiling point
boiling pointboiling point
boiling point
For burner fitted with a flame supervision device, if after 15
seconds of ignition operation the burner has not lit, stop
operating the device and wait at least 1 minute before attempting
a further ignition of the burner.
Using the hob correctly
•
A wok
burner is for very fast heating using a wok or large
•
To
ensure maximum burner efficiency, it is strongly
recommended that you use only pots and pans with a bottom fitting
the size of the burner used, so that the flame will not spread beyond
the bottom of the vessel (Table 1).
•
It is also advisable, as soon as the liquid starts boiling, to turn
down the flame so that it will barely keep the liquid simmering
Burner
Minimum
Diameter
Maximum Diameter
Wok burner 120mm 280mm
Semi-rapid 120mm 260mm
Page 9
9
9 9
9
maintenance
and care
Glass top
Glass topGlass top
Glass top
•
Persistent stains may require vigorous rubbing with nylon
scourer or creamed powder cleansers. Household enamel
cleaners are available, follow the manufacturer instructions
in their use. Harsh abrasive cleaners, powder cleaners,
steel wool or wax polishes should not be used.
•
Do not use the glass top as a work table.
Burner caps & crowns
Burner caps & crownsBurner caps & crowns
Burner caps & crowns
•
These can all be lifted off and removed for separate
cleaning.
•
Ensure burner caps and crowns are thoroughly dried
after cleaning or spillage.
•
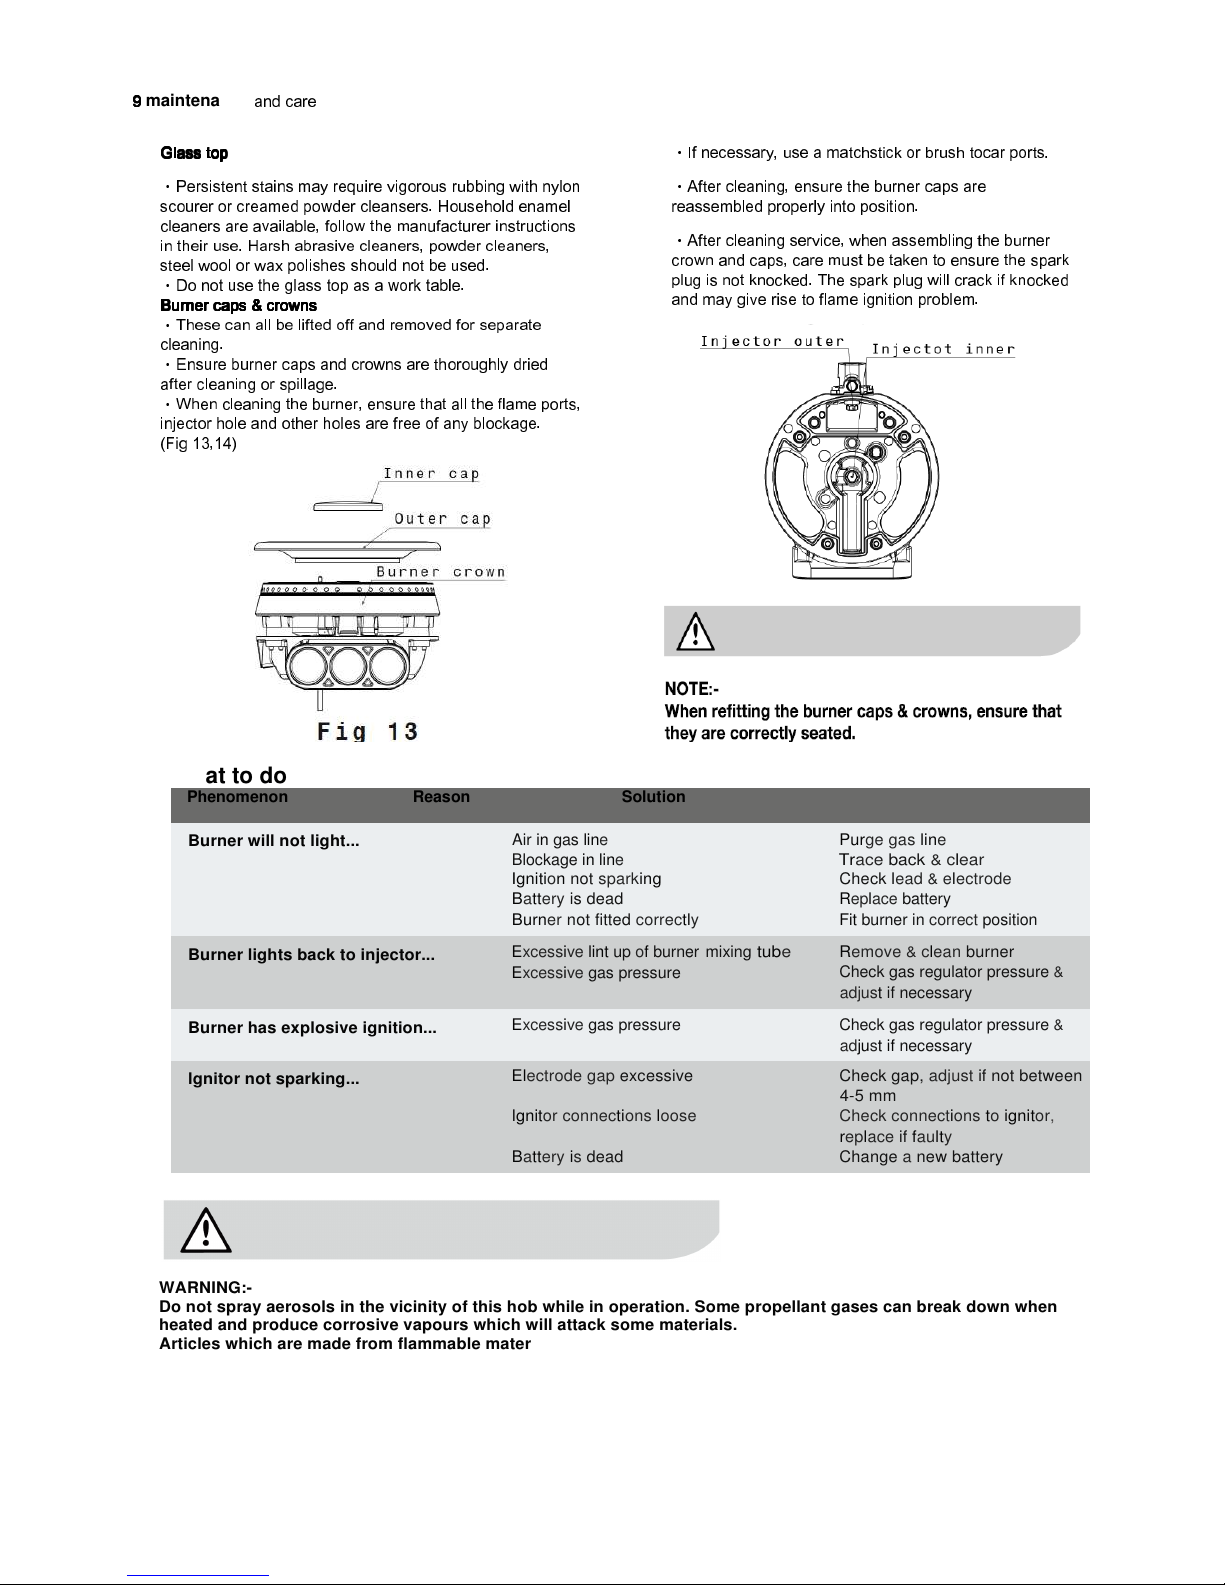
When cleaning the burner, ensure that all the flame ports,
injector hole and other holes are free of any blockage.
(Fig 13,14)
•
If necessary, use a matchstick or brush tocar ports.
•
After cleaning, ensure the burner caps are
reassembled properly into position.
•
After cleaning service, when assembling the burner
crown and caps, care must be taken to ensure the spark
plug is not knocked. The spark plug will crack if knocked
and may give rise to flame ignition problem.
What to do if
Phenomenon Reason Solution
Burner will not light...
Air in gas line
Purge gas line
Blockage
in line
Tr
ace
back
&
clear
Ignition not sparking
Check lead & electrode
Battery is dead
Replace battery
Burner not fitted correctly
Fit burner in correct position
Burner lights back to injector...
Excessive lint up of
burner
Excessive gas pressure
mixing tube
Remove & clean burner
Check gas regulator pressure
&
adjust if necessary
Burner has explosive ignition...
Excessive gas pressure
Check gas regulator pressure
&
adjust if necessary
lgnitor not sparking...
Electrode gap excessive
lgnitor connections loose
Battery is dead
Check gap, adjust if not between
4-5 mm
Check connections to ignitor,
replace if faulty
Change a new battery
WARNING:Do not spray aerosols in the vicinity of this hob while in operation. Some propellant gases can break down when
heated and produce corrosive vapours which will attack some materials.
Articles which are made from flammable materials should not be stored in drawers or cupboards immediately below
this hob.
Do not store articles within 50mm of the base.
Do not touch spark ignitor while lighting the burner.
Where this appliance is installed in a marine craft or in caravans, it shall not be used as a space heater.
Page 10
Technical specifications
Standard warranty conditions
If you need any technical help or would like more information about our products, please do not hesitate to contact our Customer Care Center, listed
below:
LPG
Double ring burner
4.8kW
Semi rapid burner
1.65kW
Reduce Rate
1.0kW
Setting
30mbar
Gas connection
0.5 Inch straight thread
(14 threads per inch)
Battery
1.5V D.C
 Loading...