

Electrolux EFC9062 User Manual
USER MANUAL
EFC90620

We were thinking of you
when we made this product

electrolux 3
IMPORTANT SAFETY INFORMATION 4
YOUR APPLIANCE 5
OPERATING INSTRUCTIONS 6
MAINTENANCE AND CLEANING 9
SOMETHING NOT WORKING 13
GUARANTEE/CUSTOMER SERVICE 14
GUARANTEE CONDITIONS 15
INSTALLATION INSTRUCTIONS 17
ELECTRICAL CONNECTIONS 18
INSTALLING THE COOKER HOOD 19
EN
Welcome to the world of Electrolux
Thank you for choosing a fi rst class
product from Electrolux, which
hopefully will provide you with lots of
pleasure in the future. The Electrolux
ambition is to offer a wide variety of
quality products that make your life
more comfortable. You fi nd some
examples on the cover in this manual.
Please take a few minutes to study this
manual so that you can take advantage
of the benefi ts of your new machine.
We promise that it will provide a
superior User Experience delivering
Ease-of-Mind.
Good luck!
EN
Guide to use the instruction book
The following Symbols will be found in the text to guide you through the instruction book
Safety instructions Step by step instructions

4 electrolux IMPORTANT SAFETY INFORMATION
EN
IMPORTANT SAFETY INFORMATION
These warnings are provided in the interests of your safety. Ensure that you
understand them all before installing or using this appliance. Your safety is of
paramount importance. If you are unsure about any of the meanings of these
warnings contact the Customer Care Department.
Installation
• Any installation work must be undertaken
by a qualifi ed electrician or a competent
person.
• This hood must be installed in accordance
with the installation instructions and all
measurements must be adhered to.
• If the cooker hood is installed for use
above a gas appliance then the provision
for ventilation must be in accordance
with the Gas Safety Codes of Practice
BS.6172, BS.5440 and BS.6891 (Natural
Gas) and BS.5482 (LP Gas) 1994, the
Gas Safety (Installation & Use) Regulations,
the Building Regulations issued by
the Department of the Environment,
the Building standards (Scotland)
(Consolidated) Regulations issued by the
Scottish Development Department.
• The fan motor of this cooker hood
incorporates a cut-out device which will
operate if the cooker hood is installed
below the minimum height recommended
under section ‘Clearance Height’, or if the
motor becomes overheated. If the cutout device is activated, switch off the fan
motor and allow the cooker hood to cool.
The cut-out device will reset itself when
the fan motor has cooled signifi cantly.
• It is dangerous to alter the specifi cations
or modify this product in any way.
• When installed between adjoining wall
cabinets the wall cabinets must not
overhang the hob.
• If the room where the hood is to be used
contains a fuel burning appliance such as
a central heating boiler then its fl ue must
be of the room sealed or balanced fl ue
type.
• If other types of fl ue or appliances are
fi tted ensure that there is an adequate
supply of air to the room.
• The ducting system for this appliance
must not be connected to any existing
ventilation system which is being used
for any other purpose.
• Do not install above a cooker with a high
level grill.
Child Safety
• This appliance is designed to be operated
by adults. Children should not be allowed
to tamper with the controls or play with
the appliance.
During Use
• This product is for domestic use only.
• Never leave frying pans unattended during
use as over-heated fats and oils might
catch fi re.
• Never do flambé cooking under this
cooker hood.
• Do not leave naked fl ames under the
hood.
• This cooker hood is designed to extract
unpleasant odours from the kitchen, it will
not extract steam.
Maintenance and Service
• This appliance can be a hazard if the
synthetic paper and charcoal fi lters are
not replaced as recommended.
• Under no circumstances should you
attempt to repair the appliance yourself.
Repairs carried out by inexperienced
persons may cause injury or more
serious malfunction. Refer to your local
Electrolux Service Force Centre. Always
insist on genuine spare parts.

YOUR APPLIANCE electrolux 5
EN
YOUR APPLIANCE
6 electrolux OPERATING INSTRUCTIONS
EN
OPERATING INSTRUCTIONS
The cooker hood is designed to extract
unpleasant odours from the kitchen, it
will not extract steam.
Cooker Hood Controls
The hood can be switched on pushing
directly onto the requested speed
without fi rstly having to select 0/1
button
L T1 T2 T3 T4 T5 F
Touch
control
Basic functions Indicator lights
Dual Function
L
When briefl y pressed it switches the lighting
system on and off.
Touch control
unlit
Lights off
When pressed for 2 seconds it starts the
lighting system in “courtesy light” mode.
The lamps are fed at a reduced power of
approximately 5W. Such function can be
stopped by pressing the touch control for 2
seconds or just by pressing it shortly in order to
return to the normal lighting mode. In courtesy
light mode the touch control is not lit.
Touch control lit Lights on
Touch control
unlit
Courtesy light on
T1
When pressed the motor is stopped, regardless
of the speed it is set to.
Touch control lit Motor on
Touch control
unlit
Motor off
T2
When pressed the motor is set to the fi rst speed
Touch control lit

7 electrolux OPERATING INSTRUCTIONS
EN
T3
By a brief pressing the motor is set to the second
speed.
Touch control lit Second speed on
By pressing the touch control for approximately
2 seconds the Delay function is enabled, i.e
delayed shutdown of the appliance ensuring
a complete elimination of the residual odours.
This function can be activated at OFF-position
and at 1°, 2° and 3°speeds. It can be stopped
in advance by pressing any of the touch
controls (T) with the exception of T3. The Delay
function works according to the following
scheme:
1°speed / OFF = 20 minuets
2°speed = 15 minutes
3°speed = 5 minutes
Flashing touch
control
Delay function on
T4
When pressed the motor is set to the third speed Touch control lit
T5
When pressed the motor is set to the intensive
speed timed to 5 minutes. At the end of 5
minutes of intensive speed the hood starts again
at the speed it was set to previously. In case the
hood is set to the intensive speed directly from
OFF-state it will then start from the fi rst speed
after 5 minutes of intensive speed.
Touch control lit
F
When pressed for 4 seconds it resets the fi lter
alarm signal indicated by fl ashing of the touch
control T1. This procedure can be carried out
only when the motor is stopped.
Touch control lit Metal grease fi lters saturation
alarm. Metal grease fi lters need
to be washed. The alarm starts
up after 100 working hours.
Flashing touch
control
Charcoal fi lter saturation
alarm. Charcoal fi lter has to
be replaced and metal grease
fi lters washed. The alarm
starts up after 200 working
hours. (Activation; check the
paragraph “Charcoal fi lter”)

OPERATING INSTRUCTIONS electrolux 8
EN
To Operate
Select the required fan speed and light
if required.
Recirculation
In the recirculation mode the
contaminated air enters the cooker
hood through the grease fi lters. The
air is cleaned by passing through the
charcoal fi lters before being passed
back into the kitchen through the grilles
in either side of the chimney stack.
Extraction
In the extraction mode the contaminated
air enters the cooker hood passing
through the grease fi lters and is passed
out through the ducting into the
atmosphere.
To obtain the best performance when
cooking it is advisable to switch the
cooker hood on for a few minutes before
you start cooking and leave it running
for about 15 minutes after fi nishing.
When used in the ducting mode the
charcoal fi lters are not required.
Never do fl ambé cooking under this
cooker hood.
Never leave frying pans unattended
during use, as over-heated fats and
oils can catch fi re.
Do not leave naked fl ames under the
cooker hood.
Ensure heating areas on your hob
are covered with pots and pans
when using the hob and cooker hood
simultaneously.
9 electrolux MAINTENANCE AND CLEANING
EN
MAINTENANCE AND CLEANING
Before carrying out any maintenance
or cleaning isolate the cooker hood
from the mains supply.
The cooker hood must be kept clean,
as a build up of grease or fat can be
a fi re hazard.
External Cleaning
Wipe the cooker hood frequently
with warm soapy water using a mild
detergent.
Never use scouring pads or abrasive
cleaners.
Never use excessive amounts of wa-
ter when cleaning particularly around
the control panel.
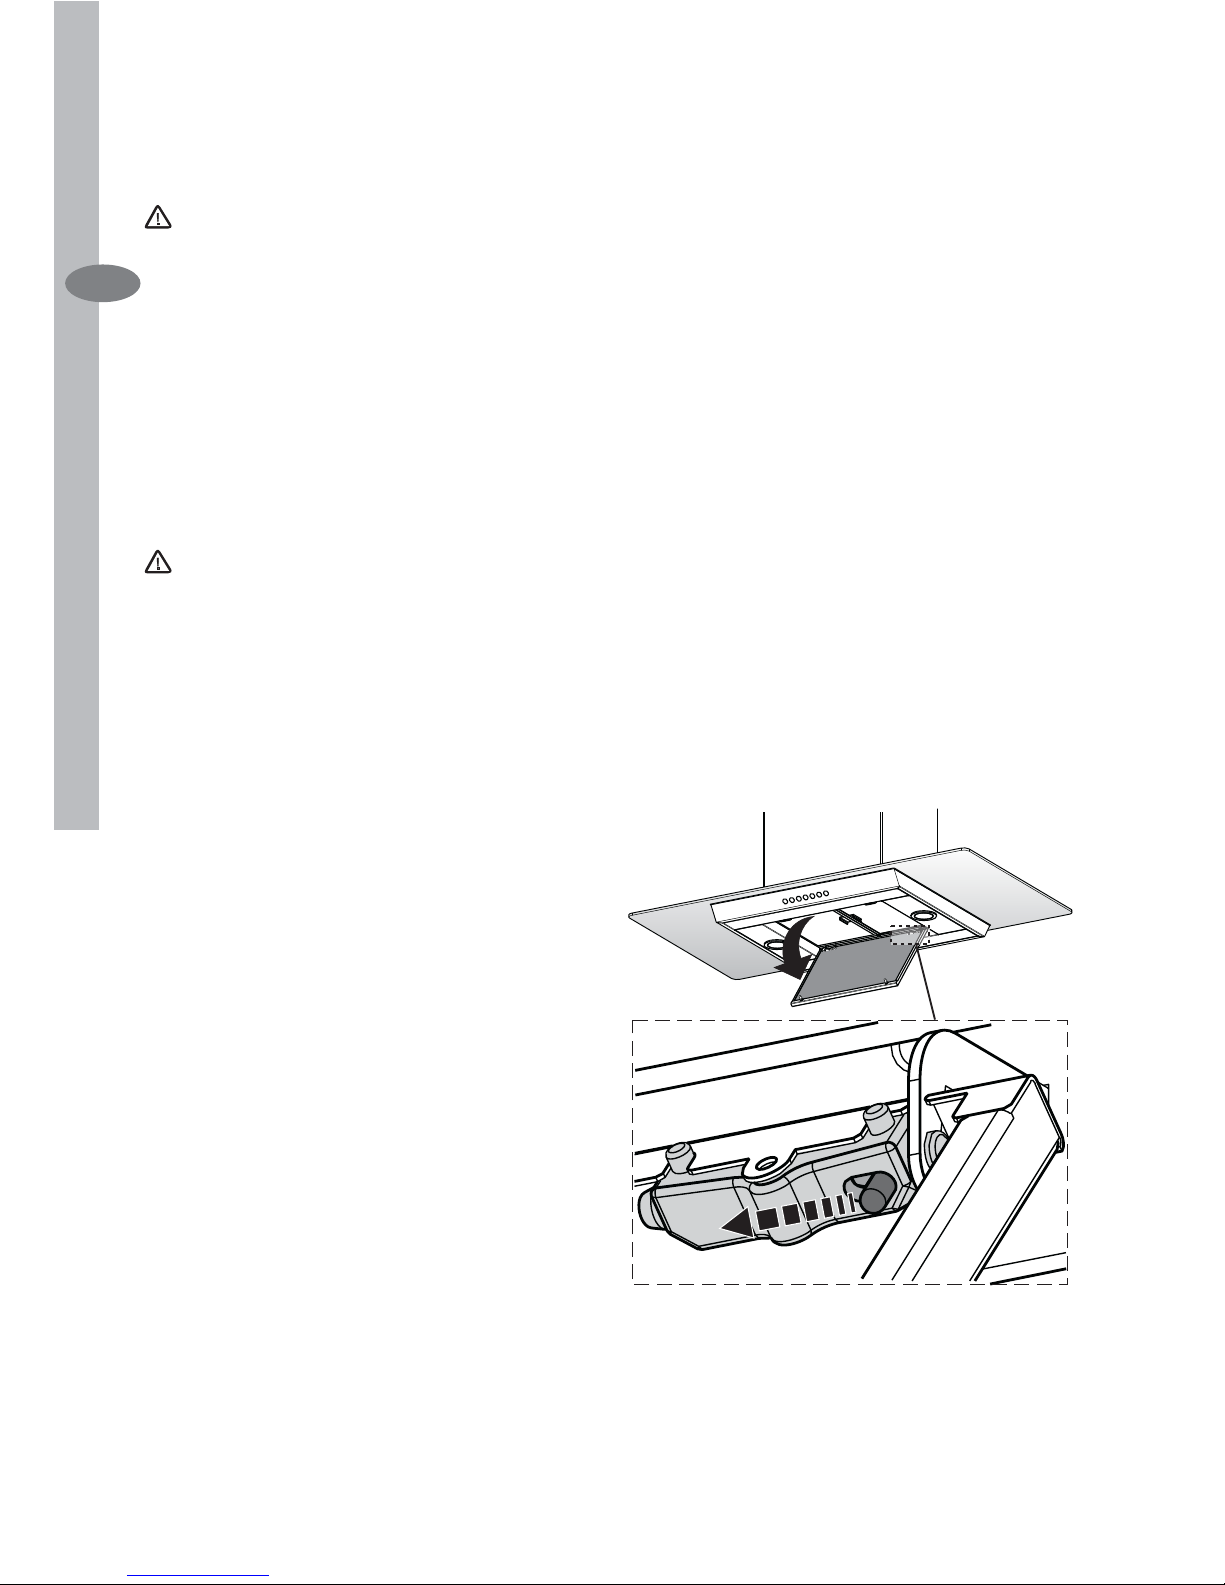
Cleaning of the Suction panel
• Pull the suction panel to open it.
• Slide the fi xing pivot lever to disconnect
the panel from the hood casing.
• Do not wash the panel in the
dishwasher.
• Clean the outside using a damp cloth
and neutral liquid detergent.
• Clean the inside as well using a damp
cloth and neutral detergent; do not use
wet cloths or sponges, or jets of water;
do not use abrasive substances.
• After having carefully cleaned the panel
hook the panel back to the hood and
close it.
 Loading...