

Page 1
820 41 68 471209316
CHEST FREEZER
INSTRUCTION BOOK
EC 5109N
Page 2

Important Safety Information
These warnings are provided in the interests of your safety. Ensure that you understand them all
before installing or using this appliance as our safety is of paramount importance
Prior to Installation
Check the appliance for transport damage. Under no
circumstances should a dam aged applianc e be ins talled. In
the event of damage please contact your retailer.
Installation
•
This appliance is h eavy. Care should be taken when
moving it.
•
It is dang erous to alter the specificat ions or attempt to
modify this product in any way.
•
Ensure that the appliance does not stand on the
electrical supply cable. If the su ppl y cable is dam aged,
it must be replaced by a cable available from Expert
Appliance Care.
•
Any electrical work required to install this appliance
should be carried out by a qualified electrician or
competent person.
•
Parts which heat up should n ot b e expos e d. Whenever
possible, the back of the applia nc e s ho uld be close to a
wall, but leaving the required distance for ventilation, as
stated in the installation instructions.
•
The appliance should be left for 2 hours after
installation bef ore it is turned on, in order to al low the
refrigerant to settle.
Child Safety
•
Do not allow children to tamper with the controls or play
with the product.
•
There is a risk of s uffocation! Keep pack aging m aterial
away from children!
During Use
•
This appliance is designed for domestic use only,
specifically for the storage of edibl e f oodstuf fs . It is not
intended for commercial or industrial use.
• Containers with flammable gases or liq uids can leak at
low temperatures. Do not store any containers
flammable materials, such as spray cans, fire
extinguisher refill cartridges etc. in the freezer.
•
Frozen food should not be refrozen once it has tha wed
out.
•
Do not place carbonated or fizzy drinks in the freezer.
•
Ice lollies can cause ’frost/freezer burns’ if consumed
straight from the freezer
•
Do not remove items from the freezer if your hands are
damp/wet, as this could cause skin abrasions or
frost/freezer burns.
•
Bottles and cans must not be placed in the freezer they
can burst when the contents freeze.
•
Manufac turers’ recommended storage tim es should be
adhered to. Refer to relevant instructions.
Maintenance and Cleaning
•
Before cleaning, always switch off the appliance and
disconnect from the electrical supply.
•
When unplugg ing always pull the plug fr om the mains
socket, do not pull on the cable.
Servicing
•
This product should be serviced by an authorised
engineer and only genuine spare parts should be used.
•
Under no circumstances should you attempt to repair
the appliance yourself. Repairs carried out by
inexperienced persons may cause injury or serious
malfunctioning. Contact Expert Appliance Care.
At the end of the Appliance Life
• When disposing of your appliance use an authorised
disposal site.
• Remove the plug and ensure that any locks or catches
are removed, to pre vent young children being trapped
inside.
2
Page 3

Contents
Instructions for the User
Important Safety Information 2
Description of the Appliance 4
Control Panel 4
Operation 5
Before use 5
Starting the Appliance 5
Temperature Control 5
Opening/Closing the Lid 5
Freezing Fresh Food 6
Frozen Food Storage 6
Thawing 6
Baskets 7
Hints and Tips 8
Normal Operating Sounds 8
Food Storage 8
Energy Saving Advice 8
In the Event of a Power Failure 8
Instructions for the installer
Technical specifications 12
Installation
Positioning 12
Electrical Connections 13
Low Frost System 9
Defrosting 9
Maintenance and Cleaning 10
Internal Cleaning 10
External Cleaning 10
When the Appliance is not in Use 10
To change the Light Bulb 10
Something not Working 11
Service and Spare Parts 11
3
Page 4
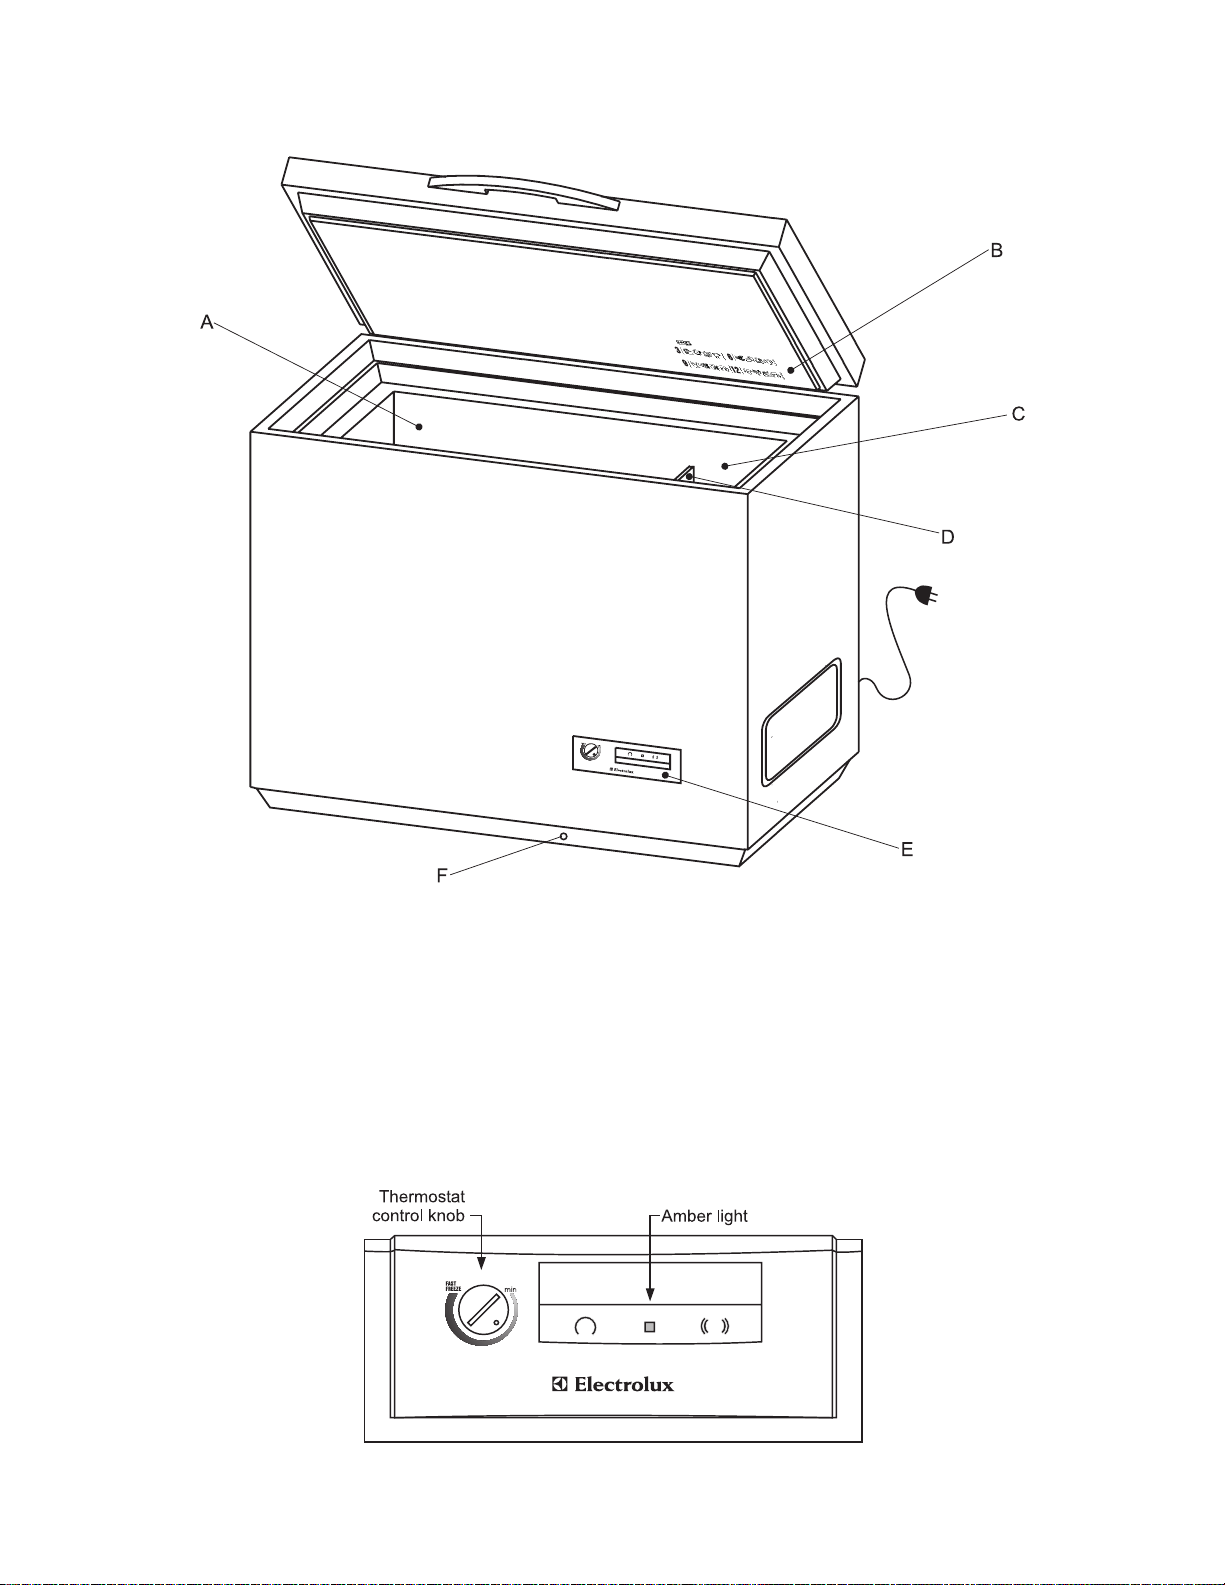
Description of the Appliance
A – Compartment for frozen food storage
B – Freezer calender (recommanded storage times for frozen foods)
C – Compartment for freezing fresh foods
D – Dividing wall
E – Control panel
F – Defrost water drain
Control Panel
4
Page 5
Operation
Before Use
Remove all packaging and s ecuring tap es. Was h inside
the appliance with lukewarm water and bicarbonate of
soda (5ml to 0.5 litre of water). Do not use soap or
detergent as the smell may linger. Dry thoroughly.
Starting the Appliance
Insert the plug into the wall socket. When the appliance
has reached the correct storage temperature for frozen
food, the amber indicator light will illuminate.
Amber Indicator Light
The amber light remains illuminated to indicate that the
internal temperature of the appliance is correct for safe
storage of frozen food. If the temperature is too high in
the appliance the light will go out. The light may go out
the following reasons:
•
There is a power failure
•
The lid has been recently opened
•
A large quantity of food has been added to the
appliance
•
There is a fault
Temperature Control
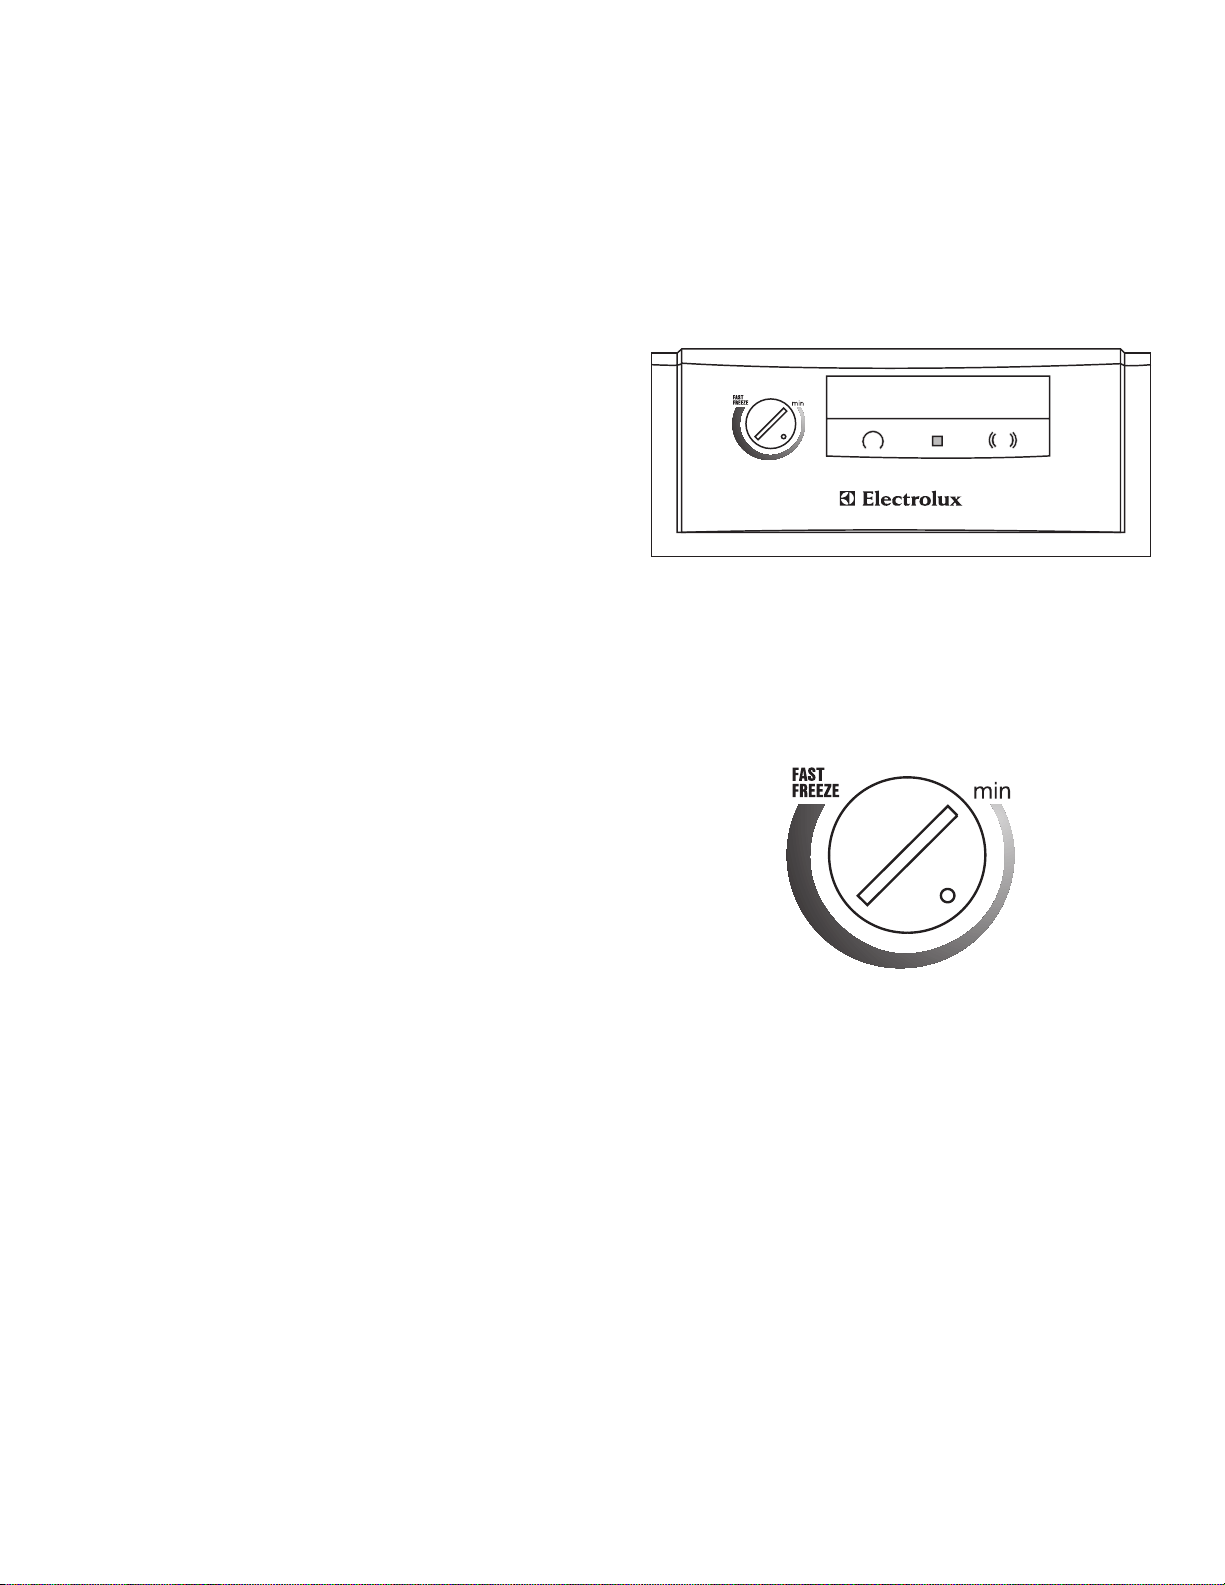
The temperature within the freezer is controlled by the
thermostat situated o n the lower f ront of the c abinet. To
operate the freezer, proceed as follows:When you first start the freezer we su gges t that you turn
the thermostat to a m edium setting b y using a coin that
fits the groove. The correct setting can be found by
measuring the tem perature of the top middle pack age in
the freezer. This s hould not have a temperature hig her
than 18°C.
Min = Lowest setting, minimum cold
Max = Highest setting, maximum cold
Allow the freezer to run for several hours before plac ing
food inside.
Do not fill the free zer to more than 5mm below the top
edge.
Opening/Closing the Lid
The lid is fitted with a tightly closing sealing strip to
prevent moisture entering the freezer, which could
increase the amount of frost formed.
When the lid is opened the air inside the freezer
becomes slightl y warmer and expands. W hen the lid is
closed again the air is cooled immediately. This may
lead to the creation of a vacu um which makes it hard to
open the lid again immediately. This is quite normal.
Wait for a few minutes until the vacuum has subsided
and then open gentl y. Never us e ex cess ive f orce on the
handle.
5
Page 6
Freezing Fresh Food
Thawing
It is important that fresh food placed in the freezer is
frozen quickly and th at the food alre ady in the f reezer is
warmed as little as possible.
If more than 3-4kg of food is to be frozen:
1. Press the fast freeze button 6-24 hours before
placing the fresh food in the freezer. The
freezer will now run continously creating a
sufficient reserve of the temperature required.
2. Place the food in t he freezer an d leave the ‘fast
freeze’ button on for a further 24 hours.
3. After 24 hours, press the ‘fast freeze’ button
again. The freezer will return to norm al storage
temperature.
If the ‘fast freeze’ button is accidentally left on,
the freezer will not be damage d, but energy will
be wasted.
Frozen Food Storage
When first starting the fr eezer or if the freezer has been
out of use for some time, we advise you to run your
appliance for at least 2 hours before storing frozen food.
Frozen food, prior to be ing used, can be thawed in the
fridge or at room temperature, depending on the time
available. Small food items may even be cooked from
frozen, in this case cooking will take longer.
Any frozen food which is allowed to thaw accidentally
should either be eaten as soon as possible, or thrown
away. Alternativel y, if the food is uncooked and has not
been completely defrosted it can be cooked and then
refrozen.
Defrosted cooked food must never be
refrozen.
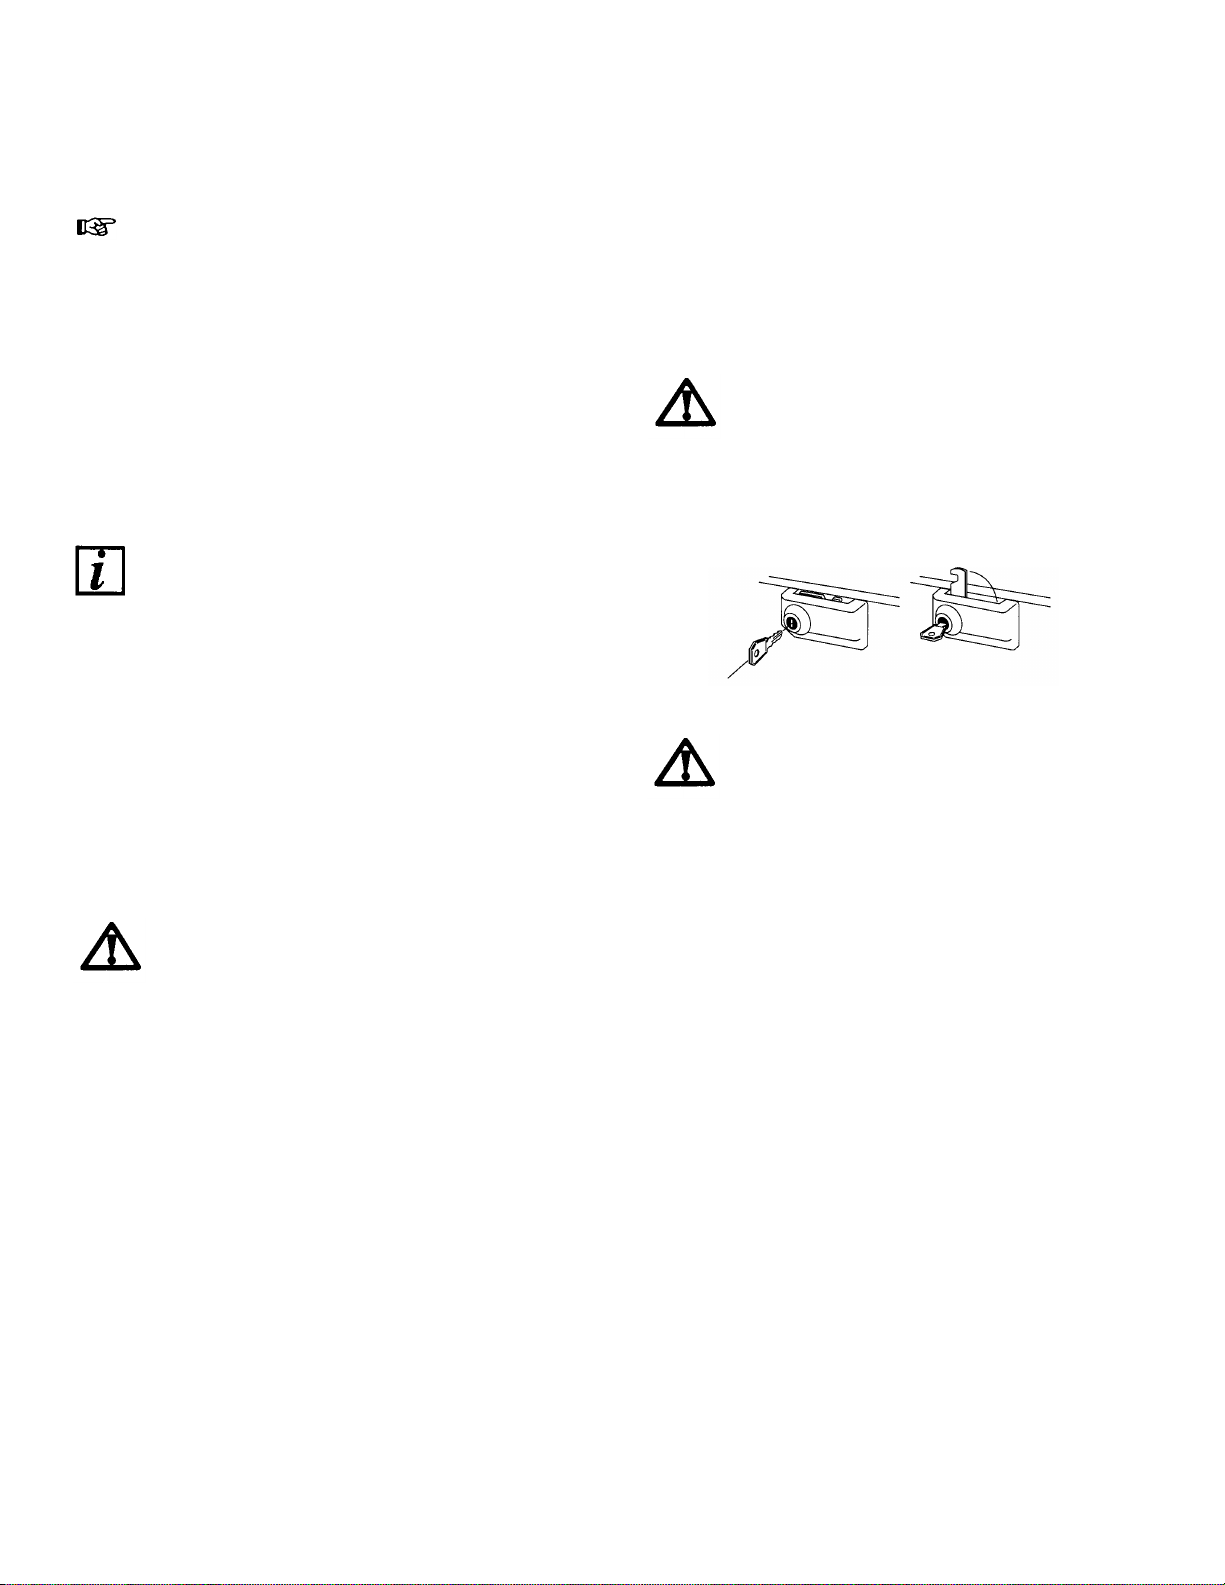
Lock
(Not a standard accessory for all models)
The lock works as shown.
Keep the key out of the reach of children
Do not exceed the storage period indicated by the
manufacturer.
Do not open the lid frequently or leave it open longer
than is necessary.
Important
Do not put carbonated liquids in the freezer.
Ice lollies, if consumed immediately after removal from
the freezer can cause a low temperature skin burn.
Do not remove items from the free zer if your hands are
damp/wet, as this could cause skin abrasions or
frost/freezer burns.
In the event of a power cut, do not open th e lid. The
food in the freezer will not be aff ected if the power cut is
short and the freezer is full. Should the food begin to
thaw it must be consumed qu ickly and must not be refrozen.
(See Hints and Tips)
6
Page 7
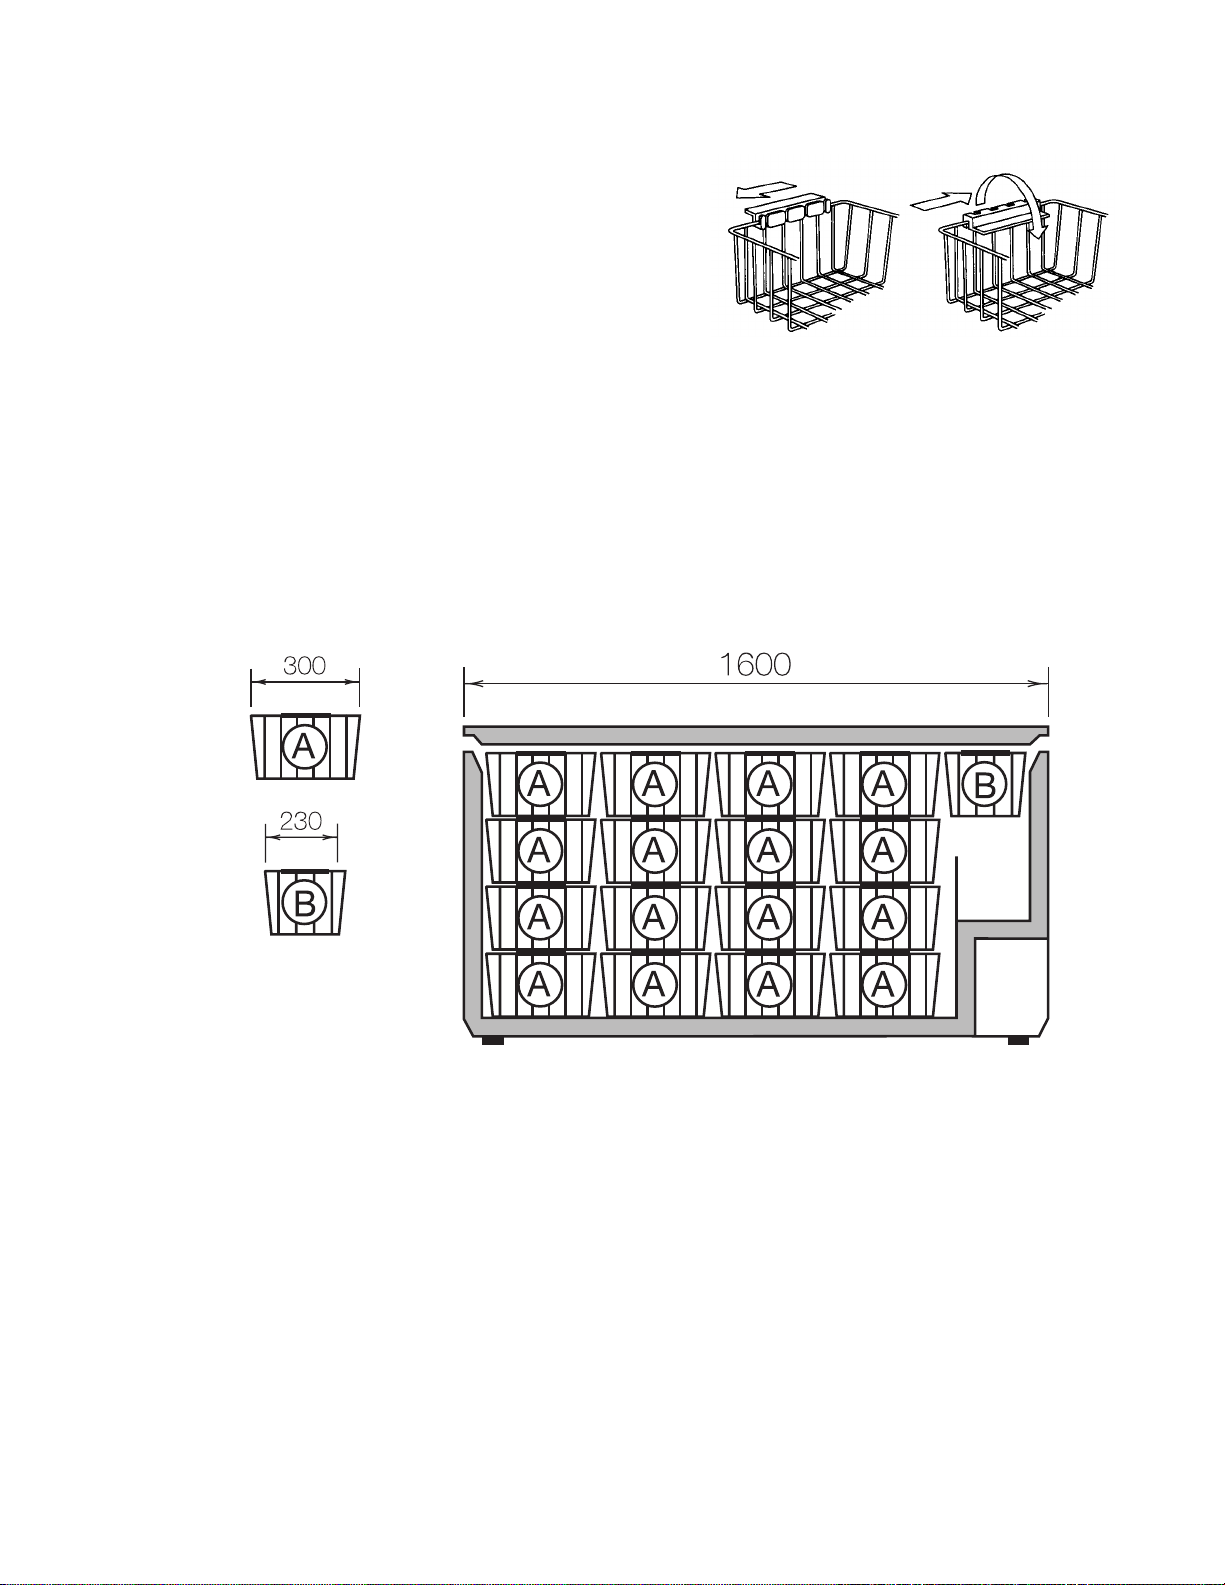
Baskets
The baskets are des igned for the storag e of food whic h
has already been frozen. T he handles can b e placed in
two positions, as shown.
The baskets can either be placed inside the freezer or
hung on the edge of the casing.
Spare baskets can be obtained Expert Appliance Care.
The following illustrat ions show how m any baskets can
be placed in various freezer models.
The number above each illustration shows the width of
the freezer in millimetres.
7
Page 8

Hints & Tips
Normal Operating Sounds
•
You may hear faint gurgling or bubbling sounds
when the refrigerant is pum ped through the coils or
tubing.
•
W hen the compressor is on, the refrigerant is b eing
pumped round and you will hear a whirring sound or
pulsating noise from the compressor.
•
A thermostat controls the compressor and you will
hear a faint ‘click’ when the thermostat cuts in and
out.
Food Storage
To obtain the best performance from your freezer:
•
Do not store warm food or evaporating liquid.
•
Avoid buying frozen food if you cannot store it
straight away. The use of an insulated con tainer is
advisable. When you arrive hom e, place the frozen
food in the freezer immediately.
Energy Saving Advice
•
Do not install the appliance close to so urces of heat,
such as a boiler or radiator.
•
Locate the appliance in a cool well ventilated room
and make sure that the air o penings of the ap pl ianc e
are not obstructed.
•
Avoid unnecessar y fros tin g i n th e c ab ine t by packing
all foodstuffs into airtight packages before placing
them in the freezer.
•
Food which is to be frozen (when cool) should be
placed in the fridge before being transferred to the
freezer.
•
Try to avoid keeping the lid open f or long periods or
opening the lid too f requently as warm air will enter
the cabinet and cause the compressor to switch on
unnecessarily often.
•
Ensure there are no obstructions preventing the lid
from closing properly.
•
Do no t push food together too much, try to allo w air
to circulate around each item.
•
Do not store food uncovered.
•
Ensure that foo d placed in the freezer is dated and
labelled and used in date order to ens ur e t hat f oo d is
consumed at its best.
•
Lean food keeps better and longer than fatt y food,
salt reduces the storage time.
•
Wrap the food in polythene or aluminium freezing
bags or foil so that they adhere to the food and
provide an airtight seal.
• Packaging which is s wollen or has traces of re fro zen
water droplets on the pack could indicate that the
product has not been k ept at a suitab le temper ature
and that it may have l ost its origi nal q ualit y. Par tial ly
thawed food must not be refrozen, it must be
consumed within 24 hours. Never exceed the
storage times indicated by the manufacturer.
In the Event of a Power Failure
If there is a power failure during the storage of frozen
foods, keep the lid c los e d. If the temperature within your
freezer should rise, do not refreeze the food without
checking its condition. The following guidelines should
assist you:
Ice Cream: Once thawed should be discarded.
Fruits & Vegetables: If soft should be cooked and used
up.
Breads & Cakes: Can be refrozen without danger.
Shellfish: Should be refrigerated and us ed up quickly.
Cooked Dishes: i.e. casseroles should be refrigerated
and used up.
Large Pieces of Meat: Can be r efro zen providing t here
are still ice crystals remaining within them.
Small Joints: Should be cooked and can then be
refrozen as cooked dishes.
Chicken: Should also be cooked and refrozen as a
fresh dish.
8
Page 9
Defrosting
The freezer compartment will become progressively
covered with frost. This should be removed with the
special plastic scr aper provided whenever the thickness
of frost exceeds ¼”.
During this operation it is not necess ary to switc h off the
power supply or to remove the foodstuffs.
However, when the ice becomes very thick on the inner
liner, complete def rosting should be c arried out and it is
advisable to per form this operation when t he appliance
is empty.
To carry out complete defrosting:
1. Disconnect the appliance from the electrical
supply.
2. Remove any stored food, wrap in several l ayers
of newspaper and store in a cool place.
3. Leave the lid open.
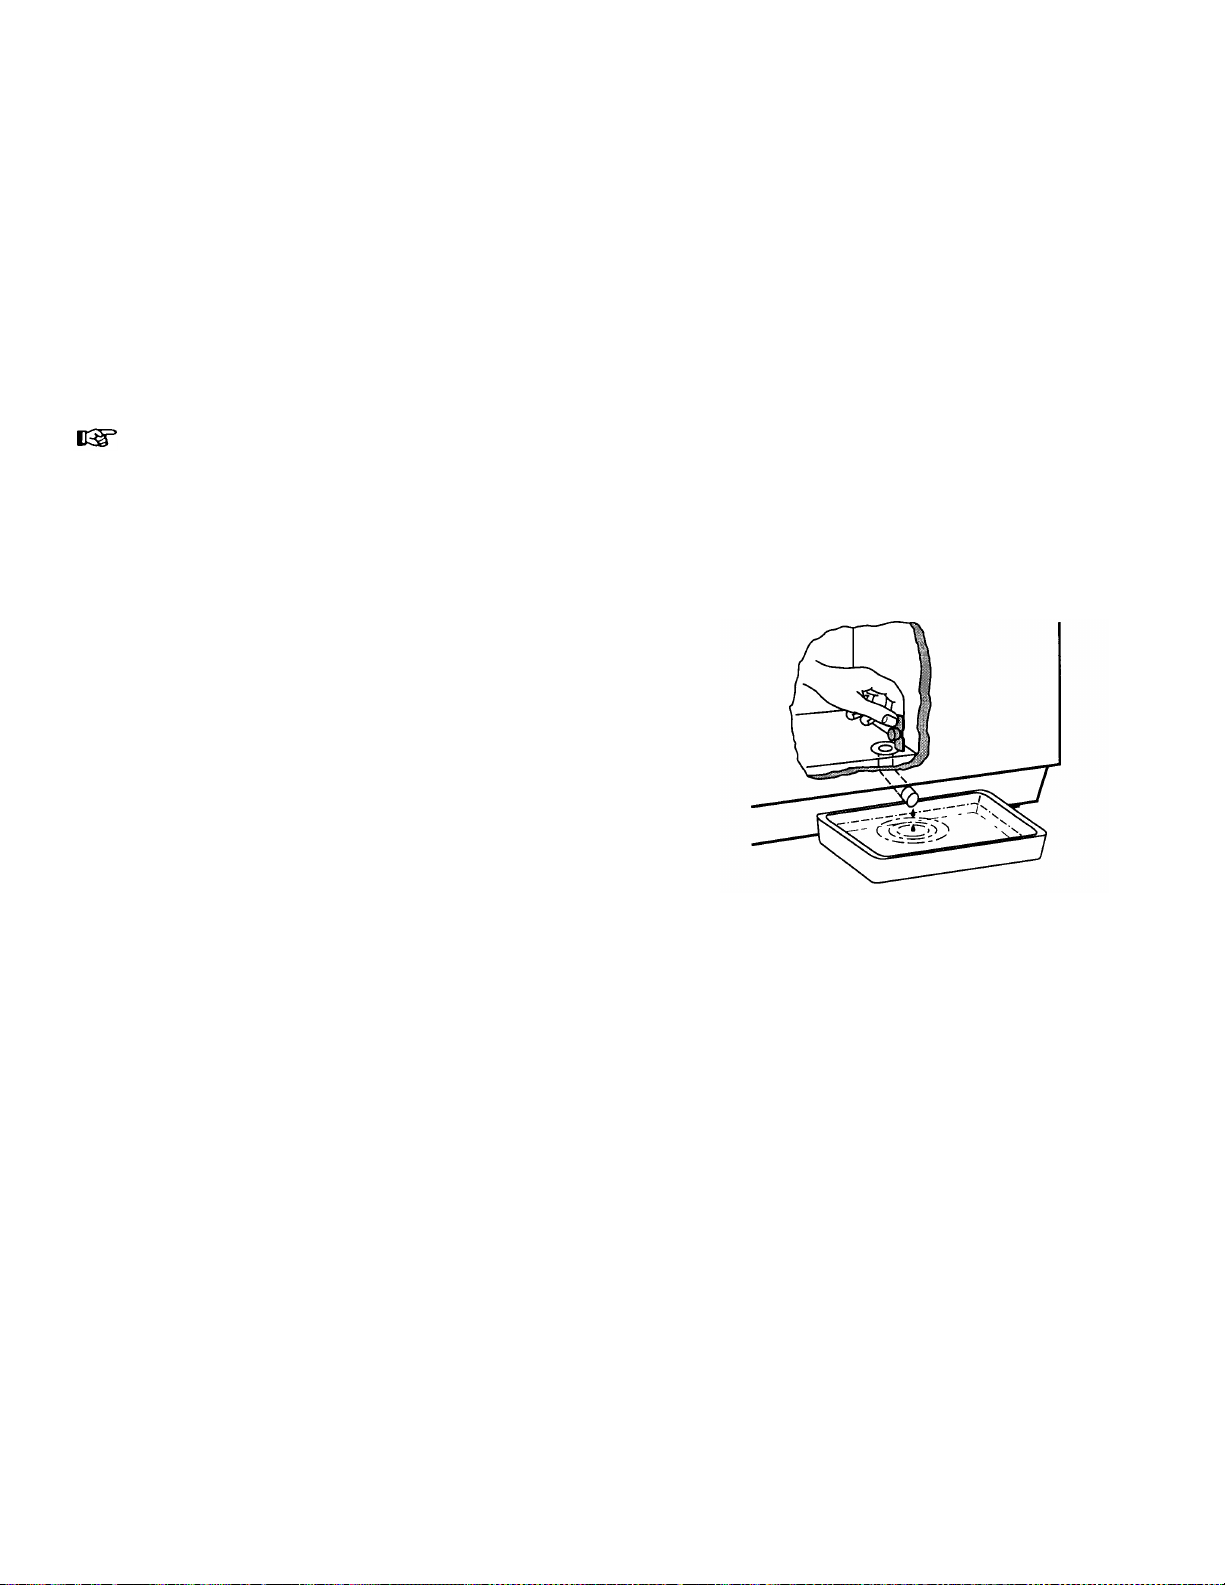
4. Remove the plug from the defrost water drain.
5. To accelerate the defrosting process place a
bowl of hot (not boili ng) water inside th e freezer
and close the lid.
6. The defrost water can be collecte d in a bowl, as
shown.
7. When defrosting is completed, dry the interior
thoroughly and replace the plug on the defrost
water drain.
8. Reconnect the appliance to the electricity and
turn the thermostat control back to a medium
setting and leave to run for at least 2 hours.
9. Replace the previously removed food.
Important
A temperature rise of the frozen food packs during
defrosting may shorten their safe storage life.
Never use sharp metal tools to s crape off frost from the
evaporator as this could damage the appli ance beyond
repair.
9
Page 10
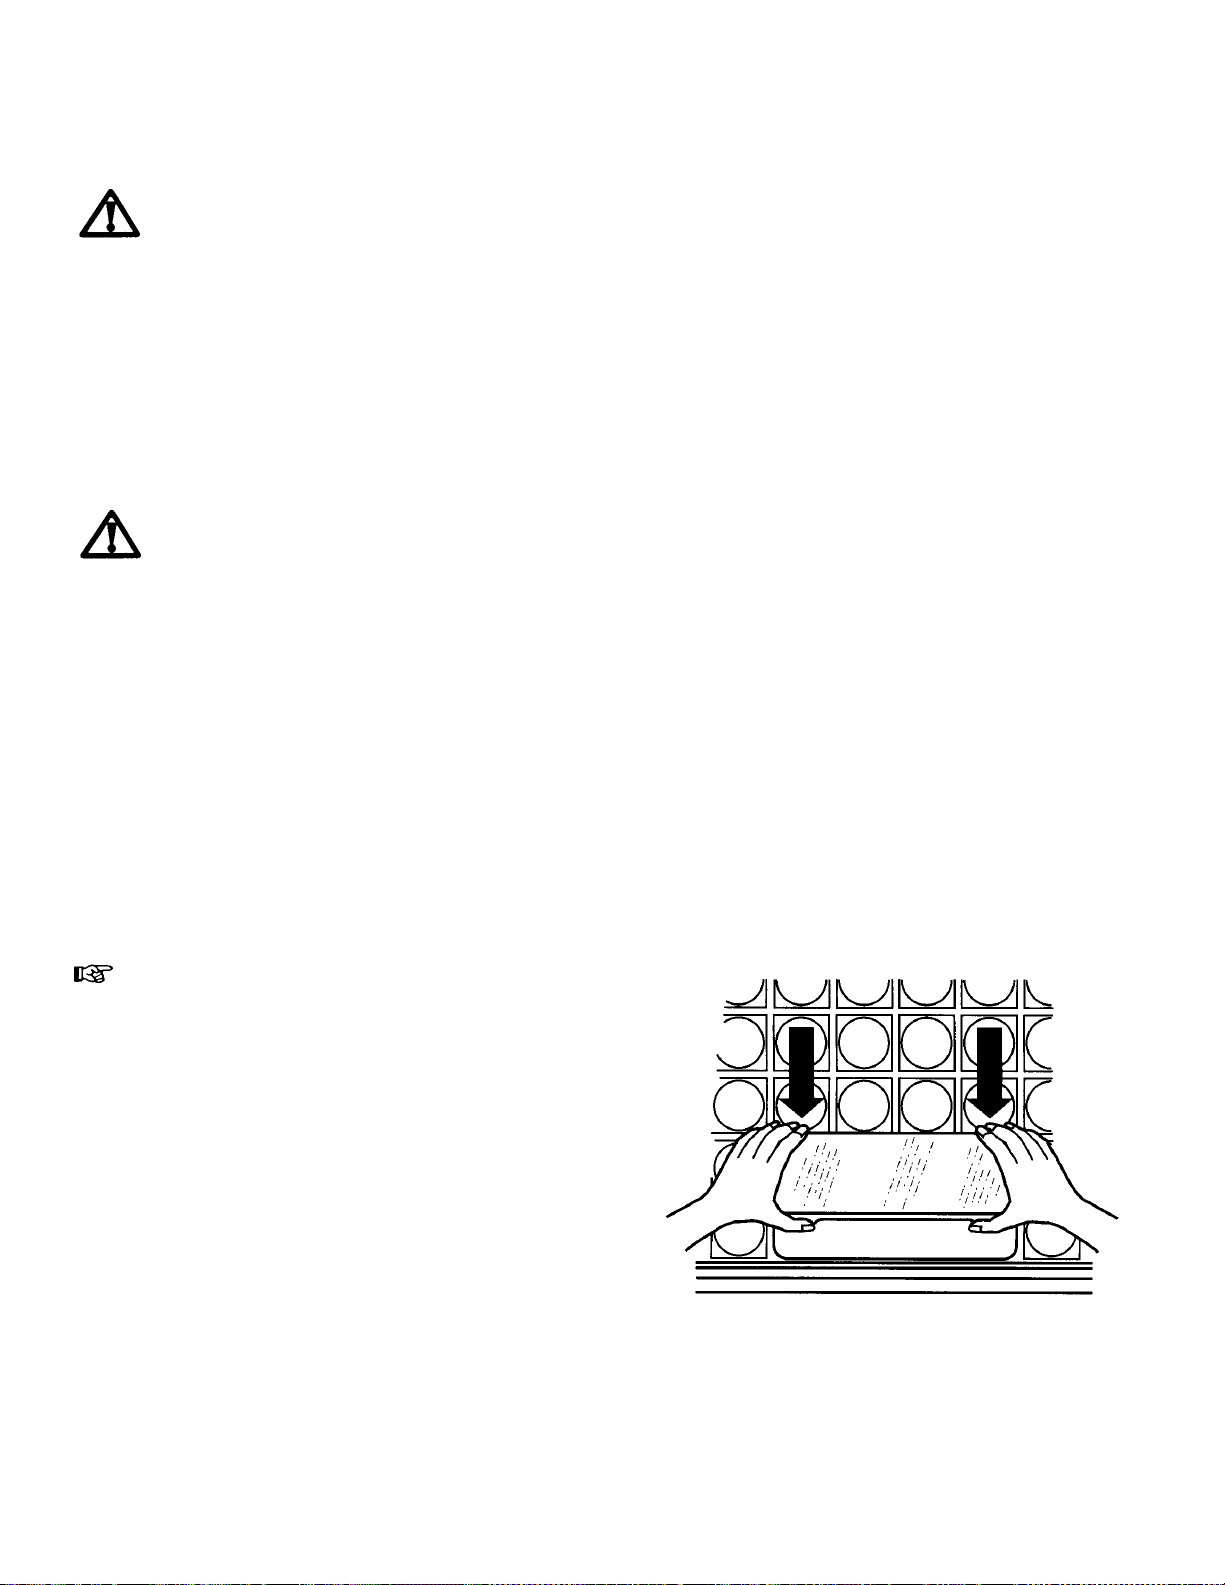
Maintenance and Cleaning
Before any maintenance or cleaning is
carried out you must DISCONNECT the
appliance from the electricity supply
Internal Cleaning
Clean the inside and accessories with warm water and
bicarbonate of soda (5ml to 0.5 litre of water).
Rinse and dry thoroughly.
NEVER use detergents, abrasive powders,
highly perfumed cleaning products or wax
polishes to clean the interior as these will
damage the surface and leave a strong
odour.
External Cleaning
Wash the outer cabinet with warm soapy water.
When the Appliance is not in Use
When the appliance is not in use for long periods,
disconnect from the electricity supply, empty all foods
and clean the appliance , leaving the lid open t o prevent
unpleasant smells.
To Change the Light Bulb
(Not a standard accessory for all models)
1. Disconnect the appliance from the electrical
supply.
2. Unscrew the bulb.
3. Replace with a new bulb (max. 15W)
4. Reconnect to the electrical supply.
Spare bulbs are available from Expert Appliance Care.
10
Page 11
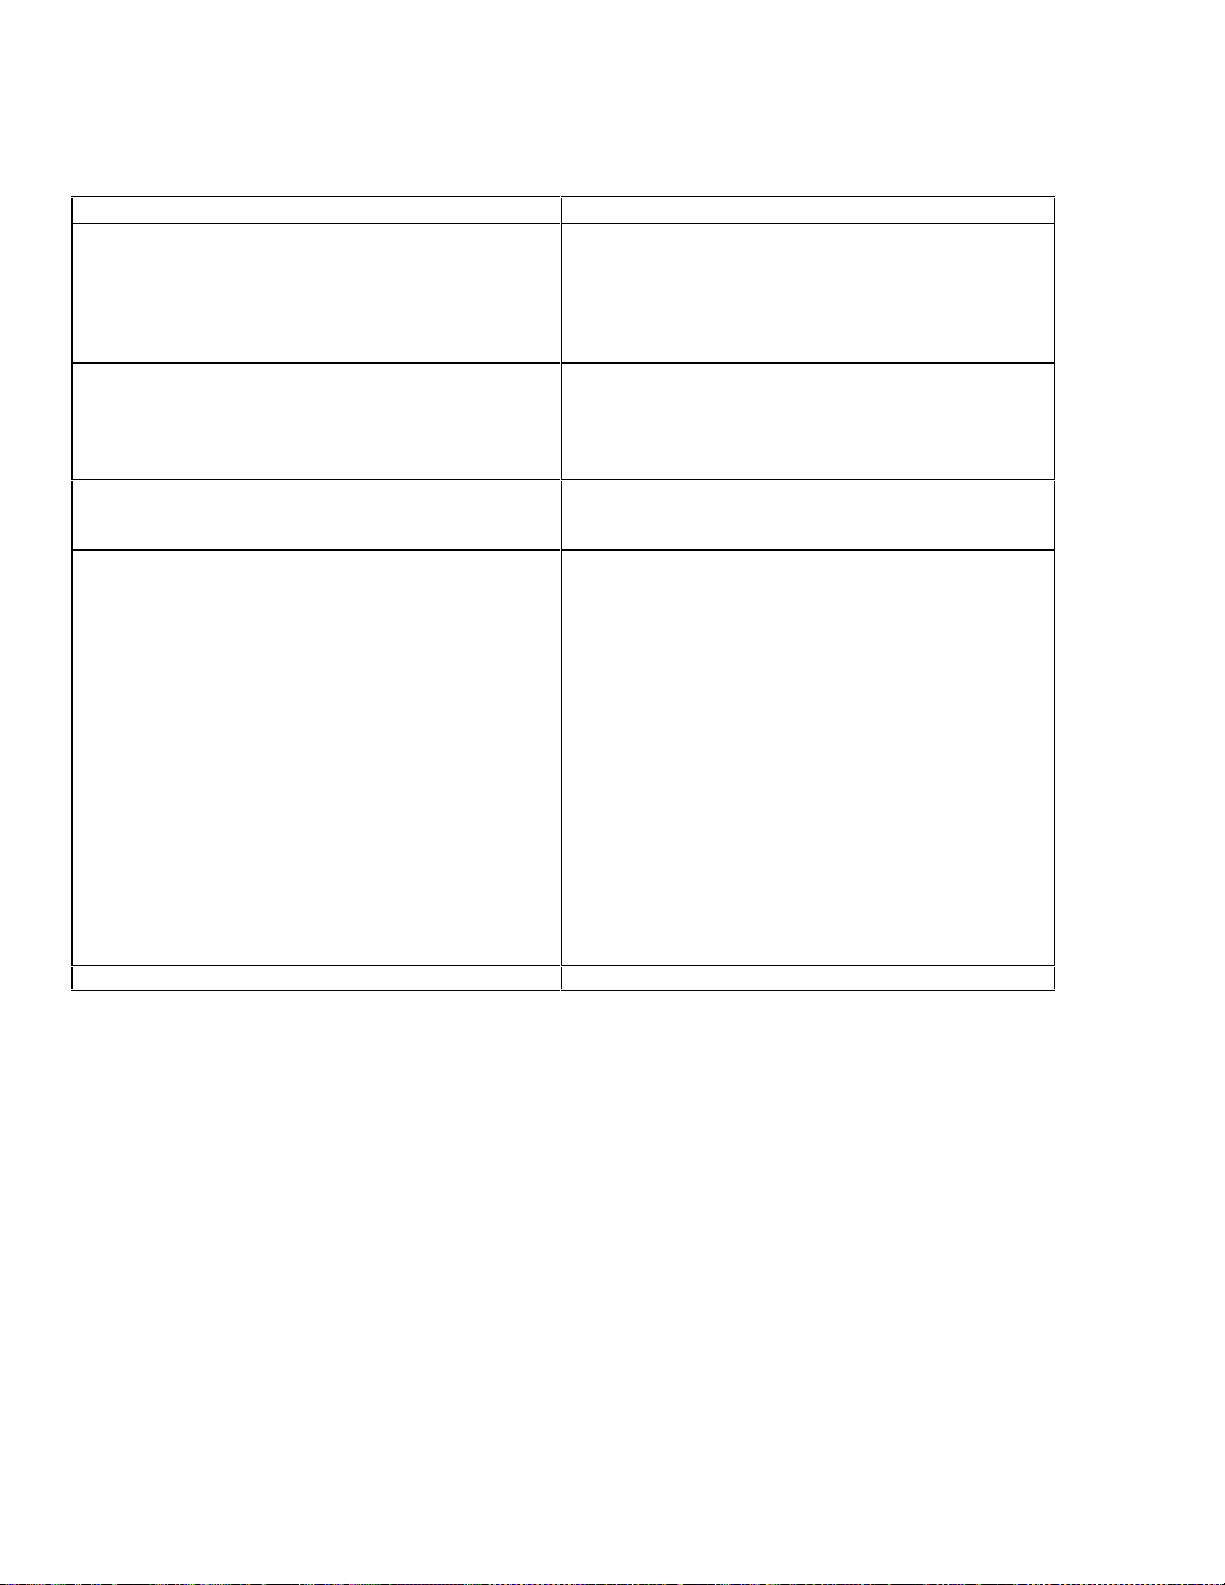
Something not Working
If the appliance is not working correctly, please carry out the following checks before Expert Appliance Care.
SYMPTOM SOLUTION
No power to the appliance Check there is power at the socket
Check there is not a power cut by checking the
household lights.
Check the mains fuse has not blown.
The temperature in the freezer is too high Check the thermostat control knob is turned to the
correct setting relevant to ambient conditions.
Check the ambient temperature is within the
appliance’s operating limits of 10° 32°C.
The freezer lid will not open Has the lid just been opened? If so leave for a
few minutes to allow the air pressure to equalise.
Excessive frost and ice has built up Adjust the thermostat control knob to give correct
temperature control. See ‘Temperature Control’.
Check that the lid is closed.
Large quantities of food have recently been placed
in the cabinet/and or the lid is frequently opened.
Check that air ventilation is not obstructed.Ensure
the lid has not been left open.
Check that nothing is preventing the lid from
closing.
Is the lid gasket intact and clean?
Has advised periodic cleaning been carried out.
Noise Refer to ‘Normal Operating Sounds’
If after all these checks your appliance still does not operate correctly, contact Expert Appliance Care.
Please note that it will be necessary to provide proof of purchase for any in-guarantee service calls.
In-guarantee customers should ensure that the above checks have been made, as the engineer will make a
charge if the fault is not a mechanical or electrical breakdown.
Service and Spare Parts
If you require further information regarding the appliance, the terms and conditions of the guarantee, or wish to call out
engineer, please contact Expert Appliance Care by telephoning:
0870 9099100
11
Page 12
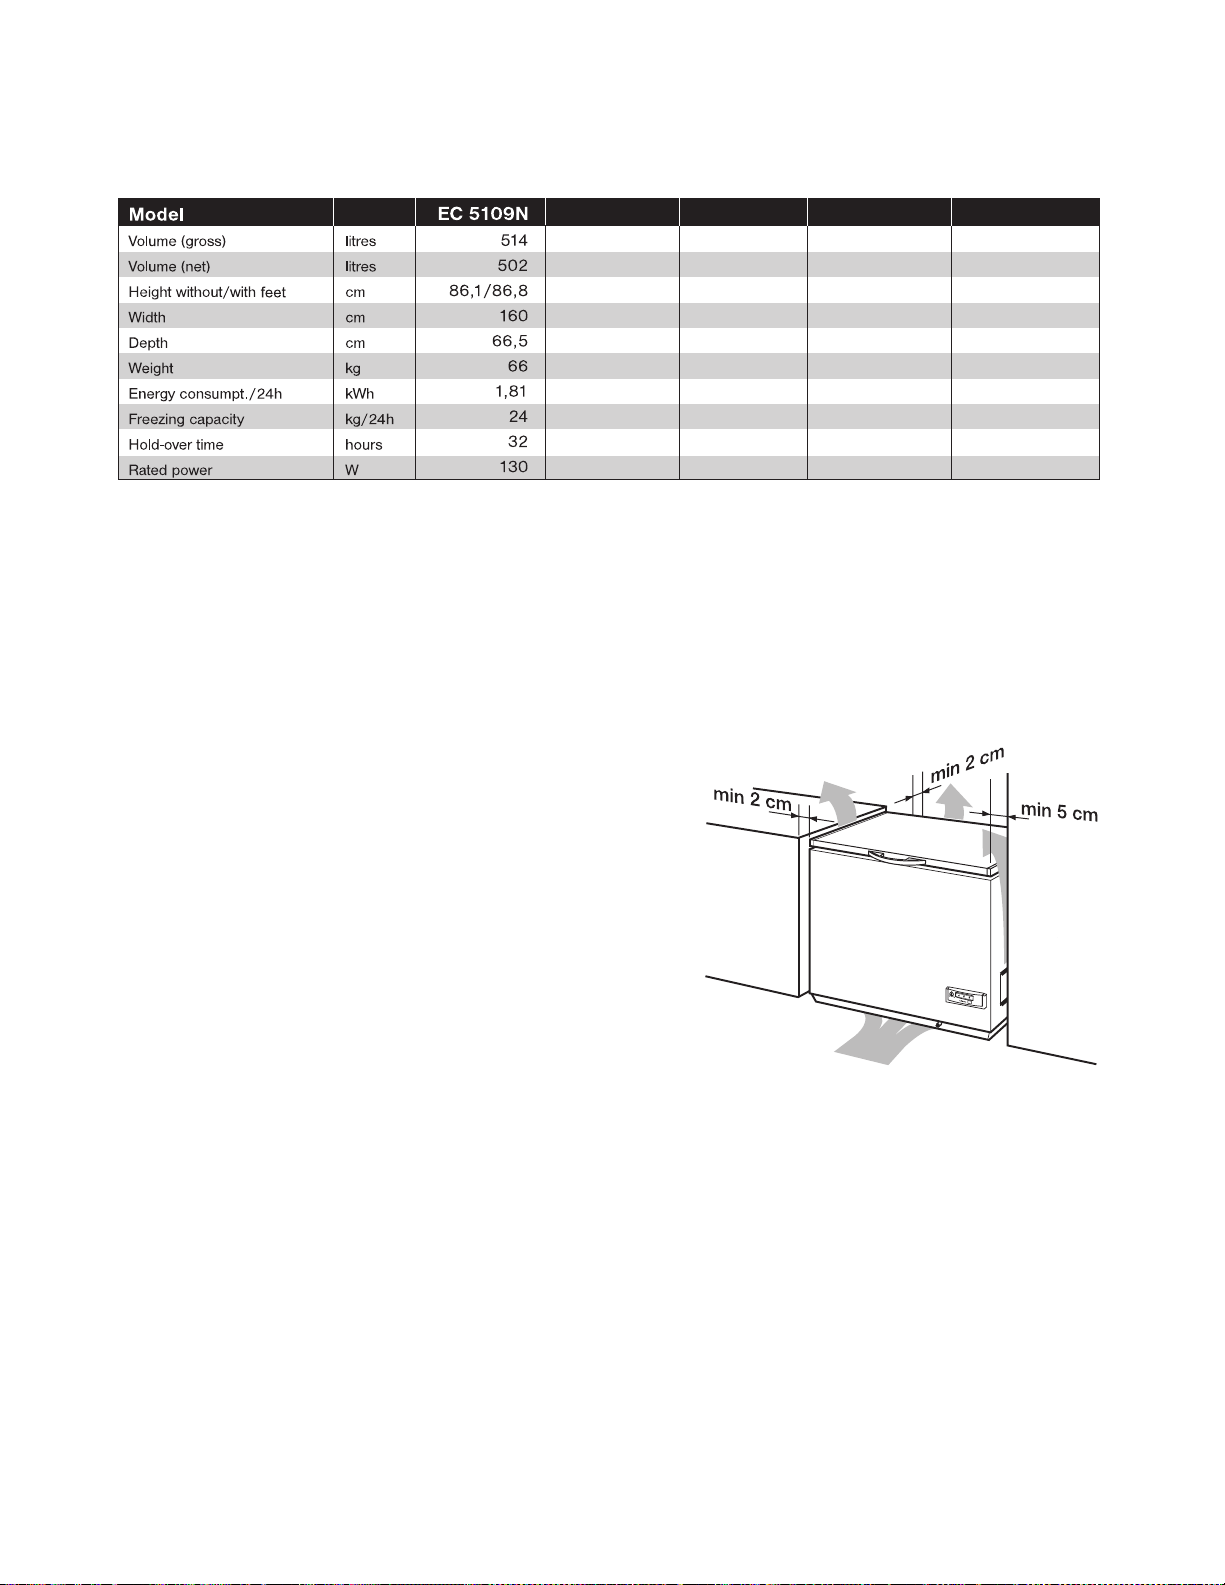
Technical Specifications
Installation
Positioning
•
Place the freezer horizontally on a firm surface,
resting on all four feet. Use a wooden block or
similar object to com pensate for an y bumps/holes in
the floor’s surface.
•
The room should be dry and adequately ventilated.
o
•
If the room temperatur e exc ee ds 32
freezing point, the freezer will not function as it
should.
•
Do not place the freezer close to sources of heat,
radiators, chimneys, etc. and do not place the
freezer in direct sunlight.
•
If the freezer has be en handled standing o n end, it
should be allowed to s tand in t he norm al pos ition f or
about 12 hours before switching it on.
•
Ensure that the appliance is installed where it is
easily accessible for the engineer in the event of a
breakdown.
C, or falls be lo w
12
Page 13
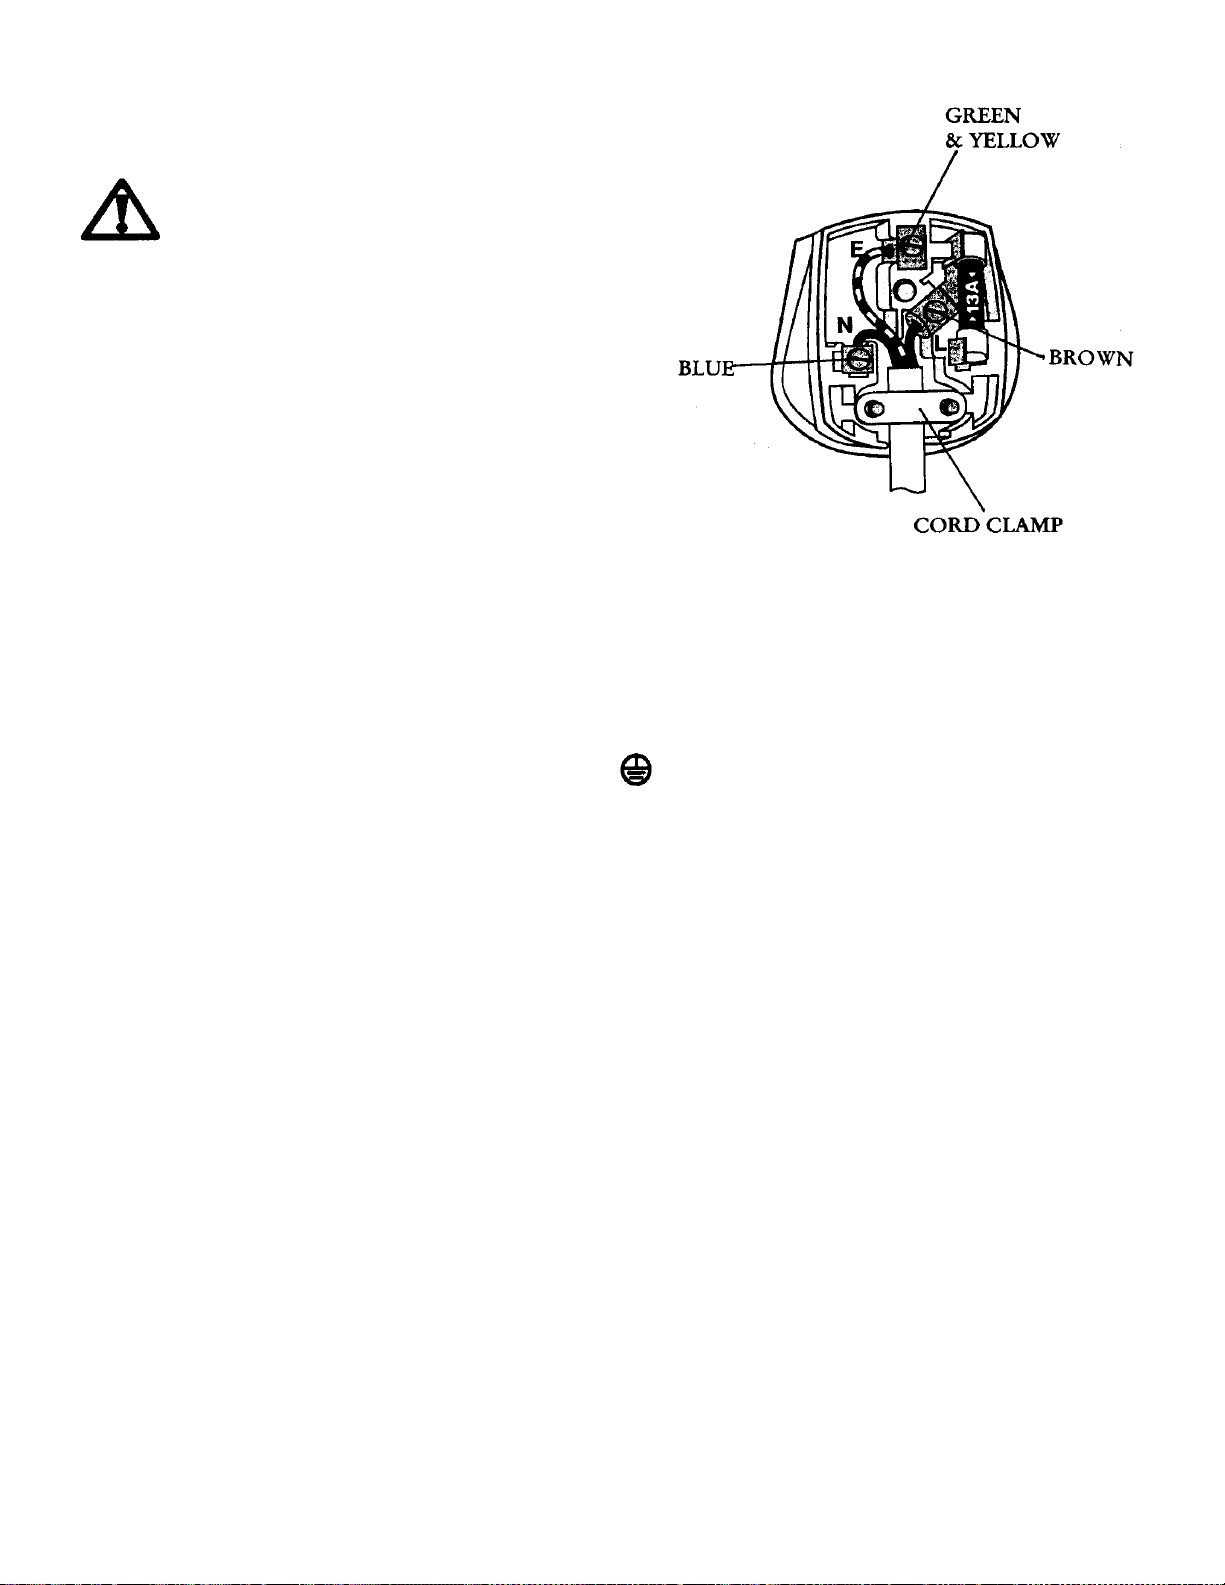
Electrical Connection
Any electrical work required to install this
appliance should be carried out by a qualified
electrician or competent person.
This appliance must be earthed.
The manufacturer declines any liability should these
safety measures not be observed.
Electrical Requirements
Before switching on, mak e sure the e lectricit y supp ly voltag e
is the same as that indicated on the appliance rating plate.
The appliance is supplied with a 13amp plug fitted. In the
event of having to change the fuse in the plug supplied, a
13amp ASTA approved (BS136 2) fuse must be use d.Should
the plug need to be replaced for any reason. The wires in
the mains lead are coloured in a ccordance wi th the fol lowing
code:
Green and Yellow : Earth
Blue : Neutral
Brown : Live
The wire coloured green and yellow must be connected to
the terminal marked wit h the lett er "E" or b y th e eart h sy m bo l
or coloured green and yellow.
The wire coloured blue must be connected to the terminal
marked "N" or coloured black.
The wire coloured brown must be c onnected to the term inal
marked "L" or coloured red.
Upon completion there must be no cut, or stray strands of
wire present and the cord clamp must be secure over the
sheath.
outer
Page 14

documentation manual, user maintenance, brochure, user reference, pdf manual
This file has been downloaded from:
User Manual and User Guide for many equipments like mobile phones, photo cameras, monther board, monitors, software, tv, dvd, and othes..
Manual users, user manuals, user guide manual, owners manual, instruction manual, manual owner, manual owner's, manual guide,
manual operation, operating manual, user's manual, operating instructions, manual operators, manual operator, manual product,
 Loading...