

Page 1
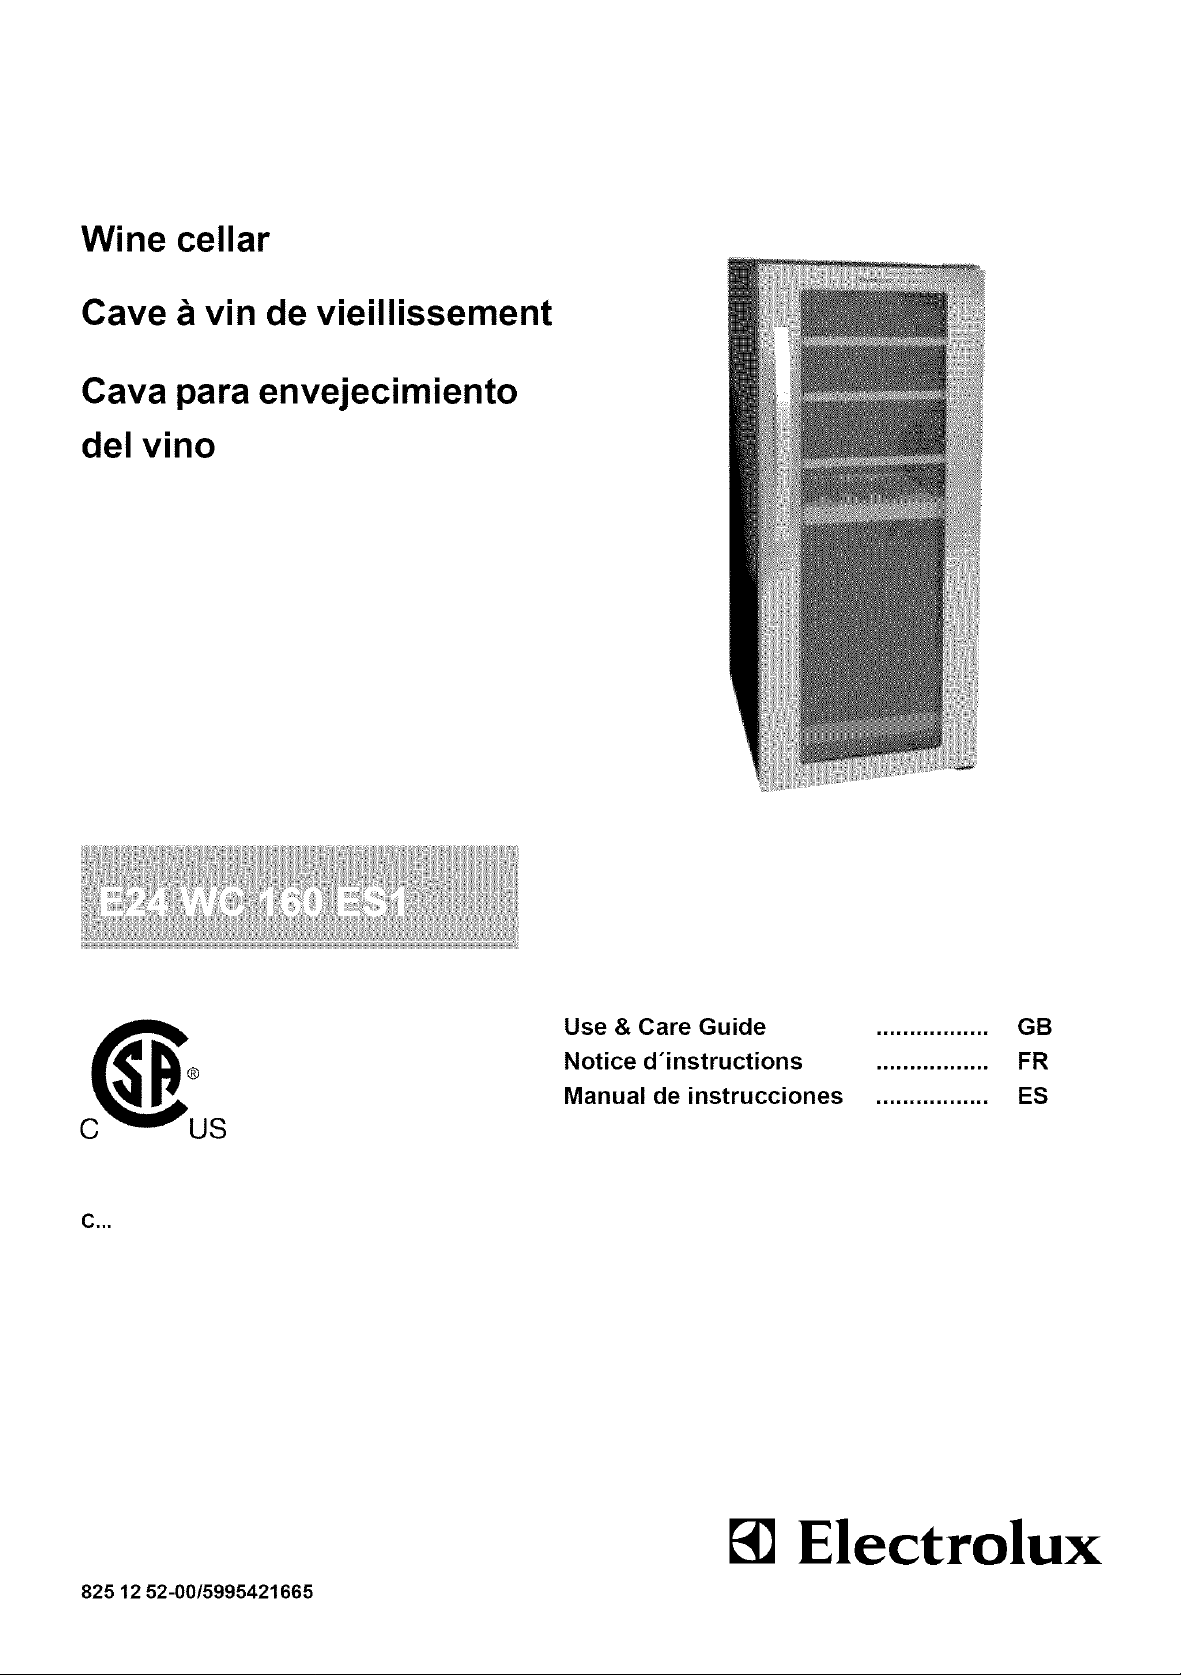
Wine cellar
Cave a vin de vieillissement
Cava para envejecimiento
del vino
C,,,
825 12 52-00/5995421665
Use & Care Guide
Notice d°instructions
Manual de instrucciones
Electrolux
=================
=================
=================
GB
FR
ES
Page 2

Page 3
Thank you for choosing an Electrolux Wine Cellar !
Operating and Installation
Instructions for your Electrolux
Wine Cellar
Introduction
Thank you for choosing the Electrolux Wine Cellar.
Please read the following instructions carefully before
installing your new wine cellar. We trust you will be
completely satisfied with your purchase.
The wine cellar must be installed and used according to
these instructions in order for it to operate correctly and
economically.
Electrical connections
Your winecellar operates on a single phase alternating
current.(AC) Please check that the voltage shown on
the serial plate corresponds to your power supply.
All wine cellars require a connection to an electrical
power source. Improper hook-up can result in a safety
hazard and potential damage to the product of con-
tents! Proper installation, in accordance with the
manufacturer's specifications and all local codes, is
the sole responsibility of the consumer. The manufac-
turer is not responsible for any installation expenses or
damages incurred due to improper installation, tf you
are insure of your ability to safely connect electric
power to the unit, consult a licensed and insured
professional to perform all electrical work.
WARNING - THE WINE CELLAR
MUST BE GROUNDED.
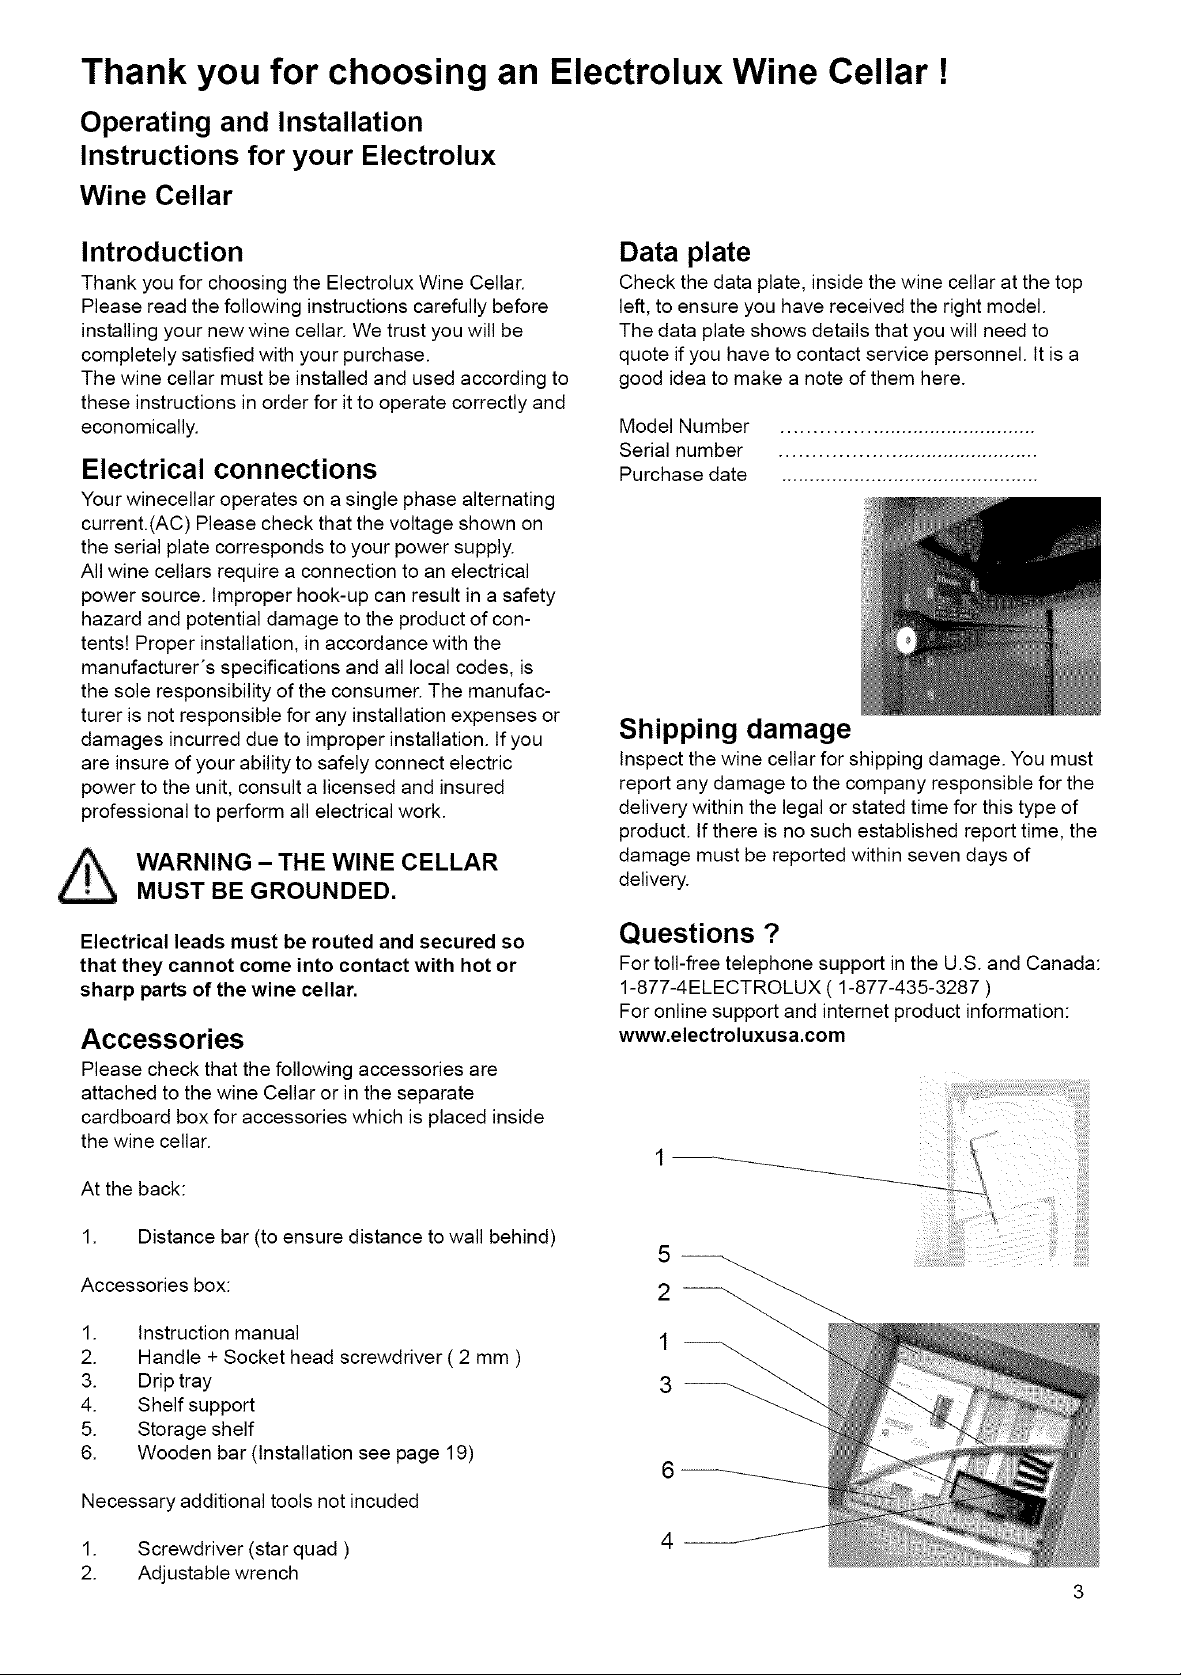
Data plate
Check the data plate, inside the wine cellar at the top
left, to ensure you have received the right model.
The data plate shows details that you will need to
quote if you have to contact service personnel. It is a
good idea to make a note of them here.
Model Number ...........................................
Serial number ...........................................
Purchase date ..............................................
Shipping damage
Inspect the wine cellar for shipping damage. You must
report any damage to the company responsible for the
delivery within the legal or stated time for this type of
product. If there is no such established report time, the
damage must be reported within seven days of
delivery.
Electrical leads must be routed and secured so
that they cannot come into contact with hot or
sharp parts of the wine cellar.
Accessories
Please check that the following accessories are
attached to the wine Cellar or in the separate
cardboard box for accessories which is placed inside
the wine cellar.
At the back:
1. Distance bar (to ensure distance to wall behind)
Accessories box:
1. Instruction manual
2. Handle + Socket head screwdriver ( 2 mm )
3. Drip tray
4. Shelf support
5. Storage shelf
6. Wooden bar (Installation see page 19)
Necessary additional tools not incuded
Questions ?
For toll-free telephone support in the U.S. and Canada:
1-877-4ELECTROLUX ( 1-877-435-3287 )
For online support and internet product information:
www.electroluxusa.com
1. Screwdriver (star quad )
2. Adjustable wrench
3
Page 4
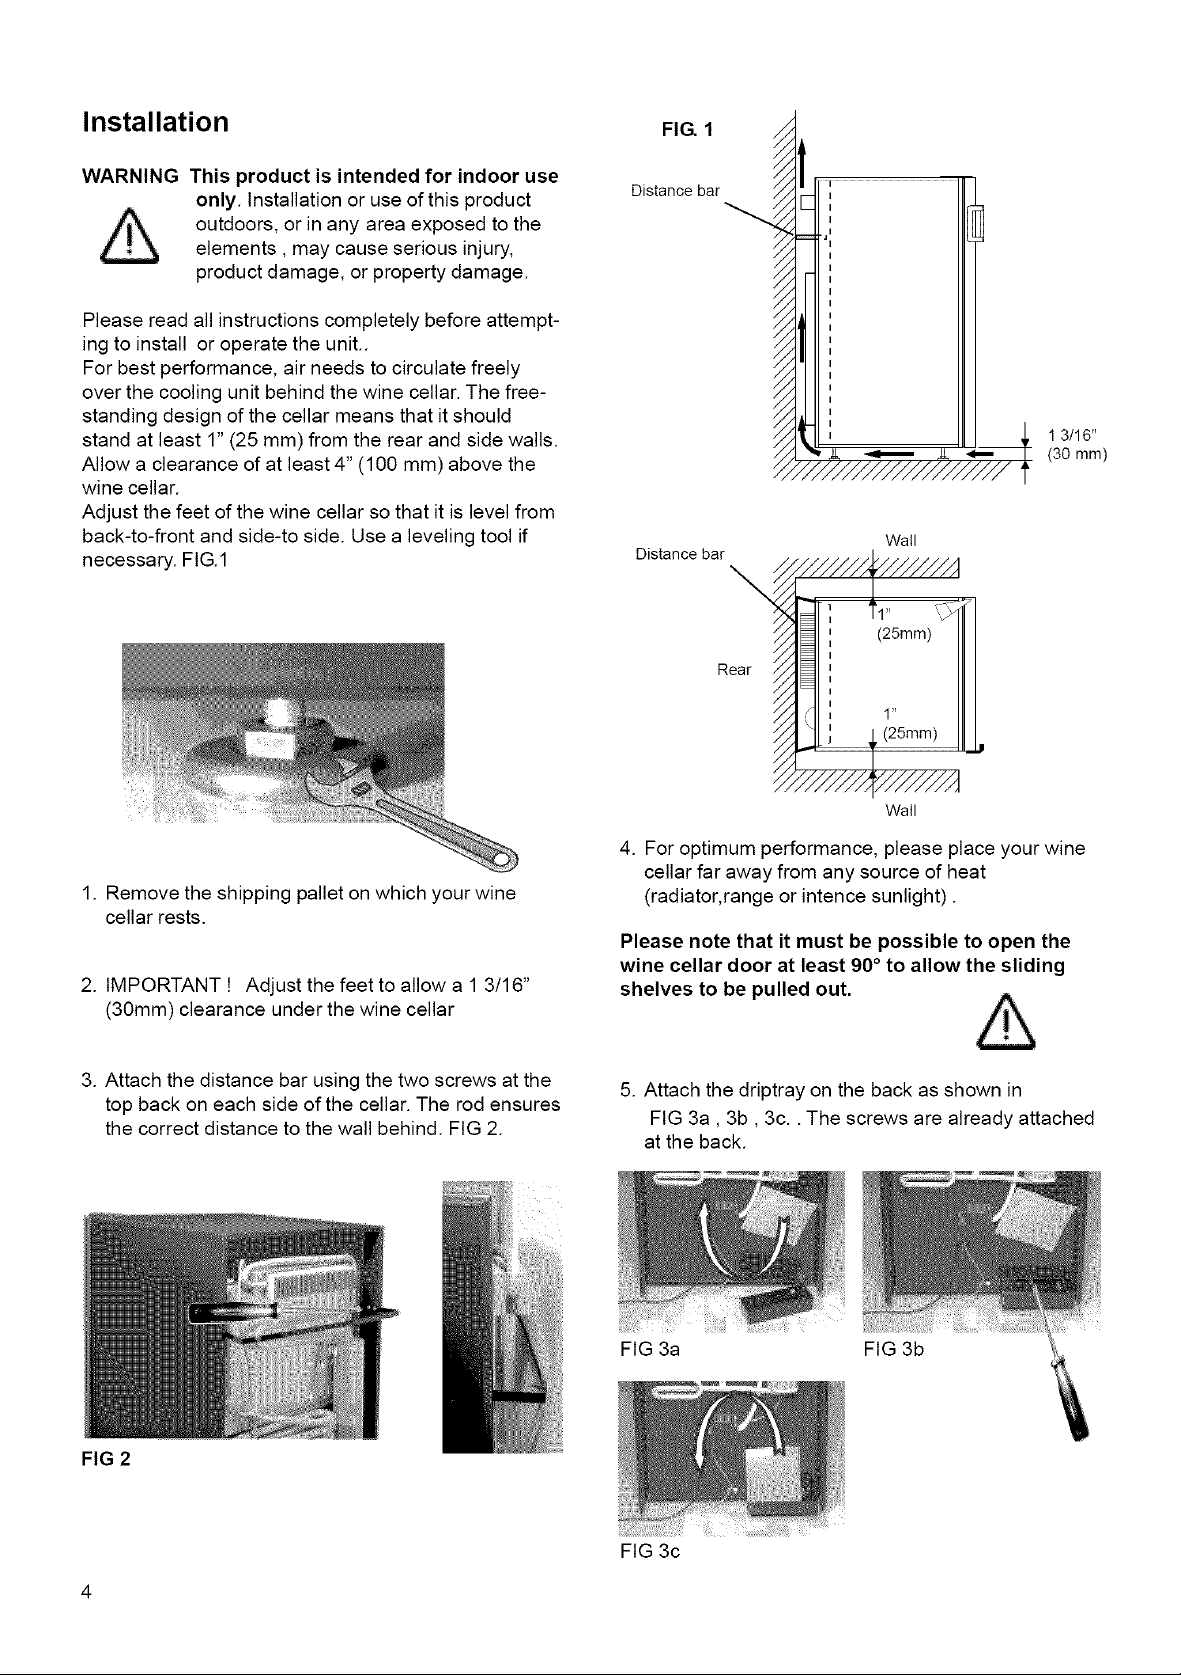
Installation FIG. 1
WARNING This product is intended for indoor use
only. Installation or use of this product
outdoors, or in any area exposed to the
elements, may cause serious injury,
product damage, or property damage.
Please read all instructions completely before attempt-
ing to install or operate the unit..
For best performance, air needs to circulate freely
over the cooling unit behind the wine cellar. The free-
standing design of the cellar means that it should
stand at least 1" (25 mm) from the rear and side walls.
Allow a clearance of at least 4" (100 mm) above the
wine cellar.
Adjust the feet of the wine cellar so that it is level from
back-to-front and side-to side. Use a leveling tool if
necessary. FIG1
Distance bar
///////////////////
Distance bar _/_///i/_//////_
R
I
13/16"
(30 mm)
Wall
1. Remove the shipping pallet on which your wine
cellar rests.
2. IMPORTANT Adjust the feet to allow a 1 3/16"
(30mm) clearance under the wine cellar
3. Attach the distance bar using the two screws at the
top back on each side of the cellar. The rod ensures
the correct distance to the wall behind. FIG 2.
"I/////////¢(///////A
Wall
4. For optimum performance, please place your wine
cellar far away from any source of heat
(radiator, range or intence sunlight).
Please note that it must be possible to open the
wine cellar door at least 90°to allow the sliding
shelves to be pulled out.
5. Attach the driptray on the back as shown in
FIG 3a, 3b, 3c.. The screws are already attached
at the back.
FIG 3a
FIG 3b
FIG 2
FIG 3c
Page 5
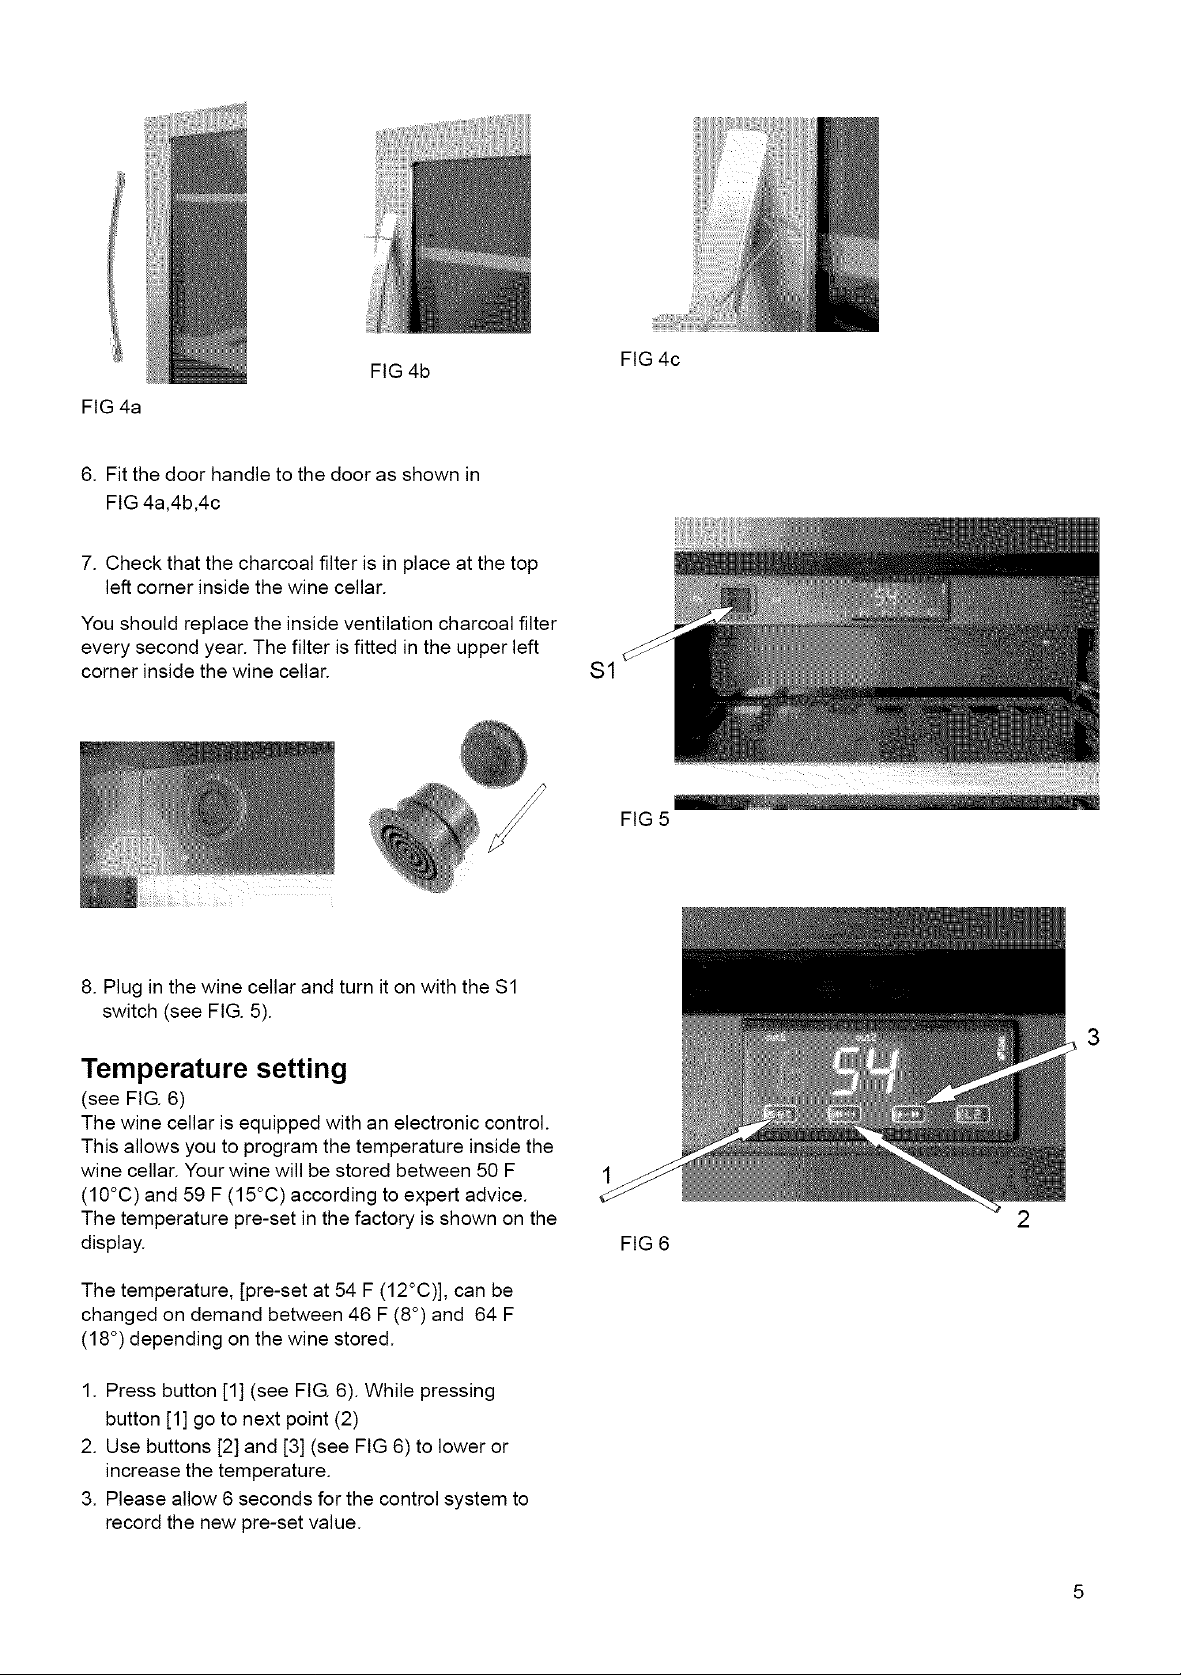
FIG 4b
FIG 4a
6. Fit the door handle to the door as shown in
FIG 4a,4b,4c
7. Check that the charcoal filter is in place at the top
left corner inside the wine cellar.
You should replace the inside ventilation charcoal filter
every second year. The filter is fitted in the upper left
corner inside the wine cellar.
FIG 4c
FIG 5
8. Plug in the wine cellar and turn it on with the $1
switch (see FIG. 5).
Temperature setting
(see FIG. 6)
The wine cellar is equipped with an electronic control.
This allows you to program the temperature inside the
wine cellar. Your wine will be stored between 50 F
(10°C) and 59 F (15°C) according to expert advice.
The temperature pre-set in the factory is shown on the
display.
The temperature, [pre-set at 54 F (12°C)], can be
changed on demand between 46 F (8°) and 64 F
(18 °) depending on the wine stored.
1. Press button [1] (see FIG. 6). While pressing
button [1] go to next point (2)
2. Use buttons [2] and [3] (see FIG 6) to lower or
increase the temperature.
3. Please allow 6 seconds for the control system to
record the new pre-set value.
3
2
FIG 6
Page 6
Maintenance
We recommend that you keep your wine cellar as
clean as possible. Unplug the cellar before cleaning.
Do not use any abrasive or strong scented substances
Use a smooth cloth or sponge and light detergent.
It is very important to check regularly that the air
circulation underneath and behind the cellar is not
blocked. Condensation collects in a small cup at the
back of the cellar.The cup has a sponge which helps
the condensation to evaporate. Check that the plastic
pipe routing the water from the inside to the cup is not
blocked by dust or dirt.
If the wine cellar fails to work, check the following
before calling a service technician:
• Is the power supply fuse intact ?
• Is the electric power plug properly inserted in its
receptacle ?
• Is the wine cellar switched on ?
If the cause of failure is not listed above contact an
authorized service technician.
The wine cellar is equipped with overheating protec-
tion. An authorized service technician can check
whether this has been triggered or not.
CAUTION that you should store
no more than one layer of bottles on the sliding
shelves.
The sliding shelves and the storage shelves can be
placed in several positions depending on the size of
your wine cellar. FIG 7 & 8
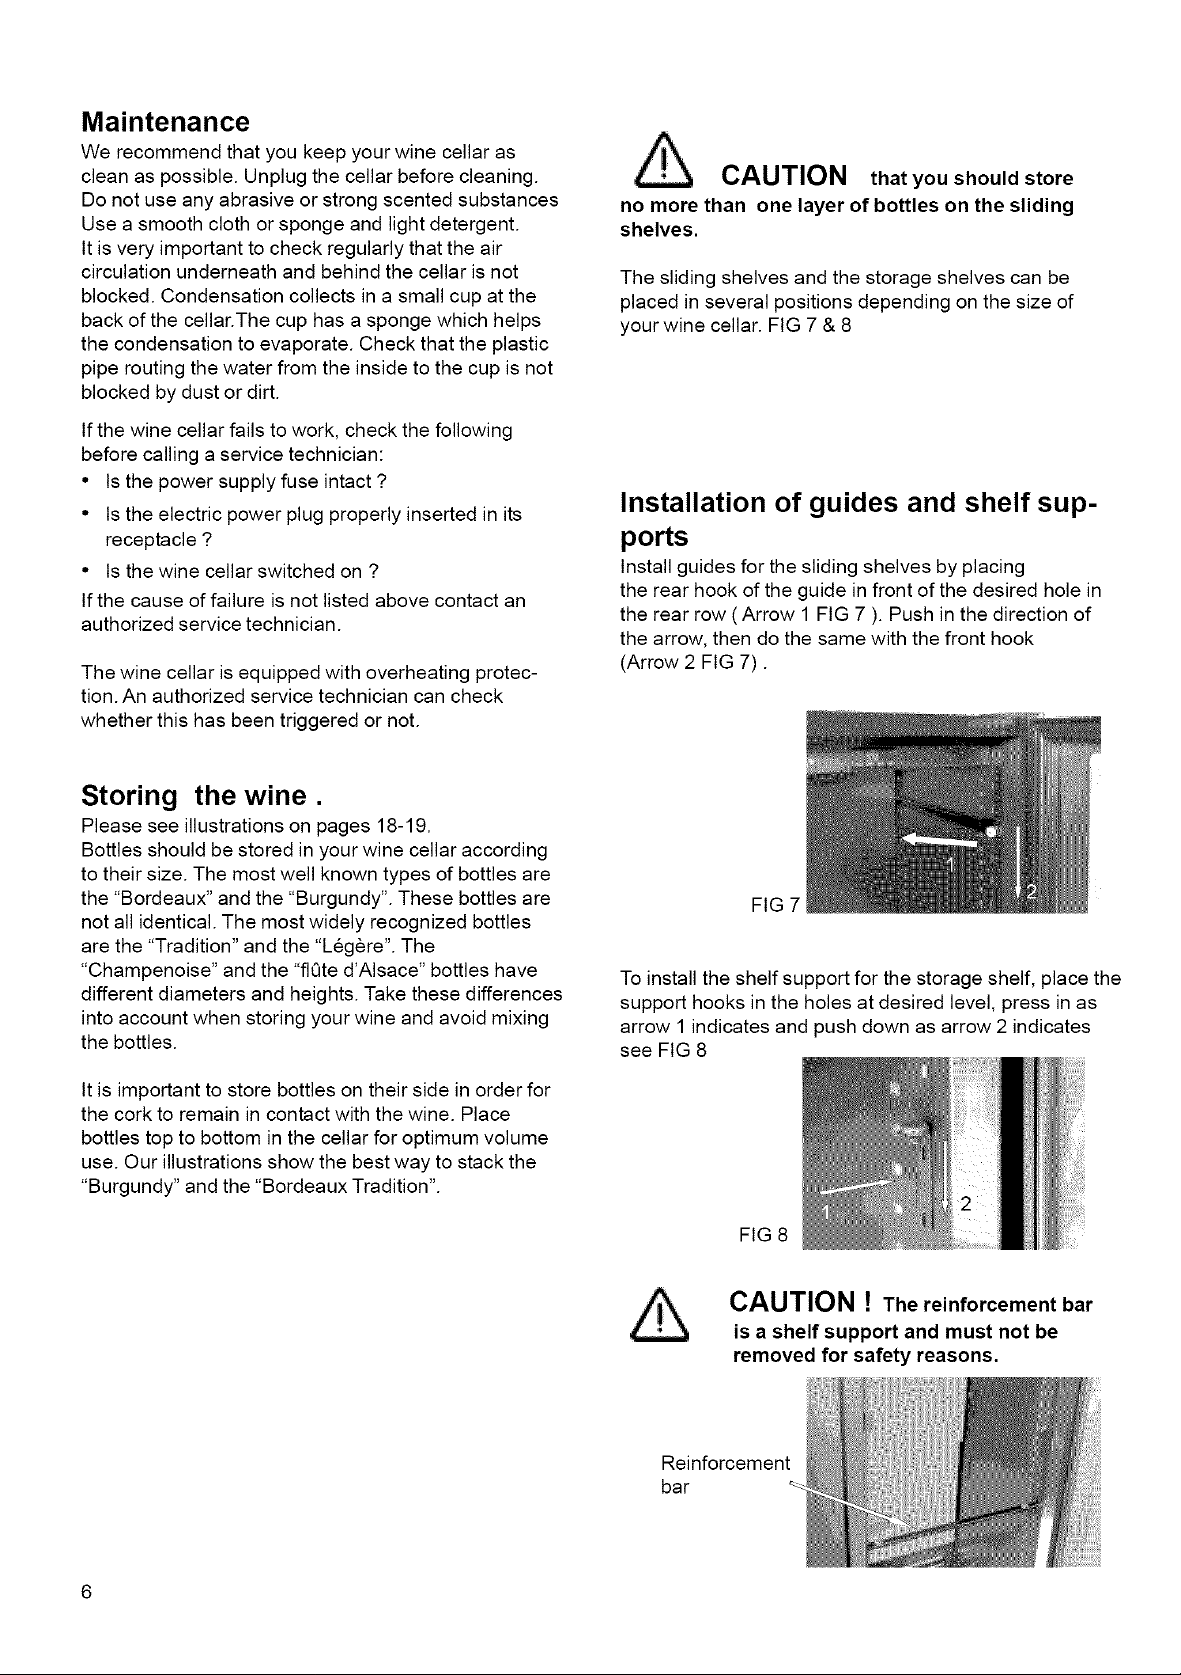
Installation of guides and shelf sup-
ports
Install guides for the sliding shelves by placing
the rear hook of the guide in front of the desired hole in
the rear row (Arrow 1 FIG 7 ). Push in the direction of
the arrow, then do the same with the front hook
(Arrow 2 FIG 7).
Storing the wine.
Please see illustrations on pages 18-19.
Bottles should be stored in your wine cellar according
to their size. The most well known types of bottles are
the "Bordeaux" and the "Burgundy". These bottles are
not all identical. The most widely recognized bottles
are the "Tradition" and the "Legere". The
"Champenoise" and the "flQte d'Alsace" bottles have
different diameters and heights. Take these differences
into account when storing your wine and avoid mixing
the bottles.
It is important to store bottles on their side in order for
the cork to remain in contact with the wine. Place
bottles top to bottom in the cellar for optimum volume
use. Our illustrations show the best way to stack the
"Burgundy" and the "Bordeaux Tradition".
FIG 7
To install the shelf support for the storage shelf, place the
support hooks in the holes at desired level, press in as
arrow 1 indicates and push down as arrow 2 indicates
see FIG 8
FIG 8
CAUTION ! The reinforcement bar
is a shelf support and must not be
removed for safety reasons.
Reinforcement
bar
Page 7
Warranty Information
WIN ECE LLAR WARRANTY Your winecellar is protectedbythis warranty
WARRANTY THROUGH OUR AUTHORIZED SERVICERS, THE CONSUMER WILL BE
PERIOD WE WILL: RESPONSIBLE FOR:
FULL ONE-YEAR One year from Pay all costs for repairing or replacing any parts Costs of service calls
WARRANTY original purchase of this appliance which prove to be defective in that are listed under
date. materials or workmanship. NORMAL RESPONSIBILITIES
OF THE CONSUMER. *
LIMITED 2nd-5th
YEAR WARRANTY
(Cabinet Liner and
Sealed System)
LIMITED
WARRANTY
Second through
fifth years from
original purchase
date.
Time periods
listed above.
Repair or replace any parts in the cabinet liner or
sealed refrigeration system
(compressor, condenser, evaporator, dryer or
tubing) which prove to be defective in mareials or
workmanship.
All of the provisions of the full warranties above
and the exclusions listed below apply.
(Applicable to the
State og Alaska)
In the U.S.A., your appliance is warranted by Electrolux Home Products, Inc. We authorize no person to change or add to any of our obligations
under this warranty. Our obligations for service and parts under this warranty must be prformed by us or an authorized ElectroIux Home
Products, Inc. serviser. In Canada, your appliance is warranted by EIectroIux Canada Corp.
* NORMAL
RESPONSIBILITIES
OF THE CUSTOMER
This warranty applies only to products in ordinary household use, and the consumer is responsible
for the items listed below:
1.
Proper use of the appliance in accordance with instructions provided with the product.
2.
Proper installation by a licensed and insured professional in accordance with instructions provided
with the appliance and in accordance with all local plumbing, electrical and/or gas codes.
3.
Proper connection to a grounded power supply of sufficient voltage, replacement of blown
fuses, repair of loose connections or defects in house wiring.
4.
Expenses for making the appIience accessible for servicing, such as removal of trim,
cupboards, shelves, etc., which are not a part of the appliance when it was shipped from the factory.
5.
Damages to finish after installation.
6.
Replacement of light bulbs and/or flourescent tubes ( on models with these features)
Costs for pickup and delivery of
the appliance required because of
service. Costs for labor,parts and
transportation other than with
respect to the cabinet liner or
sealed refrigerator system.
Costs of the technician's travel
to the home and any costs for
pick up and delivery of the
appliance required because of
service.
EXCLUSIONS
IF YOU NEED
SERVICE
This warranty only applies in the 50 States of the U.S.A and Puerto Rico, and Canada. Product features or specifications as described or
illustrated are subject to change without notice. All warranties are made by Electrolux Home Products, Inc. In Canada, your appliances is
warranted by EIectrolux Canada Corp.
USA
877-435-3287
ELECTROLUX HOME PRODUCTS, Inc.
P.O. Box 212378
Augusta, GA 30917
This warranty does not cover the following:
CONSEQUENTIAL OR INCIDENTAL DAMAGES SUCH AS PROPERTY DAMAGE AND
INCIDENTAL EXPENSES RESULTING FROM ANY BREACH OF THIS WRITTEN ORANY
IMPLIED WARRANTY.
Note: Some states do not allow the exclusion or limitation of incidental or consequential
damages, so this limitation or exclusion may not apply to you.
2.
Service calls which do not involve malfunction or defects in workmanship or material, or for
appliances not in ordinary household use. The consumer shall pay for such service calls.
3.
Damages caused by services performed by servicers other than Electrolux Home
products, Inc., EIectrotux Canada Corp., or its authorized servicers; use of parts other than
genuine EIectrolux Home products parts; obtained from persons other than such
servicers; or external causes such as abuse, misuse, inadeqaute power supply or acts of God.
4.
Products with original serial numbers that have been removed or altered and can not be
readily determined.
Keep your bill of sale, delivery slip, or some other appropriate payment record. The date on the bill estab-
lishes the warranty period should service be required. If service is performed, it is in your best interest to
obtain and keep all receipts. This written warranty gives you specific legal rights. You may also have other
rights that vary from state to state. Service under this warranty must be obtained buy contacting Electrotux
Home Products, Inc. or EIectrolux Canada Corp.
CANADA
866-213-9397
ELECTROLUX CANADA Corp.
6150 McLaughlin Road
Mississauga, Ontario
L5R 4C2
Page 8

Nous vous felicitons d'avoir choisi cette cave a vin de
veillissement !
Instructions d'installation et de
fonctionnement pour votre cave
vin de vieillissement
Introduction
Merci d'avoir choisi cette cave a vin de vieillissement.
Veuillez life attentivement les instructions suivantes
avant d'installer votre nouvelle cave a vin. Nous
sommes convaincus que vous serez entierement
satisfait de votre achat.
La cave a vin de vieillissement doit 6tre installee et
utilisee conformement a ces instructions pour
fonctionner correctement et de fa£on economique.
Branchement electrique.
II est primordial que I'installation electrique soit
effectuee correctement et conformement aux
reglementations en vigueur. Votre cave a vin
fonctionne avec du courant alternatif monophas&
Veuillez verifier que la tension indiquee sur la plaque
d'identification correspond a votre alimentation
electrique.
AVERTISSEMENT - LA CAVE .&.VlN DOlT
I_TRE RELII_E .&.LA TERRE.
Les c&bles electriques doivent 6tre passes et fixes
de fagon a ce qu'ils ne puissent pas entrer en
contact avec des parties chaudes ou tranchantes
de la cave a vin.
Accessoires
Veuillez verifier la presence des accessoires suivants,
certains se trouvent dans la bore en carton
I'interieur de la cave a vin.
Plaque d'identification
La plaque d" identification si situe en haut a gauche
I'interieur de la cave a vin.
Cette plaque contient des informations necessaires
Iors de I'intervention du Service Apres Vente.
Nous vous conseillons de les noter ci dessous.
Designation du modele .......................
Numero de serie .................................
Date de votre achat .............................
Avaries de transport
Veriflez la cave a vin Iors du deballage.Vous devez
signaler immediatement aupres de la societe responsable
de la livraison, tout dommage apparent. S'il ne vous est
pas possible de deballer la cave immediatement,
mentionnez vos reserves sur le bon de livraison avant de
le signer. En cas de decouverte d'un dommage apres le
depart des livreurs, vous disposez de 72 heures maximum
pour adresser votre recours par lettre recommandee
adressee au transporteur.
Des Questions ?
Joignez notre service client gratuit au telephone aux
Etats-Unis et au Canada :
1-877- 4 ELECTROLUX (1-877-435-3287)
Un site internet est egalement a votre disposition sous
I'adresse suivante www.electroluxusa,com
A I'arriere "
Entretoise (pour assurer une distance optimale
entre la cave et lemur)
BoRed'accessoires "
.
Notice d'instructions
2.
Poignee + Clef Allen 2mm
3.
Bac de condensation
4.
Support de clayette
5.
Clayette de stockage
6.
Barre de seuil (voir installation page 19)
Autres outils necessaires, non fournis
1. Tournevis (cruciforme)
2. Clef a molette ou clef de 21 mm
__
2
1
3
Page 9

Installation
FIG 1
NOTEZ
&
Veuillez suivre ces instructions d'installation.
Pour assurer le meilleur fonctionnement possible, I'air
dolt pouvoir circuler librement vers I'unite de
refroidissement derriere la cave a vin. Un espace libre
d'au moins 1"(25 mm) dolt _tre laisse derriere la cave
vin, ainsi que sur les cStes. Laissez un espace libre
d'au moins 4" (100 mm) au-dessus de la cave a vin.
Ajustez les pieds de la cave a vin pour qu'elle soit
parfaitement de niveau.
Si necessaire, utilisez un niveau a bulle. FIG1
Ce produit est destine a _tre utilise en
interieur uniquement. Toute installation
ou autre utilisation en exterieur pourraient
causer des deg_ts materiels, physiques
et nuire a I'environnement.
Entretoise
mCtallique
I
I
d
1,3/16"
(30 mm)
///////////////////
Mur
A
1. Enlevez la palette de transport sur laquelle repose
la cave a vin.
2. IMPORTANT ! Ajustez les pieds pour avoir un
espace libre de 1,3/16" (30 mm) sous la cave a vin.
3. Utilisez les deux vis pour fixer I'entretoise des deux
c6tes a I'arri@e de la cave a vin. L'entretoise assure
un espace suffisant pour une bonne ventilation.
FIG 2.
Mur
4. Pour un fonctionnement optimal, veillez a ce que la
cave a vin ne soit pas situee trop pres d'une source
de chaleur (radiateur, cuisiniere ou lumiere directe
du soleil).
Notez que la porte doit pouvoir _tre ouverte d'au
moins 90 ° pour sortir les clayettes coulissantes.
* AVERTISSEMENT IMPORTANT !
5. Montez le bac de condensation a I'arriere
conformement aux FIG 3a, 3b et 3c. Les vis sont
deja en place a I'arriere.
FIG 3a
FIG 3b
FIG 2
FIG 3c
Page 10

FIG4b
FIG4a
6.Ajustezlapoigneesurlaportecommerepresente
surlesimages".FIG4a,4b,4c
7.Verifiezquelefiltreacharbonestenplace,dansle
coinsuperieurgauchea I'interieurdelacaveavin.
Vousdevezremplacerlefiltreacharbontouslesdeux
ans.Lefiltreestsituedanslecoinsuperieurgauche,
I'interieurdelacaveavin.
8. Branchez la cave a vin a la prise electrique et
mettez-la en service avec I'interrupteur $1
(voir FIG. 5).
FIG4c
Sl
FIG 5
Reglage de la temperature
(voir FIG. 6)
La cave a vin est equipee d'un programmateur
electronique. IIvous permet de programmer la
temperature a I'interieur de la cave a vin. Votre vin
sera idealement garde a une temperature comprise
entre 50 F (10°C) et 59 F (15°C), selon le conseil des
experts. La temperature pre-reglee d'usine a 54 F
(12 C) degre est indiquee sur I'afficheur.
La temperature, pre-reglee en usine a 54 F (12°C),
peut 6tre modifiee a la demande entre 46 F (8°C) et
64 F (18°C).
1. Appuyez sur la touche [1] (voir FIG. 6). Le message
L1 s'affiche, puis la temperature pre-reglee clignote
apres un instant.
2. Utilisez les touches [2] et [3] (voir FIG 6) pour
augmenter ou reduire la temperature.
3. Attendez environ 6 secondes pour que le systeme
enregistre la nouvelle valeur pre-reglee.
10
3
2
FIG 6
Page 11

Entretien
Nous vous recommandons de maintenir votre cave
vin le plus propre possible. Debranchez la cave a vin
avant tout nettoyage. N'utilisez pas de substances
abrasives ni trop parfumees. Utilisez une eponge ou
un chiffon doux et un detergeant leger.
II est tres important de verifier regulierement que la
circulation de I'air sous et derriere la cave a vin n'est
pas bloquee. La condensation est recuperee dans un
petit bac a I'arriere de la cave a vin. Le bac contient
une eponge qui facilite I'evaporation de la
condensation. Verifiez que le conduit en plastique qui
achemine I'eau de la cave a vin au bac n'est pas
obture par de la poussiere ou des salissures.
Si la cave a vin ne fonctionne pas, commencez par
verifier les points suivants avant d'appeler un
technicien :
• que la fiche electrique est correctement branchee
la prise
• que I'interrupteur de la cave a vin est bien en
position de service
• que le fusible de I'alimentation electrique est intact
Si la cause n'est pas citee ci-dessus, vous devez faire
appel a un technicien agre&
NOTEZ
Les clayettes coulissantes et les clayettes de stockage
peuvent 6tre placees a differents endroits en fonction
de la taille de votre cave a vin. FIG 7 & 8
que vous ne devez pas mettre
plus d'une rangee de outeilles
sur les clayettes coulissantes.
Montage des guides et des supports de
clayette
Montez les guides pour les clayettes coulissantes en
positionnant le crochet arriere du guide en face du trou
de votre choix, a I'arriere de la rangee (Fleche 1 FIG
7), appuyez dans la direction de la fleche. Procedez de
la m6me fa£on avec le crochet avant (Fleche 2 FIG 7).
La cave a vin est equipee d'une securite en cas de
surchauffe.
Un technicien agree peut verifier si elle s'est
declenchee ou pas.
Stockage du vin.
Referez-vous aux illustrations pages 18-19.
Les bouteilles doivent 6tre rangees en fonction de
leurs tallies. Les bouteilles les plus courantes sont de
type <<Bordeaux>>et <<Bourgogne >>.Ces bouteilles ne
sont pas toutes identiques 11existe des versions
<<traditionnelles >>et <<legeres >>.Les bouteilles de
champagne et les vins d'AIsace ont differents
diametres et hauteurs. Prenez ces differences en
consideration Iorsque vous stockez votre vin et evitez
de melanger des bouteilles des types differents.
Lorsque vous conservez le vin, il est important que les
bouteilles soient couchees de fa£on ace que le
bouchon reste en contact avec le vin. Pour optimiser
I'utilisation du volume disponible, nos illustrations
montrent la meilleure fa£on de ranger des bouteilles
de Bourgogne et de Bordeaux.
FIG 7
Montage des supports pour les clayettes de stockage.
Positionnez les crochets du support dans les trous a la
hauteur de votre choix, appuyez comme le montre la
fleche 1,puis appuyez vers le bas (fleche 2). Voir FIG 8
FIG 8
N.B. La barre de renforcement est un support de
clayette et ne doit pas 6tre enlevee pour des _.
raisons de securit&
Barre de
renforcement
11
Page 12

GARANTIE - Cave b vins de vieillissement Votre cave a vin de
viellissement est couvert par cette garantie
NOUS NOUS ENGAGEONS, PAR L'ENTREMISE LE CONSOMMATEUR EST
PC:RIODE DE DE NOS CENTRES DE SERVICES APRC:S-VENTE RESPONSABLE DE CE QUl SUIT:
GARANTIE AUTORISES, A :
GARANTIE Un an a compter Reparer ou remplacer gratuitement toute piece de cet Le coot des visites de service
COMPLF:TE de la date d'achat appareil comportant un vice de materiau apres-vente decrites dans la rubrique
D'UN AN initiale, ou de fabrication. RESPONSABILITI_S GI_NI_RALES
GARANTIE LIMITI_E DE
LA 2 eme_ la 5 emeannee
(Revetement du coffret
et systeme scelle)
GARANTIE LIMITI_E
(s'applique en Alaska)
Aux E.-U., votre appareiI est garanti par Electrolux Home Products, Inc. Nous n'autorisons personne d'autre a modifier ni 8 accroftre nos
obligations aux termes de cette garantie. Nos obligations en matiere de service apres-vente et de pieces prevues par cette garantie doivent etre
satisfaites par nous ou par un reparateur agree de EIectrotux Home Products, Inc. Au Canada, votre appareil est garanti par
Electrolux Canada Corp.
*RESPONSABILITES
GENERALES DU
CONSOMMATEUR
Deuxieme
cinquieme annee
compter de la date
d'achat initiale.
Durees decrites
ci-dessus.
Cette garantie ne s'applique qu'_ I'utilisation domestique normale du produit et le consommateur est
responsable des elements 6num6res ci-dessous :
1.
Utilisation appropriee de I'appareil conformement aux directives qui accompagnent le produit.
2.
Installation correcte par un agent de service apres-vente autorise conformement aux directives qui
accompagnent I'appareil et a tous Ies codes Iocaux de plomberie, d'electricite et de gaz.
3.
Branchement correct a une source d'alimentation mise 8 Ia terre de tension suffisante, remplacement
des fusibles grilles, reparation des branchements I_ches et des defauts dans le cSblage de la maison.
4.
Frais engages pour rendre I'appareil accessible aux fins de reparation, comme le retrait de toute garniture,
d'armoires, d'etageres, etc. ne faisant pas partie de Yappareil au moment de son expedition par I'usine.
5.
Dommages 8 Ia surface apres I'installation.
6.
Remptacement des ampoules et des tubes fIuorescents (sur Ies modeles en possedant).
Reparer ou remplacer gratuitement toute piece du
revetement ou du systeme de refrigeration scelIe
(compresseur, condenseur, evaporateur, secheur ou
tuyauterie) comportant un vice de materiau
ou de fabrication.
Respecter toutes les dispositions des garanties
completes ci-dessus ainsi que Ies exclusions
decrites ci-dessous.
DU CONSOMMATEUR,*
Tous frais engages pour aller
chercher et livrer I'appareil dans le
cadre du service apres-vente.
Les frais de main-d'oeuvre, de
pieces et de transport autres que
ceux relatifs au revetement ou au
systeme de refrigeration scell&
Les frais de transport du technicien
pour se rendre au domicile du
consommateur et tous frais engages
pour aller chercher et livrer le
produit dans le cadre du service
apres-vente.
EXCLUSIONS
IPOUR UN SERVICE
APRES-VENTE
Cette garantie ne dapplique que dans les 50 etats des E.-U., a Puerto Rico, et au Canada. Les specifications et caracteristiques des produits,
decrites et illustrees, sont sujettes a modification sans preavis. Toutes les garanties sont accordees par Electrolux Home Products, Inc. Au
Canada, votre appareiI est garanti par Electrolux Canada Corp.
USA
877-435-3287
ELECTROLUX HOME PRODUCTS, Inc.
P.O. Box 212378
_2gusta, GA 30917
Cette garantie ne couvre pas les elements suivants :
LES DOMMAGES INDIRECTS OU ACCESSOIRES COMME LES DOMMAGES MATI_RIELS ET
LES DEPENSES ACCESSOIRES RESULTANT D'UNE VIOLATION DES CONDITIONS DE CETTE
GARANTIE ECRITE OU DE TOUTE GARANTIE IMPLICITE.
Remarque : Certains 6tats ne permettent pas !'exclusion ou la limitation des dommages indirects ou
accessoires; cette limitation ou exclusion peut donc ne pas s'appliquer dans votre cas.
2.
Les visites de service apres-vente qui ne sont liees a aucune faute de fonctionnement ni a aucun vice
de fabrication ou de materiau ou qui concernent des appareils qui ne sont pas utilises dans des conditions
domestiques normales. Le consommateur dolt payer les frais de ces visites de service apres-vente.
3.
Les dommages causes dans le cadre de tout entretien effectue par une personne autre que Electrotux
Home Products, Inc., EIectrolux Canada Corp. ou leurs reparateurs agrees; I'utilisation de pieces autres
que des pieces de rechange authentiques de Electrolux HomeProducts; les pieces obtenues aupres de
personnes autres qu'un reparateur agree; et les causes de dommages externes comme I'utilisation abusive
ou inappropriee, une source d'alimentation electrique inadequate ou un cas fortuit.
Les produits dont le numero de serie initial a ete obtitere ou modifie et ne peut pas etre determine aisement.
Conservez le regu d'achat, le bon de Iivraison ou tout autre regu de paiement approprie. La date qui figure sur Ia
facture permet d'etablir la periode de garantie Iorsqu'un service apres-vente est requis. Si vous devez vous
revaloir de Ia garantie, il serait judicieux d'obtenir et de conserver tousles regus. Cette garantie ecrite vous
confere certains droits, mais vous pouvez egalement jouir d'autres droits selon votre lieu de residence. Pour
vous prevaloir de cette garantie, prenez contact avec EIectrotux Home Products, Inc. ou Electrotux Canada Corp.
CANADA
866-213-9397
ELECTROLUX CANADA Corp.
6150 McLaughlin Road
Mississauga, Ontario
L5R 4C2
Page 13

iEnhorabuena por elegir la Cava para vinos de Electrolux!
Instrucciones de instalacibn y
funcionamiento de la Cava para
envejecimiento de vinos de
Electrolux
Introduccion
Deseamos agradecerle la eleccion de la Cava para
envejecimiento de vinos de Electrolux.
Lea las siguientes instrucciones de uso con
detenimiento antes de comenzar a instalar su nueva
cava. Estamos seguros que estara satisfecho con la
compra que ha realizado.
La cava debe instalarse y utilizarse del modo descrito
en estas instrucciones para que funcione de un modo
econ6mico y correcto.
Conexi6n el_ctrica.
Es muy importante que la instalacion electrica se
realice correctamente y que cumpla con la normativa y
c6digos de practicas vigentes. La cava funciona con
corriente alterna monofasica.
Compruebe que la tension que se indica en Iaplaca
de datos tecnicos es la misma que la del suministro de
energia electrica al que se va a conectar.
ADVERTENCIA: LA CAVA DEBE POSEER
UNA CONEXION A TIERRA.
Los cables electricos deben guiarse y fijarse para
que no entren en contacto con partes calientes o
afiladas de la cava.
Accesorios
Compruebe que la cava incluye los accesorios
siguientes o bien, busque una caja de cart6n
independiente en la que se deben encontrar estos
accesorios en el interior de la cava.
Placa de datos tecnicos
Compruebe la placa de datos tecnioos que se
encuentra en el interior de la cava, en la parte superior
izquierda, para asegurarse de que ha recibido el
modelo correcto.
En la placa de datos tecnicos se especifican los
detalles necesarios para solicitar asistencia tecnica. Le
sugerimos que apunte aqui los detalles.
NQmero de modelo ...............................
NQmero de serie ...................................
Fecha de compra ..............................
Da_os durante el envio
Compruebe el estado de la cava y asegQrese de que
no ha sufrido da_os durante el envio. Si observa
alguno, informe a la empresa de transportes
responsable del envio en el espacio de tiempo legal o
establecido para este tipo de producto. Si no existiera
tal espacio de tiempo para informar de da5os, debera
hacerlo durante los 7 dias posteriores a la entrega.
Para mas informacion:
Llamar al telefono gratuito en EE.UU yCanada:
1-877- 4ELECTROLUX (1-877-435-3287)
Para ayuda por internet y/o informacion de los productos:
www.electroluxusa.com
En la parte posterior:
1. Barra de separacion (para asegurar que la cava
y la pared quedan separadas)
Caja de accesorios:
1. Manual de instrucciones
2. Tirador + Llave Hallen 2mm
3. Bandeja de desagQe
4. Soporte de estanteria
5. Estanteria
6. List6n de madera (tnstalacion, ver pagina 19
Herramientas adicionales necesarias no incluidas
1. Destornillador (estrella cuadrete)
2. Llave de tuercas ajustable o fija (21 mm ) 13
__
2
3
4
Page 14

Instalacion
OBSERVE Este producto solamente se
de debe usar/instalar en un sitio cubierto
protegido de los elementos climaticos. La
instalaci6n o uso de este producto en el
exterior, o en cualquier otto sitio donde no este
protegido de los elementos climaticos puede causar
graves daSos personales, al producto y al lugar donde
ha estado situado.
A continuaci6n se proporcionan las instrucciones de
instalacion que debe seguir:
Para obtener el maximo rendimiento, es necesario
que el aire circule libremente por la unidad de
refrigeraci6n que hay en la parte posterior de la cava.
Su diseSo no-empotrado se ha realizado para que
permanezca a 1" (25 mm) como minimo separada de
la pared, por la parte de atras y los laterales. Deje un
espacio de 4" (100 mm) como minimo en la parte
superior. Ajuste los pies de la cava para que quede en
posici6n completamente vertical en ambas
direcciones. Utilice un nivel si es necesario para que
quede nivelada correctamente. FIG. 1
FIG 1
Barra de
Separaci6n _
I
///////////////////}
Barpraad;jon _ _i_/7/I/I _////7/_
Parte /_,']N I /
p°eteri°r i_//J_ i 1" /
1 3/16"
(30 mm)
Pared
1. Retire el palet de transporte en el que se suministra
la cava.
2. IMPORTANTE: Ajuste los pies de tal modo que
quede un espacio de 1 3/16" (30 mm) por debajo de
la cava.
3. Coloque la barra de separacion, con los dos
tornillos que se suministran, en la parte posterior, a
cada lado, de la cava. Esta barra asegura que se
mantiene la distancia correcta entre la cava y la
pared. FIG 2.
Pared
4. Para obtener el maximo rendimiento, coloque la
cava lejos de cualquier fuente de calor (radiadores,
cocina o luz directa del sol).
Observe que es necesario que la puerta de la cava
pueda abrirse 90° como minimo para que se
puedan sacar las estanterias deslizantes.
* ADVERTENClA IMPORTANTE:
5. Coloque la bandeja de desagQe en la parte
posterior del modo que se indica en las
ilustraciones de la FIG. 3a, 3b, 3c. Los tomillos
ya se han colocado en la parte posterior.
FIG 3a
FIG 3b
FIG 2
14
FIG 3c
Page 15

FIG4b
FIG4a
6. Fijareltiradorenlosorificiosdelapuertacomo
muestraslas.FIGURAS4a,4b,4c
7.Coloqueeltiradordelapuerta.Enloslateralesdel
bastidordelapuertasehanrealizadounas
perforacionesparacolocareltirador.
Elfiltrodecarbonparalaventilaci6ninteriordebe
cambiarsecadadosa5os.Elfiltroseencuentraenla
esquinasuperiorizquierda,enelinteriordelacava.
FIG4c
8.Enchufelacavayconectelaconelinterruptor$1
(vealaFIG.5).
Ajuste de temperatura
(consulte la FIG. 6)
La cava esta equipada con un control electr6nico. Esto
le permitira programar la temperatura del interior de la
cava. El vino debe almacenarse a una temperatura de
entre 50 F (10°C) y 59 F (15°C) segQn el consejo de
los expertos. La temperatura preajustada de fabrica se
mostrara en la pantalla.
La temperatura, [preajustada a 54 F (12°C)] puede
cambiarse para adaptarse alas necesidades entre
45 F (8°) y 64 F (18°) dependiendo del vino
almacenado.
1. Pulse el bot6n [1] (vea la FIG. 6). En la pantalla se
mostrara el mensaje L1 y, a continuacion, la
temperatura preajustada comenzara a parpadear.
2. Utilice los botones [2] y [3] (vea la FIG 6) para
aumentar o disminuir la temperatura.
3. Permita que transcurran 6 segundos para que el
sistema de control registre el nuevo valor
introducido.
Sl
FIG 5
3
2
FIG 6
15
Page 16

Mantenimiento
Recomendamos que mantenga la cava siempre
limpia. Desenchufe la cava antes de limpiarla. No
utilice sustancias abrasivas o perfumadas. Utilice un
pa5o suave o una esponja y un limpiador suave.
Es muy importante comprobar regularmente la
circulacion de aire por debajo de la cava y asegurarse
de que no se obstruye. El agua de condensaci6n se
recoge en un peque5o recipiente en la parte posterior
de la cava. El recipiente posee una esponja que ayuda
a evaporar el agua de condensaci6n. Compruebe que
el tubo de plastico por el que fluye el agua de
condensaci6n desde el interior hasta el recipiente no
se bloquea por lasuciedad o el polvo.
Si la cava no funciona, realice las comprobaciones
siguientes antes de Ilamar a un tecnico del servicio:
• el fusible del suministro de energia debe estar en
perfecto estado
• el enchufe debe estar correctamente introducido en
el z6calo del suministro de energia
• la cava de estar encendida
OBSERVE que debe almacenar una
t_nica capa de botellas en
cadaestanteria deslizante.
Las estanterias deslizantes y las estanterias de
almacenamiento pueden colocarse en posiciones
distintas segQn el tama_o de la cava. FIG. 7 y FIG. 8
Instalacion de las guias y de los
soportes de las estanterias
Para instalar las guias de las estanterias deslizantes,
coloque el gancho trasero de la guia frente al agujero
que desee de la ilia de la parte posterior (Flechal FIG.
7 ) y empuje la guia en la direccion de la fiecha. A
continuaci6n, realice la misma operacion con el
gancho frontal (Flecha 2 FIG. 7).
Si Icausa del fallo no se encuentra entre ninguna de
las posibilidades descritas anteriormente, avise a un
tecnico del servicio.
La cava se ha equipado con un sistema de proteccion
contra sobrecalentamiento.
El tecnico del servicio podra comprobar si este se ha
disparado o no.
Almacenamiento del vino.
Consulte las ilustraciones de la pagina 18-19.
Las botellas deben almacenarse en la cava segQn el
tama5o. Las botellas mas conocidas son las de los
vinos "Bordeaux" y "Burgundy". No todas estas
botellas son identicas. Las botellas mas conocidas son
"Tradition" y "Legere". Las botellas "Champenoise" y
"FIQte d'AIsace" poseen distintos diametros y alturas.
Considere estas diferencias a la hora de almacenar su
vino y evite mezclar botellas.
Es importante almacenar las botellas tumbadas para
que el corcho permanezca en contacto con el vino.
Coloque las botellas en la cava de arriba hacia abajo
para un 6ptimo aprovechamiento de su volumen. En
las ilustraciones le mostramos el mejor modo de apilar
las botellas "Burgundy" y "Bordeaux Tradition".
FIG 7
Instalaci6n del soporte de estanteria para estanteria
de almacenamiento. Coloque los ganchos del soporte
en los agujeros en el nivel que desee, presione en la
direcci6n de la Flecha 1 y empuje hacia abajo en la
direcci6n de la Flecha 2. Vea la FIG. 8
FIG 8
NOTA: La barra de refuerzo es un soporte
de estanteria y no debe retirarse por
motivos de seguridad.
16
Soporte de
estanteria
Page 17

Informacion sobre la Garantia
GARANTIA DEL CAVA PARA ENVEJECIMIENTO DEL VINO
Su Cava para envejecimiento del vino esta protegido por esta garantia
PERIODO DE LA RESPONSABILIDAD ATRAVES DE EL CONSUMIDOR SERA
GARANTIA NUESTROS TECNICOS AUTORIZADOS SERA:
GARANTIA Un a_o desde Pagar todos los costos de reparaci0n o reemplazo Los costos de las Ilamadas de
COMPLETA DE Ia fecha original de cualquier pieza de este artefacto que tenga servicio que estan enumeradas bajo
UN AI_IO de compra defectos de fabricaci6n o de materiales RESPONSABILIDADES
GARANTIA LIMITADA
DEL 2°AL 5° AI_O
(Revestimiento del
Gabinete y Sistema
Sellado)
GARANTIA
LIMITADA
(Aplicable al
Desde el segundo
hasta el quinto
ai_o desde la
fecha original de
compra.
Periodos de
tiempo indicados
anteriormente.
Reparar o reemptazar cualquier pieza del
revestimiento del gabinete o del sistema de
refrigeraci6n sellado (compresor, condensador,
evaporador, secador o tuberia) que tenga
defectos de materiales o fabricaci6n.
Se aplican todas las disposiciones de la garantia
completa indicada anteriormente y Ias exclusiones
que se indican a continuaci6n.
Estado de Alaska)
En los EE.UU. su electrodomestico esta garantizado por Electrolux Home Products, Inc. No autorizamos a ninguna persona para que cambie
ninguna de nuestras obligaciones bajo esta garantia ni tampoco agregue ninguna otra. Nuestras obligaciones respecto a reparaci6n y repuestos
bajo esta garantia deben ser efectuadas por nosotros o por un tecnico autorizado de EIectroIux Home Products, Inc. En Canada, su
etectrodomestico esta garantizado por Electrolux Canada Corp.
*RESPONSABILIDADES Esta garantia se aplica solamente a los productos que son usados para propbsitos domesticos
NORMALES DEL normales y el consumidor es responsable por Io que se indica a continuacibn :
CLIENTE 1. Uso correcto del artefacto de acuerdo con las intrucciones proporcionadas con el producto.
2. Instalaci6n correcta pot un tecnico autorizado de acuerdo con Ias instrucciones proporcionadas con
el artefacto y de acuerdo con todos los c6digos locales de plomeria, electricidad y/o gas.
3. Conex6n correcta a una fuente de energia puesta a tierra, de voltaje suficiente, reemptazo de fusibles
quemados, reparaci6n de conexiones sueltas o defectos en el alambrado del hogar.
4. Gastos para facilitar el acceso al artefacto para su reparaci6n, tales como remoci6n de molduras,
estantes, armarios, etc. que no eran parte del artefacto cuando fue enviado de Ia fabric&
5. Da_os al acabado despues de la instalaci6n.
6. Reemptazo de los focos y/o tubos fluorescentes (en los modelos con estas caracteristicas).
RESPONSABLE
DE LO SIGUIENTE :
NORMALES DEL CLIENTE.*
Los costos incurridos para recoger y
entregar el producto que debe ser reparado
Todos los costos relacionados con la mano
de obra y transporte exceptuando aqueIIos
relacionados con et revestimiento del
gabinete o con el sistema de
refrigeracion sellado
Los costos del viaje deI tecnico
al domicilio y cualquier costo
incurrido por recoger y entregar
el artefacto que debe ser reparado.
EXCLUSIONES
Sl USTED NECESlTA
SERVlClO
Esta garantia es valida solamente en los 50 estados de EE.UU., en Puerto Rico yen Canada. Las especificaciones o caracteristicas del
producto segOn se describen o ilustran estan sujetas a cambio sin aviso previo. Todas las garantias son ofrecidas por EIectrolux Home
Esta garantia no cubre Io siguiente :
1. DANOS CONSECUENTES O INCIDENTALES TALES COMO DANOS MATERIALES Y GASTOS
INCIDENTALES RESULTANTES DE CUALQUIER INCUMPLIMIENTO DE ESTA U OTRA
GARANTIA ESCRITA O IMPLICITA.
Nota: En algunos estados no se permite la exclusi6n o limitaci6n de los dados incidentales o
consecuentes, por Io tanto puede que esta limitaci6n o exclusi6n no se aplique en su caso.
2. Llamadas de servicio que no se relacionen con el mal funcionamiento o defectos de fabricaci6n o de
materiales o para artefactos que no sean usados en et hogar. El consumidor pagara por tales
Ilamadas de servicio.
3. DaSos causados por reparaciones realizadas por personas que no pertenezcan a Electrolux Home
Products, Inc., Electrolux Canada Corp. o que no sean sus t6cnicos autorizados; el uso de piezas
que no sean repuestos genuinos de ElectroIux, que hayan sido obtenidos de personas que no sean
t¢cnicos autorizados, o causas externas tales como abuso, mal uso, suministro et6ctrico inadecuado
o casos fortuitos.
4. Los productos con nOmeros de serie originales que han sido sacados o alterados y no pueden ser
facilmente legibles.
Conserve su boIeta de compra, Ia boleta de entrega o algOn otro registro apropiado de pago. La fecha en el
recibo estabtece el periodo de garantia en caso de que necesite reparaci6n. Si se efectaa la reparaci6n, es
para su propio beneficio obtener y conservar todos los recibos. Esta garantia escrita le otorga derechos
Iegales especificos. Usted tambien puede tener otros derechos que varian de un estado a otro. Los servicios
de reparaci6n bajo esta garantia pueden obtenerse poni¢ndose en contacto con Electrolux Home Products,
Inc. o Electrolux Canada Corp.
Products, Inc. En Canada, su electrodom¢sticoesta garantizado por EIectrotuxCanada Corp.
EE.UU
877-435-3287
ELECTROLUX HOME PRODUCTS, inc.
P.O. Box 212378
Augusta, GA 30917
Canad_
866-213-9397
ELECTROLUXCANADACorp.
6150 McLaughlin Road
Mississauga, Ontario L5R 4C2
17
Page 18

How to store different types of bottles
Comment ranger differents types de bouteilles
Modo de almacenar distintos tipos de botellas
Bordeaux tradition
Type Bordaux
Bordolese tradition
Burgundy tradition
Type Bourgogne
Borgognona tradition
18
Page 19

Sliding shelf
Clayette coulissante
Estanteria deslizante
Example of mix bottle types
Exemple de bouteilles mixtes
Use the sliding shelf when storing specially shaped
bottles.
Utilisez la clayette coulissante pour stocker des
bouteilles de forme speciale.
Utilice la estanteria deslizante cuando se disponga a
almacenar botellas con formas especiales.
Ejemplo de almacenamiento de distintos
tipos de botellas
NOTE ! only one layer of bottles on a sliding shelf !
N.B. Une seule rangee de bouteilles sur une clayette
coulissante !
NOTA ! Coloque una sola capa de botellas en las
estanterias deslizantes
Wooden bar
Barre de seuil
List6n de madera
19
Page 20

Schema _lectrique / Wiring diagram / Elektrisches Schaltbild / Diagrama el_ctrico /
Diagrama electrico / Schema elettrico / Elschema
29 54_101
®
A 1 A{2
}2V
100 v
120 V
i27 V
230 V 12
....
HERHOFUSE B0/ ER NVELOPE
Regulateur / Regler / Regulador / Regulador / RegoIatore /
@
Regulator
Interrupteur / Schalter / Interruptor / Interruptor /
@
Interruttore / StrOmbrytare
Transformateur / Trafo / Transformador / Transformador /
@
Trasformatore / Transformator
Element chauffant / Heizpatrone / Aquecedor / Calentador /
@
Resistenza / Varmepatron
Element chauffant / Heizetement / Unidade de aquecimento
@
/ EIemento calentador / Resistenza / Varmeelement
SCparateur d'eau a thermofusible /
@
Thermosicherung Wasserabscheider / Separador de agua
do termofusivel / Condensador de agua dei termofusibte /
Separatore d'acqua del termofusibile /
Termosakring vattenavskiljare
Enveloppe de Ia chaudiCre a thermofusible /
@
Thermosicherung Boiler / Inv61ucro da caldeira do
termofusivel / Cubierta de la caldera del termofusible /
Involucro deI boiler del termofusibile / Termosakring
kokarsvep
1_ Gris / Grau / Cinzento / Gris / Grigio / Gr_
(_) Blanc / Weil_ / Branco / Blanco / Bianco / Vit
(_) Noir / Schwarz / Preto / Negro / Nero / Svart
(_) BIeu / Blau/Azul / Azul / BIu / Bla
(_ Rouge / Rot / Vermelho / Rojo / Rosso / ROd
2O2122
Page 21

Page 22

Page 23

MO-FO 0502
23
 Loading...