

Page 1

Installation Instructions
Steamer
Coffee
Coffee
Single
Water
Hot
Espresso
Double
Latté
Double
Decaf
Large
Cappuccino
Espresso
Single
Latté
Built-In Coffee Maker
E24CM75GSS E24CM76GSS
102221 REV. C2
Page 2
2
Before You Begin
READ THESE INSTRUCTIONS
NOTE
Installer: Leave these instructions with the owner.
Owner: Read your Coffee Maker Use and Care Guide completely before use.
It contains important safety information for operating this appliance. It also has
many suggestions for getting the best results from your coffee maker.
Read all instructions before installing the coffee maker.
For your safety, please read and observe all safety instructions. This guide will
help you anticipate electrical and water connections and help you select the best
location for the coffee maker.
WARNING
Tip Over Hazard: Do not use coee maker until completely installed.
Do not connect this appliance to electrical power until it is completely
installed.
QUESTIONS?
1-877-4Electrolux (1-877-435-3287)
For toll-free telephone support in the U.S. and Canada.
INTERNET
For online support and product information:
In the U.S. visit www.electroluxusa.com. In Canada, visit www.electroluxca.com.
© 2007 Electrolux Home Products, Inc.
Post Office Box 212378, Augusta, Georgia 30917, USA
All rights reserved.
Page 3
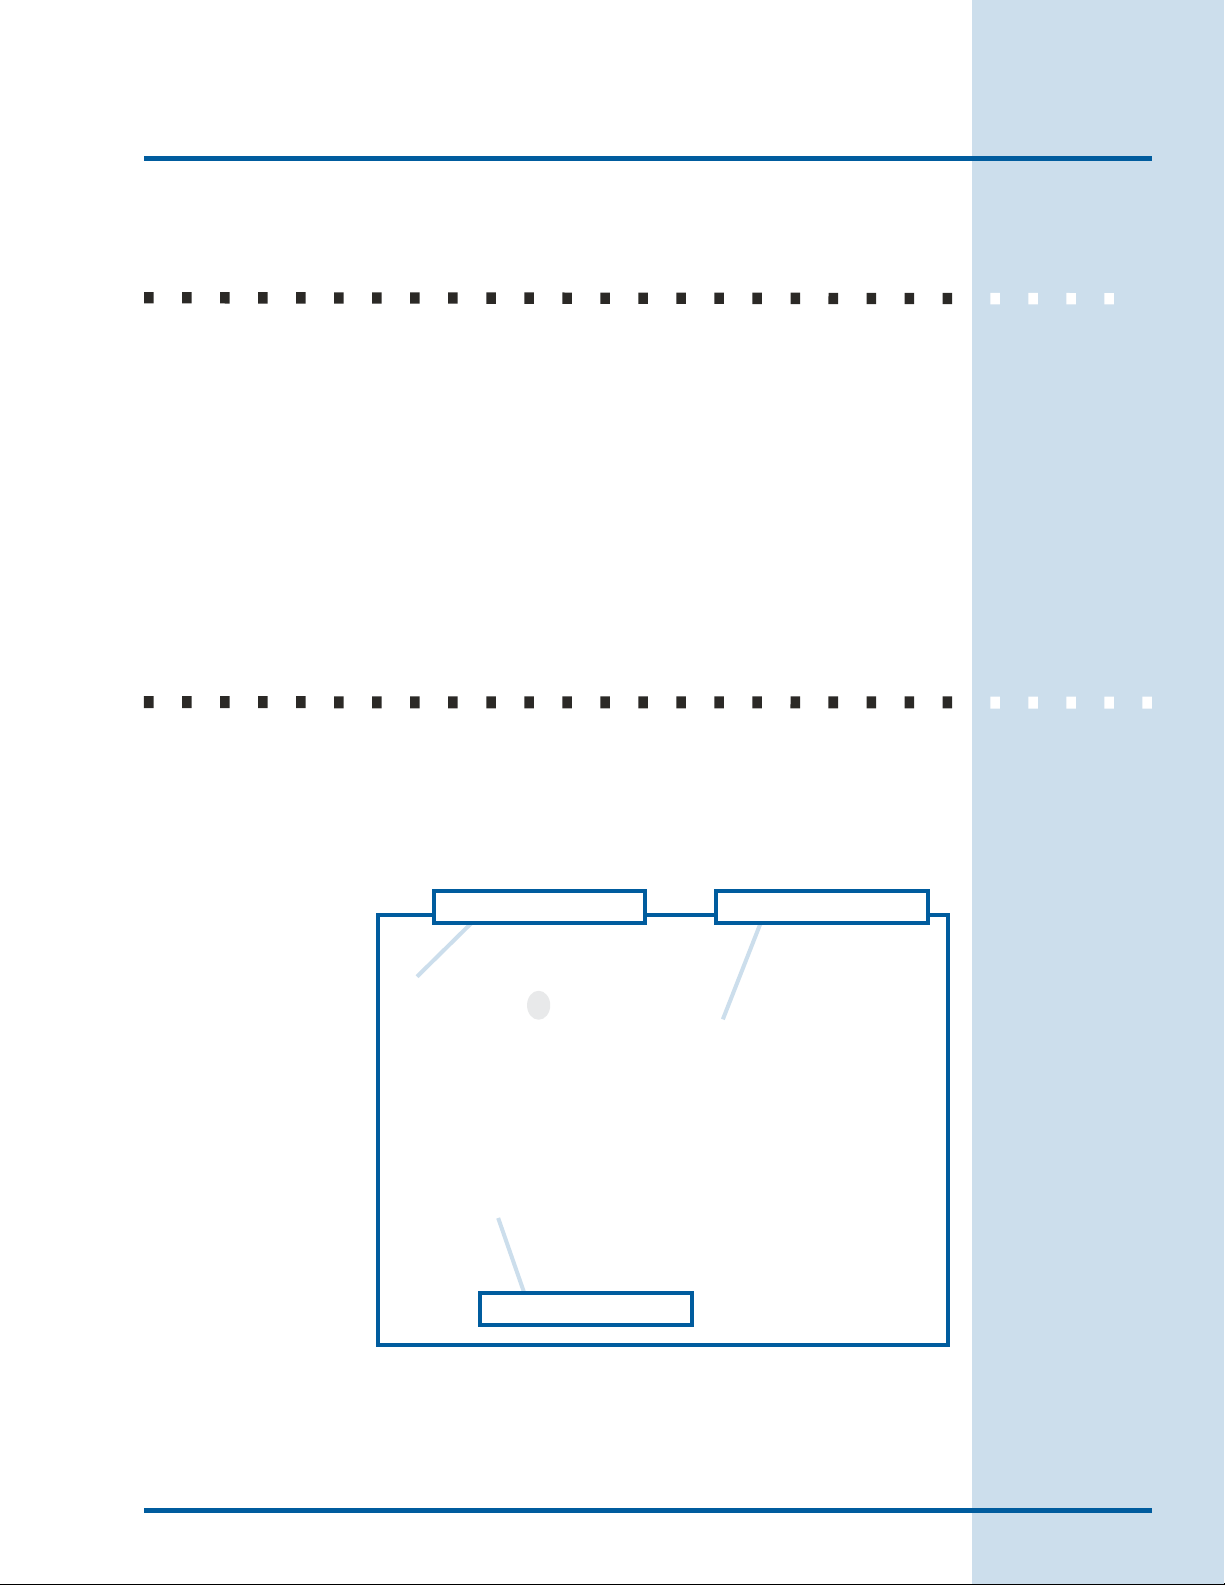
TABLE OF CONTENTS
Finding Information
3
Before You Begin ...................................................... 2
Finding Information ............................................... 3
Important Safety Instructions ...........4
Safety ........................................................................... 5
Preparing for Installation ...................................... 7
Planning the Location ...........................7
Installation ...............................................................10
Before You Start .................................. 10
Tools Needed for Installation ...........11
Plumbing Installation .......................... 12
Installing the Cabinet Glides ............ 14
Installing the Unit in the Cabinet .. 16
Coffee Maker Removal ...................... 16
Connecting the Plumbing ................. 17
Verifying Operation ............................18
IF YOUR UNIT REQUIRES SERVICE...
IMPORTANT: If the unit requires service, be sure to have
the model and serial number available when you call. The
model and serial number are on the data plate located
inside the brewing unit door. See the use and care guide for
instructions on how to open the front panel and brewing unit
doors.
Front Panel Door
Serial Number Plate
Brewing Unit Door
Page 4

4
Safety
IMPORTANT SAFETY INSTRUCTIONS
Safety Precautions
Do not attempt to install or operate this appliance until you read the safety
precautions in this guide. Safety items throughout this guide are labeled with a
Warning or Caution based on the risk type.
Denitions
This symbol is the safety alert symbol. It is used to alert you to potential
personal injury hazards. Obey all safety messages that follow to avoid
possible injury or death.
WARNING
WARNING indicates a potentially hazardous situation which, if not avoided,
could result in death or serious injury.
CAUTION
CAUTION indicates a potentially hazardous situation which, if not avoided,
may result in minor or moderate injury.
CAUTION
CAUTION used without the safety alert symbol indicates a potentially
hazardous situation which, if not avoided, may result in property damage.
IMPORTANT
Indicates installation, operation or maintenance information which is
important but not hazard related.
WARNING
Electrolux cannot be held responsible for damage to property or injury to persons
caused by failure to comply with the installation, maintenance and safety instructions
contained in this handbook.
Page 5

Safety
WARNING
To reduce the risk of fire, electrical shock, or injury when using your coffee
maker, follow basic safety precautions including the following:
Read all instructions before operating the coffee maker.
IMPORTANT: Before performing any type of service or installation, make sure
that electric power to the coffee maker is disconnected.
IMPORTANT: To avoid the possibility of explosion or fire, do not store or use
combustible, flammable, or explosive liquids or vapors (such as gasoline) inside
or in the vicinity of this or any other appliance.
IMPORTANT: This appliance is equipped with
a three-prong grounding plug for protection
against possible electric shock hazards. Plug
it only into a dedicated, grounded electrical
outlet. When only a standard two-prong
electrical outlet is available, the customer
must have it replaced with a dedicated,
properly grounded three-prong electrical outlet
before using this appliance. Do not under
any circumstances, cut or remove the third
(ground) prong from the power cord. Do not
use an adapter plug. Do not use an extension
cord. Do not use a power cord that is frayed or damaged. The use of a ground
fault interrupter (GFI) is not recommended.
Do not install or use a damaged appliance. If you receive a damaged
•
appliance, immediately contact your dealer or builder.
Do not use the coffee maker until it has been properly installed by a
•
qualified installer according to these installation instructions. The installer
must show the customer the location of the power plug so that they know
where and how to disconnect power to the coffee maker.
Do not install, repair, or replace any part of the coffee maker unless
•
specifically recommended in the literature accompanying it. A qualified
service technician should perform all other service.
Keep packaging materials away from children. Plastic sheets and bags can
•
cause suffocation.
5
Save These Instructions for Future Reference.
Page 6
6
Safety
General Safety Precautions (continued)
WARNING
•
Do not tamper with the controls.
•
Clean the coffee maker thoroughly according to the Flushing Out the
Coffee Maker section in the use and care guide before operating it for the
first time.
•
When installing or cleaning the mechanical parts of the coffee maker,
exercise care with hands and arms around the metal edges.
•
Many metal surfaces behind the front panel and inside the brewing
compartment are hot when power is on. Exercise care around metal
surfaces in these areas when the power switch is in the on position.
•
During normal operation, the person using the coffee maker must pull it out
from the cabinet to fill the coffee bins, etc. To prevent personal injury, when
pushing the coffee maker back into the cabinet, make sure body parts and
clothing are clear of the portion of the coffee maker behind the front panel.
•
To prevent an electrical shock hazard due to steam and water leakage, do
not install this appliance above or below any other appliance.
CAUTION
•
To prevent jamming of the grinding mechanism, use only the types of coffee
beans specified in these instructions.
•
Remove the drip tray before closing the front panel door. Closing the front
panel door without the drip tray removed could damage parts of the coffee
maker.
•
Keep the coffee maker keys in a safe place. Replacement keys are not
covered by the warranty.
•
To prevent property damage, the back of the cabinet must be ventilated.
See the location planning section.
•
Clean and flush the coffee maker according the the Routine Cleaning
Instructions in the use and care guide before using this appliance.
Page 7

Preparing for Installation
17 7/8”
(454mm)
1” (26mm)
Screw 8 places
(provided)
3/4” (19mm)
Level Support Platform
24”
(610mm)
Steam Barrier
(provided)
Optimal Water
and Electrical
Supply Location
20 3/4”
(527mm)
1/8”
(3mm)
22 3/16”
(564mm)
1” Min.
(26mm)
1” Min. (26mm)
3/4” (19mm)
Min. Side Walls
22 1/8” - 22 3/8”
(562mm - 568mm)
4” X 12”
(100mm - 300mm)
Ventilation Cut-Out
in Cabinet Back
8””
(203mm)
3/4” (19mm)
Min. Side Walls
PLANNING THE LOCATION
7
IMPORTANT:
•
All statutory regulations, local and regional codes and local power supply
company connection specifications must be strictly observed.
•
The supplied power cord is 60” (152.4cm) long, terminated by a three-prong
plug. It is located in the lower right rear corner on the back of the unit. It must
be plugged directly into a dedicated, wall-mounted electrical receptacle.
•
•
The electrical outlet (and water shut off valve for model E24CM76GSS)
should be located in an adjacent cabinet. Both must be accessible when the
unit is installed.
The coffee maker(E24CM76GSS) is supplied with a flexible water hose for
connection to a 1/4” threaded water line connection. See page 12 for further
information on planning the water line connection.
•
The coffee maker must be installed at a safe distance from other sources
of heat, such as home appliances, in order to avoid an excessive rise in
temperature.
•
For ventilation purposes, there must be a slot near the top of the cabinet
back. The minimum dimensions are 4” X 12” (10.0 X 30.0cm).
Page 8

8
Install unit low enough
for easy access to
coffee bins on top
Coffee maker pulled
out from cabinet
Overhanging
cabinet
Veritical distance
to overhang
Preparing for Installation
IMPORTANT:
•
DO NOT install the coffee maker in an unrestrained, free-standing cabinet.
•
During normal operation, the user must have access to the top of the unit.
The user needs to be able to pour coffee into the coffee bins on top and,
on model E24CM75GSS, be able to remove the water tank for filling and
cleaning. Install the coffee maker low enough so that the user can reach the
top of the unit easily when it is slid out of the cabinet.
•
When installing the coffee maker under overhanging cabinets, allow sufficient
room for access to the coffee bins (and on some models, the water tank) on
top. See the table below.
•
Do not install any appliance above or below the the coffee maker.
Model
E24CM75GSS 14” (Minimum)
E24CM76GSS
Vertical distance
to overhang
6” (Minimum)
12” (Recommended)
Page 9

DIMENSIONS
18 3/16”
(46.2cm)
22 1/16 (56.0cm)
17 9/16”
(44.5cm)
21 9/16”
(54.8cm)
13/16”
(2.0cm)
23 1/2”
(59.6cm)
18 3/16”
(44.0cm)
Preparing for Installation
9
All tolerances: + 1/16”, - 0”
unless otherwise stated.
TECHNICAL SPECIFICATIONS
Power Requirements 120 Vac, 60Hz, 20A grounded,
dedicated circuit required
Total Connected Load 1.8kW (15A)
Power Cord Length 60 inches
Unit Weight 110 lbs.
Shipping Weight 139 lbs.
Fresh Water Capacity
(Model E24CM75GSS)
Minimum Input Water Pressure
(Model E24CM76GSS)
Maximum Input Water Pressure
(Model E24CM76GSS)
Water inlet diameter
(Model E24CM76GSS)
5 Liters/1.3 Gallons
1.40 Bar (20 psi)
2.75 Bar (40 psi)
3/4”
The correct voltage, frequency and amperage must be supplied to the electrical
outlet from a grounded, dedicated, single phase circuit that is protected by a
properly sized circuit breaker or time-delay fuse. If one is not installed, call a
licensed electrician.
Page 10

10
Installation
BEFORE YOU START
Remove the coffee maker from the packaging and inspect it for damage. Do not
install a damaged maker. To prevent damage to the control panel door, do not set
the appliance on the floor or counter prior to installation.
Check to make sure all parts are included.
PARTS LIST
•
Steam barrier with mounting screws
•
2 guide assemblies with mounting screws
•
6” metal shims, 1/16” (1mm)
•
Three foot 1/4” to 3/4” flexible water supply hose(E24CM76GSS)
•
Use & care guide
•
Detergent tablets (sample)
•
Spare tank O-ring (model E24CM75GSS)
•
Spare piston assembly O-ring
•
Allen wrench (for grinder adjustment)
•
Anti-liming powder (sample)
•
Measuring cup for ground coffee
•
Cleaning brush
•
Keys (taped to the right side of the unit)
Page 11

Installation
Steam Barrier
(provided)
TOOLS NEEDED FOR INSTALLATION
Phillips screwdriver
•
Measuring tape
•
Level
•
Drill with 1/16” drill bit
•
STEAM BARRIER INSTALLATION
Position the steam barrier inside the top of the cut-out. Push it towards the
•
back wall until the back edge lines up with the back of the cabinet.
Attach it with the eight (8) provided screws.
•
11
Page 12

12
Installation
PLUMBING INSTALLATION
CAUTION
To prevent damage to the coee maker due to hard water, prior to
installation check the water hardness for the building where you will be
installing the coee maker. If necessary have a qualied water treatment
specialist install a water treatment system. The water treatment system
must be installed between the house plumbing and the coee maker.
Determine Water Hardness
Before installing the coffee maker, determine the water hardness. Call the local
water company. Ask them for the water hardness level of the water supplied to the
building where the coffee maker will be installed.
For Model E24CM75GSS (Tank Model):
If the water hardness level is above four grains per gallon (4 gpg) you must
•
use filtered water with a hardness of 4 gpg or less. Do not use distilled water.
If the water hardness level is below 4 gpg, you may use tap water in the
•
coffee system. Filtered water is recommended for better taste.
For Model E24CM76GSS (Plumbed Model):
If the water hardness is above 4 grains per gallon (4gpg) contact a qualified
•
water treatment specialist. Have a water treatment system installed that
lowers the water hardness level to 4 gpg or less.
Regardless of the type of water treatment system installed, ELECTROLUX
•
HIGHLY RECOMMENDS you install an Electrolux ACCFILT-24 filter system.
The coffee maker requires periodic decalcification that must be performed
regardless of the water hardness level. The filter head in the kit is required to
perform this process for model E24CM76GSS. Decalcification will be MUCH
SIMPLER with the Electrolux ACCFILT-24 filter system already installed. In
addition, the filter will improve water taste.
Electrolux does not recommend installation of a reverse osmosis filtration
•
system. Reverse osmosis systems can cause low water pressure. When the
water pressure is low, the coffee water volume level) can fluctuate and the
water pump may make a “hammering” sound.
Page 13

Installation
To house water supply To coee maker
Filter head
13
Electrolux ACCFILT-24 Filter Kit
with Filter Installed
Everpure Filter
Cartridge
Page 14

14
Installation
INSTALLING THE CABINET GLIDES
The cabinet glides mount to the inside of the cabinet. The glides on the
coffee maker slide into the cabinet glides. The guide system allows the
coffee maker to slide in and out of the cabinet for loading the coffee bins
and for maintenance.
To install the cabinet glides:
Determine the number of metal shims required to mount the cabinet glide
•
assemblies according to the chart and diagrams below. The appliance
is supplied with six
1/16” (1mm) metal
shims. Use the shims
to position the fixing
angles so that they are
properly spaced. The
appliance will not slide
in and out of the cabinet
properly if the fixing angles are not properly spaced.
Cutout Width Number of Shims
22 1/8” (56.2cm) 0
22 3/16” (56.4cm)
22 1/4” (56.6cm) 4 Total (2 on each side)
22 3/8” (56.8cm) 6 Total (3 on each side)
2 Total (1 on each side)
4” X 12” (100mm X 300mm) Min.
Cabinet Back Cutout for
Air Circulation
3/4” (19mm)
Min. Side Walls
22 1/8” (562mm) Min.
Fixing Angle
Cabinet
Glide
Cabinet
Glide
Asssembly
Shim
Side Wall
Cabinet Base
Page 15

•
Cabinet Front
Cabinet Rear
4” (100mm)
Cabinet Back Cutout for
Air Circulation
3 1/2”
(8.9cm)
18”
(45.7cm)
3 9/16”
(9.0cm)
Put the two (2) cabinet
glide assemblies, and
shims if necessary, as
shown on the inside
surfaces of the cabinet.
Position them 3 1/2”
(9.0cm) from the front
edge of the cutout
opening.
•
Insert the screws in
the holes of the glides
without tightening them
completely.
Installation
15
•
Make sure the outside
distance between the
fixing angles is 22 1/8”
(56.2cm) and that the
glides are level. Change
the number of shims or
adjust the fixing angles
as necessary.
IMPORTANT: Make sure that the glides are level.
•
Tighten all of the screws.
•
Make sure that the power cord and water feed line can be fed freely through
the back wall.
•
In order to avoid overheating the coffee maker, make an opening of at least 3
15/16” (10.0cm) at the back of the cabinet to allow air to circulate.
Page 16

16
Locking Tab
Installation
INSTALLING THE UNIT IN THE CABINET
While supporting the coffee maker from below, insert it into the cabinet
•
cutout. As you insert it into the cabinet, line up the glides on the appliance
with the cabinet glides. The appliance should glide on the rails when slight
pressure is applied to the front of the coffee maker. If it does not glide
smoothly, check the distance between the glides again.
As you slide the coffee maker into the cabinet the locking tab on the glides
•
will engage.
COFFEE MAKER REMOVAL
If you need to remove the unit from the cabinet:
Disconnect the power plug from the power receptacle.
•
Press the respective locking tabs on the glides and remove the appliance,
•
supporting it from below.
Page 17

Installation
CONNECTING THE PLUMBING E24CM76GSS
WARNING
To prevent damage to the coffee system due to hard water, prior to
•
installation, check the water hardness for the building where you will
be installing the coffee maker. See page 12
To avoid leaks, do not overtighten fittings.
•
•
Insert the 3/4” gasket into the 3/4” fitting on the water supply hose. Make sure
it is properly seated.
•
Connect the 3/4” end of the hose to the water inlet on the back of the coffee
maker.
17
•
Insert the 1/4” gasket into the 1/4” fitting on the water supply hose. Make sure
it is properly seated.
•
Connect the other end (1/4”) of the hose to the water supply.
Back of Coee
Maker
Water Inlet
Power Cord
Gasket
Water Supply
Hose
Page 18

18
Steamer
Water
Hot
Cappuccino
Installation
VERIFYING OPERATION
WARNING
Read the use and care guide completely before operation.
•
To keep the grinder from jamming, pour only roasted, unflavored
•
coffee beans into the coffee bean container.
•
Plug the coffee maker into the dedicated, properly grounded, 3-prong power
receptacle.
•
Test the lights by turning the light switch on and off. It is located on the
brewing compartment ceiling, on the far right.
•
Turn on the power switch. It is located near the middle of the brewing
compartment ceiling.
•
On model E24CM76GSS (plumbed model): Turn on the water supply at the
shut-off valve. Check the water lines for leaks.
•
On model E24CM75GSS (tank model): Fill the tank with filtered water (4 gpg
maximum water hardness, do not use distilled water).
•
Push the Hot Water button. Wait about six (6) seconds.
•
Continue to push the hot water button every six (6) seconds until
air bubbles no longer come out of the dispenser and about six (6)
ounces of water is dispensed.
•
Clean the coffee system according to the Routine Cleaning and
Flushing Out the Coffee Maker sections in the use and care guide. On
model E24CM75GSS, clean the water tank.
•
Put a sauce pan under the drink dispenser.
•
Make one of each type of drink in the Operation Instructions section of the
use and care guide.
If the coee maker does not operate properly, follow these
troubleshooting steps:
1.
Verify that power and water are being supplied to the coffee maker. On
model E24CM75GSS, make sure the water tank is full.
2.
Make sure that the coffee bins have been properly filled according to the use
and care guide.
3.
Check the regulator to make sure it is properly adjusted. Air in the system
during initial operation can cause the initial adjustment to be incorrect.
Page 19

Installation
Troubleshooting (Continued)
4.
Check the Solutions to Common Problems section of the use and care
guide.
5.
Repeat the verification process.
6.
If the appliance still does not work, contact an authorized Electrolux at the
phone number inside the front cover.
INSTALLATION CHECKLIST
WARNING
To ensure a safe and proper installation, the following checklist
•
should be completed by the installer to ensure that no part of the
installation has been overlooked.
Proper installation is the responsibility of the customer. The
•
importance of proper installation of your coffee maker cannot be
overemphasized.
19
□
Is the coffee maker connected to, or using only soft water (4 gpg maximum
hardness)? See page 12.
□
Has the coffee maker been cleaned completely prior to use as specified in
the use and care guide. See the use and care guide.
□
Is the coffee maker connected to a dedicated, grounded power receptacle?
See page 9.
□
Is there a vent hole in the back of the cabinet to allow heat to escape. See
page 7.
□
Is the steam barrier installed. See Page 11.
□
Are the cabinet glides properly adjusted. See page 15.
□
Is the coffee maker locked into the locking tabs on the glides? See page 16.
□
On E24CM76GSS: Have the water lines been inspected for leaks?
□
Has the installer verified proper operation? See facing page.
Page 20

®
1-877-4Electrolux
www.electroluxusa.com
www.electroluxca.com
 Loading...