

Electrolux EI30GF55GSD, EI30GF55GWB, EI30GF55GWA, EI30GF55GSE, EI30GF55GSC Owner’s Manual
...
Use & Care Guide
30" Free-Standing Perfect Set Tm Gas Range
Finding Information
Table of contents Please read & save this guide
Findinginformation ..................................................... 2 ThankyouforchoosingElectroiux, thenewpremium
SAFETY ................................................................... 3-6 brandinhomeappliances. This Use&,CareGuideis
Features .................................................................. 7-9 partofourcommitmenttocustomersatisfactionand
eettingStarted ................................................... 10-12 productqualitythroughouttheservicelifeofyournew
• Aboutthegrdde 10 a liance
, ................................................... pp
. Power up, control display modes &timers ........... 11
Control lock& oven lights ................................... 12 Weviewyour purchaseasthe beginning of a
Settings for Best Results .................................... 13-14 relationship. To ensure our ability to continue serving
SurfaceCooking ....................................................... 15 you pleaseusethis pagetorecordimportant
SettingSurfaceControls .......................................... 16 productinformation.
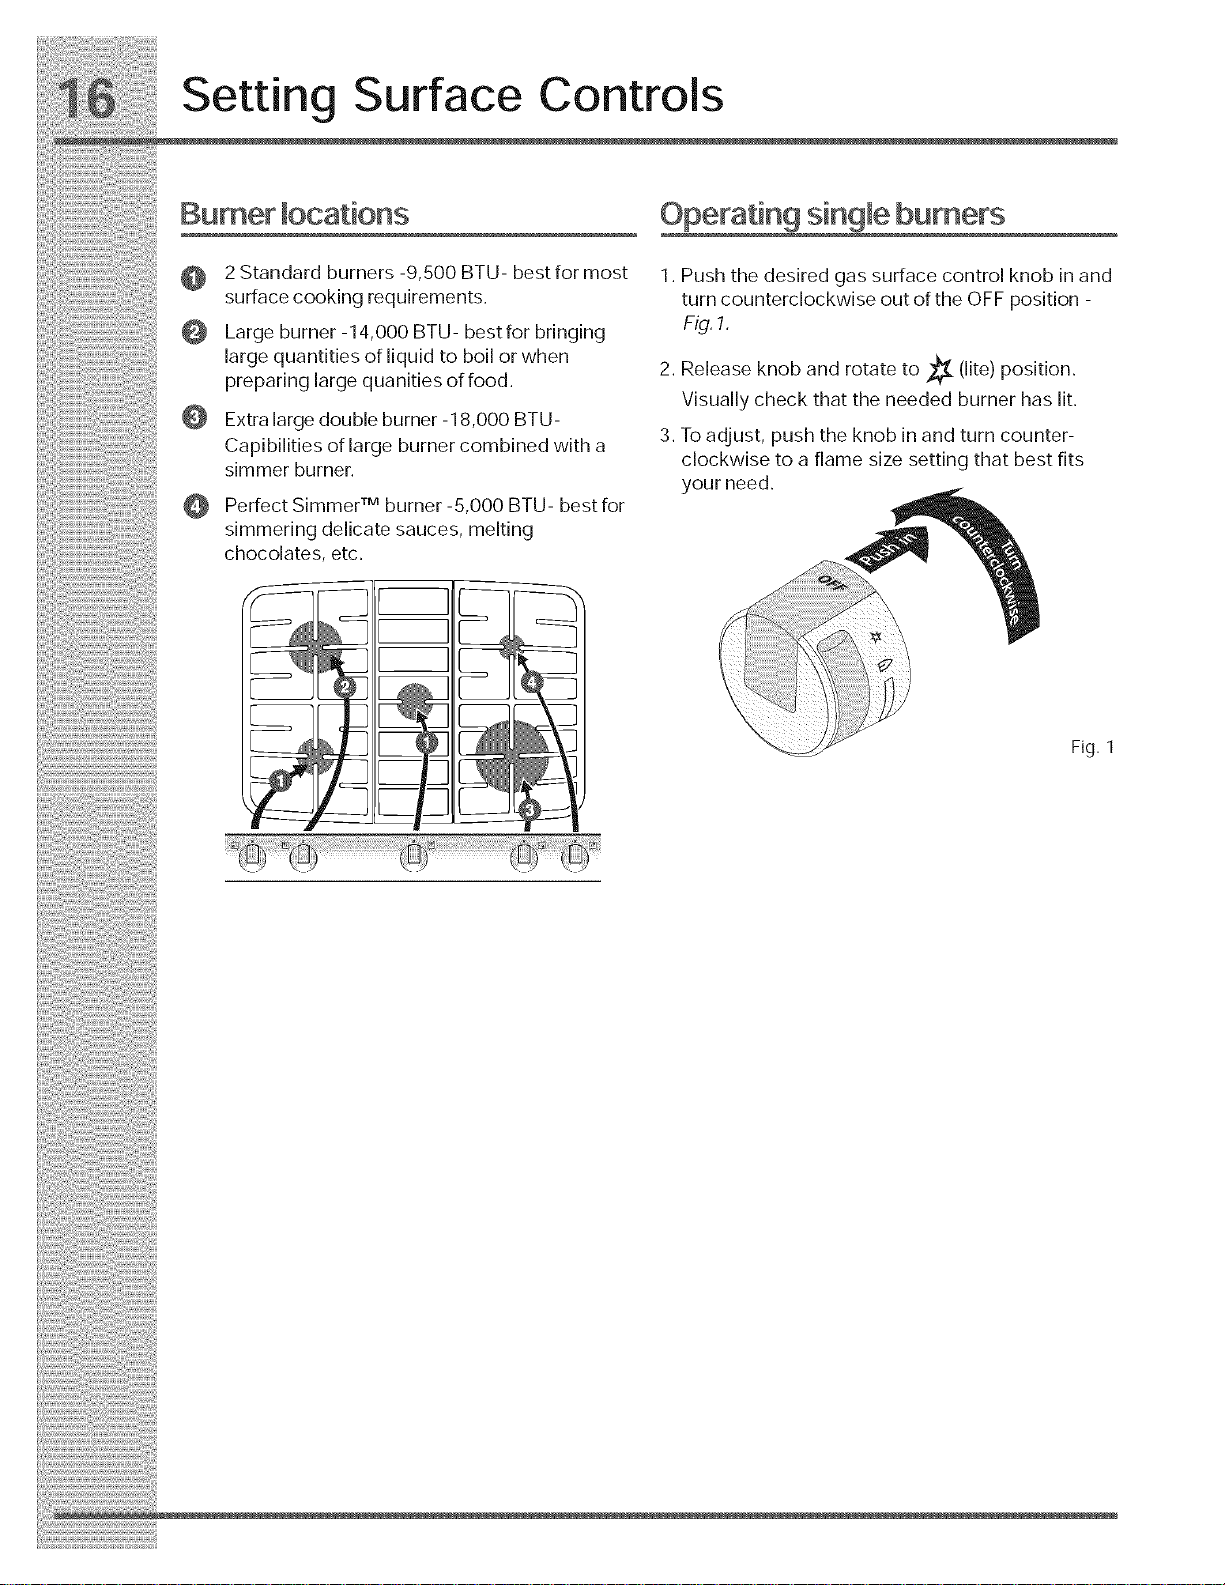
[ Burner locations .................................................. 16
Settngcooktopcontros 16 K_n _ r_r_ f_r n° i_k
• vv F _ v_ _ _ _U
Settmg Oven Controls ......................................... 17-33
Rap dpreheat......................................................17 reference
Bake .................................................................... 18
Usingcooktime .................................................. 19 __
Usingcooktimewithendtime ............................ 20 Purchasedate
Broil .............................................................. 21-22 ------
Convectionbake ................................................. 23
Usingconvectionconvert .................................... 24 _ .
........ convectionroast ........................................... 28-26
Keepwarm .......................................................... 27
Slow cook ........................................................... 28
Dehydrate ............................................................ 29 Electroluxserial number(see pictureforlocation)
Bread proof ......................................................... 30
Saving & recalling my favorite recipes .................. 31
Setting Sabbath mode ................................... 32-33
Setting Warmer Oven Controls .......................... 34-36
Keep warm ................................................... 34-36
Setting Your Preferences ................................... 37-42
Setting clock display (CLO) ................................. 37
Setting 12 or 24 hour mode (CLO) ....................... 38
Changing between F° or C ° (F-C) ........................ 38
Setting 12hr energy saving mode (ES) ................. 39
Setting audio mode (AUD) ................................... 39
Adjusting oven temperature (UPC) ...................... 40
Factory default reset (RST) ................................... 41
List of Abbreviations ........................................... 41
User preferences chart ......................................... 42
Self-Clean ........................................................... 43-44
Care &Cleaning .................................................. 45-51
Cleaning recommendations ........................... 48-46
Cleaning cooktop and parts ................................ 47
Oven door removal ........................................ 48-49
Changing oven lights .................................... 80-51
Solutions to Common Problems ......................... 52-54
Warranty ................................................................... 55
L ec_ro ux mode number
For toll-free telephone support in the U.S. and
Canada:
1-877-4ELECTROLUX (1-877-435-3287)
For online support and Internet production
information visit http://www.electroiuxusa,com
©2007 Electrolux Home Products, Inc.
All rights reserved. Printed in the USA
Important safety instructions
Recognize safety symbols, words and
labels
Safety items throughout this manual are labeled with
a WARNING or CAUTION based on the risk type as
described below:
This symbol alerts you to situations that may
cause serious body harm, death or property
damage.
This symbol alerts you to situations that may
cause bodily injury or property damage.
Read all of the following safety instructions
before using this appliance:
Safety
Save these instructions for future reference.

;i:;i!i!!il;ii!;iiii!i_;!iiil;iiiiiii_ii_iiiii:iiiiiii!i):!;il;iiiii!!iiiii{_i_ii_!:i;
Sa,ety
!mportant safety instructions
Removea,tapeandpackagingbeforeusing
the range, Destroy the carton and plastic bags
: after unpacking the range. Never allow children
to play with packaging material.
. _ ...... _we fai!_re _ _ fai ff
I_roper ns_a a_ on--i:_esureyourapp ances :,
: properly installed and grounded by a qua[,fled re J: i _ te
techn c an naccordancew ththeNat ona
Fuel Gas Code ANSI ZZZ3-latest edition, or in fu
Canada CAN/OGA B149.1 and CAN/GGA
B149.2, and the National Electrical Code .
ANSi/N FPA No.70-1atest edition, or in Canada Do not leave children alone--Children should
CSA Standard 022.1, Canadian Electrical not be [eft alone or unattended in the area
: Code, Part 1, and local code requirements, where appliance is in use. They should never
Install only per installation instructions provided be allowed to sit or stand on any part of the
in the literature package for this range. . appliance.
Ask your dealer to reco m mend a qua lified DO NOT TOUCH SU RFA CE BURN ERS,
techn c an and an author zed repa r serv ce AREAS NEARTHESE BURNERS, OVEN
Know how to disc onnect the power to thera nge BU RNERS OR INTER IORSURFAC ES O F THE
at the circuit breaker or fuse box in case of an OVEN, Both surface and oven burners may be
..... emergency, hot even though flames are not visible. Areas
• User servicing--Do not repair or replace any
part of the appliance unless specificaly
recommended in the manuMs. All other
servicing should be clone only by a qualified
technician. This may reduce the risk of personal
injury and damage to the range.
• Never modify or alter the construction of a
range by removing leveling legs, panels, wire
covers, anti-tip brackets/screws, or any other
part of the product.
• Air curtain or other overhead range hoods,
which operate by blowing adownward air
flow on to a range, shall not be used in
conjunction with gas ranges other than when
the hood and range have been designed,
tested and listed by an independent test
laboratory for use in combination with each
other.
• Storage inor on Appliance--Flammable
materials should not be stored in an oven,
warmer drawer, near surface burners or in the
storage drawer. This includes paper, plastic
and cloth items, such as cookbooks,
plasticware and towels, as well as flammable
liquids. Do not store explosives, such as aerosol
CARS,on or near the range.
• Remove the oven door from any unused
rant if it is to be stored or discarded.
near surface burners may become hot enough to
cause burns. During and after use, do not touch,
or let clothing or other flammable materials touch
these areas until they have had sufficient time to
cool. Among these areas are the cook top,
surfaces facing the cook top, the oven vent
openings and surfaces near these openings,
oven door and window.
Wear proper apparel--Loose-fitting or
hanging garments should never be worn
while using the appliance, Do not let clothing or
other flammable materials contact hot surfaces.
° Do not use water or flour on grease fires--
Smother the fire with a pan lid, or use baking
soda, a dry chemical or foam-type
extinguisher.
• When heating fat or grease, watch it closely.
Fat or grease may catch fire if allowed to
become too hot.
° Use only dry pothoiders - Moist or damp
pothoiders on hot surfaces may result in
burns from steam. Do not let potholders touch
hot heating elements. Do not use a towel or other
bulky cloth instead of a potholder.
° Do not heat unopened food containers -
Buildup of pressure may cause container to
burst and result in injury.
Important safety instructions
Safety
Important instuctions for using your
cooktop
• Know which knob controls each surface
burner. Place a pan of food on the burner before
turning it on, and turn the burner off before
removing the pan
• Always turn knob to the full LiTE position
when igniting top burners. Visually check that
burner has lit. Then adjust the flame so it does
not extend beyond the edge of the utensil.
• Utensil Handles Should Be Turned Inward and
Not Extend Over Adjacent Surface Burners--
To reduce the risk of burns, ignition of flammable
materials, and spillage due to unintentional
contact with the utensil, the handle of the utensil
should be positioned so that it is turned inward,
and does not extend over adjacent surface
burners.
• Never leave surface burners unattended at
high heat settings--Boilovers cause smoking
and greasy spillovers that may ignite, or a pan
that has boiled dry may melt.
• Protective Liners--Do not use aluminum foil to
line surface burner pans, or oven bottom, except
as suggested in this manual Improper
installation of these liners may result in risk of
electric shock, or fire.
Important instructions for using your
OVeR
• Use care when opening oven door or lower
oven drawer (if equipped)--Stand to the side of
the range when opening the door of a hot oven
Let hot air or steam escape before you remove
or replace food in the oven.
• Keep Oven Vent Ducts Unobstructed. The
oven vent is located below the backguard.
Touching the surfaces in this area when the oven
is operating may cause severe burns. Also, do
not place plastic or heat-sensitive items on or
near the oven vent. These items could melt or
ignite
• Placement of oven racks. Always place oven
racks in desired location while oven is cool. If
rack must be moved while oven is hot use
extreme caution Use potholders and grasp the
rack with both hands to reposition. Do not let
potholders contact the hot heating elements in
the oven. Remove all utensils from the rack
before moving
• Do not use the broiler pan without insert. The
broiler pan and insert allows dripping fat to drain
and be kept away from the high heat of the
broiler.
Do not cover the broiler insert with aluminum
foil. Exposed fat and grease could ignite.
Cold temperatures can damage the electronic
control When using the appliance for the first
time, or when the appliance has not been used
for an extended period of time, be certain the
unit has been in temperatures above 32°F (0°C)
for at least 3 hours before turning on the power
to the appliance.
• Glazed cooking utensils--Only certain types of
glass, glass/ceramic, ceramic, earthenware, or
other glazed utensils are suitable for cook top
service without breaking due to the sudden
change in temperature Check the
manufacturer's recommendations for cook top
use.
:Sa,ety
[mportantsafety[nstruct[ons
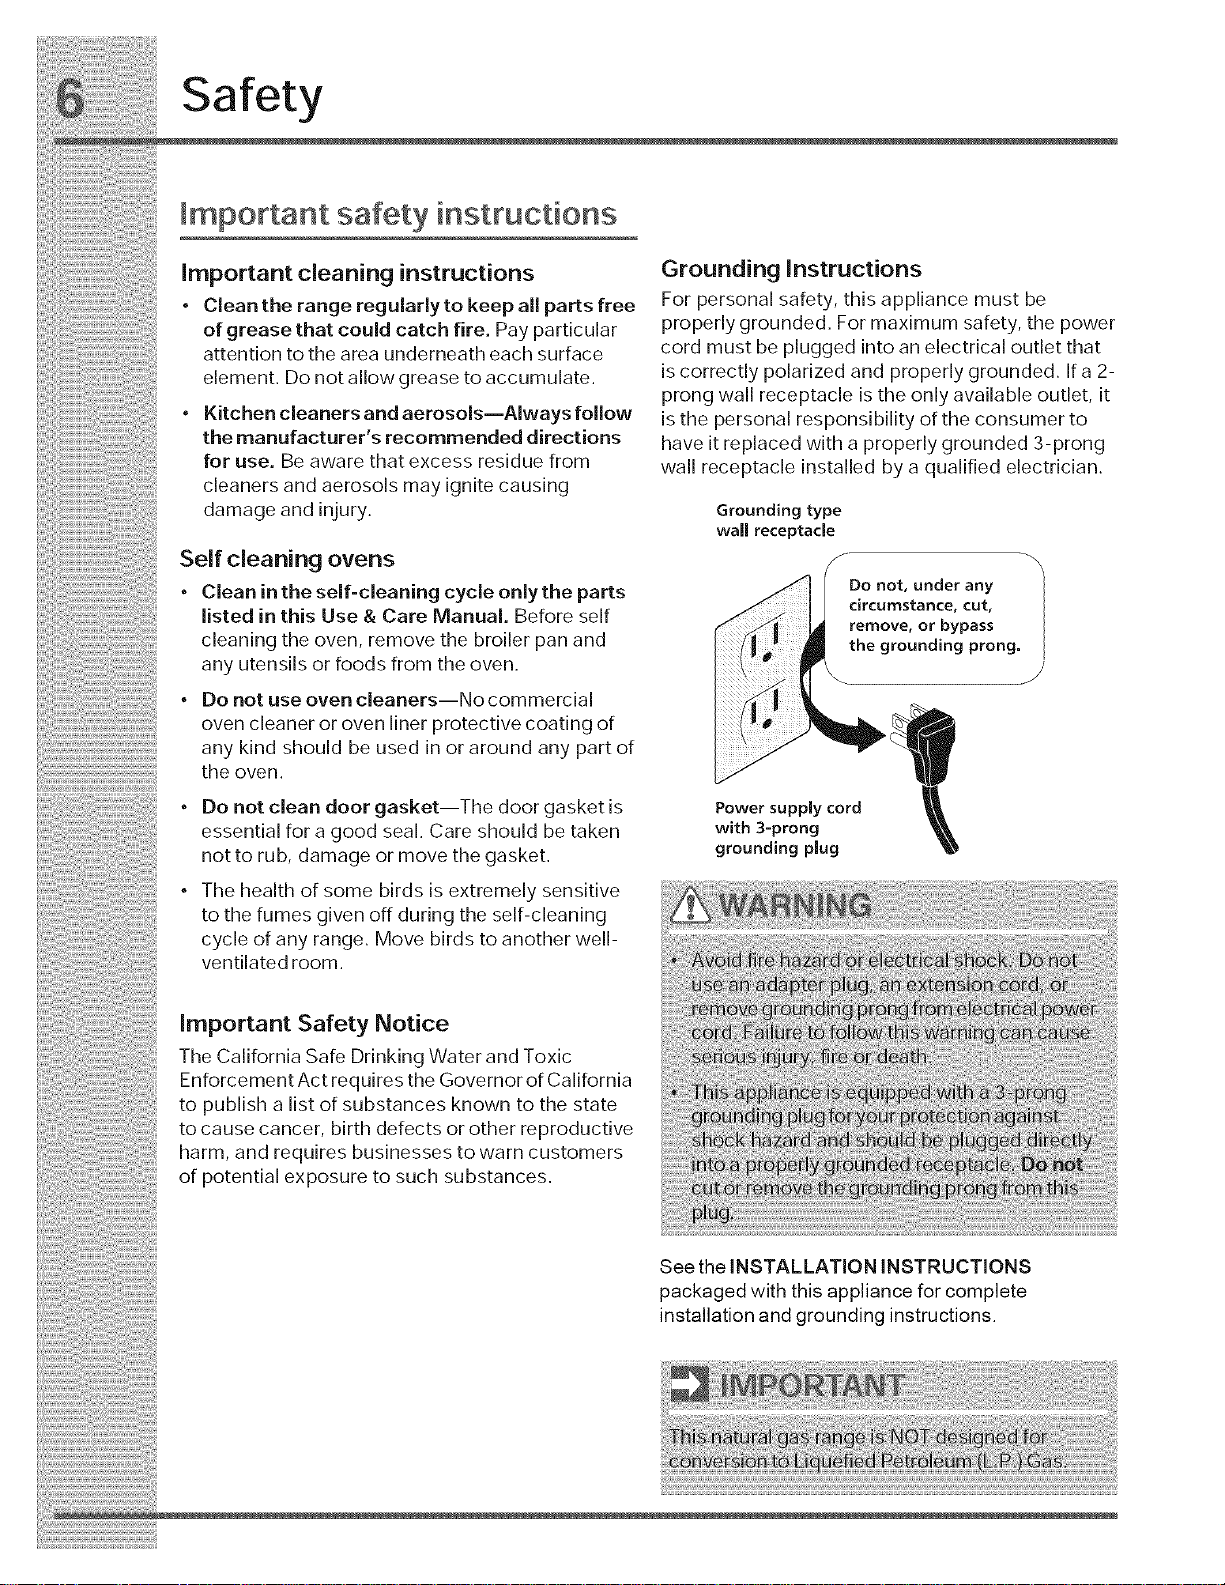
[ Importantcleaninginstructions Groundinglnstructions
• C[ean the range regu[ar[y to keep a[[ parts free For persona[ safety, this app[iance must be
ofgreasethatcou[dcatchfire. Payparticular proper[ygrounded. For.max[mumsafety, thepower
[ attentiontothearea underneatheach surface cord mustbe plugged mtoan electncal outletthat
element. Donotallowgreasetoaccumulate. iscorrectlypolarizedand properlygrounded, fa 2-
, prong wall receptacle is the only available outlet, it
Kitchencleanersandaerosols--Alwaysfollow isthe personal responsibilityoftheconsumerto
themanufacturersrecommendeddirections haveitreplacedwithaproperlygrounded3-prong
for use Be aware that excess residue from
cleaners and aerosols may ignite causing
damageandinjury. Groundingtype
Selfcleaningovens --\
. Do not under any
C ean nthese f-c ean ngcyc eon ytheparts
I,sted ,nthls Use & Care Manual. Before self remove or bypass
cleaningtheoven, removethe broilerpanand thegrounding prong.
. wall receptacle installed bya qualified electrician.
wall receptacle
c rcumstance cut,
• any utensilsorfoodsfrom theoven.
Donotuseovencleaners--Nocommercial
ovencleanerorovenlinerprotectivecoatingof
..... anykindshould beusedinoraroundanypartof
theoven.
• Do not clean door gasket--The door gasket is
essential for a good seal. Care should be taken
notto rub, damage or move the gasket.
• The health of some birds is extremely sensitive
to the fumes given off during the self-cleaning
cycle of any range. Move birds to another well-
ventilated room.
Important Safety Notice
The California Safe Drinking Water and Toxic
Enforcement Act requires the Governor of California
to publish a list of substances known to the state
to cause cancer, birth defects or other reproductive
harm, and requires businesses to warn customers
of potential exposure to such substances.
Power supply cord
with 3-prong
grounding plug
See the INSTALLATION INSTRUCTIONS
packaged with this appliance for complete
installation and grounding instructions.
Features
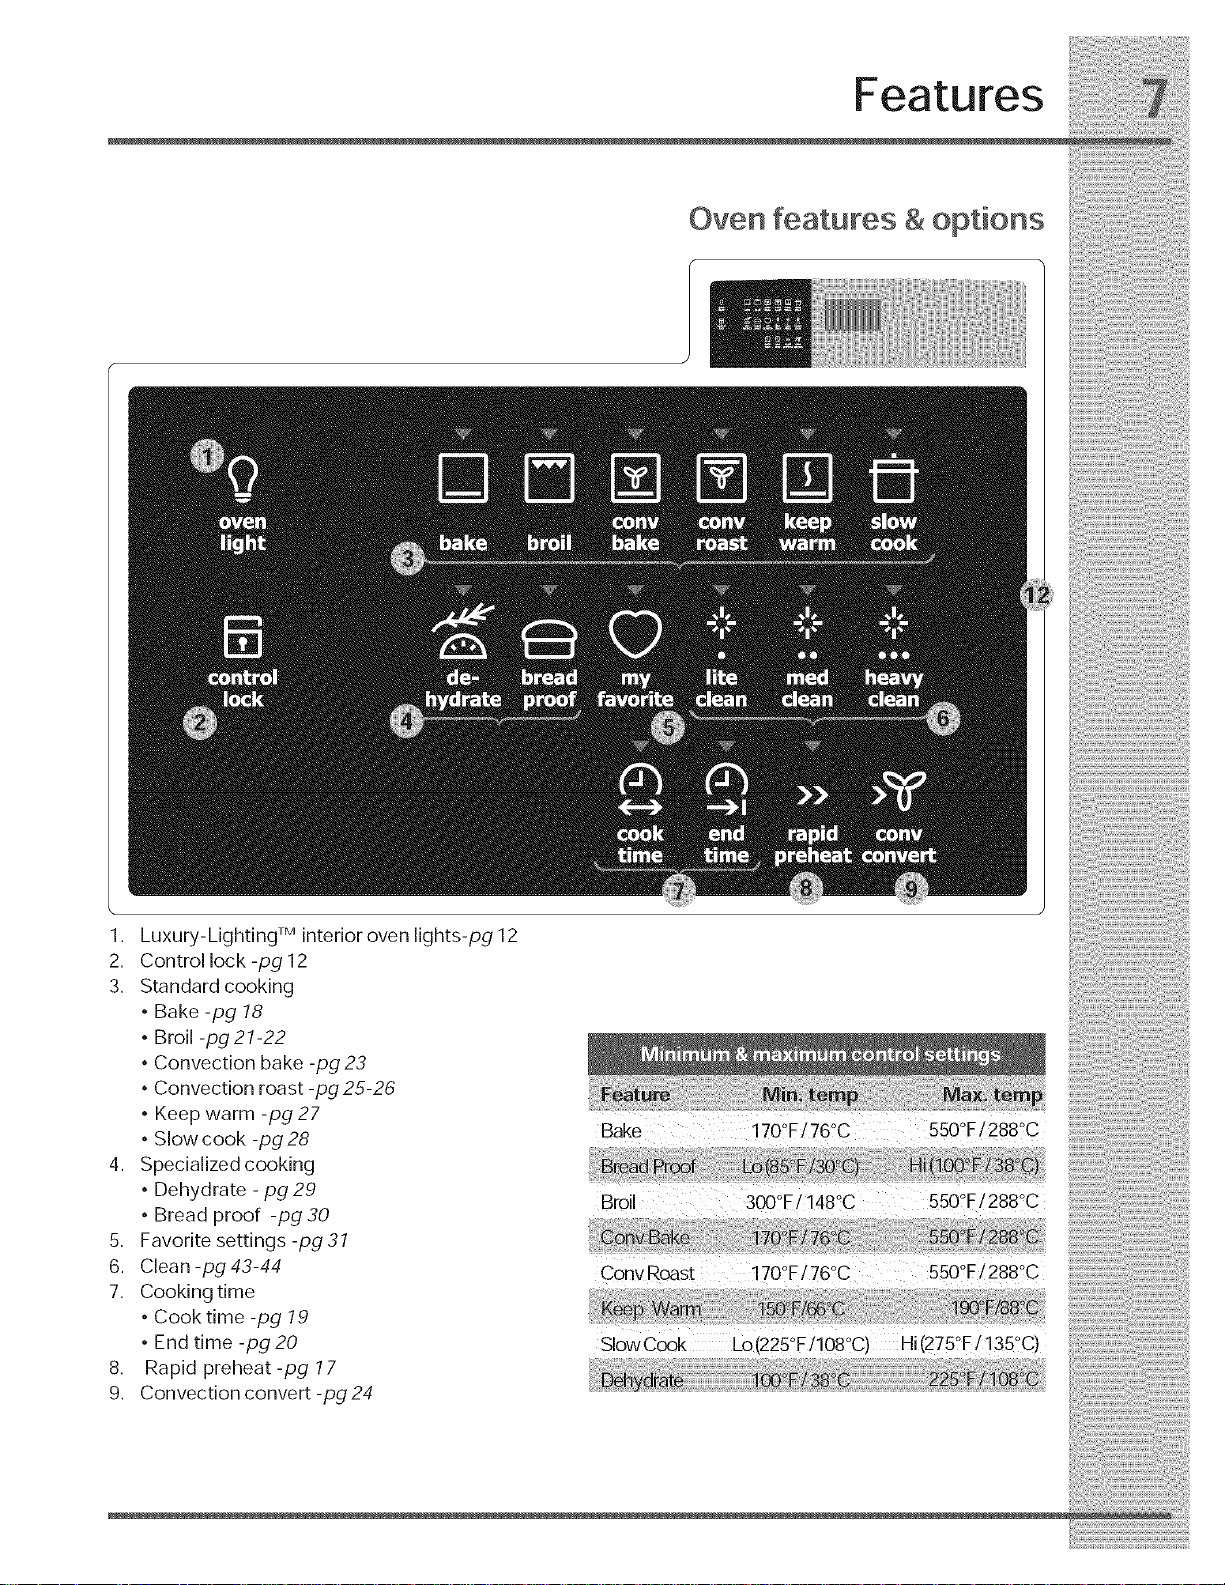
Oven features & options
1. Luxury-Lighting TM interior oven lights-pg 12
2. Controllock-pg12
3. Standard cooking
• Bake -pg 18
• Broil -pg 21-22
• Convection bake -pg 23
• Convection roast -pg 25-26
• Keep warm -pg 27
• Slow cook -pg 28
4. Specialized cooking
• Dehydrate -pg 29
• Bread proof -pg 30
5. Favorite settings -pg 31
6. Clean -pg 43-44
7. Cooking time
• Cook time -pg 19
• End time -pg 20
8. Rapid preheat-pg 17
9. Convection convert -pg 24
Bake i70_F/760C 5500F/288°C
B_il 300°E/148°C
ConyRoast 170°F/76°C
SowCook Lo(225QFi108°C) Hi(275°Fi 135°C)
!_!i!i!j;iiiii!iiiii,!!i!i!i_i!:!iiii!ii!_!_i_!_!iii!ii_i_i!ili_i¸ii!i!,iiii!ili!i;iii!_!iiiii!_iii_!iiil;!_ii_ii!iiiiii!!_iii!i¸iii!iiiiiii_ii_ii!i!i
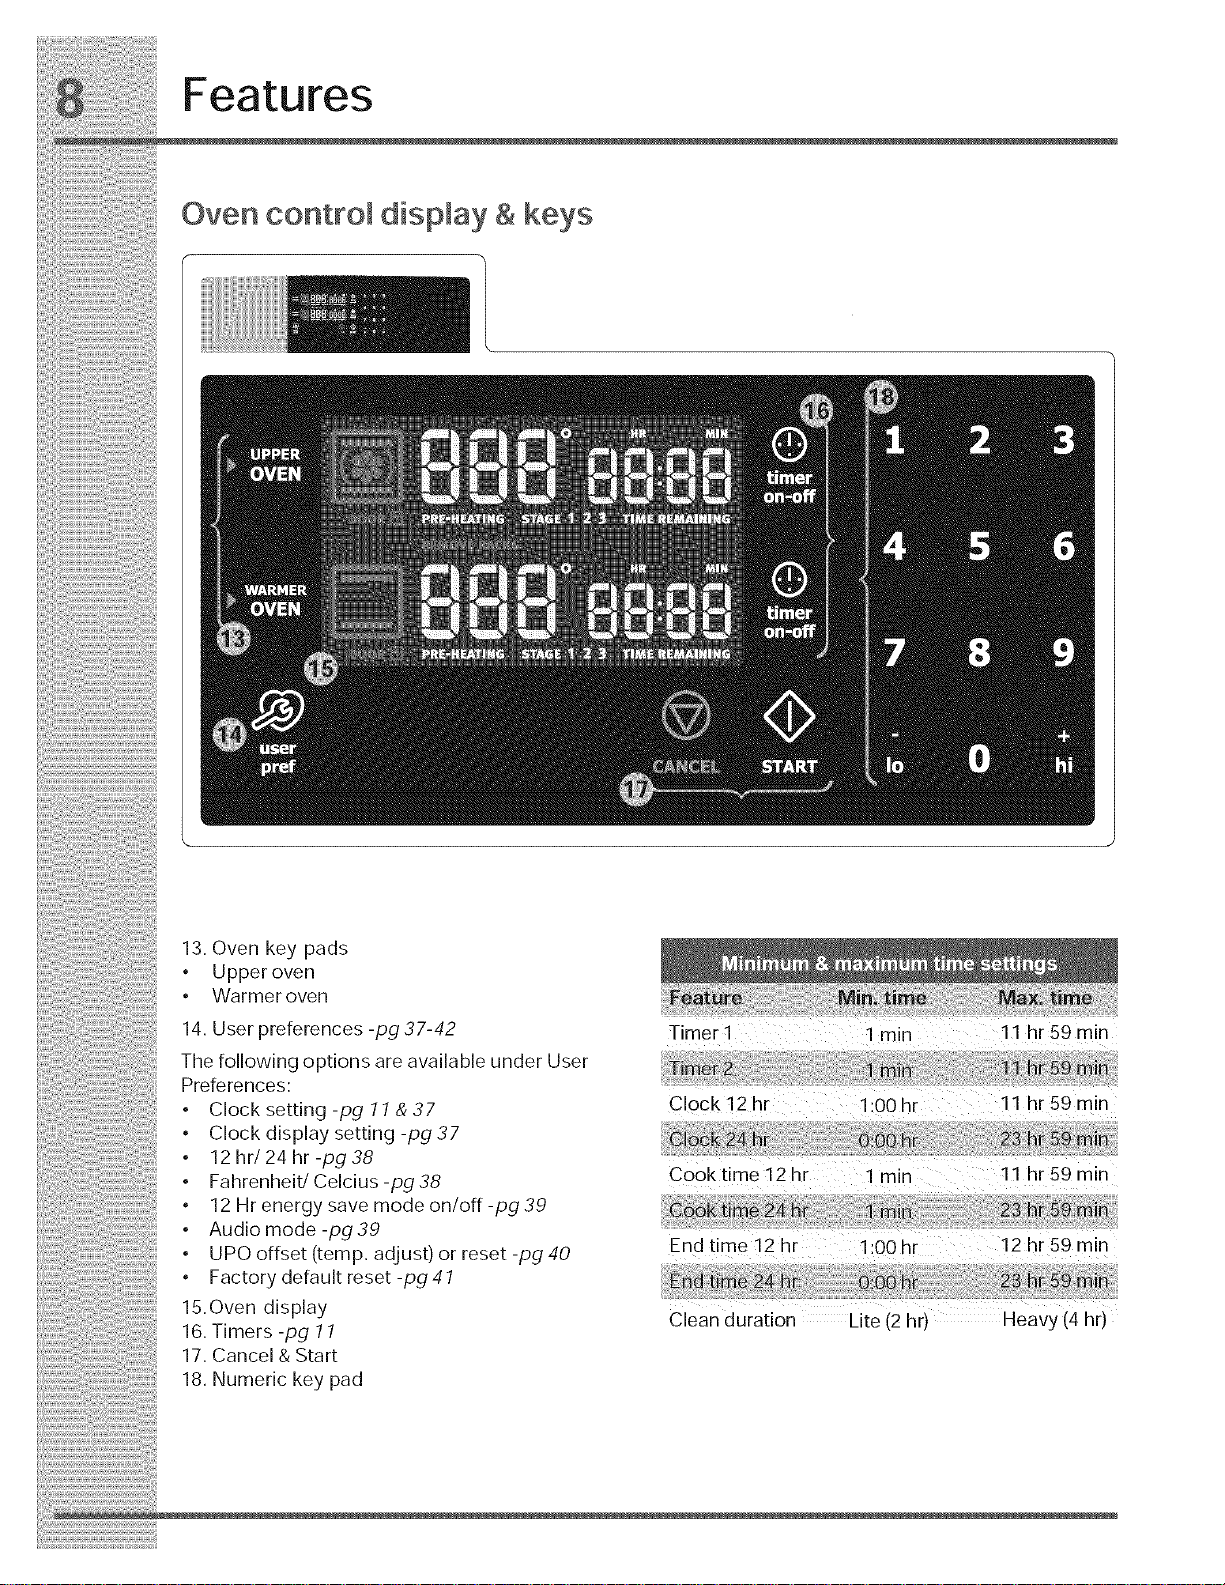
Features
Oven control display & keys
13.Oven key pads
• Upperoven
Warmer oven
14. User preferences -pg 37-42 Timer 1 lmin 11 hrSgmin
The fo ow ng opt ons are ava abe under User
Preferences: :
• Clocksetting-pgll&37 Clock 12 hr 1:00 hr !1 h[59 min
• Cockds a settn - 37
• 12hr/24hr-pq38
• Fahrenheit/ C_cius-pg 38 C00ktime!2hr ! min 1! hr59min
• 12 Mrenergy save mode on/off-pg 39
• Audio mode -pg39
, Endtme 12 hr 1 00hr 12hr59mn
, UPOoffset(temp. adjust)orreset-pg40
Factory defauIt reset -pg 41
Ovendspoy
_ .... Clean duration L te (2 hr) Heav "4hr'y[
lb. Hmers-pg ii
17. Cancel & Start
18. Numeric key pad
P Y g Pg
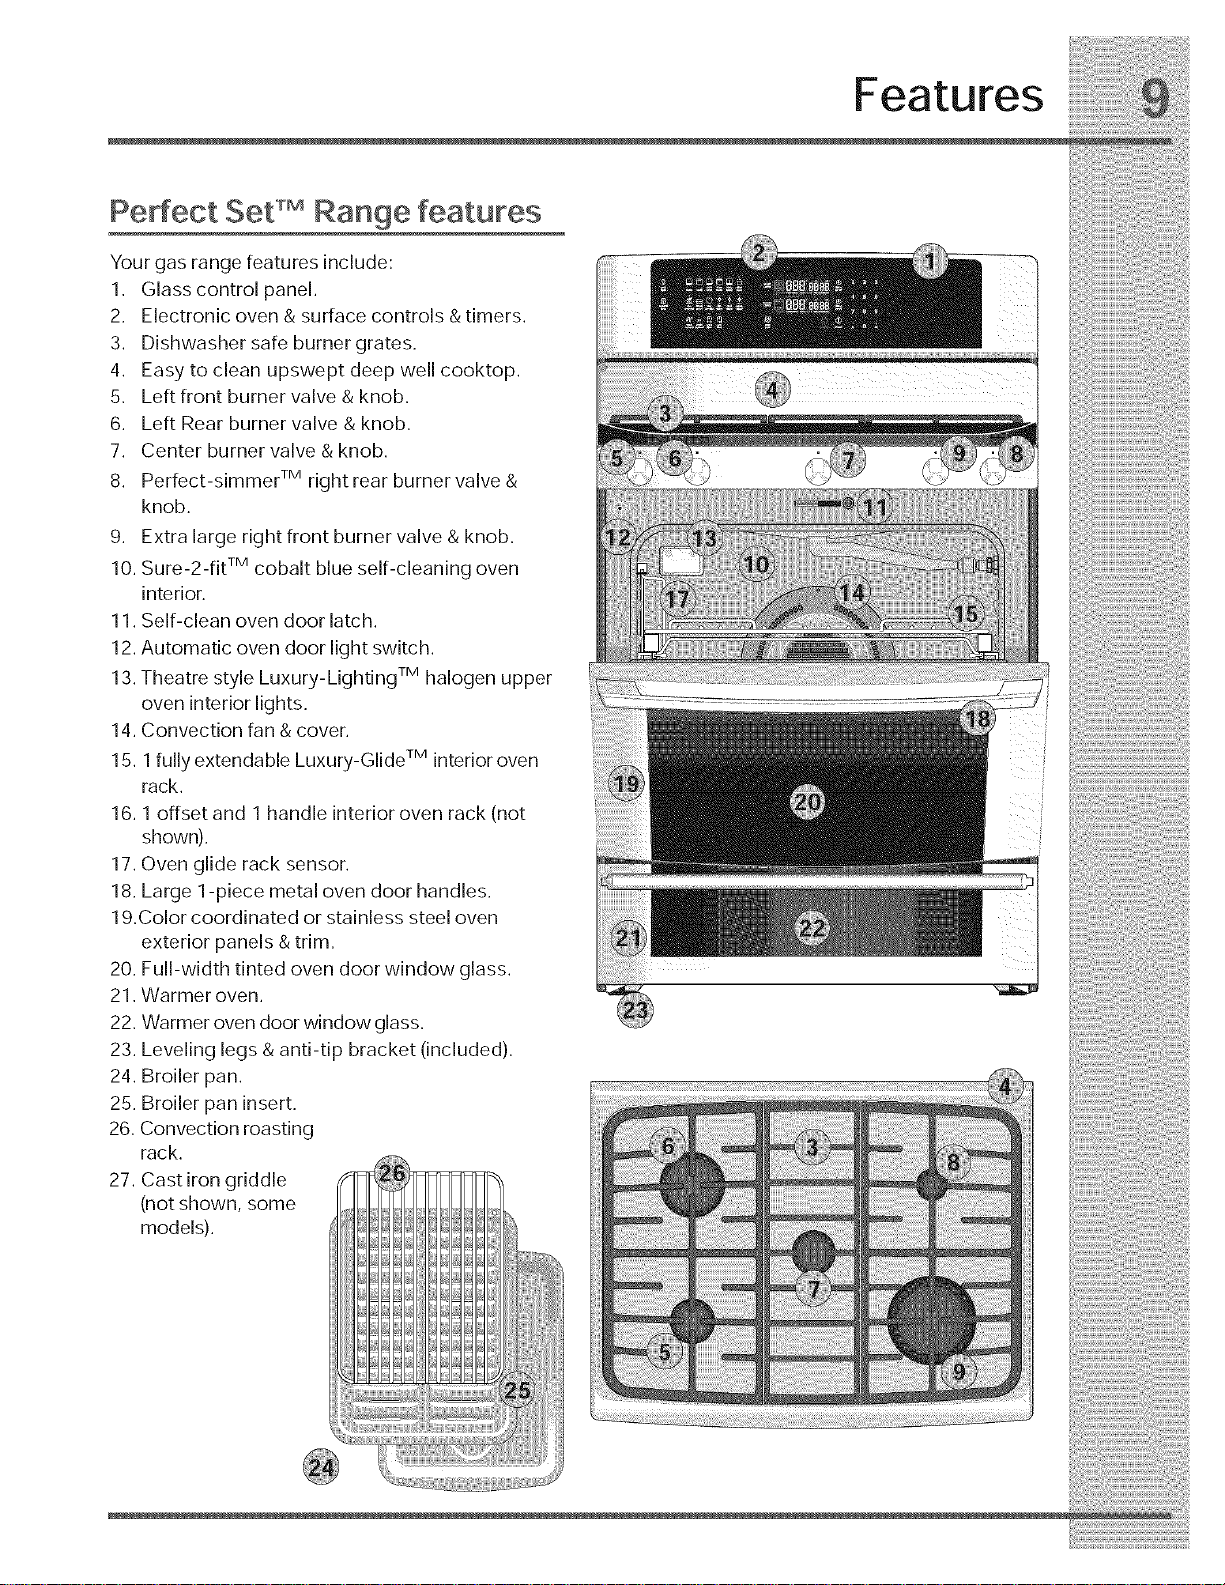
Perfect Set TMRange features
Your gas range features include:
1. Glass control panel.
2. Electronic oven & surface controls & timers.
3. Dishwasher safe burner grates.
4. Easy to clean upswept deep well cooktop.
5. Left front burner valve & knob.
6. Left Rear burner valve & knob.
7. Center burner valve & knob.
8. Perfect-simmer TMright rear burner valve &
knob.
9. Extra large right front burner valve & knob.
10. Sure-2-fit TMcobalt blue self-cleaning oven
interior.
11. Self-clean oven door latch.
12. Automatic oven door light switch.
13. Theatre style Luxury-Lighting TMhalogen upper
oven interior lights.
14. Convection fan & cover.
15.1 fully extendable Luxury-Glide TMinterior oven
Features
Getting Started
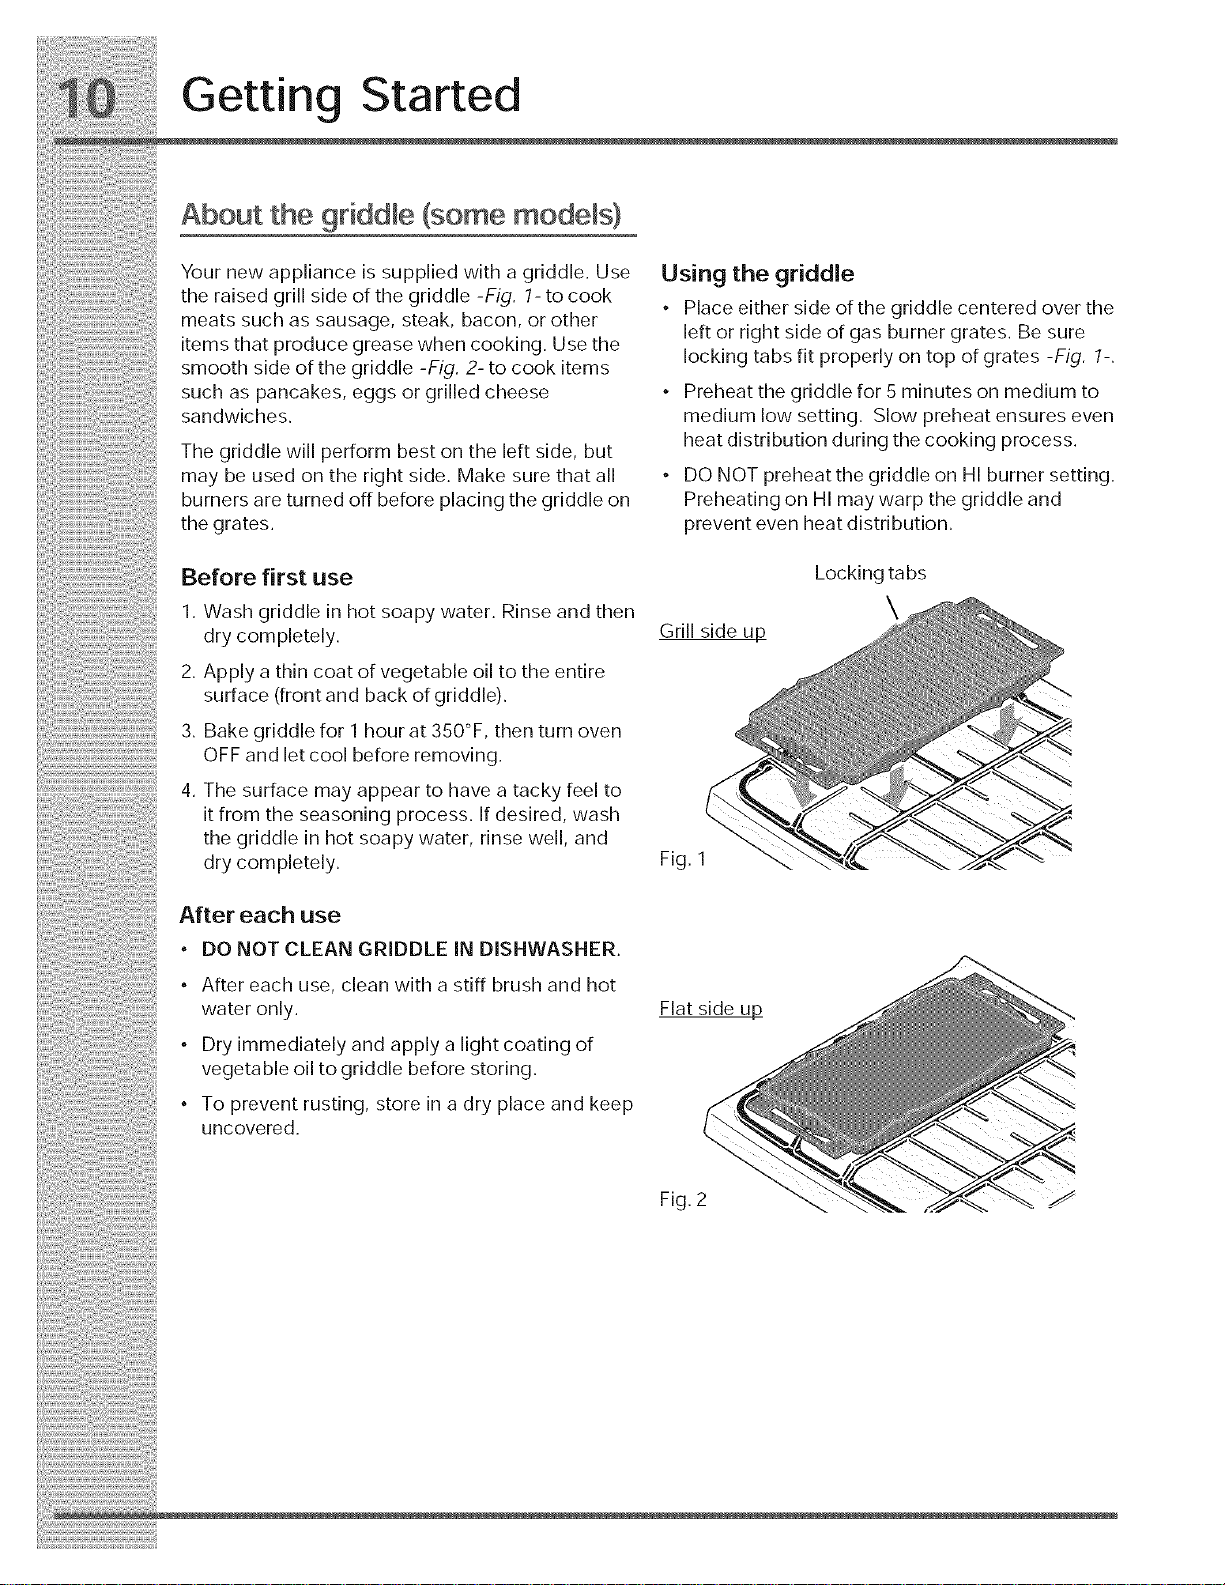
About the griddle (some models)
Your new appliance is supplied with a griddle. Use
the raised grill side of the griddle -Fig. 1- to cook
meats such as sausage, steak, bacon, or other
items that produce grease when cooking. Use the
smooth side of the griddle -Fig. 2- to cook items
such as pancakes, eggs or grilled cheese
sandwiches.
The griddle will perform best on the left side, but
may be used on the right side. Make sure that all
burners are turned off before placing the griddle on
the grates.
Before first use
1. Wash griddle in hot soapy water. Rinse and then
dry completely.
2. Apply a thin coat of vegetable oil to the entire
surface (front and back of griddle).
3. Bake griddle for 1 hour at 350°F, then turn oven
OFF and let cool before removing.
4. The surface may appear to have a tacky feel to
it from the seasoning process. If desired, wash
the griddle in hot soapy water, rinse well, and
dry completely.
Using the griddle
• Place either side of the griddle centered over the
left or right side of gas burner grates. Be sure
locking tabs fit properly on top of grates -Fig. 1-.
° Preheat the griddle for 5 minutes on medium to
medium low setting. Slow preheat ensures even
heat distribution during the cooking process.
• DO NOT preheatthe griddle on HI burner setting.
Preheating on HI may warp the griddle and
prevent even heat distribution.
Locking tabs
\
Grill side up
After each use
• DO NOT CLEAN GRIDDLE IN DISHWASHER.
• After each use, clean with a stiff brush and hot
water only.
• Dry immediately and apply a light coating of
vegetable oil to griddle before storing.
• To prevent rusting, store in a dry place and keep
uncovered.
Flat side up
Fig. 2
Getting Started
Timers Settingclockatpowerup
Thetwotimers providedwiththeovencontrol You will be prompted toenterthetime of day in the
serve as extra reminders in the kitchen. When a eventofa powerfailureorwhenyou first provide
timerreaches lessthan 1 minutethe displaywill electricpowertoyourappliance.
starttocountdown inseconds. Whenthetime • Whenyourapplianceisfirstpowered up, 12:00
runsouttheactivetimerwill beep, "00:00"will will flash in the display.
dspayandthetmerkeyw lash . . . .
Thefollowingtimesettingsapplytothetimers: padsand pressSTARTtoset.
Min. time: 1 minute If an invalid time of day is entered, the control will
• Max tme 11 hours 59mnutes triplebeep. Re-enteravalidtimeofdayand
See example below to set the timer for 5 minutes:
• Enter the hme of day using the numenc key
press START. IfCANCELis pressedyourclock
will start with the time set for 12:00.
Select the user pref key to modify the time of day
during other situations such as day light savings.
1. Press TIMER Q
2. Enter5 minutes 5
3. Press TIMER Q
To cancel after setting the timer, press the TIMER
key again.
iii i iii i iiii ilili ilili ili:i i ii!i! !,!!iiiii!iiii
Getting Started
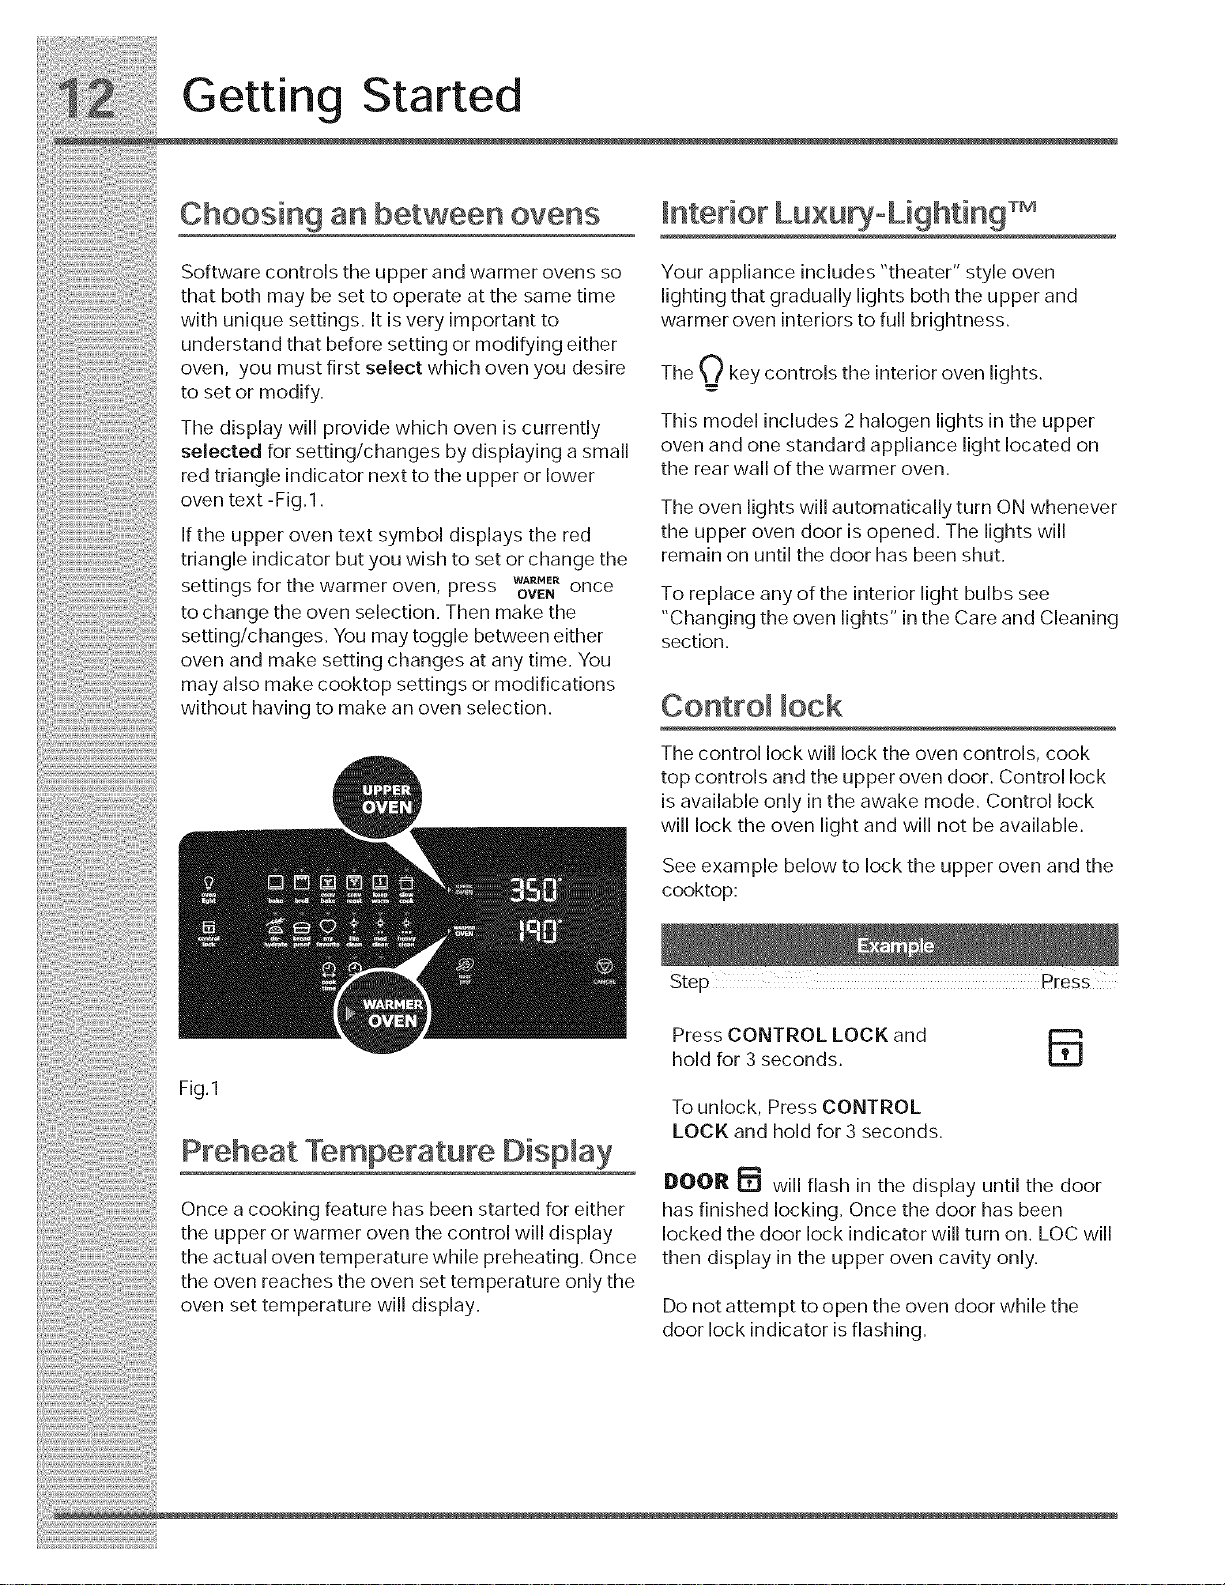
Choosing an between ovens hterior Luxu °Lighting
Software contro s the upper and warmer ovens so Your app ance nc udes "theater" sty e oven
that both may be set to operate at the same time lighting that gradually lights both the upper and
with unique settings. It is very important to warmer oven interiors to full brightness.
understand that before setting or modifying either
oven you must f rst se ect wh ch oven you des re The O ke controls the interior oven li hts
' y g .
to set or modify. --
The display will provide which oven is currently This model includes 2 halogen ligh!s in the upper
selected for setting/changes by displaying a small oven and one standard apphance hght located on
red triangle indicator next to the upper or lower the rear wall of the warmer oven.
oven text F_g 1
If the upper oven text symbol displays the red the upper oven door is opened. The lights will
triangle indicator but you wish to set or change the remain on until the door has been shut.
settings for the warmer oven, press w_R once To replace any of the interior light bulbs see
to change the oven selection. Then make the "Changing the oven lights" in the Care and Cleaning
setting/changes. You may toggle between either sect on
oven and make setting changes at any time. You
may also make cooktop settings or modifications _
without having to make an oven selection. Control lock
- " • ' The oven lights will automatically turn ON whenever
..... The control lock will lock the oven controls, cook
top controlsand the upperove n door. Cont rol Ioc k
is available only in the awake mode. Control lock
will lock the oven light and will not be available.
See example below to lock the upper oven and the
cooktop:
Step Press
Press CONTROL LOCK and
hold for 3 seconds.
Fig.1
To unlock, Press CONTROL
LOCK and hold for 3 seconds.
Preheat Temperature Display
I:IOOR _ will flash in the display until the door
Once a cooking feature has been started for either
the upper or warmer oven the control will display
the actual oven temperature while preheating. Once
the oven reaches the oven set temperature only the
oven set temperature will display.
has finished locking. Once the door has been
locked the door lock indicator will turn on. LOC will
then display in the upper oven cavity only.
Do not attempt to open the oven door while the
door lock indicator is flashing.
Setting for Best Results
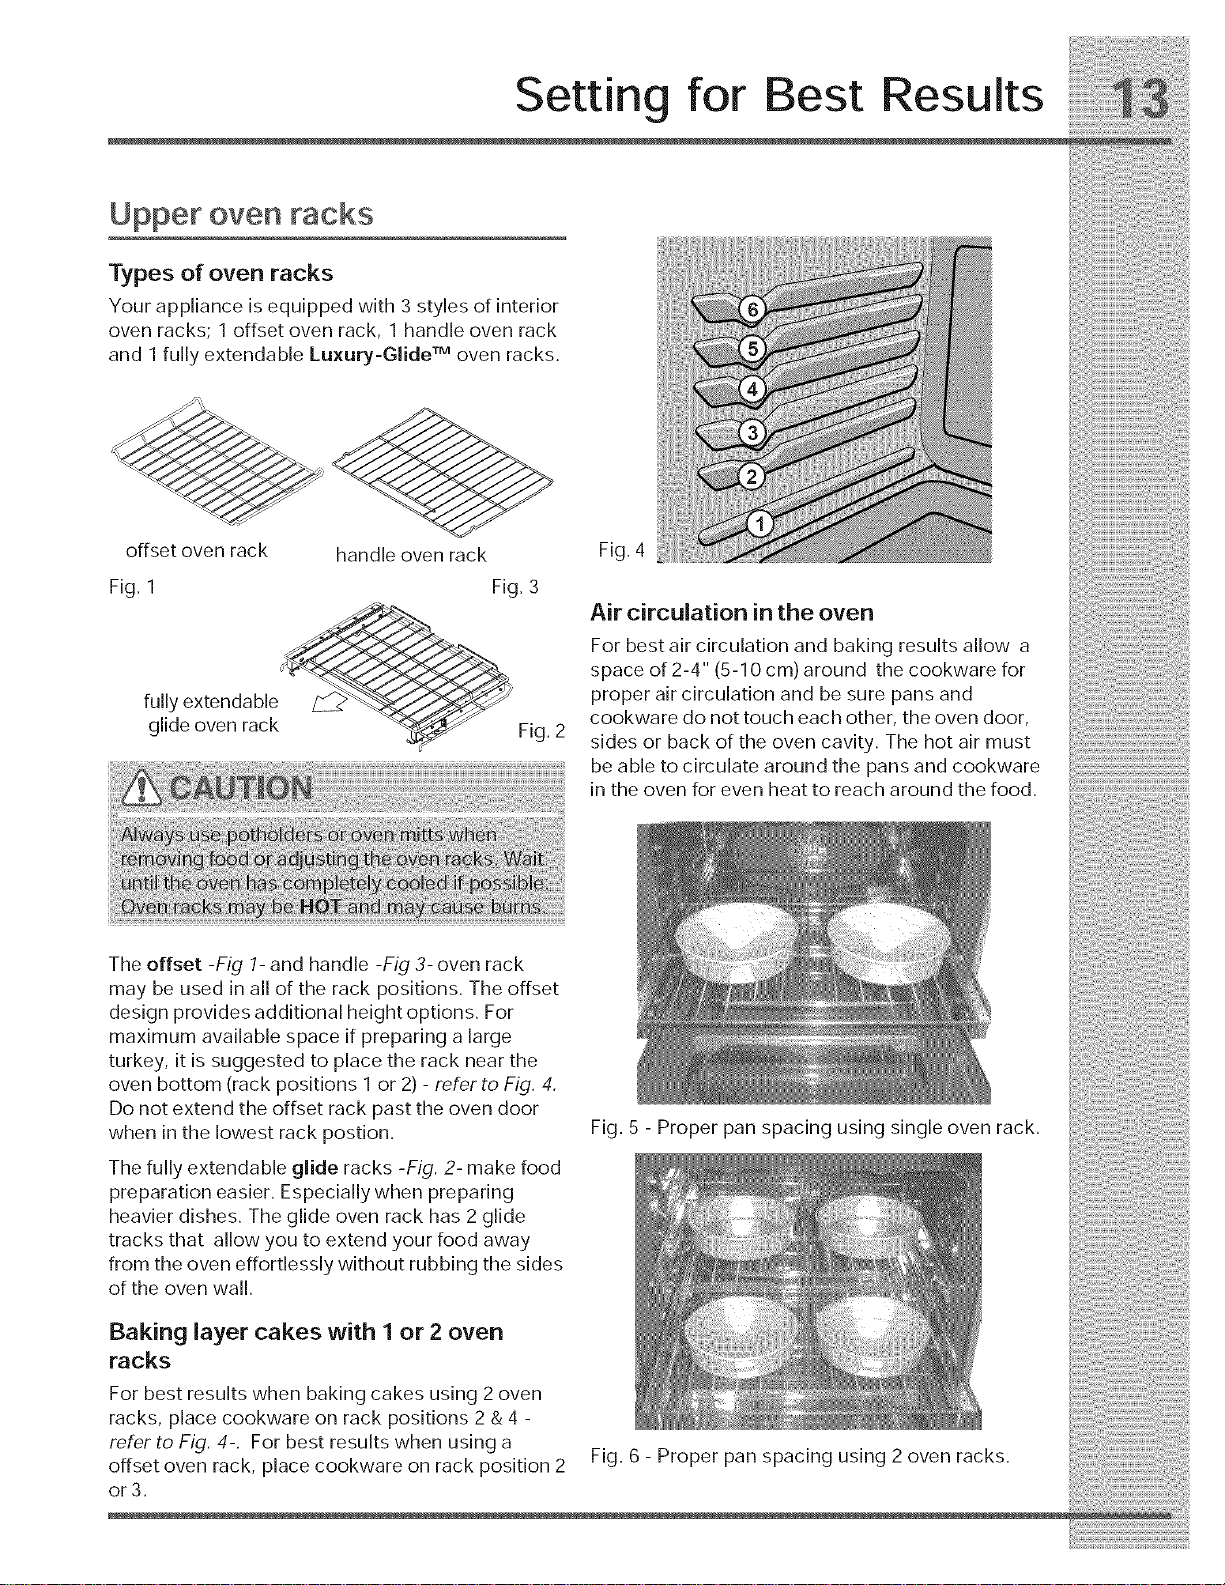
Upper oven racks
Types of oven racks
Your appliance is equipped with 3 styles of interior
oven racks; 1 offset oven rack, 1 handle oven rack
and 1 fully extendable Luxury-Glide TM oven racks.
offset oven rack handle oven rack
Fig. 1 Fig. 3
fully extendable
glide oven rack Fig. 2
Fig. 4
Air circulation in the oven
For best air circulation and baking results allow a
space of 2-4" (5-10 cm) around the cookware for
proper air circulation and be sure pans and
cookware do not touch each other, the oven door,
sides or back of the oven cavity. The hot air must
be able to circulate around the pans and cookware
in the oven for even heat to reach around the food.
i##ii_izlii_#!i!i_iiiili!;!#i_i;#!i!iii!zlii!zlii!zi!i_i_!ii#:#_!_iiiiii_!i!ili!i
14 Setting for Best ResuRs
Upper over racks
0 ! 0 re00 _[ te [_ , __
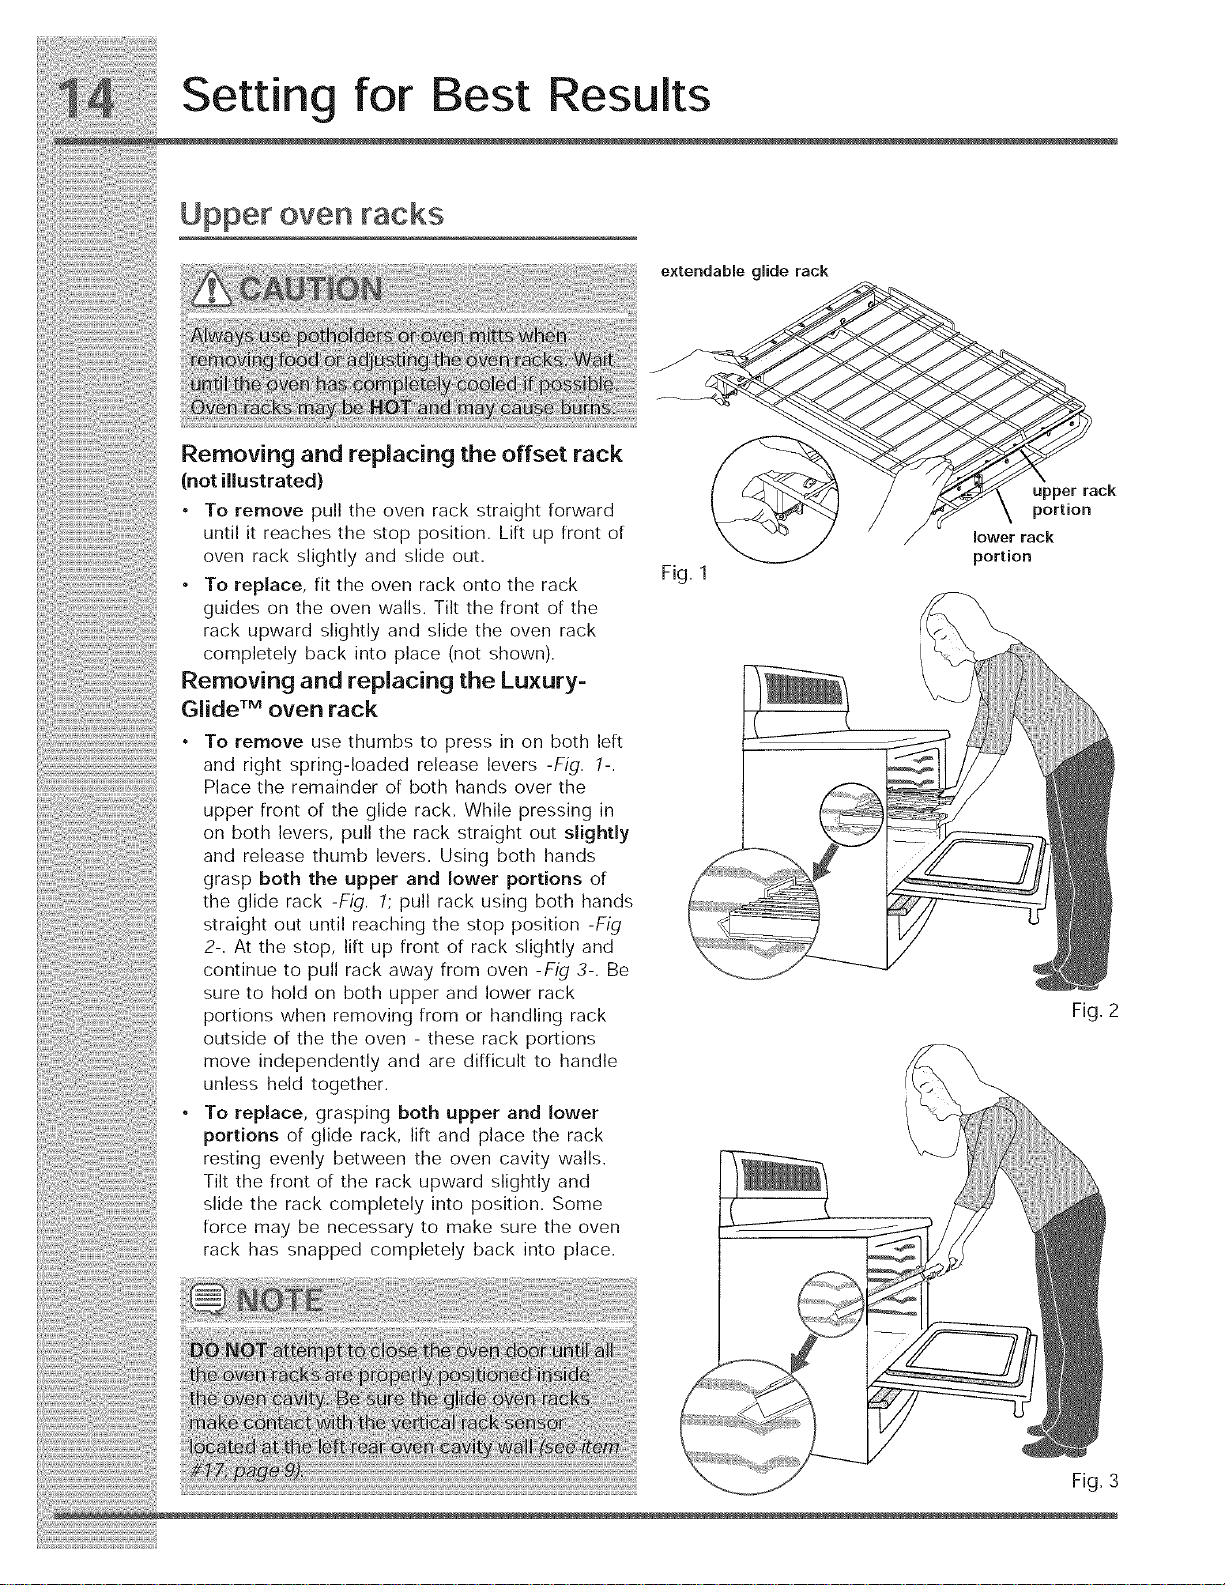
Removing and replacing the offset rack __
(not illustrated) "_ uXpperu-_err_rack
To remove pull the oven rack straight forward /_ \ portion
until it reaches the stop position. Lift up front of ° lower rack
oven rack slightly and slide out. portion
. F g 1
To replace, fit the oven rack onto the rack
: ; guides on the oven walls. Tilt the front of the
rack upward slightly and slide the oven rack
: completely back into place (not shown).
Removing and replacing the Lu×ury-
Glide TM oven rack
• Toremoveusethumbstopress_nonboth_eft
...... and right spring-loaded release levers -Fig. 1-.
Place the remainder of both hands over the
upper front of the glide rack. While pressing in
on both levers, pull the rack straight out slightly
and release thumb levers. Using both hands
grasp both the upper and lower portions of
the glide rack -Fig. 1; pull rack using both hands
straight out until reaching the stop position -Fig
2-. At the stop, lift up front of rack slightly and
continue to pull rack away from oven -Fig 3-. Be
sure to hold on both upper and lower rack
portions when removing from or handling rack Fig. 2
outside of the the oven - these rack portions
move independently and are difficult to handle
unless held together.
• To replace, grasping both upper and lower
portions of glide rack, lift and place the rack
resting evenly between the oven cavity walls.
Tilt the front of the rack upward slightly and
slide the rack completely into position. Some
force may be necessary to make sure the oven
rack has snapped completely back into place.
extendab e g de rack
Fig, 3
Surface Cooking
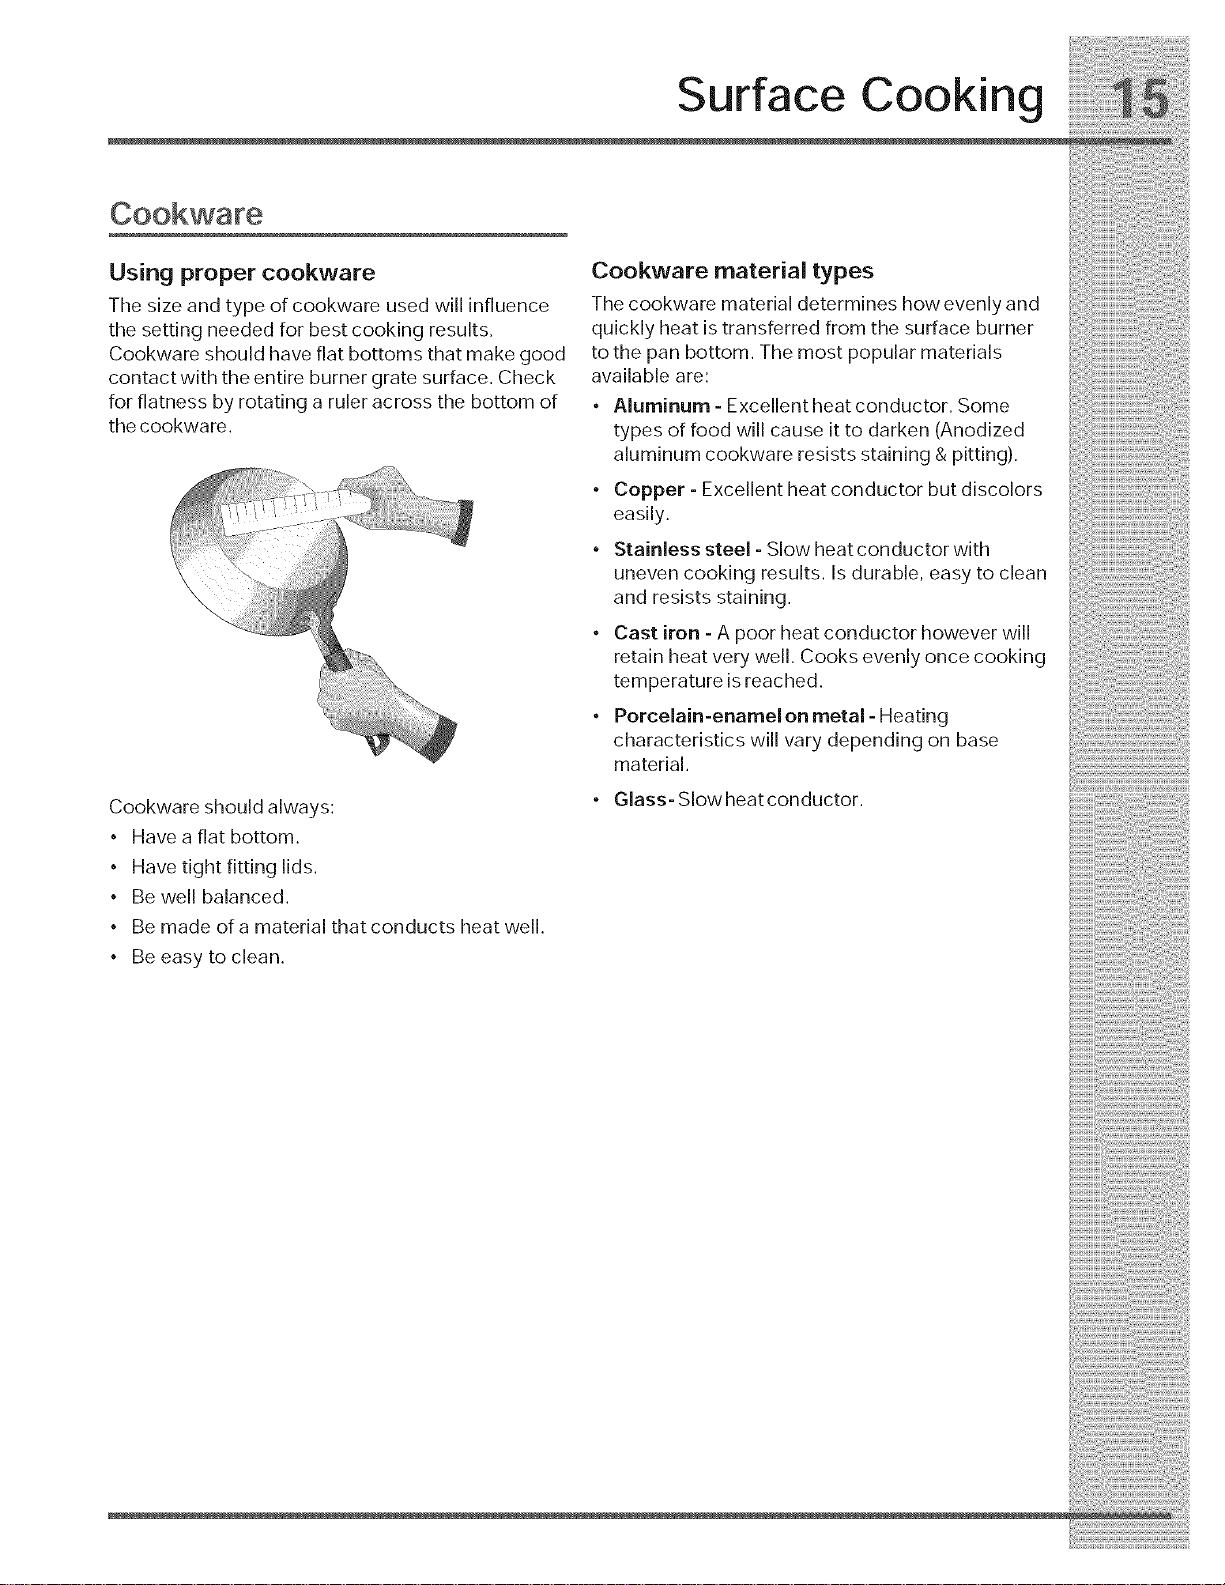
Using proper cookware
The size and type of cookware used will influence
the setting needed for best cooking results.
Cookware should have flat bottoms that make good
contact with the entire burner grate surface. Check
for flatness by rotating a ruler across the bottom of
the cookware.
Cookware should always:
* Have a flat bottom.
, Have tight fitting lids.
, Be well balanced.
, Be made of a material that conducts heat well.
, Be easy to clean.
Cookware material types
The cookware material determines how evenly and
quickly heat is transferred from the surface burner
to the pan bottom. The most popular materials
available are:
• Aluminum - Excellentheatconductor. Some
types of food will cause it to darken (Anodized
aluminum cookware resists staining & pitting).
• Copper - Excellent heat conductor but discolors
easily.
° Stainless steel - Slow heat conductor with
uneven cooking results. Is durable, easy to clean
and resists staining.
• Cast iron - A poor heat conductor however will
retain heat very well. Cooks evenly once cooking
temperature is reached.
• Porcelain-enamelon metal - Heating
characteristics will vary depending on base
material.
• Glass- Slow heat conductor.
ii_iili !_i!ii ii_ii_ i i iiii ! i i ii iiiiilJ ii i i_ ii_!_i!!i_ iiiiiiiiiii i _ i ! i i j_iiiill¸¸¸¸101i_!!i _ !iiii ii
About rapid preheat
Use the rapid preheat option on single rack baking
to quickly bring the upper oven to baking
ternperature.
The rapid preheat option may be set with the
following cooking features:
• Bake
• Cony bake
• Convroast
The following temperature settings apply to the
rapid preheat feature:
• Auto-suggest(default) setting:gS0°F/176°C
• Min. rapid preheat setting: 170°F/76°C
• Max. rapid preheat setting: 550°F/288°C
Setting Oven Controls
To add or change any cook settings after this
feature has started:
• Select the UPPER or WARMER oven you wish to
change. Make temperature changes using the +
or =keys. Each press of + or =will adjust the
temperature by 5° F (or 2°C).
• Ifchanging cooking times, selectthe cooktime
or end time keys needed to make the changes.
Settin 9 rapid preheat
See example below to set a rapid preheat with
bake to start immediately using default
temperature.
1. Press UPPER OVEN ovE_
2, Press BAKE D
3. Press RAPID PREHEAT _
4. Press START <_
When START is pressed the oven will preheat
quickly. The control will display PRE-HEATING
during this time. While PREHEATING the Convection
fan may operate.
UPPER
For best results
° Singleoven rack cooking ONLY.
° Use oven rack postions 2 or 3.
After a few minutes a beep will sound and PRE-
HEATING will no longer display. Place prepared
food on a single oven rack. The oven will continue
to bake at the set temperature until bake is canceled.

Setting Oven Controls
About baking in upper oven
Use the bake feature to cook most food items that
require normal cooking temperatures.
Bake may be set with the following options:
• Rapid preheat
• Cooktime
• Cook time with end time
The following temperature settings apply to the
bake feature:
• Auto-suggest(default) setting:350°F/176°C
• Min. bake setting: 170°F/77°0
• Max, bake setting: 550°F/288°C
Setting bake for upper oven
See example below to set a bake to start
immediately using the default temperature.
Step Press
1. Press UPPER OVEN OVEN
2. Press BAKE D
3. Press START ¢
UPPER
Ifyour recipe requires a different baking
temperature than the auto-suggested (default)
temperature (example below shows upper oven
temperature setfor425°F/218°C).
UPPER
I. PressUPPEROVEN OVEN
2, Press BAKE D
3. Enter425°F 4 2 5
4. Press START <_
For best results
• Place food items in rack positions 2 or 5.
• When using the offset oven rack, place in rack
position 2 or 3.
• When placing multiple food items in the oven
allow 2-4" (5-10cm) of space between the food
items for proper air circulation.
• For best results when baking cakes using 2 oven
racks, place cookware on rack positions 2 & 5,
Once START is pressed the oven will begin heating.
The oven display shows PRE-HEATING. While
PREHEATING the Convection fan may operate.
After the oven reaches set temperature, PRE-
HEATING will turn off and a beep will indicate the
oven is ready. The oven will continue to maintain
this temperature until the cooking feature is
canceled.
To add or change any cook settings after this
feature has started:
• Select the UPPER or WARMER oven you wish to
change. Make temperature changes using the +
or - keys. Each press of + or - will adjust the
temperature by 5° F (or 2°C).
• Ifchanging cooking times, select the cook time
or end time keys needed to make the changes.

Using cook time in upper oven
Setting Oven Controls
Adding a cook time when baking is beneficial when
a recipe requires a specific temperature and period
of time to cook. Following the recipe cook time
helps insure the best possible results.
Cook time may be set with the following features:
• Bake
•Conv bake
• Convroast
• Slowcook
• Dehydrate
• Bread proof
• Keep warm
See example below to set the upper oven for bake,
starting immediately with preheating to the auto-
suggest (default) setting of 350°F (176°C) and then
to automatically turn off after 30 minutes.
Preheat the oven if necessary
Press UPPER OVEN
2. Press BAKE D
3. Press START
4. Press COOKTiME
UPPER
OVEN
A
3O
6. Press START ¢
Once START is pressed the oven will cook and after
30 minutes automatically shut-off.

!_!;!!_i_i_i:_:_!iii_i_!i_i_i_i_ii_ii_!iii!!iiiii!i_i_!ii!i_!_i!i_i_i!i_i_i!_!_!_!_!_!i_!_!_ii_iii_z!:!_i_!:i_ii_!i!_:;i_i!_:i
Setting Oven Controls
usingcooktimewireendtime
inupperoven
Adding a cook time along with a specific end time See example below to setthe upper oven with
:: givesthe same benefitsasthecooktimeoption in preheatingforbakeat375 F(176 C)for50minutes
additiontocontrollingexactlywhenthecooking andtoautomaticallyshut-offatS:30.
processw,,beg,nandend.
Cooktimeandendtime may besetwith the
_ollowingfeatures: Step PreSS
Bake
• Convectionbake 1. Press UPPEROVEN _
• Convectionroast
• Slowcook 2 Press BAKE
Clean(delayedCleanusesendtimeonly) o
• Dehydrate 3 Enter375 F 7
. ' 3 5
. Breadproof
...... 5. Enter 50 minutes 5 0
6. Press END TiME ('_
7. Enter 5:30 5 3 0
8. Press START ¢
Once START is pressed, the oven will calculate the
start time at which the oven will begin heating. The
oven display shows PRE-HEATING. While
PREHEATING the Convection fan may operate.
After the oven reaches set temperature, PRE-
HEATING will turn off and a beep will indicate the
oven is ready. The oven will continue to maintain
this temperature for the selected time or until the
cooking feature is canceled.
-,,_ II

Setting Oven Controls
About broiling
Use the broil feature to cook meats that require
direct exposure to radiant heat for optimum
browning results. This cooking feature is only
available in the upper oven.
The following temperature settings apply to the
broil feature:
• Auto-suggest (default) setting: 550°F/288°0
• Min. broil setting: 300°F/148°0
• Max. broil setting: 550°F/288°0
Setting broil
See example below to set broil for the upper oven
starting immeadiately with the auto-suggest (de-
fault) setting.
1. Place the broiler insert on the broiler pan, then
place the meat on the insert. Remember to
follow all warnings and cautions.
2. Arrange the interior oven rack -p. 22 Figs. 2 &
3- for position recommendations. Be sure to
place the prepared food and pan directly
under broil burner. Close the oven door.
3. Press UPPER OVEN UPPER
4. Press BROIL [_
OVEN

#_i_i:_:_!iii_i_!i:;_!i:i_ii!:!_!iiii:_i_ii#_!_!:!ii_!:!!i_i_i!i_i:#_!!_!!i!_!!_i#_!_z!i_!_z!iiiii_
Setting Oven Controls
iiiiiiiiiiiiiiiiiiiiiiiiiiiiiiiiiiiiiiiiiii_i!_!i_!_ii!_ii!_!_!_:!_i!i!_i_i!_i_i!_iSettin broil
i:iili!i'iiiiiiii!!i!!iiii!!ii!!ii!!ii!!ii!!iiiiiiiiiiiiiiiiiilliiiiiii!i!i!!iiiiiiiii!ii!iiiiiiiii!iiii!i!ii!iI The broil pan insert (if equipped) contains slots that
:_iiiii______i__i_ii!_i_ii!_i_ii!:i:i!i_i:i!i_i:i!i_i:i!i_i:i!_!_iii_i_iii_i__ii_i_i!_!i!iii!ii_i!_!!!_ii!__i!i_i_i_!_!i_____i___!_!__ii_!:_i!ii!!iallowsgreasefromthemeattodrainintothe broil
_i_ii__:_ii___!i_i!_!i_ii_ii!!i!!ii!iii!iii!iii!iii!iii!i_i!i!_!iii__!i__ii!i__!ii_i!i__i_i!_!__i!i_#_!ii_pan. Place prepared meaton broil pan insertand
_i_iiiii_:_ii_:_ii_iiii_iiii_i_ii_i!ii_i!i:_i!i!_i!i!_i!i!_iii_iiii_iiii_iiii_iiii_ii_!_i:iii_i_!_!_!ii!i_i!ii_i!i_i_i!i_i_i!i_i_i!_i_i!i!!_i_:iii!_i_then placeontobroilerpanasshown -Fig. 7.
_i_iiiiiiiiiiiiiiiiiiiiiiiiiiiiiiiiiiiiii!i_i___i!i!i!i:_!__!___i!i__!i!i__!i!i__!i!i__!i!i__!i_!ii!i!!!i_ii_i_!ii_i_i!i__i_ii__i!i!_!i!i!_!iii!_i___i_i!_!!_iRecommendedbroilingtimes
i:iiiiiiiiiiiii_iiii_iiii_iiii_iiii_iii_iiii_iiiii_iii!_i_!_i_i!_i__:i__:i__:i__:i__:i__:i__:ii!!i_iii_!_ii__!!!i!i__!ii!_!i!!Usethebroilingtable -Fig. 3-forapproximate
i_iii_i_i_iiiiiiiiiiiiiiii!ii!ii!ii!i_i!_!iii!i____ii____ii____ii____ii____ii!i!i_iiii___i_!i!_i!ii_:___recommended broilingtimesforthetypesofmeats
_i_ii_:_i_:_i_iiii_iiii_iiii_iiii_iiii!_i!ii!_i!ii!_i!ii!_i!ii!_i_ii!!_ii_ii_ii_ii_ii_!_!!i!i#!!i_!i_i_i!iilisted. Increaseordecrease broilingtimes, ormove
_i_iii___ii___ii_iiii_iiii_iiii_iiii_iiii!_i!ii!_i!ii!_i!ii!_i!i!!_!i!!!:!ii!i_!ii__!i__!!ii__!!i!!i!!i!!ii_i!__ithe broiling pantoa differentrackpositiontosuit
fordoneness.
i_iiii_i!_ii!_i_i_i_i_i_i_!__ii__ii__ii__ii__ii__ii___!ii!!iii_i!i!i___!!_!!!i_!!!!i!___!Ifthefoodyouare broilingisnotlistedinthetable,
:_iiiiiii_iii!!!!_ii!i_i!i_i!i_i!i_i!i_i!!i_!_i___!__i!i__!__!__!__!_i!_!_!__!!__!!!ii_:i:!_!followtheinstructionsprovidedinyourrecipeand
iii!_!ii!:!_ii_i_i!i_ii!i!_ii#i_i#i!ii!_i_ii!i_i!i!i_i_i_i_i_!_!_i_!_!_i_!_!_ii!_!_i!_!i!_!i!!_i_!_iwatchtheitemclosely.
_i_i_i_i_i_Ji_!i_i_iiii!i!!ii!i!!ii!i!!_:_:_:_i!!_i_!!_!i!_iii!i!_i!i!ii_S!i!_S!i!ii_i!_ii_iInsert
i!!iiii:!i!ii:!i i!iiiiiiiii:i!i ii!i i !iiiiiiiii i!iiiii!il/
i_i!_!_i!i_ii_!i!_!_i!i_ii_!i!_!_i!i_ii_!i!_!_i!i_ii_!i!_!_i!i_ii_!i!_!_i!i_ii_!i!_!_i!i_ii_!i!_!_i!i_ii_!i!_!_i!i_ii_!i!_!_i!i_ii_!i!_!_i!i_i
Broil pan
Fig. 1 Fig. 2
Steaks thick 5thor6th 550 F 6 4 Medium
Steak 1" thick 5th or6tw 550°F: S 7 well
Hamburger ] thick 6th 5:_0F 9 7 Medium
*Use the off-set rack when using oven rack position 6.
Fig. 3
i_i!_!_i!i_ii_!i!_!_i!i_ii_!i!_!_i!i_ii_!i!_!_i!i_ii_!i!_!_i!i_ii_!i!_!_i!i_ii_!i!_!_i!i_ii_!i!_!_i!i_ii_!i!_!_i!i_ii_!i!_!_i!i_ii_!i!_!_i!i_i

Setting Oven Controls
About convection bake
Convection bake is part of the Perfect-Convect 3TM
system. Convection bake uses a fan to circulate
the oven heat evenly and continuously. The
improved heat distribution allows for even cooking
with excellent results. Multiple rack cooking may
slightly increase cook times for some foods, but
the overall result is time saved.
The conv bake feature should ONLY be used when
your recipe instructions have been written for use
with convection baking.
Ifyour recipe instructions are for normal baking and
you wish to use convection bake, follow the
Convection Convert option instructions. The
convection convert option will automatically adjust
the oven temperature so that convection baking
may provide the best possible results.
Conv bake may be set with the following options:
• Convconvert
• Cook time or cook time with end time
• Probe
° Rapid preheat
Benefits of convection bake:
° Superior multiple oven rack performance.
° Some foods cook up 25 to 30% faster, saving
time and energy.
° No special pans or bakeware required.
Setting convection bake
The following temperature settings apply to the
conv bake feature:
° Auto-suggest(default) setting:350°F/176°C
° Min, bake setting : 170°F/76°C
° Max. bake setting: 550°F/288°0
See the example below to set conv bake, starting
immediately with the auto-suggest (default) setting
of 350°F (176°C).
Step Press
1. Press UPPER OVEN OVEN
2. Press CONV BAKE
3. Press START <_
Once START is pressed the oven will begin
heating. The oven display shows PRE-HEATING
during this time.
After the oven reaches set temperature, PRE-
HEATING will turn off and a beep will indicate the
oven is ready. The oven will continue to maintain
thistemperature until the cooking feature iscanceled.
UPPER
For best results
When baking with a single rack use rack
positions 2 or 3. When using 2 racks use rack
positions 2 & 4. When using 3 racks use rack
positions 2, 3 & 5,
Cookies and biscuits should be baked on pans
with no sides or very low side to allow heated air
to circulate around the food,
Food baked on pans with a dark finish will cook
faster,
When placing multiple food items in the oven
allow 2-4" (5-10cm) of space between the food
items for proper air circulation.

Setting Oven Controls
Using convection convert Setting convection convert
The conv convert option allows you to convert any See the example below to set conv bake, starting
normal baking recipeusingtheconvection bake immediately_4ththeauto-suggest(default) setting
feature The contro uses the norma rec pe sett ngs of 350 F 176 C and addin the conv convert
and adjusts to a ower temperature for convect on o tion
baking. Convconvert must be used with CONV
• Superiormultipleovenrackperformance. 1. PressUPPEROVEN OV,N
• O "
. 2. PressCONVBAKE
• ( ) g
p •
Some foods cook up 25 to 30 _ faster, sawng
time and energy.
No special pans or bakeware required.
,_ ,, 3. PressCONVCONVERT >_:_
• Placefood items using the recommended rack
positions. When bakingwitha single rackuse
..... rackpositions2or3. Whenusing2racksuse OnceSTARTispressedtheovendisplayshows
rack positions 2 and 4. When using 3 racks use PRE-HEATING Aftertheovenreachesthe
rack positions 2, 3 and 5.
Cookies and biscuits should be baked on pans
with no sides or very low side to allow heated air
to circulate around the food•
Food baked on pans with a dark finish will cook
faster.
When placing multiple food items in the oven
allow 2-4" (5-10cm) of space between the food
items for proper air circulation.
4. PFessSTART £I_>
converted set temperature, PRE-HEATING will turn
off and a beep will indicate the oven is ready.
The added conv convert option will automatically
lower the set temperature you set from the bake
recipe to an adjusted conv bake temperature•
When conv convert is used with cook time the time
remaining will flash when the cook time is 75%
complete• The control will also beep at regular
intervals until baking has finished•
To add or change any cook settings after this
feature has started:
• Select the UPPER or WARMER oven you wish
to change. Make temperature changes using the
+ or - keys• Each press of + or - will adjust the
temperature by 5°F(or 2°C).
• Ifchanging cooking times, select the cook time
or end time keys needed to make the changes•
v

Setting Oven Controls
About convection roast Setting convection roast :
How convection roast works See example below to set convection roast to start
............... TM immediately with the auto-suggest (default) setting.
_onvecuon roas[ is parr orme verfec[-_onvec[ o
system, Convection roast combines a cook cycle
with the convection fan and element to rapidly
roast meats and poultry. Heated air circulates Step Press
around the meat from all sides, sealing in juices
and favors, Meats cooked w th th s feature are 1. Press UPPER OVEN UoP_l
crispy brown on the outside while staying moist on
the inside. In addition, there is no need to reduce
the oven temperature when using convection roast. 2. Press CONV ROAST I'lyI
Convection roast may be set with the following ./_
options: 3. Press START %p,
• Cook time or cook time with end time
Once START is pressed the oven will begin heating.
• Rapid preheat The oven display shows PRE-HEATING.
iiii!_!_!:i:_i1_!:i!_!:i!_!:i_!!:ii!_!!_!!:!_!:!_:!iii!i_ii!i;ii!i!!!_!i!_!_!i_i!i_i_!_!i_iiii!_ii_!!_i_!_!_!_!_!_i!!_!_!_J__
The following temperature settings apply to
convection roast:
° Factory auto-start default: 350°F/176°C
° Minimum: 170°F/76°C
° Maximum: 550°F/288°C
After the oven reaches set temperature, PRE-
HEATING will turn off and a beep will indicate the
oven is ready.

Setting Oven Controls
Roasting recommendations
Roasting rack instructions
When preparing meats for convection roasting, you Roasting rack
may use the broiler pan, insert and the roasting
rack supplied with your appliance. The broiler pan
will catch grease spills and the insert will help
prevent grease splatters. The roasting rack fits on
top of the insert allowing the heated air to circulate b'_ .
under the food for even cooking and helps to
increase browning on the underside. -_
1. Place oven rack on bottom or next to the ._)
bottom oven rack position. /
2 Place the insert on the broiler pan
• ' Broil pan
3. Make sure the roasting rack is securely seated
on top of the insert. Do not use the broiler pan Fig. 1
without the insert. Do not cover the insert with
aluminum foil.
,_) - nser_
4. Position food (fat side up) on the roasting rack.
-Fig. 1-
5. Place prepared food on oven rack in the oven.
Meat Weight Oven temp Internal temp Minute per lb.
Beef Rib ey_ r6as_ _ t_ 6 Ibs. 35_E _ 25:30
_nderl_in roast 2 to 3 Ibsl 4_F _ _5_25
Turkey, whole *" 12 to 16 Ibs. 325°F 180°F 8-10
_, Turkey whole *_ 16 to 20 Ibs. 325°F 180°F 10-15
_ou try ** o o
Turkey, whole 20 to 24 Ibs. o325F o 180oF 12-16
Chicken 3 to 4 Ibs. 350 F-375 F 180"F 12-16
o,
Ham r_st,fresh 4_ 6 Ibs: 3_1F I_F 30-40
_in _ t_4 IBs. 325_F 160°_ _25
.... F_g 2
Forbeeh medrare 145 F, mad 160 F, welldone 170 F
* Stuffed turkey requires additional roasting time. Shield legs and breast with foil to
prevent overbrowning and drying of the skin.

Setting Oven Controls
About keep warm
Use the keep warm feature to keep hot foods
warm. Keep warm may be set with the following
options:
Keep warm may be set the following options:
• Cooktime
• Cook time with end time
The following temperature settings apply to the
keep warm feature:
• Auto-suggest (default) setting: 170°F/76°0
• Min. keep warm setting: 150°F/66°0
• Max, keep warm setting: 190°F/88°0
Setting keep warm
See example below to set keep warm for the upper
oven to start immediately with the auto-suggest
(default) setting.
Step Press
1. Press UPPER OVEN OVEN
2. Press KEEPWARM [_]
3. Press START <_>
To add or change any cook settings after this
feature has started:
° Select the UPPER or WARMERoven you wish to
change. Make temperature changes using the +
or - keys. Each press of + or - will adjust the
temperature by 5°F(or 2°C).
• Ifchanging cooking times, select the cook time
or end time keys needed to make the changes.
UPPER

Setting Oven Controls
About slow cook
The slow cook feature may be used to cook foods
more slowly at lower oven temperatures. The
cooking results will be like that of a Slow Cooker or
Crock-Pot. This feature is ideal for roasting beef,
pork & poultry. Slow cooking meats may result in
the exterior of meats becoming dark but not burnt;
this is normal. Slow cook may be set using the
upper oven only.
Slow cook may be set with the following options:
• Cook time
• Cook time with end time
The following temperature settings apply to the
slow cook feature:
• HI:275°F/134°C (default)for cooking 4to 5 hours
• Lo: 225°F / 108°Cfor cooking 8 to 9 hours
Setting slow cook
See the example below to set a slow cook on Lo.
Step Press
1. Press UPPER OVEN ovE_
2. Press SLOWCOOK "_
3. Press -Io to choose the Lo
option -Fig. 2.
4. Press START
UPPER
|O
o
_,_ For best results
• Completely thaw all frozen foods before cooking.
• When using a single oven rack, place in position
2or3.
Position multiple racks to accommodate size of
cooking utensils when cooking multiple food
item.
• Add any cream or cheese sauces during the last
hour of cooking.
• Do not open the oven door often or leave the
door open when checking foods. The more heat
that is lost, the longer the food will need to cook.
• Cover the foods to keep them moist or use a
loose or vented type cover to allow foods to turn
crisp or brown.
• Roasts may be left uncovered so browning can
occur. Cook times will vary depending on the
weight, fat content, bone & the shape of the
roast.
Fig,1
To add or change any cook settings after this
featu re has started:
• Select the UPPER or WARMER oven you wish
to change. Make temperature changes using the
+ or - keys. Each press of + or - will adjust the
temperature by 5°F(or 2°C).
• Ifchanging cooking times, selectthe cooktime
or end time keys needed to make the changes.
Fig. 2
Preheating the oven will not be necessary.

Setting Oven Controls
About dehydrate
The dehydrate feature dries with heat from the
convection element. The heat is circulated
throughout the oven by the convection fan. Use
dehydrate to dry and/or preserve foods such as
fruits, vegetables, herbs and very thin slices of
meat. Dehydrate may be set in the upper oven
only. The Convection fan may operate while
dehydrating.
The following temperature settings apply to the
dehydrate feature:
• Auto-suggest (default) setting: 120°F/48°0
• Min. dehydrate setting: 100°F/38°0
• Max. dehydrate setting: 225°F / 108°C
Setting dehydrate
See the example below to set dehydrate at the
default temperature of 120°F.
For best results
Dry most fruits and vegetables at 140°F. Dry
herbs at 100°f.
Drying times vary depending on the moisture
and sugar content of the food, the size of the
pieces, the amount being dried and the humidity
in the air.
Treat fruits with antioxidants to avoid discoloration.
o
Tightly woven cooling racks can be used to
allow the air to circulate around the food; or use
drying racks to allow the air to circulate around
the food (this type of oven rack is not supplied
with this appliance).
Consult a food preservation book or library for
information.
1. Press UPPER OVEN OVEN
2. Press DEHYDRATE
3. Press START (_
To add or change any cook settings after this
feature has started:
• Select the UPPER orWARMER oven you wish
to change. Make temperature changes using the
+ or - keys. Each press of + or - will adjust the
temperature by 5° F(or 2°C).
• If changing cooking times, selectthe cooktime
or end time keys needed to make the changes.
UPPER

ii@;i,li:@iiii@iii@i!i!;!:i@i!!i!!
Setting Oven Controls
iiiiiii ! About bread proof Setting bread proof o
i:iii_i!i_ii!_ii!_iii!!!!!!!!!!!!!!!!_!!ii!_ii_ii_i_ii_i_i!_!ii!_!_i!iii!ii_ii!ii!_i_!i!_i_!i!_!i_Thebreadprooffeaturemaintainsawarm Seetheexamplebelowtosetbreadprooffor85 F/
:iiiiii_:_ii_ii!_ii!_ii!_i!i_i_i!i_i_i!i_i_i!i_i_i!_!_iii_i_iii_i_ii_i_i!_!_!_ii!_i!i!_!i!_ii_i_!i!i_i_ii!i_!i_!:i!_i_iii_i_!i!_i!!!environmentusefulforrisingyeast-leavened 30C).
i:iiiii__i_ii_!_!___!_!i!i_i_i_i!!!!_i!!!!ii_i!_ii_i!_ii_i!_ii_i!_ii_i!_ii_i!_ii!i!!i!i_!__iii___!!_i_!i_ii!!i_i_!!i!i__ii!i___ii_i_!i_i!i!_!i!i__(_!_!i!i!ii!i__i_i_products. Bread proofmaybesetintheupper
iiiiiiiiiiiiii@i!!ii!i!!ii!i!!B!!ii!i!ili!i!ili!i!iiiiiii!i!ili!_!!iiiiiiovenon_y.
:_iiiii:ii:i_i_i_i_i_i!i_i_{i!i_!_i!ii!i!i_!_!i_!_!i_!_!i_!_!i_!iii_i_!_iiii!i_i_ii_ii_ii_ii_!_i_i_Breadproofmaybesetinconjunctionwiththe Step
i:_iiiiii:iiii:iii_iiii_iiii_iiii_iiii_iii_ii_!_!i_:i:_!_!_!i:!_!i:!_!i:!_!i:!_!i:!_!i:!_i_!_!i_!_i!i:!_!!!i_ii_i!_i_iii:i_ii}_!_!_!izi!_!_!_i_flollowingfeature:
iiiiiiii_i_ii_i_iiiiiiiiiiiiiiiiiiiiiiiiiii_ii_ii_ii_ii_ii_ii_iiii_!_!_:i____i_i_!_i_i!Ji_i!Ji_i!Ji_i!Ji_i!___i!i_i_i!!i!ii!__i!i!_i_i_!_ii_ii_i_i!!i!i!_!i Myfavorite 1. PFessUPPEROVEN _
:iiiii__i__iiiiiiiiiiiiiiiii_ii_ii_ii__iii!!i_i_!i!ii!__i:!_!_i:!_!_i:!_!_i:!_!_i:!i!__i!!i_!:__!___!_i_!!__!!_:iThefollowingtemperaturesettingsapplytothe
iiiiiii__i_i__i_i_iiiiiiiiiiiiiiiiiiiiiiiii_i_i!i_i_i!i_i_i!i_i_ii__i!i___i!i___i_i!__i:i!i_i_i_i_iii_i!i!!_i_ii!_i_ii!_i_iii_______iii!ii___i_i_i!i!_i_!_!i__i_breadprooffeature: 3. PressBREADPROOF
iiiiiiii_i_ii_i_iiiiiiiiiiiiiiiiiiiiiiiiiii!iii_i!iii_i!iii_i!iii_i!ii!ii!!_!ii!i_!_!!i!i_i!i!i_!i!_!_i!!iiii_iii_i_iii_i__i____!_i!_ii_ii!i_i_!_ii_i__i_iii___ii...................." Aut°-suggest(defau't) setti?2:10°0°F/38°C ,o
i:iiiii__i:____i:i__i_!i!i_!ii!i_!ii!i_!ii!i_!ii!i_i__i_i__!i!i__!i!i__!i!i___:i_i!_!i_i!_!i_i!i!i_!_!i_i_i!_i_i__!i_!_!i__i!_i_i:iiiiiii:!i!i!i!ii__!i!!{!!i:i_!iiii!• Min. bread proof setting:85 F/30 C 4. Pressandcontmureto o ,
iii!_i_:_i_i!i!i!i_!_!_iii_!iii_!iii_!i_:i!ii!:i!ii!:i!ii!:i!_!i_i!i!i_i_i!i_i_!i!_i_!i!_i_!_!_ii!_!_i!_!i_i!_!i!i!_!!_i_i_:_!_ii!_!_ii_i_!_!_Max. bread proof setting: 100 F/38 C
, o o press - o to advance to 85 F
:_!:__!:_i!_iii___iiii_!!___i___i___!_ii_i__i!___!!_!!___i!ii_!i_i_ii!i_i______iii!i_i__ _ 5. PressSTART
i!_i:`:!_i:`:!_i:`:!_i_i:!i_!i!i___!ii_iiiii!!i_ii!!i_ii!!i_ii!!i_ii!_i_!!!__i!i!__i!i!_!!_i!i!________ii__i_i_ii_:i___:i_!__:i_!i_:i!_!_!i_!_i_i_!_i!_iii!i_i<_/_ For bestresu_ts
..... • Lightlycoverthedough
• Place a bowl of hot water on the rack below.
• Use the oven light to check progress. Do not
open the oven door.
To add or change any cook settings after this
feature has started:
• Select the UPPER or WARMER oven you wish
to change. Make temperature changes using the
+ or - keys. Each press of + or - will adjust the
temperature by 5°F(or 2°C).
° If changing cooking times, selectthe cooktime
or end time keys needed to make the changes.
4>

Setting Oven Controls
About my favorite
You may store up to 2 of your most frequently used
heat settings and cooking times, for setting or
recalling.
The favorite key will allow you to store a cooking
feature, oven set temperature and a cook time for
either the upper oven or warmer oven.
Saving my favorite instructions
All the favorite keys will display after selecting the
upper or lower oven. The example below shows
how to save a favorite cooking instruction for the
upper oven.
1. Press UPPER OVEN OVEN
UPPER
Recallin 9 a favorite
Step Press
1. Press UPPER OVEN OVEN
2. ChooseMY FAVORITE (_
3. Press START <_
UPPER
Deleting/overwriting a favorite
Once the favorite key has been filled you may
choose to overwrite an existing favorite. Follow the
same instructions to save a recipe; choose the
favorite you wish to overwrite and hold for 3
seconds.
2. Input the cooking instructions using the control
keypads and any additional options you wish
to save and later recall.
3. Press START
4. Press and hold the available
MY FAVORITE for 3 seconds
5. Press CANCEL* @
You will hear a beep and a red light will display
above the selected favorite to indicate that your
favorite recipe has been stored.
*If you wish to store the cooking instructions but
not start the oven.
It is not necessary to delete a favorite before
saving another. Choose the favorite key and store
the new cooking instructions using the overwriting
instructions.

cancelled.Ifanyofthecookingfeaturesare
cancelledwhentheapplianceisintheSabbath
mode,noaudibleorvisualindicatorswillbe
availabletoverifythecancellation.
Iftheoveninteriorlightsareneeded,besureto
activatethempriortosettingtheSabbathmode.
OncetheovenlightisturnedONandtheSabbath
modeisactive,theovenlightwillremainonuntil
theSabbathmodeisturnedoffandtheovenlights
areturnedoff.Theovendoorwillnotactivatethe
oveninteriorlightswhentheovendoorisopened
orclosed.
Afterapowerfailure,thefoodmaybesafely
removedfromtheovenwhilestillintheSabbath
mode.
,,_|i--
Fig,1
_7 Forfurtherassistance,guidelinesfor
pleasevistthewebathttp:\\www.star-k.org.
properusageandacompletelistof
modelswiththeSabbathfeature,

Setting Oven Controls
Setting Sabbath ode Canceling Sabbath mode
The example below shows setting the oven to
observe the Sabbath (and Jewish holidays).
Set the BAKE feature you need during the
Sabbath for the UPPER oven. Also make any
cooktop settings you may wish to have
available.
2. Press and hold both the LO
and HI keys together for 3
seconds (a beep will sound)
and release:
Once properly set in Sabbath mode, Sab -Fig, 1-
will show in the oven display until such time the
Sabbath mode is cancelled.
I +
&
|o hi
The example below shows how to cancel the
Sabbath mode.
Step Press
Press and hold both the LO
and HI keys together for 3
seconds (a beep will sound)
and release:
2. All cooking features previously set and the
cooktop will automatically cancel once Sabbath
mode has ended.
I +
Io hi
&

ii_!!;ii_i_!i!_i!_!_:i_!ii!i_!_!_!_!_!!i_:_i!_:_i!_i!iiJ_!i_!:_!_!_!i_i!i_i:;!i:i_!i:i_!i:_!;!_!_!i_i:!!i_ii_i_ii_ii_'i!!ili;iil
34 Setting Warmer Oven Controls
Warmer oven features
Thewarmeroven_s_dea_forwarm_ngfoodssuch
as pizza, casseroles, baked potatoes and frozen
convenience foods. Use the keep warm feature to
keep hot cooked foods at serving temperature.
The warmer oven may be set with the keep warm
eature.
: ...........................................................................................................................................
::: i ii
ve its:
rn _v t::i: : :
Recommendations forthewarmeroven _;_ For best results
When placing food in the lower oven always use ,
a baking sheet or pan with 4 raised sides to The warmer oven rack must always be ,n place
...................................................................................................... with the down turned sides into the drawer -Fig,
i_i!_!_i!i_ii_!i!_!_i!i_ii_!i!_!_i!i_ii_!i!_!_i!i_ii_!i!_!_i!i_ii_!i!_!_i!i_ii_!i!_!_i!i_ii_!i!_!_i!i_ii_!i!_!_i!i_ii_!i!_!_i!i_ii_!i!_!_i!i_i
prevent food from sliding off. when warming, Be sure that the rack is placed
° DO NOT LINE THE OVENDRAWER WITH FOIL OR
COVER THE OVEN RACK WITH FOIL. This may
result in damage to your oven.
• The maximum heightof foods and utensils that
may be used in the lower oven is 2-1/2". The
maximum width is 15". Pay close attention to
foods that have potential to rise beyond the
recommended 2-1/2" maximum height.
• Use pans in the lower oven large enough to
contain food and any juices created from the
cooking process.
• Do not use plastic wrap to cover food, Plastic
may melt onto the drawer or surrounding
areas and be very difficult to clean, Use a lid or
aluminum foil instead. Use only utensils and
cookware in the oven drawer that are
recommended for oven use in the upper oven.
1,This will provide for some air space between
the drawer and the food,
For best results with the warmer oven, pastries,
casseroles with crumb toppings and bakery
type items should be cooked in the upper oven.
When using the warmer oven, limit the number of
times the drawer is opened; this will minimize
heat loss. Repeated opening of the drawer
during the warming process may produce
uneven results.
Fig. 1

Setting Warmer Oven Controls
About keep warm in the
Use the keep warm feature to keep cooked foods
warm.
When using keep warm always start with hot food.
Do not heat cold food.
Keep warm may be set with the following options:
• Cook time
• Cook time with end time
The following temperature settings apply to the
keep warm feature:
• Auto-suggest (default) setting: 170°F/76°C
• Min. keep warm setting: 150°F/66°0
• Max. keep warm setting: 190°F/88°C
If you enter a temperature beyond this range your
control will automatically default to the nearest
temperature available.
Temperature selection
See the recommended settings chart below for
keep warm. If a particular food is not listed, use
the default temperature of 170°F. If more crispness
is desired, remove the lid or aluminum foil from the
food. Most foods can be kept at serving
temperatures at 170°F. When a combination of
foods are to be kept warm (for example a meat
with 2 vegetables and rolls) use 170°F.
Fried Foods i90QF
Soups(Cream) !70_F
sauces i70F
To add or change any cook settings after this
eature has started:
Select the UPPER or WARM ERove n you wish
to change. Make temperature changes using the
+ or- keys. EachoPress of + or- will adjust the
, temperature by 5 F(or2 C).
If changin g coo kin g tim es, selec t the coo k t ime
or end time keys needed to make the changes.
GravieS i 50F
Dinner Piaies with Food 50F
BreadsiPaSteries i50 F

Warmer oven cleaning tips
For easier clean-up, the lower oven should be
cleaned as soon as the oven cools down. Clean
after each use to minimize build-up of spatter and
food leftovers. When cooking foods that spatter,
cover the food with heat-proof lid or foil. Use a mild
detergent and water to clean the oven drawer and
sides. For stubborn soils use a non-abrasive
cleaning pad to remove soils. DO NOT use oven
cleaners on the oven cavity.

Setting Your Preferences
About user preferences with
PerfectoSet TMcontrols
The _ key controls options for preferences. The
display will show a digital abbreviation and a value
for every preference each time a key is pressed
one at a time.
Please read the following instructions before
changing the user preferences functions:
Press and continue to press USER PREF _::_J to
navigate through the preferences,
• Press or to toggle between options for
each preference.
values. You may also use the numeric keys to
input precise values.
hi Io
+
Press hi or Io to increase or decrease numeric
Setting clock display (CLO)
The clock display mode allows you to turn the
clock display on or off,
See the example below to change the clock
display to OFF,
Step Press
1. Press and continue to press
USER PREF until you reach
the pre-set clock display
mode-Fig. 1-.
2. Use the +hi & -Io to toggle to the
CLO off option -Fig. 2-.
3. Press START to accept or
press CANCEL to reject.
+
hi Io
4>
or

ii_!!;ii_i_!i!_i!_!_:i_!ii!i_!_!_;_!_!:!i_;_!_;_!ii_:_i!_:_i!_:_i!i!_!;i_;;!_!;!_i_!;!_!_iii:_ii:_i!;ii!_!_!_i_!!_i!_!i_
_ Setting Your Preferences o o
Setting 12 or 24 hour mode Changing between F or C
{F°c}
between 12and24hourmode. Thefactorypre-set
clock display mode is 12 hour. Your control has the ability to display and set
See the example below to change the default
modeto24hour, pre-settemperaturedisplayis Fahrenheit,
Fahrenhe torCe s ustemperatures The factory
Seetheexamplebelowtochangethedefault
temperoturedisp,oytoOe,sius,
St0p Rr0ss
1. Pressandcontinuetopress _ P
USER PREF until you reach
]] thepre-setclockdisplay 1 Pressandcontnuetopress
mode-Fig, 1-. USERPREFuntilyoureach
theFahrenheit/Celsius
2. Usethe+hi& -Iototoggletothe + = mode.-Fig, 1-
24hroption. -Fig, 2-, hi °r Io
2. Use the +hi or -Io to toggle to +
............................................................ the C option. -Fig, 2- hi or Io
..... 3. PressSTARTtoaccept. <_
i_i!_!_i!i_ii_!i!_!_i!i_ii_!i!_!_i!i_ii_!i!_!_i!i_ii_!i!_!_i!i_ii_!i!_!_i!i_ii_!i!_!_i!i_ii_!i!_!_i!i_ii_!i!_!_i!i_ii_!i!_!_i!i_ii_!i!_!_i!i_i
L: /|
UFI
3. Press START to accept or
press CANCEL to reject.
Fig. 1
Fig, 2
Fig. 1 Fig. 2

Setting Your Preferences
Setting 12hr energy saving
mode (ES)
The oven control has a factory preset built-in 12
hour energy saving feature that will shut off the
appliance if the oven has been heating for more
than 11 hours and 59 minutes, The oven can be
programmed to override this feature for continuous
baking.
See the example below to turn off 12 hour energy
saving mode.
Step Press
1. Press and continue to press
USER PREF until you reach
the pre-set 12hr energy
saving mode -Fig. 1.
2. Use the +hi & -Io to toggle to the
off option -Fig. 2.
3. Press START to accept or
press CANCEL to reject.
+
or
hi 1o
Setting audio mode (AUD)
The audio mode allows you choose between 5
levels of audio volume for the oven control. You
may turn the audio off and later return to operating
with all the normal audible sounds and alerts. The
preheat and cook time features will still beep to
alert you when to put your food in and take it out.
The factory pre-set audible level is 5.
See the example below when changing the audible
level settings.
1. Press and continue to press
USER PREF until you reach the
pre-set AUd mode.
2. Use the +hi or -Io to choose
desired audio level -Fig. I or
to choose the off option
-Fig. 2.
3. Press START to accept or
press CANCEL to reject.
+
or
hi Io
4>
_': Et
Fig, 1
Fig, 1 Fig, 2

thepre-setUPOmode
-Fig,1.
2. Press -Io to adjust the
ternperature lower.
3. Use -Io to advance to -10
-Fig, 2.
4. Press START to accept or
press CANCEL to reject,
To set the tern perature
higher use the hi+ key.
Fig, 1
+
-Fig. 2-
4. Press START to accept or
press CANCEL to reject,
|O
To set the temperature lower
use the Io- key.
hi
4>
_ Fig, 2
Fig, 2

Setting Your Preferences
Factory default reset (RST) List of displayed abbreviations
You may choose to restore your factory settings ....
This will erase all settings or favorites that you you may see while using your apphance.
have saved.
See the example below reset your control
1. Press and continue to press
USER PREF until you reach the g_J dEF Defrost
factory default reset mode
- Fig, 1.
2. Use the +hi or -Io to toggle to + End End of cycle
the yes option to reset -Fig, 1, hi or |o
3. Press CANCEL if you decide
not to reset.
l_¸_I¸_c_I_¸_!:¸¸uc_,_ !i!ii
,it r:
:5 ,-,o
/,-....................../
See the chart below for common abbreviations that
CkO Setting the clock
F10_ Faultcode error
Hi Hi setting
Hot Hotoven
Lo Lo setting
Fig, 1
Fig. 2
Loc Control lock
SAb Sabbath mode
Sd Demo mode
SF Sabbath mode failure
*This is an example of a fault code that you may
see. These codes will help your servicer repair
your appliance.

*Audiomodeprovides6possiblesettings

Before starting se[foc[ean
A self-cleaning oven automatically cleans with high
temperatures that are well above those used for
normal cooking. The self-clean feature eliminates
soils completely or reduces them to a fine
powdered ash that you can later easily wipe away
with a damp cloth.
Adhere to the following precautions when
running the self-clean cycle:
• Do not use oven cleaners or protective coatings
in or around the oven interior.
• Do not clean the oven door gasket. The woven
material of the oven door gasket is essential for
a good seal. Care should be taken not to rub,
damage or remove the gasket -Fig. 7.
• Do not use any cleaning materials on the door
gasket. Leaving chemical residue can damage
the door gasket.
• DO NOT force the oven door open. The
automatic door locking system can be
damaged.
Self-Clean

_5_!i_Ji_!_i_i_!_!_i!_i_i_!_i_!i_!_ii_:_!i_i_i!:_:_!_!_:_
Self-Clean
Settin 9 self-clean Settin 9 delayed self-clean
............................. The c ean feature prov des 3 d fferent cho ces for You may w sh to set our a ance to erform a
self-cleaningtheupperoven. Setthecleanforlite self-cleancycle sometime later(upto 12 hours
(2 hrs), med (3 hrs) orheavysoils(4 hrs). The later). The ENBTIME keywill determinewhenthe
examplebelowshowssettingtheupperovenfor cleaningwill stop.
self-cleantobegin immediatelyusinga medium (3
hour) setting. Youwill needtosetthe ENBTIME outfarenough
toallowforthetypeofcleancycleyouchoose(2-3-
:::[ 4hours). Remembertoadd30-40additional
_ _ m nutes for the oven to coo enough and the oven
Step wress
1. Removeracksand _ Theexamplebelowshowssettingtheupperoven
PressUPPEROVEN fora self-cleancycletoend at8:00o'clock.
2. ChooseLITE, MEDOR a,'_'or ":_'or ",:" --
door to unlock.
Y PP P
......
3 PressSTART P
UPPER
............................................................I Remove racksand own
...... icon will flash (Fig. 1). Once the door has locked the a, ,i, a°
Afterpressingstart,themotorizedovendoorlatch '
willautomaticallylocktbedoor. TheDOORIock PressUPPEROVEN
UOORIockiconwill remainonthroughtheentire 2. Choose LITE, MEDOR -s,_or _,_"or _,_"
self-clean cycle. HEAVY CLEAN ......
After self-clean, the oven may take about 30-40
minutes to cool and unlock. A Hot message (Fig. 2)
will display during this period. After cooling the
DOOR lock icon will flash and disappear indicating
that the door has unlocked.
3. Press END TIME t_
4. Enter 800 8 0 0
!_! ..............
!IFIC
Fig. 1 Fig. 2
5. Press START <_

Care and Cleaning
• Aluminum (trim pieces) & vinyl
Painted and plastic control knobs
Body parts
Painted decorative trim
o
Chrome control panel (some models)
o
Decorative trim (some models
o
Stainless steel (some models)
Use hot, soapy water and a cloth. Dry with a
clean cloth.
Forgeneral cleaning, use hot, soapy water and a
cloth. For more difficult soils and built-up grease.
apply a liquid detergent directly onto the soil.
Leave on soil for 3(; to 60 minutes. Rinse with a
damp cloth and dry. Do not use abrasive
cleaners on any of these materials; they can
scratch. To remove control knobs, turn to the OFF
position: grasp firmly and pull straight off the
shaft. To replace knobs after cleaning, line up the
flat sides of both the knob and the shaft: then
push the knob into place
Before cleaning the control panel, turn all controls
to OFF and remove the control knobs. To remove,
pull each knob straight off the shaft. Clean using
hot, soapy water and a dishcloth. Rinse with a
clean water using a dishcloth. Be sure to squeeze
excess water from the cloth before wiping the
panel; especially when wiping around the
controls. Excess water in or around the controls
may cause damage to the appliance.To replace
knobs after cleaning, line up the flat sides of both
the knob and the shaft; then push the knob into
place.
Stainless steel (some models). Clean the stainless
with warm soapy water using a clean sponge or
cloth. Rinse with clean water and dry with a soft
clean cloth. Do not use harsh scrubbing cleaners.
Only use kitchen cleaners that are especially
made for cleaning Stainless Steel. Always be sure
to rinse the cleaners from the surface as bluish
stains may occur during heating that cannot be
removed.
Porceiain enamel broiler pan and Gentle Scouring with a Soapy Sc0unng pad will
insert (if equipped)remove most SP0tS, Rinse with a 1:1 Solution of
;: _ i , Clearwater and ammonia, if necesSary, cover
uoor her _ DOClyparis
difficult spots with an ammonia:soaked paper
;' For Lower Oven Cleaning towel for 30 to 40 minutes. Rinse With Clean water
instructions see the Warmer and a damp cloth, and then Scrub witha soap_
Oven section, filled scouring pad. Rinse and wipe dry with a
clean cloth, Remove al! cleaners o[ the porcelain
may become damaged during futu[e heating. Do
not use spray oven cleaners on the cooktop.

Care and Cleaning
SurfaceType C!ean!ng Recommendat!on
• Oven racks
• Oven door
• Burner heads, caps, grates &the cooktop See "Cleaning cooktop and parts" in the Care and
Oven racks must be removed. Clean by using a
mild, abrasive cleaner following manufacturer's
instructions. Rinse with clean water and dry.
Use soap & water to thoroughly clean tiqetop,
sides and front of the oven door. Rinse well. You
may use a glass cleaner on the outside glass of the
oven door. Do not immerse the door in water. Do
not spray or allow water o r the glass cleaner to
enter the door vents. Do not use oven cleaners
clcaning powders or an__harsh abrasive cleaning
materials on the outside of the oven door.
Do not clean the oven door gasket. The oven door
gasket is made of a woven material, on Self-
Cleaning models, which is essential for a good
seal. Care should be taken not to rub damage or
remove this gasket.
Cleaning section.

Cleaning cooktop and parts
Care and Cleaning
The cooktop is designed to make cleaning easier.
Because the gas burners are sealed, cleanups are
easier when spillovers are cleaned up immediately,
Cooktop
Ira spill occurs on or in the recessed or contoured
areas, blot up spill with an absorbent cloth. Rinse
with a clean, damp cloth and wipe dry. Do not use
harsh abrasive cleaners on the cooktop. They can
scratch the porcelain. Completely rinse any mild
cleaners used from the surface or the porcelain
cooktop may become damaged during future
heating. Do not use spray oven cleaners on the
cooktop,
Burner grates
Your appliance is shipped with the burner heads
and burner caps in the correct locations. Before
using your gas range be sure to:
• Fol[owtheinstallation instructions before
installing.
• Remove all packing tape from cooktop area.
To remove:
Should you ever need to remove the burner cap for
cleaning, simply lift the cap off the burner head.
To replace:
1, Pair up burner caps sizes with corresponding
burner heads.
2, Align burner cap ignition area to the burner head
ignition area. See illustration.
3, Place the burner cap vane slots onto the burner
head vanes.
Before using make sure the burner cap fits
flush with the burner head.

Care and Cleaning
The oven door with Luxury°
Hold TMhinges
Removing the Lift-Off oven door
Fig. 1
1. Fully open the oven door -Fig. 1.
2. Unlock both oven door hinge locks by pulling
them up and away from the oven frame until
they stop (unlocked position) -Figs. 2. If
needed use a small fiat-bladed screwdriver to
assist with loosening the door hinge locks.
3. Firmly grasp both sides of oven door -Fig. 3.
4. Before completing this step, be prepared to
hold the whole weight of the door while
grasping the sides of the oven door with both
hands. Hold midway down the oven door
sides. Close the oven door to about 4 inches
and continue closing beyond the door stop
position. The oven door should release from
the frame on its own -Fig. 3.
5. Carefully lift door away evenly, slightly up and
out until both hinge arms are clear of the hinge
slots in the oven frame -Fig. 3. After door has
been removed, be sure to lay the door flat with
the inside of the door downward (never rest the
oven door with any weight on the door handle).
Fig, 2
Fig, 3

Care and Cleaning
The oven door with Luxuryo
Ho d h nges
To.e.,oce,.e..-o.o e°.oo.
1. Firmlygrasptheoven door alongbothsides _ _
j ust below t he door handie. When po sitioning
the door hinge arms with the door hinge slots in
the oven frame, you may wish to use your knee
to stabilize the door before attempting to insert
the door hinge arms in the hinge slots -Fig. 1.
2. Position the angle of the door to the door --,
remova I angle and carefully insert the door
hinge arms fully and evenly into the door hinge
slots. Carefully let the weight of the door
transfer from your hands so that the oven now
supports the oven door. Fig. 2
3. Open the oven door down to the fully open
position -Fig. 2.
4. With the door in the fully open position, push
both oven door hinge locks toward the oven
frame until they both are locked -Fig. 3.
5. Close the oven door.
iiiii#_i!i!ii!_i:i_i:i_!_!_i_!ii_i_!ii_i_!ii_#i_iii_iiii!ii!_#_#i_iii_i!_!i_i_!i_i_iii!_!_!_
Fig. 1
Fig. 3

1_ii!i_!_!_!i_ii_:_!i!!_i_:_:_!i_i_i_i_i_ii!i!_!_!_ii_i!_!i_i_i!i!i_!_!_!_!i:!:i_i!_iii:!:!!i_!i_i_i_i_i_i_i_i_i_ii_!_!;i_
50 Care and Cleaning
Special door care instructions Changing upper oven lights
i .......................................................................................................................................................................................................................................
Do notcosethe_ oven doorunt a the nteror B N _::: ::
oven racks are Tullyinsertea and retracted to
thebackoftheoven. Theupperovenlightbulbsarelocatedattherear
• Do not hit the -lass with _ots _ans or an of the oven cav ty and both are covered w th a
otherobject. Theoven doorglass may breakor glass sh,eld. The glass sh,eld must be m place
even breakata latertime unexpectedly, wheneverthe oven ,s m use.
• Rep ac ng the upper oven nter or ght bu bs
Scratching, hitting,jarring or stressing the oven
door -lass ma weaken its structure causin - 1 Turn e ectr ca power off at the man source or
LJ v LJ
an increased riskofbreakageata latertime, unplugtherange.
• 2 Remove upper oven nter or ght she d as
You may use a g ass c eaner on the outs de of
:, the oven aoor glass, uo not spray or aHow
waterorthecleanertoenterordripdowninto . . "
theoven doorvents. Spraycleaneroncloth . :
..... P .
first and then wi e the oven door clean allow your fingers to touch the new bulb when
.
Do not use strong oven cleaners, powders or
any harsh abrasive cleaning materials on the
outside of the oven door or glass.
Never clean the oven door gasket. The oven
door gasket should always clean during the
Self-clean cycle.
L3 _a , p , v . . .
ustrated De OW
3 Replace bulb with a new T 4type 25 Watt
Halogen apphance bulb Please note do not
replacing. This will shorten the life of the new
bulb. Use a paper towel to cover the new bulb
when installing.
4. Replace glass shield over bulb.
5. Turn power back on again at the main source
(or plug the range back in).
6. The clock will then need to be reset.

Changing warmer oven light
Removing warmer oven and replacing
light
1. Before drawer removal, be sure to turn OFF the
warmer oven and let the drawer area cool
completely.
2. Pull the drawer away from the oven. Using a
phillips-head screwdriver remove the two
drawer screws from the insides of the front
oven drawer compartment -Fig. 1.
3. With one hand hold the drawer front in place.
Use your other hand to pull the glide away from
the oven -Fig. 2- until the glide hook
disengages -Fig. 3.
4. Repeat from step 3 above for the other side of
the drawer.
Care and Cleaning
Fig. 1
5. With BOTH glide hooks disengaged, carefully
lift the drawer up and away from the oven.
Push both drawer glides into lower oven cavity.
6. Replace the lower oven light with a 40 Watt

.................................................................::_:_i!:_:_i:_:_i:_:_i:_!!_!i_:_!_!_i_!_!!:!i!_i_i!_i_i_i_i_:_z_:_!_ii_;_;_i_:_ii:_i_i:i_!_!ii_i::i_i_:ispace so appliance can be lifted over carpet.¸¸¸¸¸¸¸¸¸¸¸¸¸¸¸¸¸¸¸¸¸¸¸¸¸¸¸¸¸¸¸¸¸¸
i_i!_!_i!i_ii_!i!_!_i!i_ii_!i!_!_i!i_ii_!i!_!_i!i_ii_!i!_!_i!i_ii_!i!_!_i!i_ii_!i!_!_i!i_ii_!i!_!_i!i_ii_!i!_!_i!i_ii_!i!_!_i!i_ii_!i!_!_i!i_i
Surface burners do not light , Surface control knob has not been completely turned
to_ (lite). Push in and turn the surface control knob to
lite until burner ignites and then turn control knob to
desired flame size,
• Burner ports are clogged. With the burners OFF, use a
small-gauge wire or needle to clean ports. See
"Cleaning cooktop and parts" in the Care and Cleaning
section for complete instructions,
• Appliance power cord is disconnected from outlet. Be
sure power cord is securely plugged into the electrical
outlet.
• Electrical poweroutage.
Surface burner flame burns halfway
around.
• Burner ports are clogged. With the burner OFF. c ean
0orts by usirg a small-gauge wire or needle.
Moisture s present after cleaning, Lightly fan the flame
and allow burner to operate until flame is full, Dry the
burners thoroughly and follow instructions under
"Cleaning cooktop and parts" in the Care and Cleaning
section.

Solutions to Common Problems
Surface burner flame is orange.
oven does not operate Be Sure the oven Controls are Set properly for the desired
Entire appliance does not operate
• Dust particles in main line. Allow the burner to operate a
few minutes until flame turns blue
. In coastal areas, a slightly orange flame is unavoidable
due to salt air.
function. See Setting Oven Controls in this Use & Care
Guide or read the instructions Entire appliance does not
operate" in this checklist.
• The time of day is not set. The time of day must first be
set in order to operate the oven. See "Setting the clock
at power up" in the Getting Started section.
• Be sure power cord is plugged correctly into electrical
outlet.
• Service wiring is not complete. Contactyour dealer,
installing agent or authorized service agent.
° Electrical power outage. Call your local electric company
for service.

ii t,oostocom iProb'ems
Oven smokes excessively during • Control not set properly. Follow broiling instructions under
broiling Setting Oven Controls.
Make sure oven door is closed when broiling.
Meat too close to the broil burner. Reposition the broil
rack to provide proper clearance between the meat & the
, element. Preheat the broil burner for searing.
Meat not properly prepared. Remove excess fat from
meat. Cut remaining fatty edges to prevent curling, but
° do not cut into lean.
Insert on broiler pan wrong side up & grease not draining.
Always place grid on the broiler pan with ribs up & slots
, down to allow grease to drip into pan (some models).
Grease has built up on oven surfaces. Regular cleaning is
necessary when broiling frequently. Old grease or food
spatters cause excessive smoking.
Flames inside oven or • Excessive spillovers in oven For example this will
smoking from oven vent happen for pie spillovers or large amounts of grease left
on the oven bot[om. WiDe up excessive spillovers before
starting oven If flames or excessive smoke are present
see "About broiling" in the Setting Oven Controls
section.
Oven control panel beeps &
displays any F code error (for
example F10, Fll, F13, F14,
F15, F20, F23, F25, F30, F31
or Fg0)
Oven control has detected a fault or error condition.
Press CANCEL to clear the display & stop beeping.
Try the bake or broil feature again. If the F code error
repeats, remove power supply to appliance, wait 5
minutes and then repower the appliance and set clock
for the time of day. Try the bake or broil feature again.
If the fault recurs, record fault and call for service.

Maor Appliance Warranty Information
Your appliance is covered by a one year limited warranty. For one year from your original date of purchase, Electrolux will
repair or replace any parts of this appliance that prove to be defective in materials or workmanship when such appliance is
installed, used, and maintained in accordance with the provided instructions. In addition, the glass cooktop or radiant surface
element of your appliance (excluding built-in and free-standing range appliances) is covered by a two through five year
limited warranty. During the 2nd through 5th years from your original date of purchase, Electrolux will provide a replacement
glass cooktop or radiant surface element for your appliance which has proven to be defective in materials or workmanship
when such appliance is installed, used, and maintained in accordance with the provided instructions.
Exclusions
This warranty does not cover the following:
1. Products with original serial numbers that have been removed, altered or cannot be readily determined.
2. Product that has been transferred from its original owner to another party or removed outside the USA or Canada.
3. Rust on the interior or exterior of the unit.
4. Products purchased "as-is" are not covered by this warranty.
5. Products used in a commercial setting.
6. Service calls which do not involve malfunction or defects in materials or workmanship, or for appliances not in
ordinary household use or used other than in accordance with the provided instructions.
7. Service calls to correct the installation of your appliance or to instruct you how to use your appliance.
8. Expenses for making the appliance accessible for servicing, such as removal of trim, cupboards, shelves, etc.,
which are not a part of the appliance when it is shipped from the factory.
9. Service calls to repair or replace appliance light bulbs, air filters, water filters, other consumables, or knobs,
handles, or other cosmetic parts.
10. Labor or in-home service costs during the additional limited warranty periods beyond the first year from your
original date of purchase.
11. Pickup and delivery costs; your appliance is designed to be repaired in the home.
12. Surcharges including, but not limited to, any after hour, weekend, or holiday service calls, tolls, ferry trip charges, or
mileage expense for service calls to remote areas, including the state of Alaska.
13. Damages to the finish of appliance or home incurred during transportation or installation, including but not limited to
floors, cabinets, walls, etc.
14. Damages caused by: services performed by unauthorized service companies; use of parts other than genuine
Electrolux parts or parts obtained from persons other than authorized service companies; or external causes such
as abuse, misuse, inadequate power supply, accidents, fires, or acts of God.
DISCLAIMER OF IMPLIED WARRANTIES; LIMITATION OF REMEDIES
CUSTOMER'S SOLE AND EXCLUSIVE REMEDY UNDER THIS LIMITED WARRANTY SHALL BE REPAIR OR REPLACE-
MENT AS PROVIDED HEREIN. CLAIMS BASED ON IMPLIED WARRANTIES, INCLUDING WARRANTIES OF MER-
CHANTABILITY OR FITNESS FOR A PARTICULAR PURPOSE, ARE LIMITED TO ONE YEAR OR THE SHORTEST
PERIOD ALLOWED BY LAW, BUT NOT LESS THAN ONE YEAR. ELECTROLUX SHALL NOT BE LIABLE FOR CONSE-
QUENTIAL OR INCIDENTAL DAMAGES SUCH AS PROPERTY DAMAGE AND INCIDENTAL EXPENSES RESULTING FROM
ANY BREACH OF THIS WRITTEN LIMITED WARRANTY OR ANY IMPLIED WARRANTY, SOME STATES AND PROVINCES
DO NOT ALLOW THE EXCLUSION OR LIMITATION OF INCIDENTAL OR CONSEQUENTIAL DAMAGES, OR LIMITATIONS ON
THE DURATION OF IMPLIED WARRANTIES, SO THESE LIMITATIONS OR EXCLUSIONS MAY NOT APPLY TO YOU. THIS
WRITTEN WARRANTY GIVES YOU SPECIFIC LEGAL RIGHTS, YOU MAY ALSO HAVE OTHER RIGHTS THAT VARY FROM
STATE TO STATE,
If You Need Service
Keep your receipt, delivery slip, or some other appropriate payment record to establish the warranty period should service be
required. If service is performed, it is in your best interest to obtain and keep all receipts. Service under this warranty must be
obtained by contacting Electrolux at the addresses or phone numbers below.
This warranty only applies in the USA, Puerto Rico and Canada. In the USA and Puerto Rico, your appliance is warranted by
Electrolux Major Appliances North America, a division of Electrolux Home Products, Inc. In Canada, your appliance is war-
ranted by Electrolux Canada Corp. Electrolux authorizes no person to change or add to any obligations under this warranty.
Obligations for service and parts under this warranty must be performed by Electrolux or an authorized service company.
Product features or specifications as described or illustrated are subject to change without notice.
USA
1-877-435-3287
Electrolux Major Appliances North America
RO. Box 212378
Augusta, GA 30907
Canada
1-800-265-8352
Electrolux Canada Corp.
5855 Terry Fox Way
Mississauga, Ontario, Canada LSV 3E4

 Loading...