

Electrolux CEI30EF5GSC, EI30EF55GBA, EI30EF55GBB, EI30EF55GSD, CEI30EF5GWB Owner’s Manual
...
Use _ Care Guide
30" Free-Standing Perfect Set TM Electric _ange
Finding Information
Tabmeof contents Pmease read & save this guide
Findinginformation ..................................................... 2 ThankyouforchoosingElectrolux thenewpremium
SAFETY ................................................................... 3-5 brand in homeappliances. This Use &Care Guide is
Features .................................................................. 6-9 partofourcommitmenttocustomersatisfactionand
Getting Started ,:................................................. 10-11 product quality throughout the service life of your new
e Power up &t mers I0 •
Control lock & oven hghts ................................... 11
SettingsforBestResults .................................... 12-13 Weviewyourpurchaseasthebeginning of a
SurfaoeCooking ....................................................... 14 relationship.Toensureourabilitytocontinueserving
SettingSurfaceControls .................................... 15-18 you pleaseusethispagetorecordimportant
, Settingcooktopcontrols ............................... 16-17 productinformation.
Setting warmerzone ........................................... 18
DisplayAbbreviations ............................................... = r nrA fnr
SettingOvenControls ......................................... 20-37 _ ...... _
: . Rapidpreheat ...................................................... 20 reference
Bake .................................................................... 2I
, Usingcooktime .................................................. 22
Usingcooktimewithendtime ............................ 23 _--
::: _ Broil .............................................................. 24-25 b'urcnaseaate
Convectionbake ................................................. 26
, Usingconvectionconvert .................................... 27 ------
• Convectionroast ........................................... 28-29 Electroluxmodelnumber
Convection broil .................................................. 30
Keep warm .......................................................... 31
• SIowcook ........................................................... 32 Electroluxserialnumber
Dehydrate ............................................................ 33
Bread proof ......................................................... 34
Saving & recalling my favorite recipes .................. 35
Setting Sabbath mode ................................... 36-37
Setting Warmer Oven Controls .......................... 39-40
Keep warm .................................................... 39-40
Setting Your Preferences ................................... 41-46
Setting clock ....................................................... 4I
, Setting clock display (CLO) ................................. 4I
Setting 12 or 24 hour mode (CLO) ....................... 42
, Changing between F° or C°(F-C) ........................ 42
Setting 12hr energy saving mede(ES) ................. 43
, Setting audio mode (AUD) ................................... 43
Adjusting oven temperature (UPO) ...................... 44
, Adjusting lower oven temperature (UPO) ............. 44
, Factory default reset (RST) ................................... 45
User preferences chart ......................................... 46
Self-Clean ........................................................... 47-48
Care & Cleaning .................................................. 49-56
Cleaning recommendations ........................... 49-40
Cooktop maintenance ......................................... 51
Cooktop cleaning .......................................... 51-52
Oven door removal ........................................ 53-54
Changing oven lights .................................... 55-56
Solutions to Common Problems ......................... 57-59
Notes ................................................................... 60-62
Warranty ................................................................... 63
•: ........................................... appliance.
For toll-free telephone support in the U.S. and
Canada:
1-877-4ELECTROLUX (1-877-435-3287)
For online support and Internet production
informationvisit http://www.electroluxusa.com
i_i!_!_i!i_iii_!i!_!_i!i_iii_!i!_!_i!i_iii_!i!_!_i!i_iii_!i!_!_i!i_iii_!i!_!_i!i_iii_!i!_!_i!i_iii_!i!_!_i!i_iii_!i!_!_i!i_iii_!i!_!_i!i_iii_!i!_!_i!i_i__i ©2007 ElectroluxHome Products, Inc. All rights reserved. Printed inthe USA
Important safety instructions
Recognize safety symbols, words and
labels
Safety items throughout this manual are labeled with
a WARNING or CAUTION based on the risk type as
described below:
This symbol alerts you to situations that may
cause serious body harm, death or property
damage.
This symbol alerts you to situations that may
cause bodily injury or property damage.
Read all of the following safety instructions
before using this appliance:
Safety
• Remove all tape and packaging before using
the range. Destroy the carton and plastic bags
after unpacking the range. Never allow children
to play with packaging material.
• Proper installation= Be sure your appliance is
properly installed and grounded by a qualified
technician in accordance with the National
Fuel Gas Code ANSi Z223= latest edition, or in
Canada CAN/CGA B149.1 and CAN/GGA
B149.2, and the National Electrical Code
ANS[/NFPA No.70=latest edition, or in Canada
CSA Standard 022.1, Canadian Electrical
Code, Part 1, and local code requirements.
Install only per installation instructions provided
in the literature package for this range.
Ask your dealer to recommend a qualified
technician and an authorized repair service.
Know how to disconnect the power to the range
at the circuit breaker or fuse box in case of an
emergency.
• User servicing = Do not repair or replace any
part of the appliance unless specifically
recommended in the manuals. All other
servicing should be done only by a qualified
technician. This may reduce the risk of personal
injuryand damage to the range.
Never modify or alter the construction of a
range by removing leveling legs, panels, wire
covers, anti=tip brackets/screws, or any other
part of the product.
Save these instructions for future
reference.
surface zones and oven heating elements may
be hot even though they are dark in color. Areas
near surface zones may become hot enough to
cause burns. During and after use, do not touch,
or let clothing or other flammable materials touch
these areas until they have had sufficient time to
cool. Among these areas are the cook top,
surfaces facing the cook top, the oven vent
openings and surfaces near these openings,
oven door and window.
Wear proper apparel = Loose=fitting or
hanging garments should never be worn
while using the appliance. Do not let clothing or
other flammable materials contact hot surfaces.
• Do not use water or flour on grease fires=
Smother the fire with a pan lid, or use baking
soda, a dry chemical or foam =type
extinguisher.
• When heating fat or grease, watch it closely.
Fat or grease may catch fire if allowed to
become too hot.
Use only dry potholders =Moist or damp
potholders on hot surfaces may result in
burns from steam. Do not let potholders touch
hot heating elements. Do not use a towel or other
bulky cloth instead of a potholder.
before turning it on, and turn the zone off before
removing the pan.
Use proper pan size--This appliance is
equipped with one or more surface units of
different sizes. Select utensils having flat bottoms
large enough to cover the surface unit heating
element. The use of undersized utensils will
expose a portion of the heating element to direct
contact and may result inignitionof clothing.
Proper relationship of utensil to element will also
improve efficiency.
Utensil handles should be turned inward and
not extend over adjacent surface elements--To
reduce the risk of burns, ignition of flammable
materials, and spillage due to unintentional
contact with the utensil, the handle of the utensil
should be positioned so that it isturned inward,
and does not extend over adjacent surface units.
,, Never leave surface elements unattended at
high heat settings-- Boilovers cause smoking
and greasy spillovers that may ignite, or a pan
that has boiled dry may melt.
• Do not immerse or soak removable heating
elements= Heating elements should never be
immersed inwater. Heating elements clean
themselves during normal operation.
ImpoAant safety instructions
Safety
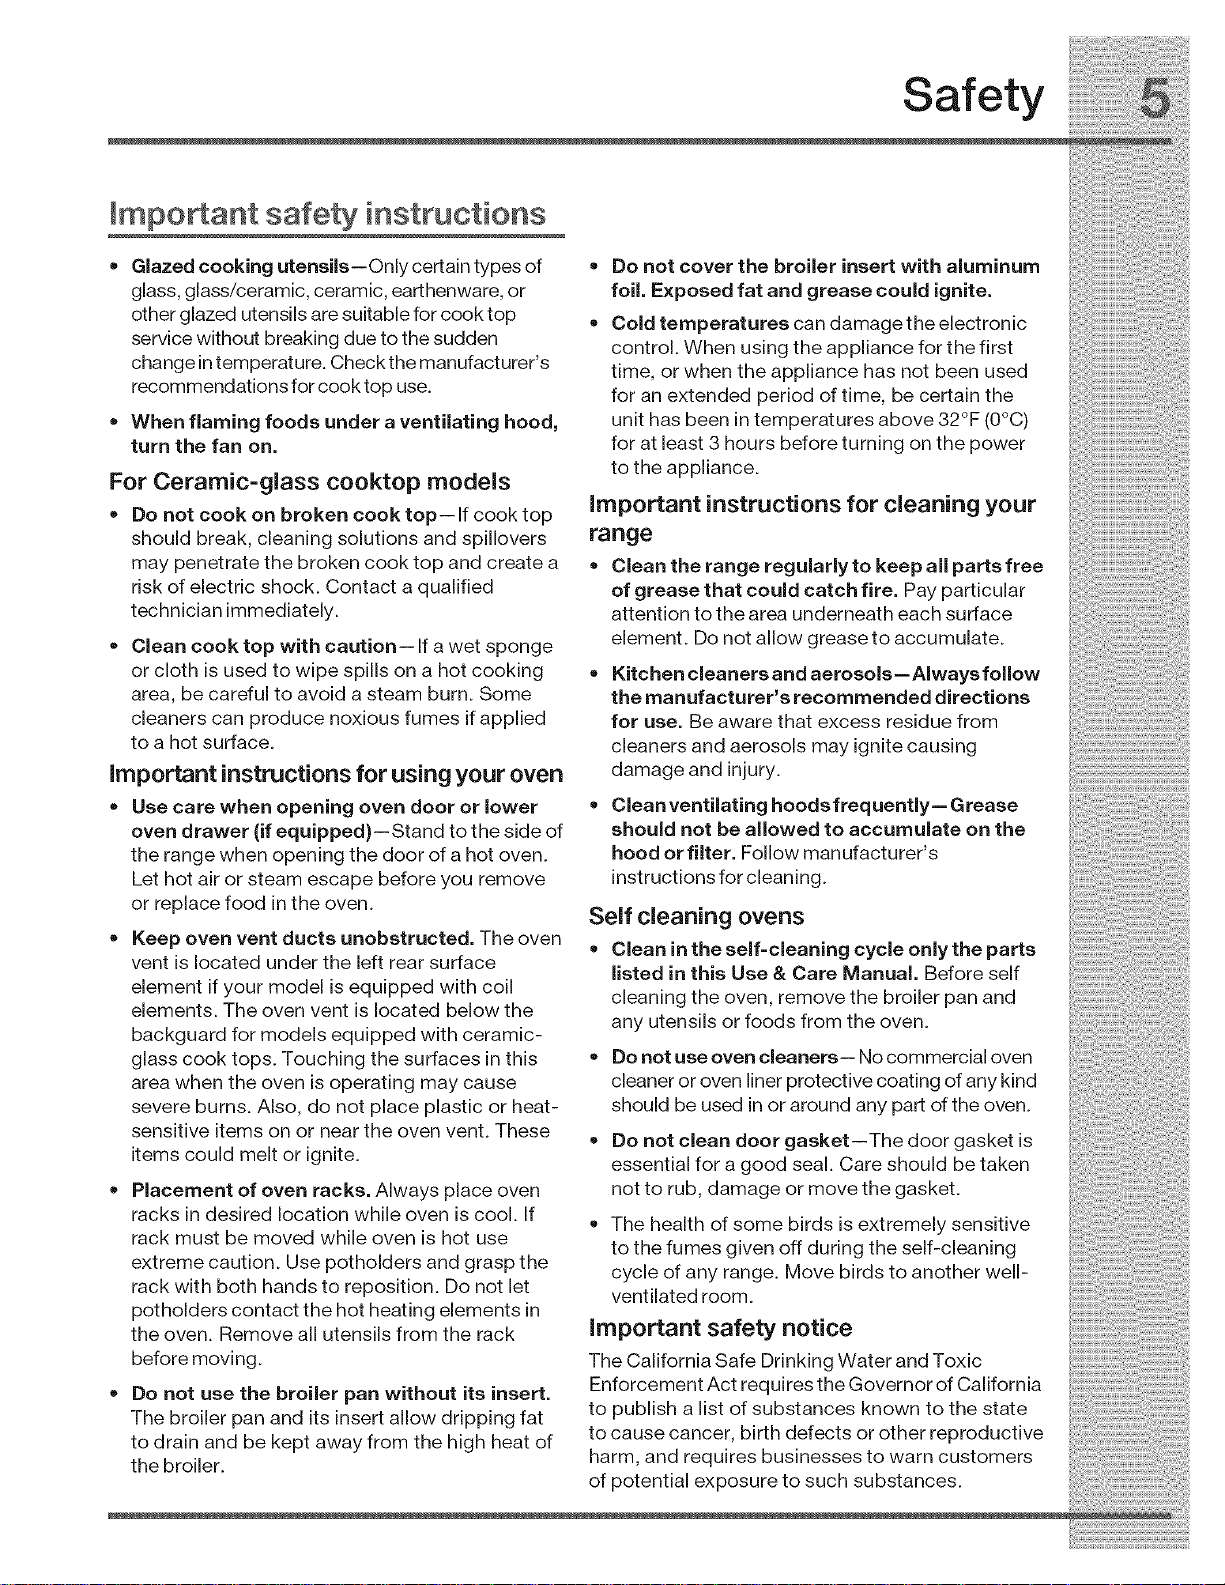
• Glazed cooking utensils--Only certain types of
glass, glass!ceramic, ceramic, earthenware, or
other glazed utensils are suitable for cook top
service without breaking due to the sudden
change intemperature. Check the manufacturer's
recommendations for cook top use.
When flaming foods under a ventilating hood,
turn the fan on.
= Do not cover the broiler insert with aluminum
foil. Exposed fat and grease could ignite.
= Cold temperatures can damage the electronic
control. When using the appliance for the first
time, or when the appliance has not been used
for an extended period of time, be certain the
unit has been intemperatures above 32°F (0°C)
for at least 3 hours before turning on the power
to the appliance.
For Ceramic=glass cooktop models
= Do not cook on broken cook top-- Ifcook top
should break, cleaning solutions and spillovers
may penetrate the broken cook top and create a
risk of electric shock. Contact a qualified
technician immediately.
• Clean cook top with caution-- If a wet sponge
or cloth is used to wipe spills on a hot cooking
area, be careful to avoid a steam burn. Some
cleaners can produce noxious fumes if applied
to a hot surface.
important instructions for using your oven
• Use care when opening oven door or lower = Clean ventilating hoodsfrequently= Grease
over= drawer ( f equ pped)--Stand to the s de of should not be allowed to accumulate on the
the range when opening the door of a hot oven. hood or filter. Follow manufacturer s
Let hot air or steam escape before you remove instructions for cleaning.
or rep ace food n the oven A,_ -,_=: .......
• Keep oven vent ducts unobstructed. The oven .............. :
vent is located under the left rear surface =istea in this bse & Care IVianuaL Before self :::::::
element if your model is equipped with coil cleaning the oven, remove the broiler pan and
elements. The oven vent _slocated below the ........
backguard for models equipped with ceramic- ::::::
glass cook tops. Touching the surfaces in this • Do not use oven cleaners-- No commercial oven
area when the oven is operating may cause cleaner or oven liner protective coating of any kind
severe burns. Also, do not place plastic or heat- should be used inor around any part of the oven.
sensitive items on o.r near the oven vent. These = Do not clean door gasket--The door gasket is
items could melt or ignite, essential for a good seal. Care should be taken
• Placement of oven racks. Always place oven not to rub, damage or move the gasket.
racks in desired location while oven is cool If
• " " . " . " " = The health of some birds is extremely sensitive ::
rack must be moved while oven is hot use
extreme cau!2,n. Use.potholder.s and grasp the cycle of any range. Move birds to another well-
rack wltn bOth nanas to reposmon. L)Onot let vent ated room
potholders contact the hot heating elements in " .
the oven. Remove all utensils from the rack important safety not|ce
before moving. The California Safe Drinking Water and Toxic
• Do not use the broiler pan without its insert. Enforcement Act requires the Governor of California
The broiler pan and its insert allow dripping fat to pubhsh a hst of substances known to the state
to drain and be kept away from the high heat of to cause cancer, birth defects or other reproductive
the bro er harm, and requires businesses to warn customers ::
important instructions for cleaning your
range
• Clean the range regularly to keep all parts free
of grease that could catch fire. Pay particular
attention to the area underneath each surface
element. Do not allow greaseto accumulate.
• Kitchen cleaners and aerosols--Always follow
the manufacturer s recommended directions
for use. Be aware that excess residue from
cleaners and aerosols may ignite causing
damage and injury.
Sell uleainily uveil_ :;:;
= L;lean In 1:he selT=cleanlng cycle only _ne parl:s
any u[enslls or TOOaSTrom[ne oven.
to the fumes given off during the self-cleaning
of potential exposure to such substances.
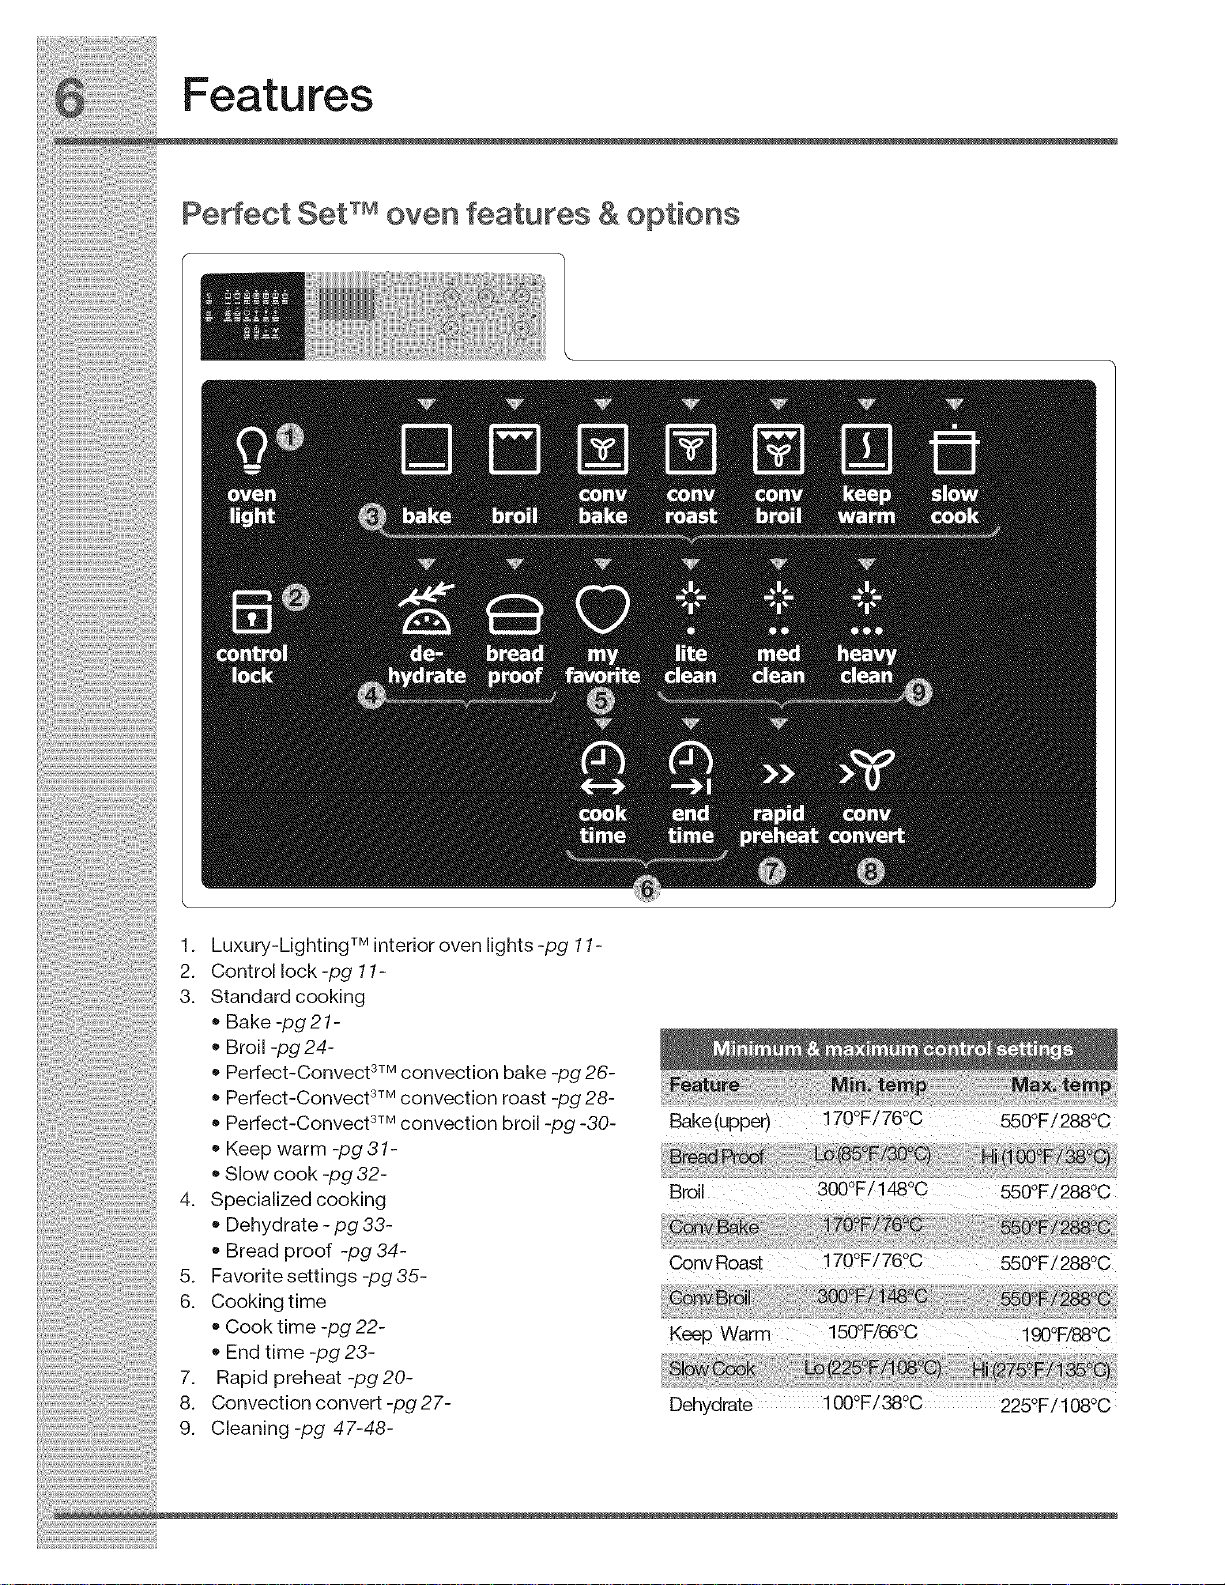
1. Luxury-LightingTM interior oven lights -pg 11-
2. Control lock -pg 11-
3. Standard cooking
• Bake -lag 21-
Broil -pg 24-
Peffect-Convect 3TMconvection bake -pg 26-
• peffect-Convect 3TMconvection roast -pg 28-
• peffect-Convect 3TMconvection broil -pg -30-
Keep warm -lag 31-
Slow cook -lag 32-
4. Specialized cooking
Dehydrate - pg 33-
Bread proof -pg 34-
5. Favorite settings -pg35-
6. Cooking time
Cook time -pg 22-
End time -pg 23-
7. Rapid preheat -lag 20-
8. Convection convert -pg 27-
9. Cleaning-pg 47-48-
Bake(upper) 170°FZ76°C 550°F/288°C
Broil 300°F!!480C 550°F!2880C
Conv Roast 170°F/76°C 550°F/288°C
Keep Warm 150°F/66°C i 90°F/88°C
Dehydrate 1000F/38°C 225OF/108oc
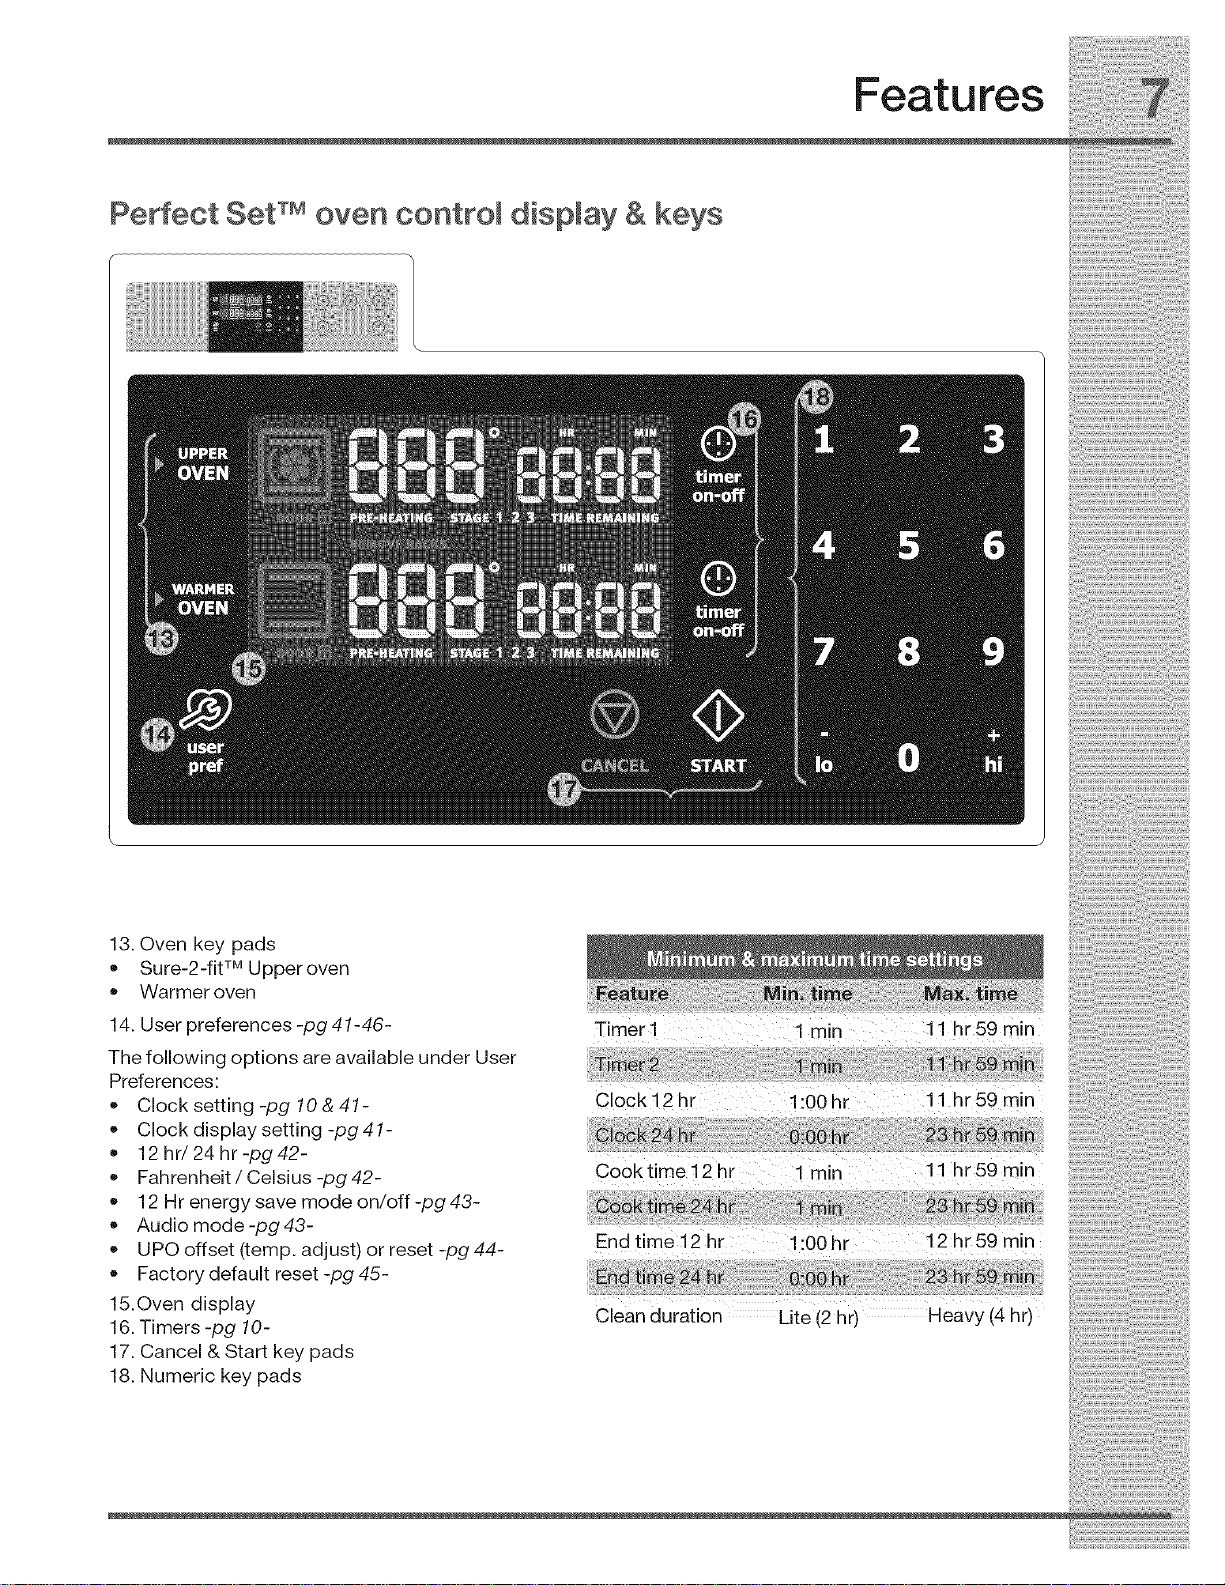
Perfect Set TM oven controm dispmay & keys
Features
13. Oven key pads
• Sure-2-flt TM Upperoven
• Warmer oven
14. User preferences -pg 41-46-
The following options are available under User
Preferences:
• Clock setting -pg 10 & 41-
Clock display setting -pg 41-
12 hr/24 hr -pg 42-
Fahrenheit / Celsius -pg 42-
12 Hr energy save mode on/off -pg 43-
Audio mode -pg 43-
UPO offset (temp. adjust) or reset -pg 44-
Factory default reset -pg 45-
15.Oven display
16.Timers -pg 10-
17. Cancel & Start key pads
18. Numeric key pads
Timer i 1rain 11 hr59min
Clock 12 hr i :00 hr 11 hr 59 min
Cooktime i2 hr 1rain ii hr59min
End time 12 hr i:00hr 12 hr59 min
Clean duration Lite (2 hr) Heavy (4hr)
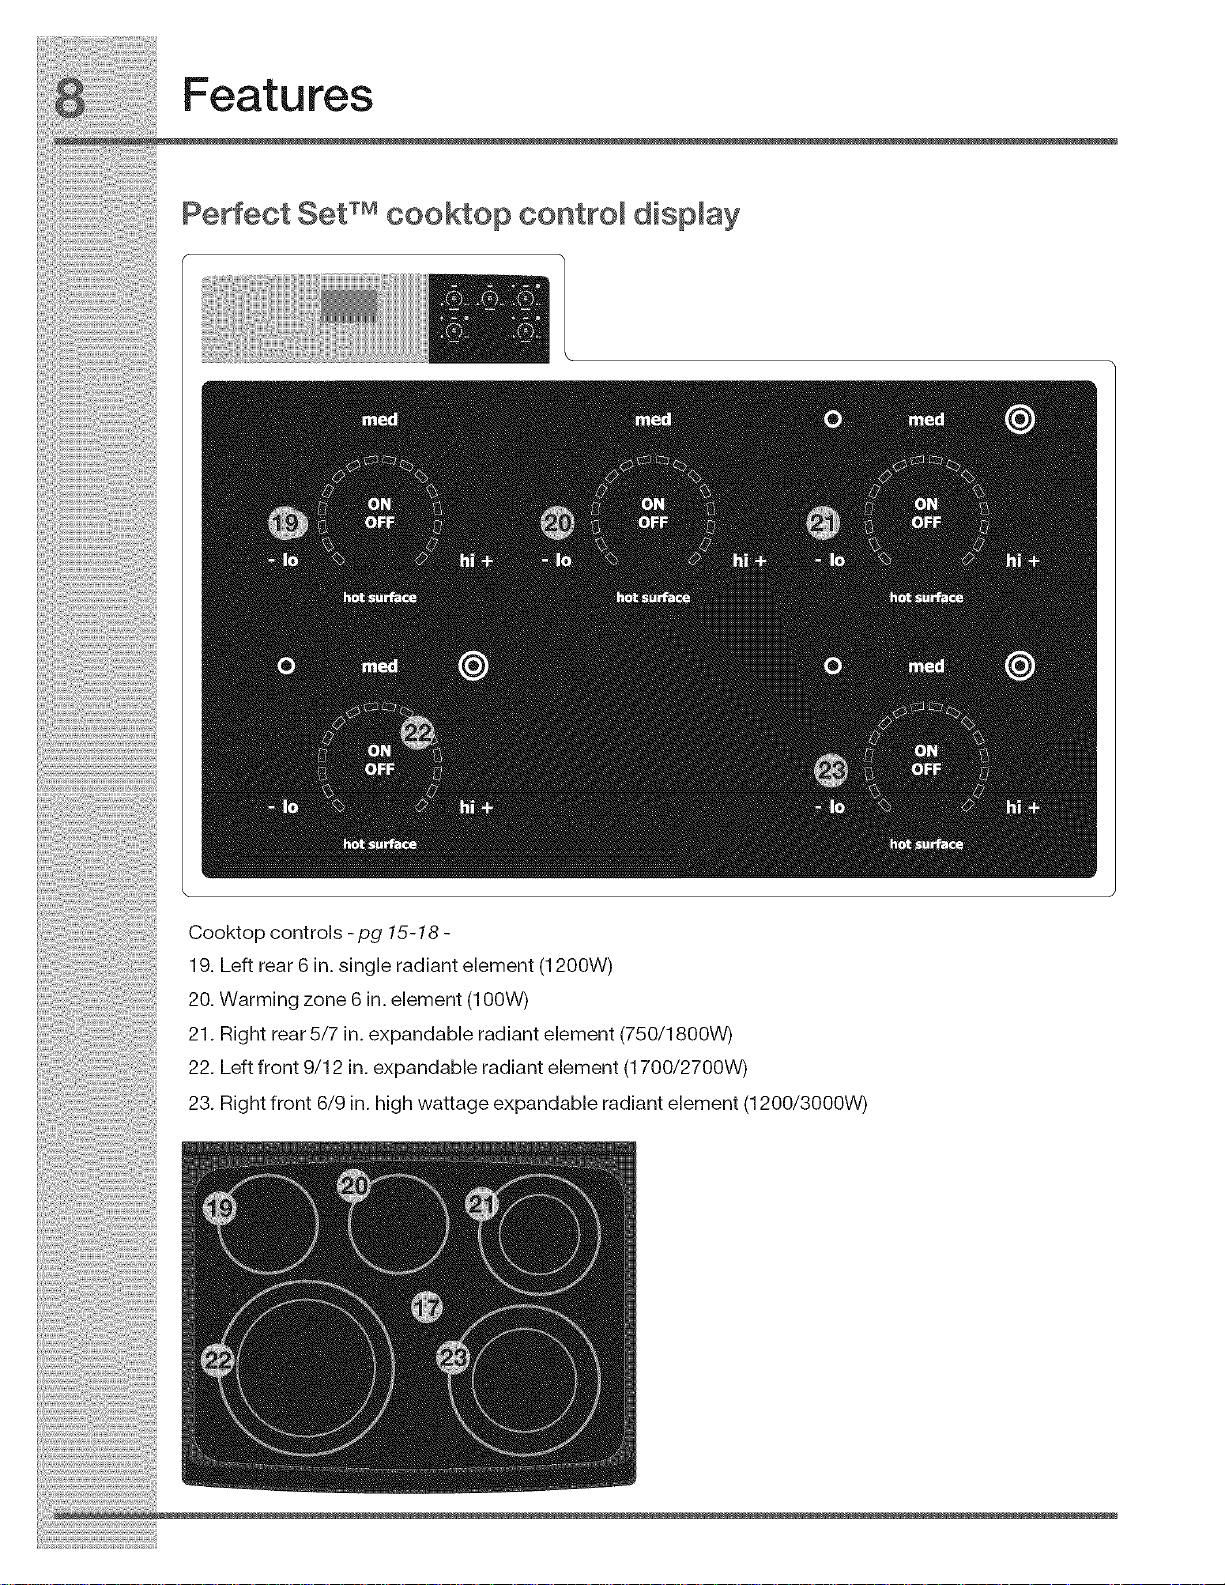
Cooktopcontrols-pg 15-18 -
19. Left rear 6 in. single radiant element (1200W)
20. Warming zone 6 in. element (100W)
21. Right rear 5/7 in. expandable radiant element (750/1800W)
22. Left front 9/12 in. expandable radiant element (1700/2700W)
23. Right front 6/9 in. high wattage expandable radiant element (1200/3000W)
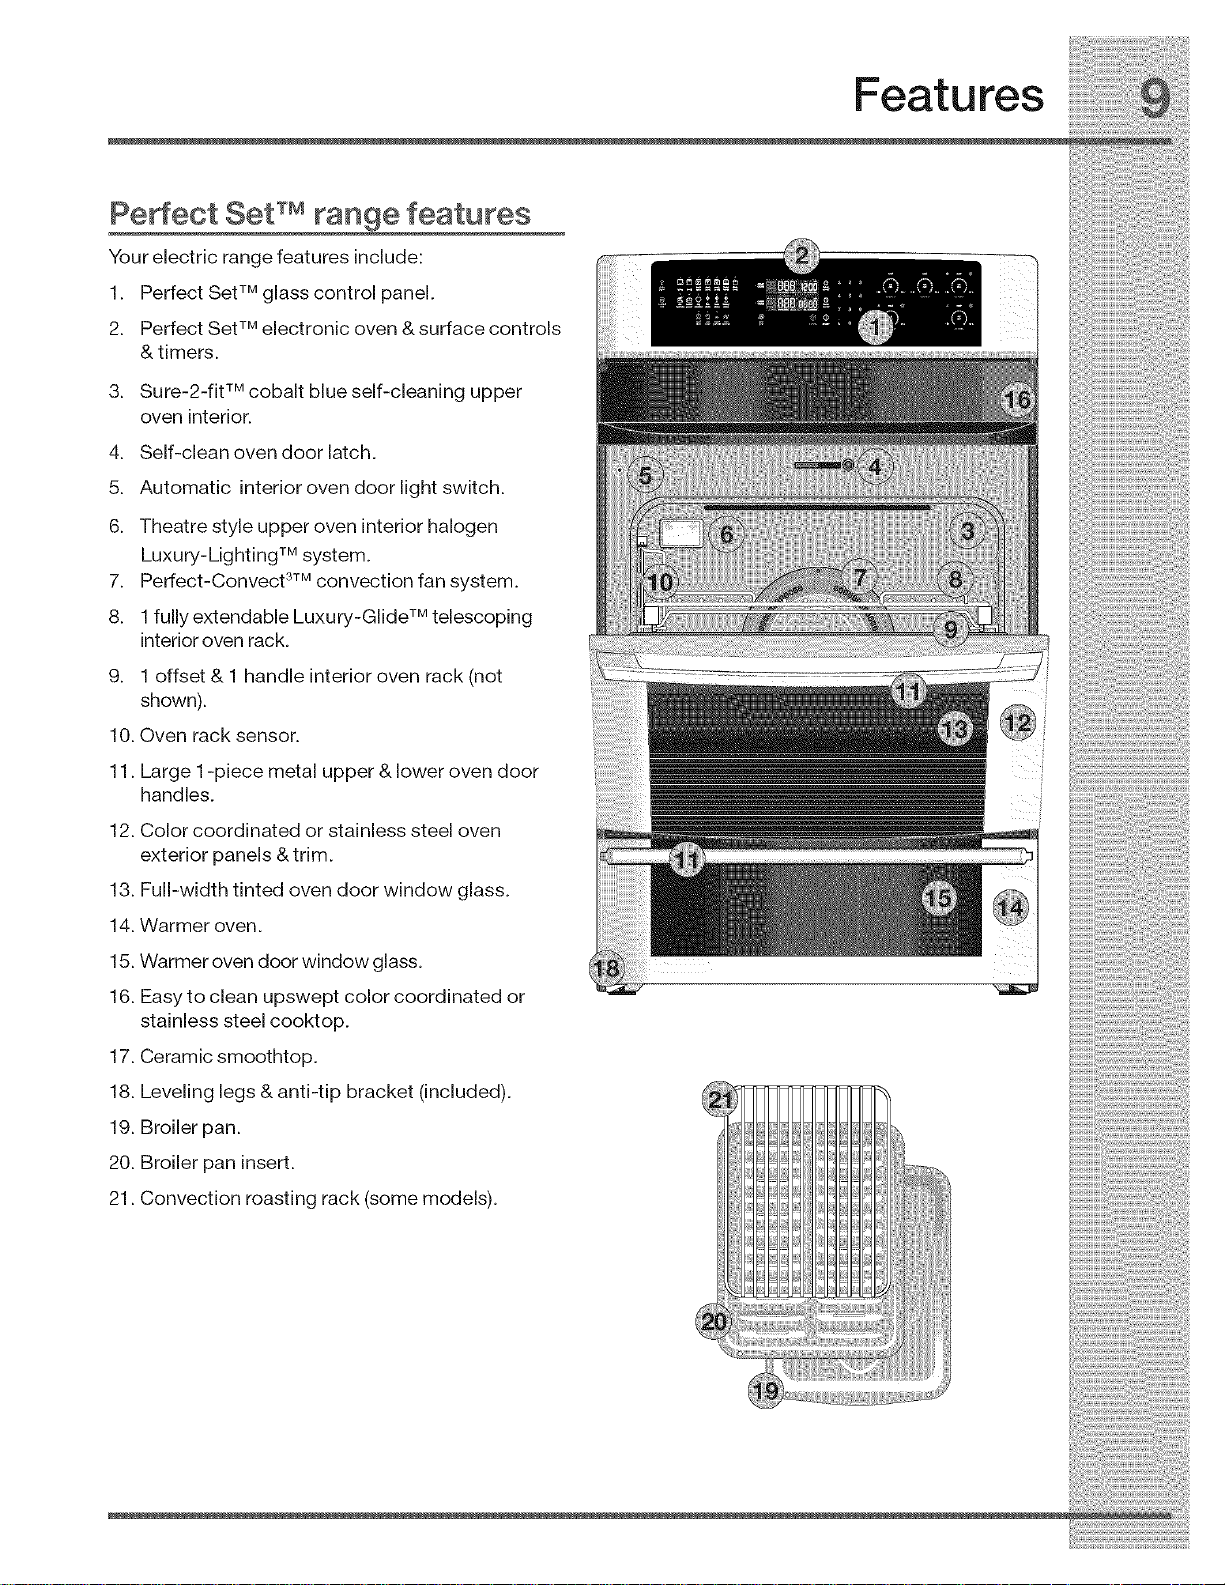
Pe ect Set TMrange features
YoureJectrJcrangefeaturesJnclude:
1. PerfectSetTMglasscontrolpanel.
2. PerfectSetTMelectronicoven &surfacecontrols
&timers.
3. Sure-2-fjtTMcobaltblueself-cleanJngupper
oven interior.
4. Self-cleanovendoorlatch.
5. Automatic interiorovendoorlightswitch.
6. Theatre style upper oven interior halogen
Luxury-Lighting TM system.
7. Perfect-Convect 3TMconvection fan system.
8. 1fully extendable Luxury-Glide TM telescoping
interior oven rack.
9. 1 offset & 1 handle interior oven rack (not
shown).
10.Oven rack sensor.
Features
11. Large 1-piece metal upper & lower oven door
handles.
12. Color coordinated or stainless steel oven
exterior panels &trim.
13. Full-width tinted oven door window glass.
14.Warmer oven.
15.Warmer oven door window glass.
16. Easy to clean upswept color coordinated or
stainless steel cooktop.
17. Ceramic smoothtop.
18. Leveling legs &anti-tip bracket (included).
19. Broiler pan.
20. Broiler pan insert.
21. Convection roasting rack (some models).

Getting Started
SeAing clock at power up
You will be prompted to enter the time of day in the
event of a power failure or when you first provide
electric power to your appliance.
• When your appliance is first powered up, 12:00
will flash in the display.
• Enter the time of day using the numeric key
pads and press START to set.
If an invalid time of day is entered, the control will
triple beep. Re-enter a valid time of day and press
START. If CANCEL is pressed your clock will start
with thetime set for 12:00.
Select the user pref key to modify the time of day
during other situations such as day light savings.
The two timers provided with the oven control
serve as extra reminders in the kitchen. When a
timer reaches less than 1 minute the display will
start to count down in seconds. When the time
runs out the active timer will beep, "00:00" will
display and the timer key will flash.
The following time settings apply to the timers:
Min. time: 1 minute
Max. time: 11 hours 59 minutes
See example below to set the timer for 5 minutes:
1. Press TIMER Q
2. Enter 5 minutes 5
3. Press TIMER Q
To cancel after setting the timer, press the TIMER
key again.
Getting Started
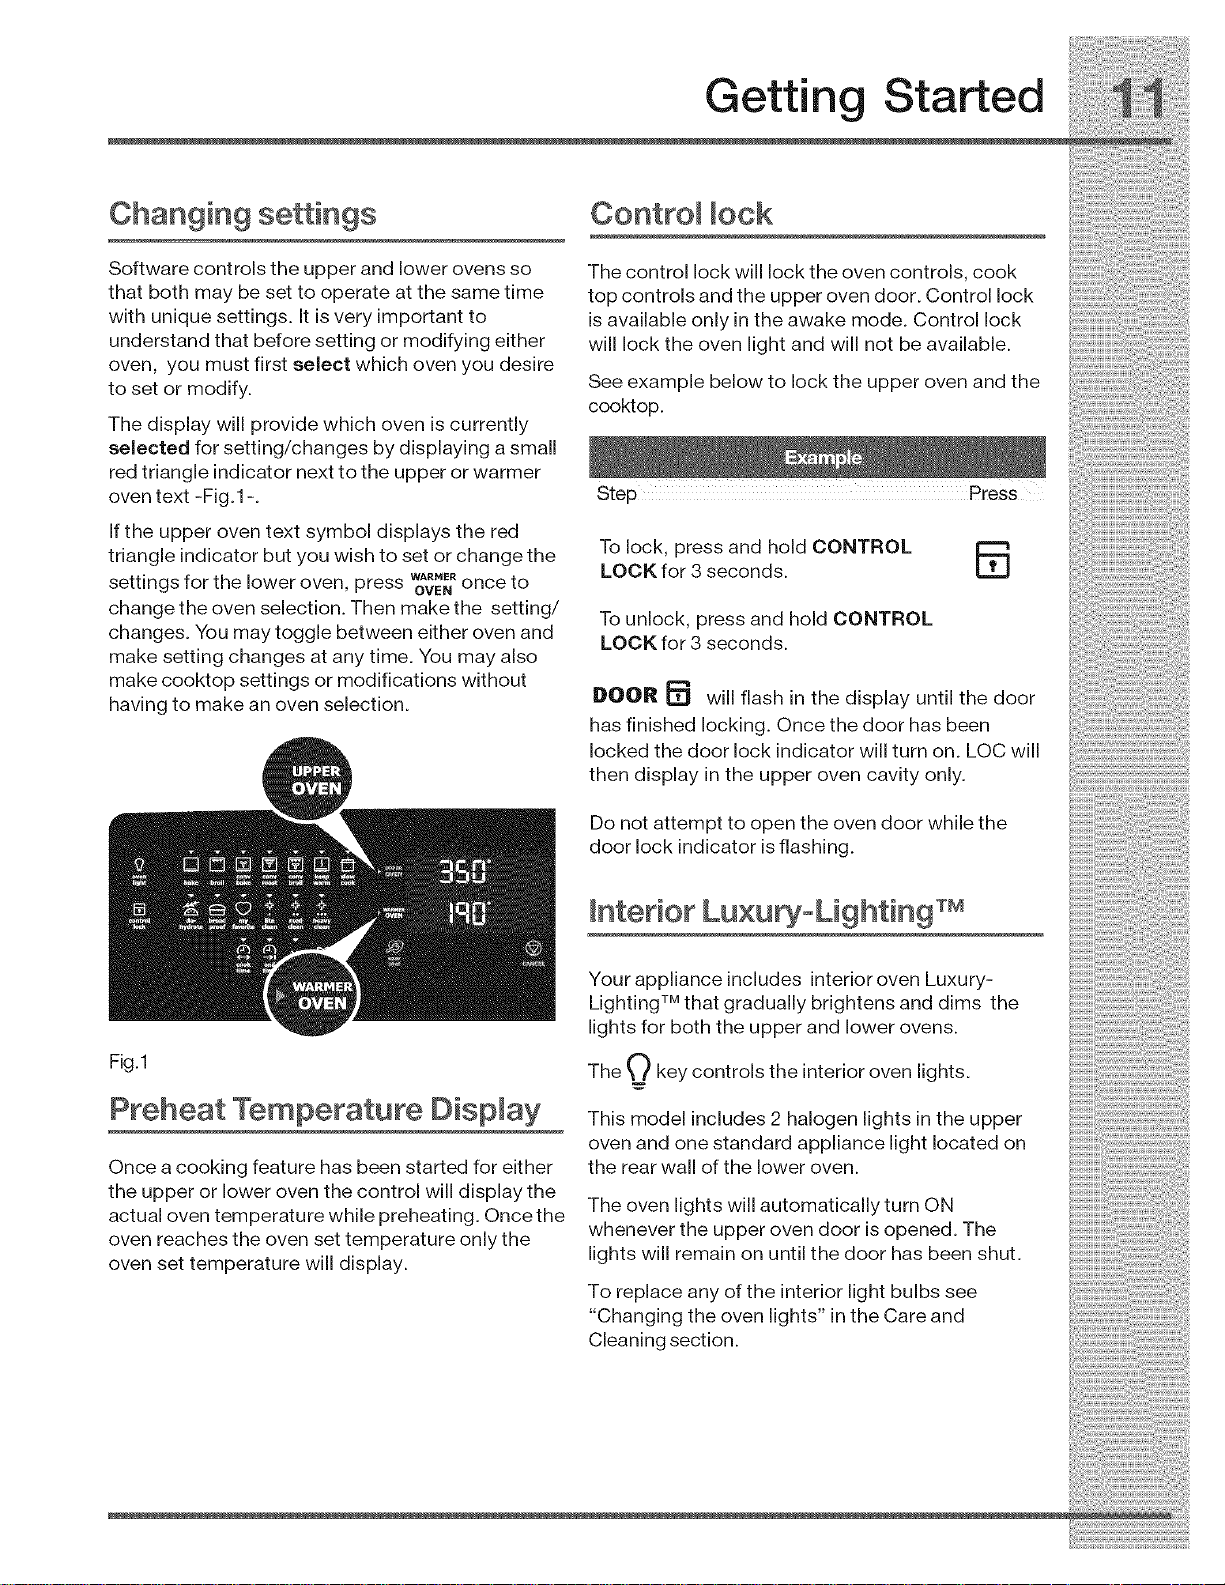
Changing settings
Software controls the upper and lower ovens so
that both may be set to operate at the same time
with unique settings. It is very important to
understand that before setting or modifying either
oven, you must first select which oven you desire
to set or modify.
The display will provide which oven is currently
selected for setting/changes by displaying a small
red triangle indicator next to the upper or warmer
oven text -Fig.1 -.
If the upper oven text symbol displays the red
triangle indicator but you wish to set or change the
settings for the lower oven, press WA_ME_once to
change the oven selection. Then make the setting/
changes. You may toggle between either oven and
make setting changes at any time. You may also
make cooktop settings or modifications without
having to make an oven selection.
OVEN
Control lock
The control lock will lock the oven controls, cook
top controls and the upper oven door. Control lock
is available only in the awake mode. Control lock
will lock the oven light and will not be available.
See example below to lock the upper oven and the
cooktop.
To lock, press and hold CONTROL
LOCK for 3 seconds. _L.tJ
To unlock, press and hold CONTROL
LOCK for 3 seconds.
DOOR _ will flash in the display until the door
has finished locking. Once the door has been
locked the door lock indicator will turn on. LOC will
then display in the upper oven cavity only.
Fig.1
Preheat Temperature Display
Once a cooking feature has been started for either
the upper or lower oven the control will display the
actual oven temperature while preheating. Once the
oven reaches the oven set temperature only the
oven set temperature will display.
Do not attempt to open the oven door while the
door lock indicator is flashing.
Interior Lu×u oLighting TM
Your appliance includes interior oven Luxury-
Lighting TM that gradually brightens and dims the
lights for both the upper and lower ovens.
The O key controls the interior oven lights.
This model includes 2 halogen lights in the upper
oven and one standard appliance light located on
the rear wall of the lower oven.
The oven lights will automatically turn ON
whenever the upper oven door is opened. The
lights will remain on until the door has been shut.
To replace any of the interior light bulbs see
"Changing the oven lights" in the Care and
Cleaning section.
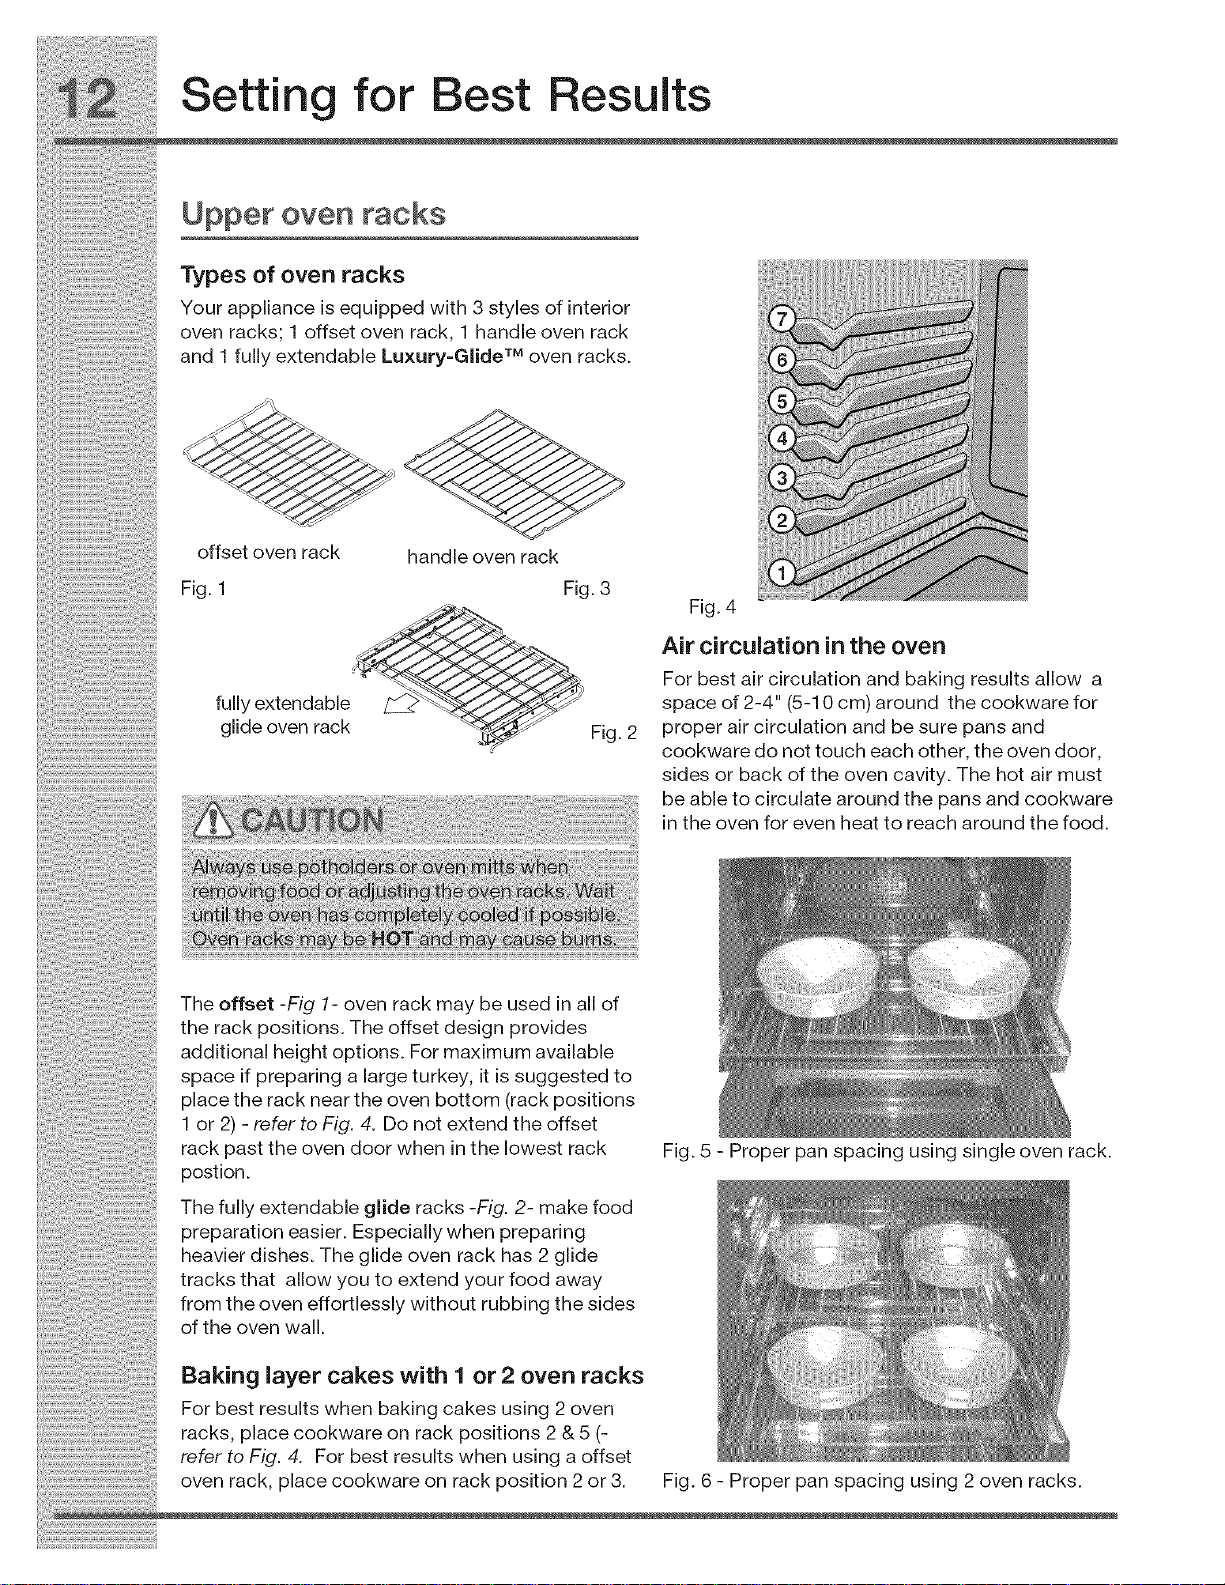
Theoffset-Fig1- oven rack may be used in all of
the rack positions. The offset design provides
additional height options. For maximum available
space if preparing a large turkey, it is suggested to
place the rack near the oven bottom (rack positions
1 or 2)- refer to Fig. 4. Do not extend the offset
rack past the oven door when in the lowest rack
postion.
The fully extendable glide racks -Fig. 2- make food
preparation easier. Especially when preparing
heavier dishes. The glide oven rack has 2 glide
tracks that allow you to extend your food away
from the oven effortlessly without rubbing the sides
of the oven wall.
Baking layer cakes with 1 or 2 oven racks
For best results when baking cakes using 2 oven
racks, place cookware on rack positions 2 & 5 (-
refer to Fig. 4. For best results when using a offset
oven rack place cookware on rack position 2 or 3.
Fig. 5 - Proper pan spacing using single oven rack.
Fig. 6 - Proper pan spacing using 2 oven racks.
Upper oven racks
Setting for Best Results
extendable glide rack
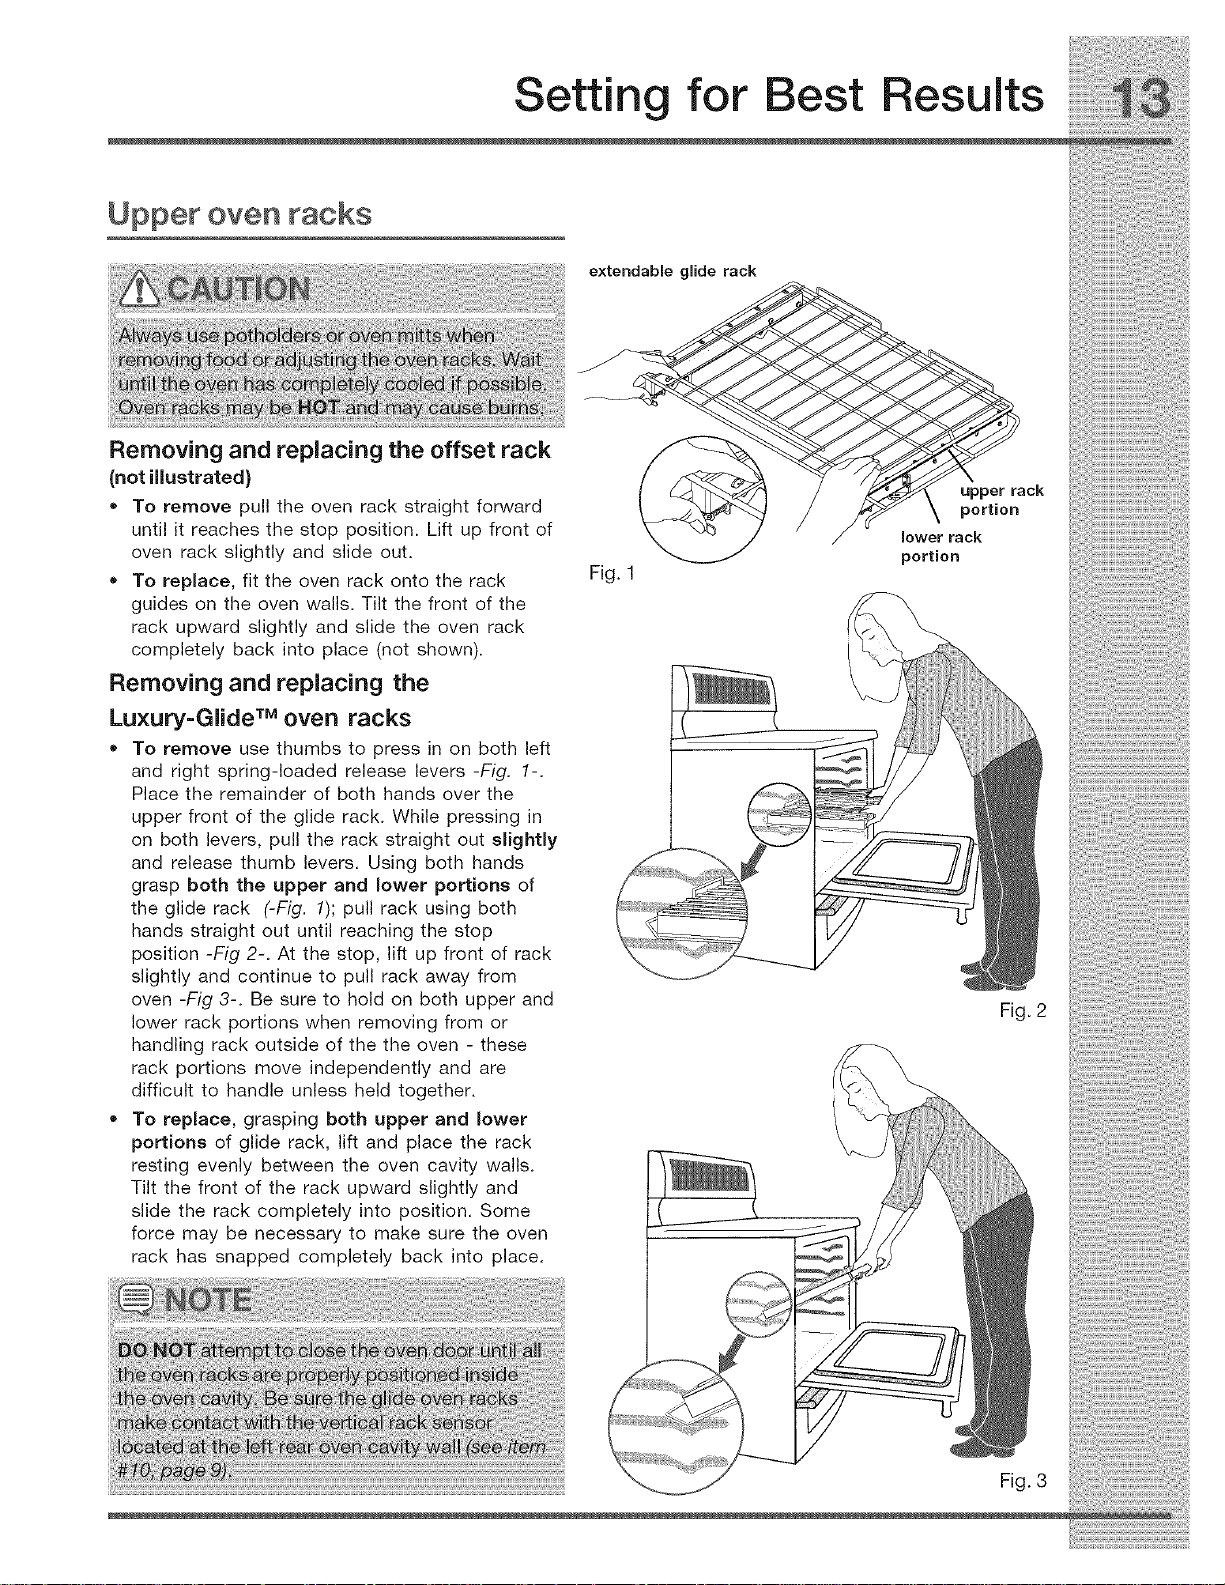
Removing and replacing the offset rack
(not illustrated)
• To remove pull the oven rack straight forward
until it reaches the stop position. Lift up front of
oven rack slightly and slide out.
• To replace, fit the oven rack onto the rack
guides on the oven walls. Tilt the front of the
rack upward slightly and slide the oven rack
completely back into place (not shown).
Removing and replacing the
Luxury=Glide TM oven racks
• To remove use thumbs to press in on both left
and right spring-loaded release levers -Fig. 1-.
Place the remainder of both hands over the
upper front of the glide rack. While pressing in
on both levers, pull the rack straight out slightly
and release thumb levers. Using both hands
grasp both the upper and lower portions of
the glide rack (-Fig. 1); pull rack using both
hands straight out until reaching the stop
position -Fig 2-. At the stop, lift up front of rack
slightly and continue to pull rack away from
oven -Fig 3-. Be sure to hold on both upper and
lower rack portions when removing from or
handling rack outside of the the oven - these
rack portions move independently and are
difficult to handle unless held together.
• To replace, grasping both upper and lower
portions of glide rack, lift and place the rack
resting evenly between the oven cavity walls.
Tilt the front of the rack upward slightly and
slide the rack completely into position. Some
force may be necessary to make sure the oven
rack has snapped completely back into place.
ck
/_ \ portion
lower rack
portion
Fig. 1
Fig. 2
Fig. 3
i_!_i_Ji_i_i%_;_i_i!5_i!_:;_:_i;i_i_i_i!_!_!iii_i_!_i_:_!
Surface Cooking
Cookware
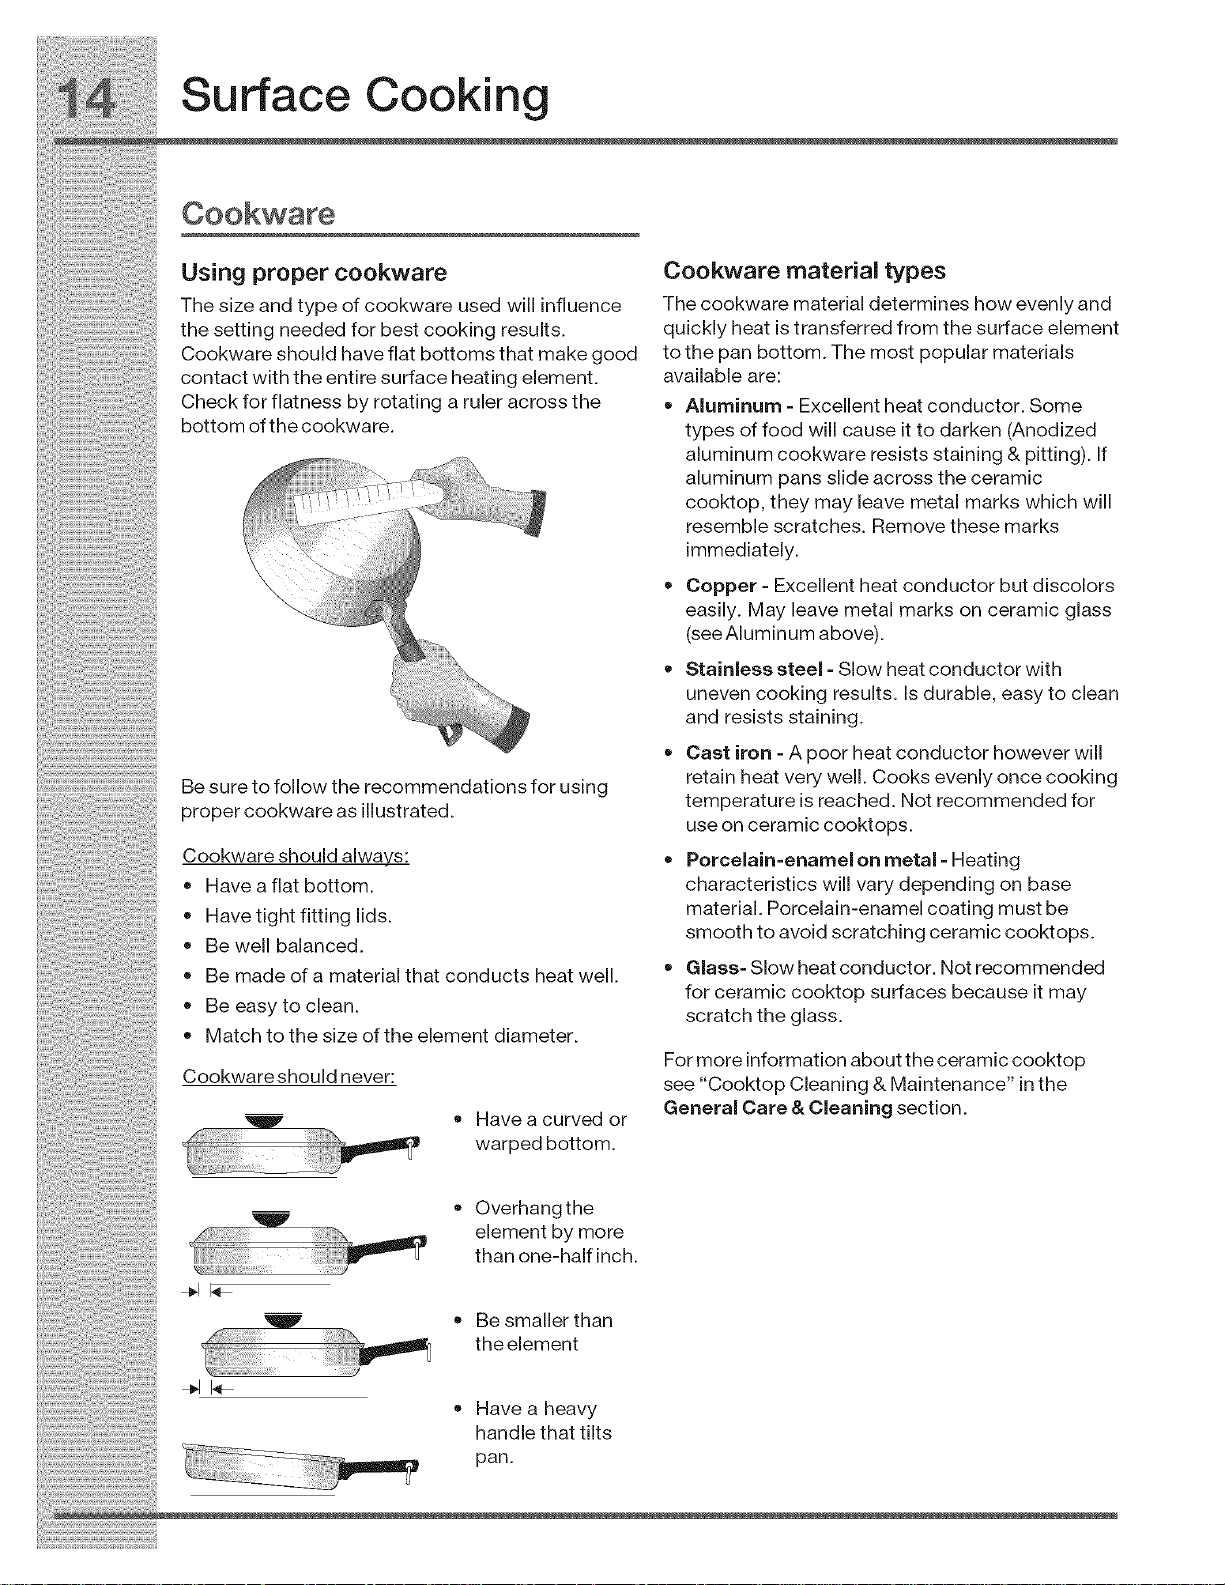
Us ngpropercookware Cookwarem t typ =
Thesizeandtypeofcookware used will influence Thecookwarematefialdetermineshowevenlyand
thesettingneededforbestcookingresults, quicklyheatistransferredfromthesurfaceelement
Cookwareshouldhaveflatbottomsthatmakegood tothepanbottom. Themostpopularmaterials
contactwiththeentiresurfaceheatingelement, available are:
Checkforfiatnessbyrotatingaruleracrossthe • Aluminum-Excellentheatconductor. Some
bottomofthecookware, typesoffoodwillcauseittodarken(Anodized
aluminumcookwareresistsstaining&pitting). If
aluminum panssfdeacrosstheceramic
cooktop, theymayleavemetal markswhichwill
resemblescratches. Removethesemarks
immediately.
• Copper-Excellentheatconductorbutdiscolors
easily. Mayleavemetal markson ceramicglass
(seeAluminumabove).
,, Stainlesssteel-Slowheatconductorwith
unevencookingresults. Isdurable, easytoclean
and resists staining.
..... • Cast iron-Apoorheatconductorhoweverwill
Be sure to follow the recommendations for using
proper cookware as illustrated.
Cookware should always:
Have a flat bottom.
Have tight fitting lids.
Be well balanced.
Be made of a material that conducts heat well.
• Be easy to clean.
Match to the size of the element diameter.
Cookwareshould never:
!_' • Have a curved or
I' warped bottom.
retain heat very well. Cooks evenly once cooking
temperature is reached. Not recommended for
use on ceramic cooktops.
Porcelain=enamel on metal - Heating
characteristics will vary depending on base
material. Porcelain-enamel coating must be
smooth to avoid scratching ceramic cooktops.
Glass- Slow heat conductor. Not recommended
for ceramic cooktop surfaces because it may
scratch the glass.
For more information about the ceramic cooktop
see "Cooktop Cleaning & Maintenance" in the
General Care & Cleaning section.
Overhangthe
elementbymore
than one-half inch.
• Be smaller than
theelement
Have a heavy
handle that tilts
pan.
How the cooktop works
Setting Surface Controls
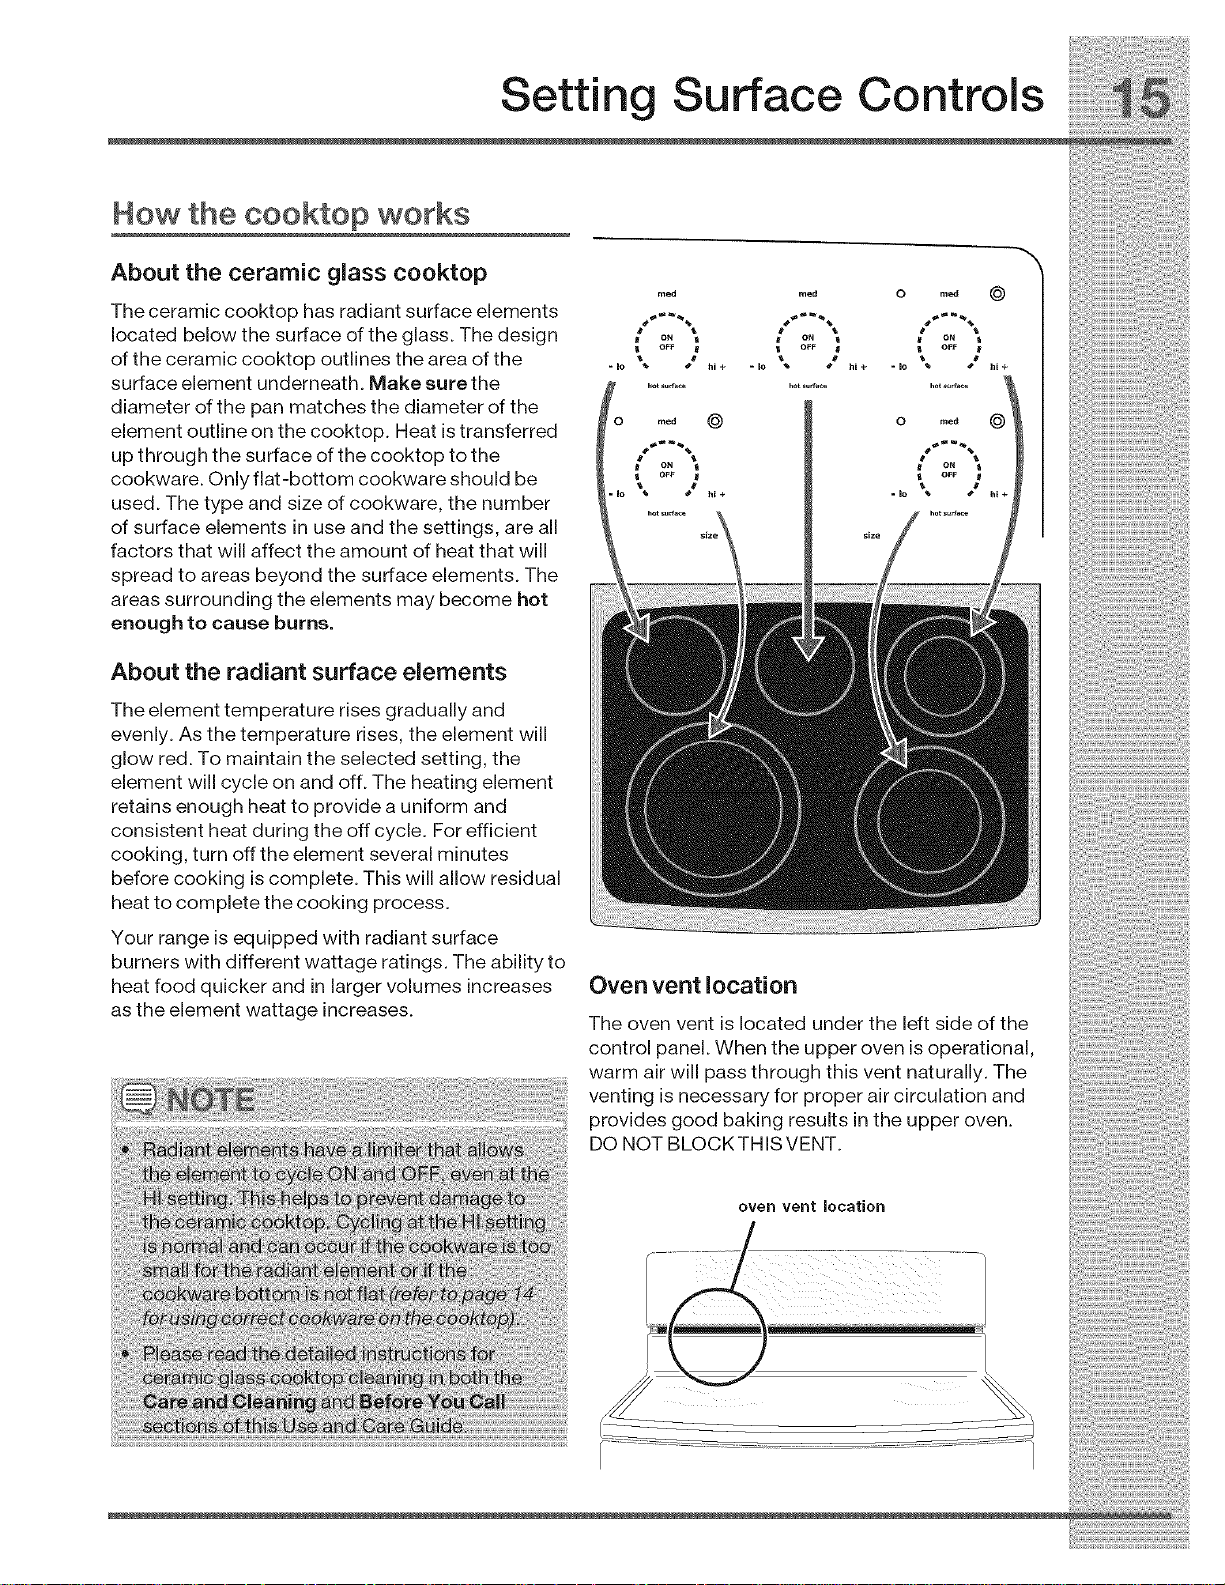
About the ceramic glass cooktop
The ceramic cooktop has radiant surface elements
located below the surface of the glass. The design
of the ceramic cooktop outlines the area of the
surface element underneath. Make sure the
diameter of the pan matches the diameter of the
element outline on the cooktop. Heat is transferred
up through the surface of the cooktop to the
cookware. Only flat-bottom cookware should be
used. The type and size of cookware, the number
of surface elements in use and the settings, are all
factors that will affect the amount of heat that will
spread to areas beyond the surface elements. The
areas surrounding the elements may become hot
enough to cause burns.
About the radiant surface elements
The element temperature rises gradually and
evenly. As the temperature rises, the element will
glow red. To maintain the selected setting, the
element will cycle on and off. The heating element
retains enough heat to provide a uniform and
consistent heat during the off cycle. For efficient
cooking, turn off the element several minutes
before cooking is complete. This will allow residual
heat to complete the cooking process.
reed reed O me,!J _)
ON ON ON
"10 \ / hi+ "IO \ tt .... IO " / "i+
OFF
© ®
Your range is equipped with radiant surface
burners with different wattage ratings. The ability to
heat food quicker and in larger volumes increases
as the element wattage increases.
Oven vent location
The oven vent is located under the left side of the
control panel. When the upper oven is operational,
warm air will pass through this vent naturally. The
venting is necessary for proper air circulation and
provides good baking results in the upper oven.
DO NOT BLOCKTHISVENT.
oven vent location
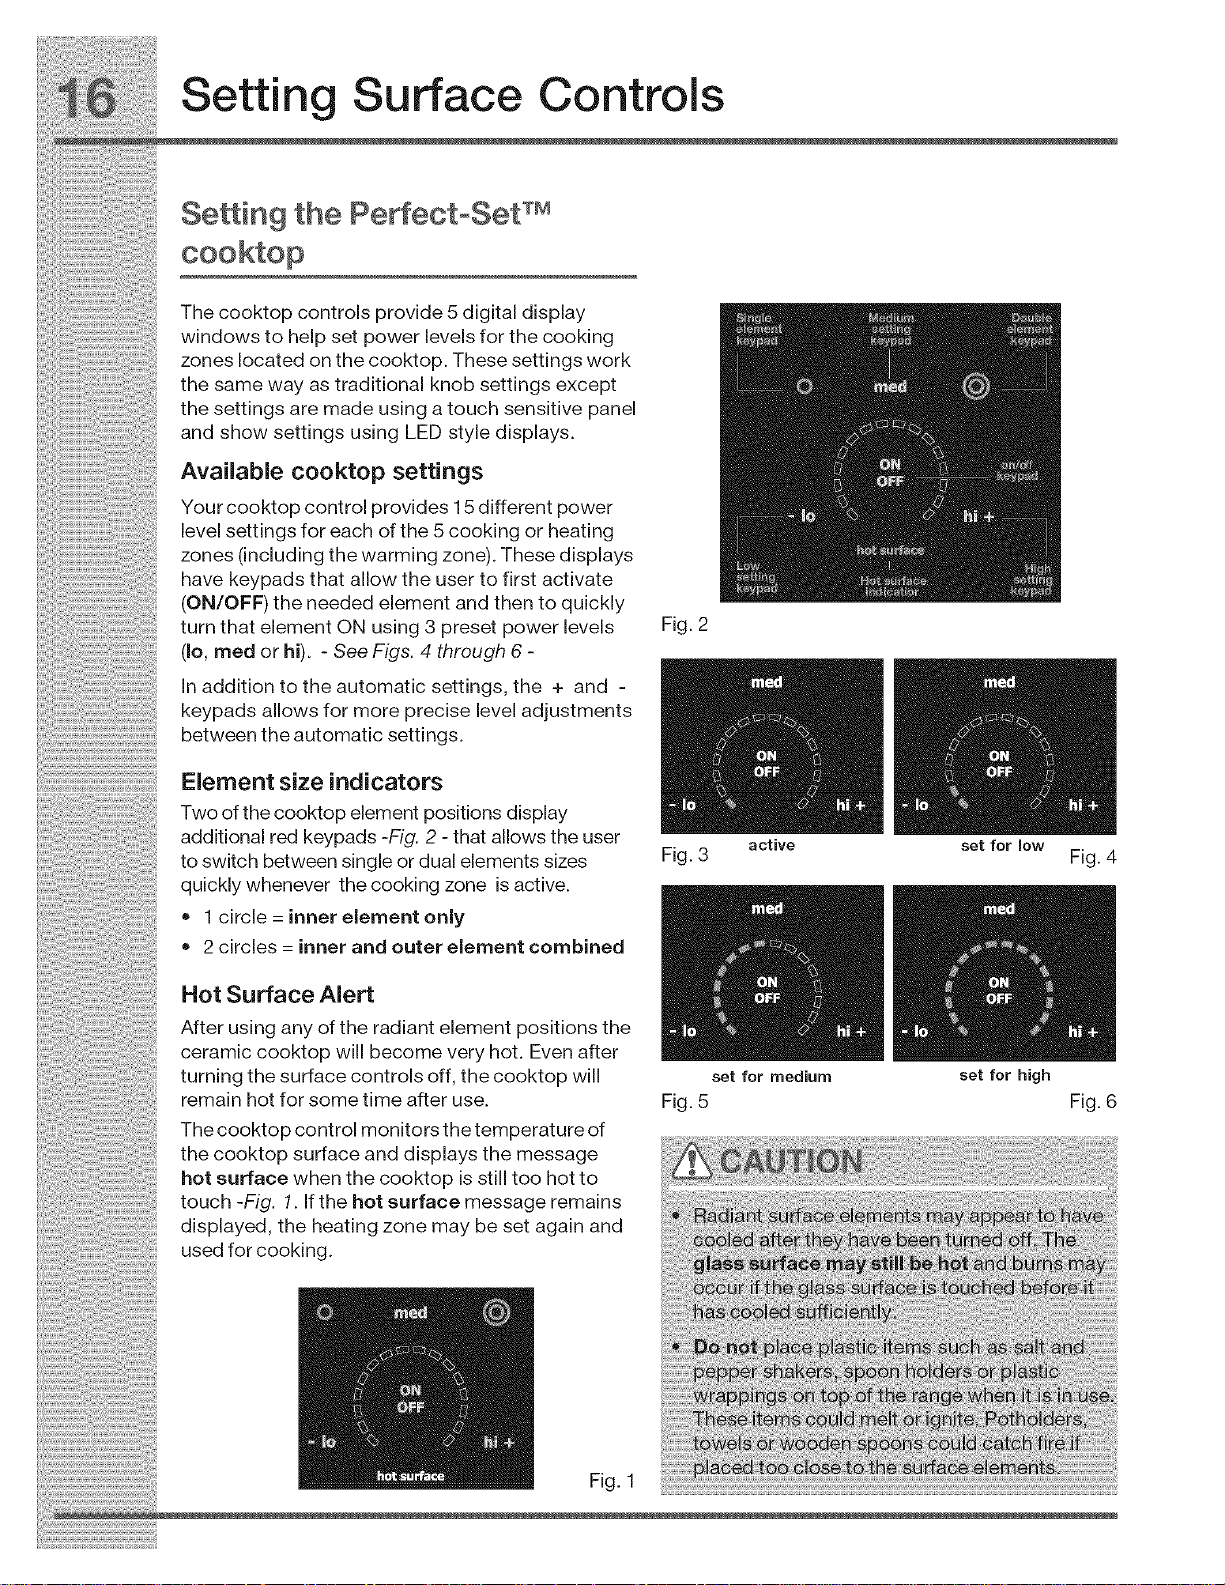
additional red keypads -Fig. 2 - that allows the user
to switch between single or dual elements sizes
quickly whenever the cooking zone is active.
• 1 circle = inner element only
• 2 circles = inner and outer element combined
Hot Surface Alert
After using any of the radiant element positions the
ceramic cooktop will become very hot. Even after
turning the surface controls off, the cooktop will
remain hot for some time after use.
The cooktop control monitors the temperature of
the cooktop surface and displays the message
hot surface when the cooktop is still too hot to
touch -Fig. 1. If the hot surface message remains
displayed, the heating zone may be set again and
used for cooking.
Fig. 3 active set for low Fig. 4
mm
set for medium set for high
Fig. 5 Fig. 6
Fig. 1
Setting Surface Controls
SeAing the PerfectoSet TM
Setting cooktop elements
• Touch the ON OFF key to activate the desired
heating zone.
If the heating zone has more than one element
diameter size available, press the desired
element ring size symbol.
Press the desired power level key once (hi+,
reed or Io=) for quick automatic settings or for
more precise level settings use the hi+ or Io=
keys. Each press of the hi+ will increase or Io=
keypad will decrease the power one level at a
time. Any of these power level changes or ring
size changes may be made any time during the
heating process.
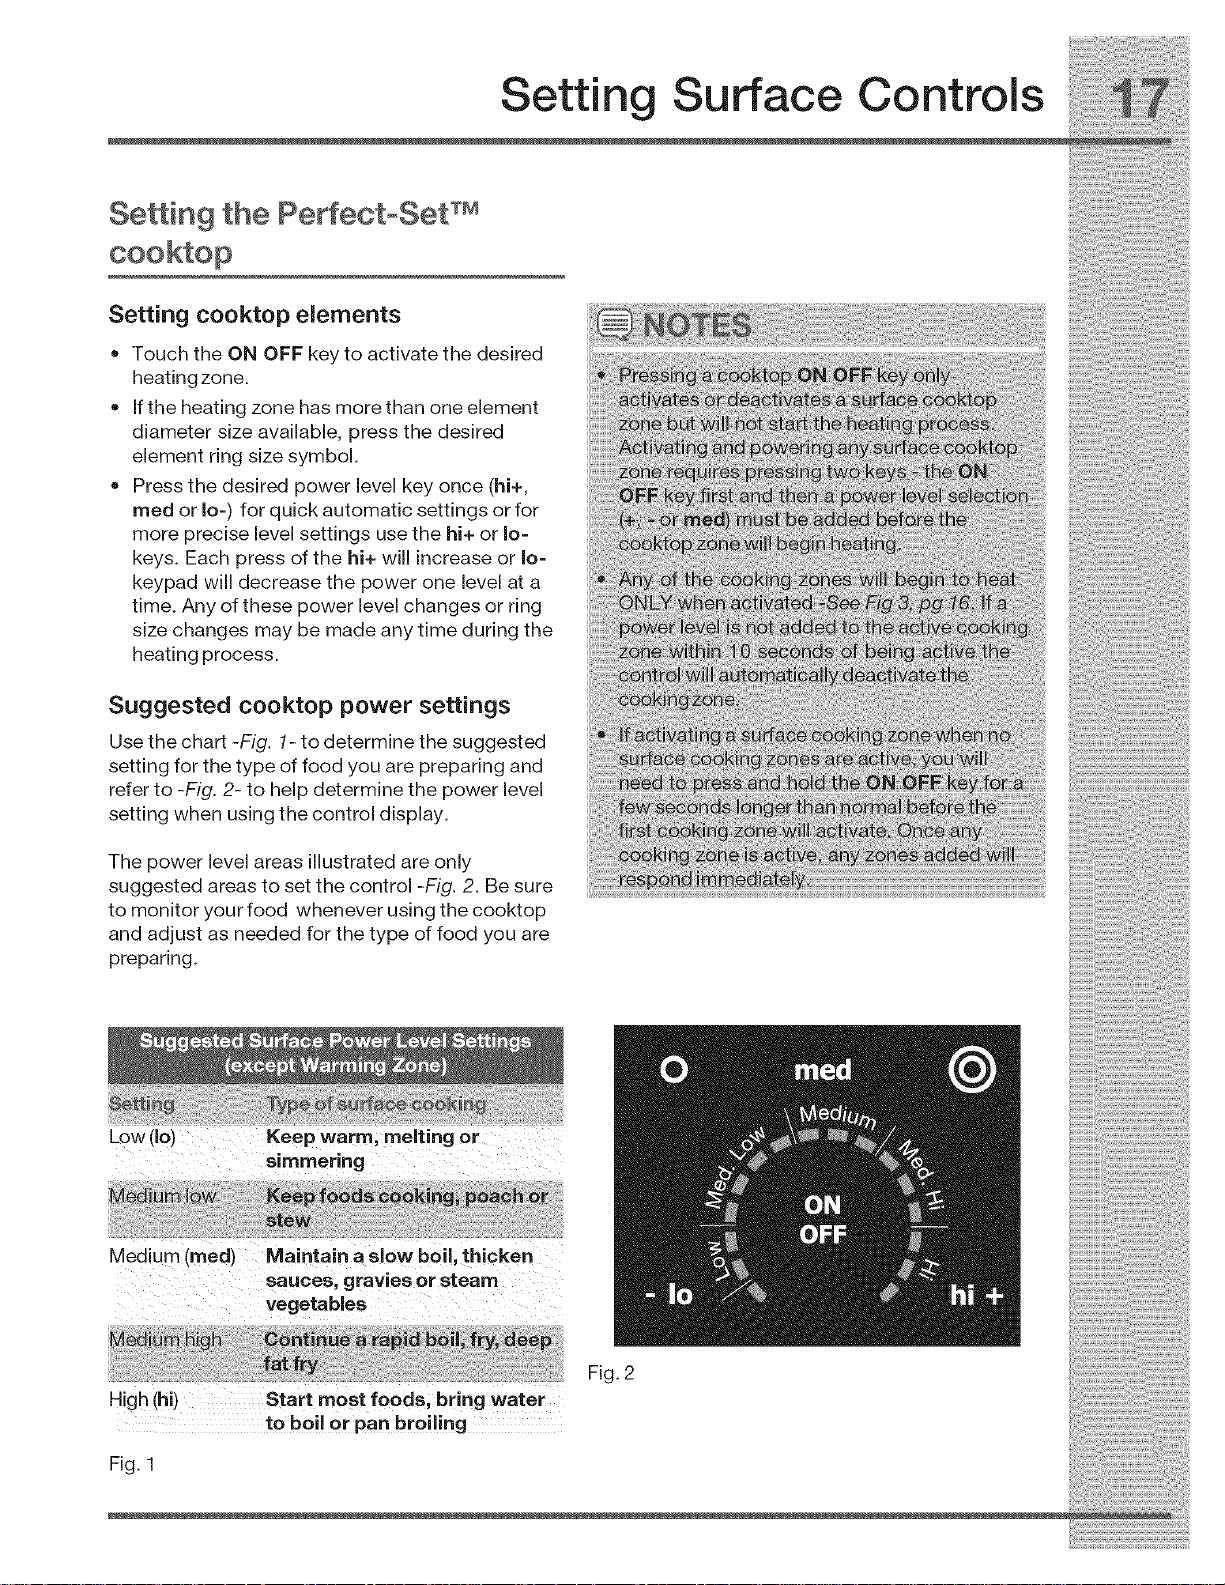
Suggested cooktop power settings
Use the chart -Fig. 1- to determine the suggested
setting for the type of food you are preparing and
refer to -Fig. 2- to help determine the power level
setting when using the control display.
The power level areas illustrated are only
suggested areas to set the control -Fig. 2. Be sure
to monitor your food whenever using the cooktop
and adjust as needed for the type of food you are
preparing.
Low (Io) Keep warm, melting or
simmering
Medium (reed) Maintain a slow boil, thicken
, gravies or steam
High (hi)Start most foods; bring water
tO boil or pan broiling
Fig. 1
Fig. 2
Setting Surface Controls
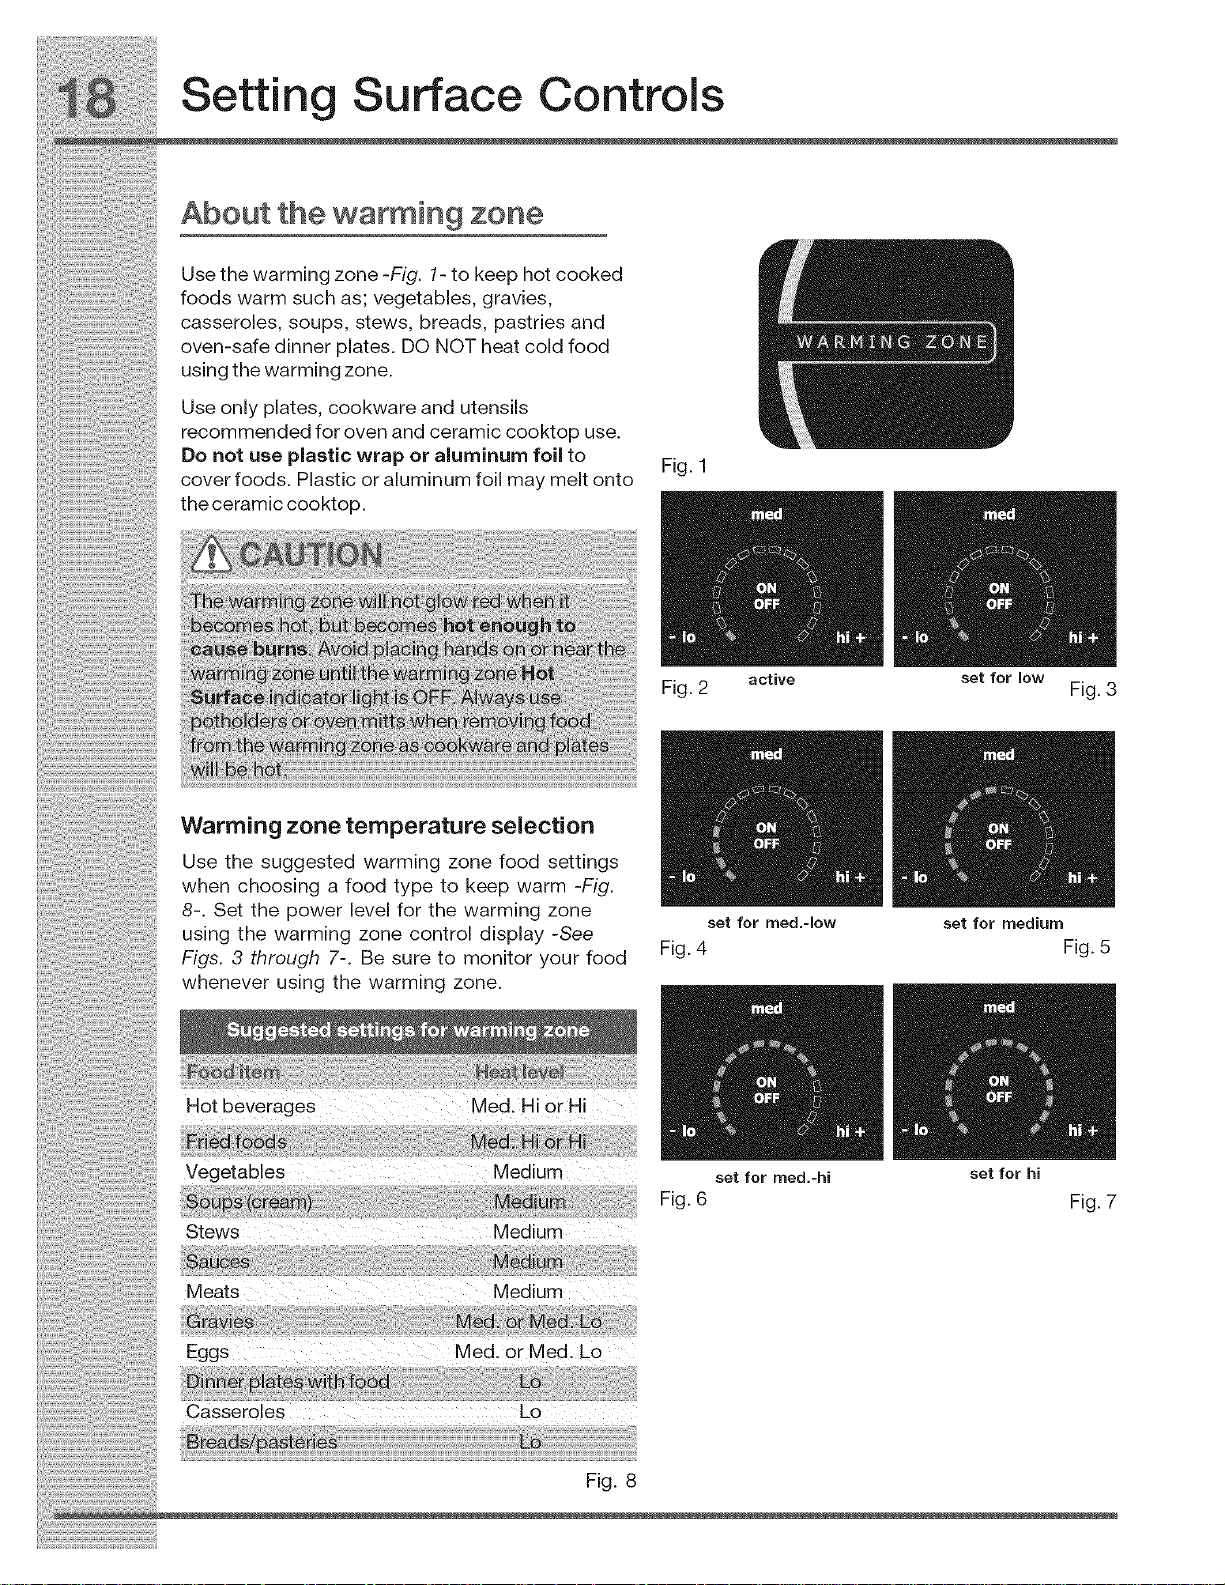
About the warming zone
Use the warming zone -Fig. 1- to keep hot cooked
foods warm such as; vegetables, gravies,
casseroles, soups, stews, breads, pastries and
oven-safe dinner plates. DO NOT heat cold food
using the warming zone.
Use only plates, cookware and utensils
recommended for oven and ceramic cooktop use.
Do not use plastic wrap or aluminum foil to
cover foods. Plastic or aluminum foil may melt onto
the ceramic cooktop.
Fig. 1
mm
Warming zone temperature selection
Use the suggested warming zone food settings
when choosing a food type to keep warm -Fig.
8-. Set the power level for the warming zone
using the warming zone control display -See
Figs. 3 through 7-. Be sure to monitor your food
whenever using the warming zone.
H0t beverages Med. Hi0r Hi
Vegetables Medium
Stews Medium
Fig. 2 active set for low Fig. 3
set for med.-[ow set for medium
Fig. 4 Fig. 5
/m
set for med.-hi set for hi
Fig. 6 Fig. 7
Meats Medium
Eggs Med. orMed. Lo
Casseroles Lo
Fig. 8
i_i!_!_i!i_ii_!i!_!_i!i_ii_!i!_!_i!i_ii_!i!_!_i!i_ii_!i!_!_i!i_ii_!i!_!_i!i_ii_!i!_!_i!i_ii_!i!_!_i!i_ii_!i!_!_i!i_ii_!i!_!_i!i_ii_!i!_!_i!i_i
Display Abbreviations
About the warming zone List of dispmayed abbreviations
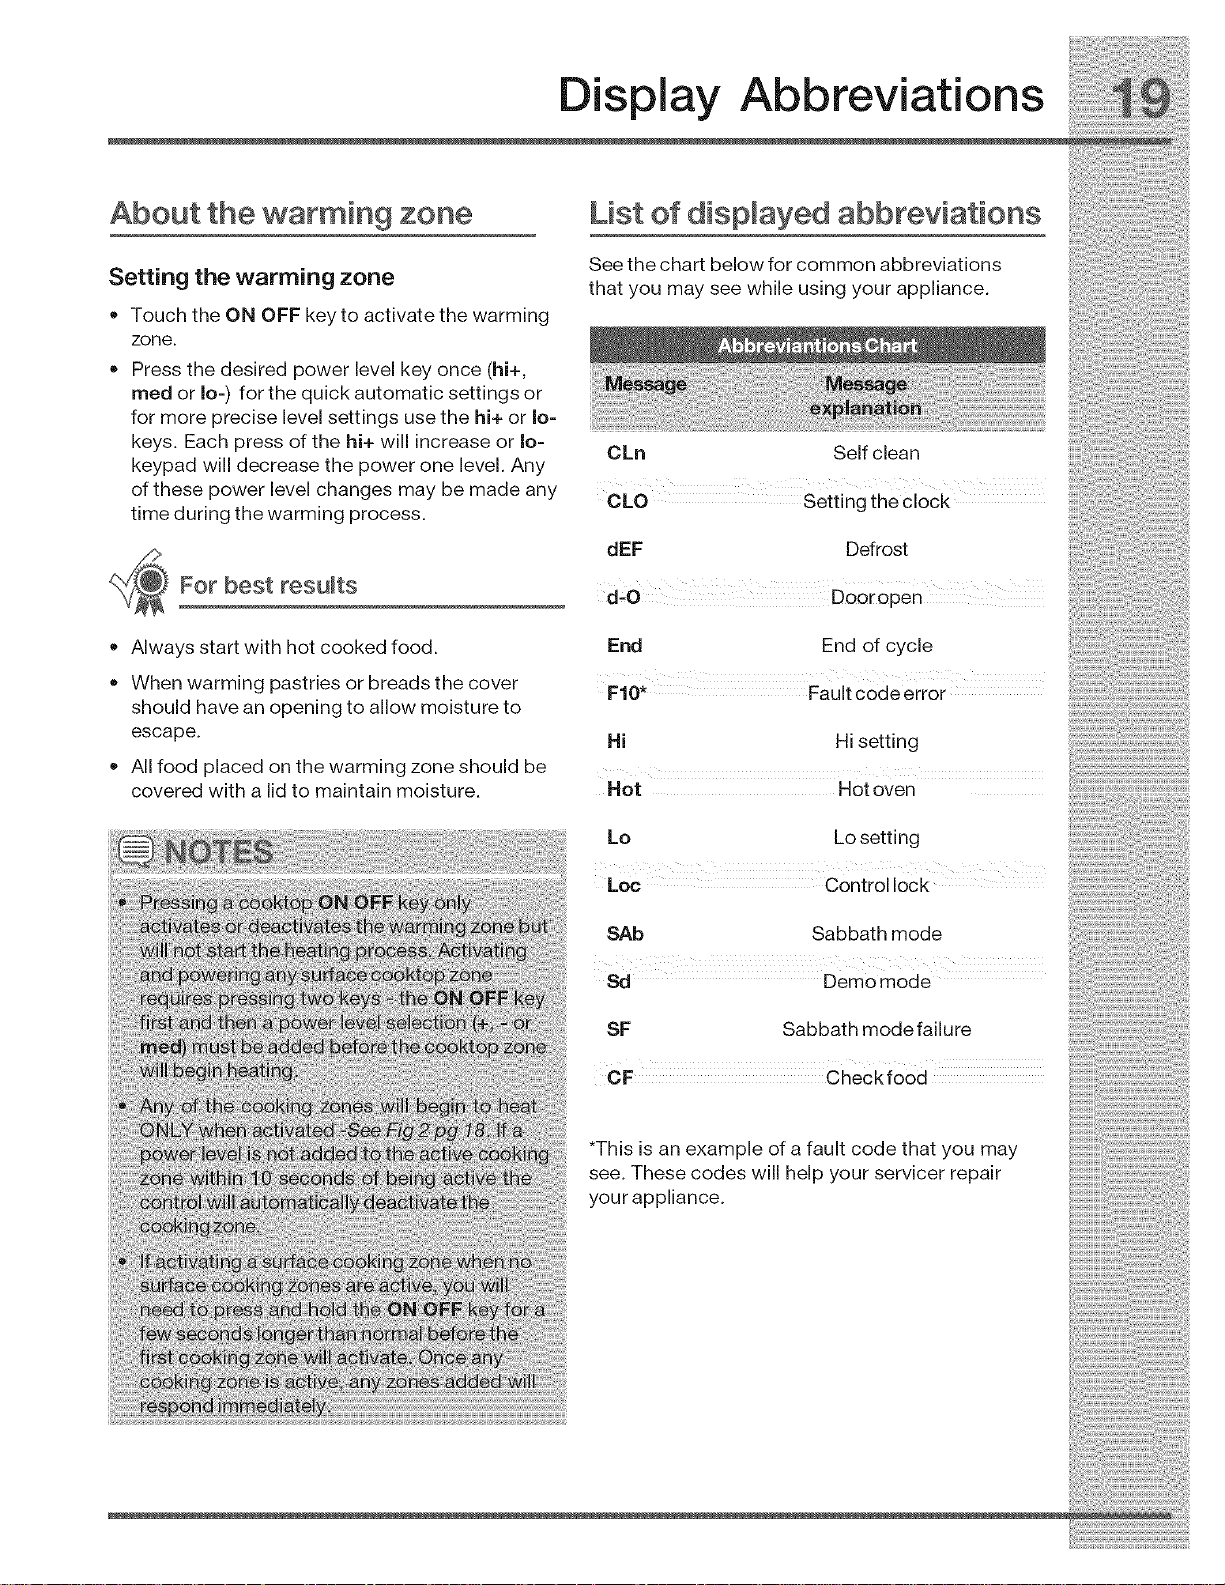
....... See the chart below for common abbreviations
_etung me warming zone that you may see while using your appliance.
• TouchtheON OFFkeytoactivatethewarming
zone
• Press the desired power level key once (hi+
med or Io for the uickautomatic settin sot
for more precise level settings use the hi+ or Io-
keys. Each press of the hi+ will increase or Io- ..................................................................................................
keypad w,II decrease the power one level. Any _kn _e, c can
of these power level changes may be made any OL0 seitin theci0ck
time during the warming prco ess. g
. ,_ dEF Defrost
• Always start with hot cooked food. End End of cycle
-) q g
For best results _ O _'00roZen
• When warming pastries or breads the cover FaUitcode error
should have an opening to allow moisture to
escape. Hi Hi setting
All food placed on the warming zone should be
covered with a lid to maintain moisture. Hot Hot oven
Lo Lo setting
Loc Control lock
SAb Sabbath mode
Sd Demo mode
SF Sabbath modefailure
*This is an example of afault code that you may
see. These codes will help your servicer repair
your appliance.
!_!_i_i_i_!i_;_!i!i_!iii_i!_!_ii_;ii!_;_ii!;!_iii_;i_i_i!_i_i!i!_!!i!_!_i_!i!_!i!_!i!!i_i:iii_i!_ii_i_!_i_!i_i_i!i;ili!!i;i;i
Setting Oven Controls
About rapid preheat
Use the rapid preheat option on single rack baking
to quickly bring the upper oven to baking
temperature.
The rapid preheat option may be set with the
following cooking features:
• Bake To add or change any cook settings after this
•Conv bake feature has started:
• Convroast • SelecttheUPPERorWARMERovenyouwishto
The following temperature sethngs applyto the - -" - -o -, _o_,
rapid preheat feature: temperature _y b _-_or z u).
...................... • f chang ng cook ng t mes se ect the cook t me
• Auto-suggest [delault) settlng:_ _1]1_ _; ...........
::: • Min. rapid preheat setting: 170 F/76 C
• Max. rapid preheat setting: 550°rF/288"°C
o o or end _lme Keys needed to make tne cnanges.
change. Make tem perature changes using t he +
or - keys Each press of + or - w adjust the
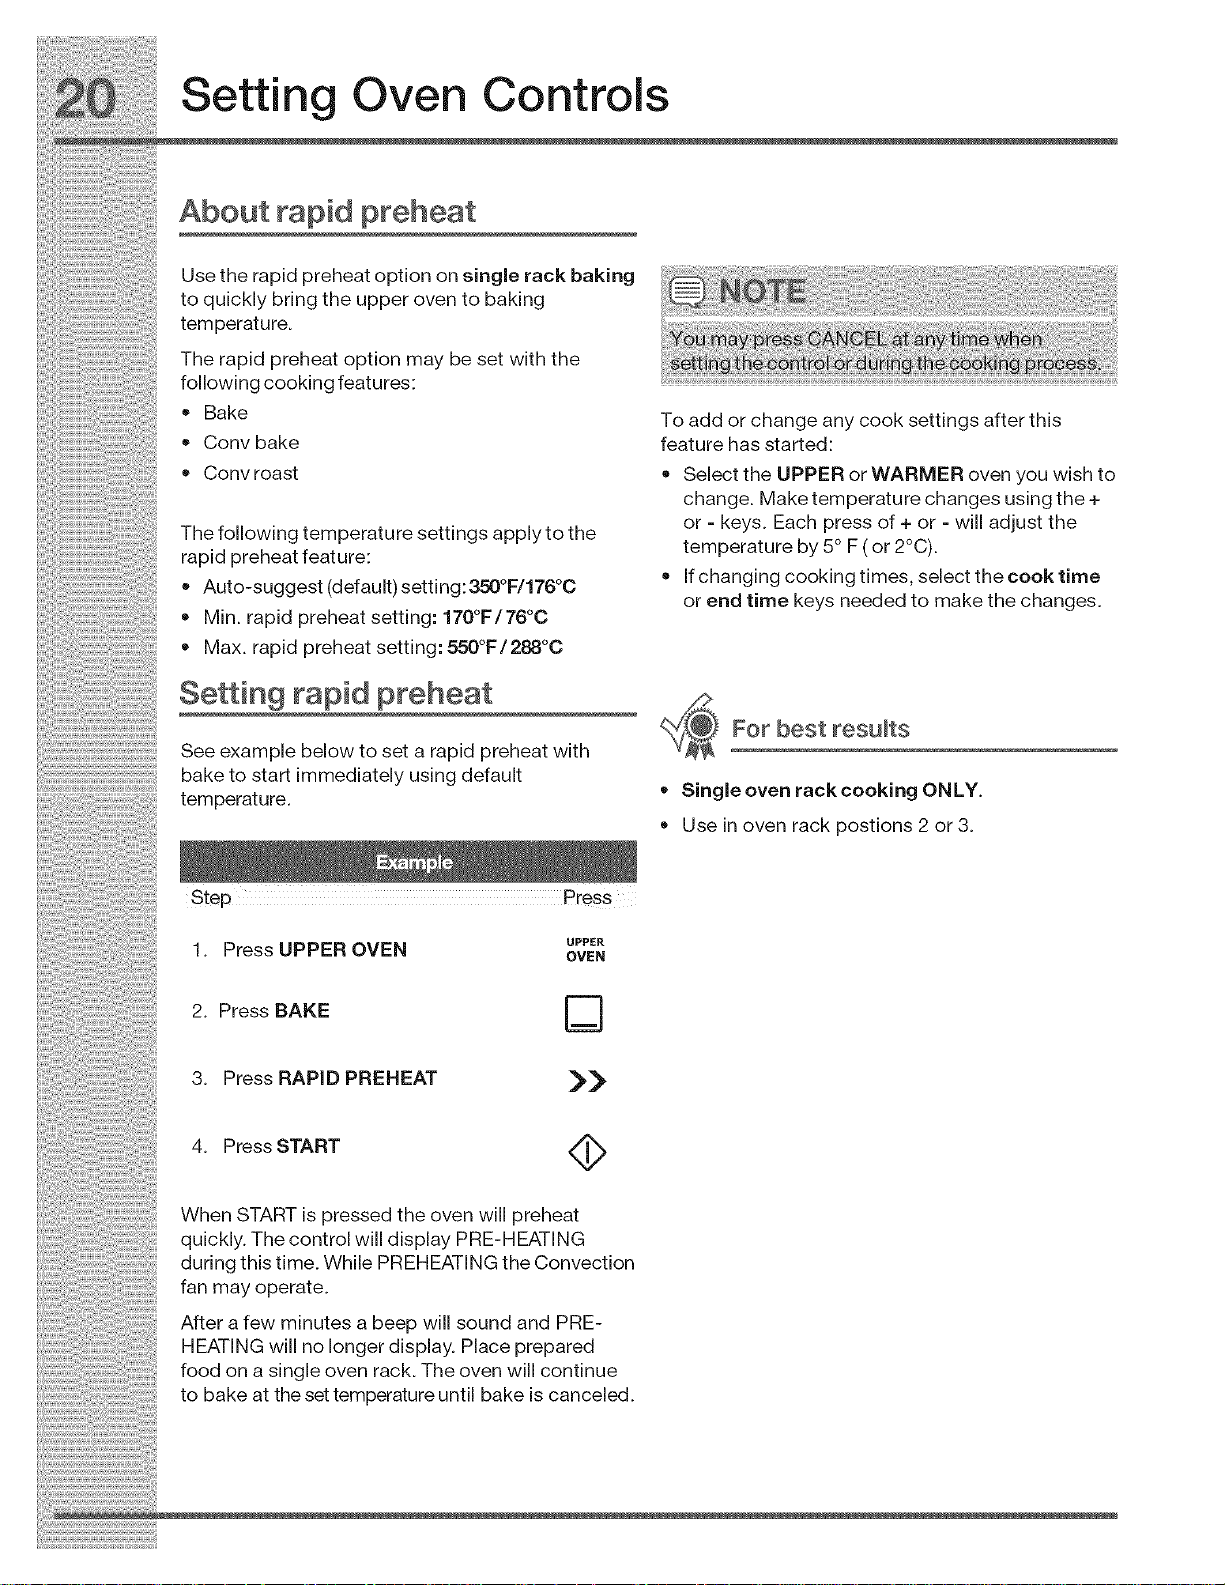
Setting rapid preheat
..... See example below to set a rapid preheat with
bake to start immediately using default
temperature. • Single oven rack cooking ONLY.
Step Press
1. Press UPPER OVEN
2. Press BAKE
3. Press RAPID PREHEAT
4. Press START <_
When START is pressed the oven will preheat
quickly. The control will display PRE-HEATING
during this time. While PREHEATING the Convection
fan may operate.
UPPER
OVEN
D
>>
FO[ best [@suits
Use in oven rack postions 2 or 3.
After a few minutes a beep will sound and PRE-
HEATING will no longer display. Place prepared
food on a single oven rack. The oven will continue
to bake at the set temperature until bake is canceled.
 Loading...