

Beam Central Vacuum
Installation Design Manual
by

Contents
HOW TO DESIGN A BEAM CENTRAL VACUUM SYSTEM
Choose the location of your Beam Appliance
Choose where the wall inlets/sockets should be placed
Typical Installation - Floorplans
Plan where the pipe/duct work can be hidden
INSTALLING YOUR PIPEWORK
Solid Wall Diagrams
Dropping from the other side of the wall
Chasing-up through the wall
Close-Ups
Floor-mounted inlet Diagrams
with pipework in timber joist floor
with pipework in solid floor
Timber Partition/Stud Wall Diagrams
Side-On
Face-On (without inlet)
VacPan Installation Diagrams - Side-on
Personal Clothes Brush Installation Diagrams
Side-on
Face-on
Wiring the Inlets & the Appliance
5 RULES OF INSTALLING A BEAM CENTRAL VACUUM
1 The Pipework
2 Sweep T
3 Glue
4 Low Voltage Wire
5 Sharp 90 bend
Normal Installation Components
Tools Required
Our Contact Details
3
3
4
5
6
7
7
7
8
8
8
9
10
11
12
13
14
15
16
16
16
2
Before starting to design the Beam Central Vacuum system into your home, it is
important that you understand all the implications on HOW it can be installed.
Refreshingly, it is fairly simple to install.
1
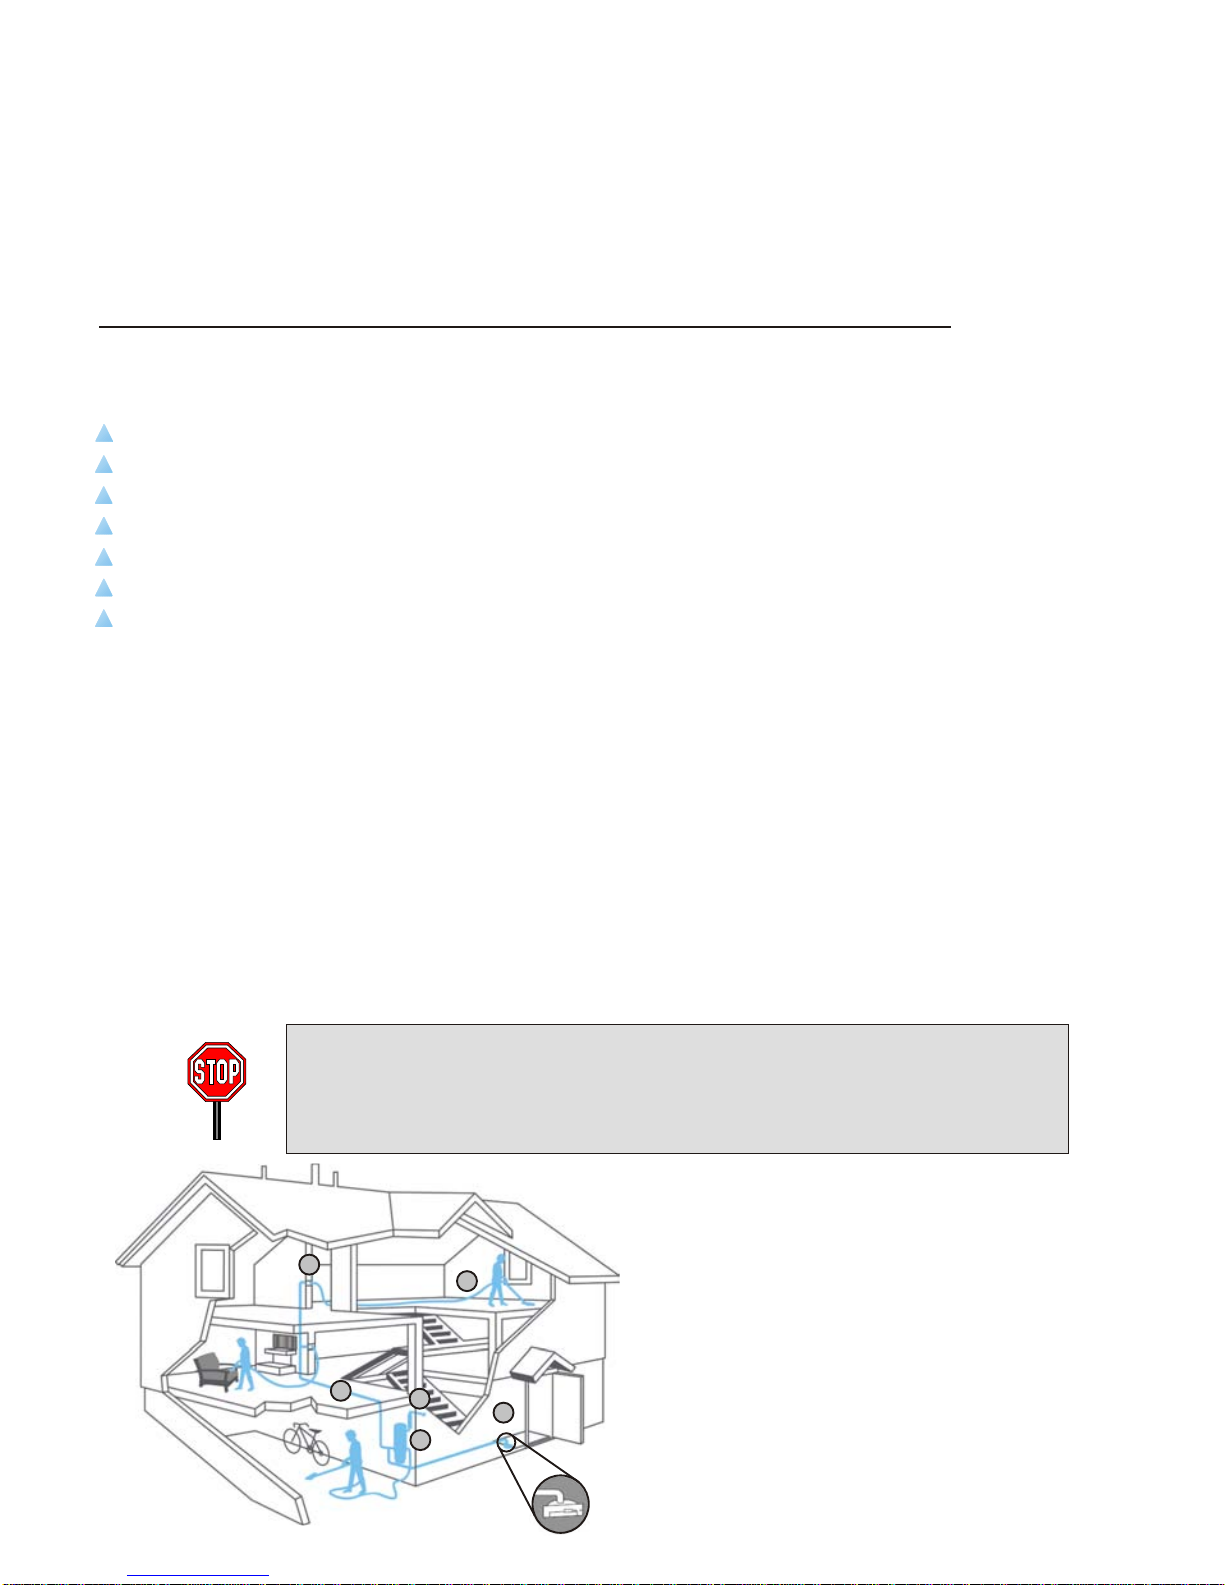
The most popular locations for the appliance to be mounted are on a wall in a:
! garage
! utility room
! under the stairs
! loft
! basement
! plant room
! cupboard (the smallest being a 500mm kitchen unit).
A bucket model, (dirt collects at the bottom of the appliance) should be fixed at
elbow height so that you can empty it easily with the top of the appliance no less than
30cm from the ceiling. If it is a bag model, it should be no less than 30cm from the
floor and there will need to be enough space above the appliance to remove the bag
along the entirety of its length (about 75cm).
Because the filters within the appliance are to a high standard, (98.3% filtration at 0.3
microns) the exhaust doesn’t always need to be vented to the outside, especially if it
is located in a garage, plant room or basement. However, if the appliance is in a
popular area of the property and it is convenient to do so, venting to an internal void
(eg under the floor) or externally, is quite useful in reducing exhaust noise as well.
Choose the location of the Beam Central Vacuum Appliance
IF YOU PLAN TO VENT THE EXHAUST, THE LENGTH OF PIPE SHOULD BE NO
LONGER THAN 3M AWAY, WITH AN EXHAUST VENT-FLAP FITTED TO THE
OUTSIDE, TO STOP WATER AND VERMIN FROM GETTING INTO THE EXHAUST
MUFFLER. (SEE OUR PRICE LIST).
How to design a
Beam Central Vacuum System
3
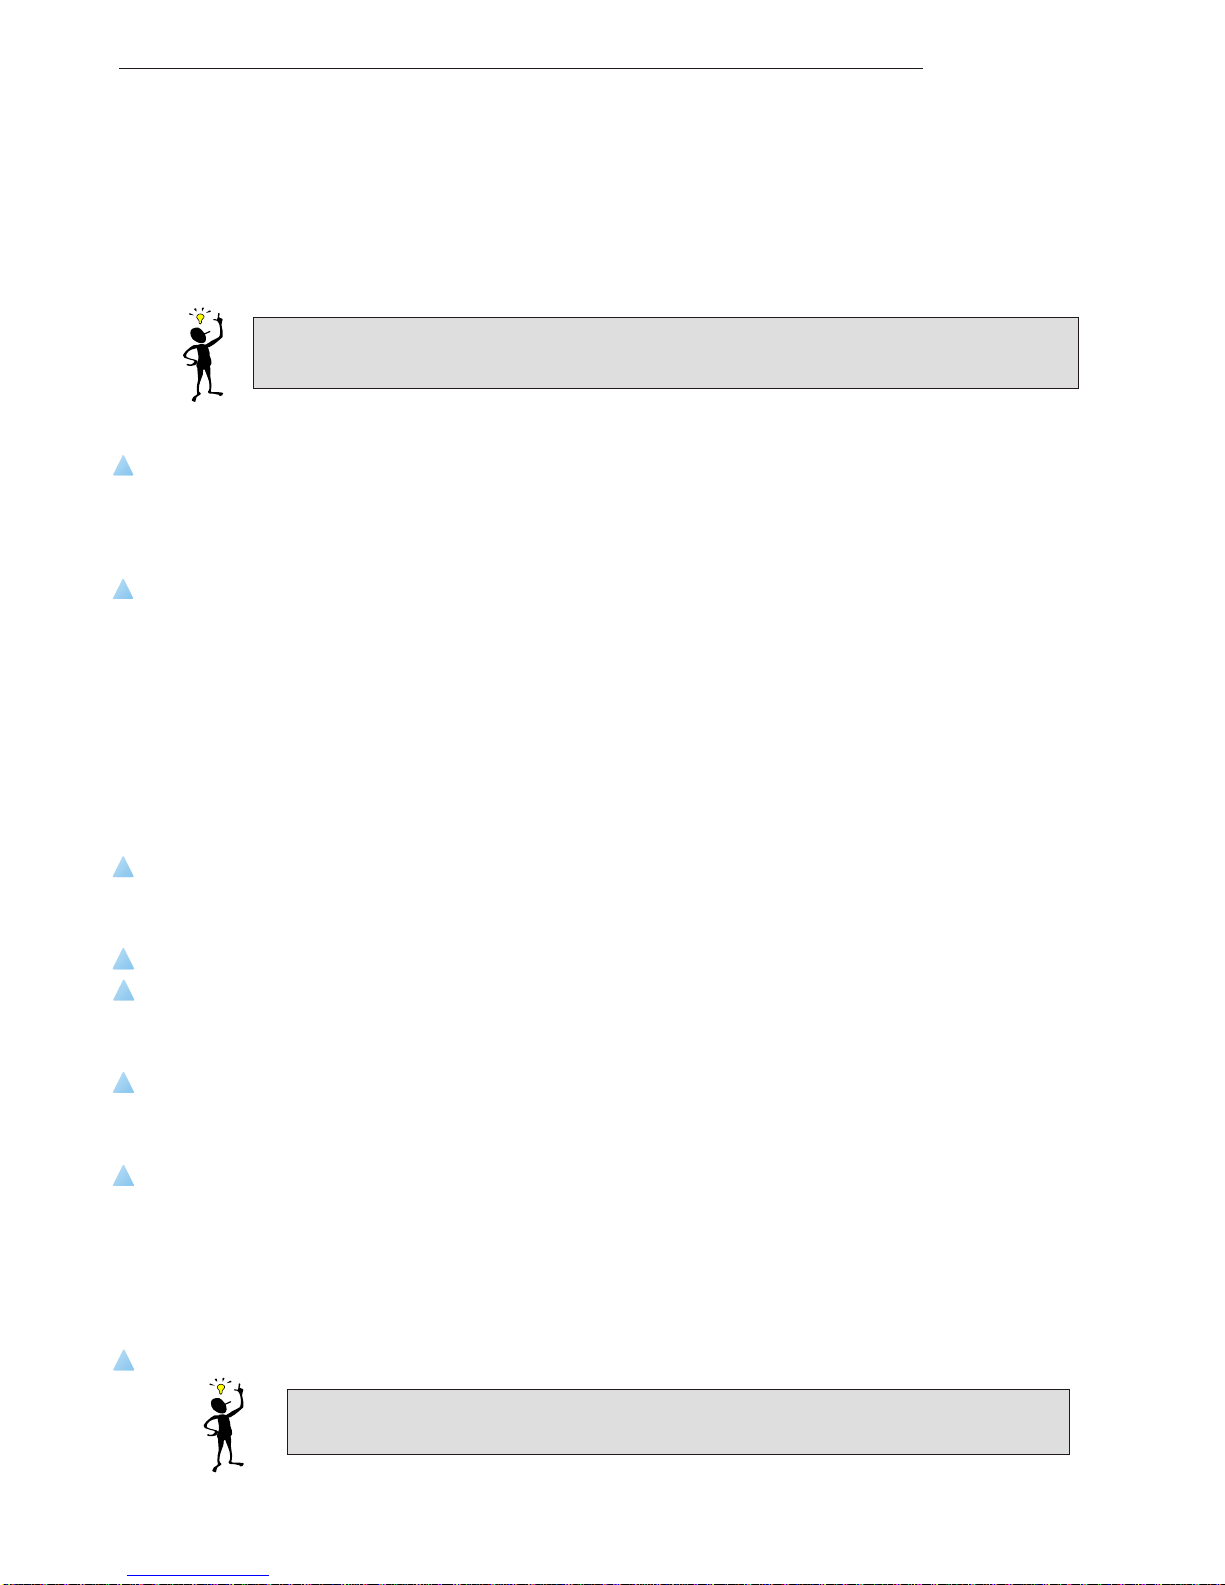
1 Ductwork
2 Wall Inlet
3 Appliance utility inlet
4 Kitchen VacPan Inlet
5 Hose, wand and vacuum attachment
6 Appliance exhausted to outside
2
1
3
4
5
6
2 Choose where the wall inlets/sockets should be located
The main aim here is to cover as much of the house from each point, so you don’t have
to keep going back to the inlet in the wall and unplugging it to reach all the rooms.
Equally, you don’t want to have excess hose for half the time that you are vacuuming you therefore need to get a happy medium between not having too-long-a hose and
not having to unplug it too often from the inlet - the property DOES NOT need an inlet
in every room!
EXISTING PROPERTY OR RENOVATION - WITHOUT FLOORPLANS
! You may need two people to work this out as you have to measure how far you can
reach with the hose all round the house. The most popular length of hose is 8m
and it is good to start with this length, although the hose can be shorter or longer
as required - see our price list for details on the lengths available to you.
! Start with an 8m (29’3”) piece of string, wool, rope or a measuring tape. One of
you will need to stand at a fixed point in the hall way, (the inlet end) about ½ a
metre off the ground. The other person will see how far the 9m “hose” reaches
into every room from that point. You may need to move the person in the hallway
slightly, have a longer hose or have more than one inlet/socket downstairs.
Always try to have an inlet in a hallway as you can access several rooms from this
point. Sometimes there may be a need to have an inlet in a room, if you have a
room-off-a-room situation, ie a conservatory or en-suite bathroom, or if there is a
very large room to get across.
! Do the same on the landing upstairs and each floor thereafter.
NEW BUILD PROPERTY OR RENOVATION WITH FLOORPLANS
! Normally a set of floorplans will be available on a new build project.
! Find what scale they are at and measure from the furthest point of the furthest
room downstairs, back into the hall. (Hopefully this will be under 8m - if not see
our price list for other lengths of hoses available).
! Mark the point you get to and measure how many metres it was with the ruler to
the furthest point of the furthest room - you are measuring what hose length is
required.
Move to each further room downstairs to see if they can all be reached from the
point you marked - if not you may need to move your mark slightly, lengthen the
hose or have more than one inlet downstairs. Always try to have an inlet in a
hallway as several rooms can be accessed from this point. Sometimes you may
need to have an inlet in a room if there is a room-off-a-room situation, ie a
conservatory or en-suite bathroom, or if there is a very large room to get across.
! Do the same on the landing upstairs and for each floor thereafter.
Alternatively, send us floorplans and
WE can complete a quote for you FREE of charge!
!
TIP: MAKE SURE THAT YOU TAKE INTO ACCOUNT WHERE FURNITURE IS LIKELY TO
BE, AS A HOSE CAN’T BE STRETCHED OVER THE TOP OF A DINING ROOM TABLE!
TIP: IT IS WISE TO HAVE AN INLET NEAR THE BOTTOM OF THE STAIRS SO THAT
YOU CAN VACUUM ALL THE WAY UP THE STAIRS BEFORE RUNNING OUT OF HOSE.
4
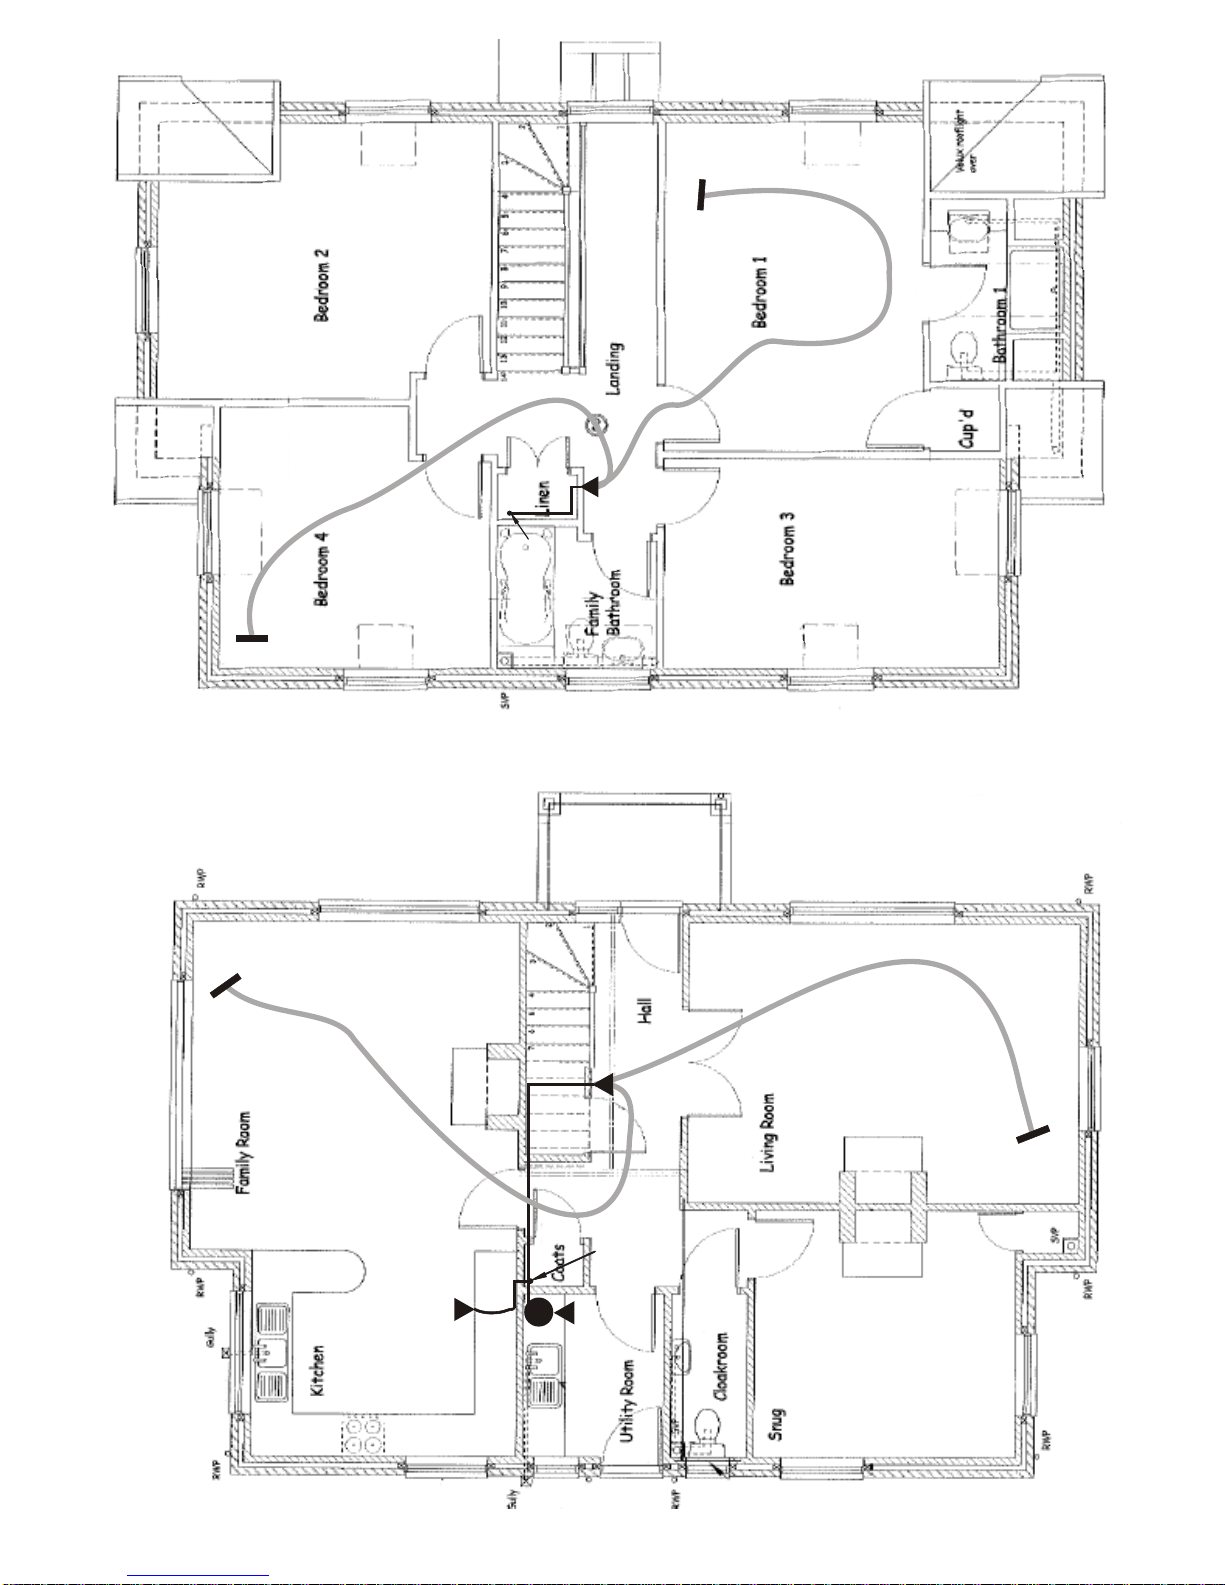
Wall
Inlet
Hidden
Drop
First Floor
P
VacPan
Inlet
9m Hose
Hidden
Ductwork
Hidden
Riser
Ground Floor
Appliance
Utility Inlet
Typical Installation
5
 Loading...