

Page 1
211620028
AU 86055-6I
Built-In Freezer
Encastrement-Congélateurs intégrables
Einbau-Gefrierschrank integrierbar
Operating instructions
Notice d’utilisation
Gebrauchsanweisung
N/AE/UC/106. (09.)
Page 2
Dear customer,
Before placing your new refrigerator/freezer into operation please read
these operating instructions carefully. They contain important information
for safe use, for installation and for care of the appliance.
Please keep these operating instructions for future reference. Pass them on
to possible new owners of the appliance.
These operating instructions are for use with several technically comparable
models with varying accessories. Please observe the notes which apply to
your model.
Notes which are important for your safety or for the proper functioning of
the appliance are stressed with a warning triangle and/ or with signal words
(Warning!, Caution!, Important!). Please observe the following carefully.
1. This symbol guides you step by step in the operation of the appliance.
2. ....
Supplementary information regarding operation and practical applications
of the appliance appear after this symbol.
Tips and notes concerning economical and environmentally sound use
of the appliance are marked with the cloverleaf.
Explanations of the technical terminology used in the operating instructions
can be found at the end in the section "Technical Terminology".
The operating instructions contain instructions for the correction of possible
malfunctions by the user in the section "What to do if ...". If these instructions should not be sufficient, please contact your local Customer Care Department.
Printed on paper manufactured with environmentally sound processes
he who thinks ecologically acts accordingly...
2
Page 3

Contents
Safety 4
Intended use / Prior to initial start–up /Refrigerant
Safety of children 4
Daily Operation / In case of malfunction 5
Disposal 6
Appliance Packaging Information / Disposal of old Appliances 6
Remove transport packaging / Installation 7
Installation Location / Building-in /
Electrical connection 8
Before start-up / Control panel / Operation 9
Temperature regulation 10
Quick freezing 10
Warning light 11
Freezing calendar 11
Internal outfit 11
Ice-cube production 11
Drawers 12
Tips / Power saving tips 12
Freezing and storage 13
Maintenance and Cleaning 15
When the appliance is not in use / Internal cleaning 15
What to do if ... 16
Correcting Malfunctions 16
Noises during Operation 17
Regulations, Standards, Guidelines / Customer Service 18
Technical Terminology 19
Grid preparation 20
Reversing the door 21
Changing over the freezer compartment door (not on
all models) 22
Building the appliance in under a worktop 23
Fitting the plinth 29
3
Page 4
Safety
The safety of our refrigerators/freezers is in accordance with recognised technological standards and appliance safety legislation. We nevertheless feel
that it is important to acquaint you with the following safety guidelines:
Intended use
• The freezer is intended for use in the home. It is suitable for the freezing of fresh food and storing frozen food, as well as for making ice.
If the appliance is used for purposes other than those intended or used
incorrectly, no liability can be accepted by the manufacturer for any
damage that may be caused.
• Alterations or changes to the freezer are not permitted for reasons of safety.
• If you use the freezer in a commercial application or for purposes other
than the freezing or frozen storage of foods, the manufacturer accepts
no liability for any damages which may occur.
Prior to initial start–up
• Check the appliance for transport damage. Under no circumstance
should a damaged appliance be plugged in. In the event of damage,
please contact your supplier.
• Ensure that the appliance does not stand on the electrical supply cable.
Important: if the supply cable is damaged, it must be replaced by a
special cord or assembly available from the manufacturer or its Customer Service.
Refrigerant
The refrigerant isobutane (R600a) is contained within the refrigerant circuit
of the appliance, a natural gas with a high level of environmental compatibility, which is nevertheless flammable.
• Warning - During transportation and installation of the appliance, be
certain that none of the components of the refrigerant circuit become
damaged.
• If the refrigerant circuit should become damaged:
– avoid open flames and sources of ignition;
– thoroughly ventilate the room in which the appliance is situated.
Safety of children
• Packaging (e.g. wraps, polystyrene) can be dangerous for children. There is a
risk of suffocation! Keep packaging material away from children!
4
Page 5

• Please make old appliances unusable prior to disposal. Pull out the mains
plug, cut off the mains cable, break or remove spring or boltcatches, if fitted.
By doing this you ensure that children cannot lock themselves in the appliance when playing (there is risk of suffocation!) or get themselves into
other dangerous situations.
• Often children cannot recognise the hazards present in household appliances.
It is therefore important that you ensure adequate supervision and never let
children play with the appliance!
Daily Operation
• Containers with flammable gases or liquids can leak at low temperatures.
There is a risk of an explosion! Do not store any containers with flammable
materials such as spray cans, fire extinguisher refill cartridges etc in the refrigerator/freezer.
• Bottles and cans must not be placed in the freezer. They can burst when the
contents freeze, high carbonate content drinks can even explode! Never store
lemonade, juices, beer, wine, sparkling wine etc. in the freezer. Exception:
high alcohol content spirits can be stored in the freezer.
• Do not put ice creams or ice cubes in the mouth immediately after removal from the
freezer . Very cold ice can freeze to the lips or tongue and cause injury.
• Do not touch frozen food with wet hands. Your hands could stick to the food
causing skin abrasions.
• Warning - Do not operate any electrical appliances in the refrigerator/ freezer
(e.g. electric ice cream makers, mixers etc.).
• Warning - In order not to impair the function of the appliance, never cover
or obstruct the ventilation openings.
• Warning - Do not damage the cooling circuit.
• Warning - Do not use any mechanical devices or other artificial means to
speed up defrosting unless they are recommended by the manufacturer.
• Before cleaning the appliance, always switch off the appliance and unplug it,
or disconnect from the electricity supply.
• When unplugging always pull the plug from the mains socket, do not pull on
the cable.
In case of malfunction
• If a malfunction occurs on the appliance, please look first in the "What to do
if ..." section of these instructions. If the information given there does not
help, please do not perform any further repairs
yourself.
• Refrigerators/freezers may only be repaired by qualified service engineers. Improper repairs can give rise to significant hazards. If your appliance needs repairing, please contact your specialist dealer or our Customer Service.
5
Page 6
Disposal
Appliance Packaging Information
All materials are environmentally sound! They can be disposed of or
burned at an incinerating plant without danger.
About the materials: The plastics can be recycled and are identified as
follows:
>PE< for polyethylene, e.g. the outer covering and the bags in the interior.
>PS< for polystyrene foam, e.g. the pads, which are all free of chlorofluorocarbon.
The carton parts are made from recycled paper and should be disposed
of at a waste-paper recycling collection location.
Disposal of old Appliances
For environmental reasons, refrigeration appliances must be disposed
of properly. This applies to your old appliance, and - at the end of its
service life - for your new appliance as well.
Warning! Before disposing of old appliances make them inoperable.
Remove plug from mains, sever the power cable, remove or destroy
any snap or latch closures. This ensures that playing children do not
lock themselves inside the appliance (danger of suffocation!) or place
themselves into other life-endangering situations.
Disposal:
• The appliance may not be disposed of with domestic waste or bulky
refuse.
• The refrigerant circuit, especially the heat exchanger at the back of
the appliance, must not be damaged.
• The symbol on the product or on its packaging indicates
that this product may not be treated as household waste. Instead it
shall be handed over to the applicable collection point for the recycling of electrical and electronic equipment. By ensuring this product
is disposed of correctly, you will help prevent potential negative consequences for the environment and human health, which could otherwise be caused by inappropriate waste handling of this product. For
more detailed information about recycling of this product, please
contact your local city office, your household waste disposal service or the shop where you purchased the product.
6
Page 7

Remove transport packaging
The appliance and the interior fittings are protected for transport.
1. Pull off the adhesive tape on the left and right side of the door.
2. Remove all adhesive tape and packing pieces from the interior of the
appliance.
Installation
Installation Location
The appliance should be set up in a well ventilated, dry room.
Energy use and efficient performance of the appliance is affected
by the ambient temperature.
The appliance should therefore
– not be exposed to direct sunlight;
– not be installed next to radiators, cookers or other sources of heat;
– only be installed at a location whose ambient temperature corresponds to the climate classification, for which the appliance is
designed.
The climate classification can be found on the rating plate, which
is located at the left on the inside of the appliance.
The following table shows which ambient temperature is correct
for each climate classification:
Climate classification for an ambient temperature of
SN from + 10 at 32°C
N from+16at32°C
ST from + 18 at 38°C
T
Installation directly under a hob is not allowed. The temperatures of
the hob, which in part are quite high, may damage the appliance. If a
hob is installed near the appliance, the corresponding installation and
safety instructions must be adhered to. Considering the numerous installation conditions which are possible, there is no way of providing
detailed information here.It is necessary to avoid overheating of the
appliance by maintaining adequate distances from heat sources and by
the use of a suitable thermal insulation plate. Proper ventilation of
the appliance must also be ensured.
from + 18 at 43°C
7
Page 8

Building-in
See installation instructions supplied.
Please check whether, after installing your appliance and specially after rehingeing the door, the door seal seals right round.
An untight door seal may lead to heavy frosting and thereby to
a higher power consumption (see also „What to do if...“).
Electrical connection
A correctly installed, earthed socket is required for the electrical
supply.
The supply must have a fuse rating of at least 10 Amps. If the
socket is not accessible once the appliance is built in, the electrical installation must include suitable means of isolating the appliance from the mains (e.g. a fused spur).
Before initial start-up, refer to the appliance rating plate to
ascertain if supply voltage and current values correspond with
those of the mains at the installation location.
e.g.: AC 220 ... 240 V 50 Hz or
220 ... 240 V ~50 Hz
(i.e. 220 to 240 volts alternating current, 50 Hertz)
The rating plate is inside the appliance on the left.
8
Page 9
Before start-up
Let the appliance in a vertical position for at least 2 hours before operating it so that oil will flow into the compressor.
• Before connecting and using the appliance, wash the interior with lukewarm water and some mild soap so as to remove the typical smell of
a brand-new product, then dry thoroughly.
Do not use detergents or abrasive powders, as these will damage the finish.
• Remove any tape and buffers used for transport purposes.
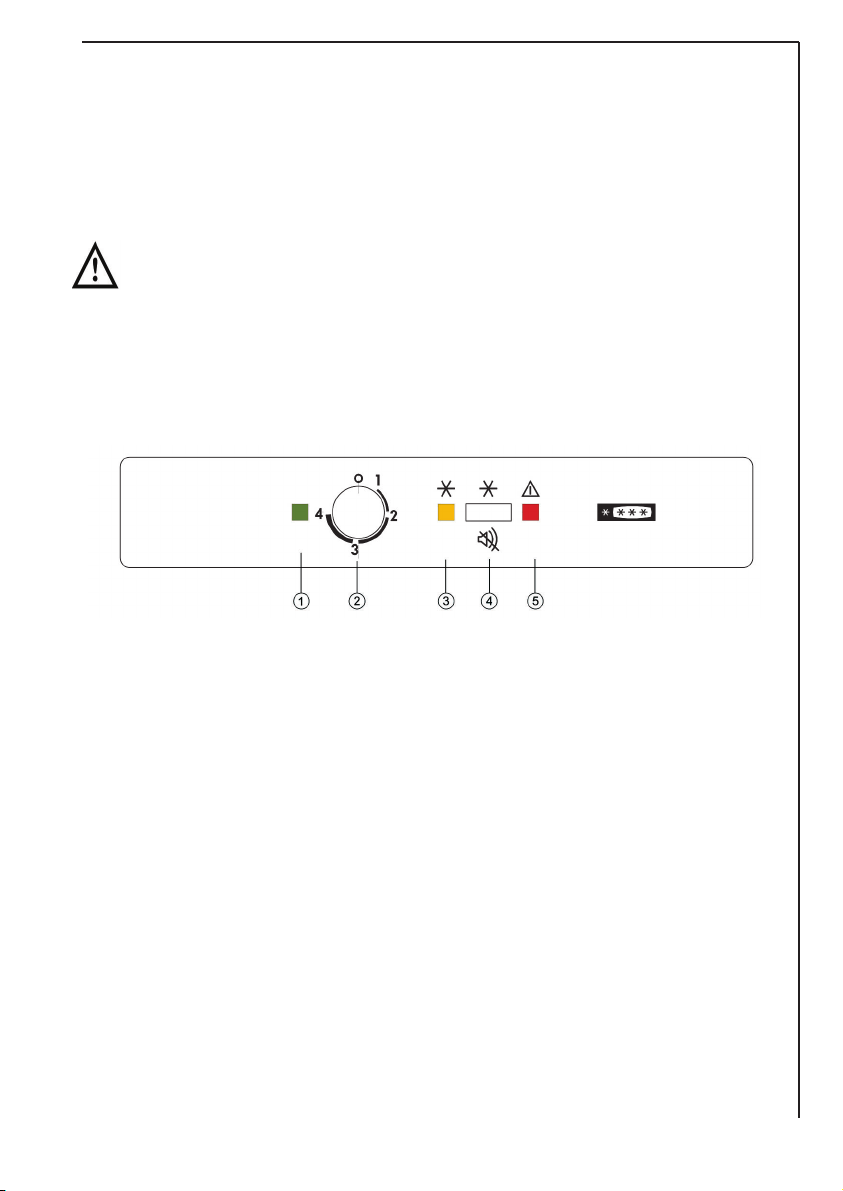
Control panel
1 Pilot light (green)
2 Thermostat
3 Quick-freeze light (yellow)
4 Quick-freeze switch
5 Warning light (red)
Operation
• Insert the plug into the wall socket and turn the thermostat knob (2)
clockwise after the position ´-16°C. Thermostat knob is on freezer work
surface.
• The pilot lights (1), (3) and (5) will light up.
After switch-on, the appliance electronic control automatically switches off quick-freeze function after 5 hours (yellow light).
To stop operation, simply turn the thermostat knob (2) to position •.
9
Page 10

Temperature regulation
• The temperature inside the freezer is automatically adjusted to ensure
safe storage of the food.
• Turn knob (2) towards higher values to obtain lower temperatures and,
conversely, towards lower temperatures if a less cold temperature is required.
• Set thermostat position according to required temperature.
• To safely store frozen and deep-frozen foods, the inner temperature of
the freezer must be at least
Therefore, we suggest you turn the knob (2) to -18° C.
• However, the exact setting should be chosen keeping in mind that the
temperature inside the appliance depends on:
• room temperature;
• how often the door is opened;
• the quantity of food stored;
• location of appliance.
Quick freezing
Press button (4) for about 1 second. The light (3) will then light up
(SUPER control on). The SUPER or quick-freezing function can be
ended manually at any time by pressing the button (4) again. The yellow light (3) goes out.
If the SUPER function is not ended manually, the appliance switches
it off after 48 hours.
10
Page 11
Warning light
This light (5) indicates when the temperature inside the appliance has
increased so much as to jeopardize the preservation of food in the
compartment (warmer than -12°C). When the appliance is switched
on or when food is placed in the compartment for freezing, this light
stays on until the temperature has reached the level required for correct storage.
Freezing calendar
The symbols on the drawers/doors show different types of frozen goods.
The numbers indicate storage time in months for the appropriate types
of frozen goods. Whether the upper or lower value of the indicated
storage time is valid depends on the quality of the food and pre-treating before freezing.
Internal outfit
Ice-cube production
This appliance is equipped with one or more trays for the production
of ice-cubes. Fill these trays with drinkable water, then put them in
the freezer.
Do not use metallic instruments to remove the trays from the freezer.
11
Page 12
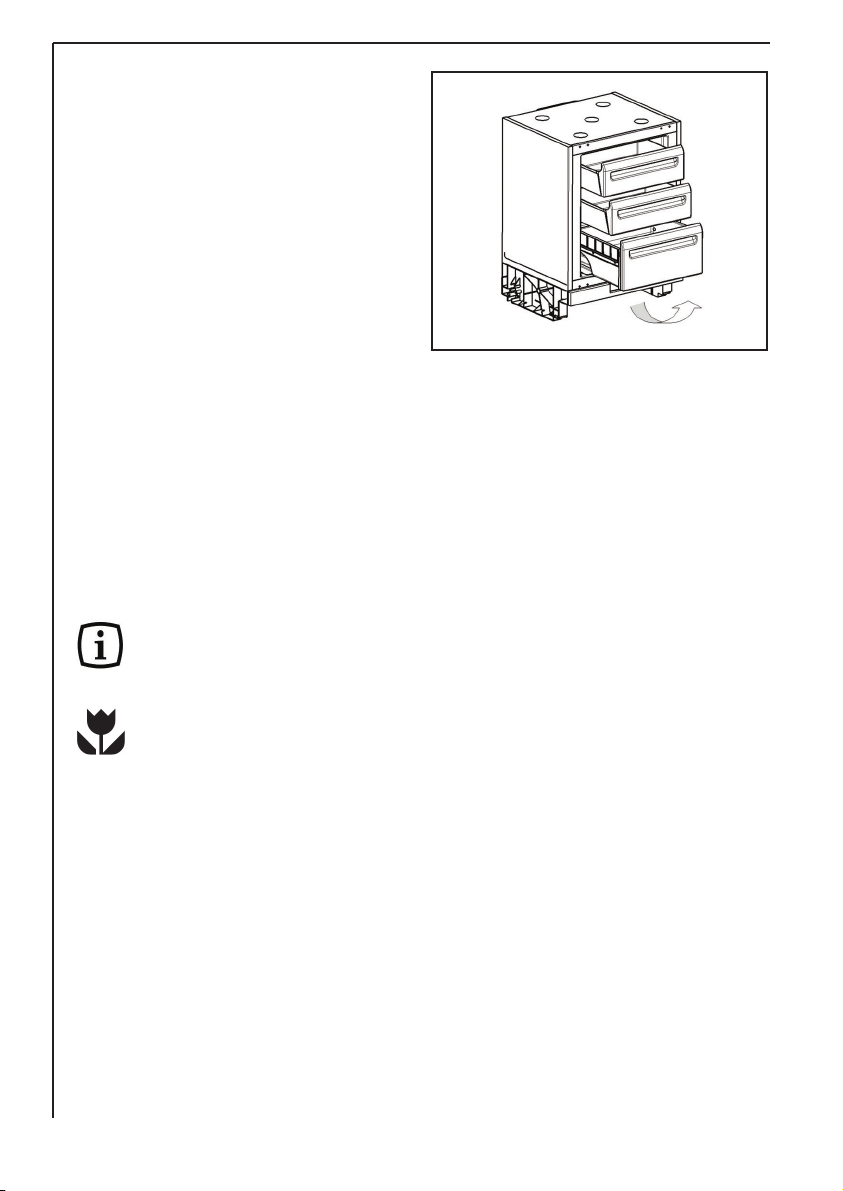
Drawers
Drawers feature a protection
against tipping over and limit
stop. This ensures safe and
comfortable storage and removal of frozen products.
To remove the drawers, proceed
as follows: pull the drawer out
until it comes to a stop, then
tilt it upwards (see figure).
Tips
12
Power saving tips
• The appliance should be installed well away from sources of heat such
as stoves, radiators, etc. If ambient temperature is high, the compressor
activates more often and for longer. See ìInstallationî section.
• Keep door open only as much as necessary.
• Do not put hot foods or beverages in the appliance, allow them to cool
down first.
‚• To thaw out frozen food, set it in the fridge. In this way frozen food
cold temperature is exploited to keep the fridge cool.
• Clean the condenser and motor-driven compressor located on appliance rear panel using a brush or a vacuum cleaner.
Page 13

Freezing and storage
• To quick-freeze foods when the appliance has not been in use, switch
on the freezer and let it run on the quick-freeze setting for at least
three hours before putting the food to be frozen in the compartment.
• If instead the appliance is already in operation, it should run on the
quick-freeze setting for at least 24 hours before the food is put in the
freezer.
• Once the food has been placed in the freezer, the freezing operation
can be considered to be complete 24 hours later. Once freezing is
complete, the freezer should be reset to normal storage use.
• Food to be frozen has to be placed in the appliance's lower compar-
tment.
• The maximum amount of food which is freezable in 24 hours is in-
dicated on the rating plate.
• Thanks to the NO FROST technology, freezing is quicker and this allows
thawed food to keep their original features, vitamin content and flavour unaltered.
• Split food into small portions to speed up freezing and avoid having to
thaw more food than you require.
• Wrap the foods in foil or polythene film, ensuring that the wrapping
adheres closely to the food and is well sealed.
• You should never freeze all at once a greater quantity of foods than the
maximum indicated on the applianceís rating plate.
• During the freezing process, do not add further food for freezing and
do not open the freezer door.
• The food for freezing should not be placed in contact with already fro-
zen food. This will prevent the temperature of already frozen food from
rising.
13
Page 14
• A temperature increase of the frozen food during defrosting shortens
its safe storage period.
• A word of warning about ice lollies: they should not be eaten straight
out of the freezer as this might cause cold burns.
• It is a good idea to mark the packs with the date on which freezing
started so that you can keep a check on storage periods.
• Never put fizzy drinks in the freezer as they might well burst.
• To ensure optimum results, it is necessary to use all available compar-
tments.
• Ensure that there is only a very short time between when you purchase
the products and when you put them in the freezer.
• Avoid opening the door too frequently and when you do open it, leave
it open only for as long as is strictly necessary.
• After thawing out, food deteriorates in a short time and could not be
frozen again.
To ensure appliance correct operation do not put frozen food directly
against the fan located on the freezer back panel.
14
Page 15
Maintenance and Cleaning
Before any maintenance or cleaning work is carried out, DISCONNECT the appliance from the ELECTRICITY supply.
Important
This appliance contains hydrocarbons in its cooling unit maintenance
and recharging must therefore only be carried out by authorised technicians.
When the appliance is not in use
When the appliance is not in use for long periods, disconnect
from the electricity supply, empty all foods and clean the appliance,
leaving the door ajar to prevent unpleasant smells.
Internal cleaning
Clean the inside and accessories with warm water and bicarbonate
of soda (5ml to 0.5 litre of water). Rinse and dry thoroughly.
NEVER USE DETERGENTS, ABRASIVE POWDERS, HIGHLY PERFUMED
CLEANING PRODUCTS OR WAX POLISHES, TO CLEAN THE INTERIOR
AS THESE WILL DAMAGE THE SURFACE AND LEAVE A STRONG
SMELL.
Important
Do not use abrasive products.
15
Page 16
What to do if ...
Correcting Malfunctions
A malfunction may be caused by only a minor fault that you can rectify
yourself using the following instructions. Do not perform any other
work on the appliance if the following information does not provide
assistance in your specific case.
Important! Repairs to refrigerators/freezers may only be performed bycompetent service engineers. Improper repairs can give rise to significant hazards for the user. If your appliance needs repairing, please
contact your specialist dealer or our local Customer Service.
Symptom Possible Cause Remedy
16
Appliance does not work.
Appliance works , green light
blinks
Green light does not light up,
yellow light lights up when
the fast freeze function is ac-
tivated.
Yellow light does not light
up, when the fast freeze
function is activated, appliance is on.
The compressor runs continuously
Heavy build up of frost, possibly also on the door seal.
Appliance does not
work.
Mains plug is not
plugged in or is loose.
Fuse has blown or is
defective
Socket is defective.
Technical Problem
Green light faulty.
Yellow light faulty.
Temperature is set too
cold.
Door seal is not airtight
(possibly after reversing
the door).
Switch on the appliance
Insert mains plug
Check fuse, replace if necesary
Mains malfunctions are to
be corrected by an electrician.
Please inform your customer service
Please inform your local
Customer Care Service
Centre.
Please inform your local
Customer Care Service
Centre.
Turn the thermostat control knob to a warmer setting temporarily.
Carefully warm the leaking
sections of the door seal witha
hair dryer (on a cool setting).
At the same time shape the
warmed door seal by hand
such that it sits correctly.
Page 17
Symptom Possible Cause Remedy
The freezer temperature is
not sufficient, red light
blinks, temperature alarm signal sounds.
The compressor does not start
immediately after changing
the temperature setting.
Temperature is not
properly adjusted.
Door was open for an
extended period.
A large quantity of
warm food placed in
the appliance within
the last 24 hours.
The appliance is near a
heat source.
This is normal, no error
has occurred.
Please look in the “Initial
Start Up” section.
Do not leave the door open
any longer than necessary.
Press the fast freeze switch.
Press the fast freeze switch.
Please look in the “Installation Location” section.
The compressor starts after
a period of time.
Important: regularly check on the red temperature pilot light and thermometer to establish that the storage temperature is being maintained.
Noises during Operation
The following noises are characteristic of refrigeration appliances:
• Clicks
Whenever the compressor switches on or off, a click can be heard.
• Humming
As soon as the compressor is in operation, you can hear it humming.
• Bubbling/Splashing
When refrigerant flows into thin tubes, you can hear bubbling or splashing noises. Even after the compressor has been switched off,
this noise can be heard for a short time.
17
Page 18
Regulations, Standards, Guidelines
This appliance was designed for household use and was manufactured
in accordance with the appropriate standards. The necessary measures
in accordance with appliance safety legislation regulations (GSG), accident prevention regulations for refrigeration appliances (VBG 20)
and the regulations of the German Society of Electrical Engineers (VDE)
were observed in the manufacture of this appliance.
The refrigerant circuit has been checked for leaks.
This appliance is in accordance with the following EU guidelines:
– 73/23/EWG dated 19 February 1973 - low voltage guidelines.
– 89/336/EWG dated 3 May 1989
(including guideline change notice 92/31/EWG) - EMV guideline
– 94/2/EG dated 21.01.1994 - Directive on Energy Labelling
– 96/57 EG dated 3.9.1996 - Energy Efficiency Requirements of
Household Electric Refrigerators, Freezers and Combinations Thereof.
Customer Service
If you cannot find the remedy for a malfunction in these operating
instructions, please contact your dealer or our customer service
department. Addresses and telephone numbers are listed in the accompanying
booklet "Guarantee Conditions/Customer Service Locations".
Selective ordering of replacement parts can save unnecessary travel
and costs. For this reason always provide the following appliance
information:
18
• Model Name
• Model Number (PNC)
• Serial Number (S-No.)
This information can be found on the serial plate in the interior at the
left of the appliance. We recommend that you enter this information
here, so that it is handy if needed.
Note: The customer bears the costs of unjustified customer service
calls even during the guarantee period.
Page 19

Technical Terminology
• Refrigerant
Liquids that can be used to a generate a cooling effect are known
as refrigerants. They have a relatively low boiling-point, indeed so
low, that the warmth from the food stored in the fridge or freezer
can cause the refrigerant to boil and vaporise.
• Refrigerant Circuit
Closed circulation system that contains the refrigerant. The refrigerant circuit comprises primarily of an evaporator, a compressor, a
condenser and pipe work.
• Evaporator
The refrigerant is evaporated in the evaporator. Similar to all other
liquids, refrigerant requires heat to evaporate. This heat is removed
from the interior of the appliance, as a result the interior is cooled.
The evaporator is therefore located inside the appliance or placed
in foam immediately behind the inner wall and thus not visible.
• Compressor
The compressor looks like a small drum. It is driven by a built-in
electric motor and is mounted on the base of the appliance at the
rear. The task of the compressor is to draw in vaporised refrigerant
from the evaporator, to compress it, and to pass it on to the condenser.
• Condenser
The condenser normally has the form of a grid. The refrigerant compressed in the compressor is liquefied in the condenser. During this
process, heat is released to the surrounding air at the surface of the
condenser. The condenser is mounted on the base of the appliance.
19
Page 20
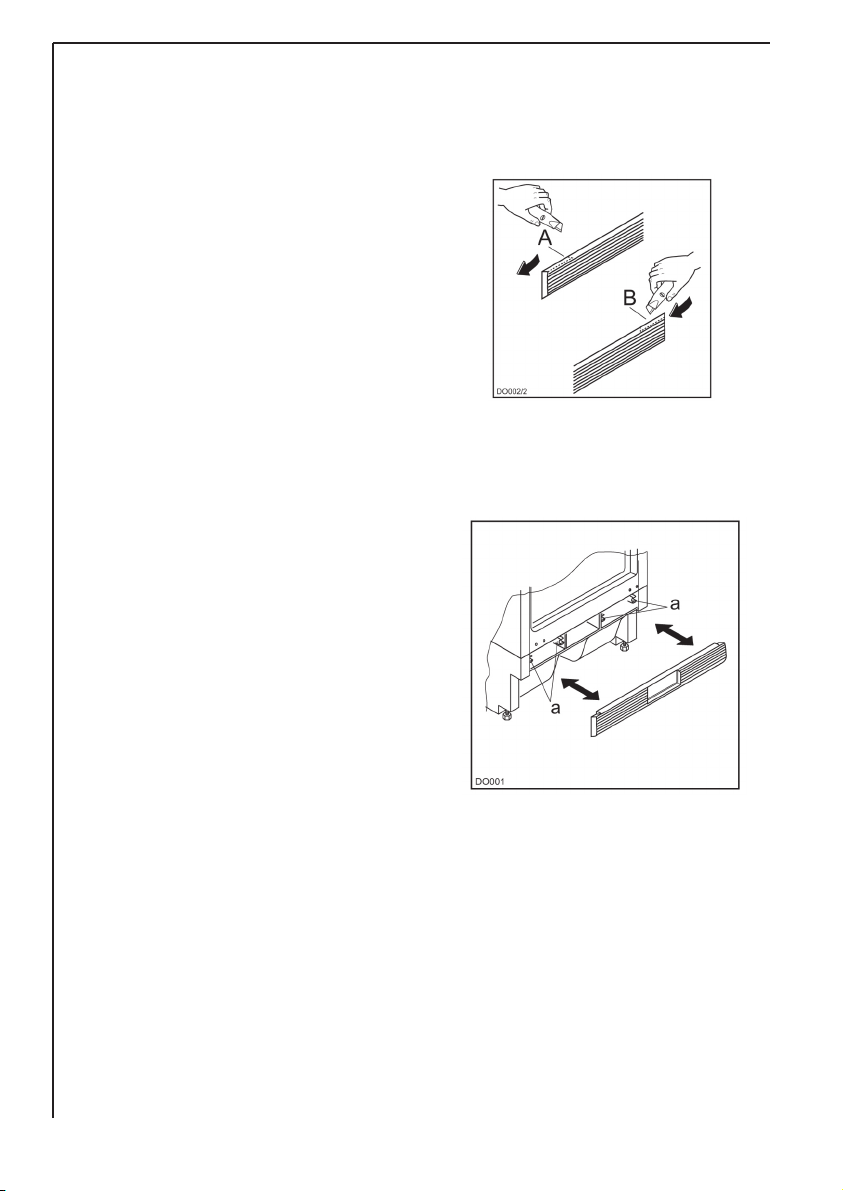
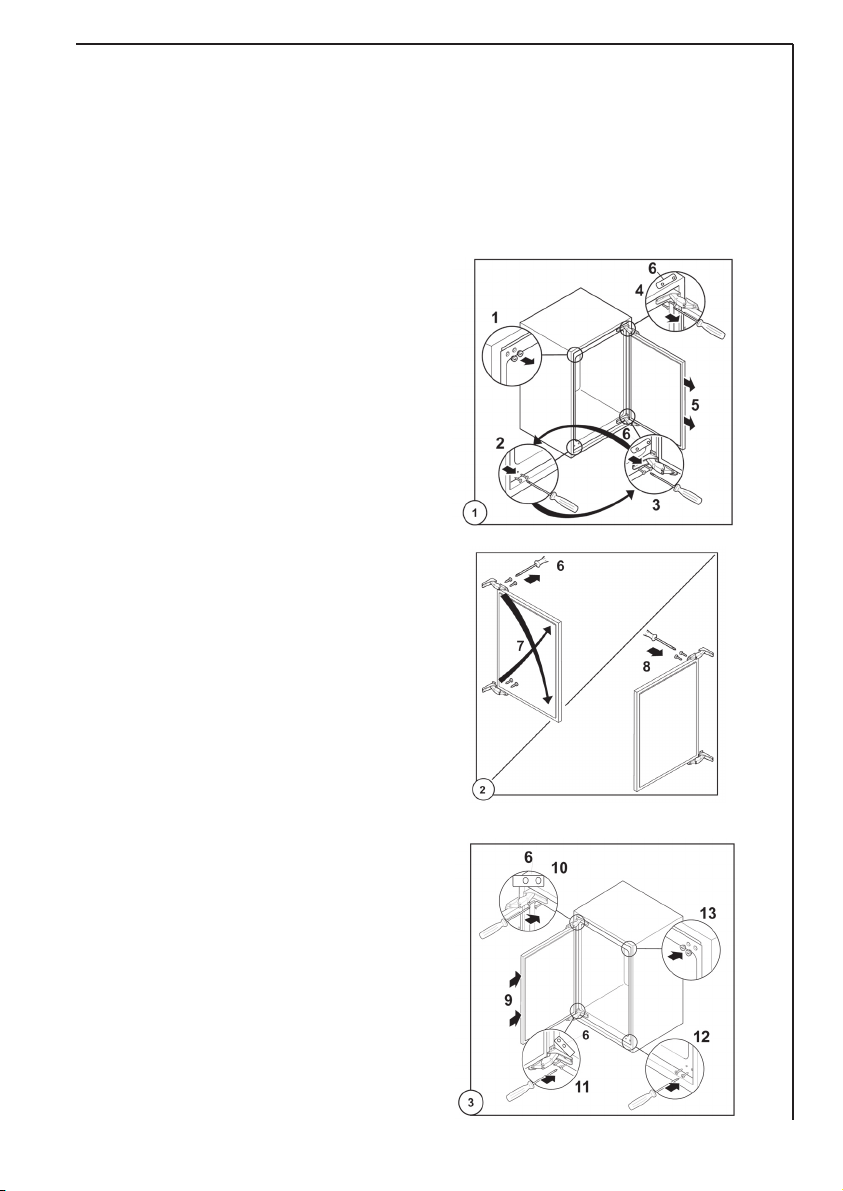
Grid preparation
When changing the side at which the door opens, remove plug from the
mains.
Left door opening:
Remove the left side (A) of the
grid cutting it from the rear (see
figure).
Right door opening:
Remove the right side (B) of
the grid cutting it from the
rear (see figure).
Re-install the grid to the base
of the appliance by pushing on
to the clasps (a) until they click.
20
Page 21
Reversing the door
The side at which the door opens can be changed from the right side
(as supplied) to the left side, if the installation site requires.
To reverse the opening direction of the door, proceed as
shown in the figures:
Attention!
After completion of the door
reversing operation, check that
the door gasket adheres to the
cabinet. If the ambient temperature is 13 cold (i.e. in Winter), the gasket may not fit
perfectly to the cabinet. In that
case, wait for the natural fitting
of the gasket or accelerate this
process by heating up the part
involved with a normal hairdryer
on a low setting.
21
Page 22
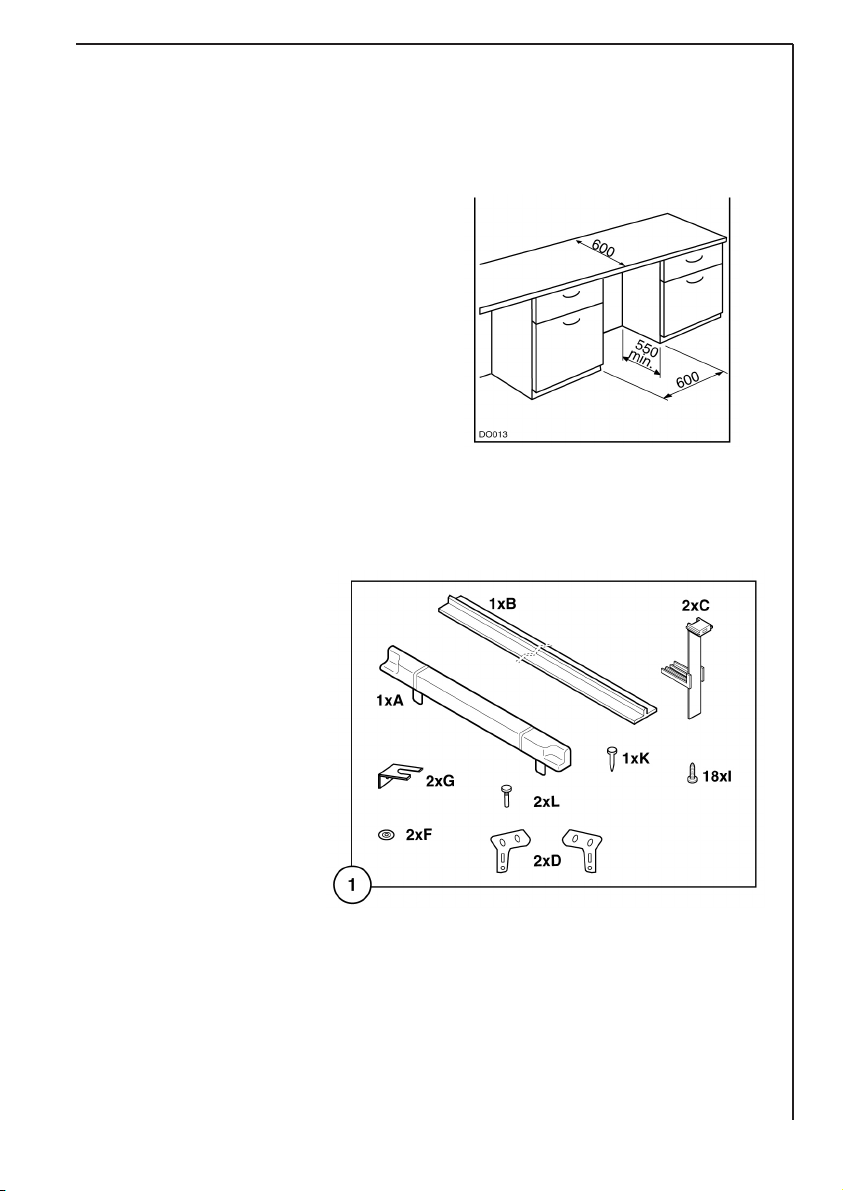
Changing over the freezer compartment door
(not on all models)
1. Open the freezer compartment
door a little way.
2. Using a small screwdriver, press
the spring in the opening of the
lower door bearing slightly upwards
and take the door bearing out complete with the door.
3. Position the covering cap (M) on the opposite side.
4. Turn the freezer compartment door through 180 and fit the lower door
bearing into the lower bearing cavity
of the freezer compartment door.
5. Lift the freezer compartment door
a little way upwards, fit it into the
upper door bearing, and at the same
time insert the lower door bearing
into the square hole. Small upwards
and downwards adjustments of the
freezer compartment door will make
fitting easier.
22
Page 23
Building the appliance in under a worktop
The dimensions of the recessed installation area must correspond with
those indicated in the figure.
Installation kit
23
Page 24
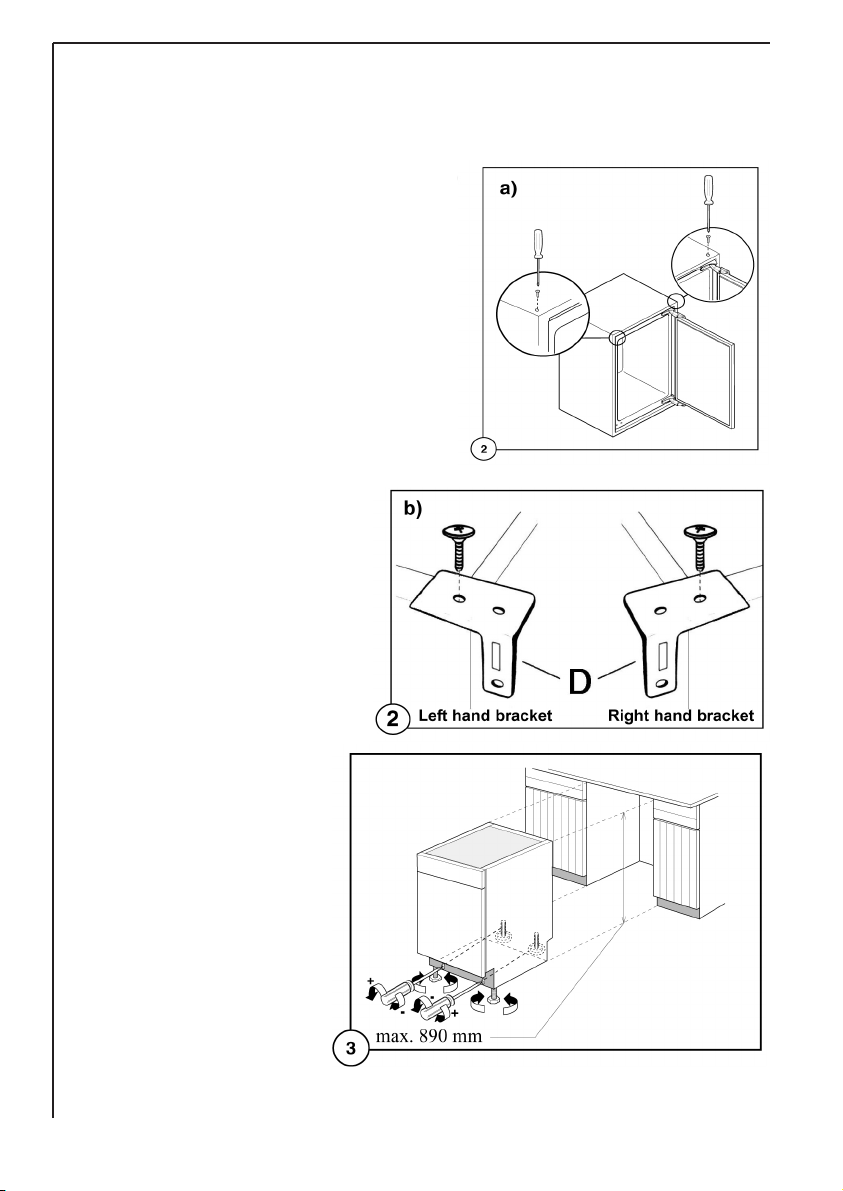
Two cabinet securing brackets are supplied with the installation pack. They
need to be assembled onto the cabinet prior to cabinet being pushed into
the Kitchen aperture.
1. To fit these brackets remove the
two screws at the top left and right
hand front corners of the cabinet.
2. Position the two brackets
as shown in the figure and replace the two securing
screws.
24
3. Push the appliance
into place. The plug socket necessary for connection of the appliance
to the electricity supply
should be positioned, so
that the plug is not placed in the recess.
4. To adjust the height
proceed as follows:
Loosen or tighten the
two front feet.
The rear feet are adjusted by
turning the screw in the front kick plate to the left or right.
Page 25
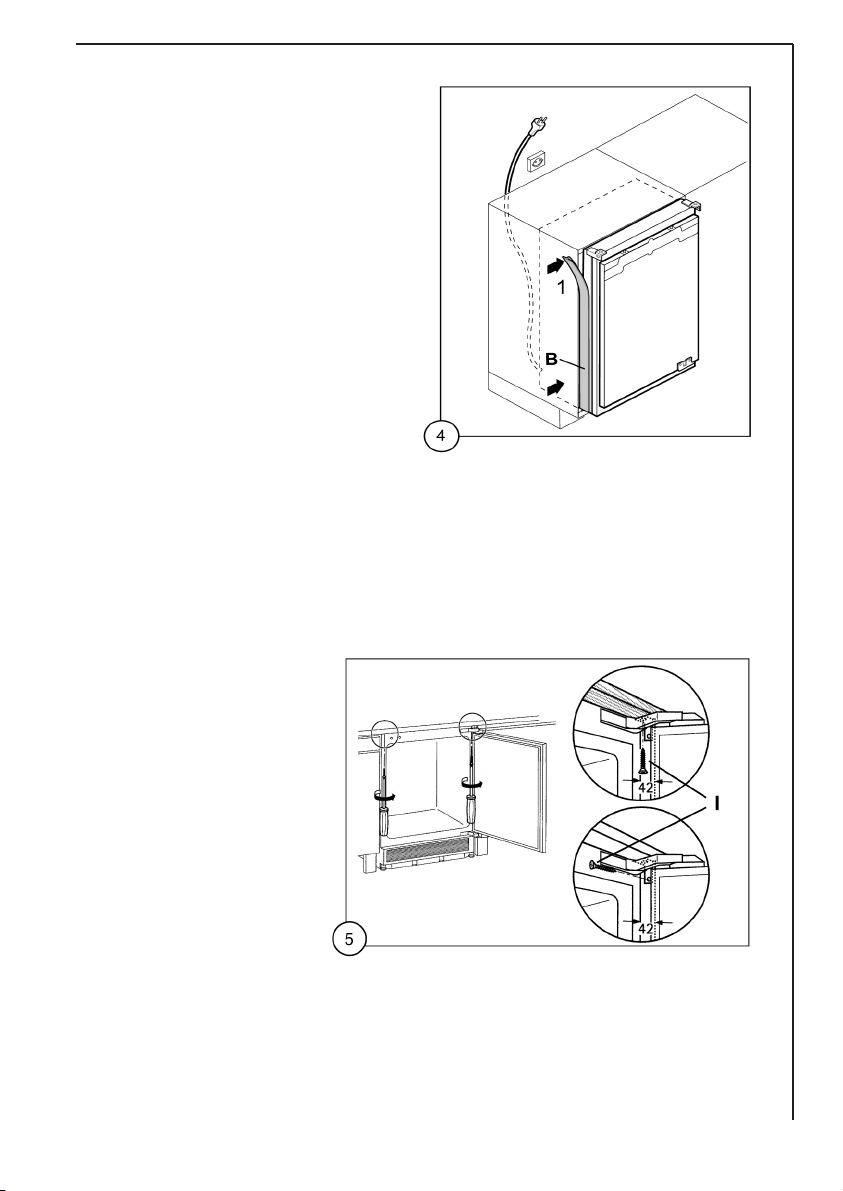
5. The joint cover (B) is to be assembled after having installed the
appliance in the recess.
Screw appliance into place
25
Page 26
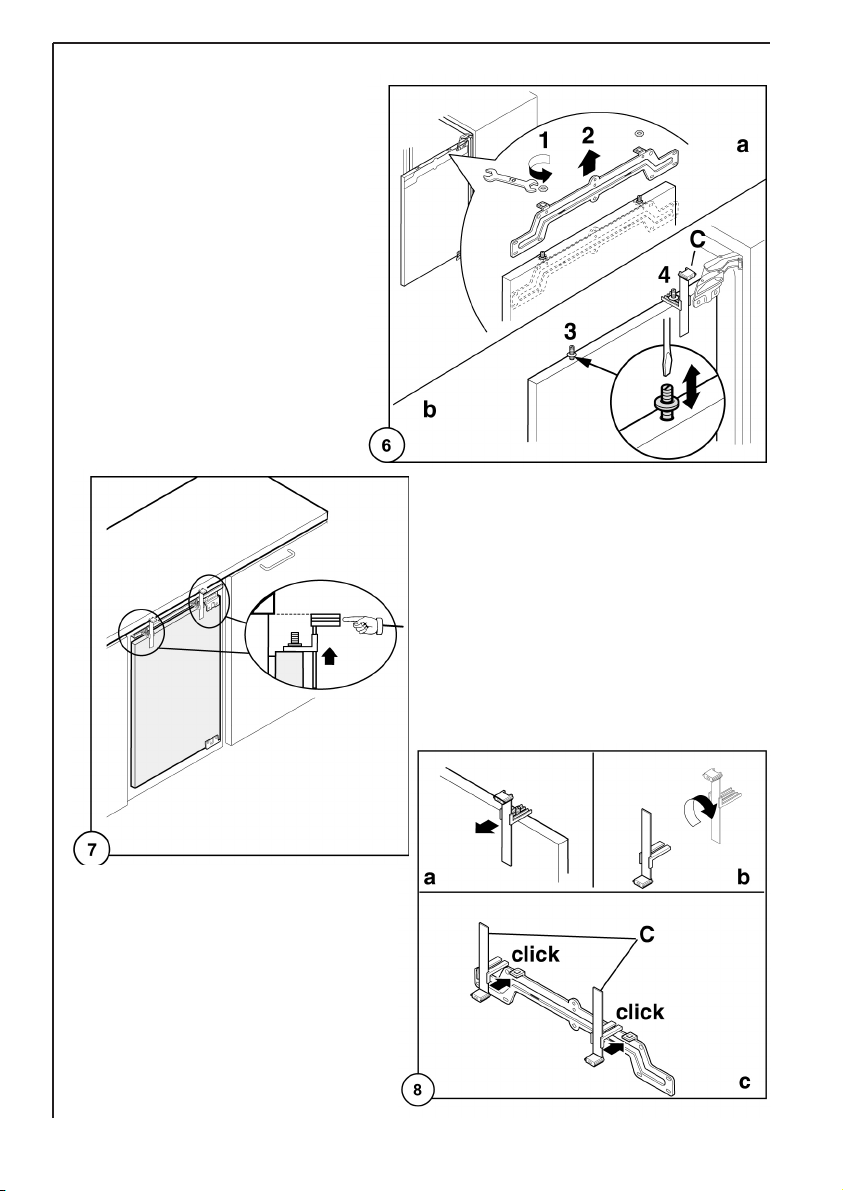
Mounting furniture door
26
Page 27
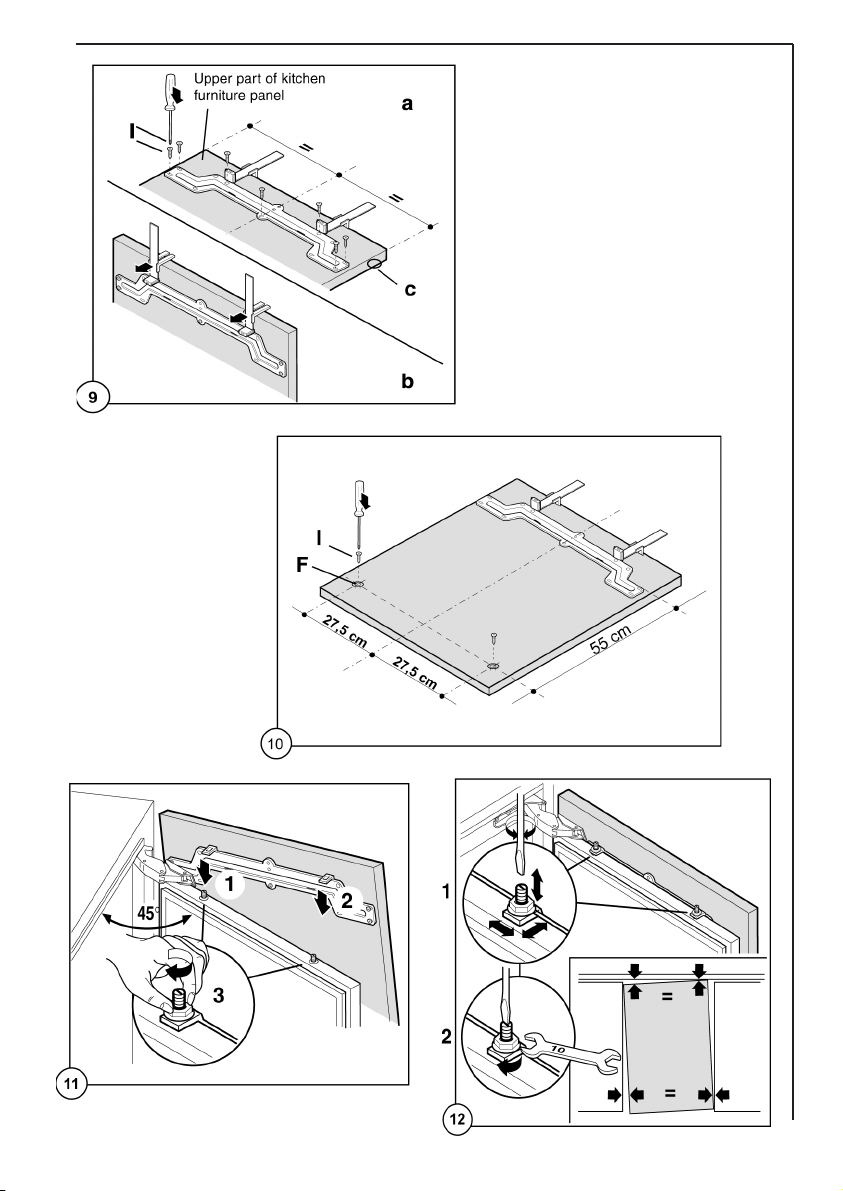
27
Page 28

Refit the covering strip.
28
Page 29

Fitting the plinth
Important!
For the efficient operation of the
appliance, it is important that
the original ventilation grid is
used.
• For an opening height di-
mension A=820 mm and a
plinth height dimension
a=100 mm, the plinth may be
fitted without adjustments.
The same applies to an opening height dimension
B=890 mm and a plinth
height dimension b=170 mm.
• For plinth heights greater
than a=100 mm, b=170 mm,
a cut should be made in the
plinth, 580 mm wide, in the
centre of the appliance position, leaving a remaining
height of a=100 mm, b=170
mm.
• Attach plinth to the kitchen units.
Important! The plinth must be positioned at a minimum distance of
25 mm from the door.
29
Page 30

Lors de sa fabrication, cet appareil a été construit selon des normes, directives et/ou décrets pour une utilisation sur le territoire français.
Pour la sécurité des biens et des personnes ainsi que pour le respect de l’environnement, vous devez d’abord lire impérativement les préconisations suivantes avant toute utilisation de votre appareil.
Pour éviter tout risque de détérioration de l’appareil, transportez-le dans sa
position d’utilisation muni de ses cales de transport (selon modèle). Au déballage de celui-ci, et pour empêcher des risques d’asphyxie et corporel,
tenez les matériaux d’emballage hors de la portée des enfants.
Pour éviter tout risque (mobilier, immobilier, corporel,…), l’installation, les
raccordements (eau, gaz, électricité, évacuation selon modèle), la mise en
service et la maintenance de votre appareil doivent être effectués par un
professionnel qualifié.
Votre appareil a été conçu pour être utilisé par des adultes. Il est destiné à
un usage domestique normal. Ne l’utilisez pas à des fins commerciales ou industrielles ou pour d’autres buts que ceux pour lesquels il a été conçu. Vous
éviterez ainsi des risques matériel et corporel.
Débranchez votre appareil avant toute opération de nettoyage manuel. N’utilisez que
des produits du commerce non corrosifs ou non inflammables.
Toute projection d’eau ou de vapeur est proscrite pour écarter le risque
d’électrocution.
30
Si votre appareil est équipé d’un éclairage, débranchez l’appareil avant de
procéder au changement de l’ampoule (ou du néon, etc.) pour éviter de
s’électrocuter.
Afin d’empêcher des risques d’explosion et d’incendie, ne placez pas de produits inflammables ou d’éléments imbibés de produits inflammables à l’intérieur, à proximité ou sur l’appareil.
Lors de la mise au rebut de votre appareil, et pour écarter tout risque corporel, mettez
hors d’usage ce qui pourrait présenter un danger : coupez le câble d’alimentation au
ras de l’appareil. Informez-vous auprès des services de votre commune des endroits
autorisés pour la mise au rebut de l’appareil.
Respectez la chaîne de froid dès l’acquisition d’un aliment jusqu’à sa consommation pour exclure le risque d’intoxication alimentaire. Veuillez maintenant lire attentivement cette notice pour une utilisation optimale de votre
appareil.
Page 31

Chère Cliente, Cher Client
Avant de mettre votre nouvel appareil en marche, veuillez lire attentivement
le présent mode d’emploi. Vous y trouverez des informations importantes
sur la sécurité d’utilisation, l’installation et l’entretien de l’appareil.
Conservez le mode d’emploi de manière à pouvoir le consulter par la suite.
Remettez-le à un éventuel nouveau propriétaire de l’appareil. Ce mode d’emploi s’applique à plusieurs modèles techniquement comparables, qui diffèrent
par leur équipement. Observez uniquement les indications qui correspondent
à votre modèle.
Le triangle d’avertissement et/ou des indications correspondantes (Avertissement! Prudence! Attention!) signalent les informations importantes pour
votre sécurité ou le bon fonctionnement de l’appareil.
Observez impérativement ces indications.
1. Ce symbole vous guide à travers les étapes d’utilisation de l’appareil.
2. ....
Ce symbole précède des informations complémentaires sur l’utilisation et
l’application pratique de l’appareil.
La feuille de trèfle signale les conseils et informations relatifs à une
utilisation économique et non polluante de l’appareil.
Vous trouverez les explications des termes spécifiques utilisés dans le mode
d’emploi tout à la fin, au chapitre "Termes spécifiques".
Le mode d’emploi contient des indications qui permettent de remédier soimême à d’éventuels dérangements. Voir "Que faire si ...". Si ces indications ne
suffisent pas, notre service consommateurs se tient à votre disposition.
Imprimé sur du papier protégeant l’environnement
il ne suffit pas de penser écologique il faut agir en conséquence ...
31
Page 32

Sommaire
Avertissements importants 33
Utilisation / Avant la première mise en service /Système frigorifique
Sécurité des enfants 33
Utilisation quotidienne 34
Installation / En cas d’anomalie 35
Protection de l’environnement / Information sur l’emballage
de l’appareil 35
Mise au rebut des anciens appareils / Retrait de la protection
pour le transport 36
Installation / Emplacement 37
Encastrement / Branchement électrique 38
Avant la mise en service
Tableau de commande / Mise en service 39
Réglage de la température / Congélation rapide
Voyant d’alarme 40
Equipement intérieur / Fabrication de cubes de glace / Tiroirs 41
Conseils
Économie d’ énergie / Congélation et surgélation 42
Entretien / Degivrage automatique / Nettoyage
Arret prolonge 43
Que faire si ...
En cas d’anomalie de fonctionnement 45
En cas d’arrêt de fonctionnement 45
Bruits de fonctionnement 46
Règlements, normes, directives 48
Prèparation de la grille 50
Rèversibilitè de la porte 51
Réversibilité du portillon du compartiment
congélateur 52
Encastrement sous un plan de travail 53
Montage de la plinthe 59
32
Page 33

Avertissements importants
La sécurité de nos appareils est conforme aux règles reconnues de la technique et à la législation sur la sécurité des appareils. Nous vous rappelons
toutefois les règles de sécurité suivantes :
Utilisation
• Cet appareil a été conçu pour être utilisé par des adultes. Veillez à ce
que les enfants n’y touchent pas et ne l’utilisent pas comme un jouet.
Votre appareil est destiné à un usage domestique normal. Ne l’utilisez
pas à des fins commerciales ou industrielles ou pour d’autres buts que
celui pour lequel il a été conçu
• Ne modifiez pas ou n’essayez pas de modifier les caractéristiques de cet
appareil. Cela représenterait un danger pour vous.
Avant la première mise en service
• Vérifiez si l’appareil n’a pas subi de dommages au cours du transport.
Ne branchez en aucun cas un appareil défectueux! En cas de dommage,
veuillez vous adresser au magasin vendeur.
Système frigorifique
Le système frigorifique et l’isolation de votre appareil ne contiennent pas de
C.F.C. contribuant ainsi à préserver l’environnement. Les C.F.C. sont remplacés par des hydrocarbures. Le circuit réfrigérant de cet appareil contient de
l’isobutane (R600a): les interventions doivent être effectuées exclusivement
par des personnes qualifiées ayant reçues une formation spécifique pour le
R600a.
Ce gaz est néanmoins inflammable :
1 Ne faites pas fonctionner d’appareils électriques (par exemple: sorbe-
tières électriques, mélangeurs ou de sèche cheveux pour accélérer le
dégivrage, …) à l’intérieur de votre appareil.
2 Pendant le transport et l’installation de votre appareil, assurez-vous
qu’aucune partie du circuit n’est endommagée. Si tel est le cas:
• Evitez les flammes vives (briquet) et tout autre allumage (étincelles).
• Aérez la pièce où se trouve l’appareil.
Sécurité des enfants
• Les matériaux d’emballage (p. ex. films, mousse de polystyrène) peuvent être
dangereux pour les enfants. Tenez les matériaux d’emballage hors de portée
des enfants.
33
Page 34

• Si votre ancien appareil doit être mis au rebus, veillez à rendre inutilisable tout ce qui pourrait représenter un danger pour un enfant (fermeture de porte, câble d’alimentation). Reportez-vous à la rubrique
"Protection de l’environnement".
Utilisation quotidienne
• Ne placez pas dans l’appareil des produits contenant du gaz ou des
liquides inflammables.
• Ne placez ni bouteilles ni boîtes de boissons gazeuses dans l’appareil,
elles pourraient éclater.
• Ne touchez pas avec les mains humides les surfaces givrées et les produits congelés et ne consommez pas certains produits tels que les bâtonnets glacés dès leur sortie de l’appareil; la température très basse
à laquelle ils se trouvent peut provoquer des brûlures ou un arrachement de la peau.
• Ne faites pas fonctionner d’appareils électriques (par ex. de sorbetières
électriques, de mélangeurs, etc.) à l’intérieur de l’appareil.
• Débranchez toujours la prise de courant avant de procéder au nettoyage de l’appareil et au remplacement de l’ampoule d’éclairage (pour les
modèles qui en sont équipés).
• A la réception de l’appareil, déballez-le ou faites-le déballer immédiatement. Vérifiez son aspect général. Faites les éventuelles réserves par
écrit sur le bon de livraison dont vous garderez un exemplaire.
34
• Les congélateurs ménagers sont destinés uniquement à la congélation
des aliments.
• Un produit décongelé ne doit jamais être recongelé.
• Suivez les indications du fabricant pour la congélation des aliments.
• Dans tous les appareils de congélation certaines surfaces peuvent se
couvrir de givre. Suivant le modèle, ce givre peut être éliminé automatiquement (dégivrage automatique) ou bien manuellement.
• Ne décollez pas les bacs à glaçons avec un couteau ou tout autre objet
tranchant.
Page 35

Installation
• Assurez-vous, après avoir installé l’appareil, que celui-ci ne repose pas
sur le câble d’alimentation.
Important: en cas de dommage du câble d’alimentation, il ne doit
être remplacé que par un professionnel qualifié.
• L’appareil se réchauffe sensiblement au niveau du condenseur et du
compresseur. Veillez à ce que l’air circule librement tout autour de l’appareil. Une ventilation insuffisante entraînerait un mauvais fonctionnement et des dommages sur l’appareil.
• Suivez les instructions données pour l’installation.
• Après la livraison, attendez 2 heures avant de brancher l’appareil pour
que le circuit frigorifique soit stabilisé.
• Cet appareil est lourd. Faites attention lors de son déplacement.
En cas d’anomalie
• En cas d’anomalie de fonctionnement, reportez-vous à la rubrique
"Que faire si...". Si malgré toutes les vérifications une intervention
s’avère nécessaire, le vendeur de votre appareil est le premier habilité
à intervenir. A défaut (déménagement de votre part, fermeture du magasin où vous avez effectué l’achat…), consultez le Centre Contact
Consommateurs qui vous communiquera alors l’adresse d’un Service
Après Vente.
En cas d’intervention sur votre appareil, exigez du service après
vente les pièces de rechange certifiées Constructeur.
Protection de l’environnement
Information sur l’emballage de l’appareil
Tous les matériaux marqués par le symbole >PE< (polyéthylène),
>PS< (mousse de polystyrène) sont recyclables. Déposez-les dans une
déchetterie prévue à cet effet (renseignez-vous auprès des services de
votre commune) pour qu’ils puissent être récupérés et recyclés.
35
Page 36

Mise au rebut des anciens appareils
Cet appareil est muni de fermetures magnétiques. S’il remplace un appareil équipé d’une fermeture mécanique, nous vous conseillons de
rendre celle-ci inutilisable avant de vous en débarrasser, ceci afin d’éviter aux enfants de s’enfermer dans l’appareil et de mettre ainsi leur
vie en danger. Veillez également à couper le câble d’alimentation électrique au ras de l’appareil. Renseignez-vous auprès des services de votre
commune pour la reprise de l’appareil.
Si vous vous débarrassez de votre appareil, veillez à ne pas détériorer
les circuits frigorifiques.
• Le symbole sur le produit ou son emballage indique que
ce produit ne peut être traité comme déchet ménager. Il doit plutôt
être remis au point de ramassage concerné, se chargeant du recyclage du matériel électrique et électronique. En vous assurant que
ce produit est éliminé correctement, vous favorisez la prévention
des conséquences négatives pour l’environnement et la santé humaine qui, sinon, seraient le résultat d’un traitement inapproprié
des déchets de ce produit. Pour obtenir plus de détails sur le recyclage de ce produit, veuillez prendre contact avec le bureau municipal de votre région, votre service d’élimination des déchets
ménagers ou le magasin où vous avez acheté le produit.
36
Retrait de la protection pour le transport
L’appareil et certaines parties de l’équipement intérieur sont protégés
pour le transport.
1. Enlevez les bandes autocollantes à gauche et à droite à l’extérieur
de la porte.
2. Enlevez toutes les bandes autocollantes et rembourrages à l’intérieur de l’appareil (sauf la plaque signalétique).
Page 37

Installation
Emplacement
Placez de préférence votre appareil loin d’une source de chaleur
(chauffage, cuisson ou rayons solaires trop intenses) dans un local bien
ventilé et sec.
La température ambiante influence sur la consommation électrique et
le bon fonctionnement de l’appareil.
Pour son bon fonctionnement, il est impératif de respecter les températures ambiantes du local où doit être placé l’appareil, suivant la classe
climatique (indiquée sur la plaque signalétique) pour lequel il est prévu.
Au delà de ces températures, ses performances peuvent s’en trouver diminuées.
Le tableau ci-dessous vous permet de repérer les différentes classes
climatiques existantes et les températures ambiantes correspondantes
en fonction du modèle de l’appareil.
Classe climatique pour une température ambiante de
SN + 10 à 32°C
N +16à32°C
ST +18à38°C
T
+ 18 à 43°C
Le montage direct sous une table de cuisson n’est pas permis. Les températures, en partie élevées, de la table de cuisson peuvent endommager l’appareil.
Si une table de cuisson est installée près de l’appareil, les relatives prescriptions de montage et de sécurité doivent être respectées. Étant donné les
multiples conditions possibles d’installation, il est impossible de fournir cicontre des informations détaillées.
Il est recommandé d’éviter le réchauffement du réfrigérateur en maintenant
une distance adéquate de toutes sources de chaleur et en utilisant une plaque d’isolation thermique appropriée. La correcte ventilation de l’appareil
doit en outre être garantie.
37
Page 38

Encastrement
Voir les instructions de montage ci-jointes.
Après l’encastrement de l’appareil, en particulier après le changement
du côté d’ouverture de la porte, veuillez vérifier si le joint de la porte
assure une étanchéité correcte tout autour de la porte. Un joint de
porte non étanche peut entraîner une formation plus forte de givre et
donc une consommation plus élevée d’énergie (voir également chapitre
„Que faire si...“).
Branchement électrique
Votre appareil ne peut être branché qu'en 230 V monophasé.
Vérifiez que le compteur électrique peut supporter l'intensité absorbée
par votre appareil compte tenu des autres appareils déjà branchés.
Calibre des fusibles en ligne (un par phase) 10 A en 230 V.
Important
L'installation doit être réalisée conformément aux règles de l'art,
aux prescriptions de la norme NF.C 15.100 et aux prescriptions de
l'E.D.F.
Utilisez un socle de prise de courant comportant une borne de mise
à la terre, qui doit être obligatoirement raccordée conformément à
la norme NF.C.15.100 et aux prescriptions de l’E.D.F ; cette prise de
courant doit impérativement être accessible.
Si le câble d'alimentation est endommagé, il doit être remplacé par
un câble d'alimentation certifié.
Cette opération ne peut être effectuée que par une personne habilitée, par votre vendeur, ou par le fabricant.
L’appareil ne doit pas être raccordé à l’aide d’un prolongateur ou
d’une prise multiple.
Vérifiez que la prise de terre est conforme aux règlements en vigueur.
Notre responsabilité ne saurait être engagée en cas d'accidents ou
d'incidents provoqués par une mise à la terre inexistante ou défectueuse.
38
Page 39

Avant la mise en service
Attendez 2 heures au moins avant de brancher l’appareil pour permettre l’huile de refluer dans le compresseur.
• L’appareil tant convenablement install , nous vous conseillons de le
nettoyer soigneusement avec de l’eau ti de savonneuse, pour enleverl’odeur caract ristique de neuf.
N’utilisez pas de produits abrasifs, poudre récurer, ponge métallique.
• Enlever les rubans adhésifs et les entretoises vous emploie pour le transport.
Tableau de commande
1 Voyant de contr le secteur vert
2 Thermostat
3 Voyant de contrôle jaune pour la congélation rapide
4 Interrupteur pour la congélation rapide
5 Voyant de contrôle alarme rouge
Mise en service
• Branchez la prise de courant. Tournez le bouton du thermostat (2) dans
le sens des aiguilles d’une montre au-del de la position -16°C. Le bouton du thermostat se trouve dans le plan de travail du congélateur.
• Les voyants (1), (3) et (5) s’allument.
A la mise en service l’appareillage lectronique teint la fonction de
congélation rapide (voyant jaune) automatiquement après 5 heures.
Pour arrêter l’appareil tournez le bouton du thermostat sur la position •.
39
Page 40

Réglage de la température
• Les différentes positions comprises entre -16°C et -24°C indiquent des
températures toujours plus froides.
• Pour une bonne conservation des produits surgelés et congelés la tempésrature l’intésrieur doit être inférieure ou égale à -18°C. Attendez
que la lampe (5) s’ éteigne. Cela signifie que la température optimale
a été atteinte.
• Les positions du thermostat sont susceptibles d’ être modifiées en considérant que la température interne dépend des facteurs suivants:
• température ambiante;
• fréquence d’ouverture des portes;
• quantité d’aliments conservés;
• emplacement de l’appareil.
• Nous vous conseillons, lors de la mise en service de l’appareil, d’effectuer un premier rêglage sur la position -18°C.
Congélation rapide
Appuyez sur l’interrupteur (4) pendant une seconde. Le voyant (3) s’allume. Si l’on réappuye sur la touche (4), la fonction de congélation rapide peut être ôtée manuellement autant qu’on veut. Le voyant jaune
(3) s’éteint.
Si la fonction de cong lation rapide n’est pas ôtée manuellement, l’appareillage lectronique l’éteint automatiquement aprés 48 heures. Le
voyant jaune (3) s’èteint.
40
Voyant d’alarme
Le voyant d’alarme (5) s’allume lorsque la température à l’intérieur du
congélateur remonte au-dessus d’une certaine valeur qui est préjudiciable à une conservation de longue durée (plus chaud que -12°C). Il
est normal que le voyant d’alarme reste momentanément allumé lors
de la mise en marche de l’appareil, c’est à dire jusqu’é ce que la température à l’intérieur atteigne la valeur convenant le mieux à la conservation des aliments.
Page 41

Calendrier de congélation
Les symboles qui figurent sur les tiroirs correspondent à différents types
de produits congelés.
Les chiffres indiquent la durée de conservation en mois du type correspondant de produit. La durée de conservation supérieure ou inférieure
est valable en fonction de la qualité des aliments et du traitement qu'ils
ont subi avant la congélation.
Equipement intérieur
Fabrication de cubes de glace
Notre appareil est équipé d’un ou plusieurs bacs à glace en matiére
plastique qui vous donneront satisfaction dans l’utilisation ménagére
courante. Remplissez d’eau les bacs à glace jusqu’aux trois quarts de
leur hauteur. Placez les bacs dans le compartiment congélateur.
N’employez pas d’objet métallique pour décoller les bacs à glace.
Le démoulage des bacs en matiére plastique s’obtient par simple torsion.
Tiroirs
Les tiroirs stables sont antibasculants et bloqués dans la position extréme. Ceci garantit un
stockage
sûr et commode et facilite l'accès aux aliments congelés.
Pour les sortir, tirez-les jusqu'à
la butée, remontez les et enlevez-les par l'avant (voir fig.).
41
Page 42

Conseils
Économie d’ énergie
• N'installez pas l'appareil à proximité de cuisinières, radiateurs ou autres
sources de chaleur. Si la température ambiante est élevée, le compresseur fonctionne plus fréquemment et plus longtemps (voir chapitre Installation).
• N’ouvrez pas la porte plus longtemps que nécessaire.
• Ne placez pas d’aliments chauds dans l’appareil. Attendez que les aliments refroidissent.
‚• Ne réglez pas la température plus bas que nécessaire.
• Placez les aliments surgelés dans le réfrigérateur pour les dégeler. Le
froid des aliments surgelès est ainsi utilis pour le refroidissement du réfrigérateur.
• De temps en temps, dépoussi rez le condenseur situé à l’arriére de l’appareil, l’aide d’un aspirateur ou d’une brosse souple.
Congélation et surgélation
• Appuyez sur la touche super congélation 3 heures avant d'introduire les
denrées fraéches si l'appareil est vide (mise en service ou aprés dégivrage par exemple). Passez ensuite au régime de conservation. Cela
n'est pas nécessaire si le congélateur est déjà en fonction.
42
• 24 heures avant d'introduire les denrées fraîches si l'appareil est déjé
en régime de conservation, et si vous utilisez la capacité maximale de
congélation.
• Maintenez le régime de congélation pendant 24 heures aprés avoir introduit les produits à congeler.
• Placez les aliments à congeler dans le compartiment inférieur de l’appareil de façon à éviter qu’ils puissent entrer en contact avec des produits déjà congelés. ce qui en éléverait la température.
• La quantité maximum d’aliments pouvant être congelés en 24 h est indiquée sur la plaque signalétique située à l’intérieur de l’appareil.
Page 43

• A cause de la technologie NO FROST le procéss de congélation est plus
rapide; dès lors que les aliments ont decongelés ils conservent toutes
les vitamines et les propriétés originales ainsi que le goût.
• Des paquets de petites dimensions permettent d’obtenir une congélation rapide et uniforme. Ne perdez jamais de vue qu’une fois décongelés, les aliments congelés se détériorent rapidement.
• Evitez d’ouvrir trop souvent la porte et ne la laissez ouverte que le
temps nécessaire.
• Pour l’emballage des aliments congeler, utilisez des sacs et films de
congélation en polyéthylène et du papier aluminium extra fort.
• Evitez de placer les produits frais en contact avec les produits déjà
congelés.
• Ne consommez pas certains produits tels que les bâtonnets glacés dès
leur sortie de l’appareil; la tempèrature très basse à laquelle ils se trouvent peut provoquer des brûlures.
• A fin d’obtenir la meuilleure performance de cet appareil il faut utiliser
tous les compartiments du congélateur.
• Indiquez sur chaque paquet la date de congélation, afin de pouvoir
contrôler le temps d’entreposage.
• Prévoyez un temps réduit au minimum pour leur transport du magasin
d’alimentation à votre domicile.
• Ne placez ni bouteilles ni boîtes de boissons gazeuses dans le cong lateur, elles pourraient clater.
• Les aliments dégelés, même partiellement, ne peuvent être recongelés
A fin d’assurer le bon fonctionnement du congélateur ne stockez
pas les paquets directement contre le ventilateur situé sur la paroi
post rieure de l’appareil..
43
Page 44

Entretien
Débranchez l'appareil avant toute opération.
Attention!
Cet appareil contient des hydrocarbures dans son circuit réfrigérant;
l'entretien et la recharge ne doivent donc Itre effectués que par
du personnel autorisé.
Degivrage automatique
Cet appareil a ete concu pour etre libre de givre. Cela signifie qu’il n’est
pas necessaire de proceder au degivrage manuellement lorsque le
degivrage a lieu automatiquement.
Nettoyage
N’utilisez jamais de produits abrasifs ou caustiques ni d’eponges
avec grattoir pour proceder au nettoyage de votre appareil.
N'utilisez jamais des objets metalliques pour nettoyer l'appareil;
vous risquez de l'endommager.
Lavez I'interieur avec de l'eau tiede et du bicarbonate, rincez et
sechez soigneusement.
Lavez la carrosserie avec de l'eau tiede savonneuse.
44
Arret prolonge
• Debranchez la prise de courant, videz, degivrez et nettoyez
l'appareil.
• Maintenez la porte entrouverte pendant toute la duree de non
utilisation.
Page 45

Que faire si ...
En cas d’anomalie de fonctionnement
La fabrication de votre appareil a fait l’objet de nombreuses vérifications. Cependant, si vous constatez une anomalie de fonctionnement,
consultez le tableau ci-dessous avant d’appeler le service après vente.
Si aucun de ces défauts n’est observé, il convient de consulter très rapidement le service après vente de votre magasin vendeur afin d’éviter
toute altération des aliments. Donnez-lui la référence complète de
votre appareil: ces renseignements figurent sur la plaque signalétique
située à l’intérieur de l’appareil.
En cas d’arrêt de fonctionnement
Si la panne est de courte durée, il n’y a aucun risque d’altération pour
les aliments. Abstenez-vous cependant d’ouvrir la porte. Si la panne
doit se prolonger, transférez les produits surgelés et congelés dans un
autre congélateur. L’autonomie de fonctionnement de votre appareil
est de 20 heures (selon la Norme NF EN 28187). Cette durée est sensiblement raccourcie suivant la charge de l’appareil.
Dès que vous constatez un début de décongélation, consommez les
aliments le plus rapidement possible ou recongelez-les après les avoir
cuits (aliments crus).
Symptômes Cause possible Solutions
L’appareil ne fonctionne
pas (aucun voyant ne
s’allume)
Le voyant vert clignote.
L’appareil fonctionne.
L’appareil n’est pas
en fonctionnement.
La prise n’est pas
branchée.
Le fusible a disjoncté
ou est défectueux.
La prise murale est
défectueuse.
Probleme technique
Mettre l’appareil en
marche.
Branchez la prise.
Vérifiez le fusible, rem-
placez-le cas échéant.
Les anomalies du réseau
électrique doivent être
résolus par votre électricien.
Contacter le service
aprèsvente.
45
Page 46

Symptômes Cause possible Solutions
Le voyant vert ne s’allume
pas, le voyant jaune est allumé lorsque la fonction
de congélation rapide est
activée.
Le voyant jaune ne s’allume pas lorsque la fonction de congélation
rapide est activée. Le voyant vert est allumé.
Le voyant vert est
défectueux.
Le voyant jaune est
défectueux.
Contacter le service
après vente.
Contacter le service
après vente.
L’appareil fait trop de froid.
L’appareil ne fait pas assez
de froid, le voyant rouge
clignote et l’alarme sonore
retentit.
La température est
mal réglée.
La température est
mal réglée.
La porte est restée
ouverte trop longtemps.
De trop grandes
quantités d’aliments
ont été entreposées
au cours des derniéres 24 heures.
L’appareil est installé à côté d’une
source de chaleur.
Anomalie de l’appareil.
Voir “Mise en service et réglage de la température”.
Veuillez consulter la
partie “Mise en service”.
N’ouvrez pas la porte
plus longtemps que nécessaire. Actionnez la
fonction de congélation rapide.
Actionnez la congélation rapide.
Veuillez consulter la
partie “Emplacement”.
Activez la congélation
rapide, laissezle congélateur fermé, contactez le
service après-vente.
46
Page 47

Symptômes Cause possible Solutions
Formation importante de
givre dans l’appareil et
éventuellement au niveau
du joint de porte.
Bruits inhabituels.
Après modification du réglage de température, le
compresseur ne démarre
pas immédiatement.
Le joint de porte
n’est pas étanche
(après changement
du sens d’ouverture
de la porte).
L’appareil n’est pas
d’aplomb et de niveau.
L’appareil est installé
contre une cloison
résonnante ou trop
près des meubles.
Ceci est normal, il ne
s’agit pas d’une anomalie.
A l’aide d’un sèchecheveux, réchauffez
avec précaution le
joint de porte aux endroits non hermétiques
(pas plus chaud qu’env.
50 °C).En même temps,
formez manuellement
le joint chauffé de la
porte de manière à ce
qu’il soit de nouveau
bien au contact.
Ajustez les pieds réglables.
Installez correctement
l’appareil.
Le compresseur se met
en marche de lui même
au bout d’un certain
temps.
47
Page 48

Bruits de fonctionnement
Les bruits suivants sont typiques des appareils frigorifiques:
• Claquement
On l’entend chaque fois que le compresseur se met en marche ou
s’éteint.
• Bourdonnement
Dès que le compresseur se met en marche, vous l’entendrez bourdonner.
• Circulation de liquide
Il n’est pas anormal d’entendre le bruit de circulation du fluide frigorigène selon son état liquide, gazeux ou vaporeux.
Règlements, normes, directives
L’appareil frigorifique est destiné à un usage domestique et a été fabriqué
en respect des normes s’appliquant à ce type d’appareils.
Cet appareil est conforme aux directives européennes suivantes :
– 73/23/CEE du 19.2.1973 - Directive sur les basses tensions
– 89/336/CEE du 3.5.1989
(y compris la directive de modification 92/31/CEE) - Directive de CEM.
48
Page 49

Electrolux Home Products France S.A.S. au capital de 67 500 000 - 552 042 285
RCS SENLIS
AEG/ ELECTROLUX
Pour tenir nos engagements, nous écoutons les Consommateurs
Info Conso Electrolux est le lien privilégié entre la marque et ses Consom-
mateurs. Il assure en permanence une double mission: satisfaire au mieux
vos exigences et tirer parti de cette proximité pour améliorer sans cesse
les produits que nous vous proposons.
AVANT L’ACHAT
Toute une équipe répond avec clarté et précision à vos sollicitations con-
cernant l’éventail de nos gammes de produits et vous apporte des infos
pour vous aider dans votre choix en fonction de vos propres besoins.
APRÈS L’ACHAT
Exprimez-vous sur la perception que vous avez de nos produits et votre
satisfaction à l’usage. Mais interrogez aussi nos spécialistes sur l’utilisa-
tion et l’entretien de vos appareils. C’est alors que notre mission prend
tout son sens. Ecouter, comprendre, agir: trois temps essentiels pour tenir
l’engagement de la marque dans le plus grand respect du Consommateur.
A bientôt!
Dans le souci d’une amélioration constante de nos produits, nous nous réservons le droit d’apporter à
leurs caractéristiques toutes modifications liées à l’évolution technique (décret du 24.03.78).
49
Page 50

Prèparation de la grille
Ouverture porte à gauche:
enlevez le côté droit (A) de la
grille en le coupant de l'arrière.
Ouverture porte à droite:
enlevez le côté droit (B) de la
grille en le coupant de l'arrière
Procédez ensuite comme suit
pour remettre la grille sur l'appareil: glissez la grille à la base
de l'appareil puis appuyer sur les
crochets (a) jusqu'au déclic.
50
Page 51

Rèversibilitè de la porte
La porte de cet appareil est rèversible: son sens d'ouverture peut être
modifié en fonction du souhait de l'utilisateur.
Attention!
La réversibilité de la porte une
fois effectuée, contrôlez que le
joint magnétique adhère à la
carrosserie. Si la température à
l'intérieur de la piéce est trop
basse (en hiver, par exemple), il
se peut que le joint níadhére pas
parfaitement. Dans ce cas, si on
ne veut pas attendre que le joint
reprenne sa dimension naturelle
aprés un certain temps, on
pourra accélérer ce processus en
chauffant la partie intéressée à
l'aide díun sèche cheveux.
51
Page 52

Réversibilité du portillon du compartiment congélateur
(pas pour tous les modèles)
1. A l'aide d'un petit tournevis, pressez le ressort dans l'évidement du
gond inférieur de la porte légèrement vers le haut et retirez le gond
de la porte en même temps que le
portillon.
2. Dèplacez le cache (M).
3. Faites tourner le portillon de 180°
et placez le gond infèrieur de la
porte sur le coussinet infèrieur du
gond du portillon.
4. Soulevez légèrement le portillon
vers le haut, mettez-le en place dans
le gond supérieur gauche de la porte
et placez en même temps le gond inférieur de la porte dans le trou carré.
En montant ou descendant le portillon, la mise en place est facilitée.
52
Page 53

Encastrement sous un plan de travail
Les dimensions de la niche doivent correspondre à celles indiquées dans la figure.
Pièces de montage fournies avec l'appareil.
53
Page 54

Côté gauche
Côté droite
1. Fixez à l’appareil les équerres livrées à cet effet (fig.).
2. Mettre en place l'appareil.
La prise murale doit se trouver impérativement hors de
la niche íencastrement de
l'appareil.
3. L'appareil est équipé de
pieds régables; pour régler
l’appareil à la hauteur souhaitée (870 mm max.), il est
nécessaire d'agir sur les 4
pieds réglables.
54
Page 55

4. Appliquez les joints (B) à pression à l’appareil (fig.).
5. Visser líappareil.
55
Page 56

Monter la porte du meuble
56
Page 57

Partie supérieure de la porte
du meuble
57
Page 58

Posez le couvre-joint (A).
58
Page 59

Montage de la plinthe
Attention!
Pour ne pas compromettre le bon fonctionnement de l’appareil, il est nècessaire
d’utiliser la grille d’aeration d’origine.
• Si la niche díencastrement de líappareil a une hauteur de A=820 mm et
une hauteur de plinthe a=100 mm,
la plinthe peut Ítre montée sans modification. Il en est de même pour
une hauteur díencastrement de
B=890 mm et une hauteur de plinthe
b=170 mm.
• For plinth heights greater than
a=100 mm, b=170 mm, a cut should
be made in the plinth, 580 mm wide,
in the centre of the appliance position, leaving a remaining height of
a=100 mm, b=170 mm.
• Fixez la plinthe au bloc cuisine.
Important! La plinthe doit être positionnée à une distance minimum de 25 mm
de la porte.
59
Page 60

Sehr geehrte Kundin, sehr geehrter Kunde,
bevor Sie Ihr neues Kältegerät in Betrieb nehmen, lesen Sie bitte diese Gebrauchsanweisung aufmerksam durch. Sie enthält wichtige Informationen
zum sicheren Gebrauch, zum Aufstellen und zur Pflege des Gerätes.
Bewahren Sie bitte die Gebrauchsanweisung zum späteren Nachschlagen
auf. Geben Sie sie an eventuelle Nachbesitzer des Gerätes weiter.
Hinweis: Diese Gebrauchsanweisung ist für mehrere technisch vergleichbare
Modelle mit unterschiedlicher Ausstattung bestimmt.
Beachten Sie bitte nur die Hinweise, die Ihre Geräteausführung betreffen.
Mit dem Warndreieck und/oder durch Signalwörter (Warnung!, Vorsicht!,
Achtung!) sind Hinweise hervorgehoben, die für Ihre
Sicherheit oder für die Funktionsfähigkeit des Gerätes wichtig sind.
Bitte unbedingt beachten.
1. Dieses Symbol leitet Sie Schritt für Schritt beim Bedienen des Gerätes.
2. ....
Nach diesem Zeichen erhalten Sie ergänzende Informationen zur Bedienung
und praktischen Anwendung des Gerätes.
Mit dem Kleeblatt sind Tipps und Hinweise zum wirtschaftlichen und umweltschonenden Einsatz des Gerätes gekennzeichnet.
Erläuterungen zu Fachbegriffen, die in der Gebrauchsanweisung verwendet
werden, finden Sie ganz zum Schluß im Abschnitt "Fachbegriffe".
Für evtl. auftretende Störungen enthält die Gebrauchsanweisung Hinweise
zur selbständigen Behebung, siehe Abschnitt "Was tun, wenn ...". Sollten
diese Hinweise nicht ausreichen, haben Sie jederzeit zwei Anlaufstellen, bei
denen Ihnen weitergeholfen wird:
Wir sind für Sie da:
montags bis frei-
tags
8.00 bis 20.00 Uhr
samstags
10.00 bis 14.00 Uhr.
• Hier erhalten Sie Antwort auf jede Frage, die die Ausstattung und den
Einsatz Ihres Gerätes betrifft. Natürlich nehmen wir auch gerne Wünsche,
Anregungen und Kritik entgegen. Unser Ziel ist es, zum Nutzen unserer Kunden unsere Produkte und Dienstleistungen weiter zu verbessern.
• Bei technischen Problemen steht Ihnen unser WERKSKUNDENDIENST in
Ihrer Nähe jederzeit zur Verfügung (Adressen und
60
Page 61

Telefonnummern finden Sie im Verzeichnis Garantiebedingungen/Kundendienststellen). Beachten Sie dazu den Abschnitt “Kundendienst”.
Gedruckt auf umweltschonend hergestelltem Papier
– wer ökologisch denkt, handelt auch so ..
Inhaltsverzeichnis
Sicherheit
Bestimmungsgemäße Verwendung / Vor der ersten Inbetriebnahme
Kältemittel 62
Sicherheit von Kindern / Im Alltagsbetrieb 63
Entsorgung
Information zur Geräteverpackung / Entsorgung von Altgeräten 64
Entsorgungshinweise 65
Transportschutz entfernen / Aufstellen 65
Einbau / Elektrischer Anschluss 66
Vor Inbetriebnahme / Bedienungsblende / Inbetriebnahme 67
Temperatureinstellung / Schnellgefriervorgang / Alarmlampe 68
Gefrierabteilausstattung 69
Eiswürfelbereitung 69
Schublade 69
Tipps / Energie-Einsparung
Einfrieren und Tiefkuhllagern 70
Automatisches Abtauen / Reinigung / Stillstandszeiten 72
Was tun, wenn ...
Abhilfe bei Störungen 72
Betriebsgeräusche
74
Bestimmungen, Normen, Richtlinien
Fachbegriffe 75
Vorbereitung des Lüftungsgitters 77
Türanschlag wechseln 78
Anschlagwechsel der Gefrierfachtür 79
Einbau unter eine Arbeitsplatte 80
Montage der Sockelblende 86
61
Page 62

Sicherheit
Die Sicherheit unserer Kältegeräte entspricht den anerkannten Regeln der
Technik und dem Gerätesicherheitsgesetz. Dennoch sehen wir uns veranlasst, Sie mit folgenden Sicherheitshinweisen vertraut zu machen:
Bestimmungsgemäße Verwendung
• Das Kältegerät ist für die Verwendung im Haushalt bestimmt. Es eignet
sich zum Einfrieren und Tiefkühllagern von Lebensmitteln sowie zur
Eisbereitung. Wird das Gerät zweckentfremdet oder falsch bedient,
kann vom Hersteller keine Haftung für eventuelle Schäden übernommen werden.
• Umbauten oder Veränderungen am Kältegerät sind aus Sicherheitsgründen nicht zulässig.
• Sollten Sie das Kältegerät gewerblich oder für andere Zwecke als zum
Tiefkühllagern und Einfrieren von Lebensmitteln benutzen, beachten
Sie bitte die für Ihren Bereich gültigen gesetzlichen Bestimmungen.
Vor der ersten Inbetriebnahme
• Überprüfen Sie das Kältegerät auf Transportschäden. Ein beschädigtes
Gerät auf keinen Fall anschließen! Wenden Sie sich im Schadensfall
bitte an den Lieferanten.
• Prüfen, dass das Gerät nach der Installation nicht auf dem Netzkabel
steht. Wichtig: Beschädigte Versorgungskabel müssen durch ein
Spezialkabel bzw. einen Spezialsatz ersetzt werden, die beim Hersteller
oder den Kundendienststellen erhältlich sind.
62
Kältemittel
Das Gerät enthält im Kältemittelkreislauf das Kältemittel Isobutan
(R600a), ein Naturgas mit hoher Umweltverträglichkeit, das jedoch
brennbar ist.
• Warnung - Achten Sie beim Transportieren und Aufstellen des Gerätes
darauf, dass keine Teile des Kältemittelkreislaufs beschädigt werden.
• Bei Beschädigung des Kältemittelkreislaufs:
– offenes Feuer und Zündquellen unbedingt vermeiden;
– den Raum, in dem das Gerät steht, gut durchlüften.
Page 63

Sicherheit von Kindern
• Verpackungsteile (z. B. Folien, Styropor) können für Kinder gefährlich
sein. Erstickungsgefahr! Verpackungsmaterial von Kindern fernhalten!
• Ausgediente Altgeräte bitte vor der Entsorgung unbrauchbar machen.
Netzstecker ziehen, Netzkabel durchtrennen, eventuell vorhandene
Schnapp- oder Riegelschlösser entfernen oder zerstören. Dadurch verhindern Sie, dass sich spielende Kinder im Gerät einsperren (Erstickungsgefahr!) oder in andere lebensgefährliche Situationen geraten.
• Kinder können Gefahren, die im Umgang mit Haushaltsgeräten liegen,
oft nicht erkennen. Sorgen Sie deshalb für die notwendige Aufsicht
und lassen Sie Kinder nicht mit dem Gerät spielen!
Im Alltagsbetrieb
• Behälter mit brennbaren Gasen oder Flüssigkeiten können durch Kälteeinwirkung undicht werden. Explosionsgefahr! Lagern Sie keine Behälter mit brennbaren Stoffen, wie z.B. Spraydosen, FeuerzeugNachfüllkartuschen etc. im Kältegerät.
• Flaschen und Dosen dürfen nicht in den Gefrierraum. Sie können springen, wenn der Inhalt gefriert - bei kohlensäurehaltigem Inhalt sogar
explodieren! Legen Sie nie Limonaden, Säfte, Bier, Wein, Sekt usw. in
den Gefrierraum. Ausnahme: Hochprozentige Spirituosen können im
Gefrierraum gelagert werden.
• Speiseeis und Eiswürfel nicht unmittelbar aus dem Gefrierraum in den
Mund nehmen. Sehr kaltes Eis kann an Lippen oder Zunge festfrieren
und Verletzungen verursachen.
• Tiefkühlgut nicht mit nassen Händen berühren. Die Hände könnten
daran festfrieren.
• Warnung - Keine Elektrogeräte (z. B. elektrische Eismaschinen, Rührgeräte etc.) im Kältegerät betreiben.
• Warnung - Um die Funktion des Gerätes nicht zu beeinträchtigen, dürfen die Lüftungsöffnungen der Geräteverkleidungen oder des Aufbaus
von Einbaumöbeln nicht abgedeckt oder zugestellt werden.
• Warnung - Um den Abtauvorgang zu beschleunigen, keine mechanischen oder künstlichen Hilfsmittel verwenden, als die vom Hersteller
empfohlenen.
• Vor Reinigungsarbeiten das Gerät grundsätzlich abschalten und den
Netzstecker ziehen oder Sicherung in der Wohnung abschalten bzw.
herausdrehen.
63
Page 64

• Netzstecker immer am Stecker aus der Steckdose ziehen, nie am Kabel.
Im Störungsfall
• Sollte einmal eine Störung am Gerät auftreten, sehen Sie bitte zuerst
in dieser Gebrauchsanweisung unter "Was tun, wenn ..." nach. Falls die
dort aufgeführten Hinweise nicht weiterhelfen, führen Sie bitte keine
weiteren Arbeiten selbst aus.
• Kältegeräte dürfen nur von Fachkräften repariert werden. Durch unsachgemäße Reparaturen können erhebliche Gefahren entstehen.
Wenden Sie sich im Reparaturfall bitte an Ihren Fachhändler oder an
unseren Kundendienst.
Entsorgung
Information zur Geräteverpackung
Entsorgen Sie das Verpackungsmaterial Ihres Gerätes sachgerecht. Alle
verwendeten Verpackungsmaterialen sind umweltverträglich und
wiederverwertbar.
Zu den Werkstoffen: Die Kunststoffe können auch wiederverwertet
werden und sind folgendermaßen gekennzeichnet:
>PE< für Polyäthylen, z. B. bei der äußeren Hülle und den Beuteln im
64
Innern.
>PS< für geschäumtes Polystyrol, z. B. bei den Polsterteilen, grundsät-
zlich FCKW-frei.
Die Kartonteile werden aus Altpapier hergestellt und sollten auch
wieder zur Altpapiersammlung gegeben werden.
Entsorgung von Altgeräten
Aus Umweltschutzgründen müssen Kältegeräte fachgerecht entsorgt
werden. Dies gilt für Ihr bisheriges Gerät und - nachdem es eines Tages
ausgedient hat - auch für Ihr neues Gerät.
Warnung! Ausgediente Altgeräte bitte vor der Entsorgung unbrauchbar machen.
Netzstecker ziehen, Netzkabel durchtrennen, eventuell vorhandene Schnappoder Riegelschlösser entfernen oder zerstören. Dadurch verhindern Sie, dass sich
spielende Kinder im Gerät einsperren (Erstickungsgefahr!) oder in andere lebensgefährliche Situationen geraten.
Page 65

Entsorgungshinweise:
• Das Gerät darf nicht mit dem Haus- oder Sperrmüll entsorgt werden.
• Der Kältemittelkreislauf, insbesondere der Wärmetauscher an der Geräterückseite, darf nicht beschädigt werden.
• Das Symbol auf dem Produkt oder seiner Verpackung weist
darauf hin, dass dieses Produkt nicht als normaler Haushaltsabfall zu
behandeln ist, sondern an einem Sammelpunkt für das Recycling von
elektrischen und elektronischen Geräten abgegeben werden muss.
Durch Ihren Beitrag zum korrekten Entsorgen dieses Produkts schützen
Sie die Umwelt und die Gesundheit Ihrer Mitmenschen. Umwelt und
Gesundheit werden durch falsches Entsorgen gefährdet. Weitere Informationen über das Recycling dieses Produkts erhalten Sie von Ihrem
Rathaus, Ihrer Müllabfuhr oder dem Geschäft, in dem Sie das Produkt
gekauft haben.
Transportschutz entfernen
Das Gerät sowie Teile der Innenausstattung sind für den Transport geschützt.
1. Klebebänder links und rechts an den Türaußenseiten abziehen.
2. Alle Klebebänder sowie Polsterteile aus dem Geräteinnenraum entfernen.
Aufstellen
Aufstellort
Das Gerät soll in einem gut belüfteten und trockenen Raum stehen. Die
Umgebungstemperatur wirkt sich auf den Stromverbrauch und die einwandfreie Funktion des Gerätes aus.
Daher sollte das Gerät
– nicht direkter Sonneneinstrahlung ausgesetzt sein;
– nicht an Heizkörpern, neben einem Herd oder sonstigen Wärmequel-
len stehen;
– nur an einem Ort stehen, dessen Umgebungstemperatur der Klima-
klasse entspricht, für die das Gerät ausgelegt ist.
Die Klimaklasse finden Sie auf dem Typschild, das sich links im Innen-
raum des Gerätes befindet.
Nachstehende Tabelle zeigt, welche Umgebungstemperatur elcher Klimaklasse zugeordnet ist:
65
Page 66

Klimaklasse
SN + 10 bis 32°C
N + 16 bis 32°C
ST + 18 bis 38°C
T
fuĴrUmgebungstemperatur
+ 18 bis 43°C
Direkter Einbau unter einem Kochfeld ist nicht zulässig. Die teilweise
hohen Abstrahlungstemperaturen des Kochfeldes können das Gerät
beschädigen.
Wird in der Nähe ein Kochfeld eingebaut, sind die zugehörigen Einbauund Schutzvorschriften zu beachten. Durch die Vielzahl der möglichen Einbausituationen können hier keine detailierten Angaben
erfolgen.
Eine Erwärmung des Kältegerätes ist durch ausreichenden Abstand und
Einbringung einer geeigneten Wärmeschutzplatte zu verhindern. Die
ordnungsgemäße Be- und Entlüftung des Kältegerätes mu ss gewährleistet sein.
Einbau
Siehe beiliegende Montageanweisung. Prüfen Sie bitte nach dem Einbau des Geräts, insbesondere nach Türanschlagwechsel, ob die Türdichtung ringsum richtig abdichtet. Eine undichte Türdichtung kann zu
verstärkter Reifbildung und dadurch zu höherem Energieverbrauch führen (siehe auch Abschnitt „Abhilfe bei Störungen“).
66
Elektrischer Anschluss
Für den elektrischen Anschluss ist eine vorschriftsmäßig installierte
Schutzkontakt-Steckdose erforderlich. Sie sollte so gesetzt sein, dass
ein Ziehen des Netzsteckers möglich ist. Die zum Anschluss des Gerätes
nötige Schutzkontakt-Steckdose sollte sich links oder rechts neben der
Einbaunische befinden. Die elektrische Absicherung muss mindestens
10/16 Ampere betragen. Ist die Steckdose bei eingebautem Gerät nicht
mehr zugänglich, muss eine geeignete Maßnahme in der Elektroinstallation sicherstellen, dass das Gerät vom Netz getrennt werden kann
(z. B. Sicherung, LSSchalter, Fehlerstrom-Schutzschalter oder dergleichen mit einer Kontaktöffnungsweite von min. 3 mm). Vor Inbetriebnahme am Typschild des Gerätes überprüfen, ob Anschlussspannung
und Stromart mit den Werten des Stromnetzes am
Aufstellort übereinstimmen.
Z. B.: AC 220 ... 240 V 50 Hz oder
220 ... 240 V ~50 Hz
(d. h. 220 bis 240 Volt Wechselstrom, 50 Hertz)
Das Typschild befindet sich links im Innenraum des Gerätes.
Page 67

Vor Inbetriebnahme
Man sollte mindestens 2 Std. warten, bevor das Gerät in Betrieb genommen wird, damit das Kaltemittel zuruckstromen kann.
• Bevor Sie das Gerat in Betrieb nehmen, beseitigen Sie den typischen
«Neugeruch» am besten durch Auswaschen der Innenteile mit lauwarmem
Wasser und einem neutralen Reinigungsmittel. Sorgfaltig nachtrocknen.
Bitte keine Reinigungs- bzw. Scheuermittel verwenden, die das Gerät
beschädigen könnten.
• Das Gerät sowie Teile der Innenausstattung sind fur den Transport
geschutzt.
Bedienungsblende
1 Netzkontrolleuchte grün
2 Thermostat
3 Schnellgefrier-Kontrolleuchte gelb
4 Schalter zum Schnellgefrieren
5 Alarmkontrolleuchte rot
Inbetriebnahme
• Den Stecker in die Steckdose einsetzen. Thermostatknopf von der Stellung
«•» (STOP) aus im Uhrzeigersinn uber die Stellung “-16°C”drehen. Der Thermostatknopf (2) ist in der Arbeitsplatte.
• Die Aufleuchten der Kontrollampe (1), der Schnellgefrier-Kontrolleuchte
(3) und der Alarmlampe (5) zeigen an. Das Gerät ist eingeschaltet.
Die Elektronic des Gerates schaltet die Schnellgefrier-Funktion bei Inbetriebnahme nach 5 Stunden automatisch ab.
Den Stillstand des Gerates erhält man durch Drehen des Thermostatknopfes
auf das Symbol «•».
67
Page 68

Temperatureinstellung
• Durch Drehen des Thermostatknopfes (2) auf die hoheren Zahlen erhalt
man kaltere Temperaturen, durch Drehen auf die niedrigeren Zahlen erhalt
man warmere Temperaturen.
• Fur eine gute Lagerung der eingefrorenen bzw. tiefgefrorenen Lebensmittel, muss die
Temperatur im Gefrierschrank unter oder gleich -18°C sein.
• Die richtige Einstellung erhalt man, unter Berucksichtigung folgender, die
Innentemperatur beeinflussender Faktoren:
- Raumtemperatur
- Häufigkeit des Türöffnens
- Menge der eingelagerten Lebensmittel,
- Aufstellung des Gerates.
• Die Temperatur wird automatisch geregelt
Stellung „-16“= warmste Innentemperatur
Stellung „-24“= kalteste Innentemperatur
Stellung „ •“= Kuhlung aus
Wir empfehlen, den Thermostatknopf (2) auf die “-18°C” Stellung
zu drehen. Die Temperaturregelung zur optimalen Aufbewahrung der Le-
bensmittel erfolgt automatisch
68
Schnellgefriervorgang
Schalter (4) ca. 1 Sekunde gedruckt halten, um auf Position SUPER zu
stellen. Die Kontrollampe (3) leuchtet auf. Die Elektronic des Gerätes schaltet die Schnellgefrier-Funktion nach 48 Stunden automatisch ab.
Sie können den Schnellgefriervorgang jederzeit manuell beenden, indem
Sie die Taste (4) erneut drücken.
Alarmlampe
Die Alarmlampe (5) leuchtet auf, wenn die Temperatur im Geräteinneren
steigt, und dadurch die richtige Lagertemperatur nicht mehr gewährleistet
wird (wärmer als -12°C). Sie leuchtet jedoch auch dann auf, wenn das
Gerat gerade eingeschaltet worden ist und bleibt solange eingeschaltet,
bis die richtige Lagertemperatur erreicht ist.
Page 69

Gefrierkalender
Die Symbole auf den Schubladen zeigen unterschiedliche Arten von
Tiefkühlgut Die Zahlen geben fur die jeweilige Art von Tiefkühlgut die Lagerzeit in Monaten an. Ob der obere oder der untere Wert der angegebenen Lagerzeiten gultig ist, hängt von der Qualitat der Lebensmittel und
deren Vorbehandlung vor dem Einfrieren ab.
Gefrierabteilausstattung
Eiswürfelbereitung
Das Gerät hat Eiswurfelschalen, welche mit Wasser aufgefullt in das Gefrierfach gestellt werden. Die Eiswürfel konnen herausgenommen werden,
indem die Eiswürfelschale kurz unter Leitungswasser gehalten wird.
Bitte zur Entnahme der Eiswurfelschalen keine Metallgegenstande benutzen
Schublade
Die stabilen Kälteschubladen sind
kippgesichert und in Endstellung
arretiert. Dies gewährleistet sicheres und bequemes Einlagern
und Entnehmen des Gefrierguts
Zum Herausnehmen ziehen Sie
die Schubladen bis zur Arretierung heraus, kippen sie nach
oben und ziehen sie nach vorn
heraus (siehe Abb.)
69
Page 70

Tipps
Energie-Einsparung
• Das Gerät nicht in der Nahe von Herden, Heizkörpern oder anderen Wärmequellen aufstellen. Bei hoher Umgebungstemperatur läuft der Kompressor häufiger und länger. Bitte im Abschnitt “Aufstellung” nachsehen.
• Tur nur so lange wie notig geoffnet lassen.
• Keine warmen Speisen in das Gerät stellen. Warme Speisen erst abkuhlen
lassen.
‚• Die Temperatur nicht kälter als notig einstellen.
• Tiefkuhlgut zum Auftauen in den Kuhlraum legen. Die Kälte im Tiefkühlgut
wird so zur Kuhlung im Kühlraum genutzt.
• Den Verflüssiger, das Metallgitter an der Geräteruckseite, mit einem Staubsauger oder einer Bürsteimmer sauber halten.
Einfrieren und Tiefkuhllagern
• Um den Schnellgefriervorgang durchzuführen, muss das Gerät falls es
nicht in Betrieb ist, wenigstens drei Stunden vor der Einlagerung der
einzufrierenden Lebensmittel auf Schnellgefriervorgang gestellt werden.
Läuft jedoch das Gerät bereits, wird empfohlen, den Schnellgefriervorgang
mindestens 24 Stunden vor der Einlagerung der einzufrierenden Lebensmittel einzuschalten.
70
• Nach der Einlagerung der Lebensmittel, rechnet man 24 Stunden bis der
Gefriervorgang beendet ist. Nach dieser Zeit den «Aufbewahrungs- Betrieb» wieder einstellen.
• Nach einem längeren Stillstand des Gerätes muss dieses vor der Einlagerung der Lebensmittel, durch Einstellung des Schalters auf Schnellgefriervorgang (SUPER), wenigstens 2 Stunden in Betrieb gesetzt werden; danach
wieder den normalen Betrieb einstellen.
• Die einzufrierenden Lebensmittel in das untere Gefrierfach einlegen.
• Das Gefriervermögen in 24 Stunden finden Sie auf dem «Typschild»
links unten im Gerätes.
Page 71

• Da das Einfrieren mit Hilfe der no_frost-Technik schneller geht, behält das
Gefriergut auch nach dem Auftauen sein ursprungliches Aussehen,seinen
Nährwert und seinen Geschmack.
• Die Lebensmittel in kleine Portionen einteilen, damit der Gefriervorgang
beschleunigt wird; dies ermöglicht das spätere Auftauen von kleineren
Portionen.
• Tür so wenig wie möglich öffnen oder offen lassen.
• Die Lebensmittel in Alu- oder Polyäthylenfolien luftdicht verpacken.
• Die einzufrierenden Lebensmittel sollen mit den Tiefkühlkosten nicht in
Berührung kommen, um ein Temperaturanstieg an diese zu verhindern.
• Speiseeis, das direkt aus dem Gefrierfach genommen wird, kann KälteBrandwunden verursachen.
• Es ist empfehlenswert, auf der Verpackung das Einfrierdatum zu notieren,
damit die Aufbewahrungszeit eingehalten werden kann.
• Um die beste Leistung des Gerätes zu erreichen empfehlen wir, für die Lagerung des Gefriergutes alle Fächer gleichmaßig zu nutzen.
• Der Transport vom Verkäufer zum Verbraucher muss in kurzer Zeit erfolgen.
• Es sollten keine kohlensaurehaltigen Getränke in das Gefrierschrankeingestellt werden, da sie explodieren können.
• Einmal aufgetaute Lebensmittel verderben schnell und können kein ein
zweites Mal eingefroren werden.
Um ein einwandfreies Funktionieren des Gerätes sicherzustellen,
darf kein Gefriergut direkten Kontakt mit der Ventilatorabdeckung
bzw. dem Ventilator in der Geräterückwand, haben.
Wartung!
Vor jeder Reinigungsarbeit immer den Netzstecker aus der Steckdose
ziehen.
Attentie!
Dieses Gerät erhaĴlt im Kaltekreislauf Kohlenwasserstoff. Aus diesem
Grund darf die Wartung und das NachfüĴllen ausschließlich von autorisierten Fachpersonal durchgeführt werden.
71
Page 72

Automatisches Abtauen
Ihr Gerät wurde so konzipiert, dass sich im Gefrierraum kein Eis bildet.
Dies bedeutet, das ses nicht manuell abgetaut werden muss. Das erforderliche Abtauen des Kälteaggregates erfolgt automatisch.
Reinigung
Bitte keine Reinigungs- bzw. Scheuermittel verwenden, die das
Gerät beschadigen könnten. Benutzen Sie nie Metallgegenstände
um das Gerat zu reinigen, da es beschädigt werden könnte.
Den Innenraum mit lauwarmem Wasser und einem neutralen Reinigungsmittel reinigen.
Gut nachwaschen und sorgfaltig trocknen.
Stillstandszeiten
• Den Stecker aus der Steckdose ziehen. Alle Lebensmittel herausnehmen
und Gerät reinigen.
• Die Tur offen lassen, um im Inneren eine gute Luftzirkulation zu
gewahrleisten und somit Geruchsbildung zu vermeiden.
Was tun, wenn ...
72
Abhilfe bei Störungen
Möglicherweise handelt es sich bei einer Störung nur um einen kleinen
Fehler, den Sie anhand nachfolgender Hinweise selbst beheben können.
Führen Sie keine weiteren Arbeiten selbst aus, wenn nachstehende Informationen im konkreten Fall nicht weiterhelfen.
Warnung! Reparaturen am Kältegerät dürfen nur von Fachkräften durchgeführt werden. Durch unsachgemäße Reparaturen können erhebliche Gefahren für den Benutzer entstehen. Wenden Sie sich im
Reparaturfall an Ihren Fachhändler oder an unseren Kundendienst.
Hat die Kühlung ausgesetzt, so überbrückt die Kältereserve im Tiefkühlgut bei voller Beladung ca. 20 Stunden.
Page 73

Störung Mögliche Ursache Abhilfe
Gerät arbeitet nicht,
keine Kontrolleuchte
brennt.
Gerät arbeitet,
die grüne Lampe blinkt
Grüne Lampe leuchtet
nicht, gelbe Lampe leuchtet bei eingeschalteter
Schnellgefrier-Funktion.
Gelbe Lampe leuchtet
nicht bei eingeschalteter
Schnellgefrier-Funktion,
Gerät arbeitet.
Gerät kühlt zu stark.
Gerät ist nicht eingeschaltet.
Netzstecker ist nicht
eingesteckt oder lose
Sicherung hat ausgelöst oder ist defekt.
Steckdose ist defekt.
Technisches Problem
Grüne Lampe defekt.
Gelbe Lampe defekt.
Temperatur ist zu
kalt eingestellt.
Gerät einschalten.
Netzstecker einstecken.
Sicherung überprüfen,
gegebenenfalls erneuern. Störungen am
Stromnetz behebt Ihr
Elektrofachmann.
Kundendienst verständigen.
Kundendienst verständigen.
Kundendienst verständigen.
Temperaturregler vorübergenhend auf wärmere Einstellung drehen.
Die Gefrierraumtemperatur ist nicht ausreichend,
rote Warnanzeige blinkt,
Temperatur-Tonwarner
ertönt.
Temperatur ist nicht
richtig eingestellt.
Tür war längere Zeit
geöffnet.
Innerhalb der letzen
24 Stunden wurden
größere Mengen
warmer Lebensmittel
eingelagert.
Das Gerät steht
neben einer Wärme-
quelle.
Bitte im Abschnitt
“Temperatur einstel-
len” nachsehen.
Tür nur so lange wie
nötig geöffnet lassen,
Schnellgefrier-Taste betätigen.
Schnellgefrier-Taste
betätigen.
Bitte im Abschnitt “Aufstellort” nachsehen.
73
Page 74

Störung Mögliche Ursache Abhilfe
Die Gefrierraumtemperatur ist nicht ausreichend,
rote Warnanzeige blinkt,
Temperatur-Tonwarner
ertönt.
Starke Reifbildung im
Gerät, evtl. auch an der
Türdichtung.
Nach Änderung der Temperatureinstellung läuft
der Kompressor nicht
sofort an.
Hinweis: Überprüfen Sie regelmäßig an der roten Warnanzeige das Einhalten
der Lagertemperatur.
Störung am Gerät
Türdichtung ist undicht (evtl. nach Türanschlagwechsel).
Dies ist normal, es
liegt keine Störung
vor.
Schnellgefrier-Funktion.
einschalten, Gefrierschrank geschlossen halten, Kundendienst
verständigen.
An den undichten Stellen Türdichtung vorsichtig mit einem
Haartrockner erwärmen
(nicht wärmer als ca.
50°C). Gleichzeitig die
erwärmte Türdichtung
von Hand so in Form ziehen, dass sie wieder einwandfrei anliegt.
Der Kompressor läuft
nach einiger Zeit selbsttätig an.
74
Betriebsgeräusche
Folgende Geräusche sind charakterstisch für Kältegeräte:
• Klicken
Immer wenn der Kompressor ein- oder ausschaltet, ist ein Klicken zu
hören.
• Summen
Sobald der Kompressor arbeitet, können Sie ihn summen hören.
• Blubbern/Plätschern
Wenn Kältemittel in dünne Rohre einströmt, können Sie ein blubberndes oder plätscherndes Geräusch hören. Auch nach dem Abschalten
des Kompressors ist dieses Geräusch noch kurze Zeit hörbar.
Page 75

Bestimmungen, Normen, Richtlinien
Das Kältegerät ist für den Haushalt bestimmt und wurde unter Beachtung der für diese Geräte geltenden Normen hergestellt. Bei der Fertigung wurden insbesondere die nach dem Gerätesicherheitsgesetz
(GSG), der Unfallverhütungsvorschrift für Kälteanlagen (VBG 20) und
den Bestimmungen des Verbandes Deutscher Elektrotechniker (VDE)
notwendigen Maßnahmen getroffen.
Der Kältekreislauf wurde auf Dichtheit geprüft.
Dieses Gerät entspricht den folgenden EG-Richtlinien:
– 73/23/EWG vom 19.2.1973 - Niederspannungsrichtlinie
– 89/336/EWG vom 3.5.1989
(einschließlich Änderungsrichtlinie 92/31/EWG) - EMV-Richtlinie
– 94/2/EG vom 21. 01. 1994 - Richtlinie zur Energieettikettierung
– 96/57 EG vom 3. 9. 1996 - Anforderung im Hinblick auf die Energieeffizienz von elektrischen Haushaltskühl- und Gefriergeräten und entsprechenden Kombinationen.
Fachbegriffe
• Kältemittel
Flüssigkeiten, die zur Kälteerzeugung verwendet werden können,
nennt man Kältemittel. Sie haben einen verhältnismäßig niedrigen
Siedepunkt, so niedrig, dass die Wärme der im Kältegerät lagernden
Lebensmittel das Kältemittel zum Sieden bzw. Verdampfen bringen
kann.
• Kältemittelkreislauf
Geschlossenes Kreislaufsystem, in dem sich das Kältemittel befindet.
Der Kältemittelkreislauf besteht im wesentlichen aus Verdampfer,
Kompressor, Verflüssiger sowie aus Rohrleitungen.
• Verdampfer
Im Verdampfer verdampft das Kältemittel. Wie alle Flüssigkeiten benötigt Kältemittel zum Verdampfen Wärme. Diese Wärme wird dem
Geräteinnenraum entzogen, der dadurch abkühlt. Deshalb ist der
Verdampfer im Geräteinnenraum angeordnet oder unmittelbar hinter der Innenwand eingeschäumt und dadurch nicht sichtbar.
• Kompressor
Der Kompressor sieht aus wie eine kleine Tonne. Er wird von einem
eingebauten Elektromotor angetrieben und ist hinten im Sockelbereich des Gerätes untergebracht. Aufgabe des Kompressors ist es,
dampfförmiges Kältemittel aus dem Verdampfer abzuziehen, zu verdichten und zumVerflüssiger weiterzuleiten.
75
Page 76

•
Verflüssiger
Der Verflüssiger hat meist die Form eines Gitters. Im Verflüssiger ird das vom Kompressor verdichtete Kältemittel verflüssigt. Dabei wird Wärme frei, die über die Oberfläche des
Verflüssigers an die Umgebungsluft abgegeben wird. Der
Verflüssiger ist deshalb außen, meist an der Geräterückseite
angebracht.
Für Deutschland: Sie können Ersatzteile, Zubehör und Pflegemittel on-line bestellen unter http://www.aeg-hausgeraete.de Für Österreich: Sie können Ersatzteile, Zubehör und
Pflegemittel für Ihr AEG
Gerät über das Internet bestellen. Ersatzteile Online finden
Sie auf unsere Homepage: http://www.aeg-hausgeraete.at
unter der Rubrik “Service”.
76
Page 77

Vorbereitung des Lüftungsgitters
Nehmen Sie das Gitter aus der unteren Verpackungsschale.
Tür Öffnung links:
entfernen Sie die linke Türlagerblende (A) vom Gitter durch einen
Schnitt von hinten.
Tür Öffnung rechts:
entfernen Sie die rechte Türlagerblende (B) vom Gitter durch einen
Schnitt von hinten.
Für die Positionierung des Gitters
am Gerät dr¸cken Sie das Gitter
auf die Haken (a) bis diese einrasten.
Das Gerät mit den Montagewinkeln in der Nische befestigen, danach das Gitter montieren.
77
Page 78

Türanschlag wechseln
Der T¸ranschlag kann von rechts (Lieferzustand) nach links gewechselt
werden, falls der Aufstellort dies erfordert.
Achtung!!
Bei einer niedrigen Raumtemperatur (z.B. im Winter) kann es vorkommen, dass die Dichtung nicht
perfekt am Schrank haftet. Die Dichtung zieht sich nach gewisser
Zeit von selbst in Form. Wollen Sie
aber diesen Prozess beschleunigen,
so genügt es, die Dichtung mit
einem Haartrockner zu erwärmen.
78
Page 79

Anschlagwechsel der Gefrierfachtür
(nicht bei allen Modellen)
1. Gefrierfachtür etwas öffnen.
2. Mit einem kleinen Schraubenzieher
die Feder in der Aussparung des
unteren Türlagers leicht nach oben
drücken und Türlager zusammen mit
der Gefrierfachtür herausziehen.
3. Abdeckkappe (M) umsetzen.
4. Gefrierfachtür um 180° drehen und unteres Türlager auf die untere Lagerbuchse der Gefrierfachtür aufsetzen.
5. Gefrierfachtür etwas nach oben anheben, in linkes oberes Türlager einsetzen und gleichzeitig unteres Türlager
in das Vierkantloch einsetzen. Regulierende Auf- und Abbewegung der Gefrierfachtür erleichtert das Einsetzen.
79
Page 80

Einbau unter eine Arbeitsplatte
Die Mafle der Nische müssen den angegebenen Werten entsprechen.
Mitgelieferte Montageteile
80
Page 81

Linke Seite
1. Winkel rechts und links wie abgebildet befestigen.
2. Gerät in die Nische einschieben. Die zum Anschuss
des Gerätes nötige Schutzkontakt- Steckdose sollte so
positioniert sein, dass sich sie
nicht vom Gerät verdeckt
wird.
3. Das Gerät ist mit regulierbaren Füflen ausgestattet,
um es der gewünschten Höhe
(max 890 mm) anzupassen;
diese befinden sich an den
vier unteren Ecken des Gerätes.
Rechte Seite
81
Page 82

4. Fugenabdeckprofil (B) am Gerät
ankleben, wie in der Abbildung gezeigt.
Gerät festschrauben
82
Page 83

Möbeltür montieren
83
Page 84

Möbeltür Innenseite
84
Page 85

Abdeckung (A) anbringen
85
Page 86

Montage der Sockelblende
Achtung!
Um die Funktion des Gerätes nicht zu beeinträchtigen ist es notwendig das OriginalLüftungsgitter zu benutzen.
• Bei einer lichten Einbauhöhe Mafl
A=820 mm und einer Sockelblendenhöhe Mafl a=100 mm kann die Sockelblende unverändert montiert werden.
Ebenso bei einer lichten Einbauhöhe
Mafl B=890 mm und einer Sockelblendenhöhe Mafl b=170 mm.
• Bei Sockelblendenhˆhen grˆfler als
a=100 mm, b=170 mm, ist die Sockelblende mittig 580 mm breit auf eine
verbleibende Resthöhe von a=100 mm,
b=170 mm auszuschneiden.
• Sockelblende an der Küchenzeile befestigen.
Wichtig! Die Sockelblende muss mit mindestens 25 mm Abstand von der Tür
montiert werden.
86
Page 87

Page 88

2009. 05. 13.
AEG Hausgeräte GmbH
Postfach 1036
D-90327 Nürnberg
Sie können Ersatzteile, Zubehör und Pflegemittel on-line bestellen bei
http://www.aeg-electrolux.de
© Copyright by AEG
Technische Änderungen vorbehalten
211620028- 00 - 2009
 Loading...