

Page 1

A83400HLW0
EN
CHEST FREEZER USER MANUAL
2
FR
CONGÉLATEUR COFFRE NOTICE D'UTILISATION
20
DE
GEFRIERTRUHE BENUTZERINFORMATION
40
Page 2
FOR PERFECT RESULTS
Thank you for choosing this AEG product. We have
created it to give you impeccable performance for many
years, with innovative technologies that help make life
simpler – features you might not find on ordinary
appliances. Please spend a few minutes reading to get the
very best from it.
ACCESSORIES AND CONSUMABLES
In the AEG webshop, you’ll find everything you need to
keep all your AEG appliances looking spotless and
working perfectly. Along with a wide range of accessories
designed and built to the high quality standards you
would expect, from specialist cookware to cutlery baskets,
from bottle holders to delicate laundry bags…
Visit the webshop at:
www.aeg.com/shop
2
Page 3
CONTENTS
4 Safety information
6 Control panel
10 First use
10 Daily use
12 Helpful hints and tips
12 Care and cleaning
14 What to do if…
16 Technical data
17 Installation
17 Noises
19 Environmental concerns
The following symbols are used in this user
manual:
Important information concerning your
personal safety and information on how to
avoid damaging the appliance.
General information and tips
Environmental information
Subject to change without notice
Contents
3
Page 4
SAFETY INFORMATION
In the interest of your safety and to ensure the correct use, before installing and first using
the appliance, read this user manual carefully, including its hints and warnings. To avoid
unnecessary mistakes and accidents, it is important to ensure that all people using the ap-
pliance are thoroughly familiar with its operation and safety features. Save these instruc-
tions and make sure that they remain with the appliance if it is moved or sold, so that ev-
eryone using it through its life will be properly informed on appliance use and safety.
For the safety of life and property keep the precautions of these user's instructions as the
manufacturer is not responsible for damages caused by omission.
Children and vulnerable people safety
• This appliance is not intended for use by persons (including children) with reduced physi-
cal, sensory or mental capabilities, or lack of experience and knowledge, unless they have
been given supervision or instruction concerning use of the appliance by a person re-
sponsible for their safety.
Children should be supervised to ensure that they do not play with the appliance.
• Keep all packaging well away from children. There is risk of suffocation.
• If you are discarding the appliance pull the plug out of the socket, cut the connection
cable (as close to the appliance as you can) and remove the door to prevent playing chil-
dren to suffer electric shock or to close themselves into it.
• If this appliance featuring magnetic door seals is to replace an older appliance having a
spring lock (latch) on the door or lid, be sure to make that spring lock unusable before
you discard the old appliance. This will prevent it from becoming a death trap for a child.
General safety
WARNING!
Keep ventilation openings, in the appliance enclosure or in the built-in structure, clear of
obstruction.
• The appliance is intended for keeping foodstuff and/or beverages in a normal household
as explained in this instruction booklet.
• Do not use a mechanical device or any artificial means to speed up the thawing process.
• Do not use other electrical appliances (such as ice cream makers) inside of refrigerating
appliances, unless they are approved for this purpose by the manufacturer.
• Do not damage the refrigerant circuit.
• The refrigerant isobutane (R600a) is contained within the refrigerant circuit of the appli-
ance, a natural gas with a high level of environmental compatibility, which is neverthe-
less flammable.
During transportation and installation of the appliance, be certain that none of the components of the refrigerant circuit become damaged.
If the refrigerant circuit should become damaged:
– avoid open flames and sources of ignition
4 Safety information
Page 5
– thoroughly ventilate the room in which the appliance is situated
• It is dangerous to alter the specifications or modify this product in any way. Any damage
to the cord may cause a short-circuit, fire and/or electric shock.
WARNING!
Any electrical component (power cord, plug, compressor) must be replaced by a certified
service agent or qualified service personnel to avoid hazard.
1. Power cord must not be lengthened.
2. Make sure that the power plug is not squashed or damaged by the back of the ap-
pliance. A squashed or damaged power plug may overheat and cause a fire.
3. Make sure that you can come to the mains plug of the appliance.
4. Do not pull the mains cable.
5. If the power plug socket is loose, do not insert the power plug. There is a risk of
electric shock or fire.
6.
You must not operate the appliance without the lamp cover
1)
of interior lighting.
• This appliance is heavy. Care should be taken when moving it.
• Do not remove nor touch items from the freezer compartment if your hands are damp/
wet, as this could cause skin abrasions or frost/freezer burns.
• Avoid prolonged exposure of the appliance to direct sunlight.
•
Bulb lamps
2)
used in this appliance are special purpose lamps selected for household ap-
pliances use only. They are not suitable for household room illumination.
Daily Use
• Do not put hot pot on the plastic parts in the appliance.
• Do not store flammable gas and liquid in the appliance, because they may explode.
•
Do not place food products directly against the air outlet on the rear wall.
3)
• Frozen food must not be re-frozen once it has been thawed out.
• Store pre-packed frozen food in accordance with the frozen food manufacturer's in-
structions.
• Appliance's manufacturers storage recommendations should be strictly adhered to. Refer
to relevant instructions.
• Do not place carbonated or fizzy drinks in the freezer compartment as it creates pressure
on the container, which may cause it to explode, resulting in damage to the appliance.
• Ice lollies can cause frost burns if consumed straight from the appliance.
Care and cleaning
• Before maintenance, switch off the appliance and disconnect the mains plug from the
mains socket.
• Do not clean the appliance with metal objects.
• Do not use sharp objects to remove frost from the appliance. Use a plastic scraper.
1) If the lamp cover is foreseen.
2) If the lamp is foreseen.
3) If the appliance is Frost Free.
Safety information 5
Page 6
Installation
For electrical connection carefully follow the instructions given in specific paragraph.
• Unpack the appliance and check if there are damages on it. Do not connect the appli-
ance if it is damaged. Report possible damages immediately to the place you bought it.
In that case retain packing.
• It is advisable to wait at least four hours before connecting the appliance to allow the oil
to flow back in the compressor.
• Adequate air circulation should be around the appliance, lacking this leads to overheat-
ing. To achieve sufficient ventilation follow the instructions relevant to installation.
• The appliance must not be located close to radiators or cookers.
• Make sure that the mains plug is accessible after the installation of the appliance.
Service
• Any electrical work required to do the servicing of the appliance should be carried out by
a qualified electrician or competent person.
• This product must be serviced by an authorized Service Centre, and only genuine spare
parts must be used.
Environment Protection
This appliance does not contain gasses which could damage the ozone layer, in either its
refrigerant circuit or insulation materials. The appliance shall not be discarded together
with the urban refuse and rubbish. The insulation foam contains flammable gases: the ap-
pliance shall be disposed according to the applicable regulations to obtain from your local
authorities. Avoid damaging the cooling unit, especially at the rear near the heat exchang-
er. The materials used on this appliance marked by the symbol
are recyclable.
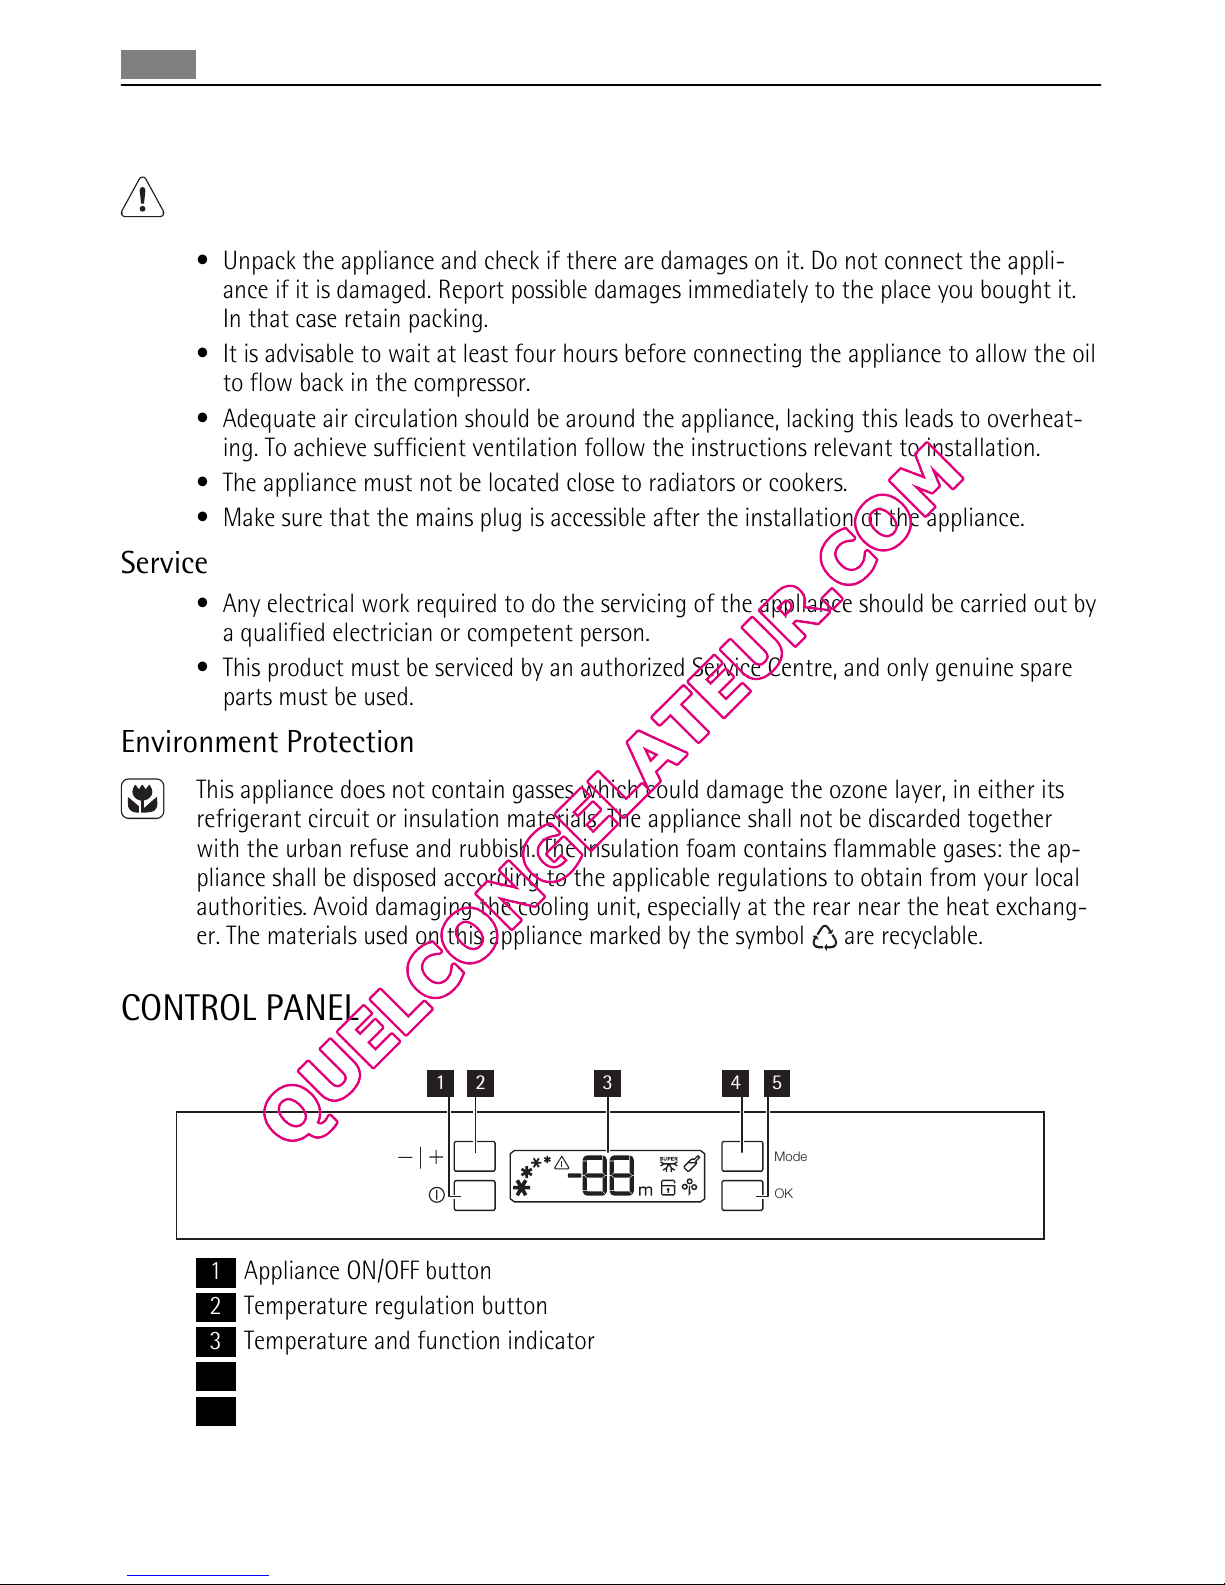
CONTROL PANEL
OK
Mode
1 2 3 4 5
1 Appliance ON/OFF button
2 Temperature regulation button
3 Temperature and function indicator
4 Mode (Function) button
5 Confirmation button
6 Control panel
Page 7
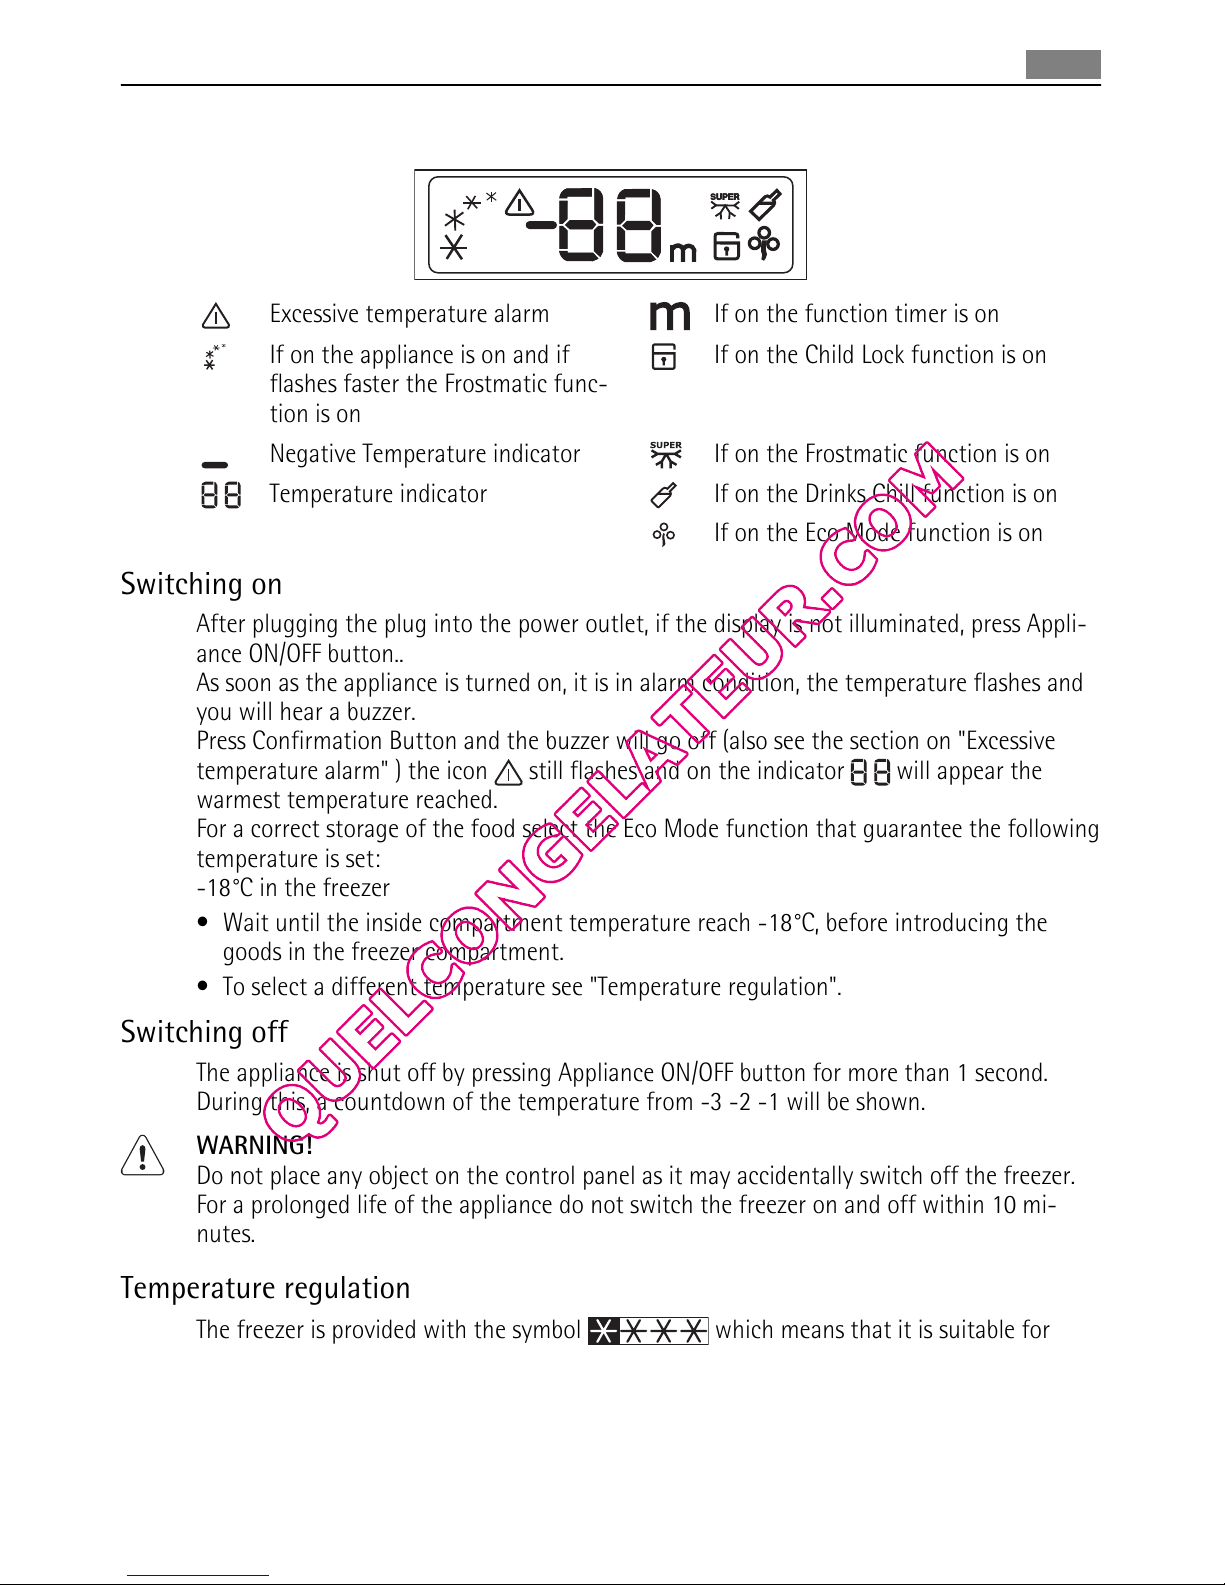
Display
Excessive temperature alarm If on the function timer is on
If on the appliance is on and if
flashes faster the Frostmatic func-
tion is on
If on the Child Lock function is on
Negative Temperature indicator If on the Frostmatic function is on
Temperature indicator If on the Drinks Chill function is on
If on the Eco Mode function is on
Switching on
After plugging the plug into the power outlet, if the display is not illuminated, press Appli-
ance ON/OFF button..
As soon as the appliance is turned on, it is in alarm condition, the temperature flashes and
you will hear a buzzer.
Press Confirmation Button and the buzzer will go off (also see the section on "Excessive
temperature alarm" ) the icon
still flashes and on the indicator will appear the
warmest temperature reached.
For a correct storage of the food select the Eco Mode function that guarantee the following
temperature is set:
-18°C in the freezer
• Wait until the inside compartment temperature reach -18°C, before introducing the
goods in the freezer compartment.
• To select a different temperature see "Temperature regulation".
Switching off
The appliance is shut off by pressing Appliance ON/OFF button for more than 1 second.
During this, a countdown of the temperature from -3 -2 -1 will be shown.
WARNING!
Do not place any object on the control panel as it may accidentally switch off the freezer.
For a prolonged life of the appliance do not switch the freezer on and off within 10 mi-
nutes.
Temperature regulation
The freezer is provided with the symbol which means that it is suitable for
freezing fresh food and for long term storage of frozen and deep-frozen food. The temperature may be regulated between -15°C and -24°C. We suggest setting the internal temperature of approximately -18°C, which guarantees proper freezing and conservation of the
frozen foods.
The temperature may be regulated by pressing the Temperature regulation button.
Control panel
7
Page 8
By pressing the Temperature regulation button the current temperature setting flashes on
the indicator and by pressing the button again it is possible to change it.
You confirm the choice of the temperature by pressing the Confirmation button. The temperature indicator shows the set temperature.
The set temperature will be reached within 24 hours.
After a long period out of use it is not necessary to set again the temperature because it
remains stored.
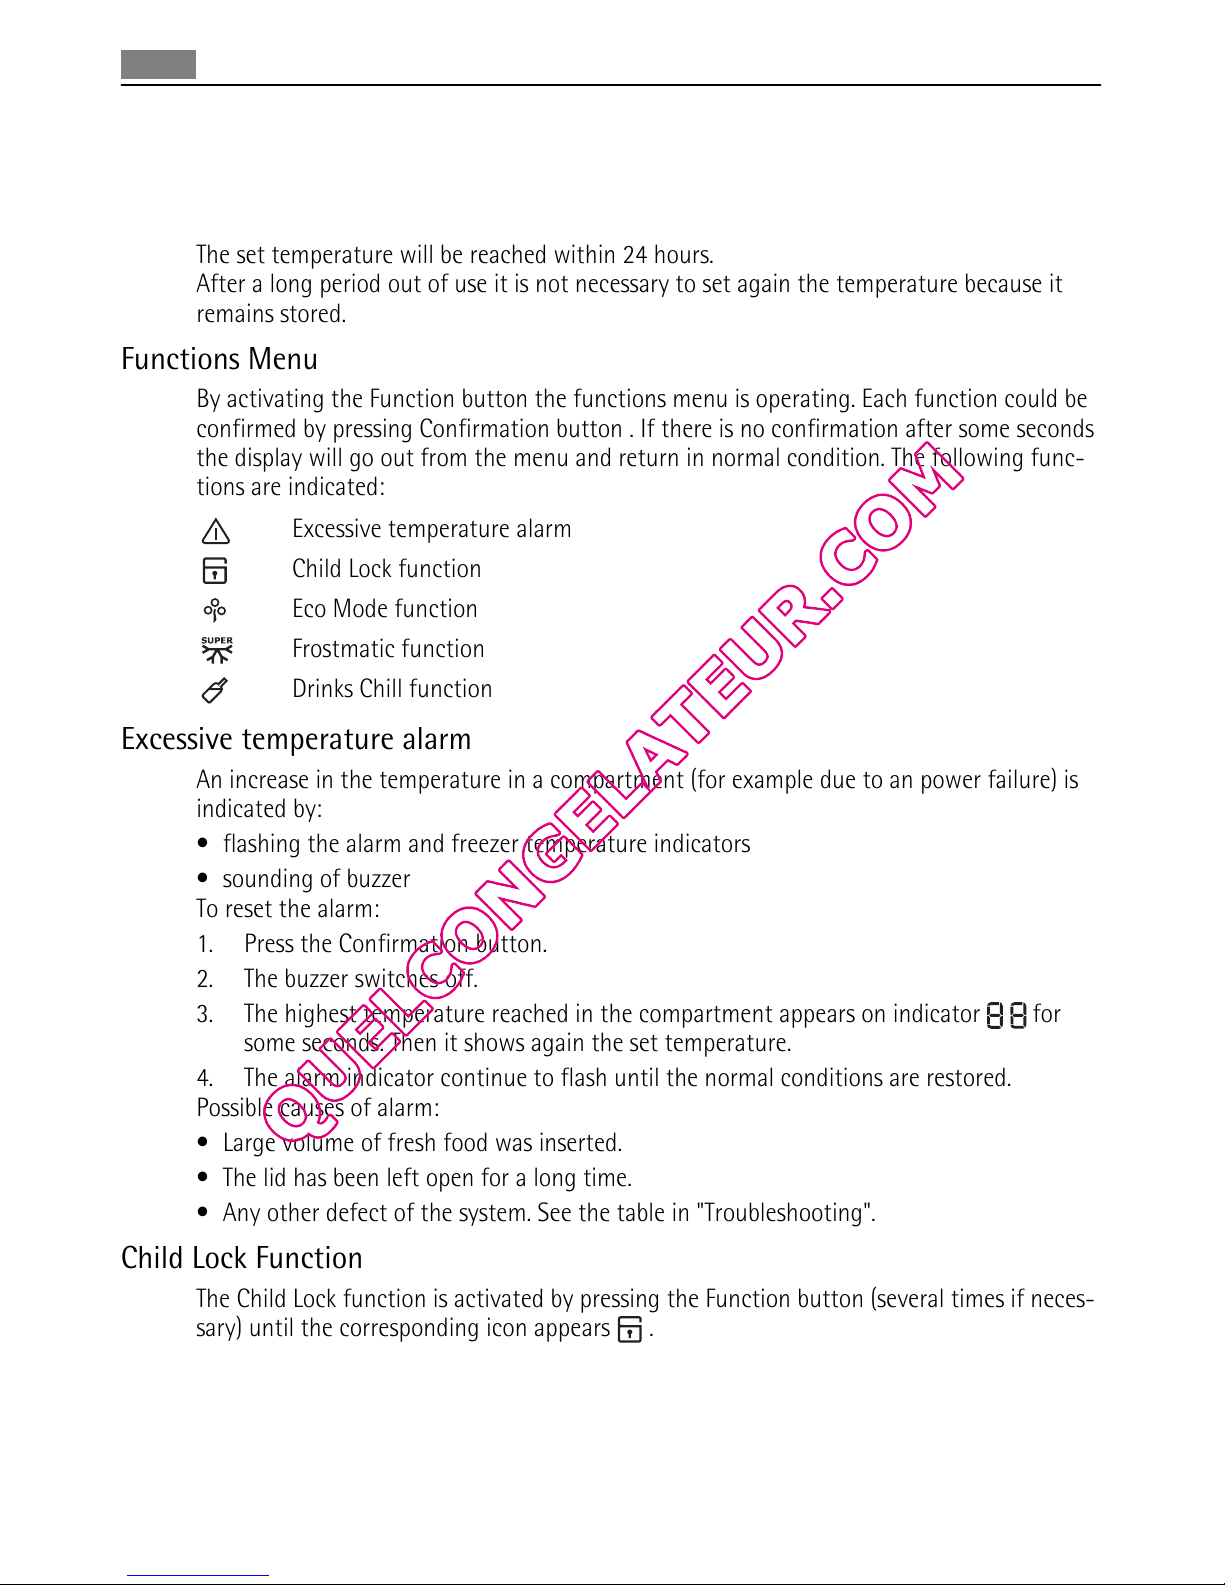
Functions Menu
By activating the Function button the functions menu is operating. Each function could be
confirmed by pressing Confirmation button . If there is no confirmation after some seconds
the display will go out from the menu and return in normal condition. The following func-
tions are indicated:
Excessive temperature alarm
Child Lock function
Eco Mode function
Frostmatic function
Drinks Chill function
Excessive temperature alarm
An increase in the temperature in a compartment (for example due to an power failure) is
indicated by:
• flashing the alarm and freezer temperature indicators
• sounding of buzzer
To reset the alarm:
1. Press the Confirmation button.
2. The buzzer switches off.
3. The highest temperature reached in the compartment appears on indicator
for
some seconds. Then it shows again the set temperature.
4. The alarm indicator continue to flash until the normal conditions are restored.
Possible causes of alarm:
• Large volume of fresh food was inserted.
• The lid has been left open for a long time.
• Any other defect of the system. See the table in "Troubleshooting".
Child Lock Function
The Child Lock function is activated by pressing the Function button (several times if neces-
sary) until the corresponding icon appears
.
You must confirm the choice by pressing the Confirmation button within few seconds. You
will hear the buzzer and the icon remains lighted. In this condition any possible operation
through the keys does not cause any change as long as this function is activated.
It is possible to de-activate the function at any time by pressing the Function button until
the corresponding icon will flash and then the Confirmation button.
8 Control panel
Page 9

Eco Mode Function
The Eco Mode function is activated by pressing the Function button (several times if necessary) until the corresponding icon appears
(or setting the temperature at -18°C).
You must confirm the choice by pressing the Confirmation button within few seconds. You
will hear the buzzer and the icon remains lighted.
In this condition the chosen temperatures are automatically set (-18°C), in the best condi-
tions for storing food.
It is possible to de-activate the function at any time by changing the selected temperature
in the compartment.
Frostmatic Function
The freezer compartment is suitable for long term storage of commercially frozen and
deep-frozen food, and for freezing fresh food.
The maximum quantity of foods to freeze in 24 hours is shown on the serial number plate.
To freeze fresh foods, you will need to activate the Frostmatic function. Press the Function
button (several times if necessary) until the corresponding icon appears
.
You must confirm the choice by pressing the Confirmation button within few seconds. You
will hear the buzzer and on the display will appear some animation with lines.
After a pre-cooling period of 24 hours, place the foods in the freezer.
The freezing process takes 24 hours. During this period do not put other foods in the freez-
er.
This function stops automatically after 54 hours.
It is possible to deactivate the function at any time by pressing the Function button until
the corresponding icon will flash and then the Confirmation button.
Drinks Chill Function
The Drinks Chill function is to be used as a safety warning when placing bottles in the
freezer compartment. It is activated by pressing the Function button (several times if neces-
sary) until the corresponding icon appears
.
You must confirm the choice by pressing the Confirmation button within few seconds. You
will hear the buzzer and the icon remains lighted.
In this condition it operates a timer with a default value of 30 min. and it could change
from 1 to 90 min., by pressing the Temperature regulation button you select the minutes
needed.
At the end of the selected time there are the following indications:
• on the indicator
the symbol flashing
•
the icon
flashing
•the icon
flashing
• sounding of an acoustic alarm until the Confirmation button is pressed
At this point bear in mind to remove the drinks contained in the freezer compartment.
It is possible to deactivate the function at any time by pressing the Function button until
the corresponding icon will flash and then the Confirmation button.
Control panel
9
Page 10
FIRST USE
Cleaning the interior
Before using the appliance for the first time, wash the interior and all internal accessories
with lukewarm water and some neutral soap so as to remove the typical smell of a brand-
new product, then dry thoroughly.
Do not use detergents or abrasive powders, as these will damage the finish.
DAILY USE
Freezing fresh food
The freezer compartment is suitable for freezing fresh food and storing frozen and deep-
frozen food for a long time.
To freeze fresh food activate the FROSTMATIC function at least 24 hours before placing the
food to be frozen in the freezer compartment.
The maximum amount of food that can be frozen in 24 hours is specified on the rating
plate.
4)
The freezing process lasts 24 hours: during this period do not add other food to be frozen.
Storage of frozen food
When first starting-up or after a period out of use, before putting the products in the com-
partment let the appliance run at least 2 hours on the higher settings.
In the event of accidental defrosting, for example due to a power failure, if the power has
been off for longer than the value shown in the technical characteristics chart under "rising
time", the defrosted food must be consumed quickly or cooked immediately and then re-
frozen (after cooling).
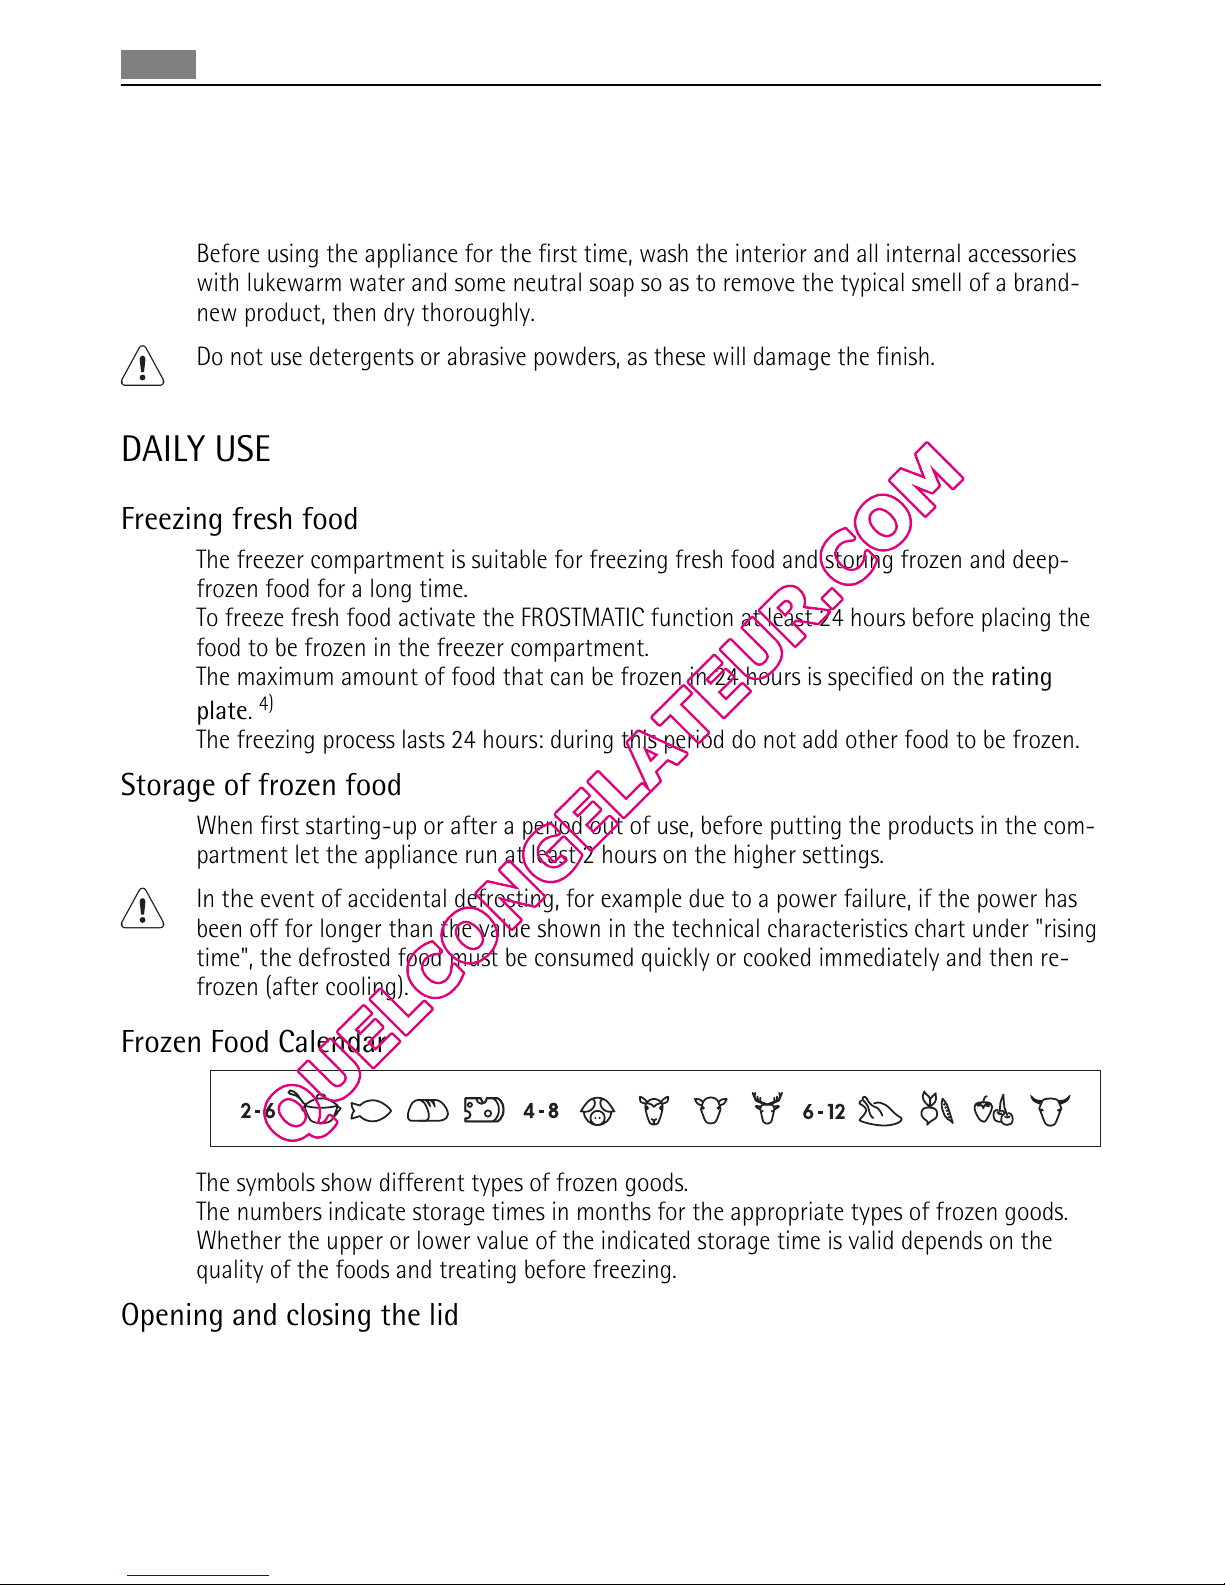
Frozen Food Calendar
The symbols show different types of frozen goods.
The numbers indicate storage times in months for the appropriate types of frozen goods.
Whether the upper or lower value of the indicated storage time is valid depends on the
quality of the foods and treating before freezing.
Opening and closing the lid
As the lid is equipped with a tightly closing seal, it is not easy to reopen it shortly after
closing (due to the vacuum formed inside).
Wait a few minutes before reopening the appliance. The vacuum valve will help you to open
the lid.
4) Refer to "Technical data".
10 First use
Page 11

WARNING!
Never pull the handle with immense force.
Low frost System
The appliance is equipped with Low frost System (you can see a valve inside the freezer in
the backside) what reduces ice-build-up in the chest freezer by up to 80 percent. That
means for you up to 5 years without defrosting.
Storage baskets
Hang the baskets on the upper edge of the freezer
(X) or place them inside the freezer (Y). Turn and
fix the handles for these two positions as shown
in the picture.
The baskets will slide into each other.
The following pictures show how many baskets
can be placed inside the various freezer models.
You can purchase additional baskets from your lo-
cal Service Centre.
Security lock
The freezer is equipped with a special lock in order to avoid accidental locking. The lock is
designed in such manner that you can turn the key and thus close the lid only if you previ-
ously push the key into the lock.
In order to close the freezer do these steps:
1. push the key into the lock gently.
2. turn the key clockwise towards the symbol
.
In order to open the freezer do these steps:
1. push the key into the lock gently.
2. turn the key counter-clockwise towards the symbol
.
Spare keys are available at the local Service Centre.
WARNING!
Keep the key well away from children.
Make sure to remove the key from the lock before you discard the old appliance.
X
Y
946
230
1061 1201
1336 1611
Daily use 11
Page 12
Plastic Low divider
With the low divider you can have a better use of the space above the compressor. The
space formed this way will allow you to store small food packs that can be found more
easily.
The separator may also be used as a tray at the time of defrosting the freezer.
HELPFUL HINTS AND TIPS
Hints for freezing
To help you make the most of the freezing process, here are some important hints:
• the maximum quantity of food which can be frozen in 24 hrs. is shown on the rating
plate;
• the freezing process takes 24 hours. No further food to be frozen should be added during
this period;
• only freeze top quality, fresh and thoroughly cleaned, foodstuffs;
• prepare food in small portions to enable it to be rapidly and completely frozen and to
make it possible subsequently to thaw only the quantity required;
• wrap up the food in aluminium foil or polythene and make sure that the packages are
airtight;
• do not allow fresh, unfrozen food to touch food which is already frozen, thus avoiding a
rise in temperature of the latter;
• lean foods store better and longer than fatty ones; salt reduces the storage life of food;
• water ices, if consumed immediately after removal from the freezer compartment, can
possibly cause the skin to be freeze burnt;
• it is advisable to show the freezing in date on each individual pack to enable you to keep
tab of the storage time.
Hints for storage of frozen food
To obtain the best performance from this appliance, you should:
• make sure that the commercially frozen foodstuffs were adequately stored by the retail-
er;
• be sure that frozen foodstuffs are transferred from the foodstore to the freezer in the
shortest possible time;
• not open the lid frequently or leave it open longer than absolutely necessary.
• Once defrosted, food deteriorates rapidly and cannot be refrozen.
• Do not exceed the storage period indicated by the food manufacturer.
CARE AND CLEANING
CAUTION!
Unplug the appliance before carrying out any maintenance operation.
12 Helpful hints and tips
Page 13
This appliance contains hydrocarbons in its cooling unit; maintenance and recharging must
therefore only be carried out by authorized technicians.
Periodic cleaning
1. Switch off the appliance.
2. Disconnect the mains plug from the mains socket.
3. Regularly clean the appliance and the accessories with warm water and neutral soap.
Clean the lid seal carefully.
4. Fully dry the appliance.
5. Connect the mains plug to the mains socket.
6. Switch on the appliance.
CAUTION!
Do not use detergents, abrasive products, highly perfumed cleaning products or wax pol-
ishes to clean the inner side of the appliance.
Prevent damage to the cooling system.
There is no need to clean the compressor area.
Many proprietary kitchen surface cleaners contain chemicals that can attack/damage the
plastics used in this appliance. For this reason it is recommended that the outer casing of
this appliance is only cleaned with warm water with a little washing-up liquid added.
Defrosting the freezer
Defrost the freezer when the frost layer reaches a thickness of about 10-15 mm.
The best time to defrost the freezer when it contains no or only a little food.
To remove the frost, do these steps:
1. Switch off the appliance.
2. Remove any stored food, wrap it in several layers of newspaper and put it in a cool
place.
3. Leave the lid open , remove the plug from the defrost water drain and collect all de-
frost water on a tray. Use a scraper to remove ice quickly.
4. When defrosting is completed, dry the interior thoroughly and refit the plug.
5. Switch on the appliance.
6. Set the temperature regulator to obtain the maximum coldness and run the appliance
for two or three hours using this setting.
7. Reload the previously removed food into the compartment.
Never use sharp metal tools to scrape off frost as you could damage the appliance. Do not
use a mechanical device or any artificial means to speed up the thawing process other than
those recommended by the manufacturer. A temperature rise of the frozen food packs, during defrosting, may shorten their safe storage life.
Periods of non-operation
When the appliance is not in use for long periods, take the following precautions:
Care and cleaning
13
Page 14
1. Switch off the appliance.
2. Disconnect the mains plug from the mains socket.
3. Remove all food.
4. Defrost and clean the appliance and all accessories.
5. Leave the lid open to prevent unpleasant smells.
If the cabinet will be kept on, ask somebody to check it once in a while to prevent the food
inside from spoiling in case of a power failure.
WHAT TO DO IF…
CAUTION!
Before troubleshooting, disconnect the power supply.
Only a qualified electrician or competent person must do the troubleshooting that is not in
this manual.
There are some sounds during normal use (compressor, refrigerant circulation).
Problem Possible cause Solution
The appliance is noisy. The appliance is not supported
properly.
Check if the appliance stands sta-
ble (all the four feet should be on
the floor).
The compressor operates
continually.
The temperature is not set cor-
rectly.
Set a warmer temperature.
The lid has been opened too fre-
quently.
Do not leave the lid open longer
than necessary.
The lid is not closed properly. Check if the lid closes well and
the gaskets are undamaged and
clean.
Large quantities of food to be
frozen were put in at the same
time.
Wait some hours and then check
the temperature again.
Food placed in the appliance
was too warm.
Allow food to cool to room tem-
perature before storing.
The temperature of the room
that contains the appliance is
too high for efficient operation.
Try to reduce the temperature in
the room where the appliance
stands.
The High temperature
alarm light is on.
It is too warm inside the freezer. Refer to "High Temperature
Alarm".
The cabinet has been recently
switched on and the temperature is still too high.
Refer to "High Temperature
Alarm".
There is too much frost
and ice.
Products are not wrapped properly.
Wrap the products better.
14 What to do if…
Page 15
Problem Possible cause Solution
The lid is not shut properly or do
not close tightly.
Check if the lid closes well and
the gaskets are undamaged and
clean.
The temperature is not set cor-
rectly.
Set a warmer temperature.
The water drainage plug is not
correctly positioned.
Position the water drainage plug
in the correct way.
The lid doesn't close com-
pletely.
There is excessive frost. Eliminate excess frost.
The lid gaskets are dirty or
sticky.
Clean the lid gaskets.
Food packages are blocking the
lid.
Arrange the packages in the right
way, see the sticker in the appli-
ance.
The lid is difficult to open. The lid gaskets are dirty or
sticky.
Clean the lid gaskets.
The valve is blocked. Check the valve.
The lamp does not work. The lamp is defective. Refer to "Replacing the lamp".
It is too warm in the
freezer.
The temperature is not set cor-
rectly.
Set a lower temperature.
The lid does not close tightly or
it is not shut properly.
Check if the lid closes well and
the gasket is undamaged and
clean.
Before freezing the appliance
was not precooled sufficiently.
Pre-cool the appliance for
enough time.
Large quantities of food to be
frozen were put in at the same
time.
Wait some hours and then check
the temperature again. Next time
insert smaller quantities of food
to be frozen at any one time.
Food placed in the appliance
was too warm.
Allow food to cool to room tem-
perature before storing.
Products to be frozen are placed
too closely to each other.
Place the products in a way so
that cold air could circulate
among them.
The lid has been opened often. Try to not open the lid often.
The lid has been opened for a
long time.
Do not leave the lid open longer
than necessary.
It is too cold inside the
freezer.
The temperature is not set correctly.
Set a warmer temperature.
What to do if… 15
Page 16
Problem Possible cause Solution
The appliance does not
work at all. Neither cooling nor lighting works.
Plug is not connected to the
mains socket properly.
Connect the mains plug properly.
Power does not reach the appli-
ance.
Try connecting another electrical
device to the power outlet.
The appliance is not switched
on.
Switch on the appliance.
There is no voltage in the mains
socket (try to connect another
appliance into it).
Call an electrician.
Customer Service
If your appliance is still not working properly after making the above checks, contact the
nearest service centre.
To obtain fast service, it is essential that when you apply for it you specify the model and
serial number of your appliance which can be found either on the guarantee certificate or
on the rating plate located on the external right side of the appliance.
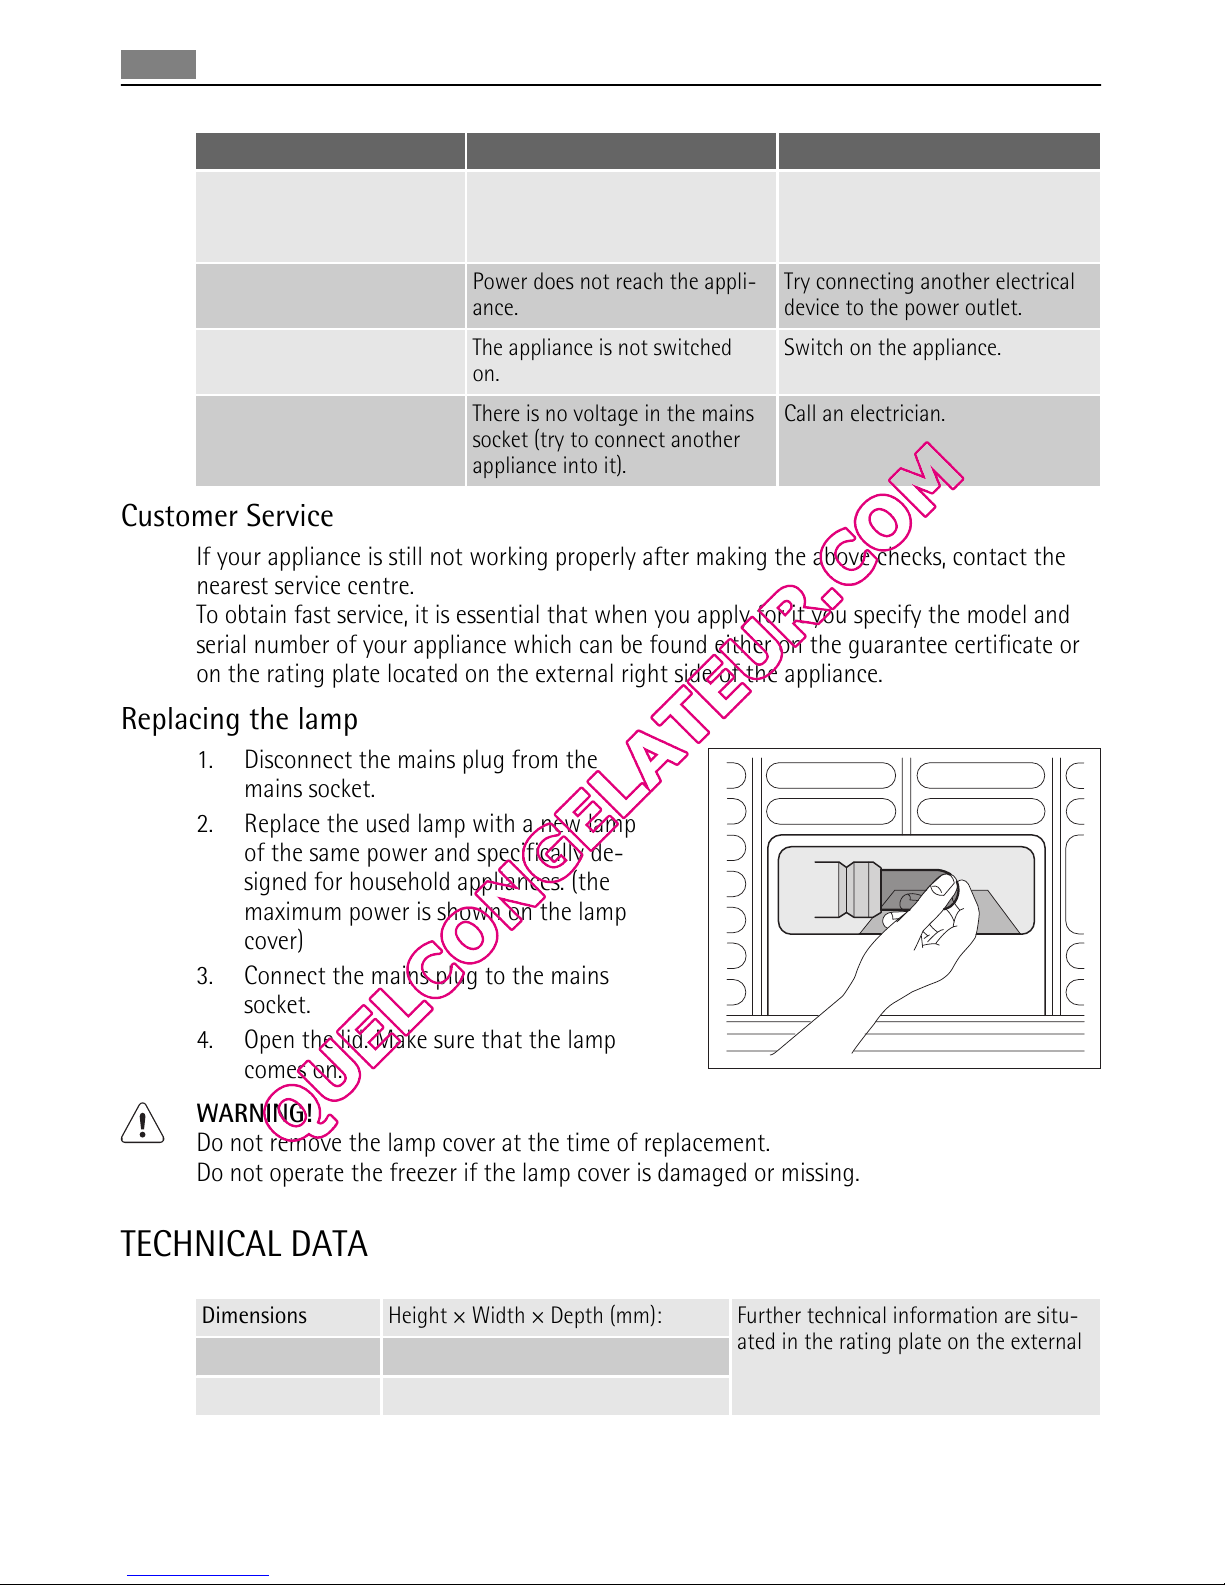
Replacing the lamp
1. Disconnect the mains plug from the
mains socket.
2. Replace the used lamp with a new lamp
of the same power and specifically de-
signed for household appliances. (the
maximum power is shown on the lamp
cover)
3. Connect the mains plug to the mains
socket.
4. Open the lid. Make sure that the lamp
comes on.
WARNING!
Do not remove the lamp cover at the time of replacement.
Do not operate the freezer if the lamp cover is damaged or missing.
TECHNICAL DATA
Dimensions Height × Width × Depth (mm): Further technical information are situ-
ated in the rating plate on the external
right side of the appliance.
876 × 1611 × 665
Rising Time 58 hours
16 Technical data
Page 17

INSTALLATION
Positioning
WARNING!
If you are discarding an old appliance that has a lock or catch on the lid, you must ensure
that it is made unusable to prevent young children being trapped inside.
The appliance shall have the plug accessible after installation.
This appliance can be installed in a dry, well ventilated indoor (garage or cellar), but for op-
timum performance install this appliance at a location where the ambient temperature cor-
responds to the climate class indicated on the rating plate of the appliance:
Climate class Ambient temperature
SN +10°C to + 32°C
N +16°C to + 32°C
ST +16°C to + 38°C
T +16°C to + 43°C
Electrical connection
Before plugging in, ensure that the voltage and frequency shown on the rating plate corre-
spond to your domestic power supply.
The appliance must be earthed. The power supply cable plug is provided with a contact for
this purpose. If the domestic power supply socket is not earthed, connect the appliance to a
separate earth in compliance with current regulations, consulting a qualified electrician.
The manufacturer declines all responsibility if the above safety precautions are not ob-
served.
This appliance complies with the E.E.C. Directives.
Ventilation requirements
1. Put the freezer in horizontal position on a firm surface. The cabinet must be on all four
feet.
2. Make sure that the clearance between the appliance and rear wall is 5 cm.
3. Make sure that the clearance between the appliance and the sides is 5 cm.
The airflow behind the appliance must be sufficient.
NOISES
There are some sounds during normal running (compressor, refrigerant circulation).
Installation
17
Page 18
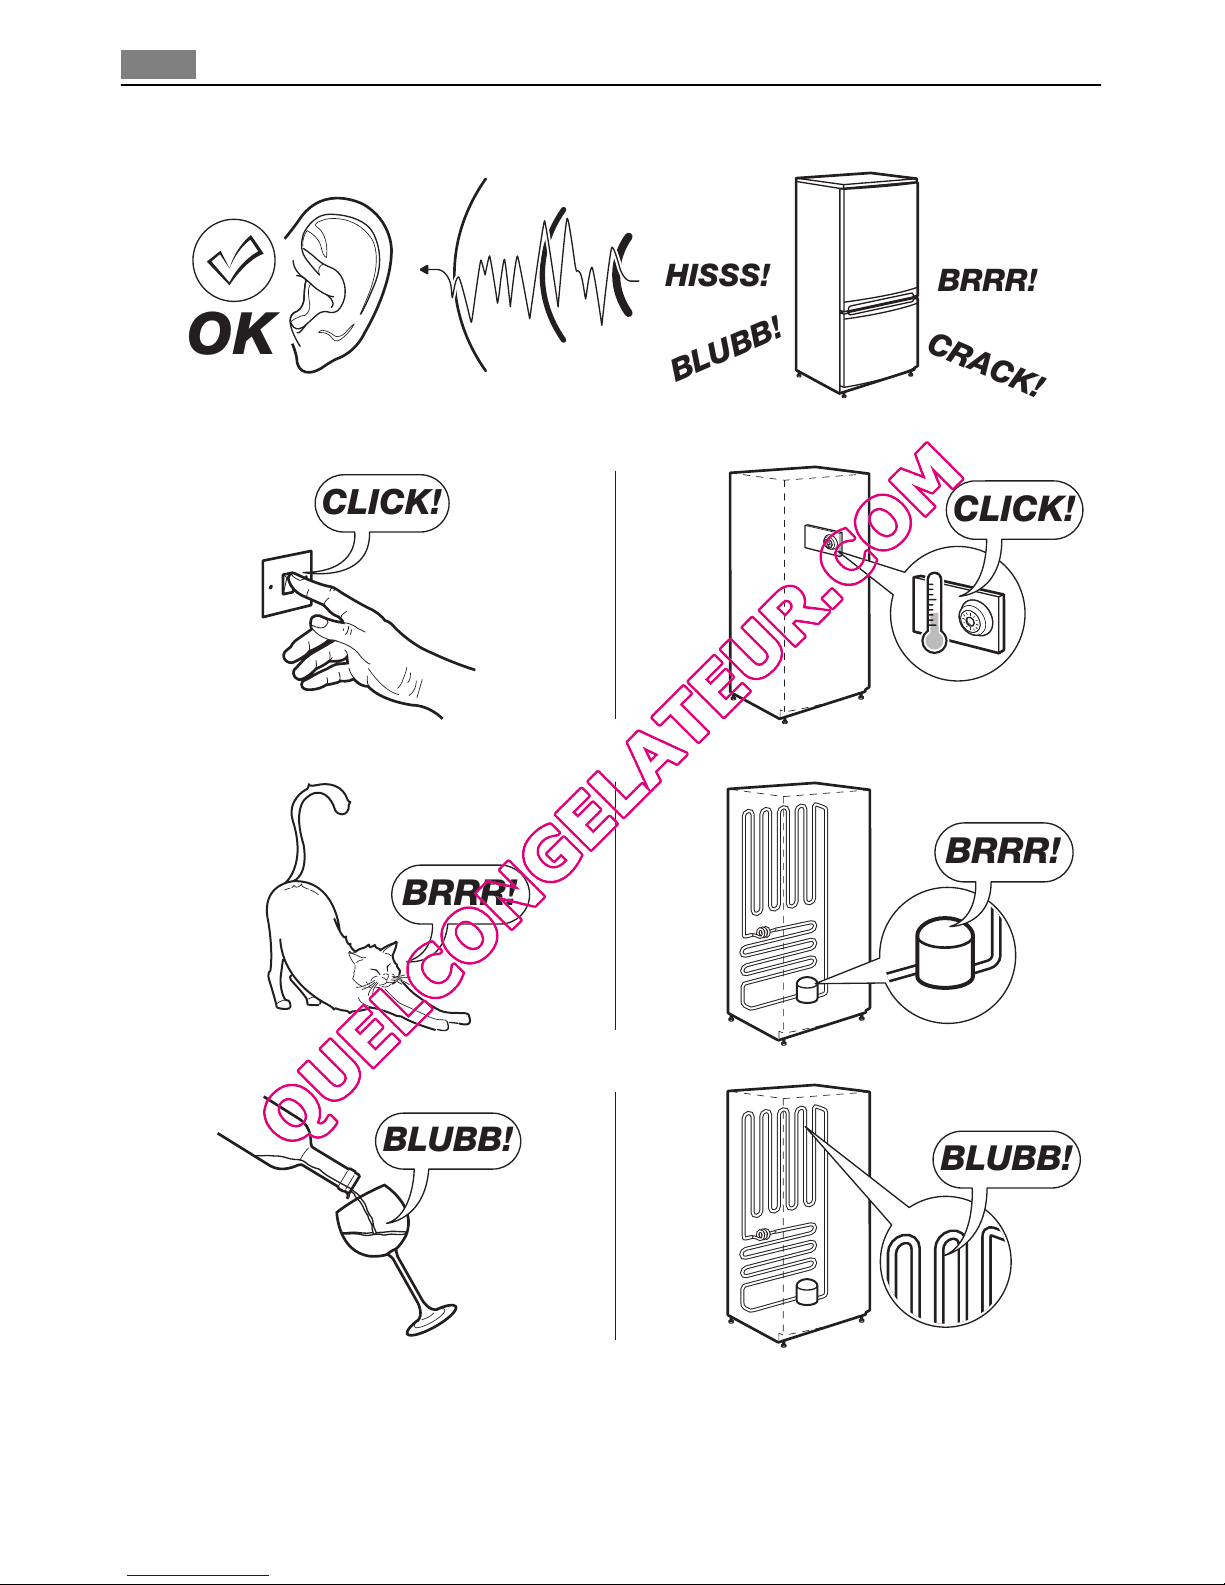
BRRR!
HISSS!
CLICK!
BLUBB!
CRACK!
SSSRRR!
OK
CLICK!
CLICK!
BRRR!
BRRR!
BLUBB!
BLUBB!
18 Noises
Page 19

HISSS!
HISSS!
SSSRRR!
SSSRRR!
CRACK!
CRACK!
ENVIRONMENTAL CONCERNS
The symbol on the product or on its packaging indicates that this product may not be
treated as household waste. Instead it should be taken to the appropriate collection point
for the recycling of electrical and electronic equipment. By ensuring this product is
disposed of correctly, you will help prevent potential negative consequences for the
environment and human health, which could otherwise be caused by inappropriate waste
handling of this product. For more detailed information about recycling of this product,
please contact your local council, your household waste disposal service or the shop where
you purchased the product.
Environmental concerns
19
Page 20

POUR DES RÉSULTATS PARFAITS
Merci d'avoir choisi ce produit AEG. Nous l'avons créé
pour vous offrir la meilleure performance pour une
longue durée, avec des technologies innovantes qui vous
simplifient la vie - autant de caractéristiques que vous ne
trouverez pas sûrement pas sur d'autres appareils.
Veuillez prendre quelques instants pour lire cette notice
afin d'utiliser au mieux votre appareil.
ACCESSOIRES ET CONSOMMABLES
Dans la boutique en ligne d'AEG, vous trouverez tout ce
qu'il vous faut pour que vos appareils AEG fonctionnent
parfaitement. Sans oublier une vaste gamme d'accessoires
conçus et fabriqués selon les critères de qualité les plus
élevés qui soient, des articles de cuisine spécialisés aux
range-couverts, des porte-bouteilles aux sacs à linge
délicats...
Visitez la boutique en ligne sur
www.aeg.com/shop
20
Page 21

SOMMAIRE
22 Consignes de sécurité
25 Bandeau de commande
28 Première utilisation
28 Utilisation quotidienne
31 Conseils utiles
31 Entretien et nettoyage
33 En cas d'anomalie de
fonctionnement
36 Caractéristiques techniques
36 Installation
37 Bruits
39 En matière de sauvegarde de
l'environnement
Les symboles suivants sont utilisés dans ce
manuel:
Informations importantes pour votre sécurité
et pour éviter d’abîmer l’appareil.
Informations générales et conseils
Informations écologiques
Sous réserve de modifications
Sommaire
21
Page 22

CONSIGNES DE SÉCURITÉ
Pour votre sécurité et garantir une utilisation correcte de l'appareil, lisez attentivement cette notice, y compris les conseils et avertissements, avant d'installer et d'utiliser l'appareil
pour la première fois. Pour éviter toute erreur ou accident, veillez à ce que toute personne
qui utilise l'appareil connaisse bien son fonctionnement et ses fonctions de sécurité. Con-
servez cette notice avec l'appareil. Si l'appareil doit être vendu ou cédé à une autre person-
ne, veillez à remettre cette notice au nouveau propriétaire, afin qu'il puisse se familiariser
avec son fonctionnement et sa sécurité.
Pour la sécurité des personnes et des biens, conservez et respectez les consignes de sécurité
figurant dans cette notice. Le fabricant décline toute responsabilité en cas de dommages
dus au non-respect de ces instructions.
Sécurité des enfants et des personnes vulnérables
• Cet appareil n'est pas destiné à être utilisé par des enfants ou des personnes dont les
capacités physiques, sensorielles ou mentales, ou le manque d'expérience et de connais-
sance les empêchent d'utiliser l'appareil sans risque lorsqu'ils sont sans surveillance ou en
l'absence d'instruction d'une personne responsable qui puisse leur assurer une utilisation
de l'appareil sans danger.
Empêchez les enfants de jouer avec l'appareil.
• Ne laissez pas les différents emballages à portée des enfants. Ils pourraient s'asphyxier.
• Si l'appareil doit être mis au rebut, veillez à couper le câble d'alimentation électrique au
ras de l'appareil pour éviter les risques d'électrocution. Démontez la porte pour éviter que
des enfants ne restent enfermés à l'intérieur.
• Cet appareil est muni de fermetures magnétiques. S'il remplace un appareil équipé d'une
fermeture à ressort, nous vous conseillons de rendre celle-ci inutilisable avant de vous en
débarrasser. Ceci afin d'éviter aux enfants de s'enfermer dans l'appareil et de mettre ainsi
leur vie en danger.
Consignes générales de sécurité
AVERTISSEMENT
Veillez à ce que les orifices de ventilation, situés dans l'enceinte de l'appareil ou la structure
intégrée, ne soient pas obstrués.
• Les appareils sont destinés uniquement à la conservation des aliments et/ou des boissons
dans le cadre d’un usage domestique normal, tel que celui décrit dans la présente notice.
• N'utilisez pas d'appareils électriques, d'agents chimiques ou tout autre système artificiel
pour accélérer le processus de dégivrage.
• Ne faites pas fonctionner d'appareils électriques (comme des sorbetières électriques, ...) à
l'intérieur des appareils de réfrigération à moins que cette utilisation n'ait reçu l'agrément du fabricant.
• N'endommagez pas le circuit frigorifique.
22 Consignes de sécurité
Page 23

• Le circuit frigorifique de l’appareil contient de l’isobutane (R600a), un gaz naturel offrant
un haut niveau de compatibilité avec l’environnement mais qui est néanmoins inflammable.
Pendant le transport et l'installation de votre appareil, assurez-vous qu'aucune partie du
circuit frigorifique n'est endommagée.
Si le circuit frigorifique est endommagé :
– évitez les flammes vives et toute autre source d'allumage
– aérez soigneusement la pièce où se trouve l'appareil
• Ne modifiez pas les spécifications de l'appareil. Si le câble d'alimentation est endomma-
gé, il peut causer un court circuit, un incendie et/ou une électrocution.
AVERTISSEMENT
Les éventuelles réparations ou interventions sur votre appareil, ainsi que le remplacement
du câble d'alimentation, ne doivent être effectuées que par un professionnel qualifié.
1. L'appareil ne doit pas être raccordé à l'aide d'un prolongateur, d'une prise multiple
ou d'un raccordement multiple (risque d'incendie).
2. Assurez-vous que la prise n'est pas écrasée ou endommagée par l'arrière de l'appa-
reil. Une prise de courant écrasée ou endommagée peut s'échauffer et causer un in-
cendie.
3. Vérifiez que la prise murale de l'appareil est accessible.
4. Ne débranchez pas l'appareil en tirant sur le câble.
5. Si la prise murale n'est pas bien fixée, n'introduisez pas de prise dedans. Risque
d'électrocution ou d'incendie.
6.
Votre appareil ne doit pas être utilisé sans le diffuseur de l'ampoule d'éclairage.
5)
pour l'éclairage intérieur.
• Cet appareil est lourd. Faite attention lors de son déplacement.
• Ne touchez pas avec les mains humides les surfaces givrées et les produits congelés (ris-
que de brûlure et d'arrachement de la peau).
• Évitez une exposition prolongée de l'appareil aux rayons solaires.
•
Les ampoules
6)
utilisées dans cet appareil sont des ampoules spécifiques destinées uni-
quement à un usage sur des appareils ménagers. Elles ne sont pas adaptées à l'éclairage
d'une habitation.
Utilisation quotidienne
• Ne posez pas d'éléments chauds sur les parties en plastique de l'appareil.
• Ne stockez pas de gaz ou de liquides inflammables dans l'appareil (risque d'explosion).
• Ne placez pas d'aliments directement contre la sortie d'air sur la paroi arrière de l'appa-
reil.
7)
• Un produit décongelé ne doit jamais être recongelé.
• Conservez les aliments emballés conformément aux instructions de leur fabricant.
5) Si l'appareil est équipé d'un diffuseur d'éclairage.
6) Si l'ampoule d'éclairage est prévue.
7) Si l'appareil est sans givre.
Consignes de sécurité 23
Page 24

• Respectez scrupuleusement les conseils de conservation donnés par le fabricant de l'appareil. Consultez les instructions respectives.
• Ne mettez pas de bouteilles ni de boîtes de boissons gazeuses dans le compartiment congélateur, car la pression se formant à l'intérieur du contenant pourrait le faire éclater et
endommager ainsi l'appareil.
• Ne consommez pas certains produits tels que les bâtonnets glacés dès leur sortie de l'ap-
pareil, car ils peuvent provoquer des brûlures.
Entretien et nettoyage
• Avant toute opération d'entretien, mettez l'appareil à l'arrêt et débranchez-le.
• N'utilisez pas d'objets métalliques pour nettoyer l'appareil.
• N'utilisez pas d'objet tranchant pour gratter la couche de givre. N'employez pour cela
qu'une spatule en plastique.
Installation
Avant de procéder au branchement électrique, respectez scrupuleusement les instructions
fournies dans le paragraphe correspondant.
• Déballez l'appareil et vérifiez qu'il n'est pas endommagé. Ne branchez pas l'appareil s'il
est endommagé. Signalez immédiatement au revendeur de l'appareil les dommages
constatés. Dans ce cas, gardez l'emballage.
• Avant de brancher votre appareil, laissez-le au moins 4 heures au repos afin de permettre
à l'huile de refluer dans le compresseur.
• Veillez à ce que l'air circule librement autour de l'appareil pour éviter qu'il ne surchauffe.
Pour assurer une ventilation suffisante, respectez les instructions d'installation.
• L'appareil ne doit pas être placé à proximité de radiateurs ou de cuisinières.
• Assurez-vous que la prise principale est accessible une fois l'appareil installé.
Maintenance
• Les branchements électriques nécessaires à l'entretien de l'appareil doivent être réalisés
par un électricien qualifié ou une personne compétente.
• Cet appareil ne doit être entretenu et réparé que par un Service après-vente autorisé,
exclusivement avec des pièces d'origine.
Protection de l'environnement
Le système frigorifique et l'isolation de votre appareil ne contiennent pas de C.F.C. contri-
buant ainsi à préserver l'environnement. L'appareil ne doit pas être mis au rebut avec les
ordures ménagères et les déchets urbains. La mousse d'isolation contient des gaz inflamma-
bles : l'appareil sera mis au rebut conformément aux règlements applicables disponibles au-
près des autorités locales. Veillez à ne pas détériorer les circuits frigorifiques, notamment au
niveau du condenseur. Les matériaux utilisés dans cet appareil identifiés par le symbole
sont recyclables.
24 Consignes de sécurité
Page 25

BANDEAU DE COMMANDE
OK
Mode
1 2 3 4 5
1 Bouton ON/OFF ARRET MARCHE de l'appareil
2 Bouton de réglage de la température
3 Voyant de température et de fonction
4 Bouton Mode (fonction)
5 Bouton de confirmation
Ecran d'affichage
Alarme de température S'il est allumé, la fonction Minuteur
est activée
S'il est allumé, l'appareil est en fonc-
tionnement et s'il clignote plus rapi-
dement, la fonction Frostmatic est
activée
S'il est allumé, la fonction Sécurité
enfants est activée
Indicateur de température négatif S'il est allumé, la fonction Frostmatic
est activée
Afficheur de température S'il est allumé, la fonction Refroidis-
sement des boissons est activée
S'il est allumé, la fonction Eco est ac-
tivée
Mise en fonctionnement
Branchez l'appareil. Si l'écran d'affichage ne s'allume pas, appuyez sur la touche Marche/
Arrêt de l'appareil.
Dès que l'appareil est mis en fonctionnement, il se trouve en condition d'alarme : la tempé-
rature clignote et un signal sonore retentit.
Appuyez sur la touche de confirmation : le signal sonore se désactive (reportez-vous égale-
ment au paragraphe " Alarme de température " ), le symbole
continue de clignoter et
l'écran d'affichage
indique la température la plus élevée ayant été atteinte.
Pour une conservation correcte des aliments, sélectionnez la fonction Eco, qui permet de
garantir les réglages de température suivants :
-18°C dans le compartiment congélateur
Bandeau de commande
25
Page 26

• Avant d'introduire des aliments dans le congélateur, attendez que la température du
compartiment soit de -18°C.
• Pour sélectionner une température différente, reportez-vous au paragraphe " Réglage de
la température ".
Mise à l'arrêt
En appuyant sur la touche Marche / Arrêt de l'appareil pendant plus d'une seconde, l'appa-
reil est mis à l'arrêt.
Le décompte de 3 à 1 apparaît sur l'écran d'affichage.
AVERTISSEMENT
Ne placez aucun objet sur le bandeau de commande pour éviter tout arrêt accidentel du
congélateur.
Pour prolonger la durée de vie de votre appareil, évitez de mettre l'appareil en fonctionne-
ment et à l'arrêt dans un délai de 10 minutes.
Réglage de la température
Votre appareil porte le sigle normalisé , ce qui signifie qu'il convient pour la
congélation des denrées fraîches, pour la conservation des aliments surgelés et congelés et
la fabrication de glaçons. Vous pouvez régler la température entre -15°C et -24°C. Effectuez
un premier réglage sur une position moyenne ( -18°C), ce qui garantit une congélation et
une conservation adéquate des aliments congelés.
Pour régler la température, appuyez sur la touche de réglage de la température.
Lorsque vous appuyez sur la touche de régulation de la température, la température cligno-
te sur l'écran d'affichage. Si vous appuyez de nouveau sur cette touche, vous pouvez modi-
fier la température.
Appuyez sur la touche de confirmation pour confirmer votre réglage. L'écran d'affichage in-
dique alors à nouveau la température réelle à l'intérieur du compartiment.
La nouvelle température sélectionnée sera atteinte au bout de 24 heures.
Une fluctuation de quelques degrés par rapport à la température réglée est normale et ne
signifie pas que l'appareil ne fonctionne pas correctement.
Menu Fonctions
Pour activer le menu Fonctions, appuyez sur la touche Fonctions. Pour confirmer la fonction
sélectionnée, appuyez sur la touche de confirmation. Si vous omettez de confirmer votre
sélection, l'écran quitte le menu Fonctions au bout de quelques secondes et retourne au
mode de fonctionnement normal. Les fonctions affichées sont les suivantes :
Alarme de température
Fonction Sécurité enfants
Fonction Mode Eco
Fonction Frostmatic
Fonction Refroidissement des boissons
Alarme de température
Une augmentation de la température dans un compartiment (par exemple, en raison d'une
coupure de courant) est indiquée par :
26 Bandeau de commande
Page 27

• Clignotement des voyants d'alarme et de température et
• déclenchement d'une alarme sonore
Pour réinitialiser l'alarme :
1. Appuyez sur la touche de confirmation.
2. L'alarme s'éteint.
3. La température maximum régnant dans le compartiment apparaît sur l'afficheur
pendant quelques secondes. Puis il affiche à nouveau la température programmée.
4. Le voyant d'alarme continue à clignoter jusqu'à ce que les conditions normales soient
restaurées.
Causes d’alarme potentielles :
• Une grande quantité de denrées fraîches a été rangée dans l'appareil.
• Le couvercle est resté ouvert pendant un long moment.
• Toute autre anomalie détectée. Reportez-vous au tableau, du paragraphe « En cas d'ano-
malie de fonctionnement ».
Fonction Sécurité enfants
Pour activer la fonction Sécurité enfants, appuyez sur la touche Fonctions (plusieurs fois, si
nécessaire), jusqu'à ce que le symbole correspondant
apparaisse.
Vous devez valider votre sélection en appuyant sur la touche de confirmation dans les se-
condes qui suivent. Un signal sonore retentit et le symbole reste allumé. Dans ce cas, et tant
que la fonction est activée, aucune modification n'est possible en appuyant sur une touche.
Il est possible de désactiver la fonction à tout moment en appuyant sur la touche Fonctions
jusqu'à ce que le symbole correspondant clignote, puis sur la touche de confirmation.
Fonction Mode Eco
Pour activer la fonction Mode Eco, appuyez sur la touche Fonctions (plusieurs fois, si néces-
saire) jusqu'à ce que le symbole correspondant
apparaisse (ou en réglant la température
sur -18°C).
Vous devez valider votre sélection en appuyant sur la touche de confirmation dans les se-
condes qui suivent. Un signal sonore retentit et le symbole reste allumé.
Dans ce cas, les températures sélectionnées sont automatiquement réglées (-18°C), assurant
des conditions optimales de conservation.
Il est possible de désactiver la fonction à tout moment en modifiant la température sélec-
tionnée à l'intérieur du compartiment.
Fonction Frostmatic
Le compartiment congélateur est idéal pour congeler des denrées fraîches et conserver des
aliments surgelés ou congelés pendant une longue période.
La quantité maximale de denrées que vous pouvez congeler par 24 heures est indiquée sur
la plaque signalétique.
Pour congeler des aliments frais, vous devez activer la fonction Frostmatic. Appuyez sur la
touche Fonctions (plusieurs fois, si nécessaire) jusqu'à ce que le symbole correspondant
apparaisse.
Vous devez valider votre sélection en appuyant sur la touche de confirmation dans les secondes qui suivent. Un signal sonore retentit et une animation sous forme de petits traits
apparaît sur l'écran d'affichage.
Bandeau de commande
27
Page 28

Placez les aliments à congeler dans le congélateur dès que la période de pré-refroidissement de 24 heures est écoulée.
Le processus de congélation prend 24 heures : Vous ne devez ajouter aucune autre denrée à
congeler au cours de cette période.
Cette fonction s'arrête automatiquement au bout de 54 heures.
Il est possible de désactiver la fonction à tout moment en appuyant sur la touche Fonctions
jusqu'à ce que le symbole correspondant clignote, puis sur la touche de confirmation.
Fonction Refroidissement des boissons
Une alarme sonore retentit pour rappeler que des boissons ont été placées dans le compar-
timent congélateur. Pour activer la fonction Refroidissement des boissons, appuyez sur la
touche Fonctions (plusieurs fois, si nécessaire), jusqu'à ce que le symbole correspondant
apparaisse.
Vous devez valider votre sélection en appuyant sur la touche de confirmation dans les se-
condes qui suivent. Un signal sonore retentit et le symbole reste allumé.
Dans ce cas, une minuterie est réglée par défaut sur 30 minutes. Il vous est possible de sé-
lectionner une durée différente (de 1 à 90 minutes) en appuyant sur la touche de réglage
de la température.
Dès que le temps réglé est écoulé, les indications suivantes s'affichent :
• sur l'afficheur de température
, le symbole clignote
•
le symbole
clignote
• le symbole
clignote
• un signal sonore retentit jusqu'à ce que vous appuyiez sur la touche de confirmation
À ce stade, n'oubliez pas de retirer les boissons qui sont à l'intérieur du compartiment con-
gélateur.
Il est possible de désactiver la fonction à tout moment en appuyant sur la touche Fonctions
jusqu'à ce que le symbole correspondant clignote, puis sur la touche de confirmation.
PREMIÈRE UTILISATION
Nettoyage intérieur
Avant d'utiliser l'appareil pour la première fois, nettoyez l'intérieur et tous les accessoires
internes avec de l'eau tiède savonneuse pour supprimer l'odeur caractéristique du "neuf"
puis séchez soigneusement.
N'utilisez pas de produits abrasifs, poudre à récurer, éponge métallique pour ne pas abîmer
la finition.
UTILISATION QUOTIDIENNE
Congélation d'aliments frais
Le compartiment congélateur est idéal pour congeler des denrées fraîches et conserver à
long terme des aliments surgelés ou congelés.
Activez la fonction FROSTMATIC 24 heures avant d'introduire les denrées fraîches à congeler dans le compartiment congélateur.
28 Première utilisation
Page 29

La quantité maximale de denrées que vous pouvez congeler par 24 heures est indiquée sur
la plaque signalétique.
8)
Le processus de congélation prend 24 heures : vous ne devez ajouter aucune autre denrée à
congeler au cours de cette période.
Conservation des aliments congelés
À la mise en service ou après un arrêt prolongé, placez le thermostat sur la position Max
pendant 2 heures environ, avant d'introduire les produits dans le compartiment.
En cas de dégivrage accidentel, dû par exemple à une panne de courant, si la panne doit se
prolonger plus longtemps qu'il n'est indiqué à la rubrique "temps d'augmentation" dans la
section Caractéristiques techniques, consommez les aliments décongelés le plus rapidement
possible ou recongelez-les après les avoir cuits (une fois refroidis).
Calendrier des aliments congelés
Les symboles indiquent différents types d'aliments congelés
Les numéros indiquent les temps de conservation en mois correspondant aux différents ty-
pes d'aliments congelés. La validité du temps de stockage maximum ou minimum indiqué
dépend de la qualité des aliments et de leur traitement avant la congélation.
Ouverture et fermeture du couvercle
Le couvercle est équipé d'un joint d'étanchéité qui empêche l'humidité de pénétrer dans la
cuve et de nuire à la production de froid. Le couvercle est alors difficile à ouvrir juste après
que vous l'ayez refermé (création d'un vide d'air).
Attendez quelques minutes et le couvercle s'ouvrira sans difficulté. La valve d'évacuation
d'air facilite l'ouverture du couvercle.
AVERTISSEMENT
Ne tirez jamais violemment sur la poignée.
Système Low Frost
L'appareil est équipé du système Low Frost (une vanne est visible à l'intérieur du congéla-
teur, à l'arrière) réduisant la formation de givre dans le congélateur coffre jusqu'à 80 pour
cent. Ceci permet de réduire considérablement les fréquences de dégivrage.
8) Consultez le paragraphe "Caractéristiques techniques"
Utilisation quotidienne 29
Page 30

Paniers de rangement
Accrochez les paniers en haut du congélateur (X)
ou placez-les à l'intérieur (Y). Tournez et bloquez
les poignées en fonction de ces deux positions,
comme indiqué.
Les paniers s'emboîtent les uns dans les autres.
Les figures suivantes vous indiquent les différen-
tes possibilités de chargement en fonction du type
d'appareil.
Vous pouvez vous procurer des paniers supplé-
mentaires en les commandant auprès de votre
magasin vendeur.
Serrure
Le congélateur est équipé d'une serrure constituant une sécurité enfant. La serrure est con-
çue de manière à ce que vous puissiez tourner la clé et fermer le couvercle uniquement si
vous avez préalablement inséré la clé dans la serrure.
Pour fermer le congélateur, procédez comme suit :
1. insérez délicatement la clé dans la serrure.
2. tournez la clé dans le sens des aiguilles d'une montre vers le symbole
.
Pour ouvrir le congélateur, procédez comme suit :
1. insérez délicatement la clé dans la serrure.
2. tournez la clé dans le sens inverse des aiguilles d'une montre vers le symbole
.
Des clés de rechange sont disponibles auprès du Service après-vente de votre magasin ven-
deur.
AVERTISSEMENT
Veillez à garder la clé hors de la portée des enfants.
Veillez à enlever la clé de la serrure lors de la mise au rebut de votre appareil.
Séparateur
Ce séparateur vous permet d'optimiser l'espace au-dessus du compresseur. L'espace ainsi
créé vous permet de ranger vos aliments à votre convenance (dans de petits emballages, qui
seront plus faciles à retrouver).
Ce système peut également servir de panier lors du dégivrage du congélateur.
X
Y
946
230
1061 1201
1336 1611
30 Utilisation quotidienne
Page 31

CONSEILS UTILES
Conseils pour la congélation
Pour obtenir les meilleurs résultats, voici quelques conseils importants :
• la quantité maximale de denrées que vous pouvez congeler par 24 heures est indiquée
sur la plaque signalétique.
• le temps de congélation est de 24 heures. Aucune autre denrée à congeler ne doit être
ajoutée pendant cette période.
• congelez seulement les denrées alimentaires fraîches, de qualité supérieure (une fois net-
toyées).
• préparez la nourriture en petits paquets pour une congélation rapide et uniforme, adap-
tés à l'importance de la consommation.
• enveloppez les aliments dans des feuilles d'aluminium ou de polyéthylène et assurez-
vous que les emballages sont étanches ;
• ne laissez pas des aliments frais, non congelés, toucher des aliments déjà congelés pour
éviter une remontée en température de ces derniers.
• les aliments maigres se conservent mieux et plus longtemps que les aliments gras ; le sel
réduit la durée de conservation des aliments
• la température très basse à laquelle se trouvent les bâtonnets glacés, s'ils sont consom-
més dès leur sortie du compartiment congélateur, peut provoquer des brûlures.
• L'identification des emballages est importante : indiquez la date de congélation du pro-
duit, et respectez la durée de conservation indiquée par le fabricant.
Conseils pour la conservation des produits surgelés et congelés du commerce
Pour une bonne conservation des produits surgelés et congelés, vous devez :
• vous assurer qu'ils ont bien été conservés au magasin ;
• prévoir un temps réduit au minimum pour leur transport du magasin d'alimentation à
votre domicile ;
• éviter d'ouvrir trop souvent le couvercle du congélateur et ne le laisser ouvert que le
temps nécessaire.
• une fois décongelés, les aliments se détériorent rapidement et ne peuvent pas être re-
congelés.
• respecter la durée de conservation indiquée par le fabricant.
ENTRETIEN ET NETTOYAGE
ATTENTION
débrancher l'appareil avant toute opération d'entretien.
Cet appareil contient des hydrocarbures dans son circuit réfrigérant : l'entretien et la recharge ne doivent donc être effectués que par du personnel autorisé.
Conseils utiles
31
Page 32

Nettoyage périodique
1. Mettez l'appareil à l'arrêt.
2. Débranchez l'appareil.
3. Nettoyez régulièrement les parois de l'appareil et les accessoires avec de l'eau tiède et
un détergent liquide inodore (produit utilisé pour la vaisselle par exemple). Lavez le
joint du couvercle avec précaution sans omettre de nettoyer également sous le joint.
4. Rincez et séchez soigneusement les parois et les accessoires de l'appareil.
5. Branchez l'appareil.
6. Mettez l'appareil en marche.
ATTENTION
N'utilisez jamais de produits abrasifs ou caustiques, ni d'éponges avec grattoir ou d'objets
métélliques pour procéder au nettoyage intérieur et extérieur de votre appareil. Vous ris-
quez de l'endommager.
Attention à ne pas endommager le système de réfrigération.
Il n'est pas nécessaire de nettoyer la zone du compresseur.
De nombreux détergents pour la cuisine recommandés par les fabricants contiennent des
produits chimiques qui peuvent attaquer/endommager les pièces en plastique utilisées dans
cet appareil. Il est par conséquent recommandé d'utiliser seulement de l'eau chaude addi-
tionnée d'un peu de savon liquide pour nettoyer la carrosserie de l'appareil.
Dégivrage du congélateur
Dégivrez le congélateur lorsque l'épaisseur de la couche de givre est d'environ 10-15 mm.
Nous vous conseillons de dégivrer le congélateur lorsque l'appareil est peu chargé (ou vide).
Pour enlever le givre, suivez les instructions ci-dessous :
1. Mettez l'appareil à l'arrêt.
2. Sortez les denrées congelées, enveloppez celles-ci dans plusieurs feuilles de papier
journal et conservez-les dans un endroit frais.
3. Maintenez le couvercle ouvert. Ôtez le bouchon de la gouttière d'évacuation de l'eau
de dégivrage. Placez un récipient dessous pour récupérer l'eau de dégivrage. Vous pou-
vez accélérer le dégivrage en retirant la couche de glace avec précaution à l'aide d'une
spatule en plastique prévue à cet effet.
4. Le dégivrage terminé, épongez et séchez bien l'intérieur, et remettez le bouchon.
5. Mettez l'appareil en marche.
6. Réglez le thermostat pour obtenir un réglage de froid maximum et faites fonctionner
l'appareil pendant deux ou trois heures en utilisant ce réglage.
7. Replacez les produits surgelés ou congelés dans le compartiment.
32 Entretien et nettoyage
Page 33

N'utilisez en aucun cas de couteau ou tout autre objet tranchant, d'objet métallique pour
gratter la couche de givre, vous risquez de détériorer irrémédiablement l'évaporateur. N'utilisez aucun autre dispositif mécanique ou moyen artificiel que ceux qui sont recommandés
par le fabricant pour accélérer le dégivrage de votre appareil. Une élévation de la température des denrées congelées, pendant la décongélation, peut réduire leur durée de conserva-
tion.
En cas d'absence prolongée ou de non-utilisation
Prenez les précautions suivantes :
1. Mettez l'appareil à l'arrêt.
2. Débranchez l'appareil.
3. Retirez tous les aliments.
4. Dégivrez et nettoyez l'appareil et tous les accessoires.
5. Maintenez le couvercle ouvert pendant toute la durée de non-utilisation pour éviter la
formation d'odeurs.
Si, toutefois, vous n'avez pas la possibilité de débrancher et vider l'appareiI, faites vérifier
régulièrement son bon fonctionnement pour éviter la détérioration des aliments en cas de
panne de courant.
EN CAS D'ANOMALIE DE FONCTIONNEMENT
ATTENTION
Avant d'intervenir sur l'appareil, débranchez-le.
La résolution des problèmes, non mentionnés dans le présent manuel, doit être exclusive-
ment confiée à un électricien qualifié ou une personne compétente.
Le fonctionnement de l'appareil produit certains bruits (compresseur et système réfrigé-
rant).
Anomalie Cause possible Solution
L'appareil est bruyant. L'appareil n'est pas correcte-
ment calé.
Vérifiez la stabilité de l'appareil
(les quatre pieds doivent reposer
sur le sol).
Le compresseur fonctionne
en continu.
La température n'est pas bien
réglée.
Choisissez une température plus
élevée.
Le couvercle a été ouvert trop
longtemps
Ne laissez pas le couvercle ouvert
plus longtemps que nécessaire.
Le couvercle n'est pas correcte-
ment fermé.
Vérifiez que le couvercle ferme
correctement et que le joint est
en bon état et propre.
Trop de produits frais ont été in-
troduits dans l'appareil.
Attendez quelques heures et vérifiez de nouveau la température.
En cas d'anomalie de fonctionnement 33
Page 34

Anomalie Cause possible Solution
Les aliments introduits dans
l'appareil étaient trop chauds.
Laissez refroidir les aliments à
température ambiante avant de
les stocker.
La température ambiante du lo-
cal où est installé l'appareil est
trop élevée pour permettre un
fonctionnement optimal.
Veillez à respecter la température
idéale (classe climatique) dans la
pièce où est installé l'appareil.
Le voyant Alarme haute
température est allumé.
La température à l'intérieur du
congélateur est trop élevée.
Consultez le paragraphe "Alarme
haute température".
L'appareil a été mis en fonction-
nement il y a peu de temps et la
température est encore trop éle-
vée.
Consultez le paragraphe "Alarme
haute température".
Il y a trop de givre. Les produits ne sont pas bien
enveloppés.
Enveloppez correctement les ali-
ments.
Le couvercle n'est pas correcte-
ment fermé ou ne ferme pas de
façon hermétique.
Vérifiez que le couvercle ferme
correctement et que le joint est
en bon état et propre.
La température n'est pas bien
réglée.
Choisissez une température plus
élevée.
Le bouchon de la gouttière
d'évacuation de l'eau de dégi-
vrage n'est pas bien placé.
Placez-le correctement.
Le couvercle ne ferme pas
correctement.
Il y a trop de givre. Procédez au dégivrage de l'appa-
reil.
Le joint du couvercle n'est pas
propre.
Nettoyez le joint du couvercle.
Des aliments bloquent la ferme-
ture du couvercle.
Reportez-vous aux instructions
qui figurent sur l'autocollant à
l'intérieur de l'appareil pour le
stockage des aliments dans l'ap-
pareil.
Le couvercle est difficile à
ouvrir.
Le joint du couvercle n'est pas
propre.
Nettoyez le joint du couvercle.
La valve est bloquée. Vérifiez la valve.
L'ampoule ne fonctionne
pas.
L'ampoule est défectueuse. Consultez le paragraphe "Rempla-
cement de l'ampoule d'éclairage".
La température à l'intérieur du congélateur est
trop élevée.
La température n'est pas bien
réglée.
Choisissez une température plus
basse.
Le couvercle ne ferme pas her-
métiquement ou n'est pas correctement fermé.
Vérifiez que le couvercle ferme
correctement et que le joint est
en bon état et propre.
34 En cas d'anomalie de fonctionnement
Page 35

Anomalie Cause possible Solution
Avant la congélation, la tempé-
rature à l'intérieur de l'appareil
n'était pas suffisamment froide.
Laissez refroidir l'appareil à vide
pendant un temps suffisant.
Trop de produits frais ont été in-
troduits dans l'appareil.
Attendez quelques heures et véri-
fiez de nouveau la température.
La prochaine fois, introduisez de
plus petites quantités d'aliments à
congeler en même temps.
Les aliments introduits dans
l'appareil étaient trop chauds.
Laissez refroidir les aliments à
température ambiante avant de
les stocker.
Les produits à congeler sont pla-
cés trop près les uns des autres.
Placez les produits de façon à ce
que l'air puisse circuler entre eux.
Le couvercle a été ouvert trop
souvent.
Evitez d'ouvrir trop souvent le
couvercle.
Le couvercle est resté ouvert
pendant un long moment.
Ne laissez pas le couvercle ouvert
plus longtemps que nécessaire.
La température à l'inté-
rieur du congélateur est
trop basse.
La température n'est pas bien
réglée.
Choisissez une température plus
élevée.
L'appareil ne fonctionne
pas du tout. Ni la réfrigé-
ration ni l'éclairage ne
fonctionne.
L'appareil n'est pas correcte-
ment branché.
Branchez correctement l'appareil.
L'appareil n'est pas alimenté
électriquement.
Vérifiez l'alimentation électrique
en branchant un autre appareil
électrique sur la prise.
Le dispositif de réglage de tem-
pérature n'est pas sur une posi-
tion de fonctionnement.
Mettez l'appareil en marche.
La prise n'est pas alimentée (es-
sayez de brancher un autre ap-
pareil sur la prise).
Faites appel à un électricien qua-
lifié.
Service après-vente
En cas d'anomalie de fonctionnement et si malgré toutes les vérifications une intervention
s'avère nécessaire, le service après-vente de votre magasin vendeur est le premier habilité à
intervenir.
Pour obtenir un service rapide, il est essentiel qu'au moment où vous appelez le service
après-vente vous communiquiez le modèle et le numéro de série de votre appareil. Ces numéros se trouvent sur la plaque signalétique, située sur le côté extérieur droit de l'appareil.
En cas d'anomalie de fonctionnement
35
Page 36

Remplacement de l'ampoule
1. Débranchez l'appareil du secteur.
2. Remplacez l'ampoule défectueuse par
une ampoule neuve de puissance identique, spécifiquement conçue pour les ap-
pareils électroménagers (la puissance
maximale est indiquée sur le diffuseur
d'éclairage).
3. Branchez l'appareil sur le secteur.
4. Ouvrez la porte. Vérifiez que l'ampoule
s'allume.
AVERTISSEMENT
N'enlevez pas le diffuseur au moment de changer l'ampoule.
N'utilisez pas le congélateur si le diffuseur n'est pas installé ou s'il est endommagé.
CARACTÉRISTIQUES TECHNIQUES
Dimensions Hauteur × Largeur × Profondeur
(mm) :
Les caractéristiques techniques détail-
lées figurent sur la plaque signalétique
située sur le côté droit à l'extérieur de
l'appareil.
876 × 1611 × 665
Temps de montée
en température
58 heures
INSTALLATION
Emplacement
AVERTISSEMENT
Lors de la mise au rebut de votre appareil, veillez à détruire le système de verrouillage et
fermeture, ceci afin d'éviter aux enfants de s'enfermer dans le congélateur et de mettre ain-
si leur vie en danger.
La prise de l'appareil doit être facilement accessible après son installation.
Cet appareil peut être installé dans un endroit sec et bien aéré (un garage ou une cave).
Cependant, pour atteindre une performance optimale, installez l’appareil dans un endroit
dont la température ambiante correspond à la classe climatique indiquée sur la plaque si-
gnalétique de l’appareil :
Classe climatique Température ambiante
SN + 10 °C à + 32 °C
N + 16 °C à + 32 °C
ST + 16 °C à + 38 °C
36 Caractéristiques techniques
Page 37

Classe climatique Température ambiante
T + 16 °C à + 43 °C
Branchement électrique
Contrôlez, avant de brancher l'appareil, si la tension et la fréquence indiquées sur la plaque
signalétique correspondent à celles de votre réseau.
L'appareil doit être relié à la terre. La fiche du câble d'alimentation comporte un logement
pour mise à la terre. Si la prise de courant murale n'est pas mise à la terre, branchez l'appa-
reil sur une prise de terre conformément aux normes en vigueur, en demandant conseil à
un électricien qualifié.
Le fabricant décline toute responsabilité en cas d'incident suite au non-respect des consi-
gnes de sécurité sus-mentionnées.
Cet appareil est conforme aux directives communautaires.
Conditions requises en matière de circulation d'air
1. Placez l'appareil parfaitement d'aplomb sur une surface plane et solide. L'appareil doit
reposer sur ses quatre pieds.
2. Laissez un espace de 5 cm entre l'appareil et le mur arrière.
3. Laissez un espace de 5 cm entre l'appareil et les côtés.
Veillez à garantir une circulation d'air suffisante à l'arrière de l'appareil.
BRUITS
L'appareil émet certains bruits pendant son fonctionnement (compresseur, circuit de réfri-
gérant).
BRRR!
HISSS!
CLICK!
BLUBB!
CRACK!
SSSRRR!
OK
Bruits 37
Page 38

CLICK!
CLICK!
BRRR!
BRRR!
BLUBB!
BLUBB!
HISSS!
HISSS!
38 Bruits
Page 39

SSSRRR!
SSSRRR!
CRACK!
CRACK!
EN MATIÈRE DE SAUVEGARDE DE L'ENVIRONNEMENT
Le symbole sur le produit ou son emballage indique que ce produit ne peut être traité
comme déchet ménager. Il doit être remis au point de collecte dédié à cet effet (collecte et
recyclage du matériel électrique et électronique).
En procédant à la mise au rebut de l'appareil dans les règles de l’art, nous préservons
l'environnement et notre sécurité, s’assurant ainsi que les déchets seront traités dans des
conditions optimum.
Pour obtenir plus de détails sur le recyclage de ce produit, veuillez prendre contact avec les
services de votre commune ou le magasin où vous avez effectué l'achat.
En matière de sauvegarde de l'environnement
39
Page 40

FÜR PERFEKTE ERGEBNISSE
Danke, dass Sie sich für dieses AEG Produkt entschieden
haben. Wir haben es geschaffen, damit Sie viele Jahre von
seiner ausgezeichneten Leistung und den innovativen
Technologien, die Ihnen das Leben erleichtern, profitieren
können. Es ist mit Funktionen ausgestattet, die in
gewöhnlichen Geräten nicht vorhanden sind. Nehmen Sie
sich ein paar Minuten Zeit zum Lesen, um seine Vorzüge
kennen zu lernen.
ZUBEHÖR UND VERBRAUCHSMATERIALIEN
Im AEG Webshop finden Sie alles, was Sie für ein
makelloses Aussehen und perfektes Funktionieren Ihrer
AEG Geräte benötigen. Wir bieten auch ein
umfangreiches Zubehörsortiment, das Ihre höchsten
Qualitätsansprüche erfüllt, vom Profi-Kochgeschirr bis zu
Besteckkörben, von Flaschenhaltern bis hin zu
Wäschebeuteln für empfindliche Wäsche...
Besuchen Sie den Webshop unter
www.aeg.com/shop
40
Page 41

INHALT
42 Sicherheitshinweise
45 Bedienfeld
48 Erste Inbetriebnahme
48 Täglicher Gebrauch
50 Praktische Tipps und Hinweise
51 Reinigung und Pflege
53 Was tun, wenn …
56 Technische Daten
56 Montage
57 Geräusche
59 Hinweise zum Umweltschutz
In dieser Benutzerinformation werden
folgende Symbole verwendet:
Wichtige Hinweise zur Sicherheit von
Personen und Informationen zur
Vermeidung von Geräteschäden
Allgemeine Hinweise und Ratschläge
Hinweise zum Umweltschutz
Änderungen vorbehalten
Inhalt
41
Page 42

SICHERHEITSHINWEISE
Lesen Sie zu Ihrer Sicherheit und für die optimale Geräteanwendung vor der Installation
und dem Gebrauch des Gerätes die vorliegende Benutzerinformation aufmerksam durch,
einschließlich der Ratschläge und Warnungen. Es ist wichtig, dass zur Vermeidung von Feh-
lern und Unfällen alle Personen, die das Gerät benutzen, mit der Bedienung und den Sicher-
heitsvorschriften vertraut sind. Heben Sie die Benutzerinformation gut auf und übergeben
Sie sie bei einem Weiterverkauf des Gerätes dem neuen Besitzer, so dass jeder während der
gesamten Lebensdauer des Gerätes über Gebrauch und Sicherheit informiert ist.
Halten Sie sich zu Ihrer Sicherheit und zum Schutz Ihres Eigentums strikt an die Vorsichts-
maßnahmen der vorliegenden Benutzerinformation, da der Hersteller bei Missachtung der-
selben von jeder Haftung freigestellt ist.
Sicherheit von Kindern und hilfsbedürftigen Personen
• Das Gerät darf von Personen (einschließlich Kindern), deren physische, sensorische Fähig-
keiten und deren Mangel an Erfahrung und Kenntnissen einen sicheren Gebrauch des
Gerätes ausschließen nur unter Aufsicht oder nach ausreichender Einweisung durch eine
verantwortungsbewusste Person benutzt werden, die sicherstellt, dass sie sich der Gefah-
ren des Gebrauchs bewusst sind.
Kinder müssen beaufsichtigt werden, damit sie nicht am Gerät herumspielen können.
• Halten Sie das Verpackungsmaterial unbedingt von Kindern fern. Erstickungsgefahr!
• Ziehen Sie vor der Entsorgung des Gerätes den Netzstecker, schneiden Sie das Netzkabel
(so nah wie möglich am Gerät) ab und entfernen Sie die Tür, so dass spielende Kinder vor
elektrischem Schlag geschützt sind und sich nicht in dem Gerät einschließen können.
• Wenn dieses Gerät mit magnetischer Türdichtung ein älteres Modell mit Schnappver-
schluss (Türlasche) an der Tür oder auf dem Deckel ersetzt, machen Sie den Schnappver-
schluss vor dem Entsorgen des Altgerätes unbrauchbar. So verhindern Sie, dass das Gerät
nicht zu einer Todesfalle für Kinder wird.
Allgemeine Sicherheitshinweise
WARNUNG!
Achten Sie darauf, dass die Belüftungsöffnungen im Gehäuse um das Gerät oder in der Ein-
baunische nicht blockiert sind.
• Das Gerät ist für die Aufbewahrung von Lebensmitteln und/oder Getränken in einem
normalen Haushalt bestimmt, wie in der vorliegenden Gebrauchsanweisung beschrieben
wird.
• Benutzen Sie keine mechanischen oder sonstigen Hilfsmittel, um den Abtauprozess zu
beschleunigen.
• Verwenden Sie keine anderen Elektrogeräte (wie Speiseeisbereiter) in Kühlgeräten, wenn
solche Geräte nicht ausdrücklich vom Hersteller für diesen Zweck zugelassen sind.
• Achten Sie darauf, den Kältekreislauf nicht zu beschädigen.
• Das Kältemittel Isobutan (R600a) im Kältekreislauf des Gerätes ist ein natürliches und
sehr umweltfreundliches Gas, das jedoch leicht entflammbar ist.
42 Sicherheitshinweise
Page 43

Achten Sie beim Transport und bei der Aufstellung des Gerätes darauf, nicht die Komponenten des Kältekreislaufs zu beschädigen.
Bei einer eventuellen Beschädigung des Kältekreislaufs:
– Offene Flammen und Zündfunken vermeiden
– Den Raum, in dem das Gerät installiert ist, gut lüften
• Technische und anderweitige Änderungen am Gerät sind gefährlich. Ein defektes Netzka-
bel kann Kurzschlüsse und einen Brand verursachen und/oder zu Stromschlägen führen.
WARNUNG!
Elektrische Bauteile (Netzkabel, Stecker, Kompressor) dürfen zur Vermeidung von Gefahren
nur vom Kundendienst oder einer Fachkraft ausgewechselt werden.
1. Das Netzkabel darf nicht verlängert werden.
2. Vergewissern Sie sich, dass der Netzstecker nicht von der Geräterückseite ge-
quetscht oder beschädigt wird. Ein gequetschter oder beschädigter Netzstecker
überhitzt und kann einen Brand verursachen.
3. Vergewissern Sie sich, dass der Netzstecker des Geräts frei zugänglich ist.
4. Ziehen Sie nicht am Netzkabel.
5. Stecken Sie den Netzstecker nie in eine lockere Steckdose. Es besteht Brand- und
Stromschlaggefahr.
6.
Betreiben Sie das Gerät nicht ohne Lampenabdeckung
9)
der Innenbeleuchtung.
• Dieses Gerät ist schwer. Vorsicht beim Transport.
• Entnehmen oder berühren Sie nie mit nassen/feuchten Händen Tiefkühlgut, da dies zu
Hautverletzungen oder Kälteverbrennungen führen kann.
• Das Gerät nicht über eine längere Zeit direkter Sonneneinstrahlung aussetzen.
•
Die Leuchtmittel
10)
für dieses Gerät sind Speziallampen, die ausschließlich für Haushalts-
geräte geeignet sind. Sie eignen sich nicht zur Raumbeleuchtung.
Täglicher Gebrauch
• Stellen Sie keine heißen Töpfe auf die Kunststoffteile des Gerätes.
• Lagern Sie keine feuergefährlichen Gase oder Flüssigkeiten in dem Gerät. Explosionsge-
fahr.
•
Legen Sie Lebensmittel nicht direkt vor den Luftauslass auf der Rückwand.
11)
• Ein aufgetautes Produkt darf nicht wieder eingefroren werden.
• Abgepackte Tiefkühlkost immer entsprechend den Herstellerangaben aufbewahren.
• Die Lagerempfehlungen des Geräteherstellers sollten strikt eingehalten werden. Halten
Sie sich an die betreffenden Anweisungen.
• Keine kohlensäurehaltigen Getränke oder Sprudel in den Tiefkühlschrank stellen, da der
Druckanstieg in den Behältern zur Explosion führen und das Gerät beschädigen kann.
• Eis am Stiel kann Kälteverbrennungen verursachen, wenn es direkt nach der Entnahme
aus dem Gefrierschrank gegessen wird.
9) Falls Lampenabdeckung vorhanden.
10) Falls Lampe vorhanden.
11) Wenn das Gerät mit dem Frost-Free-System ausgestattet ist.
Sicherheitshinweise 43
Page 44

Reinigung und Pflege
• Schalten Sie vor Wartungsarbeiten immer das Gerät ab und ziehen Sie den Netzstecker
aus der Steckdose.
• Reinigen Sie das Gerät nicht mit Metallgegenständen.
• Verwenden Sie keine scharfen Gegenstände zum Entfernen von Reif und Eis im Gerät.
Benutzen Sie einen Kunststoffschaber.
Inbetriebnahme
Halten Sie sich für den elektrischen Anschluss bitte genau an die Anweisungen im betreff-
enden Abschnitt.
• Kontrollieren Sie nach dem Auspacken das Gerät auf eventuelle Beschädigungen. Neh-
men Sie das Gerät nicht in Betrieb, wenn es beschädigt ist. Melden Sie die Schäden um-
gehend dem Händler, bei dem Sie es erworben haben. Bewahren Sie in diesem Fall die
Verpackung auf.
• Lassen Sie das Gerät mindestens vier Stunden stehen, bevor Sie es elektrisch anschließen,
damit das Öl in den Kompressor zurückfließen kann.
• Ausreichenden Freiraum zur Luftzirkulation um das Gerät lassen; anderenfalls besteht
Überhitzungsgefahr. Halten Sie sich für die Belüftung an die Installationsanweisungen.
• Das Gerät darf nicht in der Nähe von Heizkörpern oder Kochern installiert werden.
• Vergewissern Sie sich, dass der Netzstecker des Gerätes nach der Installation frei zugäng-
lich ist.
Kundendienst
• Sollte die Wartung des Gerätes elektrische Arbeiten verlangen, so dürfen diese nur von
einem qualifizierten Elektriker oder einem Elektro-Fachmann durchgeführt werden.
• Wenden Sie sich für Reparaturen und Wartung nur an Fachkräfte der autorisierten Kun-
dendienststellen und verlangen Sie stets Original-Ersatzteile.
Umweltschutz
Das Gerät enthält im Kältekreis oder in dem Isoliermaterial keine ozonschädigenden Gase.
Das Gerät darf nicht wie normaler Hausmüll entsorgt werden. Die Isolierung enthält ent-
zündliche Gase: das Gerät muss gemäß den geltenden Vorschriften entsorgt werden; sie er-
halten diese bei Ihrer Gemeindeverwaltung. Nicht das Kälteaggregat beschädigen, insbeson-
dere nicht in der Nähe des Wärmetauschers. Die Materialien, die bei der Herstellung dieses
Geräts verwendet wurden und mit dem Symbol
markiert sind, können recycelt werden.
44 Sicherheitshinweise
Page 45

BEDIENFELD
OK
Mode
1 2 3 4 5
1 Taste Gerät ON/OFF
2 Temperaturreglertaste
3 Temperatur- und Funktionsanzeige
4 Taste Modus (Funktion)
5 Bestätigungstaste
Display
Temperaturwarnung (Temperatur zu
hoch)
Wenn dieses Symbol leuchtet, ist die
Timer-Funktion aktiv
Wenn dieses Symbol leuchtet, ist das
Gerät eingeschaltet. Wenn das Sym-
bol schnell blinkt, ist die Frostmatic-
Funktion aktiv
Wenn dieses Symbol leuchtet, ist die
Kindersicherung aktiv
Negative Temperaturanzeige Wenn dieses Symbol leuchtet, ist die
Frostmatic-Funktion aktiv
Temperaturanzeige Wenn dieses Symbol leuchtet, ist die
Funktion Getränke kühlen aktiv
Wenn dieses Symbol leuchtet, ist die
Funktion Energiesparen aktiv
Einschalten des Geräts
Stecken Sie den Netzstecker in die Netzsteckdose. Falls das Display nicht leuchtet, drücken
Sie die Taste Gerät ON/OFF.
Sobald das Gerät eingeschaltet ist, befindet es sich im Alarmzustand. Die Temperaturanzei-
ge blinkt und ein Signalton ertönt.
Wenn Sie die Bestätigungstaste drücken, wird der Signalton abgeschaltet (siehe auch den
Abschnitt "Temperaturwarnung"), das Symbol
blinkt weiterhin und in der Anzeige
wird die höchste Temperatur eingeblendet.
Für eine ordnungsgemäße Lagerung von Lebensmitteln sollten Sie die Funktion Energiesparmodus wählen, die folgende Temperatureinstellung garantiert:
-18 °C im Gefriergerät
Bedienfeld
45
Page 46

• Warten Sie mit dem Einlegen von Lebensmitteln in den Gefrierraum, bis die Innentempe-
ratur -18 °C erreicht hat.
• Näheres zur Wahl einer anderen Temperatur siehe "Temperaturregelung".
Ausschalten
Das Gerät wird ausgeschaltet, wenn Sie die Taste Gerät ON/OFF länger als 1 Sekunde lang
drücken.
Dabei wird ein Temperatur-Countdown (-3 -2 -1) angezeigt.
WARNUNG!
Legen Sie keine Gegenstände auf dem Bedienfeld ab, da das Gefriergerät dadurch verse-
hentlich abgeschaltet werden kann.
Die Lebensdauer des Geräts lässt sich verlängern, wenn Sie es nicht innerhalb von 10 Minu-
ten ein- und ausschalten.
Temperaturregelung
Das Gefriergerät ist mit dem Symbol gekennzeichnet. Dies bedeutet, dass es
sich sowohl zum Einfrieren frischer Lebensmittel als auch zum Lagern gefrorener und tief-
gefrorener Lebensmittel für einen längeren Zeitraum eignet. Die Temperatur kann zwischen
-15 °C und -24 °C eingestellt werden. Es empfiehlt sich, die Innentemperatur auf ca. -18 °C
einzustellen. Dies ist die geeignete Temperatur zum Einfrieren von Lebensmitteln und für
die Lagerung der gefrorenen Lebensmittel.
Die Temperatur kann durch Drücken der Taste zur Temperaturregelung eingestellt werden.
Wenn die Taste zur Temperaturregelung gedrückt wird, blinkt die aktuelle Temperaturein-
stellung in der Anzeige. Wird die Taste erneut gedrückt, kann die Temperatur geändert wer-
den.
Sie bestätigen die ausgewählte Temperatur mit der Bestätigungstaste. Die Anzeige gibt
dann wieder die Innenraumtemperatur an.
Die neu ausgewählte Temperatur muss innerhalb von 24 Stunden erreicht werden.
Schwankungen von einigen Graden um die eingestellte Temperatur sind normal und kein
Gerätefehler .
Funktionsmenü
Durch Drücken der Funktionstaste gelangen Sie in das Menü Funktionen. Jede Funktion
kann durch Drücken der Bestätigungstaste bestätigt werden. Wenn einige Sekunden lang
keine Bestätigung erfolgt, erlischt die Anzeige im Display. Es werden folgende Funktionen
angezeigt:
Temperaturwarnung (Temperatur zu hoch)
Funktion Kindersicherung
Funktion Energiesparen
Frostmatic-Funktion
Funktion Getränke kühlen
Temperaturwarnung (Temperatur zu hoch)
Ein Anstieg der Temperatur in einem Geräteteil (zum Beispiel aufgrund eines Stromausfalls)
wird wie folgt angezeigt:
46 Bedienfeld
Page 47

• Blinkende Alarm- und Temperaturanzeige des Gefriergeräts.
• Ein Alarmsignal ertönt.
Zurücksetzen des Alarms:
1. Bestätigungstaste drücken.
2. Der Summer wird abgeschaltet.
3. Die in dem Fach erreichte höchste Temperatur wird an der Anzeige
für einige Se-
kunden angezeigt. Danach zeigt sie wieder die eingestellte Temperatur an.
4. Die Alarmanzeige blinkt so lange, bis die normalen Bedingungen wieder hergestellt
sind.
Mögliche Gründe für einen Alarm:
• Eine große Menge frischer Lebensmittel wurde eingelegt.
• Der Deckel blieb zu lange offen.
• Das System hat einen Defekt. Siehe Tabelle „Fehlersuche“.
Funktion Kindersicherung
Die Funktion Kindersicherung wird durch (eventuell mehrmaliges) Drücken der Funktions-
taste eingeschaltet, bis das entsprechende Symbol
erscheint.
Bestätigen Sie diese Auswahl innerhalb weniger Sekunden mit der Bestätigungstaste. Der
Summer ertönt und das Symbol leuchtet dauerhaft. Solange die Kindersicherung einge-
schaltet ist, kann durch Drücken einer beliebigen Taste keinerlei Funktion ausgelöst werden.
Diese Funktion kann jederzeit ausgeschaltet werden. Drücken Sie die Funktionstaste, bis das
entsprechende Symbol blinkt, und drücken Sie dann die Bestätigungstaste.
Funktion Energiesparen
Die Funktion Energiesparen wird durch (eventuell mehrmaliges) Drücken der Funktionstaste
eingeschaltet, bis das entsprechende Symbol
erscheint (oder durch Einstellen der Tempe-
ratur auf -18 °C).
Bestätigen Sie diese Auswahl innerhalb weniger Sekunden mit der Bestätigungstaste. Der
Summer ertönt und das Symbol leuchtet dauerhaft.
In diesem Modus wird die Temperatur automatisch (-18 °C) für die optimale Lagerung Ihrer
Lebensmittel eingestellt.
Diese Funktion kann jederzeit durch Ändern der ausgewählten Temperatur im Kühlraum
ausgeschaltet werden.
Frostmatic-Funktion
Der Gefrierraum eignet sich zum Lagern gefrorener und tiefgefrorener Lebensmittel für ei-
nen längeren Zeitraum sowie zum Einfrieren frischer Lebensmittel.
Die maximale Menge an Lebensmitteln, die in 24 Stunden eingefroren werden kann, ist auf
dem Typenschild angegeben.
Zum Einfrieren frischer Lebensmittel müssen Sie die Frostmatic-Funktion einschalten. Drü-
cken Sie die Funktionstaste gegebenenfalls mehrmals, bis das gewünschte Symbol
erscheint.
Bestätigen Sie diese Auswahl innerhalb weniger Sekunden mit der Bestätigungstaste. Jetzt
ertönt der Summer und auf dem Display erscheint eine Animation mit Linien.
Legen Sie die Lebensmittel nach einer Vorkühlphase von 24 Stunden in das Gefriergerät.
Bedienfeld
47
Page 48

Der Gefriervorgang dauert 24 Stunden. Legen Sie während dieses Zeitraums keine weiteren
Lebensmittel in das Gefriergerät.
Diese Funktion endet automatisch nach 54 Stunden.
Diese Funktion kann jederzeit ausgeschaltet werden. Drücken Sie die Funktionstaste, bis das
entsprechende Symbol blinkt, und drücken Sie dann die Bestätigungstaste.
Funktion Getränke kühlen
Die Funktion Getränke kühlen dient als Sicherheitseinrichtung, wenn Flaschen in den Ge-
frierraum eingelegt werden. Sie wird aktiviert, indem Sie die Funktionstaste gegebenenfalls
mehrmals drücken, bis das gewünschte Symbol
erscheint.
Bestätigen Sie diese Auswahl innerhalb weniger Sekunden mit der Bestätigungstaste. Der
Summer ertönt und das Symbol leuchtet dauerhaft.
In diesem Modus arbeitet ein Timer mit einer Standardeinstellung von 30 Min. Diese Stan-
dardeinstellung kann durch Drücken der Taste zur Temperaturregelung geändert werden
und Sie können die gewünschte Dauer zwischen 1 und 90 Minuten auswählen.
Am Ende der ausgewählten Zeit erscheinen folgende Anzeigen:
• In der Anzeige
blinkt das Symbol .
•
Das Symbol
blinkt.
• Das Symbol
blinkt.
• Der akustische Alarm ertönt, bis die Bestätigungstaste gedrückt wird.
Bitte denken Sie daran, jetzt die Getränke aus dem Gefrierraum zu entnehmen.
Diese Funktion kann jederzeit ausgeschaltet werden. Drücken Sie die Funktionstaste, bis das
entsprechende Symbol blinkt, und drücken Sie dann die Bestätigungstaste.
ERSTE INBETRIEBNAHME
Reinigung des Innenraums
Bevor Sie das Gerät in Betrieb nehmen, beseitigen Sie den typischen "Neugeruch" am besten
durch Auswaschen der Innenteile mit lauwarmem Wasser und einem neutralen Reinigungs-
mittel. Sorgfältig nachtrocknen.
Verwenden Sie keine Reinigungsmittel oder Scheuerpulver, da hierdurch die Oberfläche be-
schädigt wird.
TÄGLICHER GEBRAUCH
Einfrieren frischer Lebensmittel
Der Gefrierraum eignet sich zum Einfrieren von frischen Lebensmitteln und zum Lagern von
gefrorenen und tiefgefrorenen Lebensmitteln für einen längeren Zeitraum.
Um frische Lebensmittel einzufrieren, aktivieren Sie bitte die FROSTMATIC Funktion mindestens 24 Stunden, bevor Sie die Lebensmittel in das Gefrierfach legen.
Die maximale Menge an Lebensmitteln, die in 24 Stunden eingefroren werden kann, ist auf
dem Typschild angegeben.
12)
12) Siehe hierzu "Technische Daten"
48 Erste Inbetriebnahme
Page 49

Der Gefriervorgang dauert 24 Stunden. Legen Sie während dieses Zeitraums keine weiteren
einzufrierenden Lebensmittel in den Gefrierraum.
Lagerung gefrorener Produkte
Lassen Sie das Gerät vor der ersten Inbetriebnahme oder nach einer Zeit, in der das Gerät
nicht benutzt wurde, mindestens zwei Stunden lang auf den höheren Einstellungen laufen,
bevor Sie Lebensmittel in das Gefrierfach hinein legen.
Kam es zum Beispiel durch einen Stromausfall, der länger dauerte als der in der Tabelle mit
den technischen Daten angegebene Wert (siehe "Ausfalldauer") zu einem ungewollten Ab-
tauen, dann müssen die aufgetauten Lebensmittel sehr rasch verbraucht oder sofort ge-
kocht und (nach dem Abkühlen) erneut eingefroren werden.
Gefrierkalender
Die Symbole zeigen verschiedene Arten gefrorener Lebensmittel.
Die Zahlen geben die Lagerdauer in Monaten für das Gefriergut an. Es hängt von der Quali-
tät der Lebensmittel und ihrer Behandlung vor dem Einfrieren ab, ob der obere oder der
untere Wert für die angezeigte Lagerzeit gilt.
Öffnen und Schließen des Deckels
Da der Deckel mit einer sehr gut schließenden Dichtung ausgestattet ist, kann das Gerät
direkt nach dem Schließen nur sehr schwer geöffnet werden (da sich im Innern ein Vakuum
bildet).
Bitte warten Sie in diesem Fall einige Minuten, bis Sie das Gerät wieder öffnen. Das Unter-
druckventil hilft Ihnen, den Deckel zu öffnen.
WARNUNG!
Ziehen Sie nie mit großer Kraft am Griff.
Low Frost System
Das Gerät ist mit der Low Frost System ausgerüstet (auf der Rückwand im Geräteinneren
können Sie ein Ventil sehen), das die Eisbildung in der Gefriertruhe um 80 Prozent reduziert.
Das bedeutet für Sie 5 Jahre Betrieb ohne Abtauen.
Einsatzkörbe
Hängen Sie die Körbe auf die Oberkante des Ge-
friergeräts (X) oder in das Innere des Geräts (Y).
Drehen und fixieren Sie die Griffe in diesen beiden
Positionen wie im Bild abgebildet.
Die Körbe schieben sich dann ineinander.
X
Y
Täglicher Gebrauch 49
Page 50

Die folgenden Abbildungen zeigen, wie viele Körbe
in die verschiedenen Gefrierschrankmodelle eingesetzt werden können.
Weiter Körbe können Sie bei Ihrem Fachhändler
beziehen.
Sicherheits-Verriegelung
Die Gefriertruhe ist mit einer Spezialverriegelung ausgestattet, um eine versehentliche Ver-
riegelung zu vermeiden. Die Verriegelung ist so beschaffen, dass Sie den Schlüssel umdre-
hen und den Deckel nur so schließen können, wenn Sie den Schlüssel in die Verriegelung
stecken.
Zum Schließen der Gefriertruhe gehen Sie bitte wie folgt vor:
1. schieben Sie den Schlüssel vorsichtig ins Schloss.
2. drehen Sie den Schlüssel im Uhrzeigersinn in Richtung auf das Symbol
.
Zum Öffnen des Gefriertruhe gehen Sie bitte wie folgt vor:
1. schieben Sie den Schlüssel vorsichtig ins Schloss.
2. drehen Sie den Schlüssel gegen den Uhrzeigersinn in Richtung auf das Symbol
.
Ersatzschlüssel sind bei Ihrem lokalen Kundendienst erhältlich.
WARNUNG!
Bewahren Sie die Schlüssel für Kinder unzugänglich auf.
Vergessen Sie nicht, den Schlüssel aus dem Schloss zu nehmen, wenn Sie das alte Gerät
entsorgen.
Kunststoffdistanzstück
Mit dem Kunststoffdistanzstück können Sie den Platz über dem Kompressor besser nutzen.
In dem dadurch entstehenden Raum können Sie kleinere Lebensmittelpackungen lagern, die
sich so leichter finden lassen.
Das Distanzstück kann auch als Ablage verwendet werden, wenn die Gefriertruhe abgetaut
wird.
PRAKTISCHE TIPPS UND HINWEISE
Hinweise zum Einfrieren
Im Folgenden finden Sie einige wertvolle Tipps für einen optimalen Gefriervorgang:
• die maximale Menge an Lebensmitteln, die innerhalb von 24 Stunden eingefroren wer-
den kann. ist auf dem Typschild angegeben;
• der Gefriervorgang dauert 24 Stunden. Legen Sie während dieses Zeitraums keine weite-
ren einzufrierenden Lebensmittel in das Gefrierfach;
946
230
1061 1201
1336 1611
50 Praktische Tipps und Hinweise
Page 51

• frieren Sie ausschließlich frische und gründlich gewaschene Lebensmittel von sehr guter
Qualität ein;
• teilen Sie die Lebensmittel in kleinere Portionen ein, damit diese schnell und vollständig
gefrieren und Sie später nur die Menge auftauen müssen, die Sie gerade benötigen;
• die einzufrierenden Lebensmittelportionen sollten stets luftdicht in Aluminiumfolie oder
in lebensmittelechte Gefrierbeutel verpackt werden, um so wenig Luft wie möglich in der
Verpackung zu haben;
• achten Sie beim Hineinlegen von frischen, noch ungefrorenen Lebensmitteln darauf, dass
diese keinen Kontakt mit Gefriergut bekommen, da dieses sonst antauen kann;
• weniger fetthaltige Lebensmittel lassen sich besser lagern als fetthaltigere; Salz verkürzt
die Lagerzeit von Lebensmitteln im Gefrierfach;
• werden Gefrierwürfel direkt nach der Entnahme aus dem Gefrierfach verwendet, können
Sie zu Frostbrand auf der Haut führen;
• es empfiehlt sich, das Einfrierdatum auf jeder einzelnen Packung zu notieren, um einen
genauen Überblick über die Lagerzeit zu haben.
Hinweise zur Lagerung gefrorener Produkte
So erzielen Sie die besten Ergebnisse mit Ihrem Gerät:
• prüfen Sie sorgfältig, dass die im Handel erworbenen gefrorenen Lebensmittel sachge-
recht gelagert wurden;
• achten Sie unbedingt darauf, die eingekauften gefrorenen Lebensmittel in der kürzest
möglichen Zeit in Ihren Gefriergerät zu bringen;
• öffnen Sie den Deckel nicht zu häufig, und lassen Sie ihn nicht länger offen als unbe-
dingt notwendig.
• Abgetaute Lebensmittel verderben sehr schnell und eignen sich nicht für ein erneutes
Einfrieren.
• Das Haltbarkeitsdatum auf der Tiefkühlkostverpackung sollte nicht überschritten werden.
REINIGUNG UND PFLEGE
VORSICHT!
Ziehen Sie bitte vor jeder Reinigungsarbeit immer den Netzstecker aus der Steckdose.
Der Kältekreis des Gerätes enthält Kohlenwasserstoffe; Wartungsarbeiten und Nachfüllen
von Kältemittel dürfen daher nur durch vom Hersteller autorisiertes Fachpersonal ausge-
führt werden.
Regelmäßige Reinigung
1. Schalten Sie das Gerät aus.
2. Trennen Sie den Netzstecker von der Netzversorgung.
3. Reinigen Sie das Gerät und die Zubehörteile regelmäßig mit lauwarmem Wasser und
Neutralseife. Reinigen Sie die Dichtung des Deckels vorsichtig.
4. Lassen Sie das Gerät völlig abtrocknen.
5. Stecken Sie den Netzstecker in die Steckdose.
Reinigung und Pflege
51
Page 52

6. Schalten Sie das Gerät ein.
VORSICHT!
Benutzen Sie zur Reinigung des Innenraums keinesfalls Putzmittel, Scheuerpulver, stark
parfümierte Reinigungsmittel oder Wachspolituren, da diese die Oberfläche des Innenraums
beschädigen können.
Bitte achten Sie darauf, das Kühlsystem nicht zu beschädigen.
Der Kompressorbereich muss nicht gereinigt werden.
Viele Haushaltsreiniger für Küchen enthalten Chemikalien, die den im Gerät verwendeten
Kunststoff angreifen können. Aus diesem Grund ist es empfehlenswert, das Gerät außen nur
mit warmem Wasser und etwas flüssigem Tellerspülmittel zu reinigen.
Abtauen des Gefriergeräts
Tauen Sie des Gefriergerät ab, wenn die Reifschicht eine Stärke von etwa 10 bis 15 mm er-
reicht hat.
Die beste Zeit zum Abtauen für des Gefriergerät ist dann, wenn er nur wenig oder keine
Lebensmittel enthält.
Entfernen Sie den Reif wie nachstehend erläutert:
1. Schalten Sie das Gerät aus.
2. Nehmen Sie das gesamte Gefriergut heraus, verpacken Sie es in mehrere Schichten
Zeitungspapier und lagern Sie es an einem kühlen Ort.
3. Lassen Sie den Deckel offen, ziehen Sie den Stopfen aus dem Tauwasserablauf und fan-
gen Sie das Tauwasser in einer Schale auf. Entfernen Sie mit dem Kunststoffschaber
schnell das Eis.
4. Ist das Geräteinnere vollständig abgetaut, trocken Sie die nassen Oberflächen gründ-
lich ab und setzen Sie den Stopfen wieder ein.
5. Schalten Sie das Gerät ein.
6. Drehen Sie den Temperaturregler auf eine höhere Einstellung, um die maximal mögli-
che Kühlung zu erreichen, und lassen Sie das Gerät zwei bis drei Stunden mit dieser
Einstellung laufen.
7. Legen Sie die ausgelagerten Lebensmittel wieder in das Fach hinein.
Verwenden Sie niemals scharfe Gegenstände zum Entfernen von Reif und Eis, da dies das
Gerät beschädigen kann. Benutzen Sie keine mechanischen oder sonstigen Hilfsmittel, um
den Abtauprozess zu beschleunigen; halten Sie sich dazu ausschließlich an die Angaben des
Geräteherstellers. Ein Temperaturanstieg des Gefrierguts während des Abtauens des Gerätes
kann die Lagerzeit dieser Lebensmittel verkürzen.
Stillstandzeiten
Bei längerem Stillstand des Gerätes müssen Sie folgendermaßen vorgehen:
1. Schalten Sie das Gerät aus.
2. Trennen Sie den Netzstecker von der Netzversorgung.
3. Entnehmen Sie alle Lebensmittel.
4. Tauen Sie das Gerät ab; reinigen Sie den Innenraum und das gesamte Zubehör.
52 Reinigung und Pflege
Page 53

5. Lassen Sie den Deckel offen, um das Entstehen unangenehmer Gerüche zu vermeiden.
Möchten Sie bei einer längeren Abwesenheit das Gerät weiterlaufen lassen, bitten Sie je-
manden, gelegentlich die Temperatur zu prüfen, damit das Gefriergut bei einem möglichen
Stromausfall nicht im Innern des Gerätes verdirbt.
WAS TUN, WENN …
VORSICHT!
Ziehen Sie vor der Fehlersuche immer den Netzstecker aus der Steckdose.
Die Fehlersuche, die in der vorliegenden Gebrauchsanweisung nicht beschrieben ist, darf
nur von einem qualifizierten Elektriker oder einer kompetenten Person durchgeführt wer-
den.
Während das Gerät in Betrieb ist, entstehen bestimmte Geräusche (Kompressor und Kühl-
kreislauf).
Störung Mögliche Ursache Abhilfe
Das Gerät ist zu laut. Unebenheiten im Boden wurden
nicht ausgeglichen.
Kontrollieren Sie, ob eventuelle
Unebenheiten der Standfläche
korrekt ausgeglichen wurden, so
dass alle vier Füße fest auf dem
Boden stehen.
Der Kompressor arbeitet
ständig.
Die Temperatur ist nicht richtig
eingestellt.
Stellen Sie eine höhere Tempera-
tur ein.
Der Deckel wurde zu häufig ge-
öffnet.
Lassen Sie den Deckel nicht län-
ger als unbedingt erforderlich of-
fen.
Der Deckel ist nicht richtig ge-
schlossen.
Prüfen Sie, ob der Deckel gut
schließt und die Dichtungen un-
beschädigt und sauber sind.
Es wurden zu große Mengen an
Lebensmitteln gleichzeitig zum
Einfrieren eingelegt.
Warten Sie einige Stunden und
prüfen Sie dann die Temperatur
erneut.
In das Gerät eingelegte Lebens-
mittel waren noch zu warm.
Lassen Sie Lebensmittel auf
Raumtemperatur abkühlen, bevor
Sie diese einlagern.
Die Temperatur in dem Raum, in
dem sich das Gerät befindet, ist
zu hoch für einen effizienten
Betrieb.
Versuchen Sie, die Temperatur des
Raums zu senken, in dem sich das
Gerät befindet.
Die Temperaturwarnleuchte ist eingeschaltet.
Es ist zu warm im Gefrierschrank.
Siehe „Temperaturwarnung“.
Die Gefriertruhe wurde erst
kürzlich eingeschaltet, und die
Temperatur ist noch zu hoch.
Siehe „Temperaturwarnung“.
Was tun, wenn … 53
Page 54

Störung Mögliche Ursache Abhilfe
Zu starke Reif- und Eisbildung.
Das Gefriergut ist nicht korrekt
verpackt.
Verpacken Sie die Lebensmittel
besser.
Der Deckel schließt nicht richtig
oder ist nicht richtig geschlos-
sen.
Prüfen Sie, ob der Deckel gut
schließt und die Dichtungen un-
beschädigt und sauber sind.
Die Temperatur ist nicht richtig
eingestellt.
Stellen Sie eine höhere Tempera-
tur ein.
Der Stopfen des Tauwasserab-
laufs sitzt nicht richtig.
Stecken Sie den Stopfen des Tau-
wasserablaufs richtig ein.
Der Deckel schließt nicht
richtig.
Zu starke Reif- und Eisbildung. Entfernen Sie die Reifschicht.
Die Dichtungen des Deckels sind
schmutzig oder verklebt.
Reinigen Sie die Dichtungen des
Deckels.
Lebensmittelpackungen verhin-
dern das Schließen des Deckels.
Sortieren Sie die Packungen in
der richtigen Weise; siehe hierzu
den Aufkleber im Gerät.
Der Deckel lässt sich nur
schwer öffnen.
Die Dichtungen des Deckels sind
schmutzig oder verklebt.
Reinigen Sie die Dichtungen des
Deckels.
Das Ventil ist blockiert. Überprüfen Sie das Ventil.
Die Lampe funktioniert
nicht.
Die Lampe ist defekt. Siehe hierzu „Austauschen der
Lampe“.
Es ist zu warm im Gefrier-
schrank.
Die Temperatur ist nicht richtig
eingestellt.
Stellen Sie eine niedrigere Tempe-
ratur ein.
Der Deckel schließt nicht richtig
oder ist nicht richtig geschlos-
sen.
Prüfen Sie, ob der Deckel gut
schließt und die Dichtung unbe-
schädigt und sauber ist.
Das Gerät war vor dem Einfrie-
ren nicht ausreichend vorge-
kühlt.
Lassen Sie das Gerät ausreichend
vorkühlen.
Es wurden zu große Mengen an
Lebensmitteln gleichzeitig zum
Einfrieren eingelegt.
Warten Sie einige Stunden und
prüfen Sie dann die Temperatur
erneut. Legen Sie das nächste Mal
kleinere Mengen an Lebensmit-
teln in das Gefriergerät.
In das Gerät eingelegte Lebens-
mittel waren noch zu warm.
Lassen Sie Lebensmittel auf
Raumtemperatur abkühlen, bevor
Sie diese einlagern.
Die einzufrierenden Packungen
liegen zu dicht aneinander.
Legen Sie die Lebensmittel so hinein, dass die Luft frei um sie zirkulieren kann.
Der Deckel wurde häufig geöff-
net.
Versuchen Sie, den Deckel nicht
so häufig zu öffnen.
54 Was tun, wenn …
Page 55

Störung Mögliche Ursache Abhilfe
Der Deckel stand zu lange Zeit
auf.
Lassen Sie den Deckel nicht länger als unbedingt erforderlich offen.
Es ist zu kalt im Gefrier-
schrank.
Die Temperatur ist nicht richtig
eingestellt.
Stellen Sie eine höhere Tempera-
tur ein.
Das Gerät funktioniert
überhaupt nicht. Weder
die Kühlung noch die Be-
leuchtung funktionieren.
Der Stecker ist nicht richtig in
die Steckdose gesteckt.
Stecken Sie den Netzstecker kor-
rekt in die Steckdose.
Das Gerät bekommt keinen
Strom.
Versuchen Sie, ein anderes elekt-
risches Gerät an die Steckdose
anzuschließen.
Das Gerät ist nicht eingeschal-
tet.
Schalten Sie das Gerät ein.
Es liegt keine Spannung an der
Netzsteckdose an (versuchen Sie
bitte, ob ein anderes Gerät dort
funktioniert).
Rufen Sie einen Elektriker.
Kundendienst
Wenn Ihr Gerät noch immer nicht korrekt arbeitet, nachdem Sie die oben genannten Prüf-
ungen durchgeführt haben, kontaktieren Sie bitte den nächsten Kundendienst.
Bitte geben Sie beim Kundendienst Modell und Seriennummer Ihres Gerätes an. Sie finden
diese Daten entweder auf der Garantiekarte oder auf dem Typschild außen rechts am Gerät.
Austauschen der Lampe für die Innenbeleuchtung
1. Ziehen Sie den Netzstecker des Geräts
aus der Netzsteckdose.
2. Ersetzen Sie die defekte Lampe durch ei-
ne Lampe der gleichen Leistung, die spe-
ziell für Haushaltsgeräte vorgesehen ist
(die maximal zulässige Leistung finden
Sie auf der Lampenabdeckung).
3. Stecken Sie den Netzstecker in die
Steckdose.
4. Öffnen Sie den Deckel. Prüfen Sie, ob die
Lampe brennt.
WARNUNG!
Nehmen Sie die Lampenabdeckung zur Zeit des Austauschs nicht ab.
Betreiben Sie das Gerät nicht ohne Lampenabdeckung bzw. nicht mit einer beschädigten
Lampenabdeckung.
Was tun, wenn … 55
Page 56

TECHNISCHE DATEN
Abmessungen Höhe × Breite × Tiefe (mm): Weitere technische Informationen be-
finden sich auf dem Typenschild auf
der rechten Außenseite des Gerätes.
876 × 1611 × 665
Ausfalldauer 58 Stunden
MONTAGE
Aufstellung
WARNUNG!
Wenn Sie ein altes Gerät entsorgen möchten, das ein Schloss oder einen Riegel an der Tür
besitzt, müssen Sie das Schloss bzw. den Riegel zunächst unbrauchbar machen, um zu ver-
hindern, dass sich Kinder darin einschließen können.
Die Steckdose für den Anschluss des Geräts muss nach der Installation zugänglich sein.
Dieses Gerät kann in einer trockenen, gut belüfteten Garage oder in einem Keller installiert
werden, doch für eine optimale Leistung sollte dieses Gerät an einem Ort installiert werden,
an dem die Umgebungstemperatur mit der Klimaklasse übereinstimmt, die auf dem Typ-
schild des Geräts angegeben ist:
Klimaklasse Umgebungstemperatur
SN +10 °C bis + 32 °C
N +16 °C bis + 32 °C
ST +16 °C bis + 38 °C
T +16 °C bis + 43 °C
Elektrischer Anschluss
Kontrollieren Sie vor der ersten Benutzung des Gerätes, ob die Netzspannung und -fre-
quenz Ihres Hausanschlusses mit den auf dem Typenschild angegebenen Anschlusswerten
übereinstimmen.
Das Gerät muss geerdet sein. Zu diesem Zweck ist die Netzkabelsteckdose mit einem
Schutzkontakt ausgestattet. Falls die Steckdose Ihres Hausanschlusses nicht geerdet sein
sollte, lassen Sie das Gerät bitte gemäß den geltenden Vorschriften erden und fragen Sie
dafür einen qualifizierten Elektriker.
Der Hersteller übernimmt keinerlei Haftung für Schäden oder Verletzungen, die durch Miss-
achtung der oben genannten Sicherheitshinweise entstehen.
Das Gerät entspricht den EU- Richtlinien.
Anforderungen an die Belüftung
1. Stellen Sie des Gerät in horizontaler Position auf eine feste Fläche. Das Gerät muss mit
allen vier Füßen fest auf dem Boden stehen.
56 Technische Daten
Page 57

2. Vergewissern Sie sich, dass der Abstand zwischen dem Gerät und dem Schrank 5 cm
beträgt.
3. Vergewissern Sie sich, dass der Abstand zwischen dem Gerät und den Seiten 5 cm beträgt.
Die Luftzirkulation hinter dem Gerät muss ausreichend groß sein.
GERÄUSCHE
Während das Gerät in Betrieb ist, entstehen bestimmte Geräusche (Kompressor und Kühl-
kreislauf).
BRRR!
HISSS!
CLICK!
BLUBB!
CRACK!
SSSRRR!
OK
CLICK!
CLICK!
BRRR!
BRRR!
Geräusche 57
Page 58

BLUBB!
BLUBB!
HISSS!
HISSS!
SSSRRR!
SSSRRR!
CRACK!
CRACK!
58 Geräusche
Page 59

HINWEISE ZUM UMWELTSCHUTZ
Das Symbol auf dem Produkt oder seiner Verpackung weist darauf hin, dass dieses
Produkt nicht als normaler Haushaltsabfall zu behandeln ist, sondern an einem
Sammelpunkt für das Recycling von elektrischen und elektronischen Geräten abgegeben
werden muss. Durch Ihren Beitrag zum korrekten Entsorgen dieses Produkts schützen Sie
die Umwelt und die Gesundheit Ihrer Mitmenschen. Umwelt und Gesundheit werden durch
falsches Entsorgen gefährdet. Weitere Informationen über das Recycling dieses Produkts
erhalten Sie von Ihrem Rathaus, Ihrer Müllabfuhr oder dem Geschäft, in dem Sie das
Produkt gekauft haben.
Hinweise zum Umweltschutz
59
Page 60

www.aeg.com/shop 804180073-A-132011
 Loading...