

Electrolux 4480 Installation manual
TRIM KIT Installation Instructions, Part # 241723001
Please read these instructions thoroughly before assembly and installation of this trim kit.
Tool List: Have these on-hand before starting installation.
Phillips Screwdriver Tape (duct or masking)
Shims - Wooden or Plastic Carpenter’s Level
Tape Measure (min. 7’ length) Drill & 1/8” bit
Safety Glasses
You should have received the following items with your collar kit option:
Item Part # Qnty
A
Top Trim 241700402 1
B
Left Hand Side Trim 241700503 1
C
Right Hand Side Trim 241700504 1
D
Top Grille 5” 241700602 2
Plastic bag contains the following:
E
Corner Brackets “L” shaped 241700701 2
F
Set Screws (for corner brackets) 241700801 4
G
Phillips Head Screws - #8 x ¾” 241700901 6
H
Allen Head Wrench 241601001 1
G
Before you begin:
• Be careful when unpacking components. Do not use sharp objects when removing packaging material.
This may scratch the surface of trim components.
• Make sure that your rough opening is 37-1/4" wide by 80-3/4" tall (from top of flooring) by at least
24" deep from the cabinet’s front face. See CABINET ILLUSTRATIONS on next page.
• Make sure there is a large, clear area of floor (approx. 7’ by 7’) to assemble the trim kit. Place a drop
cloth over the floor to prevent scratching of the trim kit and/or floor.
• Use extreme care when handling the metal trim pieces. Corners are very sharp and easily damaged if
dropped.
Always wear Safety Glasses when working with power tools and sharp objects.
PN: 241722900
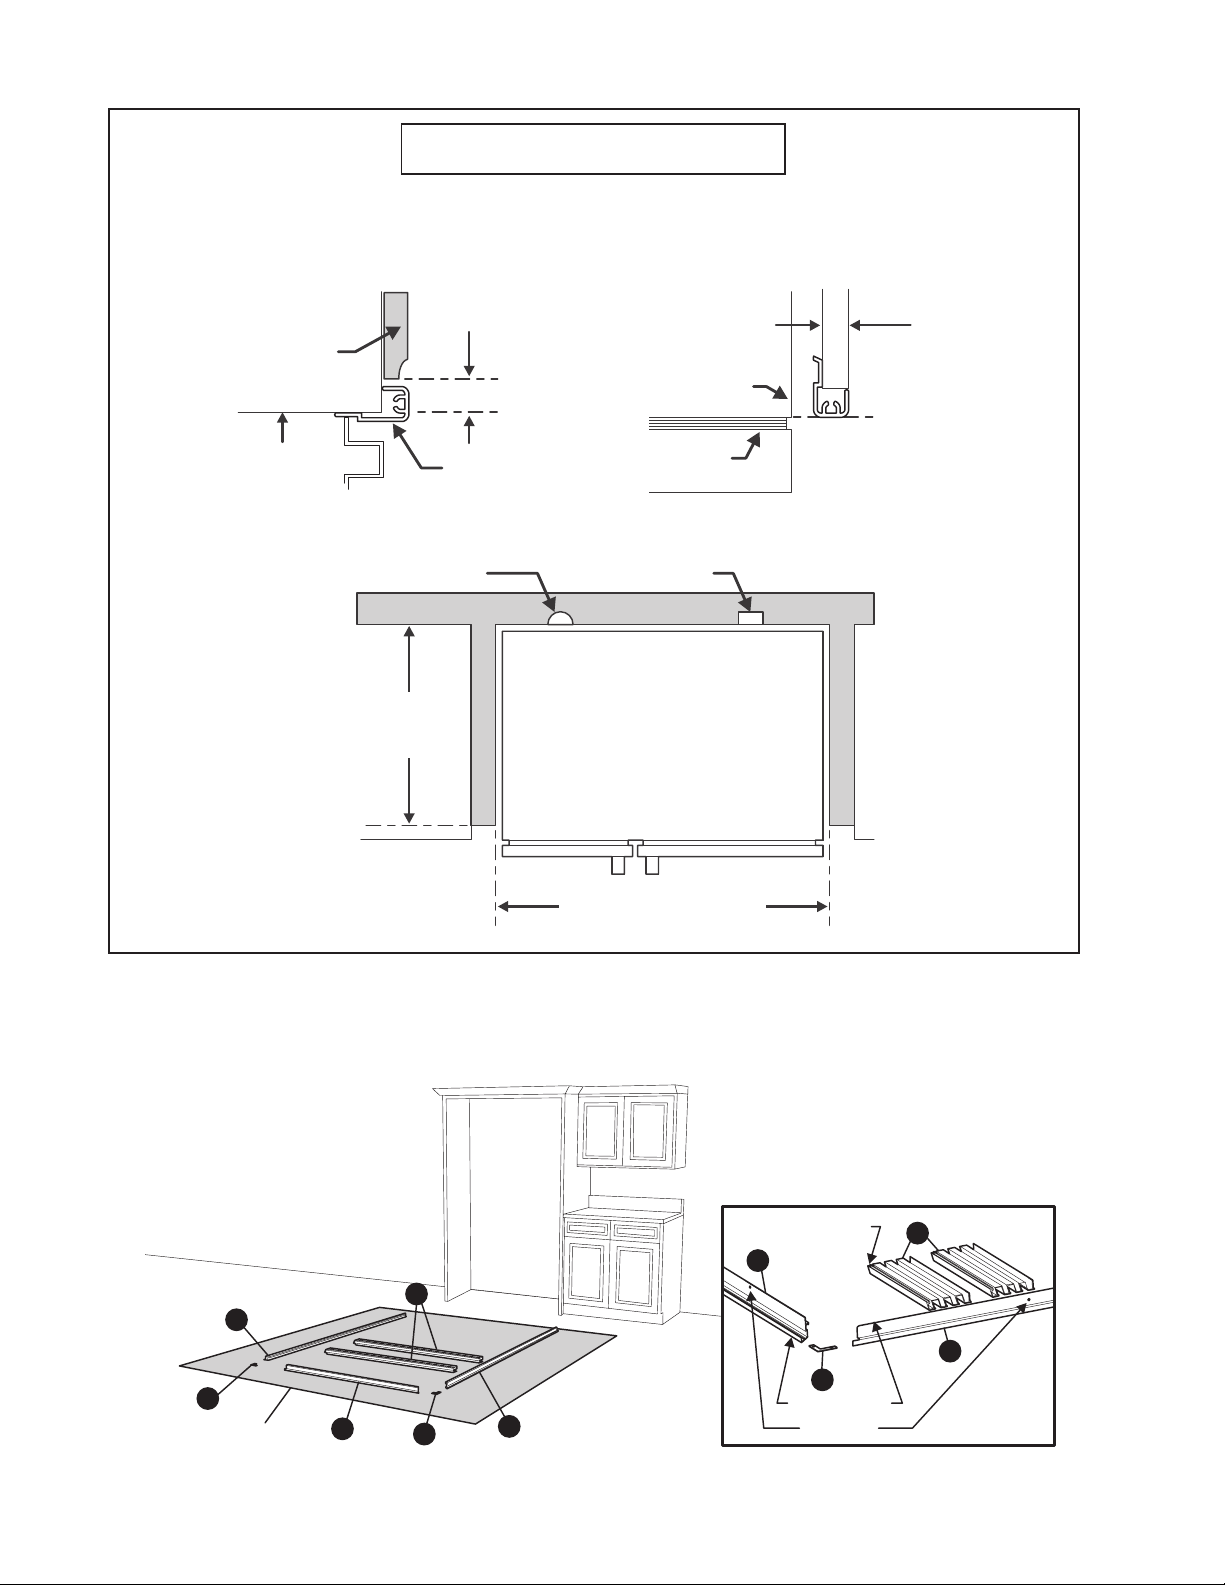
CABINET ILLUSTRATIONS
SIDE VIEW:
Overhead
Cabinet Door
80 3/4”
Height of
Opening
TOP VIEW:
Side Trim PieceTop Trim Piece
1” Min.
Clearance
Refrigerator Case
Top Trim
and Grille
TOP VIEW: Kitchen Cabinet Dimensions
Recessed
Water Line
24” Min.
Depth of
Opening
Door Gasket
Recessed
Electrical Outlet
Cabinet Side
Panel
3/4” Minimum
37 1/4” Width of Opening
1. Lay the parts out on a cleared area face down. See Figure 1.
B
E
Drop Cloth
D
A
E
D
C
Figure 1
Grooves UP
A
Face DOWN
Holes UP
D
C
E
2
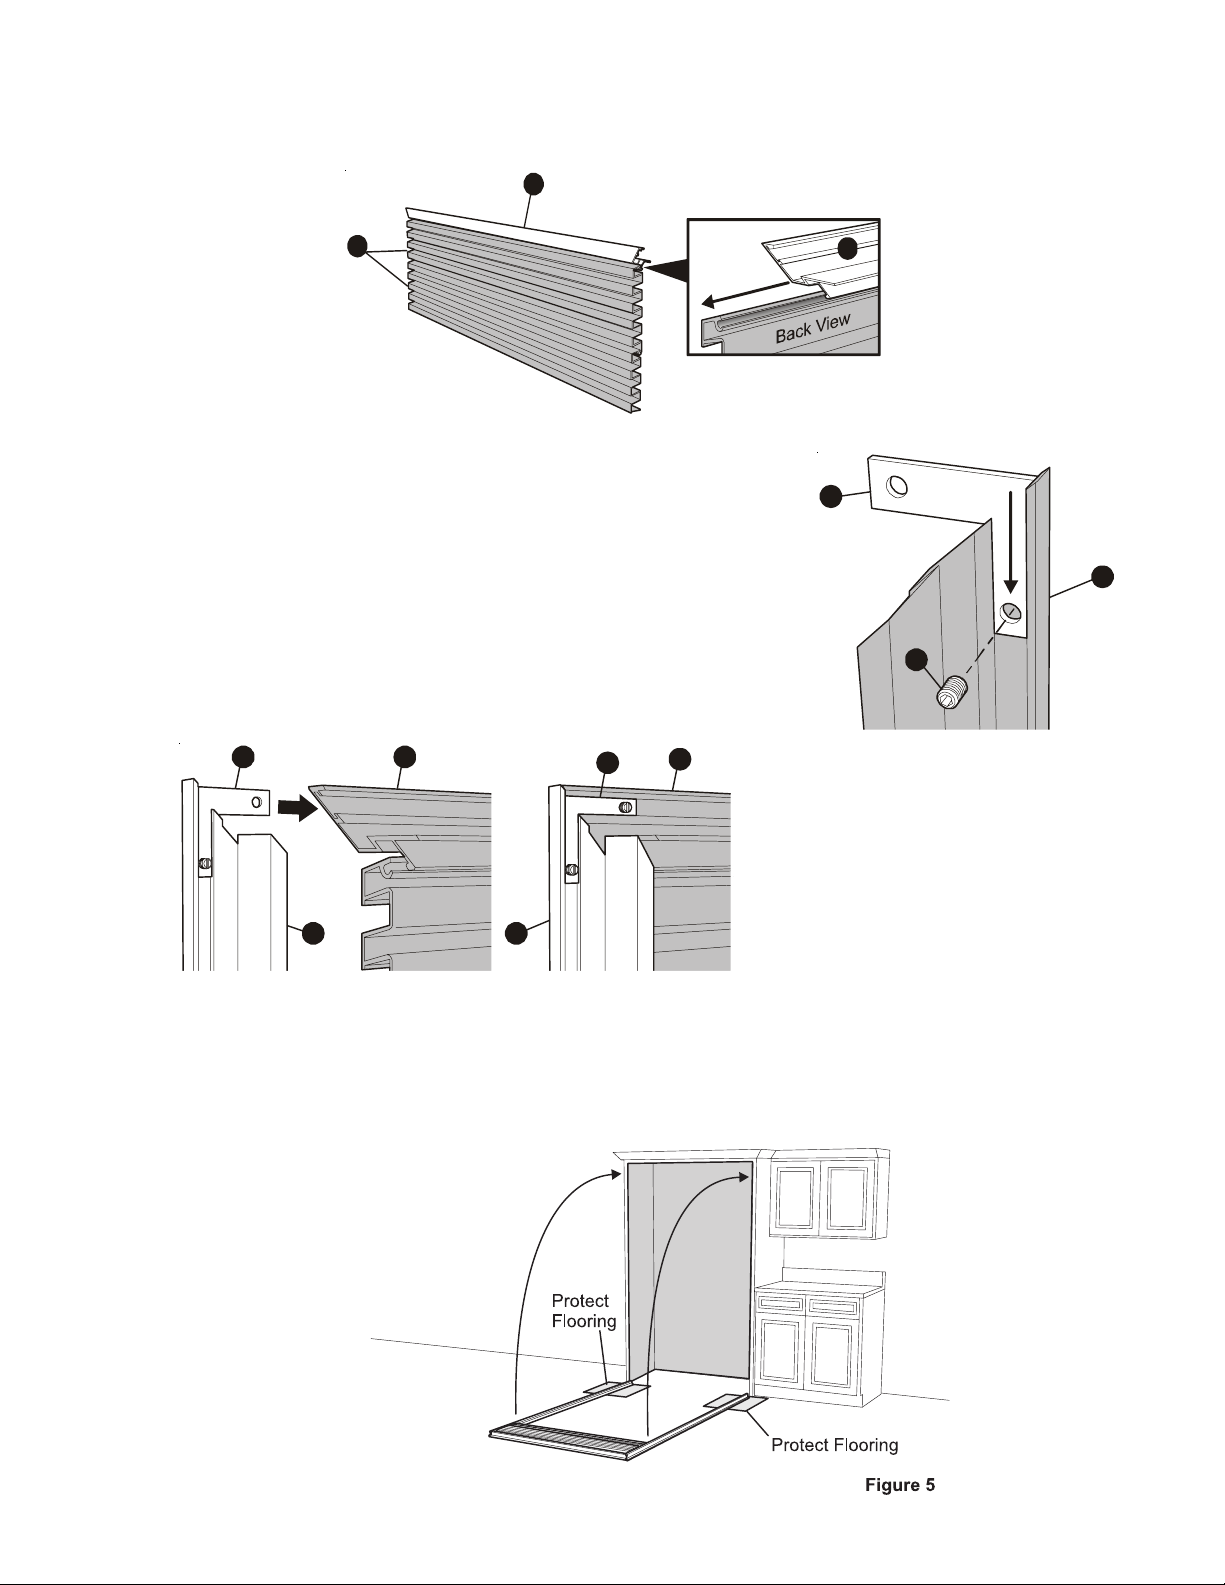
2. Slide 1 top grille (D) into top trim (A). Slide 2nd top grille (D) into 1st top grille (D). See Figure 2. Tape
together to prevent parts from sliding.
Front View
A
D
E
3. Attach brackets (E) to the angled end of each side trim (B and
C). Gently secure brackets to side trim by tightening set screws
(F), only until snug to avoid dimpling the extrusion face. See
Figure 3.
DO NOT OVERTIGHTEN.
4. Join each side trim (B and C) to the top trim (A). Make sure the
ends of the Grille Assembly are captured in the channel of each
side trim, then tape in place. Gently secure brackets (E) to top
trim (A) by tightening set screws (F), only until snug to avoid
dimpling the trim face. See Figure 4.
DO NOT OVERTIGHTEN.
EA
A
E
A
A
Figure 2
E
Figure 3
H
B
F
I
B
CC
Figure 4
Installing Trim & Grille Assembly Into Cabinetry
1. First, place protective covering where side trim will contact the floor near rough opening. Then, stand up
the grille and frame assembly and center in rough opening. See Figure 5. You may need to use several
pieces of tape at the top corners and top center to temporarily hold the assembly in place.
3
2. Making sure the frame is flush up against the front surface of
cabinetry, carefully run the mounting screws (G) through the two
holes in the top trim (A) until started into the cabinetry and slightly
snug. Do not tighten at this time.
NOTE: Some cabinet substrates may require pre-drilling holes
using a 1/8” diameter drill bit.
Figure 6A
(taken from inside
the rough opening;
backside of grille showing)
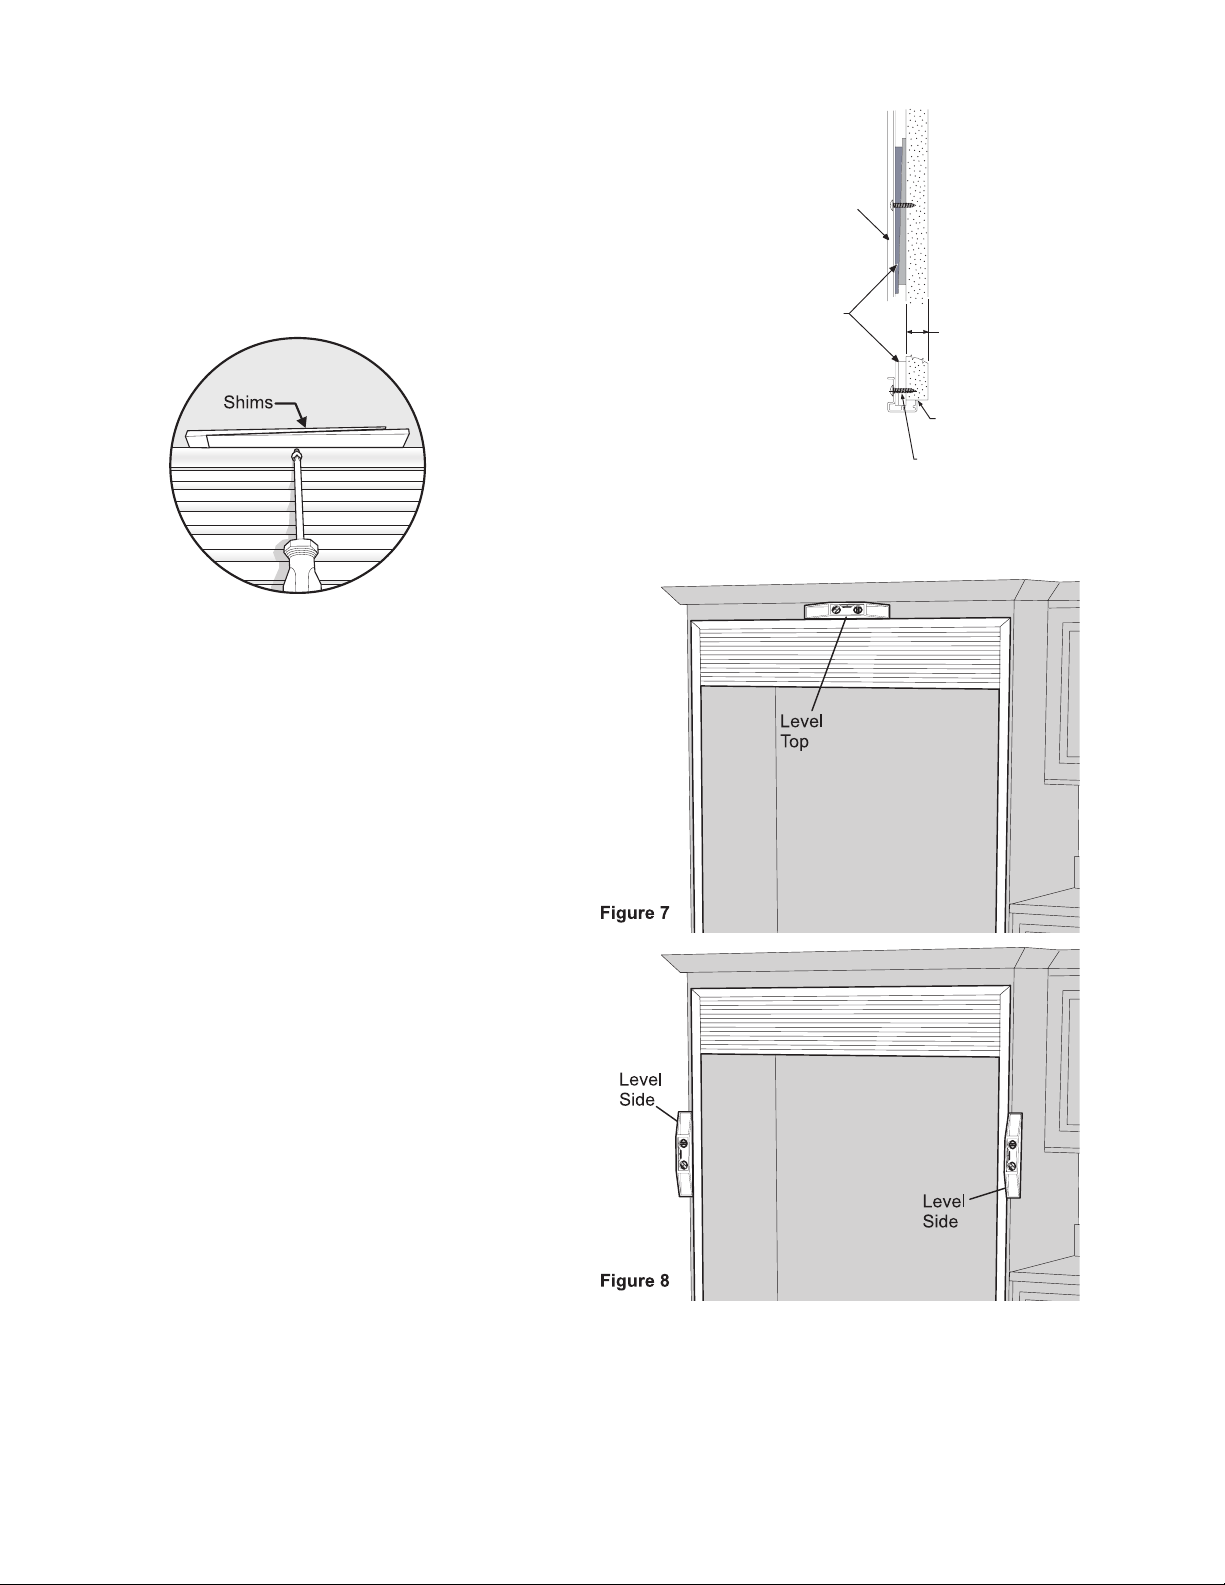
3. Level the top of the trim frame using a carpenter’s
level. See Figure 7. Shim as necessary. (Shims not
included.) See Figures 6 and 6A. Next, secure both
ends of top trim (A) to cabinetry using two 3/4”
Mounting screws (G) through the holes at each end.
Make sure all three screws are snug across the top.
Back side
of Trim
Shims
Figure 6
Figure 7
Min. 3/4" Cabinet
Side Panel
Install Side Trim flush
with cabinetry
3/4" Mounting Screw (K)
4. Using a carpenter’s level, check that each side is
vertical. Shim as necessary. Next, secure top and
bottom of each side trim to cabinetry using two
3/4” mounting screws (G). See Figure 8.
Positioning Refrigerator
1. Plug the power cord into the electrical outlet and carefully roll the refrigerator into the opening.
2. Level the unit as instructed in the product Use & Care Guide.
Care & Cleaning of Your Trim Kit
The trim and grille kit surfaces are best cleaned with a cotton cloth dampened with a mixture of water and
mild detergent. Avoid abrasive cleansers as they will mar the surface of the metal components.
4
 Loading...