


Thank you for your purchase of this Electrohome® product. Please read this instruction manual carefully before using
product to ensure proper use. Keep this manual in a safe place for future reference.
Merci d’avoir fait l’achat de cet appareil Electrohome®. S’il vous plaît lisez ce manuel attentivement avant de faire
fonctionner l’appareil pour vous assurer de l’utiliser correctement. Conservez ce manuel dans un endroit sûr an de
pouvoir vous y référer au besoin.
www.electrohome.com
INSTRUCTION MANUAL
GUIDE D’UTILISATION
KARAOKE DVD/CD+G PLAYER SPEAKER SYSTEM
with Voice Recording
LECTEUR DVD/CD+G KARAOKÉ ET SYSTÈME DE HAUT-PARLEURS
avec enregistrement de la voix
EAKAR770

- 2 -
NEED
HELP?
DO NOT RETURN THIS
PRODUCT TO THE STORE
Please contact an ELECTROHOME® customer support representative rst regarding any additional
information on product features, specications or assistance with setup.
Please contact us via one of the methods below:
For more product information visit www.ELECTROHOME.com
Toll free telephone:
1.800.663.5954
Email:
support@bluetronicsgroup.com
Toll free fax:
1.888.771.1701

- 3 -
NE RETOURNEZ PAS CE
PRODUIT AU MAGASIN!
Veuillez contacter d’abord un représentant du soutien à la clientèle ELECTROHOME® pour toute
information supplémentaire sur les caractéristiques du produit, les spécications ou pour de
l’aide avec l’installation.
Veuillez nous contacter par l’une des méthodes ci-dessous:
Pour plus d’information sur nos produits, visitez www.ELECTROHOME.com
BESOIN
D’AIDE?
ARRÊT
Téléphone sans frais:
1.800.663.5954
Courriel:
support@bluetronicsgroup.com
Télécopieur sans frais:
1.888.771.1701

- 4 -
SAFETY AND WARNINGS
The lightning ash with arrowhead symbol, within
an equilateral triangle is intended to alert the user to
the presence of uninsulated dangerous voltage within
the product’s enclosure that may be of sucient
magnitude to constitute a risk of electric shock.
The exclamation point within an equilateral triangle is
intended to alert the user to the presence of important
operating and maintenance (servicing) instructions in
the literature accompanying the appliance.
WARNING: TO PREVENT FIRE OR SHOCK HAZARD, DO NOT EXPOSE THIS APPLIANCE TO RAIN OR MOISTURE. TO PREVENT THE
SPREAD OF FIRE, KEEP CANDLES OR OPEN FLAMES AWAY FROM THIS PRODUCT AT TIMES.
CAUTION: TO PREVENT ELECTRIC SHOCK. DO NOT USE THIS POLARIZED PLUG WITH AN EXTENSION CORD, RECEPTACLE OR
OTHER OUTLET UNLESS THE BLADES CAN BE FULLY INSERTED TO PREVENT BLADE EXPOSURE.
WARNING: This equipment has been tested and found to comply with the limits for a Class B digital device, pursuant to
Part 15 of the FCC Rules. These limits are designed to provide reasonable protection against harmful interference
in a residential installation. This equipment generates, uses and can radiate radio frequency energy and, if not
installed and used in accordance with the instructions, may cause harmful interference to radio communications.
However, there is no guarantee that interference will not occur in a particular installation. If this equipment does
cause harmful interference to radio or television reception, which can be determined by turning the equipment
o and on, the user is encouraged to try to correct the interference by one or more of the following measures:
• Reorient or relocate the receiving antenna
• Increase the separation between the equipment and receiver
• Connect the equipment into an outlet on a circuit dierent from that to which the receiver is connected
• Consult the dealer or an experienced radio/TV technician for help
CAUTION: Changes or modications not expressly approved by the party responsible for compliance with the FCC Rules
could void the user’s authority to operate this equipment.
CLASS 1 LASER PRODUCT
This compact disc player is classied as a CLASS 1 LASER PRODUCT. The CLASS 1 LASER PRODUCT label is located on the
back panel.
• Your player employs a laser system.
• Use of controls, adjustments, or the performance of procedures other than those specied may result in hazardous
radiation exposure.
• Visible laser radiation is present when open and interlocks defeated. Do not stare into the beam.

- 5 -
1. ENERGY STAR is a set of power-saving guidelines by the U.S. Environmental Protection Agency (EPA). ENERGY STAR is a
joint program of the U.S. Environmental Protection Agency and the U.S. Department of Energy helping us all save money
and protect the environmental through energy ecient practices.
2. Read all instructions.
3. Keep these instructions.
4. Heed all warnings.
5. Follow all warnings.
6. Do not use this apparatus near water.
7. Clean only with a dry cloth.
8. Do not block any ventilation openings. Install in accordance with the manufacturer’s instructions.
9. Do not install near any heat sources such as radiators, heat registers, stoves, or other apparatus (incl. ampliers) that
produce heat.
10. Do not defeat the safety purpose of the polarized or grounding-type plug. A polarized plug has two blades with one
wider than the other. A grounding type plug has two blades and a third grounding prong. The wide blade or the third
prong are provided for your safety. If the provided plug does not t into your outlet, consult an electrician for replacement
of the obsolete outlet.
11. Protect the power cord from being walked on or pinched particularily at plugs, convenience receptacles, and the point
where they exit from the apparatus.
12. Only use attachments/accessories specied by the manufacturer.
13. Use only with cart, stand, tripod, bracket, or table specied by the manufacturer, or sold with the
apparatus. When a cart is used, use caution when moving the cart/apparatus combination to avoid
injury from tip-over.
14. Unplug this apparatus during lightning storms or when unused for long periods of time.
15. Refer all servicing to qualied service personnel. Servicing is required when the apparatus has been damaged in any
way, such as power-supply cord or plug is damaged. Liquid has been spilled or objects have fallen into the apparatus, the
apparatus has been exposed to rain or moisture, does not operate normally, or has been dropped.
16. Apparatus should not be exposed to dripping or splashing, and objects lled with liquids, such as vases, should
not be placed on the apparatus.
17. An outside antenna system should not be located in the vicinity of overhead power lines or other electric light or power
circuits, or where it can fall into such power lines or circuits. When installing an outside antenna system, extreme care
should be taken to keep from touching such power lines or circuits, as contact with them might be fatal.
18. Do not overload wall outlets and extension cords, as this can result in a risk of re or electric shock.
19. Do not push objects through any openings in this unit, as they may touch dangerous voltage points or short out parts
that could result in re or electric shock. Never spill or spray any type of liquid into the unit.
20. If an outside antenna or cable system is connected to the unit, be sure the antenna or cable system is grounded to provide
some protection against voltage surges and built-up static charges, Section 810 of the National Electrical Code, ANSI/
NFPA 70, provides information with respect to proper grounding of the mast and supporting structure, grounding of the
lead-in wire to an antenna discharge unit, size of grounding conductors, location of antenna discharge unit, connection
to grounding electrodes, and requirements for the grounding electrode.
21. When replacement parts are required, be sure the service technician uses replacement parts specied by the manufacturer
or those that have the same characteristics as the original part. Unauthorized substitutions may result in re, electric
shock or other hazards.
22. Upon completion of any service or repairs to this unit, ask the service technician to perform safety checks to determine
that the unit is in proper operating condition.
SAFETY AND WARNINGS

- 6 -
23. When you connect the product to other equipment, turn o the power and unplug all of the equipment from the wall
outlet. Failure to do so may cause an electric shock and serious personal injury. Read the owner’s manual of the other
equipment carefully and follow the instructions when making any connections.
24. Sudden high volume sound may cause hearing or speaker damage. When you use headphones, (if the unit is equipped
with a headphone connection) keep the volume at a moderate level. If you use headphones continuously with high
volume sound, it may cause hearing damage.
25. Do not allow the product to output distorted sound for an extended period of time. It may cause speaker overheating and
re.
26. This reminder is provided to call the cable TV system installer’s attention to Article 820-40 of the NEC that provides
guidelines for proper grounding and, in particular, species that the cable ground shall be connected to the grounding
system of the building, as close to the point of cable entry as practical.
27. The socket-outlet must be installed near the unit and easily accessible.
The unit emits heat when in operation. Do not place any covers or blankets on the unit, this may cause overheating. Do not
block ventilation holes, or set up near radiators. Do not place in direct sunshine. When placing on a shelf leave 10 cm (4 inches)
free space around the entire unit.
WARNING:
To reduce the risk of re or electric shock, do not expose this apparatus to rain or moisture.
WARNING:
The batteries shall not be exposed to excessive heat such as sunshine, re or the like.
WARNING:
Never place heavy or sharp objects on the LED panel or frame.
WARNING:
The excessive sound pressure from earphones and headphones can cause hearing loss.
This marking indicates that this product should not be disposed with other household wastes throughout North
America. To prevent possible harm to the environment or human health from uncontrolled waste disposal, recycle
it responsibly to promote the sustainable reuse of material resources. To return your used device, please use the
return and collection systems or contact the retailer where the product was purchased. They can take this product
for environmental safe recycling.
FCC warning
Changes or modications not expressly approved by the party responsible for compliance with the FCC Rules could void the
user’s authority to operate this equipment.
DHHS and FDA safety certication
This product is made and tested to meet safety standards of the FCC, requirements and compliance with safety performance of
the U.S. Department of Health and Human Services, and also with FDA Radiation Performance Standards 21 CFR Subchapter J.
Canada ICES-003 statement
This Class B digital apparatus complies with Canadian ICES-003.
SAFETY AND WARNINGS

- 7 -
TABLE OF CONTENTS
NEED HELP?........................................................................................................................................ 2
SAFETY AND WARNINGS ...................................................................................................................... 4
TABLE OF CONTENTS ........................................................................................................................... 7
WHAT’S INCLUDED ..............................................................................................................................8
BUTTONS AND CONNECTIONS .............................................................................................................. 9
SETTING UP YOUR KARAOKE SYSTEM .................................................................................................... 13
CONNECTING THE POWER CORD ............................................................................................................................ 13
CONNECTING AN EXTERNAL AUDIO INPUT DEVICE ................................................................................................13
PLAYING THE AUDIO THROUGH AN ANALOG SOUND SYSTEM .............................................................................. 13
PLAYING THE VIDEO THROUGH AN SVIDEO DISPLAY DEVICE .............................................................................. 13
PLAYING THE VIDEO THROUGH AN AV DISPLAY DEVICE ........................................................................................13
OPERATION ........................................................................................................................................ 14
TURNING YOUR KARAOKE SYSTEM ON OR OFF ..................................................................................................... 14
TURNING THE SCREEN ON OR OFF ......................................................................................................................... 14
TURNING THE SCREEN SAVER ON OR OFF .............................................................................................................. 14
ADJUSTING THE VOLUME ....................................................................................................................................... 14
ADJUSTING THE BALANCE BETWEEN THE LEFT AND RIGHT SPEAKERS .................................................................14
SELECTING THE EQUALIZER MODE ........................................................................................................................14
ADJUSTING THE ECHO EFFECT ............................................................................................................................... 14
SELECTING THE AUDIO SOURCE ............................................................................................................................. 15
SELECTING THE AUDIO OUTPUT MODE FOR THE INTERNAL SPEAKERS ................................................................. 15
PLAYING A DISC......................................................................................................................................................15
PLAYING FROM A USB FLASH DRIVE ..................................................................................................................... 15
PLAYING FROM AN SD MEMORY CARD ..................................................................................................................16
CONTROLLING PLAYBACK ...................................................................................................................................... 16
RECORDING AUDIO ................................................................................................................................................. 16
DISPLAYING PLAYBACK INFORMATION ..................................................................................................................16
CHANGING THE KEY OF THE MUSIC ........................................................................................................................ 16
CHANGING ACOUSTIC CHANNELS CD TYPES ....................................................................................................... 16
SELECTING A CHAPTER, TRACK, OR STARTING TIME ..............................................................................................17
SELECTING A TRACK WITH THE NUMBER BUTTONS ...............................................................................................17
REPEATING A CHAPTER, TITLE, OR TRACK ..............................................................................................................17
CREATING A PLAYBACK LOOP .................................................................................................................................17
CREATING A PLAYBACK PROGRAM .........................................................................................................................17
SELECTING A DVD TITLE AND CHAPTER WITH THE TITLE MENU ............................................................................ 18
SELECTING A DVD CHAPTER WITH THE MAIN MENU ............................................................................................. 18
ADJUSTING VIDEO SETTINGS ................................................................................................................................. 18
SELECTING A DVD VIEWING ANGLE ....................................................................................................................... 18
SELECTING THE ASPECT RATIO ............................................................................................................................... 18
ZOOMING IN ON A VIDEO IMAGE OR PHOTO. ..........................................................................................................19

- 8 -
TABLE OF CONTENTS
• Karaoke DVD/CD+G Player Speaker System
• Dynamic Microphone (10ft cord)
• 2 Karaoke Discs with Music from Various Artists (1 CD+G Multiplex, 1 DVD)
• Remote Control with 2 x "AAA" Batteries
• RCA Audio/Video Composite Connection Cable
• 100-240V AC/DC Power Adapter
• Instruction Manual
• 1 Year Warranty
• Lifetime Live Customer Support
WHAT’S INCLUDED
VIEWING A VIDEO FRAME BY FRAME ............................................................................................................................ 19
VIEWING A VIDEO IN SLOW MOTION ............................................................................................................................. 19
SELECTING LANGUAGES ON DVDS ................................................................................................................................ 19
SELECTING THE ONSCREEN MENU LANGUAGE ............................................................................................................ 20
CHANGING THE DVD PARENTAL CONTROL PASSWORD ................................................................................................. 20
SETTING DVD PARENTAL CONTROLS ............................................................................................................................ 20
SELECTING THE TV SYSTEM FOR A CONNECTED TV ...................................................................................................... 21
RESETTING ALL SETTINGS TO THE FACTORY DEFAULTS .................................................................................................21
VIEWING JPEGS ............................................................................................................................................................. 21
TROUBLESHOOTING ..................................................................................................................................22
MAINTENANCE .........................................................................................................................................23
STORING DISCS .............................................................................................................................................................. 23
HANDLING DISCS .......................................................................................................................................................... 23
CLEANING DISCS ........................................................................................................................................................... 23
SPECIFICATIONS .......................................................................................................................................24
GLOSSARY OF KARAOKE TERMS ..................................................................................................................24
NOTES ......................................................................................................................................................48
ELECTROHOME WARRANTY .......................................................................................................................52

- 9 -
BUTTONS AND CONNECTIONS
2 3 4 5 6 7 8 9
10 11 12
13
14 15
16
17
18
19
20
21
TOP
FRONT
BACK
1
22 23 24
25 26

- 10 -
TOP
# Item Description
1 Disc compartment
OPEN tab
Lift to open the disc compartment and insert a disc.
FRONT
# Item Description
2
POWER BUTTON
Press to turn your karaoke system on or o.
3 DVD/LINE IN Press to select an internal media device or a device connected to the LINE IN connection
as the audio source.
4 DVD/USB/SD Press repeatedly to select DISC, USB, or SD as the input media.
5 DISPLAY SCREEN Displays on-screen menus and the video from a DVD.
6 EQ Press to select the equalizer mode.
7 SCREEN ON/OFF Press to turn the screen on or o.
8 RECORD Press to start recording.
9
SKIP
/ SKIP
Press to skip to the previous or next audio track.
10 REPEAT Press to repeat the current track.
11
PLAY/PAUSE
Press to start or pause playback.
12 STOP ■
Press to stop playback. If you press this button once, then press PLAY/PAUSE
playback resumes where you stopped playback. If you press this button twice, then press
PLAY/PAUSE , playback starts at the beginning of the disc.
13 MIC VOLUME Rotate to adjust the microphone volume.
14 MASTER VOLUME Rotate to adjust the master volume.
15 REMOTE SENSOR Receives signals from the remote control. Do not block.
16 LINE IN Connect an external audio device to this connection so you can play the audio from the
device through your karaoke system.
17 USB INPUT Connect a USB device, such as a USB ash drive, to this connection so you can play les
on the device through your karaoke system.
18 SD CARD INPUT Insert an SD memory card into this slot so you can play les on the card through your
karaoke system.
19 ECHO When using the microphone, rotate to adjust the echo eect.
20 BALANCE Rotate to adjust the balance between the left and right speakers.
21 AVC Rotate to mute the vocals on a multiplex recording when a singer starts singing through
the microphone. When the singer stops singing, the recorded vocals will start playing
again.
BUTTONS AND CONNECTIONS

- 11 -
BUTTONS AND CONNECTIONS
BACK
# Item Description
22 AUDIO OUT L/R Connect an analog sound system to these connections.
23 VIDEO OUT Connect a standard (composite) AV device to this connection to display the screen image
on the connected device.
24 S-VIDEO Connect an S-Video device to this connection to display the screen image on the
connected device.
25 MIC1/MIC2 Connect microphones to these connections.
26 DC IN Connect the power cord to this connection.
REMOTE
# Item Description
1 RECORD When playing an audio or
MP3 CD, press to record to a
connected USB ash drive or
an inserted SD memory card.
Press again to stop recording.
If both a USB ash drive and an
SD memory card are inserted,
the recording will be saved to
the USB ash drive.
2 NUMBER BUTTONS Press to enter track numbers or
the parental control password.
3 WIDE Press to switch between 4:3
and 16:9 aspect ratios.
4 ANGLE During DVD playback, press to
change the viewing angle if
multiple angles are available.
5 SETUP Press to open the on-screen
menu.
6
►◄▲▼
Press to navigate through the
menus, select options, and
adjust settings.
7 ENTER Press to conrm changes.
8 ZOOM During DVD or photo playback,
press to zoom in on an image
or photo.
- 12 -
BUTTONS AND CONNECTIONS
REMOTE
# Item Description
9
PLAY/PAUSE
Press to play or pause a track.
10 FWD
Press to fast forward.
11 REV Press to fast reverse.
12 SLOW Press to play forward slowly.
13 GOTO Press to search for a playback starting point.
14 KEY – Press to lower the key of the music.
15 REPEAT During playback, press to repeat the current chapter, title, or track.
16 L/R Press to select the acoustic channel.
17 DVD/LINE IN Press to switch between internal media and a device connected to the LINE IN
connection.
18 DVD/USB/SD Press to open the media list and select audio input source.
19 PROG During playback, press to create a playback program.
20 OSD During playback, press to display playback information.
21 MUTE Press to mute the sound. Press again to restore the sound.
22 SUBTITLE During DVD playback, press to select the subtitle language or turn o subtitles.
23 TOP MENU During DVD playback, press to open the title menu, select a title and chapter.
24 MENU During DVD playback, press to open the DVD main menu and select a chapter.
25 AUDIO During DVD playback, press to select the DVD audio language.
26 STEP During DVD playback, press to view the video frame by frame.
27 STOP ■
Press to stop playback. If you press this button once, then press PLAY/PAUSE
playback resumes where you stopped playback. If you press this button twice, then press
PLAY/PAUSE , playback starts at the beginning of the disc.
28
PREV
During playback, press to go to the previous chapter, track, or MP3 le.
29 NEXT
During playback, press to go to the next chapter, track, or MP3 le.
30 EQ Press to select the equalizer mode.
31 A-B During playback, press to create a playback loop.
32 FLAT Press to return to the normal key.
33 KEY + Press to raise the key of the music.

- 13 -
SETTING UP YOUR KARAOKE SYSTEM
Connecting the power cord
To connect the power cord:
1. Plug the small connector on the AC/DC power adapter into the DC IN connection on the back of your karaoke
system.
2. Plug the other connector into a power outlet.
Connecting an external audio input device
You can connect an external audio input device to play the audio from the device through your karaoke system.
To connect an external audio input device:
1. Connect an audio cable to the LINE IN connection on the front of your karaoke system and to the LINE OUT
connection on the external device.
2. Press DVD/LINE IN to select the LINE IN mode.
Playing the audio through an analog sound system
You can connect the included analog sound system. When you connect a sound system, the audio from your karaoke system
plays through the sound system.
To play the audio through an analog sound system:
• Connect an audio cable with RCA connectors to the AUDIO OUT L/R connections on the back of your karaoke
system and to the AUDIO IN L/R connections on the sound system.
Playing the video through an s-video display device
You can connect an S-Video display device, such as a TV. When you connect a display device, the image on your karaoke’s screen
is sent to the display device.
To play the video through an external S-Video display device:
1. Connect an S-Video cable to the S-VIDEO connection on the back of your karaoke system and to the S-VIDEO IN
connection on the S-Video device.
2. On the display device, set the video connection to S-Video.
Playing the video through an AV display device
You can connect an AV display device, such as a TV. When you connect a display device, the image on your karaoke’s screen is
sent to the display device.
To play the video through an external AV display device:
1. Connect the included standard AV video cable to the VIDEO OUT connection on the back of your karaoke system
and to the VIDEO IN connection on the display device.
2. On the display device, set the video connection to the correct setting.
- 14 -
OPERATION
Turning your karaoke system on or o
To turn your karaoke system on or o:
1. Press on the front of your karaoke system.
2. Press again to turn o your karaoke system.
Turning the screen on or o
To turn the screen on or o:
1. Press SCREEN ON/OFF on the front of your karaoke system.
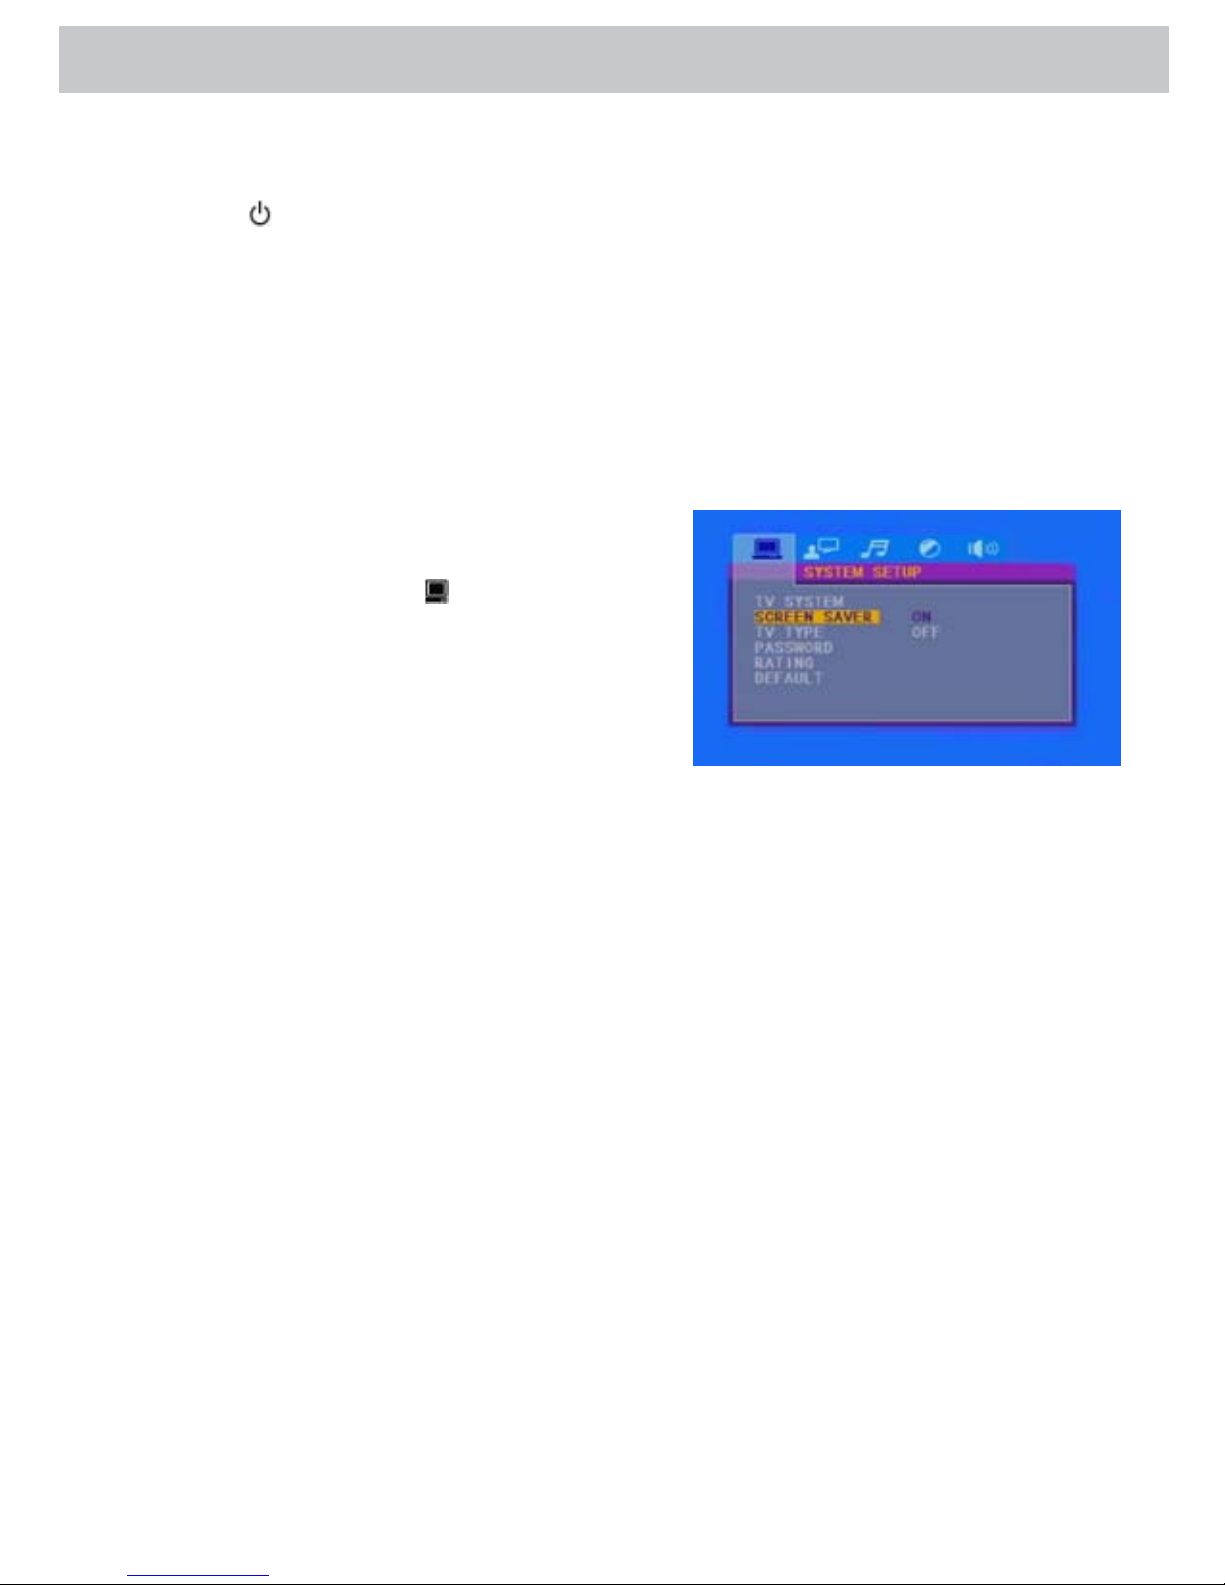
Turning the screen saver on or o
To turn the screen saver on or o:
1. Press SETUP, the on-screen menu will open.
2. Press◄ or ►to highlight . The SYSTEM SETUP menu
opens.
3. Press ◄ or ► to highlight SCREEN SAVER, then press
► to access the settings.
4. Press ◄ or ► to highlight ON or OFF, then press ENTER
to conrm your selection.
5. Press ◄ to return to the previous screen, or press SETUP to close the menu.
Adjusting the volume
To adjust the volume:
1. Rotate the MIC VOLUME knob on the front of your karaoke system to adjust the microphone volume.
2. Rotate the MASTER VOLUME knob on the front of your karaoke system to adjust the master volume.
3. Press MUTE on the remote control to mute the sound. Press again to restore the sound.
Adjusting the balance between the left and right speakers
To adjust the balance between the left and right speakers:
• Rotate the BALANCE knob.
Selecting the equalizer mode
To select the equalizer mode:
• Press EQ repeatedly. You can select Standard, Classic, Rock, Jazz or POP.
Adjusting the echo eect
To adjust the echo eect:
• While you are singing into the microphone, rotate the ECHO knob.

- 15 -
OPERATION
Selecting the audio source
To select the audio source:
1. Insert a disc, USB ash drive, or SD memory card.
2. Press DVD/USB/SD. The media list opens.
3. Press ▲ or ▼ to highlight DISC, USB, or CARD, then press ENTER.
If you do not have a media source inserted and you select that audio
source, your karaoke system will go to a media source that is inserted.
For example, if you have a disc inserted but do not have a USB ash drive
inserted and you select USB, your karaoke system will automatically
select DISC.
Selecting the audio output mode for the internal speakers
To adjust the audio output mode for the internal speakers:
1. Press SETUP. The on-screen menu opens.
2. Press ◄ or ► to highlight
. The AUDIO SETUP menu
opens.
3. Press ▼ to highlight DUAL MONO, then press ► to
access the settings.
4. Press ▲ or ▼ to select the audio output mode.
You can select:
• STEREO — Select this setting to send a dierent
audio to each speaker. The audio must be in stereo
format.
• MONO L — Select this setting to send the audio to the left speaker only.
• MONO R — Select this setting to send the audio to the right speaker only.
• MIX MONO — Select this setting to send the same audio to both the left and right speakers.
5. Press ENTER to conrm your selection.
6. Press ◄ to return to the previous screen, or press SETUP to close the menu.
Playing a disc
Your karaoke system plays DVDs with a region code of 1. Look for on the disc or disc packaging.
To play a disc:
1. Lift the OPEN tab on the top of your karaoke system to open the disc compartment.
2. Place a disc in the tray, then close the compartment cover.
3. Make sure that DISC is selected as the audio source. See “Selecting the audio source” on page 15.
4. Press PLAY/PAUSE to start playback.
Playing from a USB ash drive
To play from a USB ash drive:
1. Insert a USB ash drive into the USB port on the front of your karaoke system.
2. Make sure that USB is selected as the audio source. See “Selecting the audio source” on page 15.

- 16 -
OPERATION
Playing from an SD memory card
To play from an SD memory card:
1. Insert an SD memory card into the SD card slot on the front of your karaoke system.
2. Make sure that CARD is selected as the audio source. See “Selecting the audio source” on page 15.
3. Press PLAY/PAUSE
to start playback.
Controlling playback
To control playback:
1. Press PLAY/PAUSE
to pause playback, then press again to resume playback.
2. Press STOP ■ to stop playback. If you press this button once, then press PLAY/PAUSE
, playback resumes where
you stopped. If you press this button twice, then press PLAY/PAUSE
, playback resumes at the beginning of the
disc.
3. Press REV
or FWD fast reverse or fast forward.
4. Press PREV
or NEXT to go to the previous or next track, chapter, or MP3 le.
Recording audio
You can record the audio and singer’s voice to a USB ash drive or SD memory card. The recording will be in MP3 format. The le
name for the recording will be “Track XX.mp3.”
To record audio:
1. While playing a CD or a disc with MP3 les, press RECORD to record the audio and singer’s voice to a USB ash drive or
SD memory card.
2. To stop recording, press RECORD again.
Displaying playback information
Playback information includes:
• Media type and track number of the le that is playing.
• Elapsed time.
• Speaker status (on or o).
To display playback information:
1. Press OSD.
2. Press OSD again to close the display.
Changing the key of the music
You can adjust the key of the music.
To change the key:
1. During playback, press KEY+ or KEY– to change the key of the music.
2. Press FLAT to resume normal key.
Changing acoustic channels (CD types)
You can select the acoustic channel depending on whether you are playing a CD or CD+G. This feature only works with CDs and
CD+Gs.
To change acoustic channels:
• During playback, press L/R.
 Loading...