

PLEASE READ THIS INSTRUCTION MANUAL CAREFULLY BEFORE USING PRODUCT TO
ENSURE PROPER USE. KEEP THIS MANUAL IN A SAFE PLACE FOR FUTURE REFERENCE.
EAAC200
Digital AM/FM Clock Radio
with Dual Alarm
USER MANUAL
www.electrohome.com
- 2 -
WARNINGS
RISK OF ELECTRIC SHOCK
DO NOT OPEN
WARNING
To reduce the risk of re or electric shock, do not expose this appliance to rain
or moisture.
CAUTION
Use of controls or adjustments or performance of procedures other than those
specied may result in hazardous radiation exposure.
CAUTION - TO REDUCE THE RISK OF ELECTRIC SHOCK, DO NOT REMOVE
COVER (OR BACK). NO USER-SERVICABLE PARTS INSIDE, REFER TO
QUALIFIED USER PERSONNEL.
The lightning ash with arrowhead symbol, within an equilateral traingle, is
intended to alert the user to the presence of uninsulated “dangerous voltage”
within the product’s enclosure that may be of sufcient magnitude to constitute
a risk of electric shock to persons.
The exclamation point within an equilateral triangle is intended to alert the user
to the presence of important operating and maintenance (servicing) instructions
in the literature accompanying the appliance.
WARNING
TO PREVENT ELECTRIC SHOCK; DO NOT USE THIS PLUG WITH AN EXTENSION CORD
RECEPTACLE OR OTHER OUTLET UNLESS THE BLADES CAN BE FULLY INSERTED TO PREVENT
BLADE EXPOSURES. TO PREVENT FIRE OR SHOCK HAZARD; DO NOT INSTALL THIS PRODUCT IN
A CONFINED SPACE SUCH AS A BOOK CASE OR SIMILAR UNIT.
CAUTION: RETAIN THIS MANUAL FOR FUTURE REFERENCE
1. Read these instructions.
2. Keep these instructions.
3. Read all warnings.
4. Follow all instructions.
5. Do not use this product near water.

- 3 -
6. Clean only with a dry cloth.
7. Do not block any ventilation openings. Install in accordance with the manufacturer’s
instructions.
8. Do not install near any heat sources such as radiators, heat registers, stoves, or other
apparatus (including ampliers) that produce heat.
9. Do not defeat the safety purpose of the polarized or grounding-type plug. A polarized
plug has two blades with one wider than the other. A grounding type plug has two
blades and a third grounding prong. The wide blade or the third prong is provided for
your safety. If the provided plug does not t into your outlet, consult an electrician for
replacement of the obsolete outlet.
10. Protect the power cord from being walked on or pinched particularily at plugs,
convenience receptacles, and the point where they exit from the apparatus.
11. Only use attachments/accessories specied by the manufacturer.
12. Unplug this apparatus during lightning storms or when unused for long periods of time.
13. Refer all servicing to qualied service personnel. Servicing is required when the apparatus
has been damaged in any way, such as power-supply cord or plug is damaged, liquid has
been spilled or objects have fallen into the apparatus, the apparatus has been exposed to
rain or moisture, does not operate normally, or has been dropped.
14. Apparatus shall not be exposed to dripping or splashing, and that not objects
lled with liquids, such as vases, shall be placed on the apparatus.
15. The batteries shall not be exposed to excessive heat such as sunshine, re or the like.
16. The MAINS plug is used as the disconnect device, which shall remain readily operable.
17. The MAINS plug of apparatus should not be obstructed and should be easily accessed
during intended use.
18. The apparatus shall be connected to a MAINS socket outlet with a protective earthing
connection.
19. WARNING: To reduce the risk of re or electric shock, do not expose this apparatus to rain
or moisture.
20. There should be a minimum distance of 5 cm around the apparatus for sucient
ventilation.
21. The ventilation should not be impeded by covering the ventilation openings with items
such as newspaper, table-cloths, curtains etc.
22. No naked ame sources such as lighted candles should be placed on the apparatus.
23. Please use the apparatus in moderate climates.
IMPORTANT SAFETY INFORMATION

- 4 -
24. Unwind and straighten the power cord before use.
25. Damage Requiring Service
Unplug the power cord and refer servicing to qualied service professional under the
following conditions:
A. If liquid has been spilled on or into the product.
B. If the product has been exposed to rain, water, or other liquids.
C. If the product does not operate normally by following the operating instructions,
adjust only those controls that are covered by the operating instructions. Improper
adjustment of other controls may result in damage and will often require extensive
work by a qualied technician to restore the product to its normal operation.
D. If the product has been dropped or damaged in any way.
E. When the product exhibits a distinct change in performance. This may indicate a
need for service.
26. Servicing
Do not attempt to service this product yourself as opening or removing covers may expose
you to dangerous voltages or other hazards. Refer all servicing to a qualied service
professional.
27. Replacement Parts
When replacement parts are required, be sure the service technician has used replacement
parts specied by the manufacturer, or have the same characteristics as the original parts.
Unauthorized substitutions may result in re, electric shock, or other hazards.
28. Safety Check
Upon completion of any service or repairs to this product, ask the service technician to
perform safety checks to determine that the product is in proper operating condition.
FCC statement on regulation
This device complies with part 15 of the FCC Rules. Operation is subject to the following
two conditions:
(1) This device may not cause harmful interference.
(2) This device must accept any interference received, including interference that may cause
undesired operation.
IMPORTANT SAFETY INFORMATION

- 5 -
Any changes or modications not expressly approved by the party responsible for compliance
could void the user’s authority to operate the equipment.
NOTE: This equipment has been tested and found to comply with the limits for a Class B digital
device, pursuant to part 15 of the FCC Rules. These limits are designed to provide reasonable
protection against harmful interference in a residential installation. This equipment generates,
uses and can radiate radio frequency energy and, if not installed and used in accordance with
the instructions, may cause harmful interference to radio communications. However, there
is no guarantee that interference will not occur in a particular installation. If this equipment
does cause harmful interference to radio or television reception, which can be determined by
turning the equipment o and on, the user is encouraged to try to correct the interference by
one or more of the following measures:
• Reorient or relocate the receiving antenna.
• Increase the separation between the equipment and receiver.
• Connect the equipment into an outlet on a circuit dierent from that to which the
receiver is connected.
• Consult the dealer or an experienced radio TV technician for help.
This class[B] digital apparatus complies with Canadian ICES-003.
Don’t throw away the battery with general house waste, dispose of it correctly
as chemical waste.
This marking indicates that this product should not be disposed with other
household wastes throughout North America. To prevent possible harm to
the environment or human health from uncontrolled waste disposal, recycle
it responsibly to promote the sustainable reuse of material resources. To
return your used device, please use the return and collection systems or
contact the retailer where the product was purchased. They can take this
product for environmental safe recycling.
IMPORTANT SAFETY INFORMATION

- 6 -
NEED
HELP?
DO NOT RETURN THIS
PRODUCT TO THE STORE
Please contact an
ELECTROHOME®
customer support representative rst regarding any
additional information on product features, specications or assistance with setup.
Please contact us via one of the methods below:
For more product information visit www.ELECTROHOME.com
Support:
www.electrohome.com/support
Online live web chat:
www.electrohome.com

- 7 -
Warnings .......................................................................................................2
Important Safety Information .................................................................. 3
Need Help? ...................................................................................................6
What’s Included ........................................................................................... 8
Product Information ................................................................................... 8
Operating Instructions ............................................................................. 11
Power Connection ...................................................................................11
Battery Backup ........................................................................................11
Setting the Time ......................................................................................12
Playing the Radio .................................................................................... 12
To Set / Recall Radio Presets .................................................................... 13
Setting Alarm 1 ....................................................................................... 13
Setting Alarm 2 ....................................................................................... 14
Snooze Function ...................................................................................... 14
Sleep Timer .............................................................................................15
Dimmer Function ....................................................................................15
Troubleshooting ....................................................................................... 15
Care and Maintenance ..............................................................................16
Specications .............................................................................................16
Electrohome Warranty .............................................................................17
TABLE OF CONTENTS
- 8 -
WHAT’S INCLUDED
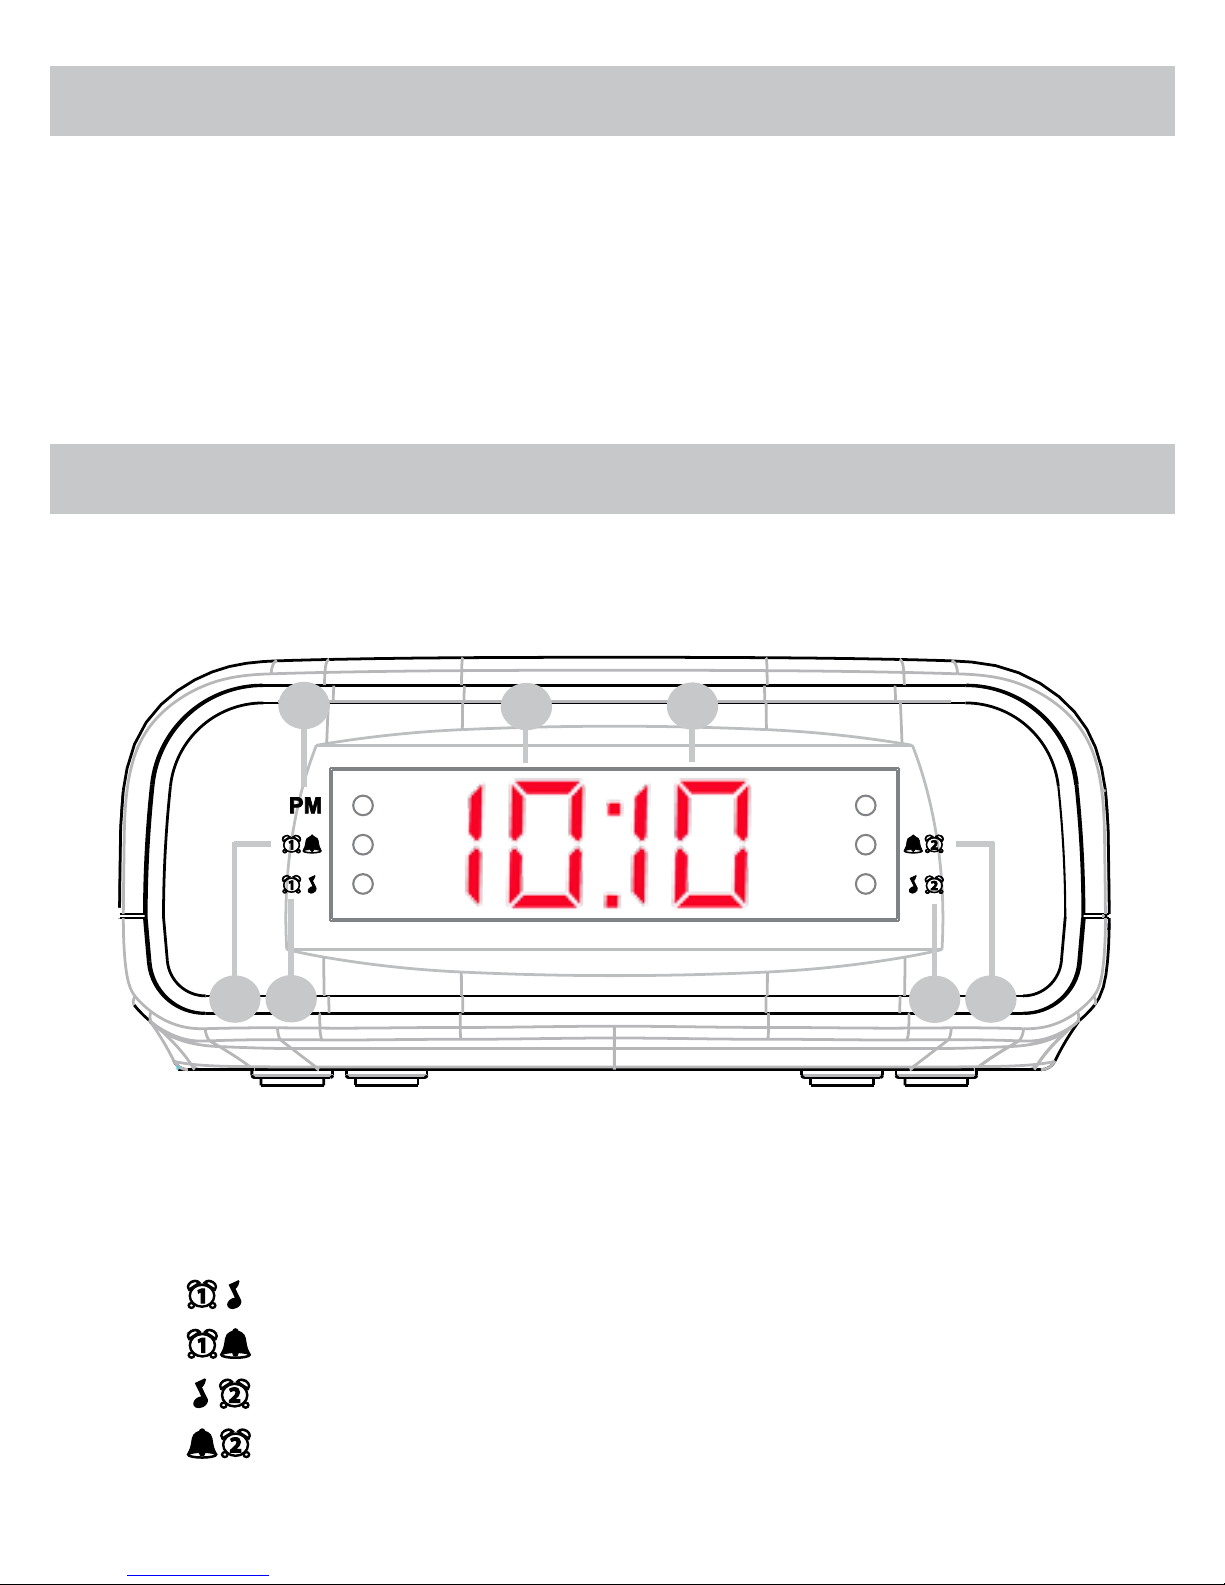
FRONT
1. PM - Red LED dot appears to the right of PM indicating time is set to PM
2. HOUR - Displays the hours
3. MINUTE- Displays the minutes
4. - Radio Alarm 1 (Red LED dot appears to the right when set)
5. - Buzzer Alarm 1 (Red LED dot appears to the right when set)
6. - Radio Alarm 2 (Red LED dot appears to the left when set)
7. - Buzzer Alarm 2 (Red LED dot appears to the left when set)
1
4
7
3
2
5
6
PRODUCT INFORMATION
• Digital AM/FM Clock Radio with Battery Backup* & Dual Alarm
• Quick Start Guide
• Instruction Manual
* 2 x AA batteries not included.
- 9 -
PRODUCT INFORMATION
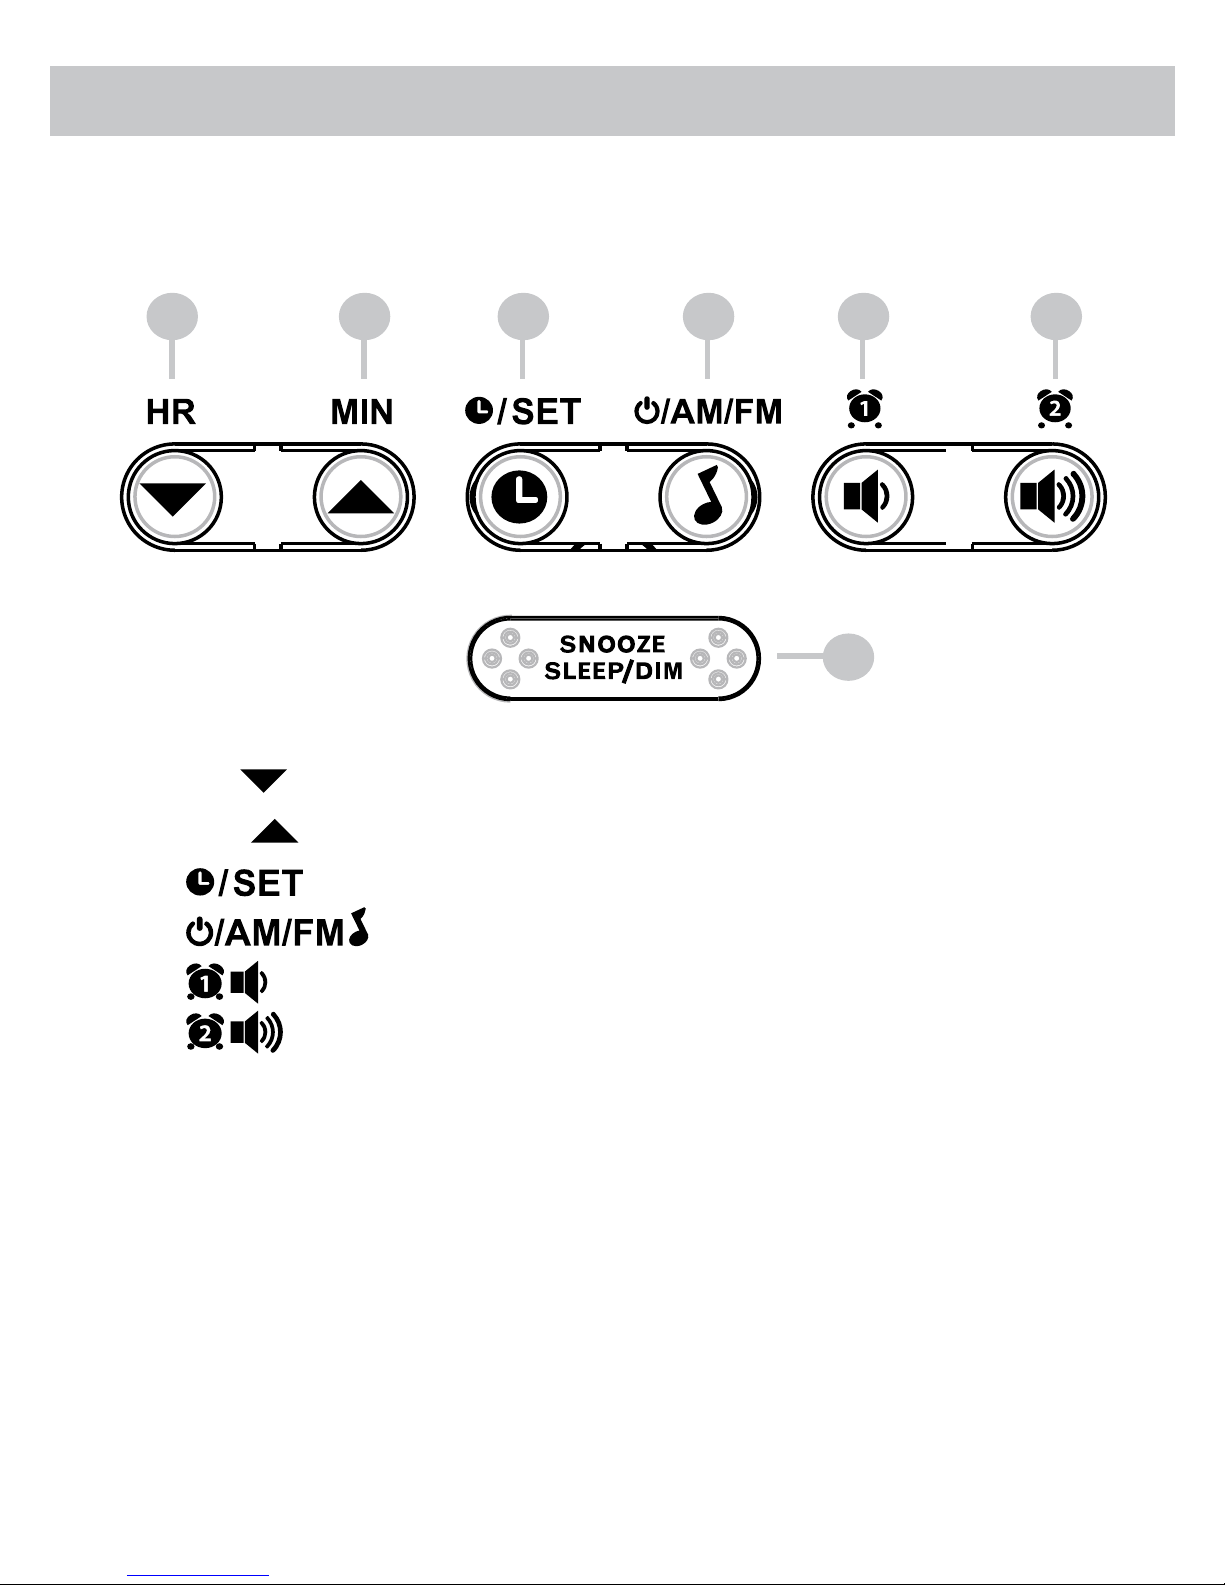
TOP
1
7
2
1. HR - Set the Hour; Decreases radio frequency
2. MIN - Set the Minutes; Increases radio frequency
3. - Change the time or Preset radio stations
4. - Turn music ON/OFF or select AM or FM radio
5. - Set ALARM1 ; Decrease volume
6. - Set ALARM2 ; Increase volume
7. SNOOZE/SLEEP/DIM - Pauses the alarm; Sets SLEEP timer; Increases or
decreases the brightness of the LED display
3 4 5 6
- 10 -
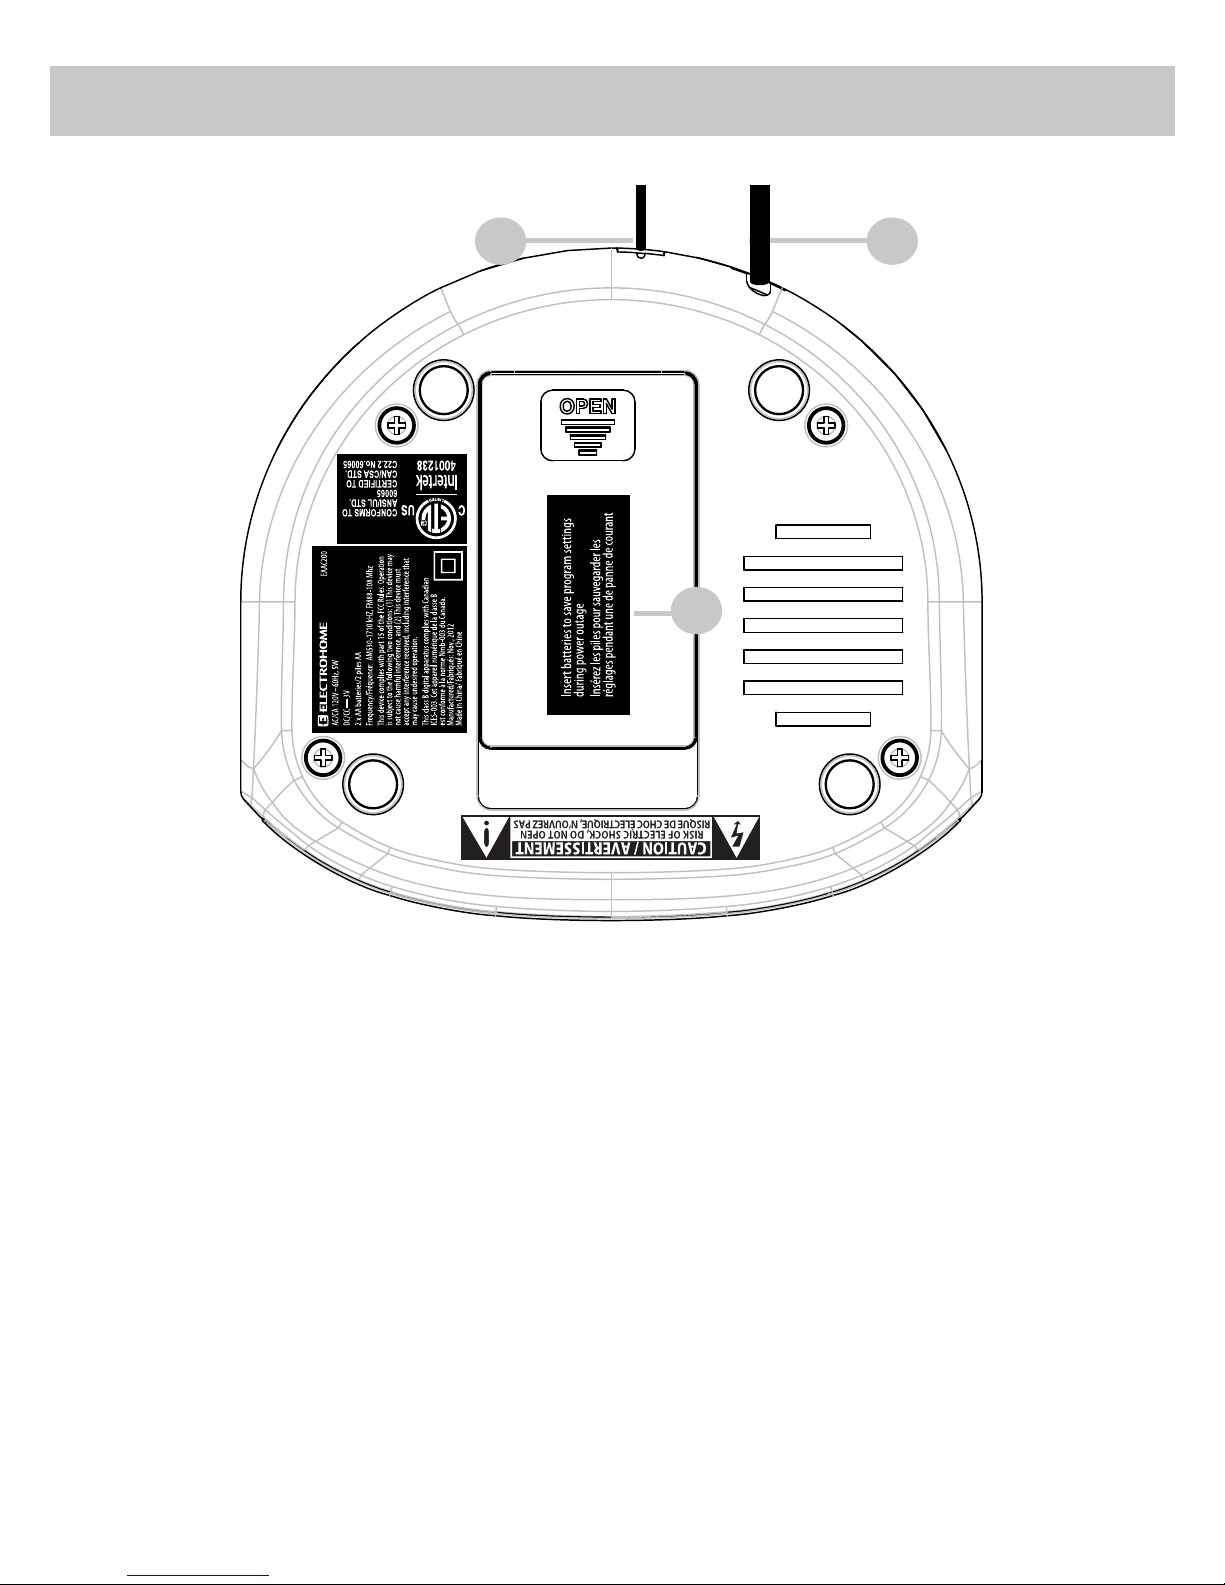
BOTTOM
1. FM Antenna
2. Power cord
3. Battery compartment
ATTENTION
• Do not plug or unplug the power cable if you have wet hands.
• If you are not planning to use the unit for an extended period of time,
disconnect the power cable from the wall outlet.
• To avoid damage to the power cord and electric shock when
disconnecting the power cord from the wall outlet, do not pull on the
cord; pull rmly at the base of the plug.
1
3
2
PRODUCT INFORMATION

- 11 -
POWER CONNECTION
1. Plug the AC power cord into a household AC outlet.
2. Clock display will ash 12:00 until set to correct time.
BATTERY BACKUP
This alarm clock is equipped with an optional battery backup feature. This will
restore your alarm clock settings in the event of a power outage.
Installing the batteries (not included)
1. Open the battery compartment on the bottom of the alarm clock by
pushing on the latch and pulling the door open.
2. Install 2 x AA batteries ensuring that the battery polarity corresponds to
the polarity in the battery compartment.
3. Close the battery compartment cover.
NOTE:
• Batteries must be installed by an adult.
• Use only the recommended size and type of battery specied.
• Please be sure to follow the correct polarity when installing the battery in the battery
compartment. A reversed battery may cause damage to the alarm clock.
• DO NOT mix dierent types of batteries or mix new and used batteries.
• When not using the unit for a prolonged period of time, please remove the batteries to
avoid possible damage caused by leaking batteries.
OPERATING INSTRUCTIONS
 Loading...