

Page 1

ATTENTION
If you purchase a universal remote control from your local retailer, please contact the remote manufacturer for the
required programming code.
Si vous utilisez avec cet appareil une télécommande universelle (autre que celle vendue avec ce téléviseur),
consultez la documentation accompagnant la télécommande universelle afin de connaître le code numérique
correspondant au téléviseur.
CAUTION
ATTENTION
Changes or modifications not expressly approved by the party responsible for compliance with the FCC Rules could
void the user's authority to operate this equipment.
Tout changement ou toute modification n'étant pas autorisée de façon explicite par l'organisme responsable de la
conformité aux règles de la FCC peut entraîner l'interdiction à l'utilisateur de se servir de l'appareil.
42” WIDE PLASMA DISPLAY
ÉCRAN À PLASMA LARGE DE 42 po
USER MANUAL
MANUEL D’INSTRUCTIONS
42E900A
Before operating the unit, please read this manual thoroughly.
Avant de faire fonctionner l’appareil, veuillez lire le présent guide attentivement.
ENGLISH
FRANÇAIS
3Y80821A_En_cover 6/21/06, 1:47 PM1
Page 2

2
The lightning flash with arrowhead symbol,
within an equilateral triangle is intended to
alert the user to the presence of uninsulated
dangerous voltage within the product's
enclosure that may be of sufficient magnitude
to constitute a risk of electric shock.
The exclamation point within an equilateral
triangle is intended to alert the user to the
presence of important operating and
maintenance (servicing) instructions in the
literature accompanying the appliance.
CAUTION:TO REDUCE THE RISK OF ELECTRIC
SHOCK, DO NOT REMOVE COVER
(OR BACK). NO USER-SERVICEABLE
PA RTS INSIDE. REFER SERVICING TO
QUALIFIED SERVICE PERSONNEL.
FCC Declaration of Conformity Compliance Statement (Part 15):
The ELECTROHOME 42E900A, WIDE PLASMA DISPLAY complies with Part 15 of the FCC rules.
Operation is subject to the following two conditions: (1) this device may not cause harmful
interference, and (2) this device must accept any interference received, including interference that
may cause undesired operation.
The party responsible for compliance to these rules is:
RGC REDMOND GROUP
6185 MCLAUGHLIN ROAD, MISSISSAUGA, ONTARIO L5R 3W7
Ph: 1-800-663-5954
WARNING: This equipment has been tested and found to comply with the limits for a Class B digital device,
pursuant to Part 15 of the FCC Rules. These limits are designed to provide reasonable protection
against harmful interference in a residential installation. This equipment generates, uses and can
radiate radio frequency energy and, if not installed and used in accordance with the instructions, may
cause harmful interference to radio communications.
However, there is no guarantee that interference will not occur in a particular installation. If this
equipment does cause harmful interference to radio or television reception, which can be determined
by turning the equipment off and on, the user is encouraged to try to correct the interference by one
or more of the following measures:
- Reorient or relocate the receiving antenna.
- Increase the separation between the equipment and receiver.
- Connect the equipment into an outlet on a circuit different from that to which the receiver is connected.
- Consult the dealer or an experienced radio/TV technician for help.
CAUTION: Changes or modifications not expressly approved by the partly responsible for compliance with the
FCC Rules could void the user's authority to operate this equipment.
Location of the required Marking
The rating sheet and the safety caution are on the rear of the unit.
WARNING: TO PREVENT FIRE OR SHOCK HAZARD, DO NOT EXPOSE THIS APPLIANCE TO RAIN OR
MOISTURE.
CAUTION: TO PREVENT ELECTRIC SHOCK DO NOT USE THIS POLARIZED PLUG WITH AN
EXTENSION CORD, RECEPTACLE OR OTHER OUTLET UNLESS THE BLADES CAN BE
FULLY INSERTED TO PREVENT BLADE EXPOSURE.
ENGLISH
3Y80821A_En_p02-11 6/21/06, 1:47 PM2
Page 3

3
ENGLISH
1) Read these instructions.
2) Keep these instructions.
3) Heed all warnings.
4) Follow all instructions.
5) Do not use this apparatus near water.
6) Clean only with dry cloth.
7) Do not block any ventilation openings. Install in accordance with the manufacturer's instructions.
8) Do not install near any heat sources such as radiators, heat registers, stoves, or other apparatus (including
amplifiers) that produce heat.
9) Do not defeat the safety purpose of the polarized or grounding-type plug. A polarized plug has two blades with
one wider than the other. A grounding type plug has two blades and a third grounding prong. The wide blade or
the third prong are provided for your safety. If the provided plug does not fit into your outlet, consult an electrician
for replacement of the obsolete outlet.
10) Protect the power cord from being walked on or pinched particularly at plugs, convenience receptacles, and the
point where they exit from the apparatus.
11) Only use attachments/accessories specified by the manufacturer.
12) Use only with the cart, stand, tripod, bracket, or table specified by the manufacturer, or sold with the apparatus. When a cart is used, use caution when moving
the cart/apparatus combination to avoid injury from tip-over.
13) Unplug this apparatus during lightning storms or when unused for long periods of
time.
14) Refer all servicing to qualified service personnel. Servicing is required when the apparatus has been damaged in
any way, such as power-supply cord or plug is damaged, liquid has been spilled or objects have fallen into the
apparatus, the apparatus has been exposed to rain or moisture, does not operate normally, or has been dropped.
15) Apparatus shall not be exposed to dripping or splashing and that no objects filled with liquids, such a vases, shall
be placed on the apparatus.
16) Do not overload wall outlets and extension cords, as this can result in a risk of fire or electric shock.
17) Do not push objects through any openings in this unit, as they may touch dangerous voltage points or short out
parts that could result in fire or electric shock. Never spill or spray any type of liquid into the unit.
18) When replacement parts are required, be sure the service technician uses replacement parts specified by the
manufacturer or those that have the same characteristics as the original part. Unauthorized substitutions may
result in fire, electric shock or other hazards.
19) Upon completion of any service or repairs to this unit, ask the service technician to perform safety checks to
determine that the unit is in proper operating condition.
20) When you connect the product to other equipment, turn off the power and unplug all of the equipment from the
wall outlet. Failure to do so may cause an electric shock and serious personal injury. Read the owner's manual of
the other equipment carefully and follow the instructions when making any connections.
21) Reduce the volume to the minimum level before you turn on the product. Otherwise, sudden high volume sound
may cause hearing or speaker damage.
22) Do not allow the product to output distorted sound for an extended period of time. It may cause speaker overheating and fire.
IMPORTANT SAFETY INSTRUCTIONS
S3126A
PORTABLE CART WARNING
(symbol provided by RETAC)
3Y80821A_En_p02-11 6/21/06, 1:47 PM3
Page 4

4
The unit emits heat when in operation. Do not place any covers or blankets on the unit, this may cause overheating.
Do not block ventilation holes, or set up near radiators. Do not place in direct sunshine. When placing on a shelf
leave 10 cm (4 inches) free space around the entire unit.
Notes when mounting the Plasma Display on a wall
• When installing the unit on a wall, allow at least 6 cm (2 1/2 inches) clearance between the rear of the Plasma
Display and the wall. Clearance of less than 6 cm (2 1/2 inches) will obstruct the vents and may cause the interior
of the unit to overheat, resulting in damage to the unit.
• If the unit is to be mounted on the wall, contact the retailer where you purchased the Plasma Display for advice, and
have the equipment professionally installed. Incomplete or improper installation may cause injury to you and/or the
Plasma Display.
•Bracket holes: To attach a wall mounting bracket (not supplied) here, remove the screws.
IMPORTANT NOTICE
Possible Adverse Effects on Plasma Screen: If a fixed (non-moving) pattern remains on the plasma screen for long
periods of time, the image can become permanently engrained in the plasma display panel and cause subtle but
permanent ghost images. This type of damage is NOT COVERED BY YOUR WARRANTY. Never leave your plasma
display on for long periods of time while it is displaying the following formats or images:
• Fixed Images, such as stock tickers, video game patterns, TV station logos, and websites.
• Special Formats that do not use the entire screen. For example, viewing letterbox style (16:9) media on a
normal (4:3) display (gray bars at top and bottom of screen); or viewing normal style (4:3) media on a
widescreen (16:9) display (gray bars on left and right sides of screen).
To avoid the engraining, we recommend that you use the screen saver function (see P.33).
The following symptoms are not signs of malfunction but technical limitation. Therefore we disclaim any
responsibility for these symptoms.
• Plasma display panels are manufactured using an extremely high level of precision technology,
however sometimes parts of the screen may be missing picture elements or have luminous spots.
This is not a sign of a malfunction.
• Do not install the Plasma Display near electronic equipment that is susceptible to electromagnetic waves.
Some equipment placed too near this unit may cause interference.
• Effect on infrared devices – There may be interference while using infrared devices such as infrared
cordless headphones.
Bracket holes
SAFETY PRECAUTIONS
10cm
3Y80821A_En_p02-11 6/21/06, 1:47 PM4
Page 5

5
ENGLISH
Troubleshooting .......................................................................... 36
Specifications ..............................................................................37
WARRANTY................................................................................ 38
Display operation ........................................................................ 18
Selecting the video input source ................................................. 19
Labeling the video input source .................................................. 19
Closed Caption............................................................................ 20
Setting the panel lock ..................................................................21
Setting the picture size ................................................................24
Setting the picture scroll ..............................................................26
Selecting the cinema mode .........................................................27
Adjusting the picture preference ................................................. 28
Picture control adjustment........................................................... 29
Selecting the colour temperature ................................................ 30
Resetting your picture adjustment............................................... 30
Sound control adjustment ........................................................... 31
Turning off the built-in speakers ..................................................31
Using the WOW
TM
surround sound feature .................................32
Selecting the HDMI audio input source .......................................32
Resetting your audio adjustment................................................. 32
Screen Saver function .................................................................33
Picture/Audio control adjustment in the PC mode....................... 34
IMPORTANT SAFETY INSTRUCTIONS ......................................3
SAFETY PRECAUTIONS ............................................................. 4
IMPORTANT NOTICE .................................................................. 4
Contents ........................................................................................5
Features ........................................................................................6
Power source ................................................................................ 6
Parts and functions ....................................................................... 7
Remote control ..............................................................................8
Connections to other equipment ................................................. 12
Setting the language ................................................................... 17
PREPARATIONS
OTHERS
OPERATION
Contents
3Y80821A_En_p02-11 6/21/06, 1:47 PM5
Page 6

6
Features
• Picture Adjustments Using The Remote Control - The On-Screen display allows precise remote control
adjustment of BRIGHTNESS, CONTRAST, COLOR, TINT and SHARPNESS.
• Programmable Display Sleep Timer - Operable from the remote control, the Plasma Display can be programmed
up to 120 minutes to turn off automatically.
• S-Video/Component Video Jacks - A VCR, DVD player, satellite receiver or other audio/video component can be
connected to this unit.
• Video Input Jacks - This unit is equipped 3 types of video input jacks. The component video in jacks and
S-video in jack enable you to watch the DVD player or the video devices with high quality picture.
• On-Screen 3 Language Display - You can select one of 3 languages, English, French or Spanish for on- screen
programming.
NOTES:
• Please make sure to insert the cord securely at both the Plasma Display and the wall outlet.
• The AC Cord has a grounding-type AC line plug. If the supplied AC cord does not match you AC outlet, contact a
qualified electrician, do not defeat the purpose of a grounding plug.
WARNING:
• DO NOT CONNECT THIS UNIT TO THE POWER USING ANY DEVICE OTHER THAN THE SUPPLIED AC
CORD. THIS COULD CAUSE FIRE, ELECTRICAL SHOCK, OR DAMAGE.
• DO NOT USE WITH A VOLTAGE OTHER THAN THE POWER VOLTAGE DISPLAYED. THIS COULD CAUSE
FIRE, ELECTRICAL SHOCK, OR DAMAGE.
CAUTION:
• WHEN THIS UNIT IS NOT USED FOR A LONG TIME, (E.G., AWAY ON A TRIP) IN THE INTEREST OF SAFETY,
BE SURE TO UNPLUG IT FROM THE AC OUTLET.
• DO NOT PLUG/UNPLUG THE PLUG WHEN YOUR HANDS ARE WET. THIS MAY CAUSE ELECTRICAL
SHOCK.
• IF YOU NEED TO REPLACE THE SUPPLIED AC ADAPTER OR AC CORD, THE SPECIFIED ONE IS
RECOMMENDED. CONTACT THE DEALER THAT YOU PURCHASED THE UNIT FROM.
Power source
TO USE AC POWER
1. Connect the AC cord plug into this unit's AC IN jack.
2. Connect the AC cord into an AC outlet.
AC cord (supplied)
AC 120V, 60Hz
3Y80821A_En_p02-11 6/21/06, 4:07 PM6
Page 7

7
ENGLISH
AUDIO (L/R)/VIDEO OUT jacks
COMPONENT-2 IN jacks
COMPONENT-1 IN jacks
VIDEO-1 IN
AC power cord socket
PC IN jack
PC AUDIO/HDMI-1 AUDIO (L/R) IN jacks
HDMI-1 IN jack
VIDEO-2 IN
HDMI-2 IN jack
HDMI-2 AUDIO IN jack
Parts and functions
Front
Rear
CD
!
"CD
Left side
VIDEO-3 IN
* To display the menu screen.
Press both
VOLUME
▲/▼
buttons
at the same time to display the menu screen.
CURSOR ▲/▼ buttons and
VOLUME
▲/▼
buttons can be used to select the desired setting during the menu
screen operations.
3Y80821A_En_p02-11 6/21/06, 1:47 PM7
Page 8

8
Remote control
11. CODE SET Button - Used to register the 3-digit codes
to operate your VCR or Cable/Satellite box (See page
10).
12. DISPLAY Button - When you press this button, the
input source will appear on the lower right corner of the
screen. Press the button again to remove display from
the screen.
13. QUICK VIEW Button - This button allows you to go
back to the previous input source selected by just
pressing the QUICK VIEW button. Press this button
again to return to the channel you were watching.
14. INPUT SELECT Button - Press to display SOURCE
SELECTION menu.
15. CH ENTER Button* - Some connected equipment such
as a Cable/Satellite box, VCR, or DVD may require this
button to input selected channels.
16. CLOSED CAPTION Button - Press this button to switch
between normal mode and the two Closed Caption
modes (captions and 1/2 of full screen text). Closed
Captioning will display text on screen for hearing
impaired viewers.
17. ENTER Button - Use to enter or select information for
On-Screen operations.
18. VOL (VOLUME) +/–, CURSOR
/ Buttons - Used to
operate the menu functions of the Plasma Display. Press
the
button to increase, or the button to decrease the
sound level.
19. EXIT Button - Press to remove setup menu.
20. DVD Operation Buttons* - Press to operate your DVD if
programmed properly using a code listed on page 11.
1. PLASMA DISPLAY, VCR, CBL (Cable/Satellite box),
DVD POWER Button* - Used to turn the Plasma
Display, VCR, Cable/Satellite box or DVD on or off after
you select the operating mode in step 9.
2. SLEEP Button - To set the Plasma Display to turn off
after a preset amount of time, use the SLEEP button on
the remote control.
3. Direct Channel Selection Buttons (0-9)* - Allows direct
access to any channel of the VCR, Cable/Satellite box or
DVD.
4. MUTE Button - To turn off the sound, press this button
once. The Plasma Display will be silenced and the
symbol “MUTE” will appear on the screen. The muting
feature can be released by pressing the MUTE button
again or one of the VOL (VOLUME) + or – buttons.
5. RESET Button - Press to reset the On-Screen picture
adjustments to their factory preset positions.
6. CH (CHANNEL), CURSOR ▲/▼ Buttons* - Used to
operate the menu functions of the Plasma Display, and
to change the channels of a Cable/Satellite box.
7. MENU Button - Use to display the On-Screen menu
function.
8. 16:9 Button - Press to display PICTURE SIZE menu.
9. VCR Operation Buttons* - Press to operate your VCR if
programmed properly using a code listed on page 10.
10. TV, VCR, CBL (Cable/Satellite box), DVD Selector
Switch - Slide to select the Plasma Display, VCR,
Cable/Satellite box or DVD to be operated.
*You can use these buttons to operate
your VCR, Cable/Satellite box or DVD
after you have programmed the remote control for the code that operates your VCR, Cable/Satellite box or
DVD (see page 10 and 11).
3
14
6
10
12
16
1
9
8
7
18
17
15
11
13
5
20
19
4
2
3Y80821A_En_p02-11 6/21/06, 1:47 PM8
Page 9

9
ENGLISH
1. Open the battery compartment cover.
2. Install two “AA” batteries (supplied).
HOW TO INSTALL BATTERIES
Before using the remote control, batteries must first be installed.
3. Replace the battery compartment cover.
BATTERY PRECAUTIONS
These precautions should be followed when using batteries in
this device:
• Use only the size and type of batteries specified.
• Be sure to follow the correct polarity when installing the
batteries as indicated in the battery compartment. Reversed
batteries may cause damage to the device.
• Do not mix different types of batteries together (e.g.
Alkaline and Carbon-zinc) or old batteries with fresh ones.
• If the device is not to be used for a long period of time,
remove the batteries to prevent damage or injury from
possible battery leakage.
•
Do not try to recharge batteries not intended to be recharged;
they can overheat and rupture. (Follow battery manufacturer's
directions.)
Use two “AA” size batteries. The batteries may last approximately one
year depending on how much the remote control is used. For best
performance, it is recommended that batteries should be replaced on a
yearly basis, or when the remote operation becomes erratic. Do not mix
old and new batteries or different types.
HOW TO USE THE REMOTE CONTROL
You may be able to use the remote control to operate your
VCR, Cable/Satellite box and DVD along with the Plasma
Display after the batteries are installed and you have
registered the codes that operate your products.
Some buttons are used exclusively for each product and
some buttons are used in common with each product.
To operate your products correctly using this universal remote
control follow each step below.
A. For PLASMA DISPLAY
Slide the selector switch to select “TV” first.
B. For VCR
Slide the selector switch to select “VCR” first.
C. For CABLE/SATELLITE box
Slide the selector switch to select “CBL” first.
Aim remote at CABLE/SATELLITE box.
NOTES:
• Some buttons that have same functions are called different
names according to the brand and model of the product. For
example, RESET may be called “CANCEL”.
• The buttons A, B, C and D are used exclusively for each product.
You can use these buttons whenever you want.
Press other buttons to operate the features of your Plasma
Display. You can use the VOL + and – buttons, the 0-9
buttons.
Press other buttons to operate the features of your VCR.
You can use the VCR CH ▲ and ▼ buttons, the 0-9
buttons, the CH ENTER button.
Aim remote at VCR.
Press the POWER button.
Aim remote at Plasma Display.
Press other buttons to operate the features of your
CABLE/SATELLITE box. You can use the CH ▲ and ▼
buttons, the 0-9 buttons, the CH ENTER button.
Press the POWER button to turn on your CABLE/SATELLITE box.
D. For DVD
Slide the selector switch to select “DVD” first.
Aim remote at DVD.
Press other buttons to operate the features of your DVD.
You can use the DVD SKIP 6 and 7 buttons, the TOP
MENU button, the DVD MENU button, the 0-9 buttons, the
CH ENTER button.
Press the POWER button to turn on DVD.
Press the POWER button to turn on VCR.
1
2
3
4
1
2
3
4
1
2
3
4
1
2
3
4
Remote control
A,B,C,D
A,B,C,D
A
D
A
B,C,D
A
A,C
B,D
A
3Y80821A_En_p02-11 6/21/06, 1:47 PM9
Page 10

10
REGISTRATION CODES BY PRODUCT AND BRAND NAME
Slide the selector switch to select the product you want to register (VCR, CBL or DVD).
Press and hold the CODE SET button while inputting a 3-digit code from the following lists using the Direct Channel
Selection buttons (0-9).
TO REGISTER YOUR VCR, CABLE/SATELLITE BOX OR DVD WITH THE REMOTE CONTROL
1
2
NOTES: • When shipped from the factory, the remote control is set to operate your Plasma Display.
• If you enter the non-listed code below, this operation is canceled.
• When you install or replace batteries, you may need to register the codes again for the products you want to
control.
Remote control
VCR
Admiral 014, 024 Motorola 005, 014
Adventura 000 Multitech 000, 017
Aiko 027 NEC 007, 009, 016, 019
Aiwa 000, 006 Nikko 006
Akai 009 Noblex 026
America Action 027 Olympus 005
American High 005 Optimus 006, 014, 019, 022, 029, 030, 045, 047, 051
Asha 026 Orion 001, 023, 024, 031, 053
Audiovox 006, 027 Panasonic 005, 022, 025, 030, 033, 042, 045, 047, 051
BEAUMARK 026 Penney 005, 006, 007, 010, 026, 042, 050
Bell & Howell 019 Pentax 010
Broksonic 001, 020, 023, 024, 031, 053 Philco 005, 024, 031
CCE 017, 027 Philips 005, 018, 034, 036, 046, 048
Calix 006 Pilot 006
Canon 005 Pioneer 016
Carver 018 Polk Audio 018
Cineral 027 Profitronic 026
Citizen 006, 027, 052 Proscan 015, 037, 044
Colt 017 Protec 017
Craig 006, 013, 017, 026 Pulsar 008
Curtis Mathes 015, 005, 009, 022, 037, 042 Quasar 005, 022, 030, 042, 047
Cybernex 026 RCA 010, 015, 026, 037, 038, 042, 044
Daewoo 012, 027, 052 Radio Shack 000, 043
Denon 010 Radix 006
Dynatech 000 Randex 006
Electrohome 006 Realistic 000, 005, 006, 013, 014, 019
Electrophonic 006 Replay TV 033
Emerex 003 Runco 008
Emerson
000, 001, 006, 011, 020, 023, 024, 027, 031, STS 010
052 Sumsung 012, 026
Fishir 013, 019 Sanky 008, 014
Fuji 004, 005 Sansui 000, 009, 016, 024, 031, 053
Funai 000 Sonyo 013, 019, 026
Garrard 000 Socott 011, 012, 020, 023
GE 005, 015, 026, 037, 038, 042, 044 Sears 000, 005, 006, 010, 013, 019, 050
Go Video 029 Semp 012
Goldstar 006, 007, 050 Sharp 014, 038, 040
Grandiente 000 Shintom 017
HI-Q 013 Shogun 026
Harley Davidson 000 Singer 017
Harman/Kardon 007, 018 Sonic Blue 033
Harwood 017 Sony 000, 003, 004, 005, 035, 041, 049
Hiyachi 000, 009, 010 Sylvania 000, 005, 011, 018, 054
JVC 009, 016 Symphonic 000
Jensen 009 TMK 026
KEC 006, 027 Tatung 009
KLH 017 Teac 000, 009
KENWOOD 007, 009, 016 Tecnics 005, 022
Kida 005, 006 Teknika 000, 005, 006
Lloyd 000 Thomas 000
Logik 017 Tivo 034, 035
LXI 006 Toshiba 011, 012, 039
MEI 000 Totevision 006, 026
MGA 011, 026 Unitech 026
MGN Technology 026 Vector 012
MTC 000, 026 Vector Research 007
Magnasonic 052 Video Concepts 012
magnavox 000, 005, 008, 018, 032 Videomagic 006
Magnin 026 Videosonic 026
Marantz 005, 018 Villain 000
Marta 006 Wards 000, 005, 010, 013, 014, 015, 017, 018, 026, 037
Matsushita 005, 022, 030
White Westinghouse
017, 024, 052
Memorex
000, 005, 006, 008, 013, 014, 022, XR-1000 000, 005, 017
024, 026, 030, 031, 043, 047, 050, 051 Yamaha 007
Minolta 010 Zenith 000, 004, 008, 031, 053
Mitsubishi 016, 011, 038
3Y80821A_En_p02-11 6/21/06, 1:47 PM10
Page 11

11
ENGLISH
Remote control
CBL (CABLE)
ABC 001, 007, 012, 046, 056 Philips 009, 034, 041, 047, 048, 052, 053, 057
ADELPHIA 017 Pioneer 004, 028, 058
Allegro 006, 010 Pulsar 013
Americast 023 RADIO SHACK 010
Antronix 025, 033 RCA 021, 039
Archer 025, 033, 040, 047 Realistic 033
AT&T 049 Regency 018
Cabletenna 025 Rembrandt 056
Cableview 025 Runco 013
Century 047 Samsung 002, 004
Citizen 047 Scientific Atlanta 011, 012, 014, 017, 020, 024, 028, 032
Colour Voice 052, 057 Signal 002, 026
Comtronics 002, 008 Signature 056
Eastern 018 SL MARX 002
Garrard 047 Spr ucer 039
GC Electronics 033 Starcom 026, 046
GE 038 Stargate 002, 026
Gemini 016, 026, 034 Starquest 026
General Instruments
005, 030, 031, 035, 037, 045, 049, 051, 056, Starsight 044
060
Starsight Cable Service
021
Hitachi 056 TANDY 042
JASCO 047 TELEVIEW 002
Jerrold
001, 003, 007, 015, 026, 031, 035, 037, 043, Tocom 001, 060
046, 049, 056 Toshiba 013
Magnavox 009 Tusa 026
Memorex 013 TV86 019
Motorola
001, 003, 005, 007, 023, 026, 030, 031, 035, Unika 025, 033, 047
037, 043, 045, 046, 049, 051, 056, 060 United Cable 046
Movie Time 019 Universal 025, 033, 040, 047, 054
NSC 019 View Star 008, 009, 019, 042
Panasonic 029, 039
Zenith
006, 010, 013, 022, 023, 027, 036, 044, 050,
Paragon 013 055, 059, 061, 062
CBL (SATELLITE)
Bell ExpressVu 125, 140, 142 Philips 108, 133, 145, 150
Dish Network 125, 131, 140, 141, 142, 144, 146 Philips/Magnavox 133, 145, 150
Drake 121, 137, 148 Pioneer 122
Echosphere 142 Primestar 147
Echostar 125, 140, 141, 142, 144, 146 Proscan 100, 101, 105, 106, 110, 134, 151
GE 100, 101, 105, 106, 110, 134, 151 RCA 100, 101, 105, 106, 110, 118
Gemini 127 RCA DDS 134
General Instruments 120, 124, 126, 130, 132, 147, 152, 154, 155 Realistic 138
Hitachi 107 Samsung 114, 116
Hughes Network Systems
104, 107, 109, 112 Sony 102, 113, 119
Jerrold 138 Star Choice 130, 147
Magnavox 108 Toshiba 149
Magnavox DDS 133, 145
VIDEO CIPHER II
121
Motorola 100, 101, 105, 106
Zenith
121, 123, 127, 128, 129, 135, 136, 137, 139,
PACE 128, 135
148, 153
Panasonic 103, 111, 115
DVD
Apex 017 Onkyo 001
Blue Parade 008 Or itron 014
Broksonic 016 Panasonic 000, 012, 023, 024, 025
DVD2000 002 Philips 001, 006, 019
Denon 000 Pioneer 004, 008, 012
Emerson 010 Polk Audio 006
Enterprise 010 Potel 011
GE 003, 017 Proscan 003
Gradiente 014 RCA 003, 008, 017, 021
Greenhill 017 Samsung 009, 018
Hitachi 009 Sansui 016
JVC 007, 011, 020 Sony 005
KLH 017 Sylvania 015
Kenwood 000 Shinsonic 005
Koss 014 Technics 000
Magnavox 001, 015 Theta Digital 008
Marantz 006 Toshiba 001, 016, 022
Microsoft 003 Urban Concepts 001
Mintek 017 Xbox 003
Mitsubishi 002 Yamaha 000, 006
Nesa 017 Zenith
001, 010
3Y80821A_En_p02-11 6/21/06, 1:47 PM11
Page 12

12
Connections to other equipment
The exact arrangement you use to interconnect various video and audio components to the Plasma Display is
dependent on the model and features of each component. Check the Owner's Manual provided with each component
for the location of video and audio inputs and outputs.
The connection diagrams below are offered as suggestions. You may need to modify them to accommodate your
particular assortment of components. The diagrams are intended to show component video and audio
interconnections only.
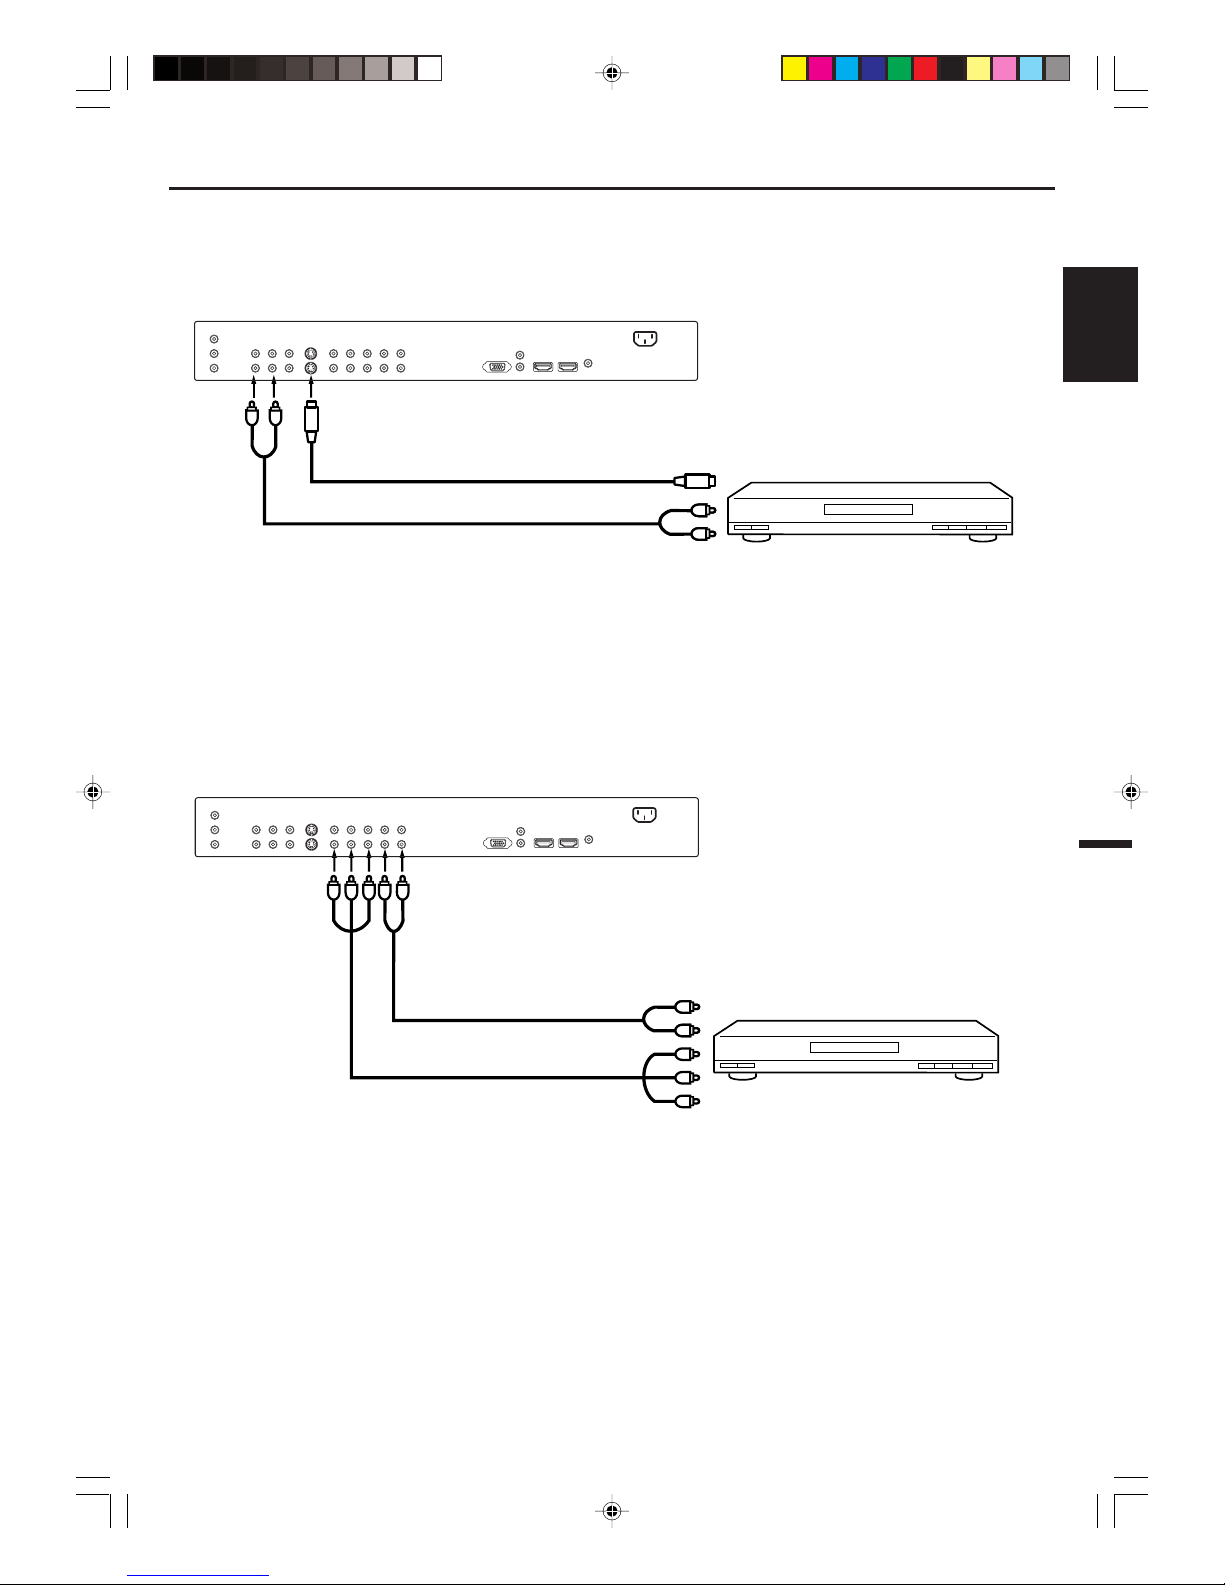
To connect the Plasma Display to a VCR with an S-Video cord
If you connect a VCR with a S-VIDEO cord to the S-VIDEO IN jack on the rear of the
Plasma Display
, you must also
connect
the audio cords to the AUDIO IN jacks on the rear of the Plasma Display. The S-VIDEO cord only carries the
video signal. The audio signal is separate.
NOTES:
• When the S-video cord and the video cord are connected to each jack at the same time, the S-video cord takes
precedence over the video cord.
• To change the TV mode to this connected device please review “Selecting the video input source” on page 19.
To S-Video OUT
To Audio OUT
Audio cord (not supplied)
(Red, and White)
S-Video cord (not supplied)
To S-VIDEO IN-1 (or 2)
To connect the Plasma Display to a VCR
Rear lower of the Plasma Display
To A udio/Video OUT
Audio/Video cord (not supplied)
(Red, White and Yellow)
To AUDIO/VIDEO IN-1 (or 2)
To AUDIO
IN 1 (or 2)
Rear lower of the Plasma Display
NOTE:
To change the TV mode to this connected device please review “Selecting the video input source” on page 19.
3Y80821A_En_p12-16 6/21/06, 1:47 PM12
Page 13
13
ENGLISH
Y
P
B
PR
Rear lower of the Plasma Display
To connect the Plasma Display to a DVD player/Satellite receiver
If your DVD player or Satellite receiver has a S-Video out jack, connect cords as shown.
Rear lower of the Plasma Display
To S-Video OUT
Audio cord (not supplied)
(Red, and White)
To A udio OUT
S-Video cord (not supplied)
To S-VIDEO IN-1 (or 2)
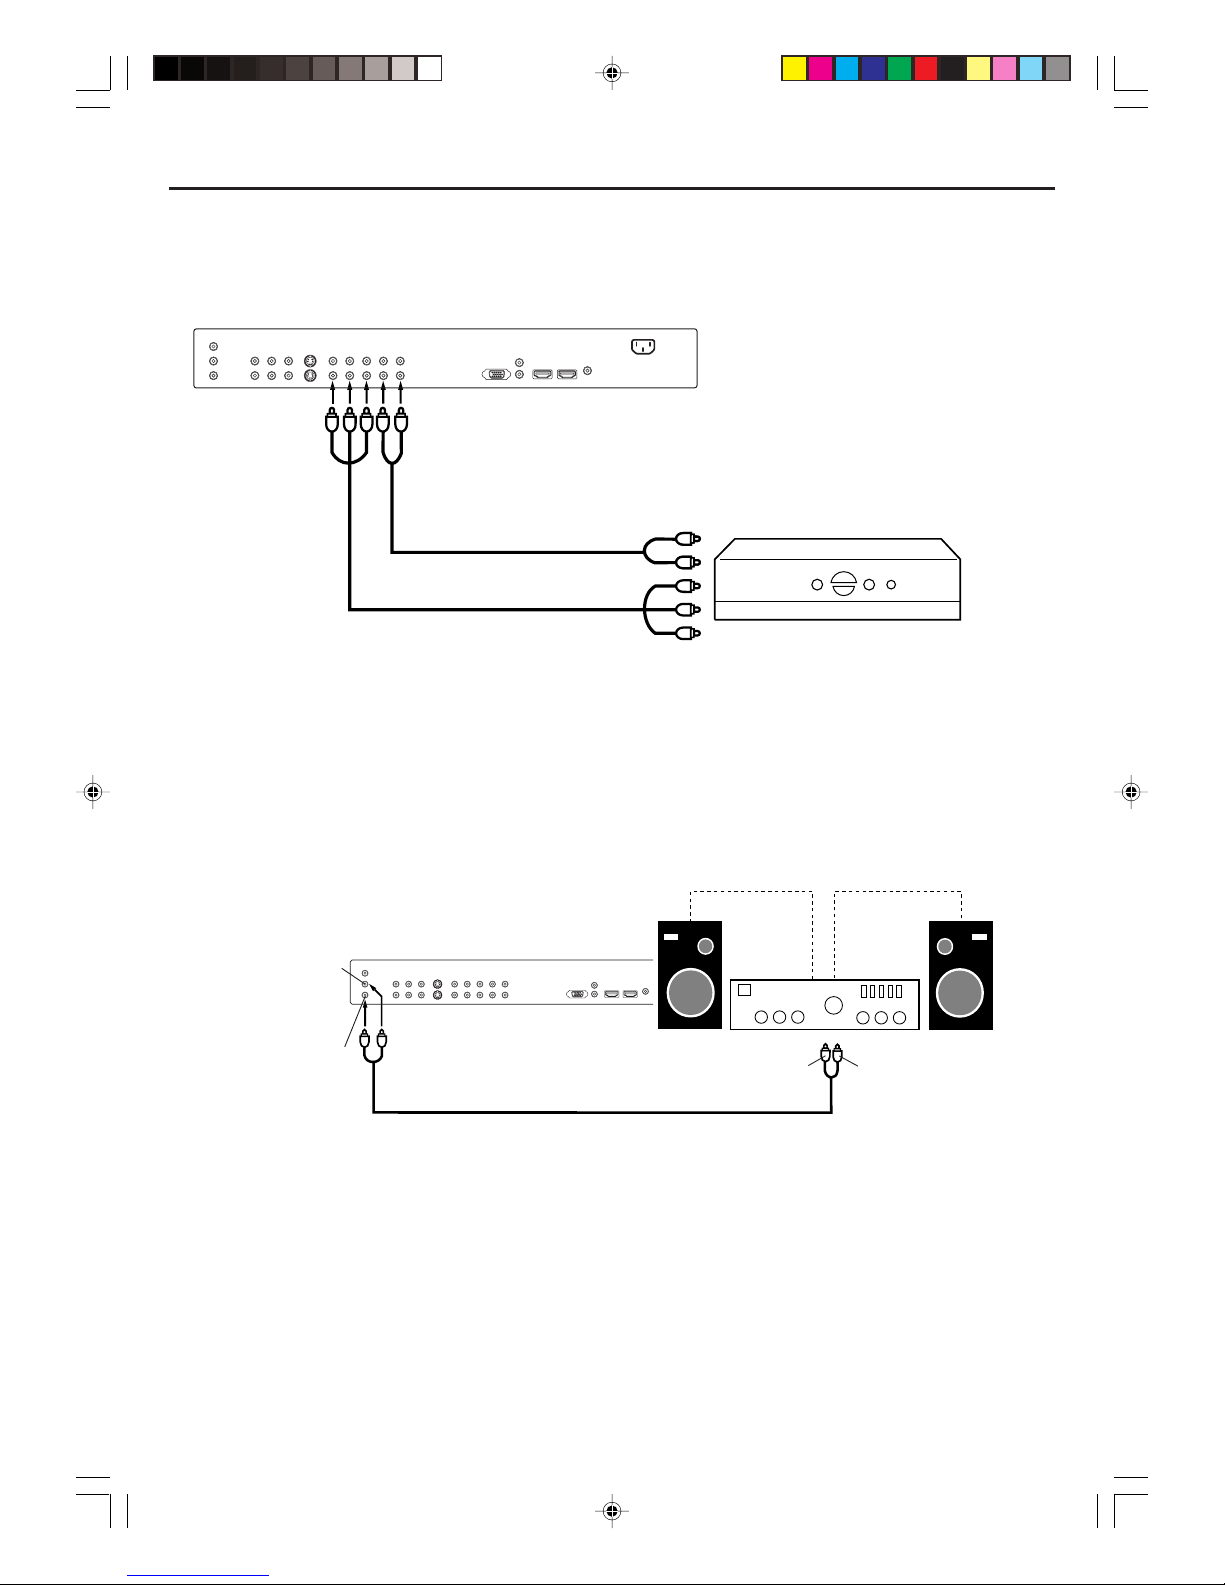
To connect the Plasma Display to a DVD player with component video
If your DVD player has component video out jacks, connect your Plasma Display to a DVD player using a component
video cord. It can greatly enhance picture quality and performance.
To Component OUT
To Audio OUT
Audio cord (not supplied)
(Red, and White)
Component video cord (not supplied)
(Red, Green and Blue)
To AUDIO
IN 1 (or 2)
To COMPONENT IN-1 (or 2)
NOTES:
• Component Video input of this unit are for use of device which output 480i/1080i interlaced signals and 480p/720p
progressive signals.
• To change the TV mode to this connected device please review “Selecting the video input source” on page 19.
Connections to other equipment
NOTE:
To change the TV mode to this connected device please review “Selecting the video input source” on page 19.
3Y80821A_En_p12-16 6/21/06, 1:47 PM13
Page 14
14
Y
P
B
PR
Connections to other equipment
To connect the Plasma Display to a DTV receiver/set-top box
If you connect a DTV receiver/set-top box, connect your Plasma Display to a DTV receiver/set-top box using a
component video cord.
Rear lower of the Plasma Display
To Component OUT
To Audio OUT
Component video cord (not supplied)
(Red, Green and Blue)
Audio cord (not supplied)
(Red, and White)
To COMPONENT IN-1 (or 2)
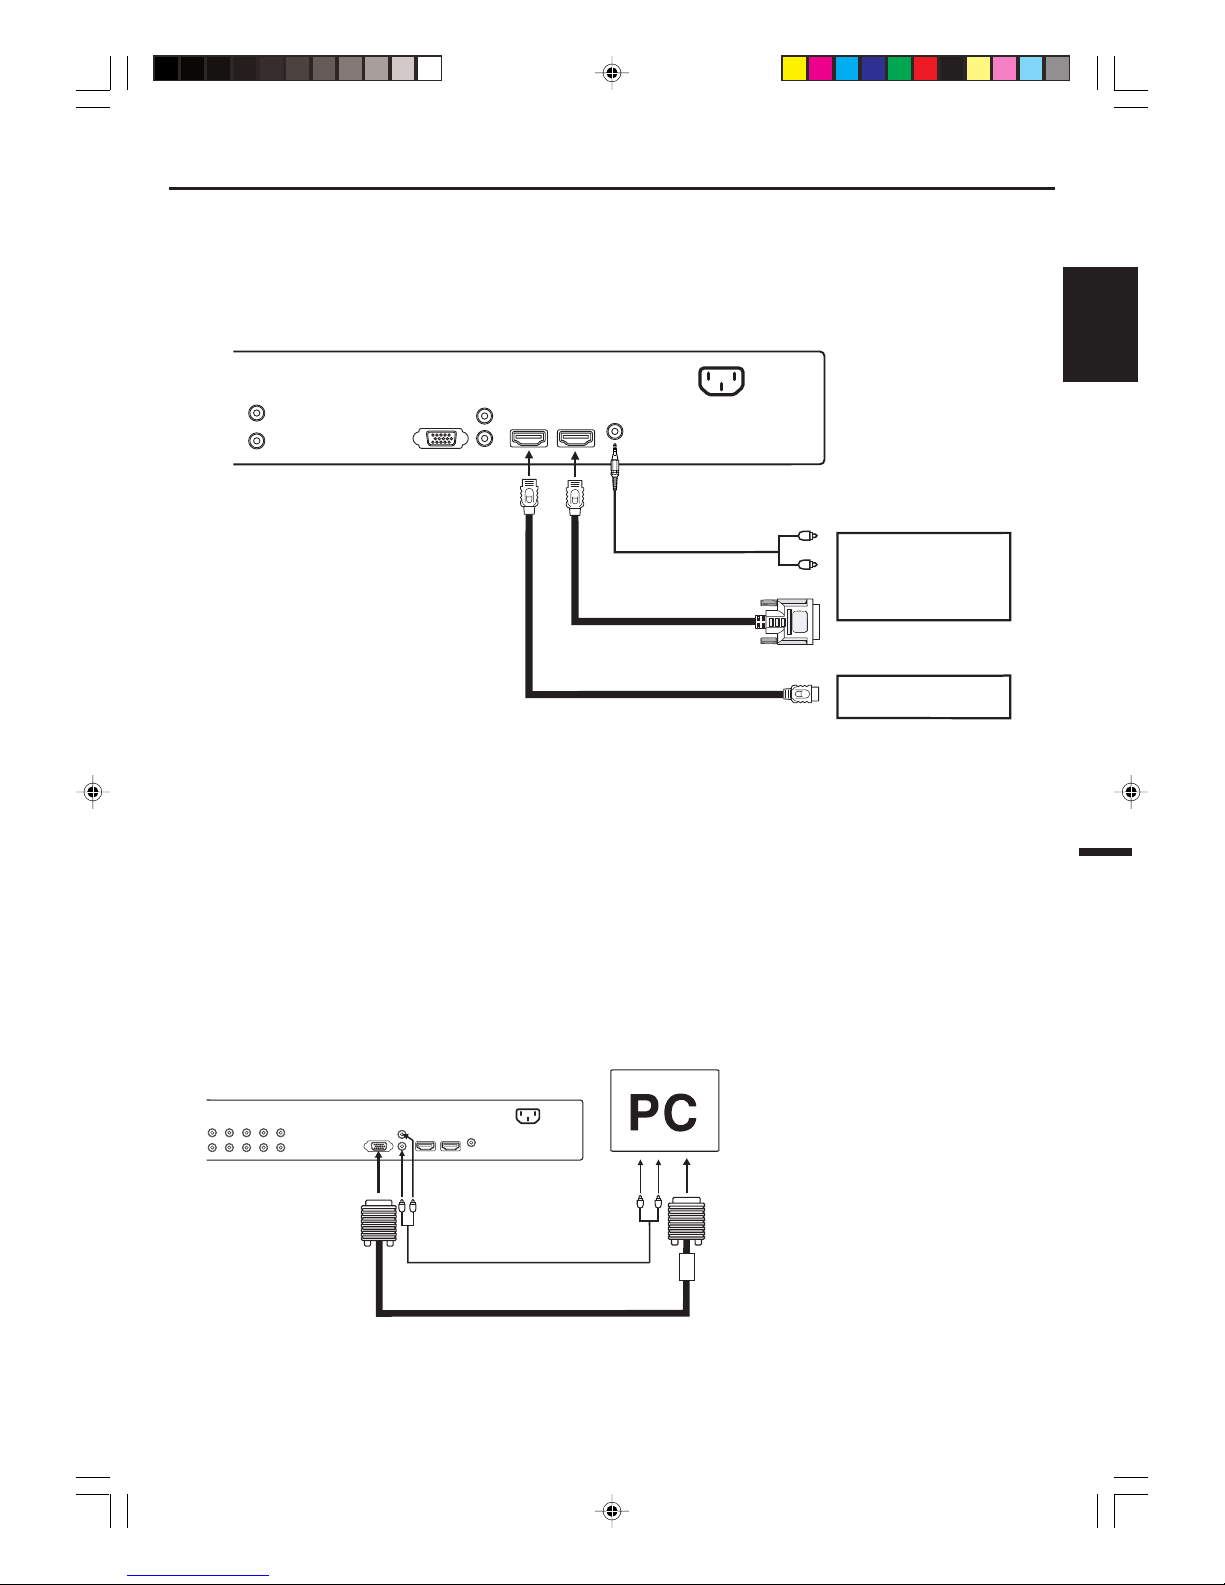
To connect an audio system
This connection allows you to use an audio amplifier and external speakers, and adjust the audio level using the
Plasma Display’s remote control.
To control the audio, turn on the Plasma Display and the stereo amplifier, and turn off the Plasma Display’s built-in
speakers (see “Turning off the built-in speakers” on page 31).
NOTE:
To hear sound when using an external audio amplifier, the volume of both the Plasma Display and the amplifier must
be set above 0 (zero).
For example, if the volume of the Plasma Display is set to 0, you will not be able to hear any sound, even if the
volume of the amplifier is at its highest level.
To A udio (L) Input
To Audio (R) Input
Audio cord (not supplied)
(Red, and White)
Amplifier
VARIABLE AUDIO (R)
OUTPUT
VARIABLE AUDIO (L)
OUTPUT
Rear lower of the Plasma Display
NOTE:
To change the TV mode to this connected device please review “Selecting the video input source” on page 19.
3Y80821A_En_p12-16 6/21/06, 1:47 PM14
Page 15
15
ENGLISH
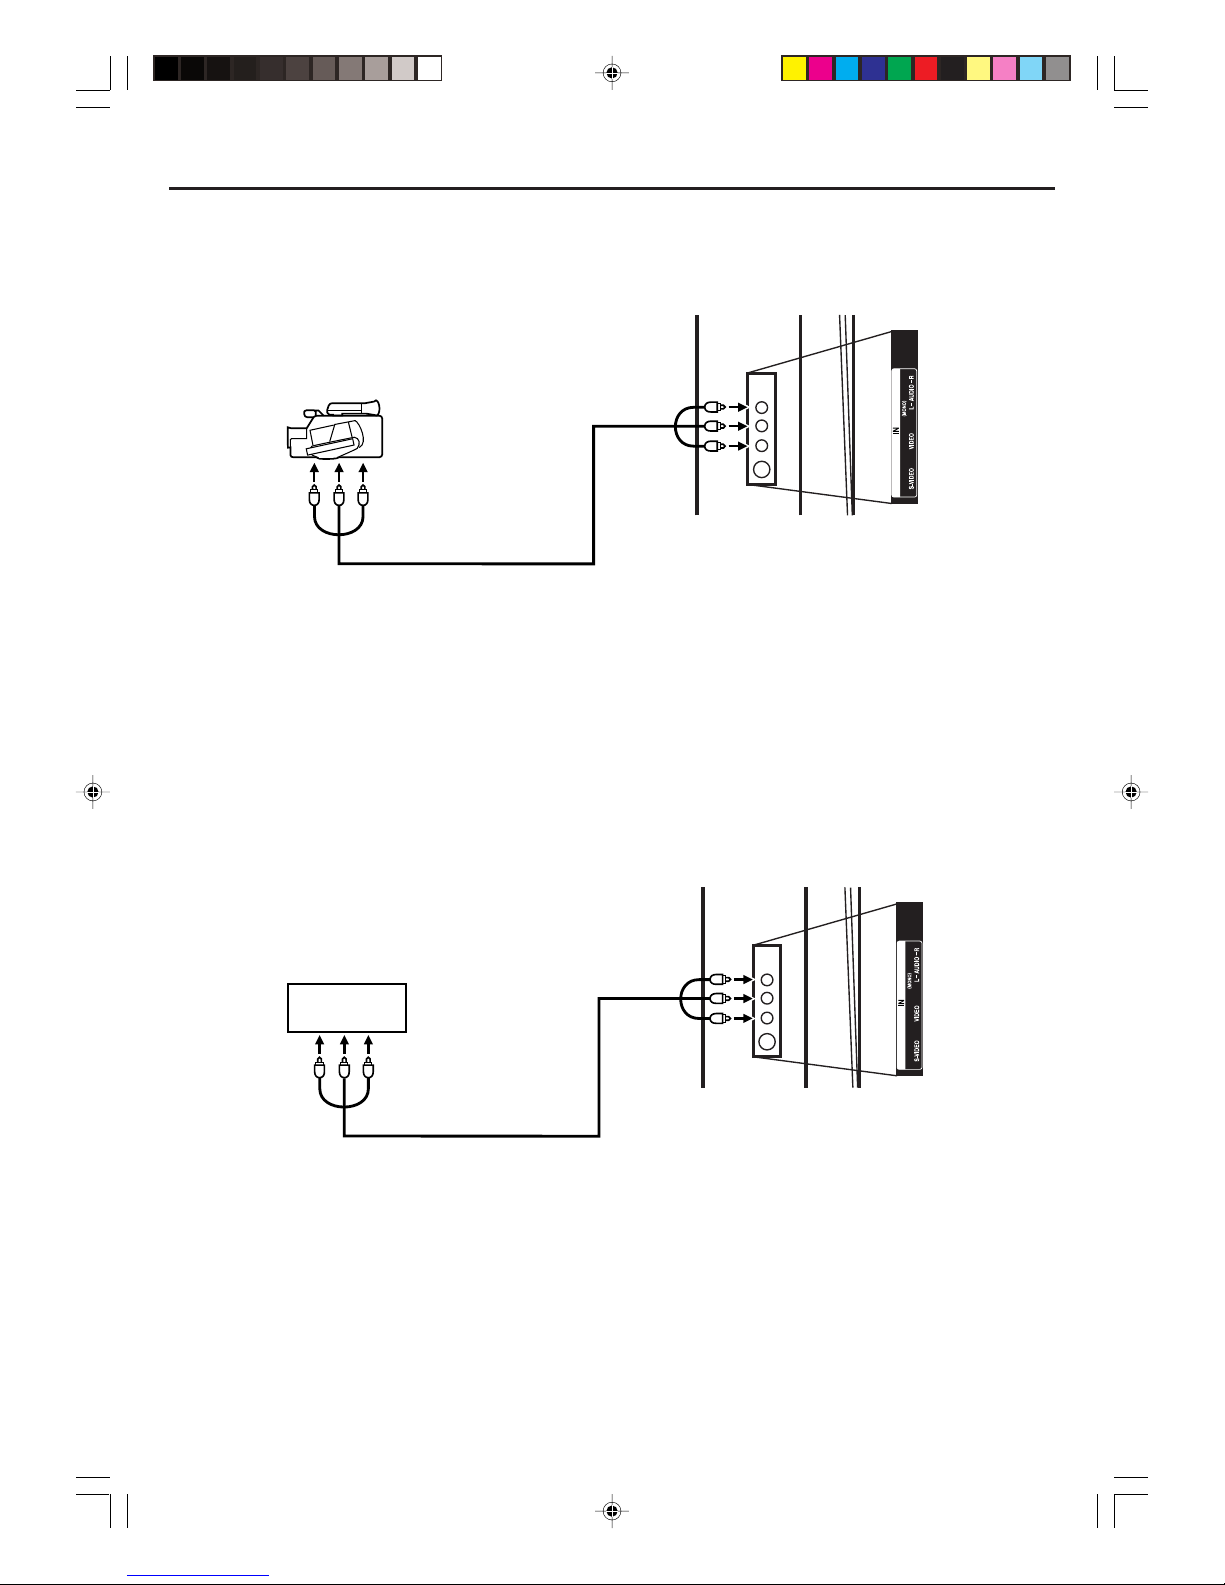
HDMI device
DVI device
Connections to other equipment
Audio cord (not supplied)
VGA cable (not supplied)
To connect the Plasma Display to a PC (Personal Computer)
Before you connect this Plasma Display to your PC, change the adjustment of your PC’s Resolution and Refresh
rate (60 Hz).
Connect one end of a (male to male) VGA cable to the video card of the computer and the other end to the
VGA
connector PC MONITOR on the back of the
Plasma Display
. Attach the connectors firmly with the screws on the plug.
In case of a Multimedia computer, connect the audio cables to the audio outputs of your Multimedia computer and to
the AUDIO L and R connectors of the PC AUDIO/HDMI-1 AUDIO (L/R) IN jacks of the Plasma Display.
Press INPUT SELECT on the remote control to select PC mode.
Switch on the computer. The Plasma Display can operate as the computer monitor.
Monitor Display modes
MODE Resolution Refresh rate
VGA 640x480 60Hz
WVGA 848x480 60Hz
SVGA 800x600 60Hz
XGA 1024x768 60Hz
WXGA 1280x768 60Hz
WXGA 1280x720 60Hz
WXGA 1360x768 60Hz
To return to normal mode
Press INPUT SELECT again.
Rear lower of the Plasma Display
To connect the Plasma Display to a HDMI or a DVI device
Rear lower of the Plasma Display
HDMI - to - DVI adapter cable
(HDMI type A connector)
(not supplied)
Audio cord (not supplied)
HDMI cable (type A connector)
(not supplied)
To DVI output
To HDMI out
or
The HDMI input receives digital audio and uncompressed video from a HDMI device or uncompressed digital video
from a DVI device.
When you connect to a DVI device with a HDMI-to-DVI adapter cable, it transfers only the video signal. Separate
analog audio cords are required.
NOTES:
• You must choose an appropriate setting for each connection (see “Selecting the HDMI audio input source” on page
32).
• You can also use HDMI-1 IN for DVI device connection. In this case, you must connect the audio cables to AUDIO L/
R, not AUDIO.
• To change the TV mode to this connected device please review “Selecting the video input source” on page 19.
To PC AUDIO/HDMI-1
AUDIO (L/R) IN jacks
To PC IN
NOTES:
• The on-screen displays will have a different appearance in PC mode than in other mode.
• When you select WXGA or WVGA mode, set the WXGA INPUT or WVGA INPUT to ON in the PC PICTURE menu
(see page 34).
•To change the TV mode to this connected device please review “Selecting the video input source” on page 19.
3Y80821A_En_p12-16 6/21/06, 1:47 PM15
Page 16
16
TV GAME
To connect the Plasma Display to a camcorder
To connect the Plasma Display to a Game
The Plasma Display can also be used as a display device for many video games. However, due to the wide variety of
signals generated by these devices and subsequent hook-up variations required, they have not all been included in
the suggested connection diagrams. You'll need to consult each component's Owner's Manual for additional
information.
To playback from a camcorder, connect the camcorder to the Plasma Display as shown.
Side of the Plasma Display
Audio/Video cord (not supplied)
(Red, White and Yellow)
To A udio/Video OUT
Side of the Plasma Display
To A udio/Video OUT
Audio/Video cord (not supplied)
(Red, White and Yellow)
Connections to other equipment
NOTE:
To change the TV mode to this connected device please review “Selecting the video input source” on page 19.
NOTE:
To change the TV mode to this connected device please review “Selecting the video input source” on page 19.
3Y80821A_En_p12-16 6/21/06, 1:47 PM16
Page 17
17
ENGLISH
1
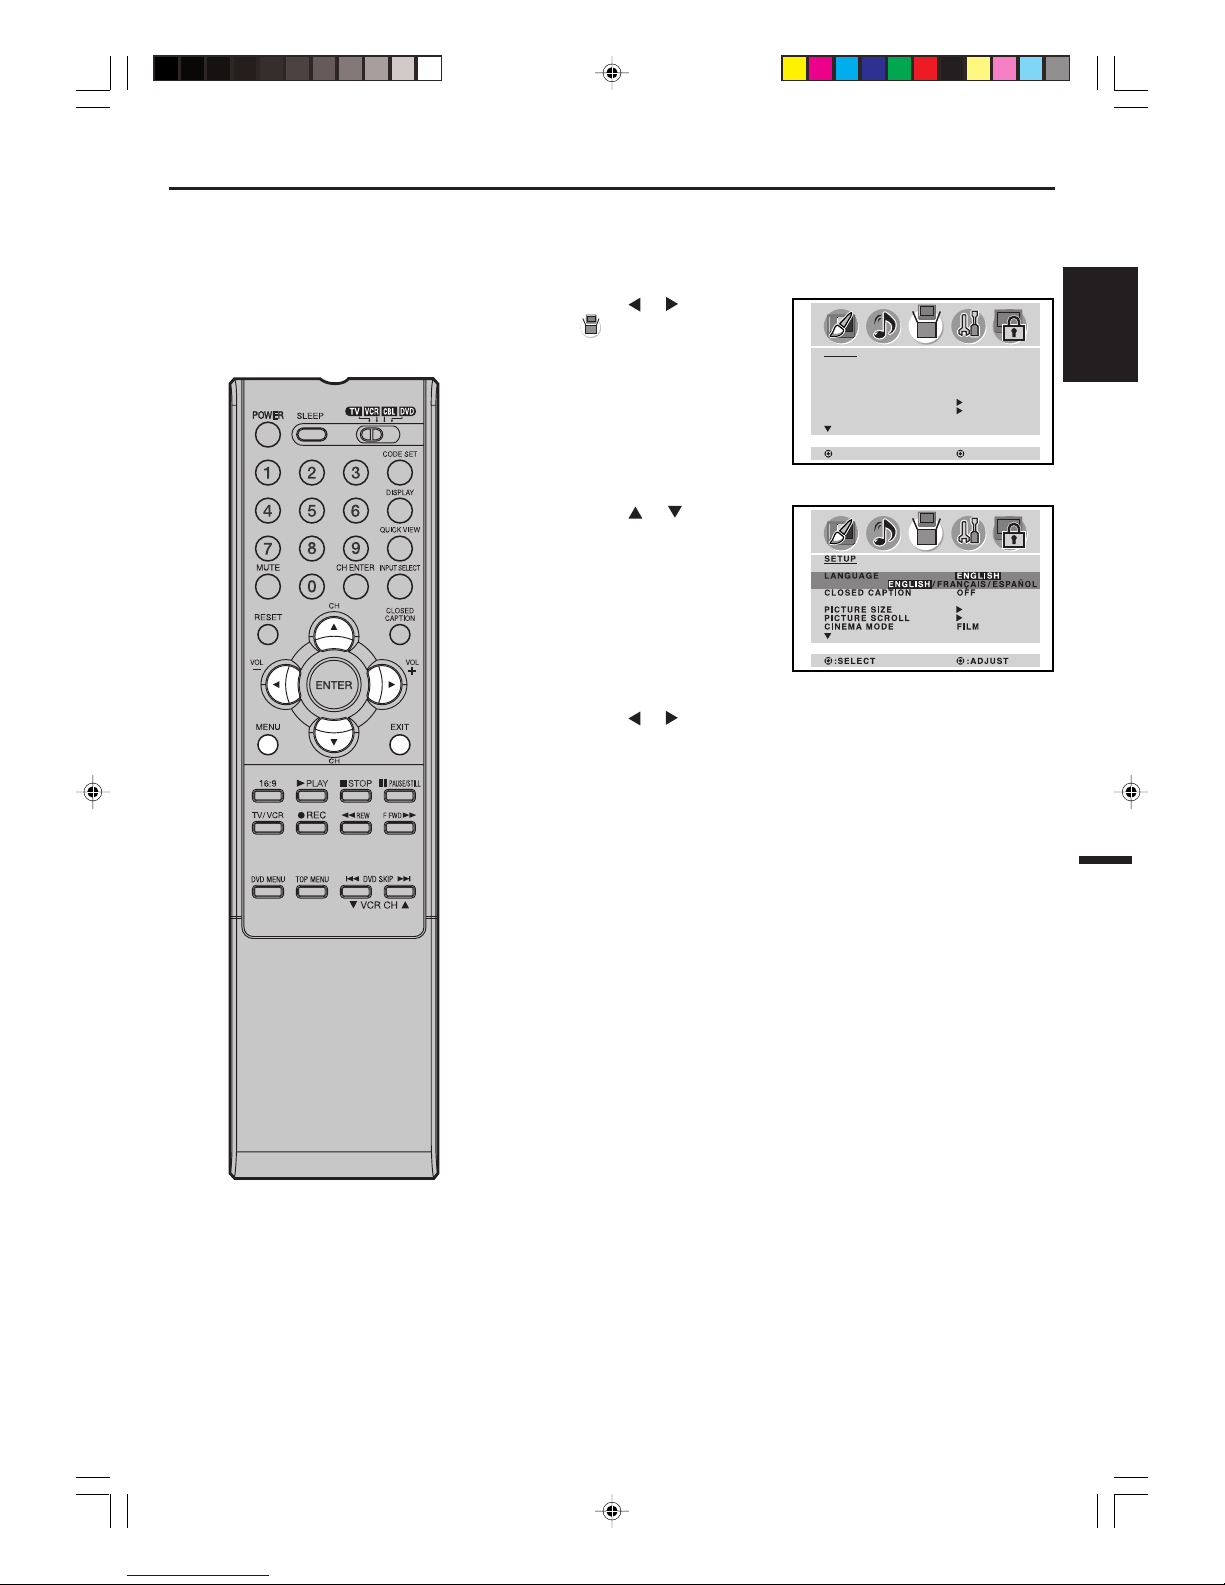
Press MENU. The menu screen will appear.
2
Press or to select
(SETUP) menu.
3
Press or to select
“LANGUAGE”.
4
Press or to select the desired language: English (ENGLISH), French (FRANÇAIS) or Spanish (ESPAÑOL).
5
Press EXIT to return to the normal screen.
Setting the language
You can choose from three different
languages (English, French and Spanish)
for the on-screen displays.
NOTE:
If no buttons are pressed for more than about
60 seconds, the MENU screen will return to
normal operation automatically.
SETUP
LANGUAGE ENGLISH
CLOSED CAPTION OFF
PICTURE SIZE
PICTURE SCROLL
CINEMA MODE FILM
:SELECT
:ADJUST
3Y80821A_En_p17-22 6/21/06, 1:47 PM17
Page 18
18
SLEEP
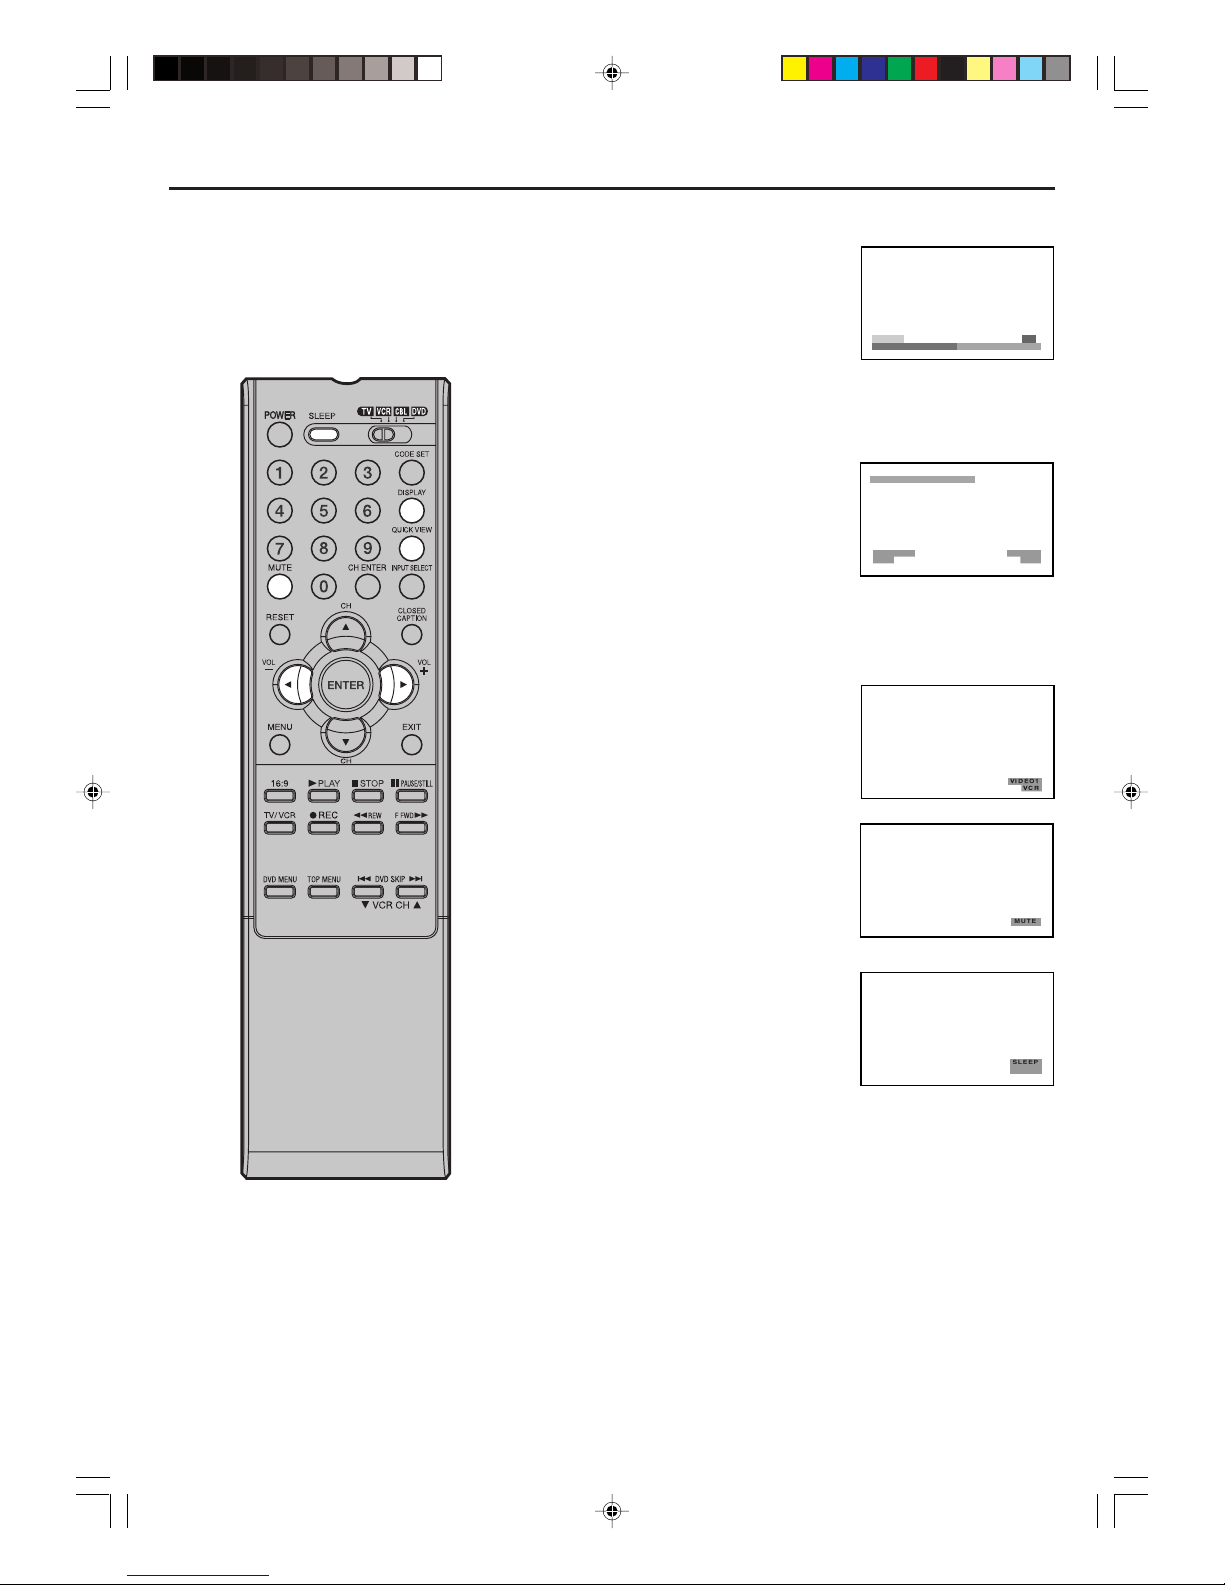
To set the unit to turn off after a preset
amount of time, press SLEEP on the
remote control. The clock will count up
10 minutes for each press of the SLEEP
button (0h00m, 0h10m, ...1h50m,
2h00m).
After the sleep time is programmed, the display will appear briefly
every ten minutes to remind you that the sleep timer is operating. To
confirm the sleep timer setting, press SLEEP and the remaining
time will be displayed for a few seconds. To cancel the sleep timer,
press SLEEP repeatedly until the display turns to 0h00m.
VOLUME
Adjust the volume level by pressing
VOL + or – . The volume level will be
indicated on the screen by white bars.
As the volume level increases, so do
the number of bars. If the volume
decreases, the number of white bars
also decreases.
QUICK VIEW
This button allows you to go back to the
last input source selected by pressing
QUICK VIEW. Press QUICK VIEW again
to return to the last input source you
were watching.
MUTE
Press MUTE to switch off the sound.
The unit’s sound will be silenced and
“MUTE” will appear on the screen. The
sound can be switched back on by
pressing this button again or VOL + or –.
Display operation
SLEEP TIMER 2h00m
NATURAL VIDEO1
480i VCR
DISPLAY
Press DISPLAY to display the current information on the screen.
• VIDEO mode selected
• Video label (if preset)
• Sleep time (if preset)
• Picture size
Press DISPLAY again to clear the call display.
VOLUME
32
VIDEO1
VCR
MUTE
SLEEP
2h00m
3Y80821A_En_p17-22 6/21/06, 1:47 PM18
Page 19
19
ENGLISH
– : Uses the default
label name
VCR : Video cassette
recorder
DVD :DVD video
DTV : Digital TV set-top box
SAT : Satellite box
CBL : Cable box
HD : HDMI device (only HDMI)
Selecting the video input source/Labeling the video input source
Selecting the video input source
P
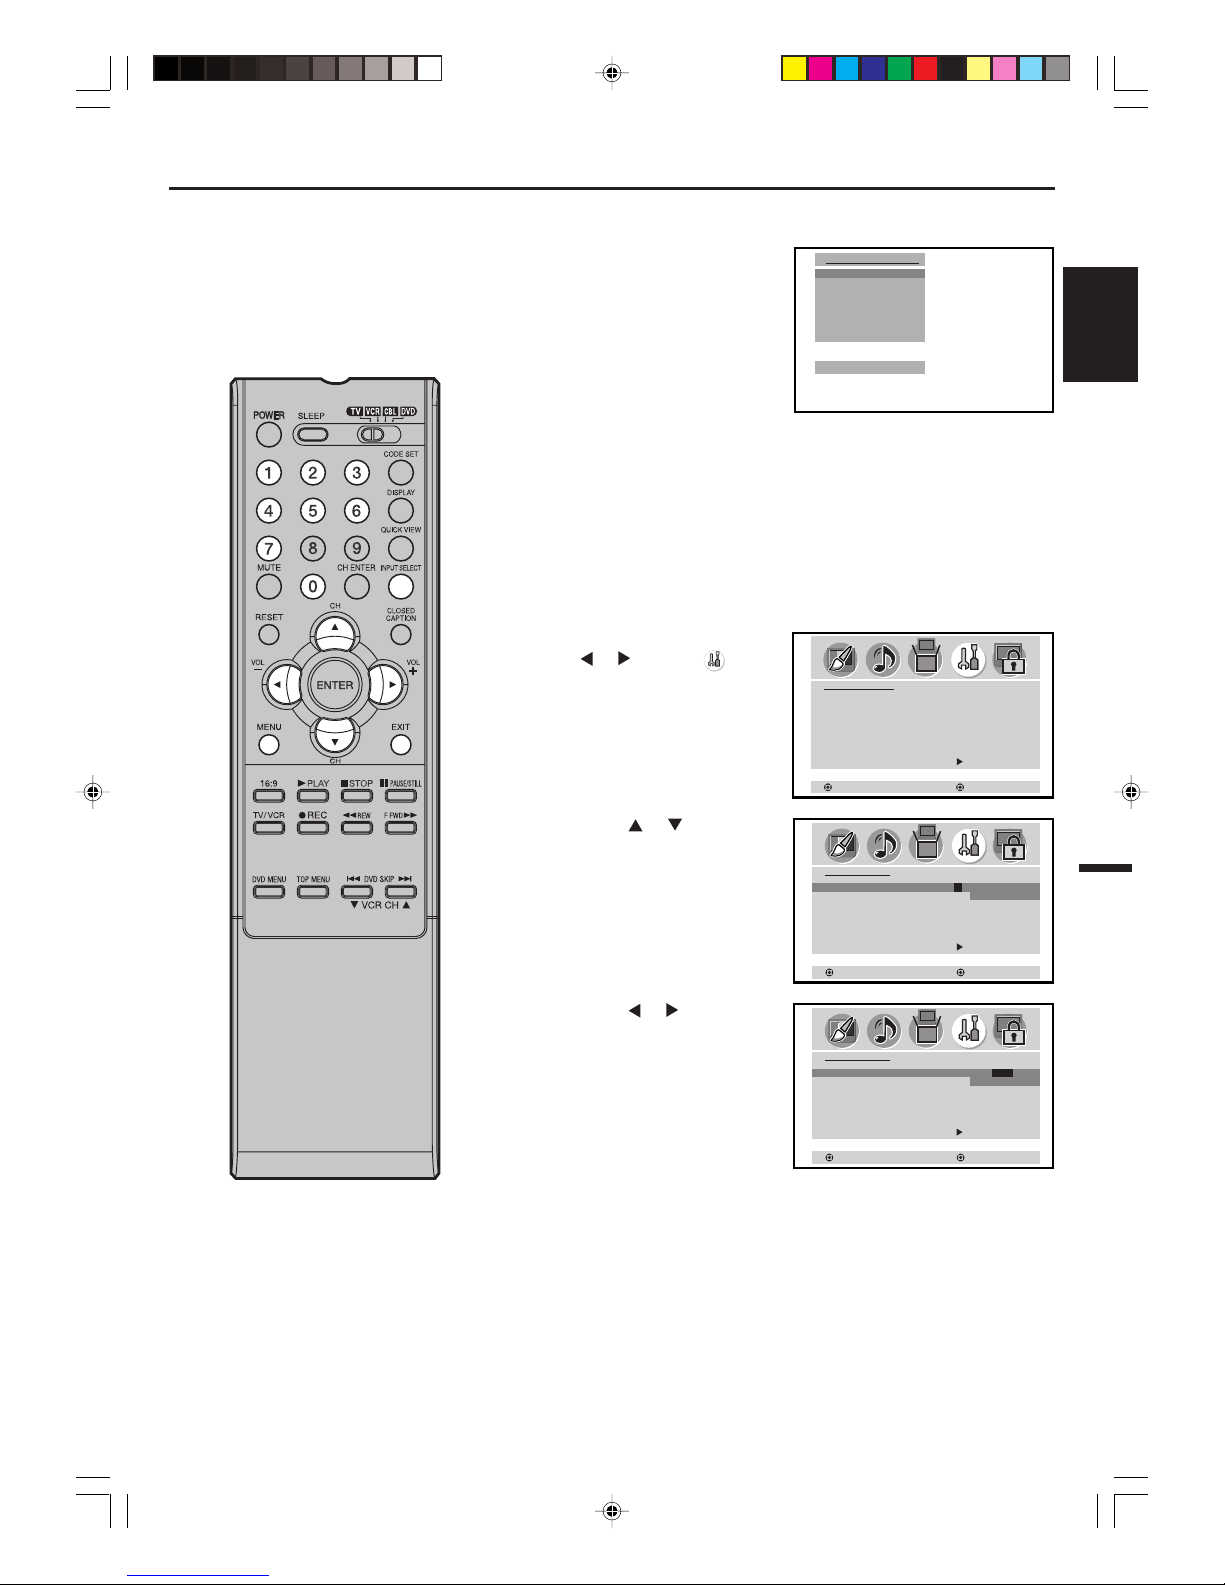
ress INPUT SELECT to view
a signal from another device
connected to your Plasma
Display, such as a VCR or
DVD player. You can select
VIDEO1, VIDEO2, VIDEO3
(left side of the unit),
COMPONENT1,
COMPONENT2, HDMI1,
HDMI2 or PC depending on
which input jacks you used to connect your devices.
Pressing INPUT SELECT on the remote control displays the
currentsignal source. To change the video input source, press
INPUT SELECT again or 0-7.
Labeling the video input source
The video label feature allows you to label each input source for
your unit.
SOURCE SELECTION
0. VIDEO1
1. VIDEO2
2. VIDEO3
3. COMPONENT1
4. COMPONENT2
5. HDMI1
6. HDMI2
7. PC
[0-7] : SELECT
VIDEO LABEL
1. VIDEO1 -
2. VIDEO2 -
3. VIDEO3 -
4. COMPONENT1 -
5. COMPONENT2 -
6. HDMI1 -
7. HDMI2 -
RETURN
:SELECT
:ADJUST
VIDEO LABEL
1. VIDEO1 - /VCR/DVD/DTV
2. VIDEO2 - SAT/ CBL
3. VIDEO3 -
4. COMPONENT1 -
5. COMPONENT2 -
6. HDMI1 -
7. HDMI2 RETURN
:SELECT
:ADJUST
:ADJUST
VIDEO LABEL
1. VIDEO1 - /VCR /DVD / DTV
2. VIDEO2 - SAT/ CBL
3. VIDEO3 -
4. COMPONENT1 -
5. COMPONENT2 -
6. HDMI1 -
7. HDMI2 -
RETURN
:SELECT
1
Press MENU. Then press
or to select
(VIDEO LABEL) menu.
2
Press or to select the
video source you want to
label.
3
Press or to select the
desired label for that input
source.
4
Press EXIT to return to the normal screen.
3Y80821A_En_p17-22 6/21/06, 1:47 PM19
Page 20
20
NOTES:
• If the program or video you selected is not closed-captioned, no captions will display on-screen.
• If text is not available in your viewing area, a black rectangle may appear on-screen. If this happens, set the
Closed Caption feature to “OFF”.
• When selecting Closed Captions, the captioning will be delayed approx. 10 seconds.
• If no caption signal is received, no captions will appear, but the plasma Display will remain in the Caption Mode.
• Misspellings or unusual characters may occasionally appear during Closed Captioning. This is normal with
Closed Captioning, especially with live programs. This is because during live programs, captions are also
entered live. These transmissions do not allow time for editing.
• When Captions are being displayed, on-screen displays, such as volume and mute may be seen but may interfere
with Closed Captions.
• Some Cable TV systems and copy protection systems may interfere with the Closed Captioned signal.
Closed Caption
WHAT IS CLOSED CAPTIONING?
This Plasma Display has the capability to decode and display Closed Captioned television programs. Closed
Captioning will display text on the screen for hearing impaired viewers and may translate and display text in another
language if broadcast.
1
Select desired video source for the Plasma Display.
2
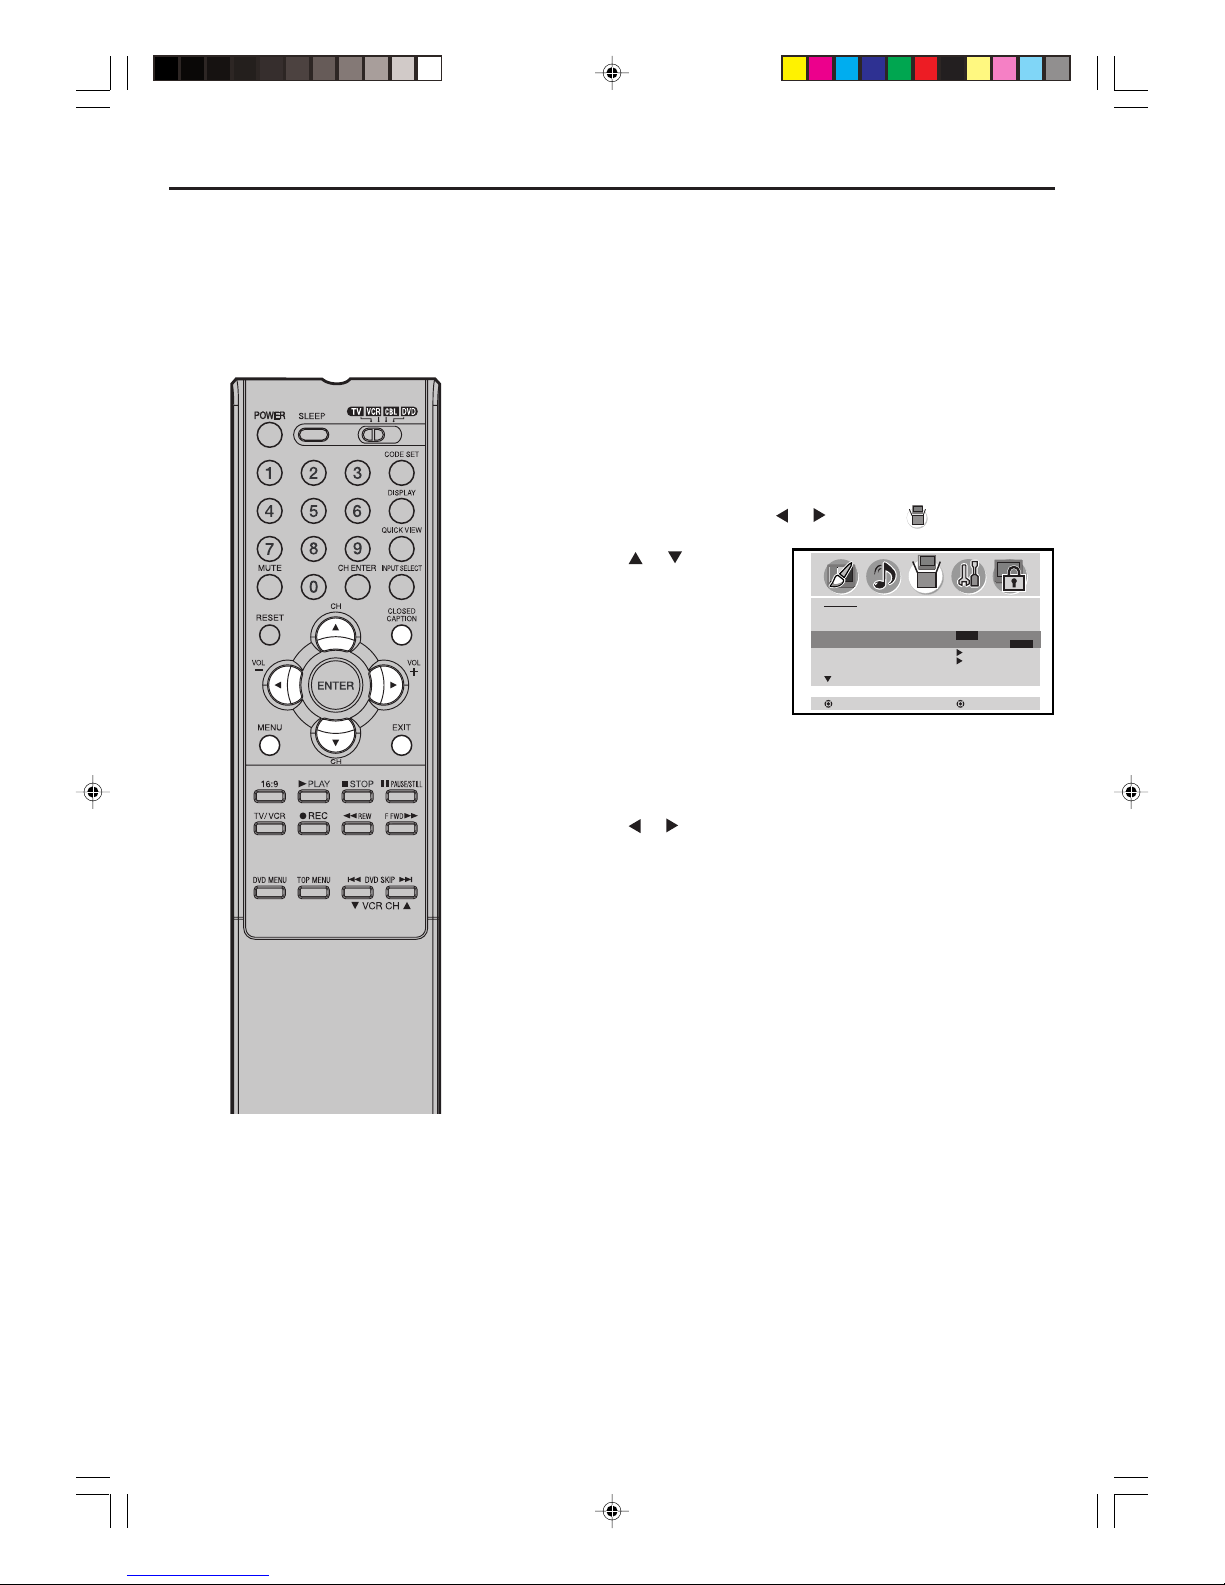
Press MENU, then press or to display (SETUP) menu.
3
Press or to select
“CLOSED CAPTION”.
NOTE:
This screen can be displayed by pressing the CLOSED
CAPTION button on the Remote control.
4
Press or to select the desired Closed Caption mode.
NOTE:
To turn the Closed Caption feature off, select “OFF”.
5
Press EXIT to return to the normal screen.
Captions: This Closed Caption Mode will display text on the screen
in English or another language if broadcast. Generally, Closed
Captions in English are transmitted on C1 and Closed Captions in
other languages are transmitted on C2.
Text: The Text Closed Caption Mode will usually fill 1/2 of the screen
with a programming schedule or other information.
:SELECT
SETUP
LANGUAGE ENGLISH
CLOSED CAPTION OFF
C1 / C2 /T1 / T2 / OFF
PICTURE SIZE
PICTURE SCROLL
CINEMA MODE FILM
:ADJUST
3Y80821A_En_p17-22 6/21/06, 1:47 PM20
Page 21
21
ENGLISH
Setting the panel lock
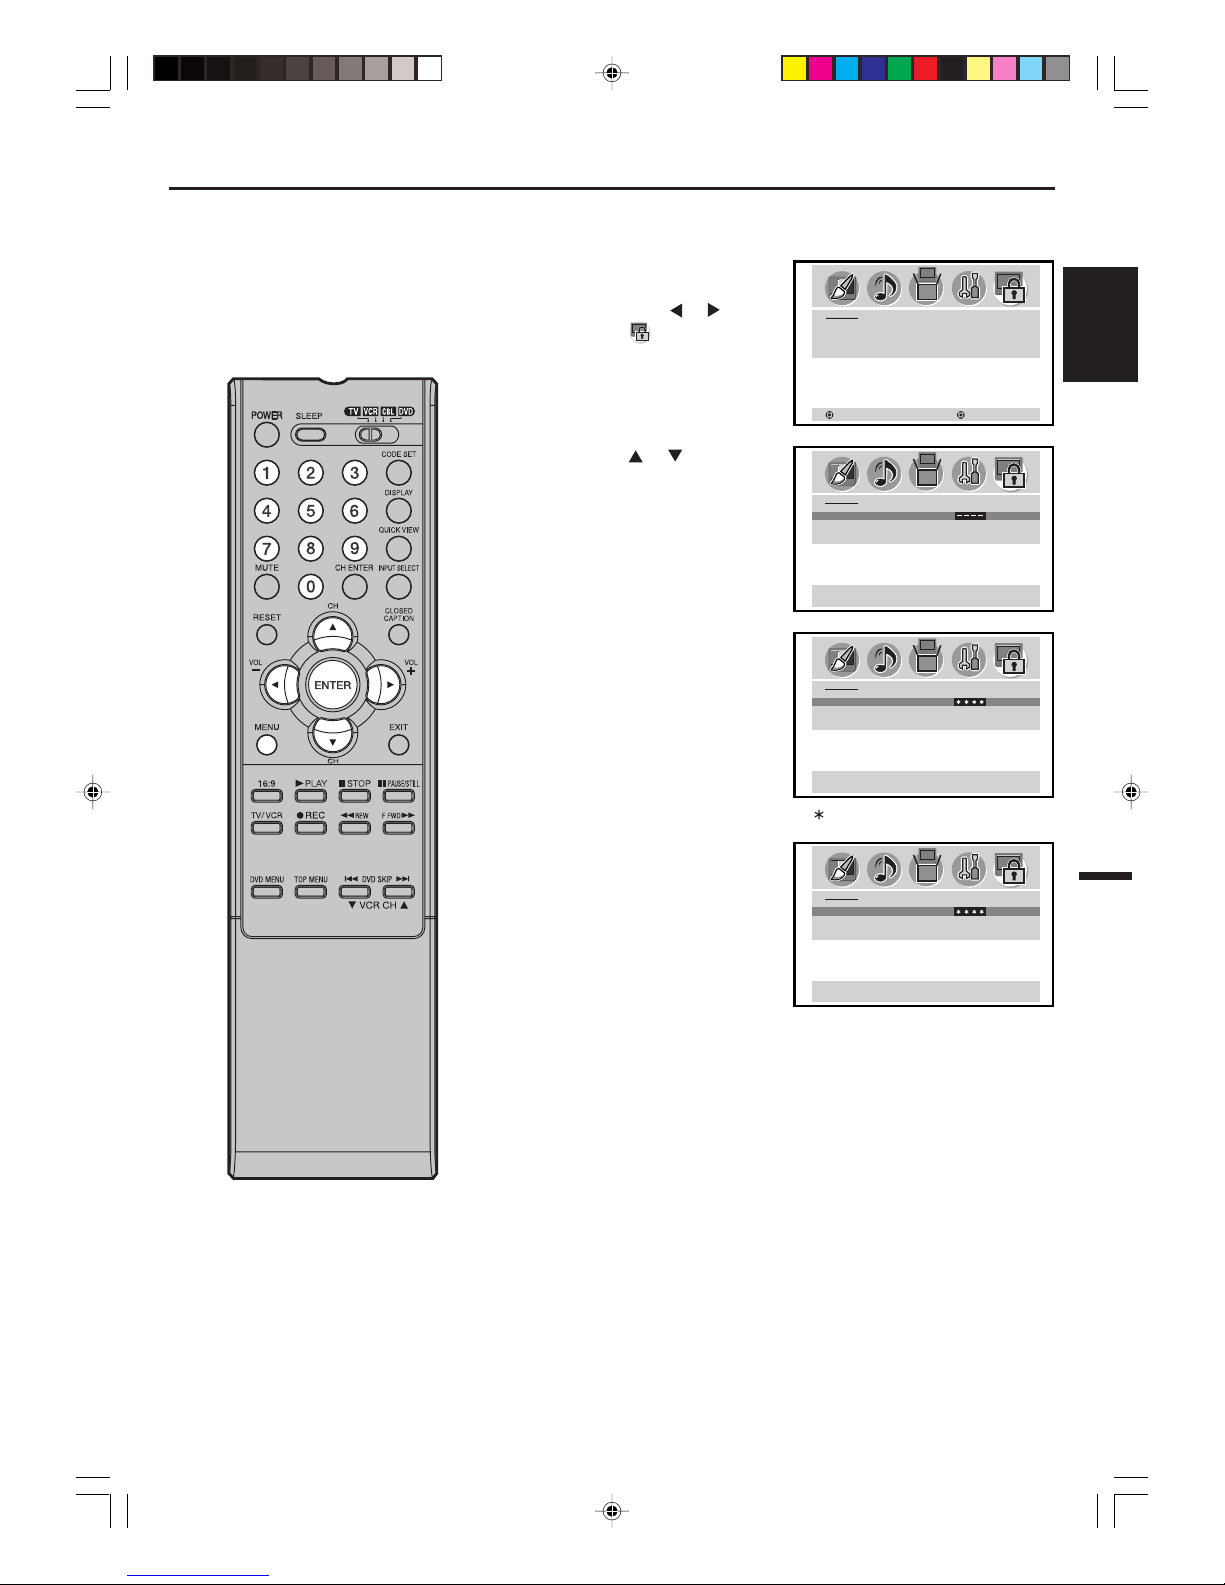
1
Press MENU. The menu
screen will appear.
Then press
or to
select (LOCKS) menu.
2
Press or to display
the password entering
mode.
3
Enter the password
(4 digits) using number
buttons (0-9), then press
ENTER.
4
Enter the same password
to confirm, then press
ENTER.
The password is now
registered and the LOCKS
menu will appear on the
screen.
To register a password
You can lock the front panel buttons to
prevent your settings from being changed
accidentally (by children, for example).
When the panel lock is ON, all control
buttons on the Plasma Display front panel
(except POWER) do not operate.
To use the panel lock function, you must
register a password.
NOTES:
• Do not forget the password. If you forget the
password, contact the dealer that you
purchased the unit from.
•To avoid forgetting the password, write it
down and keep in a safe place.
LOCKS
NEW PASSWORD
[0-9] : SELECT ENTER : SET
EXIT : END
LOCKS
NEW PASSWORD
[0-9] : SELECT ENTER : SET
EXIT : END
LOCKS
PANEL LOCK
NEW PASSWORD
:SELECT
:ADJUST
LOCKS
CONFIRM PASSWORD
[0-9] : SELECT ENTER : SET
EXIT : END
“ ” appears instead of the number.
3Y80821A_En_p17-22 6/21/06, 1:47 PM21
Page 22
22
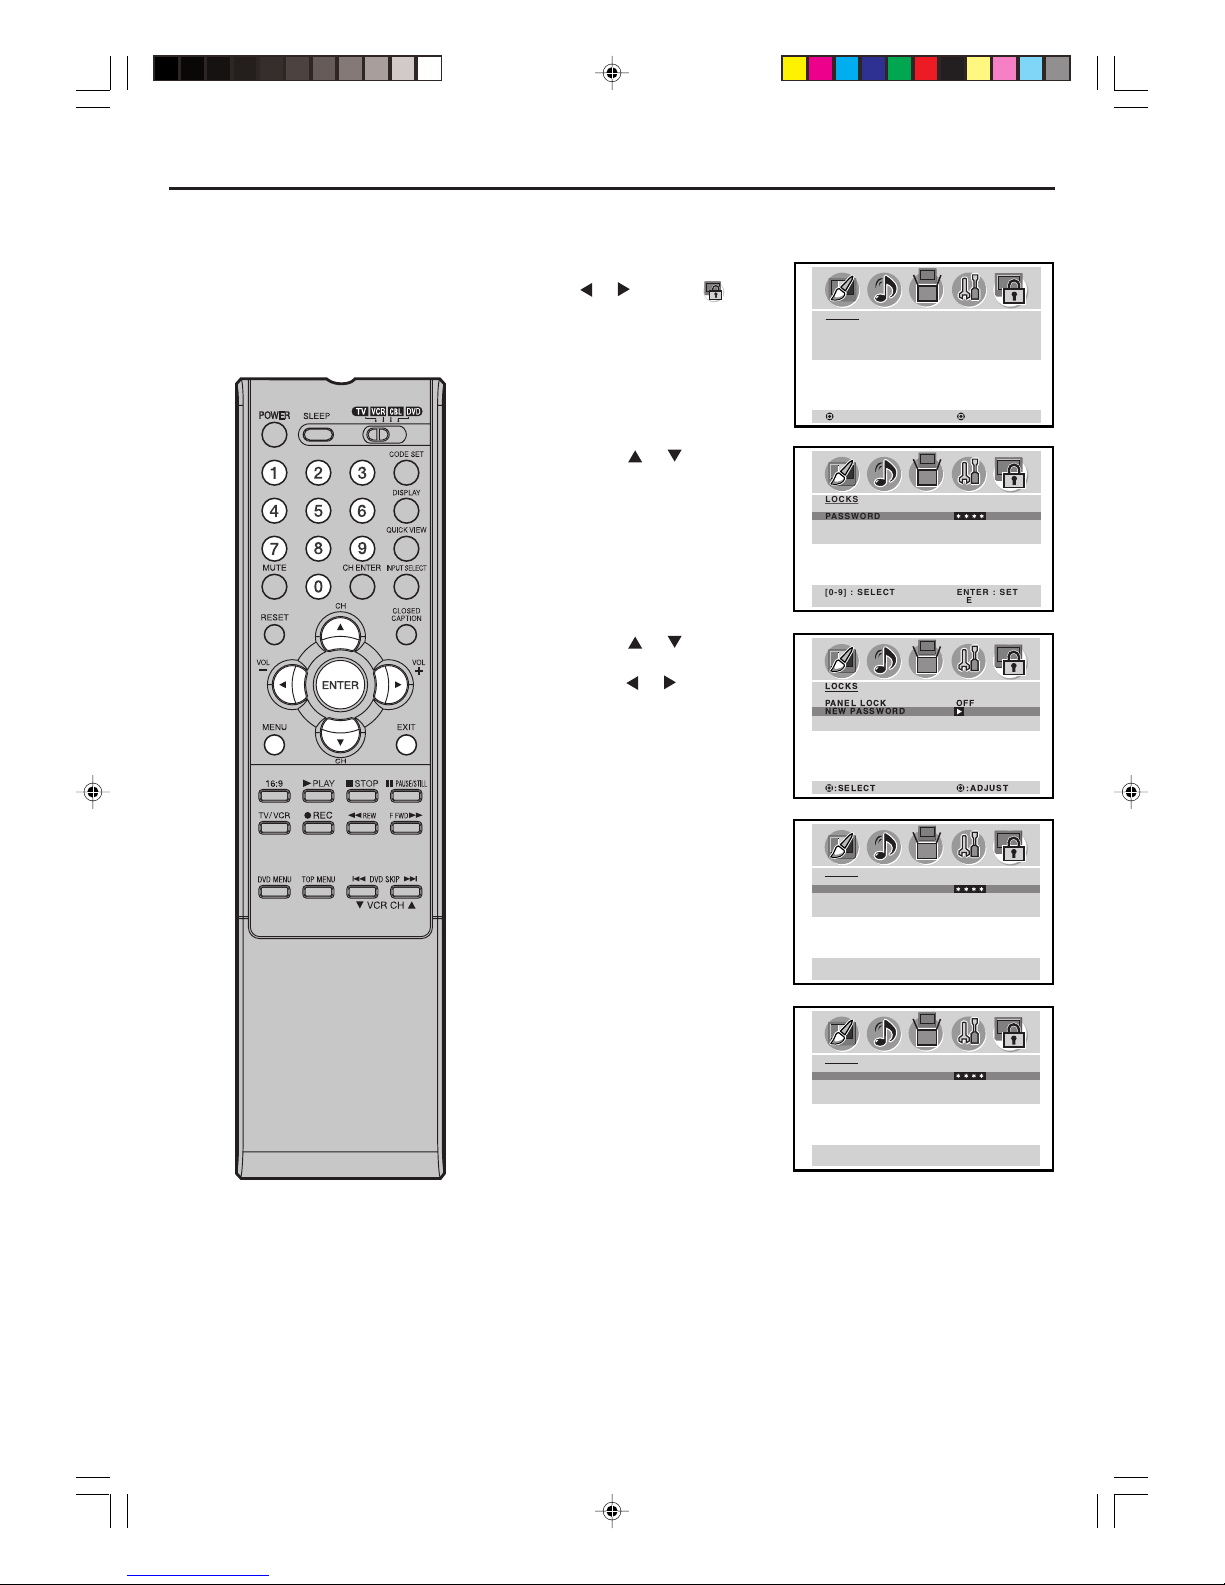
To change the password
1
Press MENU, then press
or to select
(LOCKS) menu.
2
Press or to display
the password entering
mode. Use the number
buttons (0-9) to enter your
password, then press
ENTER. The LOCKS
menu appears.
3
Press or to select
“NEW PASSWORD”, then
press
or .
4
Enter a new password
using the number buttons
(0-9), then press ENTER.
5
Enter the same password
again to confirm, then
press ENTER.
6
Press EXIT to return to the normal screen.
Setting the Panel lock
LOCKS
PASSWORD
[0-9] : SELECT ENTER : SET
EXIT : END
LOCKS
NEW PASSWORD
[0-9] : SELECT ENTER : SET
EXIT : END
LOCKS
CONFIRM PASSWORD
[0-9] : SELECT ENTER : SET
EXIT : END
LOCKS
PANEL LOCK
NEW PASSWORD
:SELECT
:ADJUST
3Y80821A_En_p17-22 6/21/06, 1:47 PM22
Page 23
23
ENGLISH
Setting the panel lock
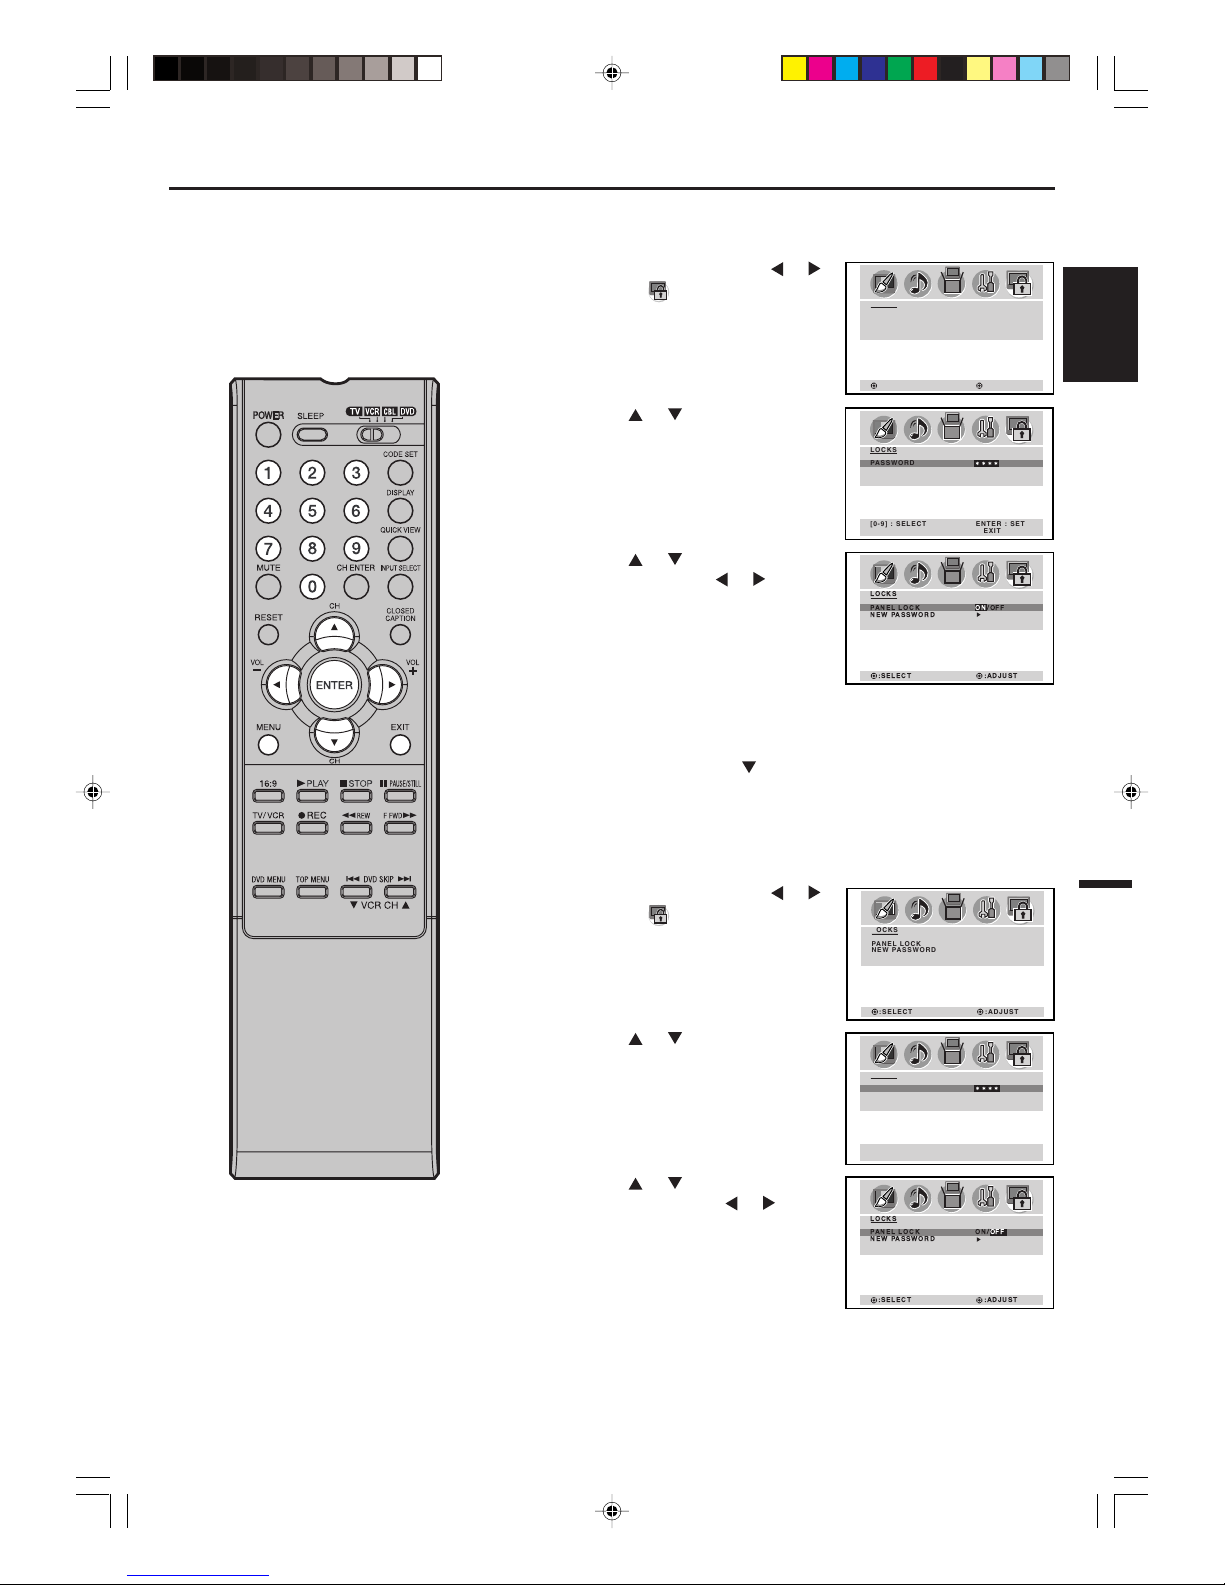
1
Press MENU, then press or
to select (LOCKS) menu.
2
Press or to display the
password entering mode. Use the
number buttons (0-9) to enter
your password, then press
ENTER. The LOCKS menu
appears.
3
Press or to select “PANEL
LOCK” and press or to select
“ON”.
If a button on the front panel is
pressed, the message “NOT
AVAILABLE” appears.
4
Press EXIT to return to the normal screen.
To lock the front panel
To unlock the front panel
Press and hold VOLUME on the front panel of Plasma Display
for about 10 seconds until the message “PANEL LOCK:OFF”
appears on the screen.
1
Press MENU, then press or
to select (LOCKS) menu.
2
Press or to display the
password entering mode.
Use the number buttons (0-9) to
enter your password, then press
ENTER. The LOCKS menu
appears.
3
Press or to select “PANEL
LOCK”, then press or to
select “OFF”.
4
Press EXIT to return to the normal screen.
You also can unlock the front panel using the menus
LOCKS
PASSWORD
[0-9] : SELECT ENTER : SET
EXIT : END
LOCKS
PASSWORD
[0-9] : SELECT ENTER : SET
EXIT : END
LOCKS
PANEL LOCK
NEW PASSWORD
:SELECT
:ADJUST
LOCKS
PANEL LOCK
NEW PASSWORD
:SELECT
:ADJUST
3Y80821A_En_p23-25 6/21/06, 1:47 PM23
Page 24
24
Setting the picture size
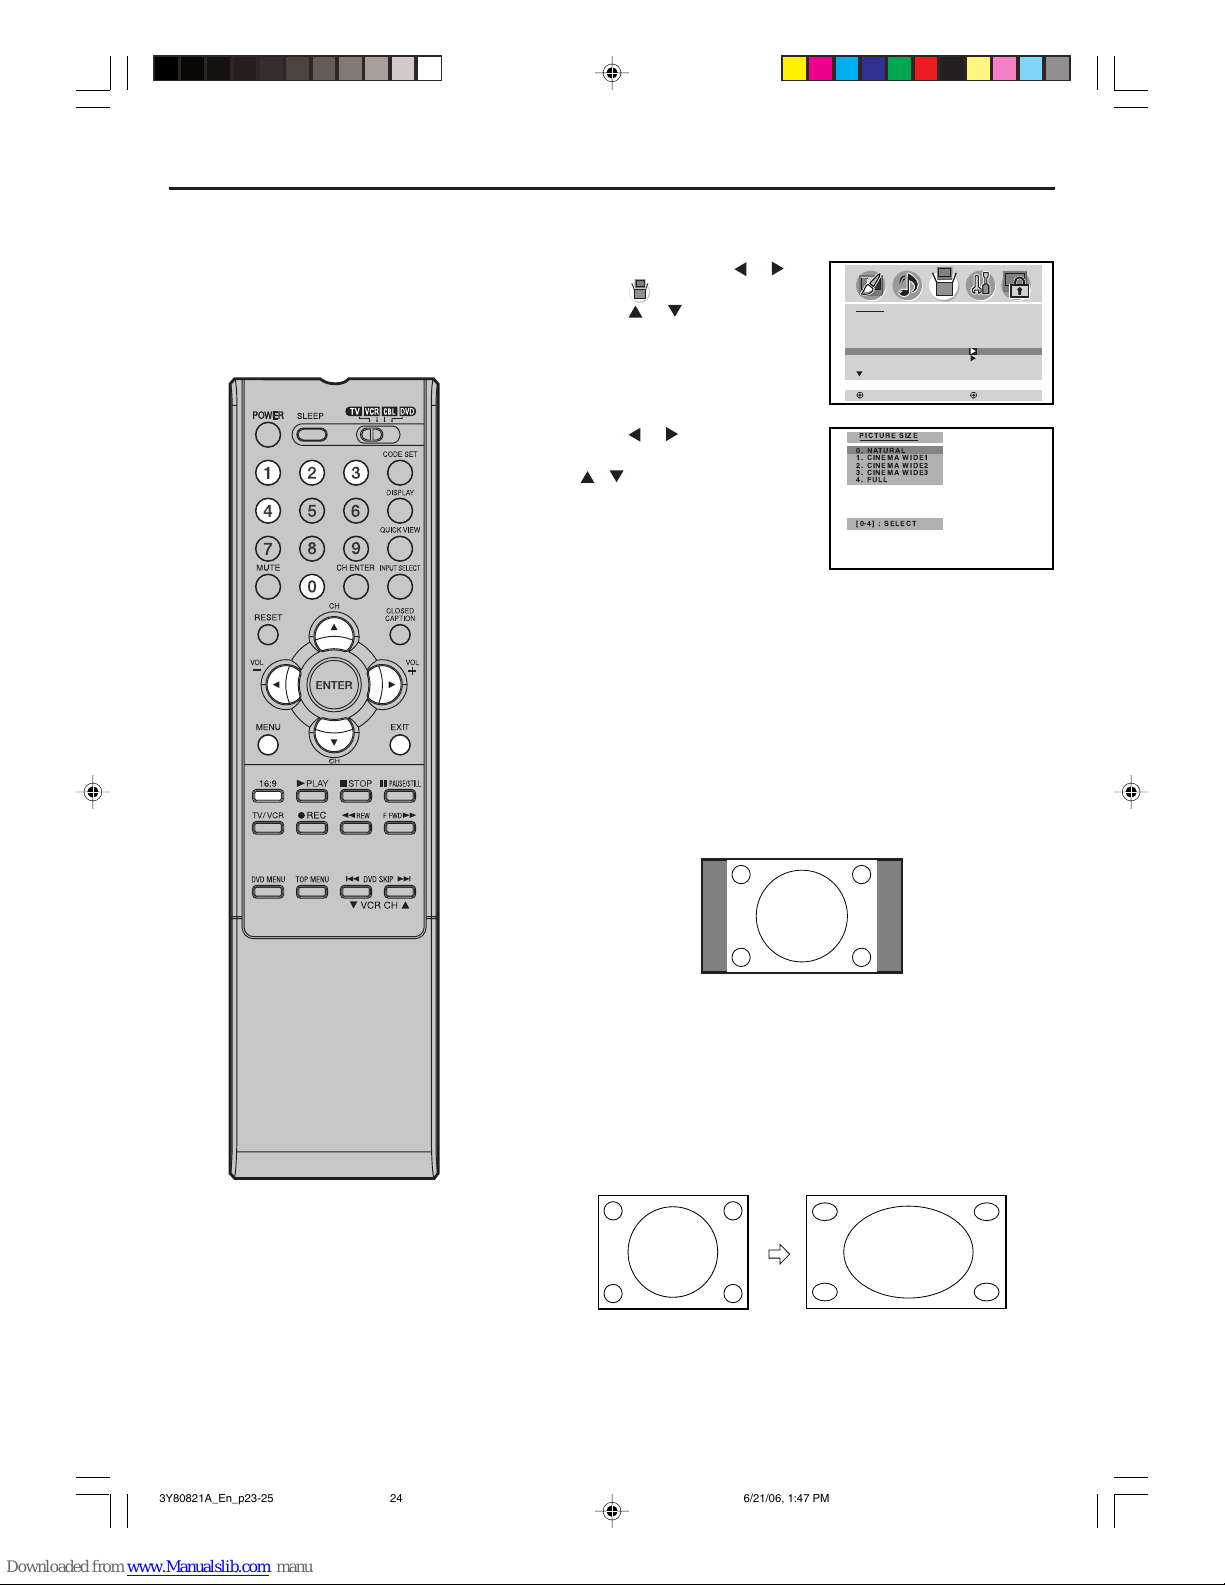
NATURAL picture size
In many cases, this image will display the size of standard 4:3
with a gray side bar.
1
Press MENU. Press or to
select
(SETUP) menu.
Press
or to select
“PICTURE SIZE”.
2
Press or . The PICTURE
SIZE menu will appear. Press
/ or a number buttons
(0-4) to select the desired
picture size, as described
below and on the next page.
3
Press EXIT to return to the
normal screen.
NOTE:
You can also display the PICTURE SIZE menu by pressing the
16:9 button on the remote control.
Selecting the picture size
You can view 480i and 480p format
programs in a variety of picture sizes
—NATURAL, CINEMA WIDE1, CINEMA
WIDE2, CINEMA WIDE3, and FULL.
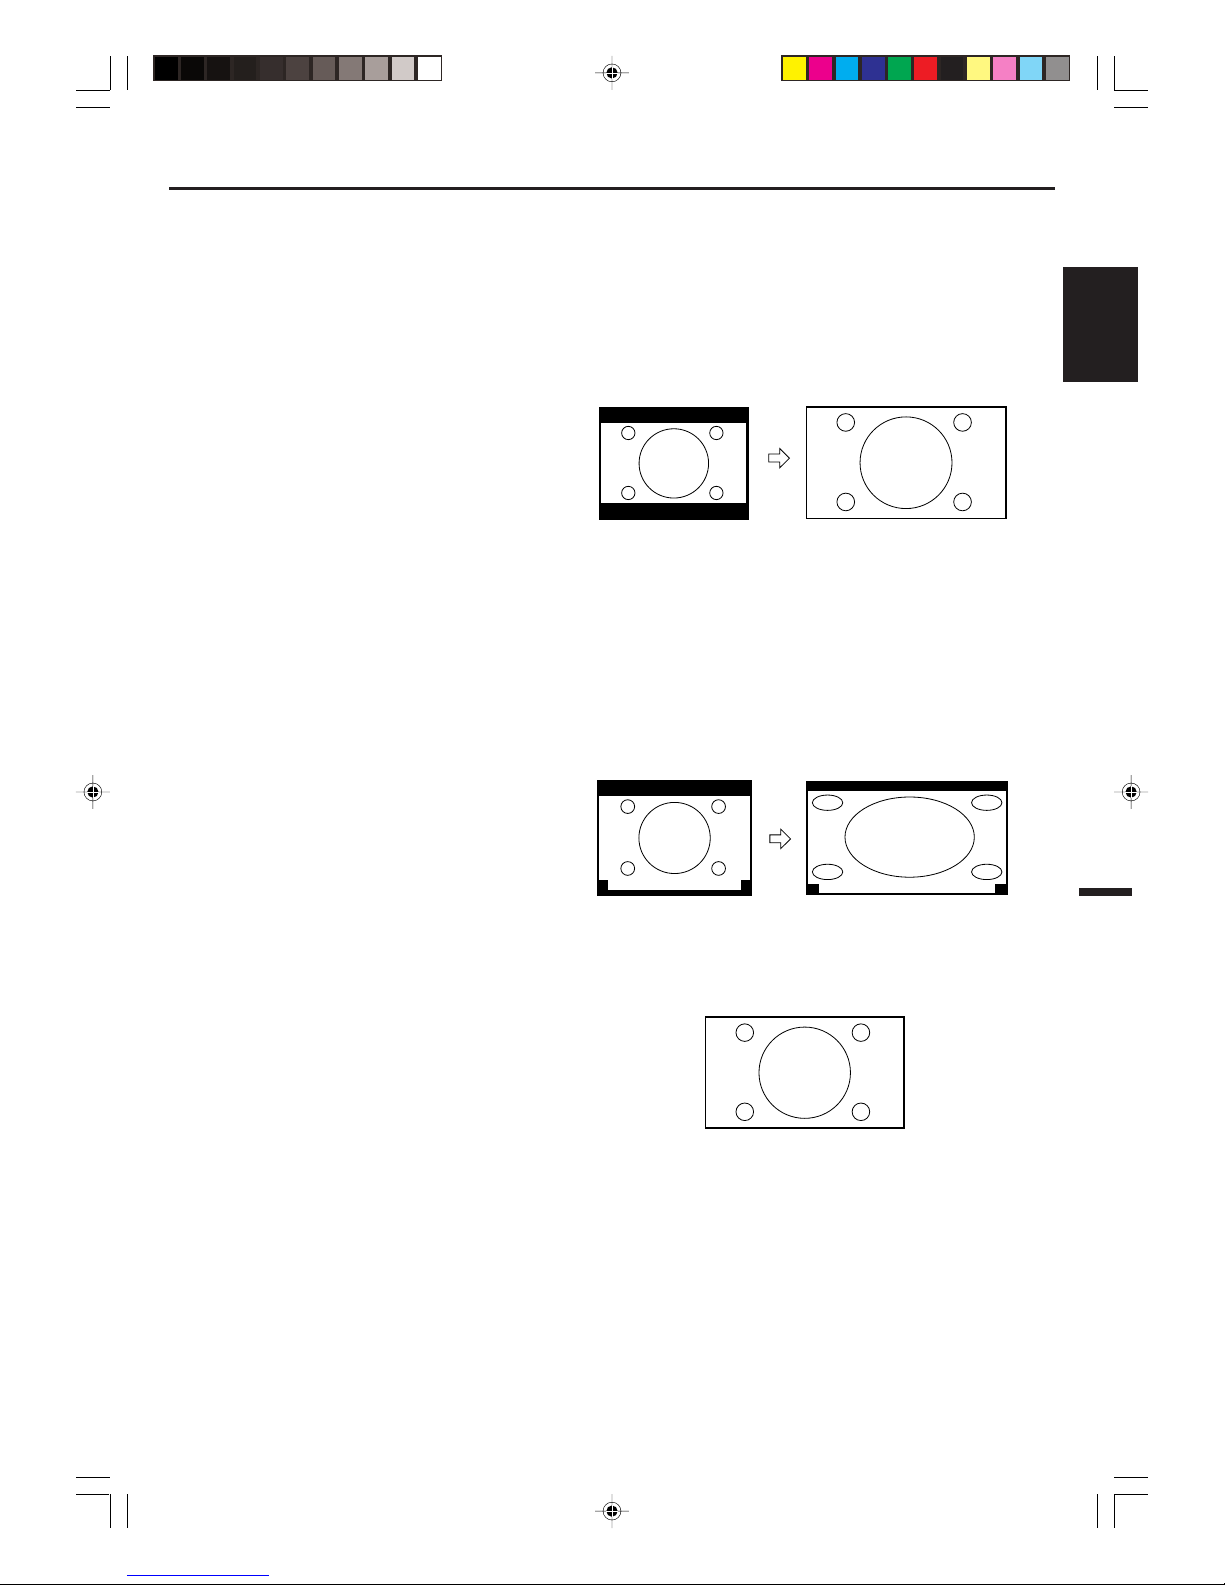
CINEMA WIDE1 picture size (for 4:3 format programs)
To fill the screen, the right and left edges are extended more widely
though the center of the picture remains near former ratio.
The top and bottom edges of the picture may be hidden.
:SELECT
SETUP
LANGUAGE ENGLISH
CLOSED CAPTION OFF
PICTURE SIZE
PICTURE SCROLL
CINEMA MODE FILM
:ADJUST
PICTURE SIZE
0. NATURAL
1. CINEMA WIDE1
2. CINEMA WIDE2
3. CINEMA WIDE3
4. FULL
[0-4] : SELECT
3Y80821A_En_p23-25 6/21/06, 1:47 PM24
Page 25
25
ENGLISH
CINEMA WIDE2 picture size (for letter box programs)
The entire picture is uniformly enlarged—it is stretched the same
amount both wider and taller (retains its original proportion).
The top and bottom edges of the picture may be hidden. To view
the hidden areas, it is possible to make the picture scroll (see
page 26).
CINEMA WIDE3 picture size (for letter box programs
with subtitles)
To fill the width of the screen, it is extended horizontally.
However; it is only slightly extended at the top and the bottom.
The top and bottom edges of the picture may be hidden. To view
the hidden areas (such as subtitles or captions), it is possible to
make the picture scroll (see page 26).
FULL picture size (for 16:9 source programs)
FULL will display the picture at the maximum size.
NOTES:
• The PICTURE SIZE feature is not
available for some program formats (such as
1080i or 720p). Such formats will display in
FULL.
• The PICTURE SIZE feature is available in
the PC mode only for NATURAL or FULL.
Setting the picture size
A B C D E F G - - - - - - - - - - - - - - - -
A B C D E F G - - - - - - - - - - - - - - - -
A B C D E F G - - - - - - - - - - - - - - - - - - - - - - - - - -
3Y80821A_En_p23-25 6/21/06, 1:47 PM25
Page 26
26
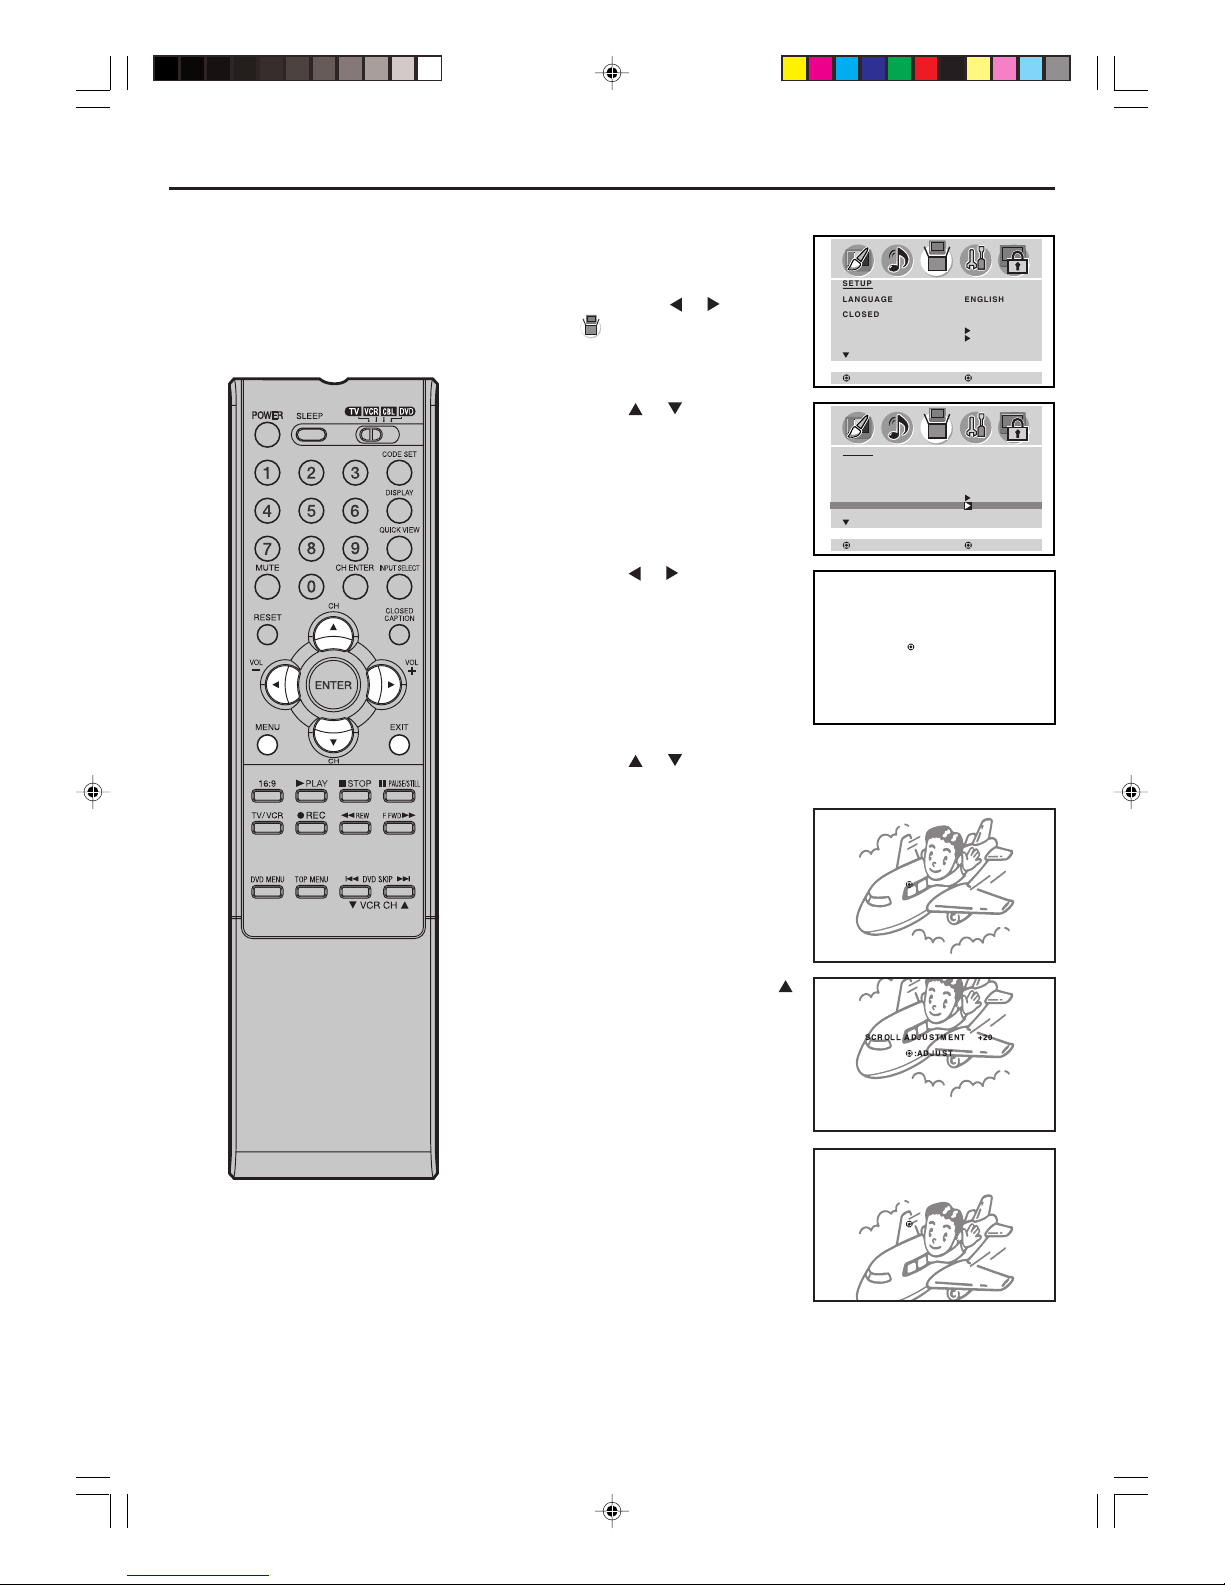
Normal (centre) position
To raise the picture, press .
To lower the picture, press ▼.
1
Press MENU in CINEMA
WIDE2 or CINEMA WIDE3
mode.
Then press
or to select
(SETUP) menu.
2
Press or to select
“PICTURE SCROLL”.
3
Press or to display the
SCROLL ADJUSTMENT
mode.
4
Press or to adjust the vertical position of the picture.
You can scroll the picture in CINEMA
WIDE2 and CINEMA WIDE3.
Setting the picture scroll
NOTE:
The scroll amounts are as follows:
• 480i/480p signal source:
CINEMA WIDE1 : Not adjustable
CINEMA WIDE2 : –10 to + 20
CINEMA WIDE3 : –10 to +10
5
Press EXIT to return to the normal screen.
SCROLL ADJUSTMENT -10
:ADJUST
SCROLL ADJUSTMENT 0
:ADJUST
SCROLL ADJUSTMENT 0
:ADJUST
SETUP
LANGUAGE ENGLISH
CLOSED CAPTION OFF
PICTURE SIZE
PICTURE SCROLL
CINEMA MODE FILM
:SELECT
:ADJUST
SETUP
LANGUAGE ENGLISH
CLOSED CAPTION OFF
PICTURE SIZE
PICTURE SCROLL
CINEMA MODE FILM
:SELECT
:ADJUST
3Y80821A_En_p26-30 6/21/06, 1:48 PM26
Page 27
27
ENGLISH
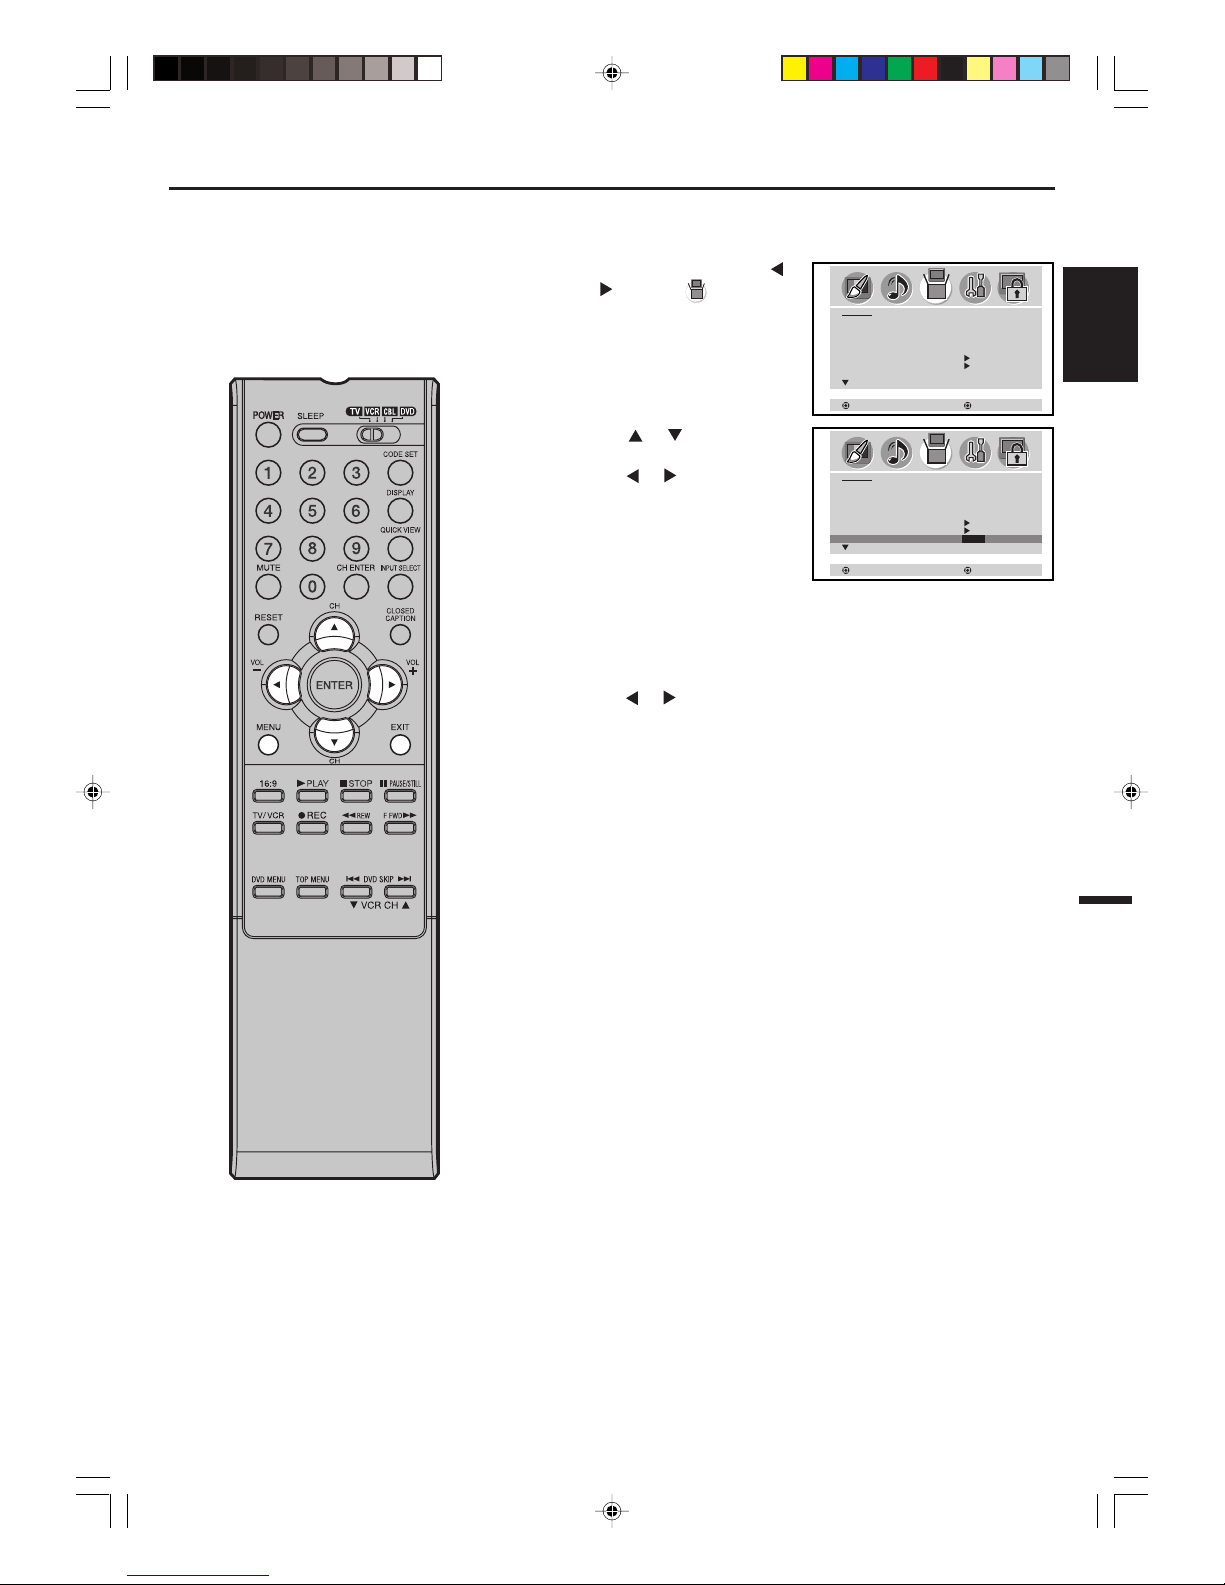
1
Press MENU, then press
or to select (SETUP)
menu.
2
Press or to select
“CINEMA MODE”, and then
press or to select
“FILM”.
3
Press EXIT to return to the normal screen.
To set the CINEMA MODE to FILM
Selecting the cinema mode
To set the CINEMA MODE to VIDEO :
Press or to select “VIDEO” in step 2 above.
A smoother motion may be obtained by
setting the CINEMA MODE to FILM when
you view a DVD from the DVD player
connected with the component input.
SETUP
LANGUAGE ENGLISH
CLOSED CAPTION OFF
PICTURE SIZE
PICTURE SCROLL
CINEMA MODE FILM
:SELECT
:ADJUST
SETUP
LANGUAGE ENGLISH
CLOSED CAPTION OFF
PICTURE SIZE
PICTURE SCROLL
CINEMA MODE FILM/VIDEO
:SELECT
:ADJUST
3Y80821A_En_p26-30 6/21/06, 1:48 PM27
Page 28
28
Adjusting the picture preference
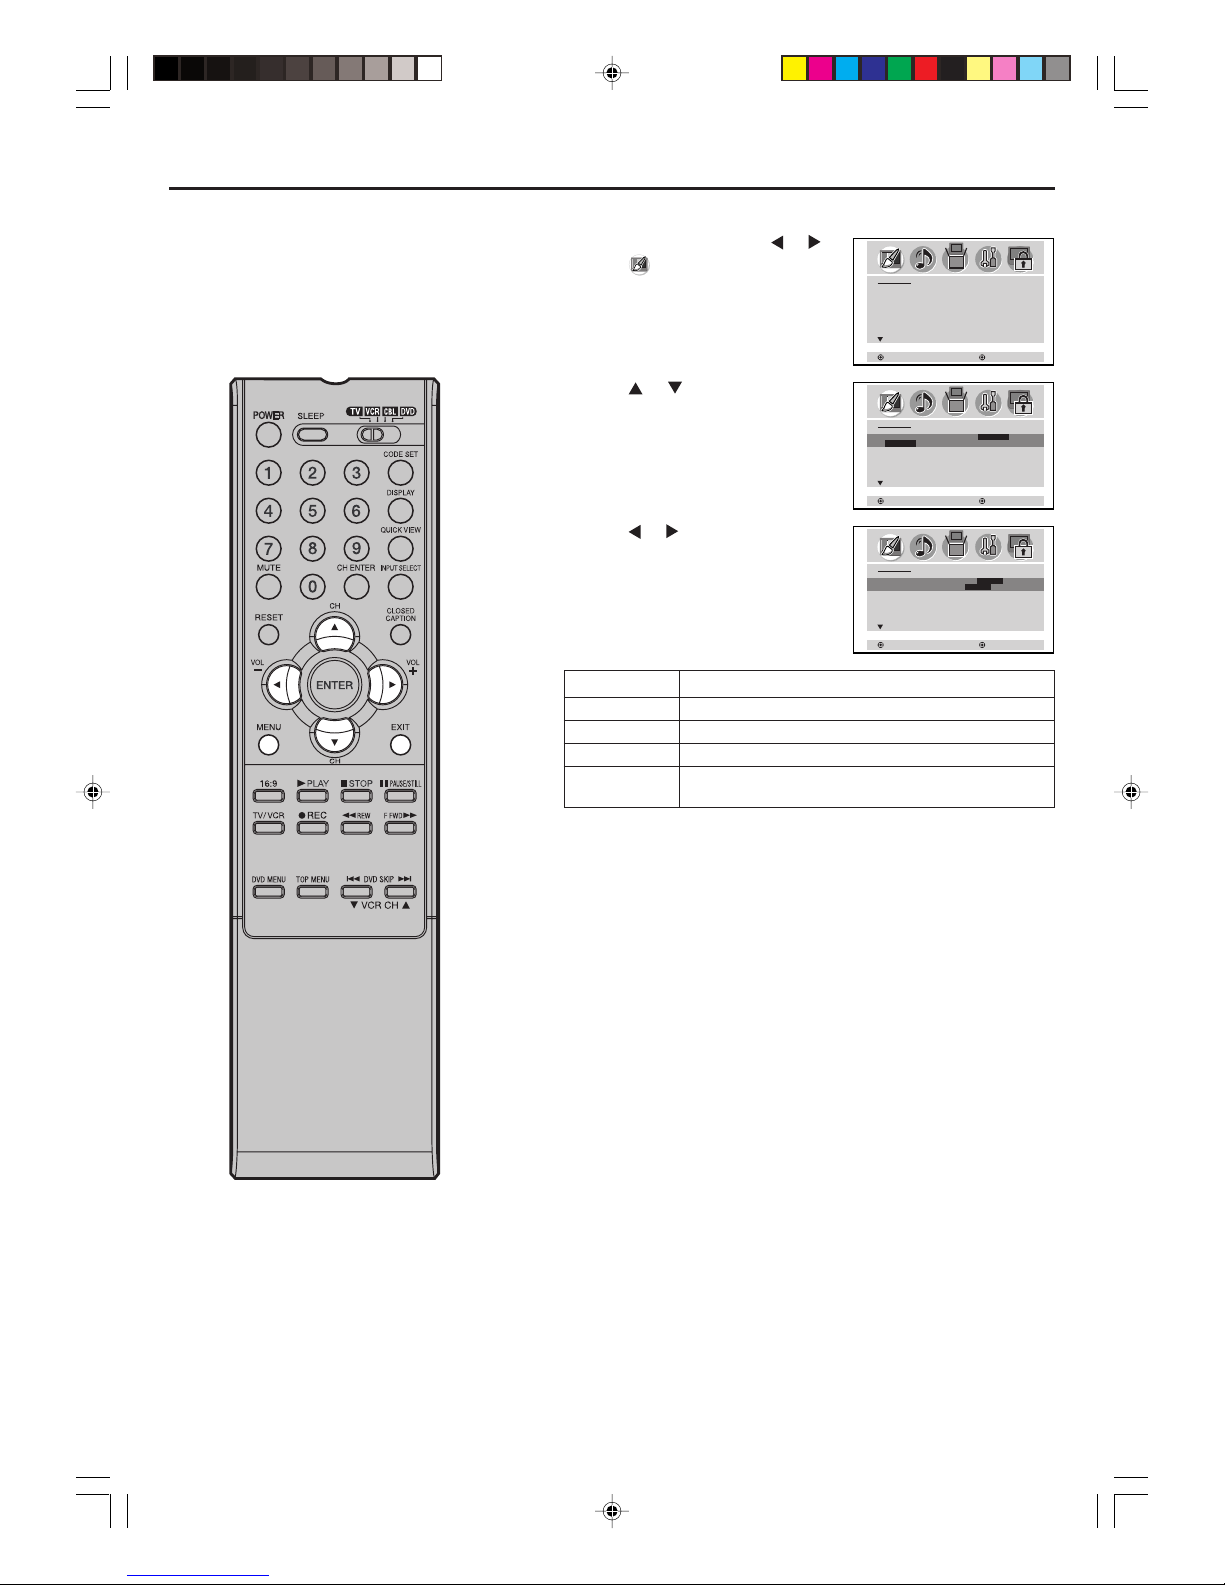
You can select four picture modes
—SPORTS, STANDARD, MOVIE, and
MEMORY—as described in the following
table:
1
Press MENU, then press or to
select (PICTURE) menu.
2
Press or to select
“PICTURE PREFERENCE”.
3
Press or to select the item
you want to adjust.
4
After your desired setting, press EXIT to return to the normal
screen.
Mode Picture Quality
SPORTS Bright and dynamic picture (factory-set)
STANDARD Standard picture quality (factory-set)
MOVIE Movie-like picture setting (factory-set)
MEMORY Your personal preferences (set by you; see “Picture
control adjustment” on page 29).
PICTURE
PICTURE PREFERENCE SPORTS
BRIGHTNESS 25
CONTRAST 50
COLOR 25
TINT 0
SHARPNESS 25
:SELECT
:ADJUST
PICTURE
PICTURE PREFERENCE SPORTS
SPORTS/STANDARD/ MOVIE/ MEMORY
BRIGHTNESS 25
CONTRAST 50
COLOR 25
TINT 0
SHARPNESS 25
:SELECT
:ADJUST
PICTURE
PICTURE PREFERENCE MOVIE
SPORTS/ STANDARD/ MOVIE/MEMORY
BRIGHTNESS 32
CONTRAST 20
COLOR 25
TINT 0
SHARPNESS 25
:SELECT
:ADJUST
3Y80821A_En_p26-30 6/21/06, 1:48 PM28
Page 29
29
ENGLISH
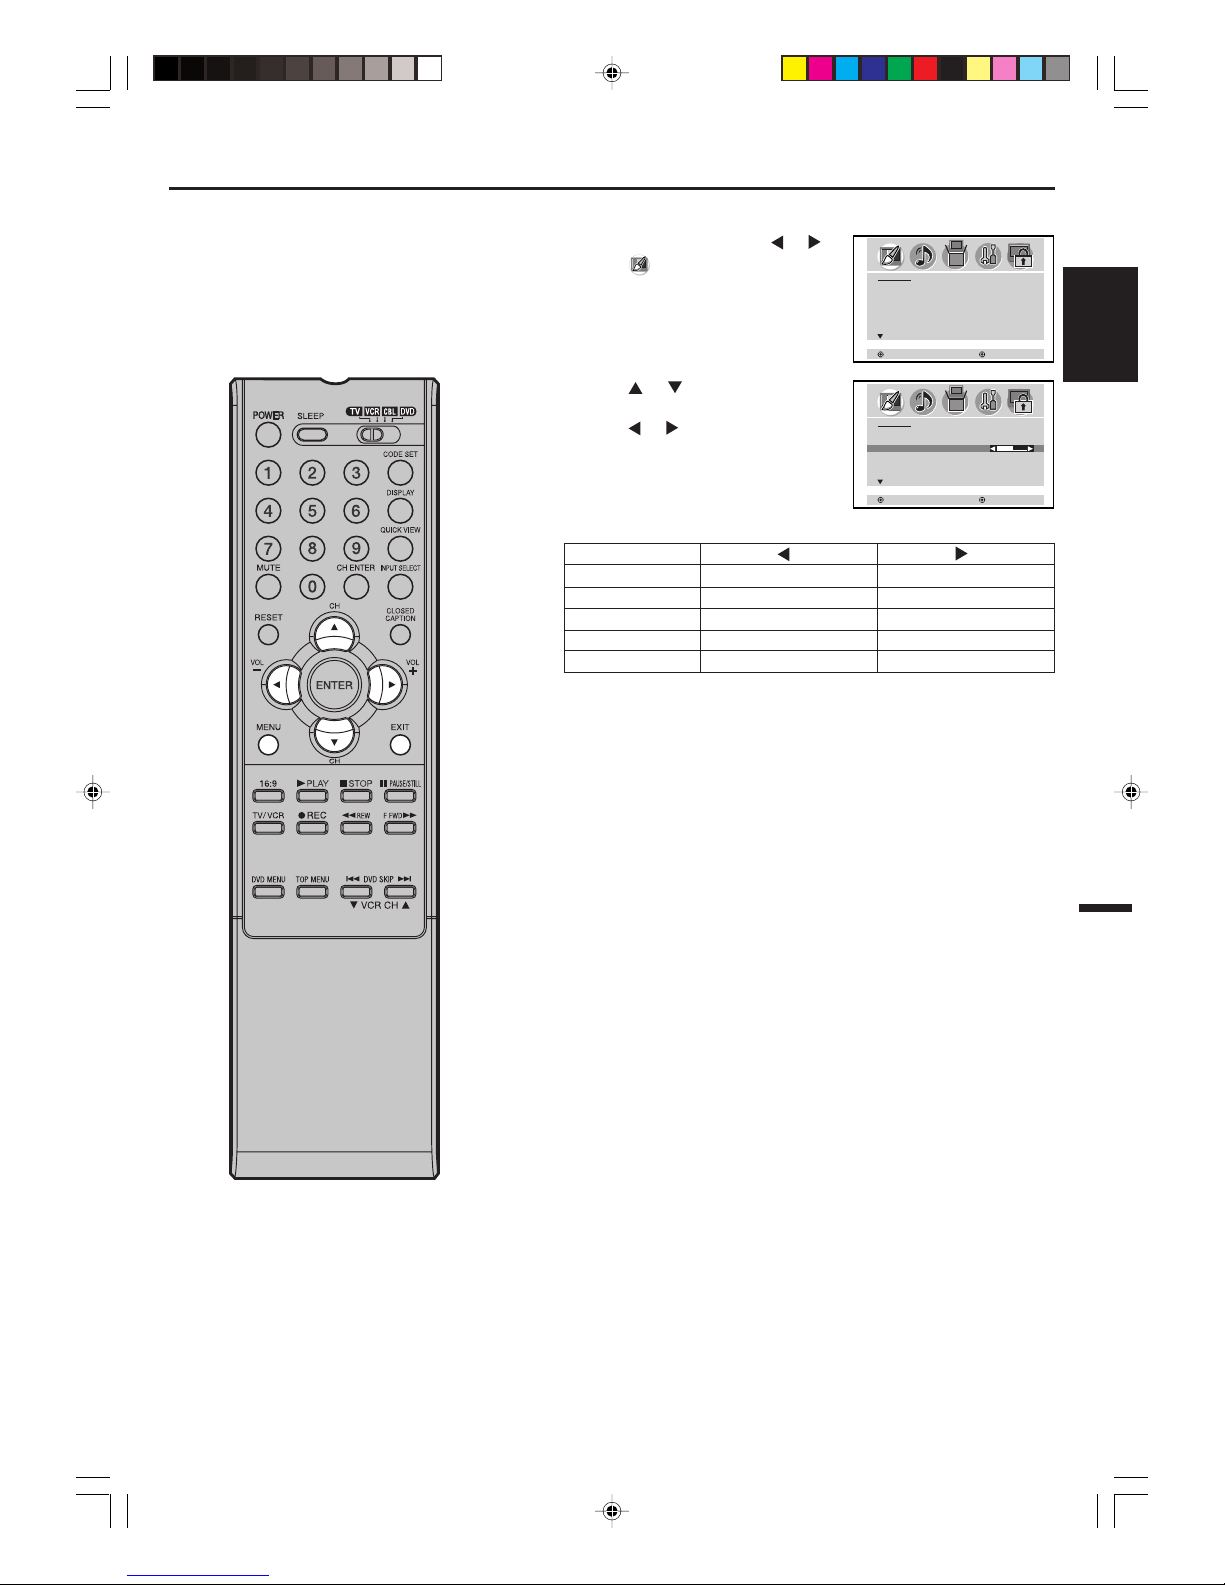
NOTE:
The CONTRAST default setting is set to
maximum at the factory.
1
Press MENU, then press or to
select (PICTURE) menu.
2
Press or to select the item
you want to adjust.
Press
or to adjust the setting.
3
After your desired setting, press EXIT to return to the normal
screen.
SHARPNESS
BRIGHTNESS
CONTRAST
COLOR
TINT
decrease brightness
decrease contrast
paler color
reddish color tint
makes picture softer
increase brightness
increase contrast
brilliant color
greenish color tint
makes picture clearer
Picture control adjustment
PICTURE
PICTURE PREFERENCE SPORTS
BRIGHTNESS 25
CONTRAST 50
COLOR 25
TINT 0
SHARPNESS 25
:SELECT
:ADJUST
PICTURE
PICTURE PREFERENCE SPORTS
BRIGHTNESS 25
CONTRAST 50
COLOR 25
TINT 0
SHARPNESS 25
:SELECT
:ADJUST
3Y80821A_En_p26-30 6/21/06, 1:48 PM29
Page 30
30
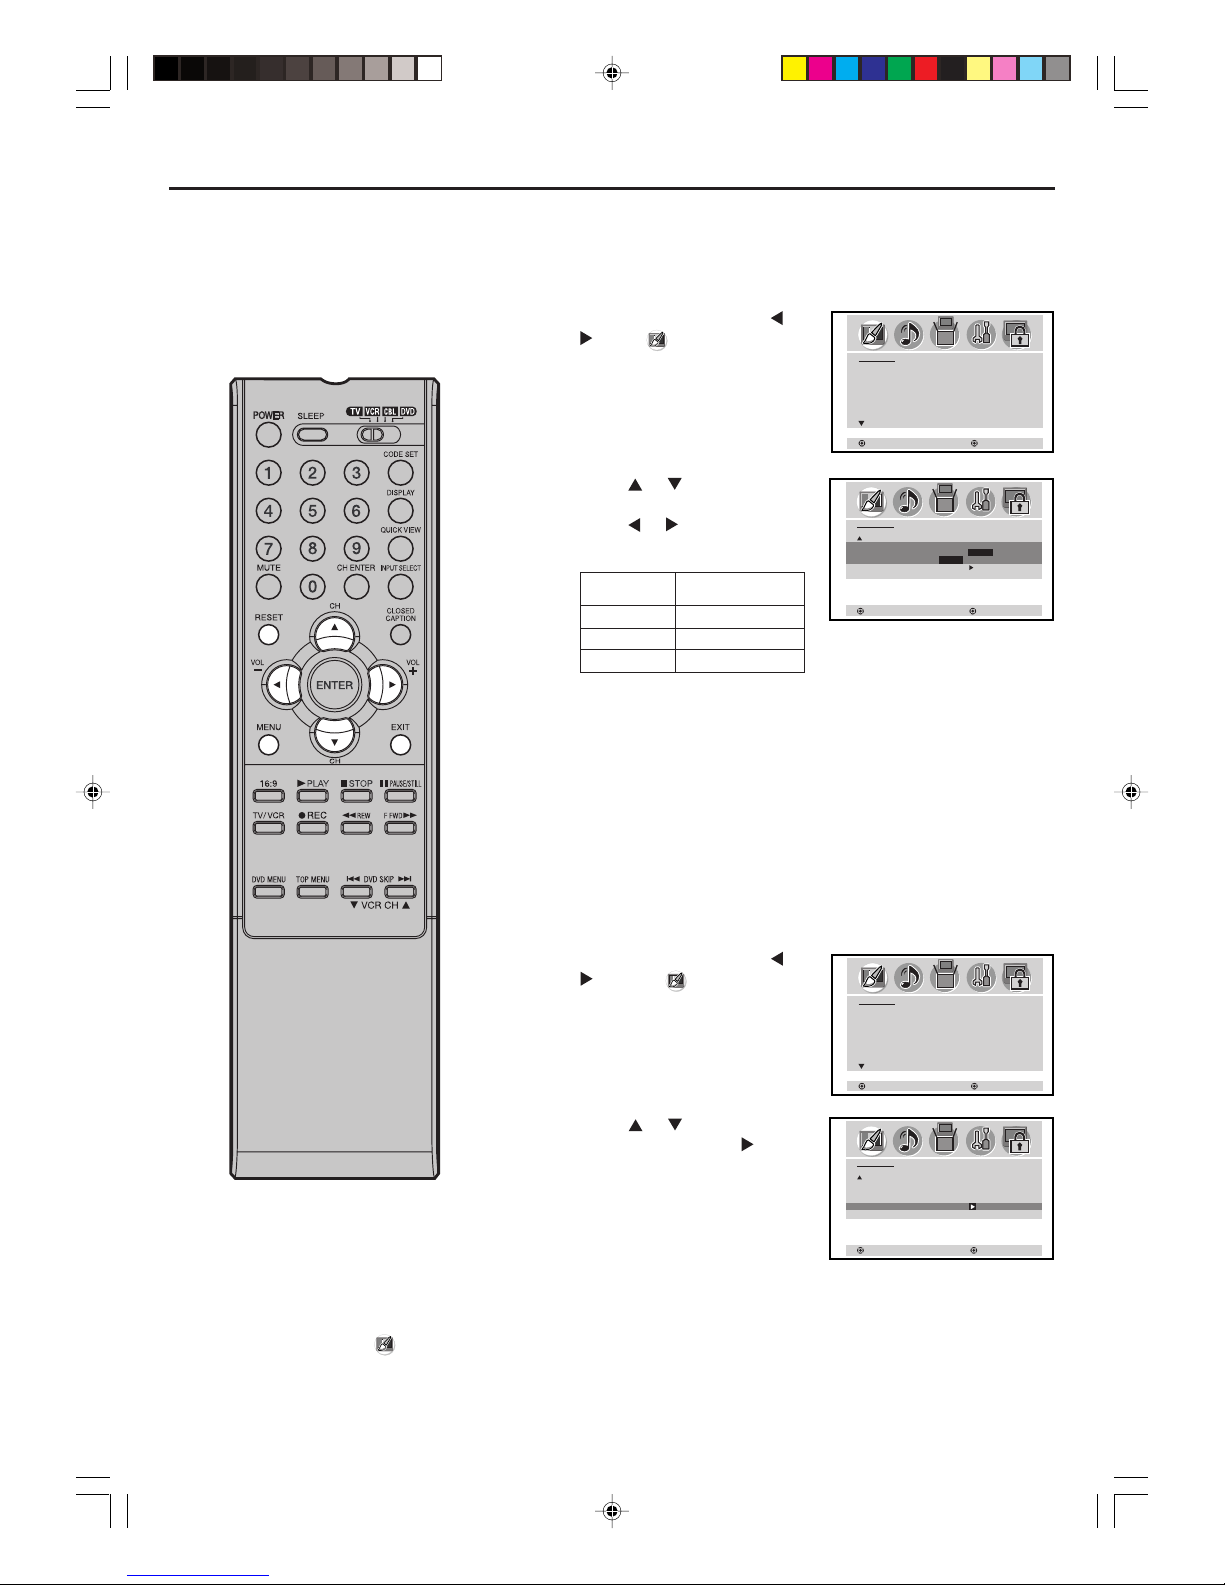
Resetting your picture adjustment
The RESET function returns your picture quality adjustments
to the following factory settings:
PICTURE PREFERENCE .. SPORTS
TINT .........................centre (0)
BRIGHTNESS ............ centre (25) SHARPNESS ......... centre (25)
CONTRAST .................. max (50)
COLOR TEMPERATURE ... COOL
COLOR ...................... centre (25)
Selecting the colour temperature
Change the picture quality by selecting from three preset
colour temperatures—COOL, MEDIUM, and WARM:
1
Press MENU, then press or
select (PICTURE) menu.
2
Press or to select
“COLOR TEMPERATURE”.
Press
or to select the
mode you prefer.
Selecting the colour temperature/Resetting your picture adjustment
3
Press EXIT to return to the normal screen.
1
Press MENU, then press or
to select (PICTURE)
menu.
2
Press or to select
“RESET”, then press .
Mode Picture Quality
COOL Blueish
MEDIUM Neutral
WARM Reddish
NOTE:
When you press RESET in (PICTURE)
menu. The picture adjustments returns to the
factory preset levels.
PICTURE
COLOR
TEMPERATURE COOL
COOL/ MEDIUM /WARM
RESET
:SELECT
:ADJUST
PICTURE
COLOR
TEMPERATURE COOL
RESET
:SELECT
:ADJUST
PICTURE
PICTURE PREFERENCE SPORTS
BRIGHTNESS 25
CONTRAST 50
COLOR 25
TINT 0
SHARPNESS 25
:SELECT
:ADJUST
PICTURE
PICTURE PREFERENCE SPORTS
BRIGHTNESS 25
CONTRAST 50
COLOR 25
TINT 0
SHARPNESS 25
:SELECT
:ADJUST
3Y80821A_En_p26-30 6/21/06, 1:48 PM30
Page 31
31
ENGLISH
Sound control adjustment/Turning off the built-in speakers
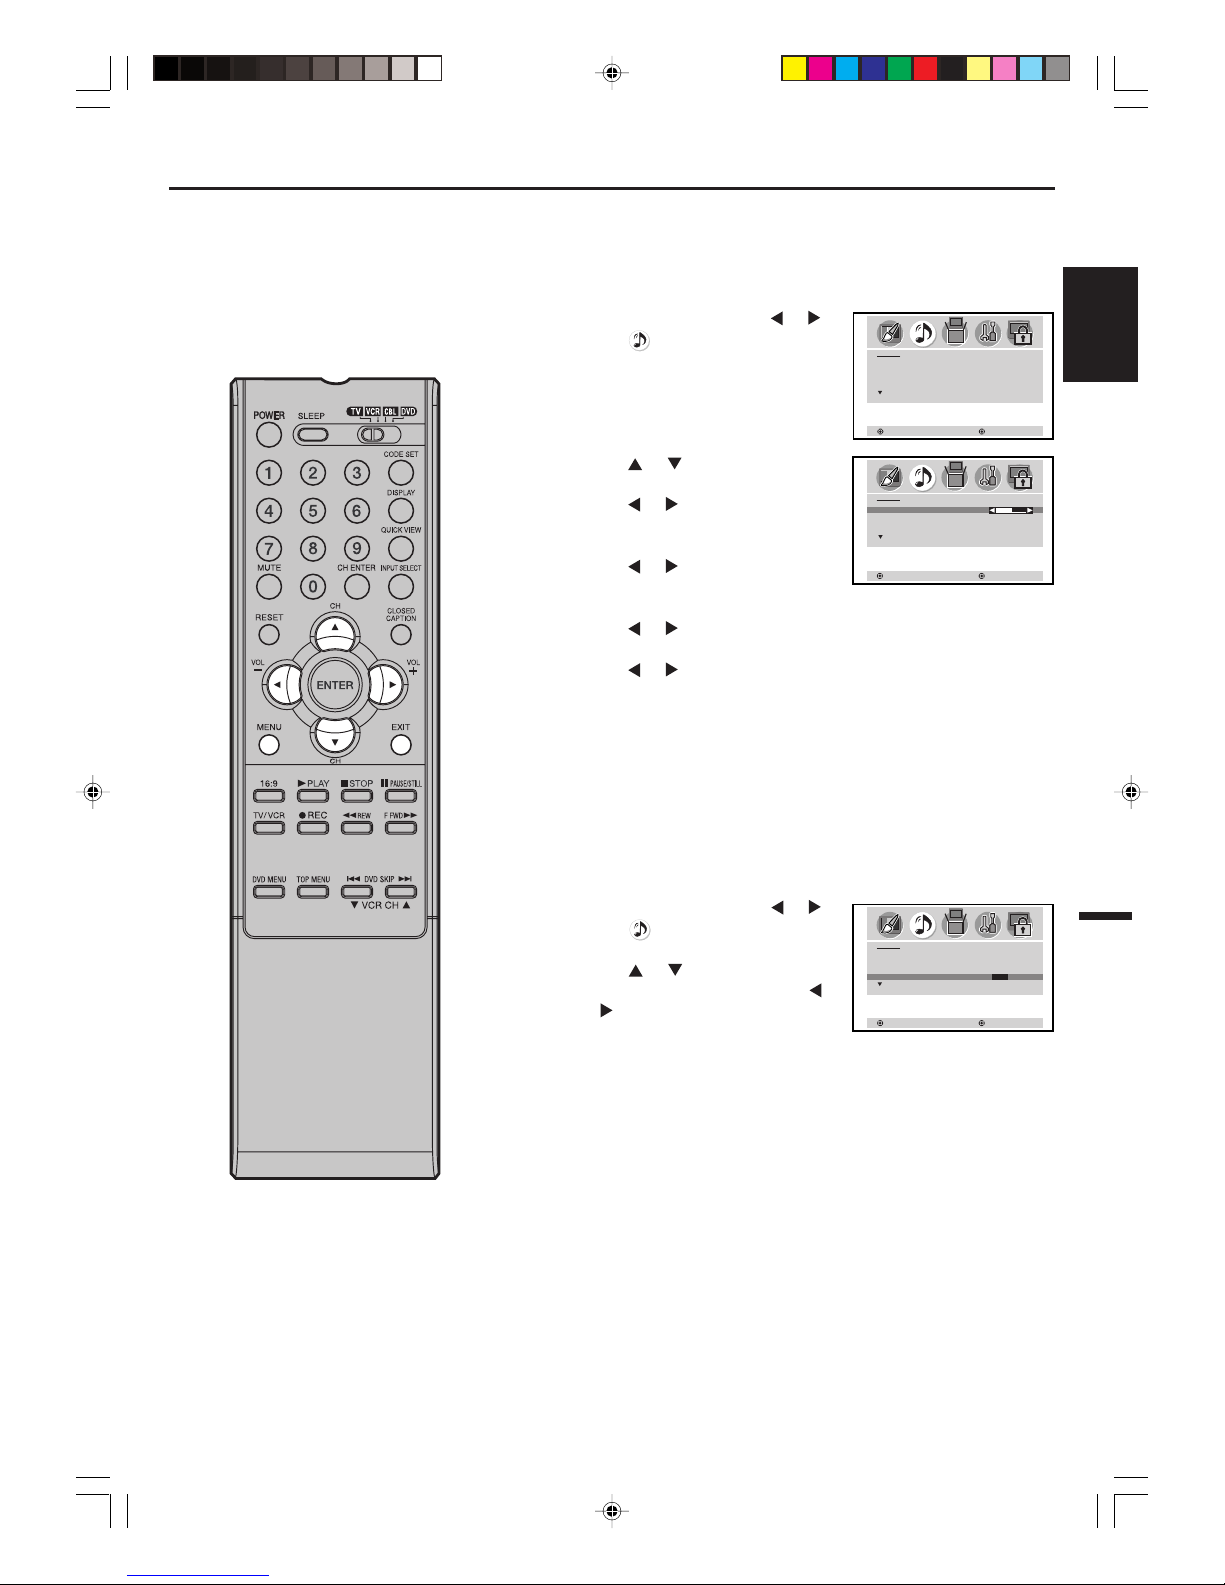
Sound control adjustment
Sound controls are factory preset but you can adjust them
individually as follows:
1
Press MENU, then press or to
select (AUDIO) menu.
2
Press or to select the item
you want to adjust.
Press
or to adjust the setting.
BASS:
Press
or to adjust the bass
sound.
TREBLE:
Press
or to adjust the treble sound.
BALANCE:
Press or to obtain an equal sound level from both
speakers.
3
After your desired setting, press EXIT to return to the normal
screen.
Turning off the built-in speakers
Use this feature to turn the Plasma Display speakers off when
you connect an audio system (see pages 14).
1
Press MENU, then press or to
select (AUDIO) menu.
2
Press or to select
“SPEAKERS”, and then press
or to select “OFF”.
3
Press EXIT to return to the normal screen.
To turn on the built-in speakers:
Select “ON” in step 2 above.
AUDIO
BASS 25
TREBLE 25
BALANCE 0
SPEAKERS ON
:SELECT
:ADJUST
AUDIO
BASS 25
TREBLE 25
BALANCE 0
SPEAKERS ON
:SELECT
:ADJUST
AUDIO
BASS 25
TREBLE 25
BALANCE 0
SPEAKERS ON/OFF
:SELECT
:ADJUST
3Y80821A_En_p31-39 6/21/06, 1:48 PM31
Page 32
32
Using the WOWTM surround sound feature/Selecting the HDMI
audio input source/Resetting your audio adjustment
WOW, SRS and symbol are trademarks of
SRS Labs, Inc.
WOW technology is incorporated under license
from SRS Labs, Inc.
NOTES:
• If the broadcast is monaural, the SRS 3D
effect will not work.
• The audio out jacks do not output any of the
SRS WOW audio features.
• When you press RESET in
(AUDIO)
menu. The audio adjustment returns to the
factory preset levels.
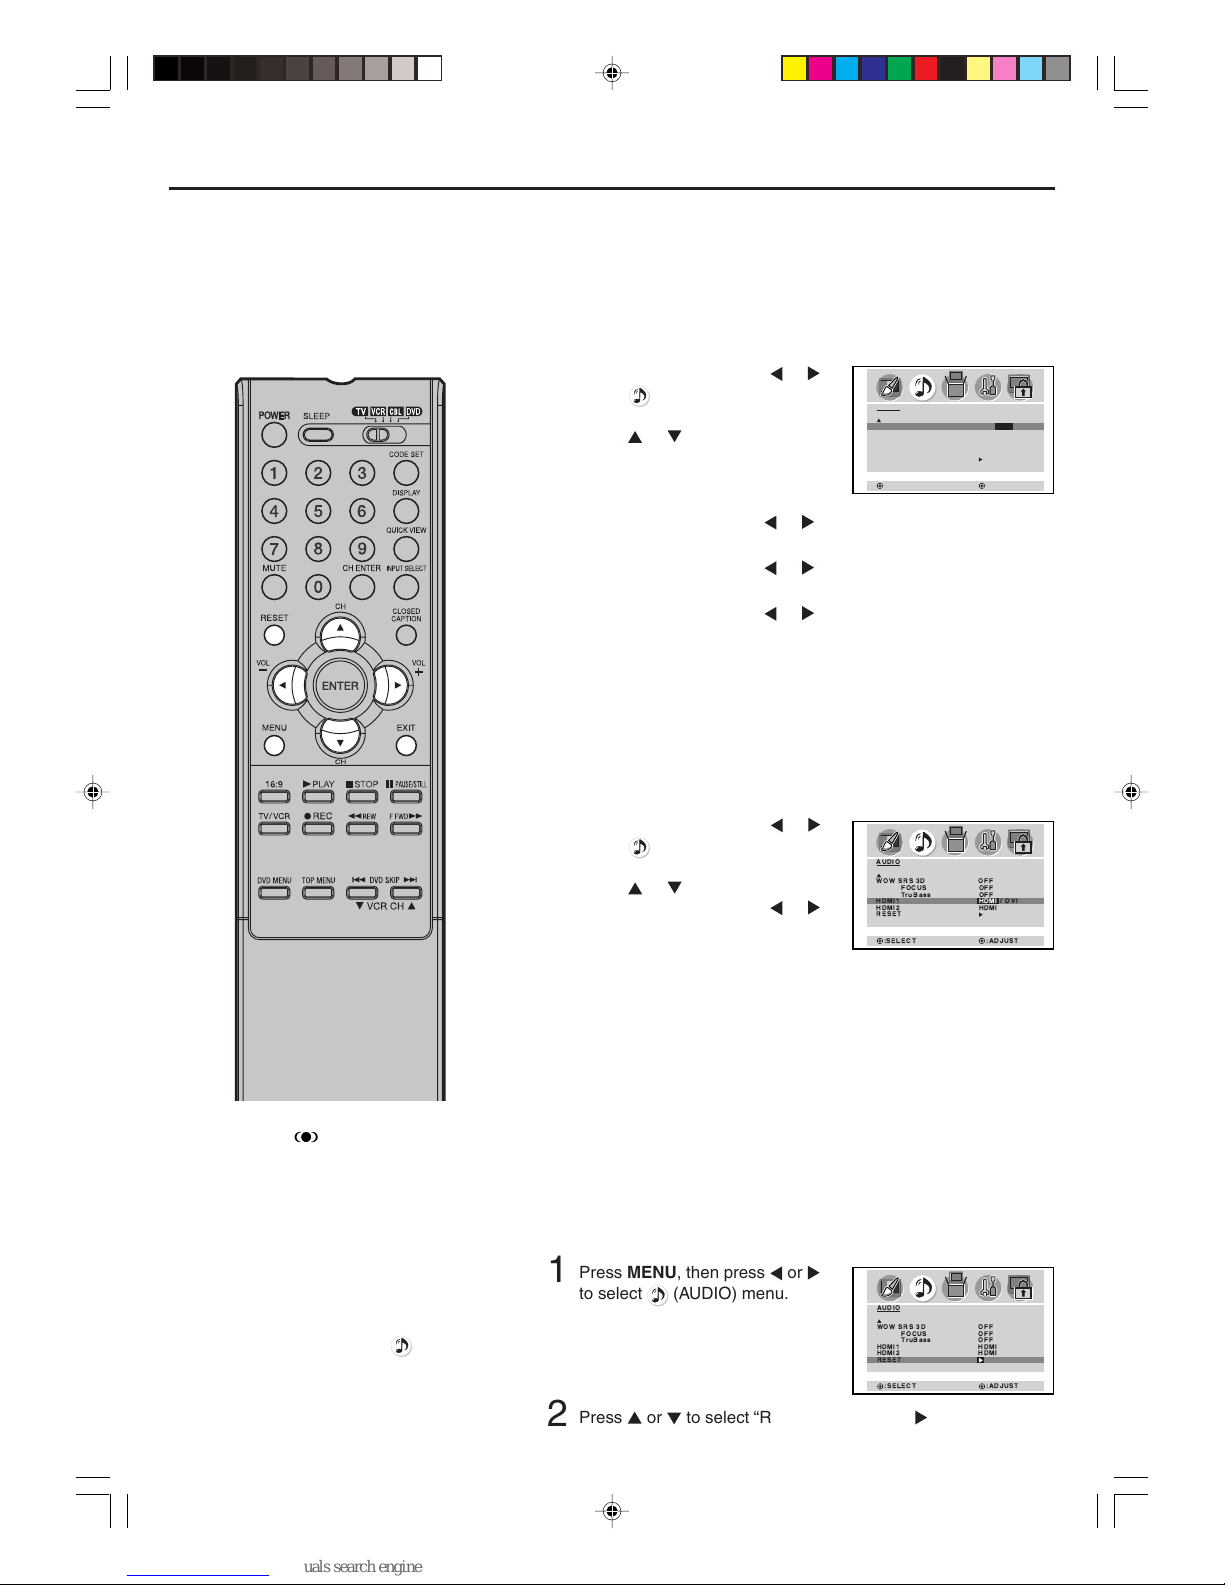
HDMI: When you connect the HDMI device to the Plasma
Display, select this setting.
DVI: When you connect the DVI device to the Plasma
Display with analog audio cords, select this setting.
3
Press EXIT to return to the normal screen.
Selecting the HDMI audio input source
When you use HDMI AUDIO IN jacks with HDMI or DVI device,
you must select HDMI audio input source from “HDMI” or “DVI”.
1
Press MENU, then press or to
select
(AUDIO) menu.
2
Press or to select “HDMI1” or
“HDMI2”, and then press
or to
select “HDMI” or “DVI”.
The RESET function returns the audio adjustment to the following
factory settings:
BASS...................... centre (25)
TREBLE ................. centre (25)
BALANCE ................ centre (0)
Resetting your audio adjustment
Using the WOWTM surround sound feature
SRS WOW is a special combination of SRS Labs audio
technologies that creates a thrilling surround sound
experience with deep, rich bass from stereo sound sources.
Your TV’s audio will sound fuller, richer, and wider. SRS WOW
consists of three features; SRS 3D, FOCUS, and TruBass.
AUDIO
WOW SRS 3D ON / OFF
FOCUS OFF
TruBass OFF
HDMI1 HDMI
HDMI2 HDMI
RESET
:SELECT
:ADJUST
1
Press MENU, then press or to
select
(AUDIO) menu.
2
Press or to select the desired
SRS WOW feature you want to
adjust.
WOW SRS 3D: Press
or to turn on or off the surround
sound effect.
FOCUS: Press
or to turn on or off the vocal
emphasis effect.
TruBass: Press
or to select the bass expansion
effect HIGH, LOW or OFF.
3
After your desired setting, press EXIT to return to the normal
screen.
1
Press MENU, then press or
to select (AUDIO) menu.
2
Press or to select “RESET”, then press .
3Y80821A_En_p31-39 6/21/06, 1:48 PM32
Page 33
33
ENGLISH
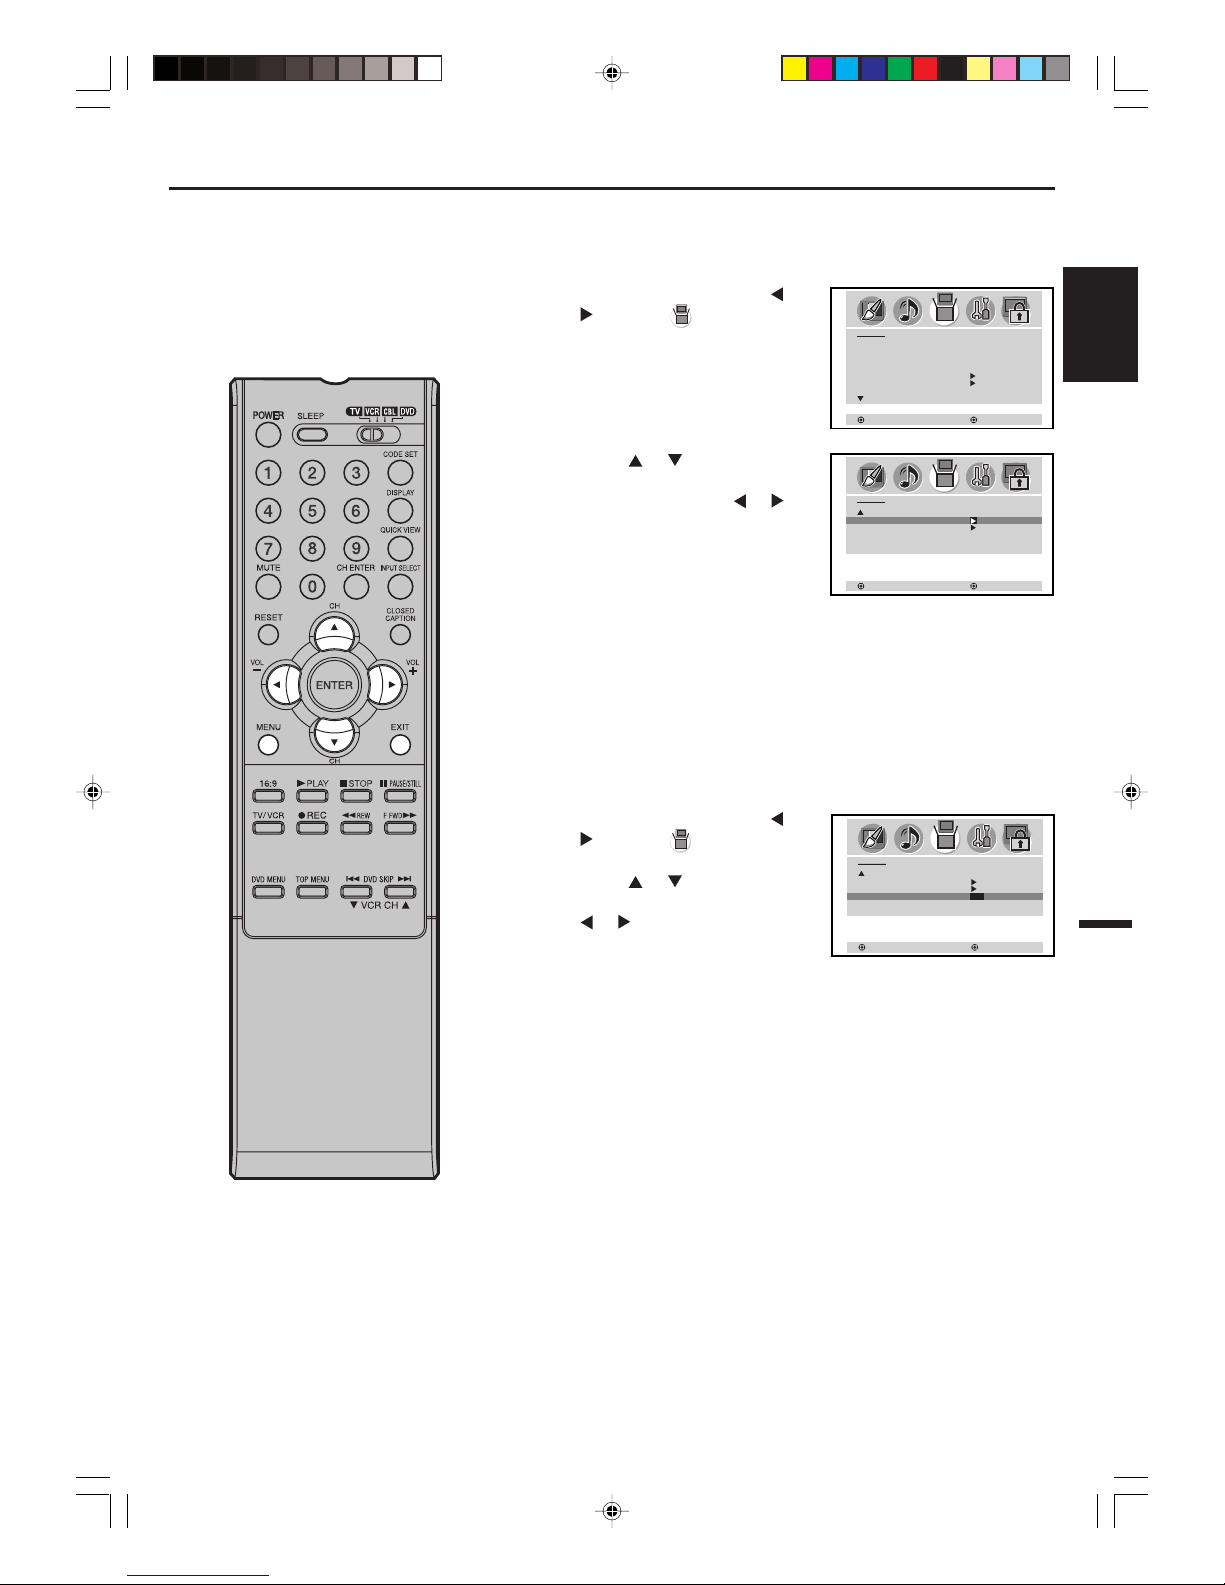
Screen Saver function
1
Press MENU, then press or
to select (SETUP) menu.
2
Press or to select the
“INVERSION” or “FULL
WHITE”, then press
or .
INVERSION
MENU disappears and the
screen colour will invert.
FULL WHITE
MENU disappears and the picture showing on screen will be
replaced with white screen.
• The screen will return to normal when any button is pressed.
INVERSION/FULL WHITE
Assists in preventing retained images on the screen.
1
Press MENU, then press or
to select (SETUP) menu.
2
Press or to select
“SCREEN SAVER”, then press
or to select “ON” or “OFF”.
3
Press EXIT to return to the normal screen.
SCREEN SAVER
When a still picture is displayed for an extended period of
time, a “ghost” image may permanently appear on the screen.
SETUP
LANGUAGE ENGLISH
CLOSED CAPTION OFF
PICTURE SIZE
PICTURE SCROLL
CINEMA MODE FILM
:SELECT
:ADJUST
SETUP
INVERSION
FULL WHITE
SCREEN SAVER ON
:SELECT
:ADJUST
SETUP
INVERSION
FULL WHITE
SCREEN SAVER ON/OFF
:SELECT
:ADJUST
3Y80821A_En_p31-39 6/21/06, 1:48 PM33
Page 34
34
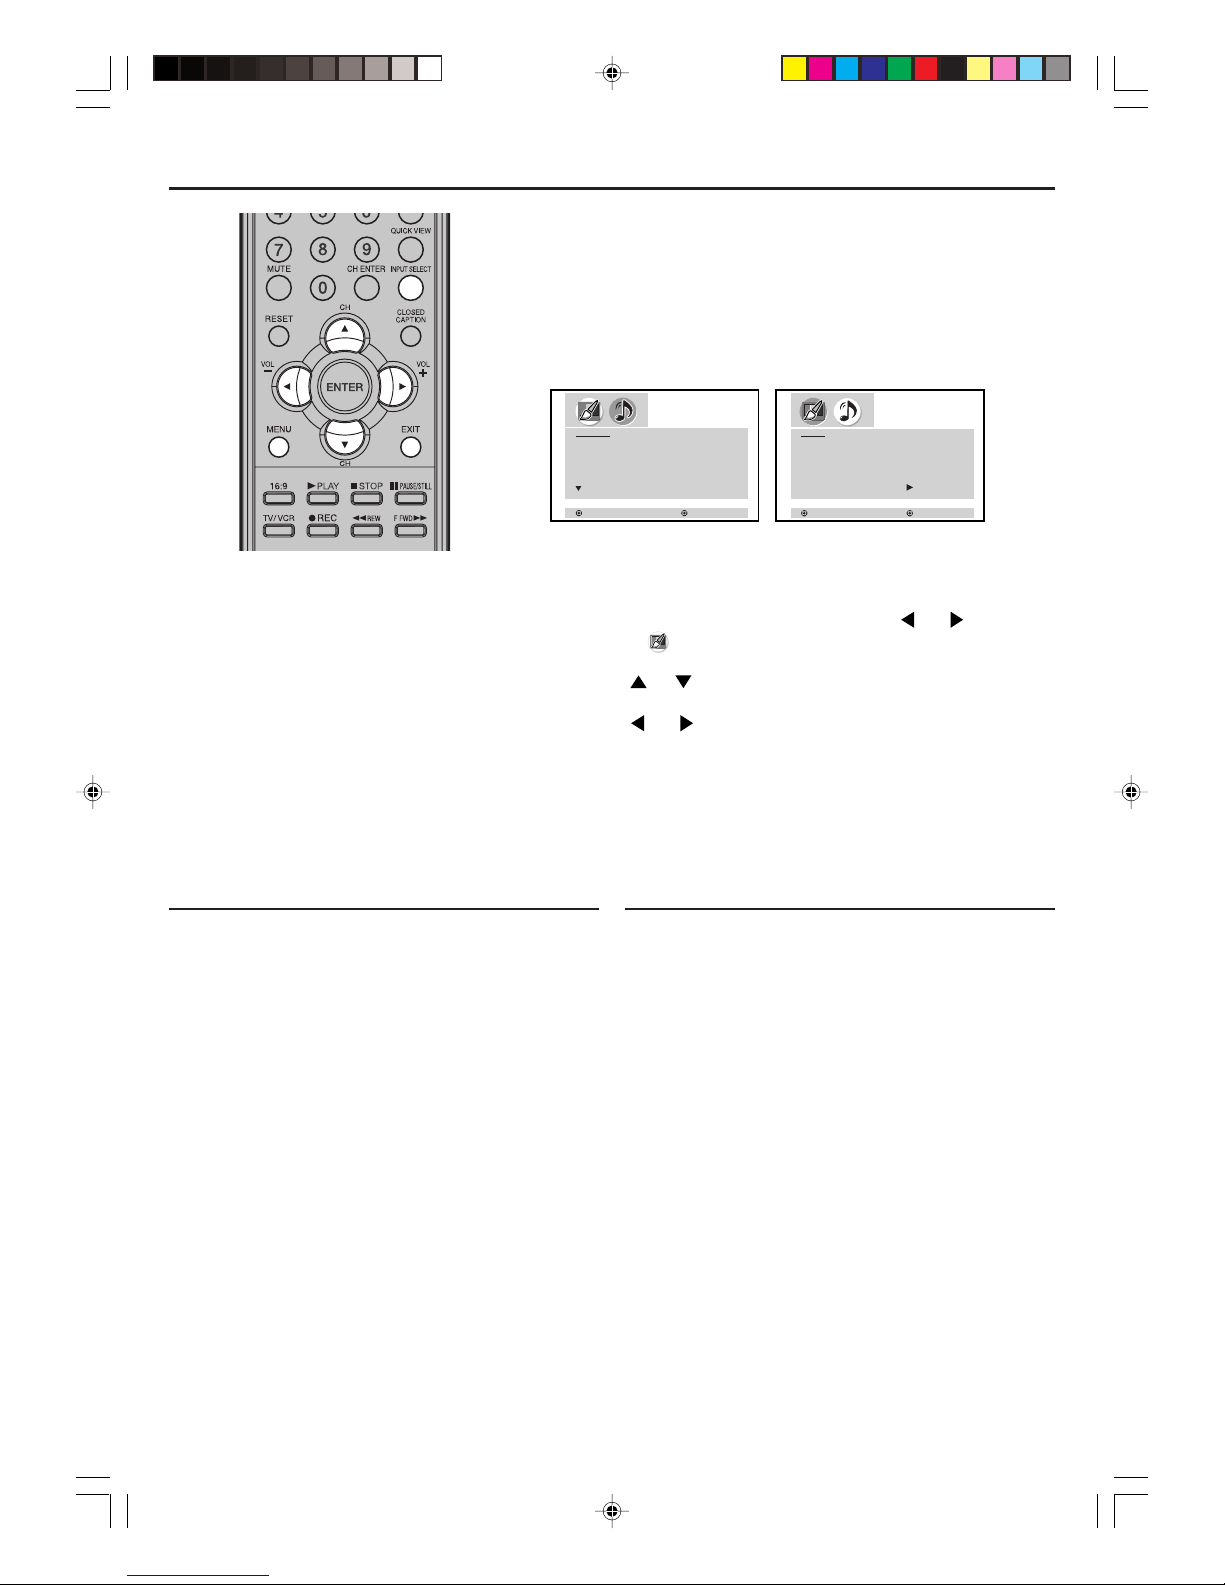
Picture/Audio control adjustment in the PC mode
NOTES:
• If you wish to change the on-screen language, follow the steps 1 - 5 on page 17.
• If no buttons are pressed for more than
approx. 60 seconds, the PC Monitor Menuscreen will return to normal Monitor-screen
automatically.
• The PC Monitor Menu settings are not
effective for normal mode, or external input
mode.
Picture menu setting:
BRIGHTNESS: To adjust the brightness
of PC Monitor-screen.
CONTRAST: To adjust the contrast
of PC Monitor-screen.
HOR POSITION: To adjust the horizontal
position of the image on the
PC Monitor-screen.
VER POSITION: To adjust the vertical position
of the image on the PC
Monitor-screen.
PHASE: This must be adjusted after
the frequency of your PC has
been set to 60 Hz to optimize
picture quality (page 15).
CLOCK: To minimize any vertical bars
or stripes visible on the
screen background.
RED/GREEN/BLUE: To adjust the colour temperature
of PC Monitor-screen.
WVGA INPUT: Set to ON, when you select
the WVGA mode on the PC.
WXGA INPUT: Set to ON, when you select
the WXGA mode on the PC.
Example: Adjust the contrast.
1
Press MENU during PC mode, then press or
to select (PICTURE) menu.
2
Press or to select CONTRAST.
3
Press or to adjust the setting.
4
Press EXIT to return to the normal screen.
PC Monitor Menu
There are a number of picture and audio settings you can
adjust to optimize the performance of the unit in PC mode.
Press INPUT SELECT repeatedly to select PC mode.
Press MENU. The PC Monitor Menu will appear.
PICTURE
BRIGHTNESS 25
CONTRAST 50
HOR POSITION 25
VER POSITION 25
PHASE 25
CLOCK 0
:SELECT
:ADJUST
:SELECT
AUDIO
BASS 25
TREBLE 25
BALANCE 0
WOW SRS 3D OFF
FOCUS OFF
TruBass OFF
RESET
:ADJUST
Audio menu setting:
BASS/TREBLE/BALANCE:
To adjust the sound quality of
PC mode.
WOW SRS 3D: To turn on or off the surround
effect in PC mode.
FOCUS: To turn on or off the vocal
emphasis effect in PC mode.
TruBass: To select your desired bass
expansion level (HIGH,
LOW or OFF) in PC mode.
PICTURE Menu
AUDIO Menu
3Y80821A_En_p31-39 6/21/06, 1:48 PM34
Page 35
35
ENGLISH
Picture/Audio control adjustment in the PC mode
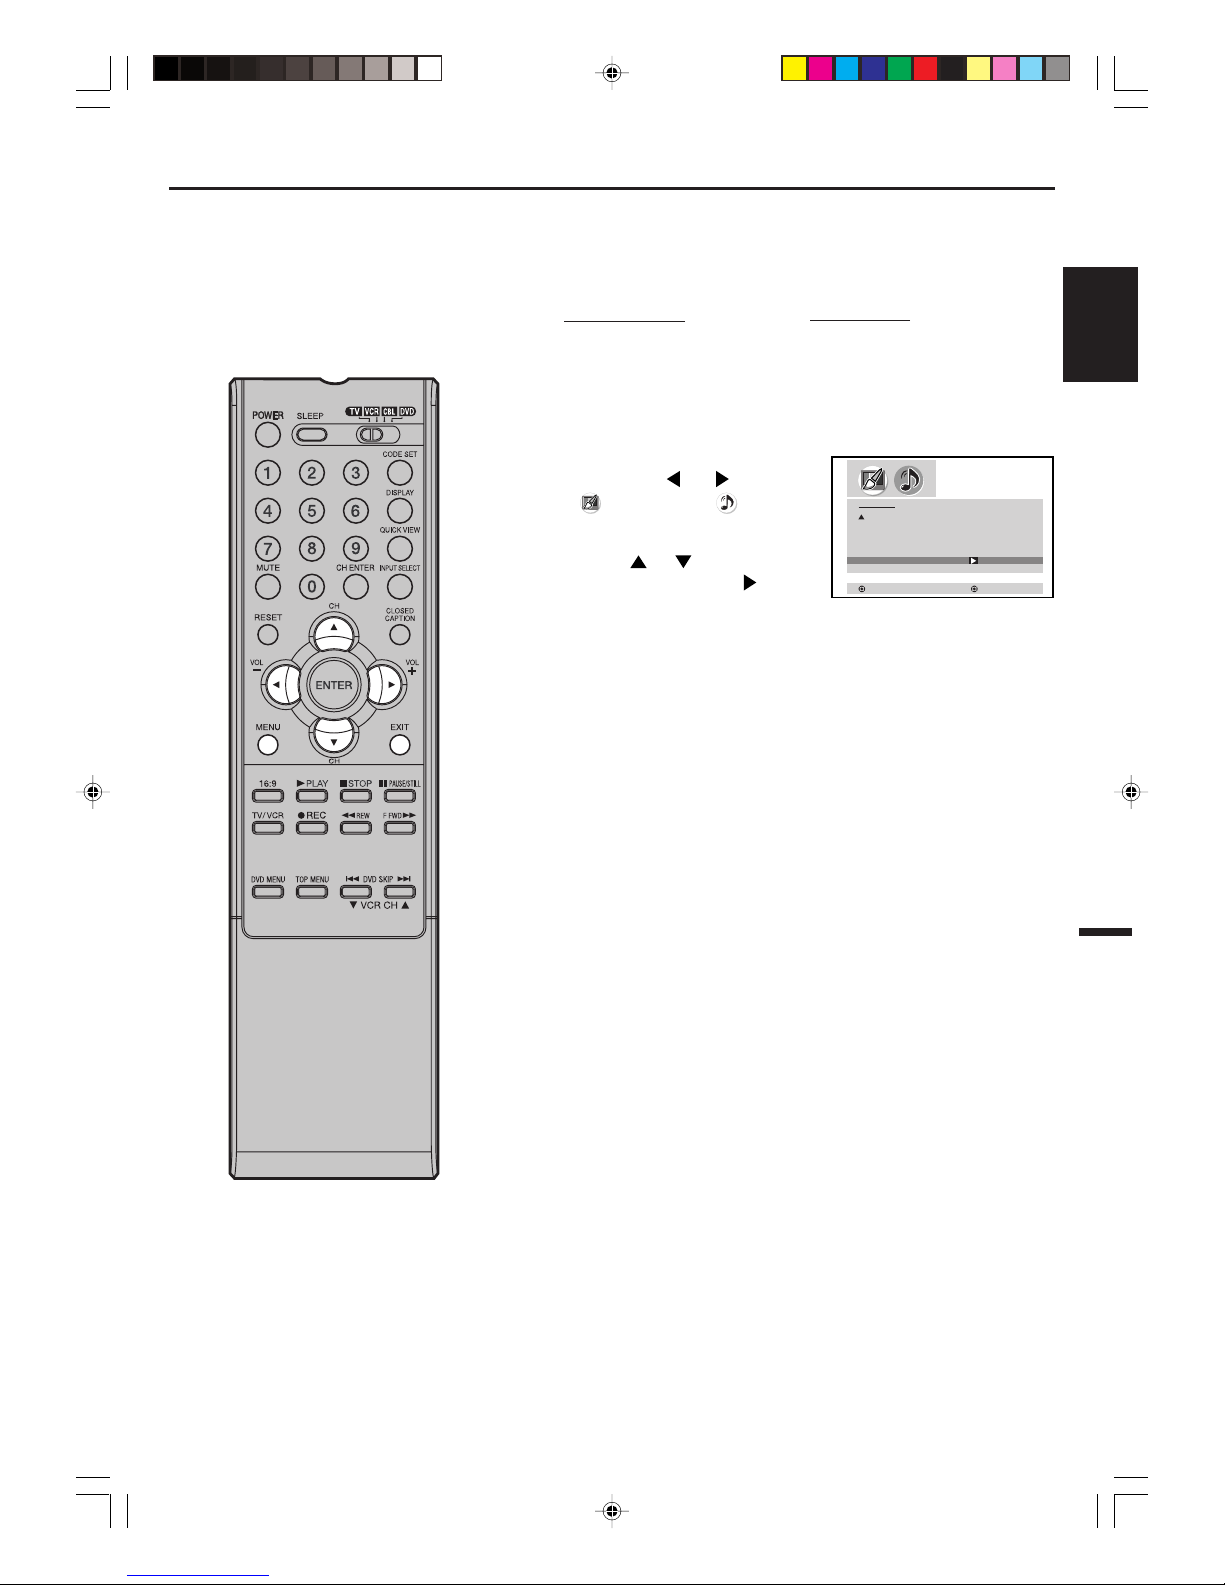
Resetting your picture/audio adjustment in the PC mode
The RESET function returns your picture/audio adjustment to
the following factory settings:
1
Press MENU during PC mode,
then press or to select
(PICTURE) or (AUDIO)
menu.
2
Press or to select
“RESET”, then press
.
PICTURE menu
BRIGHTNESS ..... centre (25)
CONTRAST ............ max (50)
RED ..................... centre (25)
GREEN ................centre (25)
BLUE ................... centre (25)
AUDIO menu
BASS ....................... centre (25)
TREBLE ...................centre (25)
BALANCE ..................centre (0)
PICTURE
RED 25
GREEN 25
BLUE 25
WVGA INPUT OFF
WXGA INPUT OFF
RESET
:SELECT
:ADJUST
3Y80821A_En_p31-39 6/21/06, 1:48 PM35
Page 36
36
Troubleshooting
Use the following checklist for troubleshooting if you have problems with your Plasma Display. Consult your local
dealer or service outlet if problems persist. Be sure all connections are properly made when using with other units.
SYMPTOMS POSSIBLE SOLUTIONS
• Make sure the power cord is plugged in.
• Try another AC outlet.
• Power is off, check fuse or circuit breaker.
• Unplug unit for an hour, then plug it back in.
• Check sound adjustments (Volume and Mute).
• Check for sources of possible interference.
• Check for sources of possible interference.
• Check picture control adjustments.
• Check picture control adjustments.
• Check for sources of possible interference.
Poor sound or no sound.
Poor picture or no picture.
Display does not operate.
Poor colour or no colour.
No Remote operation.
• Select proper language in the menu options.
Display is not shown in
your language.
• Batteries are weak, dead or inserted incorrectly.
• Remote is out of range, move closer to Plasma Display (within 15 feet).
• Make sure Remote is aimed at sensor.
• Confirm there are no obstructions between the Remote and the Plasma Display.
• Make sure the power cord is plugged in.
• Power interrupted.Display shuts off.
• Set closed caption decoder in the menu.
Closed - Caption is not
activated.
Cleaning instructions for your Plasma TV
Safety note:
Before you begin to clean, turn the unit power off, and disconnect from the power source.
Be careful not to scratch the plastic coated front panel - it is highly vulnerable to accidental scratching (e.g. by
fingernails or other sharp items).
While cleaning, do not wear jewelry that could cause surface scratching (such as rings, wrist-watch, etc.).
Use a moist lint-free cloth and pure water to clean the Plasma Display, assure the cloth is only damp and not
wet - and that the cloth is free from any dirt particles that could cause scratches to the surface.
Wipe the set clean using minimal pressure.
DO NOT USE STANDARD WINDOW CLEANER! ITS ALCOHOL / AMMONIA WILL DISSOLVE THE FRONT
WINDOW'S COATING!! NEVER USE SOLVENT OR THINNER. NEVER USE SPECIAL CLEANERS WHICH
ARE DESIGNED FOR CLEANING PC MONITORS OR CRT TV’S.
Carefully dry with a clean dry lint-free cloth.
Do not use paper towels or tissues to clean the set - paper can disintegrate when wet or may leave a trail of
dust behind. Some paper is abrasive and may scratch your screen.
THE TOLL FREE ELECTROHOME HELPLINE IS 1-800-663-5954
CALL US IF YOU HAVE ANY PROBLEMS OR QUESTIONS
ABOUT YOUR NEW ELECTROHOME PRODUCT
9 am – 5 pm (EASTERN STANDARD TIME) MONDAY TO FRIDAY
RGC REDMOND GROUP
MISSISSAUGA, CANADA
3Y80821A_En_p31-39 6/21/06, 1:48 PM36
Page 37

37
ENGLISH
Power supply: AC 120 V 60 Hz
Power consumption: Operation: 350 W
Stand by: 1 W
Weight: 91.3 lbs (41.5 kg)
Dimensions: Width: 47-5/8 inches (1,210 mm)
Height: 28-3/16 inches (716.5 mm)
Depth: 13-3/8 inches (340 mm)
Inputs: VIDEO: 1 V (p-p)/75 ohms
AUDIO: –8 dBm/50k ohms
S-VIDEO: Y: 1 V (p-p), 75 ohms
C: 0.286 V (p-p), 75 ohms
COMPONENT: Y: 1 V (p-p), 75 ohms
P
R: 0.7 V (p-p), 75 ohms
P
B: 0.7 V (p-p), 75 ohms
Output: VIDEO: 1 V (p-p)/75 ohms
AUDIO: –8 dBm/1k ohms
HDMI input: HDMI compliant (type A connector)
HDCP compliant
E-EDID compliant
Suggested scan rates: 1080i, 480p, 480i, 720p
HDMI Audio: 2-channel PCM
32/44.1/48 kHz sampling frequency
16/20/24 bits per sample
PC Monitor input: Mini-Dsub 15pin x 1
PDP: 42.32 inches (1074.9 mm diagonal)
1024 x 768 pixel
Speaker: Main: 2-3/16 inches (56 mm) x 5 inches (127 mm), 4 ohms x 2
Sound output power: 10 W + 10 W
ACCESSORIES: Remote control
Batteries (AA) x 2
AC Cord
Specifications
Designs and specifications are subject to change without notice.
3Y80821A_En_p31-39 6/23/06, 11:58 AM37
Page 38

38
ELECTROHOME WARRANTY
Consumer Electronics Products and Home Appliances
Thank you for choosing ELECTROHOME!
RGC Redmond Group gives the following express warranty to the original consumer purchaser or gift recipient for this
Electrohome brand product, when shipped in its original container and sold or distributed in Canada by RGC
Redmond Group or by an Authorized Electrohome Dealer:
RGC Redmond Group warrants that this product is free, under normal use and maintenance, from any defects in
material and workmanship. If any such defects should be found in this product within the applicable warranty period,
RGC Redmond Group shall, at its option, repair or replace the product as specified herein. Replacement parts
furnished in connection with this warranty shall be warranted for a period equal to the unexpired portion of the original
equipment warranty.
This warranty shall not apply to:
a.Any defects caused or repairs required as a result of abusive operation, negligence, accident, improper
installation or inappropriate use as outlined in the owner’s manual.
b.Any Electrohome product tampered with, modified, adjusted or repaired by any party other than RGC
Redmond Group or Electrohome’s Authorized Service Centres.
c. Damage caused or repairs required as a result of the use with items not specified or approved by RGC
Redmond Group, including but not limited to head cleaning tapes and chemical cleaning agents.
d.Any replacement of accessories, glassware, consumable or peripheral items required through normal use of
the product including but not limited to earphones, remote controls, AC adapters, batteries, temperature
probe, stylus, trays, filters, cables, paper, cabinet, cabinet parts, knobs, buttons, baskets, stands, shelves,
cookware and cooking utensils.
e.Any cosmetic damage to the surface or exterior that has been defaced or caused by normal wear and tear.
f. Any damage caused by external or environmental conditions, including but not limited to transmission line/
power line voltage or liquid spillage.
g.Any product received without appropriate model, serial number and CSA /cUL /cULus /cETL /cETLus
markings.
h.Any products used for rental or commercial purposes.
i. Any installation, setup and/or programming charges.
Should this Electrohome product fail to operate during the warranty period, warranty service may be obtained
upon delivery of the Electrohome product together with proof of purchase and a copy of this LIMITED WARRANTY
statement to an Authorized Electrohome Service Centre. In-home warranty service may be provided at RGC
Redmond Group’s discretion on any Electrohome television with the screen size of 27” or larger. This warranty
constitutes the entire express warranty granted by RGC Redmond Group and no other dealer, service centre or their
agent or employee is authorized to extend, enlarge or transfer this warranty on behalf of RGC Redmond Group. To
the extent the law permits, RGC Redmond Group disclaims any and all liability for direct or indirect damages or losses
or for any incidental, special or consequential damages or loss of profits resulting from a defect in material or
workmanship relating to the product, including damages for the loss of time or use of this Electrohome product or the
loss of information. The purchaser will be responsible for any removal, reinstallation, transportation and insurance
costs incurred. Correction of defects, in the manner and period of time described herein, constitute complete
fulfillment of all obligations and responsibilities of Electrohome Electronics to the purchaser with respect to the product
and shall constitute full satisfaction of all claims, whether based on contract, negligence, strict liability or otherwise.
CARRY-IN PARTS & LABOUR WARRANTY PERIODS:
• Audio Products: 1 Year (Remote Control, if applicable – 90 Days)
• DVD Products: 1 Year (Remote Control – 90 Days)
• LCD & Plasma Display TV: 1 Year (Remote Control – 90 Days)
• Television Products: 1 Year (Remote Control – 90 Days)
• VCR Products: 1 Year (Remote Control – 90 Days, Video Heads – 6 Months)
• Home Appliances: 1 Year
‡ Microwave Magnetron parts only additional 6 Years
‡ Refrigerator / Freezer Compressor parts only, additional 4 years
• Heating / Cooling & Humidification Products: 1 Year (Remote Control – 90 Days)
‡ Compressor parts only (if applicable), additional 4 years
To obtain the name and address of the nearest Authorized Electrohome Service Centre or Dealer, please contact:
RGC Redmond Group, 6185 McLaughlin Road, Mississauga, ON L5R 3W7.
For more information on this Warranty or Service Locations, please call (905)366-5100 or toll free 1-800-663-5954,
Monday to Friday 9:00am – 5:00pm Eastern Standard Time.
04/2006
3Y80821A_En_p31-39 6/21/06, 1:48 PM38
Page 39

39
ENGLISH
Memo
..........................................................................................................................................................................................
..........................................................................................................................................................................................
..........................................................................................................................................................................................
..........................................................................................................................................................................................
..........................................................................................................................................................................................
..........................................................................................................................................................................................
..........................................................................................................................................................................................
..........................................................................................................................................................................................
..........................................................................................................................................................................................
..........................................................................................................................................................................................
..........................................................................................................................................................................................
..........................................................................................................................................................................................
..........................................................................................................................................................................................
..........................................................................................................................................................................................
..........................................................................................................................................................................................
..........................................................................................................................................................................................
..........................................................................................................................................................................................
..........................................................................................................................................................................................
..........................................................................................................................................................................................
..........................................................................................................................................................................................
..........................................................................................................................................................................................
..........................................................................................................................................................................................
..........................................................................................................................................................................................
..........................................................................................................................................................................................
..........................................................................................................................................................................................
..........................................................................................................................................................................................
..........................................................................................................................................................................................
..........................................................................................................................................................................................
..........................................................................................................................................................................................
..........................................................................................................................................................................................
..........................................................................................................................................................................................
..........................................................................................................................................................................................
..........................................................................................................................................................................................
..........................................................................................................................................................................................
..........................................................................................................................................................................................
..........................................................................................................................................................................................
..........................................................................................................................................................................................
..........................................................................................................................................................................................
..........................................................................................................................................................................................
..........................................................................................................................................................................................
..........................................................................................................................................................................................
..........................................................................................................................................................................................
..........................................................................................................................................................................................
..........................................................................................................................................................................................
..........................................................................................................................................................................................
..........................................................................................................................................................................................
..........................................................................................................................................................................................
..........................................................................................................................................................................................
..........................................................................................................................................................................................
..........................................................................................................................................................................................
..........................................................................................................................................................................................
..........................................................................................................................................................................................
3Y80821A_En_p31-39 6/21/06, 1:48 PM39
 Loading...