

07EV755
Under-Counter 7" LCD TV with Built-in
DVD player
USER MANUAL
TO PREVENT FIRE OR SHOCK HAZARDS, DO NOT EXPOSE THIS UNIT TO RAIN OR MOISTURE.
This symbol, located on back or bottom of the unit, is intended to alert the user to the
presence of uninsulated “dangerous voltage” within the product's enclosure that may be of
sufficient magnitude to constitute a risk of electric shock to persons.
This symbol is intended to alert the user to the presence of important operating and
maintenance (servicing) instructions in the literature accompanying the appliance.
This product utilizes a Class 1 laser to read Compact Discs. This laser Compact Disc Player
is equipped with safety switches to avoid exposure when the CD door is open and the safety
interlocks are defeated. Invisible laser radiation is present when the CD Player's lid is open
and the system's interlock has failed or been defeated. It is very important that you avoid
direct exposure to the laser beam at all times. Please do not attempt to defeat or bypass the
safety switches.
Any use of the controls or an adjustment to the procedures other than those specified herein may result in
hazardous radiation.
CAUTION:
TO REDUCE THE RISK OF FIRE, DO NOT PLACE ANY HEATING OR COOKING
APPARATUS BENEATH THE UNIT.
CAUTION:
SLOT, FULLY INSERT.
TO REDUCE THE RISK OF ELECTRIC SHOCK, DO NOT REMOVE COVER (OR BACK). THERE ARE
NO USER-SERVICEABLE PARTS INSIDE. PLEASE REFER ANY SERVICING TO QUALIFIED SERVICE
PERSONNEL.
WARNING: Changes or modifications to this unit not expressly approved by the party responsible for
compliance could void the user's authority to operate the equipment.
NOTE: This device complies with Part 15 of the FCC Rules. Operation is subject to the following conditions:
1)The device may not cause harmful interference, and 2) This device must accept any interference
received, including interference that cause undesired operation. This equipment has been tested and found
to comply with the limits for a Class B digital device, pursuant to Part 15 of the FCC Rules. Receiver
complies with Par t 15 of FCC rules when manufactured. These limits are designed to provide reasonable
protection against harmful interference in a residential installation. This equipment generates, uses, and can
radiate radio frequency energy and, if not installed and used in accordance with the instructions, may cause
harmful interference to radio communications. however, there is no guarantee that interference will not
occur in a particular installation. If this equipment does cause harmful interference to radio or television
reception, which can be deter mined by turning the equipment off and on, the user is encouraged to try to
correct the interference by one or more of the following measures:
Reorient or relocate the receiving antenna.
Increase the separation between the equipment and receiver.
Connect the equipment into an outlet on a circuit different from that to which the receiver is connected.
Consult the dealer or an experienced radio/TV technician for help.
NOTE TO CATV SYSTEM INSTALLER: This reminder is to call the CATV system installer's attention to
Section 820-40 of the NEC which provides guidelines for proper grounding and, in particular, specifies that
the cable ground shall be connected to the grounding system of the building, as close to the point of cable
entry as practical.
TO PREVENT ELECTRIC SHOCK, MATCH WIDE BLADE OF PLUG TO WIDE
Special Note
1.
Read Instructions - All the safety and operating instructions should be read before the product is
operated.
Retain Instructions - The safety and operating instructions should be retained for future reference.
2.
Heed Warnings - All warnings on the product and in the operating instructions should be adhered to.
3.
4.
Follow Instructions - All operating and use instructions should be followed.
5.
Cleaning - Unplug this product from the wall outlet before cleaning. Do not u se liquid cleaners or
aerosol cleaners. Use a damp cloth for cleaning.
Attachments - Do not use attachments not recommended by the product manufacturer as they may
6.
cause hazards.
7.
Water and Moisture - Do not use this product near water - for example, near a bath tub, wash bowl,
kitchen sink, or laundry tub; in a wet basement, or near swimming pool, and the like.
8.
Accessories - Do not place this product on an unstable cart, stand tripod, bracket, or table. The
product may fall, causing serious injury to a child or adult, and serious damage to the product. Use
only with a cart, stand, tripod, bracket, or table recommended by the manufacturer, or sold with the
product. Any mounting of the product should follow the manufacturer’s instructions and should use a
mounting accessory recommended by the manufacturer.
9.
A product and cart combination should be moved with care. Quick stops, excessive force, and uneven
surfaces may cause the product and cart combination to overturn.
PORTABLE CART WARNING
(symbol provided by RETAC)
S3125A
Ventilation - Slots and openings in the cabinet are provided for ventilation and to ensure reliable
10.
operation of the product and to protect it from overheating, and these openings must not be blocked or
covered. The openings should never be blocked by placing the product on a bed, sofa, rug, or other
similar surface. This product should not be placed in a built-in installation such as a bookcase or rack
unless proper ventilation is provided according to manufacturer’s instructions.
Power Sources - This product should be operated only from the type of power source indicated on
11.
the marking label. If you are not sure of the type of power supply to your home, consult your product
dealer or local power company. For products intended to operate from battery power, or other
sources, refer to the operating instructions.
12.
Grounding or Polarization - This product may be equipped with a polarized alternating current line
plug (a plug having one blade wider than the other). This plug will fit into the power outlet only one
way. This is a safety feature. If you are unable to insert the plug fully into the outlet, try reversing the
plug. If the plug should still fail to fit, contact your electrician to replace your obsolete outlet. Do not
defeat the safety purpose of the polarized plug.
When placing your unit on a lacquered or natural finish, protect your furniture with a cloth or other protective
material.
21
NOTES ON DISC
13.
Power-Cord Protection - Power supply cords should be routed so that they are not likely to be
walked on or pinched by items placed on or against them, paying particular attention to cords at plugs,
convenience receptacles, and the point where they exit from the product.
Lightning - For added protection for this product during a lightning storm, or when it is left unattended
14.
and unused for long periods of time, unplug it from the wall outlet. This will prevent damage to the
product due to lightning and power-line surges.
15.
Overloading - Do not overload wall outlet, extension cords, or integral convenience receptacles as
this can result in a risk of fire or electric shock.
16.
Object and Liquid Entry - Never push objects of any kind into this product through openings as they
may touch dangerous voltage points or short-out parts that could result in a fire or electric shock.
Never spill liquid of any kind on the product.
17.
Servicing - Do not attempt to service this product yourself as opening or removing covers may
expose you to dangerous voltage or other hazards. Refer all servicing to qualified service personnel.
Damage requiring Service - Unplug this product from the wall outlet and refer servicing to qualified
18.
service personnel under the following conditions:
a) When the power-supply cord or plug is damaged,
b) If liquid has been spilled, or objects have fallen into the product,
c) If the product has been exposed to rain or water,
d) If the product does not operate normally by following the operating instructions, adjust only those
controls that are covered by the operating instructions as an adjustment of other controls may
result in damage and will often require extensive work by a qualified technician to restore the
product to its normal operation.
e) If the product has been dropped or damaged in any way, and
f) When the product exhibits a distinct change in performance.
Replacement Parts - When replacement parts are required, be sure the service technician uses
19.
replacement parts that have been specified by the manufacturer or that have the same characteristics
as the original part. Unauthorized substitutions may result in fire, electric shock, or other hazards.
20.
Safety Check - Upon completion of any service or repairs to this product, ask the service technician to
perform safety checks to determine that the product is in proper operating condition.
Wall or Ceiling Mounting - The product should be mounted to a wall or ceiling only as recommended
21.
by the manufacturer.
22.
Heat - The product should be situated away from heat sources such as radiators, heat registers,
stoves, or other products (including amplifiers) that produce heat.
Nonuse Periods - Unplug the product’s power cord when you will not use it for an extended period.
23.
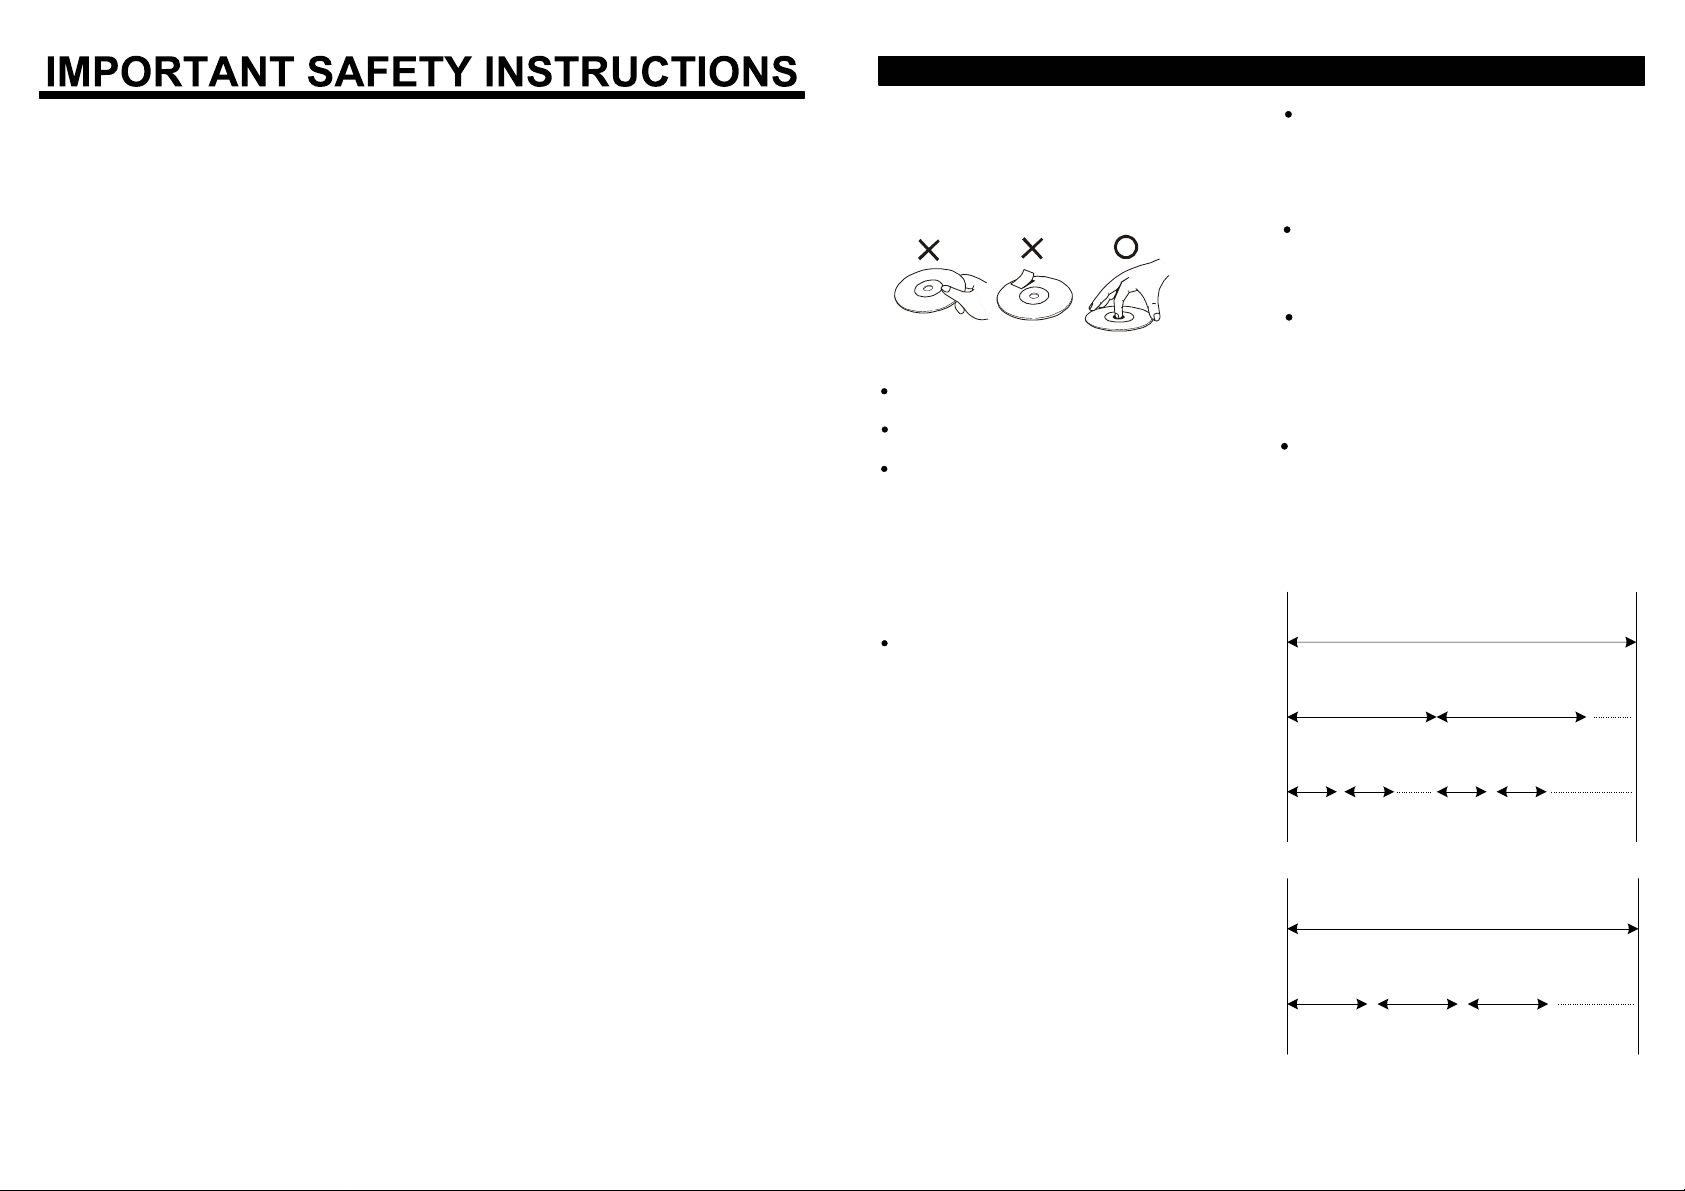
HANDLING DISC
Although the music tracks in the disc are covered
with a protective layer, it is still advisable to treat
the disc carefully. Ensure that you always pick up
discs by the edge, and put them back in their
holders immediately after use.
ON STORING DISCS
Do not store discs in a place subject to direct
sunlight or near heat sources.
Do not store discs in place subject to moisture
and dust.
Store discs in a cases.
NOTES ON REGION NUMBER
The region number of this unit is 1, playback function
is all region, this means all the DVD discs can played
in the unit.
TERMS ON DISCS
TITLE
The images or music of a DVD are divided into some
units. TITLE is the biggest one. To a image in video
software; title is movie. To a piece of music in audio
software, it is music; each title has a indication
number which makes it easy to locate.
CHAPTER
It is smaller than title among the units of a
DVD. Each title is made up of several chapters
and chapter has a number for search. But
some discs may not have numbered chapter.
TRACK
The images or music in a VCD or CD, each
track has a number for search.
SCENE
The menu picture, motion and motionless
picture of a SUPER-VCD, VCD with PBC
function can be divided into some parts,
these parts are scenes.
PBC PLAYBACK CONTROL
SUPER-VCD, VCD (version 2.0) has PBC
playback control, PBC allows you to interact
with the system via menus. If the disc has stillpictures, high-resolution playback is available.
STRUCTURE OF DVD
DISC
TITLE
CHAPTER
STRUCTURE OF SUPER-VCD, VCD AND CD
DISC
43
TRACK
PLAYABLE DISCS
LOCATION OF FEATURES
TYPE MARK CONTENT SIZE PLAYING TIME
Approx. 2hrs (single-side disc)
Approx. 4hrs (double-side disc)
Approx. 80mins (single-side disc)
Approx. 160mins (double-side disc)
Approx. 74mins
Approx. 20mins
Approx. 20mins
DVD
Super - VCD Super - VCD
VCD
CD audio
DIGITAL AUDIO
MP3
NOTES:
The playback of some discs may be restricted by software writers.
This unit can also play CD-R, CD-RW discs.
Audio+video
(motion pictures)
Audio+video
(motion pictures)
Audio+video
(motion pictures)
audio 12cm 600mins
12cm
8cm
12cm Approx. 45mins
12cm
8cm
12cm Approx. 74mins
8cm
PRINCIPLES FOR WRITING
This manual mainly introduces how to use
the buttons on the remote control.
You may operate the unit if the buttons on
the unit have the same or similar names as
to those on the remote control.
The marks shown in the right chart are used
in the manual.
“ ” may appear on the TV screen during
operation. This icon means the function
explained in the owner’s manual is not
available on that disc.
“This product incorporates copyright protection technology that is protected by U.S. patents and other
intellectual property rights. Use of this copyright protection technology must be authorized by Macrovision,
and is intended for home and other limited viewing uses only unless otherwise authorized by Macrovision.
Reverse engineering or disassembly is prohibited.”
CONSUMERS SHOULD NOTE THAT NOT ALL HIGH DEFINITION TELEVISION SETS ARE FULLY
COMPATIBLE WITH THIS PRODUCT AND MAY CAUSE ARTIFACTS TO BE DISPLAYED IN THE
PICTURE. IN CASE OF 525 OR 625 PROGRESSIVE SCAN PICTURE PROBLEMS, IT IS
RECOMMENDED THAT THE USER SWITCH THE CONNECTION TO THE ‘STANDARD DEFINITION’
OUTPUT. IF THERE ARE QUESTIONS REGARDING OUR TV SET COMPATIBILITY WITH THIS
MODEL 525p AND 625p DVD PLAYER, PLEASE CONTACT OUR CUSTOMER SERVICE CENTER.
MARK INDICATION
DVD
SVCD
VCD
CD
Functions of DVD
Functions of Super-VCD
Functions of VCD
Functions of CD
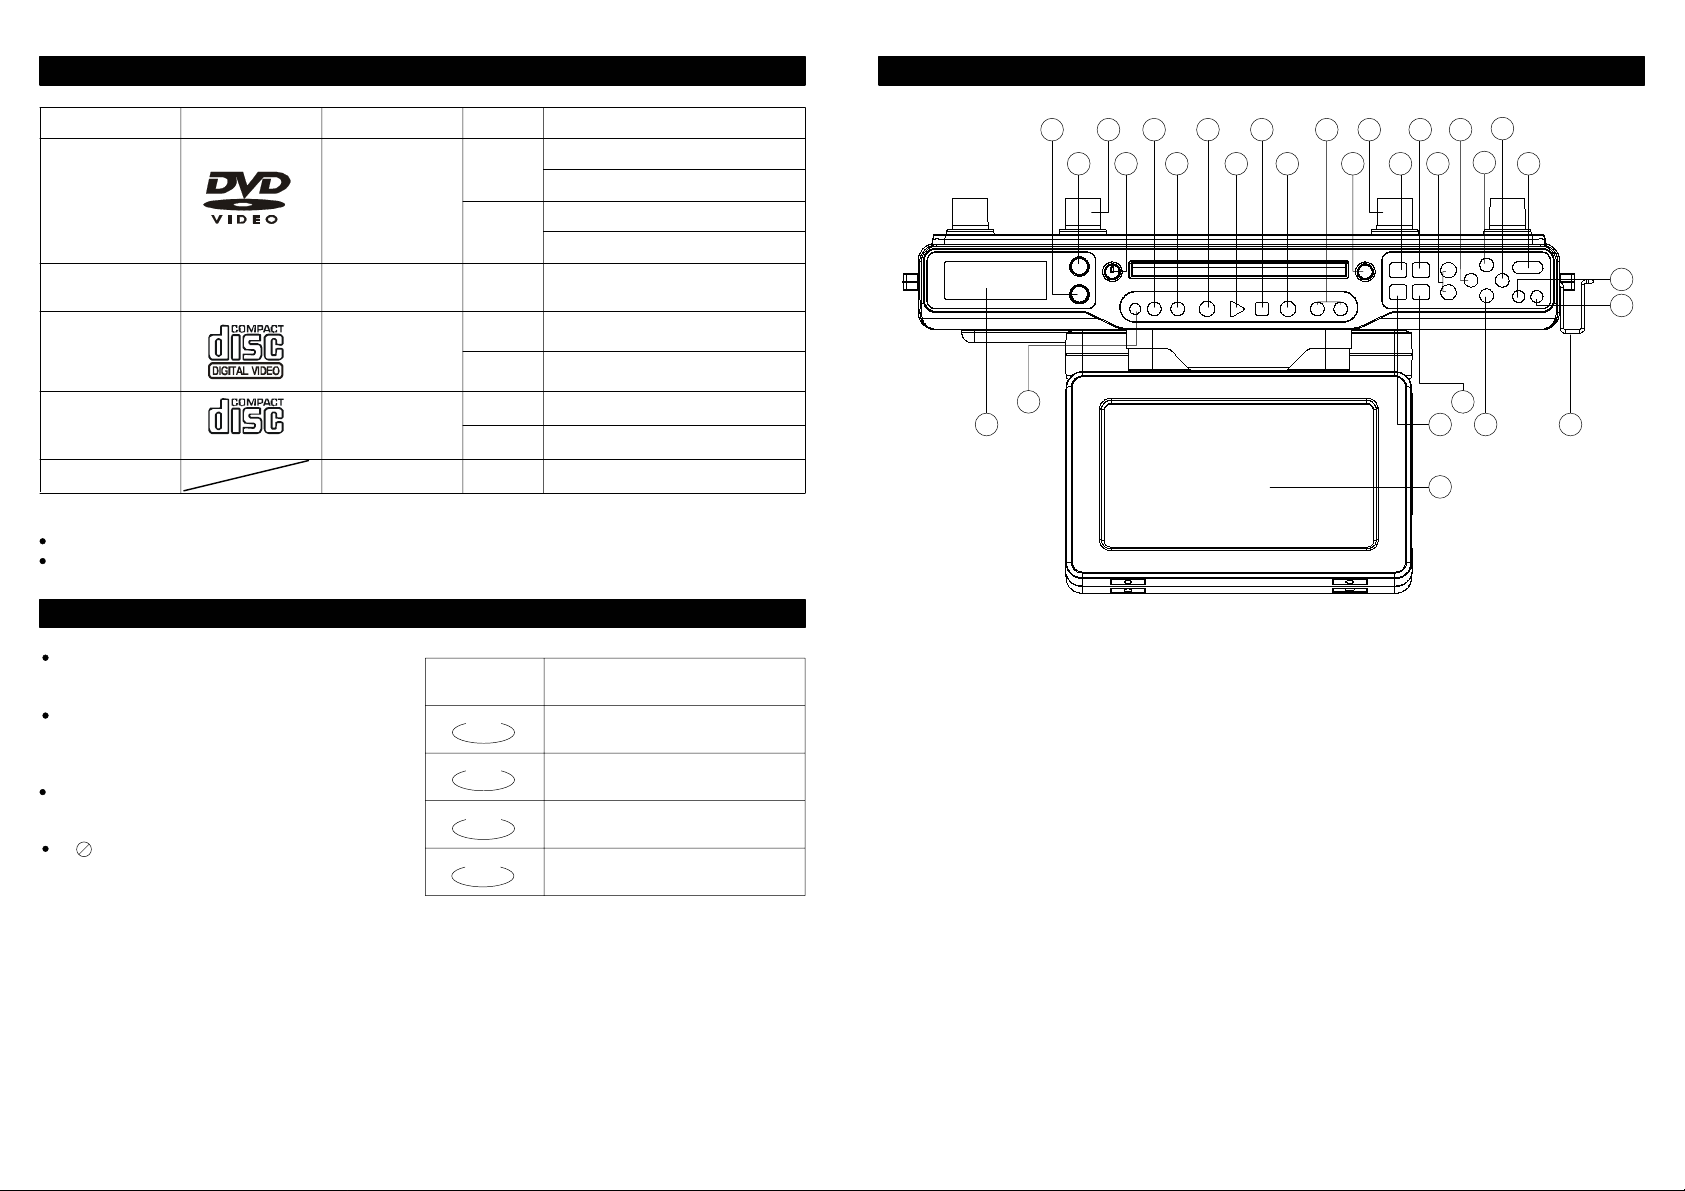
FRONT VIEW
1
2 4
28
29 2324
1. SLEEP Button
2. TIMER Button
3. MOUNTING BRACKET
4. POWER Button
5. ON SCREEN Button
6. RANDOM Button
7. REPEAT Button
8. PLAY Button
9. STOP Button
10. PAUSE Button
11. SKIP/CHANNEL Button
12. OPEN/CLOSE Button
13. MOUNTING BRACKET
14. TV (MENU) Button
15. DVD (MENU) Button
16. VOLUME +/- Button
5 7 9
6 8 16
10
11
133
17. NAVIGATION BWD Button
18. TUNING UP/NAVIGATION UP
Button
19. NAVIGATION FWD Button
20. DISPLAY Button
21. ENTER Button
22. MEMORY Button
23. REMOTE CONTROL Bracket
24. TUNING DN/NAVIGATION DN
Button
25. TUNER/BAND (FUNCTION)
Button
26. TV/DVD (FUNCTION) Button
27. TV Screen
28. REMOTE SENSOR
29. LCD Display
65
19
1715
26
27
25
18
20
21
22
1412
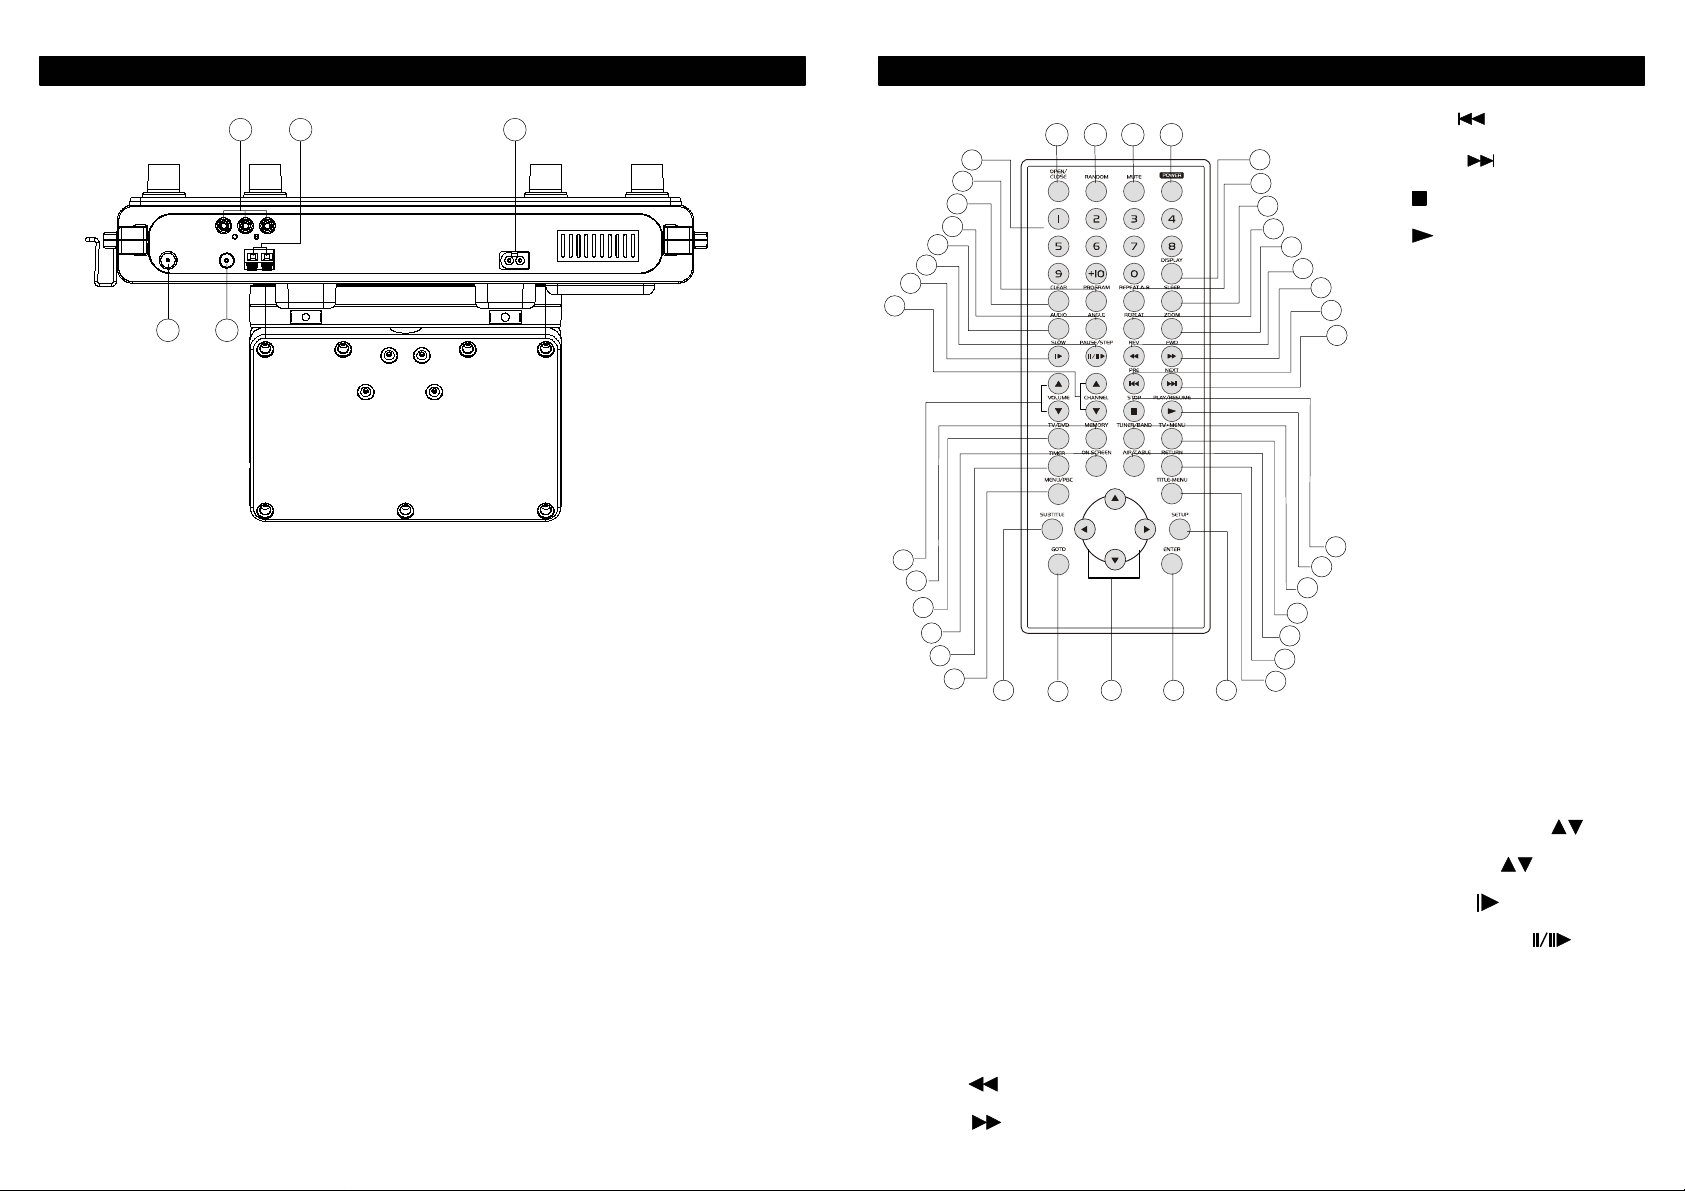
LOCATION OF FEATURES
REMOTE CONTROL FEATURES
BACK VIEW
30
34 33
30. A/V Out
31. AM ANTENNA Jack
32. AC Jack
33. FM ANTENNA Jack
34. TV ANTENNA INPUT
REMOTE CONTROLS
3231
39
38
37
36
35
34
33
32
1 2 3 4
5
6
7
8
9
10
11
12. PRE button
13. NEXT button
14. STOP button
15. PLAY/RESUME button
16. TUNER/BAND button
12
17. TV-MENU button
13
18. AIR/CABLE button
19. RETURN button
20. TITLE-MENU button
21. SETUP button
22. ENTER button
23. UP/DN/BWD/FWD button
19
18
17
16
15
14
24. GOTO button
25. SUBTITLE button
26. MENU/PBC button
27. TIMER button
31
30
29
28
27
26
25
24
23
20
2122
28. ON SCREEN button
1. OPEN/CLOSE button
2. RANDOM button
3. MUTE button
4. POWER button
5. DISPLAY button
6. REPEAT A-B button
7. SLEEP button
8. REPEAT button
9. ZOOM button
10. REV button
11. FWD button
29. TV/DVD button
30. MEMORY button
31. VOLUME UP/DN button
32. CHANNEL button
33. SLOW button
34. PAUSE/STEP button
35. AUDIO button
36. ANGLE button
37. CLEAR button
38. PROGRAM button
87
39. NUMBER buttons (0-9, +10)
BASIC OPERATION
BASIC OPERATION
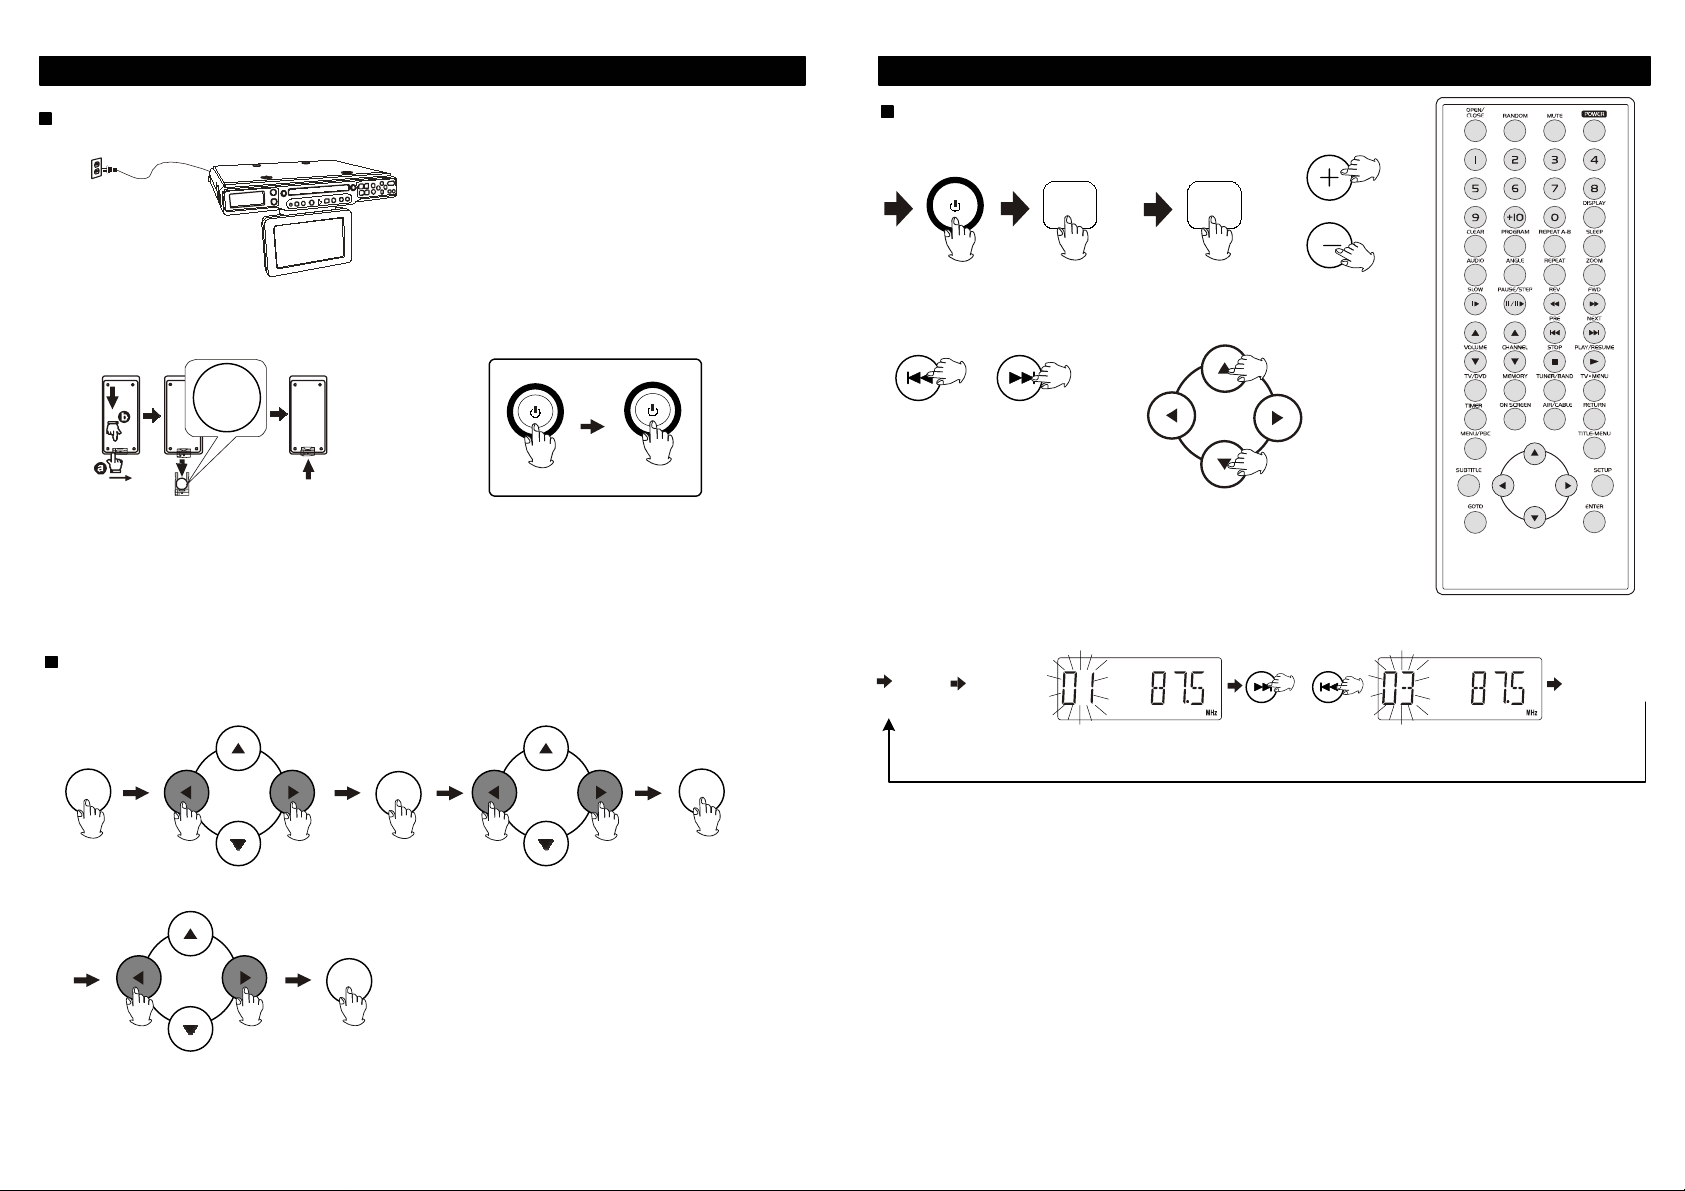
POWER SOURCES
120V AC/60Hz
This unit allows you to use 120V .
BATTERIES
POWER
LITHIUM BATTERY
+
LITHIUM
CR202
BATTERY
5
3
V
+
CR2025
3V
POWER
POWER ON POWER OFF
NOTE:
1. The button cell battery contains mercury, don’t put in the trash. Recycle or dispose as hazardous waste.
2. You may need to remove a protective covering from the remote’s battery compartment before using the
remote.
SETTING THE TIME
In DVD or TV mode:
TV-MENU
NAVIGATION
ENTER
NAVIGATION
ENTER
LISTENING TO THE RADIO
UP
TUNER
/BAND
POWER
1 2
POWER ON
SKIP/CHANNEL
OR
DOWN
To listen and change memory
channels press Skip/Channel
buttons.
PROGRAM RADIO STATIONS
Select
1
desired
channel.
Press
2
memory .
MEMORY LOCATION
FLASHES
TUNER
/BAND
FM
3
TUNING DOWN
AM
TUNING UP
NAVIGATION
To manually change channels
press tuning up or tuning down
buttons.
SKIP/CHANNEL
3
UP
TO SELECT MEMORY
LOCATION
REPEAT STEP 1-4 TO PROGRAM UP TO 20 FM AND 20 AM CHA NNELS
VOLUME
SKIP/CHANNEL
OR
DOWN
OR
Press
memory to
4
set station.
NAVIGATION
SECOND
TUNING UP
HOUR MINUTE
TV-MENU
See remote
control
features
109
BASIC OPERATION
BASIC OPERATION
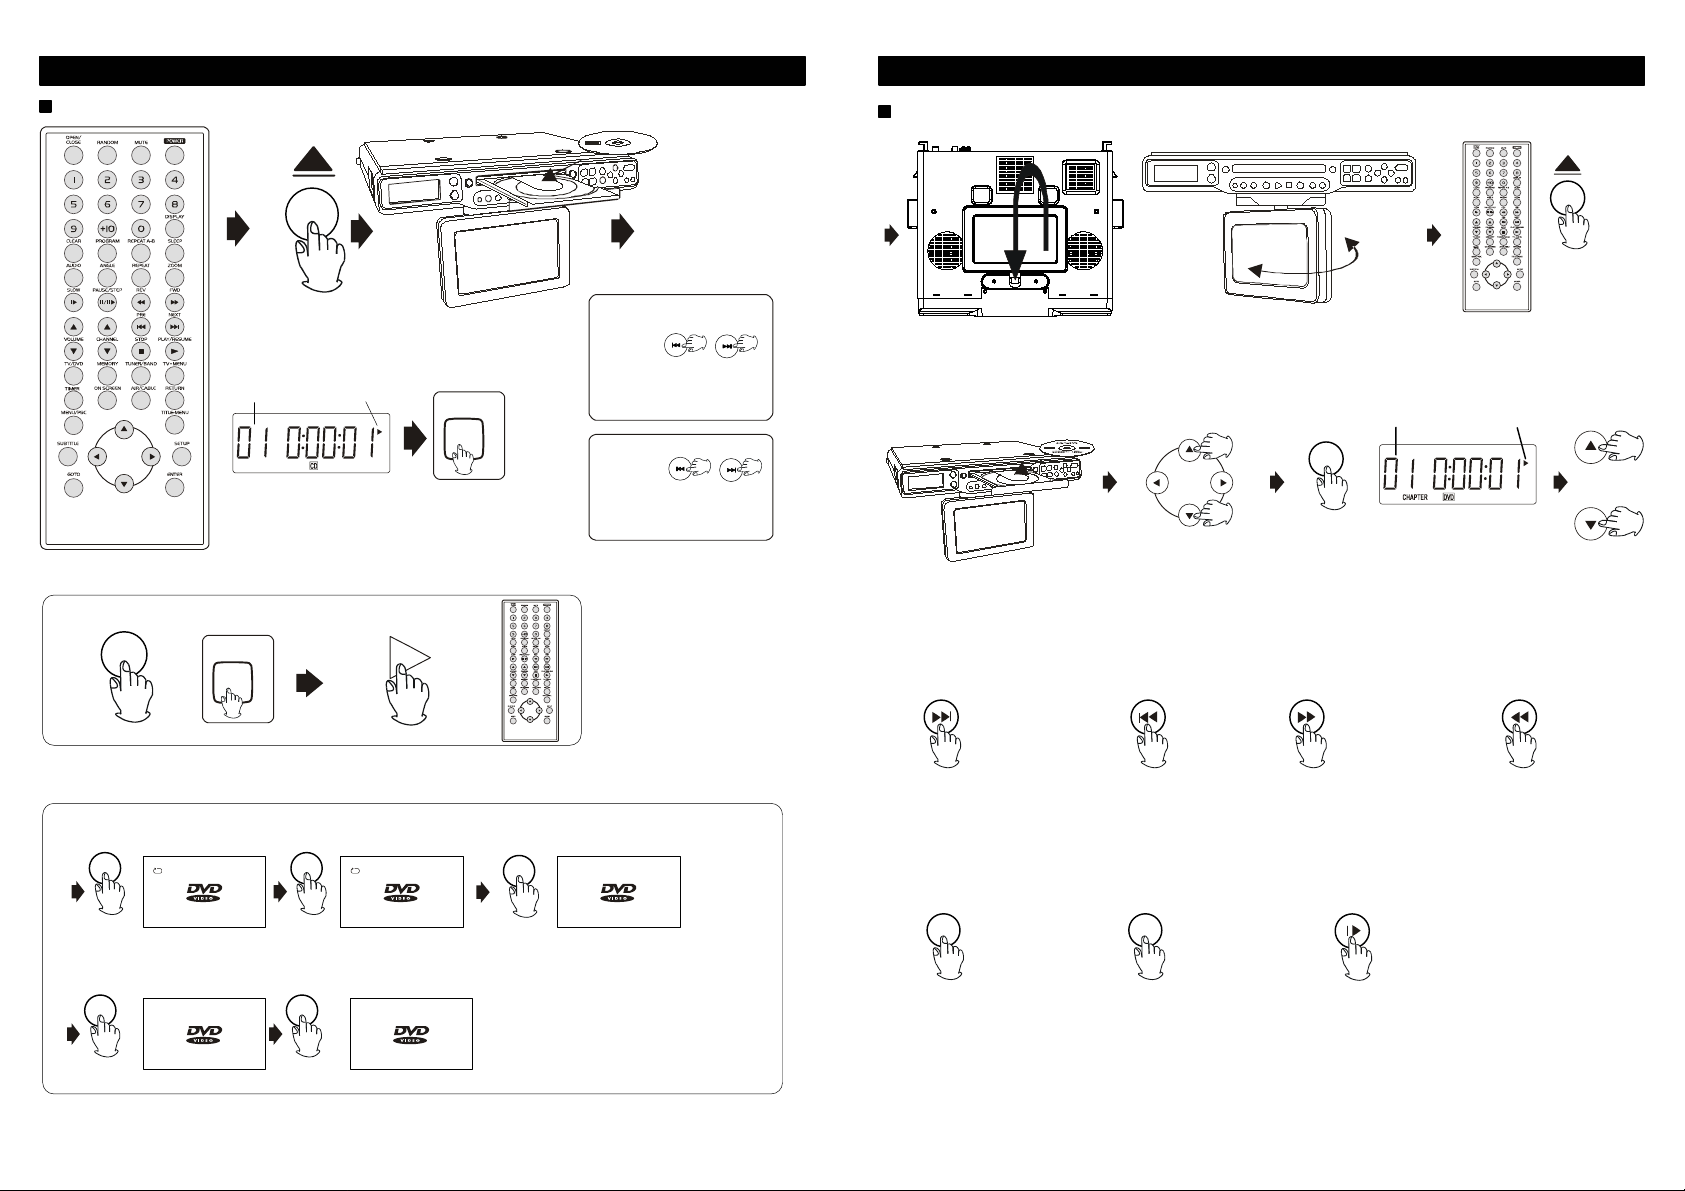
LISTENING TO A CD
PAUSE
OR
1
Open/Close
TRACK PLAY INDICATOR
TO CANCEL:
STOP
X1
2
PLAY/PAUSE
DVD PLAYBACK
Lower TV Screen
The CD will
automatically start
playing
3
SEARCH
STOP
4
SKIP
REV
FWD
On the remote press REV or
FWD to select.
To stop search press PLAY/
PAUSE.
SKIP / CHANNEL
X2
DOWN
UP
OR
Press PRE or NEXT on the
remote control
1 2
PRESS OPEN/CLOSE BUTTON
INSERT DVD
PRESS OPEN/CLOSE TO
CLOSE
USE TUNING UP OR
TUNING DN TO SELECT
FROM MAIN MENU
TUNING UP
3 4 5
NAVIGATION
TUNING DOWN
PRESS ENTER
TO SELECT
ENTER
TRACK PLAY INDICATOR
OPEN/
CLOSE
VOLUME
OR
REMOTE CONTROL FEATURES
Press “NEXT” to advance
to the next chapter
Press “PRE” to go to
the previous chapter
Press “FWD” to advance
frame by frame
Press “REV” to review
precious frames
IN THE PLAY MODE
REPEAT
1 2
REPEAT
RANDOM
1 2
RANDOM
REPEAT ONE
FOR CD MODE
Track
RANDOM
FOR CD MODE
Random
REPEAT ALL
FOR CD MODE
All
3
REPEAT REPEAT
NORMAL MODE
FOR CD MODE
RANDOM
11
NORMAL MODE
FOR CD MODE
NEXT PRE FWD REV
Press “MENU/PBC” to
return to main menu
MENU ZOOM
Press “ZOOM”
repeatedly to zoom in
Press “SLOW” to view
movie in slow motion
SLOW
12
BASIC OPERATION
TELEVISION OPERATION
External
Antenna Jack
1 2
PRESS SEARCH BUTTONS
TO CHANGE: BRIGHTNESS.
CONTRAST, COLOR, ETC
TUNING UP
NAVIGATION
TUNING DOWN
ALSO USE EXTERNAL
ANTENNA TO CONNECT
TO CABLE OR SATELLITE.
PRESS TUNING DOWN AND
SELECT AUTO SEARCH
TUNING UP
3 4 5
NAVIGATION
ENTER
PRESS ENTER
TUNING DOWN
TV
TV
AUTO SEARCH AIR
STATION FOUND
Time
Brightness
Contrast
Color
Default
SOURCE
CHANNEL
SKIP
AUTO-SEARCH
12-00-00
16
18
23
CATV
2
ON
TV/DVD
TV/DVD
BASIC OPERATION
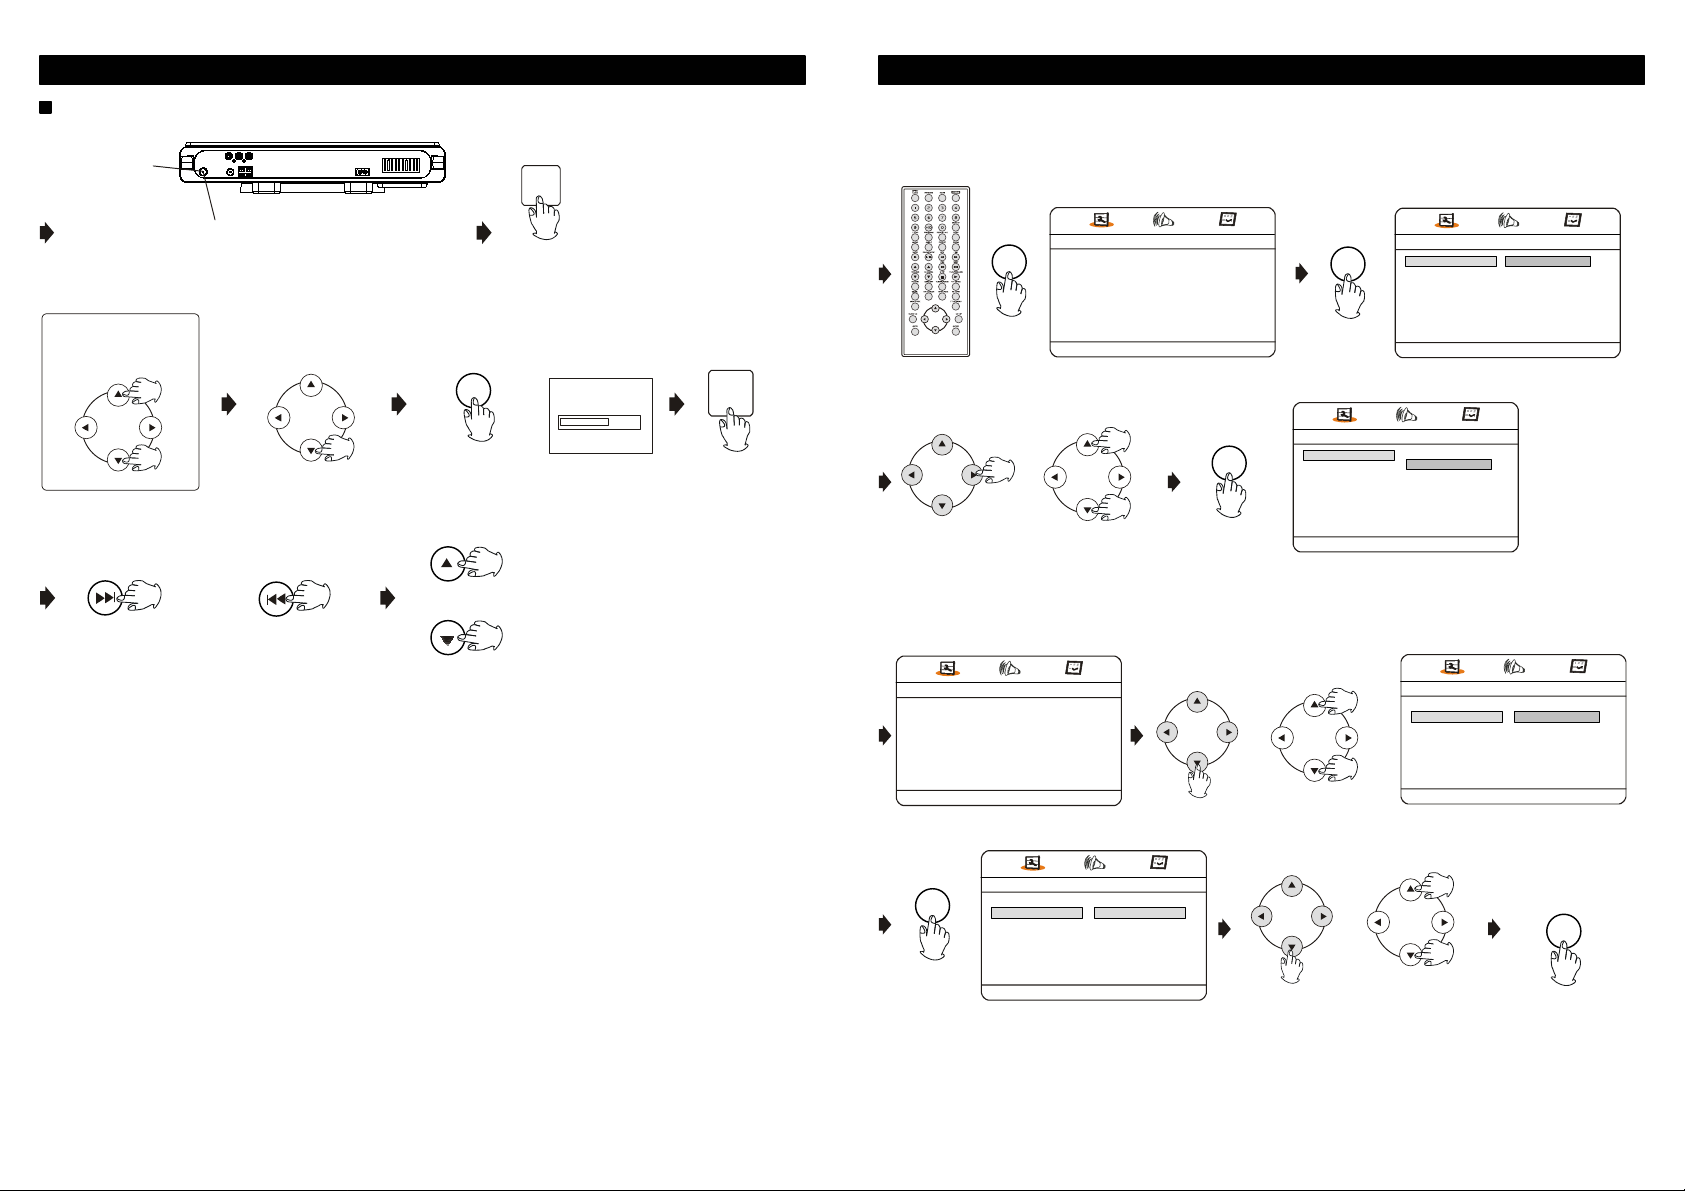
SETUP
General Setup Page
TV Display
SETUP
1
3 4
- - General Setup Page - -
TV Display
Angle Mark
OSD Lang
Captions
Screen Saver
Go To Genera Setup Page
TUNING UP
NAVIGATION
PS
On
ENG
Off
On
ENTER
ENTER
2
- - General Setup Page - -
TV Display
Angle Mark
OSD Lang
Captions
Screen Saver
- - General Setup Page - -
TV Display
Angle Mark
OSD Lang
Captions
Screen Saver
Set TV Display Mode
PS
Normal / PS
On
Norman / LB
ENG
Wide
Off
On
PS
On
ENG
Off
On
Normal / PS
Norman / LB
Wide
SKIP/CHANNEL
6 7
UP
SKIP/CHANNEL
OR
DOWN
VOLUME
OR
TUNING DOWN
Angle Mark
- - General Setup Page - -
TV Display
Angle Mark
OSD Lang
1 2
Captions
Screen Saver
Go To General Setup Page
ENTER
3
To select
PS
On
ENG
Off
On
- - General Setup Page - TV Display
Angle Mark
OSD Lang
Captions
Screen Saver
Set Angle Mark
PS
On
ENG
Off
On
On
Off
To select
Press Tune Up or Tune Dn arrow on
remote or unit to highlight your choice
4
Set TV Display Mode
TUNING UP
NAVIGATION
TUNING DOWN
- - General Setup Page - TV Display
Angle Mark
OSD Lang
Captions
Screen Saver
Set Angle Mark
TUNING UP
NAVIGATION
TUNING DOWN
PS
On
On
Off
ENG
Off
On
Press enter when your
choice is highlighted
ENTER
5
13
14

BASIC OPERATION
BASIC OPERATION
Language OSD
- - General Setup Page - -
TV Display
Angle Mark
OSD Lang
1 2
Captions
Screen Saver
Go To General Setup Page
ENTER
3
To select
PS
On
ENG
Off
On
- - General Setup Page - TV Display
Angle Mark
OSD Lang
Captions
Screen Saver
Set OSD Language
PS
On
ENG
Off
On
English
French
German
Italian
Dutch
Captions
- - General Setup Page - -
TV Display
Angle Mark
OSD Lang
1 2
Captions
Screen Saver
Go To General Setup Page
PS
On
ENG
Off
On
Press Tune Up or Tune Dn arrow on
remote or unit to highlight your choice
TUNING UP
NAVIGATION
TUNING DOWN
TUNING UP
4
Press Tune Up or Tune Dn arrow on
remote or unit to highlight your choice
TUNING UP
NAVIGATION
TUNING DOWN
NAVIGATION
TUNING DOWN
- - General Setup Page - TV Display
Angle Mark
OSD Lang
Captions
Screen Saver
Set OSD Language
- - General Setup Page - TV Display
Angle Mark
OSD Lang
Captions
Screen Saver
Closed Caption
PS
On
English
ENG
French
Off
German
On
Italian
Dutch
Press enter when your
choice is highlighted
5
PS
On
ENG
OffOnOn
Off
ENTER
Screen Saver
- - General Setup Page - -
TV Display
Angle Mark
OSD Lang
1 2
Captions
Screen Saver
Go To General Setup Page
ENTER
3
To select
PS
On
ENG
Off
On
- - General Setup Page - TV Display
Angle Mark
OSD Lang
Captions
Screen Saver
Screen Saver
PS
On
ENG
Off
On
On
Off
Speaker Setup Page
- - General Setup Page - -
TV Display
Angle Mark
OSD Lang
1 2
Captions
Screen Saver
Go To General Setup Page
PS
On
ENG
Off
On
Press Tune Up or Tune Dn arrow on
remote or unit to highlight your choice
TUNING UP
NAVIGATION
TUNING DOWN
4
Press Tune Up or Tune Dn arrow on
remote or unit to highlight your choice
TUNING UP
NAVIGATION
TUNING DOWN
- - General Setup Page - TV Display
Angle Mark
OSD Lang
Captions
Screen Saver
Screen Saver
TUNING UP
NAVIGATION
TUNING DOWN
- - Speaker Setup Page - -
PS
On
ENG
Off
On
Downmix
Go To Speaker Setup Page
On
Off
Press enter when your
choice is highlighted
ENTER
5
3
ENTER
To select
- - General Setup Page - TV Display
Angle Mark
OSD Lang
Captions
Screen Saver
Closed Caption
PS
On
ENG
OffOnOn
Off
TUNING UP
4
NAVIGATION
TUNING DOWN
15
Press enter when your
choice is highlighted
ENTER
5
3
ENTER
To select
- - Speaker Setup Page - -
Downmix LT/RT
Stereo
Set LT/RT Downmix
4
16
TUNING UP
NAVIGATION
TUNING DOWN
Press enter when your
choice is highlighted
ENTER
5

Preference Page
- - General Setup Page - -
TV Display
Angle Mark
OSD Lang
1 2
Captions
Screen Saver
Go To General Setup Page
PS
On
ENG
Off
On
BASIC OPERATION
Press Tune Up or Tune Dn arrow on
remote or unit to highlight your choice
TUNING UP
NAVIGATION
TUNING DOWN
TV Type
- - Preference Page - -
NTSC
TV Type
ENG
Audio
ENG
Subtitle
ENG
Disc Menu
Parental
Password
Default
Go To Preference Page
Subtitle
- - General Setup Page - -
TV Display
Angle Mark
1 2
OSD Lang
Captions
Screen Saver
Go To General Setup Page
PS
On
ENG
Off
On
BASIC OPERATION
Press Tune Up or Tune Dn arrow on
remote or unit to highlight your choice
TUNING UP
NAVIGATION
TUNING DOWN
- - Preference Page - -
NTSC
TV Type
ENG
Audio
ENG
Subtitle
ENG
Disc Menu
Parental
Password
Default
Preferred Subtitle Language
English
French
Spanish
Chinese
Japanese
Korean
Russian
Thai
ENTER
3
To select
- - Preference Page - TV Type
Audio
Subtitle
Disc Menu
Parental
Password
Default
Set TV Standard
NTSC
ENG
ENG
ENG
PAL
Multi
NTSC
ENG
Audio
- - General Setup Page - -
TV Display
Angle Mark
1 2
OSD Lang
Captions
Screen Saver
Go To General Setup Page
ENTER
3
To select
PS
On
ENG
Off
On
- - Preference Page - -
NTSC
TV Type
ENG
Audio
ENG
Subtitle
ENG
Disc Menu
Parental
Password
Default
Preferred Audio Language
English
French
Spanish
Chinese
Japanese
Korean
Russian
Thai
4
TUNING DOWN
Press Tune Up or Tune Dn arrow on
remote or unit to highlight your choice
TUNING UP
NAVIGATION
TUNING DOWN
4
TUNING DOWN
TUNING UP
NAVIGATION
- - Preference Page - TV Type
Audio
Subtitle
Disc Menu
Parental
Password
Default
Preferred Audio Language
TUNING UP
NAVIGATION
Press enter when your
choice is highlighted
ENTER
5
NTSC
English
ENG
French
ENG
Spanish
ENG
Chinese
Japanese
Korean
Russian
Thai
Press enter when your
choice is highlighted
ENTER
5
ENTER
3
To select
- - Preference Page - -
NTSC
TV Type
ENG
Audio
ENG
Subtitle
ENG
Disc Menu
Parental
Password
Default
Preferred Subtitle Language
English
French
Spanish
Chinese
Japanese
Korean
Russian
Thai
Disc Menu
- - General Setup Page - -
TV Display
Angle Mark
1 2
OSD Lang
Captions
Screen Saver
Go To General Setup Page
ENTER
3
To select
PS
On
ENG
Off
On
- - Preference Page - -
NTSC
TV Type
ENG
Audio
ENG
Subtitle
ENG
Disc Menu
Parental
Password
Default
Preferred Menu Language
English
French
Spanish
Chinese
Japanese
Korean
Russian
Thai
4
TUNING DOWN
Press Tune Up or Tune Dn arrow on
remote or unit to highlight your choice
TUNING UP
NAVIGATION
TUNING DOWN
4
TUNING DOWN
TUNING UP
NAVIGATION
- - Preference Page - TV Type
Audio
Subtitle
Disc Menu
Parental
Password
Default
Preferred Menu Language
TUNING UP
NAVIGATION
Press enter when your
choice is highlighted
ENTER
5
NTSC
English
ENG
French
ENG
Spanish
ENG
Chinese
Japanese
Korean
Russian
Thai
Press enter when your
choice is highlighted
ENTER
5
17
18

BASIC OPERATION
BASIC OPERATION
Parental
- - General Setup Page - -
TV Display
Angle Mark
1 2
OSD Lang
Captions
Screen Saver
Go To General Setup Page
ENTER
To select
6
PS
On
ENG
Off
On
- - Preference Page - -
Password
OK
NTSC
TV Type
ENG
Audio
ENG
Subtitle
ENG
Disc Menu
Parental
Password
Default
Preferred Menu Language
1 KID SAF
2 G
3 PG
4 PG 13
5 PGR
6 R
7 NC 17
8 ADULT
Press Tune Up or Tune Dn arrow on
remote or unit to highlight your choice
TUNING UP
NAVIGATION
TUNING DOWN
TUNING UP
4 53
TUNING UP
7
TUNING DOWN
NAVIGATION
TUNING DOWN
NAVIGATION
- - Preference Page - -
NTSC
TV Type
ENG
Audio
ENG
Subtitle
ENG
Disc Menu
Parental
Password
Default
Preferred Menu Language
Press enter when your
choice is highlighted
ENTER
8
1 KID SAF
2 G
3 PG
4 PG 13
5 PGR
6 R
7 NC 17
8 ADULT
ENTER
To select
Default
- - General Setup Page - -
TV Display
Angle Mark
OSD Lang
1
Captions
Screen Saver
Go To General Setup Page
ENTER
To select
PS
On
ENG
Off
On
- - Preference Page - -
NTSC
TV Type
ENG
Audio
ENG
Subtitle
ENG
Disc Menu
Parental
Password
Default Reset
Load Factory Setting
Press Tune Up or Tune Dn arrow on
remote or unit to highlight your choice
TUNING UP
2
NAVIGATION
TUNING DOWN
Press enter
to confirm
ENTER
53
- - Preference Page - TV Type
NTSC
Audio
ENG
Subtitle
ENG
Disc Menu
ENG
Parental
Password
Default Reset
Set Parental Control
Input the Password which you setup
Password
- - General Setup Page - -
TV Display
Angle Mark
1 2
OSD Lang
Captions
Screen Saver
Go To General Setup Page
ENTER
3
Press enter
button twice to
select
PS
On
ENG
Off
On
Old Password
New Password
Confirm PWD
OK
Press Tune Up or Tune Dn arrow on
remote or unit to highlight your choice
TUNING UP
NAVIGATION
TUNING DOWN
Input “1234”
Input new password
what you want
4
19
- - Preference Page - TV Type
NTSC
Audio
ENG
Subtitle
ENG
Disc Menu
ENG
Parental
Password Change
Default
Change Password
Press enter to confirm
ENTER
20

WAKE TO BUZZER
T
TIMER
SLEEP TIMER
SLEEP
S
BASIC OPERATION
VOLUME
OR
10 minute
SLEEP
S
AS YOU PRESS THE SLEEP BUTTON
IT COUNTS DOWN IN INCREMENTS
OF 10. ONCE IT REACHES 00 THE
SLEEP MODE CANCELS
TO SHUT OFF TIMER TO
PRESS THE TIMER
TO CANCEL
SLEEP
S
PRESS SLEEP BUTTON
REPEATEDLY TO SHUT
OFF SLEEP
GENERAL:
CARE AND MAINTENANCE
COMPACT DISCS:
Use a soft, clean cloth
moistened with plain, lukewarm water to clean the
exterior of the unit.
Never use solvents such as
benzene or other strong
chemical cleaners since these
could damage the unit’s finish.
It is important that no liquid
reaches the inside of the unit.
TROUBLESHOOTING GUIDE
Remove the CD from the case by
holding it at the edges while
pressing the center hole lightly.
Do not touch the shiny surface of
the CD or bend the CD.
Place the CD into the tray with
the label facing up.
A dirty CD may not play correctly.
If a CD becomes dirty, wipe it
with a soft cloth in a straight line
from center to edge.
Avoid exposure to direct sun light,
temperature extremes, and
moisture.
CAUTION: No not use any solvent (eg:
record sprays, thinner, benzene, etc.) to
clean a CD.
21
PROBLEM
GENERAL
No sound is heard.
CD PLAYER
Disc is inserted but
tracks are not
displayed.
Certain sections of the
disc are not played
normally.
POSSIBLE CAUSE SOLUTION
Power is not on.
VOLUME Control is set
to minimum.
Disc is inserted upside- down. Insert disc correctly (label up).
Disc is dirty. Wipe clean with soft cloth.
Disc is scratched.
Disc is seriously warped. Use a new disc.
Moisture has formed inside the
CD deck.
Disc is dirty.
Disc is scratched.
Replace the batteries.
Press the PLAY/PAUSE Button.
Adjust the VOLUME Control.
Use a new disc.
Take out the CD and leave the CD
player open for about an hour to dry.
Wipe clean with soft cloth.
Skip over scratched sections;
otherwise, replace the disc.
22

Consumer Electronics Products and Home Appliances
Thank you for choosing ELECTROHOME!
RGC Redmond Group gives the following express warranty to the original consumer purchaser or gift recipient for
this Electrohome brand product, when shipped in its original container and sold or distributed in Canada by RGC
Redmond Group or by an Authorized Electrohome Dealer:
RGC Redmond Group warrants that this product is free, under normal use and maintenance, from any defects in
material and workmanship. If any such defects should be found in this product within the applicable warranty
period, RGC Redmond Group shall, at its option, repair or replace the product as specified herein. Replacement
parts furnished in connection with this warranty shall be warranted for a period equal to the unexpired portion of
the original equipment warranty.
This warranty shall not apply to:
a. Any defects caused or repa irs required as a result of abusive operation, negligence, accident,
improper installation or in appropriate use as outlined in the owner's manual.
b. Any Electrohome product tampered with, modified, adjusted or repaired by any party other than
RGC Redmond Group or Electrohome's Authorized Service Centres.
c. Damage caused or repairs required as a result of the use with items not specified or approved
by RGC Redmond Group, including but not limited to head cleaning tapes and chemical
cleaning agents.
d. Any replacement of accessor ies, glassware, consumable or peripheral items required through
normal use of the product includ ing but not limited to earphones, remote controls, AC adapters,
batteries, temperature probe, stylus, trays, filters, cables, paper, cabinet, cabinet parts, knobs,
buttons, baskets, stands, shelves, cookware and cooking utensils.
e. Any cosmetic damage to the surface or exterior that has been defaced or caused by normal
wear and tear.
f. Any damage caused by external or environmental conditi ons, including but not limited to
transmission line/power line voltage or liquid spillage.
g. Any product received without appropriate model, serial number and CSA /cUL /cULus /cETL /
cETLus markings.
h. Any products used for rental or commercial purposes .
i. Any installation, setup and/or programming charges.
Should this Electrohome product fail to operate duri ng the warranty period, war ranty service may be obtained
upon delivery of the Electrohome product toge the r with proof of purchase and a copy of this LIMITED
WARRANTY statement to an Authorized Electrohome Service Centre. In-home warranty service may be provided
at RGC Redmond Group's discretion on any Electrohome television with the screen size of 27” or larger. This
warranty constitutes the entire express warranty granted by RGC Redmond Group and no other dealer, service
centre or their agent or employee is authorized to extend, enlarge or transfer this warranty on behalf of RGC
Redmond Group. To the extent the law permits, RGC Redmond Group disclaims any and all liability for direct or
indirect damages or losses or for any incidental, special or consequential damage s or loss of profits resulting from
a defect in material or workmanship relating to the product, including damages for the loss of time or use of this
Electrohome product or the loss of information. The purchaser will be responsible for any removal, reinstallation,
transportation and insurance costs incurred. Correction of defects, in the manner and period of time described
herein, constitute complete fulfillment of all obligations and responsibilities of Electrohome Electronics to the
purchaser with respect to the product and shall constitute full satisfaction of al l claims, whether based on contract,
negligence, strict liability or otherwise.
CARRY-IN PARTS & LABOUR WARRANTY PERIODS:
Audio Products: 1 Year (Remote Control, if applicable - 90 Days)
DVD Products: 1 Year (Remote Control - 90 Days)
LCD & Plasma Display TV: 1 Year (Remote Co ntrol - 90 Days)
Television Products: 1 Year (Remote Control - 90 Days)
VCR Products: 1 Year (Remote Control - 90 Days, Video Heads - 6 Months)
Home Appliances: 1 Year
o Microwave Magnetron parts only addit ion al 6 Ye ars
o Refrigerator / Freezer Compr essor parts only, additional 4 years
Heating / Cooling & Humidification Products: 1 Year (Remote Control - 90 Days)
o Compressor parts only (if applicable), addit ion al 4 years
To obtain the name and address of the nearest Authorized Electrohome Service Centre or Dealer, please contact:
RGC Redmond Group, 6185 McLaughlin Road, Mississauga, ON L5R 3W7.
For more information on this Warranty or Service Locations, please call (905)366-5100 or toll free 1-800-6635954, Monday to Friday 9:00am - 5:00pm Eastern Standard Time.
ELECTROHOME WARRANTY
23

07EV755
TÉLÉVISEUR ACL DE 7 PO avec lecteur
DVD à fixer sous l’armoire
GUIDE D’UTILISATION

AVERTISSEMENTS ET PRÉCAUTIONS À PRENDRE
A
A
A
j
FIN DE RÉDUIRE TOUT RISQUE D’INCENDIE OU D’ÉLECTROCUTION, N’EXPOSEZ PAS CET
PPAREIL À LA PLUIE NI À L’HUMIDITÉ EXCESSIVE.
TENSION DANGEREUSE:
Le symbole représentant un éclair dans un triangle équilatéral a pour but d'avertir l'utilisateur du
danger présenté par des pièces non isolées à l'intérieur de l'appareil et dont la tension est
suffisante pour provoquer des décharges électriques dangereuses.
ATTENTION :
Le point d'exclamation dans un triangle équilatéral a pour but d'avertir l'utilisateur que des
instructions importantes relatives à l'utilisation et à l'entretien se trouvent dans le manuel
accompagnant l'appareil.
DANGER :
Le symbole ci-contre indique que l’appareil émet un rayonnement laser invisible et dangereux
lorsque la porte du lecteur est ouverte ou que le verrouillage de celle-ci est endommagé.
Évitez toute exposition directe au faisceau. Ne tentez pas de rendre inopérant le dispositif de
sécurité que constituent les loquets de verrouillage de la porte du lecteur.
L'UTILISATION DES COMMANDES, DES RÉGLAGES OU L'EXÉCUTION DE PROCÉDURES QUI NE
SONT PAS SPÉCIFIÉES NI DÉCRITES DANS CE DOCUMENT PEUVENT ENTRAINER UNE
EXPOSITION DANGEREUSE AU RAYON LASER.
ATTEN T ION : POUR RÉDUIRE LE RSIQUE D’INCENDFIE , NE PLACEZ JAMAIS AUCUN APPAREIL DE
CUISSON DIRECTEMENT SOUS CE TÉLÉVISEUR ACL.
ATTENTION : AF IN D’ÉVITER TOUT RISQUE D’ÉLECTROCUTION, BRANCHEZ TOUJOURS LA FI CHE
DANS UNE PRISE DE COURANT DE MANIÈRE À CE QUE LA LAME LA PLUS LARGE SOIT INSÉRÉE
DANS L’ORIFICE LE PLUS LARGE.
FIN DE RÉDUIRE LES RISQUES D’ÉLECTROCUTION, NE RETIREZ PAS LE COUVERCLE (OU LE
PANNEAU ARRIÈRE). CET APPARE IL NE CONTIENT AUCUNE PIÈCE POUVANT ÊTRE RÉPARÉE
PAR L’UTILISATEUR. CONFIEZ LA RÉPA RATIO N DE L’APPAREIL À UN TECHNICIEN QUALIFIÉ.
AVERTISSEMENT : Tout changement ou modification non autorisé à cet appareil peut entraîner
l'interdiction à l'utilisat eur de se servir de cet appareil .
AVIS : Cet appareil a fait l'objet de tests qui ont déterminé qu'il est en conformité avec les limites imposées
pour les appareils numériques de la classe B, selon le chapitre 15, sur les règles de la FCC. Ces limites
sont prescrites afin d'offrir une protection raisonnable contre toute interférence préjudiciable dans une
installation résidentielle. Cet appareil produit , empl oie et peut être la cause d'un rayonnement
radioélectrique et, si l'installation et l'emploi ne sont pas conformes aux instructi ons, ri sque de présenter un
brouillage nuisible aux radiocommunications.
Toutefois, il est impossible de garantir qu'aucune interférence ne sera produite par une installation
particulière. Si cet appareil est la source de brouillage nuisible à la réception des émissions radiophoniques
ou télévisuelles, déterminé en allumant et en éteignant plusieurs fois de suite l'appareil , l ' utilisateur pourra
tenter de résoudre ce problème de brouillage par une des mesures suivantes:
• Changer l'orientation ou l'installation de l'antenne de réception.
• Eloigner davantage l'appareil du récepteur.
• Brancher le cordon d'alimentation de l'appareil dans une prise ou sur un circuit séparé du récepteur.
• Consulter le distributeur ou un technicien expérimenté en radio/TV pour assistance.
AVIS À L’INTENTION DE LA PERSONNE QUI EFFECTUERA LE RACCORDEMENT AU RÉSEAU DE
CÂBLODISTRIBUTION : Cet avis est destiné à lui rappeler l'article 820-40 du Code national de l'électricité
(NEC) qui fournit les directives à suivre et les consignes à respecter pour effectuer une mise à la terre
adéquate de l’appareil et qui stipule que « le dispositif de mise à la terre du câble doit être raccordé à un
système de mise à la terre de l'édifice, aussi près que possible de son point d'entrée ».
IMPORTANTES MESURES DE SÉCURITÉ
LISEZ LES INSTRUCTIONS
1.
Lisez attentivement toutes les instructio ns sur le foncti onnem ent et la sécuri té avant de mettre l ' appareil
en marche.
CONSERVEZ LES INSTRUCTIONS
2.
Gardez les instructions, pour vous y référer plus tard, au besoin.
3.
TENEZ COMPTE DE CES MISES EN G ARDE
Toutes les mises en garde imprimées sur l'appareil ou contenues dans le manuel d'instructions doivent
être observées.
RESPECTEZ LES DIR EC TIVES
4.
Toutes les instructions sur le fonctionnement et l'utilis ation doivent être suivies.
5.
NETTOYAGE
Débranchez l'appareil de la prise électrique avant de le nettoyer. N'utilis ez pas de produits de nettoyage
liquides ni en aérosol, mais essuyez l'appareil avec un linge humide.
6.
ACCESSOIRES
Le fabricant de cet appareil ne conseille aucun accessoire car leur emploi peut être dangereux.
7.
EAU ET HUMIDITÉ
N'utilisez pas l'appareil dans des endroits humides ou près de l'eau, comme par exemple à proximité
d'une baignoire, d'un évier de cuisine ou de salle de bain, dans un sous-sol humide ou autour d'une
piscine.
8.
EMPLACEMENT DE L’APPAREIL
Ne placez pas cet appareil vidéo sur un chariot, support,
trépied ou une table instable, car il pourrait en tomber,
se briser et blesser sérieusement quelqu'un se trouvant
à proximité.
9.
Si vous voulez déplacer l'appareil avec le chariot sur lequel
il est placé, procédez avec prudence, car des arrêts brusques,
une force excessive ou des surfaces inégales peuvent causer le renversement de l'appareil avec le
chariot.
10.
AÉRATION
Les fentes et les orifices se trouvant à l’endos et sous le boîtier de l’appareil sont dest inés à assurer sa
ventilation de manière à ce qu’il fonctionne sans anomalie et qu’il ne soit pas exposé à une surchauffe.
N'obstruez pas ces orifices d'aération en plaçant l'appareil sur une surface molle, comme un lit, un
divan ou un tapis. Ne le placez pas non plus près ou au-dessus d'un radiateur ou d'une bouche de
chauffage ni sur une étagère ou dans un meuble fermé, dont les parois pourraient bloquer la circulation
d'air autour de l'appareil. Suivez les instructions du fabricant.
SOURCES D'ALIMENTATION
11.
Cet appareil ne peut être raccordé qu'à la source d'alimentation indiquée sur sa plaque signalétique. Si
vous ne connaissez pas la tension de votre source de courant, questionnez votre marchand ou votre
fournisseur d'électricité. Pour les appareils destinés à être aliment és par des piles ou autres sources
d’alimentation, consultez le guide d’utilisateur.
12.
MISE À LA TERRE OU POLARISATION
Cet appareil est doté d'une fiche polarisée de courant alternatif (une lame est plus large que l'autre) qui
ne peut se brancher sur la prise que d'une seule façon. Ceci est un dispositif de sûreté, n'essayez pas
de neutraliser l'objectif sécuritaire de la fiche polarisée S'il vous est impossible de la brancher sur la
prise, essayez de l'inverser. Si c'est touj ours impossible, demandez à un électricien de remplacer la
prise désuète. Tout appareil doté d'une fiche à trois lames de mise à la terre, c’est-à-dire qu’une des
lames est en fait une tige, ne peut être branché que sur une prise électrique à mise à la terre. Ceci est
aussi un dispositif de sûreté. Si vous n’arrivez pas à brancher correctement ce genre de fiche dans une
prise de courant, demandez à un électricien de remplacer la prise désuète. N'essayez jamais de
neutraliser l'ob
ectif sécuritaire d’une fiche polarisée.
S3125A
PORTABLE CART WARNING
(symbol provided by RETAC)
Special Note
When placing your unit on a lacquered or natural finish, protect your furniture with a cloth or other protective
material.
21

IMPORTANTES MESURES DE SÉC URITÉ
A
13.
PROTECTION DU CORDON D'ALIMENTATION
Le cordon d'alimentation doit être acheminé de façon à ne pas être écrasé ni coincé. Il faut aussi faire
attention aux fiches, prises et points de sortie de l'appareil.
14.
ORAGE ÉLECTRIQUE
Pour éviter les dommages causés par la foudre ou les soudaines hausses de tension, débranchez
l'appareil de la prise électrique et déconnectez l'antenne ou le système de câblodist ri bution si
l'appareil doit rester sans surveillance et inutilisé pendant une longue période.
15.
SURCHARGE
Ne surchargez pas les prises électriques murales ni les cordons de rallonge, car cela risque de
causer un incendie ou des chocs électriques.
16.
PÉNÉTRATION DE LIQUIDE OU CORPS ÉTRANGER
Ne tentez jamais d’insérer un objet, quel qu’il soit, à l’intérieur du boîtier de l’appareil, ni de laisser un
liquide pénétrer dans les orifices de l'appareil, car cela peut toucher des points de t ensi on dangereux,
causer un court-circuit, un incendie ou des chocs électriques. Ne versez, ni ne vaporis ez jamais de
liquide sur l'appareil.
17.
SERVICE OU RÉPARATION
Ne tentez pas de réparer l'appareil vous-même, car l’ouverture du boîtier de l’appareil ou le
démantèlement de certaines pièces pourrait vous exposer à des tensions dangereuses ou causer des
courts-circuits qui feraient en sorte que l’appareil ne serait plus en état de fonctionner normalement.
Confiez toute réparation à du personnel qualifié, soit les techniciens d’un cent re de service autori sé.
18.
DOMMAGES EXIGEANT DES RÉPARATIONS
L'appareil doit être débranché de la prise électrique et confié à un réparateur qualifié si:
a . La fiche ou le cordon d'alimentation a été endommagé;
b . Un objet est tombé sur l’appareil ou un liquide a pénétré à l'intérieur;
c . L'appareil a été exposé à l’eau ou à la pluie;
d . L'appareil ne fonctionne pas correctement même si vous suivez les di rectives de fonctionnement.
Effectuez seulement les réglages expliqués dans le présent guide d’utilisateur, car des réglages
inadéquats peuvent endommager sérieusement l'appareil, qui exigera alors des réparat i ons
coûteuses par un technicien qualifié pour être remis en état de fonctionner;
e . L'appareil est tombé ou son boîtier a été endommagé;
f . Le fonctionnement de l'appareil a changé de façon marquante.
19.
PIÈCES DE RECHANGE
Quand il est nécessaire de remplacer certaines pièces de l'appareil, assurez-vous que le réparateur
utilise des pièces recommandées par le fabricant ou ayant les mêmes caractéristiques que les pi èces
originales. Le remplacement par des pièces non autorisées peut causer un i ncendie, des chocs
électriques ou être la source d'autres dangers.
20.
VÉRIFICATION DE SÉCURITÉ
près service ou réparation, demandez au technicien d’effectuer des vérifi cations de sécurité pour
s’assurer que l’appareil soit en bon état de fonctionnement.
21.
FIXATION AU MUR OU AU PLAFOND
Cet appareil ne doit pas être fixé sous l’armoire avec un accessoire n’ayant pas reçu l’approbation
explicite du fabricant.
22.
CHALEUR
N’exposez pas cet appareil à des sources de chaleur, comme des radiateurs, bouches de chauffage,
cuisinières ou autres appareils dégageant ou produisant de la chaleur, y compris un amplificateur.
23.
PÉRIODES DE NON UTILISATION
Débranchez l’appareil du réseau électrique lorsque vous ne prévoyez pas l ’ utiliser pendant un certain
temps.
REMARQUE CONCERNANT LES DISQUES
MANIPULATION DES DISQUES
Bien que les sillons sur lesquels sont gravées les
pièces musicales sur un disque soient recouverts
d’une couche protectrice, il est toujours fortement
recommandé de traiter les disques avec soin.
Veillez à toujours manipuler les disques en les
tenant par le rebord et les remettez-les dans leur
étui protecteur dès que nous ne les utilisez pas.
RANGEMENT DES DISQUES
z Ne rangez pas les disques dans un endroit
directement exposé aux rayons du soleil ou à
proximité d’une source de chaleur.
z Ne rangez pas les disques dans un endroit où il
y a de la poussière ou de l’humidité.
z Rangez toujours les disques dans leur étui
protecteur.
REMARQUE CONCERNANT LE NUMÉRO
La région numéro 1 est celle pour laquelle cet
appareil a été fabriqué. Par conséquent, il
effectue la lecture de tous les disques fabriqués
pour le marché identifié du numéro 1.
TERMINOLOGIE DES DISQUES
z TITRE
Les images ou la musique gravées sur un DVD sont
divisés en unités. Le TITRE représente la section la
plus grande. Pour un fichier en format vidéo, le titre
équivaut au film. Pour un fichier en format audio, le
titre équivaut à la pièce musicale. Chaque titre est
identifié par un numéro qui facilite sa localisation sur
le disque.
z CHAPITRE
Les chapitres constituent de plus petites portions (ou
unités) sur les DVD. Chaque comporte plusieurs
chapitres et chacun d’entre eux est identifié par un
numéro pour faciliter sa localisation. Il arrive
également que certains disques contiennent des
chapitres auxquels aucun numéro n’a été attribué.
z PISTE
Les fichiers vidéo ou de musique sur les VCD et
les CD sont appelés les pistes et chacune d’entre
elle est identifiée d’un numéro pour faciliter sa
localisation.
z SCÈNE
Les menus de photos, de vidéo ou d’images sur
les SUPER-VCD et les VCD avec la fonct i on PBC
de contrôle sont subdivisés en portions que l’on
appelle les scènes.
z FONCTION PBC DE CONTRÔLE DE
LECTURE
Les disques SUPER-VCD (version 2,0) sont dotés
de la fonction PBC de contrôle de lecture qui vous
permet d’utiliser les diverses fonctions du disque
à la partir des menus à l’écran. Si le disque
comporte des images, la lecture en haute
résolution peut être effectuée.
STRUCTURE DES DVD
DISQUE
TITRE
CHAPITRE
STRUCTURE DES SUPER-VCD, VCD ET CD
DISQUE
PISTE
43

PLAYABLE DISCS
ÉLÉ
V
DESCRIPTION DE L’APPAREIL
TYPE MARK CONTENT SIZE PLAYING TIME
Approx. 2hrs (single-side disc)
Approx. 4hrs (double-side disc)
Approx. 80mins (single-side disc)
Approx. 160mins (double-side disc)
Approx. 74mins
Approx. 20mins
Approx. 20mins
DVD
Super - VCD Super - VCD
VCD
CD audio
DIGITAL AUDIO
MP3
NOTES:
The playback of some discs may be restricted by software writers.
This unit can also play CD-R, CD-RW discs.
Audio+video
(motion pictures)
Audio+video
(motion pictures)
Audio+video
(motion pictures)
audio 12cm 600mins
12cm
8cm
12cm Approx. 45mins
12cm
8cm
12cm Approx. 74mins
8cm
REMARQUES SUR L’INSCRIPTION DES DISQUES
z Le présent guide d’utilisation donne la marche
à suivre pour faire fonctionner l’appareil à
l’aide de la télécommande.
z Vous pouvez également choisir d’utiliser les
commandes se trouvant sur l’appareil luimême puisque les commandes sur le lecteur
ont les mêmes fonctions que celles sur la
télécommande.
z Vous verrez les symboles ci-contre apparaître
ça et là dans le présent guide pour identifier
les divers types de disques qu’il est possible
d’utiliser avec cet appareil.
z Le symbole « Ø » pourrait apparaître à l’écran
à un moment donné, cela signifie que la
commande que vous tentez d’utiliser (et qui
est expliquée dans le présent guide) n’est pas
disponible sur le disque dans l’appareil.
Cet appareil contient de nombreuses innovations technologiques protégées par certains brevets américains
et d’autres droits d’auteur appartenant à Macrovision Corporation et à d’autres propriétai res. Seule
Macrovision Corporation peut, à sa discrétion, autoriser l’utilisa ti on de cette technologie brevetée, qui ne
peut être utilisée que pour l’usage domestique ou autre usage limité tel que stipulé par Macrovision. Il est
interdit, par le moyen d’une ingénierie inversée, d’effect uer le désassembl age de cet appareil.
NOTEZ QUE TOUS LES TÉLÉVISEURS HAUTE DÉFI NITION NE SONT PAS TOTALEMENT
COMPATIBLES AVEC CET APPAREIL ET QU’ILS PEUVENT ENGENDRER L’APPA RIT ION DE
PARASITES SUR L’IMAGE. EN CAS DE PROBLÈMES DE BALAYAGE PROGRESSIF AVEC 525 OU 625
IMAGES, NOUS VOUS RECOMMANDONS DE RÉGLER LA CONNEXION DE SORTIE À «DÉFINITION
STANDARD». SI VOUS AVEZ DES QUESTIONS RELATIVES À LA COMPATIBILITÉ DE VOTRE
T
VISEUR AVEC CE LECTEUR DVD À BALAYAGE PROGRESSIF 525P ET 625P IMAGES, VEUILLEZ
CONTACTER NOTRE SERVICE À LA CLIENTÈLE.
MARK INDICATION
DVD
SVCD
VCD
CD
Functions of DVD
Functions of Super-VCD
Functions of VCD
Functions of CD
ue de l’avant
1
2 4
28
29 2324
5 7 9
6 8 16
1. Minuterie sommeil (SLEEP)
2. Minuterie (TIMER)
3. Fixation
4. Interrupteur d’alimentation (POWER)
5. Interrupteur de l’écran (ON SCREEN)
6. Lecture aléatoire (RANDOM)
7. Lecture répétée (REPEAT)
8. Lecture (PLAY)
9. Arrêt (STOP)
10. Pause
11. Saut/station (SKIP/CHANNEL)
12. Ouverture/fermeture du compartiment à
disque (OPEN/CLOSE)
13. Fixation
14. Menu téléviseur (TV MENU)
15. Menu DVD (DVD MENU)
16. Volume +/-
65
19
1715
26
27
25
18
20
1412
10
11
133
17. Navigation
18. Syntonisation
ascendante/déplacement du
curseur vers le haut
19. Déplacement du curseur vers la
droite
20. Interrupteur de l’affichage
(DISPLAY)
21. Confirmation (ENTER)
22. Mémoire (MEMORY)
23. Support de la télécommande
24. Syntonisation
descendante/déplacement du
curseur vers le bas
25. Syntonisateur/sélecteur de
bande et de fonction
(TUNER/BAND)
26. Sélecteur téléviseur/lecteur
DVD (TV/DVD)
27. Écran de télévision
28. Capteur infrarouge
29. Affichage ACL
21
22

DESCRIPTION DE L’APPAREIL
V
DESCRIPTION DE LA TÉLÉCOMMANDE
ue de l’endos
34 33
30
30. Sortie audio/vidéo
31. Borne de l’antenne AM
32. Prise d’alimentation CA
33. Borne de l’antenne FM
34. Entrée de l’antenne de télévision
REMOTE CONTROLS
3231
39
38
37
36
35
34
33
32
1 2 3 4
5
6
7
8
9
10
12. Précédent (PRE )
13. Suivant (NEXT )
14. Arrêt (STOP )
15. Lecture/reprise de la
lecture (PLAY/RESUME )
16. Syntonisateur/sélecteur de
11
12
13
bande et de fonction
(TUNER/BAND)
17. Menu téléviseur (TV MENU)
18. Sélecteur du mode de
réception AIR/CÂBLE
19. Retour
20. Menu titre (MENU TITLE)
21. Réglage (SETUP)
22. Confirmation (ENTER)
23. Navigation à l’écran
(UP/DN/BWD/FWD)
24. Aller (GOTO)
25. Sous-titres (SUBTITLE)
19
18
17
14
26. MENU/PBC
15
16
27. Minuterie (TIMER)
28. Interrupteur de l’écran (ON
SCREEN)
29. Sélecteur téléviseur/lecteur
DVD (TV/DVD)
30. Mémoire (MEMORY)
31
30
29
28
27
26
25
24
23
20
2122
31. Volume /
32. Syntonisation
1. Ouverture/fermeture du compartiment
à disque (OPEN/CLOSE)
2. Lecture aléatoire (RANDOM)
3. Sourdine (MUTE)
4. Interrupteur d’alimentation (POWER)
5. Interrupteur d’affichage (DISPLAY)
6. Lecture répétée A-B (REPEAT A-B)
7. Minuterie sommeil (SLEEP)
8. Lecture répétée (REPEAT)
9. Zoom
ascendante/descendante
(CHANNEL /)
33. Ralenti (SLOW |)
34. Pause/avance par image
(PAUSE/STEP)
35. Audio
36. Sélecteur d’angle (ANGLE)
37. Effacement (CLEAR)
38. Programmation (PROGRAM
39. Touches numérotées (0 à 9
et +10)
10. Marche arrière (REV )
11. Avance rapide (FWD )
87

DIRECTIVES DE FONCTIONNEMENT
ARRÊ
A
A
A
A
y
DIRECTIVES DE FONCTIONNEMENT
SOURCES D'ALIMENTATION
120 volts CA / 60 Hz
Cet appareil fonctionne à partir du courant
alternatif de 120 volts.
PILES
LITHIUM BATTERY
+
LITHIUM
CR202
BATTERY
5
3
V
+
CR2025
3V
POWER
MISE EN MARCHE
POWER
T
REMARQUES:
1. La pile sert uniquement à alimenter la mémoire de l'horloge. Si une panne de courant survient, la
mémoire (alimentée par la pile) sauvegardera l'heure et le réglage de l'alarme. L'heure ne sera pas
affichée pendant l'interruption de courant mais l'horloge demeurera à l'heure.
2. La pile bouton pourrait contenir du mercure, ne la jetez pas dans les ordures ménagères mais
disposez-en plutôt dans le recyclage des déchets dangeureux.
3. Il se peut que vous ayez à retirer une pellicule protectrice apposée dans le compartiment à pile avant
d'utiliser la télécommande.
RÉGLAGE DE L'HORLOGE
En mode lecteur DVD ou téléviseur
TV-MENU
NAVIGATION
HEURE
NAVIGATION
MINUTE
ENTERENTER
TOUCHE DE
SYNTONISATON
SCENDANTE
RADIO
POWER
1 2
MISE EN MARCHE
SAUT/STATION
OU
PRÉCÉDENT
TUNER
SUIVANT
/BAND
FM
TUNER
/BAND
3
SYNTONISATION
SCENDANTE
NAVIGATION
VOLUME
AM
Pour sélectionner ou modifier
une station radio mise en
mémoire, appuyez sur la touche
de saut/sélection de station
(SKIP/CHANNEL)
SYNTONISATION
DESCENDANTE
Pour sélectionner manuellement
les stations, appuyez sur la
touche de syntonisation
ascendante ou descendante.
PROGRAMMATION DE STATIONS RADIO DANS LA MÉMOIRE
DU SYNTONISATEUR
Sélectionner
la station
1
radio à
programmer
en mémoire
ppuyez
sur la
2
touche
mémoire
(MEMORY)
LE NUMÉRO DE LA
POSITION DE
MÉMOIRE CLIGNOTE
À L'AFFIC HAGE
SAUT/STATION
3
SUIVANT
POUR SÉLECTIONNER UNE
POSITION DE MÉMOIRE
RÉPÉTEZ LES DIRECTIVES DES ÉTAPES 1 À 4
POUR PROGRAMMER TO U TES LES STATIONS
DE VOTRE CHOIX EN MÉMOIRE - JUSQU'À
CONCURRENCE DE 20 STATIONS AM ET 20
STATIONS FM
SAUT/STATION
OU
PRÉCÉDENT
OU
ppuyez sur la
touche mémoire
4
afin de
confirmer la
programmation
de la station
dans la
mémoire du
s
ntonisateur
NAVIGATION
SECONDES
TV-MENU
Consultez les explications
relatives auc fonctions des
touches sur la
télécommande
109

LECTURE DE CD
A
A
A
A
A
A
A
É
A
A
A
A
A
A
A
DIRECTIVES DE FONCTIONNEMENT
Déposez un disque sur le plateau
1
2
3
L'appareil
entamera
automatiquement
la lecture du CD.
DIRECTIVES DE FONCTIONNEMENT
LECTURE DE DVD
1 2
baissez l'écran
OPEN/
CLOSE
PAUSE
OU
EN MODE LECTURE
LECTURE
RÉPÉTÉE
1 2
REPEAT
RANDOM
1 2
RANDOM
REPEAT ONE
FOR CD MODE
Track
RANDOM
FOR CD MODE
Random
ppuyez sur la touche
d'ouverture/fermeture
(Open/Close) pour ouvirr
le compartiment à disque
PISTE
INDICATEUR DE LECTURE
POUR ANNULER
STOP
X1
REPEAT REPEAT
RANDOM
4
PLAY/PAUSE
REPEAT ALL
FOR CD MODE
All
NORMAL MODE
FOR CD MODE
STOP
X2
3
RECHERCHE DE
PISTES
ppuyez sur les touches de
marche arrière (REV) ou
d'avance rapide (FWD) pour
rechercher une piste.
Pour arrêter la recherche,
appuyez sur la touche de
lecture/pause (PLAY/PAUSE).
SAUT
PRÉCÉDENT
ppuyez sur les touches
précédent (PRE) ou
suivant (NEXT) sur la
télécommande pour
passer rapidement d'une
piste à l'autre.
NORMAL MODE
FOR CD MODE
REV
FWD
SAUT/STATION
SUIVANT
OU
PPUYEZ SUR LA TOUCHE
D'ÉJECTION (EJECT), PLACEZ
UN DVD DANS L'APPAREIL ET
PPUYEZ DE NOUVEAU SUR LA
TOUCHE D'ÉJECTION POUR
RETRACTER LE PLATEAU DANS
L'APPAREIL
UTILISEZ LES TOUCHES
DE SYNTONISATION
SCENDANTE/DESCENDA
NTE POUR
SÉLECTIONNER À PARTIR
DU MENU PRINCIPAL
APPUYEZ SUR CETTE
TOUCHE POUR UN
DÉPLACEMENT VERTICAL
VERS LE HAUT
3 4 5
NAVIGATION
APPUYEZ SUR CETTE TOUCHE
POUR UN DÉPLACEMENT
VERTICAL VERS LE HAUT
APPUYEZ SUR LA
TOUCHE DE
CONFIRMATION
(ENTER) POUR
CONFIRMER VOTRE
LECTION
S
ENTER
PISTE
FONCTIONS DES TOUCHES DE LA
TÉLÉCOMMANDE
ppuyez sur la touche
NEXT pour passer au
chapitre suivant.
ppuyez sur la touche
PRE pour revenir sur le
chapitre précédent
NEXT PRE FWD REV
ppuyez sur la touche
MENU pour revenir au
menu principal
ppuyez sur la touche
ZOOM à plusieurs
reprises afin d'effectuer
un rapprochement sur
l'image
MENU ZOOM
ppuyez sur la touche
FWD pour avancer une
image à la fois
ppuyez sur la
touche SLOW pour
effectuer une lecture
au ralenti
SLOW
INDICATEUR DE
LECTURE
VOLUME
OU
ppuyez sur REV pour
faire marche a r r ière une
image à la fois
11
12

DIRECTIVES DE FONCTIONNEMENT
A
A
A
A
É
R
A
TÉLÉVISEUR
Prise de
raccordement pour
une antenne
externe
1 2
APPUYEZ SUR LES TOUCHES
DE SYNTONISATION
SCENDANTE/DESCENDANTE
POUR AJUSTER LA
LUMINOSITÉ, LE CONTRASTE,
LA COULEUR, ETC.
APPUYEZ SUR CETTE
TOUCHE POUR UN
DÉPLACEMENT VERTICAL
VERS LE HAUT
NAVIGATION
APPUYEZ SUR CETTE
TOUCHE POUR UN
DÉPLACEMENT VERTICAL
VERS LE BAS
LA PRISE D'ANTENNE SERT
ÉGALEMENT À RACCORDER
L'APPAREIL À UN RÉSEAU DE
CÂBLODISTRIBUTION OU UN
SATELLITE
PPUYEZ SUR LA TOUCHE DE
SYNTONISATION DESCENDANTE
ET SÉLECTIONNEZ LA FONCTION
DE RECHERCHE AUTOMATIQUE
(AUTO SEARCH)
3
SYNTONISATION ASCENDANTE
NAVIGATION
SYNTONISATION DESCENDANTE
4 5
TV
TV
ENTER
APPUYEZ SUR LA
TOUCHE DE
CONFIRMATION
Time
Brightness
Contrast
Color
Default
SOURCE
CHANNEL
SKIP
AUTO-SEARCH
RECHERCHE AUTOMATIQUE EN
COURS - STATION TROUVÉE
AUTO SEARCH AIR
STATION FOUND
12-00-00
16
18
23
CATV
2
ON
TV/DVD
TV/DVD
DIRECTIVES DE FONCTIONNEMENT
RÉGLAGE
RÉGLAGE GÉNÉRAL
ffichage à l'écran
SETUP
1
APPUYEZ SUR LA
TOUCHE DE
RÉGLAGE POUR
ACCÉDER AU MENU
DE RÉGLAGE
GÉNÉRAL
APPUYEZ SUR CETTE
TOUCHE POUR UN
DÉPLACEMENT VERTICAL
VERS LE HAUT
3 4
- - General Setup Page - -
TV Display
Angle Mark
OSD Lang
Captions
Screen Saver
Go To Genera Setup Page
NAVIGATION
APPUYEZ SUR CETTE
TOUCHE POUR UN
DÉPLACEMENT
VERTICAL VERS LE BAS
PS
On
ENG
Off
On
ENTER
APPUYEZ SUR LA
TOUCHE DE
CONFIRMATION (ENTE
POUR CONFIRMER LE
RÉGLAGE
SÉLECTIONNÉ
ENTER
2
PPUYEZ SUR LA
TOUCHE DE
CONFIRMATION
(ENTER) POUR
CONFIRMER LA
SÉLECTION DU
PARAMÈTRE DE
L'AFFICHAGE À
L'
CRAN
- - General Setup Page - -
TV Display
Angle Mark
OSD Lang
Captions
Screen Saver
Set TV Display Mode
- - General Setup Page - -
TV Display
Angle Mark
OSD Lang
Captions
Screen Saver
Set TV Display Mode
PS
Normal / PS
On
Norman / LB
ENG
Wide
Off
On
PS
On
ENG
Off
On
Normal / PS
Norman / LB
Wide
SAUT/SYNTONISATIO
N/STATION
6 7
SUIVANT
SAUT/SYNTONISA
TION/STATION
OU
PRÉCÉDENT
VOLUME
13
OU
Indicateur d'angle
- - General Setup Page - -
TV Display
Angle Mark
OSD Lang
1 2
Captions
Screen Saver
Go To General Setup Page
ENTER
3
APPUYEZ SUR LA
TOUCHE DE
CONFIRMATION
(ENTER) POUR
CONFIRMER
VOTRE SÉLECTION
PS
On
ENG
Off
On
- - General Setup Page - TV Display
Angle Mark
OSD Lang
Captions
Screen Saver
Set Angle Mark
PS
On
ENG
Off
On
On
Off
Utilisez les touches de
syntonisation
ascendante/descendante
sur l'app a reil ou la
télécommande pour
mettre votre sélection en
surbrillance
APPUYEZ SUR CETTE
TOUCHE POUR UN
DÉPLACEMENT VERTICAL
VERS LE BAS
4
14
APPUYEZ SUR CETTE
TOUCHE POUR UN
DÉPLACEMENT VERTICAL
VERS LE HAUT
NAVIGATION
APPUYEZ SUR CETTE
TOUCHE POUR UN
DÉPLACEMENT VERTICAL
VERS LE HAUT
APPUYEZ SUR CETTE
TOUCHE POUR UN
DÉPLACEMENT VERTICAL
VERS LE BAS
- - General Setup Page - TV Display
Angle Mark
OSD Lang
Captions
Screen Saver
Set Angle Mark
NAVIGATION
PS
On
ENG
Off
On
5
On
Off
ppuyez sur la touche de
confirmation (ENTER)
lorsque votre sélection est
en surbrillance à l'écran
afin de confirmer le
réglage
ENTER

DIRECTIVES DE FONCTIONNEMENT
A
A
A
É
A
A
A
Langue de l'affichage à l'écran
- - General Setup Page - -
TV Display
Angle Mark
OSD Lang
1 2
Captions
Screen Saver
Go To General Setup Page
ENTER
3
APPUYEZ SUR LA
TOUCHE DE
CONFIRMATION
(ENTER) POUR
CONFIRMER
VOTRE
SÉLECTION
Activation des sous-titres
- - General Setup Page - -
TV Display
Angle Mark
OSD Lang
1 2
Captions
Screen Saver
Go To General Setup Page
PS
On
ENG
Off
On
- - General Setup Page - TV Display
Angle Mark
OSD Lang
Captions
Screen Saver
Set OSD Language
PS
On
ENG
Off
On
PS
On
ENG
Off
On
English
French
German
Italian
Dutch
Utilisez les touches de
syntonisation
ascendante/descendante sur
l'appareil ou la télécommande
pour mettre votre sélection en
surbrillance
4
Utilisez les touches de
syntonisation
ascendante/descendant
e sur l'appareil ou la
télécommande pour
mettre votre sélection
en surbrillance
APPUYEZ SUR CETTE
TOUCHE POUR UN
DÉPLACEMENT VERTICAL
VERS LE HAUT
APPUYEZ SUR CETTE
TOUCHE POUR UN
DÉPLACEMENT
VERTICAL VERS LE BAS
APPUYEZ SUR
CETTE TOUCHE
POUR UN
DÉPLACEMENT
VERTICAL VERS LE
HAUT
NAVIGATION
APPUYEZ SUR CETTE
TOUCHE POUR UN
DÉPLACEMENT
VERTICAL VERS LE BAS
APPUYEZ SUR CETTE
TOUCHE POUR UN
DÉPLACEMENT VERTICAL
VERS LE HAUT
NAVIGATION
APPUYEZ SUR CETTE
TOUCHE POUR UN
DÉPLACEMENT
VERTICAL VERS LE BAS
NAVIGATION
- - General Setup Page - TV Display
Angle Mark
OSD Lang
Captions
Screen Saver
Set OSD Language
- - General Setup Page - TV Display
Angle Mark
OSD Lang
Captions
Screen Saver
Closed Caption
PS
On
English
ENG
French
Off
German
On
Italian
Dutch
ppuyez sur la touche de
confirmation (ENTER)
lorsque votre sélection est
en surbrillance à l'écran
afin de confirmer le
réglage
5
PS
On
ENG
OffOnOn
Off
ENTER
DIRECTIVES DE FONCTIONNEMENT
conomiseur d'écran
- - General Setup Page - -
TV Display
Angle Mark
OSD Lang
1 2
Captions
Screen Saver
Go To General Setup Page
ENTER
3
PPUYEZ SUR LA
TOUCHE DE
CONFIRMATION
(ENTER) POUR
CONFIRMER
VOTRE
SÉLECTION
Menu de réglage des haut-parleurs
- - General Setup Page - -
TV Display
Angle Mark
OSD Lang
1 2
Captions
Screen Saver
Go To General Setup Page
PS
On
ENG
Off
On
- - General Setup Page - TV Display
Angle Mark
OSD Lang
Captions
Screen Saver
Screen Saver
PS
On
ENG
Off
On
PS
On
ENG
Off
On
On
Off
Utilisez les touches de
syntonisation
ascendante/descendante sur
l'appareil ou la télécommande
pour mettre votre sélection en
surbrillance
4
Utilisez les touches de
syntonisation
ascendante/descendante
sur l'appareil ou la
télécommande pour mettre
votre sélection en
surbrillance
TUNING UP
- - General Setup Page - -
NAVIGATION
TUNING DOWN
APPUYEZ SUR CETTE
TOUCHE POUR UN
DÉPLACEMENT VERTICAL
VERS LE HAUT
NAVIGATION
APPUYEZ SUR CETTE
TOUCHE POUR UN
DÉPLACEMENT
VERTICAL VERS LE BAS
APPUYEZ SUR CETTE
TOUCHE POUR UN
DÉPLACEMENT VERTICAL
VERS LE HAUT
NAVIGATION
APPUYEZ SUR CETTE
TOUCHE POUR UN
DÉPLACEMENT
VERTICAL VERS LE BAS
TV Display
Angle Mark
OSD Lang
Captions
Screen Saver
Screen Saver
PS
On
ENG
Off
On
On
Off
ppuyez sur la touche de
confirmation (ENTER) lorsque
votre sélection est en
surbrillance à l'écran afin de
confirmer le réglage
5
- - Speaker Setup Page - Downmix
Go To Speaker Setup Page
ENTER
ENTER
3
PPUYEZ SUR LA
TOUCHE DE
CONFIRMATION
(ENTER) POUR
CONFIRMER
VOTRE
SÉLECTION
- - General Setup Page - TV Display
Angle Mark
OSD Lang
Captions
Screen Saver
Closed Caption
PS
On
ENG
OffOnOn
Off
APPUYEZ SUR CETTE
TOUCHE POUR UN
DÉPLACEMENT VERTICAL
VERS LE HAUT
4
NAVIGATION
APPUYEZ SUR CETTE
TOUCHE POUR UN
DÉPLACEMENT
VERTICAL VERS LE BAS
15
ppuyez sur la touche
de confirmation (ENTER
lorsque votre sélection
est en surbrillance à
l'écran afin de confirmer
le réglage
ENTER
5
ENTER
3
APPUYEZ DEUX
FOIS SUR LA
TOUCHE DE
CONFIRMATION
(ENTER) POUR
CONFIRMER
VOTRE
SÉLECTION
- - Speaker Setup Page - -
Downmix LT/RT
Stereo
Set LT/RT Downmix
APPUYEZ SUR CETTE
TOUCHE POUR UN
DÉPLACEMENT VERTICAL
VERS LE HAUT
4
NAVIGATION
APPUYEZ SUR CETTE
TOUCHE POUR UN
DÉPLACEMENT
VERTICAL VERS LE BAS
ppuyez sur la touche de
confirmation (ENTER)
lorsque votre sélection est en
surbrillance à l'écran afin de
confirmer le réglage
ENTER
5
16

A
A
A
DIRECTIVES DE FONCTIONNEMENT
A
A
A
A
A
Menu de réglage des préférences
- - General Setup Page - -
TV Display
Angle Mark
OSD Lang
1 2
Captions
Screen Saver
Go To General Setup Page
ENTER
3
APPUYEZ DEUX
FOIS SUR LA
TOUCHE DE
CONFIRMATION
(ENTER) POUR
CONFIRMER
VOTRE
SÉLECTION
Langue de la bande sonore
- - General Setup Page - -
TV Display
Angle Mark
1 2
OSD Lang
Captions
Screen Saver
Go To General Setup Page
PS
On
ENG
Off
On
- - Preference Page - -
PS
On
ENG
Off
On
TV Type
Audio
Subtitle
Disc Menu
Parental
Password
Default
Set TV Standard
NTSC
ENG
ENG
ENG
PAL
Multi
NTSC
ENG
Utilisez les touches de
syntonisation
ascendante/descendant
e sur l'appareil ou la
télécommande pour
mettre votre sélection
en surbrillance
APPUYEZ SUR CETTE
TOUCHE POUR UN
DÉPLACEMENT
VERTICAL VERS LE BAS
4
Utilisez les touches de
syntonisation
ascendante/descendant
e sur l'appareil ou la
télécommande pour
mettre votre sélection
en surbrillance
APPUYEZ SUR CETTE
TOUCHE POUR UN
DÉPLACEMENT VERTICAL
VERS LE HAUT
NAVIGATION
APPUYEZ SUR CETTE
TOUCHE POUR UN
DÉPLACEMENT VERTICAL
VERS LE HAUT
APPUYEZ SUR CETTE
TOUCHE POUR UN
DÉPLACEMENT
VERTICAL VERS LE BAS
PPUYEZ SUR
CETTE
TOUCHE
POUR UN
DÉPLACEMEN
T LATÉRAL
VERS LA
DROITE
APPUYEZ SUR CETTE
TOUCHE POUR UN
DÉPLACEMENT VERTICAL
VERS LE HAUT
APPUYEZ SUR CETTE
TOUCHE POUR UN
DÉPLACEMENT
VERTICAL VERS LE BAS
NAVIGATION
Type télévision
- - Preference Page - TV Type
Audio
Subtitle
Disc Menu
Parental
Password
Default
Go To Preference Page
NAVIGATION
- - Preference Page - -
NTSC
TV Type
ENG
Audio
ENG
Subtitle
ENG
Disc Menu
Parental
Password
Default
Preferred Audio Language
NTSC
ENG
ENG
ENG
ppuyez sur la touche
de confirmation (ENTER
lorsque votre sélection
est en surbrillance à
l'écran afin de confirmer
le réglage
ENTER
5
English
French
Spanish
Chinese
Japanese
Korean
Russian
Thai
DIRECTIVES DE FONCTIONNEMENT
Langue des sous-titres
- - General Setup Page - -
TV Display
Angle Mark
1 2
OSD Lang
Captions
Screen Saver
Go To General Setup Page
ENTER
3
PPUYEZ SUR LA
TOUCHE DE
CONFIRMATION
(ENTER) POUR
CONFIRMER
VOTRE
SÉLECTION
Langue du menu du disque
- - General Setup Page - -
TV Display
Angle Mark
1 2
OSD Lang
Captions
Screen Saver
Go To General Setup Page
PS
On
ENG
Off
On
- - Preference Page - -
PS
On
ENG
Off
On
NTSC
TV Type
ENG
Audio
ENG
Subtitle
ENG
Disc Menu
Parental
Password
Default
Preferred Subtitle Language
English
French
Spanish
Chinese
Japanese
Korean
Russian
Thai
Utilisez les touches de
syntonisation
ascendante/descendant
e sur l'appareil ou la
télécommande pour
mettre votre sélection
en surbrillance
4
Utilisez les touches de
syntonisation
ascendante/descendant
e sur l'appareil ou la
télécommande pour
mettre votre sélection
en surbrillance
APPUYEZ SUR CETTE
TOUCHE POUR UN
DÉPLACEMENT VERTICAL
VERS LE HAUT
NAVIGATION
APPUYEZ SUR CETTE
TOUCHE POUR UN
DÉPLACEMENT
VERTICAL VERS LE BAS
APPUYEZ SUR CETTE
TOUCHE POUR UN
DÉPLACEMENT VERTICAL
VERS LE HAUT
APPUYEZ SUR CETTE
TOUCHE POUR UN
DÉPLACEMENT
VERTICAL VERS LE BAS
APPUYEZ SUR CETTE
TOUCHE POUR UN
DÉPLACEMENT VERTICAL
VERS LE HAUT
NAVIGATION
APPUYEZ SUR CETTE
TOUCHE POUR UN
DÉPLACEMENT
VERTICAL VERS LE BAS
- - Preference Page - -
NAVIGATION
- - Preference Page - -
NTSC
TV Type
ENG
Audio
ENG
Subtitle
ENG
Disc Menu
Parental
Password
Default
Preferred Subtitle Language
TV Type
Audio
Subtitle
Disc Menu
Parental
Password
Default
Preferred Menu Language
English
French
Spanish
Chinese
Japanese
Korean
Russian
Thai
ppuyez sur la touche
de confirmation (ENTER
lorsque votre sélection
est en surbrillance à
l'écran afin de confirmer
le réglage
ENTER
5
NTSC
English
ENG
French
ENG
Spanish
ENG
Chinese
Japanese
Korean
Russian
Thai
ENTER
3
PPUYEZ SUR LA
TOUCHE DE
CONFIRMATION
(ENTER) POUR
CONFIRMER
VOTRE
SÉLECTION
- - Preference Page - -
NTSC
TV Type
ENG
Audio
ENG
Subtitle
ENG
Disc Menu
Parental
Password
Default
Preferred Audio Language
English
French
Spanish
Chinese
Japanese
Korean
Russian
Thai
ppuyez sur la touche
APPUYEZ SUR CETTE
TOUCHE POUR UN
DÉPLACEMENT VERTICAL
VERS LE HAUT
4
NAVIGATION
APPUYEZ SUR CETTE
TOUCHE POUR UN
DÉPLACEMENT
VERTICAL VERS LE BAS
17
de confirmation
(ENTER) lorsque
votre sélection est en
surbrillance à l'écran
afin de confirmer le
réglage
ENTER
5
ENTER
3
PPUYEZ SUR LA
TOUCHE DE
CONFIRMATION
(ENTER) POUR
CONFIRMER
VOTRE
SÉLECTION
- - Preference Page - -
NTSC
TV Type
ENG
Audio
ENG
Subtitle
ENG
Disc Menu
Parental
Password
Default
Preferred Menu Language
English
French
Spanish
Chinese
Japanese
Korean
Russian
Thai
APPUYEZ SUR CETTE
TOUCHE POUR UN
DÉPLACEMENT VERTICAL
VERS LE HAUT
4
NAVIGATION
APPUYEZ SUR CETTE
TOUCHE POUR UN
DÉPLACEMENT
VERTICAL VERS LE BAS
18
ppuyez sur la touche
de confirmation (ENTER
lorsque votre sélection
est en surbrillance à
l'écran afin de confirmer
le réglage
ENTER
5

DIRECTIVES DE FONCTIONNEMENT
A
R
A
R
Contrôle parental
- - General Setup Page - -
TV Display
Angle Mark
1 2
OSD Lang
Captions
Screen Saver
Go To General Setup Page
ENTER
3
APPUYEZ SUR LA TOUCHE
DE CONFIRMATION (ENTER)
POUR CONFIRMER VOTRE
SÉLECTION
6
Modification du mot de passe
- - General Setup Page - -
TV Display
Angle Mark
1 2
OSD Lang
Captions
Screen Saver
Go To General Setup Page
Password
PS
On
ENG
Off
On
- - Preference Page - -
OK
Entrez le mot de
passe de votre choix
PS
On
ENG
Off
On
NTSC
TV Type
ENG
Audio
ENG
Subtitle
ENG
Disc Menu
Parental
Password
Default
Preferred Menu Language
Utilisez les touches de
syntonisation
ascendante/descendante
sur l'appareil ou la
télécommande pour mettre
votre sélection en
surbrillance
1 KID SAF
2 G
3 PG
4 PG 13
5 PGR
6 R
7 NC 17
8 ADULT
7
Utilisez les touches de
syntonisation
ascendante/descendant
e sur l'appareil ou la
télécommande pour
mettre votre sélection
en surbrillance
APPUYEZ SUR CETTE
TOUCHE POUR UN
DÉPLACEMENT VERTICAL
VERS LE HAUT
NAVIGATION
APPUYEZ SUR CETTE
TOUCHE POUR UN
DÉPLACEMENT
VERTICAL VERS LE BAS
4 5
APPUYEZ SUR CETTE
TOUCHE POUR UN
DÉPLACEMENT VERTICAL
VERS LE HAUT
NAVIGATION
APPUYEZ SUR CETTE
TOUCHE POUR UN
DÉPLACEMENT
VERTICAL VERS LE BAS
APPUYEZ SUR CETTE
TOUCHE POUR UN
DÉPLACEMENT VERTICAL
VERS LE HAUT
NAVIGATION
APPUYEZ SUR CETTE
TOUCHE POUR UN
DÉPLACEMENT
VERTICAL VERS LE BAS
- - Preference Page - -
APPUYEZ SUR CETTE
TOUCHE POUR UN
DÉPLACEMENT VERTICAL
VERS LE HAUT
NAVIGATION
APPUYEZ SUR CETTE
TOUCHE POUR UN
DÉPLACEMENT
VERTICAL VERS LE BAS
8
- - Preference Page - -
NTSC
TV Type
ENG
Audio
ENG
Subtitle
ENG
Disc Menu
Parental
Password
Default
Preferred Menu Language
touche de
confirmation (ENTE
ENTER
lorsque votre
sélection est en
surbrillance à l'écran
afin de confirmer le
réglage
TV Type
NTSC
Audio
ENG
Subtitle
ENG
Disc Menu
ENG
Parental
Password Change
Default
Change Password
1 KID SAF
2 G
3 PG
4 PG 13
5 PGR
6 R
7 NC 17
8 ADULT
ppuyez sur la
ENTER
APPUYEZ SUR LA
TOUCHE DE
CONFIRMATION
(ENTER) POUR
CONFIRMER VOTRE
SÉLECTION
DIRECTIVES DE FONCTIONNEMENT
Réinitialisaton aux réglages
d'origine
- - General Setup Page - -
TV Display
Angle Mark
OSD Lang
1
Captions
Screen Saver
Go To General Setup Page
ENTER
APPUYEZ SUR LA TOUCHE
DE CONFIRMATION (ENTER)
POUR CONFIRMER VOTRE
SÉLECTION
PS
On
ENG
Off
On
- - Preference Page - TV Type
Audio
Subtitle
Disc Menu
Parental
Password
Default Reset
Load Factory Setting
Utilisez les touches de
syntonisation
ascendante/descendant
e sur l'appareil ou la
télécommande pour
mettre votre sélection
en surbrillance
2
NTSC
ENG
ENG
ENG
APPUYEZ SUR CETTE
TOUCHE POUR UN
DÉPLACEMENT VERTICAL
VERS LE HAUT
NAVIGATION
APPUYEZ SUR CETTE
TOUCHE POUR UN
DÉPLACEMENT
VERTICAL VERS LE BAS
PPUYEZ SUR LA
TOUCHE DE
CONFIRMATION (ENTE
POUR CONFIRMER
VOTRE SÉLECTION
ENTER
53
- - Preference Page - -
NTSC
TV Type
ENG
Audio
ENG
Subtitle
ENG
Disc Menu
Parental
Password
Default Reset
Set Parental Control
ENTER
3
APPUYEZ DEUX FOIS SUR
LA TOUCHE DE
CONFIRMATION (ENTER)
POUR CONFIRMER VOTRE
SÉLECTION
Input “1234”
Old Password
New Password
Confirm PWD
OK
Input new password
what you want
19
Press enter to confirm
ENTER
4
20

p
A
r
A
A
A
DIRECTIVES DE FONCTIONNEMENT
É
À
A
VEIL AU SON DE LA TONALITÉ D'ALARME
VOLUME
T
ou
TIMER
MINUTERIE SOMMEIL
SLEEP
S
10 minutes
SLEEP
S
CHAQUE PRESSION DE LA
TOUCHE DE MINUTERIE
SOMMEIL, LA DURÉE DIMINUE
DE 10 MINUTES, JUSQU'À 00 ET
QUE LA MINUTERIE SOMMEIL
SOIT DÉSACTIVÉE
POUR ÉTEINDRE
L'ALARME, APPUYEZ
SUR LA TOUCHE DE
MINUTERIE (TIMER)
POUR ANNULER
PPUYEZ SUR LA TOUCHE
DE LA MINUTERIE SOMMEIL
(SLEEP) À PLUSIEURS
REPRISES POUR ATTEINDR E
"00" ET L'ÉTEINDRE
SLEEP
S
GÉNÉRAL :
SOIN ET ENTRETIEN DE L’APPAREIL
DISQUES COMPACTS :
Utilisez un chiffon propre et
doux, humecté d’eau tiède
pour nettoyer le boîtier de
l’appareil.
N’utilisez jamais de solvant tel
que le benzène ou autres
nettoyants chimiques forts
puisque ceux-ci risquent
d’endommager le fini de
l’appareil.
Il est important qu’aucun
liquide ne pénètre à l’intérieur
de l’appareil.
TTENTION : N’utilisez jamais aucun solvant
(p. ex. un nettoyant pour disque en vaporisateu
du benzène, etc.) pour nettoyer les disques
compacts.
Retirez le disque de son étui en
maintenant ce dernier fermement
tandis que vous dégagez le disque en
le tenant par le rebord.
Ne touchez pas la surface sillonnée du
disque et ne tentez pas de le plier.
Déposez le disque sur le plateau en
veillant toujours à ce que le côté
portant l’étiquette soit vers le haut.
Il se peut que si le disque est sale,
l’appareil n’arrive pas à en faire la
lecture correctement. Si cela survient,
nettoyez le disque en l’essuyant à
l’aide d’un chiffon doux et sec. Frottez
dans un mouvement rectiligne, en
partant du centre vers le rebord.
Évitez que les disques soient exposés
aux rayons directs du soleil, aux
ératures extrêmes et à l’humidité.
tem
GUIDE DE DÉPANNAGE
PROBLÈME
GÉNÉRAL
Il n’y a pas de son.
LECTEUR CD
Il y a un disque dans
l’appareil mais les pistes
n’apparaissent pas à
l’affichage.
Impossible d’effectuer la
lecture de certaines
portions du disque
correctement.
21
CAUSE POSSIBLE
L’appareil n’est pas en
marche.
Le volume est réglé à un
niveau trop bas.
Le disque est déposé à
l’envers sur le plateau.
Le disque est sale.
Le disque est égratigné.
Le disque est sérieusement
déformé.
Le disque est sale.
Le disque est égratigné.
22
SOLUTION
ppuyez sur l’interrupteur
d’alimentation (POWER).
justez le réglage du volume.
ppuyez sur la touche de mise en
sourdine (MUTE) se trouvant sur la
télécommande.
Placez le disque correctement.
Essuyez le disque à l’aide
d’un linge doux et sec.
Utilisez un disque qui n’est
pas endommagé.
Utilisez un disque qui n’est pas
endommagé.
Essuyez le disque à l’aide d’un linge
doux et sec.
Ne tentez pas de lire les portions du
disque qui sont égratignées ou utilisez
un disque qui n’est pas endommagé.

Appareils électroniques grand public et électroménagers
GARANTIE ELECTROHOME
Merci d’avoir choisi ELECTROHOME !
RGC Redmond Group accorde la garantie expresse suivante à l’acheteur original de cet appareil Electrohome ou à la personne qui l’a
reçu en cadeau, pourvu qu’il ait été expédié et vendu ou distribué au Canada par RGC Redmond Group ou un détaillant Electrohome
autorisé dans son emballage original.
RGC Redmond Group garantit que cet appareil est exempt de tout défaut de m atériau et de fabrication dans des con dition s norm al es
d’utilisation et d’entretien. Advenant le cas où cet appareil s’avèrerait défectueux au cours de la période pendant laquelle il est couvert
par la présente garantie, RGC Redmond Group s’engage à le réparer ou, le cas échéant et à son entière discrétion, le remplacer. Les
pièces de rechange utilisées dans l’exécution de la présente sont aussi couvertes par la garantie pendant une période égale à la
portion non échue de la garantie originale sur l’appareil.
La présente garantie ne couvre pas :
a. Les défectuosités ni les réparations résultant d’un usage abusif, d’une négligence, d’un accident ou d’une installation inadéquate
ou un usage inapproprié selon les directives fournies dans le guide d’utilisation accompagnant l’appareil.
b. Les appareils de marque Electrohome trafiqués, modifiés, réglés, ajustés ou réparés par une entité autre que RGC Redmond
Group ou un centre de réparation autorisé par Electrohome.
c. Les dommages causés ni les réparations requises à l’appareil résultant de son usage avec des composantes ou accessoires non
recommandés ni approuvés par RGC Redmond Group, incluant, sans en exclure d’autres, les cassettes et/ou produits chimiques
de nettoyage.
d. Le remplacement d’accessoires ou de pièces de verre, consomptibles ou périphériques requis dans le cadre de l’usage normal
de l’appareil incluant, sans en exclure d’autres, les écouteurs, télécommandes, adaptateurs CA, piles, sondes de température,
pointes de lecture, stylets, plateaux, filtres, câbles, papier, boîtier et composantes de boîtiers, boutons, paniers, supports,
tablettes et accessoires et ustensiles de cuisson.
e. Tout dommage apparent à la surface ou au boîtier extérieur de l’appareil et attribuable à la détérioration ou à l’usure résultant
d’un usage normal.
f. Tout dommage causé par des conditions externes ou environnementales, incluant, sans en exclure d’autres, les lignes de
transmission ou de transport d’énergie ou le renversement de liquide.
g. Tout appareil ne portant pas les identifications appropriées quant aux numéros de modèle et de série ni les étiquettes et
attestations de l’ACNOR, de l’ULC, de l’ULI, de l’ETL au Canada et aux États-Unis.
h. Tout appareil utilisé à des fins commerciales ou de location.
i. Tous les frais d’installation, d’ajustement et/ou de programmation.
Si cet appareil de marque Electrohome devient défectueux au cours de la période pendant laquelle il est couvert par la garantie, une
réparation peut être obtenue, conformément aux termes de la présente garantie, en présentant cet appareil Electrohome avec la
preuve d’achat originale et une copie de la présente GARANTIE RESTREINTE à un centre de service autorisé par Electrohome. Le
service à domicile est effectué, à la discrétion de RGC Redmond Group, sur les téléviseurs de marque Electrohome dotés d’un écran
de 27 pouces et plus. La présente garantie constitue l’intégrale de la garantie expresse accordée par RGC Redmond Group et aucun
autre détaillant, centre de service ni leur agent ou employé n’est autorisé à prolonger, étendre ou transférer la présente garantie au
nom de RGC Redmond Group. Dans la mesure où la loi le permet, RGC Redmond Group décline toute responsabilité pour des
dommages ou pertes directs et indirects, tous dommages accessoires, particuliers ou consécutifs ou perte de profits résultant d’un
défaut de matériau ou de fabrication de cet appareil, incluant les dommages attribuables à la perte de temps ou perte de jouissance de
cet appareil Electrohome ou de la perte d’information. Il incombe à l’acheteur de défrayer les coûts encourus pour l’enlèvement, la
réinstallation, le transport et l’assurance de cet appareil. La correction de toute défectuosité, de la manière et dans les délais indiqués
dans la présente, constituent l’exécution intégrale de tous les engagements et obligations contractés par RGC Redmond Group envers
l’acheteur à l’égard de cet appareil et seront considérés comme étant satisfaction pleine et entière vis-à-vis de toutes les réclamations
contractuelles ou attribuables à la négligence, et la responsabilité absolue ou autre.
PÉRIODES DE GARANTIE SUR LES PIÈCES ET LA MAIN-D’ŒUVRE POUR LES APPAREILS RAPPORTÉS AUX CENTRES DE
SERVICE :
• Appareils audio : 1 an (télécommande, s’il y a lieu – 90 jours)
• Lecteurs DVD : 1 an (télécommande – 90 jours)
• Téléviseurs à écran ACL ou plasma : 1 an (télécom m an de – 90 jour s)
• Téléviseurs : 1 an (télécommande – 90 jours)
• Magnétoscopes : 1 an (télécommande – 90 jours, têtes vidéo – 6 mois)
• Électroménagers : 1 an
- Four à micro-ondes, pièces de magnétron seulement, 6 ans additionnels
- Réfrigérateurs/congélateur, pièces de compresseur seulement, 4 ans additionnels
• Appareils de chauffage, de climatisation et d’humidification : 1 an (télécommande – 90 jours)
Pour connaître le nom et l’adresse du marchand ou du centre de service autorisé par Electrohome le plus près, veuillez communiquer
avec RGC Redmond Group, 6185 McL aug hlin R oa d, Mississauga, Ontario, L5R 3W7.
Pour obtenir de plus amples informations concernant cette garantie ou les adresses des centres de services au pays, veuillez
composer le (905) 366-5100 ou sans frais le 1 800 663-5954, du lundi au vendredi, de 9 h à 17 h HNE.
- Pièces de compresseur seulement (s’il y a lieu), 4 ans additionnels
04/2006
23
 Loading...