

Page 1
WARNING: Your Platform comes equipped with an Electro-Harmonix 9.6DC-200BI
power supply (same as used by Boss® & Ibanez®: 9.6 Volts DC 200mA). The Platform
requires 125mA at 9VDC with a center negative plug. Use of the wrong adapter or a plug
with the wrong polarity may damage your Platform and void the warranty.
PLATFORM
Stereo Compressor/Limiter
Congratulations on purchasing the Electro-Harmonix Platform Stereo
Compressor/Limiter. The Platform presents you with a versatile and powerful
studio-quality compressor enclosed in a stompbox-sized package. Use the
Platform’s compressor/limiter on any instrument—such as guitar, bass or
keyboards—for precise and powerful control of your signal’s volume. Engage the
Drive and Swell functions to further tailor and enhance your sound. Whether
you’re on stage, in the studio, putting together a podcast or creating your next
YouTube masterpiece, the Platform will help you get the job done.
FEATURES
High-quality compressor/limiter
Selectable hard/soft knee function
8-segment LED gain reduction meter
Foot switchable overdrive with volume, tone, and gain controls
Volume swell function
True stereo input and output
Stereo buffered bypass
NOTES AND SPECIFICATIONS
Input impedance for each input: 1M
Output impedance for each output: 300
Current draw: 125mA
Maximum input signal level: +7.2 dBu
Page 2
COMPRESSOR/LIMITER CONTROLS & INDICATORS
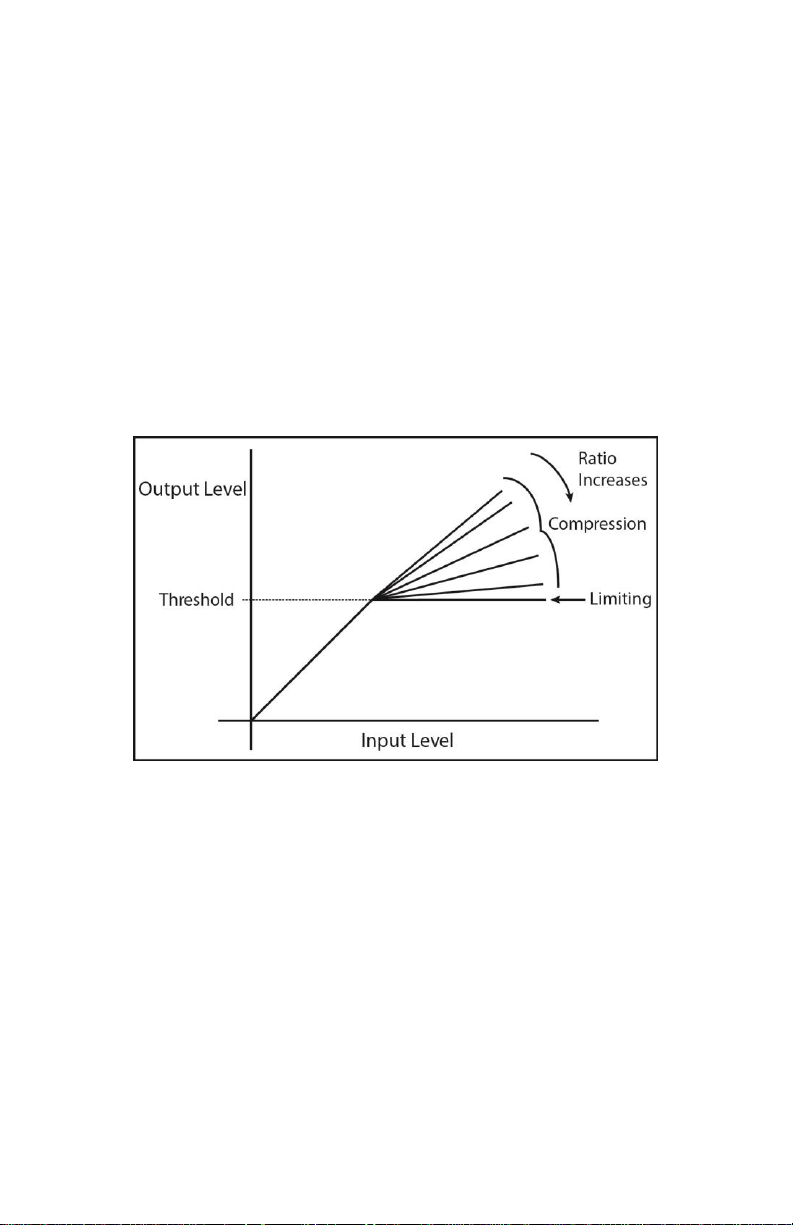
SUSTAIN Knob
Compressor Mode: Adjusts compression ratio. As you turn the SUSTAIN
knob clockwise, the compression ratio increases. This
compression is applied to a signal once it crosses the threshold.
volume level at which the compressor begins working on the signal. In
compressor mode, the Platform’s threshold level is fixed at a constant -35dB.
In practical terms, compression ratio determines how much the compressor
squashes the signal level and thus how much it levels out dynamics. The higher
the ratio, the more it reduces the peaks and valleys in your signal level to yield a
more consistent output volume.
RATIO DIAGRAM
ratio
determines how much
Threshold
is the
Limiter Mode: The SUSTAIN knob adjusts threshold level. As you turn the
SUSTAIN knob clockwise, the threshold level decreases and forces the limiter to
act sooner on your signal. The compression ratio is constant and practically
infinite in Limiter mode.
ATTACK Knob
The ATTACK knob sets the amount of time delay before the compressor/limiter
is activated once the input signal level reaches or exceeds the threshold setting.
Turn the ATTACK knob clockwise to increase the attack time from fast to slow.
Slow ATTACK settings emphasize the initial attack and add greater pop to your
notes (this is great for guitarists who like to chicken pick or play funk). Fast
ATTACK settings produce a more even compression where the initial attack is
compressed along with the sustained portion of your notes.
Page 3
RELEASE Knob
While the compressor/limiter is acting on the signal, the input may drop below
the threshold setting and cause the compressor to cease working on the signal.
The compressor does not stop working immediately, though. Rather, it gradually
stops over a period of time that is set by the RELEASE knob. As you turn this
knob clockwise,
generally result in smoother, more transparent compression with little or no
audible artifacts. Slower release settings also reduce the overall output volume.
Fast release settings allow for louder volumes and typically yield more noticeable
compression effects such as “pumping,” which is audible as unnatural level
changes.
release
time increases, or slows. Slower release settings
VOL Knob [Main Output Level]
This control—located in the upper left corner of the pedal—is the master volume
for the entire pedal. Use this control to balance your level between bypass and
effect mode.
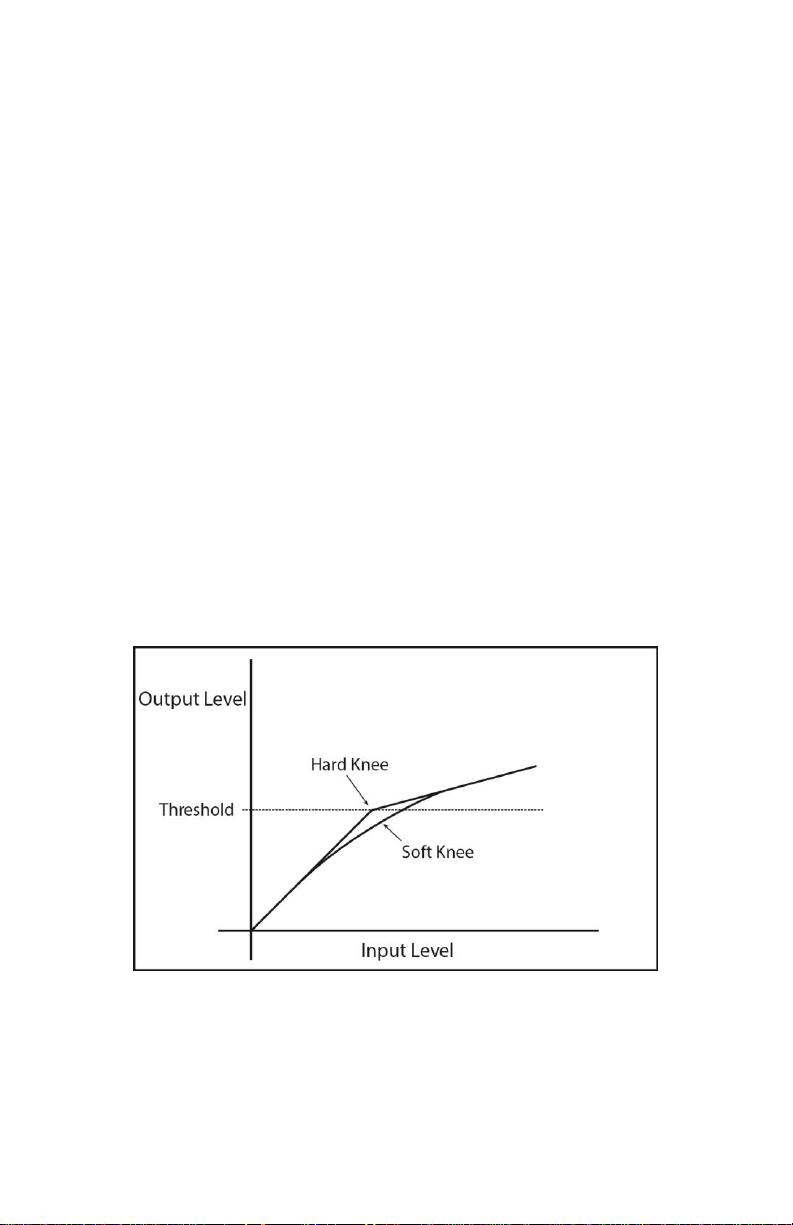
KNEE Button
The KNEE button changes the compression/limiting curve to produce a
compression sound that is either more or less transparent. When KNEE is lit,
knee
compression is enabled, and the result is a softer, subtler compression.
When KNEE is off (unlit), the compressor operates with a
and produces a more dramatic compression effect.
KNEE DIAGRAM
hard knee
response
soft
HARD KNEE – is recommended for instrumentation where you want a more
obvious compression sound. Most effect pedals employ hard knee compression.
Hard knee works great with guitar, bass, drums and keys.
SOFT KNEE – is recommended for delicate instruments or passages. It’s great
for vocals, strings, pads and other similar instruments where it is often important
for the use of compression to be as transparent as possible.
Page 4

LIMITER Button
Press the LIMITER button to engage the limiter. The button lights green to
indicate that the limiter is active. A
extremely high—practically infinite—ratio. As a result, the signal level does not
increase past the threshold setting. The ATTACK knob can still be used to delay
the limiter’s attack.
The states of the KNEE and LIMITER buttons (as well as the DRIVE footswitch)
are saved in flash memory and restored each time the Platform is powered up.
limiter
is a compressor that is fixed at an
Bar Graph LEDs
The eight gain reduction LEDs indicate the actual amount of gain reduction in
real time. The more LEDs that are lit, the more gain reduction occurs. Each LED
represents 3dB of gain reduction. The green LEDs indicate a light to medium
amount of compression/limiting. The yellow LEDs suggest a heavy amount of
compression. The red LED represents maximum compression.
BYPASS Footswitch & LED
Press the BYPASS footswitch to toggle the Platform between buffered BYPASS
and EFFECT mode. The status LED, located above the BYPASS footswitch, lights
when you are in EFFECT mode. When in bypass, the entire pedal is bypassed,
including the Drive section, no matter the state of the Drive LED.
DRIVE (OVERDRIVE) CONTROLS
DRIVE Knob
This knob controls the input gain of the overdrive section. As you turn DRIVE
clockwise, the amount of overdrive saturation increases to give you a more
distorted sound. Set Drive to a lower setting for a clean volume boost.
TONE Knob
The TONE knob adjusts the frequency response of the overdrive’s hi-cut filter,
allowing you to dial in the perfect overdrive tone.
VOL Knob [Drive Level]
The Drive VOL knob is located on the left side of the lower row of knobs, and
controls the output volume of the Drive section. Use this knob to balance the
output volume between Drive on and Drive off.
DRIVE Footswitch & LED
The DRIVE footswitch allows you to engage or bypass the overdrive section.
When Drive is engaged, the white LED above the DRIVE footswitch lights up.
The last state of the DRIVE footswitch is recalled upon power-up, as with the
KNEE and LIMITER buttons.
NOTE: The Platform must be in effect mode for Drive to be heard. The Drive
section will not be heard if the pedal is in bypass mode.
Page 5

SWELL CONTROL
The Swell algorithm is triggered every time a new note is played. The normal
attack of your instrument is replaced by a sound that fades in slowly. The Swell
function is located after the overdrive and compressor functions in the signal
chain, but before the main VOL knob. Swell has just one control, the SWELL
knob. Swell mode works best on instruments that have a quick attack and long
sustain, such as a guitar, bass, synthesizer or organ.
SWELL Knob
Adjust fade-in time with this knob. As you turn SWELL clockwise, the fade-in
time increases. When SWELL is set to zero, the Swell effect is bypassed.
SIGNAL FLOW/INPUT/OUTPUT/POWER
SIGNAL PATH:
Input -> Compressor/Limiter -> Overdrive -> Swell -> Output
MONO/L INPUT Jack – Instrument/Line level 1/4" unbalanced input jack
that accepts a maximum signal level of +7.2 dBu. Plug your instrument or output
from another effects pedal into this jack. If you use just one input, we
recommend using the MONO/L input. The input impedance presented at this jack
is 1MΩ.
R INPUT Jack – Instrument/Line level 1/4" unbalanced input jack. Plug your
instrument output or another effects pedal into this jack. Use this jack with the
MONO/L INPUT jack for stereo use. The input impedance presented at this jack
is 1MΩ. The maximum allowable signal level into this jack is +7.2 dBu. If you do
not use the R INPUT jack, the Left input signal connects to the R INPUT jack.
MONO/L OUTPUT Jack – 1/4" unbalanced output jack. The Left output
signal is sent through this jack. In Bypass, the dry signal at the Left input jack
outputs to the MONO/L Output jack. The source impedance of the MONO/L
OUTPUT is approximately 300Ω.
R OUTPUT – 1/4" unbalanced output jack. The Right output signal is sent
through this jack. In Bypass, the dry signal present at the Right input jack is
output to the R OUTPUT jack. If a plug is not inserted into the Right input jack
then the Left signal is output on the R OUTPUT jack in both effect and bypass
modes. The source impedance of the R OUTPUT is 300Ω.
9V Power Jack
Plug the output of the factory-supplied EHX9.6DC 200mA AC adapter into the 9V
power jack located at the top of the Platform. The Platform draws 125mA at
9VDC with a center negative plug. The Platform accepts Boss® and Ibanez®
style AC Adapters capable of delivering at least 150mA.
Page 6

MONO/STEREO OPERATION
MONO IN & OUT: Left In -> Left Out: when using the Platform in mono,
connect to the Left Input and Left Output.
MONO IN, STEREO OUT: Left In -> Left Out & Right Out: same
connections as mono in and out but add the Right Output. The Right output
signal will be identical to the Left Output both in effect and bypass modes.
STEREO IN, STEREO OUT: Left In & Right In -> Left Out & Right Out:
The left and right audio signals remain separate through all effects “blocks,”
including the Compressor/Limiter, Overdrive and Swell. The compressor’s
sidechain—which is the signal path that controls the compressor’s gain
reduction—sums together the left and right input signals to make one balanced
mono signal in which to control the compressor. The sidechain acts on both left
and right gain control equally so that sudden changes in the left or right input
signal will not ruin the stereo balance of the source material.
NOTE: Swell remains completely separate for the left and right inputs, and so left
and right fade-ins are triggered independently from each other.
TIPS AND TRICKS
1. When used as a guitar pedal, compressors typically perform their best near
the beginning of an effects chain, usually before distortion pedals. Having
said that, feel free to experiment with the Platform’s location in your pedal
chain; new uses for compression are waiting to be discovered!
2. If you are in compressor mode with SUSTAIN at maximum and you feel like
you need even more of a compression effect, turn on the LIMITER.
3. If you hear pumping and would like to reduce it, try the following settings in
this order:
increase the RELEASE knob setting
decrease the ATTACK knob setting
decrease the SUSTAIN knob setting
4. If you hear clicking or too much pop at the beginning of your notes, try the
following adjustments in this order:
decrease the ATTACK knob setting
increase the RELEASE knob setting
decrease the SUSTAIN knob setting
5. The Drive section can be used as a clean volume boost: turn the DRIVE
knob down below 9 o’clock, set the Drive’s VOL knob to 2 o’clock or above
and set TONE to taste.
Page 7
Page 8

- WARRANTY INFORMATION -
Please register online at http://www.ehx.com/product-registration or complete
and return the enclosed warranty card within 10 days of purchase. ElectroHarmonix will repair or replace, at its discretion, a product that fails to operate
due to defects in materials or workmanship for a period of one year from date of
purchase. This applies only to original purchasers who have bought their product
from an authorized Electro-Harmonix retailer. Repaired or replaced units will then
be warranted for the unexpired portion of the original warranty term.
If you should need to return your unit for service within the warranty period,
please contact the appropriate office listed below. Customers outside the regions
listed below, please contact EHX Customer Service for information on warranty
repairs at info@ehx.com or +1-718-937-8300. USA and Canadian customers:
please obtain a Return Authorization Number (RA#) from EHX Customer
Service before returning your product. Include with your returned unit a written
description of the problem as well as your name, address, telephone number, email address, RA# and a copy of your receipt clearly showing the purchase date.
United States & Canada Europe
EHX CUSTOMER SERVICE JOHN WILLIAMS
ELECTRO-HARMONIX ELECTRO-HARMONIX UK
c/o NEW SENSOR CORP. 13 CWMDONKIN TERRACE
55-01 2ND STREET SWANSEA SA2 0RQ
LONG ISLAND CITY, NY 11101 UNITED KINGDOM
Tel: 718-937-8300 Tel: +44 179 247 3258
Email: info@ehx.com Email: electroharmonixuk@virginmedia.com
- FCC COMPLIANCE -
Note:
This equipment has been tested and found to comply with the limits for a
Class B digital device, pursuant to part 15 of the FCC Rules. These limits are
designed to provide reasonable protection against harmful interference in a
residential installation. This equipment generates, uses and can radiate radio
frequency energy and, if not installed and used in accordance with the
instructions, may cause harmful interference to radio communications. However,
there is no guarantee that interference will not occur in a particular installation.
If this equipment does cause harmful interference to radio or television
reception, which can be determined by turning the equipment off and on, the
user is encouraged to try to correct the interference by one or more of the
following measures:
Reorient or relocate the receiving antenna.
Increase the separation between the equipment and receiver.
Connect the equipment into an outlet on a circuit different from that to
which the receiver is connected.
Consult the dealer or an experienced radio/TV technician for help.
Modifications not expressly approved by the manufacturer could void the user's
authority to operate the equipment under FCC rules.
 Loading...