

Page 1
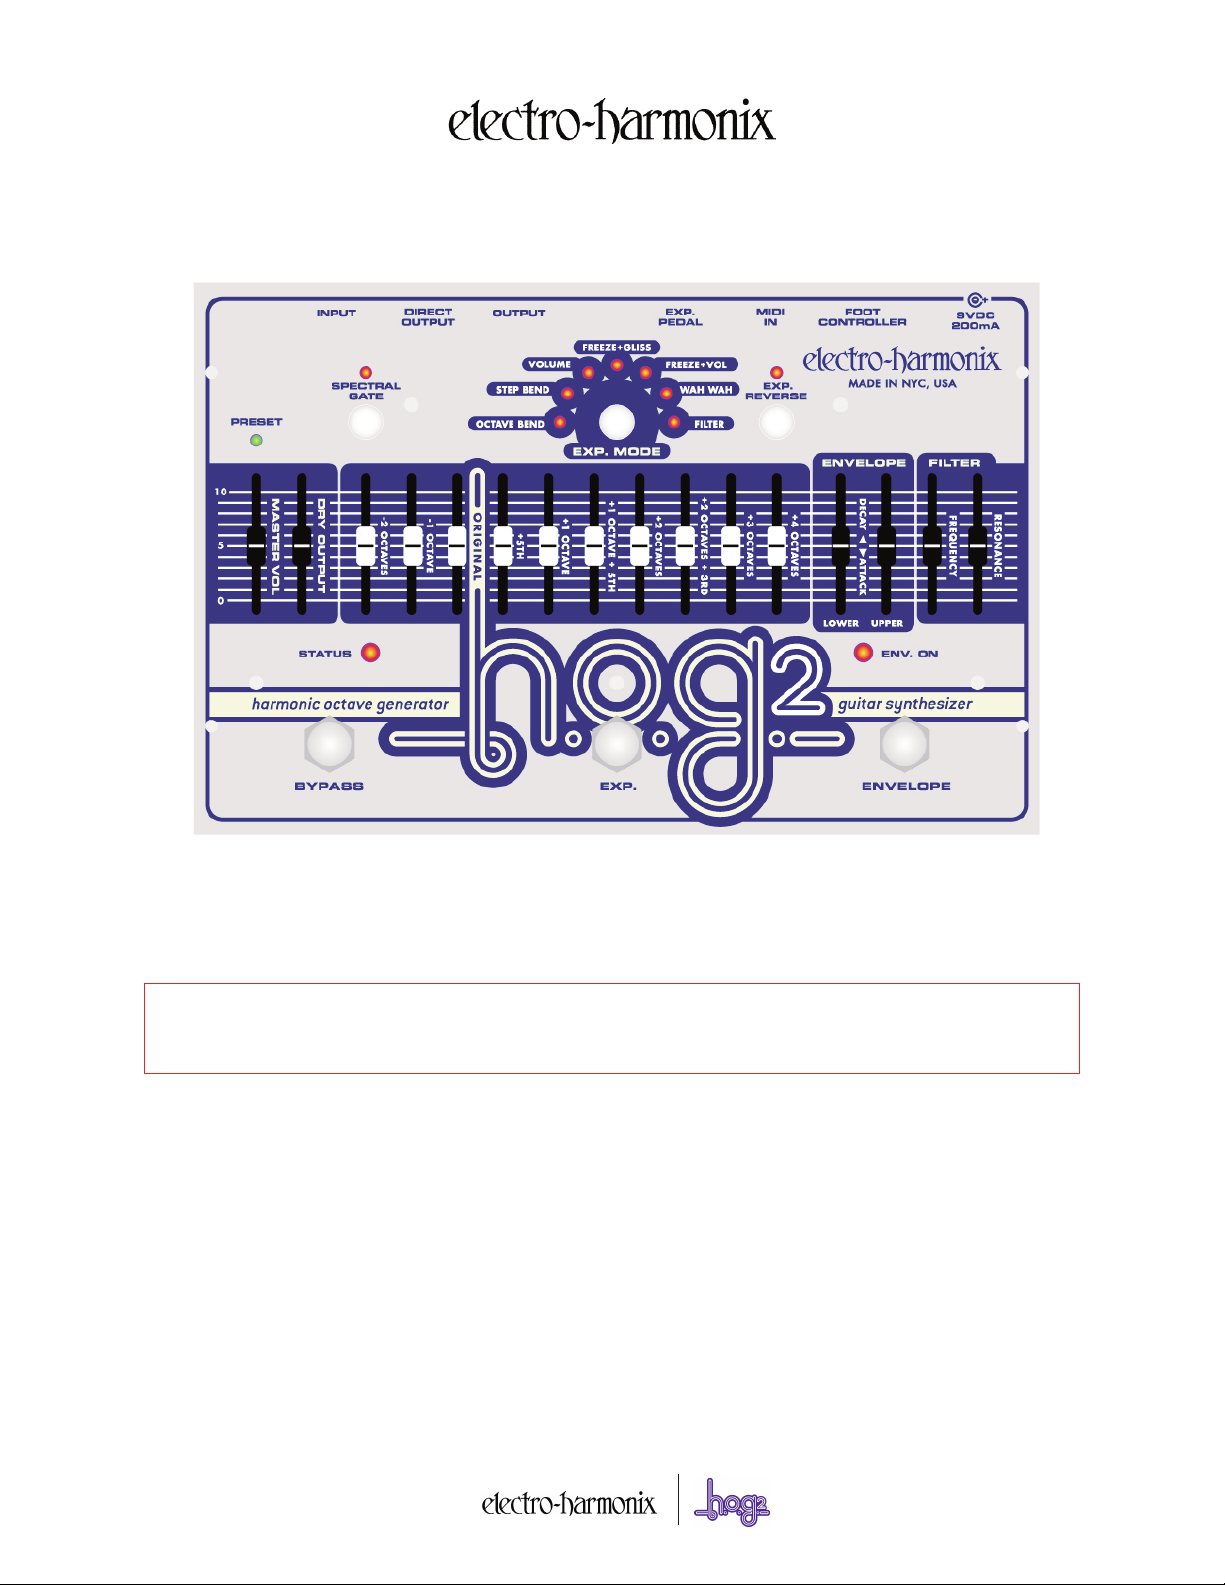
H.O.G.2
Harmonic Octave Generator – Guitar Synthesizer
Congratulations on your purchase of the HOG2! The HOG2 is an Octave and Harmonic Generator/Guitar Synthesizer that
can simultaneously generate multiple octaves and harmonics from your input signal. Whether you play single notes, arpeggios or full
chords, the HOG2 will track every note you play. Built-in to the HOG2 are 7 Expression Modes that enable you to modify your sounds using
a standard Expression Pedal, a MIDI Controller, or the Expression Button on the HOG2 itself. Further sound sculpting is achieved through an
Amplitude Envelope Generator and a 2nd-Order Low Pass Resonant Filter.
WARNING: Your HOG2 comes equipped with an Electro-Harmonix 9.6DC-200BI power supply (same as used by Boss® & Ibanez®:
9.6 Volts DC 200mA). The HOG2 requires 170mA at 9VDC with a center negative plug. The HOG2 does not take batteries. Using the
wrong adapter may damage your unit and void the warranty..
Audio Connections and Controls
MASTER VOL Slider — Sets the overall output volume of the HOG2 at the OUTPUT jack. All voices including the DRY OUTPUT signal
are affected by the MASTER VOL slider. The HOG2’s output volume will increase as this slider is pushed upward.
DRY OUTPUT Slider — Controls the output volume of your original, unaffected DRY signal before it exits the HOG2 from the OUT-
PUT jack. The DRY OUTPUT volume will increase as this slider is pushed upward. The DRY OUTPUT signal bypasses all of the Expression
Modes, the Envelope and the Filter.
INPUT Jack — Connect your instrument to the HOG2’s INPUT jack using a standard ¼” instrument cable. The input impedance pre-
sented at the INPUT jack is 1.3MΩ.
DIRECT OUTPUT Jack — This jack outputs a buffered version of the signal present at the INPUT jack. Using this jack will NOT put
any additional load on your instrument. The output impedance at this jack is 150 ohms.
OUTPUT Jack — This is the HOG2’s main output. Connect this jack to the input of your amplifier, mixer or computer using a standard
¼” instrument cable. The output impedance presented at this jack is 60 ohms.
Page 2

TATUS LED — When the STATUS LED is lit, the HOG2 is in effect mode. When the STATUS LED is off, the HOG2 is in Buffered Bypass
S
mode.
BYPASS Footswitch — Press the BYPASS Footswitch to toggle the HOG2 between Bufferred Bypass and Effect mode.
Voice Controls
There are 10 Voice sliders on the HOG2. Each features a white cap with a black line and controls the output volume for its assigned voice.
Throughout this manual we will refer to all of the generated octaves and harmonics as voices.
-2 OCTAVE Slider — Controls the output volume of the -2 OCTAVES voice, which is 2 octaves below the original input signal. The -2
OCTAVES signal will be 1/4 the frequency of the input signal. As this slider is pushed upward, the volume of the -2 OCTAVEs voice increases.
-1 OCTAVE Slider — Controls the output volume of the -1 OCTAVE voice, which is 1 octave below the original input signal. The -1
OCTAVE signal will be 1/2 the frequency of the input signal. As this slider is pushed upward, the volume of the -1 OCTAVE voice increases.
ORIGINAL Slider — Controls the output volume of the ORIGINAL voice. The ORIGINAL voice is your Dry signal sent through the
Expression Modes, Envelope and Filter, so it is treated just like all other voices with a white cap. The volume of the ORIGINAL voice will
increase as this slider is pushed upward.
+5TH Slider — Controls the output volume of the +5TH voice. The pitch of this voice is a perfect 5th note above the original input
note. For example if you play an A note, the HOG will output the first E note above the A. The +5TH signal will be 1.5 times the frequency
of the input signal. The volume of the +5TH voice increases as this slider is pushed upward.
+1 OCTAVE Slider — Controls the output volume of the +1 OCTAVE voice, which is 1 octave above the original input signal. The +1
OCTAVE signal will be twice the frequency of the original input signal. As this slider is pushed upward, the volume of the +1 OCTAVE signal
will increase.
+1 OCTAVE +5TH Slider — Controls the output volume of the +1 OCTAVE +5TH voice. The pitch of this voice is a perfect 5th note
above the first octave above the original input note. For example if you play an A note, the HOG will output an E note one octave higher
than the +5TH slider's E note. The +1 OCTAVE +5TH signal will be 3 times the frequency of the input signal. The volume of the +1 OCTAVE
+5TH voice increases as this slider is pushed upward.
+2 OCTAVES Slider — Controls the output volume of the +2 OCTAVES voice, which is 2 octaves above the original input signal. The
+2 OCTAVES signal will be 4 times the frequency of the original input signal. As this slider is pushed upward, the volume of the +2
OCTAVES signal increases.
+2 OCTAVES +3RD Slider — Controls the output volume of the +2 OCTAVES +3RD voice. The pitch of this voice is a major 3rd
note above the second octave above the original input note. For example if you play an A note, the HOG will output a C# note over two
octaves above the input. The +2 OCTAVES +3RD signal will be 5 times the frequency of the input signal. The volume of the +2 OCTAVES
+3RD voice will increase as this slider is pushed upward.
+3 OCTAVES Slider — Controls the output volume of the +3 OCTAVES voice, which is 3 octaves above the original input signal. The
+3 OCTAVES signal will be 8 times the frequency of the original input signal. As this slider is pushed upward, the volume of the +3
OCTAVES signal increases.
+4 OCTAVES Slider — Controls the output volume of the +4 OCTAVES voice, which is 4 octaves above the original input signal. The
+4 OCTAVES signal will be 16 times the frequency of the original input signal. As this slider is pushed upward, the volume of the +4
OCTAVES signal will increase.
SPECTRAL GATE Button and LED — When the SPECTRAL GATE LED is lit, the Spectral Gate function is active and in the sig-
nal path. Press and release the SPECTRAL GATE Button to toggle this function On/Off. The Spectral Gate emphasizes the loudest frequency
or harmonic of the input signal and progressively reduces the volumes of other frequencies and harmonics in the input signal. Use the
Spectral Gate to simplify the sound of the HOG2 and reduce background noise.
Envelope and Filter Controls
ENVELOPE LOWER & UPPER Sliders — The Envelope sliders control the amplitude Attack or Decay of the voices. The
LOWER slider controls the lower 5 voices (-2 Octaves to +1 Octave); the UPPER slider controls the upper 5 voices (+1 Octave +5th to +4
Octaves).
Page 3

he Envelope sliders have a center-detent; they click into place at the center of their travel. When set to the center-detent, there is no
T
change to the voices’ envelope: you have an instantaneous Attack and an infinite Decay. As you push the sliders up from the center, the
rate of Decay increases until the notes are barely audible. As you push the slider down from the center, the rate of Attack increases so that
your notes slowly fade-in.
ENVELOPE ON LED — Indicates when the Envelope section is in or out of the signal path. When the LED is lit, the Envelope is On
and in the signal path. When the LED is off, the Envelope section is bypassed.
NVELOPEFootswitch — Toggles the Envelope section ON / OFF.
E
FILTER FREQUENCY Slider — Controls the cutoff or peak frequency of the 2nd-Order lowpass filter. As the FREQUENCY slider is
pushed upward, the cutoff frequency of the filter rises.
FILTER RESONANCE Slider — Controls the resonance, Q or peak of the filter. As the RESONANCE slider is pushed upward, the
filter emphasizes the cutoff frequency more, creating an audible peak at the setting of the FREQUENCY slider.
All of the generated voices go through the filter at all times except in Wah Wah mode. If you do not want to hear the effects of the filter,
move the FREQUENCY slider to its top position and the RESONANCE slider down to its bottom position.
Expression Controls
EXP. MODE Switch and LEDs — The HOG2 has 7 different Expression modes. Each time you press the EXP. MODE button the
HOG2 selects the next mode in a clockwise rotation. It starts with BEND 1 OCTAVE, ends with FILTER and then cycles back to BEND 1
OCTAVE. Each Expression Mode has it own LED which lights up when the mode is selected. The 7 Expression Mode LEDs form a semi-circle
around the EXPRESSION MODE Switch.
EXP. REVERSE Switch and LED — This button reverses the direction of the Expression Mode currently selected. For example
with the EXP. REVERSE LED off, in BEND 1 OCTAVE mode, as you move the expression pedal from heel to toe down, the pitch of the voices
will continuously rise until you hit 1 Octave above. Press the EXP. REVERSE button so its LED lights up. As you move from heel to toe down,
the pitch of the voices will continuously fall until you hit 1 octave below.
EXP. BUTTON Footswitch — This momentary footswitch enables you to take advantage of the 7 Expression Modes without
needing an Expression Pedal. Pushing down on the EXP. BUTTON is equivalent to the toe down position of the Expression Pedal. Taking
your foot off of the EXP. BUTTON is equivalent to the heel position of the Expression Pedal.
The 7 Expression Modes are as follows (all descriptions assume you are using an Expression Pedal):
BEND 1 OCTAVE — Continuously bends all of the generated voices up to 1 Octave UP (or 1 Octave DOWN with EXP. REVERSE LED
ON). This is similar to using the whammy bar on a guitar or pitch bend wheel on a synthesizer. You can use this effect to obtain intervals
that are between the original note and the octave. For example, you can set the expression pedal to obtain a major 6th interval.
BEND 1 STEP — Continuously bends all of the generated voices up to 1 Step UP (or 1 Step DOWN with EXP. REVERSE LED ON).
Same effect as BEND 1 OCTAVE except the range is limited to just 1 step or the major 2nd interval. For example you can bend from an A
note to a B note. This mode is especially nice for producing detuned effects.
VOLUME — Continuously varies the volume of the generated voices. As you move the pedal from heel to toe down, the volume will
increase from 0 to 100% (or 100% to 0 with EXP. REVERSE LED ON).
FREEZE + GLISS — When in the heel position, you can play your instrument normally. When the toe is down, the HOG2 will freeze
whatever notes you were playing at the time of pushing the Expression pedal down. You can then play over these notes with your DRY
instrument. In between heel and toe down, the HOG2 will slide to the new note you play, from the previous note you played. The speed of
the glissando is determined by the position of the Expression pedal, the closer the Expression pedal is to toe down, the slower the slide
speed will be. For example, if you play an A note and then move the Expression Pedal down to 50%, it will freeze the A note. If you then
play a B note, the HOG will slide up to the B note. This function is similar to portamento on a synthesizer. Freeze + Gliss is a very tricky
mode, it takes some time to master. Though it can be frustrating at first, once you get it, it will open new doors to how you play guitar.
Please note:
Moving the Expression Pedal to the heel position erases the frozen note in memory.
FREEZE + VOLUME — Uses the Freeze function described in the Freeze + Gliss section but instead of Glissando, the Expression
Pedal will act like a Volume control for the Freeze function. The further down you push the Expression pedal, the louder the frozen notes
will be. When the Expression Pedal is in the heel position, you will not hear the octaves or harmonics.
Please note:
Moving the Expression Pedal to the full heel position erases the frozen note in memory.
Page 4

AH WAH —Turn your HOG2 into a wah pedal. All of the voices will go through a wah filter that you can modulate with the
W
Expression pedal. The Filter’s Frequency and Resonance sliders are inactive in this mode.
FILTER — Continuously varies the FREQUENCY slider of the Filter. The heel position is equivalent to the Frequency slider set to 0. The toe
own position will equal the current setting of the FREQUENCY slider. To sweep through the entire range of the filter with your Expression
d
pedal, set the FREQUENCY slider to 100%. Don't forget to also adjust the RESONANCE slider when in this mode, as it will have a dramatic
effect on the sound of the filter sweep.
External Control Inputs
EXP. PEDAL Jack — Plug the Expression Pedal into this jack. The Expression Pedal should have a Tip-Ring-Sleeve plug attached to
it. It is important that the Expression Pedal have the correct polarity. The tip of the plug must be connected to the wiper of the potentiometer inside the Expression Pedal. If you are not sure what type of Expression Pedal to use, try to purchase one with a polarity switch, so that
it will work with many different types of instruments. Some suggested Expression Pedals: Electro-Harmonix Expression Pedal, M-Audio EX-P,
Moog EP-2, Roland EV-5 or Boss FV-500L.
MIDI IN Jack — The MIDI connector on the HOG2 allows external control over just above every parameter on the HOG2’s top panel
as well as loading/saving presets. Please see the end of this instruction manual for more detailed information on using the HOG2 with
MIDI.
FOOTSWITCH Jack — Connect the Electro-Harmonix HOG2 Foot Controller to this jack using a standard ¼” instrument cable to
access up to 100 presets.
PRESET LED — This LED lights up solid to indicate that a preset is loaded. While a preset is loaded, if you move a slider or change a
mode on the HOG2, this LED will blink rapidly, indicating that a preset is loaded but it has been changed since it was loaded.
Please note:
connected expression pedal.
Pressing the BYPASS footswitch to change the status of the HOG2, will not cause the PRESET LED to blink nor will moving the
Presets and the HOG2 Foot Controller
If you plug the HOG2 Foot Controller (sold separately) into the FOOT CONTROLLER phone jack on the HOG2, you will be able to store and
load 100 presets. Use a standard ¼” instrument cable to connect the HOG2 Foot Controller to the HOG2. All slider positions, button settings
and footswitch settings are saved within the presets, as well as the position of the Expression Pedal, Exp. Button or MIDI settings.
Alternatively one preset can be saved and loaded on the HOG2 by itself. It will load or overwrite the last preset number selected by the Foot
Controller or MIDI. The HOG2 also has the ability to save and load all presets via MIDI CC and Program Change messages; see below for
more information on using MIDI with the HOG2.
Storing Presets: The HOG2 is capable of storing its current setting into a preset. There are three ways to go about saving presets:
HOG2 FOOT CONTROLLER
Assuming the HOG2 Foot Controller is attached to the HOG2, turn the SELECT knob on the HOG2 Foot Controller to the preset number that
you want to save to. Press and hold down the SELECT knob on the HOG2 Foot Controller. After a few seconds the digits on the HOG2 Foot
Controller will shut off and then come back on, the preset is now saved. You can release the SELECT encoder.
HOG2 MAIN UNIT
The preset will be stored in the last selected preset location. Press and hold the EXP. MODE button for two seconds. After two seconds all of
the EXP. MODE LEDs blink rapidly. After the LEDs stop blinking the preset is stored; you can release the EXP. MODE button. The factory
default location is Preset 0.
MIDI
You can save the HOG2’s current setting by sending a message using MIDI CC 117. The MIDI controller must be set to the HOG2’s current
MIDI Channel or the HOG2 must be set to OMNI ON. The data value that is sent along with MIDI CC 117 will be the location that the preset
is saved in. The HOG2 overwrites the old preset that was at this location. For example, if you want to store your setting to preset number 3,
send MIDI CC 117 with a data value equal to 3. The HOG2 can save up to 120 presets via MIDI (using values 0 through 119) any data value
above 119, will be ignored.
Page 5

oading Presets: There are three ways to go about recalling presets in the HOG2:
L
HOG2 FOOT CONTROLLER
Press and release the UP or DOWN footswitch on the HOG2 Foot Controller. Each time you press these footswitches the preset number
ncrements (UP Footswitch) or decrements (DOWN Footswitch) while loading the new preset at the same time. If you press and hold either
i
of the footswitches on the HOG2 Foot Controller, it will increment or decrement by 10.
An alternate method for loading presets with the HOG2 Foot Controller is to use the SELECT knob. First turn the SELECT knob to the preset
umber that you want to load, then press and release the SELECT knob to load the preset. Upon loading a preset, the PRESET LED on the
n
HOG2 will light up solid. The rightmost decimal point on the HOG2 Foot Controller will also light up indicating that the PRESET is loaded.
HOG2
Press and hold the SPECTRAL GATE button until the PRESET LED lights up. The HOG2 will load the preset last selected by the HOG2 Foot
Controller or by MIDI. The factory default preset is Preset 0.
MIDI
Using Program Change Messages
The HOG2 accepts MIDI Program Change messages to load its stored presets as long as the MIDI controller is set to the HOG2’s MIDI channel or the HOG2 is set to OMNI ON. As an example, if you want to load preset 10, send Program Change message 10 to the HOG2.
Using CC Messages
The HOG2 also loads presets upon receiving MIDI CC 118. The data value sent along with MIDI CC 118 indicates the preset number that will
be loaded. For example if you want to load preset 51, send MIDI CC 118 with a data value equal to 51. The HOG2 can load up to 120 presets via MIDI (using values 0 though 119). Sending a value above 119 will unload the currently selected preset.
Upon loading a preset, the PRESET LED on the HOG2 will light up solid.
Please note:
load the Expression Pedal’s saved setting. In this case, when the preset is loaded, the corresponding Expression Mode LED will blink rapidly;
this tells you there is a pre-loaded Expression Setting. If you want to reset the Expression Setting, press the EXP. BUTTON or press the EXP.
MODE Switch, the LED blinking will stop.
If an Expression Pedal is plugged into the HOG while loading a preset, the Preset’s Expression Setting will not load.
Unloading Presets: There may be times when you want to unload or exit the currently loaded preset, so that you can use the HOG2
in its normal What You See Is What You Get (WYSIWYG) mode. Each method for loading presets has a way of unloading the presets as
well. You do not have to use the same method for unloading a preset as you did for loading the preset. For example, you could load a preset with the HOG2 Foot Controller and then unload it using the HOG2 itself:
HOG2 FOOT CONTROLLER
To unload a preset using the HOG2 Foot Controller, press and release the SELECT knob on the foot controller. You will see both the PRESET
LED on the HOG2 and the right decimal point on the Foot Controller shut off.
HOG2
Press and hold the SPECTRAL GATE button for two seconds. After two seconds you should see the PRESET LED on the HOG2 go off, at this
point you are in WYSIWYG mode. You can then release the SPECTRAL GATE button.
MIDI
The HOG2 can unload a preset using either MIDI Program Change 126 or MIDI CC message 118. To unload using Program Change, send
Program Change 126 to the HOG2. Program Change 126 toggles between loading the currently selected preset and loading WYSIWYG
mode. To unload using MIDI CC, send CC 118 with a value above 119.
Editing Presets: After loading a preset, you can edit the preset and save it to a new location. This is easiest to do with the HOG2 Foot
Controller, though it could also been done with MIDI. Using the HOG2 Foot Controller, load the preset you want to edit. After you make
your edits, turn the SELECT knob on the HOG2 Foot Controller to the number you want to save it in. Then press and hold the SELECT knob
for three seconds, releasing it after the number disappears and then comes back. To save with MIDI, send MIDI CC 117 with the data value
equal to the preset number that you want to save in.
When you load a preset that has an Expression Pedal value other than 0 or heel, and no Expression Pedal is plugged in, it will
Page 6

MIDI FUNCTIONALITY
MIDI CC
HOG2 CONTRO L
EXPLANATION
RANGE
4
EXPRESSION
PEDAL – Coarse
Works as expression pedal for parameter
selected by the EX P. MODE LEDs. For
most purposes, this CC will work fine alone
but it also works with CC #36 for a finer
expression control.
0…127
7
MASTER VOL Slider
Controls the MASTER VOL slider which
sets the output volume of the HOG2.
0…127
36
EXPRESSION
PEDAL – Fine
A fine tune control over the expression
pedal parameter selected by the EXP.
MODE LEDs. This is generally only
needed for very fine pitch control. Please
see CC #4 for coarse control over the EXP.
MODES.
0…127
64
FREEZE + GLISS
Expression Control
Allows controls over FREEZE+GLISS
using MIDI CC 64 which is normally used
by keyboard sustain pedals. It also allows
FREEZE+GLISS in the following
expression modes: OCTAVE BEND, STEP
BEND, VOLUME and both FREEZE
modes. It will not w ork when the EXP.
MODE is set to VOLUME, WAH WAH or
FILTER.
0 = No Freeze
127 = Freeze Hold
Gliss occurs with
intermediate values.
85
BYPASS Footswitch
Toggles the HOG2 between bypass and
effect mode, the ST ATUS LED will update
accordingly.
0..63 = BYPASS
64..127 = EFFECT
86
EXP. Footswitch
Equivalent to pressing and holding down
the EXP. Footswitch.
0..63 = FSW Release
64..127 = FSW Press
87
ENVELOPE
Footswitch
Toggles ENV. mod e on and off. When
ENV. is on, its LED will light.
0..63 = OFF
64..127 = ON
88
SPECTRAL GAT E
Button
Toggles the SPECT RAL GATE mode on
and off. The associated LED will light
accordingly
0..63 = OFF
64..127 = ON
89
EXP. MODE Button
Selects and activates the Expression Modes:
OCTAVE BEND, STEP BEND,
VOLUME, FREEZE+GLISS,
FREEZE+VOL, W AH WAH and FILTER.
The HOG2 will jum p directly to a given
expression mode upon receiving the proper
MIDI data; you do not need to cycle
through the modes.
0..9 = OCTAVE
BEND
10..19 = STEP BEND
20..29 = VOLUME
30..39 = FREEZE +
GLISS
40..49 = FREEZE +
VOL
50..59 = WAH WAH
60..127 = FILTER
90
EXP. REVERSE
Button
Toggles the EXP. R EVERSE function on
and off. The associated LED will light
accordingly.
0..63 = OFF
64..127 = ON
102
DRY OUTPUT Slider
Controls the DRY OUTPUT slider seting
the volume of the un-effected dry signal.
0…127
103
-2 OCTAVES Slid er
Controls the -2 OC TAVES slider which
sets the volume of the synthesized notes 2
octaves below your original notes.
0…127
104
-1 OCTAVE Slider
Controls the -1 OC TAVE slider which sets
the volume of the synthesized notes 1
octave below your original notes.
0…127
105
ORIGINAL Slider
Controls the ORIGINAL slider which sets
the volume of the dry signal that goes
through the expression modes, envelope
and filter.
0…127
106
+5TH Slider
Controls the +5TH slider which sets the
volume of the synthesized notes a perfect
fifth above your original notes.
0…127
107
+1 OCTAVE Slider
Controls the +1 OC TAVE slider which sets
the volume of the synthesized notes 1
octave above your original notes.
0…127
108
+1 OCTAVE + 5T H
Slider
Controls the +1 OC TAVE +5TH slider
which sets the volume of the synthesized
notes 1 octave and the perfect fifth above
your original notes.
0…127
109
+2 OCTAVES Slider
Controls the +2 OCTAVES slider which
sets the volume of the synthesized notes 2
octaves above your original notes.
0…127
110
+2 OCTAVES + 3RD
Slider
Controls the +2 OC TAVES +3RD slider
which sets the volume of the synthesized
notes 2 octaves and the major third above
your original notes.
0…127
111
+3 OCTAVES Slider
Controls the +3 OC TAVES slider which
sets the volume of the synthesized notes 3
octaves above your original notes.
0…127
112
+4 OCTAVES Slider
Controls the +4 OC TAVES slider which
sets the volume of the synthesized notes 4
octaves above your original notes.
0…127
113
ENVELOPE /
LOWER Slider
Controls the LOWER slider in the HOG2’s
ENVELOPE section.
0…127
114
ENVELOPE / UPPER
Slider
Controls the UPPER slider in the HOG2’s
ENVELOPE section.
0…127
115
FILTER /
FREQUENCY Slider
Controls the FREQUENCY slider in the
HOG2’s FILTER section.
0…127
116
FILTER /
RESONANCE Slider
Controls the RESONANCE slider in the
HOG2’s FILTER section.
0…127
EXTRA
FUNCTIONS
117
Save Preset
Save current HOG2 settings to preset
number specified in data field of this CC
message. If the data value is above 119, the
CC message will be ignored.
0..119 = Save to this
preset number
120..127 = CC is
ignored
118
Load Preset
Load preset specified in the data field of
this CC message. If the data value is above
119, the HOG2 will unload the preset and
change to What You See Is What You Get
Mode.
0..119 = Load this
preset number
120..127 = Load
WYSIWYG mode
124
OMNI OFF
Factory Default Value. When HOG2 is set
to OMNI OFF, it will only accept
commands that are on its currently assigned
channel. The omni setting is saved during
power cycles. To change omni modes the
command must be sent on the HOG2’s
current channel setting.
Change from 0 to 1 to
enable OMNI OFF .
125
OMNI ON
When set to OMNI ON, the HOG2 will
accept commands o n all MIDI channels.
The omni setting is saved during power
cycles. To change o mni modes the
command must be sent on the HOG2’s
current channel setting even if OMNI is set
to ON.
Change from 0 to 1 to
enable OMNI ON.
Connect the MIDI OUT of your keyboard, computer or other MIDI device to the HOG2's MIDI IN jack.
MIDI CC MESSAGES
Using MIDI Control Change (CC) messages you can control all of the front panel controls on the HOG2 via MIDI. Here is a list of the CC
messages the HOG2 responds to and the acceptable range of values for each message.
Page 7

MIDI PROGRAM CHANGE MESSAGES
MIDI
CHANNEL
FREEZE
+GLISS
LED
FREEZE
+VOL
LED
WAH
WAH
LED
FILTER
LED
1 (default)
off
off
off
off 2 off
off
off
ON 3 off
off
ON
off
4
off
off
ON
ON
5
off
ON
off
off 6 off
ON
off
ON
7
off
ON
ON
off
8
off
ON
ON
ON 9 ON
off
off
off
10
ON
off
off
ON
11
ON
off
ON
off
12
ON
off
ON
ON
13
ON
ON
off
off
14
ON
ON
off
ON
15
ON
ON
ON
off
16
ON
ON
ON
ON
M
IDI PROGRAM
C
HANGE NUMBER
F
UNCTION
0
– 119
L
oads preset associated with the Program Change number. For example, Program
Change 3 will load preset number 3.
1
20 BYPASS/EFFECT toggle
121
EXP. BUTTON Footswitch toggles press/release
122
ENVELOPE On/Off toggle
123
SPECTRAL GATE On/Off toggle
124
EXP. MODE Button Select – cycles through the 7 Expression Modes
125
EXP. REVERSE On/Off toggle
126
Load/Unload Current Preset
127
Bypass/Reset Function: Puts the HOG2 into a reset state: enters Bypass, releases
EXP. Button footswitch, ENVELOPE set to off, SPECTRAL GATE set to off,
E
XP. MODE set to OCTAVE BEND, Preset is unloaded – enters WYSIWYG
mode. This reset is not a factory reset, it does not overwrite your presets.
Presets saved within the HOG2 can be loaded using an external MIDI device through MIDI Program Change messages. The MIDI Program
Change messages must be set to the same channel that the HOG2 is set to or the HOG2 must be set to OMNI ON mode. The number of the
program change message will correspond to the preset that it loads. For example to load preset 6, send MIDI Program Change #6.
MIDI PITCH BEND MESSAGES
You can modulate any of the Expression Modes using MIDI Pitch Bend. If the HOG2 is set to OCTAVE BEND, for example, you will hear the
HOG2 bending notes in the same way as you would on a keyboard.
MIDI CHANNELS
The HOG2 can be set to any of the 16 MIDI channels or you can enable OMNI ON so that the HOG2 accepts messages on all MIDI channels. The factory default is set to Channel 1 / OMNI OFF.
Displaying the Current MIDI Channel
The MIDI channel is displayed during a special start up sequence:
1. While power is off, press and hold the EXP. Footswitch.
2. Continue to hold down the EXP. Footswitch while applying
power and during the next step.
3. Upon applying power, the VOLUME LED should light up for
approximately three seconds. After the VOLUME LED shuts
off, the HOG2 displays the current MIDI channel setting. The
MIDI channel is displayed in binary; please see the table to
the right to determine the HOG2’s MIDI Channel setting.
Please Note: when the HOG2 is set to Channel 1, no LEDs in
the EXP. MODE semi-circle will be lit.
4. Release the EXP. Footswitch to exit the MIDI Channel display
and use the HOG2 normally.
Changing the MIDI Channel
The MIDI Channel can be changed during a special start up sequence similar to the procedure for displaying the MIDI Channel:
1. Follow steps 1 through 3 above for displaying the MIDI Channel.
2. While continuing to hold down the EXP. Footswitch, press and release the EXP. MODE button to cycle through the 16 MIDI
Channels. Follow the table above to determine the LED pattern needed for the MIDI Channel setting you require.
3. Release the EXP. Footswitch to save the new MIDI Channel setting and use the HOG2 normally. The MIDI Channel setting is
saved during power cycles.
Factory Reset
The following procedure resets the HOG2 to its factory settings. It will set the MIDI channel to its default setting (Channel 1) and overwrite
all presets to their original factory settings:
1. While power is off, press and hold both the BYPASS and EXP. Footswitches.
2. Continue to hold down both footswitches while applying power and during the next step.
3. After applying power, continue to hold down the footswitches until you see all of the LEDs start to blink.
4. Release the footswitches. The HOG2 is now restored to factory settings. You can now use the HOG2
Page 8

- WARRANTY INFORMATION -
lease register online at http://www.ehx.com/product-registration or complete and return the enclosed warranty card within 10 days of pur-
P
chase. Electro-Harmonix will repair or replace, at its discretion, a product that fails to operate due to defects in materials or workmanship
for a period of one year from date of purchase. This applies only to original purchasers who have bought their product from an authorized
Electro-Harmonix retailer. Repaired or replaced units will then be warranted for the unexpired portion of the original warranty term. If you
hould need to return your unit for service within the warranty period, please include a brief description of the problem as well as you
s
name, address, telephone number, copy of your receipt, and a check or money order. The costs for shipping and handling are listed below.
United States - $12
Canada - $15
Europe and other countries - $25
Ship to:
Electro-Harmonix
C/O New Sensor Corporation
55-01 2nd Street
Long Island City, NY 11101
Attn:
Service Department
Please make checks/money orders payable to New Sensor Corporation.
To hear demos on all EH pedals visit us on the web at
Email us at
info@ehx.com
www.ehx.com
.
- FCC COMPLIANCE -
Note: This equipment has been tested and found to comply with the limits for a Class B digital device, pursuant to part 15 of the FCC Rules.
These limits are designed to provide reasonable protection against harmful interference in a residential installation. This equipment generates, uses and can radiate radio frequency energy and, if not installed and used in accordance with the instructions, may cause harmful
interference to radio communications. However, there is no guarantee that interference will not occur in a particular installation. If this
equipment does cause harmful interference to radio or television reception, which can be determined by turning the equipment off and on,
the user is encouraged to try to correct the interference by one or more of the following measures:
• Reorient or relocate the receiving antenna.
• Increase the separation between the equipment and receiver.
• Connect the equipment into an outlet on a circuit different from that to which the receiver is connected.
• Consult the dealer or an experienced radio/TV technician for help.
Modifications not expressly approved by the manufacturer could void the user's authority to operated the equipment under FCC rules.
 Loading...