

Page 1
EMP 1
Balanced Multiformat Player
Owner’s Manual
ENG
Page 2

2
Owner’s manual
EMP-1 Reference
Multi Player
Warning:
To avoid risk of re or electric shock, do not expose this appliance to
rain or moisture.
Verify line voltage before use.
Do not remove cover. No user serviceable parts inside.
Refer servicing to qualied service personal.
The warranty is void if non-authorized personnel
tamper with the product.
Use only authorized Electrocompaniet service center.
Page 3

3
1. The story of Electrocompaniet
The early days…
At an AES conference in 1973, Dr. Matti
Otala presented a paper describing a distortion that he termed Transient Intermodulation
(TIM). Attending this conference was Svein
Erik Børja, a Norwegian record and broadcasting producer and a great audio enthusiast.
The seminar held by Dr. Otala on TIM
provided Svein Erik with an explanation of
the audible imperfections he had experienced
from audio ampliers. Svein Erik Børja
brought the AES papers to Electrocompaniet,
and asked if we could make an amplier
based on Dr. Otala’s theory.
A few prototype ampliers were made and the
sound, compared to other transistor ampliers,
was encouraging. But Svein Erik Børja, being
the perfectionist he was, felt that this amplier
design approach had a greater potential. At
that time we did not know too much about
high-end audio designs. This gave an element
of neutrality to our research, which we believe
contributed to the amplier’s success. We
consider our audio designers from that time to
have been the rst in what may be called the
new ‘TIM-free’ school.
The next 3 years went to further research and
design improvement. During this time we had
to develop a new ‘language’ to translate what
we were hearing, into practical design parameters (distortion, frequency response etc.) A
new mathematical equation was developed
to better describe the AC (music) characteristics of the transistor, rather than the normal
DC characteristics. The result of this work
culminated in the launch of our rst 2 x 25W
unit, “The 2 Channel Audio Power Amplier.”
The nal approval came in 1976 when the
American ‘bible’, The Audio Critic magazine,
tested the amplier and wrote: “Audio freaks
– eat your hearts out. This is the world’s best
sounding amplier.”
Since these early days, Electrocompaniet’s
designs have been continually improved and
our product programme has steadily grown.
Today we are represented in 36 countries
worldwide and our products are considered to
be among the very best in the audio industry.
The vision that drove us in the early days has
stayed:
If the music really matters....
Intro
Page 4

4
2. The Design Concept
Thank you for purchasing this ne audio
equipment. First of all we will give you a
small introduction to the ideas behind the
EMP-1
Technically, a CD (or a DVD) is a simple construction, built up with a lot of digital information, represented by only two states - zero
or one. The main work for the rst section of
the EMP-1 is to read this information. The
EMP-1 have a buffer that reads from the CD
with a higher speed than necessary. If there is
some inconsistent information the system has
time to read it again, and correct the missing
data. With this technique errors introduced
by the CD mechanics are removed. As long as
the rst stage of the process has a perfect copy
of the information on the CD there is a basis
for the next stage.
The next stage is to sample rate the information. This process removes possible jitter and
also makes sure that all parts of the DAC get
the correct information, at correct time.
The last step is to convert the digital signal
into an analog signal. This is done in two
stages. First the PCM signal is up sampled
to 192kHz. This signal is then up sampled
again to 312 kHz if selected (Factory setting
is 192kHz). After this the High Qualities DAC
converted the digital information to an analog
signal.
After this process the signal passes trough the
fully balanced, symmetrical, state-of-the-art
internal analog output stage - ready to be connected to your system.
Intro
Page 5

5
4. Patent Information
Manufactured under license
from Dolby Laboratories.
“Dolbv”,“Pro Logic” and the
double-D symbol are trademarks of Dolby Laboratories.
“DTS” and “DTS Digital
Surround” are registered
trademarks of Digital Theater
Systems, Inc.
“DivX”, “DivX Certied”,
and associated logos are trademarks of DivX Networks, Inc
and are used under license.
“DCDi” is a trademark of
Faroudja, a division of Genesis Microchip, Inc.
HDMI, the HDMI logo and
High
Denition Multimedia
Interface are trademarks or
registered trademark of HDMI
Licensing LLC.
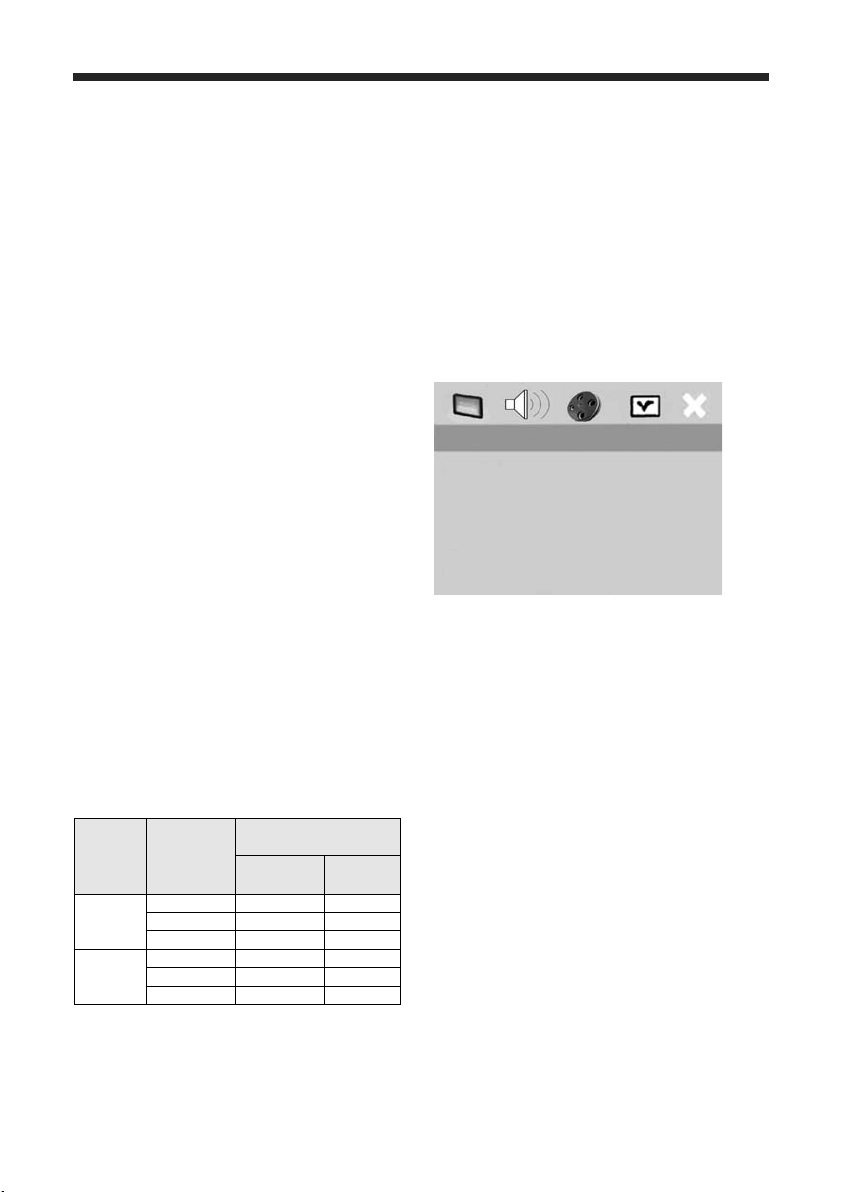
3. General Information
Notes About Discs
• This player is designed for use with
the following discs: Super Audio CD
(SA-CD), DVD-Video, Video CD,
SuperVideo CD, Audio CD, CD-R,
CD-RW, DVD+RW, DVD+R, DVD-R
and DVD-RW.
This player can play:
• MP3 and picture (Kodak. JPEG) les
recorded on CD-R(W).
- JPEG/ISO 9660format
- Maximum 30 character display
• DivX® disc on CD-R(W)/ DVD+R(W)/
DVD-R(W)
• CD-R and CD-RW cannot be played
unless nalized.
• Some discs cannot be played depending
on the recording conditions, such as the
PC environment and application software.
The characteristics and condition of some
discs: materials, scratches, curvature,
etc.. may result in playback failure.
• Be sure to use only CD-R and CD-RW
discs made by reliable manufacturers.
• Do not use any non-standard shaped
discs (heart-shaped, etc.).
• Do not use discs with tape, seals, or
paste on their surface. Doing so may
damage this player.
• Do not use discs afxed with labels
printed by a commercially available label
printer.
• Photo CD, CD-ROM, DVD-ROM,
DVD-RAM, CDV and nonstandard CD
discs cannot be played on this unit.
Cleaning Discs
• When a disc becomes dirty, clean it with
a cleaning cloth. Wipe the disc from the
center out. Do not wipe in a circular
motion.
• Do not use solvents such as benzine,
thinner, commercially available cleaners,
or antistatic spray intended for analog
records.
Intro
Page 6

6
5. Unpacking the EMP-1
Immediately upon receipt of the EMP-1,
inspect the carton for possible damage during
shipment. The carton and packaging have
been designed to provide the safest possible
protection for transport of this player. Unpack
the unit carefully. Save all packaging materials for future shipment.
The contents of the carton
1 pcs Electrocompaniet EMP 1 – Universal
Player
1 pcs AC mains cord.
1 pcs Inspection card.
1 pcs Remote control
2 pcs Batteries
Note !
The EMP 1 are designed to be used together
with the new ECT-2, the advanced RF remote
controller, sold as a separate product.
However, if you do not have this unit we have
included a standard IR controller.
Before startup
Before connecting the EMP 1 to the mains,
check that the main voltage indicated on the
rear panel corresponds to the line voltage in
the territory where you intend to use the unit.
How to avoid damages
Do not under any circumstances connect or
disconnect equipment when power is turned
on.
How to avoid noise problems
The EMP 1 contains delicate circuits that are
made to make a crystal clear, detailed sound.
Make sure all signal cables to the player have
maximal distance to cables to/from television.
If possible the television should be connected
to a separate power outlet, with lter to the
rest of your high end equipment. Television
often have a lot of magnetic stray elds that
can be picked up by cables in your system.
The unit should not be placed near main
transformers, TV sets, etc. Care should also be
taken regarding placement of the interconnect
cables. Do not run interconnect cables in parallel with main cords or speaker cables. Keep
interconnect cables as short as possible.
Important notes
For optimal sonic performance, the EMP 1
should be burned in for a minimum time of 72
hours. The easiest way to burn in your EMP 1
is to put a disc in REPEAT mode with the rest
of your system turned off.
In daily operation, switch off the EMP 1
player by using the STANDBY button on the
remote. If the EMP 1 has been switched off,
allow two hours of warm-up to optimize sonic
performance.
Due to high class A operation in all Electrocompaniet designs, it is normal for the EMP 1
to feel warm. Proper ventilation is important.
The EMP 1 should never be completely covered. A good rule of thumb is to allow at least
3 – 5 cm of air sidewise and 5 – 8 cm above
the EMP 1. It’s not recommended to install
the unit into a cabinet. It’s absolute not possible to install the unit into a closed cabinet.
This will make the system to fault, and also
reduce the lifetime dramatically.
Unpacking the unit
Page 7
7
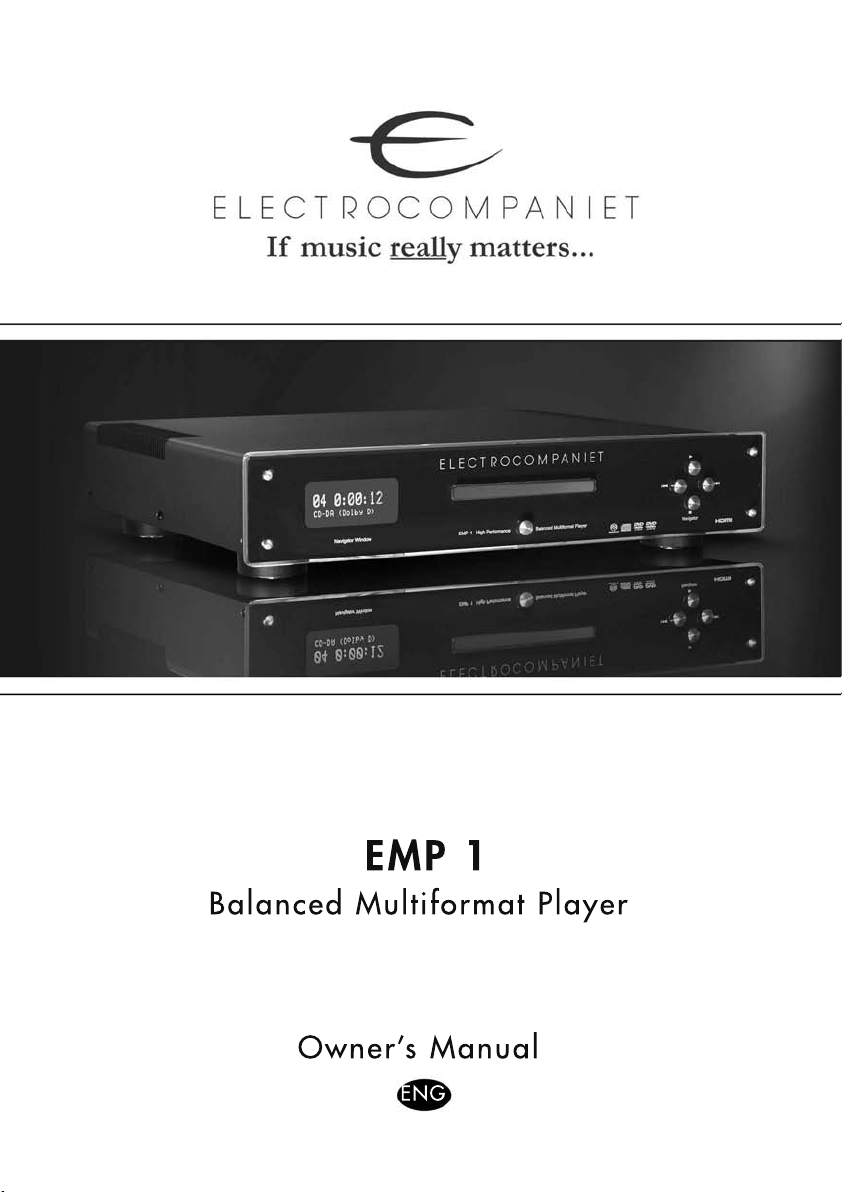
6. Connectors on the rear side
Analog
Connect the left output to the left input on the
preamplier or the integrated amplier. Connect the right output to the right input on the
preamplier or the integrated amplier. Connect the Center, Sub woofer, and Surround
left/right if you want to use the EMP 1 in a
surround setup.
Digital Output
Connect a 75 Ohm unbalanced digital signal
cable from S/P-DIF to the digital input on the
preamplier or the integrated amplier.
HDMI Output
Use a standard High Quality HDMI cable for
connection to your projector or television
Component Output
If you don’t have a HDMI media, use this
output for connection to you projector and
television. Use the switch to select progressive or inter latched signal. After changing of
this switch, the system need to be reset.
Mains
Check that the mains voltage printed on the
rear panel corresponds with the line voltage
in the territory you intend to use the EMP
1. After this is checked out, connect the AC
main cord to the power inlet on the rear side.
Front panel controls
The power on/off button is localized in the
center of the front panel. Generally, we
recommend that you use the Standby button
located on the remote control.
When not using the EMP 1 for a long period,
turn the main switch off and disconnect the
unit from the mains outlet.
The four navigator buttons on the right front
panel have the following functions:
Top button = play/pause
Right button = next
Left button = previous
Lower button = stop / eject – hold the
button pressed to eject the disc.
Connecting the EMP 1
Page 8
8
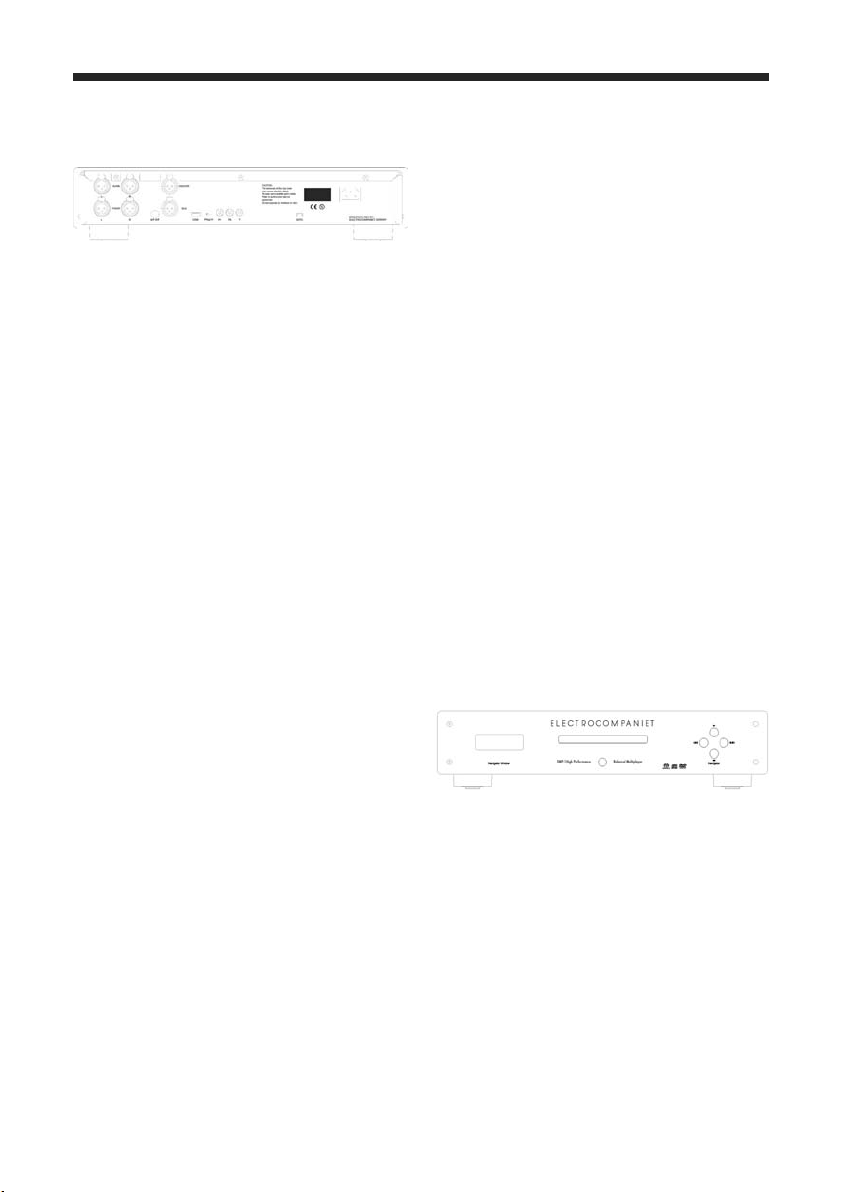
7. Remote Control
S. MODE
• Selects a sound mode:
Stereo, Virtual Surround
or Multi-channel.
• Changes the SA-CD play
back area
TOP MENU
• Displays the top-level
disc menu (DVD)
• moves back to the
previous menu (VCD)
MENU
• Accesses the disc’s root menu (for DVDs)
• Switches PBC on/off
(for VCDs)
FUNCTION ◄►▲▼
• (left/right/up/down)
Selects an item in the
currently displayed menu
FUNCTION 7 8
• Search backward or for ward (DVD only)
PREV/NEXT 9 :
• Moves to the previous or
next chapter or track
• Search back/forward,
press and hold
STOP/EJECT
• Stops playback (short)
• Eject disck ( long)
PLAY ►
• Starts playback
PLAY 4
;
• Pauses playback tempo rarily
•frame-by-frame playback
O/l
• Turns this player into the
standby mode.
0-9 numeric keypad
• Selects numbered items in the
currently displayed menu
ON SCR
• Accesses or clears the player’s
On Screen Display menu
SETUP
• Accesses or clears the player’s
setup menu
SUBTITLE
• Selects the language for subtitles
ZOOM
• Enlarges the video image
AUDIO
• Selects the audio language or
format selector
REPEAT
• Repeats the chapter, track, title,
disc or all discs
A-B
• Repeats a specic segment
SHUFFLE
• Plays tracks in random order
SCAN
• Plays the rst & seconds or less
of each track/chapter on the disc
OK
• Acknowledges the menu
selection
Functional Overview
Page 9
9
8. Remote Control, Inserting batteries
1 Open the battery compartment
2 Insert two type R06 or AA batteries,
following the indications (+/-) inside
the compartment.
3 Close the cover.
9. Turning on the Power
1 Connect the AC power cord to an AC
outlet.
2 Turn on your TV and AV receiver.
3 Select the appropriate input source
at the AV receiver that was used to
connect to chis player. Refer to the
owner’s manual for your component
for details.
4 Turn on this player.
5 Set the TV to the correct Video IN
channel. (e.g. EXT1, EXT2, AV1,
AVZ AUDIO/VIDEO, ecc. Refer
to the owner’s manual for your TV for
details.)
• The front display lights up and the
default screen appears on the TV.
10. Selecting a color system for your TV
This player it compatible with both NTSC and
PAL video formats. Select the color system
that matches your TV.
1 Press SETUP
2 Press ► repeatedly to select [VIDEO
SETUP PAGE].
3 Press ▲▼ to highlight [TVTYPE],
then press ►
TV TYPE
TV DISPLAY
BLACK LEVEL
CLOSED CAPTION
PICYURE SETTING
ADV PICTURE
PAL
NTSC
MULTI
VIDEO SETUP PAGE
Getting Started
Page 10
4 Press ▲▼ to highlight one of the options
below:
PAL
Select this if the connected TV is a PAL
system TV. It will change video signals
of NTSC discs and output them in PAL
format
NTSC
Select this if the connected TV is an
NTSC system. It will change video sig
nals of PAL discs and output them in
NTSC format.
MULTI
Select this if the connected TV is
compatible with both NTSC and PAL
formats (a multi-system TV). The output
format will be in accordance with the
video signals of the disc.
10.5 Select an item and press ENTER/OK.
Notes:
Before changing the current TV Standard
setting, ensure that your TV supports the
‘selected TV type’ system.
If the picture does not display properly on
your TV, wait 15 seconds for auto recover to
activate
Video output format
Note:
When Scan mode is set to PROGRESSIVE,
CVBS/S-video output will depend on the
format of disc
11. Setting Language Preference
You can select your own preferred language
settings. This player will automatically switch
to your preferred language for you whenever
you load a disc. If the language selected is
not available on the disc, the disc’s default
language will be used instead. The OSD
language in the system menu will remain once
selected.
Setting the OSD Language
1
Press SETUP
2 Press ◄► to select [GENERAL SETUP
PAGE].
3 Press ▲▼ to highIight [OSD LAN
GUAGE], then press ►
4 Press ▲▼ to select a language and press
ENTER/OK
DVD-AUDIO
DISK LOCK
PROGRAM
OSD LANGUAGE
SCREEN SAVER
SLEEP
DIV(X) VOD CODE
ENGLISH
FRANCAIS
ESPANOL
GENERAL SETUP PAGE
Sheet1
TV Type
Y Pb Pr
CVBS/
S-video
NTSC
PAL 576p 480i
NTSC 480p 480i
MULTI 480p 480i
PAL
PAL 576p 575i
NTSC 480p 575i
MULTI 576p 575i
Disc
Format
Output Format
(progressive ON)
Getting Started
Page 11
12. Setting the menu language
1 Press STOP
■
twice, then press SETUP.
2 Press ► repeatedly to select
[PREFERENCE PAGE].
3 Press ▲▼ to highlight the options below
one at a time, then press ►
• AUDIO (disc’s sound track)
• SUBTITLE (disc’s subtitles)
• DISC MENU (disc’s menu)
4 Press ▲▼ to select a language, then
press ENTER/OK
Note
If the language you want is not in the list:
Select [OTHERS], then use the numeric
keypad (0-9) on the remote control to
enter the 4-digit language code (see
“Language Code” on page 36) and press
ENTER/OK
13. Setting Speaker Channels
You can adjust the delay times (for center and
surround speakers only) and the volume level
for individual speakers. These adjustment let
you optimize the sound of your system to best
suit your surroundings and setup.
IMPORTANT:
Speaker settings are only available for
multi-channel audio output.
1 Press SETUP
2 Press ► repeatedly to select [AUDIO
SETUP PAGE].
3 Press ▲▼ to highlight [SPEAKER
SETUP], then press ►.
4 Enter a submenu by pressing ►.
5 Press ▲▼ to highlight one of the
options, then press OK.
Note !
If you have EC4.9 in your system, use the
more advanced speaker volume and balance
setting included in that system.
ANALOG OUTPUT
DIGITAL OUTPUT
HDMI OUTPUT
SPEAKER SETUP
CD UPSAMPLING
AUDIO SETUP PAGE
AUDIO
SUBTITLE
DISC MENU
PARENTAL
PBC
MP3 MPEG NAV
PASSWORD
DEFAULT
ENGLISH
CHINESE
FRENCH
SPANISH
PORTUGUESE
POLISH
ITALIAN
TURKISH
PREFERENCE PAGE
FRONT SPEAKER
CENTER SPEAKER
SURROND SP.
SUBWOOFER
SPEKERS VOLUME
SPEKERS DELAY
LARGE
SMALL
Getting Started
Page 12

12
6 Select the corresponding setup that t to
your installation for the Front, Center and
surround speakers.
OFF
(Only for CENTER and SURROUND
speakers)
Select when no Center speakers are connected
and you want the sound to be routed to the
left/right front speakers (Stereo).
LARGE
Select if the connected speakers can
reproduce low frequency signals below
120 Hz.
SMALL
Select if the connected speakers cannot reproduce low frequency signals below 120 Hz.
[SUB WOOFER]
ON
Select when a sub woofer is connected.
OFF
Select when no sub woofer is connected.
[SPEAKERS VOLUME]
Volume level setting for individual speakers
(-6dB ~ +6dB).
Note !
If you have EC4.9 in your system, use the
more advanced speaker volume and balance
setting included in that system.
[SPEAKERS DELAY]
Delay time settings in relation to the listening position distance for center and surround
speakers (0 MS~1S MS).
Press ◄► to adjust the setting that best suits
your surround sound needs.
Press ENTER/OK to conrm.
Notes:
Use a longer delay time setting when the surround speakers are closer to the listener then
the front speakers.
A test tone will be automatically generated to
help you judge the sound level of each speaker
CENTER
SURROUND L
SURROUND R
AUDIO SETUP PAGE
0 Ms
0 Ms
0 Ms
Getting Started
Page 13

13
14. Basic Playback
1 Press any button at the front panel to
wake up the unit
2 On the front panel, press and hold ▼ for
two second to open the disc loading tray.
3 Place the chosen discs in the tray, printed
side up.
4 Press ▲ to close and play.
The disc tray closes and playback starts
automatically.
Important:
• If the inhibit icon (x or X) appears on
the TV screen when a button is pressed,
the function for that button is not avail
able on the current disc or at the current
time.
• Depending on the DVD or VIDEO CD
disc, some operations may operate differ
ently or be restricted.
• Do not push on the disc tray or put any
objects other then discs on the disc tray.
Doing so may cause the disc player to
malfunction
15. General Operation
Unless otherwise stated, all operations
described here are carried out using the
remote control for this player.
Pausing playback
1 During playback, press PAUSE
;
• Playback will pause and the sound will
be muted.
2 Press PAUSE
;
again to select the next
picture frame.
3 To resume normal playback, press
PLAY ►
Selecting a track/chapter
Press 9 : or use the numeric keypad (0-9)
to key in a trac/chapter number.
During repeat playback of a track/chapter,
pressing 9 : will replay the same track/
chapter.
Searching backward/forward
Press and hold 9 :, then press
PLAY ► to resume normal playback.
While searching, pressing 9 : again will
increase the search speed.
Note:
For MP3, WMA and DivX®, the search
function allows you to search the track
currently being played.
Stopping playback
Press STOP/EJECT
■
Disc Operation - General
Page 14

14
Disc Operation - Repeat/Shufe
Repeat Function
Repeat (DVD-V)
Each time you press REPEAT, the front display changes is follows:
RPT CHAP: repeats the current chapter
↓
RPT TITLE: repeats the current title
↓
RPT DISC: repeats the entire disc
↓
RPT OFF: exits repeat mode
Repeat (CD)
When playing CD, each time you press
REPEAT, the front display changes as follows;
RPT TRACK: repeats the current track
↓
RPT DISC: repeats the entire disc
↓
RPT OFF Exit repeat mode
Repeating (AB)
1 While playing a disc, press A-B at your
chosen starting point.
2 Press A-B again at your chosen end point.
• A and B can be set only within the
same chapter/track.
• The section will now repeat continue
continuously.
3 To exit the sequence, press A-B.
Shufe
(Except DVD/VCD/SVCD)
With the Shufe function, you can play tracks
in random order. Each time you press SHUFFLE, the front display changes is follows:
SHF : repeats the current chapter
↓
SHF RPT : repeats the current title
↓
SHF OFF: exits repeat mode
1 During playback, press SHUFFLE
repeatedly to select between SHUFFLE
DISC, and SHUFFLE OFF.
• The selected mode appears in the dis-
play for several seconds.
• In SHUFFLE DISC mode, all tracks on
the disc currently playing are played
in random order. For Hybrid SA-CDs,
tracks on the SA-CD layer are played
by default.
Page 15

15
Using the disc menu
Depending on the disc, a menu may appear on
the TV screen once you load the disc.
To select a playback feature or item
• Use ◄►▲▼ or the numeric keypad
(0-9) on the remote control, then press
ENTER/OK to start playback.
To access or clear the menu
• Press MENU on the remote control.
Zooming in
This function allows you to enlarge the
picture on the TV screen and pan through
the enlarged picture.
1 During playback, press ZOOM
repeatedly to display the picture at
different scales.
• Use ◄►▲▼ to pan through the
enlarged picture.
• Playback will continue.
2 Press ZOOM repeatedly to return to the
original size.
Resuming playback from the last stopped
point
You can resume playback of the last 10 discs,
even if the disc was ejected or this player’s
power switched off.
1 Load one of the last 10 discs.
• LOADING appears.
2 Press PLAY► and the disc will be
played back from the last stopping point
To cancel resume mode
In stop mode, press STOP/EJECT
■
again.
On-Screen Display (OSD)
The OSD menu shows disc playback information (e.g., the ride or chapter number, elapsed
playing time or audio/ subtitle language). A
number of operations are possible without
interrupting disc playback.
1 During playback, press ON SCR.
• A list of available disc information
appears on the TV screen.
DVD
VCD/SVCD
2 Press ▲▼ to view the information and
press ENTER/OK to access the selected
item.
3 Use the numeric keypad (0-9) to input
the number/time or press ▲▼ to make
the selection, then press ENTER/OK to
conrm.
• Playback will change to the chosen time
or to the selected title/chapter/track.
Title/Chapter/Track selection (DVD/VCD)
1 Press ▲▼ to select [TITLE] or
[CHAPTER](DVD) or [TRACK](VCD)
2 Press ENTER/OK.
3 Select a title, chapter or track number
using the numeric keypad (0-9).
Disc Operation - Video Playback
MENU
TITLE 02/14
CHAPTER 02/14
AUDIO 5.1CH
SUBTITLE ENG
BITRATE 16 TOTAL ELAPSED 0:02/25
MENU
TRACK 02/14
DISC TIME 0:49:17
TRACK TIME 0:03:43
REPEAT OFF
BITRATE 16 TOTAL ELAPSED 0:02/25
Page 16

16
Time Search (DVD/VCD)
1 Press ▲▼ to select [TT TIME] or
[CHTIME] (DVD) or [TRACKTIME] or
[DISCTIME] (VCD).
• [TT TIME] refers to the total time
of the current title, and the [CH TIME]
refers to the total time of the current
chapter.
2 Press ENTER/OK.
3 Enter hours, minutes and seconds from
left to right using the numeric keypad
(0-9) (e.g. 0:34:27).
Audio/Subtitle/Angle (DVD discs)
You can change [AUDIO], [SUBTITLE] or
[ANGLE] if these functions are available on
the disc you are playing.
1 Press ▲▼ to select [AUDIO],
[SUBTITLE] or [ANGLE].
2 Press ENTER/OK
3 For Audio and Subtitle:
Press ▲▼ to highlight your selection
and press ENTER/OK
OR
For Angle:
Select an angle using the numeric keypad
(0-9).
Repeat/Time Display (DVD/VCD)
1 Press ▲▼ to select [REPEAT] or [TIME
DISP.].
2 Press ENTER/OK
3 Press ▲▼ to highlight your selection
and press ENTER/OK
Title/Group selection and time search
(DVD-Audio)
Each time you press ON SCREEN, the
front display changes as follows:
Display Example
GROUP 01/05 TRACK 01/15 0:10:00
GROUP 01 /O5 TRACK x/15
GROUP 01/05 TIME xx : xx
TRACK 01/15 TIME xx : xx
Displays the current group number/total
number, the current track number/total
number and elapsed playing time.
To select a track/group:
1 Use ◄► to highlight GROUP or
TRACK.
2 Enter a group/track number using the
numeric keypad (0-9).
3 Press ENTER/OK to conrm the select
tion, or wait for about 5 seconds without
performing any operation.
To search for a time in a group:
Enter hours, minutes and seconds from left
to right using the numeric keypad (0-9).
Note:
When searching (or a time in a group/track,
if you enter a time outside the total time for
the group/track currently being played,
x INPUT INVALID is displayed
Time display (CD)
Each time you press ON SCR, the time display changes as follows:
TOTAL ELAPSED
TOTAL REMAIN
TOTAL ELAPSED
SINGLE REMAIN
Disc Operation - Video Playback
Page 17

17
16. Special DVD Features
Playing by title
1 Press MENU
• The disc title menu appears on the TV
screen.
2 Use ◄►▲▼ or the numeric keypad
(0-9) to select a play option.
3 Press ENTER/OK to conrm.
Camera angle
Press ANGLE repeatedly to select the
desired angle.
Audio
Changing the audio language and/or
format. Press AUDIO repeatedly to select
an audio language.
Subtitles
Press SUBTITLE repeatedly to select a
subtitle language.
Disc Operation- Special DVD Features
Page 18

18
17. Special VCD and SVCD Features
Playback control (PBC)
For VCD with Playback control (PBC)
feature (version 2.0 only)
• Press MENU to toggle between PBC
ON and PBC OFF.
• If you select PBC ON, the disc menu (if
available) will appear on the TV.
• Use the 9 : or the numeric keypad
(0-9) to select a play option.
• During playback, pressing TOP
MENU/RETURN will return to the
menu screen (if PBC is selected).
If you want to skip the index menu and
playback directly from the beginning,
• Press MENU on the remote control to
switch off PBC.
Preview function
1 Press SCAN.
2 Press ▲▼ to highlight [TRACK
DIGEST],[DISC INTERVAL] or
[TRACK INTERVAL].
3 Press ENTER/OK to open one option.
TRACK DIGEST
This function minimizes the picture for every
track and displays six at a time on the screen
to help you view the tracks on the disc.
DISC INTERVAL
This function is used to divide a disc into
six parts at regular intervals, and display
them on one page to help you preview the
entire disc.
(Example of 6 thumbnails in the display)
1 Use ◄►▲▼ to select a track or use
the numeric keypad (0-9) to input the
selected track number next to [SELECT].
2 Press 9 : to open the previous or next
page.
3 Press ENTER/OK to conrm.
To quit the preview function
• Use ◄►▲▼ to highlight [EXIT] and
press ENTER/OK to conrm.
To return to the preview menu
• Use ◄►▲▼ to highlight [MENU]
and press ENTER/OK to conrm.
For CD:
• In stop mode, press SCAN on the
remote control.
• Each track will be played for a few
seconds.
SELECT DIGEST TYPE:
TRACK DIGEST
DISC INTERVAL
TRACK INTERVAL
Disc Operation - Special VCD and SVCD features
Page 19

19
18. SA-CDs (Super Audio CDs)
The SA-CD standard is based on Direct
Stream Digital (DSD) technology. This new
direct-stream digital format comprises a 1-bit
system that has a digital sampling frequency
64 times higher than that of conventional
audio CDs.
There are three types of SA-CD discs: singlelayer, dual-layer and hybrid discs. Each type
may contain up to two areas of recorded
information: a High Quality Stereo area and a
High Quality Multi-channel area.
• A single layer disc can contain both
information areas.
• A dual layer disc can contain both infor
mation areas. Double the information
can be stored on the disc, thanks to the
second layer.
• A hybrid disc can contain both informa
tion areas, and also a second, standard
CD layer, making it playable on
standard CD players,
On a hybrid disc we have:
CD layer that plays on any CD player
High Quality DSD Stereo or
High Quality DSD Multi-channel
Playing discs
1 Load the disc.
Playback starts automatically.
• The TV screen displays the current
playing status and track list for the
current playback area.
2 Playback stops at the end of the disc.
3 To stop playback, press STOP/EJECT
Changing the SA-CD playback area and
layer
You can change the SA-CD playback area
by pressing S.MODE, and then change the
playback layer by pressing AUDIO.
• On hybrid discs (with SA-CD and CD
layers), the player will always start
playing the SA-CD layer (multi-channel
area).
• You can switch between the SACD
multi-channel and SA-CD stereo areas by
pressing S.MODE
OR
1 Press ◄ and select the folder using ▲▼,
then press ENTER/OK.
2 Press ▲▼ to select a track.
3 Press ENTER/OK to conrm.
• To switch between the SA-CD layer
and the CD layer, press AUDIO while
playback is stopped.
• The SA-CD indicator lights only when
the SA-CD layer is selected.
Notes:
SA-CD Text is not supported.
You cannot change the analog output setting
during SA-CD playback (see “Audio Setup
Menu” on page 28).
5. Disc Operation - Super Audio Cd (SA-CD)
Page 20

20
Playing discs
1 Load the disc.
• Playback starts automatically.
• The TV screen displays the number of
tracks for selection and the current
playback status.
2 Playback stops at the end of the disc.
3 To stop playback, press STOP/EJECT
19. Playing MP3/DivX/JPEG/Kodak Pic ture CDs
General Operation
1 Load the disc.
• The disc reading time may exceed 30
seconds due to the complexity of the
directory/le conguration.
• The data disc menu appears on the TV
screen.
2 Playback will scart automatically. If not,
press PLAY ►
During playback, you can:
• Press 9 : to select another track/le in
the current folder.
• Press PAUSE II to pause playback.
Note:
It may not be possible to play certain MP3/
JPEG/DivX discs due to the conguration and
characteristics of the disc or condition of the
recording.
Selecting a folder and track/le
1 Press ▲▼ to select the folder and press
ENTER/OK to open the folder.
2 Press ▲▼ to select a track/le.
3 Press ENTER/OK to conrm.
• Playback will start from the selected le
to the end of the folder.
Special Picture Disc Features
1 Load the picture disc (Kodak Picture CD
or JPEG).
• For Kodak discs, the slide show begins.
• For JPEG discs, the picture menu
appears on the TV screen.
2 Press PLAY to start the slide-show.
5. Disc Operation - Audio CD / Picture CD
Page 21

21
20. Preview Function (JPEG)
This function displays the content of the current folder or the entire disc.
1 Press STOP/EJECT during playback.
• 12 thumbnail pictures appear on the TV
screen.
2 Press 9 : to display the other pictures
on the previous/next page.
3 Use ◄►▲▼ to highlight one of the
pictures and press ENTER/OK to start
playback.
4 Press MENU to return to the picture CD
menu.
Zooming pictures
1 During playback, press ZOOM
repeatedly to display the picture at
different scales.
2 Use ◄►▲▼ to view the zoomed
picture.
Playback with multi-angles
During playback, press ◄►▲▼ to rotate the
picture on the TV screen.
◄ : rotates the picture anti-clockwise
► : rotates the picture clockwise
▲ : ips the picture vertically
▼ : ips the picture horizontally
Scan Effect
• Press ANGLE repeatedly to choose a
scan effect.
• Various scan effects appear in the top
left corner of the TV screen.
Playing MP3 music and JPEG pictures
simultaneously
1 Load a disc that contains both music and
picture data.
• The disc menu appears on the TV
screen.
2 Select an MP3 track
3 During MP3 music playback, select a
picture from the TV screen and press
PLAY ►
• The picture les will be played back
one after another until the end of the
folder.
4 To quit simultaneous playback, press
MENU, then STOP/EJECT ■
Note:
- Some les on Kodak or JPEG discs may
be distorted during playback due to the
conguration and characteristics of the
disc.
5. Disc Operation - Audio CD / Picture CD
Page 22

22
21. General Setup menu
1 Press SETUP
2 Press ◄ ► to select the ‘General Setup’
icon.
3 Press ENTER/OK to conrm
Note!
Setup is carried out via the TV, enabling you
to customize this player to suit your own
particular requirements.
Locking/Unlocking the disc for viewing
Not all discs are rated or coded by the manufacturer of the disc. You can prevent playback
of a specic disc by locking the disc. You can
lock up to 40 discs on this player.
1 In’GENERAL SETUP PAGE’, press▲▼
to highlight [DISC LOCK], then press
PLAY ►.
LOCK
Select this to block playback of the cur
rent disc. Subsequent access to a locked
disc requires a six-digit password.
The default password is ‘000 000’ (see
“Changing the password” on page 35).
UNLOCK
Select this to unlock the disc and allow
future playback.
2 Press ▲▼ to select a setting, then press
ENTER/OK to conrm your selection.
22. Programming disc track and discs
Program: Track (except Picture CD/MP3/
WMA/DivX®)
You can playback the contents of a disc in the
order you want by programming the tracks to
be played. You can store up to 20 tracks.
1 In’GENERAL SETUP PAGE’,
press▲▼ to highlight [PROGRAM],
then press PLAY ► to select [FTS].
2 Press ENTER/OK to conrm
Setup Menu - General
1
2
3
4
5
6
7
8
9
10
04
10
11
-
-
-
-
-
-
-
PROGRAM TR (01-17)
EXIT NEXT
Page 23

23
23. To input your favorite tracks/chapt.
1 Use the numeric keypad (0-9) to enter a
valid track/chapter number.
2 Use ◄►▲▼ to move the cursor to the
next position.
• If the track number is more than ten,
press : to open the next page and
proceed with programming or,
• Use ◄►▲▼ to highlight [NEXT] on
the program menu, then press ENTER/
OK.
3 Repeat steps 1-2 to input another track/
chapter number.
To remove a track
4 Use ◄►▲▼ to move the cursor to
the track you want to remove.
5 Press ENTER/OK to remove this track
from the program menu.
Note:
On SA-CO discs. you can program tracks on
the CD layer.
Program: Disc
You can playback discs in the order you want
by programming the discs to be played. You
can store up to 5 discs.
1 In ‘GENERAL SETUP PAGE’, press
▲▼ to highlight [PROGRAM], then
press ► to select [FDS],
2 Press ENTER/OK to conrm.
To input your favorite discs
1 Use the numeric keypad (0-9) to enter a
valid disc number.
2 Use ◄►▲▼ to move the cursor to the
next position.
3 Repeat steps 1-2 to input another disc
number.
If you want to remove a disc
4 Use ◄►▲▼ to move the cursor to the
disc you want to remove.
5 Press 0 on the numeric keypad (0-9) to
remove this disc from the program menu.
To start program playback
Use ◄►▲▼ to highlight [START] on
the program menu, then press ENTER/
OK
• Playback starts for the selected tracks or
discs in the programmed sequence.
To exit program playback
Use ◄►▲▼ to highlight [EXIT] on the
program menu, then press ENTER/OK
Setup Menu - General
(1) DISC: -
(2) DISC: (3) DISC: (4) DISC: (5) DISC: -
START EXIT
FAVORITE DISC SELECTION
Page 24

24
24. OSD Language
This menu contains various language options
for the screen’s display language.
Screen Saver
This function is used to turn the screen saver
on or off.
1 In ‘GENERAL SETUP PAGE”,
press ▲▼ to highlight [SCREEN
SAVER], then press PLAY►.
ON
Select this if you wish to turn off the
TV screen when disc playback is stopped
or paused for more than 15 minutes.
OFF
Select chis to disable the screen saver
function.
2 Press ▲▼ to select a setting, then press
ENTER/OK to conrm your selection.
25. Sleep Timer
This feature automatically sets the DVD
player in standby mode after the period you
set has erased.
1 In ‘GENERAL SETUP PAGE’,
press▲▼ to highlight [SLEEP], then
press ►.
2 Press ▲▼ to select a setting.
• You can select from 15, 30, 45 and 60
minutes. Select [OFF] to cancel the
sleep timer function.
3 Press ENTER/OK to conrm your
selecttion.
26. DivX®VOD registration code
Yamaha provides you with the DivX®VOD
(Video On Demand) registration code that
allows you to rent and purchase videos using
the DivX
®
VOD service. For more informa-
tion, visit at www.divx.com/vod.
1 In’GENERAL SETUP PAGE’,
press ▲▼ to highlight [DIVX(R) VOD
CODE], then press ►.
• The registration code appears.
2 Press ENTER/OK to exit
3 Use the registration code to purchase or
rent the videos from DivX®VOD service
at www.divx.com/vod. Follow the instruc
tions and download the video onto a
CD-R for playback on this player.
Notes:
All videos downloaded from DivX
®
VOD can
only be played back on this player.
The time search function is not available
during DivX movie playback.
Setup Menu - General
Page 25

25
27. Audio Setup Menu
1 Press SETUP
2 Press ◄► to select the ‘Audio Setup’
icon.
3 Press ENTER/OK to conrm
28. Setting the analog output
Set Analog Output to match your player’s
playback capability.
1 In’AUDIO SETUP PAGE”, press ◄► to
highlight [ANALOG OUTPUT], then
press ►.
STEREO
Select this to change the channel output
to stereo, which only delivers sound from
the two front speakers and sub woofer.
VIRTUAL SURR
Select this to reproduce the surround
channels virtually.
MULTI-CHANNEL
Select this setting when using a multi
channel audio/( video) receiver with
6 channel inputs. In this mode, the player
performs DTS decoding or Dolby Digital
5.1-channel decoding when applicable,
and Dolby Pro Logic decoding on DVD Video, Video-CD and Audio CD discs
with 2-channel sound cracks. No Dolby
Pro Logic decoding is done which Super
Audio CD discs.
2 Press ◄► to select a setting, then press
ENTER/OK to conrm your selection.
29. Setting the digital output
The options included in Digital Audio are:
‘Digital Output’ and ‘LPCM Output’.
1 In ‘AUDIO SETUP PAGE’, press ▲▼
to highlight [DIGITAL AUDIO], then
press►.
2 Press ▲▼ to highlight an option.
3 Enter a submenu by pressing ►.
4 Move the cursor by pressing ▲▼ to high
light the selected item.
DIGITAL OUTPUT
Set the digital output according to your
optional audio component connections.
OFF
Select to turn off the digital output.
ALL
Select if you have connected your
DIGITAL AUDIO OUT to a multi channel decoder/receiver.
PCM ONLY
Select only if your receiver is not capable
of decoding multi-channel audio signals.
LPCM OUTPUT
Select if you have connected this player
to a PCM-compatible receiver via a
digital terminal, such as the coaxial or
optical terminals. In this case, you may
need to adjust LPCM Output. Discs are
recorded at a certain sampling rate. The
higher the sampling rate, the better the
sound quality.
48 kHz
Select to playback discs recorded at the
sampling rate of 48 kHz. All 96 kHz
PCM data streams (if available) will be
converted to 48 kHz.
96 kHz
Select to playback discs recorded at the
sampling race of 9 kHz. If the 96 kHz
disc is copy protected, the digital output
will automatically be converted to a
sampling rate of 48 kHz
Setup Menu - Audio
ANALOG OUTPUT
DIGITAL AUDIO
HDMI AUDIO
SPEAKER SETUP
CD UPSAMPLING
NIGTH MODE
AUDIO SETUP PAGE
Page 26

26
30. Setting the HDMI audio
If you are not using the HDMI audio output,
you should set this to [Off]. If the
monitor/receiver connected to this player
using HDMI does not support HDMI audio
signal input, set this to [Off].
In’AUDIO SETUP PAGE”, press▲▼ to
highlight [HDMI AUDIO], then press OK.
Notes:
• Super Audio CD signals cannot be
output using HDMI.
• This player can output following audio
signals using HDMI: 32/44.1/48 kHz.
2ch linear PCM signals and bit stream
signals {Dolby Digital, DTS and
MPEG).
• When audio signals are being output by
HDMI-compatible components, digital
output signals are muted.
ON
Select this to turn on the HDMI audio
output
OFF
Select this to turn off the HDMI audio
output
Speaker Setup
This menu contains setup options for
audio output so that you can set your
speakers to reproduce high quality sur
round sound. For details, see page 13.
CD upsampling info
This feature allows you to convert your
music CD to a higher sampling rate using
sophisticated digital signal processing for
better sound quality. If you have
activated the upsampling function, the
player will automatically switch to stereo
mode.
CD Upsampling
1 In AUDIO SETUPPAGE press ▲▼ to
highlight [CD UPSAMPLING], then
press OK
OFF
Select this to disable CD-upsampling.
88.2 kHz (X2)
Select this to convert the sampling rate of
CDs to twice that of the original.
176.4 kHz (X4)
Select this to convert the sampling rate of
CDs to four times that of the original.
2 Press AT to select a setting, then press
ENTER/OK to conrm your selection.
Note:
This setting is only valid for signals
output from the analog jacks.
Night Mode
In this mode, high volume output is softened
and low volume output brought upward to an
audible level. It is useful for watching your
favorite action movie without disturbing
others at night.
1 In AUDIOSETUP PAGE press ▲▼ to
highlight [NIGHT MODE], then press
OK
ON
Select this to level out the volume. This
feature is only available for movies with
Dolby Digital mode.
OFF
Select this when you want to enjoy the
full dynamic range of surround sound.
2 Press ▲▼ to select a setting, then press
ENTER/OK to conrm your selection.
Setup Menu - Audio
Page 27

27
31. Video Setup Menu
1 Press SETUP
2 Press ◄► to select ‘Video Setup’ icon,
3 Press ENTER/OK to conrm
TV Type
This menu contains options for selecting
a color system that matches your TV. For
details.
32. Setting the TV display
Set the aspect ratio of this player to match
the TV you have connected. The format
you select must be available on the disc. If
it is not, the TV display setting will not
affect the picture during playback.
1 In ‘VIDEO SETUP PAGE’, press ▲▼ to
highlight [TV DISPLAY], then press OK
2 Press ▲▼ to highlight one of the options
below:
4:3 PAN SCAN
Select this if you have a normal TV and
want both sides of the picture to bet
trimmed or formatted to t your TV
screen.
4:3 LETTER BOX
Select this if you have a normal TV. In
this case, a wide picture with black binds
on the upper and lower portions of the TV
screen will be displayed.
16:9
Select this if you have a wide-screen TV
3 Select an item and press OK.
33. Selecting the black level
If you set the TV type to NTSC, set Black
level shift to ON. This will improve the color
contrast during playback. The black level
setting has no affect if theTV type is set to
PAL.
1 In ‘VIDEO SETUP PAGE press ▲▼ to
highlight [BLACK LEVEL], then press
OK
ON
Select this to enhance the black level.
OFF
Select this for the standard black level
setting.
2 Press ▲▼ to select a setting, then press
ENTER/OK to conrm your selection.
Setup Menu - Video
VIDEO SETUP PAGE
TV TYPE
TV DISPLAY
BLACK LEVEL
CLOSED CAPTION
PICTURE SETTING
ADV PICTURE
Page 28

28
34. Closed Caption
Closed captions are data hidden in the video
signals of specic discs, and are invisible
without the use of a special decoder. The difference between subtitles and captions is that
subtitles are intended for hearing persons and
captions are for the hearing impaired. Subtitles rarely show all of the audio. For example,
captions show sound effects (e.g., “phone
ringing” and “footsteps”), while subtitles do
not. Before you select this function, please
ensure that the disc contains closed caption
information and your TV set also supports this
function.
1 In VIDEO SETUP PAGE, press ▲▼ to
highlight [CLOSED CAPTION], then
press OK
ON
To enable the closed caption function.
OFF
To disable the closed caption function.
2 Press ▲▼ to select a setting, then press
OK to conrm your selection.
35. Picture settings
This player comes with three predened
sets of picture color settings and one personal
setting that you can dene yourself. This function is available for interlace output only.
1 In VIDEO SETUP PAGE, press ▲▼
to highlight [PICTURE SETTING], then
press OK
STANDARD
Select this for the standard picture
setting.
BRIGHT
Select this to make the TV picture
brighter.
SOFT
Select this to make the TV picture softer.
PERSONAL
Select this to personalize your picture
color by adjusting the brightness,
contrast, tint and color (saturation).
2 Press ◄► to select a setting, then press
OK to conrm your selection.
3 If you select [PERSONAL], then proceed
to steps 4-7:
• The ‘PERSONAL PICTURE SETUP’’
menu appears.
4 Press ▲▼ to select one of the following
options.
BRIGHTNESS
Increase the value to brighten the picture
or vice versa. Zero (0) is the average
setting value.
SHARPNESS
Increase the value to sharpen the picture
or vice versa. Zero (0) is the average
setting value.
CONTRAST
Increase the value to sharpen the picture
or vice versa. Zero (0) is the average
contrast setting value.
TINT
Increase the value to darken the picture or
vice versa. Zero (0) is the average setting
value.
Setup Menu - Video
AUDIO SETUP PAGE
0
0
0
0
BRIGHTNESS
SHARPNESS
CONTRAST
TINT
COLOR
Page 29

29
COLOR
Increase the value to enhance the color
in your picture or vice versa. Zero (0) is
the average color setting value.
5 Press ◄► to adjust the setting that best
suits your personal preference.
6 Repeat steps 4-5 to adjust other color
features.
7 Press OK to conrm.
36. Advanced picture settings
This player allows you to ne-tune the
following video parameters. We recom
mend setting the aspect ratio on your TV
if the function is available.
1 In VIDEO SETUP PAGE, press ▲▼ to
highlight [ADV PICTURE], then press
OK.
2 Press ▲▼ to highlight an option.
6 Enter a submenu by pressing OK.
7 Move the cursor by pressing ▲▼ to
highlight the selected item.
DCDi
DCDi (Directional Correction Deinter lacing) computes and tracks the angle of
the screen edge to ll in the missing pixel
on the TV screen. DCDi will optimize the
image quality signicantly, especially
during the slow motion playback. This
function is available for progressive scan
output only.
OFF
Select to deactivate this function.
ON
Select to activate this function.
GAMMA
Enables you to adjust the intensity of the
picture non-linearly. A positive value
enables you to bring out low level detail
in dark scenes, while a negative value
emphasizes contrast. This function is not
available when using an HDMI-
compatible component.
-7 to +7
CHROMMA DELAY
The chroma (color) and luminance
(brightness) signals are not synchronized.
The Chroma Delay setting allows you to
adjust the advance delay of the chroma
signal to yield a perfectly clear picture.
This function is not available when using
an HDMI-compatible component
-3 to +3
PSCAN FORMAT
Set the aspect ratio of the projected
images on the screen. This function is
only available for progressive scan and
HDMI video output.
NL STRETCH
Select to display 4:3 image on the 16:9
screen without stretching.
4:3 PILLAR BOX
Select for display of 4:3 image on the
16:9 screen with non-linear stretching
(Center position of screen is stretched
less than the side).
OFF
No aspect ratio adjustment is made when
this option is selected.
Setup Menu - Video
Page 30

30
37. HDMI VIDEO
Enables you to adjust the resolution
depending on the monitor you are using.
You can use this function only when the
HDMI output terminal is connected to a
HDMI-compatible component.
Notes:
• While HDMI video signals are being
output, component video is muted.
• For settings other than [AUTO], HDMI
video output may not display properly if
a resolution output setting not supported
by the HDMI-compatible monitor you are
using is set.
To return to the initial setting:
1 Press STOP/EJECT to open the disc tray.
2 Press ◄
3 Press AUDIO
Do not perform this operation while playing
back a disc on this player.
• When [DIGITAL AUDIO] is set to
[OFF] on this player, PCM signals
are still output if [HDMI AUDIO] is set
to [ON] and a HDMI connection is
established between the monitor and
receiver.
• When [DIGITAL AUDIO] is set to
[ALL] on this player, PCM signals are
still output if the monitor and receiver
only support the PCM format.
480 P
480 progressive-scan video
576P
576 progressive-scan video
720P
720 progressive-scan video
1080I
1080 interlace video
AUTO
Setting Examples
Playback disc
Squeezed
16:9 video
4:3 Monitor
HDMI
videoTVshape
Monitor
Setting
PSCAN
format
Monitor
Setting
480p 16:9 Squeeze
Full
Through
Squeeze
OFF Normal
Through
Dolby
Dot
4:3
Through
Squeeze
576P
720p 16:9 Normal
Through
Dolby d
4:3 Pillar
Box
1080i
Auto The resolution is automatically selected to
match the monitor you are using. Set [TV TYP
], [PSCAN FORMAT] and your monitor setting to match the selected resolution.
• Depending on the monitor you are
using, the monitor setting names may
differ from those shown above.
• If the monitor you are using has an aspect
ratio of 4:3 and is only capable of either
480p or 576p resolution, select [4:3
PAN SCAN] or [4:3 LETTER BOX].
• If the aspect ratio you desire is not
avail able, select the most suitable
setting from:[4:3 PILLAR BOX],
[NLJ_SRETCH] and [OFF].
• Depending on the monitor you are using,
this setting may appear as “Squeeze” or
“Full”.
• 720P/1080I supports 60-Hz video
signals.
TRUE LIFE
Produces more dynamic picture by
increasing the picture contrast and the
color intensity. This function is available
for progressive scan output only.
0 to +5
Setup Menu - Video
Page 31

31
38. Preference Setup Menu
1 Press STOP to stop playback then press
SETUP.
2 Press ◄► to select the Preference Setup
icon.
3 Press OK to conrm.
Audio, Subtitle, Disc Menu
These menus contain various language
options for the audio, subtitles and disc
menus recorded on the DVD. For details,
see page 13.
Restricting playback with Parental
Control
Some DVDs may have a parental level
assigned to the complete disc or to cer
tain scenes on the disc. This feature lets
you set a playback limitation level. The
rating levels are from 1 to 6 and are coun
try dependent. You can prohibit the play
ing of certain discs that are not suitable
for your children or play certain discs in
alternative scenes for certain discs.
1 In PREFERENCE PAGE, press▲▼ to
highlight [PARENTAL], then press OK
2 Press ▲▼ to highlight a rating level for
the disc inserted and press ENTER/OK.
• To disable parental controls and have
all discs play, select [8 ADULT].
3 Use the numeric keypad (0-9) to enter
the six-digit password (see “Changing the
password” on page 35).
• DVDs that are rated above the level you
selected will not play unless you enter
the six-digit password.
Notes:
- VCD, SVCD, CD, SA-CD have no level
indication, so the parental control func
tion has no effect with these types of
discs. This also applies to most illegal
DVO discs.
- Some DVDs are not encoded with a
rating though the movie rating may be
printed on the disc cover. The rating level
feature does not work for such discs.
39. PBC (Playback Control)
You can set PBC to ON or OFF. This
feature is available only on Video CD 2.0
with the playback control (PBC) feature.
For details, see page 20.
Setup Menu - Preference
AUDIO
SUBTITLES
DISC MENU
PARENTAL
PBC
MP3/JPEG NAV
PASSWORD
DEAFAULT
PREFERANCE PAGE
AUDIO 1 KID SAFE
SUBTITLES 2 G
DISC MENU 3 PG
PARENTAL 4 PG 13
PBC 5 PGR
MP3/JPEG NAV 6 R
PASSWORD 7 NC 17
DEAFAULT 8 ADULT
PREFERANCE PAGE
Page 32

32
40. MP3/JPEG menu
MP3/JPEG Navigator can be set only if
the disc has recorded with a menu. It
allows you to select different display
menus for easy navigation.
1 In ‘PREFERENCE PAGE’, press ▲▼ to
highlight [MP3/JPEG NAV], then press
OK
WITHOUT MENU
Select this to display all the les
contained in the MP3/Picture CD.
WITH MENU
Select this to display only the folder
menu
of the MP3/Picture CD.
2 Press ▲▼ to select a setting, then press
OK to conrm your selection.
41 Changing the password
The same password is used for both
Parental Control and Disc Lock. Enter
your six-digit password when prompted
on the screen. The default password is
000 000.
1 In PREFERENCE PAGE, press ▲▼ to
high light [PASSWORD], then press OK
to select [CHANGE].
2 Press OK to enter the password
change page
3 Use the numeric keypad (0-9) to enter
your old six-digit password.
• When doing this for the rst time, enter
‘000 000’.
• If you forget your old six-digit
password, enter ‘000 000”.
4 Enter the new six-digit password.
5 Enter the new six-digit password a
second time to conrm.
• The new six-digit password is now
valid.
6 Press OK to conrm.
43. Restoring to original settings
Setting the DEFAULT function will reset
all options and your personal settings to
the factory defaults, except your
Password for Parental Control and Disc
Lock.
1 In PREFERENCE PAGE, press ▲▼ to
highlight [DEFAULT], then press OK to
select
2 Press OK to conrm.
• All settings are reset to the factory
defaults.
Setup Menu - Preference
AUDIO
SUBTITLES
DISC MENU
PARENTAL
PBC
MP3/JPEG NAV
PASSWORD CHANGE
DEAFAULT
PREFERANCE PAGE
OLD PASSWORD
NEW PASSWORD
CONFIRM PWD
OK
Page 33

33
Output impedance 100 ohm
Output level Balanced, 0dBFs 4.5Vrms
Noise oor 20 - 20 kHz < - 130 dB
Frequency deviation 20 - 20 kHz < 0.05 dB
Channel separation > 110 dB
THD + N 20 - 20 kHz < 0.002%
IMD TBD
Digital/Analog Conversion 24 bit, 192 kHz
Compatible formats CD, HDCD, SACD, DVD, MP3,
SVCD, VCD, WMA,DIVX,
Picture CD, JPEG
Dynamic Range
Dimensions W x D x H 483 x 410 x 75 mm
19 x 16.1 x 3 inches
Weight 14 kg
Power consumption No Load or signal 60W
Audio Outputs 6 ch. balanced line out (XLR)
Digital Outputs 75 ohm S/PDIF RCA
Specications are subject to change without further notice.
Technical data
Page 34

34
Analog: Sound that has not been turned Into numbers.
Analog sound varies, while digital sound has specic
numerical values. These jacks send audio through two
channels,the left and right.
Aspect ratio: The ratio of vertical and horizontal sizes of
a displayed mage.The hortzontal vs. vertical ratio of conventional TVs. is 4:3, and that of widescreens is 16:9.
AUDIO OUT Jacks: Jacks on the back of the DVD System
that send audio to another system (TV. Stereo. etc.).
Bit Rite: The amount of data used to hold a given length
of music, measured In kilobits per seconds, or kbps, Or
the speed at which you record. Generally the higher the bit
rate, or the higher the recording speed, the better the sound
qualty. However, higher bit rates use more space on a Disc.
Chapter: Sections of a picture or a music piece on a DVD
tha[ are smaller [han [kles.A[klels composed of several
chapters. Each chapter Is assigned a chapter number
enabling you to locate the chapter you want.
ComponencVideo Out Jacks: Jacks on the back of the
DVD System that send high-quality video to a TV that has
Component Video In jacks (R/G/B.Y/Pb/Pr. etc).
Disc menu: A screen display prepared for allowing selection
of Images, sounds, subtitles, multi-angles, etc., recorded on
a DVD.
Digital: Sound that has been converted Into numerical
values. Digital sound Is available when you use the DIGITAL AUDIO OUT COAXIAL or OPTICAL jacks. These
jacks send audio through multiple channels. Instead of just
two channels as analog does.
DivX 3.11/4x/5x:The DivX code is a patent panding,
MPEG-4 based video compression technology, developed
by DivXNetworks.Inc, that can shrink digital video to sizes
small enough to be transported over the Internet,while
maintaining high visual quality.
Dolby Digital: A surround sound system developed by
Dolby Laboratories containing up to six channels of digital
audio (front left and right, surround left and right, center and
subwoofer).
DTS: Digital Theatre Systems. This Is a surround sound
system, but it is different from Dolby Digital. The formats
were developed by different companies.
JPEG: A very common digital still picture format. A
still-picture data compression system proposed by the Joint
Fotographic Expert Group, which features small decrease in
image quality in spite of it’s high compression ratio.
MP3: A le format with a sound data compression system.
MP3 is the abbreviation of Motion Picture Experts Group1
(or MPEG-1) Audio Layer 3. By using MP3 format, one
CD-R or CD-RW can contain about 10 times as much data
volume as a regular CD can.
Multichannel: DVD is specied to have each sound track
constitute one sound eld. Multichannel refers to a structure
of sound tracks having three or more channels
Parental Control: A function of the DVD to limit playback
of the disc by the age of the users according to the Imitation
level in each country. The limitation varies from disc to
disc. When it is activated, playback will be prohibited if the
software’s level is higher than the user-set level.
PCM (Pulse Code Modulation): A system for converting
analog sound signal to digital signal for later processing
with no data compression used in conversion.
Playback ControI (PBC): Refers to the signal recorded on
video CDs or SVCDs for controlling reproduction. By using
menu screens recorded on a Video CD or SVCD that supports PBC,you can enjoy Interactive-type software as well
as software having a search function.
Progressive Scan: It displays all the horizontal lines of a
picture at one time, as a signal frame. This system can convert the Interfaced video from DVD Into progressive format
for connection to a progressive display. It dramatically
Increases the vertical resolution.
Region code: A system for allowing disc to be played back
only in the region designated beforehand. This player will
only play discs that have compatible region codes. You
can nd the region code of your player by looking on the
product label. Some discs are compatible with more than
one region (or ALL regions).
S-video: Produces a clear picture by sending separate
signals for the luminance and the color. You can use S-video
only if your TV has S-video In jack.
Super Audio CD (SA-CD): This audio format Is based
upon the current CD standards but Includes a greater
amount of information that provides higher quality sound.
There are three types of discs: single layer, double layer and
hybrid discs. The hybrid disc contains both standard audio
CD and Super Audio CD information.
Surround: A system for creating realistic three dimensional
sound elds full of realism by arranging multiple speakers
around the listener.
Tide: The longest section of a picture or music feature on
DVD, music. etc.. In video software, or the entire album in
audio software. Each title is assigned a title number enabling
you to locate the title you want.
VIDEO OUT jack: Jack on the back of the DVD System
that sends video to a TV
44. Glossary
Page 35

35
Contents
1. The story of Electrocompaniet 3
2. The Design Concept 4
3. General Information 5
5. Unpacking the EMP 1 6
6. Connectors on the rear side 7
7. Remote Control 8
8. Remote Control, Inserting batteries 9
9. Turning on the Power 9
10. Selecting a color system for your TV 9
11. Setting Language Preference 10
12. Setting the menu language 11
13. Setting Speaker Channels 11
14. Basic Playback 13
15. General Operation 13
16. Special DVD Features 17
17. Special VCD and SVCD Features 18
18. SA-CDs (Super Audio CDs) 19
20. Preview Function (JPEG) 21
21. General Setup menu 22
22. Programming disc track and discs 22
23. To input your favorite tracks/chapt. 23
25. Sleep Timer 24
26. DivX®VOD registration code 24
27. Audio Setup Menu 25
28. Setting the analog output 25
29. Setting the digital output 25
31. Video Setup Menu 27
32. Setting the TV display 27
33. Selecting the black level 27
34. Closed Caption 28
35. Picture settings 28
36. Advanced picture settings 29
37. HDMI VIDEO 30
38. Preference Setup Menu 31
39. PBC (Playback Control) 31
40. MP3/JPEG menu 32
41 Changing the password 32
43. Restoring to original settings 32
44. Glossary 34
Page 36

Made in Norway
W W W .ELECTRO COM PANIET.NO
 Loading...