

Page 1
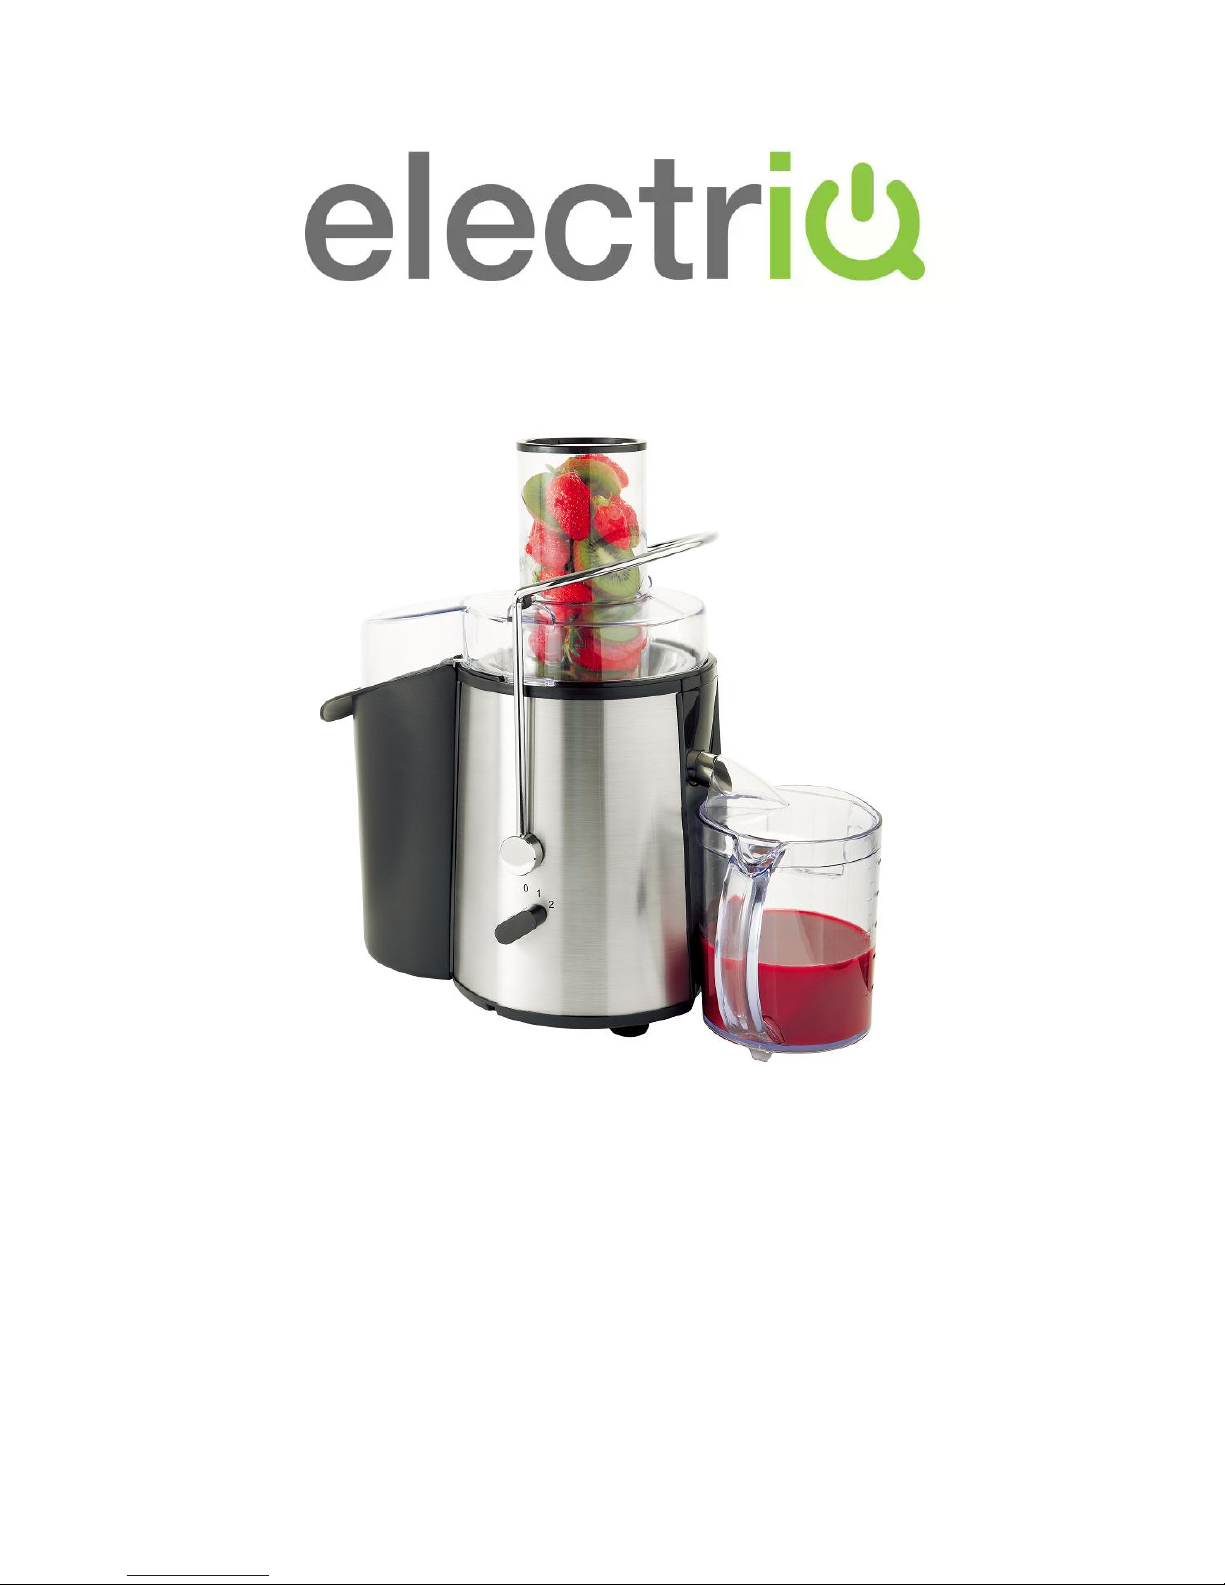
WF1000 Whole Fruit Power Juicer
USER MANUAL
Thank you for choosing ElectrIQ.
P
lease read this user manual before using this power juicer
and keep it safe for future reference.
Visit our page www.electrIQ.co.uk for
our entire range of Intelligent Electricals
Page 2

Contents
SAFETY INSTRUCTIONS 3
Quick Reference Guide 4
Assembly and Operation 5
Fruits and Vegetables Nutrition Tables 9
Cleaning and maintenance 13
Troubleshooting 14
2
Page 3

SAFETY INSTRUCTIONS
Important
• Carefully read the instructions before operating the unit
• This appliance is for indoor use only.
• Rating: This unit must be only connected to a 220-240 V / 50 Hz earthed outlet.
Always check the rating label against your electrical supply.
• If you are in any doubt about the suitability of your electrical supply have it
checked and, if necessary, retested by a qualified electrician.
• This juicer has been tested and is safe to use. However, as with any electrical
appliances - use it with care.
• Disconnect the power plug from socket before dismantling, assembling or
cleaning.
• Do not clean the unit by spraying it or immersing it in water.
• Never operate this appliance if the cord or plug is damaged. Ensure the power
cord is not stretched or exposed to sharp object/edges.
• Do not pull the mains cable to disconnect the mains plug from the mains.
• Do not use the appliance if any part or any accessory is damaged or defective.
• A damaged supply cord or plug should be replaced by the manufacturer or a
qualified electrician in order to avoid a hazard.
• Avoid touching any moving parts of the appliance.
• Never insert fingers, or any other objects apart from the food pusher though
the feeder
• This appliance is not intended for use by persons (including children) with
reduced physical, sensory or mental capabilities. It is also not intended for use by those
with a lack of experience and knowledge, unless they have been given supervision or
instruction concerning the use of the appliance by a person responsible for their safety.
• Do not leave children unsupervised with this appliance.
• Any service other than regular cleaning should be only performed by an
authorized service representative. Failure to comply could result in a voided warranty.
• Do not use the appliance for any other purposes than its intended use.
• Always place the unit on a dry and stable surface.
• Do not use the appliance in places where humidity is very high (>80%RH)
• Do not immerse the appliance in water or other liquids. If the appliance is
immersed in water or other liquids by mistake, do not touch the appliance with your
hands. Immediately remove the mains plug from the wall socket. If the appliance is
immersed in water or other liquids, discard it
Unit Safety Protection and Performance Tips
• Make sure the unit is correctly assembled and the safety locks engaged
• When juicing take regular breaks to avoid motor overheating
• Always clean the juicer immediately after use
3
Page 4
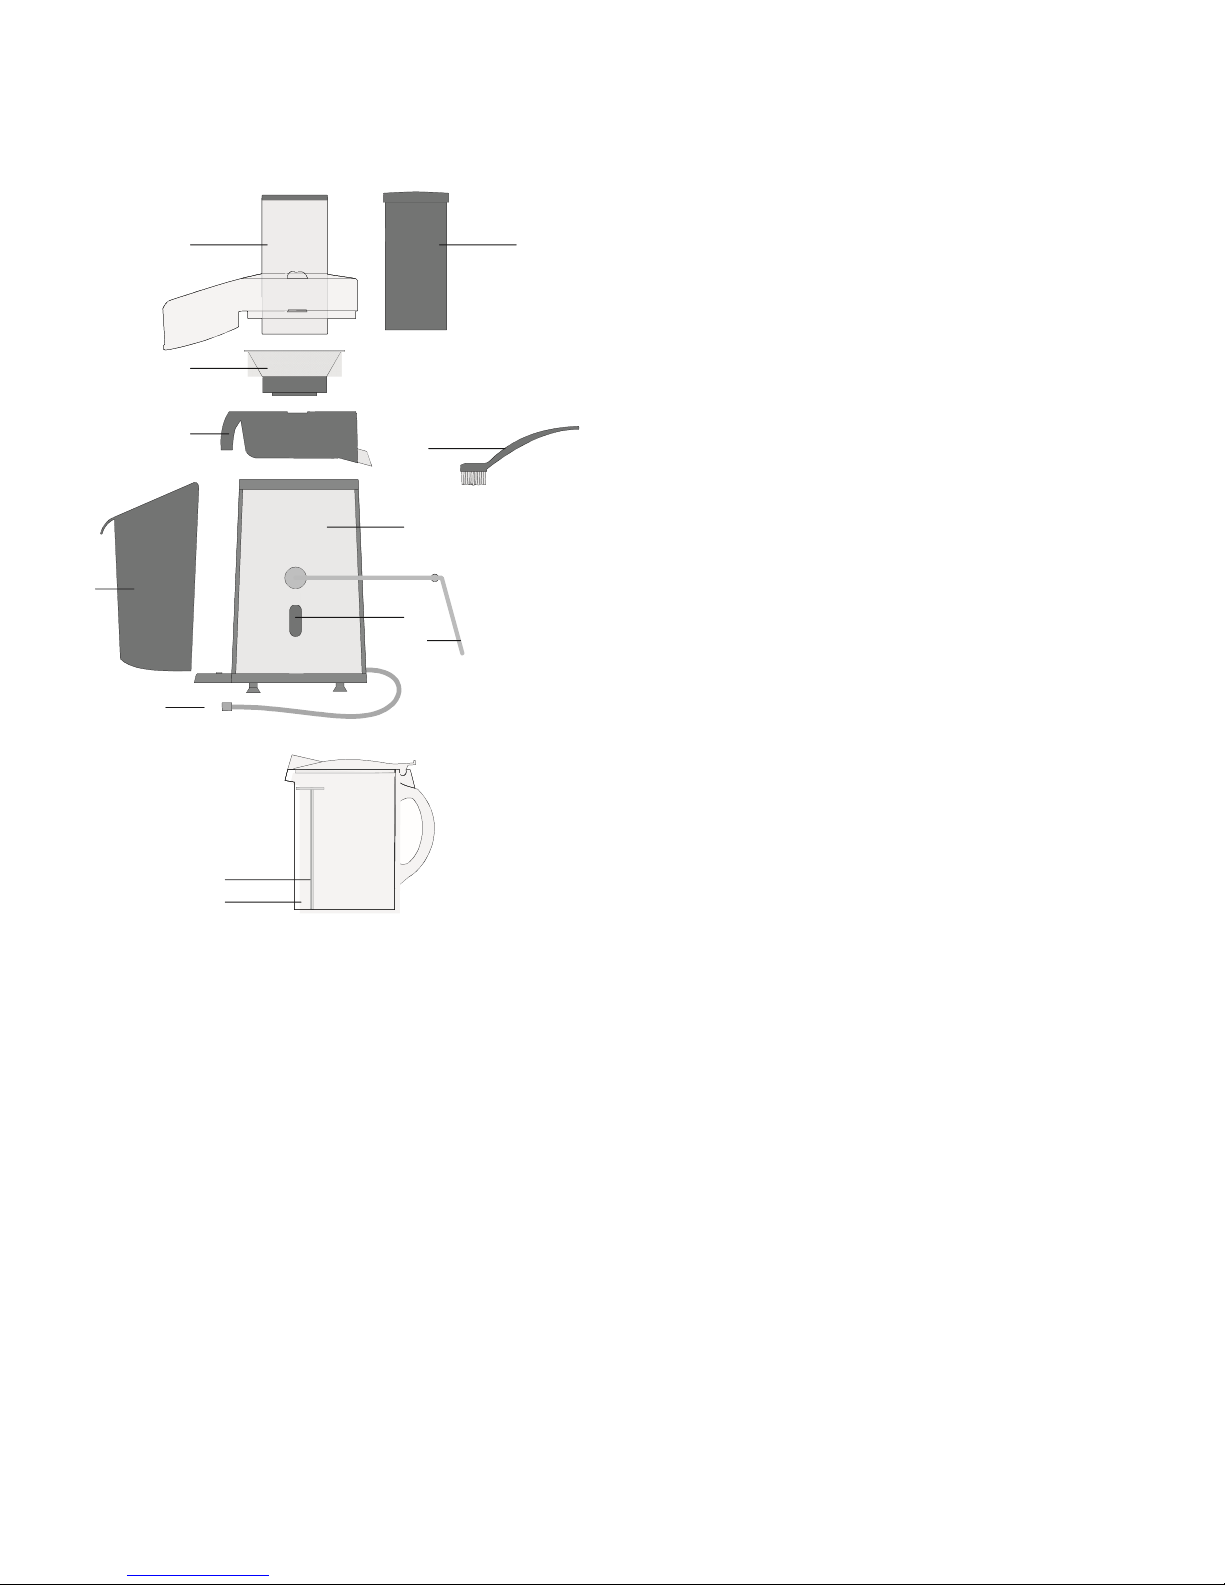
Quick Reference Guide
Your ElectrIQ juicer has been designed for extracting juice from fruits and
vegetables. It is recommended for power juicing. This juicer is suitable exclusively
for domestic use.
Initial use
Preparation
• Clean the appliance before first use
• Clean the accessories.
Refer to the section "Cleaning and maintenance"
9
8
10 11
7
6
0
1
2
5
4
12
1
3
2
1. Power cord
2. Juice jug
3. Juice foam separator
4. Safety lock
5. Power switch with speed
control
6. Juicer main body
7. Pulp container
8. Juice collector
9. Juicing blade
10. Lid with feeding tube
11. Pusher
12. Cleaning brush
4
Page 5
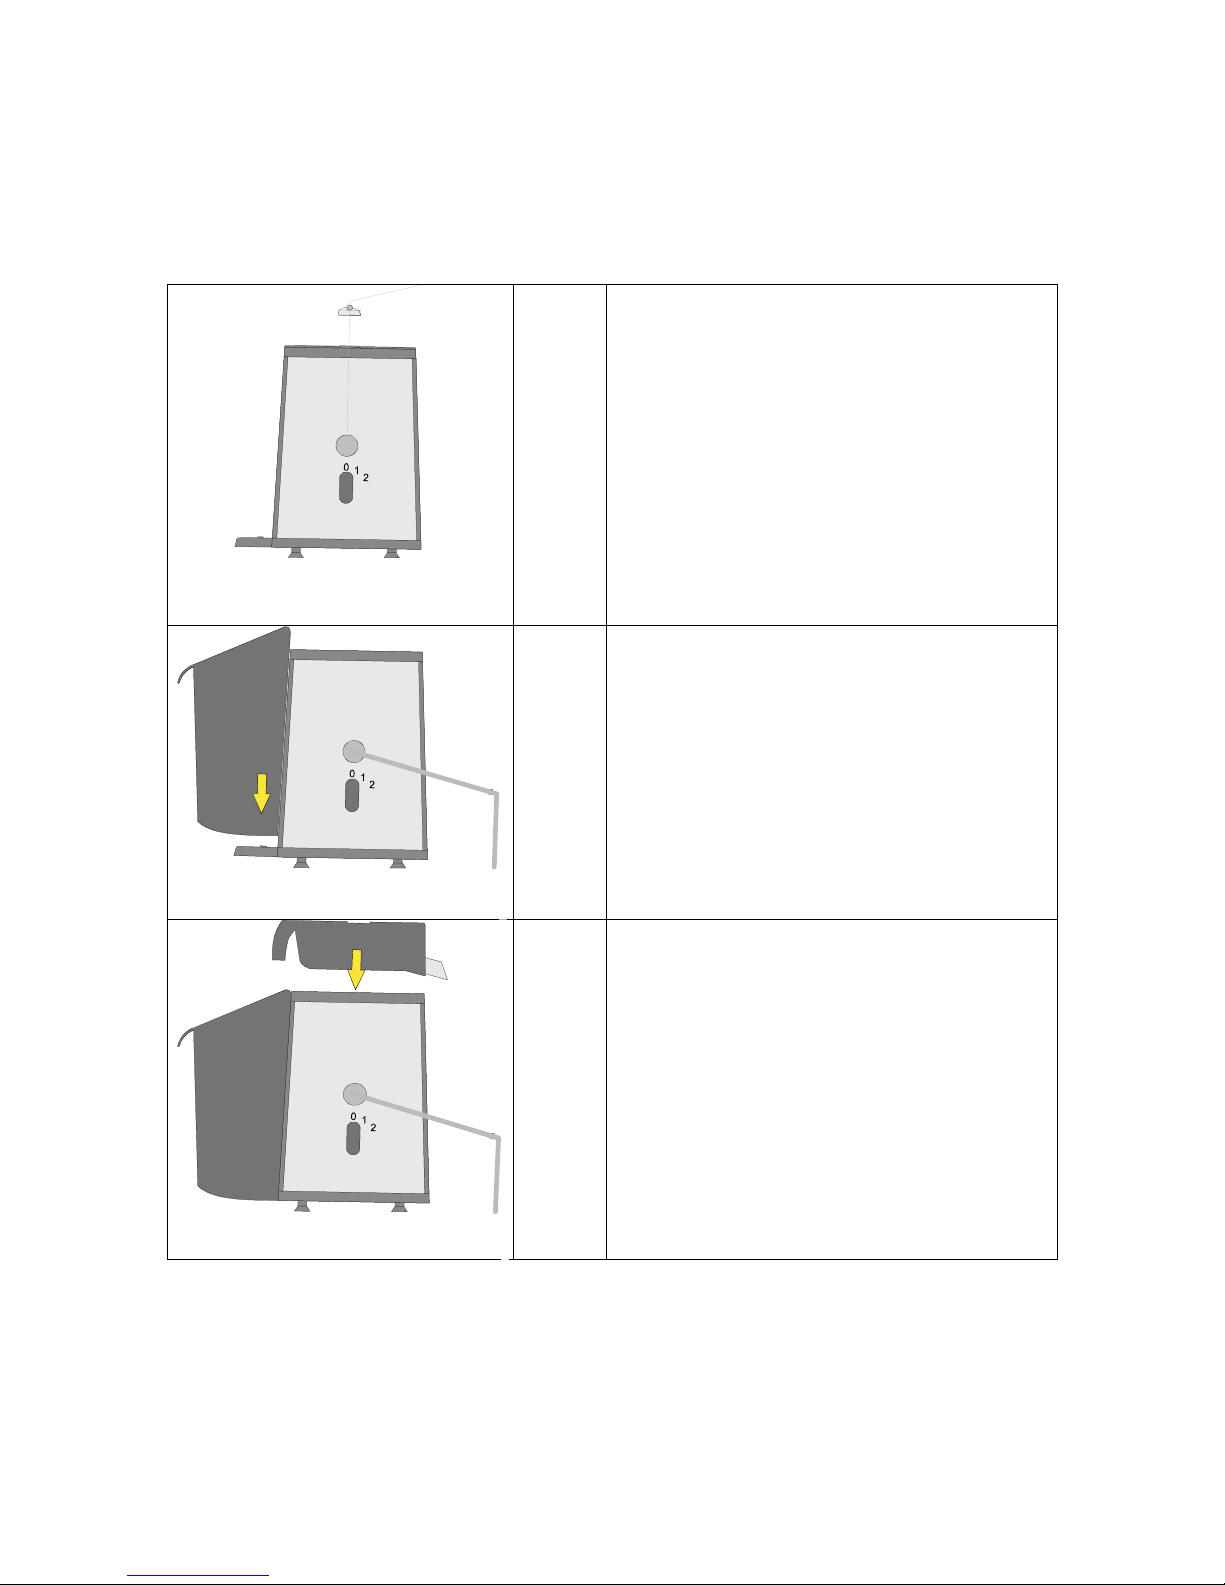
Assembly and Operation
Before assembly or disassembly, switch off the appliance, remove the mains plug
from the wall socket and wait until the appliance has cooled down.
1
Place the base of the appliance on a
stable and flat surface.
2
Attach the pulp container (7) to the base.
Pay attention to the recess on the base
of the pulp container.
3
Insert the Juice collector (8) into the
matching recesses in the base. Press the
collector insert firmly downwards, in
order to make contact with the motor.
5
Page 6
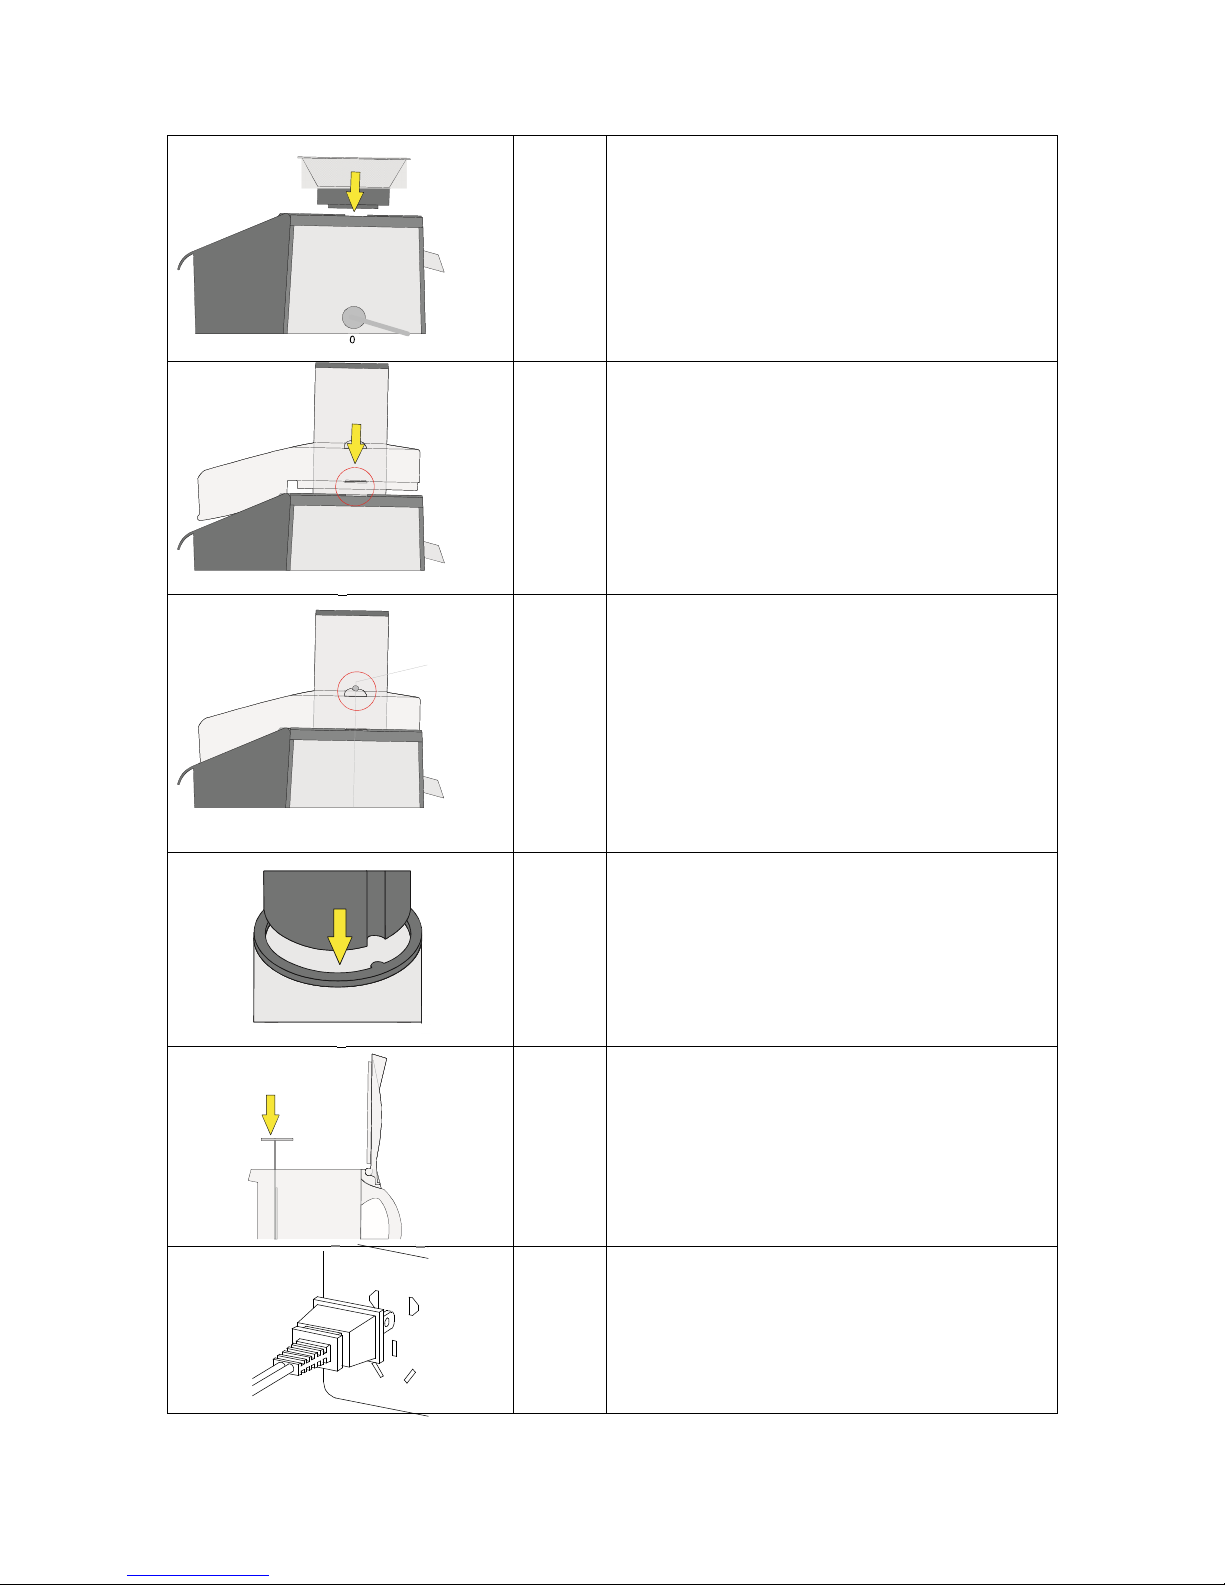
4
Place the juicing blade (9) on the juice
collector (8). Ensure that the blade (9)
clicks in and is not just sitting above the
collector insert.
5
Firmly attach the lid with the feed tube
(10). Pay attention to the catch on the
juice collector (8).
6
Raise the safety lock (4) firmly upwards
until it engages in the two catches on the
lid (10). Make sure the safety lock is
properly installed securing the juice
collector (8) and the lid with feeding
tube (10) in place.
7
Align the pusher (11) with the feed tube
(10). The feed tube has a catch that
guides the feeder. The pusher can only
be inserted in this way.
8
Open the lid of the juice container (2)
and insert the foam separator (3) if you
want to remove the foam from the juice.
The juicer is ready to use now
9
Insert the mains plug into the wall
socket.
6
Page 7

10
WF1000 is a whole fruit juicer. You can
juice whole apples, carrots and peeled
oranges. If the fruits or vegetables are
larger than the feeding tube please cut
them into pieces that fit into the feed
tube (10).
11
Switch on the appliance with the
desired setting (see Switching On/ Off)
12
Use the pusher (11) to press the pieces
of fruit and vegetables through the
feeding tube (10). Do not exert too much
pressure on the pusher.
13
If necessary, empty the juice collector
(8) and the pulp jug (7).
14
After use, switch off the appliance,
remove the mains plug from the wall
socket and wait until the appliance has
cooled down before cleaning
7
Page 8

Switching On / Off
Notes:
- Do not leave the appliance switched on continuously for more than one minute.
After one minute, switch off the appliance and allow it to cool down for two
minutes before switching it on again. Allow the appliance to cool down completely
after every three cycles of "one minute on / two minutes off".
- If the appliance stops working, possibly due to its thermal protection system,
switch off the appliance and allow it to cool down for 20-30 minutes before
switching it on again.
• To switch on the appliance to continuous low speed mode, turn the speed
control knob (1) to the "1" position. The setting is suitable for processing soft
fruits and vegetables (e.g. peaches, seedless watermelons, seedless grapes,
raspberries, tomatoes and cucumbers).
• To switch on the appliance to continuous high speed mode, turn the speed
control knob (1) to the "2" position. The setting is suitable for processing hard
fruits and vegetables (e.g. apples, pears, carrots, cauliflower and broccoli).
• To switch off the appliance, turn the speed control knob (1) or (2) to the
"O" position.
Notes:
• Do not insert hands or any objects into the feeding tube to press food
ingredients. Always use the provided pusher. Do not exert too much pressure on
the pusher.
• If the appliance starts to vibrate strongly, switch off the appliance and clean
the juicing blade.
• Only operate the appliance when the pulp jug is placed under the pulp
outlet. Regularly empty the pulp jug when processing larger quantities of fruit or
vegetables. Empty the pulp jug when it is full.
• Only operate the appliance when the juice jug is placed under the juice
outlet. Regularly empty the juice jug when processing larger quantities of fruit or
vegetables. Empty the juice jug when it is full.
8
Page 9

Juicing
• Preferably use fresh fruits and vegetables, as they contain more juice. Cold
fruits and vegetables will produces more and better quality juice.
• Do not use fruits or vegetables with hard seeds or thick skins. Always
remove hard seeds or thick skins.
• When processing harder fruits or vegetables (e.g. carrot), use very small
pieces only and do not exert more pressure on the pusher to prevent jamming of
the appliance.
• Very hard fruits, fibrous fruits and fruits with starch (e.g. pineapple cores,
bananas, mangos, papayas, avocados, dates and figs) are not suitable for the juice
extractor.
• Use a slow juicer, food processor, blender or hand blender to process very
hard fruits, fibrous fruits and fruits with starch. Very hard vegetables, fibrous
vegetables and vegetables with starch (e.g. potatoes and sugar cane) are not
suitable for the juice extractor. Use a slow juicer, food processor, blender or hand
blender to process very hard vegetables, fibrous vegetables and vegetables with
starch. It is recommended to drink the juice immediately after extraction, as the
juice will quickly lose its colour and nutritional value. Add a little lemon juice or
lime juice to slow down the oxidation process. Refer to the following tables for the
nutritional values of a wide range of fruits and vegetables.
Vegetables
Nutrition Facts
Raw, edible weight portion. Percent Daily Values (%DV) are based on a 2,000 calorie diet.
Vegetables
Serving Size
(gram weight/
ounce weight)
Calories Calories
from Fat
Total Fat Sodium Potassium Total
Carbo-hydrate
Dietary
Fiber
Sugars Protein Vitamin A Vitamin C Calcium Iron
(g)
(%D
V)
(mg) (%DV) (mg) (%DV) (g) (%DV) (g) (%DV) (g) (g) (%DV) (%DV) (%DV) (%DV)
Asparagus
5 spears
(93 g/3.3 oz)
20 0 0 0 0 0 230 7 4 1 2 8 2 2 10 15 2 2
Bell Pepper
1 medium
(148 g/5.3 oz)
25 0 0 0 40 2 220 6 6 2 2 8 4 1 4 190 2 4
Broccoli
1 medium
stalk
(148 g/5.3 oz)
45 0 0.5 1 80 3 460 13 8 3 3 12 2 4 6 220 6 6
Carrot
1 carrot, 7"
long, 1 1/4"
30 0 0 0 60 3 250 7 7 2 2 8 5 1 110 10 2 2
9
Page 10

dia
meter
(78 g/2.8 oz)
Cauliflower
1/6 medium
head
(99 g/3.5 oz)
25 0 0 0 30 1 270 8 5 2 2 8 2 2 0 100 2 2
Celery
2 medium
stalks
(110 g/3.9 oz)
15 0 0 0 115 5 260 7 4 1 2 8 2 0 10 15 4 2
Cucumber
1/3 medium
(99 g/3.5 oz)
10 0 0 0 0 0 140 4 2 1 1 4 1 1 4 10 2 2
Green (Snap)
Beans
3/4 cup cut
(83 g/3.0 oz)
20 0 0 0 0 0 200 6 5 2 3 12 2 1 4 10 4 2
Green
Cabbage
1/12 medium
head
(84 g/3.0 oz)
25 0 0 0 20 1 190 5 5 2 2 8 3 1 0 70 4 2
Green Onion
1/4 cup
chopped
(25 g/0.9 oz)
10 0 0 0 10 0 70 2 2 1 1 4 1 0 2 8 2 2
Iceberg
Lettuce
1/6 medium
head
(89 g/3.2 oz)
10 0 0 0 10 0 125 4 2 1 1 4 2 1 6 6 2 2
Leaf Lettuce
1 1/2 cups
shredded
(85 g/3.0 oz)
15 0 0 0 35 1 170 5 2 1 1 4 1 1 130 6 2 4
Mushrooms
5 medium
(84 g/3.0 oz)
20 0 0 0 15 0 300 9 3 1 1 4 0 3 0 2 0 2
Onion
1 medium
(148 g/5.3 oz)
45 0 0 0 5 0 190 5 11 4 3 12 9 1 0 20 4 4
Potato
1 medium
(148 g/5.3 oz)
110 0 0 0 0 0 620 18 26 9 2 8 1 3 0 45 2 6
Radishes
7 radishes
(85 g/3.0 oz)
10 0 0 0 55 2 190 5 3 1 1 4 2 0 0 30 2 2
Summer
Squash
1/2 medium
(98 g/3.5 oz)
20 0 0 0 0 0 260 7 4 1 2 8 2 1 6 30 2 2
Sweet Corn
kernels from 1
medium ear
(90 g/3.2 oz)
90 20 2.5 4 0 0 250 7 18 6 2 8 5 4 2 10 0 2
10
Page 11

Sweet Potato
1 medium, 5"
long, 2"
diameter
(130 g/4.6 oz)
100 0 0 0 70 3 440 13 23 8 4 16 7 2 120 30 4 4
Tomato
1 medium
(148 g/5.3 oz)
25 0 0 0 20 1 340 10 5 2 1 4 3 1 20 40 2 4
Most vegetables provide negligible amounts of saturated fat, trans fat, and cholesterol.
Fruits
Nutrition Facts
Raw, edible weight portion. Percent Daily Values (%DV) are based on a 2,000 calorie diet.
Fruits
Serving Size
(gram weight/
ounce weight)
Calories
Calories
from Fat
Total Fat
Sodium
Potassium
Total
Carbo-
hydrate
Dietary
Fiber
Su
ga
rs
Prot
ein
Vita
min
A
Vita
min
C
Calci
um
Iron
(g)
(%D
V)
(mg)
(%D
V)
(mg)
(%D
V)
(g)
(%D
V)
(g)
(%D
V)
(g) (g)
(%DV) (%DV) (%DV) (%D
V)
Apple
1 large
(242 g/8 oz)
130 0 0 0 0 0 260 7 34 11 5 20 25 1 2 8 2 2
Avocado
California,
1/5 medium
(30 g/1.1 oz)
50 35 4.5 7 0 0 140 4 3 1 1 4 0 1 0 4 0 2
Banana
1 medium
(126 g/4.5 oz)
110 0 0 0 0 0 450 13 30 10 3 12 19 1 2 15 0 2
Cantaloupe
1/4 medium
(134 g/4.8 oz)
50 0 0 0 20 1 240 7 12 4 1 4 11 1 120 80 2 2
Grapefruit
1/2 medium
(154 g/5.5 oz)
60 0 0 0 0 0 160 5 15 5 2 8 11 1 35 100 4 0
Grapes
3/4 cup
(126 g/4.5 oz)
90 0 0 0 15 1 240 7 23 8 1 4 20 0 0 2 2 0
Honeydew
Melon
1/10 medium
melon
(134 g/4.8 oz)
50 0 0 0 30 1 210 6 12 4 1 4 11 1 2 45 2 2
Kiwifruit
2 medium
(148 g/5.3 oz)
90 10 1 2 0 0 450 13 20 7 4 16 13 1 2 240 4 2
Lemon
1 medium
(58 g/2.1 oz)
15 0 0 0 0 0 75 2 5 2 2 8 2 0 0 40 2 0
Lime
1 medium
(67 g/2.4 oz)
20 0 0 0 0 0 75 2 7 2 2 8 0 0 0 35 0 0
Nectarine
1 medium
(140 g/5.0 oz)
60 5 0.5 1 0 0 250 7 15 5 2 8 11 1 8 15 0 2
11
Page 12

Orange
1 medium
(154 g/5.5 oz)
80 0 0 0 0 0 250 7 19 6 3 12 14 1 2 130 6 0
Peach
1 medium
(147 g/5.3 oz)
60 0 0.5 1 0 0 230 7 15 5 2 8 13 1 6 15 0 2
Pear
1 medium
(166 g/5.9 oz)
100 0 0 0 0 0 190 5 26 9 6 24 16 1 0 10 2 0
Pineapple
2 slices,
3" diameter,
3/4" thick
(112 g/4 oz)
50 0 0 0 10 0 120 3 13 4 1 4 10 1 2 50 2 2
Plums
2 medium
(151 g/5.4 oz)
70 0 0 0 0 0 230 7 19 6 2 8 16 1 8 10 0 2
Strawberries
8 medium
(147 g/5.3 oz)
50 0 0 0 0 0 170 5 11 4 2 8 8 1 0 160 2 2
Sweet Cherries
21 cherries; 1
cup
(140 g/5.0 oz)
100 0 0 0 0 0 350 10 26 9 1 4 16 1 2 15 2 2
Tangerine
1 medium
(109 g/3.9 oz)
50 0 0 0 0 0 160 5 13 4 2 8 9 1 6 45 4 0
Watermelon
1/18 medium
melon;
2 cups diced
pieces
(280 g/10.0 oz)
80 0 0 0 0 0 270 8 21 7 1 4 20 1 30 25 2 4
Most fruits provide negligible amounts of saturated fat, trans fat, and cholesterol; avocados
provide 0.5 g of saturated fat per ounce.
Provided by http://www.fda.gov
12
Page 13

Cleaning and maintenance
The appliance must be cleaned after each use.
Notes:
- Before cleaning or maintenance, switch off the appliance, remove the mains
plug from the wall socket and wait until the appliance has cooled down.
• Do not immerse the appliance in water or other liquids.
• Do not use aggressive or abrasive cleaning agents to clean the appliance.
• Do not use sharp objects to clean the appliance.
• Do not clean the appliance in the dishwasher. It is not recommended to
clean the accessories in the dishwasher.
• Do not sterilize any accessories with water with a temperature higher than
80 °C or in the microwave to prevent deformation or damage. The materials of all
parts that come into contact with food must be clean and hygienic.
• Regularly check the appliance for possible damage and do not use if any
damage.
• Clean the outside of the appliance with a soft, damp cloth. Thoroughly dry
the outside of the appliance with a clean, dry cloth.
• Clean the accessories:
• Disassemble the appliance.
• Clean the accessories in soapy water. Rinse the accessories under running
water. Thoroughly dry the accessories.
• Assemble the appliance. Refer to the section "Assembly".
Put the appliance and the accessories in the original packaging.
• Store the appliance with the accessories in a dry and frost-free place, out of
the reach of children.
13
Page 14

Troubleshooting
Fault Cause Troubleshooting
Not starting
Improper installation. Juice collector
or blade not properly in place
Reinstall the appliance following
assembly instructions
Burnt smell
coming from unit
Normal for first time use. Should
disappear over the time.
Return the appliance to retailer for
repair or exchange if unpleasant
smell persists after repeated use.
Stopping during
use
1. Excessive ingredients blocking the
juicing blade
2. The pusher is forced down
3. Motor thermal control protection
1. Disconnect power, remove the
surplus then reassemble.
2. Use less force on pusher
3. Restarts after pausing 20-30
minutes.
Too much pulp in
the pulp
container and low
quantity of juice
1. Pulp in the
2. Juice extraction blade is damaged
3. Pulp in the central ring
1. Clean the central ring.
2. Replace the juicing blade.
3. Use less force on pusher
Abnormal
vibration or noise
1. Improper installation of Juicing
blade or juice collector.
2. Juicer is not stable
3. Excessive ingredients
1. Reinstall according to assembly
instructions
2. Install on flat surface making
sure legs are not missing
3. Remove surplus
Note:
For any other faults please contact the service centre.
14
Page 15

ElectrIQ UK SUPPORT
www.ElectrIQ.co.uk/support
Please, for your own convenience, make these simple checks
before calling the service line.
If the unit still fails to operate call: 0871 620 1057 or
complete the online form
1. Is the unit plugged into the mains?
2. Is the fuse OK?
3. Switch the unit off. Restart the unit.
Office hours: 9AM - 5PM Monday to Friday
www.ElectrIQ.co.uk
Unit 2, The Nursery
Berristow Lane
South Normanton
Derbyshire, DE55 2FX
15
 Loading...