

Page 1

Us er Ins truc tions
P roduc t Des criptions
This is a 4 channels foot control chas er, features 17 built-in chase patterns and 7 fixed scenes ,
ea ch pattern has four operating modes: Audio, F a s t, Medium and S low. When linkup, this unit
ca n be us ed as a either a Mas ter or S lave. A DMX controller or a foot controller(supplied) ca n
be us ed to control this unit after proper connection.
C ontrol & F unc tions
5
6
1
2
3
4
9
8
1. C hannel O utput: 5A/C H ., Total 15A ma x.
2. C ircuit B reaker: 15A
3. Linkup S elector: Move this s lider to select between Master and S lave.
4. F unction S elector: T his s lider is us ed to s elect Audio/Fast/Medium/S low mode for the patterns.
5. C hannel L E Ds : T hes e LE Ds indicate the intens ity of corres ponding cha nnel or activity of the
pattern or scene.
6. S tand B y Button: T his button s erves s everal functions. In Ma s ter mode, tap this button to
activate or deactiva te S tand B y(its LE D flas hes when S tand By is active).
Pres s ing this button for three s econds can activa te 17 chase patterns or 7
fixed s cenes . When cha s e patterns are activated, each tap of P a ttern button
will s elect a chase pattern. When the s cenes are activated, each tap of P a ttern
button will forward a s cene s tep by s tep.
7. P attern B utton: In Master mode, us e this button to s elect chase pattern or scene.
11
10
7
24-004-0918
R ev 1.0
Page 2
8. Power Cable: AC 120V~60Hz, 15 A max.
9. Power Switch: Press to turn on/off the power.
10. DMX In: In Master mode, this connector can be plugged in a foot controller(supplied) for
remote control. In DMX mode, this connector is used to receive an incoming
DMX signal from either a DMX controller or DMX output(11) on another unit.
11. DMX Output: This connector can be used to link to next unit.
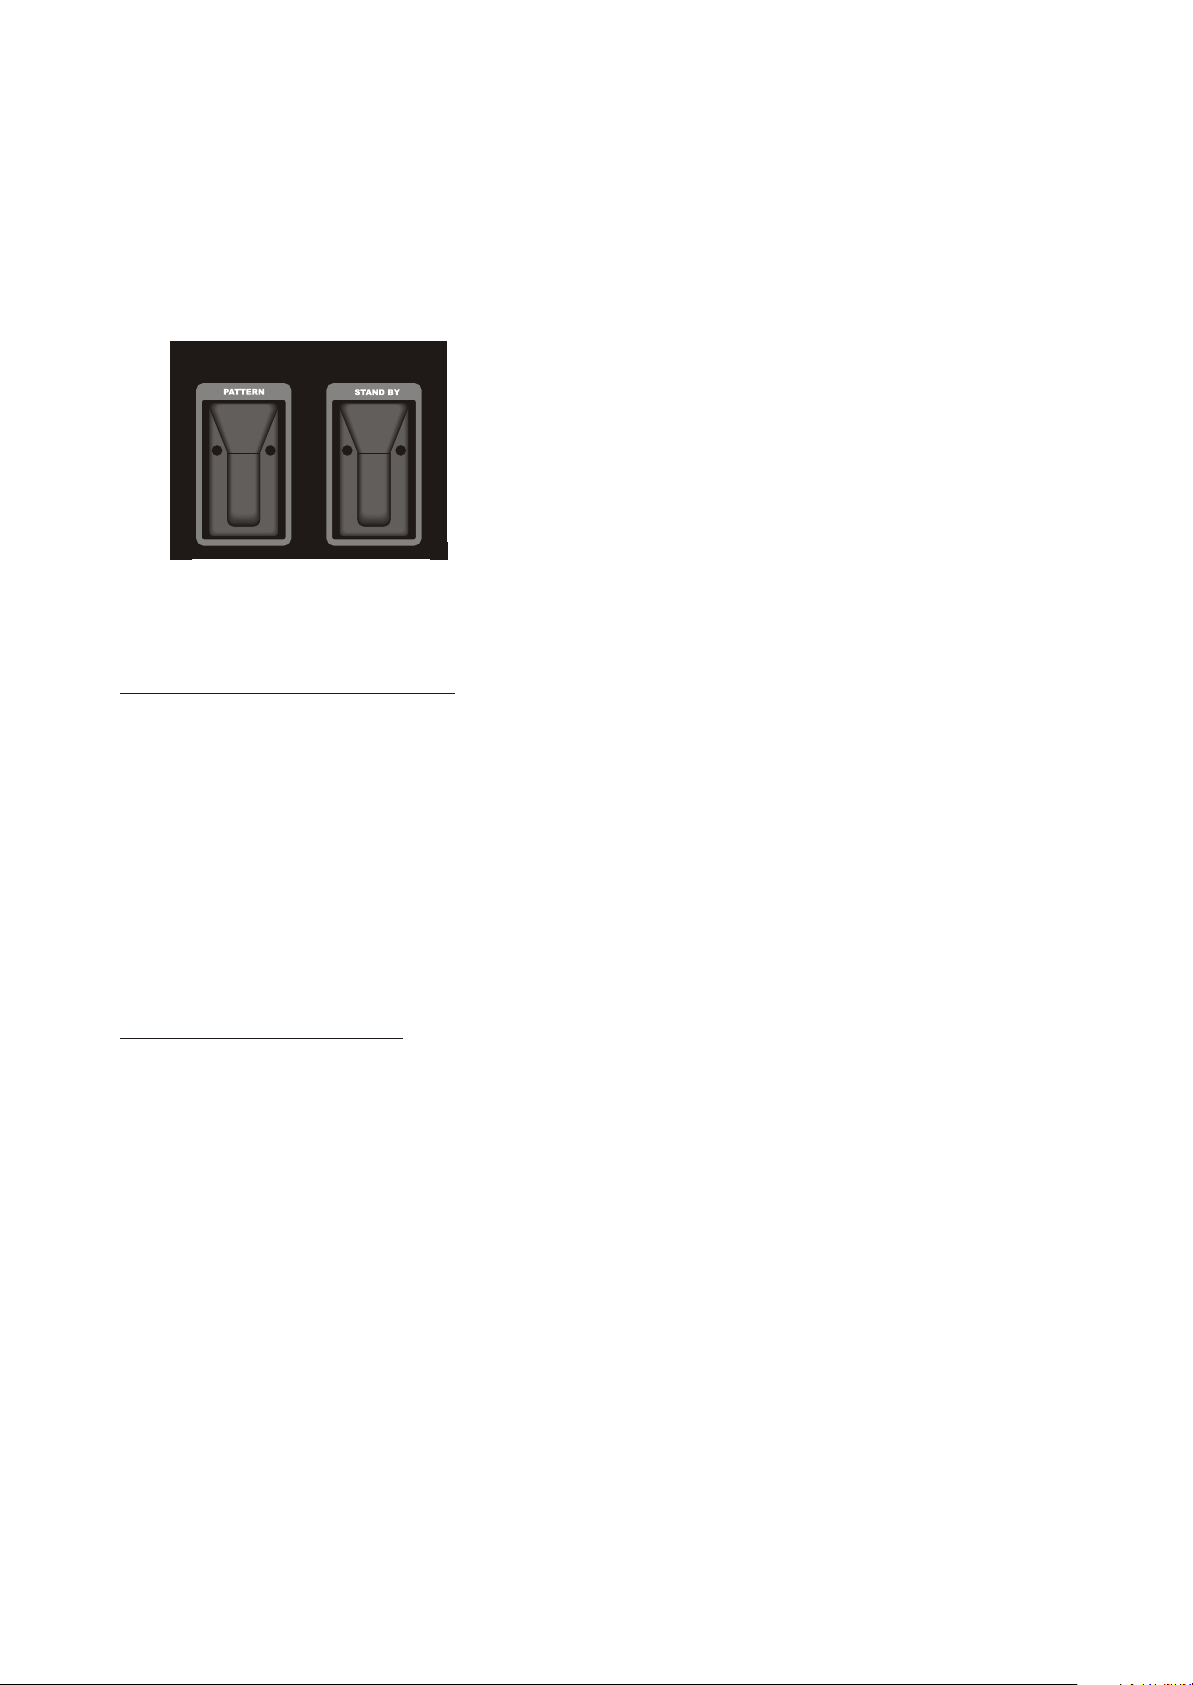
About the accessory:
The Foot Controller incorporating a 3-pin female
XLR connector is specially designed for cable
remote control of the T16F. When the T16F is in
Master mode, it serves as the two buttons: Pattern
and Stand by on the T16F, has the same functions
and operations.
Accessory(supplied)
Technical Specifications:
Power Input .................................................................................. AC 120V~60Hz, 15A max.
Channel Output ......................................................................................... 5A/CH., Total 15A
DMX In ................................................................................................ 3 pin XLR male socket
DMX Out .......................................................................................... 3 pin XLR female socket
Protection
Accessory(supplied) .......................................................................... Foot Controller x1 PC
Dimensions .................................................................................................. 220x155x60mm
Weight ........................................................................................................................... 1.6Kg
.............................................................................................. 15 A Circuit Breaker
Product Instructions:
I. Master mode: Slide Linkup selector(3) to "Master", this unit will serve as a Master,
you can use this unit directly or by a foot controller(sold separately).
By linkup function, several unit can be linked together and controlled
by the Master.(There is only a Master in the linkup.)
II. Slave mode: Slide Linkup selector(3) to "Slave", this unit will serve as a Slave, all
function buttons on this unit will be disabled and this unit will be controlled by the Master unit when available.
II. DMX mode Be sure the Linkup selector is in "Slave" position. Connect this unit with
a DMX controller, this unit will be controlled by the DMX controller. DMX
value 0-9 of DMX channel 1 activates Stand By, DMX value 10-249
leads to any of 7 scenes or 17 chase patterns. When the DMX value of
channel 1 is among 250-255, this unit will act as a 4 channel dimmer
pack and the start channel is the 2nd DMX channel.
IV. Stand By: Tap Stand By button(6) to activate Stand By, its LED flashes indicating
Stand By is active, which will kill all output momentarily. The second
tap of Stand By will deactivate this function.
V. Full On: Keep pressing Pattern and Stand By buttons at a time, Full On will be
activated, all output will be brought to full intensity. Release these two
buttons to leave.
Page 3

Operating DMX controller:
To smoothly operate this unit using the DMX channel 1 of the DMX controller, please
refer to the following table:
DMX Value
0-9
10-19
20-29
30-39
40-49
50-59
60-69
70-79
Function on T16F
Stand by
Scene 1
Scene 2
Scene 3
Scene 4
Scene 5
Scene 6
Scene 7
DMX Value Function on T16F
250-255
4 channel dimmer pack
DMX Value
80-89
90-99
100-109
110-119
120-129
130-139
140-149
150-159
160-169
170-179
180-189
190-199
200-209
210-219
220-229
230-239
240-249
Function on T16F
Pattern 1
Pattern 2
Pattern 3
Pattern 4
Pattern 5
Pattern 6
Pattern 7
Pattern 8
Pattern 9
Pattern 10
Pattern 11
Pattern 12
Pattern 13
Pattern 14
Pattern 15
Pattern 16
Pattern 17
NOTE:
1. When the 1st DMX channel is set to 0-9, the T16F will be in Stand by mode.
2. When the 1st DMX channel is set to 250-255, the T16F will serves as a 4 channel dimmer
pack, and the start channel will be the 2nd channel.
WARNING!
This Product must be earthed.
Disconnect power cable before opening.
To prevent fire or shock hazard, do not expose this product to a high
temperature or high humidity area.
Caution! No user serviceable parts inside, do not attempt repairs. In the event your unit
should fail, please contact your authorized dealer.
 Loading...