

Page 1

SafePhone
User Manual
EN ∙ RU ∙ DE ∙ FR ∙ ES ∙ IT ∙ LV ∙ LT ∙ EST
Page 2

EN
1. Introduction
Thank you for choosing Elari SafePhone
positioning mobile phone! Wherecom S3 APP
will help you experience and enjoy all functions
of this product. We are committed to provide
you with a convenient, high-quality and secure
solution of a mobile product.
2
Page 3
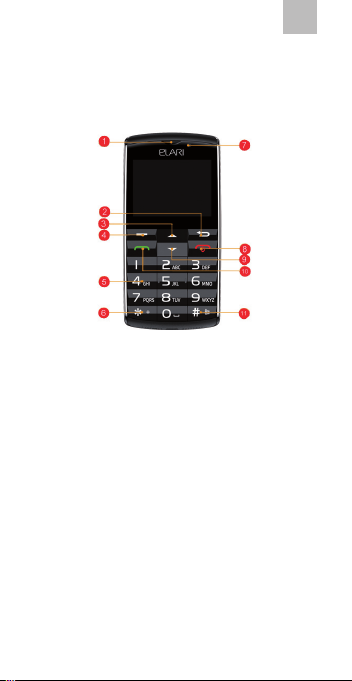
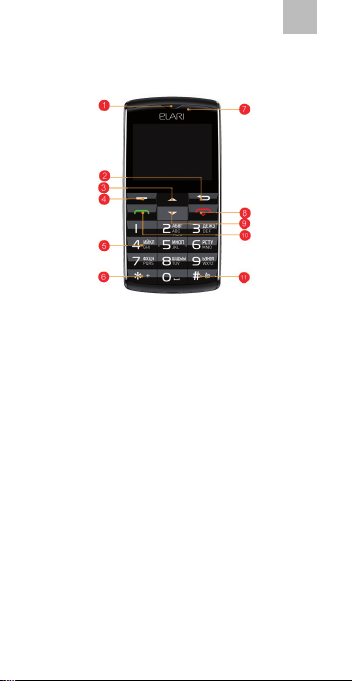
2. Device Structure
EN
1. Telephone
receiver.
2. Back key.
3. Up key.
4. Conrmation
button.
5. Numeric keys.
6. ”*” key: unlock
the screen and
punctuation.
7. Front camera.
8. On-hook button:
hang up, turn
on & turn o the
phone.
9. Down button.
10. Dial button: dial
out; view call log.
11. Hash key: unlock
the screen; switch
proles.
3
Page 4

EN
12. Microphone.
13. USB port.
15. Rear camera.
16. Flashlight.
14. Loudspeaker.
17. SOS button: long
press this button
to send out an
SOS-signal.
4
Page 5

EN
3. Instruction for main
functions
3.1 Turn on & turn o the phone
Long press the on-hook key to turn on or turn
o the phone.
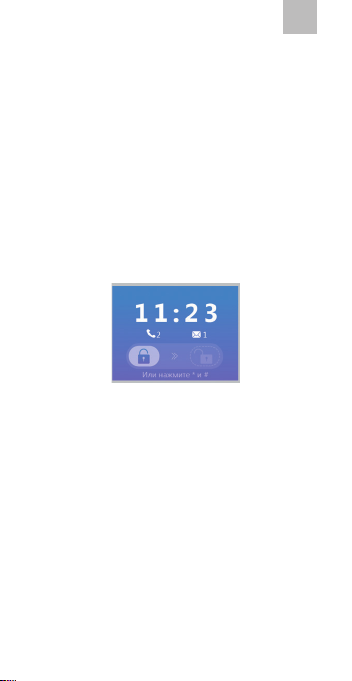
3.2 Unlock the screen:
Slide the screen to unlock the phone (oryou can
press the “*” and “#” keys to unlock the screen).
3.3 Call
1. Outcoming calls
Call out by inputting the phone number: input
the phone number in the main interface by
pressing the numeric keys, then press the dial
button.
Call out via a phone book: select a contact in the
phone book, then press the dial button.
Call out via the call log: select a call record in the
phone book, then press the dial button.
2. Incoming calls
You can answer the call by pressing the
conrmation key or the dial button.
5
Page 6
EN
3. Refuse/end calls
You can refuse the incoming call by pressing the
back button or the on-hook button.
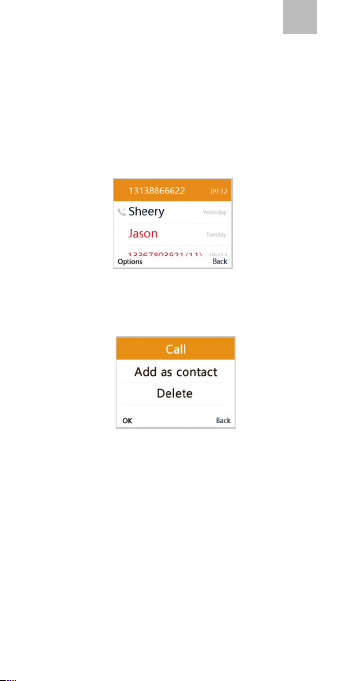
3.4 Call log
1. View call log
Press the dial key in the main interface to view
the call log.
2. Options
1. call select this option to make a call to this
contact.
2. add as contact select this option to add it as
a contact in the phone book.
3. delete select this option to delete this
record.
4. delete all call logs select this option to delete
records about all the calls.
6
Page 7
EN
3.5 One-key SOS. Send out an SOS-signal
Long press the SOS-button to send out an SOSsignal and the APP will receive notication alert
to inform the administrator.
2. Cancel the signal
Press any button except the SOS button to
cancel the signal.
3.6 Restart
Long press the on-hook button to restart the
phone.
3.7 Flight mode
Long press the on-hook button to set the phone
into ight mode.
3.8 Input method
When editing the contents, press the hash
button to choose the input method.
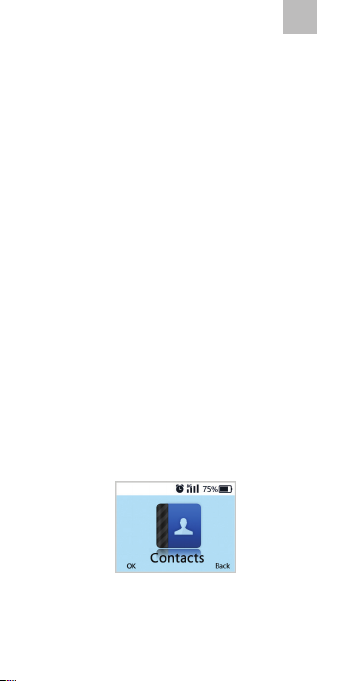
4. Main applications
4.1 Contact
7
Page 8
EN
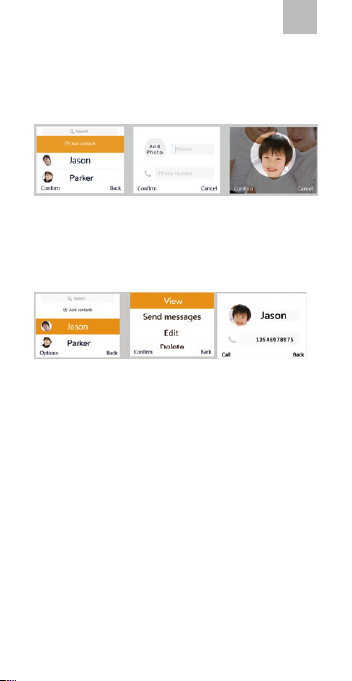
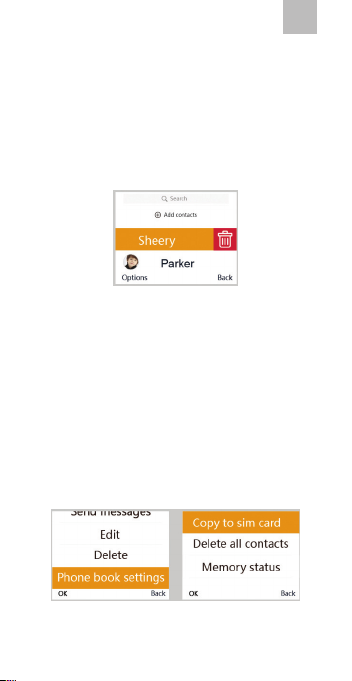
1. Add contacts
You can add name, phone number and photo
for each contact.
2. Options of the contact
1 View
Choose this option to view contact name, phone
number and photo.
2 Send messages
Choose this option to send messages to this
contact.
3 Edit
Choose this option to edit the name, phone
number and portrait of the contact.
8
Page 9
EN
4 Delete
Choose this option to delete this contact.
Note: you can also delete it by touching the
screen: press on the contact you want to delete,
then swipe left and click the icon with the
rubbish bin.
Note: contacts added from the APP cannot be
deleted from the phone, you can delete them
only from the APP.
5 Phone book settings
Phone book settings-Copy to sim card-Copy all:
through this operation you can copy contacts
from the phone to the sim card.
Phone book settings-Copy to sim card-Copy this
contact only through this operation you can
copy one chosen contact.
Phone book settings-Delete all contacts-Delete
from sim card/Delete from phone-OK through
9
Page 10
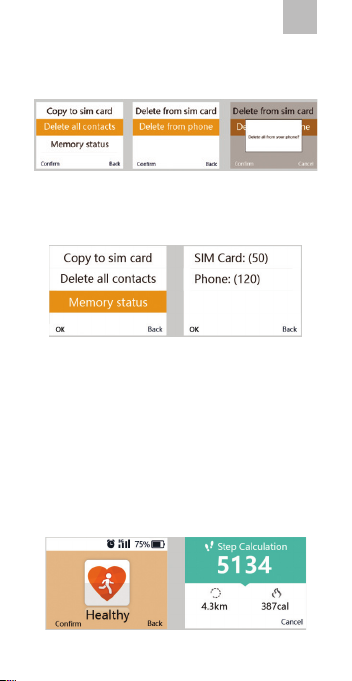
this operation you can delete all contacts from
the sim card/the phone.
Phone book settings-Memory status through
this operation you can view the number of
contacts.
Note: After you turn on the phone, all contacts
saved in the sim card will be copied into the
phone automatically.
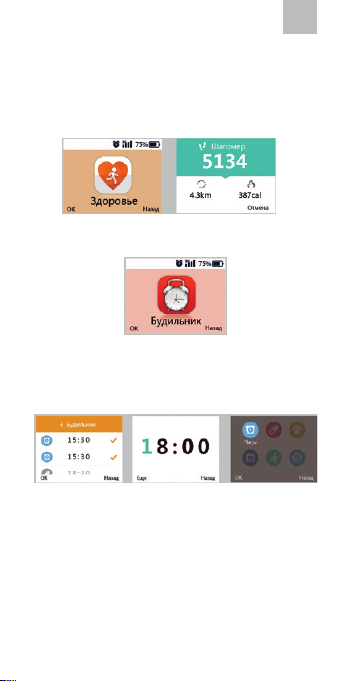
4.2 Health
Shows health data: steps, movement distance
and calories consumed during the day.
EN
10
Page 11
EN
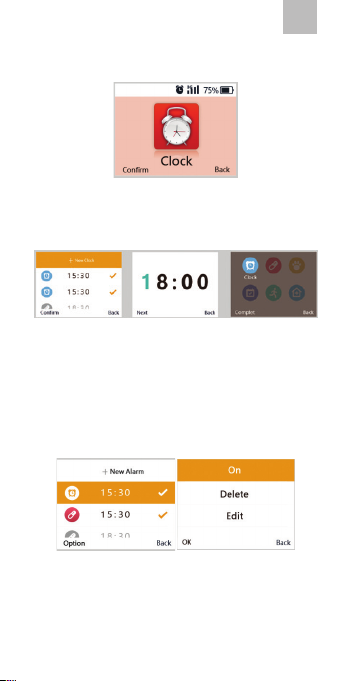
4.3 Clock
1. Add alarms
Choose “New alarm” to add an alarm and set the
time and name for it.
2. Stop the alarm
When the alarm rings, you can press any button
to stop it.
3. Alarm options
1 On/O
Choose this option to turn on/o the clock.
2 Delete alarm
Choose this option to delete the alarm.
11
Page 12
EN
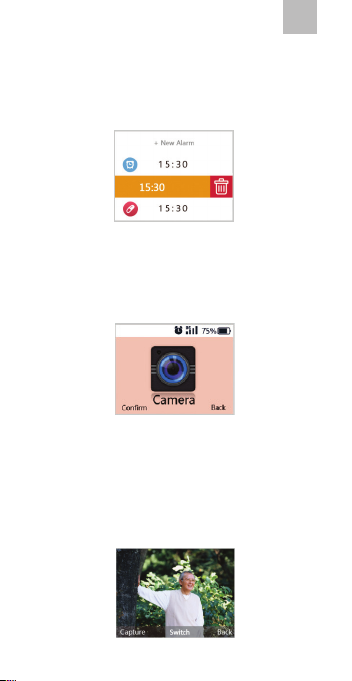
Note: you can also delete it by touching the
screen: tip the alarm that you want to delete,
swipe left and click the icon with the rubbish
bin.
3 Edit alarm
Choose this option to edit the time and name
of the alarm.
4.4 Camera
1. You can take photos and delete the photo that
you have just taken.
2. Switch cameras: press the “up” button or the
“down” button to switch in between the front
and the rear cameras.
12
Page 13
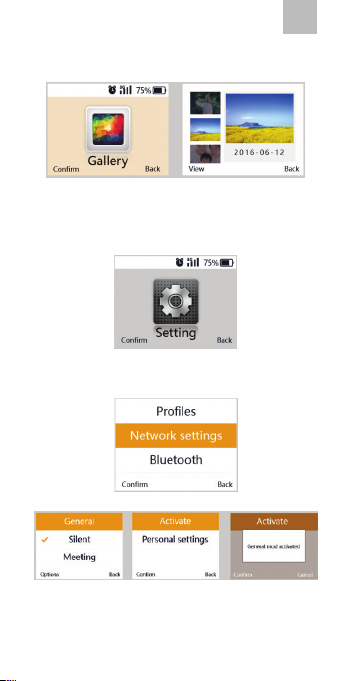
4.5 Gallery
You can view or delete a chosen photo.
4.6 Settings
1. Proles
General mode: vibration+ringtone (you can
set the tune and the volume of the ringtone in
settings);
13
EN
Page 14
Silent mode: vibration+silence;
Meeting mode: no vibration+silence.
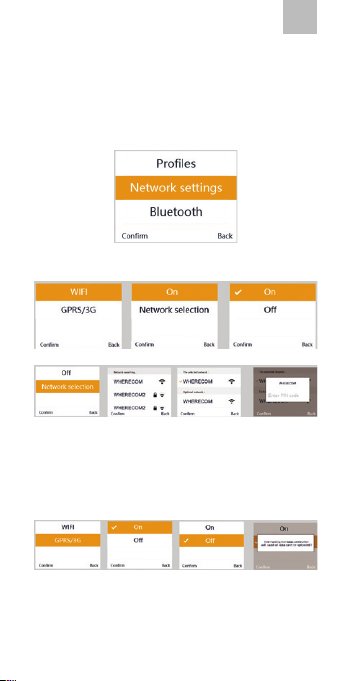
2. Network settings
1 Wi-Fi settings
You can choose the suitable Wi-Fi network,
connect or disconnect the network.
2 GPRS/3G settings
You can connect or disconnect the GPRS/3G.
EN
14
Page 15
Note: if all networks are disconnected, you will
not be able to use the “One-key SOS” function
and health data and the location of the phone
will not be uploaded to the APP! Therefore,
please, try not to disconnect the network.
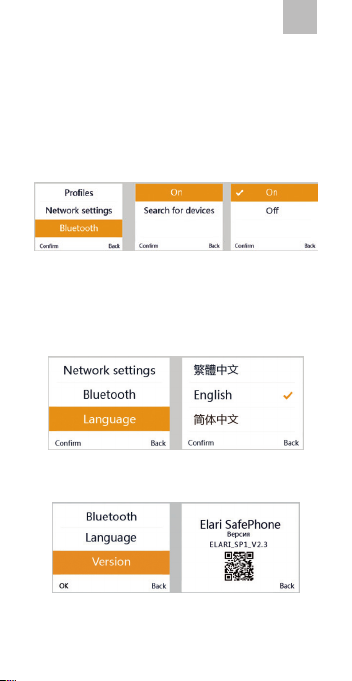
3. Bluetooth
You can search bluetooth devices, match
bluetooth and modify the name of your
bluetooth.
4. Language settings
5. Version&QR-code
EN
You can view the software version and the QRcode.
15
Page 16

EN
4.7 Messages
You can send messages, reply to messages and
delete them.
5. Instructions for the APP
5.1 Bind/follow the device
1. Steps to bind for the rst time:
1 Download Wherecom S3 APP and register
an account.
2 You can download Wherecom S3 APP in
Google Play or AppStore.
3 After you log in this account, the App will
go to the interface where you should scan the
QR-code. After scanning the QR-code, the APP
will bind this device.
QR-code of this phone:
Note: you can also view QR-code from the
phone (Settings-Version-QR code).
16
Page 17
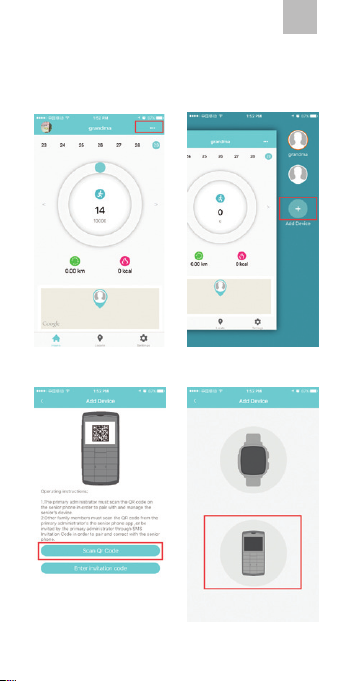
2. If the account is already bound to some
device, you can bind or follow other devices as
follows:
1 2
EN
4 3
17
Page 18
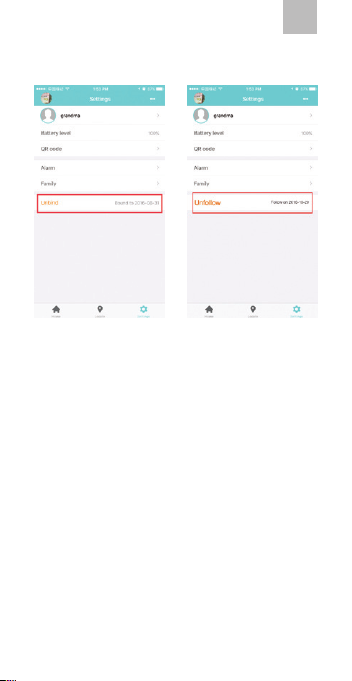
5.2 Unbind and unfollow
EN
18
Page 19

Tips
1. The phone can be bound to only one
account. If the phone has been bound, other
accounts can only follow this phone. If any
other account wants to bind this phone, the
phone should be unbound rst.
2. Administrative authority of the binder and
follower. The binder has the right to receive
SOS-signals and manage the phone (see
real-time location, check the battery, view
QR-code and invitation codes, add alarms,
add family members); The follower has the
right to receive SOS-signals and see phone
data (see real-time location, check the
battery, view QR-code and invitation codes,
see alarms, view family members);
3. After the phone is bound or followed, the
binder or the follower will be automatically
added as a contact.
4. After being unbound, the phone will be
unfollowed by all the followers.
EN
19
Page 20
SafePhone
Руководство пользователя
EN ∙ RU ∙ DE ∙ FR ∙ ES ∙ IT ∙ LV ∙ LT ∙ EST
Page 21

RU
1. Вступление
Спасибо за то, что выбрали наш мобильный
телефон SafePhone! С помощью приложения Wherecom S3 вы сможете использовать
все функции модели SafePhone по максимуму. Мы делаем все возможное, чтобы вы получили удобный и безопасный телефон высокого качества.
21
Page 22
2. Клавиши
RU
1. Приемник.
2. Клавиша
возврата.
3. Клавиша
прокрутки
наверх.
4. Клавиша
подтверждения.
5. Цифровые
клавиши.
6. Звездочка:
разблокировка
экрана и
пунктуация.
7. Фронтальная
камера.
8. Клавиша сброса:
сброс вызова,
включение/
выключение
телефона.
9. Клавиша
прокрутки вниз.
10. Клавиша
набора номера/
просмотра
истории звонков.
11. Решетка:
разблокировка
экрана, смена
профиля.
22
Page 23

RU
12. Микрофон
13. Порт USB
15. Задняя камера.
16. Фонарик.
14. Динамик
17. Клавиша
отправки сигнала
SOS: сигнал
можно отправить
с помощью
долгого нажатия.
23
Page 24
RU
3. Основные функции
телефона
3.1 Включение и выключение телефона
Нажмите и удерживайте клавишу сброса, чтобы включить или выключить телефон.
3.2 Разблокировка экрана:
Проведите пальцем по экрану вправо, чтобы
разблокировать экран. Вы также можете нажать звездочку, а затем решетку для снятия
блокировки.
3.3 Звонки
1. Исходящие вызовы
Вы можете сделать исходящий звонок путем ввода необходимого номера с помощью цифровых
клавиш и нажатия клавиши отправки вызова.
Вы можете сделать исходящий вызов с помощью
телефонной книги: найдите необходимый контакт в телефонной книге и нажмите клавишу набора номера.
Вы можете сделать исходящий вызов с помощью
истории звонков: выберите необходимый номер в истории звонков и нажмите клавишу набора номера.
24
Page 25
RU
2. Входящие вызовы
Вы можете ответить на входящий звонок с помощью клавиши подтверждения или клавиши
отправки вызова.
3. Отмена/завершение вызова
Вы можете отменить входящий вызов с помощью кнопки возврата или кнопки сброса.
3.4 Информация о звонках
1. Просмотр истории звонков
Чтобы просмотреть историю звонков, войдите в основное меню и нажмите клавишу набора номера.
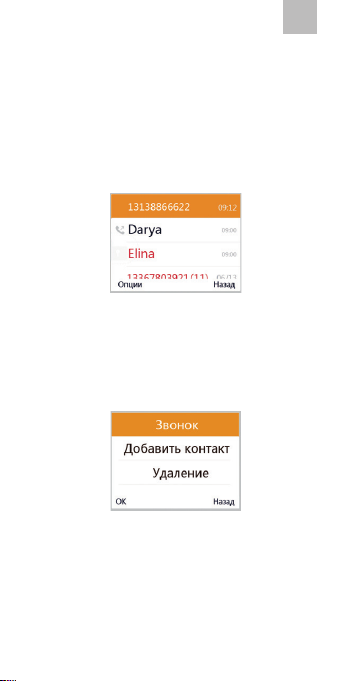
2. История вызовов: опции
1. звонок на номер: выберите эту опцию,
чтобы отправить звонок на номер
контакта.
2. добавить контакт: выберите эту опцию,
чтобы добавить контакт в телефонную
книгу;
25
Page 26

RU
3. удалить запись: выберите эту опцию,
чтобы удалить информацию о звонке;
4. удалить историю звонков: выберите
эту опцию, чтобы удалить всю историю
звонков.
3.5 Отправка сигнала SOS
1. Отправка сигнала SOS
Для того, чтобы отправить сигнал SOS, нажмите и удерживайте клавишу SOS. Приложение получит уведомление о сигнале SOS для
администратора.
2. Отменить отправку сигнала SOS
Нажмите любую клавишу за исключением
клавиши SOS, чтобы отменить отправку сигнала.
3.6 Перезагрузка
Нажмите и удерживайте клавишу сброса, чтобы перезагрузить телефон.
3.7 Режим полета
Нажмите и удерживайте клавишу сброса, чтобы включить режим полета.
3.8 Метод ввода
При вводе текста, нажмите «решетку» и выберите метод ввода.
26
Page 27
RU
4. Приложения на телефоне
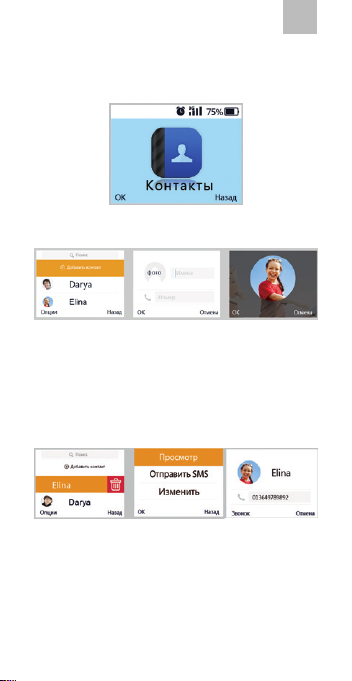
4.1 Контакты
1. Добавление контактов
Для каждого контакта вы можете ввести имя,
контактный номер и выбрать фотографию.
2. Управление контактами
1 Просмотр
Выберите эту опцию, чтобы просмотреть информацию о контакте.
2 Отправка сообщений
Выберите эту опцию, чтобы отправить сообщение на номер контакта.
3 Редактирование
Выберите эту опцию, чтобы отредактировать имя контакта, телефонный номер и фото-
27
Page 28
RU
графию.
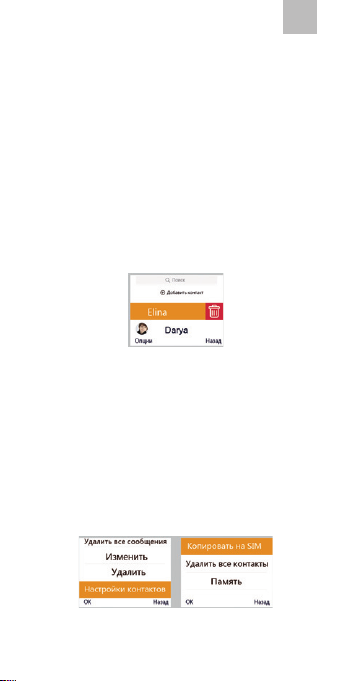
4 Удаление
Выберите эту опцию, чтобы удалить контакт.
Примечание: вы можете удалить контакт с помощью сенсорного экрана. Нажмите на контакт, который вы хотите удалить и проведите
пальцем по экрану влево. Затем нажмите на
иконку с изображением мусорного бака.
Примечание: контакты, добавленные через
приложение, могут быть удалены только с помощью приложения, но не с помощью телефона.
5 Настройки телефонной книги
Настройки списка контактов – Скопировать
на SIM-карту – Копировать всё: с помощью
этого алгоритма вы можете копировать контакты с телефона на сим-карту.
28
Page 29
RU
Настройки списка контактов – Скопировать
на SIM-карту – Скопировать только этот контакт: с помощью этого алгоритма вы можете
скопировать один выбранный контакт.
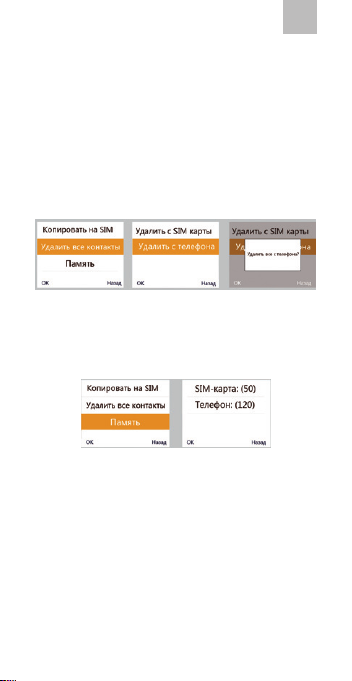
Настройки списка контактов – Удалить все
контакты – Удалить с СИМ карты / Удалить с
телефона – OK: с помощью этого алгоритма
вы можете удалить все контакты с сим-карты/телефона.
Настройки списка контактов – Память: с помощью этого контакта вы можете посмотреть количество контактов.
Примечание: После того, как вы включите телефон, все контакты, сохраненные на
сим-карте, будут автоматически скопированы
в память телефона.
29
Page 30
4.2 Фитнес и здоровье
RU
В этом разделе можно просматривать
информацию о шагах, активности и калориях,
израсходованных за день.
4.3 Часы
1. Добавить будильник
Чтобы активировать и настроить новый будильник и создать имя для него, выберите
«Новый будильник».
2. Остановить будильник
Чтобы выключить будильник, нажмите любую клавишу.
30
Page 31

RU
3. Настройка будильника
1 Включение/выключение
Выберите эту опцию, чтобы включить или выключить будильник.
2 Удалить будильник
Выберите эту опцию, чтобы удалить будильник.
Примечание: вы также можете удалить будильник с помощью сенсорного экрана. Коснитесь будильника, который вы хотите удалить, и проведите пальцем по экрану влево.
Затем нажмите на иконку с изображением мусорного бака.
3 Отредактировать будильник
Выберите эту опцию, чтобы изменить название и время будильника.
31
Page 32

RU
4.4 Камера
1. Вы можете делать фотографии и удалять
только что сделанные фото.
2. Переключение камер: используйте клавиши
прокрутки вниз и наверх, чтобы переключаться между фронтальной и задней камерами.
4.5 Галерея
Вы можете просмотреть или удалить выбранные фото.
32
Page 33

RU
4.6 Настройки
1.Профили
Основной режим: вибрация+звонок (мелодию и громкость звонка можно менять в настройках телефона)
Бесшумный режим: только вибрация
Режим совещания: полностью бесшумный режим без вибрации.
33
Page 34

RU
2. Настойка сети
1 Настройка Wi-Fi
Вы можете выбирать сеть Wi-Fi, присоединяться и отключаться от сети.
2 Настройка GPRS/3G
Вы можете подключать и отключать GPRS/3G.
Примечание: если все сети отключены, то вы
не сможете пользоваться функцией отправки
сигнала SOS, фитнес-функциями, а приложение не сможет определить местонахождение
телефона. Старайтесь не отключать сеть без
необходимости.
34
Page 35

RU
3. Bluetooth
Вы можете искать сети bluetooth, присоединяться к ним и менять имя вашего bluetooth.
4. Языковые настройки
5. Версия ПО и QR-код
В этом разделе вы можете просматривать версию ПО и QR-код.
4.7 Сообщения
Вы можете отправлять сообщения, отвечать
на них и удалять.
35
Page 36

RU
5. Приложение Wherecom S3
5.1 Привязка устройства/режим слежения
1. Алгоритм привязки телефона:
1 скачайте приложение Wherecom S3 и зарегистрируйте свой аккаунт в Google Play или
AppStore;
2 войдите в аккаунт, отсканируйте код QR
по запросу приложения. После этого телефон
будет привязан к приложению.
QR-код телефона:
Примечание: вы также можете увидеть QR-код
с телефона (Настройки-Версия и QR-код)
36
Page 37

RU
2. Если аккаунт привязан к какому-то девай-
су, вы можете привязать его к другому девайсу или подписаться к другому девайс с помощью следующего алгоритма:
1 2
4 3
37
Page 38

5.2 Отмена привязки
RU
38
Page 39

Примечания
1. Телефон может быть привязан только к
одному администратору аккаунту. Если
телефон привязан, другие аккаунты могут
только следить за ним. Чтобы привязать
телефон к новому аккаунту, нужно сначала
отвязать от аккаунта администратора.
2. Возможности администраторского
аккаунта, и подписчиков на телефон:
администраторский аккаунт имеет
право: получать сигналы SOS,
управлять телефоном (проверять его
местоположение в реальном времени,
смотреть состояние батареи, смотреть
код QR, добавлять будильники и членов
семьи). Тот, кто подписан на телефон,
имеет право: получать сигналы SOS,
смотреть информацию о телефоне
(проверять его местоположение в
реальном времени, смотреть состояние
батареи, смотреть код QR, смотреть
будильники и членов семьи)
3. Администраторский аккаунт и те, кто
подписан на телефон, автоматически
добавляются в книгу контактов.
4. После того, как Администраторский
аккаунт отменяет привязку, все подписки
обнуляются автоматически.
RU
39
Page 40

SafePhone
Bedienungsanleitung
EN ∙ RU ∙ DE ∙ FR ∙ ES ∙ IT ∙ LV ∙ LT ∙ EST
Page 41

DE
1. Einleitung
Vielen Dank, dass Sie sich für unser Mobiltelefon
SafePhone entschieden haben! Mittels der
Anwendung Wherecom S3 können Sie alle
Funktionen des Models SafePhone am optimal
nutzen. Wir machen alles mögliches, damit
Sie ein bequemes, sicheres und hochwertiges
Telefon zur Verfügung haben.
41
Page 42

2. Taste
DE
1. Hörer.
2. Zurücktaste.
3. Vorlauftaste.
4. Bestätigungstaste.
5. Zierntasten.
6. Sterntaste:
den Bildschirm
entsperren und
Zeichensetzung.
7. Frontalkamera.
8. Auegen- und
Ein-/Aus-Taste.
9. Taste, um nach
unten zu blättern.
10. Wahl-Taste /
Anruf-Liste
aufgerufen.
11. Raute-Taste:
den Bildschirm
entsperren, Prol
wechseln.
42
Page 43

DE
12. Mikrofon.
13. USB-Schnittstelle.
15. Hintere Kamera.
16. Taschenlampe.
14. Lautsprecher.
17. SOSSendungstaste:
bei langem
Druck dieser
Taste können Sie
ein Notrufsignal
absenden.
43
Page 44

DE
3. Wichtige Telefonfunktionen
3.1 Telefon ein-/ausschalten
Auegen-Taste« drücken und festhalten, um das
Telefon ein-/ und auszuschalten.
3.2 Bildschirm entsperren:
Wischen Sie mit dem Finger auf dem Bildschirm
nach rechts, um den Bildschirm zu entsperren.
Sie können auch die »* Taste« und danach
die »# Taste« drücken, um den Bildschirm zu
entsperren.
3.3 Anrufe
1. Anrufen
Zum Anrufen geben Sie die Telefonnummer
über die Zierntasten ein und drücken Sie auf
»Abheben«.
Sie können aus dem Telefonbuch anrufen: wählen
Sie den gewünschten Kontakt aus dem Telefonbuch
aus und drücken Sie auf die »Wahltaste«.
Sie können auch von der Anruiste heraus anrufen:
wählen Sie die gewünschte Telefonnummer aus der
Anruiste aus und drücken Sie auf die »Wahltaste«.
44
Page 45

DE
2. Ankommende Anrufe
Sie können mittels der »Bestätigungstaste« oder
der »Anruftaste« einen Anruf annehmen.
3. Aufheben/Anruf beenden
Sie können mit Hilfe der »Zurücktaste« oder
»Aufhebentaste« einen eingehenden Anruf
beende.
3.4 Anrufdaten
1. Durchsicht der Anruiste
Um die Anruiste durchzusichten, wählen
Sie das Hauptmenü aus und drücken Sie die
»Nummernwahltaste«.
2. Anruiste: Optionen
1. Anruf (Call): wählen Sie diese Option aus, um
diese Telefonnummer anzurufen;
2. Kontakt hinzufügen (add as contact): wählen
Sie diese Option aus, um einen Kontakt zum
Telefonbuch hinzuzufügen;
45
Page 46

DE
3. Eintrag löschen (delete): wählen Sie diese
Option aus, um die Anrufdaten zu löschen.
4. Anruiste löschen: wählen Sie diese Option
aus, um die ganze Anruiste zu löschen.
3.5 Notruf senden
1. Notruf senden
Um einen Notruf zu senden, drücken und halte
Sie die »SOS-Taste«. Durch die Anwendung
wird ein Administrator über den Notruf
benachrichtigt.
2. Die SOS-Signal-Sendung widerrufen
Drücken Sie beliebige Taste außer der »SOSTaste«, um einen Notruf zu widerrufen.
3.6 Neu starten
Die »Endetaste« drücken und lange halten, um
das Telefon neu zu starten.
3.7 Flugmodus
Die »Endetaste« drücken und halten, um den
Flugmodus einzuschalten.
3.8 Eingabe
Um eingegebenen Text zu korrigieren, drücken
Sie die »# Taste« und wählen Sie »Daten
eingeben«.
46
Page 47

DE
4. Apps
4.1 Kontakte
1. Kontakt hinzufügen (add contact)
Für jeden Kontakt können Sie den Namen und
die Telefonnummer eingeben und ein Foto
auswählen.
2. Kontakte verwalten
1 Suchen (search)
Wählen Sie diese Option, um die Kontaktdaten
durchzusehen.
2 Nachrichten senden (Send message)
Wählen Sie diese Option aus, um eine Nachricht
an die Telefonnummer des Kontaktes zu senden.
47
Page 48

DE
3 Bearbeiten (Edit)
Wählen Sie diese Option aus, um den Namen,
die Telefonnummer oder das Foto des Kontaktes
zu bearbeiten.
4 Löschen (Delete)
Wählen Sie diese Option aus, um einen Kontakt
zu löschen.
Anmerkung: Sie können einen Kontakt auch
über den Touch Screen löschen. Berühren Sie
den Kontakt, den Sie löschen möchten uns
schieben ihn mit dem Finger auf dem Bildschirm
nach links. Danach drücken Sie auf das
Mülltonne-Ikon.
Anmerkung: Kontakte, die über eine App
hinzugefügt worden sind, können nur über
die App aber nicht über das Telefon gelöscht
werden.
5 Telefonbuch-Einstellungen (Phone book
settings)
Einstellungen der Kontaktliste — auf SIM-Karte
kopieren (copy to sim card)– kopieren alles: mit
Hilfe dieser Funktion können Sie alle Kontakte
aus dem Telefon auf die SIM-Karte kopieren.
48
Page 49

DE
Einstellungen der Kontaktliste — Kopieren auf
der SIM-Karte — Kopieren nur diesen Kontakt:
mit Hilfe dieser Funktion können Sie einen
ausgewählten Kontakt kopieren.
Einstellungen der Kontaktliste — löschen
alle Kontakte — löschen aus der SIM-Karte /
Löschen aus dem Telefon — OK: mit Hilfe dieser
Funktionen können Sie alle Kontakte aus der
SIM-Karte oder aus dem Telefon löschen.
Einstellungen der Kontaktliste — Speicher
-Status: mittels dieses Kontaktes können Sie die
Anzahl der Kontakte durchsehen.
49
Page 50

DE
Anmerkung
Nachdem Sie das Telefon einschaltetet haben,
werden alle Kontakte, die auf der SIM-Karte
gespeichert sind, automatisch in den Speicher
des Telefons automatisch kopiert.
4.2 App Fitness und Gesundheit
In diesem Abschnitt können Daten zu Schritten,
Aktivitäten und Kalorien, die am Tag getätigt
oder verbraucht worden sind, angesehen werden.
4.3 App Uhr
50
Page 51

DE
1. Wecker aktivieren
Um einen neuen Wecker zu aktivieren und
einzustellen und seinen Namen zu erstellen,
wählen Sie “Neuer Wecker” (New Clock).
2. Wecker stoppen
Um den Wecker auszuschalten, drücken Sie
beliebige Taste.
3. Wecker einstellen
1Ein-/ausschalten (On)
Wählen Sie diese Option aus, um den Wecker
ein- oder auszuschalten.
2Wecker löschen (Delete)
Wählen Sie diese Option aus, um den Wecker zu
löschen.
51
Page 52

DE
Anmerkung: Sie können einen Wecker auch
über den Touchscreen löschen. Berühren Sie den
Wecker, den Sie löschen möchten, und schieben
ihn mit dem Finger über den Bildschirm nach
links. Drücken Sie danach aufs Mülltonne-Ikon.
3 Wecker bearbeiten (Edit)
Wählen Sie diese Option aus, um den Namen
des Weckers oder die Uhrzeit zu ändern.
4.4 App Kamera
1. Sie können Fotos aufnehmen und die
aufgenommenen Fotos löschen.
2. Kamera umschalten: mit Hilfe der »nach oben
Taste« bzw. »nach unten Taste« können Sie
zwischen der Front- und der hinteren Kamera
umzuschalten.
52
Page 53

DE
4.5 Galerie
Sie können die ausgewählten Fotos durchsehen
oder löschen.
4.6 Einstellungen
1. Prole
53
Page 54

DE
Grundbetrieb: Vibration + Klingel (Melodie und
Tonstärke können in den Telefon-Einstellungen
geändert werden)
Stummmodus: nur Vibration
Konferenzmodus: vollkommener Stummmodus
ohne Vibration.
2. Netz-Einstellung
1 WiFi -Einstellung
Sie können das WiFi-Netz auswählen,
anschließen und ausschalten.
2 Einstellung GPRS/3G
Sie können GPRS/3G anschließen und
abschalten.
Anmerkung: sind alle Netze abgeschaltet,
54
Page 55

DE
können auch Sie die Notruunktion und FitnessFunktionen nicht benutzen, da die App das
Telefon nicht orten kann. Schalten Sie das Netz
bitte nicht ohne Grund ab.
3. Bluetooth
Sie können nach Bluetooth-Geräten suchen,
sich mit ihnen verbinden und Ihren BluetoothNamen ändern.
4. Spracheinstellungen
5. Software- Version und QR-Code
In diesem Abschnitt können Sie die Software-
Version und QR-Code anschauen.
4.7 Nachrichten
Sie können die Nachrichten senden,
55
Page 56

beantworten und löschen.
5. App Wherecom S3
5.1 Das Gerät anknüpfen/ orten
1. Telefon- Anknüpfungsalgorithmus:
1 laden Sie die Anwendung Wherecom S3
herunter und melden Ihren Account in Google
Play oder einem anderem AppStore an;
2 geben Sie Ihren Account ein und
scannen Ihren QR-Code nach Auorderung
der App. Danach wird das Telefon mit der App
verbunden.
QR-Code des Telefons:
Anmerkung: Sie können den QR-Code des
Telefon (Settings-Version-QR code) ansehen.
DE
56
Page 57

2. Ist ihr Account mit einem beliebigen Gerät
verbunden, können Sie es mit weiteren
Geräten verbinden oder weitere Geräte wie im
Folgenden gezeigt suchen:
1 2
DE
4 3
57
Page 58

5.2 Anknüpfungen löschen
DE
58
Page 59

Anmerkungen
1. Das Telefon kann nur mit einem Account
verbunden sein. Um das Telefon mit einem
neuen Account zu verbinden, muss die
vorherige Verbindung beendet werden.
2. Diejenigen Geräte, mit denen das Telefon
verbunden ist, und die, die sich an Ihrem
Telefon angemeldet haben, haben folgende
Berechtigungen: mit Telefon verbunden.
SOS-Signale empfangen. Telefondaten zu
bearbeiten.
Lage in der Realzeit,
Akku-Zustand,
QR-Code zu überprüfen,
Wecker und Familienangehörigen hinzuzufügen.
Am Telefon angemeldet
Notrufe zu empfangen, Telefondaten anzusehen. Lage in der Realzeit, Akku-Zustand,
QR-Code zu überprüfen, Wecker und Familienangehörigen durch zu blättern.
3. Diejenigen Geräte mit denen das Telefon
verbunden ist, und die, die am Telefon angemeldet sind, werden automatisch zur Kontaktliste hinzugefügt.
4. Nach Beenden einer Verbindung werden
alle Verbindungsdaten automatisch zurückgesetzt.
DE
59
Page 60

SafePhone
Guide de l’utilisateur
EN ∙ RU ∙ DE ∙ FR ∙ ES ∙ IT ∙ LV ∙ LT ∙ EST
Page 61

FR
1. Introduction
Merci d’avoir choisi notre téléphone portable
SafePhone! Grâce à l’application Wherecom S3,
vous pourrez utiliser toutes les fonctions du
modèle SafePhone le plus ecacement possible.
Nous faisons tout notre possible pour que vous
obteniez un téléphone pratique et sécuritaire de
haute qualité.
61
Page 62

2. Touches
FR
1. Récepteur.
2. Touche de retour.
3. Touche de
délement vers
le haut.
4. Touche de
conrmation.
5. Touches
numériques.
6. Étoile:
déverrouillage de
l’écran et signes
de ponctuation.
7. Caméra frontale.
8. Bouton de
réinitialisation:
rejeter d’appel,
allumer/éteindre
le téléphone.
9. Touche de
délement vers
le bas.
10. Touche de
numérotation/
visualisation de
l’historique des
appels.
11. Dièse:
déverrouiller
l’écran, changer
de prol.
62
Page 63

FR
12. Microphone.
13. Port USB.
15. Caméra arrière.
16. Lampe de poche.
14. Haut-parleur.
17. Touche d’envoi
d’un signal SOS:
vous pouvez
envoyer ce signal
en appuyant
longuement sur la
touche.
63
Page 64

FR
3. Les Fonctions principales du
téléphone
3.1 Allumer et éteindre le téléphone
Appuyez et maintenez enfoncée la touche
de réinitialisation pour allumer ou éteindre le
téléphone.
3.2 Déverrouiller l’écran:
Faites glisser votre doigt sur l’écran vers la droite
pour déverrouiller le téléphone. Vous pouvez
également appuyer sur la touche étoile et
ensuite sur la touche dièse pour déverrouiller
l’écran.
3.3 Appels
1. Les Appels sortants
Vous pouvez eectuer un appel sortant en
composant le numéro nécessaire à l’aide des touches
numériques et en appuyant sur la touche d’appel.
Vous pouvez eectuer un appel sortant à l’aide du
répertoire téléphonique: trouvez le contact requis
dans le répertoire et appuyez sur la touche d’appel.
Vous pouvez eectuer un appel sortant à l’aide de
l’historique des appels: choisissez le numéro requis
dans l’historique des appels et appuyez sur la touche
d’appel.
64
Page 65

FR
2. Les Appels entrants
Vous pouvez répondre à un appel entrant à
l’aide de la touche de conrmation ou la touche
d’appel.
3. Rejeter/terminer un appel
Vous pouvez rejeter un appel entrant à
l’aide de la touche de retour ou la touche de
réinitialisation.
3.4 Les Informations sur les appels
1. Visualiser l’historique des appels
Pour visualiser l’historique des appels, entrez
dans le menu principal et appuyez sur la touche
d’appel.
2. L’Historique des appels: options
1. Appeler un numéro: choisissez cette option
pour appeler le numéro d’un contact.
2. Ajouter un contact: choisissez cette option
pour ajouter un contact dans le répertoire.
65
Page 66

FR
3. Supprimer une entrée: choisissez cette
option pour supprimer les informations sur
un appel.
4. Supprimer l’historique des appels: choisissez
cette option pour supprimer entièrement
l’historique des appels.
3.5 L’Envoi d’un signal SOS
1. Envoyer un signal SOS
Pour envoyer un signal SOS, appuyez et
maintenez enfoncée la touche SOS. L’application
sera notiée du signal SOS adressé à
l’administrateur.
2. Annuler l’envoi d’un signal SOS
Appuyez sur n’importe quelle touche, à
l’exception de la touche SOS, pour annuler
l’envoi du signal.
3.6 La Réinitialisation
Appuyez et maintenez enfoncée la touche de
réinitialisation pour réinitialiser le téléphone.
3.7 Le Mode avion
Appuyez et maintenez enfoncée la touche de
retour pour activer le mode avion.
3.8 Le Mode de saisie
Pour modier le texte saisi, appuyez sur la
touche dièse et sélectionnez un mode de saisie
des informations.
66
Page 67

FR
4. Les Applications sur votre
téléphone
4.1 Les Contacts
1. Ajouter un contact
Pour chaque contact, vous pouvez entrer le
nom, le numéro de contact et sélectionner une
photo.
2. Gérer les contacts
1 Visualiser
Sélectionnez cette option pour visualiser les
informations sur un contact.
2 Envoyer un message
Sélectionnez cette option pour envoyer un
message au numéro du contact.
67
Page 68

FR
3 Modier
Sélectionnez cette option pour modier le nom
du contact, son numéro de téléphone ou sa
photo.
4 Supprimer
Sélectionnez cette option pour supprimer un
contact.
NB: Vous pouvez supprimer un contact à partir
de l’écran tactile. Appuyez sur le contact que
vous voulez supprimer et faites glisser votre
doigt sur l’écran vers la gauche. Ensuite, appuyez
sur l’icône de la poubelle.
NB: Les contacts ajoutés via l’application
ne peuvent être supprimés qu’à l’aide de
l’application, mais pas à partir du téléphone.
5 Paramètres de la liste des contacts — Copier
sur la carte SIM — Copier tout: en utilisant cet
algorithme, vous pouvez copier des contacts à
partir du téléphone sur la carte SIM;
Paramètres de la liste des contacts — Copier sur
la carte SIM — Copier le contact sélectionné: en
utilisant cet algorithme, vous pouvez copier un
seul contact sélectionné.
68
Page 69

FR
Paramètres de la liste des contacts — Supprimer
tous les contacts — Supprimer de la carte SIM
/ Supprimer du téléphone — OK: en utilisant
cet algorithme, vous pouvez supprimer tous les
contacts de la carte SIM/du téléphone.
Paramètres de la liste des contacts — Mémoire:
à l’aide de ce paramètre, vous pouvez visualiser
le nombre des contacts.
NB: Quand vous allumez le téléphone, tous
les contacts stockés sur la carte SIM sont
automatiquement copiés dans la mémoire du
téléphone.
69
Page 70

FR
4.2 La Remise en forme et la santé
Dans cette section, vous pouvez visualiser les
informations sur le nombre des pas, l’activité
physique et les calories consommées pendant
la journée.
4.3 L’Horloge
1. Ajouter un réveil
Pour activer et congurer un réveil et pour lui
attribuer un nom, sélectionnez «Ajouter un
réveil».
2. Arrêter le réveil
Pour désactiver un réveil, appuyer sur n’importe
quelle touche.
70
Page 71

FR
3. Congurer le réveil
1 Activer/désactiver
Sélectionnez cette option pour activer ou
désactiver un réveil.
2 Supprimer un réveil
Sélectionnez cette option pour supprimer un
réveil.
NB: Vous pouvez également supprimer un réveil
à l’aide de l’écran tactile. Touchez le réveil que
vous voulez supprimer et faites glisser votre
doigt sur l’écran vers la gauche. Ensuite, appuyez
sur l’icône de la poubelle.
3 Modier un réveil
Sélectionnez cette option pour modier le nom
et l’heure d’un réveil.
71
Page 72

FR
4.4 La Caméra
1.Vous pouvez prendre des photos et supprimer
les photos que vous venez de prendre.
2. Basculer entre les caméras: utilisez les
touches de délement vers le haut et vers le
bas pour basculer entre la caméra frontale et la
caméra arrière.
4.5 La Galerie
Vous pouvez visualiser ou supprimer les photos
sélectionnées.
72
Page 73

4.6 Les Paramètres
1.Les Prols
Mode standard: vibration + sonnerie (vous
pouvez changer la mélodie et le volume de la
sonnerie dans les paramètres du téléphone).
Mode silencieux: seule la vibration.
Mode de réunion: un mode complètement
silencieux sans vibration.
FR
73
Page 74

FR
2. La Conguration du réseau
1 Congurer Wi-Fi
Vous pouvez sélectionner un réseau Wi-Fi, vous
connecter au réseau ou vous déconnecter du
réseau.
2 Congurer GPRS/3G
Vous pouvez connecter ou déconnecter
GPRS/3G.
NB: si tous les réseaux sont déconnectés, vous
pouvez utiliser la fonction d’envoi d’un signal SOS,
les fonctions de remise en forme, mais l’application
ne pourra pas déterminer l’emplacement du
téléphone. Évitez de déconnecter celui-ci du
réseau sans qu’il soit nécessaire.
3. Bluetooth
74
Page 75

FR
Vous pouvez eectuer la recherche de réseaux
bluetooth, y connecter et changer le nom de
votre bluetooth.
4. Les Paramètres linguistiques
5. La Version du logiciel et le code QR
Dans cette section, vous pouvez visualiser la
version du logiciel et le code QR.
4.7 Les Messages
Vous pouvez envoyer des messages, répondre à
des messages et supprimer des messages.
75
Page 76

5. L’Application S3
5.1 La Liaison du diapositif/le mode de suivi
L’Algorithme de liaison du téléphone:
1 téléchargez l’application Wherecom S3 et
enregistrez votre compte sur Google Play ou
AppStore;
2 Connectez-vous, scannez le code QR à la
demande de l’application. Après cela, votre
téléphone sera lié à l’application.
Le code QR de votre téléphone:
NB: Vous pouvez également visualiser le code
QR à partir du téléphone (Settings-Version-QR
code)
FR
76
Page 77

2. Si votre compte est déjà lié à un dispositif,
vous pouvez le lier à un autre dispositif ou
basculer vers un autre dispositif en utilisant
l’algorithme suivant:
1 2
FR
4 3
77
Page 78

5.2 Annuler la liaison
FR
78
Page 79

NB
1. Un téléphone ne peut être lié qu’à un seul
compte. Pour lier le téléphone à un nouveau
compte, il faut annuler préalablement la
liaison précédente.
2. Les possibilités des utilisateurs des
dispositifs auxquels est lié le téléphone et
celles des utilisateurs qui sont souscrits au
téléphone: L’utilisateur d’un dispositif auquel
est lié le téléphone, est autorisé de: recevoir
des signaux SOS, contrôler le téléphone
(déterminer son emplacement en temps
réel, vérier l’état de la batterie, visualiser le
code QR, ajouter des réveils et des membres
de la famille). Celui qui est souscrit au
téléphone, est autorisé de: recevoir des
signaux SOS, visualiser les informations sur
le téléphone (déterminer son emplacement
en temps réel, vérier l’état de la batterie,
visualiser le code QR, visualiser les réveils et
les membres de la famille).
3. Les utilisateurs des dispositifs auxquels est
lié le téléphone et ceux qui sont souscrits au
téléphone, sont automatiquement ajoutés
dans le répertoire des contacts.
4. Après l’annulation d’une liaison, toutes
les souscriptions sont automatiquement
éliminées.
FR
79
Page 80

SafePhone
Manual del usuario
EN ∙ RU ∙ DE ∙ FR ∙ ES ∙ IT ∙ LV ∙ LT ∙ EST
Page 81

ES
1. Introducción
¡Gracias por escoger nuestro teléfono móvil Safe
Phone! Por medio de la aplicación WherecomS3,
Ud. podrá emplear todas las funciones del
modelo Safe Phone con máxima eciencia.
Hacemos todo lo posible para que Ud. reciba
teléfono de alta calidad, confortable y seguro.
81
Page 82

2. Botones
ES
1. Receptor.
2. Botón de
retroceso.
3. Botón de
desplazamiento
hacia arriba.
4. Botón de
conrmación.
5. Botones de
números.
6. Estrella:
desbloqueo de
la pantalla y
puntuación.
7. Cámara frontal.
8. Botón de
anulación:
anulación
de llamadas,
activación/
desactivación del
teléfono.
9. Botón de
desplazamiento
hacia abajo.
10. Botón de
marcación del
número / de
revisión del
historial de
llamadas.
11. Almohadilla:
desbloqueo de la
pantalla, cambio
del perl.
82
Page 83

ES
12. Micrófono.
13. Puerto USB.
15. Cámara trasera.
16. Linterna.
14. Dinámico.
17. Botón de envío
de la señal SOS:
se podrá enviar la
señal por presión
duradera.
83
Page 84

ES
3. Funciones principales del
teléfono
3.1 Activación y desactivación del teléfono
Presione y retenga presionado el botón de
anulación para activar o desactivar su teléfono.
3.2 Desbloqueo de la pantalla:
Pasa su dedo por la pantalla hacia derecho para
desbloquear la pantalla. Ud. también podrá
presionar la estrella y luego la almohadilla para
anular bloqueo.
3.3 Llamadas
1. Llamadas salientes
Ud. podrá hacer llamada saliente por marcar
el número necesario por medio de botones de
números y presionar el botón del envío de llamada.
Ud. podrá hacer llamada saliente usando la libreta
de teléfonos: busque el contacto necesario en
la libreta de teléfonos y presione el botón de
marcación del número.
Ud. podrá hacer llamada saliente usando el historial
de llamadas: seleccione el número necesario en
el historial de llamadas y presione el botón de
marcación del número.
84
Page 85

ES
2. Llamadas entrantes
Ud. podrá responder a la llamada entrante por
medio del botón de conrmación o del botón
de llamada.
3. Anulación/n de la llamada
Ud. podrá anular la llamada entrante por
presionar el botón de retroceso o el botón de
anulación.
3.4 Información sobre llamadas
1. Revisión del historial de llamadas
Para revisar el historial de llamadas, entre
en el menú principal y presione el botón de
marcación del número.
2. Historial de llamadas: opciones
1. llamar al número: seleccione esta opción
para enviar llamada al número del contacto;
2. añadir contacto: seleccione esta opción para
añadir contacto en la libreta de teléfonos;
3. borrar los datos: seleccione esta opción para
borrar los datos sobre la llamada;
85
Page 86

ES
4. borrar el historial de llamadas: seleccione
esta opción para borrar todo el historial de
llamadas;
3.5 Envío de la señal SOS
1. Envío de la señal SOS
Para enviar la señal SOS, presione y retenga
presionado el botón SOS. La aplicación recibirá
el aviso sobre la señal SOS para el administrador.
2. Anular el envío de la señal SOS
Presione cualquier botón, excepto el botón SOS,
para anular el envío de la señal.
3.6 Reinicio
Para reiniciar el teléfono, presione y retenga
presionado el botón de anulación.
3.7 Modo de vuelo
Para activar el modo de vuelo, presione y
retenga presionado el botón de anulación.
3.8 Método de la introducción
Para redactar el texto introducido, presione
«almohadilla» y escoja el método de la
introducción de datos.
86
Page 87

4. Aplicaciones en el teléfono
4.1 Contactos
1. Adición de los contactos
Para cada contacto, Ud. podrá introducir su
nombre, su número de contacto y escoger su
fotografía.
2. Gestión de contactos
1 Revisión
Seleccione esta opción para revisar los datos
sobre el contacto;
2 Envío de mensajes
Seleccione esta opción para enviar mensaje al
número del contacto;
ES
87
Page 88

ES
3 Redacción
Seleccione esta opción para redactar el nombre
del contacto, su número de teléfono y su
fotografía.
4 Borradura
Seleccione esta opción para borrar el contacto.
Nota: Ud. podrá borrar el contacto usando la
pantalla táctil. Presione el contacto que Ud.
querrá borrar y pase su dedo a la izquierda por la
pantalla. Luego, presione el icono con la imagen
de papelera de reciclaje.
Nota: los contactos, añadidos por la aplicación,
podrán eliminarse solamente por la aplicación,
pero no por medio del teléfono.
5 Ajustes de la libreta de teléfonos
Ajustes de la lista de contactos — Copiar a
la tarjeta SIM — Copiar todo: usando este
algoritmo, Ud. podrá copiar los contactos desde
el teléfono a la tarjeta SIM.
88
Page 89

ES
Ajustes de la lista de contactos — Copiar a la
tarjeta SIM — Copiar solamente este contacto:
usando este algoritmo, Ud. podrá copiar un
contacto seleccionado;
Ajustes de la lista de contactos — Borrar todos
los contactos — Borrar de la tarjeta SIM/borrar
del teléfono — OK: usando este algoritmo, Ud.
podrá borrar todos los contactos de la tarjeta
SIM/teléfono.
Ajustes de la lista de contactos — Memoria:
usando este algoritmo, Ud. podrá revisar la
cantidad de los contactos.
Nota: Cuando Ud. activará su teléfono, todos
los contactos, memorizados en la tarjeta SIM, se
copiarán automáticamente en la memoria del
teléfono.
89
Page 90

ES
4.2 Buena forma y salud
En esta sección se puede ver la información
sobre la cantidad de pasos, actividad y calorías,
consumidas durante el día.
4.3 Reloj
1. Añadir despertador
Para activar y ajustar un nuevo despertador
y crear su nombre, seleccione “Nuevo
despertador”.
2. Parar despertador
Para desactivar el despertador, presione
cualquier botón.
90
Page 91

ES
3. Ajuste del despertador
1 Activación/ desactivación
Seleccione esta opción para activar o desactivar
el despertador.
2 Borrar despertador
Seleccione esta opción para borrar el
despertador.
Nota: Ud. también podrá borrar el despertador
usando la pantalla táctil. Presione el despertador
que Ud. querrá borrar y pase su dedo a la
izquierda por la pantalla. Luego, presione el
icono con la imagen de papelera de reciclaje.
3 Redactar despertador
Seleccione esta opción para cambiar el nombre
y el tiempo del despertador.
91
Page 92

ES
4.4 Cámara
1. Ud. podrá hacer fotografías y borrar las
fotografías recientemente hechas.
2. Conmutación de las cámaras: Use los botones
de desplazamiento hacia abajo y hacia arriba
para conmutar la cámara frontal y trasera.
4.5 Galería
Ud. podrá revisar o borrar las fotografías
seleccionadas.
92
Page 93

4.6 Ajustes
1. Perles
Modo principal: vibración + timbre (es posible
cambiar la melodía y el volumen del timbre en
los ajustes del teléfono)
Modo silencioso: solamente vibración
Modo de conferencia: modo completamente
silencioso sin vibración.
ES
93
Page 94

ES
2. Ajuste de la red
1 Ajuste de Wi-Fi
Ud. podrá seleccionar la red Wi-Fi, entrar en la
red y salir de la red.
2 Ajuste de GPRS/3G
Ud. podrá conectar y desconectar GPRS/3G.
Nota: Si todas las redes están desconectadas, Ud.
no podrá usar la función del envío de la señal
SOS, las funciones de salud, y la aplicación no
podrá determinar la posición del teléfono. Trate
de no desconectar la red sin necesidad.
3. Bluetooth
Ud. podrá buscar las redes bluetooth, entrar
en dichas redes y cambiar el nombre de su
94
Page 95

ES
bluetooth.
4. Ajustes de la lengua
5. Versión del software y código QR
En esta sección, Ud. podrá revisar la versión del
software y el código QR.
4.7 Mensajes
Ud. podrá enviar mensajes, responderlas y
borrarlas.
5. Aplicación Wherecom S3
5.1 Vinculación del dispositivo/modo de
95
Page 96

seguimiento
1. Algoritmo de vinculación del teléfono:
1 descargue la aplicación WherecomS3 y
registre su cuenta en Google Play o App Store;
2 entre en la cuenta, escanee el código QR
según la demanda de la aplicación. Luego, su
teléfono estará vinculado a la aplicación.
Código QR del teléfono:
Nota: Ud. también podrá ver el código QR del
teléfono (Settings-Version-QR code)
ES
96
Page 97

ES
2. Si su cuenta está vinculada a algún dispositivo,
Ud. podrá vincularla a otro dispositivo o seguir
otro dispositivo usando el siguiente algoritmo:
1 2
4 3
97
Page 98

5.2 Anulación de la vinculación
ES
98
Page 99

Notas
1. Su teléfono podrá vincularse solamente a
una cuenta. Para vincular su teléfono a una
cuenta nueva, será necesario primero anular
la vinculación anterior.
2. Las posibilidades de las personas, a cuyos
dispositivos su teléfono estará vinculado, y
de las personas que seguirán su teléfono:
La persona, al cuyo dispositivo su teléfono
estará vinculado, tendrá derecho a: recibir
las señales SOS, mandar el teléfono
(controlar su posición en el tiempo real, ver
el estado de su batería, ver el código QR,
añadir los despertadores y los miembros
de la familia). La persona, cuyo dispositivo
seguirá su teléfono, tendrá derecho a: recibir
las señales SOS, ver los datos del teléfono
(controlar su posición en el tiempo real, ver
el estado de su batería, ver el código QR,
ver los despertadores y los miembros de la
familia).
3. Las personas, a cuyos dispositivos su
teléfono estará vinculado, y las personas
que seguirán su teléfono se memorizarán
automáticamente en la libreta de contactos:
4. Al anularse la vinculación, todas las
suscripciones se anularán automáticamente.
ES
99
Page 100

SafePhone
Manuale per l’utente
EN ∙ RU ∙ DE ∙ FR ∙ ES ∙ IT ∙ LV ∙ LT ∙ EST
 Loading...