

Page 1

MULTILINGUAL USER MANUAL
EN | RU | DE | FR | ES | IT | LV | LT | EST | AR | HI | KM
Page 2

www.elari.net/support:
: www.elari.net/support
: www.elari.net/support
2 3
Contents
EN User manual ..............................................................................................4
RU Руководство пользователя ............................................................ 13
DE Benutzerhandbuch .............................................................................. 22
FR Manuel d’utilisation ............................................................................. 31
ES Manual de usuario ............................................................................... 40
IT Manuale d`uso ....................................................................................... 49
LV Lietotāja instrukcija ............................................................................. 58
LT Vartotojo vadovas ................................................................................ 67
EST Kasutusjuhend ...................................................................................... 76
Page 3
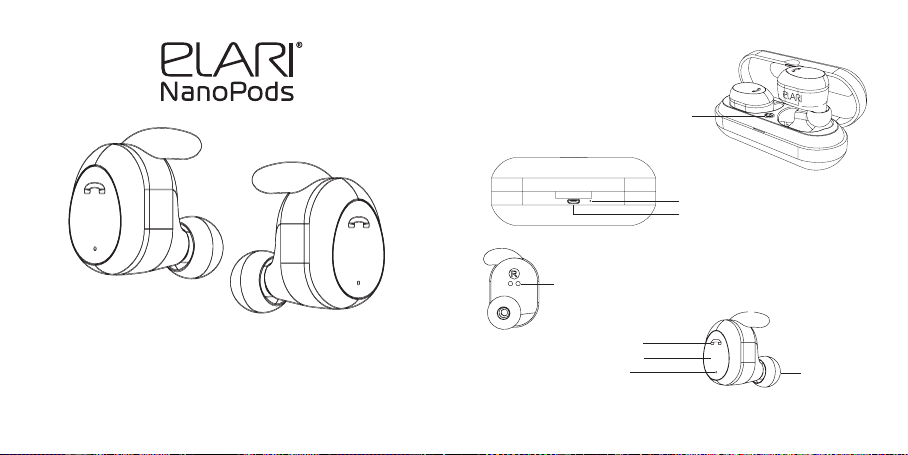
USER MANUAL
EN
4 5
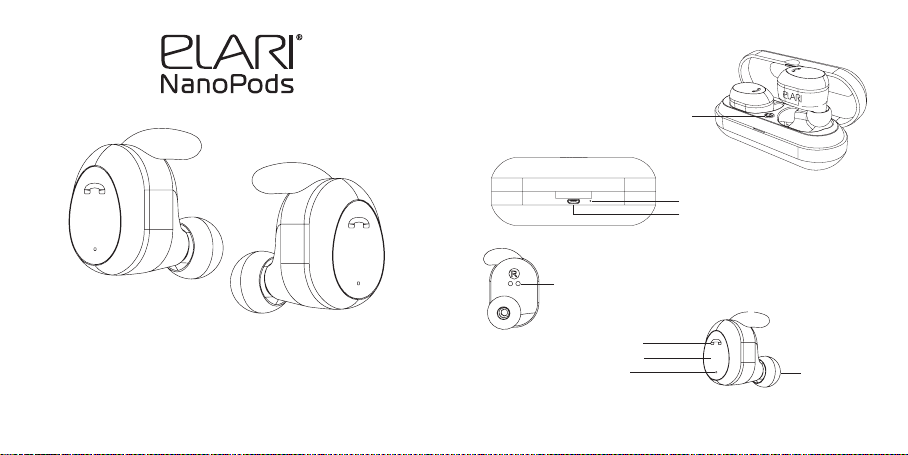
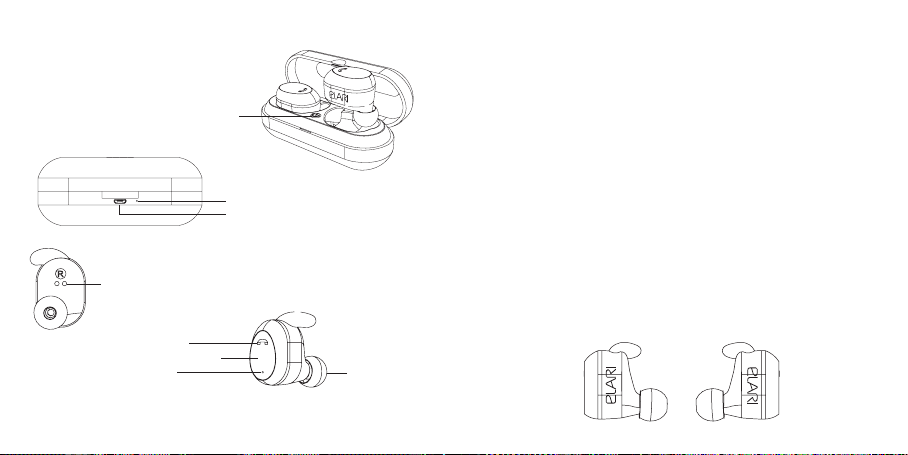
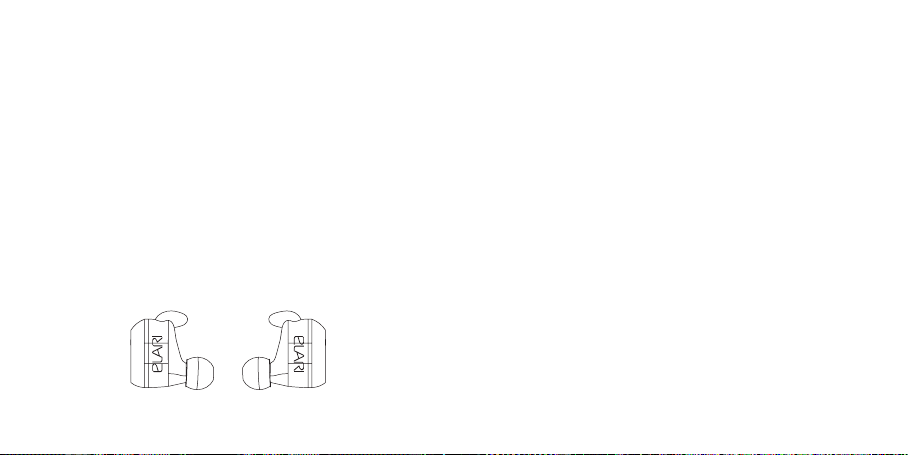
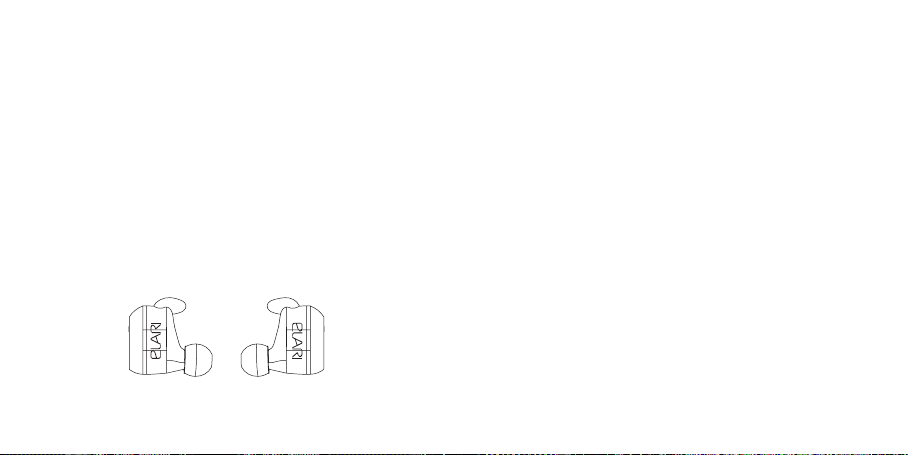
1. Description
Charging case power On/O
Magnetic contact
with the charging case
Indicator
Power/Call button
Microphon
Charging case indicator
MicroUSB charging port
Silicone tip
Page 4
2. Getting started: pairing the earphones
with each other
The earphones are two separate Bluetooth-devices which need
to be paired to each other before connecting them to your smart
phone, tablet, laptop, etc. This needs to be done once, and after
the initial connection, they will pair to each other and connect
to the Bluetooth device automatically when you power them on.
To pair the earphones to each other please follow the instruction
below:
2.1. Take the left (L) and the right (R) earphones in the o
state (indicators not blinking).
2.2. Press and hold power keys of both earphones until you
hear rst “Power on” and then “NanoPods pairing” voice mes
sages. The indicators of both earphones will start blinking
red and white.
To accelerate the pairing process, bring the headphones
closer to each other.
Left (L) Right (R)
6 7
-
2.3. Now the earphones will connect to each other and indicators will start blinking white only. In the earphones you will
hear “NanoPods connected” voice message.
-
2.4. Then you will hear the voice messages: “Right channel” and “Left channel”. Now the earphones are successfully
paired to each other and ready to be connected to your Bluetooth device, and the right earphone will start blinking red
and white.
3. Connecting to a Bluetooth device
3.1. Turn on Bluetooth on your device.
3.2. Open Bluetooth settings and search for new devices.
3.3. Choose “Elari NanoPods-R” from the list of Bluetooth
devices.
3.4. Complete the connection.
3.5. You will hear “Music source connected” voice message in
the earphones.
NOTE: DURING PHONE CALLS OR OTHER USE OF THE EARPHONES AS HEADSET FOR VOICE CONVERSATION, THE
SOUND IS ONLY IN THE RIGHT EARPHONE, NOT BOTH (you
can also choose and connect the left earphone if you prefer
that by pairing it separately in mono mode).
Earphones support devices with Bluetooth versions
V2.1+EDR and above.
Page 5
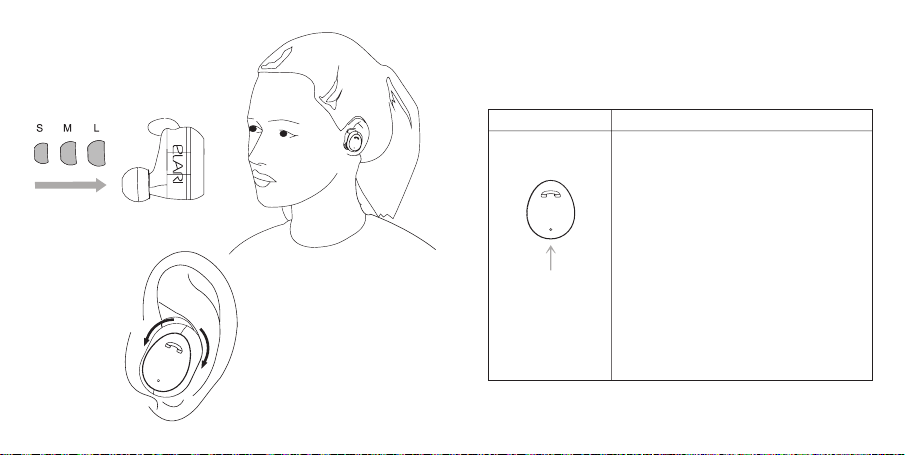
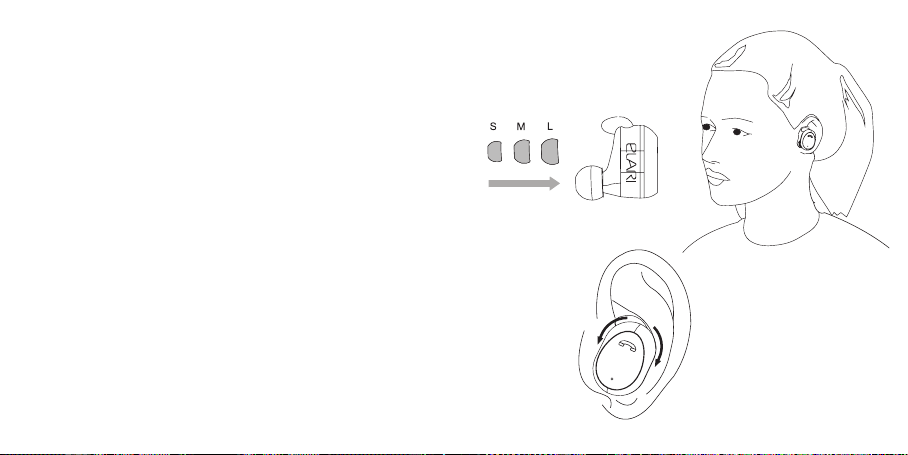
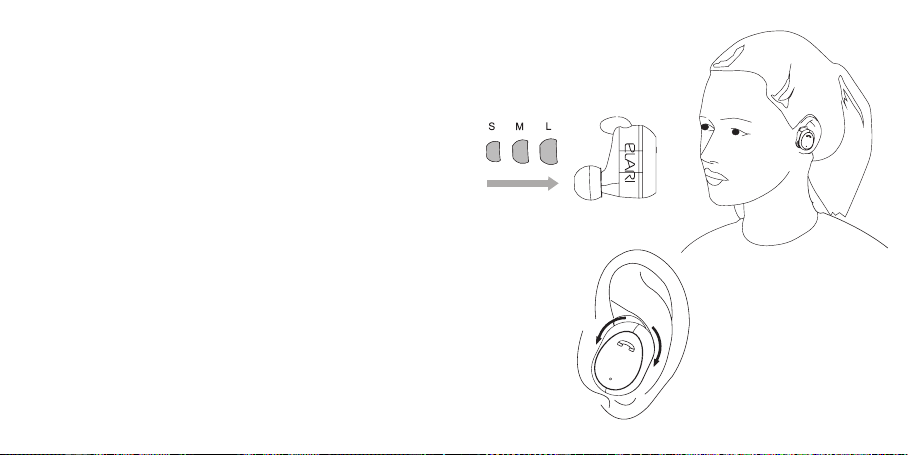
4. How to wear
Choose the most
suitable silicone tips
5. Buttons functions
When both earphones (R) and (L) are turned on, the main earphone is
considered to be the right earphone (R). The functions described below
relate mainly to the right earphone (R).
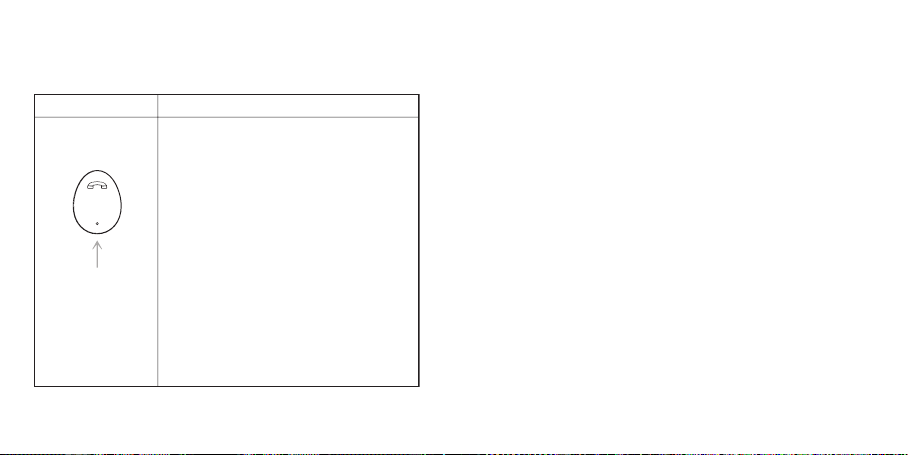
Button Function
• To turn the earphones on or o, press and
hold the button for a few seconds.
• To answer or end a call, short press the
button.
• To reject an incoming call, press and hold
the button until you hear a beep.
• Press twice the button to redial the last
call.
• Short press the button to pause or play
Power/Call button
Adjust a comfortable angle
If only one of the earphones is turned on – all the functions of the Power/
Сall button described above are carried out directly on the earphone.
8 9
music.
• With the earphones not paired to each
other, and not connected to the phone,
and are in pairing mode, press the button
twice to switch between dierent languages of the voice prompt.
Page 6

6. Earphones and case charging
Both earphones and the charging case are equipped with
built-in batteries. Before the rst use, make sure that the
headset is charged.
Charging case: connect the charging cable to the case’s
microUSB port. Plug the cable into standard USB 5 V power
output. When charging, the indicator will be ashing red. If
the charging didn’t start, unplug the charging cable and then
plug it again. When the case is fully charged, the case’s indicator will turn red without ashing. You can now unplug the
charging cable from the microUSB port.
Earphones: earphones charging doesn’t require a charging
cable. Just insert the earphones into the charging case and
press the in-case power button. When the earphone’s indicator turns red, the charging case’s indicator will turn white,
and the earphones will start charging. If the charging didn’t
start, take the earphones out of the case, and then put them
back again. When the earphones are fully charged, the red
indicator will turn o. The charging case will turn the power
o automatically.
Make sure that the silicon tip is attached correctly and is not
preventing the earphone from charging inside the case, and
that the charging contacts on the earphone and/or the case
are not dirty.
10 11
Attention
• Use only original Elari cable included in the set. Using
non-original USB/microUSB 5 V charging cables may result
in damaging the earphones, or, under extreme conditions,
explosion, and will void the product warranty.
• Multiple repeated charging and discharging of the earphones will decrease the battery performance over time.
This is normal for any rechargeable battery.
• Do not make or receive calls during charging.
• When the earphones battery level is low, the earphones
will repeat “Low battery” voice message, and the earphone’s indicator will start blinking red. If the earphones
become discharged during a call, the call will be automatically transferred back to the phone.
Page 7
7. Power o
Press and hold the Power/Call button on the earphone to
turn the earphones o.
12 13
Руководство пользователя
RU
Page 8
1. Описание
Кнопка включения зарядного кейса
Магнитный
контакт с зарядным кейсом
Индикатор
Кнопка включения/вызова
Микрофон
Индикатор зарядного кейса
MicroUSB-порт для зарядки
Амбушюр
2. Начало работы: cопряжение
наушников друг с другом
Оба наушника представляют собой два разных Bluetoothустройства, которые необходимо сопрячь друг с другом перед
тем, как соединить по Bluetooth с вашим смартфоном, планшетом,
ноутбуком и т.п. Эта процедура выполняется один раз: в дальней
шем, после каждого включения, наушники будут сопрягаться друг
с другом и подключаться к Bluetooth-устройству автоматически.
Для сопряжения наушников друг с другом необходимо следовать
инструкции ниже:
2.1. Возьмите выключенные левый (L) и правый (R) наушники
(световые индикаторы наушников не мигают).
2.2. Нажмите и удерживайте кнопки включения каждого на
ушника, как минимум, в течение 5 секунд, пока не услышите
голосовые сообщения: сначала «Включение», а затем – «Со
пряжение». Световые индикаторы наушников в этот момент
будут поочередно мигать красным и белым.
Для ускорения процесса сопряжения, рекомендуем подне
сти наушники друг у другу.
Левый (L) Правый (R)
1514
-
-
-
-
Page 9
2.3. Теперь наушники начнут подключаться друг к другу, а
световые индикаторы будут мигать только белым. Дождитесь, когда в наушниках прозвучит голосовое сообщение
«NanoPods подключены».
2.4. После этого в правом и левом наушниках прозвучат
голосовые сообщения «Правый канал» и «Левый канал»
соответственно. Теперь наушники успешно сопряжены
друг с другом и готовы к подключению к вашему Bluetoothустройству (световой индикатор на правом наушнике при
этом будет поочередно мигать красным и белым).
3. Подключение к Bluetooth-устройству
3.1. Включите Bluetooth на вашем устройстве.
3.2. Откройте меню настроек Bluetooth на вашем устройстве
и произведите поиск.
3.3. Выберите «Elari NanoPods-R» из списка найденных
Bluetooth-устройств.
3.4. Нажмите на него для подключения.
3.5. Сопряженные наушники подключатся к вашему устройству,
и вы услышите голосовое сообщение «Устройс тво подключено».
ПРИМЕЧАНИЕ: ВО ВРЕМЯ ЗВОНКОВ, А ТАКЖЕ ВО ВСЕХ СЛУЧАЯХ ИСПОЛЬЗОВАНИЯ НАУШНИКОВ В РЕЖИМЕ ГАРНИТУРЫ
ДЛЯ ГОЛОСОВОГО ОБЩЕНИЯ, ГОЛОС СОБЕСЕДНИКА БУДЕТ
СЛЫШЕН ТОЛЬКО В ПРАВОМ НАУШНИКЕ (при желании вы также можете выбрать левый наушник как источник звука, подключив его отдельно в монорежиме).
Наушники поддерживают устройства с версиями Bluetooth
V2.1+EDR и выше.
16 17
4. Ношение
наушников
Подберите
удобные амбушюры
Выберите
комфортный угол
наклона наушников
Page 10
5. Функции кнопок наушников
При включенных обоих наушниках (R) и (L), главным наушником
считается правый (R). Функции, описанные ниже, относятся, главным
образом, к правому наушнику.
Кнопка Функция
• Для включения или выключения наушников
нажмите и удерживайте кнопку в течение нескольких секунд.
• Короткое нажатие на кнопку позволит ответить на звонок или прервать его.
• Для отклонения вызова при входящем звонке
нажмите и удерживайте кнопку до звукового
сигнала.
• Дважды нажмите на кнопку для повторного
набора последнего номера.
Кнопка включения/
вызова
Если включен только один из наушников – все функции кнопки
включения/вызова, описанные выше, осуществляются непосредственно на включенном наушнике.
• При проигрывании музыки короткое нажатие
на кнопку позволяет поставить трек на паузу
или запустить проигрывание.
• Если наушники не сопряжены друг с другом, не
подключены к Bluetooth-устройству или находятся в режиме сопряжения, двойное нажатие
на кнопку приведет к смене языка голосовых
сообщений.
18 19
6. Зарядка наушников и кейса
Наушники и зарядный кейс оснащены встроенными аккумуляторами. Перед первым использованием убедитесь,
что наушники полностью заряжены.
Зарядный кейс: вставьте кабель питания в порт microUSB.
Другой конец кабеля подключите в стандартный USBразъем на 5 В. Во время зарядки индикатор рядом с портом
microUSB будет мигать красным. Если зарядка не началась,
извлеките и снова вставьте кабель питания. При достижении полного заряда кейса индикатор будет непрерывно
гореть красным. Выньте кабель питания из порта microUSB.
Наушники: зарядка наушников не требует кабеля. Просто
поместите наушники в кейс и нажмите кнопку включения
питания внутри кейса. Когда индикатор на наушнике загорится красным, а на кейсе - белым, зарядка наушников
начнется. Если зарядка не началась, извлеките наушники и
снова вставьте их в кейс. При достижении полного заряда
наушников красный индикатор погаснет. При этом зарядный кейс автоматически выключится.
Перед установкой наушников в зарядный кейс убедитесь,
что амбушюры правильно зафиксированы на наушниках и
не препятствуют их зарядке, а зарядные контакты на науш-
никах и/или в корпусе кейса не загрязнены.
Page 11

Внимание
• Используйте только оригинальный зарядный кабель
Elari, входящий в комплект. Использование неоригинальных кабелей может привести к повреждению
наушников, либо, при неблагоприятном стечении обстоятельств, к взрыву аккумулятора и аннулированию
гарантии на изделие.
• Постепенно циклы заряда и разряда наушников снизят время работы аккумулятора. Это нормально для
любых аккумуляторов.
• Не звоните и не принимайте вызовы во время зарядки
наушников.
• При низком уровне заряда наушники будут повторять
голосовое сообщение «Батарея разряжена», а индикатор будет мигать красным. Если наушники разрядятся
во время звонка, он будет автоматически перенаправлен на телефон.
20 21
7. Выключение наушников
Нажмите и удерживайте кнопку включения/вызова на
наушнике в течение нескольких секунд для выключения наушников.
Page 12
1. Beschreibung
Ladegehäuse-Einschalttaste
Magnetkontakte für den Kontakt
mit dem Ladegehäuse
Ladegehäuse-Anzeige
microUSB-Port für die Auadung
BENUTzERhANdBUch
DE
22
Einschalttaste/Ruftaste
Indikator
Mikrofon
Ohrkissen
23
Page 13
2. Erste Schritte: kopplung der Kopfhörer
Die Kopfhörer sind zwei separate Bluetooth-Geräte, die miteinander verbunden werden müssen, bevor sie an das Smartphone, Tablet, Laptop usw. angeschlossen werden. Dies muss
nur einmal durchgeführt werden. Nach der ersten Kopplung
werden die Kopfhörer automatisch per Bluetooth miteinander
gekoppelt und verbunden wenn sie einschaltet werden.
Um die Ohrhörer zu koppeln, muss man folgende Schritte vornehmen:
2.1. Nehmen Sie den linken (L) und den rechten Kopfhörer (R)
im ausgeschalteten Zustand (die Anzeigen blinken nicht) aus
dem Gehäuse.
2.2. Drücken und halten Sie die Netztasten der beiden
Ohrhörer, bis Sie höre zuerst „Power on“ und dann „NanoPods
Pairing“ -Stimme hören. Die Anzeigen beider Kopfhörer
beginnen rot und weiß zu blinken.
Links(L) Rechts(R)
24 25
2.3. Jetzt werden die Kopfhörer miteinander verbunden und
die Anzeigen beginnen nur weiß zu blinken. In den Kopfhörern hören sie die Sprachnachricht „NanoPods connected“.
2.4. Dann hören Sie die Sprachnachrichten: „Rechter Kanal“ und
„Linker Kanal“ Jetzt sind beide Kopfhörer erfolgreich gekoppelt
und bereit, mit Ihrem Bluetooth-Gerät verbunden zu werden. Der
rechte Ohrhörer beginnt rot und weiß zu blinken.
3. Verbindung mit einem Bluetooth-Gerät
herstellen
3.1. Aktivieren Sie die Bluetooth Funktion auf Ihrem Gerät.
3.2. Önen Sie die Bluetooth-Einstellungen und suchen nach
neuen Geräten.
3.3. Wählen Sie „Elari NanoPods-R“ aus der Liste der
Bluetooth-Geräte.
3.4. Schließen Sie die Verbindung ab.
3.5. Sie hören jetzt die Sprachnachricht „Mit Musikquelle
verbunden“
HINWEIS: WÄHREND DER TELEFONANRUFE ODER ANDEREN
VERWENDUNG DER KOPFHÖRER ALS HEADSET BESTEHT DIE
TONAUSGABE NUR IM RECHTEN BZW LINKEN KOPFHÖRER UND
NICHT WIE SONST BEI BEIDEN KOPFHÖRERN (Sie können auch
den linken Kopfhörer auswählen und verbinden falls Sie dies
bevorzugen, indem Sie den Kopfhörer separat im Mono-Modus
koppeln).
Kopfhörer unterstützen Geräte mit Bluetooth Versionen V2.1 +
EDR und höher.
Page 14
4. Kopfhörer Tragen
Wählen Sie bequeme
Ohrkissen aus
5. Tastenfunktionen
Wenn beide Kopfhörer (R) und (L) eingeschaltet sind, gilt der rechte
Ohrhörer als Hauptohrhörer (R). Die nachfolgend beschriebenen
Funktionen beziehen sich hauptsächlich auf den rechten Ohrhörer (R).
Bouton Funktionen
• Um die Kopfhörer ein- oder auszuschalten, halten
Sie die Taste für ein paar Sekunden gedrückt.
• Um einen Anruf anzunehmen oder zu beenden,
drücken Sie kurz die Taste.
• Um einen eingehenden Anruf abzulehnen,
drücken und halten Sie die Taste, bis Sie einen
Signalton hören.
• Drücken Sie zweimal die Taste, um den letzten
Anruf erneut zu wählen.
Einschalt/Ruftaste
Wählen Sie einen bequemen
Hörerneigungswinkel aus
Wenn nur einer der Ohrhörer eingeschaltet ist, erfolgen alle oben
beschriebenen Funktionen der Anschalt /Anruftaste direkt an diesem
26 27
Kopfhörer.
• Drücken Sie kurz die Taste, um Musik anzuhalten
oder abzuspielen.
• Wenn die Ohrhörer nicht miteinander gekoppelt
und nicht mit dem Telefon verbunden sind und
sich im Paarungsmodus benden, drücken Sie die
Taste zweimal, um zwischen den verschiedenen
Sprachen der Sprachansage zu wechseln.
Page 15

6. Kopfhörer und Ladegehäuse auaden
Beide Kopfhörer und das Ladegehäuse sind mit eingebauten Akkus ausgestattet. Vor der ersten Verwendung stellen Sie sicher, dass
das beide Kopfhörer voll aufgeladen sind.
Ladegehäuse: Schließen Sie das Ladekabel an den microUSB-Anschluss des Gehäuses an. Schließen Sie das Kabel an den StandardUSB-5-V-Stromausgang an. Während des Ladevorgangs blinkt die
Anzeige rot. Falls der Ladevorgang nicht gestartet wurde, trennen
Sie das Ladekabel und schließen Sie es erneut an. Wenn das Gehäuse vollständig aufgeladen ist, leuchtet die Anzeige des Gehäuses rot, ohne zu blinken. Sie können jetzt das Ladekabel vom
microUSB-Port trennen.
Kopfhörer: Für das Auaden des Kopfhörers ist kein Ladekabel erforderlich. Stecken Sie einfach die Kopfhörer in das Ladegehäuse
und drücken die Einschalttaste. Wenn die Anzeige des Kopfhörers
rot leuchtet, wird die Anzeige des Ladegehäuses weiß und die
Kopfhörer beginnen zu laden. Wenn der Ladevorgang nicht gestartet wurde, nehmen Sie die Kopfhörer aus dem Gehäuse und legen
Sie sie wieder zurück. Wenn die Ohrhörer vollständig aufgeladen
sind, erlischt die rote Anzeige und das Ladegehäuse schaltet die
Auadefunktion automatisch aus.
Stellen Sie sicher, dass die Silikon Ohrkissen richtig angebracht sind
und das Auaden der Kopfhörer im Ladegehäuse nicht verhindern
und dass die Ladekontakte am Kopfhörer und/oder am Gehäuse
nicht verschmutzt sind.
28 29
Achtung
• Verwenden Sie nur original Elari-Kabel, die im Lieferumfang enthalten sind. Die Verwendung von nicht originalen USB/microUSB 5 V-Ladekabeln kann zur Beschädigung des Kopfhörers oder unter extremen Bedingungen
zu einer Explosion führen und führt zum Erlöschen der
Produktgarantie.
• Mehrere wiederholte Lade- und Entladevorgänge der
Kopfhörer verringern die Batterieleistung im Laufe der
Zeit. Dies ist normal für jeden Akku.
• Während des Ladevorgangs keine Anrufe tätigen oder
empfangen.
• Wenn die Akkukapazität des Kopfhörers gering ist,
wiederholen die Ohrhörer die Sprachmeldung „Niedriger
Akkustand“, und die Anzeige des Kopfhörers beginnt
rot zu blinken. Wenn sich die Kopfhörer während eines
Anrufs entladen, wird der Anruf automatisch zum Telefon
zurück übertragen.
Page 16
7. Ausschalten
Um die Ohrhörer auszuschalten, halten Sie die Einschalt/
Ruftaste an einem Ohrhörer gedrückt.
MANUEL d’UTILISATIoN
FR
30
31
Page 17

1. Description
Bouton marche/arrêt
du boîtier de charge
Contact magnétique avec
le boîtier de charge
Voyant de charge du boîtier
Prise microUSB pour la charge
2. Mise en route: jumelage des écouteurs
entre eux
Les écouteurs sont deux appareils Bluetooth individuels qui
doivent être appariés l’un avec l’autre avant de les connecter à
votre smartphone, tablette, PC portable, etc. Une fois appariés au
début de l’utilisation, ils s’apparient entre eux et se connectent à
votre appareil Bluetooth de manière automatique lorsque vous
les allumez.
Pour apparier les écouteurs l’un avec l’autre, procéder comme
suit:
2.1. Insérer les écouteurs gauche (L) et droit (R) dans vos
oreilles à l’état éteint (les voyants ne clignotent pas).
2.2. Appuyer sur les boutons d’alimentation des deux écouteurs et les maintenir enfoncés jusqu’à ce que vous entendiez
le message «Power on», puis «NanoPods pairing». Les voyants
des deux écouteurs commencent à clignoter en rouge et
blanc.
Bouton mise en marche/appel
Voyant
Microphone
Embout en
silicone
Gauche (L) Droit (R)
32 33
Page 18

2.3. Les écouteurs se connectent alors l’un à l’autre et les voyants
commencent à clignoter uniquement en blanc. Vous entendez le
message «NanoPods connected» dans vos écouteurs.
2.4. Ensuite, vous entendez les messages: «Right channel» et «Left
channel». Maintenant, les écouteurs sont appariés et sont prêts à
être connectés à votre appareil Bluetooth. À ce stade, l’écouteur
droit commence à clignoter en rouge et blanc.
3. Connexion à un appareil Bluetooth
3.1. Activer l’option Bluetooth sur votre appareil.
3.2. Accéder aux paramètres Bluetooth et rechercher de nouveaux appareils.
3.3. Dans la liste des appareils Bluetooth, sélectionner «Elari
NanoPods-R».
3.4. Terminer la connexion.
3.5. Vous entendez le message «Music source connected».
REMARQUE: PENDANT LES APPELS TÉLÉPHONIQUES OU
D’AUTRES CONVERSATIONS VOCALES QUAND VOUS UTILISEZ
LES ÉCOUTEURS COMME UN KIT MAINS LIBRES, LE SON NE
SERA ENTENDU QUE DANS L’ÉCOUTEUR DROIT (si nécessaire,
vous pouvez également sélectionner et connecter l’écouteur
gauche en l’appariant séparément en mode individuel).
Les écouteurs sont compatibles avec les appareils Bluetooth V2.1
+ EDR et de versions plus récentes.
34 35
4. Port des écouteurs
Sélectionner des embouts
silicone adaptés
Régler l’angle pour un
confort optimal
Page 19

5. Fonctions de bouton
Lorsque les deux écouteurs (R) et (L) sont allumés, l’écouteur
principal est le droit (R). Les fonctions décrites ci-dessous concernent
essentiellement l’écouteur droit (R).
Bouton Fonction
• Pour mettre en marche ou arrêter les écouteurs,
appuyer et maintenir enfoncé le bouton pendant
quelques secondes.
• Un appui court sur le bouton d’appel permet de
répondre à un appel ou de l’interrompre.
• Pour refuser un appel entrant, appuyer et maintenir enfoncé le bouton jusqu’au signal sonore.
• Appuyer deux fois sur le bouton pour une nouvelle numérotation du dernier numéro.
Bouton mise
en marche/appel
Si un seul écouteur est allumé, toutes les fonctions du bouton mise en
marche/appel décrites ci-dessus sont exécutées directement sur cet
écouteur.
• Un appui court sur le bouton permet d’arrêter ou
de lire la musique.
• Lorsque les écouteurs ne sont pas appariés l’un
avec l’autre ni connectés au téléphone, et qu’ils
sont en mode d’appariement, un double appui sur
le bouton entraînera le changement de la langue
des messages vocaux.
36 37
6. Écouteurs et recharge
Les écouteurs et le boîtier de charge sont équipés de batteries
intégrées. Avant la première utilisation, vérier que les écouteurs sont complètement chargés.
Boîtier de charge: brancher le câble d’alimentation dans le
connecteur microUSB du boîtier. Raccorder l’autre bout du
câble au connecteur USB standard de 5V. Lors de la charge, le
voyant clignote en rouge. Si la charge ne démarre pas, débrancher et rebrancher le câble. Quand le boîtier est complètement
chargé, le voyant s’allume en rouge xe. Débrancher alors le
câble de charge de la prise microUSB.
Écouteurs: la charge des écouteurs ne nécessite pas de câble.
Placer simplement les écouteurs dans le boîtier et appuyer sur
le bouton de mise en marche à l’intérieur du boîtier. Quand le
voyant des écouteurs s’allume en rouge, le voyant du boîtier
de charge s’allume en blanc, et les écouteurs commencent à
se charger. Si la charge ne démarre pas, sortir les écouteurs du
boîtier puis les y réinsérer. Quand les écouteurs sont complètement chargés, le voyant rouge s’éteint. Le boîtier de charge
s’éteint automatiquement.
Vérier que l’embout en silicone est correctement installé et
qu’il n’interfère pas avec la charge des écouteurs à l’intérieur
du boîtier. De plus, vérier qu’il n’y a pas de saleté sur les
contacts de charge des écouteurs et/ou du boîtier.
Page 20

Attention
• Utiliser exclusivement les câbles de charge Elari originaux
fournis. L’utilisation de câbles diérents des câbles d’origine USB/microUSB 5 V peut endommager les écouteurs
ou, à l’extrême, causer l’explosion de la batterie. Cela annule la garantie du produit.
• Les cycles répétés de charge et de décharge réduiront
progressivement le temps de fonctionnement de la batterie. C’est normal pour toutes les batteries rechargeables.
• Ne pas passer ni répondre à des appels lors de la charge
des écouteurs.
En cas de niveau de charge bas, les écouteurs diusent
en boucle le message vocal «Low battery» etle voyant clignote en rouge. Si les casques se déchargent lors d’un appel, celui-ci est automatiquement renvoyé au téléphone.
38 39
7. Extinction
Pour éteindre les écouteurs, maintenir le bouton mise en
marche/appel de l’écouteur enfoncé.
Page 21

MANUAL dE USUARIo
ES
1. Descripción
Botón de encendido/apagado
del estuche de carga
Contacto magnético con
el estuche de carga
Indicador luminoso
Botón de encendido/llamada
Micrófono
Indicador luminoso
del estuche de carga
Puerto de carga microUSB
Almohadillas
de silicona
40
41
Page 22

2. Primeros pasos: sincronización de los
auriculares
Los auriculares son dos dispositivos‐Bluetooth independientes que han de sincronizarse entre sí antes de conectarlos al
smartphone, tablet, portátil, etc. Este proceso tiene que hacerse solo una vez, después de la conexión inicial se conectarán
entre ellos y al dispositivo Bluetooth automáticamente cada
vez que los enciendas.
Sigue estas instrucciones para sincronizar los auriculares entre
sí:
2.1. Coge los auriculares izquierdo (L) y derecho (R) en modo
apagado (los indicadores no parpadean).
2.2. Mantén pulsadas las teclas de encendido de ambos auriculares hasta que escuches un mensaje de voz diciendo:
“Power on”, y después: “NanoPods pairing”. Los indicadores
de ambos auriculares empezarán a parpadear en blanco y
rojo.
Izquierda (L) Derecha (R)
42 43
2.3. Los auriculares se conectarán entre sí y los indicadores parpadearán sólo en blanco. En los auriculares se escuchará un mensaje
de voz diciendo: «NanoPods connected».
2.4. Después se escucharán los siguientes mensajes de voz: «Right
channel» y «Left channel». Ahora los auriculares ya están correctamente conectados entre sí y preparados para conectarse al dispositivo
‐Bluetooth. El auricular derecho empezará a parpadear con
los colores blanco y rojo.
3. Conexión al dispositivo Bluetooth
3.1. Activa la función Bluetooth de tu dispositivo.
3.2. Abre los ajustes de Bluetooth y realiza la búsqueda
de nuevos dispositivos.
3.3. Escoge “Elari NanoPods-R” de la lista de dispositivos
Bluetooth.
3.4. Completa el proceso de conexión.
3.5. En los auriculares se escuchará el siguiente mensaje de voz:
“Music source connected”.
NOTA: DURANTE LAS LLAMADAS DE TELÉFONO, O SI UTILIZA LOS
AURICULARES PARA CONVERSACIONES DE VOZ, EL SONIDO SE
ESCUCHARÁ SOLAMENTE POR EL AURICULAR DERECHO, NO POR
AMBOS AURICULARES (si lo preeres, también puedes seleccionar
y conectar el auricular izquierdo sincronizándolo por separado en
modo mono).
Los auriculares son compatibles con dispositivos con Bluetooth
V2.1 + EDR y superior.
Page 23

4. Colocación
de los auriculares
Elige las almohadillas de
silicona que mejor te vayan
5. Función de los botones
Cuando están encendidos ambos auriculares (R) y (L) , el auricular
derecho (R) se considera el auricular principal. Las funciones descritas a
continuación se reeren, principalmente, al auricular derecho (R).
Botón Función
• Mantén pulsado el botón durante unos
segundos para encender o apagar los
auriculares.
• Pulsa brevemente el botón para contestar o
terminar una llamada.
• Para rechazar una llamada entrante mantén
pulsado el botón hasta escuchar un sonido.
• Pulsa dos veces para rellamar al último
número.
• Durante la reproducción de música, pulsa
brevemente para pausar o reanudar la reproducción.
• Con los auriculares no sincronizados entre sí
y no conectados al teléfono, en modo sincronización, pulsa el botón dos veces para cambiar
el idioma de los avisos de voz.
Ajusta el ángulo de
inclinación de los auriculares
Botón de encendido/
llamada
Si sólo está conectado uno de los auriculares, todas las funciones del botón de encendido/llamada se realizarán directamente en ese auricular.
44 45
Page 24

6. Auriculares y carga del estuche
Los auriculares y el estuche de carga incorporan baterías no
extraíbles. Antes del primer uso asegúrate de que los auriculares están completamente cargados.
Estuche de carga: inserta el cable de alimentación en el puerto microUSB. Introduce el otro extremo del cable en una ranura USB estándar de 5 V de salida. Durante la carga, el indicador
parpadeará en rojo. Si la carga no se ha iniciado, desenchufa el
cable de alimentación y vuélvelo a enchufar. Cuando se complete la carga, el indicador se iluminará en rojo sin pardear. Ya
puedes desenchufar el cable de alimentación del puerto microUSB.
Auriculares: los auriculares no necesitan cable para cargarse. Coloca los auriculares en el estuche y pulsa el botón de
encendido que hay dentro del estuche. Los auriculares empezarán a cargarse cuando el indicador de los auriculares se
ponga en rojo y el del estuche se ilumine en blanco.. Si no se
ha iniciado la carga, extrae los auriculares y vuélvelos a poner
en el estuche. Cuando se complete la carga de los auriculares
el indicador rojo se apagará y el estuche de carga se apagará
automáticamente.
Asegúrate de que la almohadilla de silicona está bien colocada
y no obstaculiza la carga de los auriculares dentro del estuche
y de que los contactos de carga de los auriculares y/o estuche
no están sucios.
46 47
Advertencia
• Utiliza solamente los cables originales de Elari. El uso de cables de alimentación USB/microUSB 5V no originales pueden
ocasionar daños en los auriculares o, en condiciones extremas,
provocar la explosión de la batería, e invalidará la garantía.
• Los repetidos ciclos de carga y descarga de los auriculares reducen el rendimiento de la batería. Esto es normal en baterías
recargables.
• No realices ni contestes llamadas durante la carga.
• Cuando los auriculares tengan la batería baja, se reproducirá
un mensaje de voz diciendo: “Low battery”, y el indicador parpadeará en rojo. Si los auriculares se descargan durante una
llamada, ésta se redireccionará automáticamente al teléfono.
Page 25

7. Apagado
Mantén pulsado el botón de encendido/llamada del auricular
para apagar los auriculares.
MANUALE d`USo
IT
48
49
Page 26

1. Descrizione
Tasto di accensione
della custodia di ricarica
Contatto magnetico
con la custodia di ricarica
Spia della custodia di ricarica
Porta MicroUSB per la carica
2. IInizio: collegamento delle cue
Le cue sono due dispositivi Bluetooth separati, che devono
essere collegate l’una con l’altra prima di essere attaccate al vostro smartphone, tablet, notebook, ecc.
Questa azione è necessaria una sola volta e, dopo il collegamento iniziale, le cue saranno collegate tra loro ed al dispositivo Bluetooth automaticamente all’accensione.
Per collegare le cue tra loro bisogna eseguire le seguenti
azioni:
2.1. Inserire nelle orecchie la cua sinistra (L) e la cua destra (R) non attive (le spie non lampeggiano).
2.2. Premere e tenere premuto il tasto di alimentazione di
ambedue le cue nché non si sente un messaggio vocale
“Power on”, e poi “NanoPods pairing”. Le spie delle cue inizieranno a lampeggiare in rosso e bianco.
Tasto di accensione/chiamata
Spia
Microfono
Cuscinetto
Sinistra (L) Destra (R)
50 51
Page 27
2.3. Nel momento in cui le cue vengono collegate tra di loro, le
spie lampeggeranno solo di color bianco. Le cue emetteranno il
messaggio vocale “NanoPods connected”.
2.4. Dopodiché sarà possibile sentire i messaggi vocali: “Right
channel” и “Left channel”. Adesso le cue sono collegate correttamente tra loro e sono pronte per essere connesse al vostro
dispositivo Bluetooth; a questo punto la cua destra lampeggerà
in rosso e bianco.
3. Collegamento al dispositivo Bluetooth
3.1. Avviare il Bluetooth del dispositivo.
3.2. Aprire impostazioni Bluetooth ed eseguire una ricerca dei
nuovi dispositivi.
3.3. Dalla lista dei dispositivi Bluetooth scegliere “Elari NanoPods-R”.
3.4. Terminare il collegamento.
3.5. Le cue emetteranno il messaggio vocale “Music source
connected”.
NOTA: DURANTE LE TELEFONATE O ALTRO UTILIZZO DELLE
CUFFIE COME AURICOLARI, PER LE CONVERSAZIONI VOCALI IL
SUONO SARA’ UDIBILE SOLO NELLA CUFFIA DESTRA, E NON IN
TUTTE E DUE LE CUFFIE (qualora lo preferiate è anche possibile
scegliere e collegare la cua sinistra, accoppiandola in modo
indipendente in modalità mono).
Le cue supportano i dispositivi con versioni Bluetooth V2.1 +
EDR e superiore.
52 53
4. Uso degli auricolari
Scegliere i cuscinetti
più adatti
Scegliere l`angolo di
inclinazione più confortevole
delle cue
Page 28

5. Funzioni dei tasti
Quando sono abilitate ambedue le cue (R) e (L), la cua principale
è considerata quella destra (R). Le funzioni descritte a seguire sono
relative per lo più alla cua destra (R).
Tasto Funzione
• Premere e tenere premuto il tasto di chiamata per qualche secondo per accendere o
spegnere gli auricolari.
• Premere brevemente il tasto di chiamata per
rispondere ad una chiamata o interromperla.
• Per respingere una chiamata in entrata
premere e tenere premuto il tasto di chiamata
no al segnale acustico.
• Premere il tasto due volte per ripetere la
composizione dell’ultimo numero chiamato.
Tasto di accensione/
chiamata
Se solo una delle cue è abilitata, tutte le funzioni sopra descritte del tasto
Accensione/Chiamata, vengono eseguite direttamente in questa cua.
• Durante l’ascolto della musica, premere
brevemente il tasto per mettere la traccia in
pausa, oppure riprendere l’ascolto.
• In caso di assenza di connessione dopo
l`accensione ed in modalità di collegamento,
premere due volte il tasto per modicare la
lingua dei messaggi vocali.
54 55
6. Le cue e la carica
Gli auricolari e la custodia di ricarica sono dotati di batteria
integrata ssa. Precedentemente al primo utilizzo, assicurarsi
che le cue siano completamente caricate.
Custodia di ricarica: inserire il cavo nella porta microUSB. Inserire l`estremità opposta del cavo nella porta USB standard
5V. Durante la carica, la spia accanto alla porta microUSB inizia
a lampeggiare in rosso. Se la carica non inizia, staccare ed inserire nuovamente il cavo di alimentazione. Al raggiungimento
della carica completa della custodia, la spia si accende in rosso, senza lampeggiare. Staccare il cavo di alimentazione dalla
porta microUSB.
Gli auricolari: per la carica degli auricolari non serve il cavo.
Basta semplicemente metterli nella custodia e premere il tasto
di avvio dell’alimentazione all`interno della custodia. La spia
rossa accesa sulla cua e la spia bianca accesa sulla custodia
segnalano che gli auricolari sono in caricamento. Se la carica
non inizia, estrarre gli auricolari ed inserirli nuovamente nella
custodia. Al raggiungimento della carica completa degli auricolari, la spia rossa si spegne e la custodia di carica si spegne
automaticamente anch`essa.
Conviene assicurarsi, che le manopole in silicone siano installate correttamente e non impediscano la carica delle cue
all’interno del corpo, e che i poli di caricamento delle cue e/o
del corpo sono puliti.
Page 29

Attenzione
• Usare solo i cavi di caricamento originali Elari. I cavi non
originali diversi da quelli standard possono provocare il guasto degli auricolari, oppure, creare circostanze pericolose,
l`esplosione della batteria, e di conseguenza invalideranno la
garanzia.
• Col tempo i cicli di carica e scarica degli auricolari diminuiranno l’autonomia della batteria. E` un fenomeno normale per
tutte le batterie.
• Non chiamare o accettare le chiamate durante la carica degli
auricolari.
Basso livello di carica degli auricolari
Gli auricolari ripeteranno il messaggio vocale «Low battery»,
mentre la spia lampeggerà in rosso. Se gli auricolari si scaricano durante la chiamata, quest`ultima sarà automaticamente
inoltrata al telefono.
56 57
7. Interruzione dell’alimentazione
Per scollegare le cue bisogna premere e trattenere il tasto
Accensione/Chiamata della cua.
Page 30

1. Apraksts
Lādēšanas korpusa
ieslēgšanas poga
Magnētiskais kontakts
ar lādēšanas korpusu
Lādēšanas korpusa indikators
MicroUSB lādēšanas ports
LIEToTājA INSTRUkcIjA
LV
58
Ieslēgšanas/zvana poga
Indikators
AmbušūrsMikrofons
59
Page 31
2. Darba sākšana: austiņu vienas ar otru
savienošana
Austiņas ir divas atsevišķas Bluetooth ierīces, kas jāsavieno viena
ar otru pirms pieslēgšanas jūsu viedtālrunim, planšetei, portatīvajam datoram utt. Tas jāizdara vienu reizi, un pēc sākotnējās pieslēgšanas tās savienosies viena ar otru un pieslēgsies Bluetooth
ierīcei automātiski, tās ieslēdzot.
Lai austiņas savienotu vienu ar otru, jāveic šādas darbības:
2.1. Ielikt ausīs kreiso (L) un labo (R) austiņu izslēgtā pozīcijā
(indikatori nemirgo).
2.2. Nospiest un noturēt abu austiņu padeves taustiņus līdz
atskan vispirms paziņojums “Power on”, bet pēc tam
“NanoPods pairing”. Abās austiņās indikatori sāks mirgot sar
kanā un baltā krāsā.
Pa kreisi (L) Pa labi (R)
60 61
2.3. Tagad pieslēdzot austiņas vienu pie otras, indikatori mirgos
tikai baltā krāsā. Austiņās atskanēs balss paziņojums.
2.4. Pēc tam atskanēs balss paziņojums: “Right channel” un “Left
channel”. Tagad austiņas ir veiksmīgi savienotas viena ar otru un
gatavas pieslēgšanai jūsu Bluetooth ierīcei, turklāt labā austiņa
sāks mirgot sarkanā un baltā krāsā.
3. Pieslēgšana Bluetooth ierīcei
3.1. Ieslēgt Bluetooth ierīcē.
3.2. Atvērt Bluetooth iestatījumus un veikt jaunu ierīču
meklēšanu.
3.3. No Bluetooth ierīču saraksta izvēlēties “Elari NanoPods-R”.
3.4. Pabeigt savienošanu.
3.5. Austiņās atskanēs balss paziņojums “Music source
connected”.
PIEZĪME: TELEFONA ZVANU LAIKĀ VAI, IZMANTOJOT CITĀDI KĀ
GALVAS GARNITŪRU BALSS SARUNĀM, SKAŅA BŪS TIKAI LABA
JĀ AUSTIŅĀ, NEVIS ABĀS (ja nepieciešams, var arī izvēlēties un
pieslēgt kreiso austiņu).
Austiņas atbalsta ierīces ar Bluetooth versiju V2.1 + EDR un
augstāk.
-
Page 32

4. Austiņu nēsāšana
Izvēlieties ērtus ambušūrus
5. Pogu funkcijas
Kad ieslēgtas abas austiņas (R) un (L), par galveno austiņu uzskatāma
labā austiņa (R). Tālāk aprakstītās funkcijas galvenokārt attiecas uz labo
austiņu (R).
Poga Funkcija
• Nospiediet un noturiet zvana pogu dažas
sekundes, lai ieslēgtu vai izslēgtu austiņas.
• Neilga zvana pogas nospiešana ļaus atbildēt
uz zvanu vai to pārtraukt.
• Izsaukuma atslēgšanai ienākošā zvana
gadījumā nospiediet un noturiet zvana pogu
līdz skaņas signālam.
• Divreiz nospiediet pogu atkārtotai pēdējā
numura ievadīšanai.
Ieslēgšanas/zvana poga
Izvēlieties komfortablu
austiņu slīpuma leņķi
Ja ieslēgta tikai viena austiņa, tad visas iepriekš aprakstītās pogas Power/
Call funkcijas tiek izpildītas tieši šajā austiņā.
62 63
• Atskaņojot mūziku, neilga pogas
nospiešana ļauj uzlikt pauzi ierakstam vai
sākt atskaņošanu.
• Ja nav savienojuma pēc ieslēgšanas un
sasaistes režīmā dubulta pogas nospiešana
mainīs balss ziņojumu valodu.
Page 33

6. Austiņas un uzlāde
Austiņas un uzlādēšanas korpuss ir aprīkots ar iebūvētu nenoņemamu akumulatoru. Pirms pirmās lietošanas pārliecinieties,
ka austiņas ir pilnībā uzlādētas.
Uzlādēšanas korpuss: pievienojiet strāvas vadu microUSB
pieslēgvietā. Otru vada galu pievienojiet standarta USB 5 V
savienotājam. Uzlādēšanas laikā indikators blakus microUSB
pieslēgvietai mirgos sarkanā krāsā. Ja uzlāde nesākas, izņemiet
un atkal ielieciet strāvas vadu. Kad korpuss ir pilnībā uzlādēts,
indikators degs sarkanā krāsā, nemirgojot. Izņemiet strāvas
vadu no microUSB pieslēgvietas.
Austiņas: austiņu uzlādei vads nav vajadzīgs. Vienkārši ievietojiet austiņas korpusā un nospiediet barošanas ieslēgšanas
pogu korpusa iekšpusē. Kad indikators uz austiņas iedegsies
sarkanā krāsā, bet pēc tam uz korpusa – baltā, austiņas sāks
lādēties. Ja uzlāde nesākas, izņemiet austiņas un no jauna ielieciet tās korpusā. Kad austiņas būs pilnībā uzlādējušās, sarkanais indikators nodzisīs. Turklāt uzlādēšanas korpuss automātiski izslēgsies.
Jāpārliecinās, ka silikona uzgalis uzstādīts pareizi un netraucē
austiņu uzlādei korpusā, un, ka uz austiņu un/vai korpusa uzlādes kontaktiem nav netīrumu.
64 65
Uzmanību
• Lietojiet tikai oriģinālus Elari lādētāju vadus. Neorģināli no
standarta atšķirīgi vadi var izraisīt austiņu bojājumus, vai nelabvēlīgu apstākļu sagadīšanās rezultātā akumulatora sprādzienu, un anulēt izstrādājuma garantiju.
• Pakāpeniski austiņu uzlādēšanas un izlādēšanās cikli pazeminās akumulatora darbības laiku. Tas ir normāli jebkādiem
akumulatoriem.
• Austiņu uzlādēšanas laikā nezvaniet un nepieņemiet zvanus.
Ja ir zems austiņu uzlādes līmenis
Austiņas atkārtos balss ziņojumu “Low battery”, bet indikators
mirgos sarkanā krāsā. Ja austiņas izlādēsies zvana laikā, tas tiks
automātiski pārsūtīts uz tālruni.
Page 34

7. Padeves izslēgšana
Lai austiņas izslēgtu, jānospiež un jānotur poga Power/Call uz
austiņas.
VARToTojo VAdoVAS
LT
66
67
Page 35

1. Aprašymas
Įkrovimo korpuso
maitinimo mygtukas
Įjungimo/skambinimo
mygtukas
Atsiliepimo/baigimo mygtukas
Indikatorius
Įkrovimo korpuso indikatorius
Mikro USB įkrovimo prievadas
AmbušiurasMikrofonas
2. Darbo pradžia: ausinių sujungimas
viena su kita
Ausinės yra du atskiri Bluetooth įrenginiai, tad prieš naudodami ausines su savo išmaniuoju telefonu, planšetiniu, nešiojamu
kompiuteriu ir t.t., Jūs turite jas sujungti viena su kita. Tai reikės
atlikti vieną kartą, ir po pradinio susijungimo jos prisijunginės
viena prie kitos ir prie Bluetooth įrenginio automatiškai įjungimo
metu.
Norėdami sujungti ausines viena su kita, turite atlikti šiuos veiksmus:
2.1. Įsidėkite į ausis kairiąją (L) ir dešiniąją (R) išjungtas ausines
(indikatoriai nemirksi).
2.2. Paspauskite ir laikykite nuspaudę abiejų ausinių maitini
mo mygtuką, kol iš pradžių išgirsite balso pranešimą “Power
on” , ir po to “NanoPods pairing”. Abiejų ausinių indikatoriai
pradės mirksėti raudona ir balta spalva.
68 69
Kairėje (L) Teisingai (R)
Page 36

2.3. Dabar ausinėms susijungiant viena su kita indikatoriai
mirksės tik balta spalva. Ausinėse išgirsite pranešimą “NanoPods
connected”.
2.4. Tuomet išgirsite balso pranešimą: “Right channel” ir “Left
channel”. Dabar ausinės yra sėkmingai sujungtos viena su kita ir
pasirengusios būti prisijungtos prie Bluetooth įrenginio, o deši
nioji ausinė pradės mirksėti raudona ir balta spalva.
3. Prijungimas prie Bluetooth įrenginio
3.1. Įjunkite Bluetooth savo įrenginyje.
3.2. Atverkite Bluetooth nuostatas ir atlikite naujų įrenginių
paiešką.
3.3. Iš Bluetooth įrenginių sąrašo pasirinkite “Elari NanoPods-R”.
3.4. Užbaikite prisijungimą.
3.5. Ausinėse išgirsite balso pranešimą “Music source
connected”.
PASTABA: NAUDOJANT AUSINES TELEFONO SKAMBUČIO METU
ARBA KAIP LAISVŲ RANKŲ ĮRANGA, GIRDĖSITE GARSĄ TIK DE
ŠINIOJOJE AUSINĖJE, O NE ABIEJOSE (jei prireiks, taip pat galite
pasirinkti ir prijungti kairę ausinę).
Ausinės palaiko įrenginius su V2.1 + EDR ir naujesnėmis
Bluetooth versijomis.
70 71
4. Ausinių dėvėjimas
Pasirinkite tinkamus ambušiurus
-
Pasirinkite patogų ausinių
pakreipimo kampą
Page 37

5. Mygtukų funkcijos
Kai yra įjungtos abi ausinės (R) ir (L), pagrindine ausine laikoma
dešinioji (R) ausinė. Toliau aprašytos funkcijos daugiausiai tinka dešinei
ausinei (R).
Mygtukas Funkcija
• Paspauskite ir palaikykite kelias sekundes nuspaustą atsiliepimo mygtuką tam, kad įjungti
arba išjungti ausines.
• Trumpas mygtuko paspaudimas leis atsiliepti
į skambutį arba jį nutraukti.
• Norėdami atmesti skambutį, kai priimamas
kitas skambutis, paspauskite ir palaikykite
skambinimo mygtuką išgirsite garso signalą.
• Du kartus paspauskite mygtuką, norėdami
pakartotinai įvesti paskutinį numerį.
Atsiliepimo/baigimo
mygtukas
Jei įjungta tik viena ausinė, tada visos anksčiau aprašytos mygtuko
“Powe/Call” funkcijos yra taikomos tiesiai tai ausinei.
• Muzikos grojimo metu trumpas mygtuko paspaudimas leidžia laikinai sustabdyti grojimą
arba vėl jį paleisti.
• Jei po įjungimo ir susiejimo režimo nėra ryšio,
du kartus paspaudus mygtuką bus pakeista
balso pranešimų kalba.
72 73
6. Ausinės ir įkrovimas
Ausinės ir įkrovimo korpusas turi įmontuotą neišimamą bateriją. Prieš naudodamiesi pirmą kartą įsitikinkite, kad ausinės yra
visiškai įkrautos.
Įkrovimo korpusas: įkiškite maitinimo laidą į microUSB prievadą. Kitą laido galą prijunkite prie standartinės 5 V USB jungties. Įkrovimo metu indikatorius šalia microUSB prievado mirksės raudonai. Jei įkrovimas neprasideda, išimkite ir vėl įkiškite
maitinimo laidą. Pasiekus pilną korpuso įkrovą, indikatorius
sustos mirksėti ir užsidegs raudonai. Išimkite maitinimo laidą
iš microUSB prievado.
Ausinės: Įkraunant ausines laidas nėra reikalingas. Tiesiog įdėkite ausines į korpusą ir paspauskite maitinimo mygtuką kor-
puso viduje. Kai ausinių indikatorius užsidegs raudonai, o ant
korpuso – baltai, ausinės pradės įkrovimą. Jei įkrovimas neprasideda, išimkite ausines ir vėl įdėkite jas į korpusą. Kai ausinės
bus visiškai įkrautos, raudonas indikatorius užges. Įkrovimo
korpusas automatiškai išsijungs.
Įsitikinkite, kad silikono antgalis yra teisingai uždėtas ir netrukdo ausinių įkrovimui korpuso viduje ir kad ausinių įkrovimo
kontaktuose ir (arba) korpuse nėra purvo.
Page 38

Dėmesio
• Naudokite tik originalius Elari įkrovimo laidus. Neoriginalūs
laidai, kurie skiriasi nuo standartinių, gali sugadinti ausines
arba, esant nepalankioms aplinkybėms, sukelti akumuliatoriaus sprogimą ir panaikinti produkto garantiją
• Palaipsniui ausinių įkrovimo ir iškrovimo ciklai trumpina akumuliatoriaus tarnavimo laiką. Tai yra normalu bet kokiai baterijai.
• Neskambinkite ir neatsiliepkite į skambučius ausinių įkrovimo metu.
Esant žemam ausinių įkrovimo lygiui
Ausinėse girdėsite kartojamą balso pranešimą “Low battery”,
o indikatorius mirksės raudonai. Jei ausinės išsikraus pokalbio
metu, jis bus automatiškai nukreiptas į telefoną.
74 75
7. Maitinimo išjungimas
Tam kad išjungti ausines paspauskite ir laikykite nuspaudę
Power/Call mygtuką ausinėje.
Page 39

1. Kirjeldus
Laadimisseadme
sisselülitamisnupp
Laadimisseadme
magnetkontakt
Laadimisseadme indikaator
MicroUSB laadimispesa
kASUTUSjUhENd
EST
76
Sisselülitamis/helistamise nupp
Indikaator
Mikrofon
77
Kõrvaklappide
padjad
Page 40

2. Alustamine: kõrvaklappide ühendamine
üksteisega
Kõrvaklapid – on kaks eraldi Bluetooth-seadet, mis peavad
olema omavahel ühendatud enne nende ühendamist teie nutitelefoniga, tahvelarvutiga, sülearvutiga jne. Seda tuleb teha
ühekordselt, ning pärast esialgset ühendust ühenduvad need
üksteisega ja Bluetoothiga automaatselt sisselülitamisel.
Kõrvaklappide ühendamiseks üksteisega palun järgige alltoodud juhiseid:
2.1. Sisendage vasak (L) ja parem (R) kõrvaklapp oma
kõrvadesse väljalülitatud olekus (indikaatorid ei vilgu).
2.2. Vajutage ja hoidke mõlema kõrvaklapi lülitit. Te kuulete
algul “Power on” ja siis “NanoPods pairing” kõnesõnumeid.
Mõlema kõrvaklapi indikaatorid hakkavad vilkuma punase ja
valge värviga.
Vasak (L) Õige (R)
78 79
2.3. Nüüd ühenduvad kõrvaklapid üksteisega ja indikaatorid
hakkavad vilkuma ainult valge värviga. Te kuulete kõrvaklappi
des “NanoPods connected” kõnesõnumit.
2.4. Seejärel kuulete kõnesõnumeid “Right channel” ja “Left
channel”. Nüüd on kõrvaklappid edukalt ühendatud üksteisega
ja on valmis teie Bluetooth-seadmega ühendamiseks, ning parem
kõrvaklapp hakkab vilkuma punast ja valget.
3. Ühendamine Bluetooh-seadmega
3.1. Lõlitage sisse Bluetooth oma seadmel.
3.2. Avage Bluetooth seaded ja otsige uusi seadmeid.
3.3. Valige “Elari NanoPods-R” Bluetooth-seadmete nimekirjast.
3.4. Lõpetage ühendamine.
3.5. Te kuulete “Music source connected” kõnesõnumit kõrvak
lappides.
MÄRKUS: TELEFONIKÕNEDE JA MUU KÕRVAKLAPPIDE KÕNE
JAOKS KASUTAMISE AJAL ON HÄÄL AINULT PAREMAS KÕRVAK
LAPPIS, MITTE MÕLEMAS (te saate samuti valida ning ühendada
vasakut kõrvaklappi, kui te eelistate seda).
Kõrvaklapid toetavad seadeid Bluetooth versioonidega
V2.1+EDR ning üle selle.
-
Page 41

4. Kõrvaklappide
kandmine
Valige mugavad
kõrvaklappide padjad.
5. Nuppude funktsioonid
Kui mõlemad kõrvaklapid (R) ja (L) on sisselülitatud, on põhiliseks
kõrvaklapiks parem kõrvaklapp (R). Allpool kirjeldatud funktsioonid
puudutavad peamiselt paremat (R) kõrvaklappi.
Nupp Funktsioon
• Kõrvaklappide sisselülitamiseks vajutage
ja hoidke helistamisnuppu mõne sekundi
jooksul.
• Lühike vajutus helistamisnupule võimaldab
kõnele vastata või see katkestada.
• Kõne tagasilükkamiseks saabuva kõne puhul
vajutage ja hoidke helistamisnuppu kuni
kuulete helisignaali.
• Viimase numbri kordusvalimiseks vajutage
Sisselülitamis/
helistamise nupp
Valige mugav
kõrvaklappide kaldenurk
Kui ainult üks kõrvaklappidest on sisselülitatud – kõik eespool kirjeldatud
Toite/Kõne nuppude funktsioonid toimivad otse selle kõrvaklappiga.
80 81
kaks korda.
• Muusika kuulamisel lühike vajutus nupule
võimaldab panna muusika pausile või alustada
taasesitust.
• Ühenduse puudumisel pärast sisselülitamist
ja ühendatud režiimis kahekordne nuppu
vajutamine muudab häälsõnumite keelt.
Page 42

6. Kõrvaklappide ja karbi laadimine
Kõrvaklapid ja laadimisseade on varustatud sisseehitatud
mitte eemaldatava akuga. Enne esimest kasutamist veendu
ge, et kõrvaklapid on täielikult laetud.
Laadimisseade: ühendage toitejuhe microUSB pesaga.
Teine juhtmeots ühendage standardse USB 5 V pistikuga.
Laadimise ajal vilgub indikaator microUSB pesa kõrval pu
nase tulega. Kui laadimine pole alanud, võtke toitejuhe välja
ja pange jälle sisse. Kui laadimisseade on täielikult laetud,
siis näitab indikaator punast tuld vilkumata. Võtke toitejuhi
microUSB pesast välja.
Kõrvaklappid: kõrvaklappide laadimiseks pole kaablit vaja.
Lihtsalt paigaldage kõrvklappid seadmesse ja vajutage
toitenuppu seadme sees. Kui kõrvaklapi indikaator näitab
punast tuld, ja seade valget, siis alustavad kõrvaklapid laa
dimist. Kui laadimine pole alanud, võtke kõrvaklapid välja ja
pange need seadmesse tagasi. Kui kõrvaklapid on täielikult
laetud, punane indikaator lülitub punane indikaator ja laadi
misseade automaatselt välja.
Veenduge, et silikoonist ots on õigesti kinnitatud ja ei takista
kõrvaklapi laadimist karbi sees, ja et kõrvaklapi ja/või karbi
laadimiskontaktid pole määrdunud.
82 83
Tähelepanu
• Kasutage ainult originaalseid Elari laadimisjuhtmeid. Mitte-
-
-
-
originaalsed juhtmed, mis standardsetest eristuvad, võivad
põhjustada kõrvaklappide riket või, ebasoodsate asjaolude
tõttu, ka aku plahvatamist ning see tühistab toote garantii.
• Järk-järgult lühendab aku laadimine ja tühjenemine aku kasutusaega. See on normaalne kõikide akude jaoks.
• Ärge helistage ning ärge võtke kõnesid vastu kõrvaklappide
laadimise ajal.
Kõrvaklappide madala laadimistaseme puhul
Kordavad kõrvaklapid häälsõnumit “Low battery“ ja indikaa-
tor vilgub punase tulega. Kui kõrvaklappide aku saab tühjaks
kõne ajal, suundub see automaatselt telefonile.
-
Page 43

7. Toite väljalülitamine
Vajuta ja hoia kõrvaklapil Toite/kõne nuppu kõrvaklappide väljalülitamiseks.
84
Page 44

www.elari.net
 Loading...