

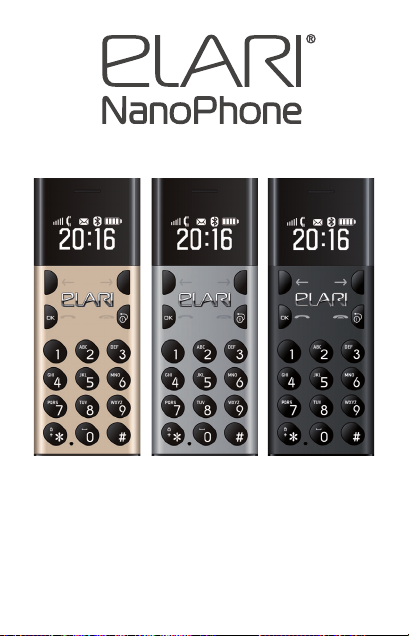
Page 1
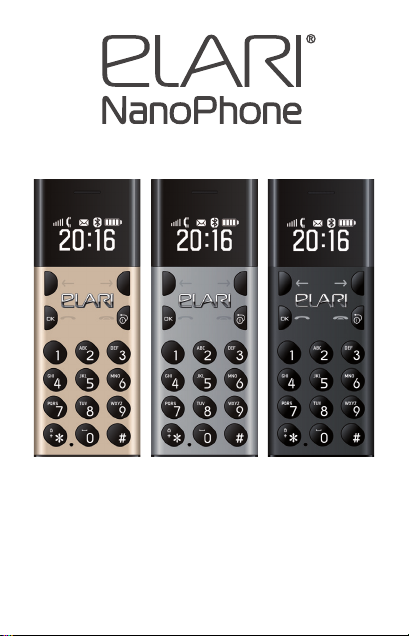
User Manual
EN / RU / DE / FR / ES / IT / LV / LT / EST / UA
More languages at www.elari.net/support
Page 2

EN
Introduction
Thank you for choosing NanoPhone! Our NanoPhone conforms to European standards and can be used in GSM network. GSM network is an international standard of the
global cellular communication system. Your phone can access various international networks in full, including dialing and receiving international phone calls. However, if you
want to use the advanced functions such as Internet access,
you should apply for the services rst and pay a relevant fee
as specied by the cellular provider.
In order to use all the functions of your NanoPhone properly and in full, we advise you read this manual carefully and
stick to the recommendations stated herein.
If some functions considering NanoPhone’s network conguration and services are not allowed for use, please contact
the seller or the network company.
Safety notes
For proper and safe exploitation of the phone please read
and follow the precautions below:
•
Do not use the phone in the environments with high
moisture level, e. g. bathroom.
2
Page 3

EN
Introduction
•
Do not immerse the phone in liquid or put it under water.
•
Do not touch the display with sharp objects. Dust and dirt
can scratch the display. Gently wipe away the dust with a
soft cloth without damaging the screen.
• Charge the phone only in enclosed spaces.
•
Do not disassemble the phone or its accessories. Maintenance and repair should be carried out by qualied personnel in authorized service centers.
• Do not turn on the phone in restricted areas.
• Do not use the phone while driving.
•
Follow the rules of the phone usage inside the medical
institutions. Turn o the phone in proximity to any medical equipment.
•
Turn o the phone in proximity to high precision electronic devices.
• Turn o the phone during the air ights.
•
Do not expose the phone to strong electromagnetic radiations.
• Do not place magnetic data carriers in close proximity to
the phone as its radiation can interfere with the carrier
and damage the data it is holding.
•
Do not expose the phone to the high temperatures; do
not use it in a potentially explosive environment, e. g. gas
stations.
3
Page 4

EN
Introduction
•
Do not use the phone in close proximity to a gas leak spot.
• Do not throw away old or not used lithium batteries; instead, hand them over to the collection points for the recycling of electronic and electrical equipment.
•
Do not give the phone and the accessories to children. Do
not let the children use the mobile device without parental supervision.
• For long-term and safe usage of the phone it is highly
•
recommended to use only original batteries, chargers
and accessories.
• Usage of non-original accessories can cause phone damage and void your warranty.
•
Please follow the rules of proper usage of mobile devices.
•
Patients with various implants and pacemakers should
keep the device not closer than 15cm to the implant and
use it on the side of the body opposite to the one with
the implant.
4
Page 5
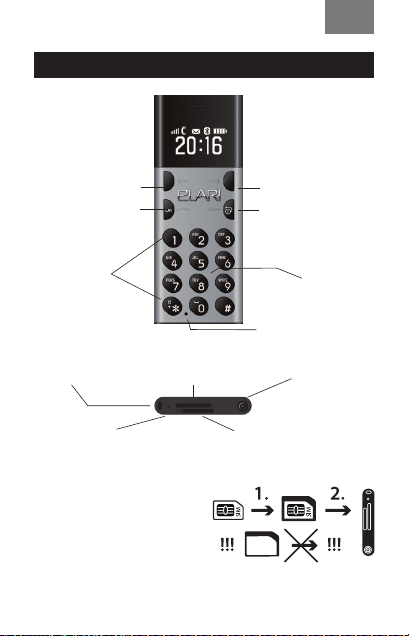
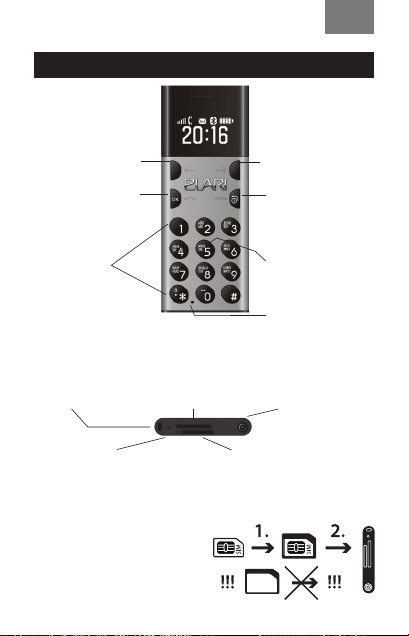
Basic functions of the buttons
EN
Left select button
OK, dial button
Combination
lock button
Right select button
Return button
hang up button
ON/OFF
Play, pause,
setting button
Forced switch-o
Basic function of ports:
Rope port Earphone,
MIC port Memory card slot
Proper installation of the SIM-card
Attention!
The slot supports microSIMcards. To install a nanoSIMcard, please use the adaptor
to prevent any malfunctions
of the phone. Do not
install the adapter without
a nanoSIM-card. You can
download the latest version of
the software at www.elari.net
MicroSIM card slot
5
charging,
data port
Page 6
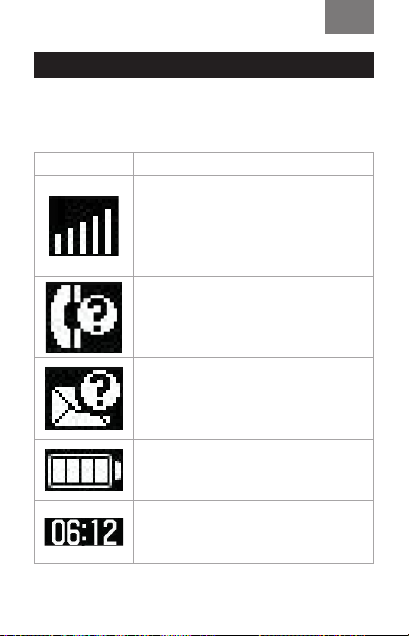
Basic functions of the buttons
Standby interface icon description:
Icons Descriptions
Network signal strength: the more
vertical stripes, the stronger the signal. If a maximum of one vertical
stripe is displayed on your phone, the
SIM-card is not inserted.
Missed calls: if you have any missed
calls, the icon will be displayed in the
upper part of the screen.
Messages: when the inbox has unread message, the icon will be displayed in the upper part of the
screen.
Battery intensity
The fuller the battery icon, the more
battery capacity.
Clock
Displays current time.
EN
6
Page 7

EN
Instructions before use
Installation of the SIM card
NanoPhone only supports a single card. Please keep the SIM
card away from children.
Any bruises and bends can easily damage the SIM card.
Please be careful while inserting or taking out the SIM card.
Before inserting or taking out the SIM card, please make sure
the power supply has been turned o.
Find the SIM card slot at the back of the phone, slip the SIM
card into the slot in the correct direction and press it a bit till
you hear a ticking sound. Do not force the SIM card inside the
phone and do not apply too much strength. After the installation please make sure the metal contact pieces of the card
face upwards and please take note of the corner cut direction.
Installation of the memory card
NanoPhone supports memory cards. Before using NanoPhone with a memory card, please make sure, that the power
supply has been turned o and it is correctly inserted into
the phone.
Note: please don’t bend or scratch the memory card;
don’t expose it to static electricity, dust or water.
7
Page 8

EN
Instructions before use
Battery charge
Connect the adapter to a 3,5 mm round port and then attach the microUSB-cable. Connect the other end of the charging cable to a power adapter or a computer USB interface.
If the phone is on, the battery strength icon in the top right
corner of the screen should be scrolling (that indicates that
the charging process has begun). When the stripes stop
scrolling and the battery icon is full, the battery is full. If
the phone is o, the charging battery icon will also be displayed on the screen.
Pull out the charging adapter/USB cable after the charging
is completed.
•
When battery capacity is low, the phone will display warning information. When battery capacity is too low, the
phone will automatically turn o. Please don’t keep the
battery in a low power state for a long time, otherwise the
battery quality and work time will shorten.
•
When the battery is next to zero, the phone may fail to
show the charging battery icon once the charger is connected. Please wait for a while.
• For the NanoPhone to work properly, please use only the
original charger.
8
Page 9
EN
Main functions
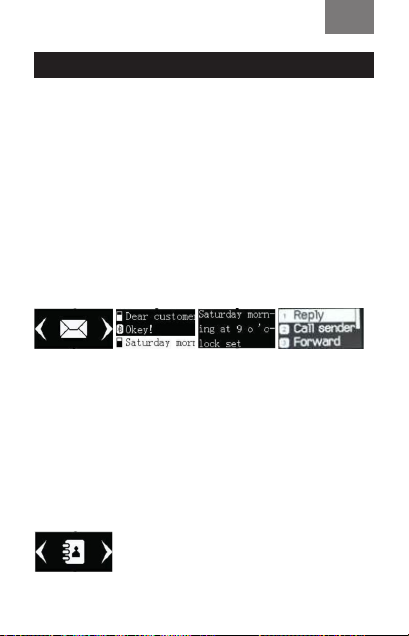
Messages
Message service is a network function which allows you to
receive and send messages. For more details, please contact
the cellular company.
Inbox
Inbox can save all received read or unread messages. Select
any message, press [OK] to enter the interface of the message, press the left and right buttons to turn pages for reading, after that, press [OK] to delete or reply etc.
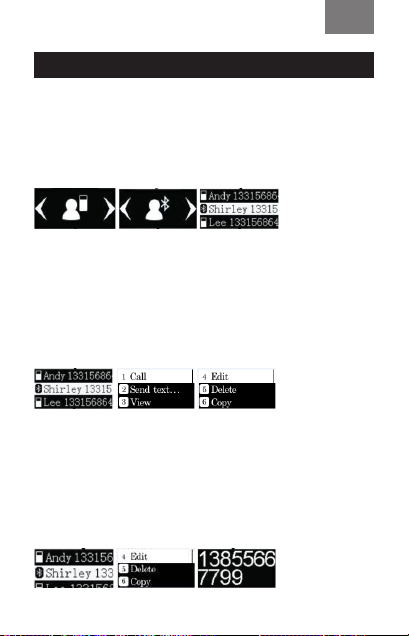
Phonebook
This NanoPhone can save 500 telephone records (including
local and Bluetooth data), telephone records’ quantity is different depending on the SIM card capacity.
Add contacts
Press [OK] to enter the relevant menu, input the contact’s
name, phone number, press [OK] to save or cancel.
9
Page 10
EN
Main functions
Search contacts
In the phonebook menu press [←] left select key and [→]
right select key to view SIM card contacts and Bluetooth
contacts.
Calls
Select contacts, press [OK] to enter the menu with the following options: call, send SMS, view, edit, delete contacts,
copy contacts, phonebook settings. Choose the dial option
to call the contact.
Edit, delete contacts
Select contacts menu, press[←] left select key and [→] right
select key to conrm the contacts you want to edit or delete, press [5] to enter the menu of the edit, delete options.
After that, press [OK] to conrm the changes.
10
Page 11
EN
Main functions
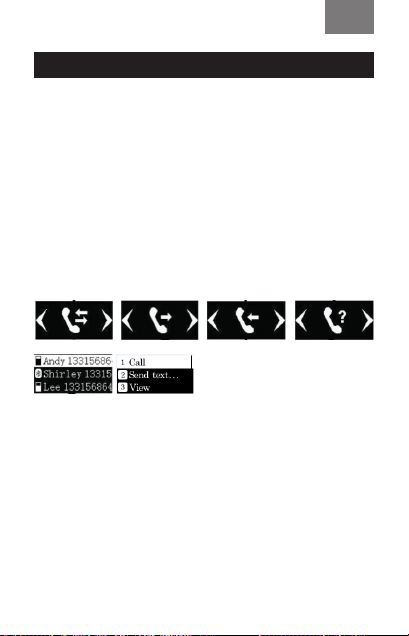
Call history
Enter the “call history” option where you can view all missed
calls, dialled numbers, received calls, and delete all the histor y.
Press [OK] to enter “call history”, press[←] and [→] to select
dialled numbers, received calls, missed calls option, press
[OK] to view the “call history” list, then press [OK] to do call
the contact, send SMS, save to the phonebook, view, delete.
Press [OK] to conrm.
11
Page 12
EN
Main functions
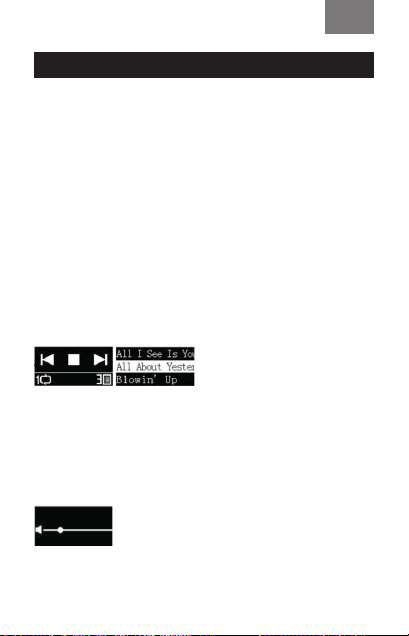
Music player
Play sound les from the memory card.
After entering the player interface, press [OK] or [5] to play/
pause / press [←] and [→] to select a previous or a next
le (icon /). Press [1] to switch the regime: one song on
repeat or the whole playlist on repeat.
View the song name and select play
Inside the player interface, press [3] to enter the song list
and to view the song name, press[←] left select key and [→]
right select key to look through song names, press [OK] or
[5] to play the selected song.
Play music and control the volume
While playing music, you can press [*] and [#] to enter the
volume control interface: [*] to reduce the current volume
and [#] to increase the volume.
12
Page 13
EN
Main functions
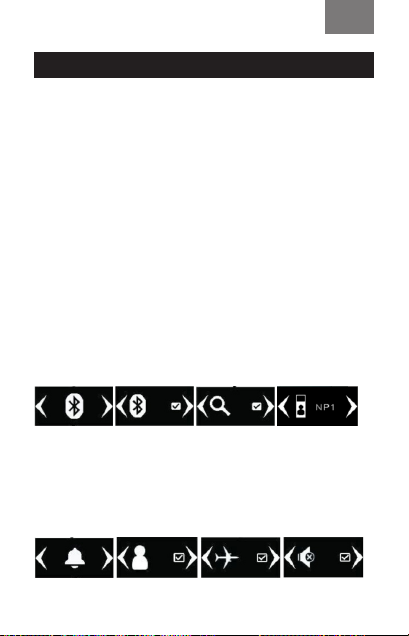
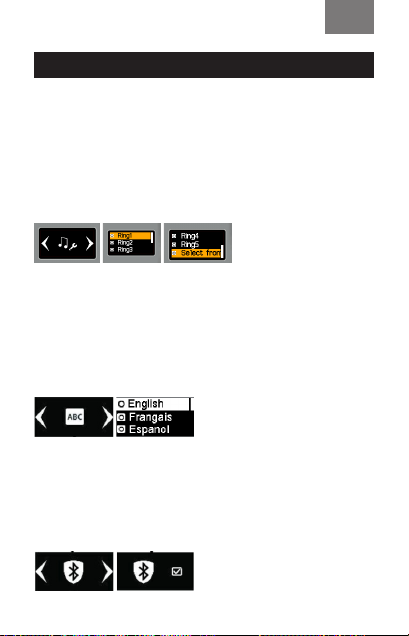
Bluetooth
Inside Bluetooth interface press [OK] to enter Bluetooth settings, press [←] and [→] to switch functions, press [OK] to
conrm whether the function is on state or o state.
If it shows , the Bluetooth function is on. The name of the
device in the network is NP1(cannot be changed).
To activate Bluetooth search put a check in the relevant
eld . If you have not activated Bluetooth itself or the
search option, the connection will fail.
Note: press OK key to conrm the pairing with another
device, otherwise the connection will fail.
Proles
Enter the prole menu interface and press [OK] to enter prole settings, press [←] and [→] to select the prole, press
[OK] to conrm if the prole is activated or deactivated .
13
Page 14
EN
Main functions
Standard mode: apply for the general environment.
Silent mode: apply in the environment where no sound interference is allowed.
Airplane mode: the SIM card function is turned o.
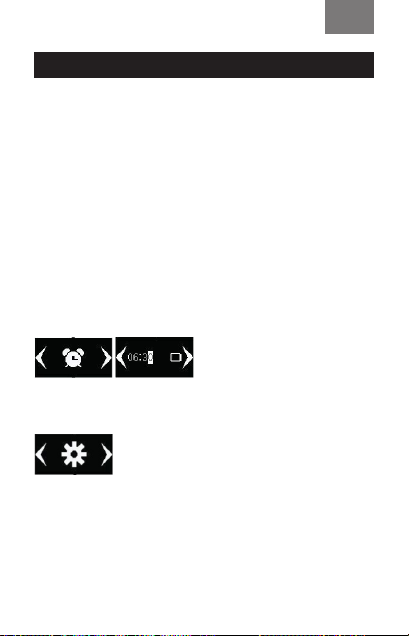
Alarm clock setting
Enter the alarm clock setting interface, press [OK] to enter
the alarm clock setting, press [←] and [→] to select among
three alarms, enter the alarm clock time, press [OK] to conrm if the alarm is activated or deactivated .
Phone settings
14
Page 15
EN
Main functions
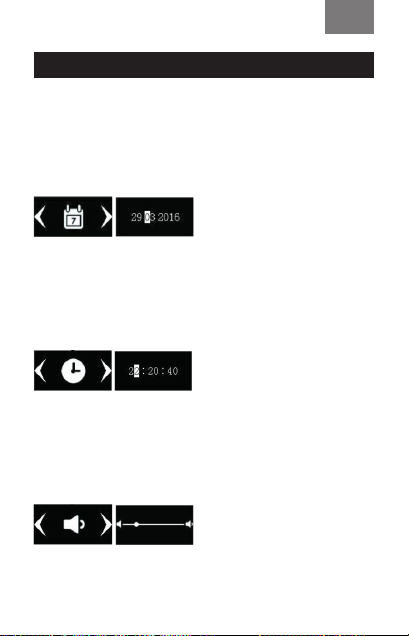
Date setting
Enter the date menu, press [OK] to enter the date setting:
directly input the date with the help of the keyboard, after
that press [OK] to save the settings and return to the previous menu.
Time setting
Press [OK] key to enter the time setting: directly input the
time with the help of the keyboard, after that press [OK] to
save the settings and return to the previous menu.
Volume setting
Press [OK] key to enter volume setting:
Press [←] and [→] to reduce or increase the volume, after
that press the [return] key to return the previous menu.
15
Page 16
EN
Main functions
Ringtone setting
Enter the ringtone setting interface, press [OK] to enter ringtone settings, press [←] left select key and [→] right select key to choose the ringtone from the 5 tunes available.
It is also possible to use a tune from the memory card for
your ringtone.
Language setting
Press [OK] to enter the language setting: press [←] and [→]
to select the default language, then press [OK] to conrm,
after that press [OK] key to save the settings and return to
the previous menu.
Anti-lost mode setting
Press [OK] to enter the anti-lost mode setting: press [OK] to
switch and select whether the anti-lost mode is activated
or not, after that press [OK] to return to the previous menu.
16
Page 17
EN
Accessories
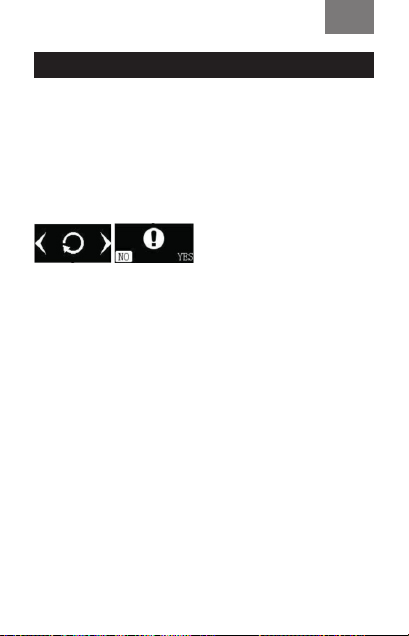
Restore factory settings
Press [OK] to enter the relevant menu: the default option is
NO, to restore the settings press[←] and [→] to choose the
desired option and press [OK] to conrm. The system will
automatically restart with factory settings if you choose the
relevant option (YES).
Accessories
You can purchase the following accessories for NanoPhone.
To buy other accessories, please contact the seller. The phone
can only use the adapter, cable and accessories approved by
our company. Other unauthorized usage or connection will violate the phone’s recognition or warranty terms, and can be
dangerous.
Adapter and cable
Adapter and cable can be used to charge the phone, you also
can charge the phone through the charging wire byconnecting it to the PC (PC should be turned on). You can view the
charging progress on the screen. If the phone is o, it will not
turn on automatically if connected to charger. You can long
press the “turn on” button to start the phone during charging.
17
Page 18

EN
Comments
Earphones
Earphones use the standard 3.5mm earphone plug, accessories do not include the earphone wire.
Note: when you dial the number or answer the phone,
please don’t plug or pull out the earphones.
The device doesn’t support the microphone function!
Comments
• If your SIM card is a Nano card, an adapter is needed.
•
No empty Micro card adapter should be put into NanoPhone, otherwise you might have troubles with taking
it out. Do not apply force while pulling out the SIM card,
otherwise you can damage the hardware.
•
When the phone is in a crash state: all buttons have no
function, phone screen can’t operate, please use the
equipped card needle to and insert it into the reset button port, long press 6 seconds to turn o the phone and
restart it again.
• Every NanoPhone should be charged for about 12 hours
before using it for the rst time and at least 2 hours per
day for further use.
• Standby time of NanoPhone is up to four days, talk time
18
Page 19

EN
FAQ
is up to 4 hours. Actual standby time is dierent depending on exploitation mode, talking time, phone hardware
setting, environment factors, etc.
FAQ
Q: SIM card has been inserted but NanoPhone doesn’t
work. What should I do?
A: NanoPhone only supports global quad-band
(850/900/1800/1900 MHZ) GSM network, please conrm
whether your SIM card support these or check whether a
4G card is compatible with 2G/3G/4G networks.
If the network status does not change, please try to shut
down and restart the NanoPhone to conrm the SIM state.
If it still cannot be identied, please check the SIM card and
the slot (check if the SIM copper feed point has been damaged or oxidized or if it is exposed to debris or dust or any
other outside eects). Make sure the SIM card is inserted in
the correct direction.
Q: Bluetooth does not work. What should I do?
19
Page 20

EN
FAQ
A: First, please check whether the Bluetooth is on. Then go to
the settings and check if the search for other devices is active.
B. Second, after pairing the Bluetooth connection, please conrm the connection by pressing OK.
If there is no response, please check the Bluetooth connection record of the phone. If the phone is connected to other
devices, it might have reached its maximum connecting capacity. Deactivate some of the devices and try connecting
again.
Q: My NanoPhone is mute, I cannot hear the sound of incoming calls or music.
A: Please check if your phone is in silent mode of if the
volume is set on the minimum. If the settings are okay, try
plugging the USB cable or the earphones again and check for
the sound. If all of the above did not help, please restart your
phone so all the system settings are automatically restored.
Note: sometimes if the phone is charging, it can be recognized as a device in the earphone mode. To solve the
problem try plugging the cable or the earphones again.
20
Page 21
Руководство пользователя
EN / RU / DE / FR / ES / IT / LV / LT / EST / UA
Другие языки на сайте www.elari.net/support
Page 22

RUS
Вступление
Спасибо зато, что выбрали NanoPhone! Он полностью
соответствует европейским стандартам иодобрен для
использования врежиме GSM. Сеть GSM — это международный стандарт сотовой сети коммуникаций.
NanoPhone может ловить сети различных сотовых операторов повсему миру: отправлять ипринимать звонки
ииспользовать все остальные функции ивозможности,
которые предоставляет сеть. Однако, для использования
дополнительных опций подоступу вИнтернет необходимо предварительно зарегистрироваться иоплатить эту
услугу всоответствии старифами сетевого оператора.
Для того, чтобы полноценно использовать все возможности, которые предоставляет NanoPhone, мы рекомендуем внимательно прочитать это руководство. Если
какие-то изфункций телефона, описанных ниже, неработают, свяжитесь спродавцом или вашим сетевым оператором.
Меры предосторожности:
•
Для правильного ибезопасного использования мобильного устройства, пожалуйста, внимательно изучите меры предосторожности.
22
Page 23

RUS
Вступление
•
Старайтесь неиспользовать устройство вместах свысокой влажностью, например, вванной комнате.
•
Не погружайте мобильное устройство вжидкость
инеразмещайте его под потоком воды.
•
Не касайтесь экрана смартфона острыми предметами. Частицы пыли игрязи могут поцарапать экран.
Пожалуйста, поддерживайте чистоту экрана. Аккуратно удаляйте пыль при помощи мягкой ткани, неповреждая экран.
•
Производите зарядку смартфона только взакрытых
помещениях.
•
Не пытайтесь самостоятельно разобрать мобильное
устройство или аксессуары кнему. Ремонт устройства
может производиться только квалифицированными
специалистами вАвторизованных Сервисных Центрах.
•
Не включайте мобильное устройство вместах, где
запрещено пользоваться телефоном.
•
Не пользуйтесь мобильным устройством вовремя
управления автомобилем.
•
Соблюдайте правила иинструкции пользования мобильными устройствами вмедицинских учреждениях.
Выключайте смартфон, находясь рядом смедицинским
оборудованием.
•
Выключайте мобильное устройство рядом свысоко
точными электронными устройствами.
23
-
Page 24

RUS
Вступление
•
Выключайте мобильное устройство во время
авиаперелетов.
•
Не подвергайте мобильное устройство или аксессуары
кнему воздействию сильных электромагнитных полей.
• Не размещайте магнитные носители информации рядом смобильным устройством. Излучение отустройства может повлиять нахранящуюся наносителях информацию.
•
Не помещайте мобильное устройство впомещения
свысокой температурой воздуха инеиспользуйте
его навзрыво- и пожароопасных объектах, например, наАЗС.
•
Не используйте данный аппарат вслучае утечки газа
внепосредственной близости отместа утечки.
•
Не выбрасывайте вмусор старые или неиспользованные литиевые аккумуляторы, сдавайте их всоответствующие пункты посбору ипереработке использованного электронного и электрического
оборудования.
•
Не давайте мобильное устройство иаксессуары кнему
детям. Непозволяйте детям пользоваться мобильным
устройством без наблюдения взрослых.
24
Page 25

RUS
Вступление
•
Для гарантии безопасного идлительного использова
ния телефона настоятельно рекомендуется использовать только оригинальные аккумуляторы, зарядные
устройства иаксессуары. Использование неоригинальных запчастей иаксессуаров может
•
привести кповреждению устройства ианнулирова
нию гарантии.
•
Соблюдайте законы инормы поиспользованию беспроводных устройств.
•
Пациентам смедицинскими имплантатами (сердечный, инсулиновый идр.) следует держать мобильное
устройство нарасстоянии неменее 15см отимплантата, авовремя звонка держать устройство настороне тела, противоположной той, накоторой установлен имплантат.
-
-
25
Page 26
RUS
Основные функции клавиш телефона
Прокрутка влево
Подтверждение/
набор
Комбинация
клавиш для
блокировки
Прокрутка вправо
Завершение
вызова или
возврат/вкл.
и выкл. телефона
Проигрыш,
пауза, установка
настроек
Принудительное
выключение
телефона
Основные функции порта ввода / вывода:
включение / выключение телефона
Разъем для
шнурка
Микрофон Слот для карты памяти
Правильная установка SIM-карты
Внимание! Слот поддерживает microSIM-карты.
При установке nanoSIM-карты необходимо использовать адаптер во избежание
поломки телефона. Не устанавливайте SIM-адаптер в
NanoPhone без nanoSIM-карты.
Слот для установки
microSIM-карты
26
Порт для
подсоединения
наушников
и зарядного
устройства
Page 27

Основные функции клавиш телефона
Иконки на экране телефона:
Иконки Описание
Мощность принимаемого сигнала
сети: чем больше вертикальных
полосок, тем лучше прием. Если на
вашем дисплее отображается не
более одной полоски, это означает,
что SIM-карта не вставлена.
Пропущенные вызовы: при
наличии пропущенных вызовов
такое изображение появится в
верхней части экрана вашего
телефона.
Текстовые сообщения: при
наличии непрочитанных текстовых
сообщений такое изображение
появится в верхней части экрана
вашего телефона.
Уровень заряда батареи: чем
больше заполненность иконки, тем
выше уровень заряда.
Часы: отображают текущее время.
RUS
27
Page 28

RUS
Инструкции до использования
Установка сим-карты
NanoPhone поддерживает только одну сим-карту одного типа.
Не давайте маленьким детям играть ссим-картой.
Любые механические повреждения изагибы сим-карты могут повлиять накачество ее работы. Пожалуйста,
вставляйте или доставайте сим-карту состорожностью.
Прежде чем вставлять или отсоединять сим-карту, убедитесь, что NanoPhone выключен.
Чтобы установить сим-карту, найдите слот для сим-карты назадней стенке телефона, вставьте сим-карту внутрь
вправильном направлении ислегка надавите. Сим-карта будет установлена после негромкого щелчка. Неприменяйте силу при установке сим-карты. Убедитесь, что
сим-карта вставлена вNanoPhone металлическими контактами вверх изапомните правильное расположение
относительно срезанного ребра сим-карты.
28
Page 29

RUS
Инструкции до использования
Установка карты памяти
NanoPhone поддерживает карты памяти. Прежде чем использовать NanoPhone с картой памяти внутри, убедитесь, что телефон выключен и карта вставлена верно.
Примечание: пожалуйста, не сгибайте и не царапайте
карту, а также не подвергайте ее воздействию статического электричества, пыли или воды.
Зарядка батареи
Подключите адаптер в порт диаметром 3.5 мм, затем
присоедините microUSB-кабель. Подсоедините другой
конец зарядного устройства к адаптеру от сети или к
порту USB включенного компьютера.
Если телефон находится вовключенном состоянии,
топроцесс иуровень зарядки будет отображаться насоответствующем индикаторе надисплее телефона. Если
телефон выключен, топри зарядке батареи шкала зарядки также появится надисплее при подключении иработе зарядного устройства. Когда шкала уровня заряда
надисплее телефона полностью заполнена, зарядка завершена. Отсоедините адаптер или кабель USB зарядного устройства после завершения зарядки.
29
Page 30

RUS
Инструкции до использования
Если заряд батареи находится нанизком уровне, надисплее телефона появится соответствующее предупреждение. Когда батарея разряжена, телефон автоматически
выключится. Пожалуйста, неиспользуйте телефон при
низком уровне заряде батареи слишком долго, так как
это может привести куменьшению срока икачества работы батареи.
Если батарея практически разряжена, телефон может
сразу не отобразить процесс зарядки на дисплее при
подключении зарядного устройства. Необходимо подождать некоторое время.
Для корректной работы телефона, пожалуйста, используйте оригинальный кабель изкомплекта поставки.
30
Page 31

RUS
Основные функции
Текстовые сообщения
Эта функция позволяет вам принимать и отправлять текстовые сообщения. За подробностями обращайтесь к сотовому оператору.
Папка для входящих сообщений
В этой папке сохранены все входящие сообщения: прочитанные и непрочитанные. Выберите сообщение, нажмите [OK], чтобы прочитать его. Для прокрутки оперируйте кнопками [←] и [→]. Для ответа на сообщения или
удаления сообщения войдите в соответствующее меню с
помощью кнопки [OK].
Телефонная книга
В телефонной книге может быть сохранено до 500 контактов (включая городские номера и имена из сети
Bluetooth). Однако, это количество может варьироваться
в зависимости от вместительной способности SIM-карты.
31
Page 32

RUS
Основные функции
Добавление контактов
Нажмите [OK], чтобы войти в меню добавления контактов, введите имя и телефонный номер и снова нажмите [OK], чтобы сохранить или отменить операцию.
Просмотр контактов
Оперируйте кнопками [←] и [→], чтобы просмотреть
контакты с SIM-карты и Bluetooth-контакты.
Звонки
Выберите необходимый контакт, нажмите [OK], чтобы
открыть меню контакта со следующими опциями: позвонить, отправить SMS-сообщение, просмотреть контактную информацию, редактировать, копировать или удалить контакт, просмотреть настройки адресной книги.
Для звонка выберите функцию набора номера [Набор].
32
Page 33

RUS
Основные функции
Редактирование и удаление контактов
В меню выберите контакты, которые вы хотите удалить
или отредактировать, с помощью кнопок [←] и [→]. Нажмите [5], чтобы выбрать операцию (редактирование
или удаление). Нажмите «OK», чтобы сохранить изме
нения.
История звонков
Войдите в меню истории звонков для просмотра всех
пропущенных и принятых вызовов или для удаления
истории звонков. Для входа нажмите [ОК], оперируйте
кнопками [←] и [→], чтобы выбрать между списками набранных звонков, принятых звонков или пропущенных
звонков. Нажмите [ОК], чтобы подтвердить выбор. Нажмите [OK], чтобы позвонить контакту, отправить SMS,
сохранить в телефонную книгу, просмотреть или удалить контакт. Нажмите [ОК], чтобы подтвердить выбор.
33
-
Page 34

RUS
Основные функции
Плеер
Прослушивание аудио-файлов с карты памяти
Зайдите в меню проигрывателя и нажмите [OK] or [5], чтобы проиграть файл / поставить на паузу / нажмите
[←] и [→], чтобы перейти к предыдущей или следующей
композиции (значок /). Кнопка [1] может регулировать проигрыш одной композиции по кругу или всех аудиофайлов.
Выбор и прослушивания аудио-файла
Зайдите в меню проигрывателя и нажмите [3], чтобы
открыть список песен; чтобы пролистывать его
используйте кнопки [←] и [→]. Нажмите [OK] или [5],
чтобы проиграть выбранную песню.
Прослушивание аудио-файла и регулировка
уровня звука
Во время проигрывания аудио-файлов нажмите [*] и [#],
чтобы отрегулировать уровень громкости ([*] — чтобы
уменьшить громкость и [#] - чтобы увеличить громкость.
34
Page 35

RUS
Основные функции
Использование технологии Bluetooth
Выберите вменю телефона настройки Bluetooth, нажмите [OK]. Для активации/ деактивации технологии
Bluetooth используйте кнопки [←] и [→]. Для подтверждения выбора нажмите [OK].
Если отображается значок , тоBluetooth включен. Имя
устройства всети — NP1 (имя устройства изменить нельзя).
Необходимо поставить галочку всоответствующем поле
для отображения устройства вобщей сети иактивации
поиска. Впротивном случае, соединение сдругими
устройства неможет быть установлено.
Для подтверждения соединения сдругим устройством
необходимо нажать [OK], иначе соединение небудет
установлено.
35
Page 36

RUS
Основные функции
Выбор режима
Войдите в меню выбора режима с помощью кнопки
[OK], оперируйте кнопками [←] и [→ ] для выбора
необходимого режима, нажмите [OK], чтобы подтвердить
включение или выключение режима .
Стандартный режим: применяется в обычных условиях.
Бесшумный режим: применяется, когда недопустимы
внешние звуковые сигналы.
Режим работы в самолете: выключение приема сим-карты.
Установка будильника
Войдите в меню настройки будильника с помощью
кнопки [OK], оперируйте кнопками [←] и [→] для выбора
между тремя разными будильниками. Введите желаемое
время сигнала и нажмите [OK], чтобы подтвердить
активацию или деактивацию будильника.
36
Page 37

RUS
Основные функции
Настройки телефона
Настройка даты
Войдите в меню настройки даты с помощью кнопки [OK],
введите дату с помощью клавиатуры и нажмите [OK] для
сохранения настроек и возврату к предыдущему меню.
Настройка времени
Войдите в меню настройки времени с помощью кнопки [OK], введите дату с помощью клавиатуры и нажмите [OK] для сохранения настроек и возврату к преды
дущему меню.
-
37
Page 38

RUS
Основные функции
Настройка громкости
Войдите в меню настройки громкости с помощью кнопки
[OK], оперируйте кнопками [←] и [→] для регулировки
уровня громкости, затем нажмите “Return” для возврата
к предыдущему меню.
Установка мелодии звонка
Войдите в меню настройки мелодии звонка с помощью
кнопки [OK], оперируйте кнопками [←] и [→] для выбора мелодии из пяти возможных. Также есть возможность выбрать мелодию для звонка с карты памяти. Подтвердите свой выбор с помощью кнопки [OK].
38
Page 39

RUS
Основные функции
Языковые настройки
Войдите в меню настройки языка с помощью кнопки
[OK], оперируйте кнопками [←] и [→] для выбора языка
телефона по умолчанию, подтвердите свой выбор с помощью кнопки [OK]. Затем вы автоматически вернетесь
к предыдущему меню.
Настройка анти-потери
Войдите в меню настройки режима анти-потери с помощью кнопки [OK], активируйте режим с помощью той же
кнопки. Снова нажмите кнопку [OK] для возврата к предыдущему меню.
39
Page 40

RUS
Аксессуары
Возврат к заводским настройкам
Войдите в меню возврата к заводским настройкам с помощью кнопки [OK]. По умолчанию в меню выбран отказ
от возврата. Оперируйте кнопками [←] и [→], чтобы активировать или деактивировать возврат к заводским
настройкам, затем нажмите [OK]. При выборе соответствующей опции настройки телефона автоматически
вернутся к заводским.
Аксессуары
Для вашего NanoPhone вы можете приобрести следующие аксессуары. За другими аксессуарами обращайтесь
к продавцу. Следует использовать только адаптер, кабель и аксессуары, одобренные к использованию нашей
компанией. Использование неоригинальных запчастей
и аксессуаров может привести к повреждению устройства и аннулированию гарантии.
Адаптер и кабель
Адаптер и кабель используются для зарядки устройства.
Вы также можете зарядить NanoPhone, подключив его
к компьютеру посредством кабеля (при этом компью-
40
Page 41

RUS
Аксессуары
тер должен быть во включенном состоянии). Процесс
зарядки отображается на соответствующей иконке на
дисплее телефона. Если телефон находится в выключенном состоянии, то при подключении зарядного устройства он не включится автоматически. Нажмите и удерживайте кнопку включения/выключения, чтобы включить
телефон.
Наушники
В наушниках используется стандартный разъем на
3.5мм. Провод для наушников не входит в комплект ак-
сессуаров.
Примечание: при наборе номера или разговоре не
подключайте и не отсоединяйте наушники.
Устройство не поддерживает функция микрофона!
41
Page 42

RUS
Примечания
•
Если ваша сим-карта нано-размера, вам потребуется
адаптер для сим-карт.
•
Не устанавливайте пустой микро-адаптер вслот для
сим-карты. Неприменяйте силу при отсоединении
сим-карты, иначе вы можете повредить контакты телефона.
•
Если ниэкран, ни кнопки телефона неработают, используйте специальную иголку изкомплекта поставки
для активации функции перезагрузки: кончиком игол
ки надавите накнопку перезагрузки внутри соответствующего порта иудерживайте 6 секунд.
•
Каждый NanoPhone должен заряжаться покрайней
мере 12 часов впервый день использования инеменее 2-х часов вдень вдальнейшем.
•
Время работы NanoPhone в режиме ожидания составляет до 4 дней, время работы в режиме разговора составляет до 4 часов. Время работы в режиме ожидания может варьироваться в зависимости от частоты
использования телефона, настроек, времени, проведенного в режиме разговора, и внешних факторов.
-
42
Page 43

RUS
Часто задаваемые вопросы
В: Несмотря направильно вставленную сим-карту,
NanoPhone неработает. Какие шаги необходимо предпринять?
О: NanoPhone поддерживает четырехдиапазонный формат
сети GSM (850/900/1800/1900 MHZ). Проверьте, поддерживаетли ваша карта такой формат сети. Вслучае, если вы используете сим-карту стандарта 4G, убедитесь, что она поддерживает сети вформате 2G/3G/4G.
NanoPhone может нераспознать сеть вовключенном состо
янии: попробуйте выключить ивключить телефон, чтобы активировать поиск сети. Если это непомогло, проверьте саму
сим-карту ислот для нее вNanoPhone: возможно правильной работе сим-карты мешают посторонние частицы, пыль
или механические повреждения самой карты или слота
для нее, включая царапины или окисления металла наконтактах сим-карты. Убедитесь, что сим-карта вставлена верно.
В: Вмоем телефоне неработает технология Bluetooth.
Что делать?
О: Прежде всего, внастройках телефона проверьте активированли сам Bluetooth, атакже функция поиска других
устройств. При успешном нахождении другого устройства
43
-
Page 44

RUS
Часто задаваемые вопросы
посредством технологии Bluetooth, убедитесь, подтвердилили вы соединение сним (для этого необходимо нажать
кнопку «OK»). Если для связь между устройствами тем
неменее установить неудается, проверьте регистр телефона: возможно превышено количество поддерживаемых
Bluetooth соединений. Вэтом случае, необходимо деактивировать некоторые изних изаново попробовать установить необходимое соединение.
В: Янеслышу звонок входящего вызова иаудио-файлы,
которые проигрываются нателефоне. Вчем может заключаться проблема?
О: Прежде всего проверьте настройки телефона: возможно
нанем установлен беззвучный режим или громкость звука уменьшена доминимума. Если все настройки впорядке,
попробуйте заново подключить кабель USB или наушники.
Проверьте наличие звука. Если звук так инепоявился, перезагрузите телефон (выключите ивключите), чтобы все обновить все настройки.
Примечание: если телефон заряжается, то он может
отображаться как работающий в режиме гарнитуры.
Чтобы решить проблему, заново подключите кабель
USB или наушники.
44
Page 45

Benutzeranleitung
EN / RU / DE / FR / ES / IT / LV / LT / EST / UA
Übersetzung in andere Sprachen nden
Sie unter Adresse: www.elari.net/support
Page 46

DE
Vorwort
Vielen Dank, dass Sie NanoPhone gewählt haben! Es erfüllt völlig die europäischen Standards und wurde für die Benutzung im
GSM-Modus genehmigt. GSM-Netzwerk ist ein internationaler
Standard des Mobilfunkneztes. NanoPhone unterstützt Mobilfunknetze von Mobilfunkanbietern aus der ganzen Welt: es kann
Anrufe machen und erhalten sowie andere Funktionen und
Möglichkeiten benutzen, welche das Mobilfunknetz gewährt.
Aber für die Benutzung von zusätzlichen Internetzugangsoptionen muss man sich vorläug anmelden und diese Dienstleistung gemäß den Tarifen des Mobilfunkanbieters bezahlen.
Um alle Funktionen von NanoPhone im vollen Umfang zu benutzen, empfehlen wir Ihnen, diese Benutzeranleitung sorgfältig
durchzulesen. Falls irgendwelche Funktionen des Handys, welche unten beschrieben sind, nicht arbeiten, kontaktieren Sie den
Verkäufer oder den Mobilfunkanbieter.
Sicherheitsmaßnahmen
• Für die richtige und gefahrlose Benutzung des Mobilgerätes
lesen Sie bitte sorgfältig die Sicherheitsmaßnahmen durch.
•
Bemühen Sie sich, das Gerät in den Räumen mit erhöhter
Feuchtigkeit (z.B. Badezimmer) nicht zu benutzen.
• Das Mobilgerät in die Flüssigkeit nicht eintauchen sowie unter dem Wasserstrom nicht platzieren.
46
Page 47

DE
Vorwort
•
Das Smartphone-Display mit dem scharfen Gegenständen
nicht berühren. Die Schmutz- und Staubpartikeln können das
Display ankratzen. Sichern Sie bitte die Reinheit des Displays.
Den Staub sorgfältig mittels des weichen Tuches entfernen,
indem Sie das Display nicht beschädigen.
•
Das Smartphone nur in den geschlossenen Räumen auaden.
•
Das Mobilgerät oder sein Zubehör selbstständig nicht ausbauen. Die Reparatur des Gerätes soll nur in den autorisierten
Servicezentren durch ausgebildetes Fachpersonal erfolgen.
• Das Mobilgerät dort nicht einschalten, wo es verboten ist, es
zu benutzen.
•
Das Mobilgerät bei der Führung des Kraftfahrzeuges nicht
benutzen.
• Die Regeln und Anleitungen zur Benutzung der Mobilgeräte
in den Gesundheitseinrichtungen beachten. Das Smartphone
neben den medizinischen Geräten ausschalten.
•
Das Smartphone neben den elektronischen Präzisionsgeräten ausschalten.
• Das Mobilgerät während der Flüge ausschalten.
•
Das Mobilgerät oder sein Zubehör der Einwirkung von starken
elektromagnetischen Feldern nicht unterziehen.
•
•Magnetische Informationsträger neben dem Mobilgerät nicht
platzieren. Die Ausstrahlung des Gerätes kann auf die Daten, welche auf den Informationsträgern gespeichert sind,
einwirken.
47
Page 48

DE
Vorwort
•
Das Mobilgerät in den Räumen mit hohen Lufttemperatur
nicht platzieren sowie es auf den explosions- und feuergefährdeten Objekten (z.B. Tankstelle) nicht benutzen.
• Dieses Gerät im Fall des Gaslecks in unmittelbarer Nähe von
der Leckstelle nicht benutzen.
•
Die alten oder nicht gebrauchten Lithium-Ionen-Akkus in den
Mülleimer nicht werfen, man muss diese in die Einrichtungen
für Sammeln und Bearbeitung von gebrauchten elektronischen und elektrischen Geräten übergeben.
• Das Mobilgerät und sein Zubehör außer Reichweite von Kindern aufbewahren. Die Kinder dürfen nicht das Mobilgerät
ohne Aufsicht von Erwachsenen benutzen.
•
Zwecks Sicherung der gefahrlosen und dauerhaften Benutzung des Handys wird es empfohlen, nur originelle Akkus,
Ladegeräte und Zubehöre zu benutzen. Die Benutzung von
nicht originellen Ersatzteilen und Zubehören kann zur Beschädigung des Gerätes und Garantieannullierung führen.
•
Die Gesetze und Standards zur Benutzung von drahtlosen
Geräten beachten.
•
Die Patienten mit den medizinischen Implantaten (Herzimplantat, Insulin-Implantat usw.) müssen das Mobilgerät im
Abstand mindestens 15cm vom Implantat halten. Während
des Anrufes soll sich das Gerät auf derjenigen Körperseite be
nden, welche der Seite, wo das Implantat eingesetzt ist, gegensätzlich ist.
48
-
Page 49

Schnellstart Anleitung
Die Grundfunktionen
der Bedienknöpfe
DE
Linke Auswahltaste
OK-, Wähltaste
Tastenkombination zum Verriegeln
Die Grundfunktionen
der E/A Schnittstelle
Buchse für die
TragebandBefestigung
Mikrofon Schlitz für Memory Card
Schlitz für SIM-Karte
Rechte Auswahltaste
Return-Taste
Auegen-Taste
AN/AUS
Taste für Abspielen, Pause, Einstellungen
Zwangsabschaltung
des Handys
Kopfhörer Netzanschluss Daten -Schnittstelle
Die korrekte Installation der SIM-Karte
Achtung! Slot ermöglicht es Ihnen, eine
Mikro-SIM zu verwenden. Bei der Installation von Nano-SIM-Karte ist es notwendig, einen Adapter zu verwenden,
um eine Beschädigung des Telefons zu
verhindern. Legen Sie den SIM-Adapter ins NanoPhone ohne Nano-SIM-Karte nicht ein. Die neue Version kann von
der Webseite www.elari.net heruntergeladen werden.
49
Page 50

Hauptfunktionen der Handy-Tastatur
Icons auf dem Handy-Display:
DE
Icons Beschreibung
Die Signalstärke des Mobilnetzes: je
mehr vertikale Striche vorhanden
sind, desto besser ist die Signalstärke. Falls auf Ihrem Display nicht
mehr als ein Strich vorhanden ist, das
heißt, dass Sie keine SIM-Karte eingelegt haben.
Verpasste Anrufe: falls Sie verpasste
Anrufe haben, wird solches Icon im
oberen Teil Ihres Handy-Displays
auftauchen.
SMS-Mitteilungen: falls Sie ungelesene SMS-Mitteilungen haben,
wird solches Icon im oberen Teil Ihres
Handy-Displays auftauchen.
Batterieladezustand: je mehr das Icon
gefüllt ist, desto besser ist der Batterieladezustand.
Uhr: zeigt aktuelle Uhrzeit.
50
Page 51

DE
Anleitung bevor Nutzung
Installation der SIM-Karte
NanoPhone unterstützt nur eine Karte. Bitte halten Sie die
SIM-Karte von Kindern fern. Jede Quetschung und jeder
Knick kann die SIM -Karte leicht zerstören. Bitte seien Sie vorsichtig beim Einlegen oder Herausnehmen der SIM-Karte. Vor
dem Einlegen der SIM-Karte versichern Sie sich bitte, dass die
Stromversorgung ausgeschaltet ist. Sie nden den Schlitz für
die SIM-Karte an der Rückseite des Gerätes. Schieben Sie die
SIM-Karte in der richtigen Position in den Schlitz und drücken Sie sie ein bisschen, bis Sie einen Klick hören. Zwängen
Sie die SIM-Karte nicht in das Innere des Telefons. Stellen Sie
nach der Installation sicher, dass die Metallkontakte der Karte
nach oben zeigen und beachten Sie die Richtung der abgeschnittenen Ecke.
Installation der Memory Card
NanoPhone unterstützt Memory Cards. Bevor Sie ein NanoPhone mit Memory Card benutzen, stellen Sie sicher, dass
diese richtig in das Telefon eingelegt ist.
Achtung: bitte quetschen oder zerkratzen Sie die mit
Memory Card nicht, setzen Sie sie auch nicht statischer
Elektrizität, Staub oder Wasser aus.
51
Page 52

DE
Anleitung bevor Nutzung
Laden des Akkus
Den Adapter an den 3,5-mm-Port anschließen, danach das
USB-Kabel anschließen. Verbinden Sie das andere Ende des
Ladeadapters mit einem Ladegerät oder einer Computer USB
–Schnittstelle. Wenn das Telefon angeschaltet wird, sollte sich
jetzt die Balkenanzeige auf der oberen rechten Ecke des Displays bewegen (das bedeutet, dass das Laden im Gang ist).
Wenn sich die Balken nicht mehr bewegen und die Ladungsanzeige ist vollständig, ist das Laden beendet. Auch wenn das
Telefon abgeschaltet ist, wird die Ladungsanzeige im Display
angezeigt. Ziehen Sie das den Ladeadapters/USB-Stecker ab,
wenn das Laden beendet ist.
Ist die Akkukapazität niedrig, wird eine Warnung angezeigt. Ist
Akkukapazität zu niedrig, schaltet sich das Telefon automatisch
ab. Bitte belassen Sie den Akku nicht für eine lange Zeit in einem niedrigen Kapazitätszustand, da sich sonst die Qualität
und Lebensdauer des Akkus verringert. Ist die Akkuspannung
zu gering, kann es vorkommen, dass die Ladungsanzeige nicht
angezeigt wird nachdem das Telefon mit dem Ladegerät verbunden wurde. Machen Sie sich keine Sorgen, da dies ein normales Verhalten ist. Man muss einige Zeit abwarten. Benutzen
Sie das Origalladegerät damit das Telefon zuverlässig arbeitet.
52
Page 53

DE
Wichtige Funktionen
SMS-Mitteilungen
Diese Funktion hilft Ihnen, die SMS-Mitteilungen zu empfangen und zu senden. Für weitere Informationen kontaktieren Sie Ihren Mobilfunkanbieter.
Ordner für eingehende SMS-Mitteilungen
In diesem Ordner werden alle eingehenden Mitteilungen
aufbewahrt: sowohl gelesene als auch ungelesene Mitteilungen. Mitteilung wählen, [ОK] klicken, um diese zu lesen.
Zum Scrollen die Tasten [←] und [→] benutzen. Um die Mitteilungen zu beantworten oder diese zu löschen, gehen Sie
auf den entsprechenden Menüpunkt mittels der Taste [ОK].
Telefonbuch
Im Telefonbuch können bis zu 500 Kontakte gespeichert
werden (inklusive Festnetznummer und Namen vom Bluetooth-Netz). Diese Anzahl kann in Abhängigkeit von der
Speicherkapazität der SIM-Karte variieren.
53
Page 54

DE
Wichtige Funktionen
Hinzufügung der Kontakte
Auf [ОК] klicken, um Menü „Hunzufügung der Kontakte“ zu
önen, Namen und Telefonnummer eingeben und wieder auf [ОК] klicken, um den Vorgang zu speichern oder abzubrechen.
Durchsicht der Kontakte
Zum Scrollen die Tasten [←] und [→] benutzen, um die
auf der SIM-Karte gespeicherten Kontakte sowie Bluetooth-Kontakte durchzusehen.
Anrufe
Wählen Sie die Kontakte, drücken Sie auf [OK], um das Menü
mit den folgenden Optionen auszuwählen: Anzeigen, SMS
versenden, anrufen, bearbeiten, Kontakt löschen, Kontakt kopieren, siehe auch Einstellungen des Adressbuches. Wählen Sie die Anruf Option, um den Kontakt anzurufen.
54
Page 55

DE
Wichtige Funktionen
Bearbeitung und Löschung der Kontakte
Im Menü mittels der Tasten [←] und [→] wählen Sie Kontakte, welche Sie löschen oder bearbeiten möchten. Klicken Sie auf [5], um den Vorgang zu wählen (Bearbeitung oder
Löschung). Auf «OK» klicken, um Änderungen zu speichern.
Anrufhistorie
Gehen Sie auf den Menüpunkt „Anrufhistorie“, um alle verpassten und empfangenen Anrufe durchzusehen oder die
Anrufhistorie zu löschen. Klicken Sie auf [ОК], um auf den
Menüpunkt zu gehen. Zum Scrollen zwischen den angerufenen
Nummern, empfangenen und verpassten Anrufen die Tasten
[←] und [→] benutzen. Klicken Sie auf [ОК], um die Wahl zu
bestätigen. Klicken Sie auf [ОК], um einen Kontakt anzurufen,
eine SMS-Mitteilung zu senden, eine Nummer im Telefonbuch
zu speichern oder einen Kontakt zu löschen. Klicken Sie auf
[ОК], um die Auswahl zu bestätigen.
55
Page 56

DE
Wichtige Funktionen
Musik-Player
Musik von einer Sound-Datei auf der Memory Card abspielen
Nachdem Sie die Anzeige des Musik-Players aufgerufen haben, drücken Sie [OK] oder [5], um das Abspielen zu starten oder anzuhalten /. Drücken Sie [←] and [→] um
die vorhergehende oder nächste Datei auszuwählen. /
auszuwählen. Drücken Sie auf [1] um dem Abspielmodus zu
ändern: Eine Datei oder gesamte Abspielliste wiederholen.
Name des Liedes anzeigen und zum Abspielen Auswahlen
Drücken Sie innerhalb des Musik-Players Anzeige auf [3],
um Liste der Lieder mit Namen anzuzeigen. Mit den Tasten:
[←] linke Auswahltaste und [→] rechte Auswahltaste können Sie durch Liste blättern. Drücken Sie [OK] oder [5], um
das gewählte Lied abzuspielen.
Musik abspielen und Regelung der Lautstarke
Bisher die Musik abgespielt wird, können Sie [*] oder [#] drucken, um die Lautstärkeanzeige aufzurufen. Mit [*] verrin-
gern Sie und mit [#] erhöhen Sie die Lautstärke.
56
Page 57

DE
Wichtige Funktionen
Bluetooth
Innerhalb der Bluetooth-Anzeige drücken Sie [5], um die
Bluetooth aufzurufen. Mit [←] and [→] können Sie die einzelnen Funktionen anwählen. Mit [OK] schalten Sie die gewählte Funktion an oder aus.
Wird ein angezeigt, ist die Bluetooth-Funktion eingeschaltet. Der Gerätename im Netzwerk ist NP1 und kann
nicht geändert werden.
Um die Bluetooth-Suche zu aktivieren, setzen Sie ein Häkchen am entsprechenden Feld. Sollten Sie Bluetooth
selber oder die Bluetooth-Suche nicht aktiviert haben, so
scheitert die Netzverbindung.
Wichtig: Drücken Sie die [OK]-Taste, um die Verbindung
mit einem anderem Gerät zu bestätigen, andernfalls scheitert die Verbindung.
57
Page 58

DE
Wichtige Funktionen
Modusauswahl
Auf die Taste [ОК] im Menü „Modusauswahl“ klicken. Um den
nötigen Modus zu wählen, benutzen Sie die Tasten [←] and
[→]. Auf [ОК] klicken, um Aktivierung oder Deaktivierung
des Modus zu wählen.
Standard-Modus wird in den üblichen Bedingungen genutzt. Ruhemodus wird in den Bedingungen genutzt, falls
keine externen Tonsignale erlaubt sind.
Im Flugmodus wird die Funktion Ihrer SIM-Karte zeitweise deaktiviert.
Einstellung des Weckers
Gehen Sie auf den Menüpunkt „Einstellung des Weckers“
mittels der Taste [ОК]. Zum Scrollen zwischen drei verschiedenen Weckern die Tasten [←] and [→] benutzen. Die gewünschte Zeit des Weckersignals einstellen und [ОК] klicken, um die Aktivierung oder Deaktivierung des
Weckers zu bestätigen.
58
Page 59

DE
Wichtige Funktionen
Telefoneinstellungen
Datumseinstellungen
Gehen Sie auf den Menüpunkt „Datumseinstellungen“ mittels der Taste [ОК], geben Sie Datum mittels der Tastatur ein
und klicken Sie auf [ОК], um die Einstellungen zu speichern
und zum vorigen Menüpunkt zurückzukehren.
Zeiteinstellungen
Gehen Sie auf den Menüpunkt „Zeiteinstellungen“ mittels
der Taste [ОК], geben Sie Datum mittels der Tastatur ein und
klicken Sie auf [ОК], um die Einstellungen zu speichern und
zum vorigen Menüpunkt zurückzukehren.
59
Page 60

DE
Wichtige Funktionen
Lautstärkeeinstellungen
Gehen Sie auf den Menüpunkt „Lautstärkeeinstellungen“
mittels der Taste [OK], benutzen Sie die Tasten [←] and [→],
um die Lautstärke einzustellen, danach klicken Sie auf “Return”, um zum vorigen Menüpunkt zurückzukehren.
Klingeltoneinstellungen
Gehen Sie auf den Menüpunkt „Klingeltoneinstellungen“
mittels der Taste [ОК].Benutzen Sie die Tasten [←] and [→],
um einen Klingelton aus fünf verschiedenen zu wählen. Sie
können auch den auf der Flash-Karte gespeicherten Klingelton wählen. Bestätigen Ihre Auswahl mittels der Taste [ОК].
Spracheinstellungen
Gehen Sie auf den Menüpunkt „Spracheeinstellungen“ mittels der Taste [ОК].Benutzen Sie die Tasten [←] and [→], um
Standardsprache zu wählen. Bestätigen Sie Ihre Auswahl
mittels der Taste [ОК]. Danach übergehen Sie automatisch
zum vorigen Menüpunkt.
60
Page 61

DE
Zubehör
Einstellung der Anti-Verlust-Funktion
Gehen Sie auf den Menüpunkt „Einstellung der Anti-Verlust-Funktion“ mittels der Taste [ОК]. Aktivieren Sie den Modus mittels der gleichen Taste. Klicken Sie wieder auf die
Taste [ОК], um zum vorigen Menüpunkt zurückzugehen.
Factory-Reset
Gehen Sie auf den Menüpunkt „Factory-Reset“ mittels der
Taste [ОК]. Als Standardeinstellung ist die Funktion „Factory-Reset“ nicht aktiviert. Benutzen Sie die Tasten [←] and
[→], um die Funktion „Factory-Reset“ zu aktivieren oder zu
deaktivieren, danach klicken Sie auf [ОК]. Bei der Auswahl
der entsprechenden Einstellungsoption.
Zubehör
Für Ihr NanoPhone können Sie folgende Zubehöre kaufen. Um
andere Zubehöre zu kaufen, wenden Sie sich an die Verkäufer.
Man darf nur die Adapter, Kabel und Zubehöre benutzen, welche von uns genehmigt sind. Die Benutzung von nicht origi-
61
Page 62

DE
Zubehör
nellen Ersatzteilen und Zubehören kann sowohl zur Beschädigung des Gerätes als auch zur Annullierung der Garantie führen.
Adapter und Kabel
Adapter und Kabel werden zur Ladung des Gerätes benutzt.
Sie können auch NanoPhone auaden, indem Sie es mittels
des Kabels an PC anschließen (dabei soll der PC eingeschaltet sein) . Der Ladevorgang wird mittels des entsprechenden
Icons auf dem Handy-Display dargestellt. Falls das Handy ausgeschaltet ist, wird es bei dem Anschluss an das Ladegerät
nicht automatisch eingeschaltet. Drücken Sie die Ein-/Aus-Taste und halten diese gedrückt, um das Handy auszuschalten.
Kopfhörer
In den Kopfhörern wird der 3,5-mm-Klinkenstecker genutzt.
Das Kopfhörerkabel ist nicht im Lieferumfang enthalten.
Anmerkung: bei dem Anruf einer Telefonnummer die
Kopfhörer sowohl nicht anschließen als auch nicht entfernen.
Das Gerät unterstützt Mikrofon-Funktion nicht.
62
Page 63

DE
Anmerkungen
Anmerkungen
• Falls Sie nano-SIM-Karte haben, brauchen Sie den Adapter für SIM-Karten.
•
Legen Sie den leeren micro-Adapter in den Slot für
SIM-Karte nicht ein. Bitte keine Gewalt beim Entfernen
der SIM-Karte anwenden, sonst können Sie die Kontaktkörper des Handys beschädigen.
•
Falls sowohl das Display als auch die Tasten des Handys
nicht funktionieren, benutzen Sie spezielle Nadel aus dem
Lieferumfang, um die Reset-Funktion zu aktivieren: mittels der Nadelspitze die Reset-Taste innerhalb des entsprechenden Ports drücken und im Laufe von 6 Sekunden gedrückt halten.
• Jedes NanoPhone soll mindestens 12 Stunden am ersten
Nutzungstag aufgeladen werden und nicht weniger als 2
Stunden im weiteren Verlauf.
•
Die Betriebsdauer von NanoPhone im Standby-Modus beträgt 4 Tage, die Betriebsdauer im Gesprächsmodus beträgt bis 4 Stunden. Die Betriebsdauer im Standby-Modus
kann in Abhängigkeit von der Häugkeit der Benutzung
von Handy, den Einstellungen, der Zeit, welche Sie im
Gesprächsmodus verbracht haben, und den Außenfaktoren variieren.
63
Page 64

DE
Fragen und Antworten
Fragen und Antworten
F: Die SIM-Karte ist eingesteckt, aber NanoPhone funktioniert nicht. Was soll ich tun?
A: NanoPhone unterstützt nur globale Quad-Band
(850/900/1800/1900 MHZ) GSM Netze, bitte versichern Sie
sich, dass Ihre SIM-Karte dieses unterstützt oder dass eine
4G-Karte kompatibel mit 2G/3G/4G Netzen ist. Ändert sich
der Netzstatus nicht, versuchen Sie bitte das NanoPhone herunterzufahren und neu zu starten, um den SIM-Status zu validieren. Sollte es immer noch nicht erkannt werden, überprüfen Sie bitte die SIM-Karte und den Schlitz (überprüfen Sie,
ob die Kupferanschlüsse beschädigt oder oxidiert sind oder
ob sie Splittern oder Staub ausgesetzt waren.) Stellen Sie sicher, dass die SIM-Karte richtig herum einsteckt worden ist.
F: Bluetooth funktioniert nicht. Was soll ich tun?
A: Erstens, bitte überprüfen Sie, ob Bluetooth eingeschaltet
ist. Danach rufen Sie die Bluetooth-Settings auf und überprüfen Sie, ob die Suche nach anderen Geräten eingeschaltet ist. B. Zweitens, nach dem Verbindungsaufbau bestätigen
Sie die Verbindung mit [OK]. Erhalten Sie keine Antwort, über
prüfen Sie bitte das Bluetooth-Verbindungsprotokoll des Telefons. Wenn das Telefon mit anderen Geräten verbunden
64
-
Page 65

DE
Fragen und Antworten
ist, kann es sein, dass die Maximalanzahl von Verbindungen
überschritten ist. Deaktivieren Sie einige Geräte und versuchen Sie erneut, eine Verbindung aufzubauen.
F: Ich höre nicht den Klingelton des eingehenden Anrufs
sowie die Tondateien, welche auf dem Handy abgespielt
werden. Worin besteht das Problem?
A: Vor allem müssen Sie die Einstellungen Ihres Handys prüfen: wahrscheinlich wurde der Ruhemodus aktiviert oder
die Lautstärke minimiert. Falls alle Einstellungen in Ordnung
sind, versuchen Sie wieder das USB-Kabel oder die Kopfhörer anschließen. Prüfen Sie, ob die Tonfunktion in Ordnung ist.
Falls die Tonfunktion nicht funktioniert, setzen Sie Ihr Handy
(aus- und einschalten) zurück, um alle Einstellungen zu aktualisieren.
Anmerkung: falls das Handy aufgeladen wird, kann es als
ein im Sprechgarnitur-Modus funktionierendes Gerät an
gezeigt werden. Um das Problem zu lösen, schließen Sie
das USB-Kabel oder die Kopfhörer wieder an.
-
65
Page 66

Guide d’utilisateur
EN / RU / DE / FR / ES / IT / LV / LT / EST / UA
Plus de langues au site www.elari.net/support
Page 67

FR
Introduction
Merci d’avoir choisi le NanoPhone! Il correspond complètement
aux normes européennes et a été approuvé pour l’utilisation en
mode GSM. Le réseau GSM c’est un standard international du réseau cellulaire de communication. Le NanoPhone peut capter les
réseaux des opérateurs cellulaires dans le monde entier: envoyer
et recevoir les appels et utiliser les autres fonctions et possibilités fournies par le réseau. Cependant, pour l’utilisation des options supplémentaires d’accès à l’Internet il est nécessaire, préalablement, de s’enregistrer et de payer ce service selon les tarifs
de l’opérateur du réseau.
Pour utiliser toutes les capacités fonctionnelles présentées par le
NanoPhone de plein exercice, nous vous recommandons de lire
attentivement ce guide. Si quelques fonctions du portable sont
hors service, contactez le vendeur ou votre opérateur de réseau.
Mesures de précaution
•
• Pour l’utilisation correcte et sécuritaire de l’appareil mobile
veuillez examiner attentivement les mesures de précaution.
• Tâcher de ne pas utiliser l’appareil dans les lieux où l’humidité
est élevée, par example dans la salle de bain.
• Ne pas immerger l’appareil mobile dans la liquide et ne pas le
mettre sous le courant d’eau.
•
Ne pas toucher l’écran du smartphone par des objets aigus.
67
Page 68

FR
Introduction
Les particules de poussière et de boue peuvent gratter l’écran.
Veuillez maintenir la propriété de l’écran. Dépoussiérer soigneusement l’écran par un tissu doux sans l’endommager.
•
Charger l’accumulateur du smartphone uniquement dans
des espaces clos.
•
Ne pas essayer de désassembler l’appareil mobile ou ses accessoires soi-même. Le portable peut être réparé exclusivement
par les spécialistes qualiés des Centes de Services agréés.
•
Ne pas démarrer l’appareil mobile dans les lieux où il est interdit d’utiliser le téléphone.
• Ne pas utiliser l’appareil mobile pendant la conduite de la voiture.
•
Respecter les règles et les instructions d’utilisation des appareils mobiles dans les établissements médicaux. Arrêter le
smartphone près des équipements médicaux.
• Arrêter l’appareil mobile près des dispositifs électroniques de
technologies pointues.
• Arrêter l’appareil mobile lors des vols en avion.
•
Ne pas exposer l’appareil mobile ou ses accessoires aux
champs électromagnétiques forts.
•
Ne pas placer les supports magnétiques près de l’appareil mobile. Le rayonnement du portable peut inuer sur les informations conservées sur les supports.
•
Ne pas laisser l’appareil mobile dans des locaux avec la tem-
68
Page 69

FR
Introduction
pérature ambiante élevée et ne pas l’utiliser aux sites présentant le risque d’incendie ou d’explosion, par exemple, aux stations-services.
•
Ne pas utiliser cet appareil dans le cas d’une fuite de gaz à
proximité du lieu de la fuite.
• Ne pas jeter aux ordures de vieilles batteries lithiums ou celles
non-utilisées, mais les rendre aux postes correspondants de reprise et de recyclage des équipements électroniques et électriques.
•
Ne pas donner l’appareil mobile ou ses accessoires aux enfants.
Ne pas permettre aux enfants d’utiliser l’appareil mobile sans
la surveillance des adultes.
•
Pour assurer l’utilisation sécuritaire et prolongée du portable il
est vivement recommandé d’appliquer exclusivement des batteries, des chargeurs de batterie et des accessoires originaux.
L’application des pièces détachées et des accessoires non-originaux peut entraîner la détérioration de l’appareil et l’annulation de la garantie.
•
Respecter les lois et les normes d’utilisation des dispositifs
sans ls.
• Les patients ayant des implants médicaux (cardiaque, d’insuline etc.) doivent mettre l’appareil mobile à la distance minimale de 15cm de l’implant et, lors de l’appel, tenir l’appareil
près du côté opposé à celui où votre implant cardiaque est mis.
69
Page 70

Guide de démarrage rapide
Fonctions principales
des boutons du
téléphone
Déler vers
le gauche
Conrmation/
appel
Combinaison
des boutons
verrouillage
Fonctions principales des des ports
Connecteur
pour les
Logement pour
la carte SIM
écouteurs et
le chargeur
Microphone
L’installation correcte de la carte SIM.
Attention! Slot permet d’utiliser
une micro SIM. En installant nano
SIM il est nécessaire d’utiliser
un adaptateur pour éviter
l’endommagement de votre
téléphone. Ne installez pas un
adaptateur de carte SIM sans une
carte nano SIM dans NanoPhone.
La dernière version du logiciel
peut être téléchargée à partir du
site web www.elari.net
70
Déler vers le droit
Fin de l’appel
ou retour,
Allumer/Éteindre
Jouer, pause,
dénir
les paramètres
Arrêt forcé du portable
Logement pour
la carte mémoire
FR
Port pour
le cordon
connexion
Page 71

Fonctions générales des touches de l’appareil
Icônes à l’écran de l’appareil:
FR
Icônes Désignation
Force du signal reçu du réseau: plus
la quantité de barres verticales est
grande, plus la captation est bonne.
Si votre écran ache au plus une
barre, cela signie qu'une carte SIM
n'est pas insérée.
Appels manqués: si vous avez ces appels, vous aurez cette image à la partie haute de l'écran de votre appareil.
Messages textuels: si vous avez des
messages textuels non-lus, vous aurez cette image à la partie haute de
l'écran de votre appareil.
Niveau de charge de la batterie: plus
l'icône est remplie, plus le niveau de
charge est grand.
Horloge: ache l'heure courante.
71
Page 72

FR
Instructions avant l’utilisation
Installation de la carte SIM
NanoPhone ne prend en charge qu’une seule carte SIM. Ne laissez pas les jeunes enfants jouer avec la carte SIM. Tout dommage mécanique ou déformation d’une carte SIM peut aecter la qualité de son fonctionne- ment. S’il vous plaît procéder
avec soin quand vous installez ou retirez la carte SIM. Avant
d’insérer ou déconnecter la carte SIM, s’il vous plaît vous assurer que NanoPhone est éteint.
Pour installer la carte SIM, trouvez le logement pour la carte
SIM dans la partie inférieure du téléphone, y insérez la carte SIM
dans le sens correct et appuyez doucement. La carte SIM sera
installée après un faible clic. N’utilisez pas de force en installant
la carte SIM. Vériez si la carte SIM est insérée dans NanoPhone
avec ses contacts métalliques vers le haut et retenez bien sa
position correcte par rapport au coin coupé de la carte SIM.
Installation de la carte mémoire
Installation de la carte mémoire NanoPhone prend en charge
l’installation de cartes mémoire. Avant d’utiliser NanoPhone
avec une carte mémoire installée, s’il vous plaît vous assurer
que la carte est installée correctement.
Note: s’il vous plaît éviter de plier ou gratter la carte, de
même que l’exposer à l’électricité statique, la poussière
ou l’eau.
72
Page 73

FR
Instructions avant l’utilisation
Chargement de la pile
Connecter l’adaptateur au port du diamètre 3,5mm, puis
brancher le câble micro-USB. Connectez l’autre extrémité du
chargeur au réseau électrique ou à un ordinateur fonctionnant. Si le téléphone est allumé, le processus et le niveau du
chargement seront achés par l’indicateur correspondant sur
l’écran du téléphone. Si le téléphone est éteint, dans ce cas, au
cours du chargement de la pile, l’échelle du chargement sera
aussi achée sur l’écran au moment de la connexion et au
cours de l’opération du chargeur. Quand l’échelle du niveau
de la charge sur l’écran du téléphone est pleine, le chargement est terminé. Déconnectez l’adaptateur et le câble USB
du chargeur quand le chargement est terminé.
Si la charge de la pile est faible, un avertissement correspondant sera aché sur l’écran du téléphone. Quand la pile est
déchargée, le téléphone s’arrête automatiquement. S’il vous
plaît éviter d’utiliser trop longtemps le téléphone quand la
charge de la pile est faible, parce que cela peut réduire la durée et la qualité de la vie de la pile. Si la pile est presque déchargée, il est possible que le téléphone n’ache pas le processus du chargement sur son écran lors de la connexion du
chargeur. Il faut attendre quelque temps. Pour l’opération correcte du téléphone, veuillez utiliser le câble d’origine fourni
avec le kit de livraison.
73
Page 74

FR
Fonctions générales
Messages textuels
Cette fonction vous permet de recevoir et d’envoyer des
messages textuels. Pour plus de détails contactez à votre
opérateur cellulaire.
Répertoire pour les messages d’entrée
Tous les messages d’entrée sont conservés dans ce répertoire, lus et non-lus. Choisissez un message et appuyez sur
[OK] pour le lire. Pour le délement manipuler les touches [←] et [→]. Pour la réponse à un message ou l’eace
ment d’un message, entrez au menu correspondant avec
la touche [OK].
Liste de contacts
La liste de contacts peut conserver jusqu’à 500 contacts (y
compris les numéros de téléphone xe et les noms du réseau Bluetooth). Cependant, cette quantité peut se varier
en fonction de la capacité de votre carte SIM.
-
74
Page 75

FR
Fonctions générales
Ajout des contacts
Appuyez sur [OK] pour entrer au menu de l’ajout des contacts, saisissez un nom et un numéro de téléphone, puis
appuyez de nouveau sur [OK] pour enregistrer ou pour annuler l’opération.
Revue des contacts
Manipulez les touches [←] et [→] pour voir les contacts de
la carte SIM et les contacts Bluetooth.
Appels
Sélectionnez le contact souhaité, appuyez sur <OK> pour
ouvrir le menu du contact avec les options suivantes: visualiser les informations de contact, envoyer un message SMS,
appeler, éditer, copier ou supprimer le contact, visualiser les
paramètres du carnet d’adresses. Pour faire un appel, sélectionnez la fonction de l’appel («APPEL»).
75
Page 76

FR
Fonctions générales
Édition et suppression des contacts
Au menu choisissez les contacts que vous souhaitez supprimer ou éditer avec les touches [←] et [→]. Appuyez sur
[5] pour choisir l’opération (édition ou suppression). Appuyez sur «OK» pour enregistrer les modications.
Histoire des appels
Entrez au menu de l’histoire des appels pour voir tous les
appels manqués et reçus ou pour supprimer l’histoire des
appels. Pour entrer appuyez sur [ОК], puis manipulez les
touches [←] et [→] pour choisir entre les listes des appels
eectués, des appels reçus et des appels manqués. Appuyez
sur [ОК] pour conrmer le choix. Appuyez sur [ОК] pour
appeler le contact, pour envoyer un SMS, pour conserver
un contact dans la liste de contacts, pour en voir ou pour
en supprimer. Appuyez sur [ОК] pour conrmer le choix.
76
Page 77

FR
Fonctions générales
Utilisation du baladeur
Jouer des chiers audio à partir de la carte mémoire
Ouvrez le menu du baladeur et appuyez sur [OK] ou [5]
pour jouer un chier / pour faire une pause / appuyez
sur [←] et [→] pour basculer vers le morceau précédent ou
suivant (l’icône /). Le bouton [1] permet de contrôler
la lecture d’un seul morceau continuellement ou de tous
les chiers audio.
Sélectionner le nom du chier et jouer
Ouvrez le menu du baladeur et appuyez sur [3] pour ouvrir
la liste des chansons ; pour parcourir cette liste, utilisez les
boutons [←] et [→]. Appuyez sur [OK] ou [5] pour jouer la
chanson sélectionnée.
Ajuster le niveau sonore
Pendant la lecture de chiers audio, appuyez sur [*] ou [#]
pour ajuster le niveau sonore ([*] – pour diminuer le volume
et [#] pour augmenter le volume).
77
Page 78

FR
Fonctions générales
Utilisation de la technologie Bluetooth
Dans le menu du téléphone, sélectionnez les paramètres
Bluetooth, appuyez sur [OK]. Pour activer/ désactiver la
technologie Bluetooth, utilisez les boutons [←] et [→]. Pour
conrmer appuyez sur [OK]. Si l’icône est achée, Bluetooth est activé. Le nom du dispositif dans le réseau est NP1
(vous ne pouvez pas changer le nom du dispositif). Il faut
cocher la case correspondante pour que le dispositif soit
visible dans le réseau commun et pour activer la recherche,
sinon il sera impossible de le connecter aux autres dispositifs. Pour conrmer la connexion à un autre dispositif il faut
appuyer sur [OK], sinon la connexion ne sera pas établie.
Choix du mode
Entrez au menu du mode avec la touche [ОК], puis manipulez les touches [←] et [→] pour choisir le mode nécessaire,
appuyez sur [ОК] pour conrmer l’activation ou la désactivation du mode.
Mode Général: est employé dans les conditions habituels.
78
Page 79

FR
Fonctions générales
Mode Silence: est employé quand les signaux sonores extérieurs ne sont pas admis.
Mode Avion: la désactivation de la captation de la carte SIM.
Réglage du réveil
Entrez au menu du réglage du réveil avec la touche [ОК],
puis manipulez les touches [←] et [→] pour choisir entre
trois réveils diérents. Saisissez l’heure souhaitée du signal
et appuyez sur [ОК] pour conrmer l’activation ou la désactivation du réveil.
Réglages de l’appareil
Réglage de la date
Entrez au menu du réglage de la date avec la touche [OK],
saisissez la date à l’aide du clavier et appuyez sur [OK]
pour enregistrer les réglages et pour retourner au menu
précédent.
79
Page 80

FR
Fonctions générales
Réglage de l’heure
Entrez au menu du réglage de l’heure avec la touche [OK],
saisissez l’heure à l’aide du clavier et appuyez sur [OK]
pour enregistrer les réglages et pour retourner au menu
précédent.
Réglage du volume
Entrez au menu du réglage du volume avec la touche [OK],
puis manipulez les touches [←] et [→] pour ajuster le niveau
du volume, ensuite appuyez sur [Return] pour retourner au
menu précédent.
Sélection de la mélodie des appels
Entrez au menu de la sélection de la mélodie des appels
avec la touche [ОК], puis manipulez les touches [←] et [→]
pour choisir une mélodie entre celles cinq possibles. Conrmer votre choix en appuyant sur la touche [ОК].
80
Page 81

FR
Fonctions générales
Réglage de la langue
Entrez au menu du réglage de la langue avec la touche [ОК],
puis manipulez les touches [←] et [→] pour choisir la langue
de l’appareil par défaut. Conrmer votre choix en appuyant
sur la touche [ОК]. Ensuite, vous retournerez automatiquement au menu précédent.
Réglage de l’anti-perte
Entrez au menu du réglage du mode d’anti-perte avec la
touche [ОК], activer ce mode avec la même touche. Appuyez sur la touche [ОК] encore une fois pour retourner au
menu précédent.
81
Page 82

FR
Accessoires
Retour aux réglages d’usine
Entrez au menu du retour aux réglages d’usine avec la
touche [ОК]. Par défaut c’est le refus du retour qui est sélectionné. Manipulez les touches [←] et [→] pour l’activation
ou la désactivation du retour aux réglages d’usine, puis appuyez sur [ОК]. La sélection de l’option correspondante de
l’appareil eectuée, les réglages du téléphone retourne automatiquement à ceux d’usine.
Accessoires
Vous pouvez achetez pour votre NanoPhone les accessoires
suivants. Pour d’autres accessoires contactez le vendeur. Il appartient d’appliquer exclusivement l’adaptateur, le câble et
les accessoires approuvés pour l’utilisation par notre société.
L’utilisation des pièces détachées et des accessoires non-originaux peut entraîner la détérioration de l’appareil et l’annulation de la garantie.
Adaptateur et câble
L’adaptateur et le câble sont utilisés pour la charge de l’appareil. Vous pouvez également charger votre NanoPhone, en le
82
Page 83

FR
Notes
branchant à un ordinateur via le câble (l’ordinateur doit être
démarré). Le processus de la charge est aché par l’icône
correspondante sur l’écran du téléphone. Si l’appareil est arrêté, lors du branchement du chargeur celui-là ne démarrera pas automatiquement. Appuyez et maintenez la touche de
démarrage/arrêt pour démarrer votre téléphone.
Écouteurs
Les écouteurs ont un connecteur standard de 3,5mm. Le
l pour les écouteurs n’est pas fourni dans le lot des accessoires.
Note: lors de la composition d’un numéro ou de la
conversation ne branchez pas et ne débranchez pas les
écouteurs.
L’appareil ne supporte pas la fonction du micro!
Notes
•
Si vous posséder une nano-SIM, vous aurez besoin d’un
adaptateur pour les cartes SIM.
•
N’insérez pas un micro-adaptateur vide au slot pour la
carte SIM. N’appliquez pas la force lors de la déconnexion de la carte SIM, vous pouvez détériorer les contacts
du téléphone.
83
Page 84

FR
Questions fréquemment posées
•
Si ni l’écran ni les touches de l’appareil ne fonctionnent
pas, utiliser l’aiguille spéciale du lot de livraison pour activer la fonction de réinitialisation: par la pointe de l’aiguille pressez la touche de réinitialisation à l’intérieur du
port correspondant et maintenez-la pendant 6 secondes.
•
Chaque NanoPhone doit être chargé au moins pendant
12 heures le premier jour de l’utilisation et au minimum
pendant 2 heures par jour ultérieurement.
•
Le temps du fonctionnement du NanoPhone en veille
est environ 4 jours, le temps du fonctionnement au mode
de conversation est environ 4 heures. Le temps du fonctionnement en veille peut se varier suivant la fréquence
de l’utilisation de l’appareil, les réglages, le temps passé
au mode de conversation et les conditions extérieures.
Questions fréquemment posées
Q: Bien que la carte SIM soit installée correctement, NanoPhone ne marche pas. Que dois-je faire?
R: NanoPhone prend en charge le format du réseau GSM à
quatre plages (850/900/1800/1900 MHZ). Vériez si votre
carte prend en charge ce format du réseau. Si vous utilisez
une carte SIM du standard 4G, vériez si elle prend en charge
les réseaux aux formats 2G/3G/4G. Quand le téléphone est
84
Page 85

FR
FAQ
allumé, NanoPhone peut ne pas identier le réseau: essayez
d’éteindre et d’allumer à nouveau le téléphone pour activer la
recherche du réseau. Si cela ne sut pas, vériez la carte SIM
elle-même et son logement dans NanoPhone: il est probable
que le fonctionnement correct de la carte SIM soit empêché
par des particules étrangères, de la poussière ou un dommage mécanique de la carte elle-même ou de son logement,
y compris des égratignures ou l’oxydation du metal sur les
plaques de la carte SIM. Vériez si la carte SIM est installée
d’une manière correcte.
Q: Bluetooth does not work. What should I do?
A: Avant tout, vériez dans les paramètres du téléphone si
Bluetooth est activé, aussi bien que la fonction de la recherché d’autres dispositifs. Si un autre dispositif est trouvé avec
succès en utilisant la technologie Bluetooth, vériez si vous
avez conrmé la connexion à ce dispositif (en appuyant sur
le bouton «OK»). Si, néanmoins, la communication entre les
deux dispositifs ne peut pas établie, vériez le registre du
téléphone: peut-être, vous avez excédé le nombre maximal
de connexions Bluetooth établies. Dans ce cas, il faut désactiver certaines de celles-ci et essayer encore une fois d’établir
la connexion souhaitée.
85
Page 86

FR
FAQ
Question: Je n’entends pas le son de l’appel entrant et les
audio-chiers joués par le téléphone. En quoi peut consister le problème?
Réponse: Avant tout vériez les réglages de l’appareil: il est
possible que c’est le mode Silence qui est sélectionné ou que
le volume du son est réduit jusqu’à celui minimal. Si tous les
réglages sont correctes, essayez de rebrancher le câble-USB
ou les écouteurs. Vériez la présence du son. Si le son, tout de
même, n’apparaît pas, réinitialiser votre téléphone (arrêter et
démarrer) pour actualiser tous les réglages.
Note: Si l’appareil est en train de la charge, il peut être afché comme fonctionnant au mode de la casque. Pour
résoudre ce problème, rebrancher le câble USB ou les
écouteurs.
86
Page 87

Manual de usuario
EN / RU / DE / FR / ES / IT / LV / LT / EST / UA
Más idiomas en el sitio www.elari.net/support
Page 88

ES
Prefacio
¡Agradecemos por haber seleccionado el NanoPhone! Corresponde por completo a los estándares europeos y está aprobado para el uso en el régimen GSM. La red de GSM es un estándar
internacional de la red de comunicaciones celulares. El NanoPhone puede captar las redes de diferentes operadores de telefonía móvil por todo el mundo: enviar y recibir las llamadas y
usar todas las demás funciones y capacidades que ofrece la red.
Sin embargo, para usar las opciones adicionales del acceso a la
Internet es necesario registrarse previamente y pagar por este
servicio de acuerdo con tarifas del operador de telefonía móvil.
Para usar todas las capacidades de pleno valor, que son ofrecidos por el NanoPhone, recomendamos leer con atención este
manual. Si algunas de las funciones del teléfono descritas más
abajo no funcionan, comuníquese con el vendedor o con nuestro operador de telefonía móvil.
Medidas de precaución
• Para el uso correcto y seguro del dispositivo móvil, por favor,
lea con atención las medidas de precaución.
• Trate no usar el dispositivo en los lugares con humedad ele-
vada, por ejemplo, en el cuarto de baño.
•
No sumerja el dispositivo móvil en el líquido y no coloque
bajo el chorro de agua.
88
Page 89

ES
Prefacio
•
No toque la pantalla de teléfono inteligente con los objetos agudos. Las partículas de polvo y barro pueden arañar la
pantalla. Por favor, mantenga el carácter limpio de pantalla.
Elimine con cuidado el polvo con ayuda de tejido suave sin
dañar la pantalla.
•
Efectúe la carga de teléfono inteligente sólo en los locales
cerrados.
• No intente desmontar por sí mismo el dispositivo móvil o los
accesorios para este. La reparación del dispositivo se puede
realizar sólo por los especialistas calicados en los Centros de
Servicio Autorizados.
•
No conecte el dispositivo móvil en los lugares donde está pro
hibido usar el teléfono.
•
No use el dispositivo móvil durante conducción del automóvil.
• Observe las reglas e instrucciones de uso de los dispositivos
móviles en los establecimientos médicos. Desconecte el teléfono inteligente estando al lado del equipo médico.
•
Desconecte el dispositivo móvil cerca de los dispositivos electrónicos de alta precisión.
• Desconecte el dispositivo móvil durante los vuelos.
•
No exponga el dispositivo móvil o los accesorios para este a la
inuencia de los campos magnéticos fuertes.
•
No coloque los portadores magnéticos de información al
lado del dispositivo móvil. La radiación del dispositivo puede
ejercer inuencia sobre la información almacenada en los
portadores.
89
-
Page 90

Prefacio
•
No coloque el dispositivo móvil en los locales con temperatura alta de aire, y no lo use en los objetos con peligro de explosión e incendio, por ejemplo en las estaciones de servicio.
•
No use dicho dispositivo en caso de fugas de gas en la cercanía inmediata de los lugares de fugas.
•
No bote a la basura las baterías de litio viejas o no usadas, entrégelas en los puntos correspondientes de recolección y reciclaje del equipo electrónico y eléctrico usado.
•
No dé el dispositivo movil y los accesorios para este a los
niños. No permite a los niños usar el dispositivo móvil sin vigilancia de los adultos.
•
Para garantizar el uso seguro y de larga duración del teléfono
se recomienda con insistencia usar sólo las baterías, los cargadores de baterías y los accesorios originales. El uso de las piezas de repuesto y los accesorios no originales puede llevar al
daño del dispositivo y a la anulación de la garantía.
•
Observe las leyes y normas de uso de los dispositivos inalámbricos.
•
A los pacientes que tienen implantes médicos (de corazón, de
insulina, etc.) se les aconseja a mantener el dispositivo móvil
a la distancia no inferior de 15 cm de los mismos, y durante la
llamada mantener el dispositivo en el lado del cuerpo opuesto al donde está instalado el implante.
ES
90
Page 91

El liderato breve del usuario
Las funciones
básicas de
las teclas del
teléfono
El desplazamiento
a la izquierda
La conrmación/
el set
La combinación
de teclas para
bloquear
Las funciones
básicas de los
conectores
El conector
del cable
El micrófono
Guía de instalación de la tarjeta SIM
Atención! La ranura es
compatible con micro Sim Para
evitar daños en el teléfono se
recomienda el uso de adaptador
para nano SIM No establezca el
adaptador SIM en Nano Phone
sin nano SIM La última versión
del software está disponible en
el sitio web www.elari.net
La ranura para
tarjetas SIM
La ranura para tarjeta
de memoria
91
de inserción, pausa,
conguración de la
forzada del teléfono
ES
El desplazamiento
a la derecha
La nalización
de llamada
o el regreso,
activar, apagar
La herramienta
instalación
Desconexión
El conector
para conectar
los auriculares
y el cargador
Page 92

Funciones principales de las teclas del teléfono
Íconos en la pantalla del teléfono:
ES
Íconos Descripción
Potencia de la señal recibida de la
red: en cuanto más haya barras verticales, mejor será la recepción. Si en
su terminal de pantalla se reeja no
más de una barra, esto signica que
la tarjeta SIM no está insertada.
Llamadas perdidas: en caso si hay
llamadas perdidas, tal imagen aparece en la parte superior de pantalla
de su teléfono.
Mensajes de texto: en caso si hay
mensajes de texto no leídos, tal imagen aparece en la parte superior de
pantalla de su teléfono.
Nivel de carga de la batería: cuanto
mayor sea el carácter de llenado del
ícono, mayor será el nivel de carga.
Reloj: reejan la hora corriente
92
Page 93

ES
Instrucciones antes de uso
La instalación de la tarjeta SIM
NanoPhone admite sólo una tarjeta SIM. No permita que los
niños pequeños jueguen con la tarjeta SIM. Cualquier daño
mecánico, dobladura de la tarjeta SIM pueden afectar a la
calidad de su trabajo. Tenga cuidado al insertar o extraer la
tarjeta SIM. Antes de insertar o desconectar la tarjeta SIM,
asegúrese de que NanoPhone está desconectado.
Para instalar la tarjeta SIM, busque la ranura de la tarjeta SIM
en la parte inferior del teléfono, inserte la tarjeta SIM en el
lado correcto y presione ligeramente. La tarjeta SIM se instalará después de un suave clic. No fuerce la tarjeta SIM.
Asegúrese de que la tarjeta SIM se inserta en NanoPhone con
los contactos de metal hacia arriba y recordar la ubicación
correcta en relación con los bordes cortados de la tarjeta SIM.
La inserción de una tarjeta de memoria
NanoPhone admite la instalación de una tarjeta de memoria. Antes de utilizar NanoPhone con una tarjeta de memoria en el interior, asegúrese de que la tarjeta está insertada
correctamente.
Nota: Por favor, no doble ni raye la tarjeta, y no lo exponga a la electricidad estática, el polvo o el agua.
93
Page 94

ES
Instrucciones antes de uso
Carga de la batería
Conecte el adaptador al puerto con el diámetro de 3.5 mm,
luego conecte el cable microUSB. Conecte el otro extremo
del cargador a una red o un equipo que ejecuta. Si el teléfono está encendido, el proceso y el cargo aparecerá en el
indicador correspondiente en la pantalla del teléfono. Si el
teléfono está apagado, cuando la batería se está cargando,
la escala de carga también aparecerá en la pantalla cuando
se conecta el cargador. Cuando el nivel de carga de la escala en la pantalla del teléfono está llena, se ha completado la
carga. Desconecte el adaptador o el cable USB del cargador
cuando la carga está completa.
Si la carga de la batería es bajo, aparece un mensaje de advertencia en la pantalla del teléfono. Cuando la batería está
baja, el teléfono se apaga automáticamente. Por favor, no utilice el teléfono cuando la batería está baja durante demasiado tiempo, ya que esto puede conducir a una disminución del
tiempo y la calidad del trabajo de la batería.
Si la batería está casi vacía, el teléfono no puede visualizar
el proceso de carga en la pantalla cuando se conecta el cargador. Es necesario esperar durante algún tiempo. Para el correcto funcionamiento del teléfono, por favor, utilice el cable
original del suministrado.
94
Page 95

ES
La funcion principal
Mensajes de texto
Esta función le permite recibir y enviar los mensajes de texto. Para saber las detalles, por favor, diríjase al operador de
telefonía móvil.
Carpeta para los mensajes de entrada
En esta carpeta están guardados todos los mensajes de
entrada: leídos y no leídos. Seleccione el mensaje, presione [OK] para leerlo. Para el desplazamiento opere con los
botones [←] y [→]. Para responder al mensaje o eliminar
los mensajes entre al menú correspondiente con ayuda
de botón [OK].
Guía telefónica
En la guía telefónica se puede guardar hasta 500 contactos (incluso los números de teléfonos de la ciudad y los
nombres de la red Bluetooth. Sin embargo, esta cantidad
se puede variar según capacidad de almacenamiento de
la tarjeta SIM.
95
Page 96

ES
La funcion principal
Agregar los contactos
Presione [OK] para entrar al menú para agregar los contactos, introduzca el nombre o el número de teléfono y vuelva a presionar [OK] para guardar o cancelar la operacion.
Revisión de contactos
Opere con los botones [←] y [→] para revisar los contactos
de la tarjeta SIM y los contactos Bluetooth.
Las llamadas
Seleccione un contacto, pulse OK, para abrir el menu del
contacto con las siguientes opciones: ver información de
contacto, enviar SMS-mensaje, llamada, editar, copiar o eliminar un contacto, ver la conguración de la libreta de direcciones. Para la llamada seleccione una función de marcación de llamada (SET).
96
Page 97

ES
La funcion principal
Editar y eliminar los contactos
Seleccione en el menú los contactos que quiere eliminar o
editar con ayuda de los botones [←] y [→]. Presione [5] para
seleccionar la operación (editar o eliminar). Presione “OK”
para guardar las modicaciones.
Historia de llamadas
Entre al menú de la historia de llamadas para ver todas las
llamadas perdidas y recibidas o para eliminar la historia de
llamadas. Para entrar presione [OK], opere con los botones [←] y [→] para seleccionar entre las listas de llamadas
marcadas, las llamadas recibidas o llamadas perdidas. Presione [OK] para conrmar la selección. Presione [OK] para
llamar al contacto, enviar un SMS, guardar en la guía telefónica, revisar o eliminar el contacto. Presione [OK] para conrmar la selección.
97
Page 98

ES
La funcion principal
El uso del reproductor
Juega a los archivos de audio de la tarjeta de memoria
Entre en el menú del reproductor y en [OK] o [5] para reproducir el archivo / pausa / haga clic [←] y [→] para ir
a la canción anterior o siguiente (icono/). El botón [1]
puede controlar la herramienta de inserción de una composición en un círculo, o todos los archivos de audio.
Seleccione el nombre del archivo y reproducirlo
Entre en el menú del reproductor y pulse [3] para abrir una
lista de canciones; para desplazarse utilice el botón [←] y
[→]. Pulse [OK] o [5] para reproducir la canción seleccionada.
Ajuste el nivel de sonido
Durante la reproducción de archivos de audio, pulse [*] y [#],
para ajustar el nivel de volumen ([*] – para reducir el volumen y la [#] – para aumentar el volumen).
98
Page 99

ES
La funcion principal
El uso de la tecnología Bluetooth
Seleccione la conguración de Bluetooth en el menú del
teléfono, haga clic en [Ok]. Para activar / desactivar la tecnología Bluetooth, utilice los botones [←] y [→]. Para conrmar la selección, pulse [OK]. Si ve el icono , el Bluetooth está activado. El nombre del dispositivo en la red
– NP1 (el nombre del dispositivo no se puede cambiar). Es
necesario poner una tilde en la casilla correspondiente
para mostrar los dispositivos en una red común y activar la
búsqueda. De lo contrario, la conexión con otros dispositivos no puede ser establecida. Para conrmar la conexión
con otro dispositivo, debe pulsar la tecla [OK], de lo contrario, la conexión fallará.
Seleccionar el régimen
Entre al menú para seleccionar el régimen con ayuda de
botón [OK], opere con los botones [←] y [→] para seleccionar el régimen necesario, presione [OK] para conrmar la conexión o desconexión del régimen.
99
Page 100

ES
La funcion principal
Régimen estándar: se utiliza en las condiciones normales.
Régimen silencioso: se utiliza cuando están inadmisibles las
señales acústicas exteriores.
Régimen de funcionamiento en el avión: desconexión de recepción de la tarjeta SIM.
Ajuste del despertador
Entre al menú de ajuste del despertador con ayuda de
botón [OK], opere con los botones [←] y [→] para seleccionar tres despertadores diferentes. Introduzca la hora de la
señal y presione [OK] para conrmar la activación o desactivación del despertador.
Ajustes del teléfono
100
 Loading...