

Page 1

Setup Manual
Important: Please read this Setup Manual and the User’s Manual stored on the CD-
ROM carefully to familiarize yourself with safe and effective usage. Please
retain this manual for future reference.
Installationshandbuch
Wichtig: Lesen Sie dieses Installationshandbuch und das Benutzerhandbuch (auf der
CD-ROM) aufmerksam durch, um sich mit der sicheren und effi zienten
Bedienung vertraut zu machen. Bewahren Sie dieses Handbuch zum
späteren Nachschlagen auf.
Manuel d’installation
Important : Veuillez lire attentivement ce manuel d’installation, ainsi que le manuel
d’utilisation inclus sur le CD-ROM, pour vous familiariser avec une utilisation
effi cace et en toute sécurité. Veuillez conserver ce manuel pour référence
ultérieure.
Manual de instalación
Importante: Lea detenidamente este Manual de instalación y el Manual del usuario (en el
CD-ROM) para familiarizarse con las normas de seguridad y procedimientos
de uso. Conserve este manual para consultas posteriores.
English Deutsch Français Español Italiano Svenska Greece Russia
Manuale di installazione
Importante: si consiglia di leggere con attenzione il presente Manuale di installazione e il
Manuale dell’utente (sul CD-ROM in dotazione) per acquisire le informazioni
necessarie per un utilizzo sicuro ed effi cace. Conservare il manuale per
consultazioni future.
Installationshandboken
Viktigt: Läs den här installationshandboken och bruksanvisningen som fi nns på CD-
skivan noggrant så att du känner dig säker och får ett effektivt användande
av produkten. Behåll manualen för framtida behov.
Εγχειρίδιο εγκατάστασης
Σημαντικό: Διαβάστε προσεκτικά αυτό το εγχειρίδιο εγκατάστασης και το εγχειρίδιο
χρήσης που είναι αποθηκευμένο στο CD-ROM για να εξοικειωθείτε με την
ασφαλή και αποτελεσματική χρήση της μονάδας. Διατηρήστε αυτό το
εγχειρίδιο για μελλοντική χρήση.
Руководство по установке
Важно! Внимательно прочитайте настоящее Руководство по установке и
Руководство пользователя на диске CD-ROM для получения сведений о
безопасной и эффективной эксплуатации. Сохраните это руководство
для справки.
䆒ᅮݠ
䞡㽕џ乍˖ 䇋Ҩ㒚䯙䇏ټᄬܝⲬ⠛Ёⱘ䆒ᅮݠ⫼᠋ݠˈҹ֓❳ᙝᅝܼ᳝ᬜՓ⫼ᴀ
ᰒ⼎఼ⱘֵᙃDŽ䇋ֱ⬭ᴀݠˈҹ֓Ҟৢখ㗗DŽ
Ё᭛
Page 2

Compatible Resolutions/Freguencies Kompatibla upplösningar/frekvenser
Kompatible Aufl ösungen/Bildwiederholfrequenzen
Résolutions/Fréquences compatibles
Frecuencias y resoluciones compatibles
Συμβατές αναλύσεις/Συχνότητες
Поддерживаемые разрешения/частоты
ݐᆍⱘߚ䕼⥛ˋ乥⥛
Risoluzioni/Frequenze compatibili:
The monitor supports the following resolutions.
Der Monitor unterstützt die nachfolgend aufgeführten Aufl ösungen.
Le moniteur est compatible avec les résolutions suivantes.
El monitor admite las siguientes resoluciones.
Il monitor supporta le seguenti risoluzioni.
Skärmen stöder följande upplösningar.
Η οθόνη υποστηρίζει τις παρακάτω αναλύσεις.
Монитор поддерживает следующие разрешения.
ᴀᰒ⼎఼ᬃᣕϟ߫ߚ䕼⥛DŽ
Analog Input
Resolution Frequency Remarks
320 × 200 70 Hz VGA Graphic
640 × 480 67 Hz Apple Macintosh
640 × 480 - 75 Hz VGA, VESA
720 × 400 70 Hz VGA TEXT
800 × 600 - 75 Hz VESA
832 × 624 75 Hz Apple Macintosh
1024 × 768 - 75 Hz VESA
1152 × 864 75 Hz VESA
1152 × 870 75 Hz Apple Macintosh
1280 × 960 60 Hz VESA
1280 × 960 75 Hz Apple Macintosh
*1280 × 1024 - 75 Hz VESA
M1700 M1900
Dot Clock 135 MHz (Max.)
✓✓
✓✓
✓✓
✓✓
✓✓
✓✓
✓✓
✓✓
✓✓
✓✓
✓✓
✓✓
Digital Input
Resolution Frequency Remarks Dot Clock 108 MHz (Max.)
640 × 480 60 Hz VGA
720 × 400 70 Hz VGA
720 × 480 60 Hz VESA Safe Mode
800 × 600 60 Hz VESA
1024 × 768 60 Hz VESA
*1280 × 1024 60 Hz VESA
* Recommended resolution
* Empfohlene Aufl ösung
* Résolution recommandée
* Resolución recomendada
* Risoluzione consigliata
* Rekommenderad upplösning
* Προτεινόμενη ανάλυση
* Рекомендованное разрешение
* 㤤ⱘߚ䕼⥛
✓✓
✓✓
✓✓
✓✓
✓✓
✓✓
Page 3

TroubleshootingSetting/AdjustmentInstallationPrior to use
Color LCD Monitor
SAFETY SYMBOLS
This manual uses the safety symbols below. They denote critical information. Please read them carefully.
WARNING
Failure to abide by the information in a WARNING
may result in serious injury and can be life threatening.
Indicates a prohibited action.
Indicates to ground for safety.
PRECAUTIONS
WARNING
If the unit begins to emit smoke, smells like
something is burning, or makes strange
noises, disconnect all power connections
immediately and contact your dealer for
advice.
Attempting to use a malfunctioning unit may result in
fi re, electric shock, or equipment damage.
Keep small objects or liquids away from the
unit.
Small objects accidentally falling through the
ventilation slots into the cabinet or spillage into the
cabinet may result in fi re, electric shock, or equipment
damage. If an object or liquid falls/spills into the
cabinet, unplug the unit immediately. Have the unit
checked by a qualifi ed service engineer before using it
again.
The equipment must be connected to a grounded main outlet.
Not doing so may result in fi re or electric shock.
CAUTION
Failure to abide by the information in a CAUTION
may result in moderate injury and/or property or
product damage.
Use the enclosed power cord and connect to
the standard power outlet of your country.
Be sure to remain within the rated voltage of the power
cord. Not doing so may result in fi re or electric shock.
Set the unit in an appropriate location.
Not doing so may result in fi re, electric shock, or
equipment damage.
• Do not place outdoors.
• Do not place in the transportation system (ship,
aircraft, trains, automobiles, etc.).
• Do not place in a dusty or humid environment.
• Do not place in a location where the steam comes
directly on the screen.
• Do not place near heat generating devices or a
humidifi er.
English
CAUTION
Do not block the ventilation slots on the
cabinet.
• Do not place any objects on the ventilation slots.
• Do not install the unit in a closed space.
• Do not use the unit laid down or upside down.
Blocking the ventilation slots prevents proper airfl ow
and may result in fi re, electric shock, or equipment
damage.
About Setup Manual and User’s Manual
Setup Manual
(this manual)
User’s Manual
(• PDF fi le on the CD-ROM*)
* Installation of Adobe Reader is required.
Describes basic information ranging from connection of the monitor to a
PC to using the monitor.
Describes application information such as screen adjustments, settings,
and specifi cations.
Use an easily accessible power outlet.
This will ensure that you can disconnect the power
quickly in case of a problem.
1
Page 4

English
TroubleshootingSetting/AdjustmentInstallationPrior to use
Package Contents
Check that all the following items are included in the packaging box. If any items are missing or damaged, contact your local
dealer.
NOTE
• Please keep the packaging box and materials for future movement or transport of the monitor.
□ Monitor
□ Power cord
□ Digital signal cable (FD-C39)
□ Analog signal cable (MD-C87)
□ Stereo Mini-jack cable
□ EIZO LCD Utility Disk (CD-ROM)
• User’s Manual
□ Setup Manual (this manual)
□ Limited warranty
□ Fixing screws: M4 × 12 mm 4PCS
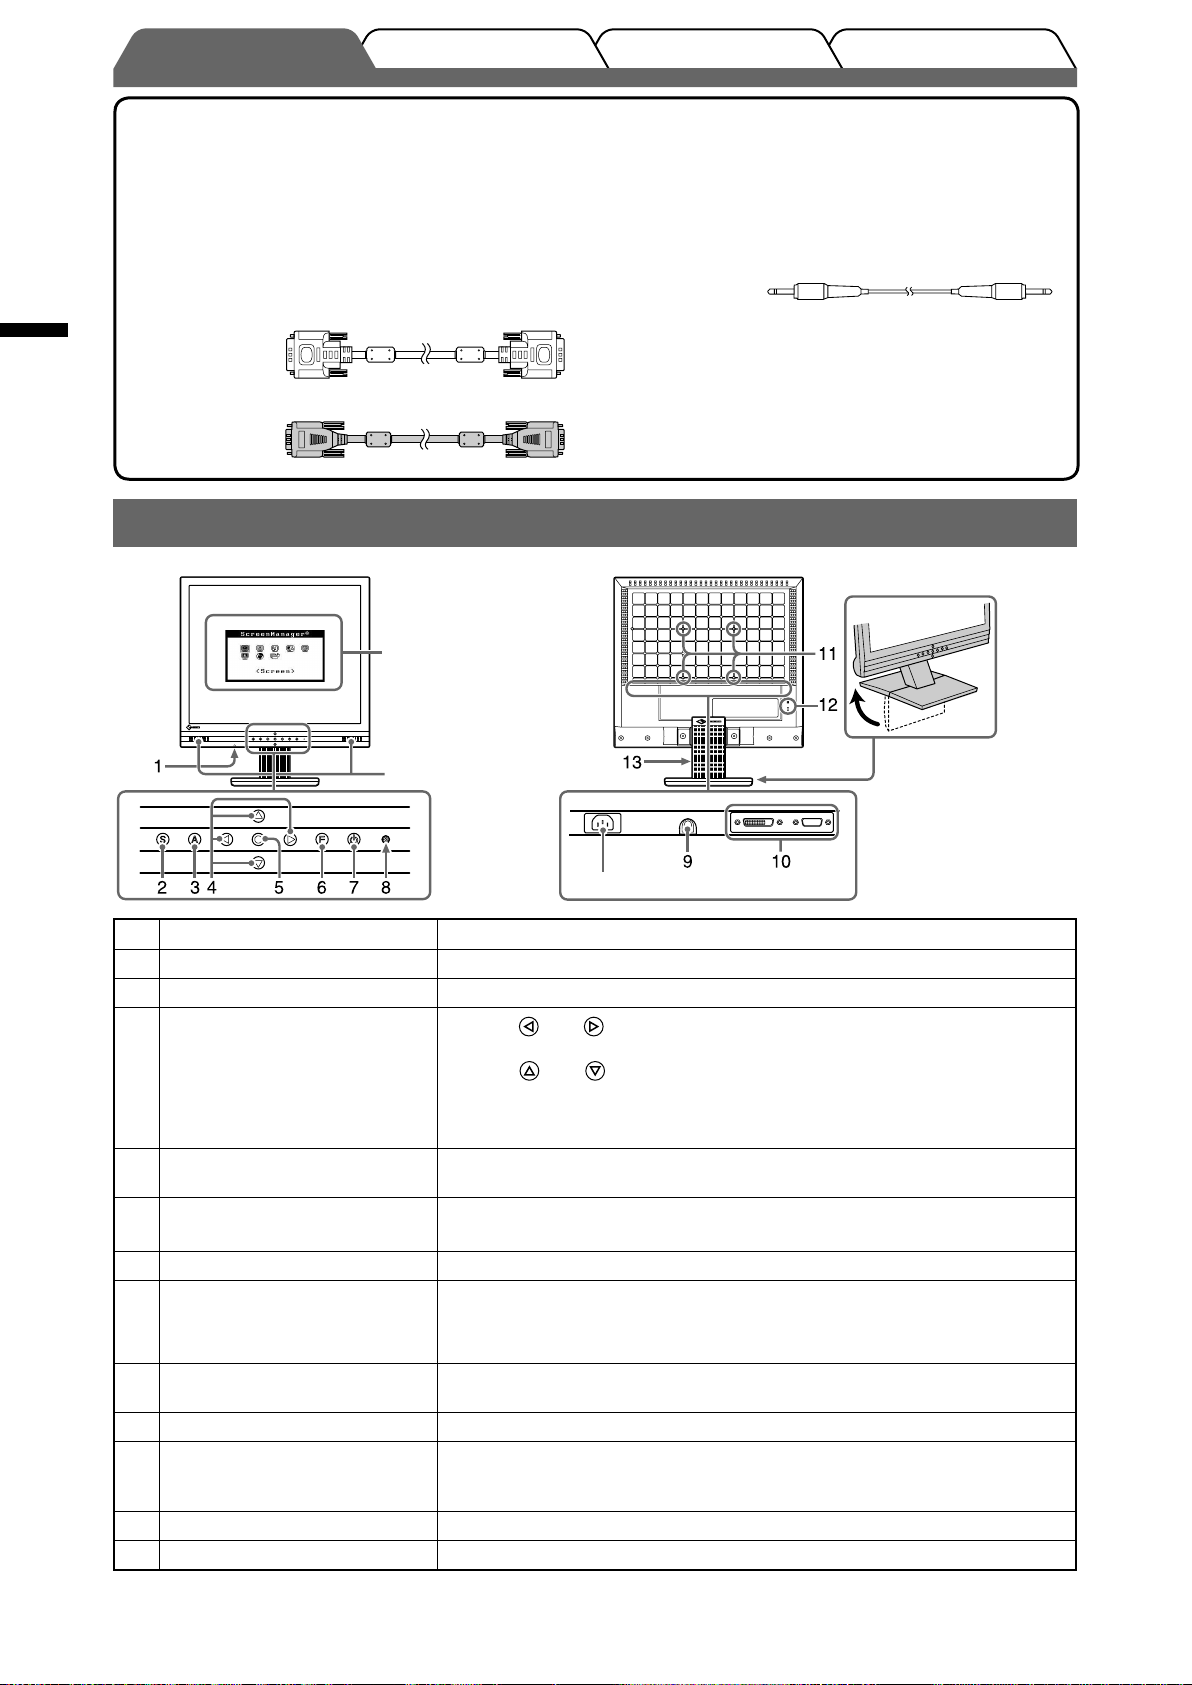
Controls and Functions
*ScreenManager
®
Open the folded
Speakers
stand.
Power connector
1 Headphone (Stereo Mini-jack) Connects the headphone.
2 Input Signal Selection button Switches input signals for display when two PCs are connected to the
monitor.
3 Auto Adjustment button Performs the function to adjust the screen automatically. (analog input only)
4 Control buttons (Left, Down,
Up, Right)
5 Enter button Displays the Adjustment menu, determines an item on the menu screen, and
6 FineContrast button Switches the display mode of the FineContrast mode in the FineContrast
or button: Displays the the Volume adjustment window (page 5).
•
• or button: Displays the brightness adjustment window (page 5).
• Chooses an adjustment item or increases/decreases adjusted values for
advanced adjustments using the Adjustment menu (page 5).
saves values adjusted.
menu (page 7).
7 Power button Turns the power on or off.
8 Power indicator Indicates monitor’s operation status.
Blue : Operating Off : Power off
Yellow : Power saving
9 External line in
(Stereo Mini-jack)
10 Input signal connectors Left: DVI-D connector/Right: D-sub mini 15-pin connector.
11 4 holes for mounting an arm/
stand
12 Security lock slot Complies with Kensington’s MicroSaver security system.
13 Height adjustable stand Adjusts the height and angle of the monitor screen.
®
* ScreenManager
the CD-ROM.)
is an EIZO’s nickname of the Adjustment menu. (For how to use ScreenManager, refer to the User’s Manual on
Connects the Stereo Mini-jack cable.
The stand can be replaced with an arm or another stand.
For how to replace, refer to the User’s Manual on the CD-ROM.
2
Page 5

Connecting Cables
TroubleshootingSetting/AdjustmentPrior to use Installation
Attention
• When replacing the current monitor with an M1700/M1900 monitor, be sure to change the PC settings for
resolution and vertical frequency to those which are available for the M1700/M1900 monitor referring to
the resolution table (back of cover page) before connecting the PC.
NOTE
• To use speaker, connect a stereo mini-jack cable to the Audio output terminal on a PC or CD player.
• When connecting two PCs to the monitor, refer to the User’ s Manual on the CD-ROM.
Check that the monitor and the PC are powered off.
1
Connect the monitor to the PC with a signal cable that matches the connectors.
2
After connecting the cable connectors, tighten the screws of the connectors to secure the coupling.
CD player etc
Connectors on the
PC
Audio output terminal
(Stereo mini-jack)
Audio output terminal
(Stereo mini-jack)
Stereo Mini-jack cable (supplied)
Connectors on the
monitor
External line in
(Stereo mini-jack)
English
DVI-I connector
D-sub mini 15-pin
connector
D-sub 15-pin
connector
Plug the power cord into a power outlet and the Power connector on the monitor.
3
Signal cable FD-C39 (supplied)
Digital connection
Signal cable MD-C87 (supplied)
Analog connection
Macintosh Adaptor (optional) and
signal cable MD-C87 (supplied)
Analog connection
DVI-D connector
D-sub mini 15-pin
connector
Adjusting Screen Height and Angle
Adjust the screen height, tilt and swivel the screen to the best condition for working.
3
Page 6
English
Prior to use Installation TroubleshootingSetting/Adjustment
Displaying Screen
Press to turn on the monitor.
1
Turn on the PC.
2
The monitor’s Power indicator lights up blue and the screen image appears.
When using analog input signals, perform the Auto Adjustment function. (Refer
3
to “Performing Auto Adjustment function” below.)
The Auto Adjustment function is not necessary when digital signals are input because images are
displayed correctly based on the preset data of the monitor.
Attention
• Turn off the monitor and PC after using them.
• For the maximum power saving, it is recommended that the Power button be turned off. Unplugging the
power cord completely shuts off power supply to the monitor.
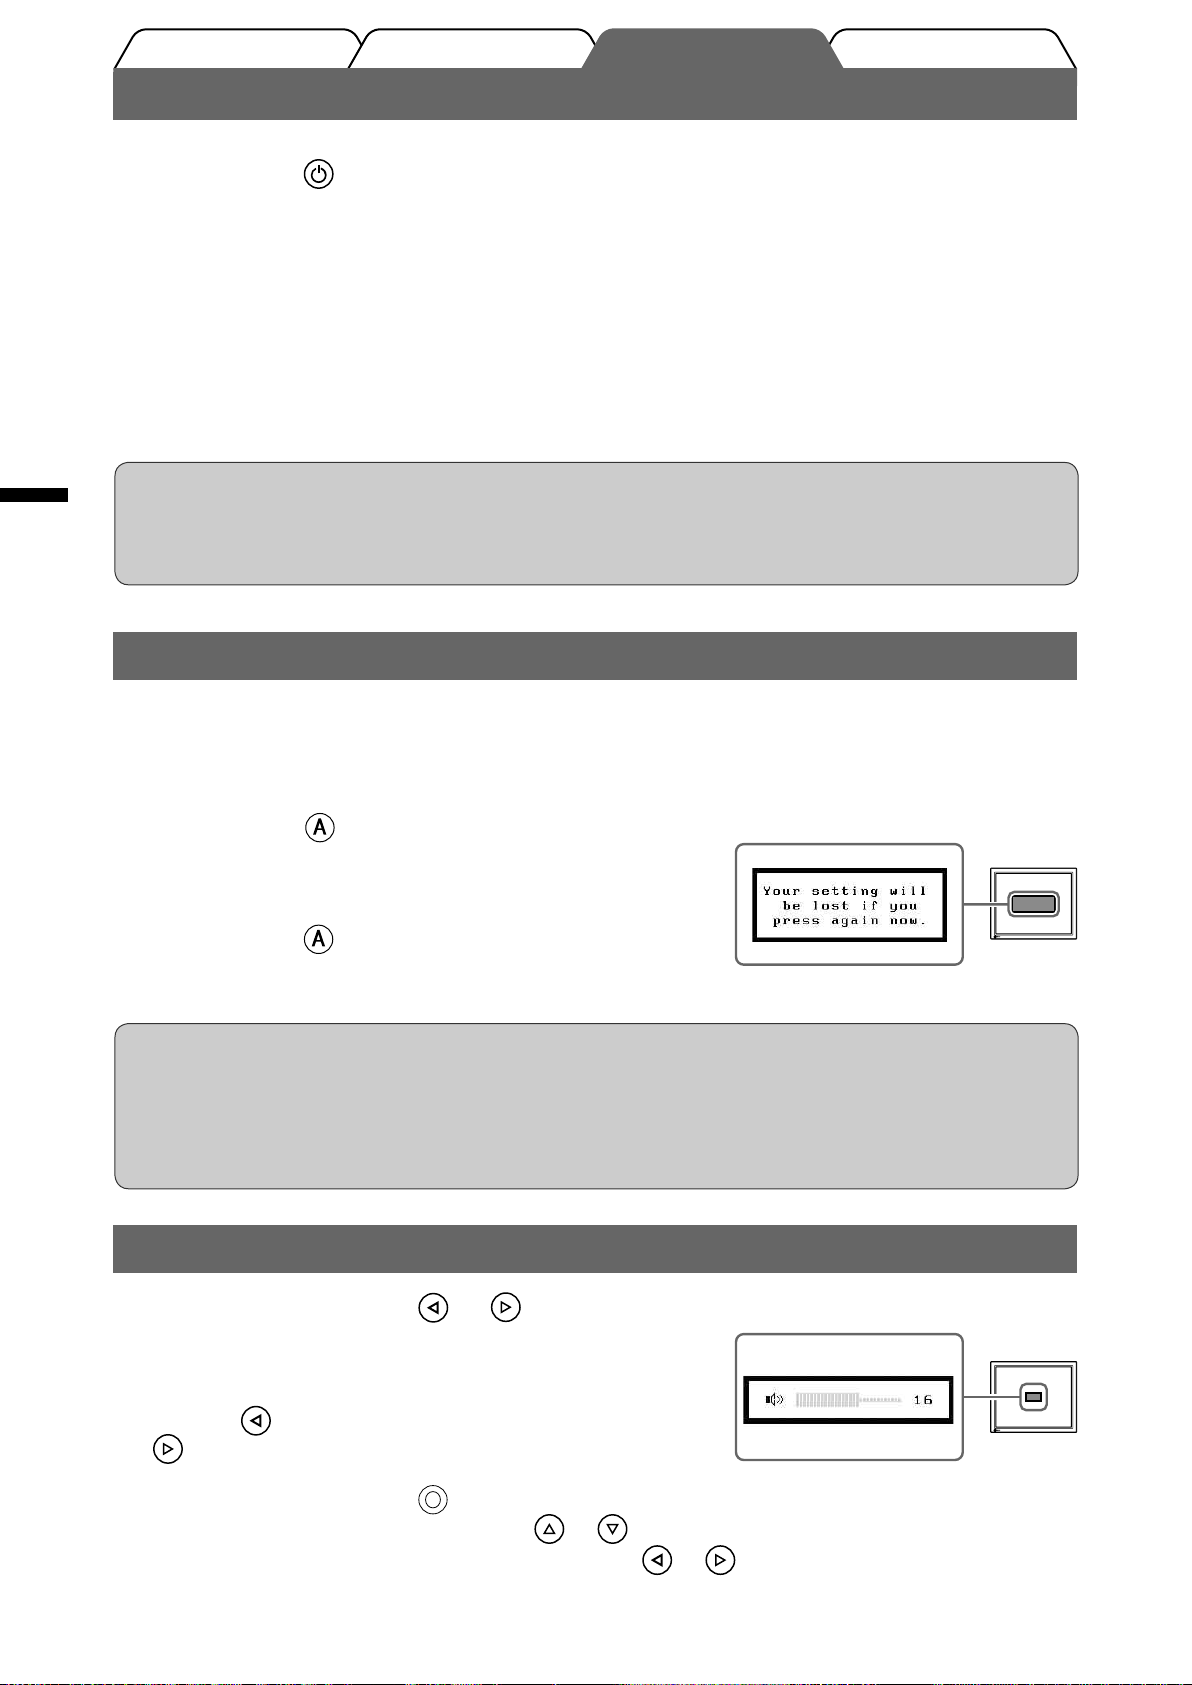
Performing Auto Adjustment Function (Analog input only)
When analog signals are input, the Auto Adjustment function enables the automatic adjustment of clock, phase, screen
position, and resolution.
For details of the Auto Adjustment function, refer to the User’s Manual on the CD-ROM.
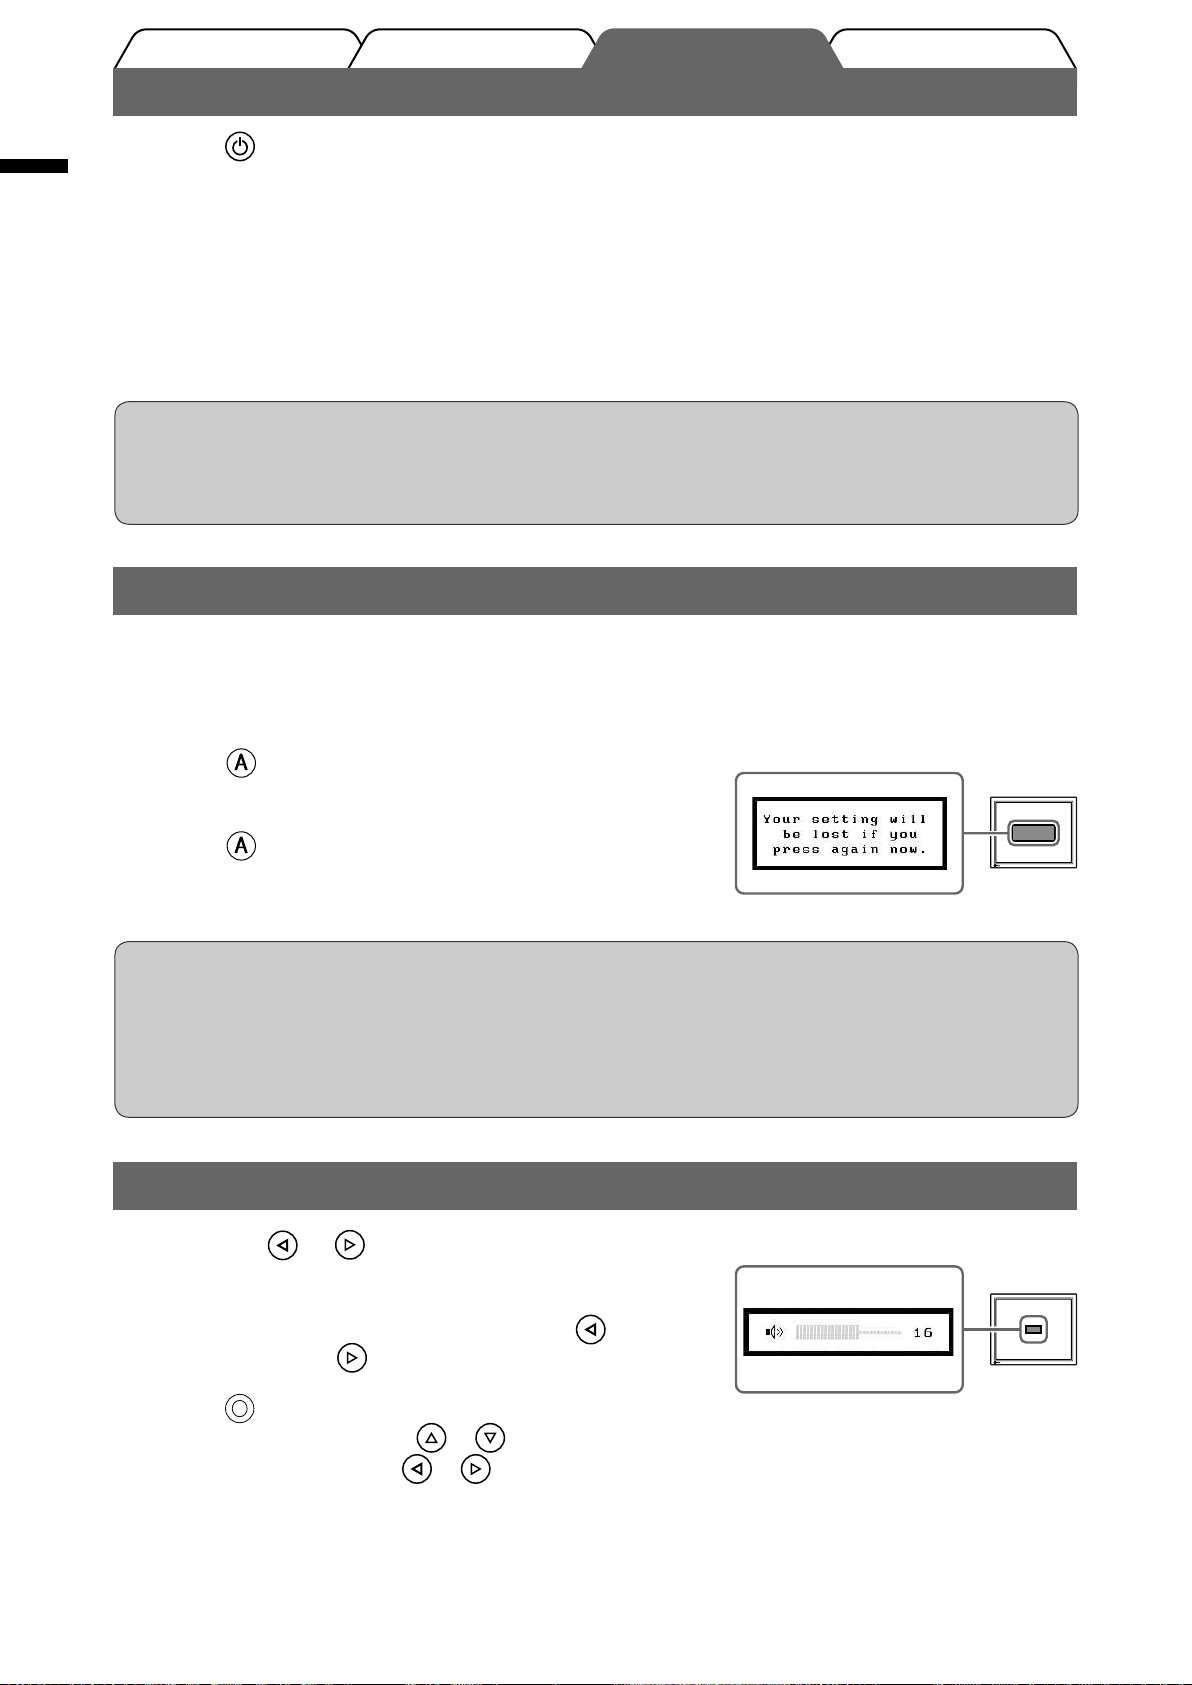
Press .
1
A message window appears.
Press again while the message is displayed.
2
The Auto Adjustment function is activated and clock, phase,
screen position, and resolution are adjusted automatically.
Attention
• The Auto Adjustment function works correctly when an image is fully displayed over the display area of a
Macintosh or Windows PC screen.
It does not work properly when an image is displayed only on a part of the screen (DOS prompt window,
for example) or when a black background (wallpaper, etc.) is in use.
• The Auto Adjustment function may not work properly with some graphics boards.
Message window
Adjusting Speaker Volume
Press the or button.
1
The volume adjustment window appears.
Change the speaker volume with the to
2
decrease or the
Press at the desired volume.
3
To mute the sound, press the or while the volume adjustment menu is displayed.
To cancel muting, press the or button.
to increase.
Volume adjustment window
4
Page 7
Prior to use Installation TroubleshootingSetting/Adjustment
Selecting Display Mode
FineContrast allows you to select the best display mode easily according to monitor’s application.
For details of FineContrast, refer to the User’s Manual on the CD-ROM.
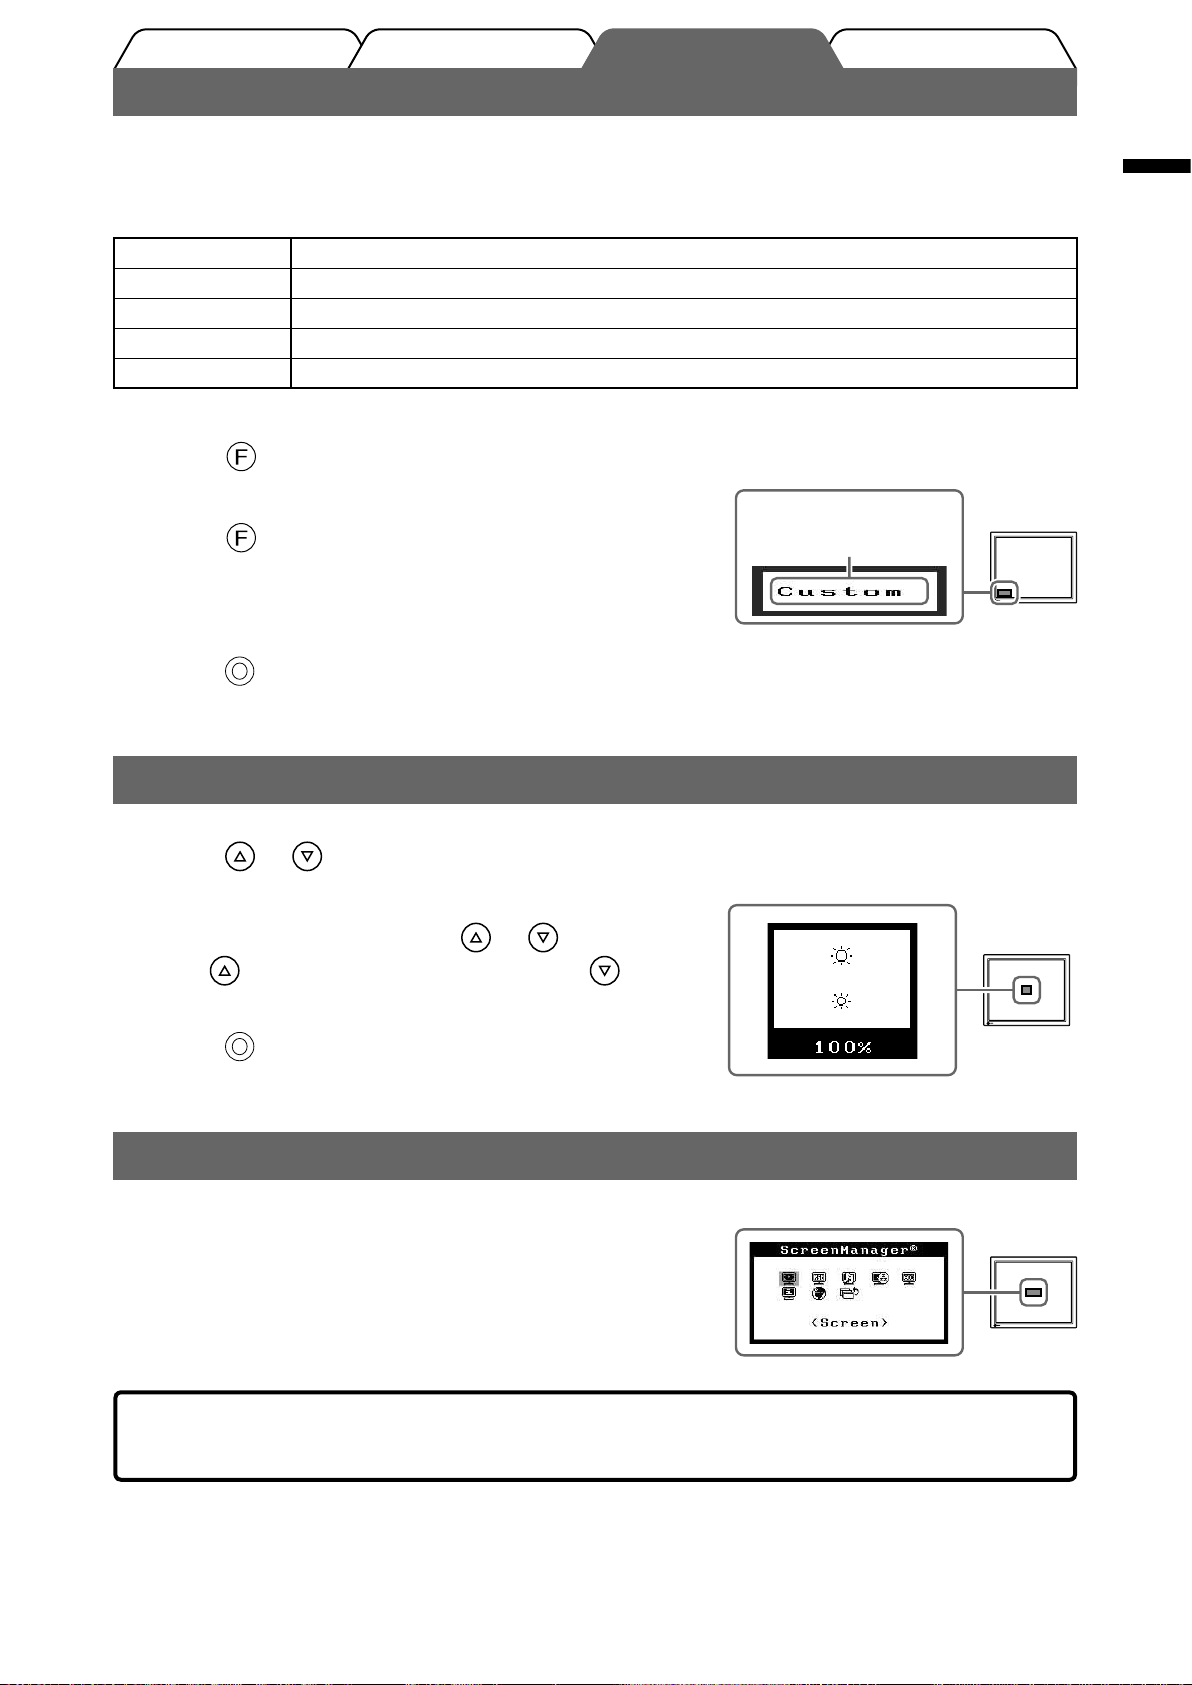
FineContrast Mode
Custom Available for making desired setting.
sRGB Suitable for color matching with sRGB compatible peripherals.
Text Suitable for displaying texts for word processing or spreadsheets.
Picture Suitable for displaying images such as photos or picture images.
Movie Suitable for playing back animated images.
English
Press .
1
The FineContrast window appears.
Press again while the FineContrast
2
menu is displayed.
Each time the button is pressed, the mode on the screen
switches. (Refer to the FineContrast Mode table.)
Press at the desired mode.
3
The selected mode is set.
Adjusting Brightness
Press or .
1
The brightness adjustment window appears.
Adjust the brightness with or .
2
Press to increase screen brightness or press to
decrease.
FineContrast window
Displays the
current mode.
Brightness adjustment window
Press at the desired brightness.
3
The specifi ed brightness is saved.
Performing Advanced Settings/Adjustments
Advanced adjustments for the screen or color and various settings are
available using the Adjustment menu.
For details of each adjustment function, refer to the User’s Manual on
the CD-ROM.
The basic settings and adjustments are completed. For advanced settings/adjustments,
refer to the User’s Manual on the CD-ROM.
Adjustment menu
5
Page 8

English
Prior to use Installation Setting/Adjustment Troubleshooting
No-Picture Problem
If no picture is displayed on the monitor even after the following remedial action is taken, contact your local dealer.
1. Check the Power indicator.
Symptom Status Possible cause and remedy
No picture Power indicator does not light
up.
Power indicator lights blue. Check the brightness setting.
Power indicator lights yellow.
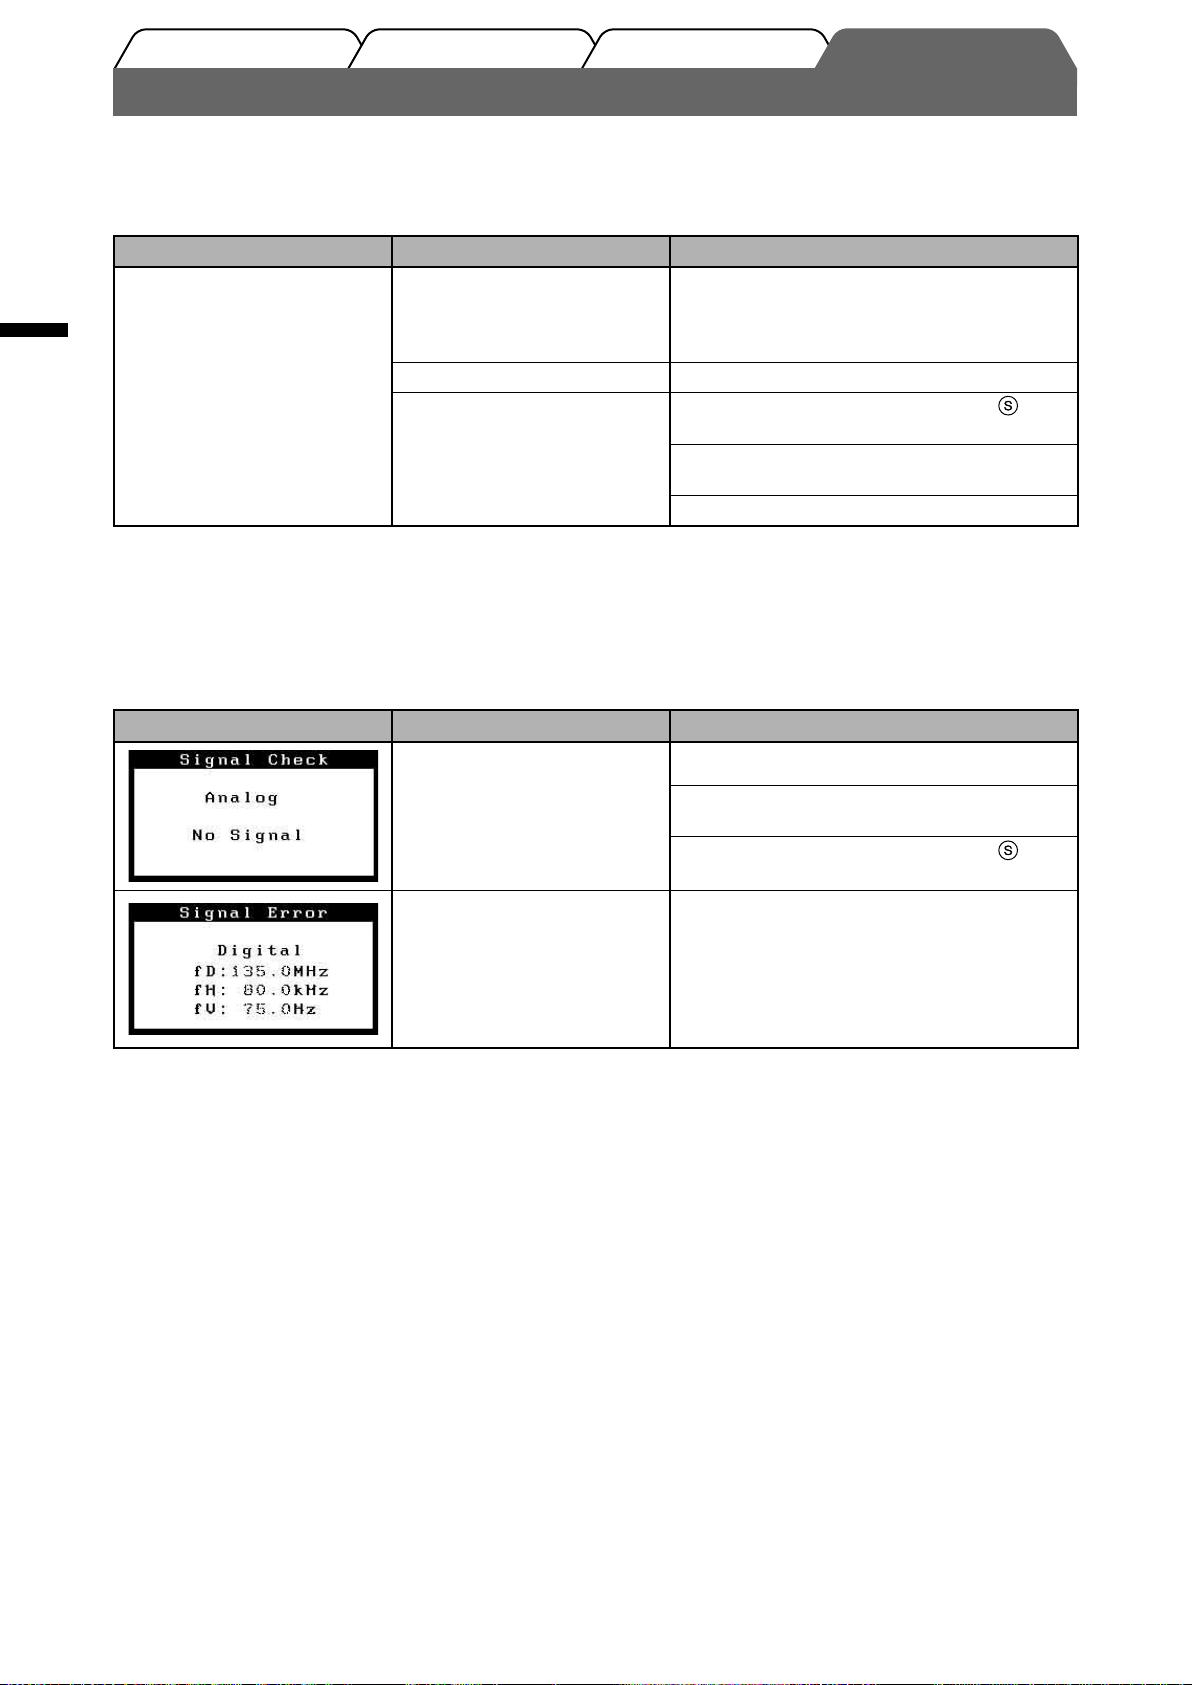
2. Check the error message that remains on the screen for 40 seconds.
These messages appear when the input signal is incorrect even if the monitor is functioning.
Symptom Status Possible cause and remedy
The input signal is not received
correctly.
Check whether the power cord is correctly
connected. If the problem persists, turn off the
monitor for a few minutes, and then turn it on
again.
Switch the input signal with
Press a key on the keyboard or click the mouse.
Turn on the PC.
Check whether the PC is turned on.
Check whether the signal cable is properly
connected to the PC.
Switch the input signal with
.
.
The signal frequency is outside
the specifi cation. Incorrect
signal frequency is shown in
red.
Change the mode to an appropriate mode using
the graphics board’s utility software. Refer to the
manual of the graphics board for details.
6
Page 9

InstallationVor der Benutzung
Einstellungen/Justierung
Fehlerbeseitigung
LCD-Farbmonitor
SICHERHEITSSYMBOLE
In diesem Handbuch werden die unten dargestellten Sicherheitssymbole verwendet. Sie geben Hinweise auf äußerst wichtige
Informationen. Bitte lesen Sie diese Informationen sorgfältig durch.
VORSICHT
Die Nichtbefolgung von unter VORSICHT angegebenen
Anweisungen kann schwere Verletzungen oder sogar
lebensbedrohende Situationen zur Folge haben.
Weist auf eine unerlaubte Vorgehensweise hin.
Weist auf eine erforderliche Erdung aus Sicherheitsgründen hin.
VORSICHTSMASSNAHMEN
VORSICHT
ACHTUNG
Die Nichbeachtung unter ACHTUNG angegebener
Informationen kann mittelschwere Verletzungen und/oder
Schäden oder Veränderungen des Produkts zur Folge haben.
Deutsch
Wenn das Gerät Rauch entwickelt, verbrannt
riecht oder merkwürdige Geräusche produziert,
ziehen Sie sofort alle Netzkabel ab, und bitten
Sie Ihren Fachhändler um Rat.
Der Versuch, mit einem fehlerhaften Gerät zu arbeiten,
kann Feuer, einen elektrischen Schlag oder eine
Beschädigung des Geräts verursachen.
Halten Sie Flüssigkeiten und kleine
Gegenstände vom Gerät fern.
Flüssigkeiten oder kleine Gegenstände können aus
Versehen durch die Lüftungsschlitze in das Gehäuse
gelangen und somit Feuer, einen elektrischen Schlag
oder eine Beschädigung des Geräts verursachen. Sollte
ein Gegenstand oder eine Flüssigkeit in das Gehäuse
gelangt sein, ist sofort das Netzkabel des Geräts
abzuziehen. Lassen Sie das Gerät in diesem Fall von
einem qualifi zierten Servicetechniker überprüfen, bevor
Sie wieder damit arbeiten.
Das Gerät muss an eine ordnungsgemäß geerdete Steckdose angeschlossen werden.
Andernfalls besteht Brand- und Stromschlaggefahr.
Verwenden Sie zum Anschließen an die
landesspezifi sche Standard-Netzspannung das
beiliegende Netzkabel.
Stellen Sie sicher, dass die Nennspannung des
Netzkabels nicht überschritten wird. Andernfalls besteht
Brand- und Stromschlaggefahr.
Stellen Sie das Gerät an einen geeigneten
Platz.
Andernfalls könnte das Gerät beschädigt werden, und
es besteht Brand- und Stromschlaggefahr.
• Verwenden Sie das Gerät nicht im Freien.
• Geben Sie das Gerät nicht als Transportgut auf (per
Schiff, Flugzeug, Zug, Auto etc.).
• Installieren Sie es nicht in staubiger oder feuchter
Umgebung.
• Stellen Sie es nicht an einen Platz, an dem Licht direkt
auf den Bildschirm fällt.
• Stellen Sie es nicht in die Nähe eines Wärme
erzeugenden Geräts oder eines Luftbefeuchters.
ACHTUNG
Blockieren Sie die Lüftungsschlitze am
Gehäuse nicht.
• Legen Sie keine Objekte auf die Lüftungsschlitze.
• Installieren Sie das Gerät nicht in einem engen Raum.
•
Setzen Sie das Gerät nur in der korrekten Orientierung ein.
Das Blockieren der Lüftungsschlitze führt dazu, dass
die Luft nicht mehr zirkulieren und somit Feuer, ein
elektrischer Schlag oder eine Beschädigung des Geräts
verursacht werden kann.
Schließen Sie das Netzkabel an eine leicht
zugängliche Steckdose an.
Damit stellen Sie sicher, dass Sie das Netzkabel im
Notfall schnell abziehen können.
Über das Installationshandbuch und das Benutzerhandbuch
Installationshandbuch
(das vorliegende Handbuch)
Benutzerhandbuch
(• PDF-Datei auf CD-ROM*)
* Erfordert die Installation von Adobe Reader.
Informationen zum Verbinden des Monitors mit dem Computer und zur
Inbetriebnahme.
Anwendungsinformationen, beispielsweise zu Bildschirmeinstellungen,
-justierungen und technischen Daten.
1
Page 10
Deutsch
InstallationVor der Benutzung
Einstellungen/Justierung
Fehlerbeseitigung
Lieferumfang
Prüfen Sie, ob sich alle der folgenden Gegenstände in der Verpackung befi nden. Sollte einer der Gegenstände fehlen oder
beschädigt sein, wenden Sie sich an Ihren Fachhändler.
HINWEIS
• Heben Sie die Verpackung sowie die Verpackungsmaterialien für evtl. Transporte des Monitors gut auf.
□ Monitor
□ Netzkabel
□ digitales Signalkabel (FD-C39)
□ analoges Signalkabel (MD-C87)
□ Stereo Mini-Jack-Kabel
□ CD-ROM mit EIZOs LCD Utility Disk
• Benutzerhandbuch
□ Installationshandbuch (das vorliegende Handbuch)
□ Beschränkte Garantie
□ Befestigungsschraube: M4 × 12 mm 4Stück
Bedienelemente und Funktionen
*ScreenManager
®
Klappen Sie den Fuß
Lautsprecher
auf.
Netzstecker
1 Kopfhörer (Stereo Mini-Jack) Anschluss für einen Kopfhörer.
2 Eingangswahltaste Schaltet zwischen den Signalen zweier angeschlossener Computer um.
3 Automatiktaste Führt eine automatische Justierung des Bildschirms durch. (nur Analogeingang)
4 Steuertasten (Links, Unten,
Oben, Rechts)
5 Eingabetaste Zeigt das Justierungsmenü an, wählt ein Element im Menübildschirm und
6 Feinkontrasttaste Wechseln Sie den Anzeigemodus des Modus „FineContrast“ im Menü
7 Netzschalter Zum Ein- und Ausschalten.
8 Betriebsanzeige Zeigt den Betriebsstatus des Monitors an.
9 Externer Eingang
(Stereo Mini-Jack)
10 Signaleingänge Links: DVI-D-Verbinder /Rechts: 15-poliger Mini-D-Sub-Verbinder.
11 4 Löcher zur Befestigung
eines Schwenkarms/Fußes
12
Öffnung für Diebstahlsicherung
13 Höhenverstellbarer Fuß Zum Einstellen der Höhe und Neigung des Bildschirms.
®
* ScreenManager
Sie dem Benutzerhandbuch auf der CD-ROM.)
ist der Name des Justierungsmenüs von EIZO. (Informationen zur Verwendung von ScreenManager entnehmen
• Taste
(Seite 5).
• Taste oder : Zeigt den Bildschirm für die Helligkeitseinstellung an
(Seite 5).
• Wählt ein Einstellungselement oder erhöht/reduziert justierte Werte
erweiterter Einstellungen mithilfe des Justierungsmenüs (Seite 5).
speichert geänderte Werte.
„FineContrast“ (Seite 5).
Blau : in Betrieb Aus : Hauptstromversorgung getrennt
Gelb : Energiesparmodus
Zum Anschließen des Stereo Mini-Jack-Kabels.
Der Fuß kann durch einen Schwenkarm oder einen anderen Fuß ausgetauscht werden.
Anweisungen zum Austauschen entnehmen Sie dem Benutzerhandbuch auf der CDROM.
Kompatibel mit dem Kensington MicroSaver-Sicherheitssystem.
oder : Zeigt das Fenster zum Einstellen der Lautstärke an
2
Page 11

InstallationVor der Benutzung
Einstellungen/Justierung
Fehlerbeseitigung
Kabel anschließen
Hinweis
• Um einen bereits vorhandenen Monitor durch einen Monitor des Typs M1700/M1900 zu ersetzen, stellen
Sie die PC-Einstellungen für Aufl ösung und vertikale Bildwiederholfrequenz auf die für M1700/M1900-
Monitore verfügbaren Werte ein. Diese entnehmen Sie bitte der Aufl ösungstabelle (Rückseite der ersten
Seite), bevor Sie den Monitor anschließen.
HINWEIS
• Schließen Sie zur Verwendung der Lautsprecher das Stereo Mini-Jack-Kabel am Audioausgang des PCs, CD-Players
usw. an.
• Lesen Sie im Benutzerhandbuch auf der CD-ROM nach, wenn Sie zwei PCs an den Monitor anschließen möchten.
Stellen Sie sicher, dass Computer und Monitor ausgeschaltet sind.
1
Verbinden Sie Monitor und Computer mithilfe eines passenden Signalkabels.
2
Ziehen Sie nach dem Anschließen der Kabel die Schrauben der Verbinder an, um ein versehentliches
Ausstecken zu verhindern.
Deutsch
CD-Player usw.
Anschlüsse am
PC
Anschluss des Audioausgangs
(Stereo Mini-Jack)
DVI-I-Verbinder
15-poliger Mini-D-Sub-
Verbinder
15-poliger D-Sub-
Verbinder
Anschluss des Audioausgangs
(Stereo Mini-Jack)
Stereo Mini-Jack-Kabel (mitgeliefert)
Signalkabel FD-C39 (mitgeliefert)
Digitale Verbindung
Signalkabel MD-C87 (mitgeliefert)
Analoge Verbindung
Macintosh-Adapter (optional) und
Signalkabel MD-C87 (mitgeliefert)
Anschlüsse am
Monitor
Externer Eingang
(Stereo Mini-Jack)
DVI-D-Verbinder
15-poliger Mini-D-Sub-
Verbinder
Analoge Verbindung
Verbinden sie mithilfe des Netzkabels den Netzanschluss des Monitors mit einer
3
Steckdose.
Höhe und Neigung des Bildschirms einstellen
Stellen Sie die für Ihren Arbeitsplatz optimale Höhe, Neigung und Drehung des
Bildschirms ein.
3
Page 12

Deutsch
InstallationVor der Benutzung
Einstellungen/Justierung
Fehlerbeseitigung
Bild wiedergeben
Drücken Sie , um den Monitor einzuschalten.
1
Schalten Sie den Computer ein.
2
Die Betriebsanzeige des Monitors leuchtet auf (blau), und das Bild wird angezeigt.
Falls Sie den analogen Eingang verwenden, führen Sie die „automatische
3
Einstellung“ durch. (Siehe „Automatische Einstellung durchführen“.)
Falls Sie den digitalen Eingang verwenden, ist diese Funktion nicht erforderlich, da das Bild durch die
voreingestellten Werte des Monitors automatisch korrekt angezeigt wird.
Hinweis
• Schalten Sie Computer und Monitor aus, wenn Sie sie nicht mehr benötigen.
• Um möglichst viel Energie zu sparen, empfi ehlt es sich, auch den Netzschalter auszuschalten. Wenn Sie
das Netzkabel abziehen, wird die Stromzufuhr zum Monitor vollständig unterbrochen.
Automatische Einstellung durchführen (nur analoger
Falls Sie den analogen Eingang verwenden, können Sie Takt, Phase, Bildlage und Aufl ösung mithilfe der
Automatikfunktion automatisch einstellen lassen.
Weitere Einzelheiten zur automatischen Einstellung entnehmen Sie dem Benutzerhandbuch auf der CD-ROM.
Drücken Sie .
1
Ein Fenster mit einer Meldung wird angezeigt.
Während die Meldung angezeigt wird, drücken
2
Sie erneut .
Daraufhin wird die automatische Einstellung für Takt, Phase,
Bildlage und Aufl ösung durchgeführt.
Hinweis
• Die automatische Einstellung funktioniert korrekt, wenn das Bild größtmöglich auf einem Macintosh- oder
Windows-PC-Bildschirm angezeigt wird.
Die Einstellung funktioniert möglicherweise nicht korrekt, wenn das Bild nur auf einem Teilbereich des
Bildschirms angezeigt wird, z. B. wenn Sie ein DOS-Befehlsfenster verwenden oder falls Sie Schwarz als
Desktop-Hintergrundfarbe gewählt haben.
• Die automatische Einstellung funktioniert möglicherweise nicht mit bestimmten Grafi kkarten.
Meldungsfenster
Eingang)
Lautstärke der Lautsprecher einstellen
Drücken Sie die Taste oder .
1
Das Fenster zum Einstellen der Lautstärke wird angezeigt.
Erhöhen Sie die Lautstärke mit der Taste ;
2
verringern Sie sie mit der Taste
Ist die gewünschte Lautstärke eingestellt, drücken Sie .
3
Drücken Sie zum Stummschalten der Tonausgabe die Taste oder , während das Menü zur
Einstellung der Lautstärke angezeigt wird.
Drücken Sie zum Aufheben der Stummschaltung die Taste oder .
.
4
Fenster zum Einstellen der Lautstärke
Page 13

InstallationVor der Benutzung
Einstellungen/Justierung
Fehlerbeseitigung
Anzeigemodus auswählen
Mithilfe des Modus FineContrast können Sie den optimalen Anzeigemodus schnell und einfach wählen.
Weitere Einzelheiten zu FineContrast entnehmen Sie dem Benutzerhandbuch auf der CD-ROM.
Modus FineContrast
Custom (Cbenutzerdefi niert) zum wunschgemäßen Einstellen der Farben.
sRGB Einstellung für Farbabgleich mit Peripheriegeräten, die sRGB unterstützen.
Text Einstellung für Textverarbeitungen und Tabellenkalkulationen.
Picture (Bild) Einstellung für Fotos und Bilder.
Movie (Film) Einstellung für animierte Bilder.
Deutsch
Drücken Sie .
1
Das Fenster „FineContrast“ wird angezeigt.
Drücken Sie erneut die Taste , während das
2
Menü FineContrast angezeigt wird.
Wenn Sie die Taste drücken, wird zwischen den Anzeigemodi
gewechselt. (siehe Tabelle „Modus FineContrast“.)
Ist der gewünschte Modus eingestellt, drücken Sie .
3
Dadurch wird die Einstellung gespeichert.
Bildschirmhelligkeit einstellen
Drücken Sie oder .
1
Das Menü zur Helligkeitseinstellung wird eingeblendet.
Stellen Sie die Helligkeit mit der
2
Taste oder ein.
Drücken Sie zum Aufhellen des Bildschirms die Taste ;
um ihn abzudunkeln, drücken Sie die Taste .
Fenster zur Helligkeitseinstellung
Fenster „FineContrast“
Zeigt den aktuellen
Modus an.
Ist die gewünschte Helligkeit eingestellt,
3
drücken Sie
Damit wird der eingestellte Wert gespeichert.
.
Erweiterte Einstellungen/Justierung vornehmen
Im Justierungsmenü können erweiterte Justierungen des Monitors und der
Farben sowie verschiedene andere Einstellungen vorgenommen werden.
Weitere Einzelheiten zu den einzelnen Justierungsfunktionen entnehmen
Sie dem Benutzerhandbuch auf der CD-ROM.
Die grundlegenden Einstellungen und Justierungen sind damit beendet. Weitere
Einzelheiten zu erweiterten Einstellungen/Justierungen entnehmen Sie dem
Benutzerhandbuch auf der CD-ROM.
Justierungsmenü
5
Page 14
Deutsch
InstallationVor der Benutzung
Einstellungen/Justierung
Fehlerbeseitigung
Problem: Kein Bild
Wird auch nach dem Durchführen der nachfolgend vorgeschlagenen Lösungen kein Bild angezeigt, wenden Sie sich an
Ihren Fachhändler.
1. Prüfen Sie den Status der Betriebsanzeige.
Symptom Status Mögl. Ursache und Lösung
Kein Bild Anzeigenstatus: Aus Prüfen Sie, ob das Netzkabel richtig eingesteckt
ist. Besteht das Problem weiterhin, schalten Sie
den Monitor aus und nach wenigen Minuten
wieder ein.
Anzeigenstatus: Blau Prüfen Sie die Helligkeitseinstellung.
Anzeigenstatus: Gelb
2. Prüfen Sie die Fehlermeldungen (Diese bleiben für 40 Sekunden auf dem
Bildschirm eingeblendet.).
Wechseln Sie durch Drücken der Taste den
Signaleingang.
Drücken Sie eine Taste auf der Tastatur, oder
klicken Sie mit der Maus.
Schalten Sie den Computer ein.
Diese Meldungen werden angezeigt, wenn das Eingangssignal nicht ordnungsgemäß übertragen wird, der Monitor
jedoch korrekt funktioniert.
Symptom Status Mögl. Ursache und Lösung
Das Eingangsignal wird nicht
ordnungsgemäß empfangen.
Die Signalfrequenz liegt nicht
im zulässigen Bereich. Die
falsche Signalfrequenz wir rot
angezeigt.
Prüfen Sie, ob der Computer eingeschaltet ist.
Prüfen Sie, ob das Signalkabel ordnungsgemäß
am Computer angeschlossen ist.
Wechseln Sie durch Drücken der Taste
Signaleingang.
Wechseln Sie mithilfe des zur Grafi kkarte
gehörenden Dienstprogramms in einen
kompatiblen Modus. Weitere Informationen
hierzu entnehmen Sie dem Handbuch der
Grafi kkarte.
den
6
Page 15
Réglage/AjustageInstallationAvant l’utilisation
Guide de dépannage
Moniteur couleur LCD
SYMBOLES DE SECURITE
Ce manuel utilise les symboles de sécurité présentés ci-dessous. Ils signalent des informations critiques. Veuillez les lire
attentivement.
AVERTISSEMENT
Le non respect des consignes données dans un message
AVERTISSEMENT peut entraîner des blessures
sérieuses ou même la mort.
Indique une action interdite.
Signale la nécessité d’une mise à la terre de sécurité.
PRECAUTIONS
AVERTISSEMENT
ATTENTION
Le non respect des consignes données dans un message
ATTENTION peut entraîner des blessures et/ou des
dommages au matériel ou au produit.
Français
Si le moniteur fume, sent le brûlé ou émet des
bruits anormaux, débranchez immédiatement
tous les cordons secteur et prenez contact
avec votre revendeur.
Il peut être dangereux d’utiliser un moniteur au
fonctionnement défectueux.
Eloignez les petits objets ou les liquides de
l’appareil.
L’introduction accidentelle de petits objets ou de liquide
dans les fentes de ventilation de la carrosserie peut
entraîner un choc électrique, un incendie ou des dégâts
à l’appareil. Si un objet tombe dans la carrosserie ou si
du liquide se répand sur ou à l’intérieur de l’appareil,
débranchez immédiatement le cordon secteur. Faites
contrôler l’appareil par un technicien qualifi é avant de
l’utiliser à nouveau.
L’appareil doit être relié à une prise avec terre.
Tout autre branchement peut présenter des risques d’incendie ou de choc électrique.
Utilisez le cordon secteur fourni pour le
branchement sur la prise secteur standard
dans votre pays.
Vérifi ez la tension d’épreuve du cordon secteur. Tout
autre branchement peut présenter des risques d’incendie
ou de choc électrique.
Choisissez bien l’emplacement du moniteur.
Il y a des risques de dégâts à l’appareil, d’incendie ou
de choc électrique.
• Ne pas utiliser à l’extérieur.
• Ne pas utiliser dans des moyens de transport (bateau,
avion, trains, automobiles, etc.).
• Ne pas installer l’appareil dans un environnement
poussiéreux ou humide.
• Ne pas installer l’appareil à un endroit exposé
directement à la vapeur d’eau.
• Ne pas placer l’appareil près des appareils de
chauffage ou d’humidifi cation.
ATTENTION
N’obstruez pas les fentes de ventilation de la
carrosserie.
• Ne placez jamais d’objets sur les fentes de ventilation.
• N’installez pas le moniteur dans un espace confi né.
• N’utilisez pas le moniteur couché sur le côté ni à
l’envers.
Toutes ces utilisations risquent d’obstruer les fentes de
ventilation et d’empêcher une circulation d’air normale,
et d’entraîner un incendie ou d’autres dégâts.
Utilisez une prise électrique facilement
accessible.
Ceci vous permettra de débrancher rapidement
l’appareil en cas de problème.
A propos du manuel d’installation et du manuel d’utilisation
Manuel d’installation
(Ce manuel d’installation)
Manuel d’utilisation
(• Fichier PDF inclus sur le
CD-ROM*)
* Installation du logiciel Adobe Reader nécessaire.
Décrit les informations de base depuis la connexion du moniteur à
l’ordinateur jusqu’à l’utilisation du moniteur.
Décrit les informations d’application telles que les ajustages d’écran, les
réglages et les spécifi cations.
1
Page 16

Réglage/AjustageInstallationAvant l’utilisation
Guide de dépannage
Contenu de l’emballage
Vérifi ez que tous les éléments indiqués ci-dessous sont inclus dans le carton d’emballage. Contactez votre revendeur local si
l’un des éléments est manquant ou abîmé.
REMARQUE
• Veuillez conserver le carton et les matériaux d’emballage pour les réutiliser lors d’un déplacement ultérieur du
moniteur.
Français
□ Moniteur
□ Cordon d’alimentation
□ Câble de signal numérique (FD-C39)
□ Câble de signal analogique (MD-C87)
Commandes et fonctions
*ScreenManager
Haut-parleurs
□ Câble à mini-prises stéréo
□ EIZO LCD Utility Disk (CD-ROM)
• Manuel d’utilisation
□ Manuel d’installation (ce manuel)
□ Garantie limitée
□ Vis de montage : M4 × 12 (mm) × 4 pièces
®
Déployez le pied
replié.
Connecteur d’alimentation
1
Casque d’écoute (Mini-prise stéréo)
2 Touche de sélection du
signal d’entrée
3
Touche de réglage automatique
4 Touches de commande
(Gauche, Bas, Haut, Droite)
5 Touche de validation Pour affi cher le menu Ajustage, pour sélectionner un élément de l’écran de
6 Touche FineContrast Pour commuter le mode d’affi chage du mode FineContrast dans le menu
7 Touche d’alimentation Pour mettre sous/hors tension.
8 Voyant d’alimentation Pour indiquer l’état de fonctionnement du moniteur.
9 Entrée de ligne externe
(Mini-prise stéréo)
Connecteurs de signal d’entrée
10
11 4 orifi ces pour le montage du
bras/pied
12
Fente pour le verrouillage de sécurité
Pied ajustable pour la hauteur
13
®
* ScreenManager
désirez de plus amples détails sur l’utilisation de ScreenManager.)
est un alias choisi par EIZO pour le menu Ajustage. (Consultez le manuel d’utilisation sur le CD-ROM si vous
Pour raccorder le casque d’écoute.
Pour commuter les signaux d’entrée de l’affi chage lors de la connexion de 2
PC au moniteur.
Pour ajuster automatiquement l’écran. (entrée analogique uniquement)
• Bouton
• Bouton ou : Pour affi cher l’écran d’ajustage de la luminosité
(page 5).
Pour sélectionner un élément d’ajustage ou augmenter/diminuer les valeurs
•
ajustées pour des ajustages avancés à l’aide du menu Ajustage (page 5).
menu et sauvegarder les valeurs ajustées.
FineContrast (page 5).
Bleu : En fonctionnement Eteint : Hors tension
Jaune : Economie d’énergie
Pour connecter le câble à mini-prises stéréo.
Gauche : Connecteur DVI-D /Droite : Connecteur à 15 tiges D-sub mini.
Le pied peut être remplacé par un bras ou un autre support.
Consultez le manuel d’utilisation sur le CD-ROM pour savoir comment le remplacer.
Compatible avec le système de sécurité MicroSaver de Kensington.
Pour ajuster la hauteur et l’angle de l’écran du moniteur.
ou : Pour affi cher l’écran d’ajustage du volume (page 5).
2
Page 17

Réglage/AjustageInstallationAvant l’utilisation
Guide de dépannage
Connexion des câbles
Attention
• Lors du remplacement du moniteur actuel par un moniteur M1700/M1900, veillez à modifi er la résolution
et la fréquence verticale du PC conformément aux réglages du M1700/M1900 indiqués dans le tableau
des résolutions (verso de la couverture) avant de connecter le PC.
REMARQUE
• Lors de l’utilisation de haut-parleurs, branchez le câble à mini-prises stéréo à la borne de sortie audio de l’ordinateur,
du lecteur de CD, etc.
• Pour connecter deux PC au moniteur, consultez le Manuel d’utilisateur inclus sur le CD-ROM.
Vérifi ez que le moniteur et le PC sont hors tension.
1
Connectez le moniteur au PC à l’aide d’un câble de signal correspondant aux
2
connecteurs.
Une fois que les connecteurs de câble sont connectés, serrez les vis des connecteurs pour assurer le
couplage.
Français
Lecteur de CD,
Connecteurs du
PC
Borne de sortie audio
(Mini-prise stéréo)
Connecteur DVI-I
Connecteur à 15 tiges
D-sub mini
Connecteur à 15 tiges
D-sub
etc.
Borne de sortie audio
(Mini-prise stéréo)
Câble à mini-prises stéréo (fourni)
Câble de signal FD-C39 (fourni)
Connexion numérique
Câble de signal MD-C87 (fourni)
Connexion analogique
Adaptateur Macintosh (en option) + Câble de signal MD-C87 (fourni)
Connecteurs du
moniteur
Entrée de ligne externe
(Mini-prise stéréo)
Connecteur DVI-D
Connecteur à 15 tiges
D-sub mini
Connexion analogique
Branchez le cordon d’alimentation dans une prise secteur et dans le connecteur
3
d’alimentation du moniteur.
Ajustage de la hauteur et de l’angle de l’écran
Pour permettre d’ajuster la hauteur, l’inclinaison et l’orientation de l’écran à une
position agréable pour le travail.
3
Page 18
Français
Réglage/AjustageInstallationAvant l’utilisation
Guide de dépannage
Affi chage de l’écran
Appuyez sur pour mettre le moniteur sous tension.
1
Mettez le PC sous tension.
2
Le voyant d’alimentation du moniteur s’éclaire en bleu et l’image d’écran apparaît.
Lorsqu’un signal d’entrée analogique est utilisé, activez la fonction Ajustage
3
automatique. (Consultez « Activation de la fonction Ajustage automatique » cidessous.)
La fonction Ajustage automatique n’est pas nécessaire à l’entrée de signaux numériques étant donné
que les images s’affi chent correctement en fonction des données prédéfi nies du moniteur.
Attention
• Mettez le moniteur et le PC hors tension lorsque vous ne les utilisez plus.
• Pour une économie d’énergie maximale, il est recommandé que le voyant d’alimentation soit éteint.
L’alimentation du moniteur est coupée en débranchant le cordon d’alimentation.
Activation de la fonction Ajustage automatique (entrée analogique uniquement)
Lorsque des signaux analogiques sont entrés, la fonction Ajustage automatique permet d’ajuster automatiquement
l’horloge, la phase, la position de l’écran et la résolution.
Consultez le manuel d’utilisation inclus sur le CD-ROM si vous désirez de plus amples détails sur la fonction Ajustage
automatique.
Appuyez sur .
1
Un message s’affi che.
Alors que le message est affi ché, appuyez à
2
nouveau sur .
La fonction Ajustage automatique est activée et l’horloge, la
phase, la position de l’écran et la résolution sont ajustées automatiquement.
Attention
• La fonction Ajustage automatique fonctionne lorsqu’une image s’affi che complètement sur la zone
d’affi chage d’un écran d’un ordinateur Macintosh ou Windows.
Elle ne fonctionne pas correctement lorsqu’une image ne s’affi che que sur une partie de l’écran (fenêtre
de commande DOS, par exemple) ou lorsqu’un arrière-plan noir (papier peint, etc.) est utilisé.
• La fonction Ajustage automatique peut ne pas fonctionner correctement avec certaines cartes vidéo.
Message
Ajustage du volume des haut-parleurs
Appuyez sur le bouton ou .
1
La fenêtre d’ajustage du volume apparaît.
Modifi ez le volume des haut-parleurs à l’aide du
2
bouton
pour l’augmenter.
Appuyez sur le bouton une fois le volume souhaité ajusté.
3
Pour couper le son, appuyez sur le bouton ou lorsque le menu d’ajustage du volume est affi ché.
Pour activer de nouveau le son, appuyez sur le bouton
pour baisser le volume ou du bouton
ou .
4
Fenêtre d’ajustage du volume
Page 19

Réglage/AjustageInstallationAvant l’utilisation
Guide de dépannage
Sélection du mode d’écran
FineContrast vous permet de sélectionner facilement le meilleur mode d’écran en fonction de l’application du moniteur.
Consultez le manuel d’utilisation sur le CD-ROM si vous désirez de plus amples détails sur FineContrast.
Mode FineContrast
Custom
(Personnaliser)
sRGB Adapté à la comparaison des couleurs des périphériques compatibles sRGB.
Text (Texte) Adapté à l’affi chage de textes sur traitement de texte ou feuille de calcul.
Picture (Image) Adapté à l’affi chage de photos ou d’images.
Movie (Cinéma) Adapté à la lecture d’images animées.
Pour ajuster les réglages selon vos préférences.
Appuyez sur .
1
La fenêtre FineContrast apparaît.
Alors que le menu FineContrast est affi ché,
2
appuyez de nouveau sur
A chaque pression sur le bouton, le mode passe au mode
suivant. (Consultez le tableau des modes FineContrast.)
Appuyez sur le bouton une fois le mode souhaité ajusté.
3
Le mode sélectionné est défi ni.
.
Fenêtre FineContrast
Ajustage de la luminosité
Appuyez sur ou .
1
La fenêtre d’ajustage de la luminosité apparaît.
Ajustez la luminosité à l’aide du bouton
2
ou .
Appuyez sur pour augmenter la luminosité de l’écran ou
sur pour la diminuer.
Fenêtre d’ajustage de la luminosité
Français
Affi che le mode
courant.
Appuyez sur le bouton une fois la luminosité souhaitée ajustée.
3
La luminosité spécifi ée est enregistrée.
Réglages/Ajustages avancés
Les ajustages avancés concernant l’écran ou les couleurs et différents
réglages sont disponibles dans le menu Ajustage.
Consultez le manuel d’utilisation inclus sur le CD-ROM si vous désirez de
plus amples détails sur chaque fonction d’ajustage.
Les réglages et ajustages de base sont terminés. Consultez le manuel d’utilisation sur le
CD-ROM si vous désirez de plus amples détails sur les Réglages/Ajustages avancés.
Menu Ajustage
5
Page 20

Français
Réglage/AjustageInstallationAvant l’utilisation Guide de dépannage
Problème de non-affi chage d’images
Si aucune image ne s’affi che sur le moniteur même après avoir utilisé les solutions suivantes, contactez votre revendeur
local.
1. Vérifi ez le voyant d’alimentation.
Symptôme Etat Cause possible et solution
Aucune image Le voyant ne s’allume pas. Vérifi ez que le cordon d’alimentation est
correctement branché. Si le problème subsiste,
mettez le moniteur hors tension pendant
quelques minutes, puis remettez-le sous
tension.
Le voyant s’allume en bleu. Vérifi ez le réglage de luminosité.
Le voyant s’allume en jaune.
Changez le signal d’entrée en appuyant sur
Appuyez sur une touche du clavier ou cliquez
sur la souris.
Mettez le PC sous tension.
2. Vérifi ez le message d’erreur qui reste affi ché sur l’écran pendant 40 secondes.
Ces messages s’affi chent lorsque le signal d’entrée est incorrect même si le moniteur fonctionne correctement.
.
Symptôme Etat Cause possible et solution
Le signal d’entrée n’est pas
reçu correctement.
La fréquence du signal est en
dehors de la spécifi cation. La
fréquence de signal incorrecte
est indiquée en rouge.
Vérifi ez si le PC est sous tension.
Vérifi ez si le câble de signal est correctement
connecté au PC.
Changez le signal d’entrée en appuyant sur
Passez en un mode approprié à l’aide du
logiciel utilitaire de la carte vidéo. Consultez le
manuel de la carte vidéo pour de plus amples
détails.
.
6
Page 21

Solución de problemasConfiguración/AjusteInstalaciónAntes de su utilización
Monitor en color de pantalla de cristal líquido
SÍMBOLOS DE SEGURIDAD
Este manual utiliza los símbolos de seguridad que aparecen a continuación. Contienen información importante. Léalos
detenidamente.
ADVERTENCIA
No respetar la información de una ADVERTENCIA
puede provocar heridas graves y suponer un riesgo para
la integridad física.
Indica una acción no permitida.
Indica poner a tierra por motivos de seguridad.
PRECAUCIONES
ADVERTENCIA
PRECAUCIÓN
No respetar la información de una PRECAUCIÓN
puede provocar heridas leves o daños materiales o en el
equipo.
Si la unidad empieza a oler a quemado, hace
ruidos extraños o sale humo de ella,
desconecte inmediatamente todas las
conexiones de alimentación y póngase en
contacto con su distribuidor.
Intentar utilizar una unidad defectuosa puede provocar
un incendio, una descarga eléctrica o daños en el
equipo.
Mantenga objetos pequeños y líquidos
alejados de la unidad.
Si algún objeto pequeño cae del monitor por la ranura
de ventilación o se derrama algún líquido en su interior
puede provocar un incendio, una descarga eléctrica o
daños en el equipo. Si cae un objeto o se derrama un
líquido dentro de la unidad, desconéctela
inmediatamente. Asegúrese de que un técnico
cualifi cado revise la unidad antes de volver a utilizarla.
El equipo debe conectarse a una toma de corriente de conexión a tierra.
De lo contrario, podría producirse un incendio o una descarga eléctrica.
Utilice el cable de alimentación que se adjunta
y conéctelo a la toma de corriente estándar de
su país.
Asegúrese de no superar el voltaje nominal del cable de
alimentación. De lo contrario, podría producirse un
incendio o una descarga eléctrica.
Instale la unidad en una ubicación apropiada.
De lo contrario, podría producirse un incendio, una
descarga eléctrica o daños en el equipo.
• No la instale en el exterior.
• No la instale en ningún medio de transporte (barco,
avión, trenes, automóviles, etc.).
• No la instale en un entorno con humedad o con polvo.
• No la instale en una ubicación donde el vapor de agua
entre en contacto directo con la pantalla.
• No la instale cerca de humidifi cadores o de aparatos
que generen calor.
PRECAUCIÓN
No tape las ranuras de ventilación del aparato.
• No coloque ningún objeto sobre las ranuras de
ventilación.
• No instale la unidad en un espacio cerrado.
• No utilice la unidad en posición horizontal ni boca
abajo.
Cubrir las ranuras de ventilación impide una ventilación
adecuada y podría provocar un incendio, una descarga
eléctrica o daños en el equipo.
Utilice una toma de corriente de fácil acceso.
De esta manera podrá desconectar la corriente de forma
rápida si surge algún problema.
Español
Información sobre el Manual de instalación y el Manual del usuario
Manual de instalación
(este manual)
Manual del usuario
(• archivo PDF incluido en el
CD-ROM*)
* Es necesario tener instalado Adobe Reader.
Sólo se suministran archivos PDF en inglés, alemán, francés y chino.
Información sobre la conexión al ordenador y la utilización del monitor.
Información sobre ajustes de pantalla, parámetros y especifi caciones.
1
Page 22

Solución de problemasConfiguración/AjusteInstalaciónAntes de su utilización
Contenido del embalaje
Compruebe que los elementos siguientes estén incluidos en el embalaje. Póngase en contacto con su distribuidor si alguno de
los elementos no aparece o aparece dañado.
NOTA
• Conserve la caja y los materiales de embalaje para utilizarlos en posibles futuros transportes del monitor.
□ Monitor
□ Cable de alimentación
□ Cable de señal digital (FD-C39)
□ Cable de señal analógica (MD-C87)
□ Cable con minitoma estéreo
□ EIZO LCD Utility Disk (CD-ROM)
• Manual del usuario
□ Manual de instalación (este manual)
□ Garantía limitada
□ Tornillo de montaje: M4 × 12 mm 4 un.
Controles y funciones
Español
*ScreenManager
®
Abra el soporte
Altavoces
plegado.
Conector de alimentación
1
Auriculares (minitoma estéreo)
2 Botón de selección de la
señal de entrada
3 Botón de autoajuste Ajusta la pantalla automáticamente (solamente entrada analógica).
4 Botones de control
(izquierda, abajo, arriba y
derecha)
5 Botón Intro Muestra el menú de ajuste, confi rma los ajustes de los elementos en la
6 Botón FineContrast Permite cambiar el modo de visualización del modo FineContrast en el menú
7 Botón de alimentación Enciende o apaga la unidad.
8 Indicador de alimentación Indica el estado operativo del monitor.
9 Entrada de línea externa
(minitoma estéreo)
10
Conectores de señal de entrada
11 4 orifi cios para montar un
brazo o un soporte
12
Ranura de bloqueo de seguridad
13 Soporte de altura regulable Ajusta la altura y el ángulo de la pantalla del monitor.
* ScreenManager
consulte el Manual del usuario del CD-ROM.)
®
es un nombre que aplica EIZO al menú de ajuste. (Para obtener información sobre el uso de ScreenManager,
Conecte los auriculares.
Alterna la visualización de las señales de entrada cuando se conectan dos
ordenadores al monitor.
• Botón o : Muestra la ventana de ajuste del volumen (página 5).
• Botón o : Muestra la pantalla de ajuste de brillo (página 5).
•
Selecciona un elemento de ajuste o aumenta o disminuye los valores
ajustados en los ajustes avanzados mediante el menú de ajuste (página 5).
pantalla de menú y guarda los elementos ajustados.
FineContrast (página 5).
Azul : Operación Apagado : Alimentación apagada
Amarillo : Ahorro de energía
Conecte el cable con minitoma estéreo.
Izquierdo: Conector de DVI-D /Derecho: Miniconector D-sub de 15 contactos.
Es posible sustituir el soporte por un brazo o por otro soporte.
Para obtener información sobre cómo sustituir el soporte, consulte el Manual
del usuario del CD-ROM.
Este bloqueo admite el sistema de seguridad MicroSaver de Kensington.
2
Page 23

Solución de problemasConfiguración/AjusteInstalaciónAntes de su utilización
Conexión de los cables
Atención
• Si sustituye el monitor actual por un monitor M1700/M1900, consulte la tabla de resoluciones (parte
posterior de la portada) para cambiar la confi guración de la resolución y la frecuencia vertical del
ordenador a una disponible para el monitor M1700/M1900.
NOTA
• Cuando utilice los altavoces, conecte el cable con minitoma estéreo al terminal de salida de audio del PC,
reproductor de CD, etc.
• Si va a conectar dos ordenadores al monitor, consulte el manual del usuario almacenado en el CD-ROM.
Compruebe que la alimentación del monitor y del ordenador está desactivada.
1
Conecte el monitor al ordenador con un cable de señal haciendo coincidir los
2
conectores.
Una vez conectados los conectores del cable, apriete los tornillos de los conectores para fi jar la
conexión.
Reproductor de
CD, etc.
Conectores del
ordenador
Terminal de salida de audio
(Minitoma estéreo)
Terminal de salida de audio
(Minitoma estéreo)
Cable con minitoma estéreo (suministrado)
Conectores del
monitor
Entrada de línea externa
(Minitoma estéreo)
Español
Conector DVI-I
Miniconector D-sub de
15 contactos
Conector D-sub de
15 contactos
Enchufe el cable de alimentación en una toma de corriente y el conector de
3
Adaptador para Macintosh (opcional) y cable de señal MD-C87 (suministrado)
Cable de señal FD-C39 (suministrado)
Conexión digital
Cable de señal MD-C87 (suministrado)
Conexión analógica
Conexión analógica
Conector DVI-D
Miniconector D-sub de
15 contactos
alimentación en el monitor.
Ajuste de la altura y el ángulo de la pantalla
Es posible ajustar la altura, inclinación y giro de la pantalla para conseguir una
posición de trabajo adecuada.
3
Page 24

Solución de problemasConfiguración/AjusteInstalaciónAntes de su utilización
Visualización de la pantalla
Pulse para encender el monitor.
1
Encienda el ordenador.
2
El indicador de alimentación del monitor se iluminará en color azul y aparecerá la imagen de la pantalla.
Si utiliza la señal de entrada analógica, ejecute la función de Autoajuste.
3
(Consulte “Ejecución de la función de Autoajuste”.)
Si se recibe la señal digital, la función de Autoajuste no es necesaria, ya que la imagen aparecerá
correctamente a partir de los datos preajustados del monitor.
Atención
• Apague el monitor y el ordenador después de utilizarlos.
• Se recomienda desconectar completamente el monitor de la fuente de alimentación para ahorrar
energía. Para ello, desenchufe el cable de alimentación del monitor.
Ejecución de la función de Autoajuste (solamente con la entrada analógica)
Español
Si se reciben señales analógicas, la función de Autoajuste le permite ajustar automáticamente el reloj, la fase, la
posición de la pantalla y la resolución.
Para obtener información más detallada sobre la función de Autoajuste, consulte el Manual del usuario del CD-ROM.
Pulse .
1
Aparece una ventana de mensaje.
Mientras se muestra el mensaje, pulse de
2
nuevo.
La función de Autoajuste se activa y el reloj, la fase, la
posición de la pantalla y la resolución se ajustan automáticamente.
Atención
• La función de Autoajuste funciona correctamente cuando la imagen se visualiza en el área máxima
posible de una pantalla de un Macintosh o un ordenador con Windows.
Es posible que no funcione correctamente si la imagen se visualiza sólo en una parte de la pantalla, por
ejemplo, al utilizar una ventana de comandos DOS o si el color de fondo del escritorio es negro.
• Es posible que la función de Autoajuste no funcione correctamente con algunas tarjetas gráfi cas.
Ventana de mensaje
Ajuste del volumen del altavoz
Pulse el botón o .
1
Aparece la ventana de ajuste del volumen.
Pulse el botón para disminuir el volumen del
2
altavoz o el botón
Pulse el botón hasta conseguir el volumen
3
deseado.
Para silenciar el sonido, pulse el botón o mientras se muestre el menú de ajuste del volumen.
Si desea cancelar la función de silenciamiento, pulse el botón
para aumentarlo.
Ventana de ajuste del volumen
o .
4
Page 25

Solución de problemasConfiguración/AjusteInstalaciónAntes de su utilización
Selección del modo de pantalla
La función FineContrast (Matices de contraste) le permite seleccionar fácilmente el modo de visualización más
apropiado en función de la utilización del monitor.
Para obtener información más detallada sobre FineContrast, consulte el Manual del usuario del CD-ROM.
Modo FineContrast
Custom
(Personalizar)
sRGB
(RGB estándar)
Text (Texto) Adecuado para el trabajo con software de procesador de textos o de hojas de cálculo.
Picture (Imagen) Adecuado para la visualización de imágenes como fotografías o dibujos.
Movie (Película) Adecuado para la reproducción de imágenes animadas.
Permite realizar los ajustes deseados.
Adecuado para la coincidencia de colores con periféricos que admiten RGB estándar.
Pulse .
1
Aparece la ventana de FineContrast.
Pulse de nuevo mientras se visualiza el menú
2
FineContrast.
Cada vez que se pulsa el botón, cambia el modo de la
pantalla. (Consulte la tabla del “Modo FineContrast”.)
En el modo de visualización deseado, pulse el botón .
3
Se ajusta el modo seleccionado.
Ventana de FineContrast
Ajuste del brillo
Pulse o .
1
Aparece la ventana de ajuste del brillo.
Ajuste el brillo con o .
2
Pulse para dar más brillo a la pantalla o
para oscurecerla.
Ventana de ajuste del brillo
Muestra el
modo actual.
Español
Cuando obtenga el brillo deseado, pulse .
3
De este modo se guarda el brillo especifi cado.
Ejecución de la confi guración/ajustes avanzados
Los ajustes avanzados de pantalla o color y otros ajustes diversos
pueden realizarse mediante el menú de ajuste.
Para obtener información más detallada sobre cada función de
ajuste, consulte el Manual del usuario del CD-ROM.
La confi guración y ajustes básicos se han completado. Para obtener información sobre
la confi guración/ajustes avanzados, consulte el Manual del usuario del CD-ROM.
Menú de ajuste
5
Page 26

Solución de problemasConfiguración/AjusteInstalaciónAntes de su utilización
Sin problemas con las imágenes
Si no se muestra ninguna imagen en el monitor tras seguir las soluciones propuestas, póngase en contacto con su
distribuidor local.
1. Compruebe el indicador de alimentación.
Síntoma Estado Posible causa y solución
No aparece ninguna imagen El indicador de alimentación no
se ilumina.
El indicador de alimentación se
ilumina en azul.
El indicador de alimentación se
ilumina en amarillo.
2. Compruebe los mensajes de error. Éstos permanecen en la pantalla durante 40
Compruebe que el cable de alimentación está
conectado correctamente. Si el problema
persiste, apague el monitor durante algunos
minutos y, a continuación, vuelva a encenderlo
de nuevo.
Compruebe la confi guración del brillo.
Cambie la señal de entrada mediante el botón
.
Pulse una de las teclas del teclado o haga clic
con el ratón.
Encienda el ordenador.
Español
segundos.
Este tipo de mensajes aparecen cuando la señal de entrada no es correcta, aunque el monitor esté funcionando.
Síntoma Estado Posible causa y solución
La señal de entrada no se ha
recibido correctamente.
La frecuencia de la señal está
fuera del rango admitido. La
frecuencia de la señal
incorrecta aparecerá en rojo.
Compruebe si el ordenador está encendido.
Compruebe si el cable de señal está
correctamente conectado al ordenador.
Cambie la señal de entrada mediante el botón
.
Utilice el software de la tarjeta gráfi ca para
seleccionar un modo adecuado. Consulte el
manual de la tarjeta gráfi ca para obtener más
información.
6
Page 27

InstallazionePreparazione
Configurazione e regolazione
Risoluzione dei problemi
Monitor LCD a colori
SIMBOLI DI SICUREZZA
Il manuale utilizza i simboli di sicurezza riportati sotto per segnalare informazioni di primaria importanza. Leggere le informazioni
con attenzione.
AVVERTENZA
La mancata osservanza delle informazioni
contrassegnate da un simbolo di AVVERTENZA può
dar luogo a gravi lesioni personali anche mortali.
Indica un’azione vietata.
Indica che è necessario effettuare il collegamento a terra per ragioni di sicurezza.
PRECAUZIONI
AVVERTENZA
ATTENZIONE
La mancata osservanza delle informazioni
contrassegnate da un simbolo di ATTENZIONE può
dar luogo a lesioni personali di entità moderata o danni
a cose o al prodotto stesso.
Se l’unità dovesse emettere fumo, rumori
insoliti oppure si percepisca odore di bruciato,
scollegare immediatamente tutti i cavi di
alimentazione e rivolgersi al rivenditore.
L’utilizzo di unità con problemi di funzionamento può
causare incendi, folgorazione o danni alle
apparecchiature.
Mantenere liquidi e oggetti di piccole
dimensioni lontano dall’unità.
I piccoli oggetti o i liquidi caduti accidentalmente
nell’unità attraverso le aperture di ventilazione, possono
causare incendi, folgorazione o danni all’unità stessa.
Nel caso in cui un oggetto o dei liquidi dovessero
penetrare nell’unità, scollegare immediatamente l’unità.
Richiedere il controllo dell’unità da parte di un tecnico
dell’assistenza prima di utilizzarla nuovamente.
L’apparecchio deve essere collegato a una presa munita di collegamento a terra.
In caso contrario potrebbero verifi carsi incendi o folgorazione.
Utilizzare il cavo di alimentazione in dotazione
e collegarlo alla presa a muro.
Assicurarsi che la tensione di alimentazione si
compresa nei limiti nominali indicati sul cavo stesso. In
caso contrario potrebbero verifi carsi incendi o
folgorazione.
Collocare l’unità in un luogo appropriato.
In caso contrario potrebbero verifi carsi incendi o
folgorazione o danni all’unità stessa.
• Non installare all’aperto.
• Non installare in mezzi di trasporto (imbarcazioni,
aeromobili, treni, autoveicoli, ecc.).
• Non posizionare in ambienti polverosi o umidi.
• Non installare in luoghi in cui i vapori siano emessi
direttamente in direzione dello schermo.
• Non posizionare vicino a fonti di calore o in
prossimità di dispositivi di umidifi cazione.
ATTENZIONE
Non ostruire le aperture di ventilazione
dell’unità.
• Non inserire oggetti nelle aperture di ventilazione.
• Non installare l’unità in un luogo ristretto e chiuso.
• Non utilizzare l’unità in posizione orizzontale o
capovolta.
L’ostruzione delle aperture di ventilazione impedisce il
fl usso corretto dell’aria e può causare incendi,
folgorazioni o danni alle apparecchiature.
Utilizzare una presa di corrente facilmente
accessibile.
Ciò consente di scollegare rapidamente il cavo di
alimentazione in caso di problemi.
Italiano
Informazioni sul manuale di installazione e sul manuale dell’utente
Manuale di installazione
(il presente manuale)
Manuale dell’utente
(• fi le PDF, sul CD-ROM in dotazione*)
* È richiesta l’installazione di Adobe Reader.
Sono forniti esclusivamente i fi le PDF delle versioni Inglese, Tedesca, Francese e Cinese.
Fornisce le informazioni di base dal collegamento del monitor al
computer all’utilizzo del monitor stesso.
Fornisce informazioni quali la regolazione dello schermo, le
impostazioni e le specifi che tecniche.
1
Page 28

InstallazionePreparazione
Configurazione e regolazione
Risoluzione dei problemi
Contenuto della confezione
Verifi care che tutti i seguenti componenti siano inclusi nella confezione. Se i componenti elencati di seguito risultassero
mancanti o danneggiati, contattare il rivenditore locale.
NOTA
• Conservare la confezione e tutti i relativi componenti per eventuali spostamenti del monitor.
□ Monitor
□ Cavo di alimentazione
□ Cavo segnale digitale (FD-C39)
□ Cavo segnale analogico (MD-C87)
□ Cavo con minipresa stereo
□ EIZO LCD Utility Disk (CD-ROM)
• Manuale dell’utente
□ Manuale di installazione (il presente manuale)
□ Garanzia limitata
□ Viti di fi ssaggio: M4 × 12 mm 4PZ
Comandi e funzioni
Italiano
*ScreenManager
®
Allungare il supporto.
Casse
Connettore di alimentazione
1 Cuffi a (minipresa stereo) Collegare le cuffi e.
2 Tasto di selezione del
segnale di ingresso
Tasto di regolazione automatica
3
4 Tasti direzionali (sinistra,
destra, giù, su)
5 Tasto di conferma Visualizza il menu di regolazione, consente di scegliere un valore dalla
6 Pulsante FineContrast Consente di selezionare la modalità di visualizzazione della modalità
7 Pulsante di accensione/
spegimento
8 Indicatore di alimentazione Indica lo stato di funzionamento del monitor.
9 Ingresso linea esterna
(minipresa stereo)
10
Connettori segnale di ingresso
11 4 fori per il fi ssaggio del
braccio o del supporto
Fissaggio lucchetto di sicurezza
12
13 Supporto regolabile in altezza Consente di regolare l’altezza e l’angolo dello schermo.
®
* ScreenManager
manuale dell’utente su CD-ROM.
è un marchio di EIZO per il menu regolazione. Per informazioni sull’uso di ScreenManager, fare riferimento al
Consente di selezionare il segnale di ingresso se al monitor sono collegati
due PC.
Regola automaticamente la visualizzazione dello schermo. (solo ingresso analogico)
tasto o : visualizza la schermata di regolazione del volume (pagina 5).
•
• t
asto o : visualizza la schermata di regolazione della luminosità (pagina 5).
• consente di scegliere un valore di regolazione oppure aumenta/diminuisce
i valori impostati per regolazioni avanzate mediante il menu di regolazione
(pagina 5).
schermata di menu e salva i valori impostati.
FineContrast nel menu FineContrast (pagina 5).
Accende o spegne l’unità.
Blu : Acceso Spento
Giallo
Per il collegamento del cavo con minipresa stereo.
Sinistra: Connettore DVI-D /Destra: Connettore D-Sub mini 15 pin.
Il supporto può essere sostituito con un braccio o un altro supporto.
Per informazioni sulla sostituzione, fare riferimento al manuale dell’utente su
CD-ROM.
Questo tipo di blocco è compatibile con il sistema di sicurezza Kensinton MicroSaver.
: Risparmio energetico
: Alimentazione principale spenta
2
Page 29

Preparazione Installazione
Configurazione e regolazione
Risoluzione dei problemi
Collegamento dei cavi
Nota
• Durante la sostituzione del monitor attuale con un monitor M1700/M1900, assicurarsi di selezionare le
impostazioni del computer per la risoluzione e la frequenza verticale disponibili per il monitor M1700/
M1900 facendo riferimento alla tabella delle risoluzioni (retro copertina) prima di collegare il PC.
NOTA
• Per l’uso delle casse, collegare il cavo con minipresa stereo al terminale dell’uscita audio del PC, del lettore CD e
così via.
• Per collegare due PC al monitor, fare riferimento al Manuale utente su CD-ROM.
Verifi care che il monitor e il PC siano scollegati dall’alimentazione elettrica.
1
Collegare il monitor al computer con il cavo segnale appropriato per i connettori
2
utilizzati.
Dopo aver collegato i connettori dei cavi, stringere le viti dei connettori affi nché combacino perfettamente.
Lettore CD e così via
Connettori sul PC
Terminale dell´uscita audio
(Minipresa stereo)
Connettore DVI-I
Connettore D-Sub mini
15 pin
Connettore D-Sub
15 pin
Terminale dell´uscita audio
(Minipresa stereo)
Cavo con minipresa stereo (fornito)
Cavo segnale FD-C39 (fornito)
Connessione digitale
Cavo segnale MD-C87 (fornito)
Connessione analogica
Adattatore Macintosh (opzionale) e cavo
segnale MD-C87 (fornito)
Connessione analogica
Connettori sul
monitor
Ingresso linea esterna
(Minipresa stereo)
Connettore DVI-D
Italiano
Connettore D-Sub mini
15 pin
Collegare il cavo di alimentazione in una presa di corrente e il connettore di
3
alimentazione sul monitor.
Regolazione dell’altezza e dell’angolo dello schermo
È possibile regolare l’altezza, l’inclinazione e la rotazione dello schermo fi no a
ottenere la posizione di lavoro ottimale.
3
Page 30

Preparazione Installazione
Configurazione e regolazione
Risoluzione dei problemi
Visualizzazione dello schermo
Premere per accendere il monitor.
1
Accendere il PC.
2
Si accenderà l’indicatore di alimentazione del monitor (blu) e verrà visualizzata l’immagine dello
schermo.
In modalità di ingresso analogico eseguire la funzione di regolazione automatica
3
(fare riferimento alla sezione “Esecuzione della funzione di regolazione
automatica” riportata sotto).
In modalità di ingresso digitale, la funzione di regolazione automatica non è necessaria poiché
l’immagine verrà visualizzata correttamente sulla base dei dati preimpostati.
Nota
• Al termine dell’uso spegnere sempre PC e monitor.
• Per un risparmio energetico ottimale, si consiglia di spegnere il pulsante di alimentazione. Scollegando il
cavo di alimentazione viene interrotto il fl usso di corrente al monitor.
Italiano
Esecuzione della funzione di regolazione automatica
(solo ingres so analogico)
In modalità di ingresso analogico, la funzione di regolazione automatica consente di regolare automaticamente clock,
fase, posizione di visualizzazione e risoluzione.
Fare riferimento al manuale dell’utente su CD-ROM per maggiori informazioni sulla funzione di regolazione
automatica.
Finestra di messaggio
Premere .
1
Verrà visualizzata una fi nestra di messaggio.
Premere nuovamente amentre è visualizzato il
2
messaggio.
La funzione di regolazione automatica verrà attivata per regolare automaticamente clock, fase,
posizione di visualizzazione e risoluzione.
Nota
•
La funzione di regolazione automatica funziona correttamente solo se l’immagine è visualizzata
completamente sull’area di visualizzazione dello schermo di un computer Macintosh o Windows.
La funzione di regolazione automatica non funziona correttamente se l’immagine è visualizzata solo su una
parte dello schermo (ad esempio la fi nestra del prompt di DOS) oppure quando si utilizza uno sfondo nero.
• La funzione di regolazione automatica potrebbe non funzionare correttamente con alcuni tipi di schede
grafi che.
Regolazione del volume delle casse
Premere il pulsante o .
1
Viene visualizzata la fi nestra di regolazione del volume.
Per modifi care il volume delle casse utilizzare il
2
pulsante per diminuire oppure per
aumentare.
Premere sul volume desiderato.
3
Per disattivare il suono, premere il pulsante o mentre è visualizzato il menu di regolazione del
volume.
Per annullare la disattivazione del suono, premere il pulsante
4
Finestra di regolazione del volume
o .
Page 31

Preparazione Installazione
Configurazione e regolazione
Risoluzione dei problemi
Selezione della modalità schermo
La funzione FineContrast consente di selezionare in modo semplice e intuitivo la miglior modalità di visualizzazione in
base all’applicazione del monitor.
Fare riferimento al manuale dell’utente su CD-ROM per maggiori informazioni sulla funzione FineContrast.
Modalità FineContrast
Custom
(Personalizzato)
sRGB Ottimizzato per la corrispondenza colore con periferiche che supportano sRGB.
Text (Testo) Ottimizzato per la visualizzazione di testo in programmi di elaborazione testo o fogli di calcolo.
Picture (Foto) Ottimizzato per la visualizzazione di foto o immagini fi sse.
Movie (Film) Ottimizzato per la visualizzazione di immagini in movimento.
Per la regolazione delle impostazioni secondo le proprie preferenze personali.
Premere .
1
Viene visualizzata la fi nestra FineContrast.
Premere nuovamente mentre è visualizzato il
2
menu FineContrast.
A ogni pressione del tasto cambia la modalità sullo schermo
(fare riferimento alla tabella Modalità FineContrast).
Premere quando è visualizzata la modalità desiderata.
3
La modalità selezionata è impostata.
Regolazione della luminosità
Premere o .
1
Viene visualizzata la fi nestra di regolazione della luminosità.
Regolare la luminosità con o .
2
Premere per aumentare la luminosità dello schermo o
per diminuirla.
Finestra di regolazione della luminosità
Finestra FineContrast
Visualizza la
modalità corrente.
Italiano
Premere quando è visualizzata la luminosità
3
desiderata.
La luminosità specifi cata viene salvata.
Esecuzione delle impostazioni/regolazioni avanzate
Il menu di regolazione dispone di varie impostazioni per la regolazione
dello schermo e del colore.
Fare riferimento al manuale dell’utente su CD-ROM per maggiori
informazioni su ciascuna funzione di regolazione.
Le impostazioni e le regolazioni di base sono state completate. Fare riferimento al manuale
dell’utente su CD-ROM per maggiori informazioni sulle regolazioni/impostazioni avanzate.
Menu regolazione
5
Page 32

Preparazione Installazione
Configurazione e regolazione
Risoluzione dei problemi
Problema Nessuna immagine
Se sul monitor non viene visualizzata alcuna immagine anche dopo aver applicato le soluzioni consigliate, contattare il
rivenditore locale.
1. Verifi care l’indicatore di alimentazione.
Sintomo Stato Possibile causa e rimedio
Nessuna immagine L’indicatore di alimentazione
non si accende.
Stato indicatore blu. Controllare l’impostazione della luminosità.
Stato indicatore giallo. Provare a commutare il segnale di ingresso
2. Controllare il messaggio di errore che rimane visualizzato a schermo per 40
secondi.
Tali messaggi vengono visualizzati quando il segnale di ingresso non è corretto, anche se il monitor funziona
correttamente.
Verifi care che il cavo di alimentazione sia
collegato correttamente. Se il problema persiste,
spegnere il monitor per alcuni minuti, quindi
riaccenderlo.
premendo
Provare a premere un tasto sulla tastiera o a
fare clic con il mouse.
Accendere il PC.
.
Italiano
Sintomo Stato Possibile causa e rimedio
Segnale di ingresso non
ricevuto correttamente.
La frequenza del segnale è al di
fuori delle specifi che consentite.
L’errore di frequenza del
segnale è visualizzato in rosso.
Controllare che il PC sia acceso.
Controllare che il cavo di segnale sia collegato
correttamente al PC.
Provare a commutare il segnale di ingresso
premendo
Cambiare la frequenza del segnale utilizzando il
software di utilità della scheda grafi ca (fare
riferimento al manuale della scheda grafi ca per
ulteriori informazioni).
.
6
Page 33

LCD-färgskärm
SÄKERHETSSYMBOLER
Den här manualen använder säkerhetssymbolerna nedan. De indikerar kritisk information. Läs dem noggrant.
VARNING
Om informationen i en VARNING inte åtföljs kan det
resultera i allvarliga skador som kan vara livshotande.
Indikerar en förbjuden åtgärd.
Indikerar att enheten skall anslutas till jordat eluttag.
FÖRSIKTIGHETSÅTGÄRDER
VARNING
FÖRSIKTIGHET
Om uppmaningen FÖRSIKTIGHET inte åtföljs fi nns
det risk för person- eller produktskador.
FelsökningInställning/justeringInstallationFöre användningen
Om enheten avger rök, luktar bränt eller ger
ifrån sig ovanliga ljud skall alla
strömanslutningar kopplas ur genast. Kontakta
sedan din återförsäljare.
Försök att använda en enhet som är felaktig kan leda till
brand, elektriska stötar eller skador på utrustning.
Undvik att komma i kontakt med enheten med
små föremål eller vätska.
Små föremål som av misstag faller in genom
ventilationsöppningarna i kåpan eller spill kan orsaka
brand, elektriska stötar eller skador på utrustning. Om
ett föremål eller vätska hamnar innanför kåpan skall det
kopplas ur omedelbart. Enheten skall kontrolleras av en
behörig servicetekniker innan den används igen.
Utrustningen måste vara ansluten till ett jordat uttag.
Om detta inte åtföljs kan det orsaka brand eller elektriska stötar.
FÖRSIKTIGHET
Blockera inte ventilationsöppningarna i kåpan.
• Placera inga föremål på ventilationsöppningarna.
• Installera inte enheten i ett slutet utrymme.
• Använd inte enheten liggande eller upp och ner.
Genom att blockera ventilationsöppningarna förhindras
tillräckligt luftfl öde vilket kan orsaka brand, elektriska
stötar eller skada på utrustning.
Använd den medföljande sladden och anslut
den till ett standardeluttag.
Försäkra dig om att du håller dig inom märkspänningen
för sladden. Om detta inte åtföljs kan det orsaka brand
eller elektriska stötar.
Placera enheten på ett lämpligt ställe.
Om detta inte åtföljs kan det orsaka brand, elektriska
stötar eller skador på utrustning.
• Använd inte enheten utomhus.
• Använd inte enheten i fordon (fartyg, fl ygplan, tåg
eller bilar etc.).
• Använd inte enheten i en dammig eller fuktig miljö.
• Placera inte enheten så att ånga kommer direkt på
skärmen.
• Placera inte enheten nära värmeelement eller
luftfuktare.
Svenska
Använd ett strömuttag som är lätt att komma åt.
Detta säkerställer att det är lätt att koppla ur enheten om
det skulle uppstå problem.
Om installationshandboken och bruksanvisningen
Installationshandboken
(denna handbok)
Bruksanvisning
(• Pdf-fi l på CD-skivan*)
* Kräver att Adobe Reader är installerat.
Pdf-fi lerna som medföljer fi nns endast på engelska, tyska, franska och kinesiska
Beskriver grundinformation från anslutning av monitorn till en dator till
användning av skärmen.
Beskriver applikationsinformation så som bildjusteringar, inställningar
och specifi kationer.
1
Page 34

FelsökningInställning/justeringInstallationFöre användningen
Förpackningens innehåll
Kontrollera att följande artiklar fi nns i förpackningen. Om någonting saknas skall du kontakta din lokala återförsäljare.
OBS!
• Behåll kartongen och emballage för framtida förfl yttningar av skärmen.
□ Monitor
□ Nätsladd
□ Digital signalkabel (FD-C39)
□ Analog signalkabel (MD-C87)
Reglage och funktioner
*ScreenManager
Högtalare
□ Kabel med ministereokontakt
□ EIZO LCD Utility Disk (CD-skiva)
• Bruksanvisning
□ Installationshandboken (denna handbok)
□ Garantisedel
□ Monteringsskruvar: M4 × 12 mm 4 st.
®
Öppna det hopvikta
stativet.
Svenska
Nätanslutning
1 Hörlurar (stereominikontakt) Anslutning för hörlurar.
2 Knapp för val av
signalingång
3 Knapp för automatisk
justering
4 Manöverknappar (vänster,
nedåt, uppåt, höger)
5 Knappen Enter Visar menyn Justeringar och bestämmer alternativ på skärmen och sparar
6 Knappen FineContrast Byt visningsläge för läget FineContrast i menyn FineContrast (sidan 5).
7 Strömbrytaren Slår på och stänger av strömmen.
8 Strömindikator Visar skärmens driftsstatus.
9 External Line In
(Ministereokontakt)
10 Signalingångar Vänster: DVI-D-anslutning /Höger: D-sub minianslutning med 15 stift.
11 4 hål för att montera
armstativ
12 Uttag för säkerhetslås Kompatibelt med Kensington MicroSaver-säkerhetssystem.
13 Höjdinställbart stativ Justerar höjd och vinkel för monitorns skärm.
®
* ScreenManager
bruksanvisningen på CD-skivan.)
är ett smeknamn för EIZO’s justeringsmeny. (För information om hur du använder ScreenManager, se
Växlar mellan ingångssignalerna om två datorer är anslutna till skärmen.
Genomför automatisk justering av skärmen. (endast analog ingång)
• knappen
• knappen eller : Visar skärmen för ljusstyrka (sidan 5).
• Väljer ett justeringsalternativ eller ökar/minskar justerade värden i
avancerade justeringar i menyn Justeringar (sidan 5).
justerade värden.
Blå : Skärmen används Av : Strömmen är av
Gul : Energisparläge
För anslutning av kabel med ministereokontakt.
Stativet kan bytas mot en arm eller ett annat stativ.
För information om hur du gör bytet, se bruksanvisningen på CD-skivan.
eller : Visar skärmen för volymjustering (sidan 5).
2
Page 35

FelsökningInställning/justeringInstallationFöre användningen
Att ansluta kablarna
Observera
• När du byter ut en befi ntlig skärm mot M1700/M1900 skall du försäkra dig om att du ändrar datorns
inställningar för upplösning och vertikal frekvens till de som är tillgängliga för M1700/M1900 genom att se
till upplösningstabellen (baksidan av omslagssidan) innan du ansluter datorn.
OBS!
• När du skall använda högtalarna ansluter du ministereokontakten till ljudutgången på datorn, cd-spelaren etc.
• När du ansluter två datorer till monitorn skall du se användarmanualen på CD-skivan.
Kontrollera att monitorn och datorn är avstängda.
1
Anslut monitorn till datorn med en signalkabel som passar anslutningarna.
2
Efter att du anslutit kabelanslutningarna skall du dra åt skruvarna för att säkra anslutningen.
CD-spelare etc.
Anslutningar på
datorn
Ljudutgång
(Ministereokontakt)
DVI-I-anslutning
D-sub minianslutning
med 15 stift
D-sub-anslutning med
15 stift
Ljudutgång
(Ministereokontakt)
Kabel med ministereokontakt (medföljer)
Signalkabel FD-C39 (medföljer)
Digital anslutning
Signalkabel MD-C87 (medföljer)
Analog anslutning
Macintoshadapter (tillbehör) och signalkabel
MD-C87 (medföljer)
Analog anslutning
Anslutningar på
monitorn
External Line In
(Ministereokontakt)
DVI-D-anslutning
D-sub minianslutning
med 15 stift
Svenska
Koppla in nätsladden i ett vägguttag och till strömanslutningen på skärmen.
3
Justera skärmhöjd och vinkel
Justera skärmhöjd, lutning och vridning av skärmen till bästa läge för arbete.
3
Page 36

FelsökningInställning/justeringInstallationFöre användningen
Visa skärmen
Tryck på för att sätta på monitorn.
1
Sätt på datorn.
2
Skärmens strömmen lyser blått och skärmens bild visas.
Genomför den automatiska justeringsfunktionen när du använder en analog
3
ingångssignal. (Se ”Att genomföra funktionen Autojustering” nedan).
Funktionen autojustering behövs inte om du använder en digital insignal eftersom att bilderna visas
korrekt baserat på förinställda data hos monitorn.
Observera
• Stäng av monitorn och datorn när du använt dem.
• För maximal energibesparing rekommenderar vi att apparaterna stängs av med knappen Power. Genom
att dra ut nätsladden stängs monitorns strömförsörjning helt.
Att genomföra funktionen autojustering (endast vid analog insignal)
Svenska
När insignalerna är analoga möjliggör funktionen autojustering automatisk justering av klockan, fasfrekvensen,
skärmens placering och upplösning.
För information om funktionen autojustering, se bruksanvisningen på CD-skivan.
Tryck på .
1
Ett meddelandefönster visas.
Tryck på igen när meddelandet visas.
2
Funktionen autojustering aktiveras och klocka, fasfrekvens,
skärmens placering och upplösningen justeras automatiskt.
Observera
• Funktionen autojustering fungerar korrekt när hela bilden visas över visningsområdet på en Macintosh
eller en Windows PC.
Den fungerar inte korrekt när endast en del av bilden visas på skärmen (exempelvis en DOS-prompt eller
när en svart bakgrund (skrivbordsunderlägg etc.) används).
• Det är inte säkert att funktionen autojustering fungerar som den skall med alla grafi kkort.
Meddelandefönster
Justera högtalarvolym
Tryck på knappen eller .
1
Fönstret för justering av volym visas.
Ändra högtalarnas volym med för att minska
2
eller
Tryck på vid önskad volym.
3
För att stänga av ljudet trycker du på eller när menyn för volymjustering visas.
För att få tillbaka ljudet trycker du på knappen eller .
för att öka.
Fönstret för volymjustering
4
Page 37

FelsökningInställning/justeringInstallationFöre användningen
Välja skärmläge
FineContrast möjliggör för dig att enkelt välja bästa skärmvisningsläge i förhållande till monitorns användning.
För information om funktionen FineContrast, se bruksanvisningen på CD-skivan.
Läget FineContrast
Custom (Anpassat)
sRGB För att göra färganpassning med sRGB-kompatibla kringutrustningar.
Text Passar för att visa ordbehandlings- eller kalkylprogram.
Picture (Bild) Passar för att visa fotografi er eller bilder.
Movie (Film) För att spela upp animerade bilder.
För att göra önskade inställningar.
Tryck på .
1
Fönstret FineContrast visas.
Tryck på igen när menyn FineContrast visas.
2
Varje gång du trycker på knappen ändras läget på skärmen
(se tabellen lägen för FineContrast).
Tryck på vid önskat läge.
3
Det valda läget väljs.
Ställa in skärmens ljusstyrka
Tryck på eller .
1
Fönstret för justering av ljusstyrka visas.
Justera ljusstyrkan med eller .
2
Tryck på för att göra skärmen ljusare eller på för att
göra den mörkare.
Tryck på vid önskad ljusstyrka.
3
Den valda ljusstyrkan sparas.
Fönstret FineContrast
Visar aktuellt läge.
Fönstret för justering av ljusstyrka
Svenska
Att genomföra avancerade inställningar/justeringar
Avancerade justeringar av skärmen eller färger och olika inställningar
är tillgängliga i menyn Justeringar.
För information om justeringsfunktionerna, se bruksanvisningen på
CD-skivan.
Grundinställningarna och justeringarna är färdiga. För avancerade inställningar/
justeringar, se bruksanvisningen på CD-skivan.
Justeringsmeny
5
Page 38

FelsökningInställning/justeringInstallationFöre användningen
Ingen bild visas
Om det inte visas någon bild på monitorn efter att du genomfört följande åtgärder skall du kontakta din lokala
återförsäljare.
1. Kontrollera strömindikatorn.
Symptom Status Möjlig orsak och åtgärd
Ingen bild Strömindikatorn tänds inte. Kontrollera att nätsladden är riktigt ansluten.
Om problemet kvarstår skall du stänga av
skärmen i ett par minuter och slå på den igen.
Strömindikatorn lyser blått. Kontrollera inställningen av ljusstyrkan.
Strömindikatorn lyser gult. Växla inkommande signal genom att trycka på
.
Tryck på en tangent på tangentbordet eller
klicka på musen.
Sätt på datorn.
2. Läs felmeddelandet som visas på skärmen i 40 sekunder.
Dessa meddelanden visas när den inkommande signalen är felaktig även om monitorn fungerar.
Svenska
Symptom Status Möjlig orsak och åtgärd
Den inkommande signalen
mottas inte på rätt sätt.
Signalfrekvensen är utanför
specifi kationerna. Felaktig
signalfrekvens visas i rött.
Kontrollera att datorn är påslagen.
Kontrollera att signalkabeln är riktigt ansluten till
datorn.
Växla inkommande signal genom att trycka på
.
Ändra läge till ett passande genom att använda
grafi kkortets mjukvara. Se grafi kkortets
bruksanvisning för ytterligare information.
6
Page 39

Έγχρωμη οθόνη LCD
ΣΥΜΒΟΛΑ ΑΣΦΑΛΕΙΑΣ
Σε αυτό το εγχειρίδιο χρησιμοποιούνται τα παρακάτω σύμβολα ασφαλείας. Καταδεικνύουν σημαντικές πληροφορίες. Διαβάστε τις
με προσοχή.
ΠΡΟΕΙΔΟΠΟΙΗΣΗ
Αν δεν συμμορφωθείτε με τις πληροφορίες μιας
ΠΡΟΕΙΔΟΠΟΙΗΣΗΣ μπορεί να προκληθεί σοβαρός
τραυματισμός ή κίνδυνος για τη ζωή.
Δηλώνει μια ενέργεια που απαγορεύεται.
Συνιστά τη σύνδεση με γείωση για λόγους ασφαλείας.
ΠΡΟΦΥΛΑΞΕΙΣ
ΠΡΟΕΙΔΟΠΟΙΗΣΗ
ΠΡΟΣΟΧΗ
Αν δεν συμμορφωθείτε με τις πληροφορίες κάτω από τον
τίτλο ΠΡΟΣΟΧΗ, μπορεί να προκληθούν μικροτραυματισμοί
ή/και ζημιές στην ιδιοκτησία σας ή στο προϊόν.
Αν από τη μονάδα αρχίζει να βγαίνει καπνός, ή
αν η μονάδα μυρίζει σαν να καίγεται ή κάνει
παράξενους θορύβους, αποσυνδέστε αμέσως
όλες τις συνδέσεις τροφοδοσίας και
επικοινωνήστε με τον αντιπρόσωπο για βοήθεια.
Αν επιχειρήσετε να χρησιμοποιήσετε μια μονάδα που
δυσλειτουργεί, μπορεί να προκληθεί πυρκαγιά,
ηλεκτροπληξία ή ζημιά στον εξοπλισμό.
Κρατήστε μικρά αντικείμενα ή υγρά μακριά
από τη μονάδα.
Μικρά αντικείμενα που μπορεί να πέσουν κατά λάθος
μέσα στις σχισμές αερισμού και να μπουν στο
περίβλημα ή υγρά που θα χυθούν σε αυτό μπορεί να
έχουν ως αποτέλεσμα πυρκαγιά, ηλεκτροπληξία ή ζημιά
στον εξοπλισμό. Αν κάποιο αντικείμενο ή υγρό πέσει ή
χυθεί μέσα στο περίβλημα, αποσυνδέστε αμέσως τη
μονάδα από το ρεύμα. Αναθέστε τον έλεγχο της
μονάδας σε εξειδικευμένο τεχνικό συντήρησης πριν να
τη χρησιμοποιήσετε ξανά.
Ο εξοπλισμός πρέπει να συνδέεται με γειωμένη πρίζα.
Στην αντίθετη περίπτωση μπορεί να προκληθεί πυρκαγιά ή ηλεκτροπληξία.
ΠΡΟΣΟΧΗ
Μην φράζετε τις σχισμές αερισμού του
περιβλήματος.
• Μην τοποθετείτε αντικείμενα πάνω στις σχισμές
αερισμού.
• Μην εγκαθιστάτε τη μονάδα σε κλειστό χώρο.
• Μην χρησιμοποιείτε τη μονάδα όταν είναι πεσμένη ή
αναποδογυρισμένη.
Το φράξιμο των σχισμών αερισμού εμποδίζει τη σωστή
ροή του αέρα και ενδέχεται να προκαλέσει πυρκαγιά,
ηλεκτροπληξία ή ζημιά στον εξοπλισμό.
Χρησιμοποιήστε το καλώδιο τροφοδοσίας που
περιλαμβάνεται στη συσκευασία και συνδέστε
τη μονάδα με την τυποποιημένη πρίζα
ρεύματος της χώρας σας.
Βεβαιωθείτε ότι χρησιμοποιείτε την ονομαστική τάση
του καλωδίου τροφοδοσίας. Στην αντίθετη περίπτωση
μπορεί να προκληθεί πυρκαγιά ή ηλεκτροπληξία.
Τοποθετήστε τη μονάδα σε κατάλληλο χώρο.
Στην αντίθετη περίπτωση μπορεί να προκληθεί
πυρκαγιά, ηλεκτροπληξία ή ζημιά στον εξοπλισμό.
• Μην την τοποθετείτε σε εξωτερικό χώρο.
• Μην την τοποθετείτε σε μεταφορικό μέσο (πλοίο,
αεροσκάφος, τρένο, αυτοκίνητο κ.λπ.) .
Μην την τοποθετείτε σε περιβάλλον με σκόνη ή υγρασία.
•
• Μην την τοποθετείτε σε χώρο όπου κατευθύνεται
απευθείας ατμός προς την οθόνη.
• Μην την τοποθετείτε κοντά σε συσκευές παραγωγής
θερμότητας ή υγραντήρα.
Να χρησιμοποιείτε πρίζα με εύκολη
πρόσβαση.
Με αυτόν τον τρόπο διασφαλίζεται η δυνατότητα
άμεσης αποσύνδεσης της μονάδας σε περίπτωση
προβλήματος.
Greece
Σχετικά με το εγχειρίδιο Εγκατάστασης και το Εγχειρίδιο χρήσης
Εγχειρίδιο εγκατάστασης
(Το παρόν Εγχειρίδιο)
Εγχειρίδιο
(• Αρχείο PDF στο CD-ROM*)
* Απαιτείται η εγκατάσταση του Adobe Reader.
Παρέχονται αρχεία PDF μόνο στην αγγλική, τη γερμανική, τη γαλλική και την κινέζικη γλώσσα.
χ
ρήσ
τη
Περιγράφει βασικές πληροφορίες, από τη σύνδεση της οθόνης με
υπολογιστή έως τη χρήση της οθόνης.
Περιέχει πληροφορίες για την εφαρμογή, όπως είναι οι ρυθμίσεις της
οθόνης, οι προσαρμογές και οι προδιαγραφές.
1
Page 40

Περιεχόμενα συσκευασίας
Ελέγξτε αν υπάρχουν όλα τα παρακάτω αντικείμενα περιλαμβάνονται στη συσκευασία. Αν κάποιο από τα αντικείμενα λείπει ή
παρουσιάζει φθορά, επικοινωνήστε με τον τοπικό αντιπρόσωπο.
ΣΗΜΕΙΩΣΗ:
• Διατηρήστε το κουτί της συσκευασίας για μελλοντική μετακίνηση ή μεταφορά της οθόνης.
□ Οθόνη
□ Καλώδιο ρεύματος
□ Καλώδιο ψηφιακού σήματος (FD-C39)
□ Καλώδιο αναλογικού σήματος (MD-C87)
Χειριστήρια και λειτουργίες
*ScreenManager
Μεγάφωνα
®
□ Καλώδιο stereo Mini-jack
□ EIZO LCD Utility Disk (CD-ROM)
• Εγχειρίδιο χρήστη
□ Εγχειρίδιο εγκατάστασης (το παρόν εγχειρίδιο)
□ Περιορισμένη εγγύηση
□ Βίδα προσάρτησης: M4 × 12 mm 4 PCS
Ανοίξτε τη διπλωμένη
βάση.
Greece
Υποδοχή σύνδεσης καλωδίου τροφοδοσίας
1 Ακουστικό (Stereo Mini-jack) Συνδέστε το ακουστικό.
2 Κουμπί επιλογής σήματος
εισόδου
3 Κουμπί αυτόματης ρύθμισης
4 Κουμπιά ελέγχου (Αριστερά,
Κάτω, Πάνω, Δεξιά)
5 Κουμπί Enter Προβάλει το μενού ρυθμίσεων, καθορίζει τα αντικείμενα στην οθόνη του μενού
6 Κουμπί FineContrast Αλλάξτε την κατάσταση εμφάνισης της λειτουργίας FineContrast στο μενού
7 Κουμπί τροφοδοσίας Ανάβει και
8 Ενδεικτικό τροφοδοσίας Δηλώνει την κατάσταση λειτουργίας της οθόνης.
9 Εξωτερικό βύσμα
(Stereo Mini-jack)
10 Υποδοχές σήματος εισόδου Αριστερά: Υποδοχή DVI-D /Δεξιά: Υποδοχή D-sub mini 15 ακίδων.
11 4 τρύπες για το μοντάρισμα
του βραχίονα ή της βάσης
12 Σχισμή κλειδώματος
ασφαλείας
13 Βάση ρύθμισης ύψους Ρυθμίζει το ύψος και τη γωνία κλίσης της οθόνης.
®
* Η ονομασία ScreenManager
ScreenManager, ανατρέξτε στο Εγχειρίδιο Χρήστη στο CD-ROM.)
είναι ένα όνομα του EIZO για το μενού ρυθμίσεων. (Για πληροφορίες σχετικά με τη χρήση του
Αλλάζει τα σήματα εισόδου σε περίπτωση σύνδεσης δύο υπολογιστών με την
οθόνη.
Εκτελεί τη λειτουργία αυτόματης προσαρμογής της οθόνης. (αναλογικό σήμα μόνο)
• Κουμπί ή : Εμφανίζει το παράθυρο ρύθμισης της έντασης (σελίδα 5).
•
Κουμπί ή : Εμφανίζει το παράθυρο ρύθμισης φωτεινότητας (σελίδα 5).
• Επιλέγει έ
τιμές για σύνθετες ρυθμίσεις με χρήση του μενού ρυθμίσεων (σελίδα 5).
και αποθηκεύει τις προσαρμοσμένες τιμές.
FineContrast (σελίδα 5).
Μπλε : Λειτουργία Σβησμένο : Εκτός λειτουργίας
Κίτρινο : Εξοικονόμηση ενέργειας
Συνδέστε το καλώδιο Stereo Mini-jack.
Η βάση μπορεί να αντικατασταθεί με ένα βραχίονα ή μια άλλη
Για πληροφορίες σχετικά με την αντικατάσταση, ανατρέξτε στο Εγχειρίδιο
χρήστη στο CD-ROM.
Υποστηρίζει το σύστημα ασφαλείας Kensington’s MicroSaver.
να αντικείμενο ρύθμισης ή αυξάνει/μειώνει τις προσαρμοσμένες
σβήνει τη μονάδα.
βάση.
2
Page 41

Σύνδεση καλωδίων
Προσοχή
Κατά την αντικατάσταση της ήδη υπάρχουσας οθόνης με μια οθόνη M1700/M1900, βεβαιωθείτε ότι έχετε αλλάξει
•
τις ρυθμίσεις του υπολογιστή για την ανάλυση και την κατακόρυφη συχνότητα σε αυτές που είναι διαθέσιμες για
την οθόνη M1700/M1900 στον πίνακα ανάλυσης (στο οπισθόφυλλο) πριν να συνδέσετε τον υπολογιστή.
ΣΗΜΕΙΩΣΗ:
• Όταν χρησιμοποιείτε τα ακουστικά, συνδέστε το καλώδιο Stereo Mini-jack στην έξοδο ήχου του υπολογιστή, του CD
κ.λπ.
• Κατά τη σύνδεση δύο υπολογιστών στην οθόνη, ανατρέξτε στο εγχειρίδιο χρήσης στο CD-ROM.
Βεβαιωθείτε ότι η οθόνη και ο υπολογιστής δεν είναι σε λειτουργία.
1
Συνδέστε την οθόνη στον υπολογιστή με ένα καλώδιο σήματος που ταιριάζει με
2
τις υποδοχές.
Αφού συνδέσετε τις υποδοχές των καλωδίων, σφίξτε τις βίδες των υποδοχών για να ασφαλίσετε την ένωση.
CD κ.λπ.
Υποδοχές στον υπολογιστή
Έξοδος ήχου
(Μίνι υποδοχή για
στερεοφωνικό)
Υποδοχή DVI-I
Υποδοχή D-sub mini
15 ακίδων
Υποδοχή D-sub 15
ακίδων
Έξοδος ήχου
(Μίνι υποδοχή για στερεοφωνικό)
Καλώδιο μίνι υποδοχής για στερεοφωνικό (παρέχεται)
Καλώδιο σήματος FD-C39 (παρέχεται)
Ψηφιακή σύνδεση
Καλώδιο σήματος MD-C87 (παρέχεται)
Αναλογική σύνδεση
Προσαρμογέας Macintosh (προαιρετικός) και
καλώδιο σήματος MD-C87 (παρέχεται)
Αναλογική σύνδεση
Υποδοχές στην οθόνη
Εξωτερικό βύσμα
(Μίνι υποδοχή για
στερεοφωνικό)
Υποδοχή DVI-D
Υποδοχή D-sub mini
15 ακίδων
Greece
Συνδέστε το καλώδιο τροφοδοσίας στην υποδοχή τροφοδοσίας στην οθόνη.
3
Ρύθμιση του ύψους και της γωνίας κλίσης
Ρυθμίστε το ύψος της οθόνης, την κλίση και την οριζόντια περιστροφή της στην
καταλληλότερη θέση εργασίας.
3
Page 42

Εμφάνιση της οθόνης
Πατήστε το κουμπί για να ανάψετε την οθόνη.
1
Ανάψτε τον υπολογιστή.
2
Το ενδεικτικό τροφοδοσίας της οθόνης ανάβει μπλε και η εικόνα της οθόνης εμφανίζεται.
Κατά την αναλογική είσοδο σήματος, εκτελέστε τη λειτουργία αυτόματης
3
ρύθμισης. (Ανατρέξτε στην παράγραφο "Εκτέλεση λειτουργίας αυτόματης
ρύθμισης" παρακάτω.)
Η λειτουργία αυτόματης ρύθμισης δεν είναι απαραίτητη κατά την ψηφιακή είσοδο σήματος, επειδή οι
εικόνες εμφανίζονται σωστά με βάση τα προ-ρυθμισμένα δεδομένα της οθόνης.
Προσοχή
• Κλείστε την οθόνη και τον υπολογιστή μετά τη χρήση.
• Για μέγιστη εξοικονόμηση ενέργειας, συνιστάται να σβήσετε την οθόνη από το κουμπί τροφοδοσίας. Η
αφαίρεση του καλωδίου τροφοδοσίας διακόπτει την παροχή ρεύματος στην οθόνη.
Εκτέλεση λειτουργίας αυτόματης ρύθμισης (αναλογική είσοδος μόνο)
Στην αναλογική είσοδο σήματος, η λειτουργία αυτόματης ρύθμισης σας επιτρέπει την αυτόματη ρύθμιση του ρολογιού,
της φάσης, της θέσης της οθόνης και της ανάλυσης.
Για λεπτομέρειες σχετικά με τη λειτουργία αυτόματης ρύθμισης, ανατρέξτε στο εγχειρίδιο χρήσης στο CD-ROM.
Greece
Πατήστε .
1
Εμφανίζεται ένα παράθυρο μηνύματος.
Πατήστε ξανά το ενώ το μήνυμα βρίσκεται
2
στην οθόνη.
Η λειτουργία αυτόματης ρύθμισης ενεργοποιείται και το ρολόι,
η φάση, η θέση της οθόνης και η ανάλυση ρυθμίζονται αυτόματα.
Προσοχή
• Η λειτουργία αυτόματης ρύθμισης λειτουργεί σωστά όταν η εικόνα εμφανίζεται σε ολόκληρη την οθόνη
μιας οθόνης υπολογιστή Macintosh ή Windows.
Μπορεί να μην εκτελείται σωστά όταν η εικόνα καλύπτει μέρος μόνο της οθόνης (για παράδειγμα όταν
χρησιμοποιείται το παράθυρο γραμμής εντολών DOS) ή όταν υπάρχει μαύρο φόντο (ταπετσαρία κ.λπ.).
• Η λειτουργία αυτόματης ρύθμισης ενδέχεται να μην λειτουργεί σωστά με ορισμένες κάρτες γραφικών.
Παράθυρο μηνύματος
Ρύθμιση έντασης ήχου μεγαφώνου
Πατήστε το κουμπί ή .
1
Εμφανίζεται το παράθυρο ρύθμισης της έντασης.
Παράθυρο ρύθμισης έντασης
Αλλάξτε την ένταση του ήχου με το κουμπί για
2
μείωση ή με το κουμπί
Πατήστε το κουμπί όταν φτάσετε στην
3
επιθυμητή ένταση.
Για να κλείσετε τον ήχο, πατήστε το κουμπί ή έχοντας στην οθόνη το μενού προσαρμογής
έντασης ήχου.
Για να επαναφέρετε τον ήχο, πατήστε το κουμπί
για αύξηση.
ή .
4
Page 43

Επιλογή λειτουργίας οθόνης
Η λειτουργία FineContrast (αντίθεση ακριβείας) σας επιτρέπει να διαλέγετε με ευκολία την καλύτερη λειτουργία
οθόνης σύμφωνα με την εφαρμογή της οθόνης.
Για λεπτομέρειες σχετικά με τη λειτουργία FineContrast, ανατρέξτε στο εγχειρίδιο χρήσης στο CD-ROM.
Λειτουργία FineContrast
Custom
(Προσαρμοσμένη)
sRGB Κατάλληλη για ταίριασμα χρωμάτων με περιφερειακά με υποστήριξη sRGB.
Text (Κείμενο) Κατάλληλη για εμφάνιση κειμένου σε λογισμικό επεξεργασίας κειμένου ή λογιστικών φύλλων.
Picture
(Φωτογραφία)
Movie (Ταινία) Κατάλληλο για την αναπαραγωγή κινούμενων εικόνων.
Για ρύθμιση σύμφωνα με τις προτιμήσεις σας.
Κατάλληλη για εμφάνιση εικόνων, π.χ, φωτογραφιών ή άλλων.
Πατήστε το .
1
Εμφανίζεται το παράθυρο FineContrast.
Πατήστε ξανά το ενώ το μενού FineContrast
2
εμφανίζεται στην οθόνη.
Κάθε φορά που πατάτε το κουμπί, αλλάζει ο τρόπος
λειτουργίας στην οθόνη. (Ανατρέξτε στον πίνακα της λειτουργίας
FineContrast.)
Πατήστε το κουμπί όταν φτάσετε στην επιθυμητή λειτουργία.
3
Η επιλεγμένη λειτουργία έχει ρυθμιστεί.
Παράθυρο FineContrast
Εμφανίζει την ήδη
επιλεγμένη.λειτουργία.
Ρύθμιση φωτεινότητας
Πατήστε ή .
1
Εμφανίζεται το παράθυρο ρύθμισης της φωτεινότητας.
Ρυθμίστε τη φωτεινότητα με το ή το .
2
Πατήστε το για να αυξήσετε τη φωτεινότητα ή το για
να τη μειώσετε.
Παράθυρο ρύθμισης φωτεινότητας
Πατήστε το κουμπί όταν φτάσετε στην
3
επιθυμητή φωτεινότητα.
Η τιμή που έχετε καθορίσει αποθηκεύεται.
Εκτέλεση ρυθμίσεων για προχωρημένους/Ρύθμιση
Ρυθμίσεις για προχωρημένους για την οθόνη, το χρώμα και για
διάφορες ρυθμίσεις είναι διαθέσιμες μέσω του μενού προσαρμογής.
Για λεπτομέρειες σχετικά με κάθε λειτουργία προσαρμογής, ανατρέξτε
στο εγχειρίδιο χρήσης στο CD-ROM.
Οι βασικές προσαρμογές και ρυθμίσεις έχουν ολοκληρωθεί. Για ρυθμίσεις/προσαρμογές
για προχωρημένους, ανατρέξτε στο εγχειρίδιο χρήσης στο CD-ROM.
Μενού προσαρμογής
Greece
5
Page 44

Πρόβλημα "Καθόλου εικόνα"
Αν δεν εμφανίζεται εικόνα στην οθόνη ακόμη και μετά την εφαρμογή των προτεινόμενων λύσεων, επικοινωνήστε με
τον τοπικό αντιπρόσωπο.
1. Ελέγξτε το ενδεικτικό τροφοδοσίας.
Σύμπτωμα Κατάσταση Πιθανή αιτία και λύση
Δεν υπάρχει εικόνα Το ενδεικτικό τροφοδοσίας δεν
ανάβει.
Το ενδεικτικό τροφοδοσίας είναι
μπλε.
Το ενδεικτικό τροφοδοσίας είναι
κίτρινο.
2. Ελέγξτε το μήνυμα σφάλματος που παραμένει στην οθόνη για 40 δευτερόλεπτα.
Τα μηνύματα αυτά εμφανίζονται στην οθόνη όταν το μήνυμα εισόδου είναι εσφαλμένο ακόμα και αν η οθόνη
λειτουργεί.
Βεβαιωθείτε ότι το καλώδιο τροφοδοσίας είναι
συνδεδεμένο σωστά. Αν το πρόβλημα
παραμένει, σβήστε την οθόνη για λίγα λεπτά και
στη συνέχεια ανάψτε την ξανά.
Ελέγξτε τη ρύθμιση φωτεινότητας.
Αλλάξτε το σήμα εισόδου πατώντας το .
Πατήστε ένα πλήκτρο του πληκτρολογίου ή
κάντε κλικ με το ποντίκι.
Ανάψτε τον υπολογιστή.
Greece
Σύμπτωμα Κατάσταση Πιθανή αιτία και λύση
Δεν γίνεται σωστή λήψη του
σήματος εισόδου.
Η συχνότητα του σήματος είναι
εκτός των προδιαγραφών. Η
εσφαλμένη συχνότητα σήματος
εμφανίζεται με κόκκινο χρώμα.
Ελέγξτε ότι ο υπολογιστής είναι αναμμένος.
Ελέγξτε ότι το καλώδιο σήματος είναι
συνδεδεμένο σωστά στον υπολογιστή.
Αλλάξτε το σήμα εισόδου πατώντας το
Αλλάξτε τη λειτουργία σε μια κατάλληλη
χρησιμοποιώντας το βοηθητικό πρόγραμμα της
κάρτας γραφικών. Για λεπτομέρειες ανατρέξτε
στο εγχειρίδιο της κάρτας γραφικών.
.
6
Page 45

Цветной жидкокристаллический монитор
ПРЕДУПРЕДИТЕЛЬНЫЕ СИМВОЛЫ
В данном руководстве используются следующие предупредительные символы. Они указывают на важную информацию.
Пожалуйста, уделяйте ей должное внимание.
ПРЕДУПРЕЖДЕНИЕ
Пренебрежение информацией, относящейся к
символу “ПРЕДУПРЕЖДЕНИЕ”, может привести к
серьезной травме или угрозе жизни.
Обозначает запрещенное действие.
Указывает на необходимость заземления в целях безопасности.
МЕРЫ ПРЕДОСТОРОЖНОСТИ
ПРЕДУПРЕЖДЕНИЕ
ВНИМАНИЕ
Пренебрежение информацией, относящейся к
символу “ВНИМАНИЕ”, может привести к травме
средней тяжести и/или материальному ущербу либо
повреждению устройства.
При появлении дыма, исходящего из
устройства, запаха гари или необычных
звуков немедленно обесточьте устройство и
обратитесь к продавцу за помощью.
Попытка эксплуатации неисправного устройства
может привести к пожару, поражению электрическим
током или повреждению оборудования.
Храните мелкие предметы и жидкости вдали
от устройства.
Случайное попадание мелких предметов или
пролитой жидкости внутрь корпуса через
вентиляционные отверстия может привести к пожару,
поражению электрическим током или повреждению
оборудования. В случае попадания какого-либо
предмета или жидкости внутрь корпуса немедленно
обесточьте устройство. Перед последующей
эксплуатацией обратитесь к квалифицированному
специалисту по ремонту и техническому
обслуживанию для выполнения проверки.
Оборудование должно быть подключено к заземленной штепсельной розетке питающей сети.
Невыполнение этого требования может привести к пожару или поражению электрическим током.
Используйте входящий в комплект шнур
питания, подключаемый к стандартной для
вашей страны штепсельной розетке.
Убедитесь в соблюдении пределов номинального
напряжения, на которое рассчитан шнур питания.
Невыполнение этого требования может привести к
пожару или поражению электрическим током.
Установите устройство в подходящем месте.
Невыполнение этого требования может привести к
пожару, поражению электрическим током или
повреждению оборудования.
• Не устанавливайте на открытом воздухе.
•
Не устанавливайте в транспортных средствах (на
кораблях, в самолетах, поездах, автомобилях и т. д.).
• Не устанавливайте в пыльных и влажных местах.
• Не устанавливайте в месте, где экран подвержен
прямому действию пара.
• Не устанавливайте вблизи устройств, выделяющих
тепло, или увлажнителя.
ВНИМАНИЕ
Не закрывайте вентиляционные отверстия в
корпусе.
• Не помещайте какие-либо предметы на
вентиляционные отверстия.
Не устанавливайте устройство в замкнутом пространстве.
•
• Не эксплуатируйте устройство в горизонтальном
или перевернутом положении.
Закрытие вентиляционных отверстий нарушает
правильный воздушный поток и может привести
пожару, поражению электрическим током или
повреждению оборудования.
Используйте штепсельную розетку с
возможностью легкого доступа.
Благодаря этому при необходимости можно будет
быстро обесточить устройство в случае
возникновения какой-либо проблемы.
О руководстве по установке и руководстве пользователя
Russia
Руководство по
установке
Сведения об устройстве, начиная от подключения к компьютеру и
заканчивая эксплуатацией.
(данное руководство)
Руководство
пользователя
(•
в виде PDF-файла на CD-ROM*)
* Необходимо установить программу Adobe Reader.
На PDF-файлах имеются руководства только на английском, немецком, французском и китайском языках.
Указанная выше информация, а также сведения о настройке экрана,
параметрах и технических условиях.
1
Page 46

Содержимое упаковки
Убедитесь, что все следующие компоненты имеются в упаковке. Пожалуйста, обращайтесь к продавцу за помощью,
если что-либо из перечисленного ниже отсутствует или повреждено.
ПРИМЕЧАНИЕ
• Сохраните упаковку и материалы для будущего перемещения или перевозки монитора.
□ Монитор
□ Шнур питания
□ Цифровой сигнальный кабель (FD-C39)
□ Аналоговый сигнальный кабель (MD-C87)
□ Кабель с мини-разъемом стерео
□ EIZO LCD Utility Disk (CD-ROM)
• Руководство пользователя
□ Руководство по установке (данное руководство)
□ Ограниченная гарантия
□ Крепежный винт: M4 × 12 мм × 4 шт.
Средства управления и их назначение
Russia
*ScreenManager
®
Раскрытие
Громкоговорители
сложенной стойки.
Разъем питания
1
Наушники (мини-разъемом стерео)
Кнопка выбора входного сигнала
2
3 Кнопка автоматической
настройки
4 Кнопки управления (влево,
вниз, вверх, вправо)
5 Кнопка ввода Отображение меню параметров, определение элемента в экране меню,
6 Кнопка точной настройки
контраста
7 Кнопка питания Включение/выключение питания.
8 Индикатор питания Показывает рабочее состояние монитора.
9 Вход внешней линии
(мини-разъемом стерео)
10 Разъемы для входных
сигналов
11 4 Отверстия для крепления
кронштейна-стойки
12 Разъем для кодового замка Поддерживает систему
Стойка регулировки высоты
13
* ScreenManager
руководстве пользователя на CD-ROM.)
®
- это название EIZO для меню параметров. (Подробнее об использовании меню ScreenManager см. в
Подключение наушников.
Переключение входных сигналов при подключении к двум компьютерам.
Автоматическая настройка экрана с установкой подходящих
параметров. (только при аналоговом входном сигнале)
• Кнопка
• Кнопка или : отображение экрана настройки яркости (стр. 5).
•
Выбор элемента настройки или увеличение/уменьшение настраиваемых
значений для расширенных настроек в меню параметров (стр. 5).
а также сохранение настроенных значений.
переключение в режим точной настройки контраста в меню точной
настройки контраста FineContrast (стр. 5).
синий : рабочий режим выключен : питание выключено
желтый :
Подключение кабеля с мини-разъемом стерео.
Слева: разъем DVI-D /Справа: 15-штырьковый мини-разъем D-Sub.
Стойку можно заменить кронштейном или другой стойкой.
Подробнее о замене стойки см. в руководстве пользователя на CD-ROM.
Регулировка высоты и угла наклона экрана монитора.
или : отображение экрана настройки громкости (стр. 5).
режим экономии энергии
безопасности MicroSaver компании Kensington.
2
Page 47

Подключение кабелей
Внимание
При замене текущего монитора на монитор M1700/M1900 перед его подключением к компьютеру обязательно
•
установите на компьютере такие параметры разрешения и частоты вертикальной развертки, которые
подходят для монитора M1700/M1900, обратившись к таблице разрешений (на задней стороне обложки).
ПРИМЕЧАНИЕ
• При использовании громкоговорителей подсоедините кабель с мини-разъемом стерео к выходному
аудиоразъему компьютера, проигрывателя компакт-дисков и т.д.
• При подключении двух компьютеров к монитору см. руководство пользователя на CD-ROM.
Убедитесь, что у монитора и компьютера выключено питание.
1
Подключите монитор к компьютеру, используя сигнальный кабель для
2
соответствующих разъемов.
После подключения разъемов кабеля затяните винты разъемов, чтобы обеспечить надежное соединение.
Проигрыватель
компакт-дисков и т.д.
Разъемы
компьютера
Выходной аудиоразъем
(Мини-разъем стерео)
Разъем DVI-I
15-штырьковый
мини-разъем D-Sub
15-штырьковый
разъем D-Sub
Выходной аудиоразъем
(Мини-разъем стерео)
Кабель с мини-разъемом стерео (входит в комплект)
Сигнальный кабель (FD-C39) (входит в комплект)
Цифровое соединение
Сигнальный кабель (MD-C87) (входит в комплект)
Аналоговое соединение
Адаптер Macintosh (не входит в комплект) и
сигнальный кабель MD-C87 (входит в комплект)
Аналоговое соединение
Разъемы
монитора
Вход внешней линии
(Мини-разъем стерео)
Разъем DVI-D
15-штырьковый
мини-разъем D-Sub
Подключите шнур питания к розетке и разъему питания, расположенному
3
сзади монитора.
Регулировка высоты и угла наклона экрана
Возможна регулировка высоты, наклона и поворота экрана для достижения
удобного для работы положения.
Russia
3
Page 48

Отображение экрана
Нажмите , чтобы включить монитор.
1
Включите компьютер.
2
Индикатор питания монитора загорится синим цветом, и на экране появится картинка.
В случае аналогового входного сигнала выполните автоматическую
3
настройку (см. “Выполнение автоматической настройки”).
В случае цифрового входного сигнала в использовании функции автоматической настройки
необходимости нет, так как картинка будет отображаться правильно в соответствии с
предварительно установленными параметрами.
Внимание
• По окончании работы выключайте компьютер и монитор.
• Для максимальной экономии электроэнергии рекомендуется отключение монитора от источника
питания. При отсоединении шнура питания питание монитора полностью отключается.
Выполнение автоматической настройки (только при аналоговом входном сигнале)
В случае аналогового входного сигнала функция автоматической настройки позволяет настроить параметры
синхронизации, фазы, смещения изображения и разрешения автоматически.
Подробнее о функции автоматической настройки см. в руководстве пользователя на CD-ROM.
Экран с сообщением
Нажмите кнопку .
1
На экране появится сообщение.
Во время отображения сообщения на экране
2
снова нажмите кнопку
Будет произведена автоматическая настройка параметров, таких как синхронизация, фаза,
смещение изображения и разрешение экрана.
Внимание
• Автоматическая настройка выполняется корректно, если изображение занимает максимально
возможную площадь экрана компьютера Macintosh или персонального компьютера, работающего
под управлением Windows.
Она может выполняться неправильно, если изображение занимает лишь часть экрана, например,
при использовании окна командной строки DOS или при черном цвете фона рабочего стола.
• Автоматическая настройка может выполняться неправильно при использовании некоторых
видеокарт.
.
Russia
Регулировка громкости громкоговорителя
Нажмите кнопку или .
1
Появится экран настройки громкости.
Измените уровень громкости
2
громкоговорителя с помощью
громкости) или
Установив нужную громкость, нажмите кнопку .
3
Чтобы приглушить звук, нажмите или , когда отображается меню настройки громкости.
Чтобы отменить приглушение звука, нажмите кнопку
(увеличение громкости).
(уменьшение
4
Экран настройки громкости
или .
Page 49

Выбор рабочего режима экрана
Функция точной настройки контраста FineContrast позволяет легко устанавливать наиболее подходящий режим
отображения информации на экране.
Подробнее о функции точной настройки контраста FineContrast см. в руководстве пользователя на CD-ROM.
Режим точной настройки контраста FineContrast
Custom
(Пользовательский)
sRGB
Text (Текст)
Picture
(Изображение)
Movie (Кино) Подходит для просмотра динамических изображений.
Нажмите кнопку .
1
Появится экран точной настройки контраста FineContrast.
Во время отображения меню точной
2
настройки контраста FineContrast еще раз
нажмите кнопку .
При каждом нажатии кнопки происходит изменение режима
(см. “Режим точной настройки контраста FineContrast”).
Настройка параметров цвета согласно предпочтениям пользователя.
Подходит для обеспечения соответствия цветов при использовании периферийных
устройств, поддерживающих стандарт sRGB.
Подходит для отображения текста в текстовом процессоре или программе табличных вычислений.
Подходит для отображения фото и других изображений.
Экран точной настройки
контраста FineContrast
Тек ущий
режим.
Выбрав нужный режим, нажмите кнопку .
3
Выбранный режим будет сохранен.
Настройка яркости экрана
Нажмите кнопку или .
1
Появится экран настройки яркости.
Отрегулируйте яркость с помощью
2
кнопок
Нажмите кнопку для увеличения или для
уменьшения яркости экрана.
Установив нужную яркость, нажмите кнопку .
3
Установленное значение яркости будет сохранено.
или .
Экран настройки яркости
Выполнение дополнительных настроек/регулировок
В меню параметров можно выполнить дополнительные регулировки
экрана или цвета, а также различные настройки.
Подробнее обо всех функциях настроек см. в руководстве
пользователя на CD-ROM.
Меню параметров
Russia
Теперь основные настройки и регулировки выполнены. Подробнее о дополнительных
настройках/регулировках см. в руководстве пользователя на CD-ROM.
5
Page 50

Отсутствует изображение на экране
Если проблема не будет устранена, несмотря на выполнение предлагаемых действий, обратитесь к продавцу.
1. Проверьте индикатор питания.
Проявление
неисправности
Отсутствует изображение Индикатор питания не горит. Проверьте правильность подключения шнура
Индикатор питания горит
синим.
Индикатор питания горит
желтым.
Состояние Причина и действия по устранению
питания. Если проблема не будет устранена,
выключите питание монитора на несколько
минут, а затем снова включите его и
попробуйте еще раз.
Проверьте параметр яркости.
Попробуйте переключить входной сигнал
нажатием кнопки
Попробуйте нажать какую-либо клавишу на
клавиатуре или щелкнуть кнопкой мыши.
Попробуйте включить компьютер.
.
2. Проверьте сообщения об ошибке (отображаются на экране в течение 40
секунд).
Эти сообщения появляются в случае некорректного входного сигнала, даже если монитор исправен.
Проявление
неисправности
Некорректный входной
сигнал.
Частота сигнала находится
вне допустимых пределов.
Неправильная частота
сигнала будет выделена
красным цветом.
Состояние Причина и действия по устранению
Убедитесь, что компьютер включен.
Проверьте правильность подключения
сигнального кабеля к компьютеру.
Попробуйте переключить входной сигнал
нажатием кнопки
Используйте обслуживающее программное
обеспечение видеокарты для установки
требуемого режима. Подробнее см. в
руководстве по видеокарте.
.
Russia
6
Page 51

ᔽ㡆⎆ᰒ⼎఼
ᅝܼヺো
ᴀݠՓ⫼ⱘᅝܼヺোབϟDŽᅗӀ㸼⼎䞡㽕ֵᙃDŽ䇋Ҩ㒚䯙䇏DŽ
䄺
㢹ϡ䙉ᅜĀ䄺āЁⱘֵᙃˈৃ㛑Ӯ䗴៤Ϲ䞡Ӹᆇ
࿕㚕ࠄ⫳ᅝܼDŽ
㸼⼎⽕ℶⱘࡼDŽ
㸼⼎ഄҹ⹂ֱᅝܼDŽ
乘䰆ᮑ
䄺
⭥䲒㾷ㄨ䆒ᅮˋ䇗ᭈᅝ㺙⫼ࠡ乏ⶹ
⊼ᛣ
㢹ϡ䙉ᅜĀ⊼ᛣāЁⱘֵᙃˈৃ㛑Ӯ䗴៤ЁᑺӸᆇ
ᑊˋՓ䋶ѻѻકফᤳDŽ
㢹ᴎ఼ߎ⦄⚳䳒ˈ䯏䍋ᴹڣᰃϰ㽓ⴔ☿ˈ㗙᳝༛
ᗾໄ䷇ˈ䇋ゟࠏᮁᓔ᠔᳝⬉⑤ˈᑊ㘨㒰㒣䫔ଚҹᇏ
∖ᓎ䆂DŽ
ᇱ䆩Փ⫼ࡳ㛑ᓖᐌⱘᴎ఼ৃ㛑Ӯ䗴៤☿♒ǃ⬉ߏ
䆒ফᤳDŽ
䅽ᴎ఼䖰⾏ᇣ⠽ક⎆ԧDŽ
ᇣ⠽કᛣᥝܹ䗮亢ῑ㗠䖯ܹᴎˈ⎆ԧ⑶ܹᴎ
Ӯ䗴៤☿♒ǃ⬉ߏ䆒ফᤳDŽ㢹⠽કᥝܹ⎆
ԧ⑶ܹᴎˈ䇋ゟࠏᢨϟᴎ఼ⱘ⬉⑤ᦦ༈DŽݡՓ
⫼ᴎ఼ࠡˈ䇋⬅ড়Ḑⱘ᳡ࡵᎹᏜẔᶹDŽ
㺙㕂ᖙ乏䖲ࠄഄЏᦦᑻDŽ
৺߭ৃ㛑Ӯ䗴៤☿♒⬉ߏDŽ
⊼ᛣ
䇋࣓䰏าᴎϞⱘ䗮亢ῑDŽ
噝䇋࣓ᇚӏԩ⠽કᬒѢ䗮亢ῑϞDŽ
噝䇋࣓ᇚᴎ఼ᅝ㺙ᇕ䯁ぎ䯈ЁDŽ
噝䇋࣓ᴎ఼ᬒϟ乴צᯊՓ⫼DŽ
䰏า䗮亢ῑӮ䰏䗖ᔧ⇨⌕䖯ߎˈᑊ䗴៤☿♒ǃ⬉
ߏ䆒ফᤳDŽ
Փ⫼ݙ䰘⬉⑤㒓ˈᑊ䖲ᔧഄⱘޚ⬉⑤ᦦᑻDŽ
⹂ֱ⬉⑤⬉⬉⑤㒓ⱘ乱ᅮ⬉㣗ೈݙDŽ৺߭ৃ
㛑Ӯ䗴៤☿♒⬉ߏDŽ
䗖ᔧⱘԡ㕂ᅝ㺙ᴎ఼DŽ
৺߭ৃ㛑Ӯ䗴៤☿♒ǃ⬉ߏ䆒ফᤳDŽ
噝䇋࣓ᬒѢ᠋DŽ
噝䇋࣓ᬒѢѸ䗮䖤䕧㋏㒳Ё˄䕂㠍ǃ亲ᴎǃ☿䔺ǃ
≑䔺ㄝ˅DŽ
噝䇋࣓ᬒѢᏗ⒵♄ᇬ╂ⱘ⦃๗ЁDŽ
噝䇋࣓ᬒѢ㪌⇨Ⳉ䖒ࠄሣᐩⱘഄᮍDŽ
噝䇋࣓ᬒѢ⛁⑤㺙㕂ࡴ఼䰘䖥DŽ
Փ⫼ৃ䕏ᯧ䖲ⱘ⬉⑤ᦦᑻDŽ
䖭ৃ⹂ֱ䯂乬থ⫳ᯊᖿ䗳ᮁᓔ⬉⑤DŽ
݇Ѣ䆒ᅮݠϢ⫼᠋ݠ
䆒ᅮݠ
˄ᴀݠ˅
⫼᠋ݠ
˄噝ܝⲬϞⱘ3')᭛ӊ˅
䳔㽕ᅝ㺙$GREH5HDGHUDŽ
䇈ᯢᰒ⼎఼䖲ࠄϾҎ䅵ㅫᴎҹঞՓ⫼ᰒ⼎఼ⱘᴀֵᙃDŽ
䇈ᯢሣᐩ䇗ᭈǃ䆒ᅮ㾘Ḑㄝᑨ⫼ֵᙃDŽ
Ё᭛
1
Page 52

⭥䲒㾷ㄨ䆒ᅮˋ䇗ᭈᅝ㺙⫼ࠡ乏ⶹ
ࣙ㺙ݙᆍ
䇋Ẕᶹࣙ㺙ⲦЁᰃ৺ࣙϟ߫⠽કDŽབᵰ㔎ᇥ⠽કˈ⠽કᄬᤳണ⦄䈵ˈ䇋Ϣᙼ᠔ഄⱘ㒣䫔ଚ㘨㋏DŽ
⊼ᛣ
噝䇋ֱ⬭དࣙ㺙Ⲧࣙ㺙ᴤ᭭ˈҹ֓ᇚᴹᰒ⼎఼⿏ࡼᨀ䖤ᯊՓ⫼DŽ
ƶᰒ⼎఼
ƶ⬉⑤㒓
ƶ᭄ᄫֵো⬉㓚˄)'&˅
ƶᢳֵো⬉㓚˄0'&˅
ࠊࡳ㛑
*6FUHHQ0DQDJHU
ᡀໄ఼
ƶゟԧໄ䗋Դᦦᄨ⬉㓚
ƶ(,=2/&'8WLOLW\'LVN˄ܝⲬ˅
•⫼᠋ݠ
ƶ䆒ᅮݠ˄ᴀݠ˅
ƶ᳝䰤ֱׂ
ƶᅝ㺙㶎䩝˖0hPPϾ
®
ᠧᓔᡬ䍋ⱘᬃᶊDŽ
Ё᭛
⬉⑤䖲఼
㘇ᴎ˄ゟԧໄ䗋Դᦦᄨ˅ 䖲㘇ᴎDŽ
䕧ֵܹো䗝ᢽᣝ䪂 ᔧϸϾϾҎ䅵ㅫᴎ䖲ᰒ⼎఼Ϟᯊˈৃ⫼ℸᣝ䪂ߛᤶᰒ⼎ⱘ䕧ֵܹোDŽ
㞾ࡼ䇗ᭈᣝ䪂 ᠻ㸠㞾ࡼ䇗ᭈሣᐩⱘࡳ㛑DŽ˄ҙ䰤ᢳ䕧ܹ˅
ࠊᣝ䪂˄ᎺǃϟǃϞǃে˅
ಲ䔺ᣝ䪂 ᰒ⼎䇗ᭈ㦰ˈ⹂ᅮ㦰ሣᐩϞⱘᶤϾ乍ⳂˈᑊֱᄬᏆ䇗ᭈⱘؐDŽ
)LQH&RQWUDVWᣝ䪂 )LQH&RQWUDVW㦰Ёߛᤶ)LQH&RQWUDVWᓣⱘᰒ⼎ᓣ˄义˅DŽ
⬉⑤ᣝ䪂 ᠧᓔ݇䯁⬉⑤DŽ
⬉⑤ᣛ⼎఼ ᣛߎᰒ⼎఼ⱘ᪡⢊ᗕDŽ
䚼㒓䏃䕧ܹッ
˄ゟԧໄ䗋Դᦦᄨ˅
䕧ֵܹো䖲఼ Ꮊ˖'9,'䖲఼ˋে˖'VXEPLQL䩜䖲఼DŽ
Ͼᬃᩥ㞖ᑩᑻᅝ㺙ᄨ ᑩᑻৃҹᤶᬃᩥ㞖݊ᅗᑩᑻDŽ
ᅝܼ䫕ᦦῑ ヺড়.HQVLQJWRQⱘ䰆ⲫ䫕ᅝܼ㋏㒳DŽ
催ᑺৃ䇗ᭈⱘᑩᑻ 䇗ᭈᰒ⼎఼ሣᐩⱘ催ᑺ㾦ᑺDŽ
6FUHHQ0DQDJHU
®
ᰃ䇗ᭈ㦰ⱘ(,=2߿⿄DŽ˄݇ѢབԩՓ⫼6FUHHQ0DQDJHUˈ䇋খ㗗ܝⲬЁⱘ⫼᠋ݠDŽ˅
ᣝ䪂˖ᰒ⼎䷇䞣䇗ᭈにষ˄义˅DŽ
噝
噝 ᣝ䪂˖ᰒ⼎҂ᑺ䇗ᭈにষ˄义˅DŽ
噝䗝ᢽ䇗ᭈ乍Ⳃˈࡴˋ䰡Ԣ߽⫼䇗ᭈ㦰˄义˅䖯㸠催㑻䇗ᭈᯊⱘᏆ
䇗ᭈؐDŽ
㪱㡆 ᪡Ё ݇䯁 ⬉⑤݇䯁
咘㡆 ⳕ⬉⢊ᗕ
䖲ゟԧໄ䗋Դᦦᄨ⬉㓚DŽ
݇Ѣᤶᮍ⊩ˈ䇋খ㗗ܝⲬЁⱘ⫼᠋ݠDŽ
2
Page 53

⭥䲒㾷ㄨ䆒ᅮˋ䇗ᭈᅝ㺙⫼ࠡ乏ⶹ
䖲⬉㓚
⊼ᛣ
噝ᇚᔧࠡⱘᰒ⼎఼ᤶ៤00ᰒ⼎఼ᯊˈ䇋ࡵᖙখ✻ᇕ䴶㚠ৢⱘߚ䕼⥛㸼ᇚϾҎ䅵ㅫᴎⱘߚ䕼⥛ൖⳈ
乥⥛䆒ᅮᬍЎ00ᰒ⼎఼ৃՓ⫼ⱘ䆒ᅮؐˈ✊ৢݡ䖲ϾҎ䅵ㅫᴎDŽ
⊼ᛣ
Փ⫼ᡀໄ఼ᯊˈ䇋ᇚゟԧໄ䗋Դᦦᄨ⬉㓚䖲㟇 3&ǃ&' ᪁ᬒ఼ㄝ䆒ⱘ䷇乥䕧ߎッᄤDŽ
噝
ᇚϸৄϾҎ䅵ㅫᴎ䖲ࠄᰒ⼎఼Ϟᯊˈ䇋খ䯙ܝⲬϞⱘ⫼᠋ݠDŽ
噝
⹂ֱᰒ⼎఼ϾҎ䅵ㅫᴎⱘ⬉⑤݇䯁DŽ
1
⫼ϔḍϢ䖲఼䜡ⱘֵো⬉㓚䖲ᰒ⼎఼ϾҎ䅵ㅫᴎDŽ
2
䖲ࠄ⬉㓚䖲఼ৢˈ䇋ᢻ㋻䖲఼ⱘ㶎䩝ˈՓ䜡ড়㋻ᆚDŽ
&'᪁ᬒ఼ㄝ
ϾҎ䅵ㅫᴎϞⱘ䖲఼
䷇乥䕧ߎッᄤ
˄ゟԧໄ䗋Դᦦᄨ˅
'9,,䖲఼
'VXEPLQL
䩜䖲఼
'VXE
䩜䖲఼
䷇乥䕧ߎッᄤ
˄ゟԧໄ䗋Դᦦᄨ˅
ゟԧໄ䗋Դᦦᄨ⬉㓚˄Ꮖᦤկ˅
ֵো⬉㓚)'&˄Ꮖᦤկ˅
᭄ᄫ䖲
ֵো⬉㓚0'&˄Ꮖᦤկ˅
ᢳ䖲
0DFLQWRVK䕀఼˄䗝䌁˅ֵো⬉㓚0'&˄Ꮖᦤկ˅
ᢳ䖲
ᰒ⼎఼Ϟⱘ䖲఼
䚼㒓䏃䕧ܹッ
˄ゟԧໄ䗋Դᦦᄨ˅
'9,'䖲఼
'VXEPLQL
䩜䖲఼
ᇚ⬉⑤㒓ᦦ༈ᦦܹ⬉⑤ᦦᑻᰒ⼎఼Ϟⱘ⬉⑤䖲఼DŽ
3
䇗ᭈሣᐩ催ᑺ㾦ᑺ
䇗ᭈሣᐩ催ᑺˈᑊᇚሣᐩؒ᭰ᮟ䕀ࠄ᳔ՇᎹԡ㕂DŽ
Ё᭛
3
Page 54

⭥䲒㾷ㄨ䆒ᅮˋ䇗ᭈᅝ㺙⫼ࠡ乏ⶹ
ᰒ⼎ሣᐩ
ᣝ ᇚᰒ⼎఼ᓔᴎDŽ
1
ᇚϾҎ䅵ㅫᴎᓔᴎDŽ
2
ᰒ⼎఼ⱘ⬉⑤ᣛ⼎఼Ӯ҂䍋˄㪱㡆˅ˈПৢߎ⦄ሣᐩڣDŽ
Փ⫼ᢳ䕧ֵܹোᯊˈ䇋ᠻ㸠Ā㞾ࡼ䇗ᭈࡳ㛑āDŽ˄䇋খ㗗ϟ᭛ⱘĀᠻ㸠㞾ࡼ䇗ᭈࡳ
3
㛑āDŽ˅
䕧᭄ܹᄫֵোᯊϡᖙ䖯㸠㞾ࡼ䇗ᭈࡳ㛑ˈЎڣӮḍܜࠡ䆒ᅮⱘ᭄ᴹℷ⹂ᰒ⼎DŽ
⊼ᛣ
噝Փ⫼ৢ݇䯁ᰒ⼎఼ϾҎ䅵ㅫᴎDŽ
噝Ўњ᳔䰤ᑺഄⳕ⬉ˈᓎ䆂ᙼ݇䯁⬉⑤ᣝ䪂DŽᢨϟ⬉⑤ᦦ༈ৃᅠܼ݇䯁ᰒ⼎఼ⱘ⬉⑤DŽ
ᠻ㸠㞾ࡼ䇗ᭈࡳ㛑˄ҙ䰤ᢳ䕧ܹ˅
䕧ܹᢳֵোᯊˈ㞾ࡼ䇗ᭈࡳ㛑ৃҹ䅽ᰒ⼎఼㞾ࡼᅠ៤ᯊ䩳ǃⳌԡǃᰒ⼎ԡ㕂ߚ䕼⥛ⱘ䇗ᭈDŽ
㢹䳔㽕㞾ࡼ䇗ᭈࡳ㛑ⱘ䆺㒚ֵᙃˈ䇋খ㗗ܝⲬЁⱘ⫼᠋ݠDŽ
ᣝ DŽ
1
ߎ⦄ֵᙃにষDŽ
ᰒ⼎ֵᙃᯊˈݡᣝϔϟ DŽ
2
㞾ࡼ䇗ᭈࡳ㛑ࡼˈᯊ䩳ǃⳌԡǃᰒ⼎ԡ㕂ߚ䕼⥛㹿㞾ࡼ䇗ᭈDŽ
⊼ᛣ
噝ܼሣᐩⱘ0DFLQWRVK:LQGRZVϾҎ䅵ㅫᴎሣᐩϞᰒ⼎ڣᯊˈ㞾ࡼ䇗ᭈࡳ㛑Ӯℷ⹂ᠻ㸠DŽ
䚼ߚሣᐩϞᰒ⼎ڣᯊ˄՟བՓ⫼'26ᮍᓣにষᯊ˅ˈḠ䴶㚠᱃˄㒌ㄝ˅㡆ᔽЎ咥㡆ᯊˈ䆹ࡳ㛑
ৃ㛑᮴⊩ℷᐌ䖤DŽ
噝䚼ߚᔶৃ㛑᮴⊩ℷ⹂ᠻ㸠㞾ࡼ䇗ᭈࡳ㛑DŽ
ֵᙃにষ
䇗ᭈᡀໄ఼䷇䞣
ᣝ ᣝ䪂DŽ
1
ߎ⦄䷇䞣䇗ᭈにষDŽ
⫼ 䰡Ԣ⫼ 催ᡀໄ఼ⱘ䷇䞣DŽ
2
䇗ᭈࠄ᠔䳔䷇䞣ৢᣝ DŽ
3
㢹㽕݇䯁ໄ䷇ˈ䇋ᰒ⼎䷇䞣䇗ᭈ㦰ⱘ䖛Ёᣝ DŽ
㢹㽕প⍜䴭䷇ˈ䇋ᣝ ᣝ䪂DŽ
䷇䞣䇗ᭈにষ
Ё᭛
4
Page 55

䗝ᢽᰒ⼎ᓣ
)LQH&RQWUDVWৃՓᙼᣝ✻ᰒ⼎఼ⱘԧᑨ⫼ᚙމᮍ֓ഄ䗝ᢽ᳔Շⱘᰒ⼎ᓣDŽ
㢹䳔㽕)LQH&RQWUDVWⱘ䆺㒚ֵᙃˈ䇋খ㗗ܝⲬЁⱘ⫼᠋ݠDŽ
)LQH&RQWUDVWᓣ
&XVWRP˄㞾ᅮН˅
V5*% 䗖ড়ϢᬃᣕV5*%ⱘ䖍䆒䖯㸠买㡆䜡DŽ
7H[W˄᭛ᴀ˅
3LFWXUH˄⠛˅ 䗖ড়ᰒ⼎✻⠛⠛ڣDŽ
0RYLH˄⬉ᕅ˅ 䗖ড়᪁ᬒࡼ⬏DŽ
⫼ᴹᠻ㸠䳔㽕ⱘ䆒ᅮDŽ
䗖ড়ᄫ໘⧚఼⬉ᄤ㸼Ḑ䕃ӊⱘ᭛ᴀDŽ
⭥䲒㾷ㄨ䆒ᅮˋ䇗ᭈᅝ㺙⫼ࠡ乏ⶹ
ᣝ DŽ
1
ߎ⦄)LQH&RQWUDVWにষDŽ
ᰒ⼎)LQH&RQWUDVW㦰ᯊˈݡᣝϔϟ DŽ
2
↣ᣝϔℸᣝ䪂ˈሣᐩϞⱘᓣ֓ӮߛᤶDŽ
˄䇋খ㗗)LQH&RQWUDVWᓣ㸼DŽ˅
䇗ᭈࠄ᠔䳔ᓣৢᣝ DŽ
3
᠔䗝ⱘᓣ㹿䆒ᅮDŽ
䇗ᭈ҂ᑺ
ᣝ DŽ
1
ߎ⦄҂ᑺ䇗ᭈにষDŽ
Փ⫼ 䇗ᭈ҂ᑺDŽ
2
ᣝ Փሣᐩব҂ˈ ՓሣᐩবᱫDŽ
䇗ᭈࠄ᠔䳔҂ᑺৢᣝ DŽ
3
ֱᄬᣛᅮⱘ҂ᑺؐDŽ
)LQH&RQWUDVWにষ
ᰒ⼎ᔧࠡᓣDŽ
҂ᑺ䇗ᭈにষ
ᠻ㸠催㑻䆒ᅮˋ䇗ᭈ
ৃҹ⫼䇗ᭈ㦰ᴹ䖯㸠ሣᐩ买㡆ˈҹঞ݊ᅗ⾡䆒ᅮⱘ催㑻䇗ᭈDŽ
㢹䳔㽕䇗ᭈࡳ㛑ⱘ䆺㒚ֵᙃˈ䇋খ㗗ܝⲬЁⱘ⫼᠋ݠDŽ
ᴀ䆒ᅮ䇗ᭈᏆ㒣ᅠ៤DŽ㢹䳔㽕催㑻䆒ᅮˋ䇗ᭈⱘ䆺㒚ֵᙃˈ䇋খ㗗ܝⲬЁⱘ⫼᠋ݠDŽ
䇗ᭈ㦰
Ё᭛
5
Page 56

⭥䲒㾷ㄨ䆒ᅮˋ䇗ᭈᅝ㺙⫼ࠡ乏ⶹ
᮴⠛ⱘ䯂乬
㢹ᏆՓ⫼ᓎ䆂ⱘׂℷᮍ⊩ৢҡ✊᮴⬏䴶ᰒ⼎ˈ䇋Ϣᙼ᠔ഄⱘ㒣䫔ଚ㘨㋏DŽ
Ẕᶹ⬉⑤ᣛ⼎఼DŽ
⮛⢊ ⢊ᗕ 㸹ᬥᮑ
᮴⠛ ⬉⑤ᣛ⼎఼ϡ҂DŽ Ẕᶹ⬉⑤㒓ᰃ৺Ꮖℷ⹂䖲DŽ㢹䯂乬ҡᄬˈ䇋
݇䯁ᰒ⼎఼⬉⑤᭄ߚ䩳ৢݡᓔᴎ䞡䆩ϔDŽ
⬉⑤ᣛ⼎఼⚍҂˄㪱㡆˅DŽ Ẕᶹ҂ᑺ䆒ᅮDŽ
⬉⑤ᣛ⼎఼⚍҂˄咘㡆˅DŽ
ẔᶹሣᐩϞذ⬭ ⾦ⱘ䫭䇃ֵᙃDŽ
Փᰒ⼎఼ࡳ㛑ℷᐌˈᔧ䕧ֵܹোϡℷ⹂ᯊˈ䖭ѯֵᙃҡӮߎ⦄DŽ
⮛⢊ ⢊ᗕ 㸹ᬥᮑ
䕧ֵܹোⱘᬊϡℷ⹂DŽ ẔᶹϾҎ䅵ㅫᴎᰃ৺ᏆᓔᴎDŽ
⫼
ߛᤶ䕧ֵܹোDŽ
ᣝ䬂ⲬϞᶤϔϾ䬂ˈߏ哴DŽ
ᇚϾҎ䅵ㅫᴎᓔᴎDŽ
Ẕᶹֵো㒓ᰃ৺Ꮖℷ⹂䖲ࠄϾҎ䅵ㅫᴎDŽ
ߛᤶ䕧ֵܹোDŽ
⫼
ֵো乥⥛䍙ߎ㾘ᅮ㣗ೈDŽ䫭䇃ⱘ
ֵো乥⥛Ӯҹ㑶㡆ᰒ⼎DŽ
Փ⫼ᔶⱘᅲ⫼ᑣ䕃ӊᇚᓣᬍবࠄᶤϾ䗖
ᔧⱘᓣDŽ䆺ᚙ䇋খ㗗ᔶⱘՓ⫼䇈ᯢDŽ
Ё᭛
6
Page 57

MEMO
Page 58

MEMO
Page 59

Hinweise zur Auswahl des richtigen Schwenkarms für Ihren Monitor
Dieser Monitor ist für Bildschirmarbeitsplätze vorgesehen. Wenn nicht der zum Standardzubehör gehörige
Schwenkarm verwendet wird, muss statt dessen ein geeigneter anderer Schwenkarm installiert werden. Bei der
Auswahl des Schwenkarms sind die nachstehenden Hinweise zu berücksichtigen:
Der Standfuß muß den nachfolgenden Anforderungen entsprechen:
a) Der Standfuß muß eine ausreichende mechanische Stabilität zur Aufnahme des Gewichtes vom Bildschirmgerät
und des spezifi zierten Zubehörs besitzen. Das Gewicht des Bildschirmgerätes und des Zubehörs sind in der
zugehörenden Bedienungsanleitung angegeben.
b) Die Befestigung des Standfusses muß derart erfolgen, daß die oberste Zeile der Bildschirmanzeige nicht höher
als die Augenhöhe eines Benutzers in sitzender Position ist.
c) Im Fall eines stehenden Benutzers muß die Befestigung des Bildschirmgerätes derart erfolgen, daß die Höhe
der Bildschirmmitte über dem Boden zwischen 135 – 150 cm beträgt.
d)Der Standfuß muß die Möglichkeit zur Neigung des Bildschirmgerätes besitzen (max. vorwärts: 5°, min. nach
hinten ≥ 5°).
e) Der Standfuß muß die Möglichkeit zur Drehung des Bildschirmgerätes besitzen (max. ±180°). Der maximale
Kraftaufwand dafür muß weniger als 100 N betragen.
f) Der Standfuß muß in der Stellung verharren, in die er manuell bewegt wurde.
g) Der Glanzgrad des Standfusses muß weniger als 20 Glanzeinheiten betragen (seidenmatt).
h) Der Standfuß mit Bildschirmgerät muß bei einer Neigung von bis zu 10° aus der normalen aufrechten Position
kippsicher sein.
Hinweis zur Ergonomie :
Dieser Monitor erfüllt die Anforderungen an die Ergonomie nach EK1-ITB2000 mit dem Videosignal, 1280
Punkete × 1024 Zeilen, RGB analog, 0,7 Vp-p und mindestens 75,0 Hz Bildwiederholfrequenz, non interlaced.
Weiterhin wird aus ergonomischen Gründen empfohlen, die Grundfarbe Blau nicht auf dunklem Untergrund zu
verwenden (schlechte Erkennbarkeit, Augenbelastung bei zu geringem Zeichenkontrast.)
English Deutsch Français Español Italiano Svenska Greece Russia
„Maschinenlärminformations-Verordnung 3. GPSGV:
Der höchste Schalldruckpegel beträgt 70 dB(A) oder weniger gemäss EN ISO 7779“
Ё᭛
Page 60

 Loading...