

Page 1
Page 2

English
LIMITED WARRANTY
EIZO NANAO CORPORATION (“EIZO”) and EIZO authorized distributors warrant, subject to and in
accordance with the terms of this warranty, to the original purchaser who purchased the product from EIZO
or EIZO authorized distributors that this product shall be free from defects in material and workmanship
for a period of one (1) year from the date of purchase, and that, in the event of malfunction of the product
during the warranty period attributable directly to defective material and/or workmanship, EIZO and EIZO
authorized distributors will, at their sole discretion, either repair or replace the defective product. EIZO and
EIZO authorized distributors shall bear no other liability or obligation under this warranty. EIZO and
EIZO authorized distributors cease to bear any obligation under this warranty with regard to any parts of
the product upon expiration of five (5) years after the production of such parts is discontinued. This
warranty is valid only in the countries or territories where the EIZO authorized distributors are located.
This Limited Warranty does not restrict legal rights as granted by implied warranty against the vendor.
Furthermore, EIZO and EIZO authorized distributors shall have no obligation under this warranty
whatsoever in respect of any of such defects, or in any of such cases, as set forth below:
Any defect of the product caused by freight damage, modification, alteration, abuse, misuse, accident,
incorrect installation, disaster, faulty maintenance and/or improper repair by third party other than EIZO
and EIZO authorized distributors.
To obtain service under this warranty, the original purchaser must deliver the product, freight prepaid, in its
original package or other adequate package affording an equal degree of protection, assuming the risk of
damage and/or loss in transit, to the local EIZO authorized distributor. The original purchaser must present
proof of purchase establishing the date of purchase of the product when requesting warranty service.
Warranty period for any replaced and/or repaired product under this warranty shall expire at the end of the
original warranty period.
EIZO AND EIZO AUTHORIZED DISTRIBUTORS MAKE NO FURTHER WARRANTIES,
EXPRESSED OR IMPLIED, WITH RESPECT TO THE PRODUCT AND ITS QUALITY,
PERFORMANCE, MERCHANTABILITY OR FITNESS FOR ANY PARTICULAR USE. IN NO
EVENT SHALL EIZO OR EIZO AUTHORIZED DISTRIBUTORS BE LIABLE FOR ANY
INCIDENTAL, INDIRECT, SPECIAL, CONSEQUENTIAL OR OTHER DAMAGE
WHATSOEVER (INCLUDING, WITHOUT LIMITATION, DAMAGES FOR LOSS OF PROFIT,
BUSINESS INTERRUPTION, LOSS OF BUSINESS INFORMATION, OR ANY OTHER
PECUNIARY LOSS) ARISING OUT OF THE USE OR INABILITY TO USE THE PRODUCT OR
IN ANY CONNECTION WITH THE PRODUCT, WHETHER BASED ON CONTRACT, TORT,
NEGLIGENCE, STRICT LIABILITY OR OTHERWISE, EVEN IF EIZO OR EIZO AUTHORIZED
DISTRIBUTORS HAVE BEEN ADVISED OF THE POSSIBILITY OF SUCH DAMAGES. THIS
EXCLUSION ALSO INCLUDES ANY LIABILITY WHICH MAY ARISE OUT OF THIRD PARTY
CLAIMS AGAINST THE ORIGINAL PURCHASER. THE ESSENCE OF THE PROVISION IS TO
LIMIT THE POTENTIAL LIABILITY OF EIZO AND EIZO AUTHORIZED DISTRIBUTORS
ARISING OUT OF THIS LIMITED WARRANTY AND/OR SALES.
2
Page 3
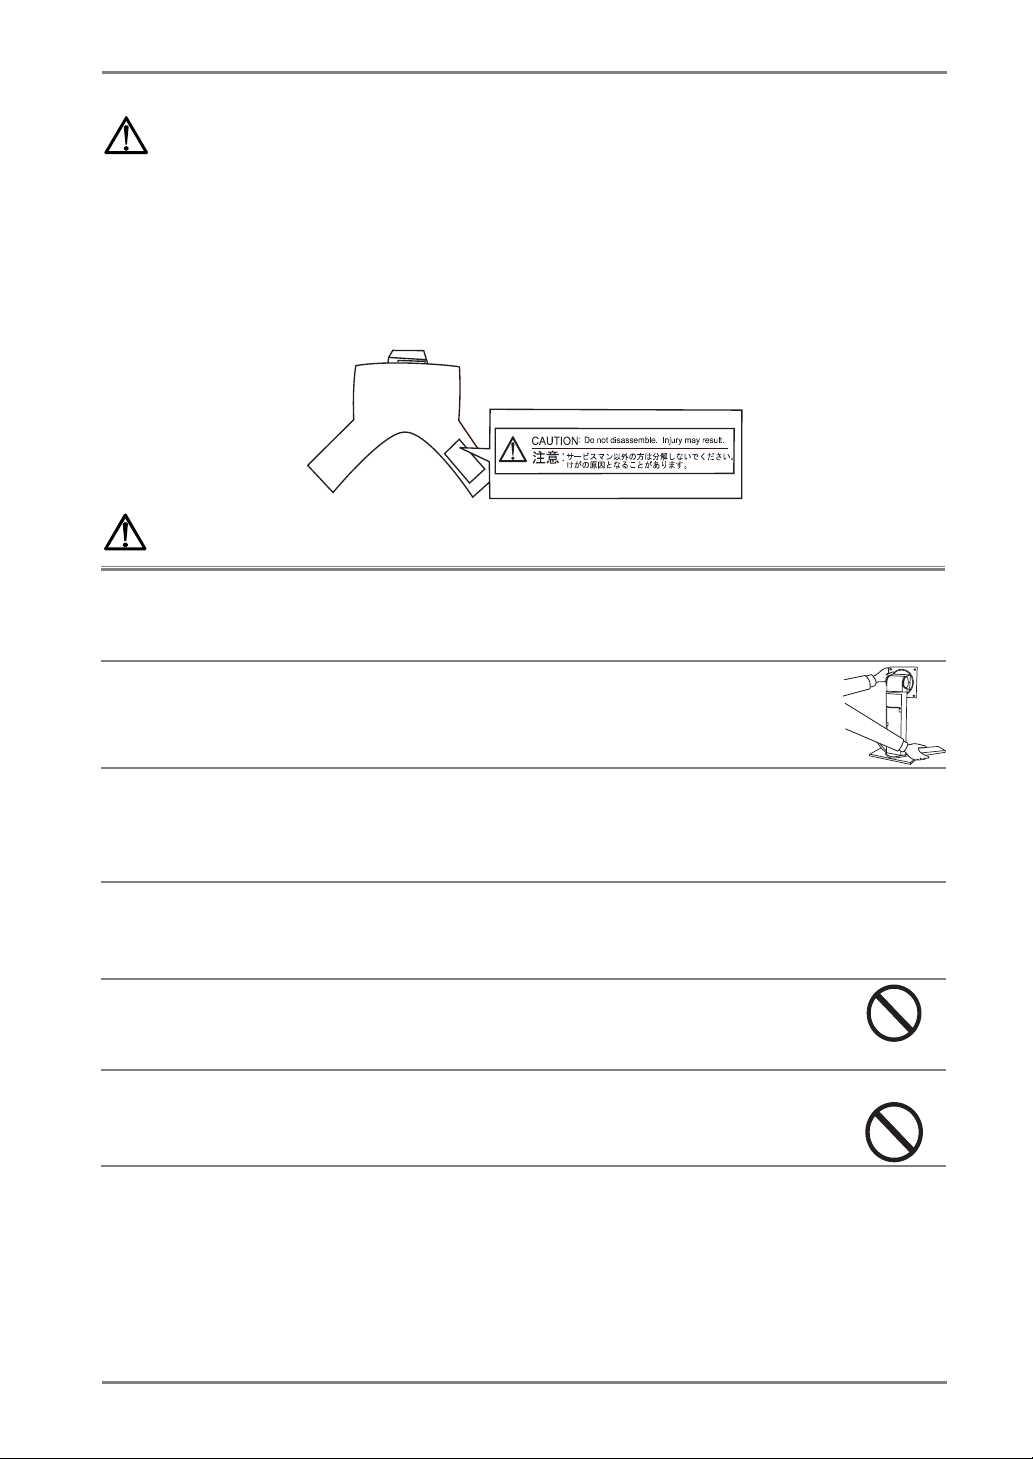
PRECAUTIONS
g
IMPORTANT!
x To ensure personal safety and proper maintenance, please read this section and the
caution statements on the unit (refer to the figure below).
[Location of the Caution Statements]
WARNING
Attach the applicable EIZO LCD monitor only.
Not doing so may cause the stand or monitor to drop, which may result in injury or
equipment damage.
English
Handle with care when carrying the stand.
When handling the stand, grip the bottom with one hand and grip the shield plate
with another hand. Not doing so may cause the equipment damage.
Attach the LCD monitor securely to the stand.
Install the monitor securely with using the enclosed screws in the stand package.
Follow the instructions on the user’s manual. Not doin
come unattached, which may result in injury or equipment damage.
Handle with care when attaching the Balance Weight.
It weights approx 0.9 kg (1.98 lbs.) [LS-H32-D] / 1.2 kg (2.65 lbs.) [LS-H51-D].
Dropping it may result in injury or equipment damage.
Do not disassemble.
The spring mechanism inside of the stand may cause injury or equipment damage
when disassembling.
Do not adjust the height or the angle with gripping the iSound (if applicable).
Adjusting the height or the angle with gripping the iSound is dangerous. It may
result in injury or equipment damage.
so may cause the monitor to
3
Page 4

English
Package Contents
Please contact your local dealer for assistance if any of the listed items are missing or
damaged.
x Stand
x Stand Mounting Cover, 2 pcs
x Balance Weight (Enclosed to LS-H32-D [for L367]/LS-H51-D)
x User’s Manual
x Sheet (Compatible Screws List)
x Mounting Screws, 4 pcs each
(For the compatible screws and monitors, refer to the ‘Compatible Screws List’.)
How to attach the monitor
Attaching method depends on the stand and the monitor in use.
For the installation, use specified screws refering to the ‘Compatible Screws List’.
Stand Monitor Reference page
Refer to the ‘Compatible
Screws List’
L367 See p. 6
LS-H51-D Refer to the ‘Compatible
Screws List’
LS-H63-D Refer to the ‘Compatible
Screws List’
See p. 5 LS-H32-D
See p. 6
See p. 7
4
Page 5

How to attach the monitor: LS-H32-D
1. Remove the original tilt stand.
Lay the LCD monitor down on the soft cloth or cushion and then remove the stand.
(Refer to “Attaching An Arm Stand” section in the monitor’s user’s manual in
details.) When reattaching the original tilt stand, please use the same screws and
tighten them securely.
2. Attach the LCD monitor to the stand.
Place the shield plate to be straight with the monitor.
Sheild Plate
Mounting screws (Enclosed)
English
3. Attach the covers to the shield plate.
Hold the center of the stand mounting cover and slide them rightward or leftward
to attach them.
Covers (Enclosed)
4. Plug the power cord and signal cable into the connectors at rear of
monitor.
After plugging, lead the power cord and signal cable into the cable holder at rear of
the monitors.
NOTE
x The cable holder enables to hold 2 signal cables by EIZO,
a power cord, 5 USB cables and 2 stereo mini jack cables.
x The cables are recommended to lead with slight sag for the
smooth motion of the stand.
Cable Holder
5
Page 6

English
How to attach the monitor: LS-H51-D
LS-H32-D
(when attaching the L367)
1. Remove the original tilt stand.
Lay the LCD monitor down on the soft cloth or cushion and then remove the stand.
(Refer to “Attaching An Arm Stand” section in the monitor’s user’s manual in
details.) When reattaching the original tilt stand, please use the same screws and
tighten them securely.
2. Attach the LCD monitor and Balance Weight to the stand.
Place the shield plate and balance weight to be straight with the monitor.
Sheild Plate
Balance Weight
NOTE
x Attaching the LCD monitor to the stand without the Balance Weight may result
in a shift of the monitor’s vertical position.
Mounting screws(Enclosed)
3. Attach the covers to the shield plate.
Hold the center of the stand mounting cover and slide them rightward or leftward
to attach them.
Covers (Enclosed)
4. Plug the power cord and signal cable into the connectors at rear of
monitor.
After plugging, lead the power cord and signal cable into the cable holder at rear of
the monitors.
NOTE
x The cable holder enables to hold 2 signal cables by EIZO, a
power cord, 5 USB cables and 2 stereo mini jack cables.
x The cables are recommended to lead with slight sag for the
smooth motion of the stand.
Cable Holder
6
Page 7

How to attach the monitor: LS-H63-D
1. Remove the original tilt stand.
Lay the LCD monitor down on the soft cloth or cushion and then remove the stand.
(Refer to “Attaching An Arm Stand” section in the monitor’s user’s manual in
details.) When reattaching the original tilt stand, please use the same screws and
tighten them securely.
2. Attach the LCD monitor to the stand.
Place the shield plate to be straight with the monitor.
English
Sheild Plate
Mounting screws (Enclosed)
3. Attach the covers to the shield plate.
Hold the center of the stand mounting cover and slide them rightward or leftward
to attach them.
Covers (Enclosed)
4. Plug the power cord and signal cable into the connectors at rear of
monitor.
After plugging, lead the power cord and signal cable into the cable holder at rear of
the monitors.
NOTE
x The cable holder enables to hold 2 signal cables by EIZO, a
power cord, 5 USB cables and 2 stereo mini jack cables.
x The cables are recommended to lead with slight sag for the
smooth motion of the stand.
Cable Holder
7
Page 8

English
How to adjust the monitor height or angle
Grip both side of the monitor firmly with both hands and adjust the monitor height or
angle as desired.
Specifications
LS-H32-D
Height adjustable range 100 mm
Supported Weight
Weight Stand: 2.3 kg (5.07 lbs.)
Supported Weight: Total weight of the monitor including the weight of the cables and optional
*
peripherals (Including the balance weight).
3.2a4.3kg (7.1~9.5 lbs)
Balance Weight: 0.9 kg (1.98 lbs.)
Dimensions
Front Side
NOTE
x This stand does not have the capability of the pivoting function.
mm (inches)
To p
8
Page 9

English
LS-H51-D
Height adjustable range 100 mm
Supported Weight
Weight Stand: 2.3 kg (5.07 lbs.)
Supported Weight: Total weight of the monitor including the weight of the cables and optional
*
peripherals (Including the balance weight).
5.0a6.8kg (11.0~14.9 lbs)
Balance Weight: 1.2 kg (2.65 lbs.)
LS-H63-D
Height adjustable range 100 mm
Supported Weight
Weight Stand: 2.3 kg (5.07 lbs.)
Supported Weight: Total weight of the monitor including the weight of the cables and optional
*
peripherals.
5.0a6.8kg (11.0~14.9 lbs)
Dimensions
Front
mm (inches)
Side Top
9
 Loading...