

Page 1

Setup Manual
Important: Please read PRECAUTIONS, this Setup Manual and the User’s Manual
stored on the CD-ROM carefully to familiarize yourself with safe and effective
usage. Please retain this manual for future reference.
Installationshandbuch
Wichtig: Lesen Sie die VORSICHTSMASSNAHMEN, dieses Handbuch zur
Einrichtung und das Benutzerhandbuch (auf der CD-ROM) aufmerksam
durch, um sich mit der sicheren und efzienten Bedienung vertraut zu
machen. Bewahren Sie dieses Handbuch zum späteren Nachschlagen auf.
Manuel d’installation
Important : Veuillez lire attentivement les PRECAUTIONS, ce Manuel d’installation ainsi
que le Manuel d’utilisation inclus sur le CD-ROM, an de vous familiariser
avec ce produit et de l’utiliser efcacement et en toute sécurité. Veuillez
conserver ce manuel pour référence ultérieure.
Manual de instalación
Importante: Lea detenidamente el apartado PRECAUCIONES, el Manual de instalación y
el Manual del usuario que encontrará en el CD-ROM para familiarizarse con
las normas de seguridad y los procedimientos de uso. Conserve este manual
para consultas posteriores.
English Deutsch Français Español Italiano Svenska Ελληνική Pусский
Manuale di installazione
Importante: leggere attentamente la sezione PRECAUZIONI, il presente Manuale di
installazione e il Manuale dell’utente memorizzati sul CD-ROM per utilizzare il
prodotto in modo efcace e sicuro. Conservare il manuale per consultazioni
future.
Installationshandboken
Viktigt: Läs försiktighetsåtgärderna, den här installationshandboken och
användarhandboken som nns på CD-skivan noggrant så att du känner dig
säker och får ett effektivt användande av produkten. Behåll manualen för
framtida behov.
Εγχειρίδιο εγκατάστασης
Σημαντικό: Διαβάστε προσεκτικά τις ΠΡΟΦΥΛΑΞΕΙΣ, το Εγχειρίδιο εγκατάστασης και το
Εγχειρίδιο χρήστη που θα βρείτε στο CD-ROM προκειμένου να εξοικειωθείτε
με την ασφαλή και αποτελεσματική χρήση της συσκευής. Διατηρήστε αυτό το
εγχειρίδιο για μελλοντική χρήση.
Руководство по установке
Важно! Внимательно прочитайте МЕРЫ ПРЕДОСТОРОЖНОСТИ, настоящее
Руководство по установке и Руководство пользователя на CD-ROM для
получения сведений о безопасной и эффективной эксплуатации.
Сохраните это руководство для справки.
设定手册
重要事项: 请仔细阅读储存在光盘上的用户手册、本设定手册和预防措施、掌握如何安
全、有效地使用本产品。请保留本手册、以便今后参考。
中文
Page 2

Page 3

Setup Manual
Important: Please read PRECAUTIONS, this Setup Manual and the User’s Manual
stored on the CD-ROM carefully to familiarize yourself with safe and
effective usage. Please retain this manual for future reference.
English
Page 4
TroubleshootingSetting/AdjustmentInstallationPrior to use
FORIS FX2431
English
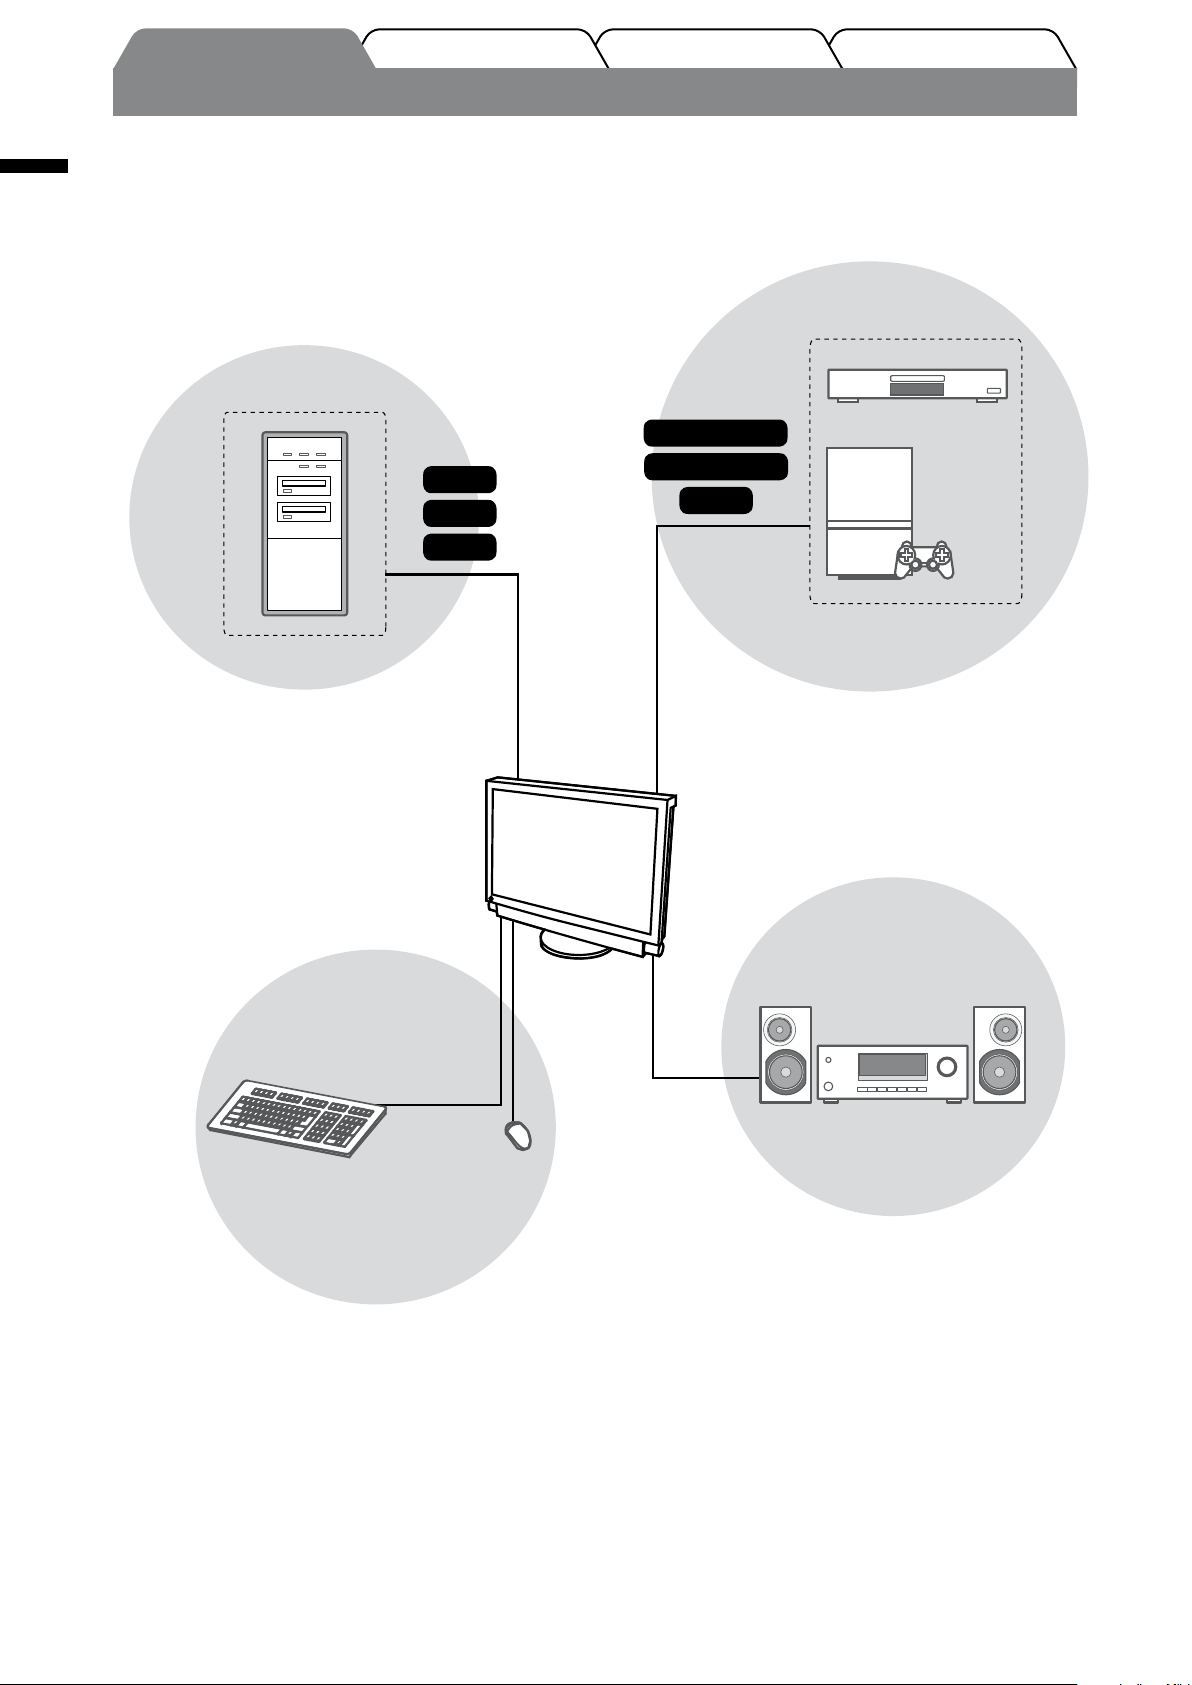
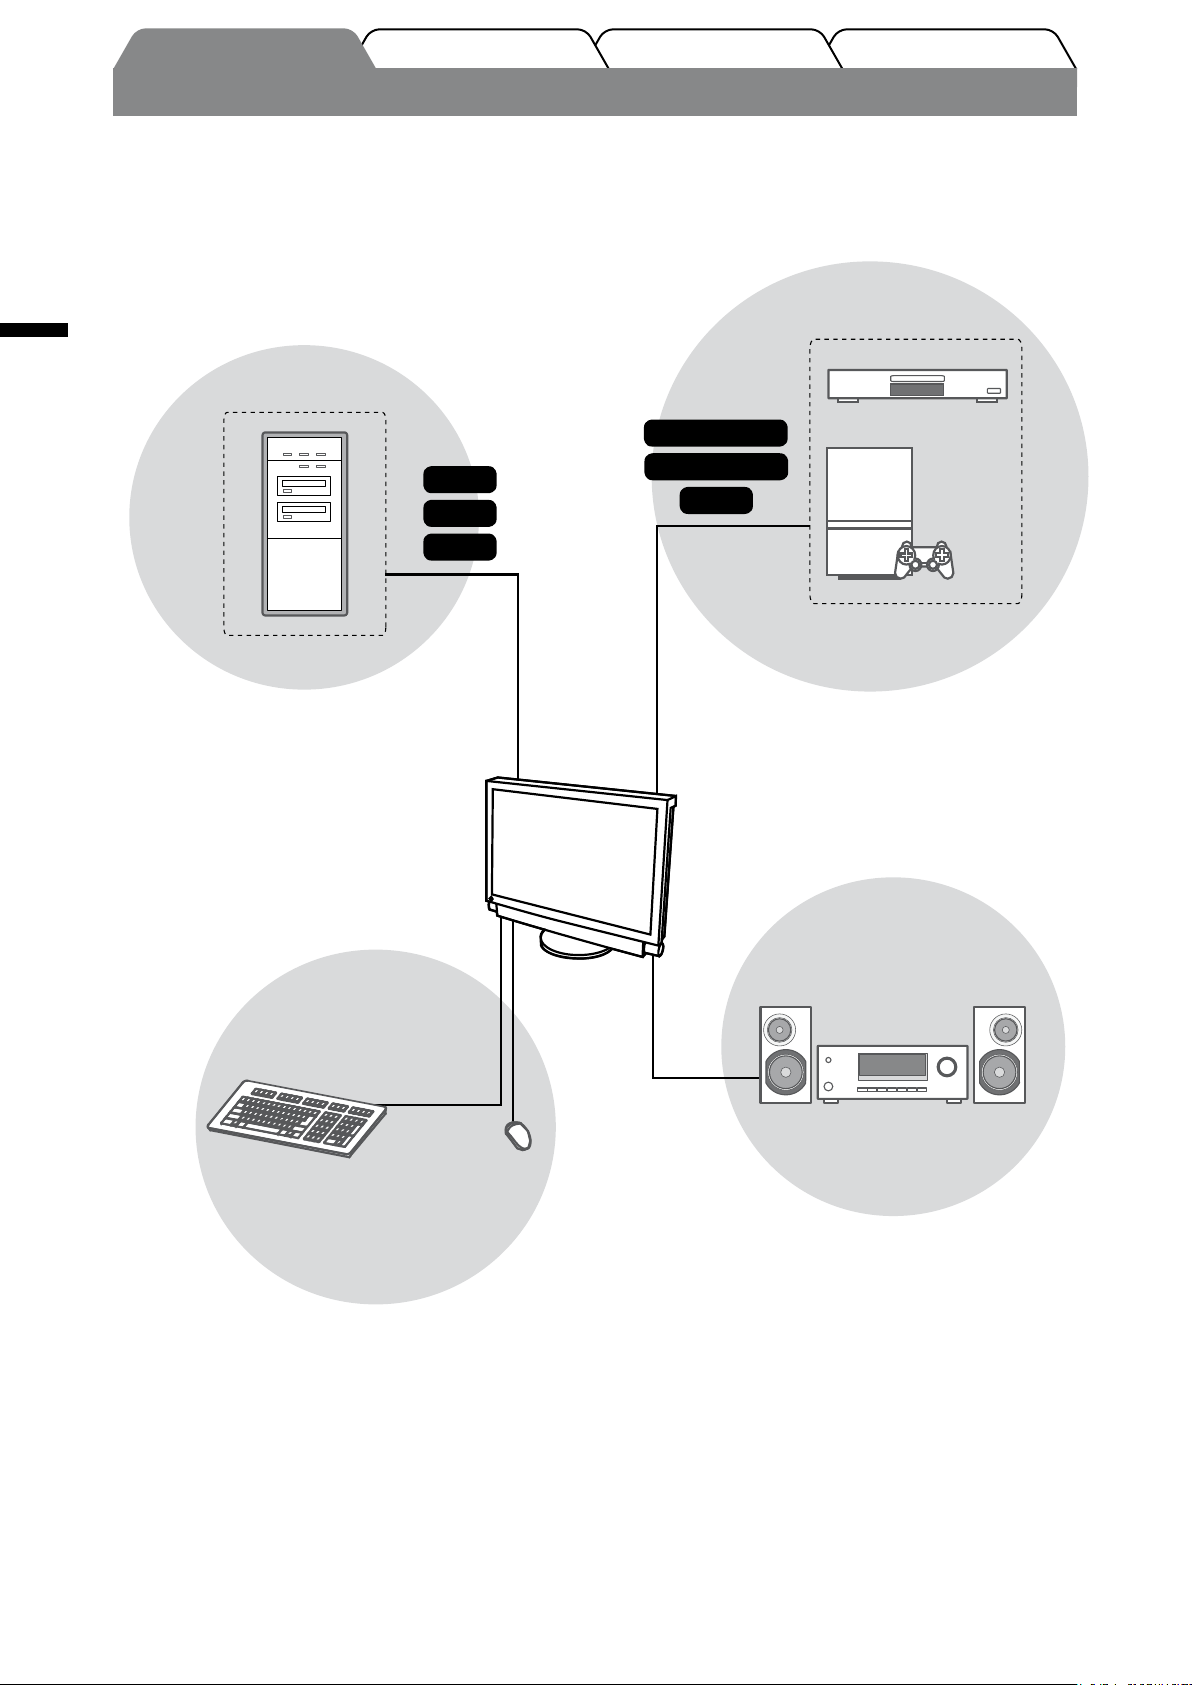
FX2431 can be connected to the following devices.
PC
DVI
D-Sub
HDMI
Enables you to use as a monitor by connecting to
a Windows PC or a Macintosh.
• Applicable resolution ............page 3
• Connection methods ..............page 7
AV device
DVD player
S-Video / Video
Component
HDMI
Enables you to display projected images by
connecting a DVD, Video, game, etc.
• Applicable signal format .............page 3
• Connection methods ................... page 11
Game
USB devices
Keyboard
• Connection methods .............
(Also available to connect a printer or a
scanner, etc.)
Attention
• Use a PC/OS applicable to USB devices.
[Applicable OS]
- Windows 2000/XP/Vista
- Mac OS 9.2.2 and Mac OS X 10.2 or later
• USB device does not work when the main
power switch of the monitor is off.
Mouse
page 10
Audio device
Enables you to output sound from PC and
AV device by connecting to speakers and
AV amplier.
• Connection methods ..............page 12
NOTE
• Enables you to enjoy sound by
connecting a headphone to the
headphone jack. .....................page 12
(Caution: When using headphones, do
not turn the volume up too high. It
affects your hearing.)
2
Page 5
TroubleshootingSetting/AdjustmentInstallationPrior to use
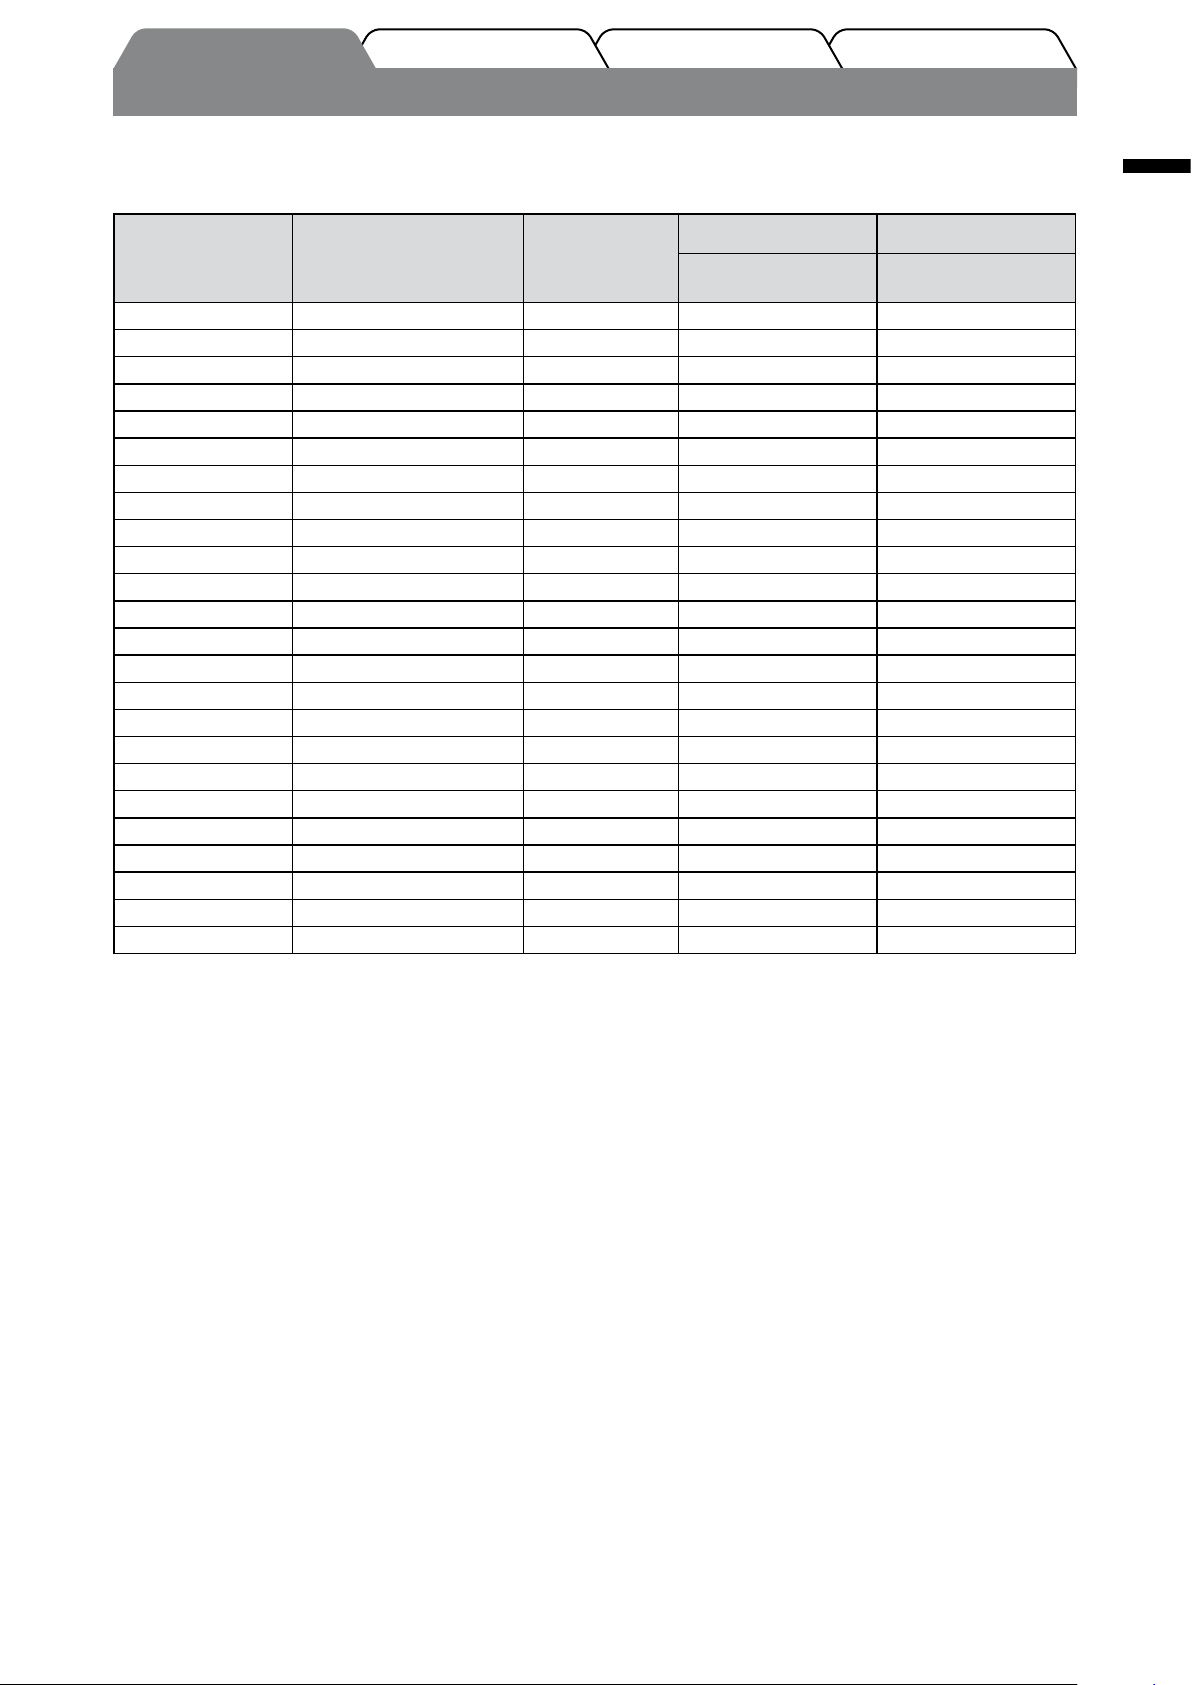
Compatible Resolutions/Signal Format
The monitor supports the following resolutions and signal format.
PC Input / HDMI (PC Signal) Input
Digital Input Signal Analog Input Signal
Resolution Frequency Mode
640 × 400 70 Hz NEC PC-9821 —
640 × 480 67 Hz Apple Macintosh
640 × 480 ~75 Hz VGA, VESA
720 × 400 70 Hz VGA TEXT
720 × 480 60 Hz
848 × 480 60 Hz
800 × 600 ~75 Hz
832 × 624 75 Hz Apple Macintosh
1024 × 768 ~75 Hz
1152 × 864 75 Hz
1152 × 870 75 Hz Apple Macintosh
1
1280 × 768
1280 × 768
1280 × 960 60 Hz
1280 × 960 75 Hz Apple Macintosh
1280 × 1024 ~75 Hz
1360 × 768 60 Hz
1600 × 1200 60 Hz
1680 × 1050
1680 × 1050
1920 × 1200
1280 × 720p 50 Hz
1920 × 1080p 50 Hz
1920 × 1080p
*
1
*
1
*
1
*
2
*1 *
3
*
24 Hz, 25 Hz, 30 Hz, 48 Hz 1080p
60 Hz VESA CVT RB —
~75 Hz VESA CVT —
60 Hz VESA CVT
60 Hz VESA CVT RB
60 Hz VESA CVT RB
3
*
, 60 Hz 720p
3
*
, 60 Hz 1080p
VESA
VESA
VESA
VESA
VESA —
VESA
VESA
VESA —
VESA
Dot Clock:
~ 162 MHz
ü (60 Hz) ü
ü (60 Hz) ü
ü (60 Hz) ü
ü (60 Hz) ü
ü (60 Hz) ü
ü (60 Hz) ü
Dot Clock:
~ 162 MHz
—
ü ü
ü ü
ü ü
—
—
ü ü
—
ü ü
ü ü
ü ü
ü ü
ü
English
ü
ü
ü
ü
ü
ü
ü
ü
ü
—
*1 When displaying the wide format input signal, a graphics board in conformance with VESA CVT standard is required.
*2 Recommended resolution (Set this resolution.)
*3 Resolution for some AV devices such as Microsoft Xbox 360
VIDEO Input
[S-Video / Video Signal]
– NTSC / PAL / PAL-60
[Component video Signal]
– 525i (480i) / 525p (480p): 60 Hz
– 625i (576i) / 625p (576p): 50 Hz
– 1125i (1080i) / 750p (720p): 50 Hz / 60 Hz
– 1125p (1080p): 24 Hz / 50 Hz / 60 Hz
HDMI (Video Signal) Input
• Video signal
– 525i (480i) / 525p (480p): 60 Hz
– 625i (576i) / 625p (576p): 50 Hz
– 1125i (1080i) / 750p (720p): 50 Hz / 60 Hz
– 1125p (1080p): 24 Hz / 25 Hz / 30 Hz / 50 Hz / 60 Hz
• Audio signal
2ch linear PCM (32 kHz / 44.1 kHz / 48 kHz)
3
Page 6
English
TroubleshootingSetting/AdjustmentInstallationPrior to use
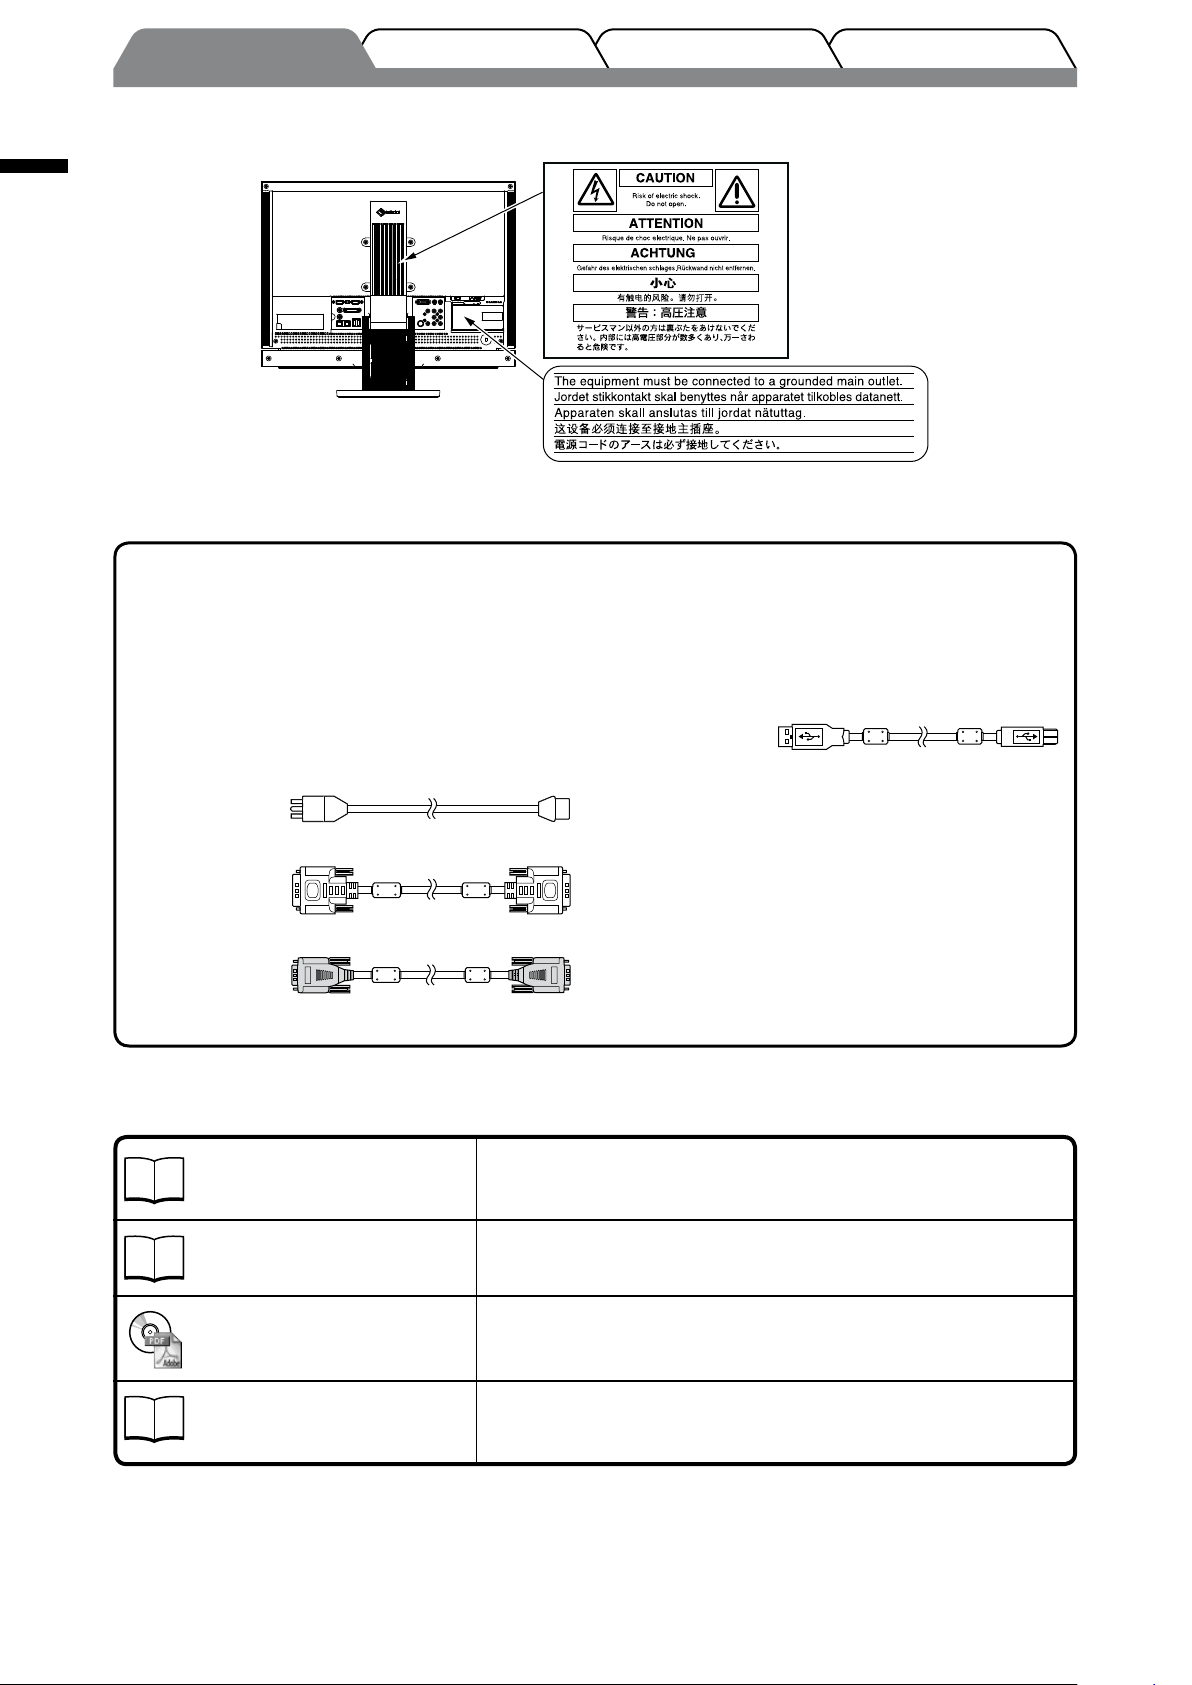
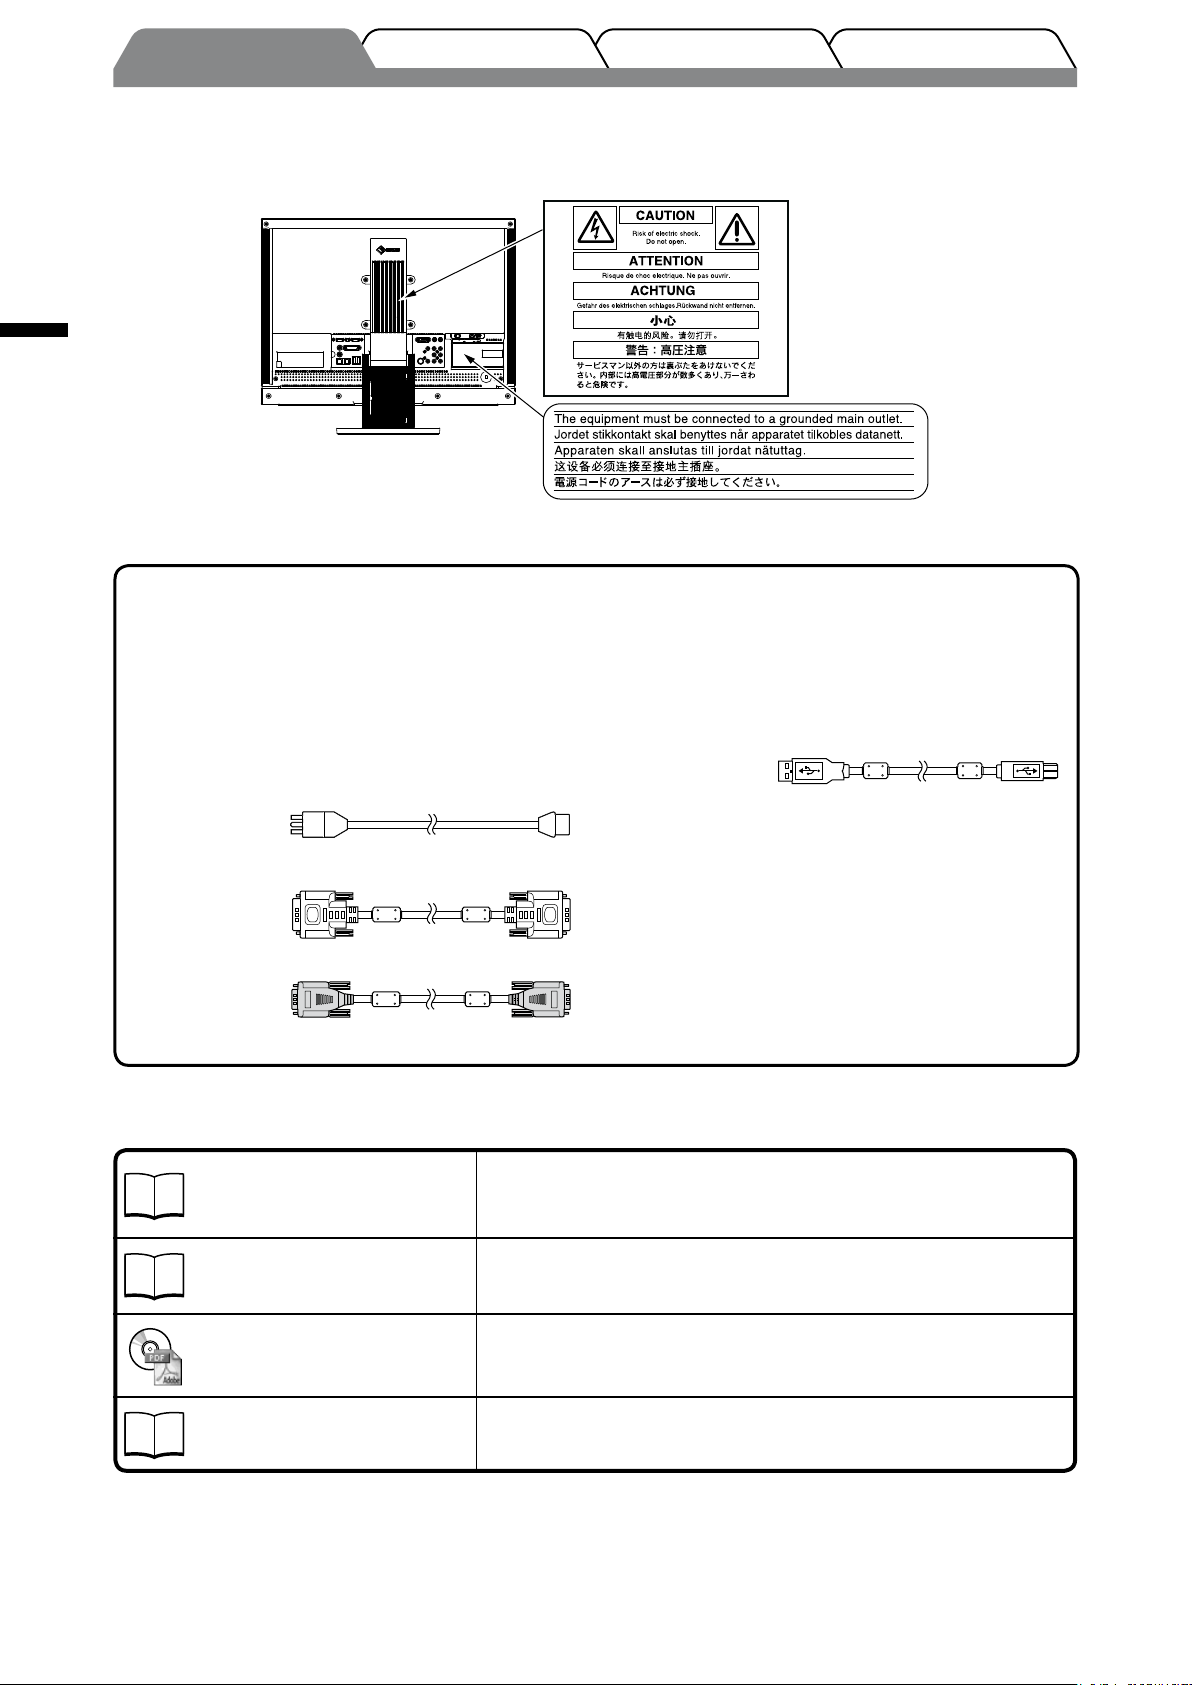
[Location of Caution Statement]
Package Contents
Check that all the following items are included in the packaging box. If any items are missing or damaged, contact your local
dealer.
NOTE
• Please keep the packaging box and materials for future movement or transport of the monitor.
□ Monitor
□ Remote control
□ AA batteries (2 pcs)
□ Power cord
□ Digital signal cable (FD-C39)
□ Analog signal cable (MD-C87)
□ EIZO USB cable (MD-C93)
□ EIZO LCD Utility Disk (CD-ROM)
• User’s Manual
□ Setup Manual (this manual)
□ Remote Control Guide
□ PRECAUTIONS
□ Limited warranty
□ Recycling Information
□ Mounting Screws (M4 x 12, 4 pcs)
About Setup Manual and User’s Manual
Setup Manual
(this manual)
Remote Control Guide
User’s Manual
(PDF le on the CD-ROM*1)
PRECAUTIONS
*1 Installation of Adobe Reader is required.
• Product specications vary with sales areas. Conrm that the manual is written in the language of the area of purchase.
4
Describes basic information ranging from connection of the monitor to
external device, such as a PC, etc., to using the monitor.
Describes the operation with remote control.
Describes application information such as operation of this monitor,
screen adjustments, settings, and specications.
Describes how to use the monitor safely.
Page 7
TroubleshootingSetting/AdjustmentInstallationPrior to use
About EIZO LCD Utility Disk (CD-ROM)
5m
30°
30°
7m
5m
5m
5m
20°
20°
7m
●
Disk contents and software overview
The disk includes software programs for adjustment, and User’s Manual. Refer to “Readme.txt” or the “read me” le on
the disk for software startup procedures or le access procedures.
Item Overview OS
A “Readme.txt” or “read me” le
Screen adjustment pattern les Used when adjusting the image of the analog
ScreenManager Pro for LCD A software for adjusting the screen using the
WindowMovie Checker Software WindowMovie is a function of ScreenManager
EIZO ScreenSlicer A software that divides a screen and lays out
User’s Manual of this monitor (PDF le)
●
To use ScreenManager Pro for LCD
signal input manually.
mouse and keyboard.
Regarding the adjustable items, refer to the
“Parameter Adjustment Items”.
Pro for LCD.
For more information, refer to the User’s
Manual of ScreenManager Pro for LCD on the
disk.
multiple windows efciently.
For the installation and use of ScreenManager Pro for LCD, refer to its User’s Manual on the disk.
Windows
*
If your OS is other than Windows,
download the pattern les from
our site: http://www.eizo.com
Windows XP / Vista
*
WindowMovie Checker Software
is not applicable to Windows
Vista.
Windows XP / Vista
English
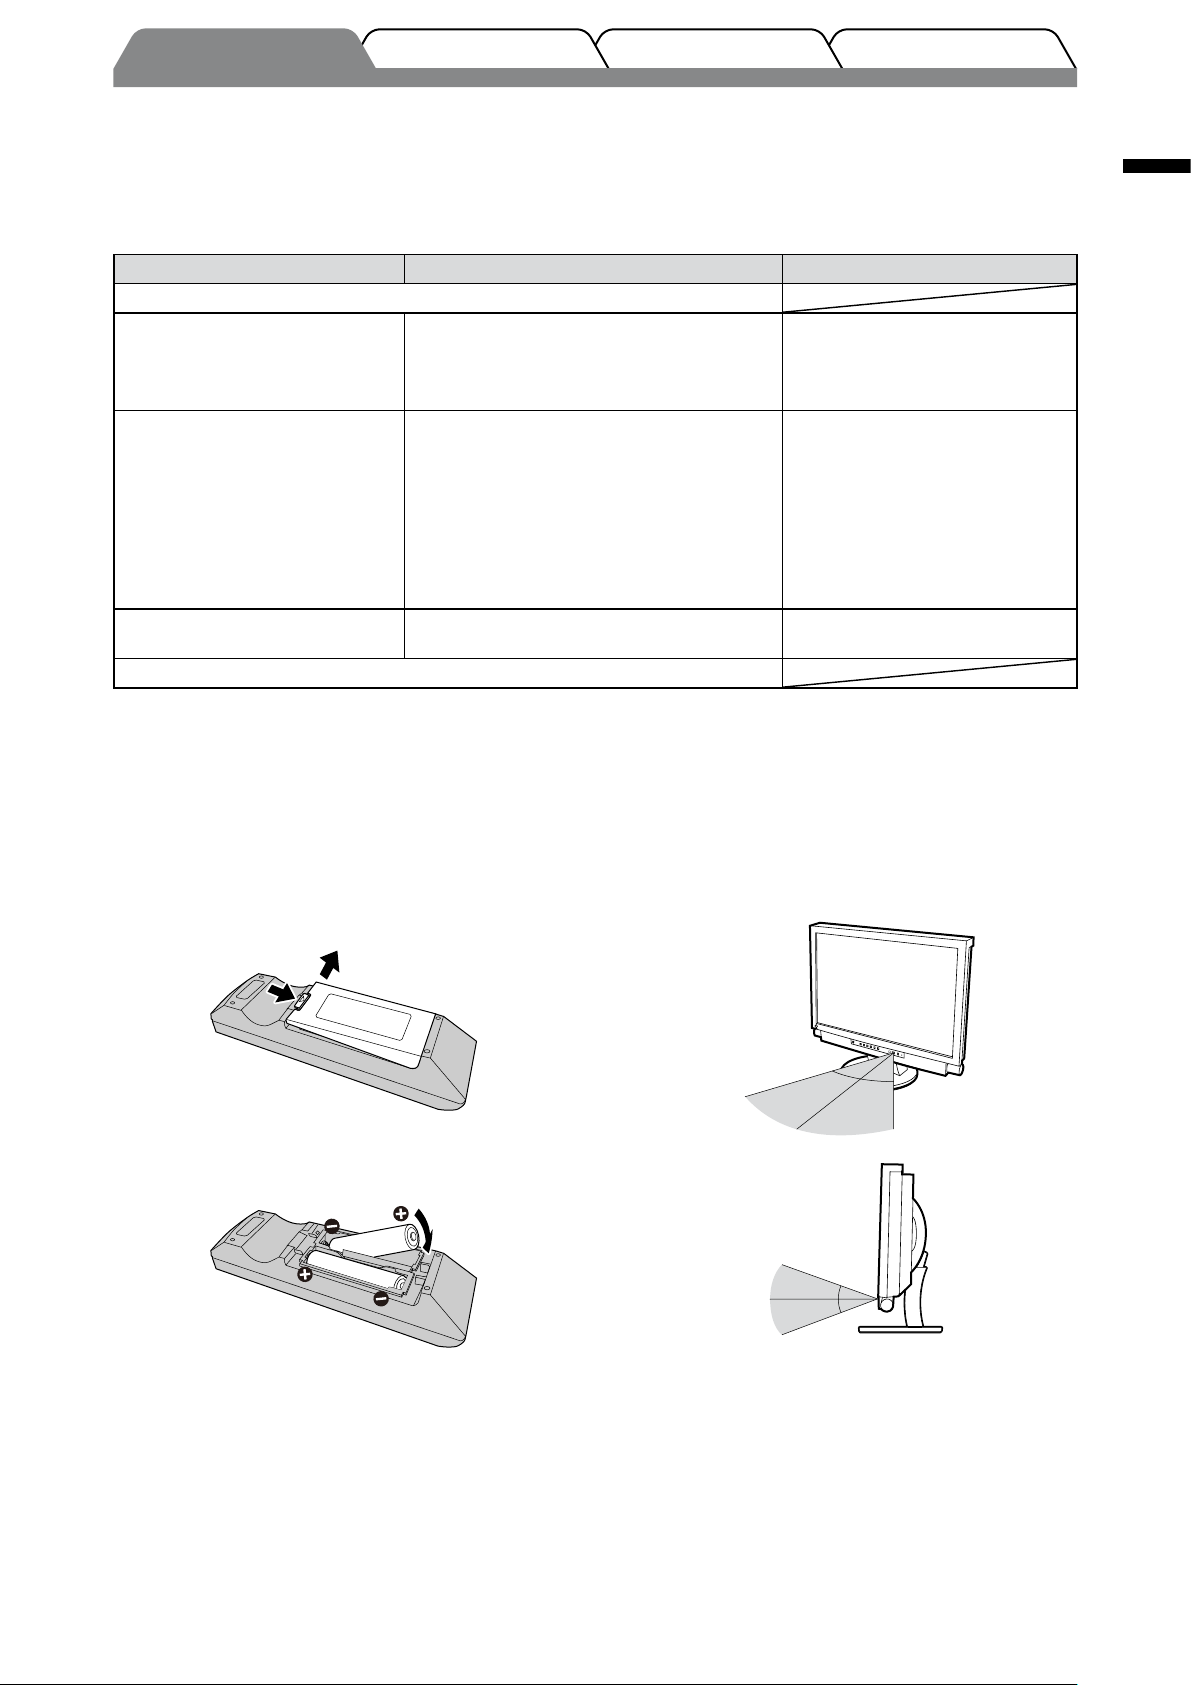
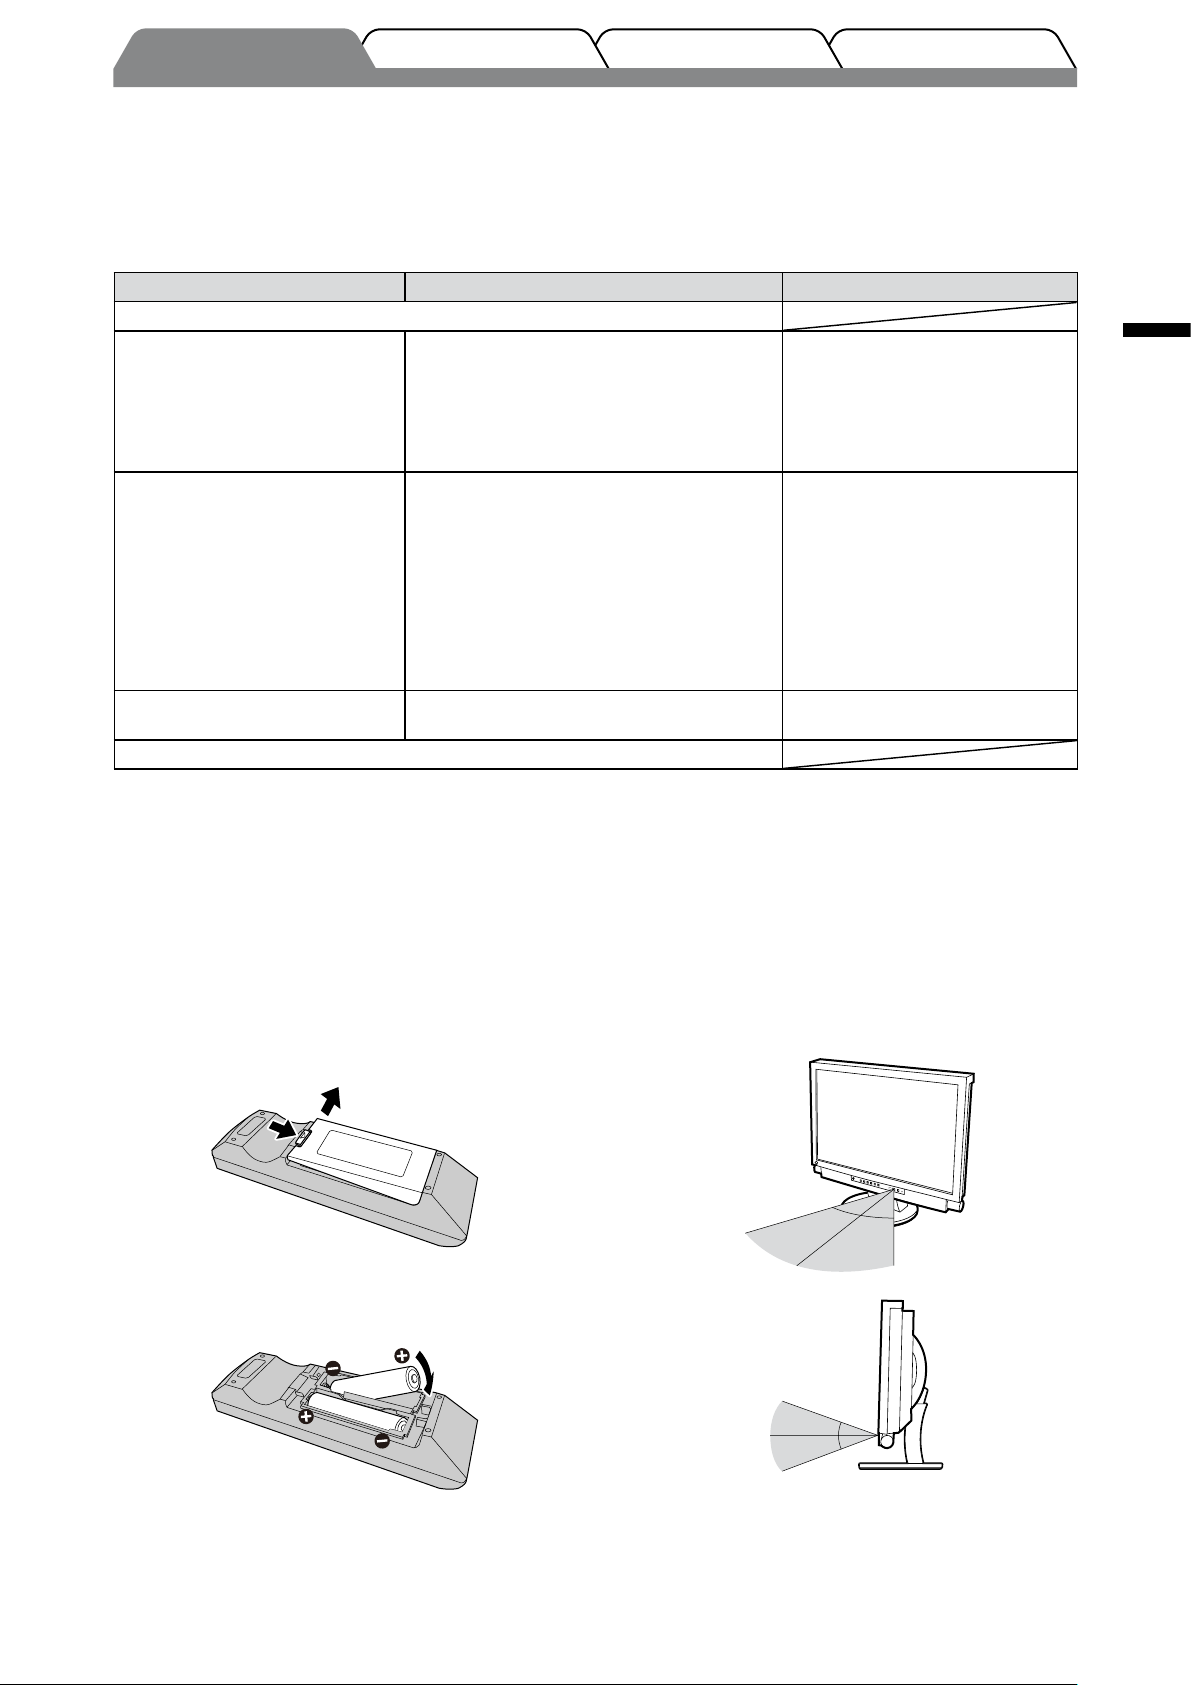
Before Using Remote Control
●
How to install batteries
1. On the back of the remote control, press the
knob to unlock, and remove the cover.
2. Input AA batteries, and slide the cover back.
● Receivable Range of Remote Control
Use the remote control inside of the range as below.
5
Page 8
English
5 6 7 8 9 10 11
22
4
3
12
13 14
16 17
15
20
19
18
2121
ScreenManager
®
Color
Sound
PowerManager™
Monitor Settings
Information
[ENTER]: Enter
: Select
1 2
23
TroubleshootingSetting/AdjustmentInstallationPrior to use
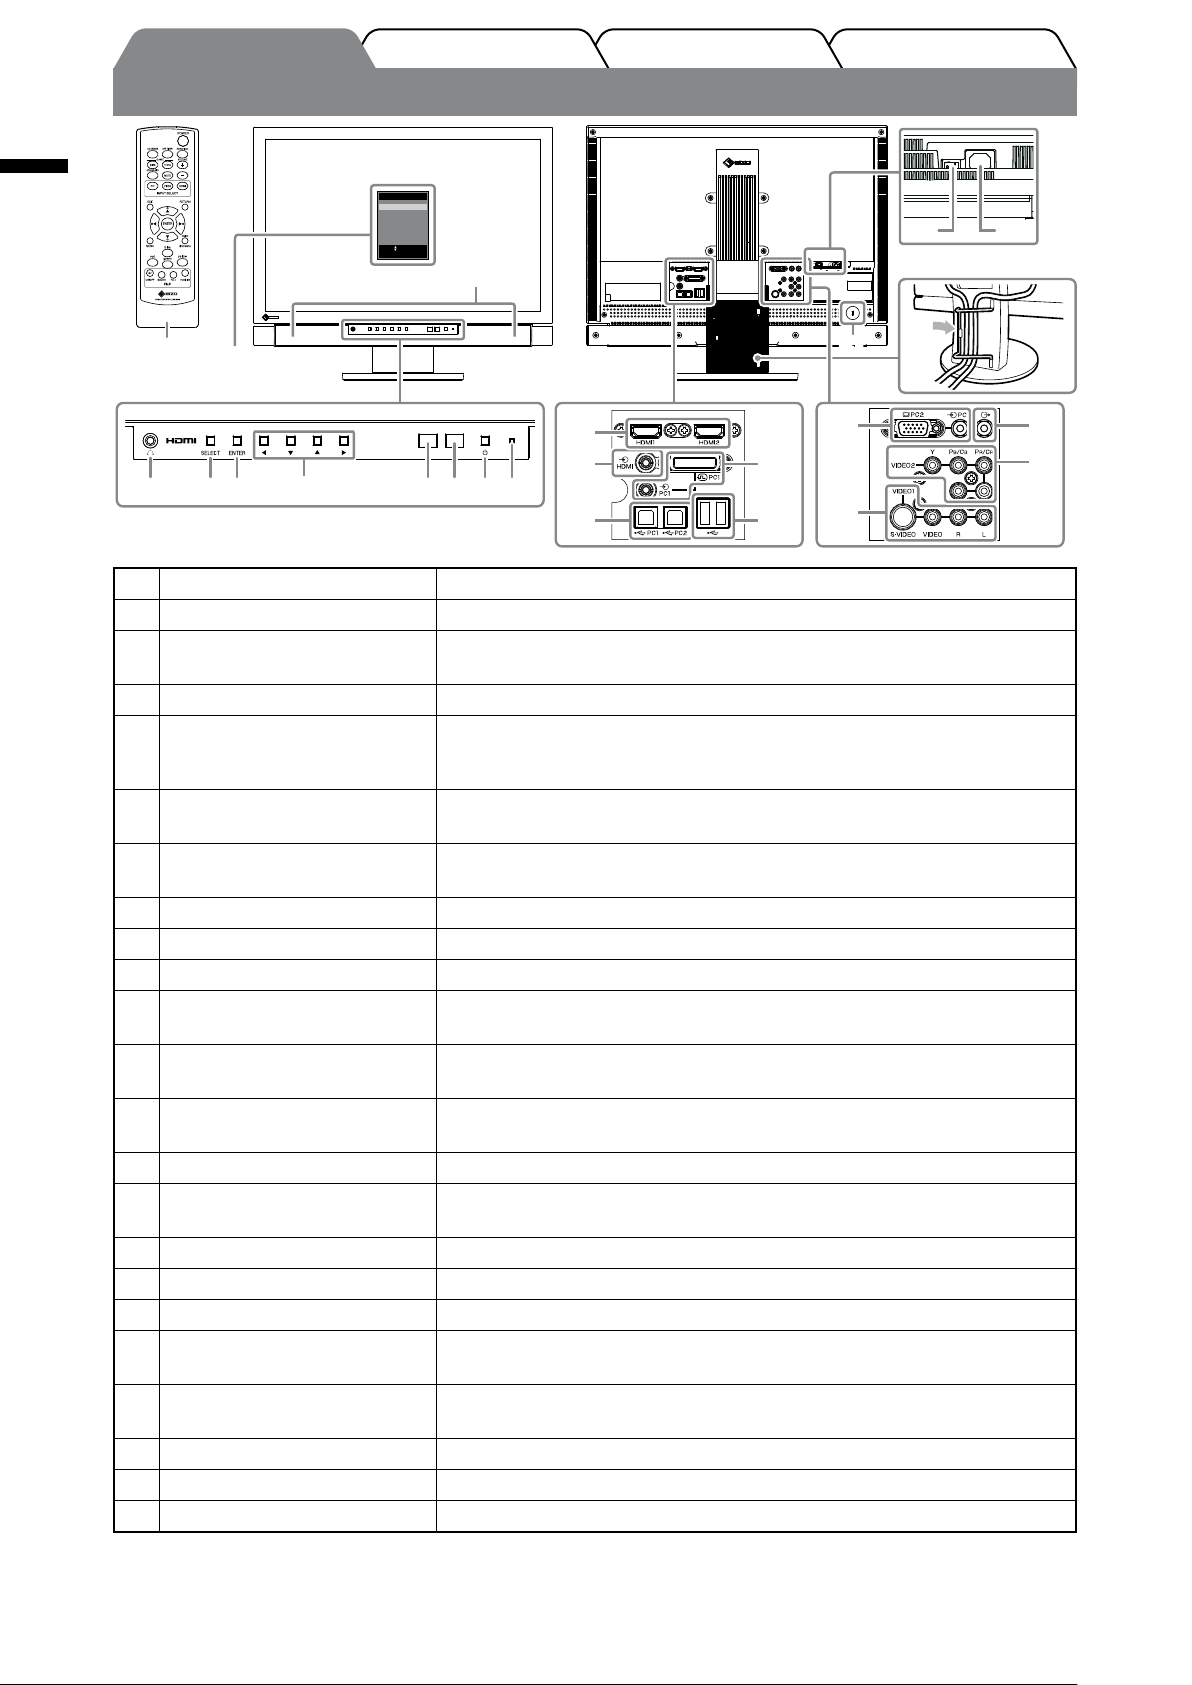
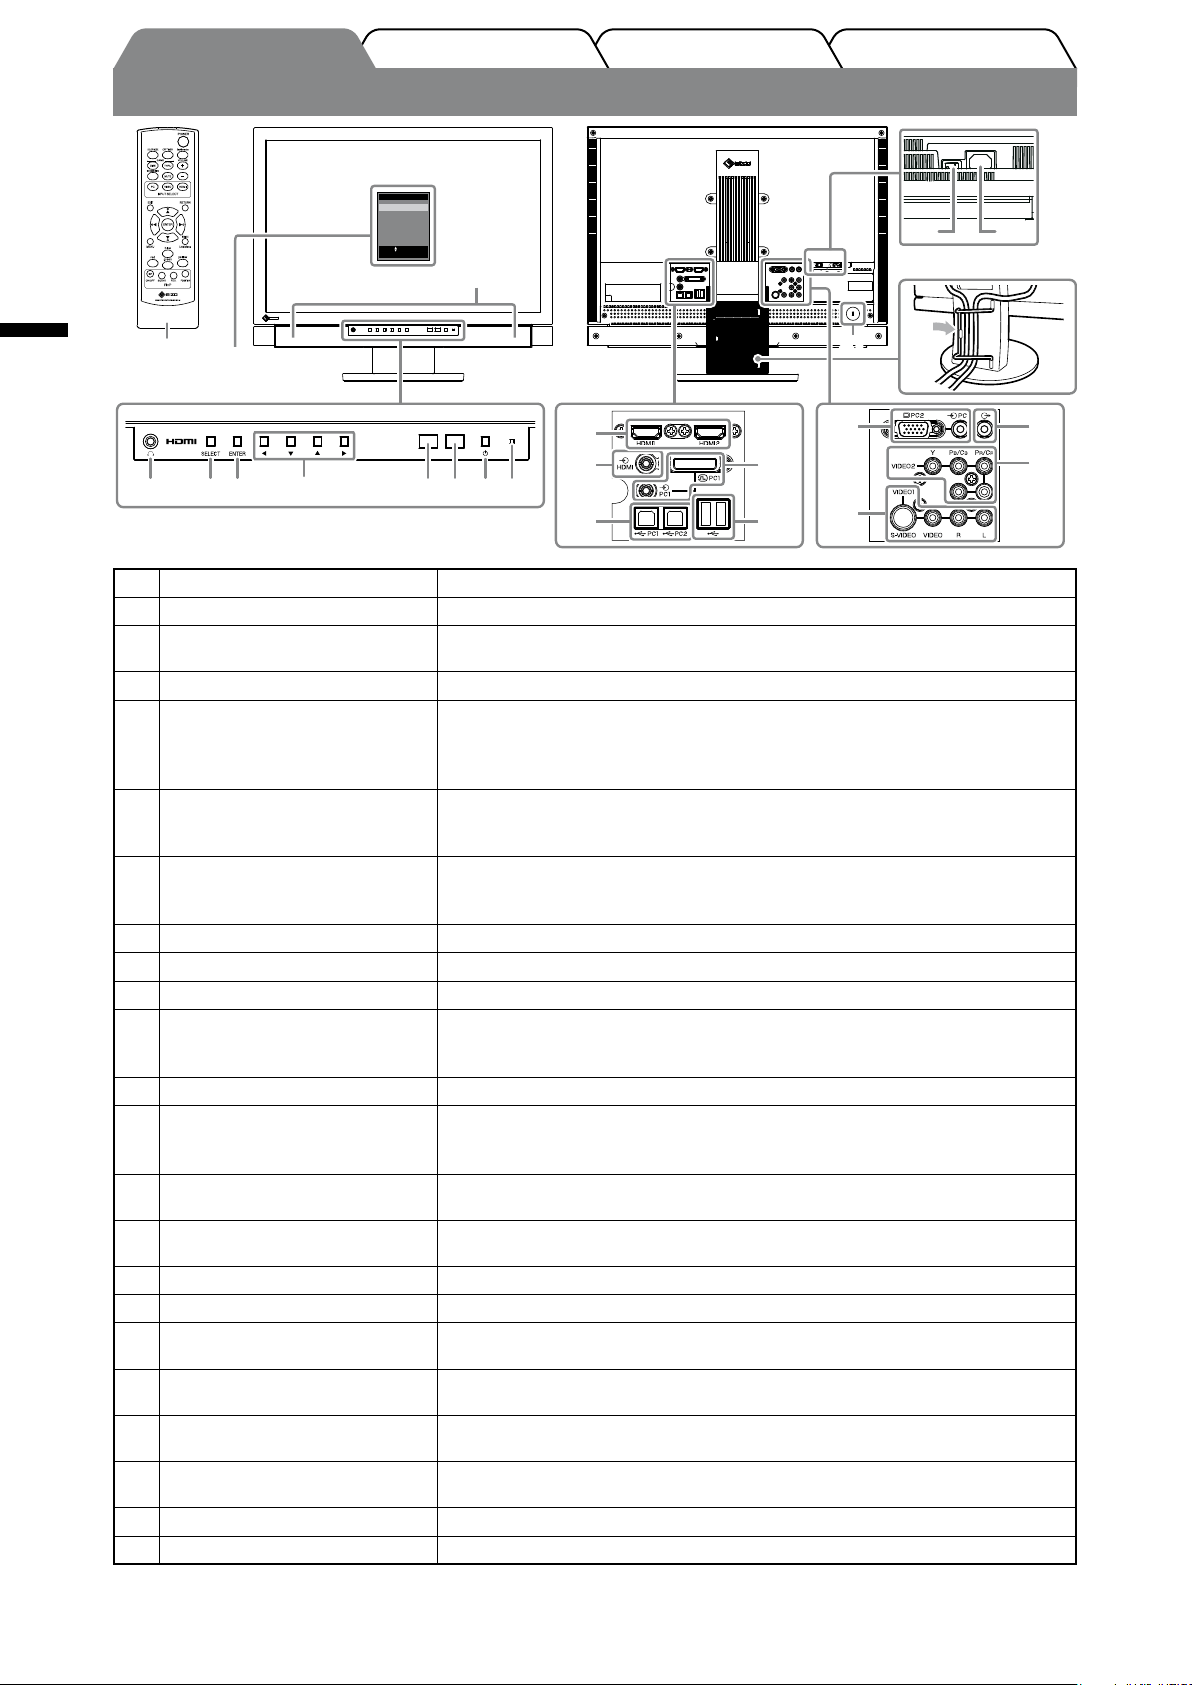
Controls and Functions
Cabling
Setting menu
®
1
(ScreenManager
1 Main Power Switch Turns the main power on or off.
2 Power connector Connects the power cord.
3 Remote control Using the remote control, operation, settings and adjustments of the monitor
4 Headphone jack [Stereo mini jack] Connects headphones.
5 Select button (SELECT) • Displays “SELECT” menu.
6 Enter button (ENTER) Displays the Setting menu, xes the setting or adjustment items on each
7 Control buttons
(t qp u)
8 Sensor Detects the environmental brightness. Auto EcoView function (see page 15).
9 Remote control detector Receives the signal from the remote control.
10 Power button Turns the power on or off.
11 Power indicator Indicates monitor’s operation status.
12 Input signal connectors
(HDMI1 / HDMI2)
13 Audio input connector
(“Analog Sound”)
14 Input signal connector (PC1) [Video : DVI-D connector, Audio : Stereo mini jack] Connects a PC.
15 Input signal connector (PC2) [Video : D-Sub mini 15-pin connector, Audio : Stereo mini jack]
16 USB ports (Up) [Upstream × 2] Connects a PC.
17 USB ports (Down) [Downstream × 2] Connects a peripheral USB device.
18 Audio output connector [Stereo mini jack] Connects audio devices.
19 Input signal connector
(VIDEO1)
20 Input signal connector
(VIDEO2)
21 Security lock slot Complies with Kensington’s MicroSaver security system.
22 Cable holder Covers the monitor cables.
23 Speaker Outputs audio source.
*1 ScreenManager ® is an EIZO’s nickname of the Setting menu. For how to use ScreenManager, refer to the User’s Manual on the
CD-ROM.
6
*
)
can be performed.
• Each time you press the button, the content of the menu changes.
(You can adjust the volume and change the input signal in “SELECT” menu.)
menu, and saves the setting or adjustment results.
Used to select the setting or adjustment items, or to increase or decrease the
adjustment values on each menu.
Blue : Operating Orange : Power saving Off : Power off
[HDMI connector
× 2] Connects AV device or PC.
[Stereo mini jack] For HDMI input, used to input the audio signal from
connectors other than the HDMI connector.
Connects a PC.
[Video : S-Video/Video input connector, Audio : Pin jack]
Connects AV device.
[Video : Component video input connector, Audio : Pin jack]
Connects AV device.
Page 9
TroubleshootingSetting/AdjustmentPrior to use Installation
Connecting Cables
Connect each device.
1
• Connect a PC ............................................See below
• Connect a USB device .................................Page 10
• Connect an AV device .................................. Page 11
• Connect an audio device .............................Page 12
●
Connect a PC
Attention
• When replacing the current monitor with an FX2431 monitor, be sure to change the PC settings for
resolution and vertical frequency to those which are available for the FX2431 monitor referring to the
resolution table (see page 3) before connecting the PC.
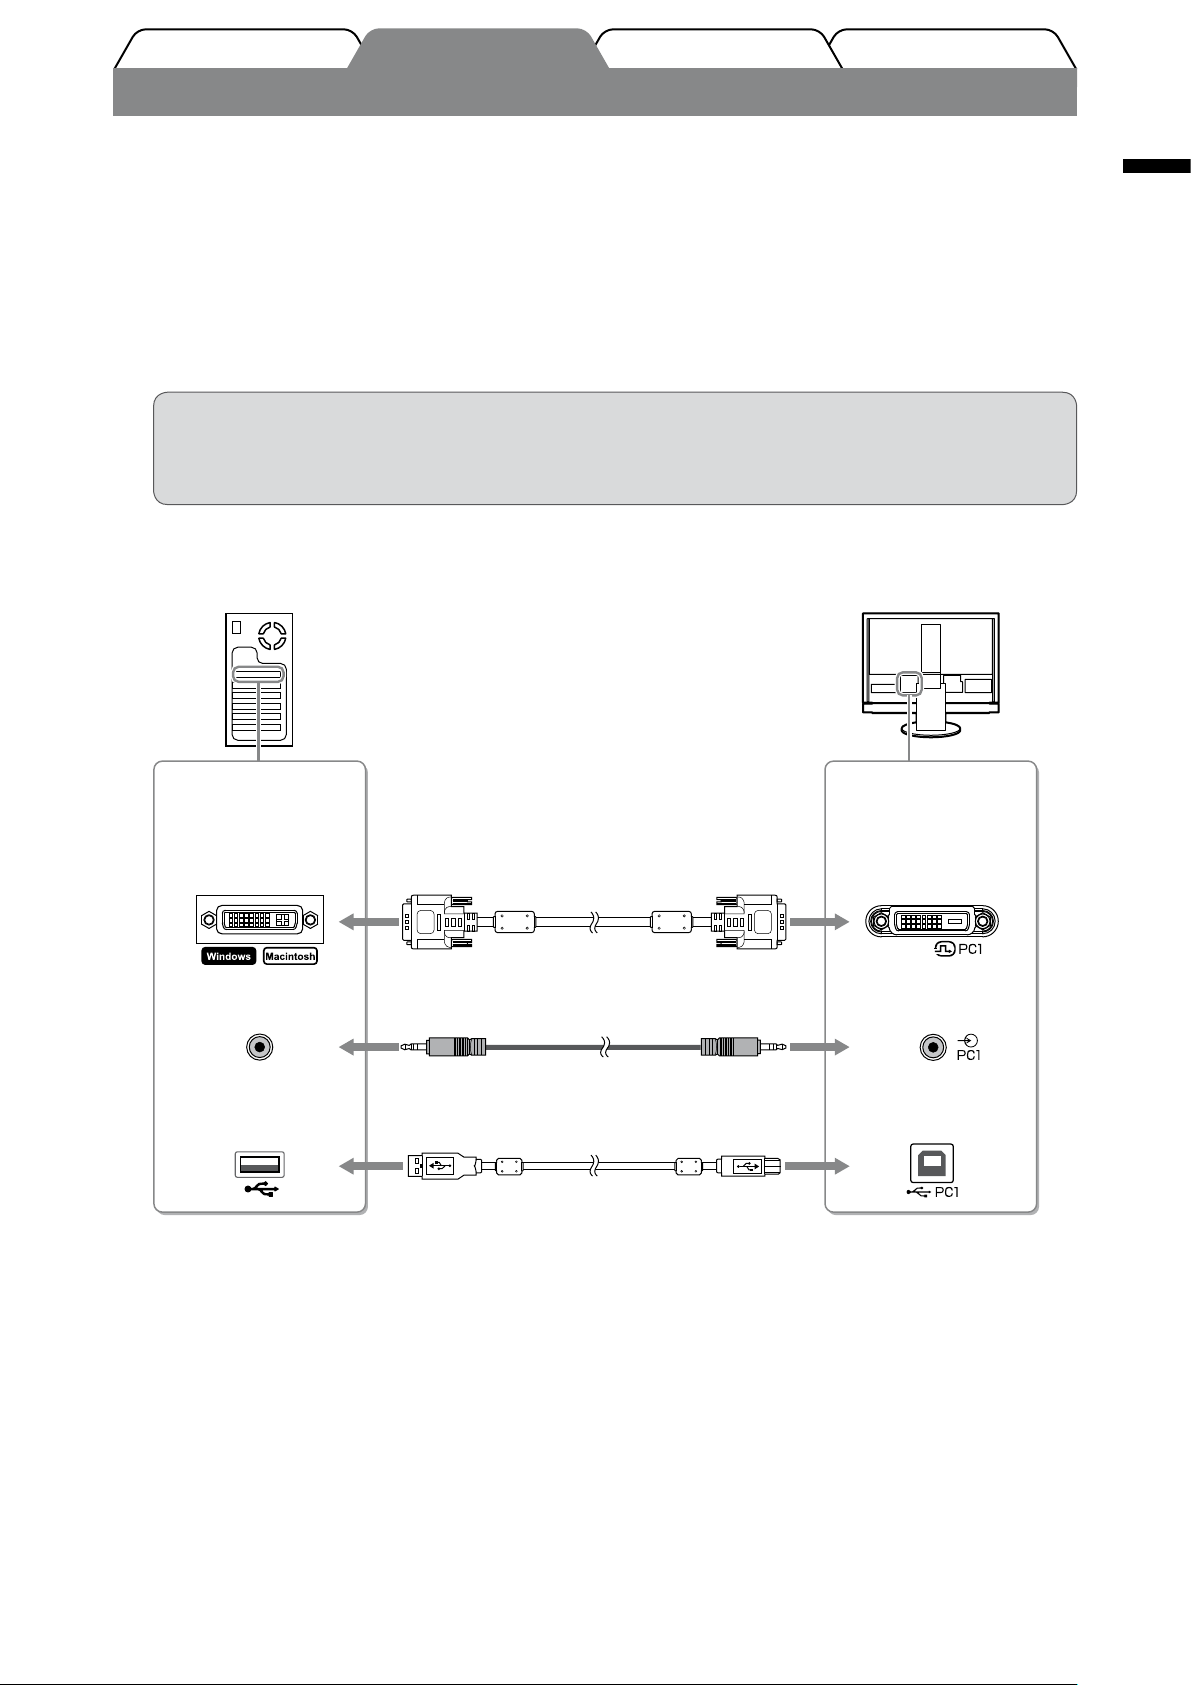
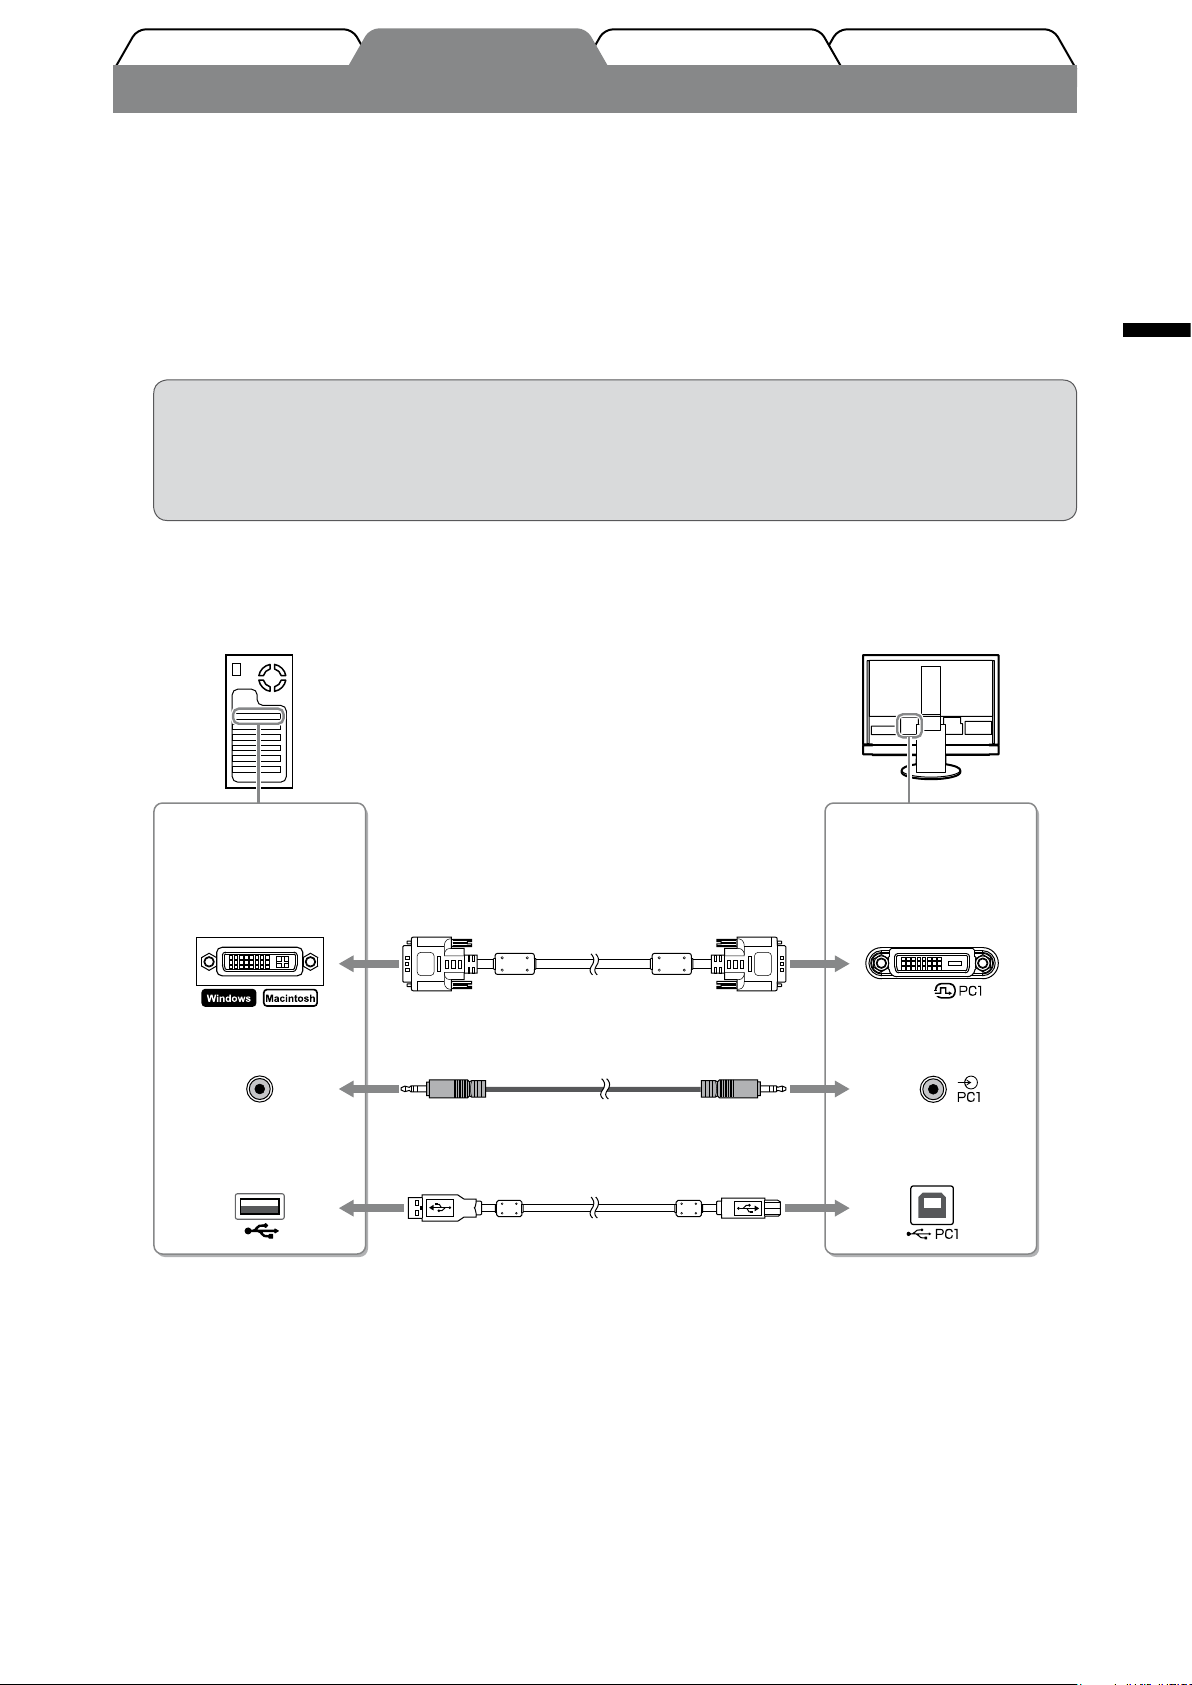
1. Connect the monitor to the PC with a signal cable that matches the connectors.
After connecting the cable connectors, tighten the screws of the connectors to secure the coupling.
• When connecting to PC1 input (digital signal connection)
English
Connectors on the
PC
DVI connector
Audio output
connector
USB
Downstream
Signal cable FD-C39 (supplied)
1
Audio cable
(stereo mini jack to stereo mini jack)
USB cable MD-C93 (supplied)
1
*
Please purchase the cable.
2
*
When connecting two PCs to the monitor,
please purchase another cable.
*
2
*
Connectors on the
monitor
DVI-D connector
Audio input
connector
USB
Upstream
7
Page 10
English
TroubleshootingSetting/AdjustmentPrior to use Installation
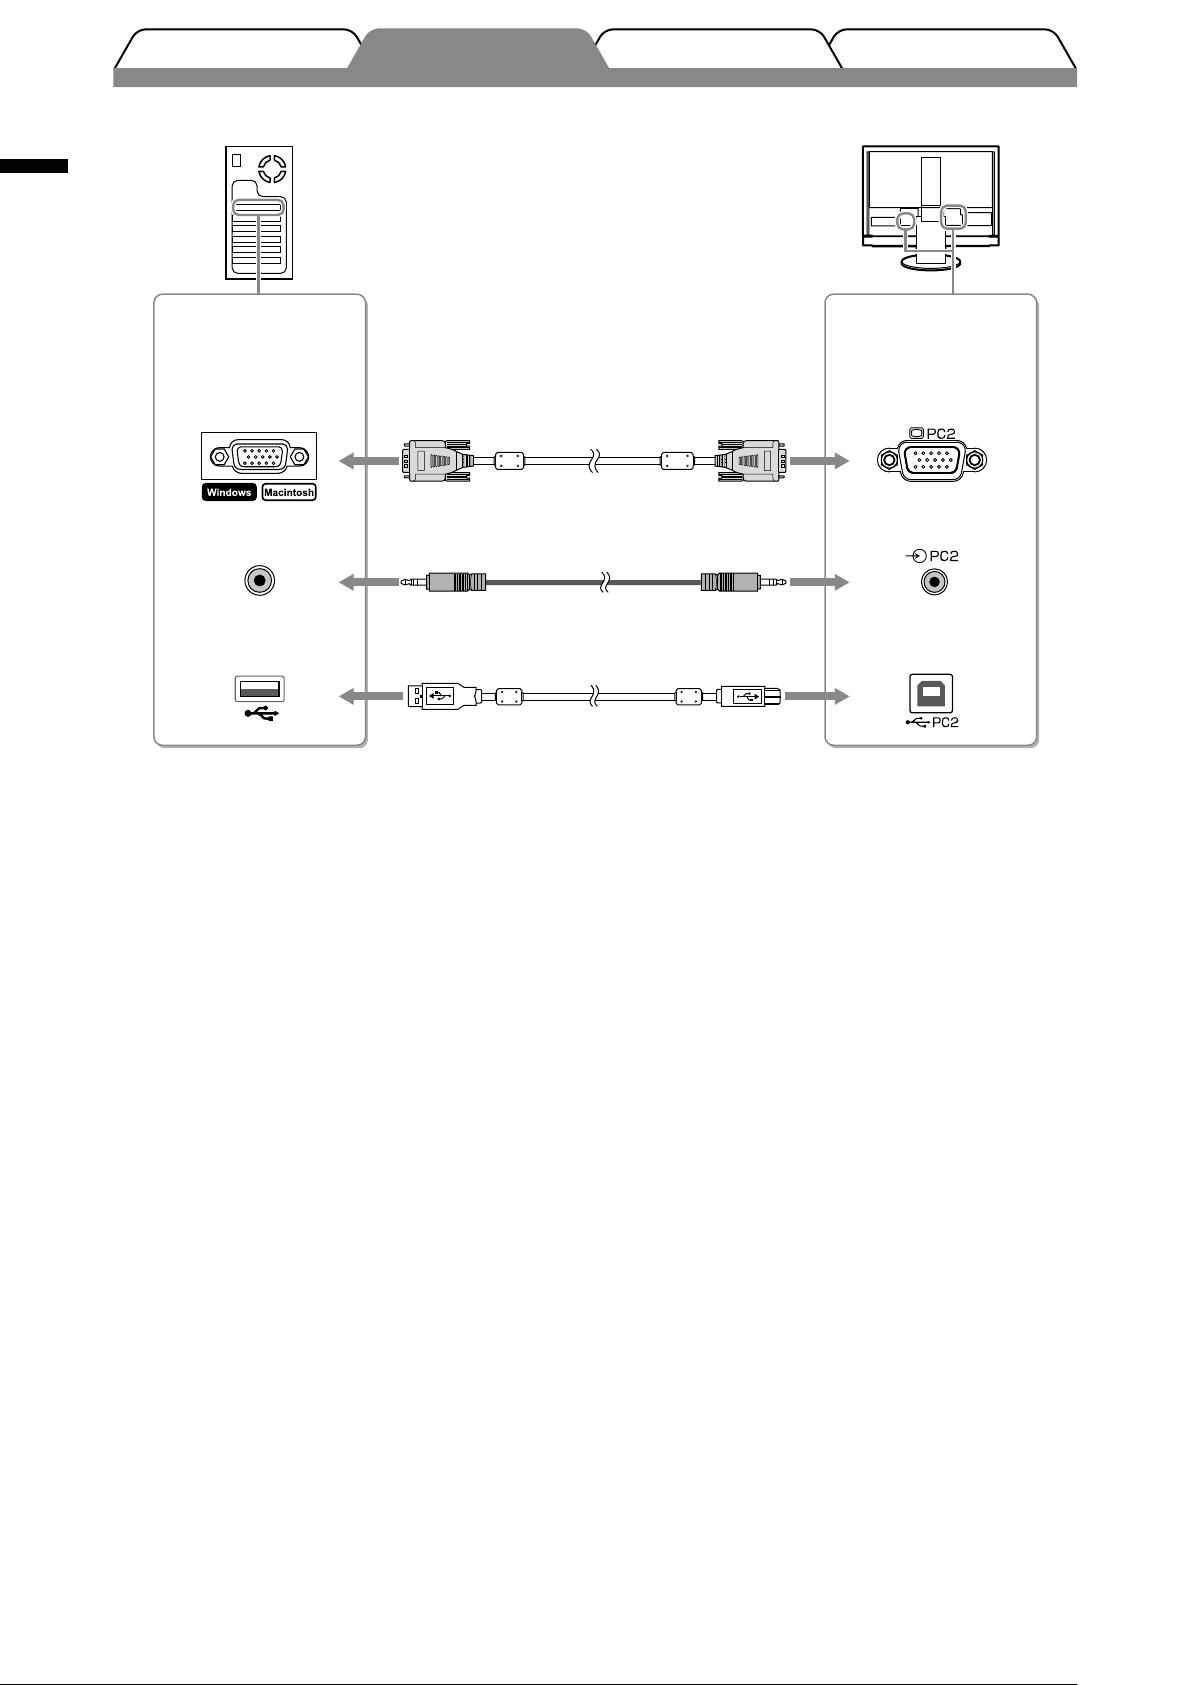
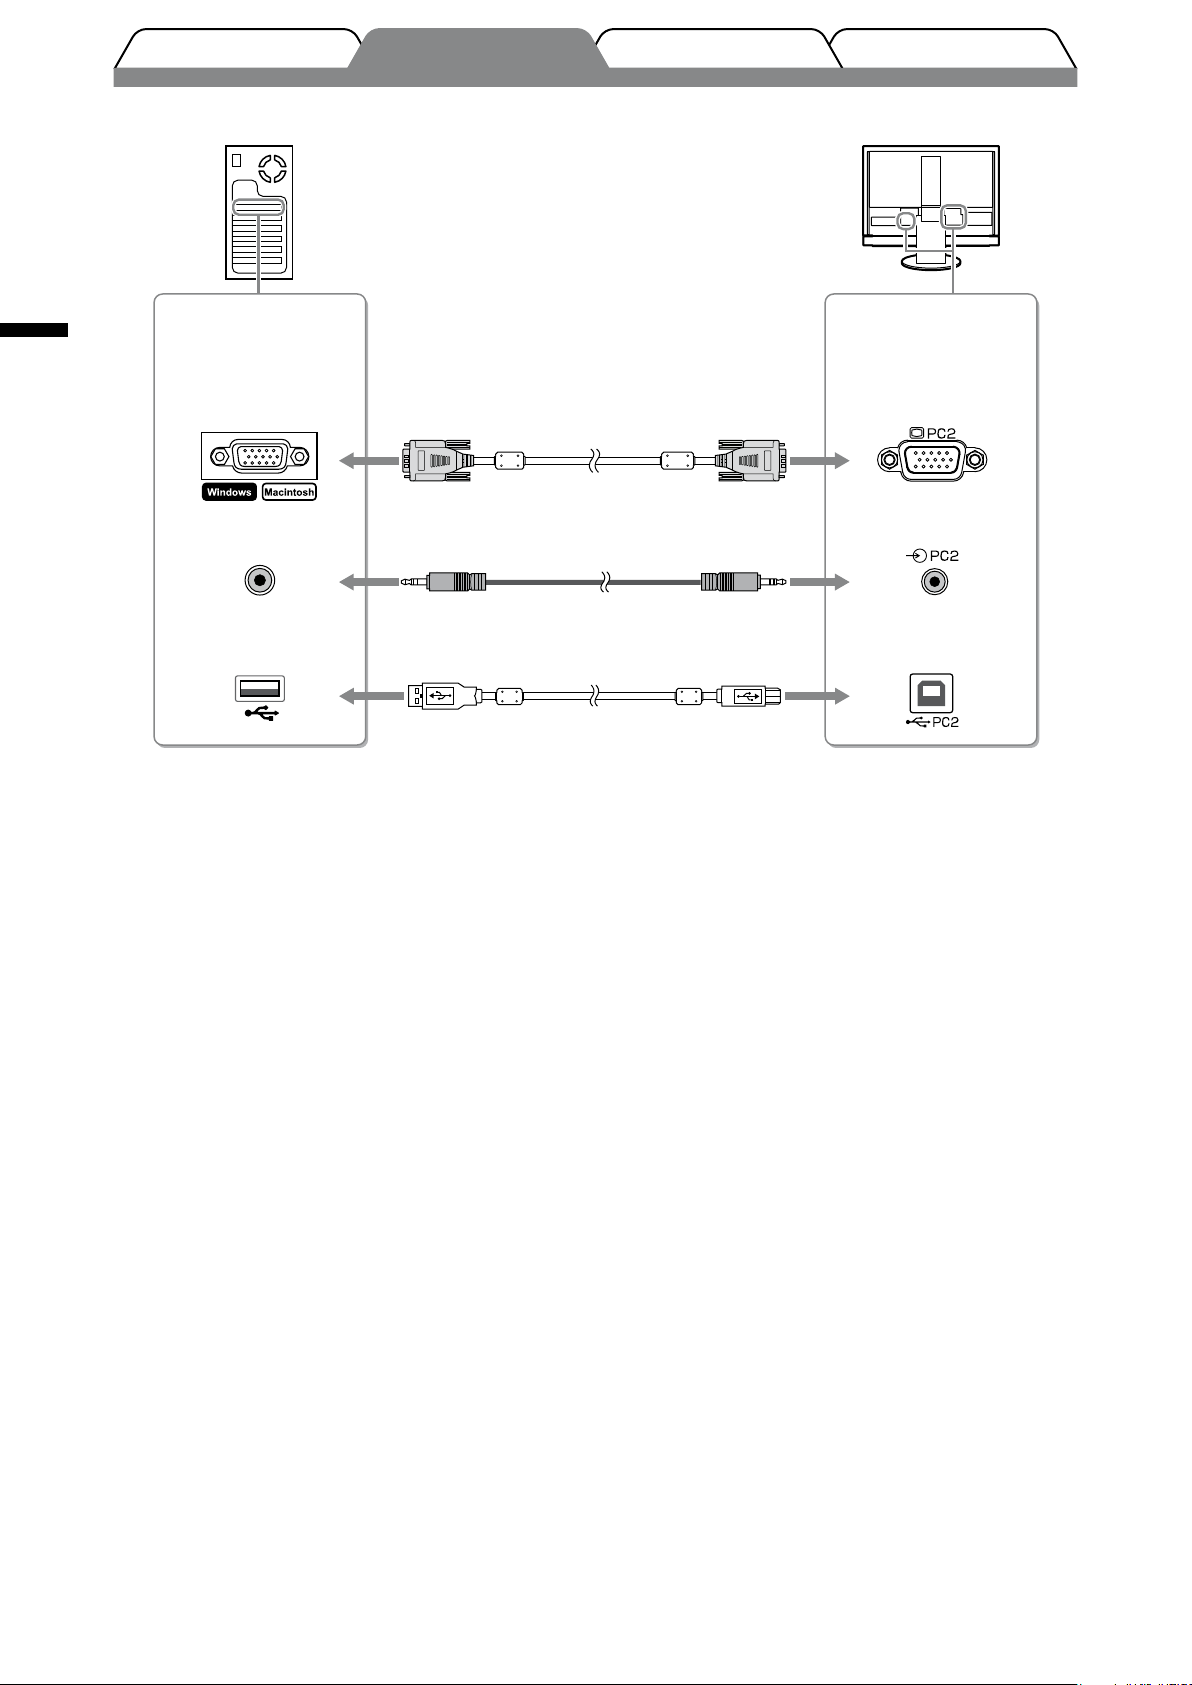
• When connecting to PC2 input (analog signal connection)
Connectors on the
PC
D-Sub mini 15-pin
connector
Audio output
connector
USB
Downstream
Signal cable MD-C87 (supplied)
1
Audio cable
*
(stereo mini jack to stereo mini jack)
2
USB cable MD-C93 (supplied)
1
*
Please purchase the cable.
2
*
When connecting two PCs to the monitor,
please purchase another cable.
*
Connectors on the
monitor
D-Sub mini 15-pin
connector
Audio input
connector
USB
Upstream
8
Page 11
TroubleshootingSetting/AdjustmentPrior to use Installation
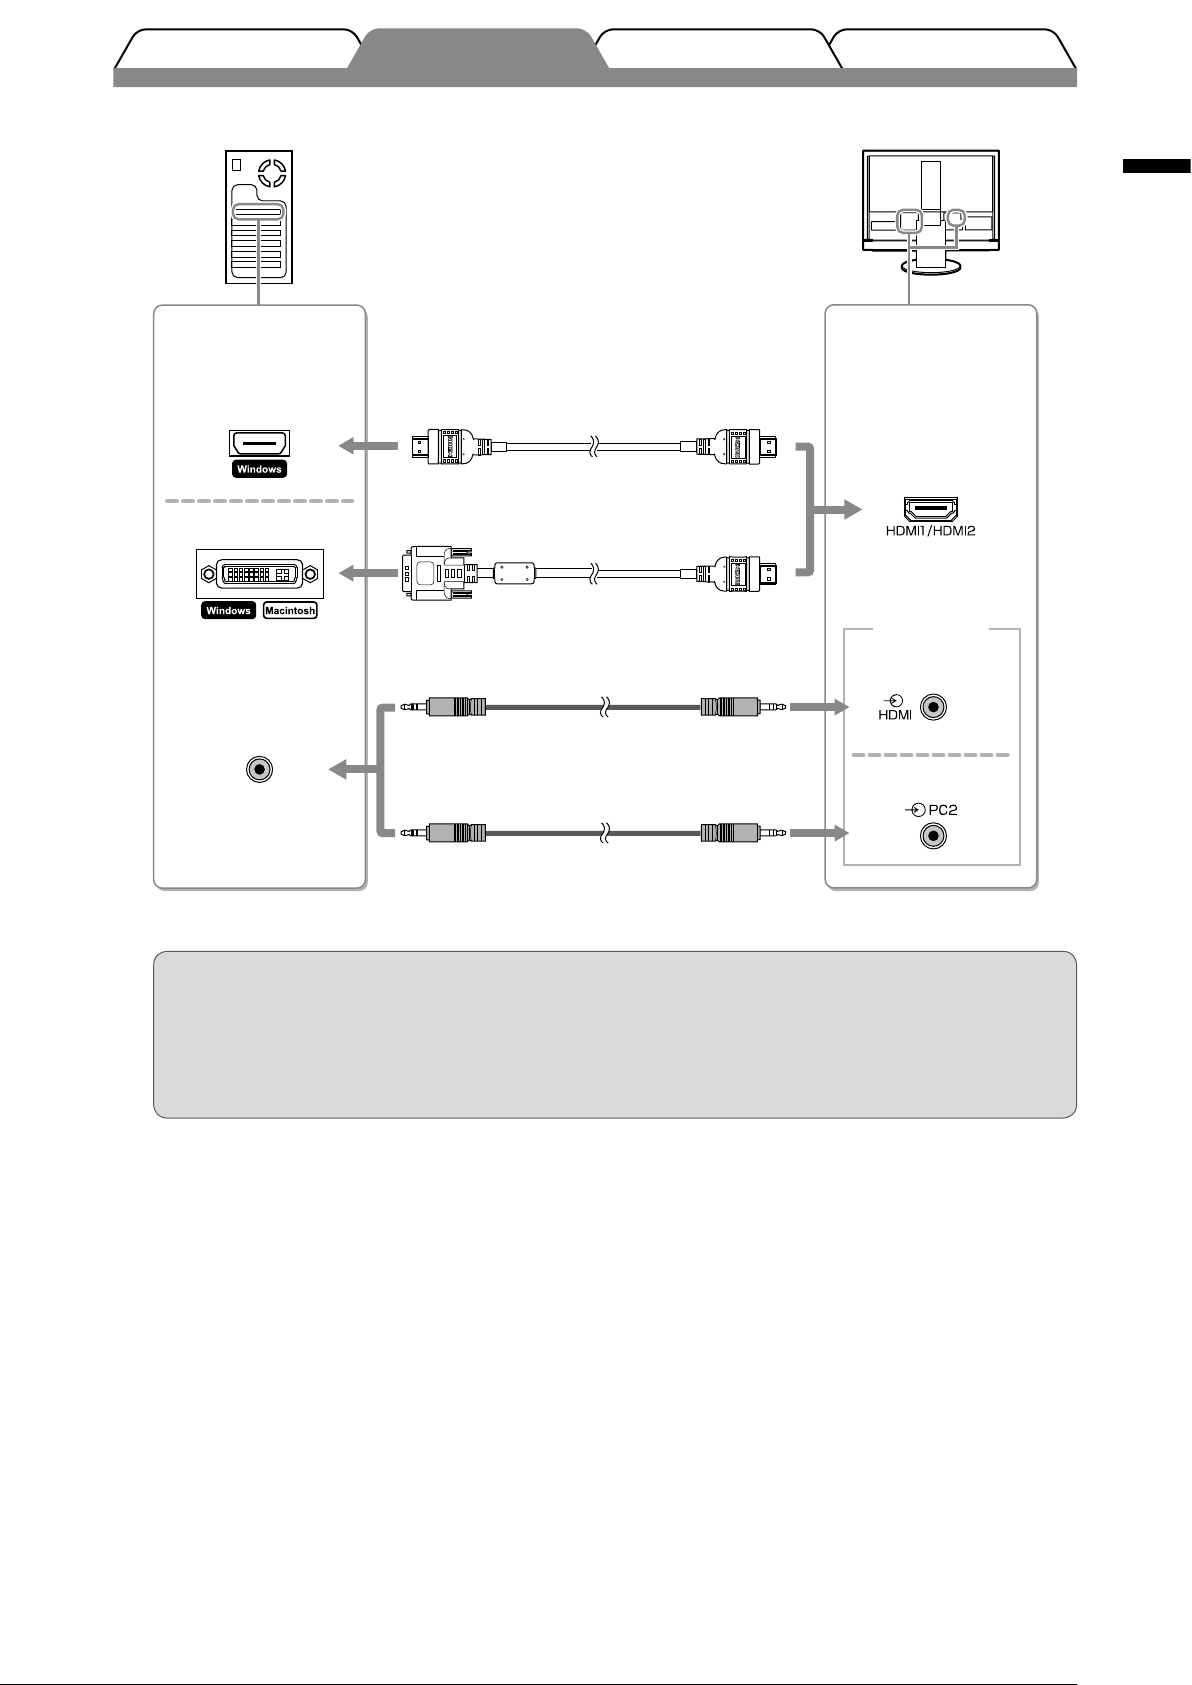
• When connecting HDMI1 input / HDMI2 input (digital signal connection)
English
Connectors on the
PC
HDMI connector
DVI connector
Audio output
connector
1
HDMI cable
DVI-HDMI converter cable
Audio cable
*
1
*
1
*
(stereo mini jack to stereo mini jack)
1
Audio cable
*
(stereo mini jack to stereo mini jack)
Connectors on the
monitor
HDMI connector
Audio input
connector
(“Analog Sound”)
(“PC2 Sound”)
1
*
Please purchase the cable.
Attention
• Please note the following when connecting the PC to HDMI input.
- After setting “PC” to [Input Format] of the Setting menu, start the PC.
- Set the connector (“Analog Sound” or “PC2 Sound”) from which the sound of the PC is input in [Sound Input
Jack] of the Setting menu.
For details, refer to the User’s Manual on the “EIZO LCD Utility Disk” (CD-ROM).
9
Page 12
●
TroubleshootingSetting/AdjustmentPrior to use Installation
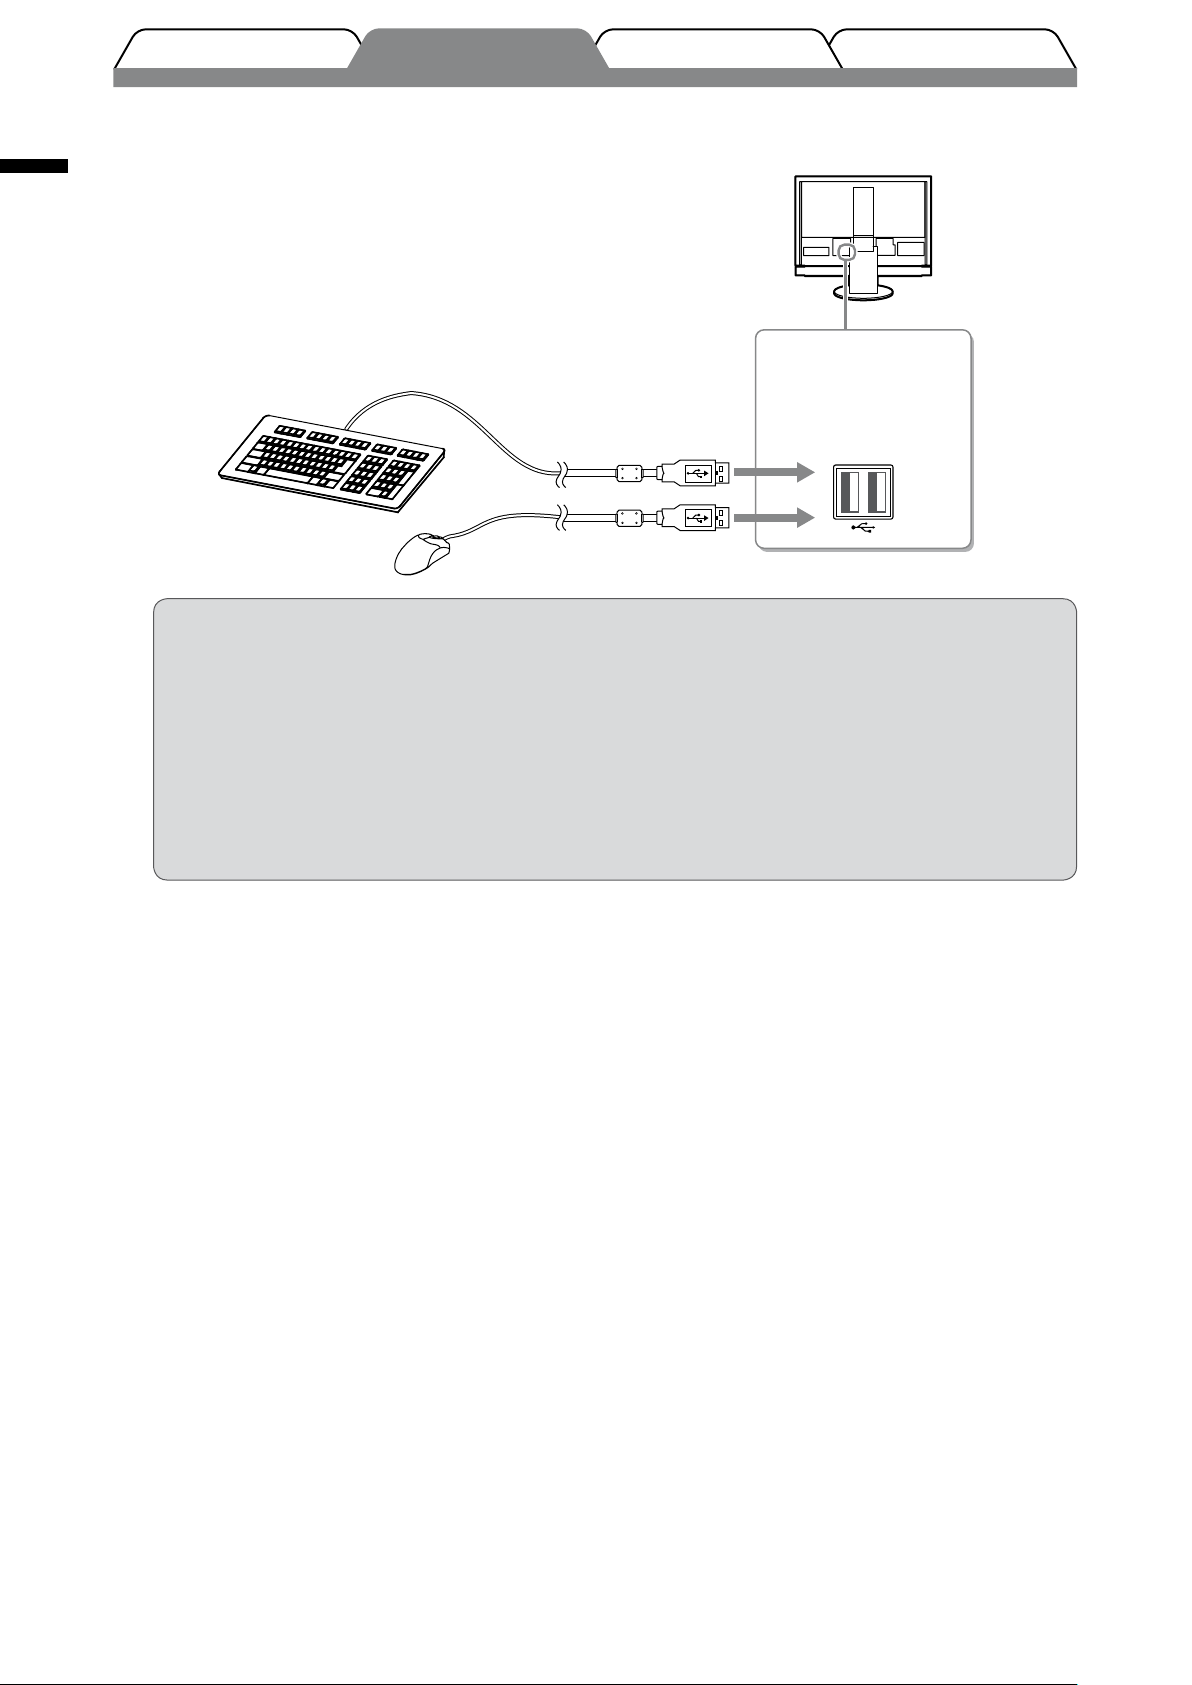
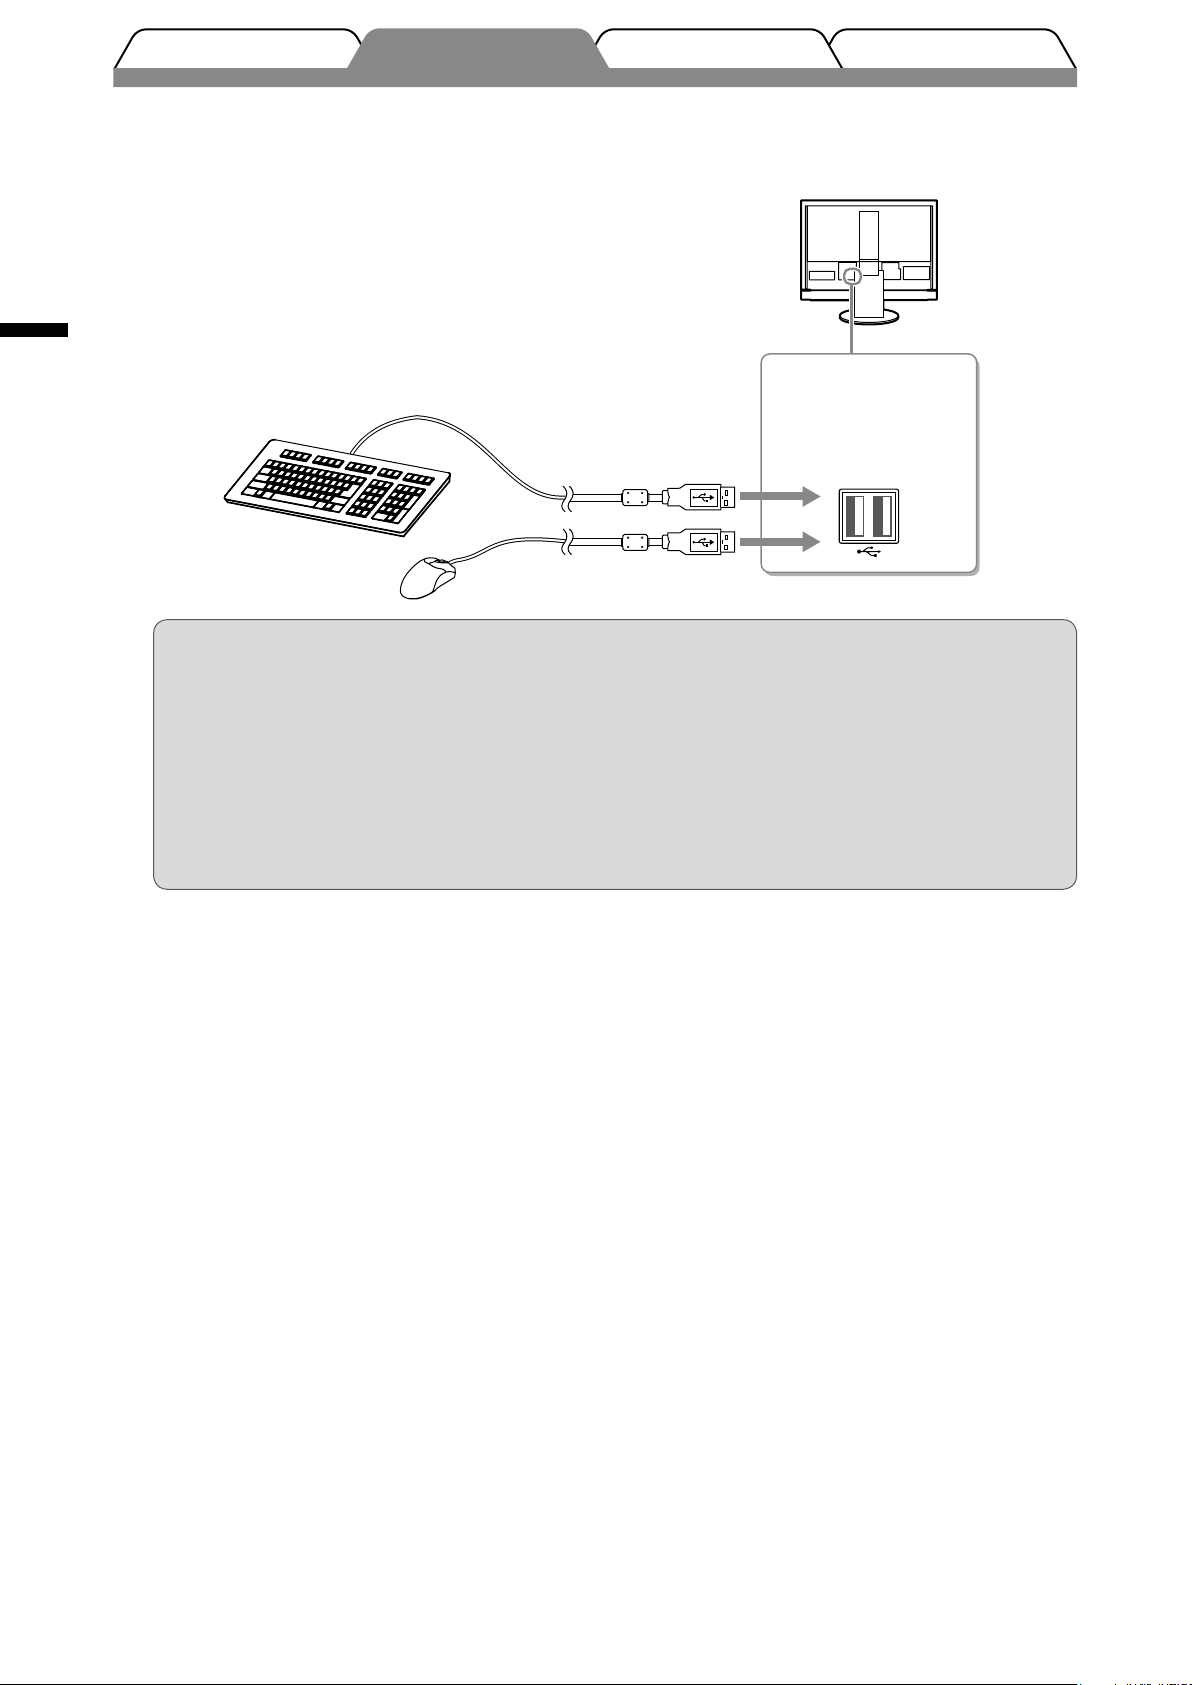
Connect a USB device
English
1. Connect USB devices (keyboard, mouse, etc.) to the USB port (downstream) on the monitor.
Connectors on the
monitor
USB
Downstream
Keyboard
Mouse
Attention
• After connecting the USB devices and turning on the monitor, the USB function is set up
automatically.
• This monitor may not work properly depending on the PC, OS or USB devices used. (For USB
compliance of the respective devices, consult their manufacturers.)
• USB device does not work when the main power switch of the monitor is off.
NOTE
• The PC (PC1 or PC2) on which the USB devices work switches automatically in conjunction with input signal
switching. The PC on which the USB devices work can also be specied. For details, refer to the User’s Manual
on the “EIZO LCD Utility Disk” (CD-ROM).
10
Page 13
●
TroubleshootingSetting/AdjustmentPrior to use Installation
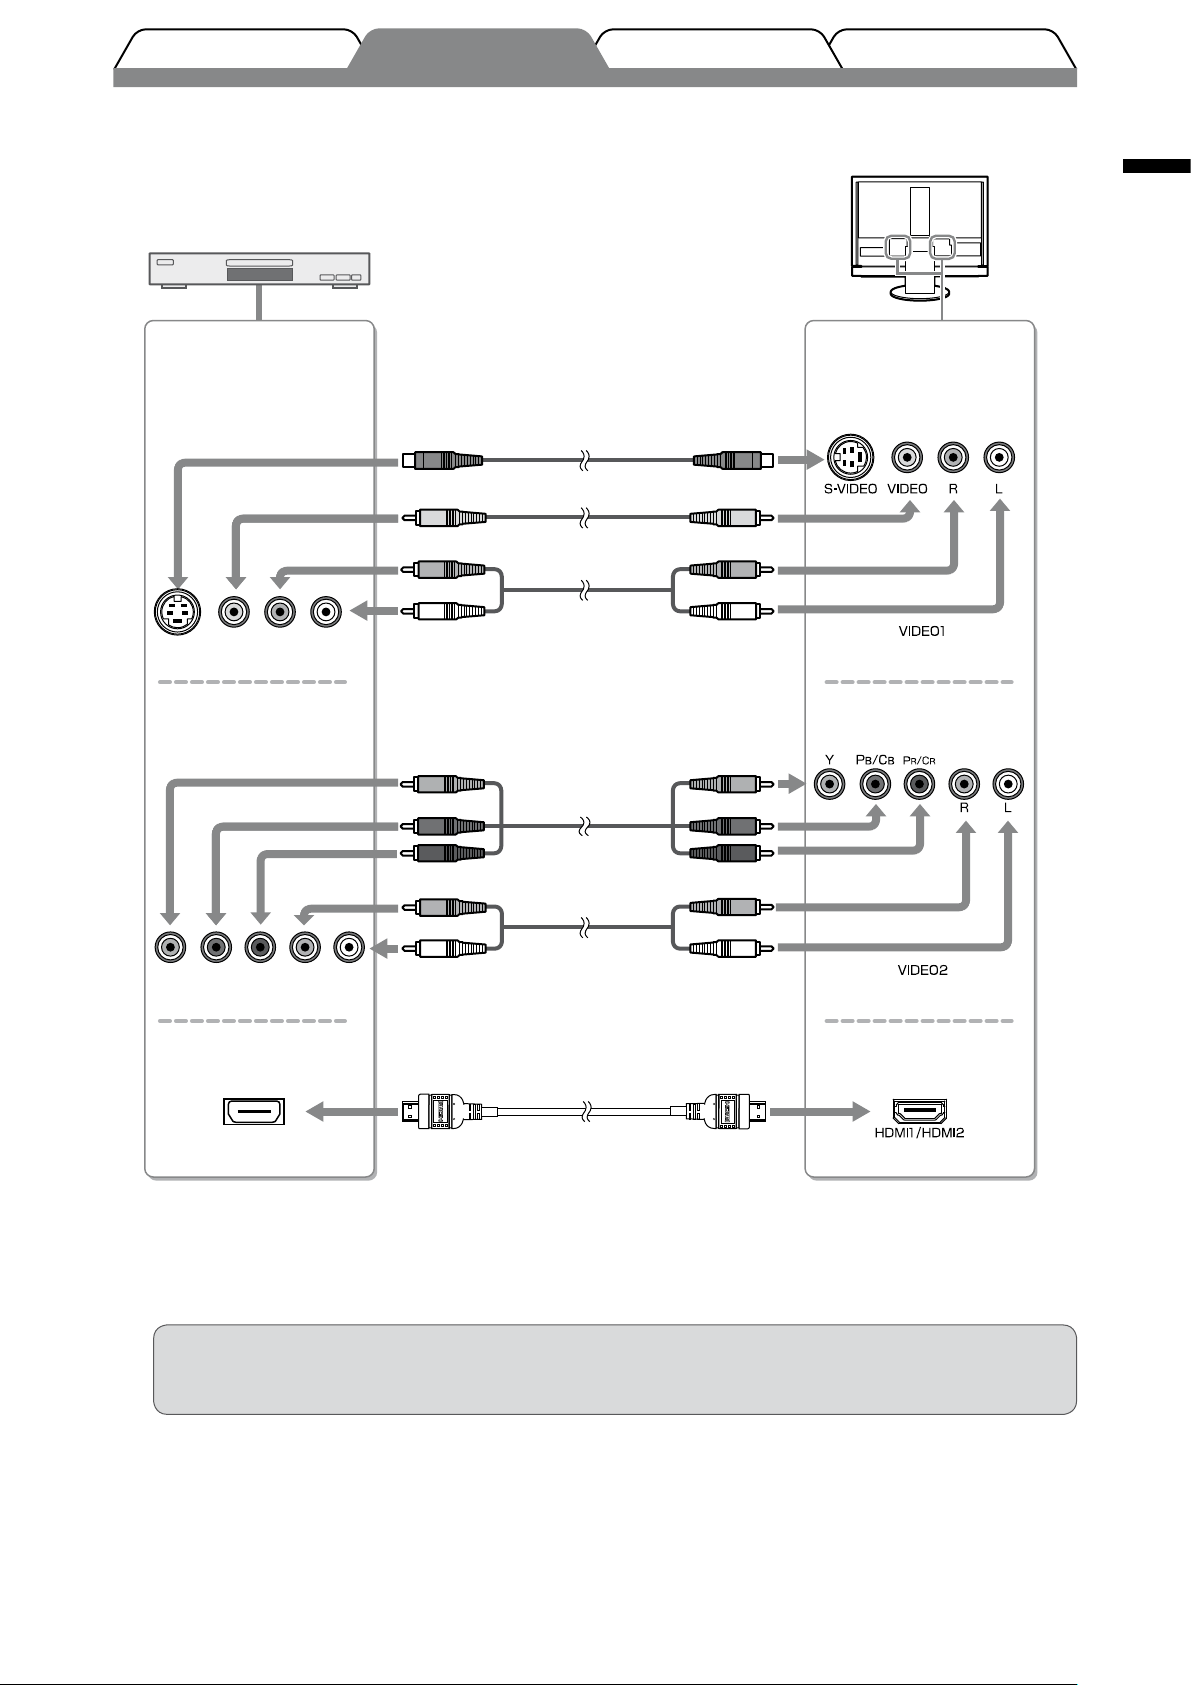
Connect an AV device
1. Connect the monitor to the AV device with a signal cable that matches the connectors.
Connectors on the
AV device
S-Video cable
*1 *
2
Connectors on the
monitor
or
2
Video cable
Audio cable
VideoS-Video
R L
(pin jack to pin jack)
Component video cable
*1 *
*
1
Component video
1
*
English
1
*
3
*1*
1
*
Please purchase the cable.
2
*
Use either cable to connect the monitor and the AV
device.
3
*
Please use the cable on which “High Speed HDMI
Cable” is written.
HDMI connector
Component video
HDMI connector
R L
Audio cable
(pin jack to pin jack)
HDMI cable
Attention
• When controlling the AV device connected to HDMI input of the monitor using the HDMI CEC
function, [HDMI CEC Setting] of the Setting menu is required to be set (see page 16).
TM
11
Page 14

English
TroubleshootingSetting/AdjustmentPrior to use Installation
●
Connect an audio device
1. Connect the monitor to the audio device with an audio cable that matches the connectors.
Connector on the
monitor
1
Audio cable
(stereo mini jack to pin jack)
Audio output
connector
Attention
• When using the audio device, set the volume of the monitor to “0”. Adjust the volume and sound on
the audio device.
NOTE
• When using headphones, connect the
headphones to the headphone jack on
the monitor.
Audio cable
(stereo mini jack to stereo mini jack)
1
*
Please purchase the cable.
*
1
*
Headphone
Headphone jack
Connectors on the
audio device
Audio input
connector
(Pin jack)
R L
(Stereo mini jack)
Plug the power cord of the monitor into a power outlet.
2
1. Plug the power cord into a power outlet and the Power connector on the monitor.
Adjusting the Screen Height and Angle
Hold left and right edge of the monitor with both hands, and adjust the screen height, tilt and swivel the screen to the
best condition for working.
12
Page 15
Prior to use Installation TroubleshootingSetting/Adjustment
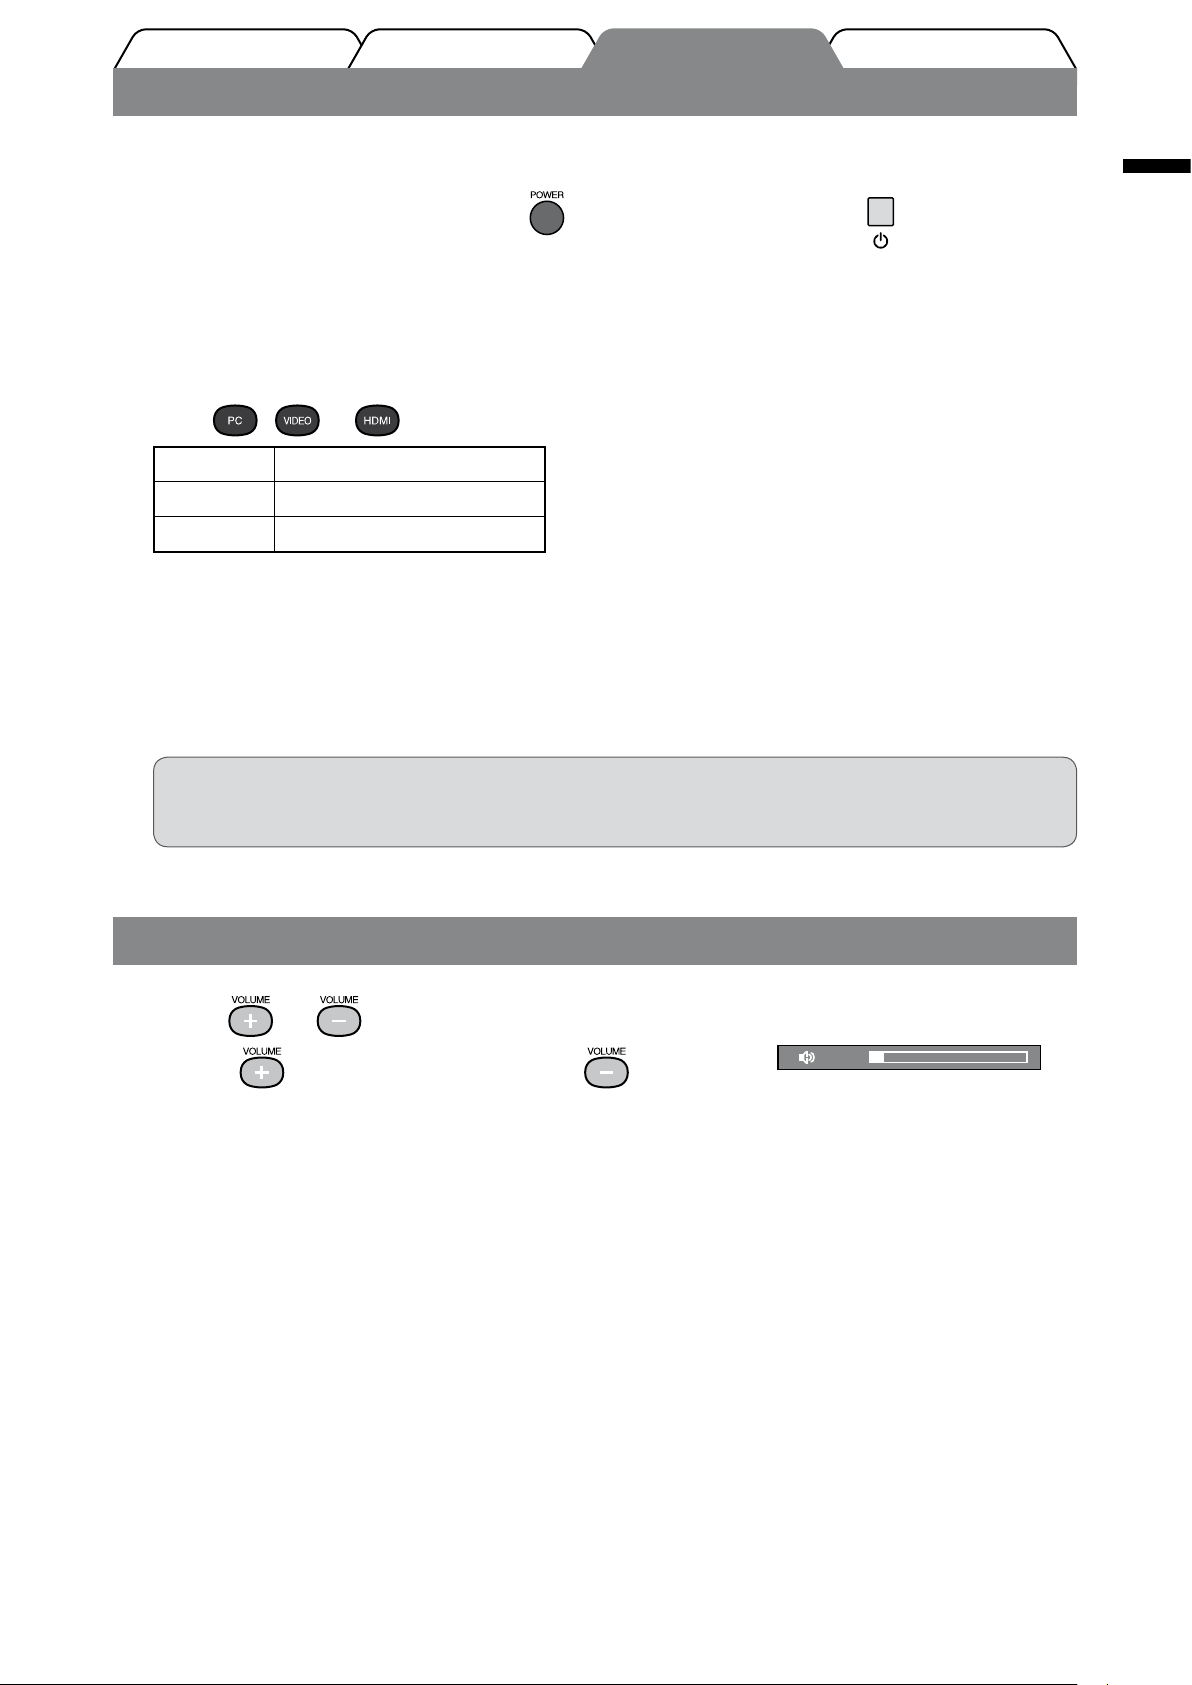
Displaying the Screen
4
Check that the main power switch of the monitor is on.
1
Turn on the monitor by pressing on the remote control (or on the
2
monitor).
The monitor’s Power indicator lights up blue.
Turn on the external device.
3
Switch the input signal to display the desired image sent from the device.
4
Press , or . Each time you press the button, the input signal switches to the other.
PC PC1
VIDEO VIDEO1
HDMI HDMI1
n When receiving an analog signal from the PC
When turning on the monitor and PC for the rst time with the analog signal, the Auto Screen Adjust
function works to adjust the clock, phase, and screen position automatically.
When digital signal is input from PC, images are displayed correctly based on the preset data of the
monitor.
PC2...
g
VIDEO2...
g
HDMI2...
g
English
Attention
• Turn off the monitor if you do not use the monitor for a long time. Unplugging the power cord
completely shuts off power supply to the monitor.
Adjusting Sound Volume
Press or on the remote control.
1
Pressing raises the volume, and pressing reduces
the volume.
Volume adjustment menu
13
Page 16
English
Prior to use Installation TroubleshootingSetting/Adjustment
Color Mode
Custom(xxxx)
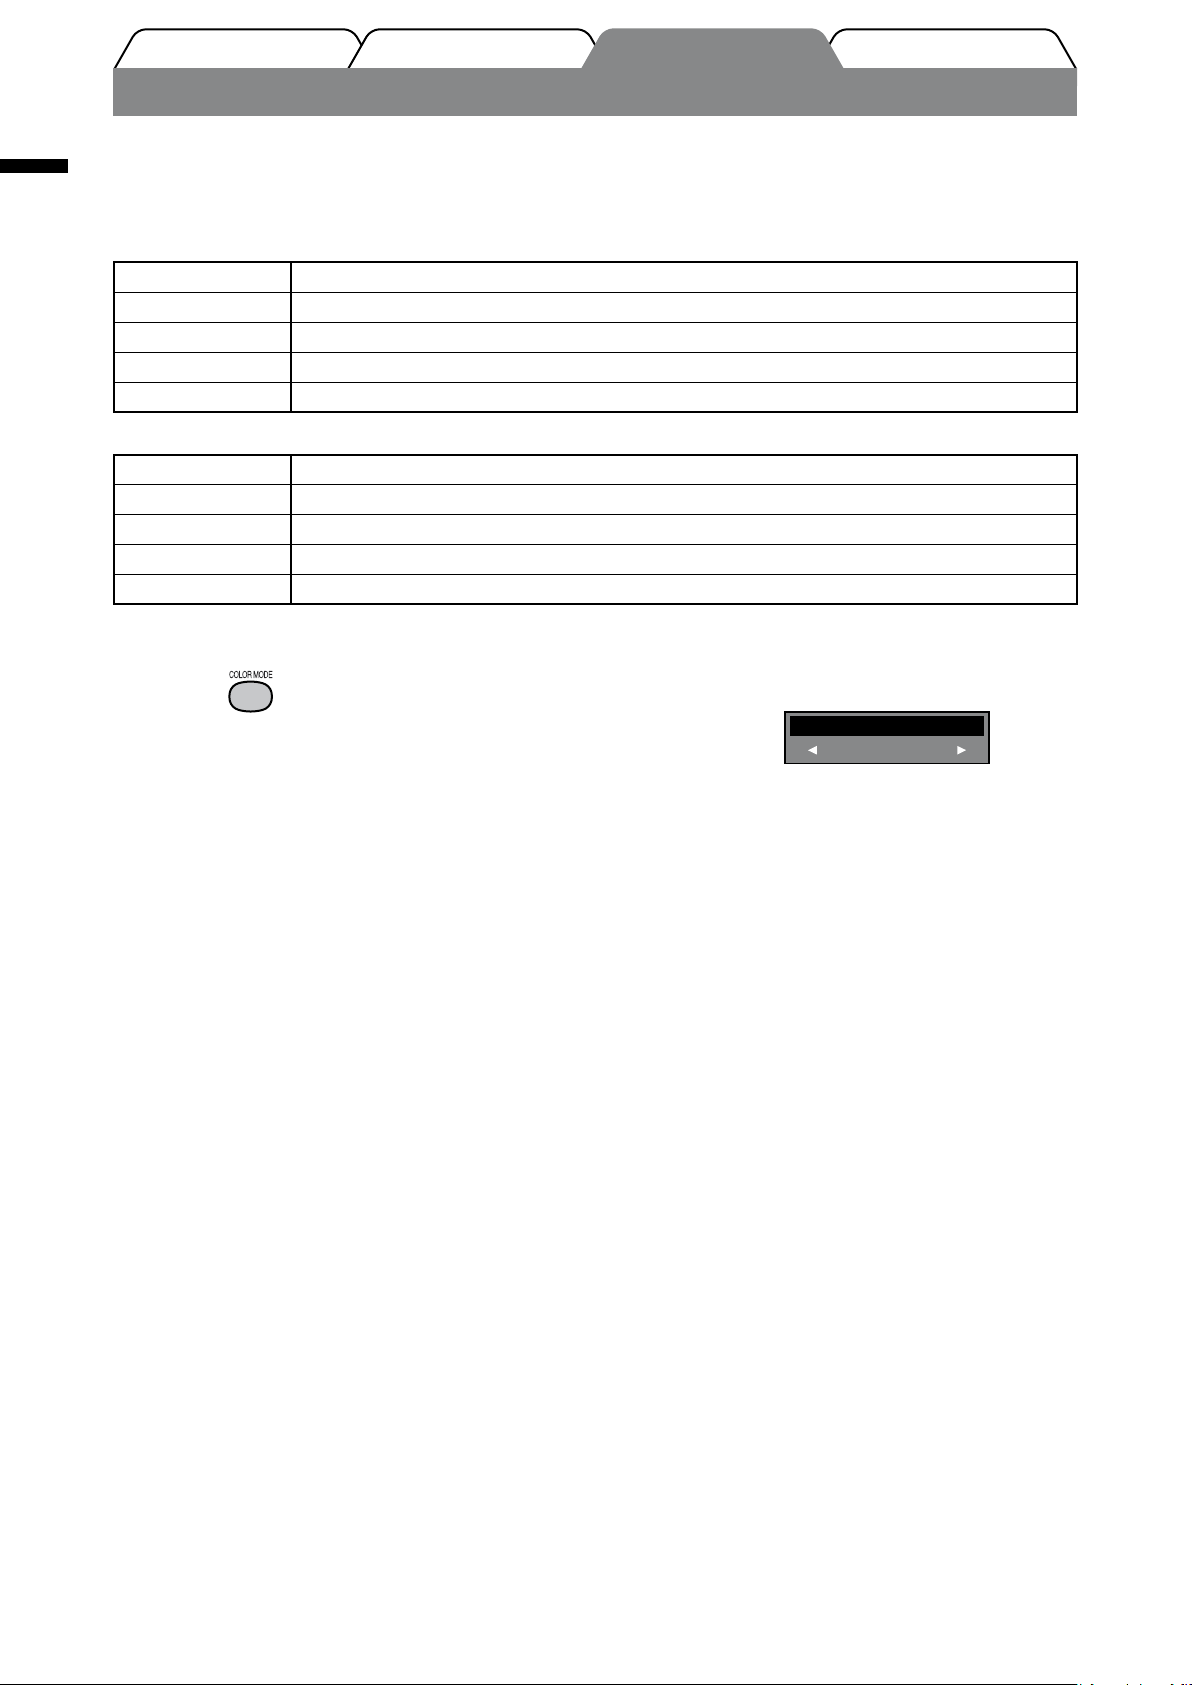
Selecting Display Mode
Changing the color mode allows you to set the appropriate display mode easily.
For details of Color Mode, refer to the User’s Manual on the “EIZO LCD Utility Disk” (CD-ROM).
Color Mode
(PC Input / HDMI (PC Signal) Input)
Text Suitable for displaying texts for word processing or spreadsheets.
Picture Suitable for displaying images such as photos or picture images.
Movie Suitable for playing back animated images.
Game (PC) Suitable for displaying game images.
1
Custom (xxx
(VIDEO Input / HDMI (Video Signal) Input)
Standard Standard video display.
Cinema Suitable for cinema effect, etc.
Dynamic Suitable for a clearly outlined image.
Game Suitable for displaying game images.
Custom (xxx
*1 The input selected at that time is displayed.
*
) Available for making desired settings.
1
*
) Available for making desired settings.
Press on the remote control.
1
Each time you press the button, the mode changes.
Color Mode setting menu
14
Page 17
Prior to use Installation TroubleshootingSetting/Adjustment
Adjusting Brightness
Color
Color Mode
Brightness
Black Level
Hue
Saturation
Contrast
Temperature
Return
[ENTER] : Enter
: Select
[EXIT]: Exit
Reset
Advanced Settings
[ ]Standard
[ ]Custom(xxxx)
[ ]50
[ ]50
[ ]0
[ ]0
[ ]6500K
Brightness
50
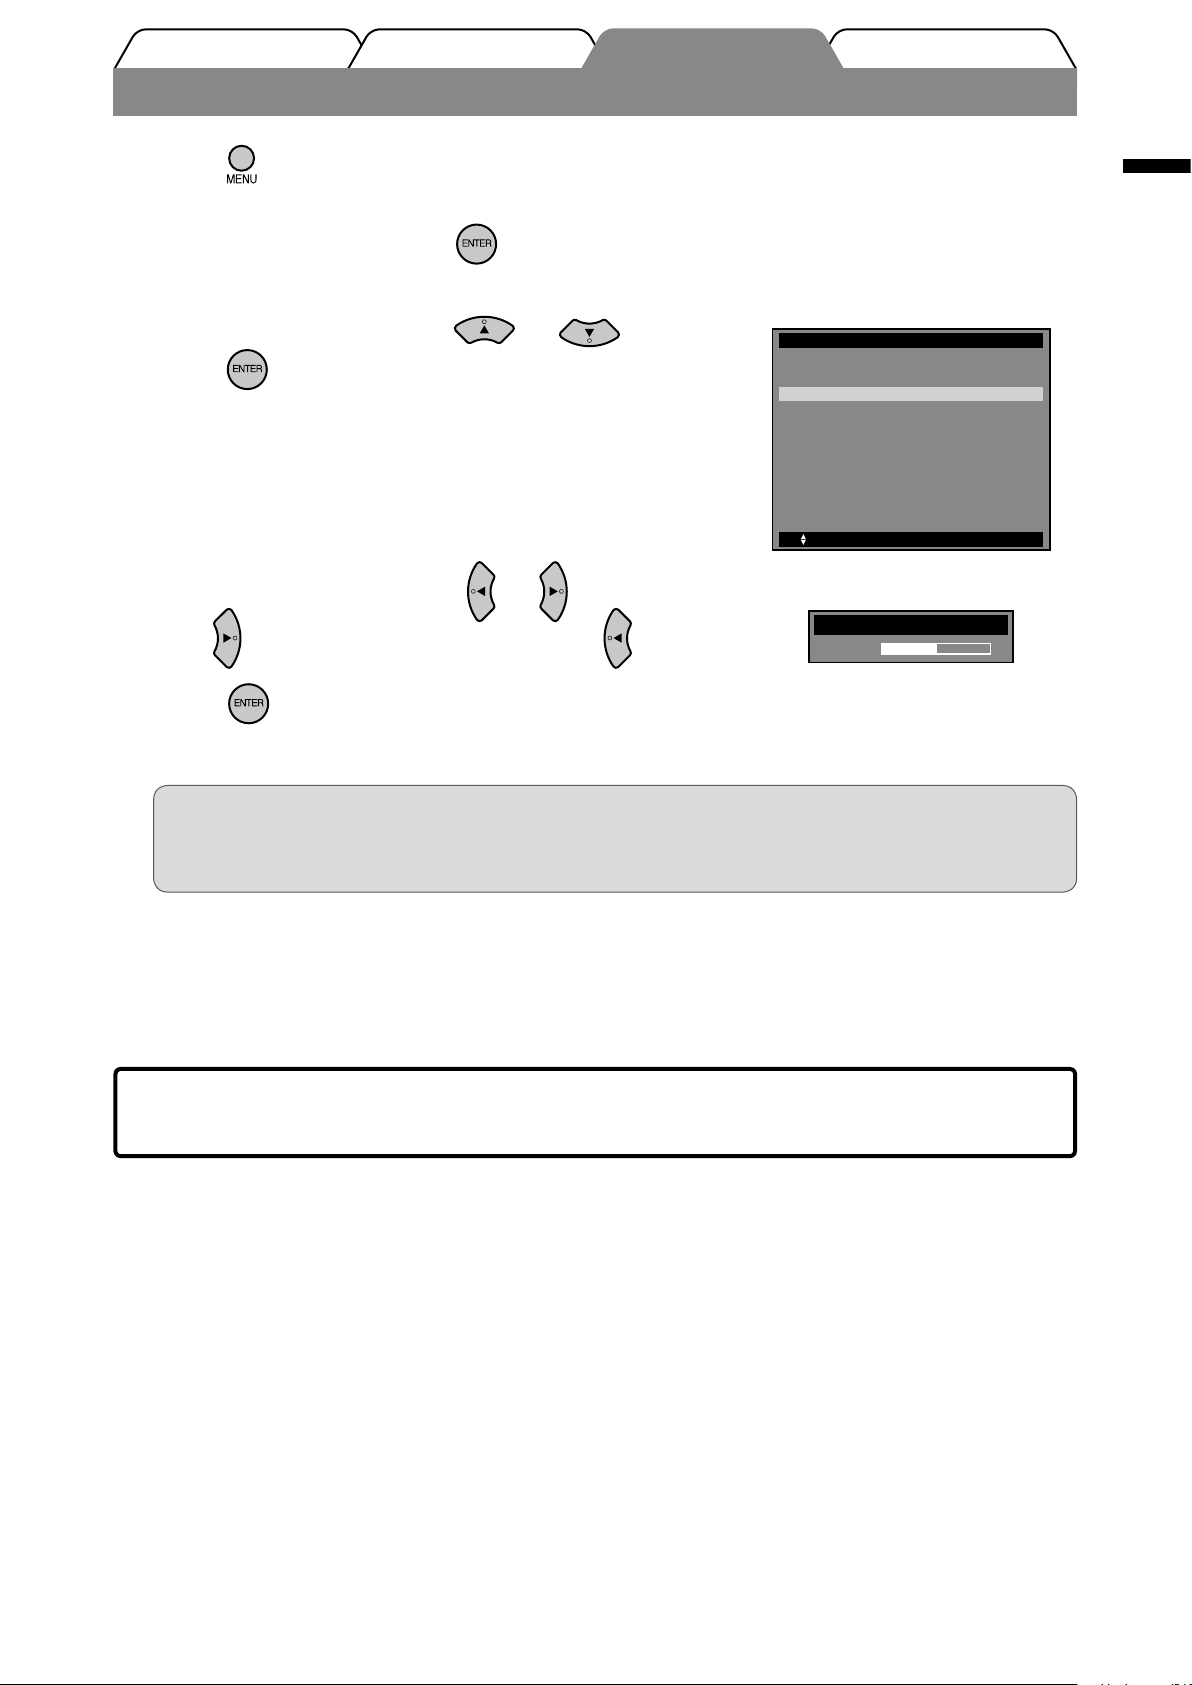
Press on the remote control.
1
The Setting menu appears.
Choose [Color] and press .
2
The Color menu appears.
Choose [Brightness] with or and
3
press .
The brightness adjustment menu appears.
Adjust the brightness with or .
4
Press to increase screen brightness or press to decrease.
Press at the desired brightness.
5
The specied brightness is saved.
English
Color menu
Brightness adjustment menu
NOTE
• When using the Auto EcoView, according to the environmental brightness detected by the sensor on the bottom
side of the monitor and the brightness of displayed images, the screen brightness can be adjusted to the
appropriate one automatically. For details, refer to the User’s Manual on the “EIZO LCD Utility Disk” (CD-ROM).
The basic settings and adjustments are completed. For advanced settings/adjustments,
refer to the User’s Manual on the CD-ROM.
15
Page 18
English
Prior to use Installation TroubleshootingSetting/Adjustment
HDMI CEC Setting
HDMI CEC
Power On Link
Power Off Link
Reset
Return
[ENTER] : Enter
: Select
[EXIT]: Exit
[ ]Enable
[ ]Disable
[ ]Enable
Monitor Settings
Language
USB Selection
Power Indicator
HDMI CEC Setting
Real Image
Sub-Window Lucent
Advanced Settings(xxxx)
Return
[ENTER] : Enter
: Select
[EXIT]: Exit
Reset
[ ]On
[ ]English
[ ]Auto
[ ]0
[ ]Disable
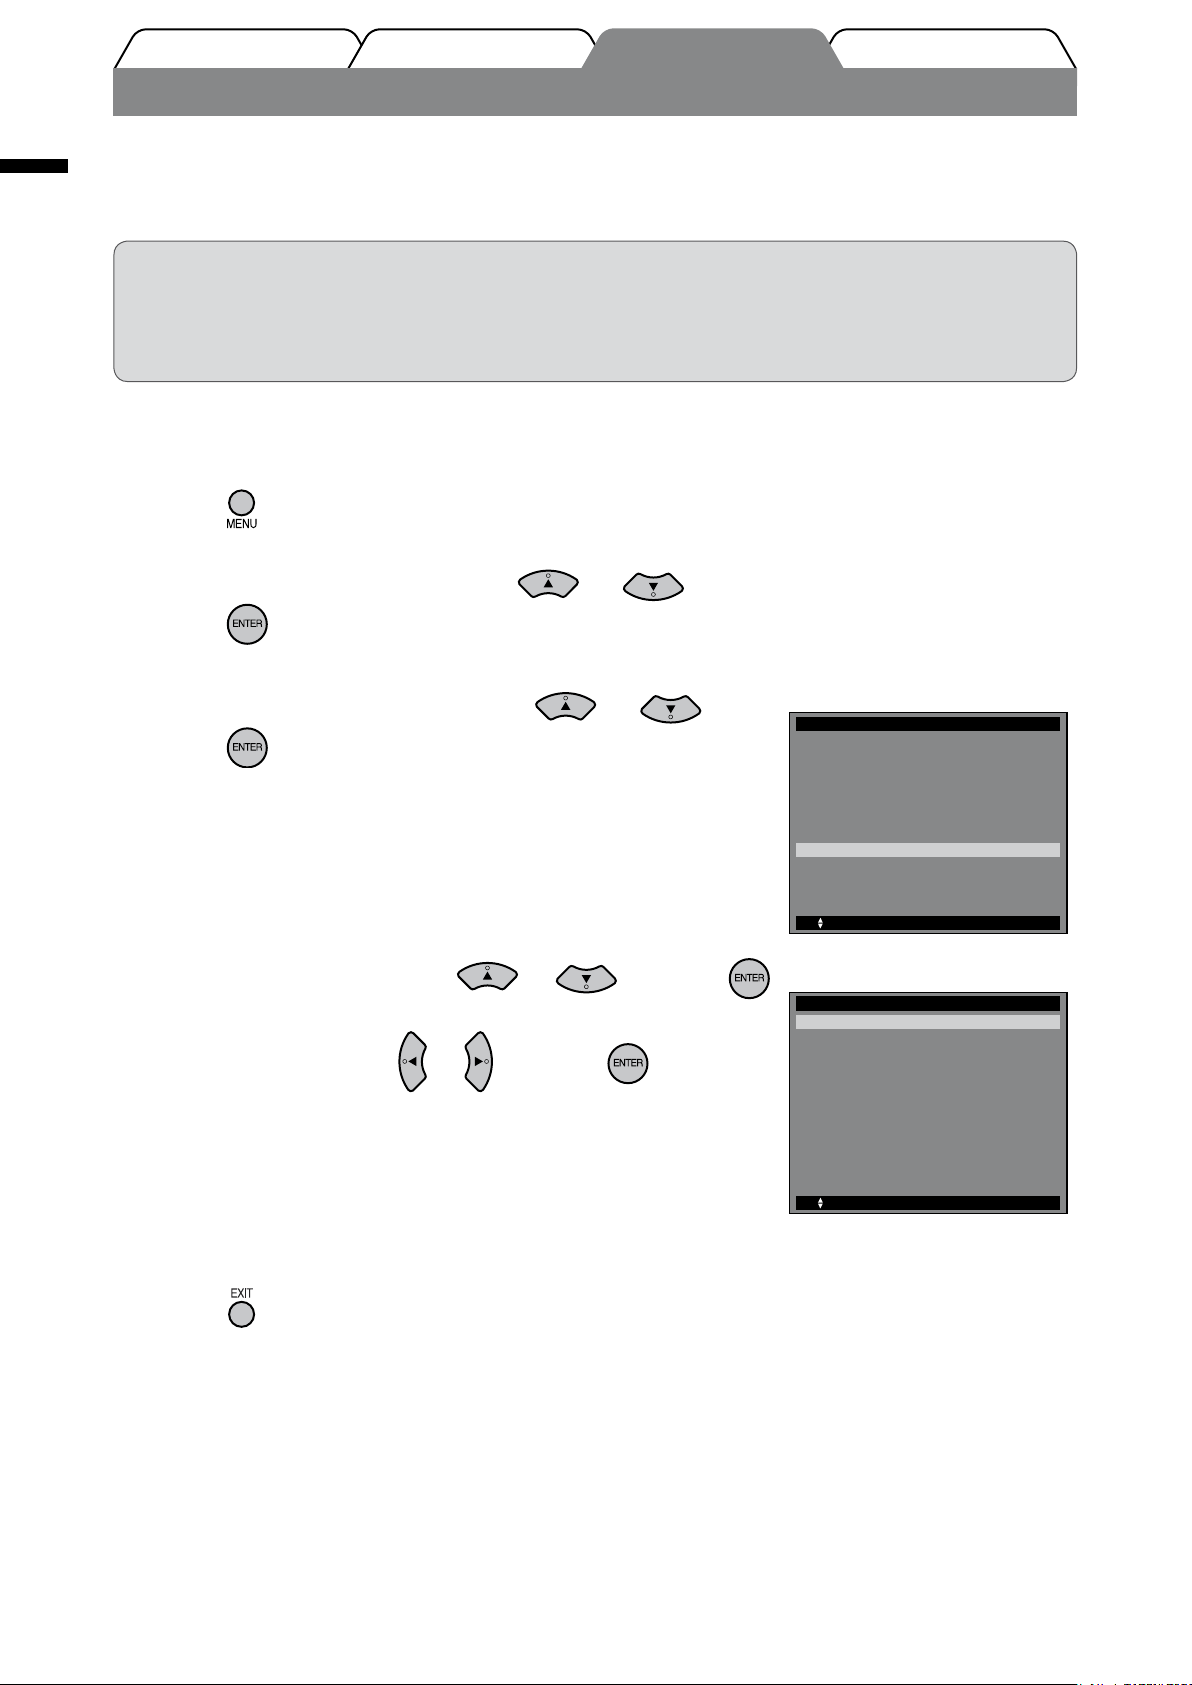
Setting HDMI CEC (When controlling external devices from the monitor)
This monitor supports HDMI CEC (Consumer Electronics Control). The interactive control becomes possible by
connecting the external device applicable to HDMI CEC to the monitor with the HDMI cable.
Set the following when controlling the external device from the monitor using the HDMI CEC function.
Attention
• Using the HDMI CEC function, this monitor can control only those external devices such as recorders
and players applicable to HDMI CEC. However, this function does not work correctly with some devices.
• For details on the control of external devices and the HDMI CEC function, refer to the Remote Control
Guide and the User’s Manual on the “EIZO LCD Utility Disk” (CD-ROM).
Conrm that the HDMI CEC setting of the external device is enabled.
1
For details on the setting, refer to the manual of the external device.
Press on the remote control.
2
The Setting menu appears.
Choose [Monitor Settings] with or and
3
press
The Monitor Settings menu appears.
Choose [HDMI CEC Setting] with or and
4
press
.
Monitor Settings menu
.
The HDMI CEC Setting menu appears.
Set each item.
5
1. Choose the setting item with or and press .
The setting menu of the selected item appears.
2. Select the setting with
or and press .
• [HDMI CEC] : Select “Enable”.
• [Power On Link] : Select “Enable” when turning on the monitor
in conjunction with the power on operation of
the external device.
• [Power Off Link] : Select “Enable” when turning off the external
device in conjunction with the power off
operation of the monitor.
Press .
6
The setting is completed.
HDMI CEC Setting menu
16
Page 19

Prior to use Installation Setting/Adjustment Troubleshooting
No-Picture Problem
Signal Error
PC
FORIS FX2431 S/N:********
Usage Time
******** H
Input Signal
Signal Error
Information(HDMI1)
Return
[ENTER]: Return
If no picture is displayed on the monitor even after the following remedial action is taken, contact your local dealer.
1. Check the Power indicator.
Symptom Status Possible cause and remedy
No picture Power indicator does not light
up.
Power indicator lights blue. Check whether the device is connected
Power indicator lights orange. (PC Input / HDMI (PC Signal) Input)
• Check whether the power cord is correctly
connected.
• Check whether the main power switch is on.
• Press
on the remote control (or on the
monitor).
correctly.
(PC Input / HDMI (PC Signal) Input)
Set each adjusting value in [Brightness],
[Contrast] and [Gain]
1
*
to higher level.
(VIDEO Input / HDMI (Video Signal) Input)
Check whether the power of the connected
device is turned on.
• Press a key on the keyboard or click the
mouse.
• Turn on the PC.
English
*1 For the setting of the brightness, contrast and gain, please refer to the User’s Manual on the CD-ROM.
2. Check the error message that remains on the screen.
(PC Input / HDMI (PC Signal) Input)
Symptom Status Possible cause and remedy
Example:
The message left shows that
the input signal is out of the
specied frequency range.
*
Current input signal can be
checked in [Information]
menu. (The signal frequency
that is out of the range is
displayed in magenta.)
Change the mode appropriately using the
graphics board’s utility software. Refer to the
manual of the graphics board for details.
3. Check [Information] of the Setting menu.
(Press on the remote control, choose [Information] with
Symptom Status Possible cause and remedy
Example:
The message left shows that
the signal is not input from the
device or the signal from the
device is outside the
specication.
or
• Check whether the device is connected
correctly.
• Check whether the power of the connected
device is turned on.
• Conrm the output signal format by referring
to the instruction manual of the connected
device.
, and then press .)
“Signal Error” is displayed.
17
Page 20

English
Copyright© 2009 EIZO NANAO CORPORATION All rights reserved.
No part of this manual may be reproduced, stored in a retrieval system, or transmitted, in any form or by any means,
electronic, mechanical, or otherwise, without the prior written permission of EIZO NANAO CORPORATION.
EIZO NANAO CORPORATION is under no obligation to hold any submitted material or information condential
unless prior arrangements are made pursuant to EIZO NANAO CORPORATION’s receipt of said information.
Although every effort has been made to ensure that this manual provides up-to-date information, please note that EIZO
monitor specications are subject to change without notice.
Apple and Macintosh are registered trademarks of Apple Inc.
HDMI, the HDMI logo and High-Definition Multimedia Interface are trademarks or registered trademarks of HDMI Licensing LLC.
VGA is a registered trademark of International Business Machines Corporation.
Windows, Windows Vista and Xbox 360 are registered trademarks of Microsoft Corporation in the United States and other countries.
VESA is a registered trademark or a trademark of Video Electronics Standards Association in the United States and other countries.
EIZO and ScreenManager are registered trademarks of EIZO NANAO CORPORATION in Japan and other countries.
FORIS is a trademark of EIZO NANAO CORPORATION.
18
Page 21

Setup Manual
Installationshandbuch
Important: Please read this Setup Manual and the User’s Manual stored on the CD-
Wichtig:
Lesen Sie die VORSICHTSMASSNAHMEN, dieses Handbuch zur
ROM carefully to familiarize yourself with safe and effective usage. Please
Einrichtung und das Benutzerhandbuch (auf der CD-ROM) aufmerksam
retain this manual for future reference.
durch, um sich mit der sicheren und efzienten Bedienung vertraut zu
machen. Bewahren Sie dieses Handbuch zum späteren Nachschlagen auf.
English
Deutsch
Page 22
Deutsch
Fehlerbeseitigung
Einstellungen/Justierung
InstallationVor der Benutzung
FORIS FX2431
FX2431 kann an die folgenden Geräte angeschlossen werden:
AV-Gerät
PC
D-Sub
HDMI
Ermöglicht die Verwendung eines Monitors
durch Anschließen an einen Windows-PC oder
Macintosh.
• Geeignete Auösung .............Seite 3
• Anschlussmethoden ............... Seite 7
DVI
S-Video/Video
Component
HDMI
Ermöglicht das Anzeigen von Bildern durch
Anschließen eines DVD-/Video-Players oder einer
Spielkonsole usw.
• Geeignetes Signalformat ............. Seite 3
• Anschlussmethoden .................... Seite 11
DVD-Player
Spielkonsole
Audiogerät
USB-Geräte
Tastatur
• Anschlussmethoden ...............
(Auch für den Anschluss eines Druckers oder
Scanners usw.)
Hinweis
• Verwenden Sie einen PC/ein Betriebssystem,
der bzw. das mit USB-Geräten kompatibel ist.
[Für OS]
- Windows 2000/XP/Vista
- Mac OS 9.2.2 und OS X 10.2 oder höher
• USB-Geräte funktionieren nicht, wenn der
Netzschalter des Monitors ausgeschaltet ist.
Seite 10
Maus
Audio von PC und AV-Geräten kann mit
angeschlossenem AV-Verstärker über
Lautsprecher wiedergegeben werden.
• Anschlussmethoden ..............Seite 12
HINWEIS
• Ermöglicht die Tonausgabe durch
Anschließen eines Kopfhörers an die
Kopfhörerbuchse. ..................Seite 12
(Achtung: Drehen Sie die Lautstärke
nicht zu hoch auf, wenn Sie Kopfhörer
verwenden. Dadurch wird Ihr
Hörvermögen beeinträchtigt.)
2
Page 23

Fehlerbeseitigung
Einstellungen/Justierung
InstallationVor der Benutzung
Kompatible Auösungen/Signalformate
Der Monitor unterstützt die folgenden Auösungen und Signalformate:
PC-Eingang / HDMI (PC-Signal)-Eingang
Digitales
Auösung Frequenz Modus
640 × 400 70 Hz NEC PC-9821
640 × 480 67 Hz Apple Macintosh
640 × 480 ~75 Hz VGA, VESA
720 × 400 70 Hz VGA TEXT
720 × 480 60 Hz
848 × 480 60 Hz
800 × 600 ~75 Hz
832 × 624 75 Hz Apple Macintosh
1024 × 768 ~75 Hz
1152 × 864 75 Hz
1152 × 870 75 Hz Apple Macintosh
1
1280 × 768
1280 × 768
1280 × 960 60 Hz
1280 × 960 75 Hz Apple Macintosh
1280 × 1024 ~75 Hz
1360 × 768 60 Hz
1600 × 1200 60 Hz
1680 × 1050
1680 × 1050
1920 × 1200
1280 × 720p 50 Hz
1920 × 1080p 50 Hz
1920 × 1080p
*
1
*
1
*
1
*
1
*
*
3
*
60 Hz VESA CVT RB —
~75 Hz VESA CVT —
60 Hz VESA CVT
60 Hz VESA CVT RB
2
60 Hz VESA CVT RB
3
*
, 60 Hz 720p
3
*
, 60 Hz 1080p
24 Hz, 25 Hz,
30 Hz, 48 Hz
VESA
VESA
VESA
VESA
VESA —
VESA
VESA
VESA —
VESA
1080p
Eingangssignal
Punkt-Clock:
~ 162 MHz
—
—
ü (60 Hz) ü
ü ü
ü ü
ü ü
ü (60 Hz) ü
—
ü (60 Hz) ü
—
ü ü
—
ü (60 Hz) ü
ü ü
ü ü
ü ü
ü ü
ü (60 Hz) ü
ü (60 Hz) ü
ü
Analoges
Eingangssignal
Punkt-Clock:
~ 162 MHz
ü
ü
ü
ü
ü
ü
ü
ü
ü
—
Deutsch
*1 Zur Anzeige des Eingangssignals für das Breitbild ist eine Grakkarte erforderlich, die die Anforderungen des
Standards VESA CVT erfüllt.
*2 Empfohlene Auösung (diese Auösung festlegen)
*3 Auösung für einige AV-Geräte wie Microsoft Xbox 360
VIDEO-Eingang
[S-Video- / Video-Signal]
– NTSC / PAL / PAL-60
[Komponentenvideosignal]
– 525i (480i) / 525p (480p): 60 Hz
– 625i (576i) / 625p (576p): 50 Hz
– 1125i (1080i) / 750p (720p): 50 Hz / 60 Hz
– 1125p (1080p): 24 Hz / 50 Hz / 60 Hz
HDMI (Videosignal)-Eingang
• Videosignal
– 525i (480i) / 525p (480p): 60 Hz
– 625i (576i) / 625p (576p): 50 Hz
– 1125i (1080i) / 750p (720p): 50 Hz / 60 Hz
– 1125p (1080p): 24 Hz / 25 Hz / 30 Hz / 50 Hz / 60 Hz
• Audiosignal
2ch Linear PCM (32 kHz / 44,1 kHz / 48 kHz)
3
Page 24
Deutsch
Fehlerbeseitigung
Einstellungen/Justierung
InstallationVor der Benutzung
[Anbringung der Vorsichtshinweise]
Lieferumfang
Prüfen Sie, ob sich alle der folgenden Gegenstände in der Verpackung benden. Sollte einer der Gegenstände fehlen oder
beschädigt sein, wenden Sie sich an Ihren Fachhändler.
HINWEIS
• Heben Sie die Verpackung sowie die Verpackungsmaterialien für evtl. Transporte des Monitors gut auf.
□ Monitor
□ Fernbedienung
□ AA-Batterien (2 Stck.)
□ Netzkabel
□ Digitales Signalkabel (FD-C39)
□ Analoges Signalkabel (MD-C87)
□ EIZO USB-Kabel (MD-C93)
□ CD-ROM mit EIZOs LCD Utility Disk
• Benutzerhandbuch
□ Installationshandbuch (das vorliegende Handbuch)
□ Handbuch für die Fernbedienung
□ VORSICHTSMASSNAHMEN
□ Beschränkte Garantie
□ Informationen zum Thema Recycling
□ Befestigungsschrauben (M4 x 12, 4 Stck.)
Über das Installationshandbuch und das Benutzerhandbuch
Installationshandbuch
(das vorliegende Handbuch)
Handbuch für die
Fernbedienung
Benutzerhandbuch
(PDF-Datei auf CD-ROM*1)
VORSICHTSMASSNAHMEN
*1 Erfordert die Installation von Adobe Reader.
• Die Produktspezikationen variieren in den einzelnen Absatzgebieten. Überprüfen Sie, dass das Handbuch in der Sprache des
jeweiligen Absatzgebietes geschrieben ist.
4
Beschreibt die grundlegenden Informationen von der Monitorverbindung
zum externen Gerät, wie z. B. ein PC usw., bis zur Verwendung des
Monitors.
Beschreibung der Bedienung mit der Fernbedienung.
Beschreibung von Anwendungsinformationen wie z. B. Bedienung
dieses Monitors, Bildjustage, Einstellungen und Spezikationen.
Informationen zur sicheren Verwendung des Monitors.
Page 25
Fehlerbeseitigung
Einstellungen/Justierung
InstallationVor der Benutzung
Informationen zur CD-ROM mit dem EIZO LCD-Dienstprogramm
5m
30°
30°
7m
5m
5m
5m
20°
20°
7m
●
Übersicht zum CD-Inhalt und zur Software
Die CD-ROM enthält Softwareprogramme für die Justierung sowie das Benutzerhandbuch. Informationen zu
Startprozeduren für die Software oder zu Dateizugriffsprozeduren nden Sie in der Datei „Readme.txt“ oder der
„read me“-Datei auf der CD.
Element Übersicht Betriebssystem
Eine „Readme.txt“ oder „read me“-Datei
Dateien für Justierungsmuster Zur manuellen Justierung des Bildes bei
Anwendungssoftware
ScreenManager Pro for LCD
WindowMovie-Checker-Software WindowMovie ist eine Funktion von
EIZO ScreenSlicer Eine Software, die einen Bildschirm teilt und
Bedienungsanleitung zu diesem Monitor (PDF-Datei)
analogem Signaleingang.
Eine Software zur Bildschirmkonguration mit
Maus und Tastatur.
Informationen zu den einstellbaren
Objekten nden Sie unter
„Parametereinstellungslemente“.
ScreenManager Pro for LCD.
Weitere Informationen erhalten Sie in der
Bedienungsanleitung zu ScreenManager Pro
for LCD auf der CD-ROM.
mehrere Fenster efzient darauf anordnet.
Windows
*
Bei anderen Betriebssystemen
als Windows laden Sie die
Musterdateien von unserer
Website herunter:
http://www.eizo.com
Windows XP / Vista
*
WindowMovie-Checker-Software
ist mit Windows Vista nicht
kompatibel.
Windows XP / Vista
Deutsch
●
So verwenden Sie ScreenManager Pro for LCD
Informationen zur Installation und Verwendung von ScreenManager Pro for LCD nden Sie in der entsprechenden
Bedienungsanleitung auf der CD-ROM.
Vor der Verwendung der Fernbedienung
●
Einsetzen der Batterien
1. Drücken Sie auf der Rückseite der
Fernbedienung die Taste zum Entsperren,
und entfernen Sie die Abdeckung.
2. Setzen Sie AA-Batterien ein, und schieben Sie
die Abdeckung wieder zurück.
●
Reichweite der Fernbedienung
Verwenden Sie die Fernbedienung in diesem Bereich
wie nachstehend erläutert.
5
Page 26
Deutsch
Fehlerbeseitigung
Einstellungen/Justierung
InstallationVor der Benutzung
5 6 7 8 9 10 11
22
4
3
12
13 14
16 17
15
20
19
18
2121
ScreenManager
®
Color
Sound
PowerManager™
Monitor Settings
Information
[ENTER]: Enter
: Select
1 2
23
Bedienelemente und Funktionen
Verkabelung
Einstellungsmenü
(ScreenManager ® *1)
1 Netzschalter Dient zum Ein- und Ausschalten (Ein oder Aus).
2 Netzstecker Zum Anschließen des Netzkabels.
3 Fernbedienung Mit der Fernbedienung können Bedienung, Einstellungen und Justagen am
Monitor vorgenommen werden.
4 Kopfhörerbuchse [Buchse für Stereo-Klinkenstecker] Zum Anschließen von Kopfhörern.
5 Select-Taste (SELECT) • Zeigt das Menü „SELECT“ an.
• Mit jedem Drücken dieser Taste ändert sich der Inhalt des Menüs.
(Im Menü „SELECT“ kann die Lautstärke angepasst und das
Eingangssignal gewechselt werden.)
6 Eingabetaste (ENTER) Zeigt das Einstellungsmenü an, legt in jedem Menü die Einstellungen oder
Einstellungselemente fest und speichert die vorgenommenen Einstellungen
und Anpassungen.
7 Steuertasten
(t qp u)
8 Sensor
9 Fernbedienungsdetektor Empfang des Signals von der Fernbedienung.
10 Netzschalter Zum Ein- und Ausschalten.
11 Betriebsanzeige Zeigt den Betriebsstatus des Monitors an.
12
Signaleingänge (HDMI1 / HDMI2)
13 Anschluss des
Audioeingangs
(„Analoger Ton“)
14 Signaleingang (PC1) [Video : DVI-D-Anschluss, Audio : Stereo-Kabel mit Klinkenstecker] Zum
15 Signaleingang (PC2) [Video : 15-poliger Mini-D-Sub-Anschluss, Audio : Stereo-Kabel mit
16 USB-Anschlüsse (hinten) [Vorgeschaltet × 2] Zum Anschließen an einen PC.
17 USB-Anschlüsse (seitlich) [Nachgeschaltet × 2] Zum Anschließen eines USB-Peripheriegeräts.
18 Anschluss des
Audioausgangs
19 Signaleingang (VIDEO1) [Video : Anschluss des S-Video-/Videoeingangs, Audio : Steckbuchse]
20 Signaleingang (VIDEO2) [Video : Anschluss für Komponentenvideoeingang, Audio : Steckbuchse]
21 Öffnung für
Diebstahlsicherung
22 Kabelabdeckung Verdeckt die Anschlusskabel.
23 Lautsprecher Quelle für Audioausgang.
*1 ScreenManager ® ist der Name des Einstellungsmenüs von EIZO. Informationen zur Verwendung von ScreenManager entnehmen
Sie dem Benutzerhandbuch auf der EIZO LCD Utility Disk (CD-ROM).
6
Diese Tasten werden zum Auswählen von Einstellungen und
Einstellungselementen oder zum Erhöhen bzw. Verringern von
Einstellungswerten in den Menüs verwendet.
Erkennt die Umgebungshelligkeit. Funktion zur Auto EcoView (siehe Seite 15).
Blau : In Betrieb Orange : Energiesparmodus
Aus : Hauptstromversorgung getrennt
[HDMI-Anschluss × 2] Anschluss für AV-Gerät oder PC.
[Stereo-Kabel mit Klinkenstecker] Für den HDMI-Eingang; Eingang für das
Audiosignal von anderen Anschlüssen als dem HDMI-Anschluss.
Anschließen an einen PC.
Klinkenstecker] Zum Anschließen an einen PC.
[Stereo-Kabel mit Klinkenstecker] Anschluss für Audiogeräte.
Anschluss für AV-Geräte.
Anschluss für AV-Geräte.
Kompatibel mit dem Kensington MicroSaver-Sicherheitssystem.
Page 27
Fehlerbeseitigung
Einstellungen/Justierung
InstallationVor der Benutzung
Kabel anschließen
Anschließen der einzelnen Geräte.
1
• Anschließen eines PCs ..........................Siehe unten
• Anschließen eines USB-Geräts ...................Seite 10
• Anschließen eines AV-Geräts ........................Seite 11
• Anschließen eines Audiogeräts .................... Seite 12
●
Anschließen eines PCs
Hinweis
• Um einen bereits vorhandenen Monitor durch einen Monitor des Typs FX2431 zu ersetzen, stellen
Sie die PC-Einstellungen für Auösung und vertikale Bildwiederholfrequenz auf die für FX2431Monitore verfügbaren Werte ein. Diese entnehmen Sie bitte der Auösungstabelle (siehe Seite 3),
bevor Sie den Monitor anschließen.
1. Verbinden Sie Monitor und PC mithilfe eines passenden Signalkabels.
Ziehen Sie nach dem Anschließen der Kabel die Schrauben der Verbinder an, um ein versehentliches
Ausstecken zu verhindern.
• Beim Anschluss an den PC1-Eingang (digitale Signalverbindung)
Anschlüsse am
PC
DVI-Verbinder
Signalkabel FD-C39 (mitgeliefert)
Anschlüsse am
Monitor
DVI-D-Verbinder
Deutsch
Anschluss des
Audioausgangs
USB nachgeschaltet
1
Audiokabel
(Stereokabel mit Klinkenstecker an
Stereokabel mit Klinkenstecker)
USB-Kabel MD-C93 (mitgeliefert)
1
*
Erwerben Sie das Kabel.
2
*
Erwerben Sie ein weiteres Kabel, um
zwei PCs an den Monitor anzuschließen.
*
Anschluss des
Audioeingangs
2
*
USB vorgeschaltet
7
Page 28
• Beim Anschluss an den PC2-Eingang (analoge Signalverbindung)
Fehlerbeseitigung
Einstellungen/Justierung
InstallationVor der Benutzung
Deutsch
Anschlüsse am
PC
15-poliger Mini-
D-Sub-Verbinder
Anschluss des
Audioausgangs
USB nachgeschaltet
Signalkabel MD-C87 (mitgeliefert)
1
Audiokabel
*
(Stereokabel mit Klinkenstecker an
Stereokabel mit Klinkenstecker)
USB-Kabel MD-C93 (mitgeliefert)
1
*
Erwerben Sie das Kabel.
2
*
Erwerben Sie ein weiteres Kabel, um
zwei PCs an den Monitor anzuschließen.
*
Anschlüsse am
Monitor
15-poliger Mini-
D-Sub-Verbinder
Anschluss des
Audioeingangs
2
USB vorgeschaltet
8
Page 29

• Beim Anschluss an den HDMI1-Eingang / HDMI2-Eingang (digitale Signalverbindung)
Fehlerbeseitigung
Einstellungen/Justierung
InstallationVor der Benutzung
Anschlüsse am
PC
HDMI-Anschluss
DVI-Verbinder
Anschluss des
Audioausgangs
1
HDMI-Kabel
DVI-HDMI-Konvertierungskabel
Audiokabel
*
*
1
*
(Stereokabel mit Klinkenstecker an
Stereokabel mit Klinkenstecker)
1
Audiokabel
*
(Stereokabel mit Klinkenstecker an
Stereokabel mit Klinkenstecker)
Anschlüsse am
Monitor
HDMI-Anschluss
1
Deutsch
Anschluss des
Audioeingangs
(„Analoger Ton“)
(„PC2-Ton“)
1
*
Erwerben Sie das Kabel.
Hinweis
• Beachten Sie beim Anschluss des PCs an den HDMI-Eingang Folgendes:
- Legen Sie im Einstellungsmenü „PC“ auf [Eingabeformat] fest, und starten Sie den PC.
- Legen Sie im Einstellungsmenü unter [Toneingangsbuchse] den Anschluss („Analoger Ton“ oder „PC2-Ton“)
fest, aus dem der Ton des PCs eingehen soll.
Weitere Informationen nden Sie im Benutzerhandbuch auf der „EIZO LCD Utility Disk“ (CD-ROM).
9
Page 30
Deutsch
Fehlerbeseitigung
Einstellungen/Justierung
InstallationVor der Benutzung
●
Anschließen eines USB-Geräts
1. Schließen Sie USB-Geräte (Tastatur, Maus usw.) am USB-Anschluss (nachgeschaltet) des
Monitors an.
Anschlüsse am
Monitor
USB nachgeschaltet
Tastatur
Maus
Hinweis
• Nach dem Anschließen der USB-Geräte und Einschalten des Monitors wird die USB-Funktion
automatisch eingerichtet.
• Der Monitor funktioniert je nach PC, Betriebssystem oder USB-Gerät u. U. nicht. (Erkundigen Sie
sich bei den entsprechenden Herstellern, ob die Geräte USB-kompatibel sind.)
• USB-Geräte funktionieren nicht, wenn der Netzschalter des Monitors ausgeschaltet ist.
HINWEIS
• Der PC (PC1 oder PC2), auf dem die USB-Geräte ausgeführt werden, wird zusammen mit dem Eingangssignal
automatisch gewechselt. Der PC, auf dem die USB-Geräte ausgeführt werden, kann auch angegeben werden.
Weitere Informationen nden Sie im Benutzerhandbuch auf der „EIZO LCD Utility Disk“ (CD-ROM).
10
Page 31

Fehlerbeseitigung
Einstellungen/Justierung
InstallationVor der Benutzung
●
Anschließen eines AV-Geräts
1. Schließen Sie den Monitor mit einem zu den Anschlüssen passenden Signalkabel an das
AV-Gerät an.
Anschlüsse am
AV-Gerät
S-Videokabel
*1 *
2
Anschlüsse am
Monitor
oder
2
*1 *
*
1
S-Video
Video
R L
Video-Kabel
Audiokabel
(Stecker an Stecker)
Deutsch
Komponentenvideo
HDMI-Anschluss
R L
Komponentenvideokabel
1
Audiokabel
*
(Stecker an Stecker)
3
HDMI-Kabel
*1*
1
*
Erwerben Sie das Kabel.
2
*
Verwenden Sie eines der beiden Kabel, um den
Monitor an das AV-Gerät anzuschließen.
3
*
Verwenden Sie das Kabel, auf dem „High Speed
HDMITM Cable“ steht.
Komponentenvideo
1
*
HDMI-Anschluss
Hinweis
• Bei der Steuerung des AV-Geräts, das an den HDMI-Eingang des Monitors angeschlossen ist, über
die HDMI-CEC-Funktion, muss die [HDMI-CEC-Einstellung] im Einstellungsmenü festgelegt werden
(siehe Seite 16).
11
Page 32

Deutsch
Fehlerbeseitigung
Einstellungen/Justierung
InstallationVor der Benutzung
●
Anschließen eines Audiogeräts
1. Schließen Sie den Monitor mit einem zu den Anschlüssen passenden Audiokabel an das
Audiogerät an.
Anschlüsse am
Monitor
1
Audiokabel
Anschluss des
Audioausgangs
Hinweis
• Bei Verwendung des Audiogeräts setzen Sie die Lautstärke des Monitors auf „0“. Stellen Sie
Lautstärke und Ton auf dem Audiogerät ein.
HINWEIS
• Schließen Sie zur Verwendung von
Kopfhörern diese an der Kopfhörerbuchse
des Monitors an.
(Stereokabel mit Klinkenstecker an Stecker)
Audiokabel
(Stereokabel mit Klinkenstecker an
Stereokabel mit Klinkenstecker)
*
*
1
*
1
Erwerben Sie das Kabel.
Kopfhörerbuchse
Kopfhörer
Anschlüsse am
Audiogerät
Anschluss des
Audioeingangs
(Steckbuchse)
R L
(Stereo-Kabel mit
Klinkenstecker)
Stecken Sie das Netzkabel des Monitors in eine Steckdose.
2
1. Verbinden sie mithilfe des Netzkabels den Netzanschluss des Monitors mit einer Steckdose.
Höhe und Neigung des Bildschirms einstellen
Halten Sie den Monitor mit beiden Händen am linken und rechten Rand fest, und stellen Sie die für Ihren Arbeitsplatz
optimale Höhe, Neigung und Drehung des Bildschirms ein.
12
Page 33

Fehlerbeseitigung
Einstellungen/Justierung
InstallationVor der Benutzung
Bild wiedergeben
4
Der Netzschalter des Monitors muss eingeschaltet sein.
1
Schalten Sie den Monitor ein, indem Sie auf der Fernbedienung drücken
2
(oder auf dem Monitor).
Die Betriebsanzeige des Monitors leuchtet auf (blau).
Schalten Sie das externe Gerät ein.
3
Wechseln Sie das Eingangssignal, damit das gewünschte, vom Gerät gesendete
4
Bild angezeigt wird.
Drücken Sie , oder . Mit jedem Drücken der Taste wird das Eingangssignal
gewechselt.
Deutsch
PC PC1
VIDEO VIDEO1
HDMI HDMI1
n Beim Empfang eines analogen Signals vom PC
Wenn Sie den Monitor und den PC erstmalig mit dem Analogsignal einschalten, können Sie mit der
Funktion „Autom. Bildeinst.“ die Uhr, Phase und Bildschirmposition automatisch einstellen.
Wenn das digitale Signal von einem PC stammt, werden Bilder durch die voreingestellten Werte des
Monitors korrekt angezeigt.
Hinweis
• Schalten Sie den Monitor aus, wenn Sie ihn längere Zeit nicht verwenden. Wenn Sie das Netzkabel
abziehen, wird die Stromzufuhr zum Monitor vollständig unterbrochen.
PC2...
g
VIDEO2...
g
HDMI2...
g
Anpassen der Lautstärke
Drücken Sie auf der Fernbedienung oder
1
Mit erhöhen Sie die Lautstärke, mit verringern Sie sie.
.
Menü zum Einstellen der
Lautstärke
13
Page 34

Deutsch
Fehlerbeseitigung
Einstellungen/Justierung
InstallationVor der Benutzung
Color Mode
Custom(xxxx)
Anzeigemodus auswählen
Durch das Ändern des Farbmodus kann der geeignete Anzeigemodus schnell und einfach gewählt werden.
Weitere Informationen zum Farbmodus nden Sie im Benutzerhandbuch auf der „EIZO LCD Utility Disk“ (CD-ROM).
Farbmodus
(PC-Eingang / HDMI (PC-Signal)-Eingang)
Text Einstellung für Textverarbeitungen und Tabellenkalkulationen.
Bild Einstellung für Fotos und Bilder.
Film Einstellung für animierte Bilder.
Spiele (PC) Einstellung für Bilder aus Spielen.
Benutzerdef.
1
*
(xxx
)
(VIDEO-Eingang / HDMI (Videosignal)-Eingang)
Standard Standardvideoanzeige.
Kino Einstellung für Kinoeffekt usw.
Dynamisch Einstellung für klar umrissene Bilder.
Spiele Einstellung für Bilder aus Spielen.
Benutzerd. (xxx
*1 Der zu dieser Zeit ausgewählte Eingang wird angezeigt.
Zum wunschgemäßen Einstellen der Farben.
1
*
) Zum wunschgemäßen Einstellen der Farben.
Drücken Sie auf der Fernbedienung .
1
Mit jedem Drücken dieser Taste wird der Modus geändert.
Einstellungsmenü Farbmodus
14
Page 35

Fehlerbeseitigung
Einstellungen/Justierung
InstallationVor der Benutzung
Bildschirmhelligkeit einstellen
Color
Color Mode
Brightness
Black Level
Hue
Saturation
Contrast
Temperature
Return
[ENTER] : Enter
: Select
[EXIT]: Exit
Reset
Advanced Settings
[ ]Standard
[ ]Custom(xxxx)
[ ]50
[ ]50
[ ]0
[ ]0
[ ]6500K
Brightness
50
Drücken Sie auf der Fernbedienung .
1
Das Einstellungsmenü wird angezeigt.
Wählen Sie [Farbe] aus, und drücken Sie .
2
Das Menü „Farbe“ wird angezeigt.
Wählen Sie [Helligkeit] mit oder aus,
3
Menü „Farbe“
und drücken Sie .
Das Menü zum Justieren der Helligkeit wird angezeigt.
Stellen Sie die Helligkeit mit oder ein.
4
Menü zum Justieren der Helligkeit
Drücken Sie zum Aufhellen des Bildschirms ;zum
Abdunkeln drücken Sie .
Ist die gewünschte Helligkeit eingestellt, drücken
5
Sie .
Damit wird der eingestellte Wert gespeichert.
HINWEIS
• Bei der Verwendung von Auto EcoView wird die Bildschirmhelligkeit der vom Sensor unten am Monitor
erkannten Umgebungshelligkeit und der Helligkeit angezeigter Bilder entsprechend automatisch angepasst.
Weitere Informationen nden Sie im Benutzerhandbuch auf der „EIZO LCD Utility Disk“ (CD-ROM).
Deutsch
Die grundlegenden Einstellungen und Justierungen sind damit beendet. Weitere
Einzelheiten zu erweiterten Einstellungen/Justierungen entnehmen Sie dem
Benutzerhandbuch auf der CD-ROM.
15
Page 36

Deutsch
Fehlerbeseitigung
Einstellungen/Justierung
InstallationVor der Benutzung
HDMI CEC Setting
HDMI CEC
Power On Link
Power Off Link
Reset
Return
[ENTER] : Enter
: Select
[EXIT]: Exit
[ ]Enable
[ ]Disable
[ ]Enable
Monitor Settings
Language
USB Selection
Power Indicator
HDMI CEC Setting
Real Image
Sub-Window Lucent
Advanced Settings(xxxx)
Return
[ENTER] : Enter
: Select
[EXIT]: Exit
Reset
[ ]On
[ ]English
[ ]Auto
[ ]0
[ ]Disable
Festlegen von HDMI-CEC
(Bei der Steuerung externer Geräte über den Monitor)
Dieser Monitor unterstützt HDMI-CEC (Consumer Electronics Control). Zur interaktiven Steuerung eines
HDMI-CEC-fähigen externen Geräts muss dieses über ein HDMI-Kabel an den Monitor angeschlossen werden.
Legen Sie Folgendes fest, wenn Sie das externe Gerät mit der Funktion HDMI-CEC über den Monitor steuern.
Hinweis
• Mit der Funktion HDMI-CEC kann dieser Monitor ausschließlich externe Geräte steuern, die HDMI-CEC
unterstützen (beispielsweise Recorder oder Player). Diese Funktion arbeitet mit einigen Geräten jedoch
nicht ordnungsgemäß zusammen.
• Weitere Informationen zur Steuerung externer Geräte und der Funktion HDMI-CEC nden Sie im
Handbuch für die Fernbedienung und dem Benutzerhandbuch auf der „EIZO LCD Utility Disk“ (CD-
ROM).
Die Einstellung HDMI-CEC des externen Geräts muss aktiviert sein.
1
Details zur Einstellung nden Sie im Handbuch des externen Geräts.
Drücken Sie auf der Fernbedienung .
2
Das Einstellungsmenü wird angezeigt.
Wählen Sie [Monitoreinst.] mit oder aus,
3
und drücken Sie
.
Das Menü „Monitoreinst.“ wird angezeigt.
Wählen Sie [HDMI-CEC-Einstellung] mit oder
4
aus, und drücken Sie .
Das Menü „HDMI-CEC-Einstellung“ wird angezeigt.
Stellen Sie die Elemente ein.
5
1. Wählen Sie mit oder das einzustellende
Element aus, und drücken Sie .
Das Einstellungsmenü erscheint für das gewählte Element.
2. Wählen Sie mit
Sie .
• [HDMI-CEC] : Wählen Sie „Ein“ aus.
• [Einschaltautomatik] : Wählen Sie „Ein“ aus, wenn Sie den Monitor
• [Ausschaltautomatik] : Wählen Sie „Ein“ aus, wenn Sie das externe
oder die Einstellung, und drücken
gemeinsam mit dem externen Gerät
einschalten.
Gerät gemeinsam mit dem Monitor
ausschalten.
Menü „Monitoreinst.“
Menü „HDMI-CEC-Einstellung“
Drücken Sie .
6
Die Einstellung wurde vorgenommen.
16
Page 37

Fehlerbeseitigung
Einstellungen/Justierung
InstallationVor der Benutzung
Problem: Kein Bild
Signal Error
PC
FORIS FX2431 S/N:********
Usage Time
******** H
Input Signal
Signal Error
Information(HDMI1)
Return
[ENTER]: Return
Wird auch nach dem Durchführen der nachfolgend vorgeschlagenen Lösungen kein Bild angezeigt, wenden Sie sich an
Ihren Fachhändler.
1. Prüfen Sie den Status der Betriebsanzeige.
Symptom Status Mögl. Ursache und Lösung
Kein Bild Anzeigenstatus: Aus • Prüfen Sie, ob das Netzkabel richtig
eingesteckt ist.
• Schalten Sie den Netzschalter ein.
• Drücken Sie auf der Fernbedienung
am Monitor).
(oder
Deutsch
Anzeigenstatus: Blau
Prüfen Sie, ob das Gerät richtig angeschlossen ist.
(PC-Eingang / HDMI (PC-Signal)-Eingang)
Setzen Sie alle anzupassenden Werte unter
[Helligkeit], [Kontrast] und [Gain-Einstellung]*1
auf einen höheren Wert.
(VIDEO-Eingang / HDMI (Videosignal)-Eingang)
Prüfen Sie, ob das angeschlossene Gerät
eingeschaltet ist.
Anzeigenstatus: Orange (PC-Eingang / HDMI (PC-Signal)-Eingang)
• Drücken Sie eine Taste auf der Tastatur, oder
klicken Sie mit der Maus.
• Schalten Sie den PC ein.
*1
Weitere Informationen zur Einstellung von Helligkeit, Kontrast und Gain nden Sie im Benutzerhandbuch auf der CD-ROM.
2. Überprüfen Sie die Fehlermeldung auf dem Bildschirm.
(PC-Eingang / HDMI (PC-Signal)-Eingang)
Symptom Status Mögl. Ursache und Lösung
Beispiel:
Die Meldung zeigt an, dass sich
das Eingangssignal außerhalb
des angegebenen
Frequenzbereichs bendet.
*
Das momentane
Eingangssignal kann im Menü
[Informationen] geprüft
werden. (Das außerhalb des
angegebenen
Frequenzbereichs liegende
Eingangssignal wird in der
Farbe Magenta angezeigt.)
Ändern Sie den Modus mithilfe des zur
Grakkarte gehörenden Dienstprogramms.
Weitere Informationen hierzu entnehmen Sie
dem Handbuch der Grakkarte.
3. Prüfen Sie im Einstellungsmenü den Menüpunkt [Informationen].
(Drücken Sie auf der Fernbedienung , wählen Sie mit oder den Menüpunkt [Informationen]
aus, und drücken Sie .)
Symptom Status Mögl. Ursache und Lösung
Beispiel:
„Signalfehler“ wird angezeigt.
Die Meldung links besagt, dass
das Signal nicht über das Gerät
eingeht oder dass das Signal
vom Gerät außerhalb der
Spezikationen liegt.
• Prüfen Sie, ob das Gerät richtig
angeschlossen ist.
• Prüfen Sie, ob das angeschlossene Gerät
eingeschaltet ist.
• Prüfen Sie das Format des Ausgangssignals
gemäß den Anweisungen im Handbuch des
angeschlossenen Geräts.
17
Page 38

Deutsch
Copyright© 2009 EIZO NANAO CORPORATION. Alle Rechte vorbehalten.
Kein Teil dieses Handbuchs darf ohne die vorherige schriftliche Zustimmung von EIZO NANAO CORPORATION in
irgendeiner Form oder mit irgendwelchen Mitteln – elektronisch, mechanisch oder auf andere Weise – reproduziert, in
einem Suchsystem gespeichert oder übertragen werden.
Es besteht keine Verpichtung seitens der EIZO NANAO CORPORATION, zur Verfügung gestelltes Material oder
Informationen vertraulich zu behandeln, es sei denn, es wurden vor dem Erhalt solcher Informationen entsprechende
Vereinbarungen mit der EIZO NANAO CORPORATION getroffen. Obwohl größte Sorgfalt aufgewendet wurde, um
zu gewährleisten, dass die Informationen in diesem Handbuch dem neuesten Stand entsprechen, ist zu beachten, dass
die Spezikationen der Monitore von EIZO ohne vorherige Ankündigung geändert werden können.
Apple und Macintosh sind eingetragene Marken der Apple Inc.
HDMI, das HDMI-Logo und High-Definition Multimedia Interface sind Marken oder eingetragene Marken von HDMI Licensing LLC.
VGA ist eine eingetragene Marke der International Business Machines Corporation.
Windows, Windows Vista und Xbox 360 sind eingetragene Warenzeichen der Microsoft Corporation in den USA und anderen Ländern.
VESA ist ein eingetragenes Warenzeichen oder ein Warenzeichen von Video Electronics Standards Association in den USA und
anderen Ländern.
EIZO und ScreenManager sind eingetragene Marken der EIZO NANAO CORPORATION in Japan und anderen Ländern.
FORIS ist eine Marke der EIZO NANAO CORPORATION.
18
Page 39

Manuel d’installation
Important : Veuillez lire attentivement les PRECAUTIONS, ce Manuel d’installation
ainsi que le Manuel d’utilisation inclus sur le CD-ROM, an de vous
familiariser avec ce produit et de l’utiliser efcacement et en toute
sécurité. Veuillez conserver ce manuel pour référence ultérieure.
Français
Page 40

Français
Réglage/AjustageInstallationAvant l’utilisation
Guide de dépannage
FORIS FX2431
Le moniteur FX2431 peut être raccordé aux périphériques suivants.
PC
DVI
D-Sub
HDMI
Permet d’utiliser un moniteur en le raccordant à
un PC Windows ou Macintosh.
• Résolution applicable ............page 3
• Procédure de raccordement ...page 7
Périphérique AV
S-Vidéo/Vidéo
Composante
HDMI
Permet d’afcher les images projetées en
raccordant un lecteur de DVD, un jeu vidéo, etc.
• Format de signal applicable ......... page 3
• Procédure de raccordement ........page 11
Lecteur de DVD
Jeux
Périphériques USB
Clavier
• Procédure de raccordement ...
(Décrit également le raccordement d’une
imprimante, d’un scanner, etc.)
Attention
• Utilisez un PC/système d’exploitation
compatible avec les périphériques USB.
[SE compatible]
- Windows 2000/XP/Vista
- Mac OS 9.2.2 et Mac OS X 10.2 ou version
ultérieure
• Le périphérique USB ne fonctionne pas
lorsque le commutateur d’alimentation
principal est en position d’arrêt.
page 10
Souris
Périphérique audio
Permet d’émettre du son depuis le PC et
le périphérique AV en raccordant les haut-
parleurs et l’amplicateur AV.
• Procédure de raccordement ...page 12
REMARQUE
• Permet d’écouter le son en raccordant
un casque à la prise pour casque.
...............................................page 12
(Attention : ne réglez pas le volume à un
niveau trop élevé lorsque vous utilisez le
casque. Vous risqueriez d’endommager
votre ouïe.)
2
Page 41

Réglage/AjustageInstallationAvant l’utilisation
Guide de dépannage
Résolutions/Format de signal compatibles
Ce moniteur prend en charge les résolutions et le format de signal suivants.
Entrée PC/Entrée HDMI (signal PC)
Signal d’entrée
Résolution Fréquence Mode
640 × 400 70 Hz NEC PC-9821
640 × 480 67 Hz Apple Macintosh
640 × 480 ~75 Hz VGA, VESA
720 × 400 70 Hz VGA TEXT
720 × 480 60 Hz
848 × 480 60 Hz
800 × 600 ~75 Hz
832 × 624 75 Hz Apple Macintosh
1 024 × 768 ~75 Hz
1 152 × 864 75 Hz
1 152 × 870 75 Hz Apple Macintosh
1
1 280 × 768
1 280 × 768
1 280 × 960 60 Hz
1 280 × 960 75 Hz Apple Macintosh
1 280 × 1 024 ~75 Hz
1 360 × 768 60 Hz
1 600 × 1 200 60 Hz
1 680 × 1 050
1 680 × 1 050
1 920 × 1 200
1 280 × 720p 50 Hz
1 920 × 1 080p 50 Hz
1 920 × 1 080p
*
1
*
1
*
1
*
2
*1 *
3
*
24 Hz, 25 Hz, 30 Hz, 48 Hz 1 080p
60 Hz VESA CVT RB —
~75 Hz VESA CVT —
60 Hz VESA CVT
60 Hz VESA CVT RB
60 Hz VESA CVT RB
3
*
, 60 Hz 720p
3
*
, 60 Hz 1 080p
VESA
VESA
VESA
VESA
VESA —
VESA
VESA
VESA —
VESA
numérique
Horloge de point:
~ 162 MHz
—
—
ü (60Hz) ü
ü ü
ü ü
ü ü
ü (60Hz) ü
—
ü (60Hz) ü
—
ü ü
—
ü (60Hz) ü
ü ü
ü ü
ü ü
ü ü
ü (60 Hz) ü
ü (60 Hz) ü
ü
Signal d’entrée
analogique
Horloge de point:
~ 162 MHz
ü
ü
ü
ü
ü
ü
ü
ü
ü
—
Français
*1 Lors de l’afchage du signal d’entrée format large, une carte vidéo conforme à la norme VESA CVT est requise.
*2 Résolution recommandée (Réglez votre appareil sur cette résolution)
*3 Résolution pour certains périphérique AV tels que Microsoft Xbox 360
Entrée VIDEO
[Signal S-Vidéo/Vidéo]
– NTSC / PAL / PAL-60
[Signal vidéo composante]
– 525i (480i) / 525p (480p): 60 Hz
– 625i (576i) / 625p (576p): 50 Hz
– 1 125i (1 080i) / 750p (720p): 50 Hz / 60 Hz
– 1 125p (1 080p): 24 Hz / 50 Hz / 60Hz
Entrée HDMI (signal vidéo)
• Signal vidéo
– 525i (480i) / 525p (480p): 60 Hz
– 625i (576i) / 625p (576p): 50 Hz
– 1 125i (1 080i) / 750p (720p): 50 Hz / 60 Hz
– 1 125p (1 080p): 24 Hz / 25 Hz / 30 Hz / 50 Hz / 60 Hz
• Signal audio
2 canaux PCM linéaire (32 kHz / 44.1 kHz / 48 kHz)
3
Page 42

Français
Réglage/AjustageInstallationAvant l’utilisation
Guide de dépannage
[Emplacements des étiquettes de sécurité]
Contenu de l’emballage
Vériez que tous les éléments indiqués ci-dessous sont inclus dans le carton d’emballage. Contactez votre revendeur local si
l’un des éléments est manquant ou abîmé.
REMARQUE
• Veuillez conserver le carton et les matériaux d’emballage pour les réutiliser lors d’un déplacement ultérieur du moniteur.
□ Moniteur
□ Télécommande
□ Piles AA (2 pièces)
□ Cordon d’alimentation
□ Câble de signal numérique (FD-C39)
□ Câble de signal analogique (MD-C87)
□ Câble EIZO USB (MD-C93)
□ EIZO LCD Utility Disk (CD-ROM)
• Manuel d’utilisation
□ Manuel d’installation (Ce manuel d’installation)
□ Manuel de la télécommande
□ PRECAUTIONS
□ Garantie limitée
□ Informations sur le recyclage
□ Vis de montage (M4 x 12, 4 pièces)
A propos du manuel d’installation et du manuel d’utilisation
Manuel d’installation
(Ce manuel d’installation)
Manuel de la
télécommande
Manuel d’utilisation
(Fichier PDF inclus sur le
CD-ROM*1)
PRECAUTIONS
*1 Installation du logiciel Adobe Reader nécessaire.
• Les caractéristiques techniques du produit varient en fonction des régions de commercialisation. Vériez que le manuel est bien
écrit dans la langue de la région d’achat de périphérique.
4
Décrit les informations de base depuis le raccordement du moniteur à un
périphérique externe, comme un PC, etc., jusqu’à l’utilisation du
moniteur.
Décrit l’utilisation et les fonctionnalités de la télécommande.
Décrit les informations d’application telles que le fonctionnement de ce
moniteur, les ajustements d’écran, les réglages et les spécications.
Décrit la façon d’utiliser le moniteur en toute sécurité.
Page 43

Réglage/AjustageInstallationAvant l’utilisation
Guide de dépannage
A propos du disque d’utilitaires EIZO LCD (CD-ROM)
5m
30°
30°
7m
5m
5m
5m
20°
20°
7m
●
Contenu du disque et présentation du logiciel
Le disque inclut des logiciels de réglage ainsi que le Manuel d’utilisation. Lisez le chier « Readme.txt » ou « read me » inclus sur le
disque pour connaître les procédures de démarrage des logiciels ou d’accès aux chiers.
Elément Présentation Système d’exploitation
Fichier « Readme.txt » ou « read me »
Fichiers de motifs de réglage
d’écran
Logiciel ScreenManager Pro for
LCD
Logiciel WindowMovie Checker WindowMovie est une fonction du logiciel
EIZO ScreenSlicer
Manuel d
’utilisation de ce moniteur (Fichier PDF)
Pour le réglage manuel de l’image d’entrée
du signal analogique.
Logiciel permettant de régler l’écran à l’aide
de la souris et du clavier.
Pour en savoir plus sur les options réglables,
consultez la section « Options de réglage des
paramètres ».
ScreenManager Pro for LCD.
Pour plus d’informations, consultez le manuel
d’utilisation du logiciel ScreenManager Pro for
LCD disponible sur le disque.
Logiciel permettant de diviser l’écran en de
multiples fenêtres de manière efcace.
Windows
*
Si vous n’utilisez pas le système
d’exploitation Windows,
téléchargez les motifs de réglage
disponibles sur notre site: http://
www.eizo.com
Windows XP / Vista
*
Le logiciel WindowMovie Checker
ne fonctionne pas sous Windows
Vista.
Windows XP / Vista
Français
●
Pour utiliser ScreenManager Pro for LCD
Pour savoir comment installer et utiliser ScreenManager Pro for LCD, consultez le manuel d’utilisation du logiciel
disponible sur le disque.
Avant d’utiliser la télécommande
●
Installation des piles
1. A l’arrière de la télécommande, appuyez sur
le bouton pour déverrouiller, puis retirez le
couvercle.
2. Insérez les piles AA, puis replacez le
couvercle.
●
Portée de la télécommande
Utilisez la télécommande dans la plage indiquée
ci-dessous.
5
Page 44

Réglage/AjustageInstallationAvant l’utilisation
Guide de dépannage
5 6 7 8 9 10 11
22
4
3
12
13 14
16 17
15
20
19
18
2121
ScreenManager
®
Color
Sound
PowerManager™
Monitor Settings
Information
[ENTER]: Enter
: Select
1 2
23
Commandes et fonctions
Câblage
Français
Menu de réglage
®
1
(ScreenManager
1 Commutateur d’alimentation
principal
2 Connecteur d’alimentation Permet de connecter le cordon d’alimentation.
3 Télécommande
4 Prise pour casque [Mini-prise stéréo] Permet de raccorder un casque.
5 Touche de sélection
(SELECT)
6
Touche de validation (ENTER)
7 Touches de commande
(t qp u)
8 Capteur Détecte la luminosité ambiante. Fonction Auto EcoView (voir page 15).
9 Capteur de télécommande Permet de recevoir le signal émis par la télécommande.
10 Touche d’alimentation Met le moniteur sous/hors tension.
11 Voyant d’alimentation Indique l’état de fonctionnement du moniteur.
12 Connecteurs de signal
d’entrée (HDMI1 / HDMI2)
13 Connecteur d’entrée audio
(«Son analogique»)
14 Connecteur de signal
d’entrée (PC1)
15 Connecteur de signal
d’entrée (PC2)
16 Ports USB (amont) [Amont × 2] Permettent de raccorder un PC.
17 Ports USB (aval) [Aval × 2] Permettent de raccorder un périphérique USB.
18 Connecteur de sortie audio [Mini-prise stéréo] Permet de raccorder des périphériques audio.
19 Connecteur de signal
d’entrée (VIDEO1)
20 Connecteur de signal
d’entrée (VIDEO2)
21 Fente pour le verrouillage de
sécurité
22 Enveloppe de câbles Protège les câbles du moniteur.
23 Haut-parleur Permet de diffuser une source audio.
*1 ScreenManager ® est un alias choisi par EIZO pour le menu de réglage. Consultez le manuel d’utilisation sur le EIZO LCD Utility
Disk (CD-ROM) si vous désirez de plus amples détails sur l’utilisation de ScreenManager.
*
)
Permet de mettre le moniteur sous/hors tension.
La télécommande permet de faire fonctionner, de régler et d’ajuster le moniteur.
• Permet d’afcher le menu « SELECT ».
• Chaque fois que vous appuyez sur la touche, le contenu du menu change.
(Vous pouvez ajuster le volume et modier le signal d’entrée dans le menu
« SELECT ».)
Permet d’afcher le menu de réglage, de dénir les options de réglage ou
d’ajustement de chaque menu et d’enregistrer les valeurs de réglage ou
d’ajustement.
Permettent de sélectionner les options de réglage ou d’ajustement de
chaque menu ou d’augmenter ou diminuer les valeurs de réglage ou
d’ajustement.
Bleu : En fonctionnement Orange : Economie d’énergie
Arrêt : Hors tension
[Connecteur HDMI × 2] Permettent de raccorder un périphérique AV ou un
PC.
[Mini-prise stéréo] Pour l’entrée HDMI, utilisé pour l’émission du signal audio
à partir de connecteurs autres que le connecteur HDMI.
[Vidéo : Connecteur DVI-D, Audio : Mini-prise stéréo] Permet de raccorder un
PC.
[Vidéo : Connecteur D-Sub mini à 15 broches, Audio : Mini-prise stéréo]
Permet de raccorder un PC.
[Vidéo : Connecteur d’entrée S-Vidéo/Vidéo, Audio : Prise broche]
Permet de raccorder un périphérique AV.
[Vidéo : Connecteur d’entrée vidéo composante, Audio : Prise broche]
Permet de raccorder un périphérique AV.
Compatible avec le système de sécurité MicroSaver de Kensington.
6
Page 45

Réglage/AjustageInstallationAvant l’utilisation
Guide de dépannage
Connexion des câbles
Raccordez chaque périphérique.
1
• Raccordement d’un PC ...................Reportez-vous ci-dessous
• Raccordement d’un périphérique USB .......................Page 10
• Raccordement d’un périphérique AV ...........................Page 11
• Raccordement d’un périphérique audio ...................... Page 12
●
Raccordement d’un PC
Attention
• Lorsque vous remplacez le moniteur par un moniteur FX2431, veillez à congurer votre PC en
fonction des paramètres de résolution et de fréquence verticale propres au moniteur FX2431, en
vous référant au tableau de résolution (voir page 3), avant de raccorder le PC.
1. Connectez le moniteur au PC à l’aide d’un câble de signal correspondant aux connecteurs.
Une fois que les connecteurs de câble sont connectés, serrez les vis des connecteurs pour assurer le
couplage.
• Lors du raccordement à l’entrée PC1 (connexion par signal numérique)
Français
Connecteurs du
PC
Connecteur DVI
Connecteur de
sortie audio
Port USB (aval)
Câble de signal FD-C39 (fourni)
1
Câble audio
(mini-prise stéréo à mini-prise stéréo)
Câble USB MD-C93 (fourni)
1
*
Veuillez acheter ce câble.
2
*
Si vous souhaitez raccorder deux PCs au
moniteur, veuillez acheter un autre câble.
*
2
*
Connecteurs du
moniteur
Connecteur DVI-D
Connecteur d’entrée
audio
Port USB (amont)
7
Page 46

• Lors du raccordement à l’entrée PC2 (connexion par signal analogique)
Réglage/AjustageInstallationAvant l’utilisation
Guide de dépannage
Français
Connecteurs du
PC
Connecteur à 15 tiges
D-Sub mini
Câble de signal MD-C87 (fourni)
Connecteurs du
moniteur
Connecteur à 15 tiges
D-Sub mini
Connecteur
Connecteur de
sortie audio
Port USB (aval) Port USB (amont)
(mini-prise stéréo à mini-prise stéréo)
Câble USB MD-C93 (fourni)
Câble audio
1
*
Veuillez acheter ce câble.
2
*
Si vous souhaitez raccorder deux PCs au
moniteur, veuillez acheter un autre câble.
1
*
2
*
d’entrée audio
8
Page 47

• Lors du raccordement à l’entrée HDMI1 / HDMI2 (connexion par signal numérique)
Réglage/AjustageInstallationAvant l’utilisation
Guide de dépannage
Connecteurs du
PC
Connecteur HDMI
Connecteur DVI
Connecteur de
sortie audio
1
Câble HDMI
Câble de conversion DVI-HDMI
Câble audio
*
1
*
1
*
(mini-prise stéréo à mini-prise stéréo)
1
Câble audio
*
(mini-prise stéréo à mini-prise stéréo)
Connecteurs du
moniteur
Connecteur HDMI
Français
Connecteur
d’entrée audio
(« Son analogique »)
(« PC2 audio »)
1
*
Veuillez acheter ce câble.
Attention
• Veuillez noter les points suivants lors du raccordement du PC à l’entrée HDMI.
- Après avoir réglé « PC » sur [Format d’entrée] dans le menu de réglage, démarrez le PC.
- Dénissez le connecteur (« Son analogique » ou « PC2 audio ») à partir duquel le son du PC est émis dans [Prise
d’entrée audio] dans le menu de réglage.
Pour plus d’informations, reportez-vous au Manuel d’utilisation du « EIZO LCD Utility Disk »
(CD-ROM).
9
Page 48

Réglage/AjustageInstallationAvant l’utilisation
Guide de dépannage
●
Raccordement d’un périphérique USB
1. Raccordez les périphériques USB (clavier, souris, etc.) au port USB (aval) du moniteur.
Connecteurs du
moniteur
Port USB (aval)
Français
Clavier
Souris
Attention
• Après avoir raccordé les périphériques USB et mis le moniteur sous tension, la fonction USB se
règle automatiquement.
• Selon le PC, le système d’exploitation ou les périphériques USB utilisés, il est possible que le
moniteur ne fonctionne pas normalement. (Pour connaître la compatibilité USB de chaque
périphérique, consultez le fabricant.)
• Le périphérique USB ne fonctionne pas lorsque le commutateur d’alimentation principal est en
position d’arrêt.
REMARQUE
• Le PC (PC1 ou PC2) auquel sont raccordés les périphériques USB bascule automatiquement en fonction de la
commutation du signal d’entrée. Le PC auquel sont raccordés les périphériques USB peut également être
spécié.
Pour plus d’informations, reportez-vous au Manuel d’utilisation du « EIZO LCD Utility Disk » (CD-ROM).
10
Page 49

Réglage/AjustageInstallationAvant l’utilisation
Guide de dépannage
●
Raccordement d’un périphérique AV
1. Raccordez le moniteur à le périphérique AV à l’aide d’un câble de signal compatible avec les
connecteurs.
Connecteurs du
périphérique AV
S-Vidéo
Vidéo
R L
2
Câble S-Vidéo
*1 *
ou
2
Câble vidéo
Câble audio
*1 *
*
1
(Prise à broches à prise à broches)
1
Câble vidéo composante
*
Connecteurs du
moniteur
Français
Vidéo composante
1
*
3
*1*
1
*
Veuillez acheter ce câble.
2
*
Utilisez l’un ou l’autre câble pour raccorder le
moniteur et le périphérique AV.
3
*
Veuillez utiliser le câble portant la mention « High
Speed HDMI
TM
».
Connecteur HDMI
Vidéo composante
Connecteur HDMI
R L
Câble audio
(Prise à broches à prise à broches)
Câble HDMI
Attention
• Lorsque vous commandez un périphérique AV raccordé à l’entrée HDMI du moniteur à l’aide de la
fonction HDMI CEC, le réglage [Réglage HDMI CEC] du menu de réglage doit être déni (voir page
16).
11
Page 50

●
Réglage/AjustageInstallationAvant l’utilisation
Guide de dépannage
Raccordement d’un périphérique audio
1. Raccordez le moniteur au périphérique audio à l’aide d’un câble audio compatible avec les
connecteurs.
Français
Connecteurs du
moniteur
1
Câble audio
(mini-prise stéréo à prise à broches)
Connecteur de
sortie audio
Câble audio
(mini-prise stéréo à mini-prise stéréo)
1
*
Attention
• Lors de l’utilisation du périphérique audio, réglez le volume du moniteur sur « 0 ». Réglez le niveau
sonore sur le périphérique audio.
REMARQUE
• Si vous utilisez un casque, raccordez
le casque à la prise pour casque du
moniteur.
*
1
*
Veuillez acheter ce câble.
Prise pour casque
Casque
Connecteurs du
périphérique audio
Connecteur
d’entrée audio
(Prise broche)
R L
(Mini-prise stéréo)
Branchez le cordon d’alimentation du moniteur sur une prise de courant.
2
1. Branchez le cordon d’alimentation dans une prise secteur et dans le connecteur d’alimentation
du moniteur.
Ajustage de la hauteur et de l’angle de l’écran
Placez vos mains des deux côtés du moniteur et réglez la hauteur, l’inclinaison et l’orientation de l’écran dans une
position agréable et confortable pour travailler.
12
Page 51

Réglage/AjustageInstallationAvant l’utilisation
Guide de dépannage
Afchage de l’écran
4
Vériez que le commutateur principal du moniteur est réglé sur ON.
1
Pour mettre le moniteur sous tension, appuyez sur la touche de la
2
télécommande (ou la touche du moniteur).
Le voyant tension du moniteur s’éclaire en bleu.
Mettez le périphérique externe sous tension.
3
Changez le signal d’entrée pour afcher l’image envoyée par le périphérique.
4
Appuyez sur , ou . Chaque fois que vous appuyez sur une touche, le signal d’entrée
commute.
PC PC1
PC2...
g
Français
VIDEO VIDEO1
HDMI HDMI1
n Lors de la réception d’un signal analogique émis par le PC
Lorsque vous mettez le moniteur et le PC sous tension pour la première fois avec le signal analogique,
la fonction Réglage écran auto règle l’horloge, la phase et la position de l’écran automatiquement.
Lorsque le signal numérique est émis depuis le PC, les images s’afchent correctement en fonction des
données prédénies du moniteur.
Attention
• Mettez le moniteur hors tension si vous prévoyez de ne pas l’utiliser pendant une période prolongée.
L’alimentation du moniteur est coupée en débranchant le cordon d’alimentation.
VIDEO2...
g
HDMI2...
g
Réglage du volume sonore
Appuyez sur les touches ou de la
1
télécommande.
Menu de réglage du volume
En appuyant sur , le volume augmente et en appuyant sur
, il diminue.
13
Page 52

Français
Réglage/AjustageInstallationAvant l’utilisation
Guide de dépannage
Color Mode
Custom(xxxx)
Sélection du mode d’écran
La modication du mode Couleur vous permet de régler facilement le mode d’afchage adapté.
Pour plus d’informations sur le Mode Couleur, reportez-vous au Manuel d’utilisation inclus sur le « EIZO LCD Utility
Disk » (CD-ROM).
Mode Couleur
(Entrée PC/Entrée HDMI (signal PC))
Texte Adapté à l’afchage de textes sur traitement de texte ou feuille de calcul.
Image Adapté à l’afchage de photos ou d’images.
Film Adapté à la lecture d’images animées.
Jeu (PC) Adapté à l’afchage d’images de jeux vidéo.
Personnalisé
1
*
(xxx
)
(Entrée VIDEO/Entrée HDMI (signal vidéo))
Standard Afchage vidéo standard.
Cinéma Idéal pour les effets de cinéma, etc.
Dynamique Pour faire ressortir les contour de l’image.
Jeu Adapté à l’afchage d’images de jeux vidéo.
Personnalisé
1
*
(xxx
)
Pour ajuster les réglages selon vos préférences.
Pour ajuster les réglages selon vos préférences.
*1 L’entrée sélectionnée à cet instant s’afche.
Appuyez sur la touche de la télécommande.
1
Chaque fois que vous appuyez sur cette touche, le mode change.
Menu de réglage Mode Couleur
14
Page 53

Réglage/AjustageInstallationAvant l’utilisation
Guide de dépannage
Ajustage de la luminosité
Color
Color Mode
Brightness
Black Level
Hue
Saturation
Contrast
Temperature
Return
[ENTER] : Enter
: Select
[EXIT]: Exit
Reset
Advanced Settings
[ ]Standard
[ ]Custom(xxxx)
[ ]50
[ ]50
[ ]0
[ ]0
[ ]6500K
Brightness
50
Appuyez sur la touche de la télécommande.
1
Le menu de réglage apparaît.
Choisissez [Couleur], puis appuyez sur .
2
Le menu Couleur apparaît.
Sélectionnez [Luminosité] à l’aide de la touche
3
ou , puis appuyez sur .
Le menu de réglage Luminosité apparaît.
Menu Couleur
Français
Réglez la luminosité à l’aide de la touche ou .
4
Menu de réglage Luminosité
Appuyez sur pour augmenter la luminosité de l’écran ou sur
pour la diminuer.
Appuyez sur une fois la luminosité souhaitée dénie.
5
La luminosité spéciée est enregistrée.
REMARQUE
• Lorsque la fonction Auto EcoView est activée, la luminosité de l’écran peut être réglée automatiquement au
niveau approprié en fonction de la luminosité ambiante détectée par le capteur situé sur le côté inférieur du
moniteur et la luminosité des images afchées. Pour plus d’informations, reportez-vous au Manuel d’utilisation
du « EIZO LCD Utility Disk » (CD-ROM).
Les réglages et ajustages de base sont terminés. Consultez le manuel d’utilisation sur le
CD-ROM si vous désirez de plus amples détails sur les Réglages/Ajustages avancés.
15
Page 54

Français
Réglage/AjustageInstallationAvant l’utilisation
Guide de dépannage
HDMI CEC Setting
HDMI CEC
Power On Link
Power Off Link
Reset
Return
[ENTER] : Enter
: Select
[EXIT]: Exit
[ ]Enable
[ ]Disable
[ ]Enable
Monitor Settings
Language
USB Selection
Power Indicator
HDMI CEC Setting
Real Image
Sub-Window Lucent
Advanced Settings(xxxx)
Return
[ENTER] : Enter
: Select
[EXIT]: Exit
Reset
[ ]On
[ ]English
[ ]Auto
[ ]0
[ ]Disable
Réglage HDMI CEC
(Lors du contrôle de périphériques externes depuis le moniteur)
Ce moniteur prend en charge la technologie HDMI CEC (Consumer Electronics Control). La commande interactive est
disponible si vous raccordez le périphérique externe compatible avec la fonction HDMI CEC au moniteur à l’aide du
câble HDMI.
Exécutez la procédure suivante lorsque vous commandez le périphérique externe depuis le moniteur à l’aide de la
fonction HDMI CEC.
Attention
• Grâce à la fonction HDMI CEC, ce moniteur peut commander uniquement des périphériques externes
comme des enregistreurs et des lecteurs compatibles avec la fonction HDMI CEC. Toutefois, cette
fonction ne fonctionne pas correctement avec certains périphériques.
• Pour plus d’informations sur le contôle de périphériques externes et la fonction HDMI CEC, reportezvous au Manuel de la télécommande et au Manuel d’utilisation inclus dans le « EIZO LCD Utility Disk »
(CD-ROM).
Vériez que le réglage HDMI CEC du périphérique externe est activé.
1
Pour plus d’informations sur ce réglage, consultez le manuel du périphérique externe.
Appuyez sur la touche de la télécommande.
2
Le menu de réglage apparaît.
Sélectionnez [Réglages moniteur] à l’aide de la
3
touche ou , puis appuyez sur .
Le menu Réglages moniteur apparaît.
Sélectionnez [Réglage HDMI CEC] à l’aide de la
4
touche ou , puis appuyez sur .
Le menu Réglage HDMI CEC apparaît.
Réglez chaque option.
5
1. Choisissez l’option de réglage à l’aide de la touche ou
et appuyez sur .
Le menu de réglage de l’option sélectionnée apparaît.
2.
Sélectionnez le réglage à l’aide de la touche ou et
appuyez sur .
Menu Réglages moniteur
Menu Réglage HDMI CEC
• [HDMI CEC] : Sélectionnez « Activer ».
• [Marche en veille] : Sélectionnez « Activer » lors de la mise sous
tension simultanée du moniteur et du périphérique
externe.
• [Arrêt em veille] : Sélectionnez « Activer » lors de la mise hors
tension simultanée du périphérique externe et moniteur.
Appuyez sur .
6
La conguration est terminée.
16
Page 55

Réglage/AjustageInstallationAvant l’utilisation Guide de dépannage
Problème de non-afchage d’images
Signal Error
PC
FORIS FX2431 S/N:********
Usage Time
******** H
Input Signal
Signal Error
Information(HDMI1)
Return
[ENTER]: Return
Si aucune image ne s’afche sur le moniteur même après avoir utilisé les solutions suivantes, contactez votre revendeur
local.
1. Vériez le voyant tension.
Symptôme Etat Cause possible et solution
Aucune image Le voyant ne tension pas. • Vériez que le cordon d’alimentation est
correctement branché.
• Vériez que le commutateur principal est réglé
sur ON.
• Appuyez sur
sur le moniteur).
sur la télécommande (ou sur
Le voyant tension en bleu.
Vériez que le périphérique est correctement
raccordé.
(Entrée PC/Entrée HDMI (signal PC))
Augmentez chaque valeur de réglage dans
[Luminosité], [Contraste] et [Gain]*1.
(Entrée VIDEO/Entrée HDMI (signal vidéo))
Vériez que le périphérique raccordé est sous
tension.
Le voyant tension en orange.
(Entrée PC/Entrée HDMI (signal PC))
• Appuyez sur une touche du clavier ou cliquez
avec la souris.
• Mettez le PC sous tension.
*1 Pour plus d’informations sur le réglage de la luminosité, du contraste et du gain, reportez au Manuel d’utilisation
inclus dans le CD-ROM.
2. Vériez le message d’erreur qui apparaît à l’écran.
(Entrée PC/Entrée HDMI (signal PC))
Symptôme Etat Cause possible et solution
Exemple:
Le message indique que le signal
d’entrée est en dehors de la plage
de fréquences spéciée.
*
Le signal d’entrée actuel peut
être vérié dans le menu
[Informations]. (La fréquence du
signal se trouvant en dehors de
la plage de fréquences s’afche
en rouge.)
Sélectionnez le mode approprié à l’aide du
logiciel utilitaire de la carte vidéo. Consultez le
manuel de la carte vidéo pour de plus amples
détails.
Français
3. Vériez le réglage [Informations] dans le menu de réglage.
(Appuyez sur la touche de la télécommande, sélectionnez [Informations] à l’aide de la touche ou
, puis appuyez sur .)
Symptôme Etat Cause possible et solution
Exemple:
Le message « Erreur de
Signal » s’afche.
Le message afché indique que
le signal n’est pas émis par le
périphérique ou que la
fréquence du signal se trouve
en dehors de la spécication.
• Vériez que le périphérique est correctement
raccordé.
• Vériez que le périphérique raccordé est sous
tension.
• Le message afché indique que le signal n’est
pas émis par le périphérique ou que la
fréquence du signal se trouve en dehors de la
spécication.
17
Page 56

Français
Copyright© 2009 EIZO NANAO CORPORATION. Tous droits réservés.
Aucune partie de ce manuel ne peut être reproduite, enregistrée dans un système documentaire ou transmise sous
quelque forme et par quelque moyen que ce soit, électronique, mécanique ou autre, sans l’autorisation préalable écrite
de EIZO NANAO CORPORATION.
EIZO NANAO CORPORATION n’est tenu à aucun engagement de condentialité vis-à-vis des informations ou
documents soumis, sauf en cas d’accord préalable passé avant réception de ces informations par EIZO NANAO
CORPORATION. Malgré tous les efforts déployés pour garantir la mise à jour des informations contenues dans ce
manuel, veuillez noter que les caractéristiques techniques du moniteur EIZO sont sujettes à modications sans préavis.
Apple et Macintosh sont des marques déposées de Apple Inc.
HDMI, le logo HDMI et High-Definition Multimedia Interface sont des marques commerciales ou des marques déposées de HDMI
Licensing LLC.
VGA est une marque déposée de International Business Machines Corporation.
Windows, Windows Vista et Xbox 360 sont des marques déposées enregistrées de Microsoft Corporation aux États-Unis et dans d’
autres pays.
VESA est une marque ou une marque déposée de Video Electronics Standards Association aux Etats-Unis et dans d’autres pays.
EIZO et ScreenManager sont des marques déposées de EIZO NANAO CORPORATION au Japon et dans d’autres pays.
FORIS est une marque de EIZO NANAO CORPORATION.
18
Page 57

Manual de instalación
Importante: Lea detenidamente el apartado PRECAUCIONES, el Manual de
instalación y el Manual del usuario que encontrará en el CD-ROM para
familiarizarse con las normas de seguridad y los procedimientos de uso.
Conserve este manual para consultas posteriores.
Español
Page 58

Solución de problemasConfiguración/AjusteInstalaciónAntes de su utilización
FORIS FX2431
FX2431 puede conectarse a los dispositivos siguientes.
PC
Dispositivo audiovisual
Español
DVI
D-Sub
HDMI
Se puede utilizar como un monitor si se conecta
a un PC Windows o Macintosh.
• Resolución adecuada .............página 3
• Métodos de conexión .............página 7
S-Video / vídeo
Componente
HDMI
Permite visualizar imágenes proyectadas mediante
la conexión de un DVD, un vídeo, un juego, etc.
• Formato de señal adecuado ......... página 3
• Métodos de conexión .................. página 11
Reproductor de DVD
Juegos
Dispositivo de audio
Dispositivos USB
Teclado
• Métodos de conexión .........
(También está disponible para conectar a una
impresora o un escáner, etc.)
Atención
• Utilice un PC o un sistema operativo (SO) que
funcione con dispositivos USB.
[SO adecuado]
- Windows 2000/XP/Vista
- Mac OS 9.2.2 y Mac OS X 10.2 o superior
• El dispositivo USB no funciona cuando el
interruptor de alimentación principal está
apagado.
página 10
Ratón
Permite emitir sonido desde un PC o un
dispositivo audiovisual conectándolo a
unos altavoces y un amplicador
audiovisual.
• Métodos de conexión ..........
NOTA
• Permite escuchar sonido conectando
unos auriculares a la toma de
auriculares. .........................página 12
(Precaución: si utiliza auriculares, no
suba demasiado el volumen, ya que sus
oídos podrían verse afectados.)
página 12
2
Page 59

Solución de problemasConfiguración/AjusteInstalaciónAntes de su utilización
Resoluciones/formato de señal compatibles
El monitor admite las resoluciones y el formato de señal siguientes.
Entrada PC / Entrada HDMI (señal PC)
Señal de entrada
Resolución Frecuencia Modo
640 × 400 70 Hz NEC PC-9821
640 × 480 67 Hz Apple Macintosh
640 × 480 ~75 Hz VGA, VESA
720 × 400 70 Hz VGA TEXT
720 × 480 60 Hz
848 × 480 60 Hz
800 × 600 ~75 Hz
832 × 624 75 Hz Apple Macintosh
1024 × 768 ~75 Hz
1152 × 864 75 Hz
1152 × 870 75 Hz Apple Macintosh
1
1280 × 768
1280 × 768
1280 × 960 60 Hz
1280 × 960 75 Hz Apple Macintosh
1280 × 1024 ~75 Hz
1360 × 768 60 Hz
1600 × 1200 60 Hz
1680 × 1050
1680 × 1050
1920 × 1200
1280 × 720p 50 Hz
1920 × 1080p 50 Hz
1920 × 1080p
*
*
1
1
*
1
*
*1 *
*
2
3
60 Hz VESA CVT RB —
~75 Hz VESA CVT —
60 Hz VESA CVT
60 Hz VESA CVT RB
60 Hz VESA CVT RB
3
*
, 60 Hz 720p
3
*
, 60 Hz 1080p
24 Hz, 25 Hz,
30 Hz, 48 Hz
VESA
VESA
VESA
VESA
VESA —
VESA
VESA
VESA —
VESA
1080p
digital
Reloj de puntos:
~ 162 MHz
—
—
ü (60 Hz) ü
ü ü
ü ü
ü ü
ü (60 Hz) ü
—
ü (60 Hz) ü
—
ü ü
—
ü (60 Hz) ü
ü ü
ü ü
ü ü
ü ü
ü (60 Hz) ü
ü (60 Hz) ü
ü
Señal de entrada
analógica
Reloj de puntos:
~ 162 MHz
ü
ü
ü
ü
ü
ü
ü
Español
ü
ü
—
*1
Se necesita una tarjeta gráca compatible con el estándar VESA CVT para visualizar la señal de entrada con formato panorámico.
*2
Resolución recomendada (ajuste esta resolución)
*3 Resolución para algunos dispositivos audiovisuales como Microsoft Xbox 360
Entrada VIDEO
[S-Video / señal de vídeo]
– NTSC / PAL / PAL-60
[Señal de vídeo por componente]
– 525i (480i) / 525p (480p): 60 Hz
– 625i (576i) / 625p (576p): 50 Hz
– 1125i (1080i) / 750p (720p): 50 Hz / 60 Hz
– 1125p (1080p): 24 Hz / 50 Hz / 60 Hz
Entrada HDMI (señal vídeo)
• Señal de vídeo
– 525i (480i) / 525p (480p): 60 Hz
– 625i (576i) / 625p (576p): 50 Hz
– 1125i (1080i) / 750p (720p): 50 Hz / 60 Hz
– 1125p (1080p): 24 Hz / 25 Hz / 30 Hz / 50 Hz / 60 Hz
• Señal de audio
PCM lineal con 2 canales (32 kHz / 44,1 kHz / 48 kHz)
3
Page 60

Español
Solución de problemasConfiguración/AjusteInstalaciónAntes de su utilización
[Ubicación de las notas de precaución]
Contenido del embalaje
Compruebe que los elementos siguientes estén incluidos en el embalaje. Póngase en contacto con su distribuidor si alguno de
los elementos no aparece o aparece dañado.
NOTA
• Conserve la caja y los materiales de embalaje para utilizarlos en posibles futuros transportes del monitor.
□ Monitor
□ Mando a distancia
□ Pilas AA (2 unidades)
□ Cable de alimentación
□ Cable de señal digital (FD-C39)
□ Cable de señal analógica (MD-C87)
□ Cable EIZO USB (MD-C93)
□ EIZO LCD Utility Disk (CD-ROM)
• Manual del usuario
□ Manual de instalación (este manual)
□ Guía del mando a distancia
□ PRECAUCIONES
□ Garantía limitada
□ Información sobre reciclaje
□ Tornillos de montaje (M4 x 12, 4 unidades)
Información sobre el Manual de instalación y el Manual del usuario
Manual de instalación
(este manual)
Guía del mando a distancia
Manual del usuario
(archivo PDF incluido en el CD-ROM
PRECAUCIONES
*1 Es necesario tener instalado Adobe Reader.
• Las especicaciones del producto varían en función del área de venta. Compruebe que el manual está escrito en el idioma del área
de adquisición del producto.
4
Información básica de varios temas que abarcan desde la conexión del monitor
a dispositivos externos, tales como un PC, hasta la utilización del monitor.
Describe el funcionamiento mediante mando a distancia.
Información sobre la aplicación como el funcionamiento del monitor,
ajustes de pantalla, parámetros y especicaciones.
*1)
Información sobre cómo utilizar el monitor de forma segura.
Page 61

Solución de problemasConfiguración/AjusteInstalaciónAntes de su utilización
Acerca de EIZO LCD Utility Disk (CD-ROM)
5m
30°
30°
7m
5m
5m
5m
20°
20°
7m
●
Descripción general del contenido del disco y del software
El CD-ROM incluye programas de software para denir los ajustes, y el Manual del usuario. Consulte el archivo
“Readme.txt” o el “read me” del CD-ROM para obtener información sobre cómo iniciar el software o cómo acceder a
los archivos.
Elemento Descripción general Sistema operativo
Un archivo “Readme.txt” o “read me
Archivos de patrones para ajustar
la pantalla
ScreenManager Pro for LCD Software para ajustar la pantalla utilizando el
Software WindowMovie Checker WindowMovie es una función de
EIZO ScreenSlicer Software que divide una pantalla y muestra
Manual del usuario de este monitor (archivo PDF)
”
Se utilizan para ajustar la imagen de la
entrada de señal analógica manualmente.
ratón y el teclado.
Para obtener información sobre los elementos
que pueden ajustarse, consulte “Parameter
Adjustment Items”.
ScreenManager Pro for LCD.
Para obtener más información, consulte el
Manual del usuario de ScreenManager Pro
for LCD incluido en el disco.
varias pantallas de manera eciente.
Windows
*
Si su sistema operativo no es
Windows, descargue los archivos
de patrones de nuestro sitio web.
http://www.eizo.com
Windows XP / Vista
*
El software WindowMovie
Checker no se puede utilizar con
Windows Vista.
Windows XP / Vista
Español
●
Uso de ScreenManager Pro for LCD
Para obtener información sobre la instalación y el uso de ScreenManager Pro for LCD, consulte el Manual del usuario
correspondiente que se incluye en el disco.
Antes de utilizar el mando a distancia
●
Cómo colocar las pilas
1. En la parte trasera del mando a distancia,
presione la pestaña para desbloquear la tapa y
sáquela.
2. Inserte las pilas AA y, a continuación, vuelva a
deslizar la cubierta para colocarla en su sitio.
●
Rango de recepción del mando a
distancia
Utilice el mando a distancia dentro del rango de
recepción que se indica a continuación.
5
Page 62

Solución de problemasConfiguración/AjusteInstalaciónAntes de su utilización
Controles y funciones
5 6 7 8 9 10 11
22
4
3
12
13 14
16 17
15
20
19
18
2121
ScreenManager
®
Color
Sound
PowerManager™
Monitor Settings
Information
[ENTER]: Enter
: Select
1 2
23
Cableado
Español
Menú de ajustes
®
1
(ScreenManager
1 Interruptor de alimentación
principal
2 Conector de alimentación Conecta el cable de alimentación.
3 Mando a distancia Mediante el mando a distancia pueden controlarse el funcionamiento, los
4 Toma de auriculares [Minitoma estéreo] Conecta auriculares.
5 Botón de selección (SELECT) • Muestra el menú “SELECT”.
6 Botón Intro (ENTER) Muestra el menú de ajustes, ja los elementos de ajuste o conguración de
7 Botones de control
(t qp u)
8 Sensor Detecta el brillo del entorno. Función Auto EcoView (consulte la página 15).
9
Detector del mando a distancia
10 Botón de alimentación Enciende o apaga la unidad.
11 Indicador de alimentación Indica el estado operativo del monitor.
12 Conectores de señal de
entrada (HDMI1 / HDMI2)
13 Conector de entrada de audio
(“Sonido analógico”)
14 Conector de señal de entrada
(PC1)
15 Conector de señal de entrada
(PC2)
16 Puertos USB (superior) [2 ujos ascendentes] Conecta un PC.
17 Puertos USB (inferior) [2 ujos descendentes] Conectan un dispositivo USB periférico.
18 Conector de salida de audio [Minitoma estéreo] Conecta dispositivos de audio.
19 Conector de señal de entrada
(VIDEO1)
20 Conector de señal de entrada
(VIDEO2)
21
Ranura de bloqueo de seguridad
22 Portacables Cubre los cables del monitor.
23 Altavoz Fuente de emisión de audio.
*1 ScreenManager ® es el nombre que utiliza EIZO para el menú de ajuste. Para obtener información sobre el uso de ScreenManager,
consulte el Manual del usuario del EIZO LCD Utility Disk (CD-ROM).
6
*
)
Enciende o apaga la alimentación principal.
parámetros y los ajustes del monitor.
•
Cada vez que pulse este botón, cambiará el contenido del menú.
(Puede ajustar el volumen y cambiar la señal de entrada en el menú “SELECT”.)
cada menú y guarda los resultados de ajustes o conguración.
Sirve para seleccionar los elementos de ajuste o conguración, o para
aumentar o disminuir los valores de ajuste de cada menú.
Recibe la señal procedente del mando a distancia.
Azul : en funcionamiento Naranja : ahorro de energía
Off : apagado
[2 conectores HDMI] Conecta un dispositivo audiovisual o un PC.
[Minitoma estéreo] Si la entrada es HDMI, sirve para la entrada de señal de
audio de conectores que no sean HDMI.
[Vídeo : Conector DVI-D, Audio : Minitoma estéreo] Conecta un PC.
[Vídeo : Miniconector D-Sub de 15 contactos, Audio : Minitoma estéreo]
Conecta un PC.
[Vídeo : Conector de entrada de S-Video/vídeo, Audio :
Toma de contactos
Conecta un dispositivo audiovisual.
[Vídeo : Conector de entrada de vídeo por componente, Audio : Toma de contactos]
Conecta un dispositivo audiovisual.
Admite el sistema de seguridad MicroSaver de Kensington.
]
Page 63

Solución de problemasConfiguración/AjusteInstalaciónAntes de su utilización
Conexión de los cables
Conecta cada dispositivo.
1
• Conecta un PC .............Instrucciones a continuación
• Conecta un dispositivo USB ......................página 10
• Conecta un dispositivo audiovisual ............página 11
• Conecta un dispositivo audio .....................página 12
●
Conecta un PC
Atención
• Al reemplazar su monitor actual por el nuevo monitor FX2431, y antes de conectar el PC, asegúrese
de cambiar la conguración de la resolución y de la frecuencia vertical del PC con el n de denirla
con los ajustes disponibles del nuevo monitor FX2431; para ello, consulte la tabla de resoluciones
(en la página 3).
1. Conecte el monitor al PC con un cable de señal haciendo coincidir los conectores.
Una vez conectados los conectores del cable, apriete los tornillos de los conectores para jar la conexión.
• Si se conecta a una entrada PC1 (conexión de señal digital)
Español
Conectores del PC
Conector DVI
Conector de
salida de audio
Conexión de ujo
descendente para USB
Cable de señal FD-C39 (suministrado)
1
Cable de audio
(minitoma estéreo a minitoma estéreo)
Cable USB MD-C93 (suministrado)
1
*
Debe adquirir el cable.
2
*
Si conecta dos PC al monitor, debe
adquirir otro cable.
*
2
*
Conectores del
monitor
Conector DVI-D
Conector de
entrada de audio
Conexión de ujo
ascendente para USB
7
Page 64

• Si se conecta a una entrada PC2 (conexión de señal analógica)
Solución de problemasConfiguración/AjusteInstalaciónAntes de su utilización
Conectores del PC Conectores del
monitor
Español
Miniconector D-Sub de
15 contactos
Conector de
salida de audio
Conexión de ujo
descendente para USB
Cable de señal MD-C87 (suministrado)
1
Cable de audio
*
(minitoma estéreo a minitoma estéreo)
Cable USB MD-C93 (suministrado)
1
*
Debe adquirir el cable.
2
*
Si conecta dos PC al monitor, debe
adquirir otro cable.
Miniconector D-Sub de
15 contactos
Conector de
entrada de audio
Conexión de ujo
ascendente para USB
2
*
8
Page 65

• Al conectar a una entrada HDMI1/entrada HDMI2 (conexión de señal digital)
Solución de problemasConfiguración/AjusteInstalaciónAntes de su utilización
Conectores del PC Conectores del
monitor
Conector HDMI
Cable HDMI
1
*
Conector HDMI
1
Conector DVI
Cable conversor DVI-HDMI
*
Conector de
1
Cable de audio
*
(minitoma estéreo a minitoma estéreo)
entrada de audio
(“Sonido analógico”)
Conector de
salida de audio
1
Cable de audio
(minitoma estéreo a minitoma estéreo)
*
1
*
Debe adquirir el cable.
(“Sonido PC2”)
Atención
• Tenga en cuenta lo siguiente cuando conecte el PC a una entrada HDMI.
- Una vez que haya ajustado el “PC” en [Formato de entrada], en el menú de ajustes, inicie el PC.
- Seleccione el conector (“Sonido analógico” o “Sonido PC2”) desde el que entrará el sonido del PC, en la opción
[Toma entrada sonido] del menú de ajustes.
Para obtener más información, consulte el Manual del usuario del “EIZO LCD Utility Disk” (CD-
ROM).
Español
9
Page 66

Español
Solución de problemasConfiguración/AjusteInstalaciónAntes de su utilización
●
Conecta un dispositivo USB
1. Conecte dispositivos USB (teclado, ratón, etc.) al puerto USB (ujo descendiente) del monitor.
Conectores del
monitor
Conexión de ujo
descendente para USB
Teclado
Ratón
Atención
• Una vez que se conectan los dispositivos USB y se enciende el monitor, la función USB se congura
de forma automática.
• Es posible que el monitor no funcione correctamente según el PC, el SO o los dispositivos USB
utilizados. (Para obtener información sobre la compatibilidad con USB de los distintos dispositivos,
consulte a los fabricantes respectivos.)
• El dispositivo USB no funciona cuando el interruptor de alimentación principal está apagado.
NOTA
• El PC (PC1 o PC2) en el que funcionan los dispositivos USB cambia automáticamente junto con el cambio de la
señal de entrada. El PC en el que funcionan los dispositivos USB también se puede especicar. Para obtener
más información, consulte el Manual del usuario del “EIZO LCD Utility Disk” (CD-ROM).
10
Page 67

Solución de problemasConfiguración/AjusteInstalaciónAntes de su utilización
●
Conecta un dispositivo audiovisual
1. Conecte el monitor al dispositivo audiovisual con un cable de señal que se corresponda con
los conectores.
Conectores del
dispositivo
audiovisual
S-Video
Vídeo
R L
2
Cable de S-Video
*1 *
o
2
Cable de vídeo
Cable de audio
*1 *
*
1
(toma de contactos a toma de contactos)
1
Cable de vídeo por componente
*
Conectores del
monitor
Español
Vídeo por componente
1
*
3
*1*
1
*
Debe adquirir el cable.
2
*
Utilice uno de los cables para conectar el monitor y
el dispositivo audiovisual.
3
*
Utilice el cable en el que se puede leer “High Speed
HDMITM Cable”.
Conector HDMI
Vídeo por
componente
Conector HDMI
R L
Cable de audio
(toma de contactos a toma de contactos)
Cable HDMI
Atención
• Cuando se controla el dispositivo audiovisual conectado a la entrada HDMI del monitor mediante la
función HDMI CEC, debe ajustarse la opción [Ajuste HDMI CEC] del menú de ajustes (consulte la
página 16).
11
Page 68

Solución de problemasConfiguración/AjusteInstalaciónAntes de su utilización
●
Conecta un dispositivo audio
1. Conecte el monitor al dispositivo de audio que tenga un cable de audio que se corresponda
con los conectores.
Español
Conectores del
monitor
1
Cable de audio
(minitoma estéreo a toma de contactos)
Conector de
salida de audio
Atención
• Cuando utilice el dispositivo de audio, ajuste el volumen del monitor a “0”. Ajuste el volumen y el
sonido del dispositivo de audio.
NOTA
• Si utiliza auriculares, conéctelos a la toma
de auriculares del monitor.
Cable de audio
(minitoma estéreo a minitoma estéreo)
1
*
Debe adquirir el cable.
*
1
*
Auricular
Toma de auriculares
Conectores del
dispositivo de audio
Conector de
entrada de audio
(Toma de contactos)
R L
(Minitoma estéreo)
Conecte el cable de alimentación del monitor a una toma de corriente.
2
1. Enchufe el cable de alimentación en una toma de corriente y el conector de alimentación en el
monitor.
Ajuste de la altura y el ángulo de la pantalla
Sujete el monitor con las manos por ambos lados para regular la altura, la inclinación y el giro de la pantalla y conseguir
una posición de trabajo óptima.
12
Page 69

Solución de problemasConfiguración/AjusteInstalaciónAntes de su utilización
Visualización de la pantalla
4
Compruebe que el interruptor de alimentación principal esté encendido.
1
Encienda el monitor pulsando en el mando a distancia (o en el monitor).
2
El indicador de alimentación del monitor se ilumina en azul.
Encienda el dispositivo externo.
3
Cambie la señal de entrada con el n de mostrar la imagen enviada desde el
4
dispositivo.
Pulse , o . Cada vez que pulse el botón se alternará la señal de entrada.
PC
VIDEO
HDMI
n Si recibe una señal analógica del PC
Cuando encienda el monitor y el PC por primera vez con la señal analógica, la función Autoajuste
pantalla se activa para ajustar el reloj, la fase y la posición de la pantalla automáticamente.
Cuando entra señal digital desde el PC, las imágenes se muestran correctamente según los datos
preajustados del monitor.
Atención
• Apague el monitor si no va a utilizar el monitor durante un período de tiempo prolongado. Para ello,
desenchufe el cable de alimentación del monitor.
PC1gPC2...
VIDEO1gVIDEO2...
HDMI1gHDMI2...
Ajuste del volumen del sonido
Pulse o en el mando a distancia.
1
Menú de ajuste del volumen
Español
Pulse para aumentar el volumen y para reducirlo.
13
Page 70

Solución de problemasConfiguración/AjusteInstalaciónAntes de su utilización
Selección del modo de pantalla
Color Mode
Custom(xxxx)
El cambio del modo de color facilita el ajuste correcto del modo de visualización.
Para encontrar información sobre el Modo de Color, consulte el Manual del usuario incluido en el “EIZO LCD Utility
Disk” (CD-ROM).
Modo de Color
(Entrada PC / Entrada HDMI (señal PC))
Texto Adecuado para el trabajo con software de procesador de textos o de hojas de cálculo.
Imagen Adecuado para la visualización de imágenes como fotografías o dibujos.
Vídeo Adecuado para la reproducción de imágenes animadas.
Juego (PC) Adecuado para la visualización de imágenes de juegos.
Personalizado
1
*
(XXX
)
(Entrada VIDEO / Entrada HDMI (señal vídeo))
Estándar Visualización de vídeo estándar.
Cine Adecuado para el efecto Cine, etc.
Dinámico Adecuado para una imagen claramente delimitada.
Juego Adecuado para la visualización de imágenes de juegos.
Personal. (XXX
Permite realizar los ajustes deseados.
1
*
) Permite realizar los ajustes deseados.
Español
*1 Se visualiza la entrada seleccionada en ese momento.
Pulse en el mando a distancia.
1
Cada vez que pulse este botón, el modo cambiará.
Menú de ajuste Modo de Color
14
Page 71

Solución de problemasConfiguración/AjusteInstalaciónAntes de su utilización
Ajuste del brillo
Color
Color Mode
Brightness
Black Level
Hue
Saturation
Contrast
Temperature
Return
[ENTER] : Enter
: Select
[EXIT]: Exit
Reset
Advanced Settings
[ ]Standard
[ ]Custom(xxxx)
[ ]50
[ ]50
[ ]0
[ ]0
[ ]6500K
Brightness
50
Pulse en el mando a distancia.
1
Aparecerá el menú de ajustes.
Elija [Color] y pulse .
2
Aparecerá el menú Color.
Elija [Brillo] mediante las echas o
3
y pulse .
Aparecerá el menú de ajuste de brillo.
Menú Color
Ajuste el brillo con o .
4
Pulse para dar más brillo a la pantalla o para oscurecerla.
Menú de ajuste Brillo
Cuando obtenga el brillo deseado, pulse .
5
De este modo se guarda el brillo especicado.
NOTA
• Si utiliza Auto EcoView, el brillo de la pantalla puede ajustarse en el parámetro adecuado automáticamente,
según el brillo del entorno detectado por el sensor situado en la parte inferior del monitor y el brillo de las
imágenes mostradas. Para obtener más información, consulte el Manual del usuario del “EIZO LCD Utility Disk”
(CD-ROM).
La conguración y ajustes básicos se han completado. Para obtener información sobre
la conguración/ajustes avanzados, consulte el Manual del usuario del CD-ROM.
Español
15
Page 72

Español
Solución de problemasConfiguración/AjusteInstalaciónAntes de su utilización
HDMI CEC Setting
HDMI CEC
Power On Link
Power Off Link
Reset
Return
[ENTER] : Enter
: Select
[EXIT]: Exit
[ ]Enable
[ ]Disable
[ ]Enable
Monitor Settings
Language
USB Selection
Power Indicator
HDMI CEC Setting
Real Image
Sub-Window Lucent
Advanced Settings(xxxx)
Return
[ENTER] : Enter
: Select
[EXIT]: Exit
Reset
[ ]On
[ ]English
[ ]Auto
[ ]0
[ ]Disable
Ajuste HDMI CEC (Si controla dispositivos externos desde el monitor)
Este monitor admite HDMI CEC (Consumer Electronics Control). Para el control interactivo, conecte el dispositivo
externo correspondiente a HDMI CEC en el monitor con el cable HDMI.
Lleve a cabo los ajustes siguientes cuando controle el dispositivo externo desde el monitor mediante la función HDMI
CEC.
Atención
• La función HDMI CEC permite al monitor controlar sólo dispositivos externos como grabadoras y
reproductores aplicables a HDMI CEC. No obstante, esta función no funciona correctamente con
algunos dispositivos.
• Para obtener más información sobre el control de dispositivos externos y la función HDMI CEC, consulte
la Guía del mando a distancia y el Manual del usuario del “EIZO LCD Utility Disk” (CD-ROM).
Asegúrese de que el ajuste HDMI CEC del dispositivo externo esté habilitado.
1
Para obtener más información sobre los ajustes, consulte el manual del dispositivo externo.
Pulse en el mando a distancia.
2
Aparecerá el menú de ajustes.
Elija [Ajustes monitor] mediante las echas o
3
y pulse .
Aparecerá el menú Ajustes monitor.
Elija [Ajuste HDMI CEC] mediante las echas o
4
y pulse .
Aparecerá el menú Ajuste HDMI CEC.
Ajuste cada elemento.
5
1. Elija el elemento de ajuste mediante o y
pulse .
Aparecerá el menú de ajuste del elemento seleccionado.
2. Seleccione el ajuste mediante
o y pulse .
• [HDMI CEC] : Seleccione “Habilitar”.
• [Enlace aliment. on] : Seleccione “Habilitar” para encender el
monitor a partir de la operación de
encendido del dispositivo externo.
• [Enlace aliment. off] : Seleccione “Habilitar” para apagar el
dispositivo externo a partir de la operación
de apagado del monitor.
Presione .
6
Se habrá completado la denición del ajuste.
16
Menú Ajustes monitor
Menú Ajuste HDMI CEC
Page 73

Solución de problemasConfiguración/AjusteInstalaciónAntes de su utilización
Si no se muestra ninguna imagen
Signal Error
PC
FORIS FX2431 S/N:********
Usage Time
******** H
Input Signal
Signal Error
Information(HDMI1)
Return
[ENTER]: Return
Si no se muestra ninguna imagen en el monitor tras seguir las soluciones propuestas, póngase en contacto con su
distribuidor local.
1. Compruebe el indicador de alimentación.
Síntoma Estado Posible causa y solución
No aparece ninguna imagen El indicador de alimentación no
se ilumina.
El indicador de alimentación se
ilumina en azul.
El indicador de alimentación se
ilumina en naranja.
• Compruebe que el cable de alimentación está
conectado correctamente.
• Compruebe que el interruptor de alimentación
principal esté encendido.
• Pulse
en el mando a distancia (o en el
monitor).
Compruebe que el dispositivo esté bien
conectado.
(Entrada PC / Entrada HDMI (señal PC))
Con gure los valores de ajuste de [Brillo],
[Contraste] y [Ganancia]
*1 a un nivel superior.
(Entrada VIDEO / Entrada HDMI (señal vídeo))
Compruebe que el dispositivo conectado esté
encendido.
(Entrada PC / Entrada HDMI (señal PC))
• Pulse una tecla del teclado o haga clic con el
ratón.
• Encienda el PC.
Español
*1 Para obtener información sobre el ajuste del brillo, el contraste y la ganancia, consulte el Manual del usuario del CD-
ROM.
2. Compruebe el mensaje de error de la pantalla.
(Entrada PC / Entrada HDMI (señal PC))
Síntoma Estado Posible causa y solución
Ejemplo:
El mensaje indica que la señal
de entrada está fuera del rango
de frecuencia especicado.
*
Puede averiguar la señal de
entrada mediante el menú
[Información]. (La frecuencia
de señal que se encuentra
fuera del rango se muestra en
magenta.)
Utilice el software de la tarjeta gráca para
cambiar a un modo adecuado. Consulte el
manual de la tarjeta gráca para obtener más
información.
3. Consulte [Información] en el menú de ajustes.
(Pulse en el mando a distancia, seleccione [Información] con las echas o y, a continuación,
pulse .)
Síntoma Estado Posible causa y solución
Ejemplo:
Aparecerá “Error de Señal”.
El mensaje muestra que no
llega señal del dispositivo o
bien que ésta está fuera de lo
especicado.
• Compruebe que el dispositivo esté bien
conectado.
• Compruebe que el dispositivo conectado esté
encendido.
• Conrme el formato de la señal de salida
consultando el manual de instrucciones del
dispositivo conectado.
17
Page 74

Español
Copyright© 2009 EIZO NANAO CORPORATION Todos los derechos reservados.
Está prohibida la reproducción y almacenamiento en un sistema que permita la recuperación de ninguna parte de este
manual. Asimismo, está prohibida su transmisión, bajo forma alguna y a través de ningún medio electrónico, mecánico
u del tipo que sea, sin previo consentimiento por escrito de EIZO NANAO CORPORATION.
EIZO NANAO CORPORATION no tiene ninguna obligación de mantener la condencialidad del material o de la
información suministrados, salvo que así se acuerde previamente en función de la recepción de dicha información por
parte de EIZO NANAO CORPORATION. Aunque por todos los medios posibles se intenta garantizar la actualización
de la información contenida en este manual, las especicaciones sobre el monitor EIZO pueden están sujetas a
cambios sin previo aviso.
Apple y Macintosh son marcas registradas de Apple Inc.
HDMI, el logotipo de HDMI y High-Definition Multimedia Interface son marcas comerciales o marcas registradas de HDMI Licensing
LLC.
VGA es una marca registrada de International Business Machines Corporation.
Windows, Windows Vista y Xbox 360 son marcas comerciales registradas de Microsoft Corporation en los Estados Unidos y en otros
países.
VESA es una marca comercial registrada o una marca comercial de Video Electronics Standards Association en los Estados Unidos y
en otros países.
EIZO y ScreenManager son marcas comerciales registradas de EIZO NANAO CORPORATION en Japón y en otros países.
FORIS es una marca comercial de EIZO NANAO CORPORATION.
18
Page 75

Manuale di installazione
Importante: leggere attentamente la sezione PRECAUZIONI, il presente Manuale di
installazione e il Manuale dell’utente memorizzati sul CD-ROM per
utilizzare il prodotto in modo efcace e sicuro. Conservare il manuale
per consultazioni future.
Italiano
Page 76

Risoluzione dei problemi
Configurazione e regolazione
InstallazionePreparazione
FORIS FX2431
È possibile collegare il monitor FX2431 ai dispositivi indicati di seguito.
PC
S-Video / Video
DVI
D-Sub
HDMI
Consente di utilizzare il monitor effettuando il
collegamento a un PC Windows o Macintosh.
• Risoluzione compatibile ........pagina 3
• Modalità di collegamento ......pagina 7
Componente
Dispositivo AV
Lettore DVD
HDMI
Consente di visualizzare le immagini proiettate
collegando un lettore DVD, un video, una
postazione di gioco e così via.
• Formato del segnale compatibile
.....................................................
• Modalità di collegamento ...........pagina 11
Gioco
pagina 3
Italiano
Dispositivo USB
Tastiera
• Modalità di collegamento ...
(per il collegamento inoltre di una stampante o
uno scanner e così via)
Attenzione
• Utilizzare un PC/sistema operativo
compatibile con le dispositivo USB.
[Sistema operativo compatibile]
- Windows 2000/XP/Vista
- Mac OS 9.2.2 e Mac OS X 10.2 o successivo
• Il dispositivo USB non funziona quando
l’interruttore di alimentazione principale del
monitor è spento.
pagina 10
Mouse
Dispositivo audio
Consente di trasmettere l’audio dal PC e
dal dispositivo AV effettuando il
collegamento ai diffusori e
all’amplicatore AV.
• Modalità di collegamento ...
NOTA
• Consente di ascoltare l’audio collegando
le cufe alla presa cufe.
............................................pagina 12
(Attenzione: durante l’uso delle cufe,
non tenere il volume eccessivamente
elevato, onde evitare di causare danni
all’udito.)
pagina 12
2
Page 77

Risoluzione dei problemi
Configurazione e regolazione
InstallazionePreparazione
Risoluzioni/Formato del segnale compatibili
Il monitor supporta le risoluzioni e il formato del segnale riportati di seguito.
Ingresso PC / Ingresso HDMI (segnale PC)
Segnale di ingresso
Risoluzione Frequenza Modalità
640 × 400 70 Hz NEC PC-9821
640 × 480 67 Hz Apple Macintosh
640 × 480 ~75 Hz VGA, VESA
720 × 400 70 Hz VGA TEXT
720 × 480 60 Hz
848 × 480 60 Hz
800 × 600 ~75 Hz
832 × 624 75 Hz Apple Macintosh
1024 × 768 ~75 Hz
1152 × 864 75 Hz
1152 × 870 75 Hz Apple Macintosh
1
1280 × 768
1280 × 768
1280 × 960 60 Hz
1280 × 960 75 Hz Apple Macintosh
1280 × 1024 ~75 Hz
1360 × 768 60 Hz
1600 × 1200 60 Hz
1680 × 1050
1680 × 1050
1920 × 1200
1280 × 720p 50 Hz
1920 × 1080p 50 Hz
1920 × 1080p
*
*
1
1
*
1
*
2
*1 *
3
*
24 Hz, 25 Hz, 30 Hz, 48 Hz 1080p
60 Hz VESA CVT RB —
~75 Hz VESA CVT —
60 Hz VESA CVT
60 Hz VESA CVT RB
60 Hz VESA CVT RB
3
*
, 60 Hz 720p
3
*
, 60 Hz 1080p
VESA
VESA
VESA
VESA
VESA —
VESA
VESA
VESA —
VESA
Frequenza dot clock:
digitale
~ 162 MHz
—
—
ü (60 Hz) ü
ü ü
ü ü
ü ü
ü (60 Hz) ü
—
ü (60 Hz) ü
—
ü ü
—
ü (60 Hz) ü
ü ü
ü ü
ü ü
ü ü
ü (60 Hz) ü
ü (60 Hz) ü
ü
Segnale di ingresso
analogico
Frequenza dot clock:
~ 162 MHz
ü
ü
ü
ü
ü
ü
ü
ü
ü
Italiano
—
*1 Per visualizzare il segnale di ingresso in formato ampio, è necessaria una scheda graca conforme allo standard
VESA CVT.
*2 Risoluzione consigliata (impostare questo valore di risoluzione)
*3 Risoluzione per alcuni dispositivo AV, ad esempio Microsoft Xbox 360
Ingresso VIDEO
[Segnale S-Video / Video]
– NTSC / PAL / PAL-60
[Segnale video componente]
– 525i (480i) / 525p (480p): 60 Hz
– 625i (576i) / 625p (576p): 50 Hz
– 1125i (1080i) / 750p (720p): 50 Hz / 60 Hz
– 1125p (1080p): 24 Hz / 50 Hz / 60 Hz
Ingresso HDMI (segnale video)
• Segnale video
– 525i (480i) / 525p (480p): 60 Hz
– 625i (576i) / 625p (576p): 50 Hz
– 1125i (1080i) / 750p (720p): 50 Hz / 60 Hz
– 1125p (1080p): 24 Hz / 25 Hz / 30 Hz / 50 Hz / 60 Hz
• Segnale audio
PCM lineare a 2 canali (32 kHz / 44.1 kHz / 48 kHz)
3
Page 78

Italiano
Risoluzione dei problemi
Configurazione e regolazione
InstallazionePreparazione
[Posizione delle informazioni relative alle avvertenze]
Contenuto della confezione
Vericare che tutti i seguenti componenti siano inclusi nella confezione. Se i componenti elencati di seguito risultassero
mancanti o danneggiati, contattare il rivenditore locale.
NOTA
• Conservare la confezione e tutti i relativi componenti per eventuali spostamenti del monitor.
□ Monitor
□ Telecomando
□ Pile AA (2 pezzi)
□ Cavo di alimentazione
□ Cavo segnale digitale (FD-C39)
□ Cavo segnale analogico (MD-C87)
□ Cavo EIZO USB (MD-C93)
□ EIZO LCD Utility Disk (CD-ROM)
• Manuale dell’utente
□ Manuale di installazione (il presente manuale)
□ Guida del telecomando
□ PRECAUZIONI
□ Garanzia limitata
□ Informazioni sul riciclaggio
□ Viti di montaggio (M4 x 12, 4 pezzi)
Informazioni sul manuale di installazione e sul manuale dell’utente
Manuale di installazione
(il presente manuale)
Guida del telecomando
Manuale dell’utente
(le PDF, sul CD-ROM in dotazione*1)
PRECAUZIONI
*1 È richiesta l’installazione di Adobe Reader.
• Le caratteristiche tecniche variano in base all’area di vendita. Vericare che il manuale sia scritto nella lingua corrispondente
all’area di acquisto.
4
Fornisce le informazioni di base dal collegamento del monitor a un
dispositivo esterno, quale un PC, all’uso del monitor stesso.
Descrive il funzionamento mediante il telecomando.
Fornisce informazioni quali il funzionamento del monitor, la
regolazione dello schermo, le impostazioni e le speciche tecniche.
Descrive come utilizzare in modo sicuro il monitor.
Page 79

Risoluzione dei problemi
Configurazione e regolazione
InstallazionePreparazione
Informazioni su EIZO LCD Utility Disk (CD-ROM)
5m
30°
30°
7m
5m
5m
5m
20°
20°
7m
●
Contenuto del disco e panoramica del software
Il disco include programmi software per la regolazione e il Manuale dell’utente. Per le procedure di avvio del software
o di accesso ai le, consultare il le “Readme.txt” o “read me” sul disco.
Contenuto Panoramica Sistema operativo
File “Readme.txt” o “read me”
File motivo regolazione schermo Utilizzato per la regolazione manuale
ScreenManager Pro for LCD Software per la regolazione dello schermo
Software WindowMovie Checker
EIZO ScreenSlicer Software che suddivide lo schermo e
Manuale dell’utente del presente monitor (le PDF)
dell’immagine dell’ingresso del segnale
analogico.
utilizzando il mouse e la tastiera.
Per le voci regolabili, consultare la sezione
“Voci di regolazione dei parametri”.
WindowMovie è una funzione di
ScreenManager Pro for LCD.
Per ulteriori informazioni, consultare il
manuale dell’utente di ScreenManager Pro for
LCD contenuto nel disco.
visualizza più nestre in modo efciente.
Windows
*
Se viene utilizzato un sistema
operativo diverso da Windows,
scaricare i le motivo dal sito
Web di EIZO: http://www.eizo.
com
Windows XP / Vista
*
Il software WindowMovie
Checker non è compatibile con
Windows Vista.
Windows XP / Vista
●
Uso di ScreenManager Pro for LCD
Per le modalità di installazione e uso di ScreenManager Pro for LCD, consultare il relativo manuale dell’utente
contenuto nel disco.
Prima di utilizzare il telecomando
●
Come inserire le pile
1. Nella parte posteriore del telecomando,
premere la linguetta per sbloccare e
rimuovere il coperchio.
2. Inserire pile AA, quindi chiudere il coperchio.
●
Gamma di ricezione del telecomando
Utilizzare il telecomando entro il raggio d’azione
previsto, come riportato di seguito.
Italiano
5
Page 80

Risoluzione dei problemi
Configurazione e regolazione
InstallazionePreparazione
Comandi e funzioni
5 6 7 8 9 10 11
22
4
3
12
13 14
16 17
15
20
19
18
2121
ScreenManager
®
Color
Sound
PowerManager™
Monitor Settings
Information
[ENTER]: Enter
: Select
1 2
23
Cablaggio
Italiano
Menu Impostazione
(ScreenManager
1 Interruttore di alimentazione
®
1
*
)
Consente di attivare o disattivare l’alimentazione principale.
principale
2 Connettore di alimentazione Consente di collegare il cavo di alimentazione.
3 Telecomando Tramite il telecomando, è possibile controllare il monitor, nonché effettuare le
relative impostazioni e regolazioni.
4 Presa cufe [Minipresa stereo] Consente di collegare le cufe.
5 Tasto Select (SELECT) • Consente di visualizzare il menu “SELECT”.
• Ad ogni pressione del tasto, il contenuto del menu cambia.
(È possibile regolare il volume e modicare il segnale di ingresso nel menu
“SELECT”.)
6 Tasto di conferma (ENTER) Consente di visualizzare il menu Setting, di confermare le voci di
impostazione o di regolazione di ciascun menu e di salvare i risultati
dell’impostazione o della regolazione.
7 Tasti direzionali
(t qp u)
Utilizzati per selezionare le voci di impostazione o di regolazione o per
aumentare o ridurre i valori di regolazione di ciascun menu.
8 Sensore Rileva la luminosità dell’ambiente circostante. Funzione di Auto EcoView
(vedere a pagina 15).
9 Rilevatore telecomando Consente di ricevere il segnale emesso dal telecomando.
10 Pulsante di accensione/
Accende o spegne l’unità.
spegimento
11 Indicatore Power Indica lo stato di funzionamento del monitor.
Blu : acceso Arancione : risparmio energetico
Off : alimentazione spenta
12 Connettori del segnale di
[Connettore HDMI × 2] Consente di collegare un dispositivo AV o un PC.
ingresso (HDMI1 / HDMI2)
13 Connettore di ingresso audio
(“Audio analogico”)
14 Connettore del segnale di
[Minipresa stereo] Per l’ingresso HDMI, viene utilizzato per trasmettere il
segnale audio da connettori diversi dal connettore HDMI.
[Video : Connettore DVI-D, Audio : Minipresa stereo] Consente di collegare un PC.
ingresso (PC1)
15 Connettore del segnale di
ingresso (PC2)
16 Porte USB (superiori) [Upstream × 2] Consente di collegare un PC.
17 Porte USB (inferiori) [Downstream × 2] Consente di collegare una periferica USB.
18 Connettore di uscita audio [Minipresa stereo] Consente di collegare dispositivi audio.
19
Connettore del segnale di
ingresso (VIDEO1)
20 Connettore del segnale di
ingresso (VIDEO2)
21 Alloggiamento del lucchetto
di sicurezza
22 Fermacavi Consente di coprire i cavi del monitor.
23 Diffusore Trasmette la sorgente audio.
*1 ScreenManager ® è un marchio di EIZO per il menu Impostazione. Per informazioni sull’uso di ScreenManager, fare riferimento
[Video : Connettore D-Sub mini a 15 piedini, Audio : Minipresa stereo]
Consente di collegare un PC.
[Video : Connettore di ingresso S-Video/Video, Audio : Presa a piedini]
Consente di collegare un dispositivo AV.
[Video : Connettore di ingresso video componente, Audio : Presa a piedini]
Consente di collegare un dispositivo AV.
Compatibile con il sistema di sicurezza Kensinton MicroSaver.
al manuale dell’utente su EIZO LCD Utility Disk (CD-ROM).
6
Page 81

Risoluzione dei problemi
Configurazione e regolazione
Preparazione Installazione
Collegamento dei cavi
Collegare ciascun dispositivo.
1
• Collegamento di un PC ..................Vedere di seguito
• Collegamento di un dispositivo USB .........Pagina 10
• Collegamento di un dispositivo AV .............Pagina 11
• Collegamento di un dispositivo audio .......Pagina 12
●
Collegamento di un PC
Attenzione
• Durante la sostituzione del monitor in uso con un monitor FX2431, prima di procedere al
collegamento del PC assicurarsi di modicare le impostazioni del PC relative alla risoluzione e alla
frequenza verticale regolandole su quelle disponibili per il monitor FX2431, facendo riferimento alla
tabella di risoluzione (vedere a pagina 3).
1. Collegare il monitor al computer con il cavo segnale appropriato per i connettori utilizzati.
Dopo aver collegato i connettori dei cavi, stringere le viti dei connettori afnché combacino
perfettamente.
• Durante il collegamento all’ingresso PC1 (collegamento segnale digitale)
Connettori sul PC
Connettore DVI
Connettore di uscita
audio
Downstream USB
Cavo segnale FD-C39 (fornito)
1
Cavo audio
(da minipresa stereo a minipresa stereo)
Cavo USB MD-C93 (fornito)
1
*
Acquistare il cavo.
2
*
Per il collegamento di due PC al monitor, è
necessario acquistare un secondo cavo.
*
2
*
Connettori sul
monitor
Connettore DVI-D
Connettore di
ingresso audio
Upstream USB
Italiano
7
Page 82

Risoluzione dei problemi
Configurazione e regolazione
Preparazione Installazione
• Durante il collegamento all’ingresso PC2 (collegamento segnale analogico)
Connettori sul PC Connettori sul
monitor
Italiano
Connettore
D-Sub mini 15 pin
Connettore di
uscita audio
Downstream USB
Cava segnale MD-C87 (fornito)
1
Cavo audio
*
(da minipresa stereo a minipresa stereo)
2
Cavo USB MD-C93 (fornito)
1
*
Acquistare il cavo.
2
*
Per il collegamento di due PC al monitor, è
necessario acquistare un secondo cavo.
*
Connettore
D-Sub mini 15 pin
Connettore di
ingresso audio
Upstream USB
8
Page 83

• Durante il collegamento all’ingresso HDMI1 / HDMI2 (collegamento segnale digitale)
Risoluzione dei problemi
Configurazione e regolazione
Preparazione Installazione
Connettori sul PC Connettori sul
monitor
Connettore HDMI
Connettore DVI
Cavo HDMI
Cavo di conversione DVI-HDMI
1
*
Connettore HDMI
1
*
Connettore di
1
Cavo audio
*
(da minipresa stereo a minipresa stereo)
ingresso audio
(“Audio analogico”)
Connettore di
uscita audio
1
Cavo audio
(da minipresa stereo a minipresa stereo)
*
1
*
Acquistare il cavo.
(“PC2 Suono”)
Attenzione
• Durante il collegamento del PC all’ingresso HDMI, notare quanto segue.
- Dopo avere impostato “PC” su [Formato ingresso] nel menu Setting, avviare il PC.
- Impostare il connettore (“Audio analogico” o “PC2 Suono”) da cui viene trasmesso l’audio del PC in [Presa
ingresso audio] del menu Setting.
Per ulteriori informazioni, consultare il Manuale dell’utente contenuto in “EIZO LCD Utility Disk” (CD-
ROM).
Italiano
9
Page 84

Italiano
Risoluzione dei problemi
Configurazione e regolazione
Preparazione Installazione
●
Collegamento di un dispositivo USB
1. Collegare le dispositivo USB (tastiera, mouse e così via) alla porta USB (downstream) del
monitor.
Connettori sul
monitor
Downstream USB
Tastiera
Mouse
Attenzione
• Una volta collegate le dispositivo USB e aver acceso il monitor, la funzione USB viene impostata
automaticamente.
• A seconda del PC, del sistema operativo o delle dispositivo USB utilizzati, è possibile che il presente
monitor non funzioni correttamente (per informazioni sulla compatibilità USB delle periferiche,
rivolgersi ai rispettivi produttori).
• Il dispositivo USB non funziona quando l’interruttore di alimentazione principale del monitor è
spento.
NOTA
• Il PC (PC1 o PC2) su cui vengono utilizzati i dispositivi USB si attiva automaticamente insieme all’attivazione del
segnale di ingresso. È inoltre possibile specicare il PC su cui vengono utilizzati i dispositivi USB. Per ulteriori
informazioni, consultare il Manuale dell’utente contenuto in “EIZO LCD Utility Disk” (CD-ROM).
10
Page 85

Risoluzione dei problemi
Configurazione e regolazione
Preparazione Installazione
●
Collegamento di un dispositivo AV
1. Collegare il monitor al dispositivo AV mediante un cavo di segnale che corrisponda ai
connettori.
Connettori sul
dispositivo AV
S-Video Video
R L
2
Cavo S-Video
*1 *
o
2
Cavo Video
Cavo audio
*1 *
1
*
(da presa a piedino a presa a piedino)
1
Cavo video componente
*
Connettori sul
monitor
Video componente
Italiano
1
*
3
*1*
1
*
Acquistare il cavo.
2
*
Utilizzare un cavo o l’altro per collegare il monitor e il
dispositivo AV.
3
*
Utilizzare il cavo che presenta la dicitura “High
Speed HDMI
TM
Cable”.
Connettore HDMI
Video componente
Connettore HDMI
R L
Cavo audio
(da presa a piedino a presa a piedino)
Cavo HDMI
Attenzione
• Durante l’uso del dispositivo AV collegato all’ingresso HDMI del monitor tramite la funzione HDMI
CEC, è necessario impostare la voce [Impostaz. HDMI CEC] del menu Setting (vedere a pagina 16).
11
Page 86

Risoluzione dei problemi
Configurazione e regolazione
Preparazione Installazione
●
Collegamento di un dispositivo audio
1. Collegare il monitor al dispositivo audio mediante un cavo audio che corrisponda ai
connettori.
Italiano
Connettori sul
monitor
1
Cavo audio
(da minipresa stereo a presa a piedino)
Connettore di
uscita audio
Cavo audio
(da minipresa stereo a minipresa stereo)
*
Attenzione
• Durante l’uso del dispositivo audio, impostare il volume del monitor su “0”. Regolare il volume e il
suono del dispositivo audio.
NOTA
• Per utilizzare le cufe, collegare
quest’ultime alla presa cufe sul monitor.
*
1
*
1
Acquistare il cavo.
Cufe
Presa cufe
Connettori sul
dispositivo audio
Connettore di
ingresso audio
(Presa a piedini)
R L
(Minipresa stereo)
Inserire il cavo di alimentazione del monitor in una presa di rete.
2
1. Collegare il cavo di alimentazione in una presa di corrente e il connettore di alimentazione sul
monitor.
Regolazione dell’altezza e dell’angolo dello schermo
Afferrare i lati destro e sinistro del monitor con entrambe la mani, quindi regolarne l’altezza, l’inclinazione e la
rotazione no a ottenere la posizione di lavoro ottimale
12
Page 87

Preparazione Installazione
Configurazione e regolazione
Risoluzione dei problemi
Visualizzazione dello schermo
4
Vericare che l’interruttore di alimentazione principale del monitor sia acceso.
1
Accendere il monitor premendo sul telecomando (o sul monitor).
2
L’indicatore di alimentazione del monitor si illumina in blu.
Accendere il dispositivo esterno.
3
Selezionare il segnale di ingresso per visualizzare l’immagine desiderata inviata
4
dal dispositivo.
Premere , o . Ad ogni pressione del tasto, il segnale di ingresso passa da un’opzione
all’altra.
PC PC1
VIDEO VIDEO1
HDMI HDMI1
n In caso di ricezione di un segnale analogico dal PC
Se il monitor e il PC vengono accesi per la prima volta con il segnale analogico, la funzione di
regolazione automatica dello schermo viene attivata per regolare i valori di clock, di fase e la posizione
dello schermo in modo automatico.
Se dal PC viene trasmesso il segnale digitale, le immagini vengono visualizzate correttamente in base ai
dati preimpostati del monitor.
Attenzione
• Spegnere il monitor se si prevede di non utilizzarlo per un periodo di tempo prolungato. Scollegando
il cavo di alimentazione viene completamente interrotta l’alimentazione del monitor.
PC2...
g
VIDEO2...
g
HDMI2...
g
Regolazione del volume dell’audio
Italiano
Premere o sul telecomando.
1
Premendo , il volume si alza; premendo , il volume si
abbassa.
Menu di regolazione del volume
13
Page 88

Preparazione Installazione
Configurazione e regolazione
Risoluzione dei problemi
Selezione della modalità schermo
Color Mode
Custom(xxxx)
Modicando la modalità del colore, è possibile impostare facilmente il modo di visualizzazione appropriato.
Per ulteriori informazioni su Modalità Colore, consultare il Manuale dell’utente contenuto in “EIZO LCD Utility Disk”
(CD-ROM).
Modalità Colore
(Ingresso PC / Ingresso HDMI (segnale PC))
Testo Ottimizzato per la visualizzazione di testo in programmi di elaborazione testo o fogli di calcolo.
Immagine Ottimizzato per la visualizzazione di foto o immagini sse.
Filmato Ottimizzato per la visualizzazione di immagini in movimento.
Gioco (PC) Ottimizzato per la visualizzazione di immagini di videogiochi.
Personalizzato
1
*
(XXX
)
(Ingresso VIDEO / Ingresso HDMI (segnale video))
Standard Visualizzazione standard delle schermate.
Cinema Ottimizzato per effetto cinema e così via.
Dinamico Ottimizzato per immagini nitide e denite.
Gioco Ottimizzato per la visualizzazione di immagini di videogiochi.
Personalizz.
1
*
(XXX
)
Per la regolazione delle impostazioni secondo le proprie preferenze personali.
Per la regolazione delle impostazioni secondo le proprie preferenze personali.
Italiano
*1 Viene visualizzato l’ingresso correntemente selezionato.
Premere sul telecomando.
1
Ad ogni pressione del tasto, la modalità cambia.
Menu di impostazione Modalità Colore
14
Page 89

Preparazione Installazione
Configurazione e regolazione
Risoluzione dei problemi
Regolazione della luminosità
Color
Color Mode
Brightness
Black Level
Hue
Saturation
Contrast
Temperature
Return
[ENTER] : Enter
: Select
[EXIT]: Exit
Reset
Advanced Settings
[ ]Standard
[ ]Custom(xxxx)
[ ]50
[ ]50
[ ]0
[ ]0
[ ]6500K
Brightness
50
Premere sul telecomando.
1
Viene visualizzato il menu Impostazione.
Selezionare [Colore] e premere .
2
Viene visualizzato il menu Colore.
Selezionare [Luminosità] mediante o
3
, quindi premere .
Viene visualizzato il menu di regolazione della luminosità.
Menu colore
Regolare la luminosità con o .
4
Menu di regolazione Luminosità
Premere per aumentare la luminosità dello schermo o
per diminuirla.
Premere quando è visualizzata la luminosità
5
desiderata.
La luminosità specicata viene salvata.
NOTA
• Durante l’uso di Auto EcoView, è possibile regolare automaticamente la luminosità dello schermo corretta in
base alla luminosità ambientale rilevata dal sensore posto sulla parte inferiore del monitor e alla luminosità delle
immagini visualizzate. Per ulteriori informazioni, consultare il Manuale dell’utente contenuto in “EIZO LCD Utility
Disk” (CD-ROM).
Italiano
Le impostazioni e le regolazioni di base sono state completate. Fare riferimento al manuale
dell’utente su CD-ROM per maggiori informazioni sulle regolazioni/impostazioni avanzate.
15
Page 90

Preparazione Installazione
Configurazione e regolazione
Risoluzione dei problemi
Impostazione di HDMI CEC
HDMI CEC Setting
HDMI CEC
Power On Link
Power Off Link
Reset
Return
[ENTER] : Enter
: Select
[EXIT]: Exit
[ ]Enable
[ ]Disable
[ ]Enable
Monitor Settings
Language
USB Selection
Power Indicator
HDMI CEC Setting
Real Image
Sub-Window Lucent
Advanced Settings(xxxx)
Return
[ENTER] : Enter
: Select
[EXIT]: Exit
Reset
[ ]On
[ ]English
[ ]Auto
[ ]0
[ ]Disable
(Durante il controllo di dispositivi esterni dal monitor)
Questo monitor supporta la tecnologia HDMI CEC (Consumer Electronics Control). Il controllo interattivo diventa
possibile collegando il dispositivo esterno compatibile con HDMI CEC al monitor mediante il cavo HDMI.
Durante il controllo del dispositivo esterno dal monitor tramite la funzione HDMI CEC, impostare quanto segue.
Attenzione
• Tramite la funzione HDMI CEC, il monitor può controllare solo dispositivi esterni, quali registratori e
lettori, compatibili con HDMI CEC. Tuttavia, questa funzione non opera correttamente con alcuni
dispositivi.
• Per ulteriori informazioni sul controllo di dispositivi esterni e sulla funzione HDMI CEC, consultare la
Guida del telecomando e il Manuale dell’utente contenuti in “EIZO LCD Utility Disk” (CD-ROM).
Vericare che l’impostazione HDMI CEC del dispositivo esterno sia attivata.
1
Per ulteriori informazioni sull’impostazione, consultare il manuale del dispositivo esterno.
Premere sul telecomando.
2
Viene visualizzato il menu lmpostazione.
Selezionare [Impostazioni monitor] mediante o ,
3
quindi premere .
Italiano
Viene visualizzato il menu Impostazioni monitor.
Selezionare [Impostaz. HDMI CEC]
4
mediante o , quindi premere .
Viene visualizzato il menu Impostaz. HDMI CEC.
Impostare ciascuna voce.
5
1. Selezionare la voce di impostazione mediante o ,
quindi premere .
Viene visualizzato il menu di impostazione della voce selezionata.
2. Selezionare l’impostazione mediante
premere .
o , quindi
Menu Impostazioni monitor
Menu Impostaz. HDMI CEC
• [HDMI CEC] : selezionare “Abilita”.
• [Colleg.accensione] : selezionare “Abilita” per accendere il monitor in
• [Colleg.spegnimento] : selezionare “Abilita” per spegnere il dispositivo
Premere .
6
L’impostazione è completata.
16
seguito all’attivazione dell’alimentazione del
dispositivo esterno.
esterno in seguito alla disattivazione
dell’alimentazione del monitor.
Page 91

Configurazione e regolazione
Preparazione Installazione
Risoluzione dei problemi
Problema Nessuna immagine
Signal Error
PC
FORIS FX2431 S/N:********
Usage Time
******** H
Input Signal
Signal Error
Information(HDMI1)
Return
[ENTER]: Return
Se sul monitor non viene visualizzata alcuna immagine anche dopo aver applicato le soluzioni consigliate, contattare il
rivenditore locale.
1. Vericare l’indicatore di alimentazione.
Sintomo Stato Possibile causa e rimedio
Nessuna immagine L’indicatore di alimentazione
non si accende.
Stato indicatore blu.
Stato indicatore arancione. (Ingresso PC/Ingresso HDMI (segnale PC))
• Vericare che il cavo di alimentazione sia
collegato correttamente.
• Vericare che l’interruttore di alimentazione
principale sia acceso.
• Premere
sul telecomando (o sul monitor).
Vericare che il dispositivo sia collegato
correttamente.
(Ingresso PC/Ingresso HDMI (segnale PC))
Impostare ogni valore di regolazione in
[Luminosità], [Contrasto] o [Guadagno]*1 su un
livello più elevato.
(Ingresso VIDEO/Ingresso HDMI (segnale video))
Vericare che l’alimentazione del dispositivo
collegato sia attivata.
• Premere un tasto della tastiera o fare clic con il
mouse.
• Accendere il PC.
*1 Per ulteriori informazioni sull’impostazione della luminosità, del contrasto e del guadagno, consultare il Manuale
dell’utente sul CD-ROM.
2. Controllare il messaggio di errore sullo schermo.
(Ingresso PC/Ingresso HDMI (segnale PC))
Sintomo Stato Possibile causa e rimedio
Esempio:
Il messaggio indica che il
segnale di ingresso non rientra
nell’intervallo di frequenze
specicato.
*
Il segnale di ingresso corrente
può essere vericato nel
menu [Informazioni]. (La
frequenza del segnale che
non rientra nell’intervallo
viene visualizzata in
magenta.)
Modicare la frequenza del segnale in modo
corretto utilizzando il software di utilità della
scheda graca. Per ulteriori informazioni, fare
riferimento al manuale della scheda graca.
3. Vericare [Informazioni] del menu Setting.
(Premere sul telecomando, selezionare [Informazioni] mediante o , quindi premere .)
Sintomo Stato Possibile causa e rimedio
Esempio:
Il messaggio a sinistra indica
che il segnale non viene
trasmesso dal dispositivo o che
il segnale proveniente dal
dispositivo non rientra nella
specica.
• Vericare che il dispositivo sia collegato
correttamente.
• Vericare che l’alimentazione del dispositivo
collegato sia attivata.
• Vericare il formato del segnale di uscita
consultando il manuale delle istruzioni del
dispositivo collegato.
Italiano
Viene visualizzato “Errore
Segnale”.
17
Page 92

Italiano
Copyright© 2009 EIZO NANAO CORPORATION Tutti i diritti riservati.
Nessuna parte del presente documento può essere riprodotta, memorizzata in un sistema di recupero di informazioni o
trasmessa, in nessuna forma o attraverso qualsiasi mezzo, elettronico, meccanico o di altra natura, senza previa
autorizzazione scritta di EIZO NANAO CORPORATION.
EIZO NANAO CORPORATION non è obbligata a mantenere riservati i materiali o le informazioni ricevute, a meno
che non vengano stipulati accordi preventivi relativamente alla ricezione di suddette informazioni da parte di EIZO
NANAO CORPORATION. Sebbene il presente manuale contenga informazioni aggiornate, le caratteristiche tecniche
del monitor EIZO sono soggette a modiche senza preavviso.
Apple e Macintosh sono marchi di fabbrica registrati di Apple Inc.
HDMI, il logo HDMI e High-Definition Multimedia Interface sono marchi di fabbrica o marchi di fabbrica registrati di HDMI Licensing LLC.
VGA è un marchio di fabbrica registrato di International Business Machines Corporation.
Windows, Windows Vista e Xbox 360 sono marchi di fabbrica registrati di Microsoft Corporation negli Stati Uniti e in altri paesi.
VESA è un marchio di fabbrica o un marchio di fabbrica registrato di Video Electronics Standards Association negli Stati Uniti e in altri
paesi.
EIZO e ScreenManager sono marchi di fabbrica registrati di EIZO NANAO CORPORATION in Giappone e in altri paesi.
FORIS è un marchio di fabbrica di EIZO NANAO CORPORATION.
18
Page 93

Installationshandboken
Viktigt: Läs försiktighetsåtgärderna, den här installationshandboken och
användarhandboken som nns på CD-skivan noggrant så att du
känner dig säker och får ett effektivt användande av produkten.
Behåll manualen för framtida behov.
Svenska
Page 94

FelsökningInställning/justeringInstallationFöre användningen FelsökningInställning/justeringInstallationFöre användningen
FORIS FX2431
FX2431 kan anslutas till följande enheter.
PC
AV-enhet
DVI
D-Sub
HDMI
Möjliggör användning som bildskärm genom att
ansluta till en Windows PC eller en Macintosh.
• Tillämplig upplösning ...........sidan 3
• Anslutningsmetoder ...............sidan 7
S-Video / Video
Komponent
HDMI
Gör det möjligt att visa bilder genom att ansluta en
DVD, video, spelkonsol osv.
• Tillämpligt signalformat .............. sidan 3
• Anslutningsmetoder .................... sidan 11
DVD-spelare
Spelkonsol
Ljudenhet
Svenska
USB-enheter
Tangentbord
• Anslutningsmetoder .............sidan 10
(Kan även ansluta till en skrivare eller skanner osv.)
Observera
• Använd en dator/ett operativsystem som är
lämpligt för USB-enheter.
[Tillämpligt OS]
- Windows 2000/XP/Vista
- Mac OS 9.2.2 och Mac OS X 10.2 eller senare
• USB-enheten fungerar inte när skärmens
huvudström är bruten.
Mus
Gör att du kan mata ut ljud från dator och
AV-enhet genom att ansluta hö gtalarna
och AV-förstärkaren.
• Anslutningsmetoder .............. sidan 12
OBS!
• Gör det möjligt att njuta av ljud genom
att ansluta hörlurar till hörlursuttaget.
..............................................
(Försiktighet: Vid användning av
hörlurar är det viktigt att du inte vrider
upp volymen för högt. Det kan påverka
hörseln.)
sidan 12
2
Page 95

FelsökningInställning/justeringInstallationFöre användningen
Kompatibla upplösningar/signalformat
Bildskärmen stöder följande upplösningar och signalformat.
PC-ingång / HDMI-ingång (PC-signal)
Digital ingångssignal Analog ingångssignal
Grakupplösning Frekvens Läge
640 × 400 70 Hz NEC PC-9821
640 × 480 67 Hz Apple Macintosh
640 × 480 ~75 Hz VGA, VESA
720 × 400 70 Hz VGA TEXT
720 × 480 60 Hz
848 × 480 60 Hz
800 × 600 ~75 Hz
832 × 624 75 Hz Apple Macintosh
1024 × 768 ~75 Hz
1152 × 864 75 Hz
1152 × 870 75 Hz Apple Macintosh
1
1280 × 768
1280 × 768
1280 × 960 60 Hz
1280 × 960 75 Hz Apple Macintosh
1280 × 1024 ~75 Hz
1360 × 768 60 Hz
1600 × 1200 60 Hz
1680 × 1050
1680 × 1050
1920 × 1200
1280 × 720p 50 Hz
1920 × 1080p 50 Hz
1920 × 1080p
*
1
*
1
*
1
*
1
2
*
*
3
*
24 Hz, 25 Hz, 30 Hz, 48 Hz
60 Hz VESA CVT RB —
~75 Hz VESA CVT —
60 Hz VESA CVT
60 Hz VESA CVT RB
60 Hz VESA CVT RB
3
*
, 60 Hz 720p
3
*
, 60 Hz 1080p
VESA
VESA
VESA
VESA
VESA —
VESA
VESA
VESA —
VESA
1080p
Dotklocka:
~ 162 MHz
ü (60 Hz) ü
ü (60 Hz) ü
Dotklocka:
~ 162 MHz
—
—
ü (60Hz) ü
ü ü
ü ü
ü ü
ü (60Hz) ü
—
ü (60Hz) ü
—
ü ü
—
ü (60Hz) ü
ü ü
ü ü
ü ü
ü ü
ü
ü
ü
ü
ü
ü
ü
ü
ü
ü
—
*1 Vid visning med ingångssignalen för bredbildsformat, krävs ett grakkort som uppfyller VESA CVT-standard.
*2 Rekommenderad upplösning (Ställ in den här upplösningen)
*3 Upplösning för vissa AV-enheter som t.ex. Microsoft Xbox 360
VIDEO-ingång
[S-Video / Video-signal]
– NTSC / PAL / PAL-60
[Komponentvideosignal]
– 525i (480i) / 525p (480p): 60 Hz
– 625i (576i) / 625p (576p): 50 Hz
– 1125i (1080i) / 750p (720p): 50 Hz / 60 Hz
– 1125p (1080p): 24 Hz / 50 Hz / 60 Hz
HDMI-ingång (videosignal)
• Videosignal
– 525i (480i) / 525p (480p): 60 Hz
– 625i (576i) / 625p (576p): 50 Hz
– 1125i (1080i) / 750p (720p): 50 Hz / 60 Hz
– 1125p (1080p): 24 Hz / 25 Hz / 30 Hz / 50 Hz / 60 Hz
• Audiosignal
2 kanalers linjär PCM (32 kHz / 44,1 kHz / 48 kHz)
Svenska
3
Page 96

FelsökningInställning/justeringInstallationFöre användningen
[Plats för varningsmeddelande]
Förpackningens innehåll
Kontrollera att följande artiklar nns i förpackningen. Om någonting saknas skall du kontakta din lokala återförsäljare.
OBS!
• Behåll kartongen och emballage för framtida föryttningar av skärmen.
Svenska
□ Monitor
□ Fjärrkontroll
□ AA-batterier (2 stk)
□ Nätsladd
□ Digital signalkabel (FD-C39)
□ Analog signalkabel (MD-C87)
□ EIZO USB-kabel (MD-C93)
□ EIZO LCD Utility Disk (CD-skiva)
• Bruksanvisning
□ Installationshandboken (denna handbok)
□ Bruksanvisning för fjärrkontroll
□ FÖRSIKTIGHETSÅTGÄRDER
□ Garantisedel
□
Återvinningsinformation
□ Monteringsskruvar (M4 x 12, 4 st)
Om installationshandboken och bruksanvisningen
Installationshandboken
(denna handbok)
Bruksanvisning för
fjärrkontroll
Beskriver grundläggande information, bland annat anslutning av
bildskärmen till en extern enhet, till exempel en dator, och hur skärmen
används.
Beskriver funktionen med fjärrkontrollen.
Bruksanvisning
(PDF-l på CD-skivan*1)
FÖRSIKTIGHETSÅTGÄRDER
*1 Kräver att Adobe Reader är installerat.
• Produktspecikationerna varierar i olika försäljningsområden. Kontrollera att manualen är skriven på språket i inköpsområdet.
4
Beskriver applikationsinformation så som skärmfunktioner,
bildjusteringar, inställningar och specikationer.
Beskriver hur du använder bildskärmen på ett säkert sätt.
Page 97

FelsökningInställning/justeringInstallationFöre användningen
Om EIZO LCD Utility Disk (CD-ROM-skiva)
5m
30°
30°
7m
5m
5m
5m
20°
20°
7m
●
Skivinnehåll och översikt över programvaran
Skivan innehåller program för justering och Bruksanvisning. Se len ”Readme.txt” eller ”read me” på skivan för
information om hur programvaran startas och hur du kommer åt ler.
Objekt Översikt OS
Filen ”Readme.txt” eller ”read me”
Mönsterler för skärmjustering Använd när du ändrar bilden för den analoga
ScreenManager Pro for LCD Ett program för skärmjustering med mus och
Kontrollprogrammet WindowMovie WindowMovie är en funktion hos
EIZO ScreenSlicer Ett program som delar en skärm och lägger ut
Användarhandbok för bildskärmen (PDF-l)
●
Använda ScreenManager Pro for LCD
insignalen manuellt.
tangentbord.
Gällande justeringsalternativ, se ”Parameter
för justeringsalternativ”.
ScreenManager Pro for LCD.
Mer information nns i användarhandboken
för ScreenManager Pro for LCD på skivan.
era fönster.
Information om installation och användning av ScreenManager Pro for LCD nns i programmets användarhandbok på
skivan.
Windows
*
Om du har ett annat OS än
Windows ska du hämta
mönsterlerna från vår webbplats
http://www.eizo.com
Windows XP / Vista
*
Kontrollprogrammet
WindowMovie gäller inte
Windows Vista.
Windows XP / Vista
Innan du använder fjärrkontrollen
●
Installera batterier
1. Tryck på knappen på fjärrkontrollens baksida
för att låsa upp, och ta bort locket.
2. Sätt i AA-batterierna och för tillbaka locket på
plats.
●
Fjärrkontrollens mottagningsområde
Använd fjärrkontrollen inom nedanstående område.
Svenska
5
Page 98

FelsökningInställning/justeringInstallationFöre användningen
Reglage och funktioner
5 6 7 8 9 10 11
22
4
3
12
13 14
16 17
15
20
19
18
2121
ScreenManager
®
Color
Sound
PowerManager™
Monitor Settings
Information
[ENTER]: Enter
: Select
1 2
23
Kablar
Svenska
Inställningsmeny
®
1
(ScreenManager
1 Huvudströmbrytare Slår på och stänger av huvudströmmen.
2 Nätanslutning Koppla in strömsladden.
3 Fjärrkontroll Du kan sköta funktioner, göra inställningar och skärmjusteringar med
4 Hörlursuttag [Stereominiuttag] Anslutning för hörlurar.
5 Välj knapp (SELECT) • Visar menyn ”SELECT”.
6 Knappen Enter (ENTER) Visar inställningsmenyn, ordnar inställnings- eller justeringsalternativen i
7 Manöverknappar
(t qp u)
8 Sensor Känner av omgivande ljusstyrka. Funktionen för Auto EcoView (se sidan 15).
9 Fjärrkontrolldetektor Tar emot signalen från fjärrkontrollen.
10 Strömbrytaren Slår på och stänger av strömmen.
11 Strömindikator Visar skärmens driftsstatus.
12 Ingångssignalanslutningar
(HDMI1 / HDMI2)
13 Audioingångsanslutning
(”Analogt ljud”)
14
Ingångssignalanslutning
15
Ingångssignalanslutning
16 USB-portar (Upp) [Uppströms × 2] Anslutning för dator.
17 USB-portar (ned) [Nedströms × 2] Anslutning för en perifer USB-enhet.
18 Audio-utgångsanslutning [Stereominiuttag] Ansluta ljudenheter.
19
Ingångssignalanslutning
(VIDEO1)
20
Ingångssignalanslutning
(VIDEO2)
21
Fäste för säkerhetslås Kompatibelt med Kensingtons MicroSaver-säkerhetssystem.
22
Kabelhållare Täcker skärmens kablar.
23 Högtalare Källa för audioutgång.
*1 ScreenManager ® är ett smeknamn för EIZO:s inställningsmeny. För information om hur du använder ScreenManager, se
bruksanvisningen på EIZO LCD Utility Disk (CD-ROM).
6
*
)
fjärrkontrollen.
• Varje gång du trycker på knappen ändras innehållet i menyn.
(Du kan ändra volymen och ändra insignalen i menyn ”SELECT”)
varje meny och sparar inställningen eller justeringsresultaten.
Används för att välja inställningen eller justeringsposterna, eller för att öka
eller minska justeringsvärdena i respektive meny.
Blå : Skärmen används Orange : Energisparläge
Av : Strömmen är av
[HDMI-anslutning × 2] Kopplar AV-enheten eller datorn.
[Stereominiuttag] För HDMI-in används för ljudinsignaler från andra
anslutningar än HDMI-anslutningen.
(PC1) [Video : DVI-D-anslutning, Audio : Stereominiuttag] Anslutning för dator.
(PC2) [Video : D-Sub-minianslutning med 15 stift, Audio : Stereominiuttag]
Anslutning för dator.
[Video : Anslutning för S-Video / Video-ingång, Audio : stiftanslutning]
Ansluter AV-enhet.
[Video : Anslutning för Komponent video-ingång,
Audio : stiftanslutning]
Ansluter AV-enhet.
Page 99

FelsökningInställning/justeringInstallationFöre användningen
Att ansluta kablarna
Anslut respektive enhet.
1
• Anslut en dator ...........................................Se nedan
• Anslut en USB-enhet ...................................Sidan 10
• Anslut en AV-enhet .......................................Sidan 11
• Anslut en ljudenhet ......................................Sidan 12
●
Anslut en dator
Observera
• När du ersätter den aktuella skärmen med en FX2431-skärm ska du ändra datorinställningarna för
upplösning och vertikal frekvens till dem som nns tillgängliga för FX2431-skärmen, enligt
upplösningstabellen (se sidan 3) innan du ansluter datorn.
1. Anslut monitorn till datorn med en signalkabel som passar anslutningarna.
Efter att du anslutit kabelanslutningarna skall du dra åt skruvarna för att säkra anslutningen.
• När du ansluter till en PC1-ingång (digital signalanslutning)
Anslutningar på
datorn
DVI-anslutning
Audio-
utgångsanslutning
USB
nedström
Signalkabel FD-C39 (medföljer)
1
Audiokabel
(stereo mini-uttag till stereo mini-uttag)
USB-kabel MD-C93 (medföljer)
1
*
Införskaffa extrakabeln.
2
*
Om du vill ansluta två datorer till skärmen
ska du införskaffa en till kabel.
*
2
*
Anslutningar på
monitorn
DVI-D-anslutning
Audioingångsanslutning
USB
uppström
Svenska
7
Page 100

• När du ansluter till en PC2-ingång (analog signalanslutning)
FelsökningInställning/justeringInstallationFöre användningen
Anslutningar på
datorn
D-sub minianslutning
med 15 stift
Audio-
utgångsanslutning
USB
nedström
Signalkabel MD-C87 (medföljer)
1
Audiokabel
*
(stereo mini-uttag till stereo mini-uttag)
2
USB-kabel MD-C93 (medföljer)
1
*
Införskaffa extrakabeln.
2
*
Om du vill ansluta två datorer till skärmen
ska du införskaffa en till kabel.
*
Anslutningar på
monitorn
D-sub minianslutning
med 15 stift
Audioingångsanslutning
USB
uppström
Svenska
8
 Loading...