

Page 1

D Originalbetriebsanleitung
Akku-Bohrschrauber
GB Original operating instructions
Cordless drill/screwdriver
F Mode d’emploi d’origine
Perceuse sans fi l
I Istruzioni per l’uso originali
Trapano avvitatore a batteria
DK/ Original betjeningsvejledning
N Akku-bore-/skruemaskine
S Original-bruksanvisning
Batteridriven
borrmaskin/skruvdragare
HR/ Originalne upute za uporabu
BIH Akumulatorska bušilica-izvijač
RS Originalna uputstva za upotrebu
Akumulatorska bušilica-izvijač
CZ Originální návod k obsluze
Akumulátorový vrtací šroubovák
SK Originálny návod na obsluhu
Akumulátorový vŕtací skrutkovač
TH-CD 18-2 2B
1
Art.-Nr.: 45.135.50 I.-Nr.: 11022
Anl_TH_CD_18_2_2B_SPK1.indb 1Anl_TH_CD_18_2_2B_SPK1.indb 1 02.10.12 07:5502.10.12 07:55
Page 2

1
2
1
4
10 9
3
11
12
7
2
5
Anl_TH_CD_18_2_2B_SPK1.indb 2Anl_TH_CD_18_2_2B_SPK1.indb 2 02.10.12 07:5502.10.12 07:55
6
8
5
11
12
3
5
8
a
- 2 -
7
Page 3
4 5
1
2
10
1
9
4
3
6
2a
- 3 -
Anl_TH_CD_18_2_2B_SPK1.indb 3Anl_TH_CD_18_2_2B_SPK1.indb 3 02.10.12 07:5502.10.12 07:55
Page 4

D
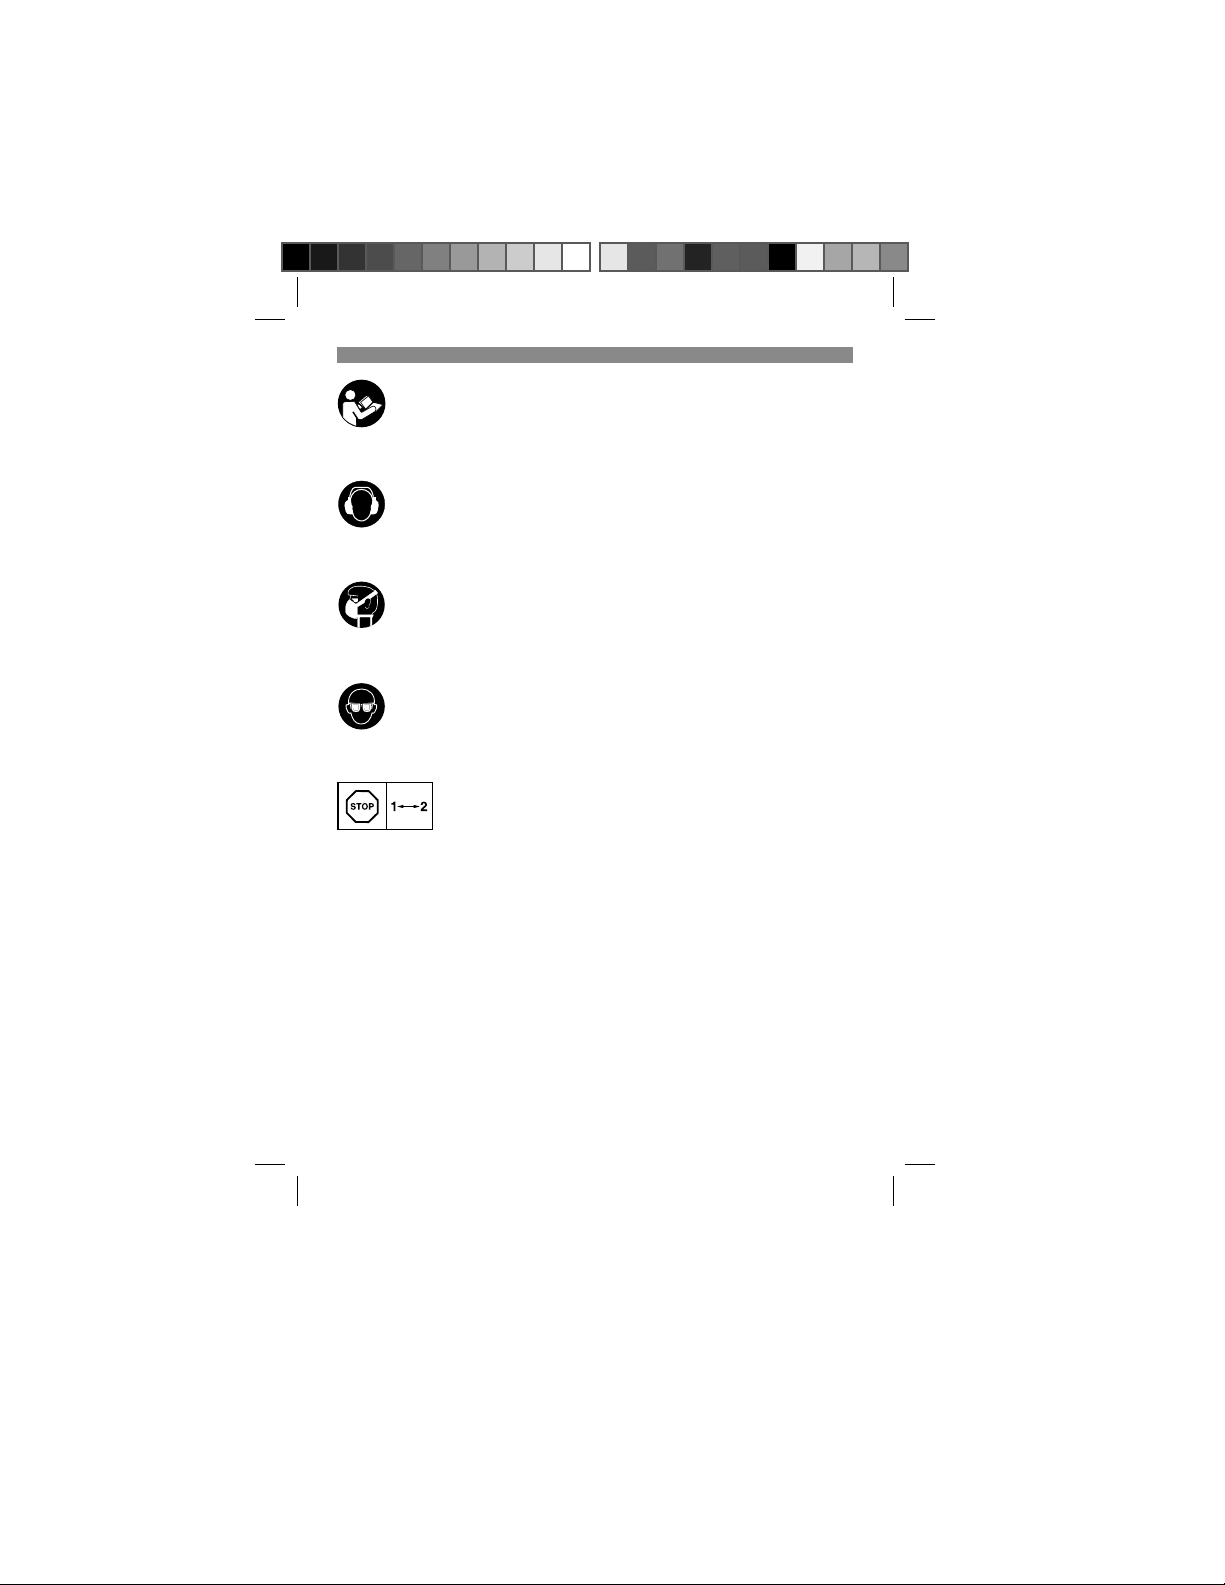
Warnung - Zur Verringerung des Verletzungsrisikos Bedienungsanleitung lesen
Tragen Sie einen Gehörschutz. Die Einwirkung von Lärm kann Gehörverlust bewirken.
Tragen Sie eine Staubschutzmaske. Beim Bearbeiten von Holz und anderer Materialien kann ge-
sundheitsschädlicher Staub entstehen. Asbesthaltiges Material darf nicht bearbeitet werden!
Tragen Sie eine Schutzbrille. Während der Arbeit entstehende Funken oder aus dem Gerät heraustretende Splitter, Späne und Stäube können Sichtverlust bewirken.
Um eine Beschädigung des Getriebes zu vermeiden, darf die Gangumschaltung nur im
Stillstand umgeschaltet werden
- 4 -
Anl_TH_CD_18_2_2B_SPK1.indb 4Anl_TH_CD_18_2_2B_SPK1.indb 4 02.10.12 07:5502.10.12 07:55
Page 5

Achtung!
Beim Benutzen von Geräten müssen einige Sicherheitsvorkehrungen eingehalten werden, um
Verletzungen und Schäden zu verhindern. Lesen
Sie diese Bedienungsanleitung / Sicherheitshinweise deshalb sorgfältig durch. Bewahren Sie diese gut auf, damit Ihnen die Informationen jederzeit
zur Ver fügung stehen. Falls Sie das Gerät an andere Personen übergeben sollten, händigen Sie
diese Bedienungsanleitung / Sicherheitshinweise
bitte mit aus. Wir übernehmen keine Haftung für
Unfälle oder Schäden, die durch Nichtbeachten
dieser Anleitung und den Sicherheitshinweisen
entstehen.
1. Sicherheitshinweise
Die entsprechenden Sicherheitshinweise fi nden
Sie im beiliegenden Heftchen!
Warnung
Lesen Sie alle Sicherheitshinweise und Anweisungen. Versäumnisse bei der Einhaltung der
Sicherheitshinweise und Anweisungen können
elektrischen Schlag, Brand und/oder schwere
Verletzungen verursachen. Bewahren Sie alle
Sicherheitshinweise und Anweisungen für
die Zukunft auf.
2. Gerätebeschreibung und
Lieferumfang
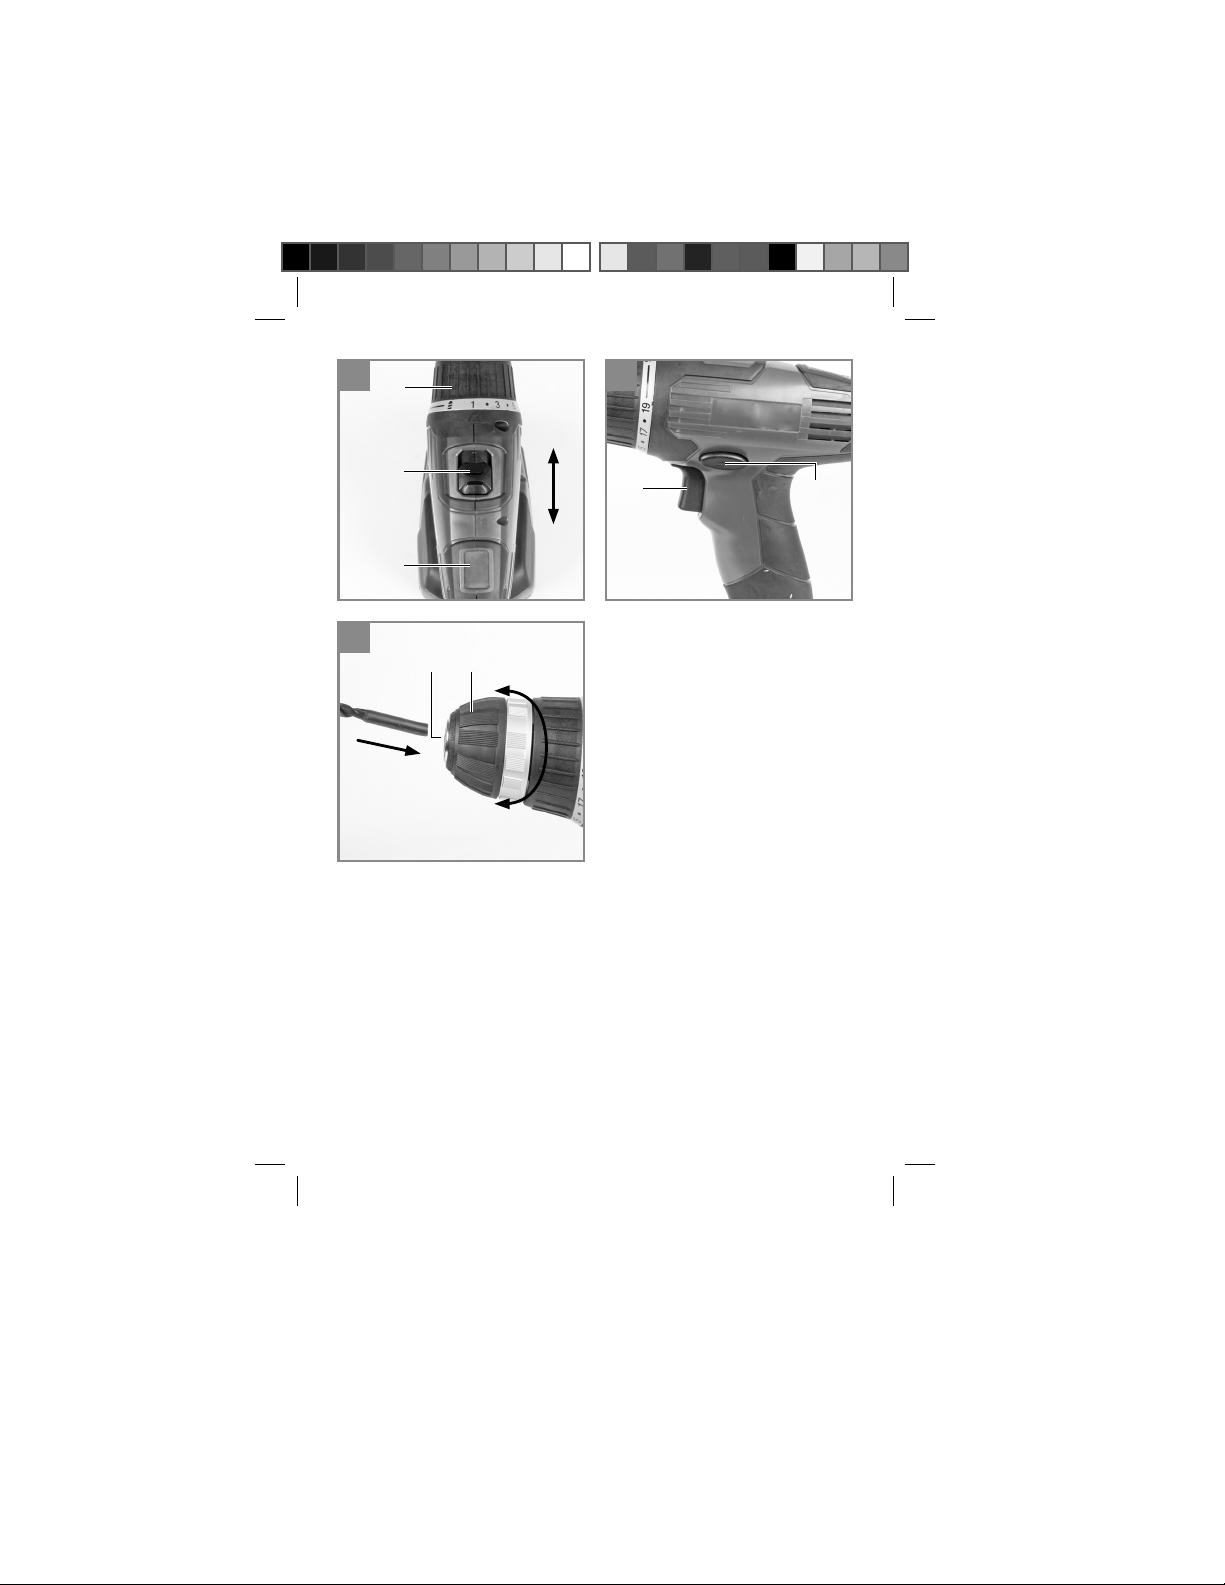
2.1 Gerätebeschreibung (Bild 1)
1. Drehmomenteinstellung (Stellring)
2. Schnellspannbohrfutter
3. Drehrichtungsschalter
4. Ein-/ Ausschalter
5. Akku
6. Ladegerät
7. Ladeadapter
8. Rasttaste
9. Magnet-Schraubenhalter
10. Umschalter 1. Gang – 2. Gang
11. Akku-Kapazitätsanzeige
12. Schalter Akku-Kapazitätsanzeige
D
2.2 Lieferumfang
Bitte überprüfen Sie die Vollständigkeit des Artikels anhand des beschriebenen Lieferumfangs.
Bei Fehlteilen wenden Sie sich bitte spätestens
innerhalb von 5 Arbeitstagen nach Kauf des Artikels unter Vorlage eines gültigen Kaufbeleges an
unser Service Center oder an den nächstgelegenen zuständigen Baumarkt. Bitte beachten Sie
hierzu die Gewährleistungstabelle in den Garantiebestimmungen am Ende der Anleitung.
Öffnen Sie die Verpackung und nehmen Sie
•
das Gerät vorsichtig aus der Verpackung.
Entfernen Sie das Verpackungsmaterial so-
•
wie Verpackungs-/ und Transportsicherungen
(falls vorhanden).
Überprüfen Sie, ob der Lieferumfang vollstän-
•
dig ist.
Kontrollieren Sie das Gerät und die Zubehör-
•
teile auf Transportschäden.
Bewahren Sie die Verpackung nach Möglich-
•
keit bis zum Ablauf der Garantiezeit auf.
Achtung!
Gerät und Verpackungsmaterial sind kein
Kinderspielzeug! Kinder dürfen nicht mit
Kunststoff beuteln, Folien und Kleinteilen
spielen! Es besteht Verschluckungs- und Erstickungsgefahr!
Akku-Bohrschrauber
•
Akku (2x)
•
Ladegerät
•
Ladeadapter
•
Originalbetriebsanleitung
•
Sicherheitshinweise
•
3. Bestimmungsgemäße
Verwendung
Der Akku-Bohrschrauber ist geeignet zum Eindrehen und Lösen von Schrauben, sowie zum
Bohren in Holz, Metall und Kunststoff .
Die Maschine darf nur nach ihrer Bestimmung
verwendet werden. Jede weitere darüber hinausgehende Ver wendung ist nicht bestimmungsgemäß. Für daraus hervorgerufene Schäden oder
Verletzungen aller Art haftet der Benutzer/Bediener und nicht der Hersteller.
Bitte beachten Sie, dass unsere Geräte bestimmungsgemäß nicht für den gewerblichen, handwerklichen oder industriellen Einsatz konstruiert
- 5 -
Anl_TH_CD_18_2_2B_SPK1.indb 5Anl_TH_CD_18_2_2B_SPK1.indb 5 02.10.12 07:5502.10.12 07:55
Page 6

wurden. Wir übernehmen keine Gewährleistung,
wenn das Gerät in Gewerbe-, Handwerks- oder
Industriebetrieben sowie bei gleichzusetzenden
Tätigkeiten eingesetzt wird.
4. Technische Daten
Spannungsversorgung Motor: ................. 18 V d.c.
Leerlauf-Drehnzahl:................ 0-350/0-1100 min
Drehmomentstufen: .....................................19+1
Rechts- Links-Lauf: ............................................ja
Spannweite Bohrfutter: .....................max. 10 mm
Ladespannung Akku: .............................. 18 V d.c.
Ladestrom Akku: ....................................... 0,55 A
Netzspannung Ladegerät: ................230V~ 50Hz
Ladezeit: .......................................... max. 3-5 Std.
Akkutyp: ....................................................... NiCd
Gewicht: ......................................................1,7 kg
Geräusch und Vibration
Die Geräusch- und Vibrationswerte wurden entsprechend EN 60745 ermittelt.
Schalldruckpegel L
Unsicherheit K
Schallleistungspegel L
Unsicherheit K
Tragen Sie einen Gehörschutz.
Die Einwirkung von Lärm kann Gehörverlust bewirken.
Schwingungsgesamtwerte (Vektorsumme dreier
Richtungen) ermittelt entsprechend EN 60745.
Bohren in Metall
Schwingungsemissionswert a
Unsicherheit K = 1,5 m/s
Schrauben ohne Schlag
Schwingungsemissionswert ah ≤ 2,5 m/s
Unsicherheit K = 1,5 m/s
Warnung!
Der angegebene Schwingungsemissionswert ist
nach einem genormten Prüfverfahren gemessen
worden und kann sich, abhängig von der Art und
Weise, in der das Elektrowerkzeug verwendet
wird, ändern und in Ausnahmefällen über dem
angegebenen Wert liegen.
........................... 66,4 dB(A)
pA
............................................ 3 dB
pA
..................... 77,4 dB(A)
WA
........................................... 3 dB
WA
2
≤ 2,5 m/s
h
2
2
2
D
Der angegebene Schwingungsemissionswert
kann zum Vergleich eines Elektrowerkzeuges mit
einem anderen verwendet werden.
Der angegebene Schwingungsemissionswert
kann auch zu einer einleitenden Einschätzung der
Beeinträchtigung verwendet werden.
Beschränken Sie die Geräuschentwicklung
und Vibration auf ein Minimum!
-1
Verwenden Sie nur einwandfreie Geräte.
•
Warten und reinigen Sie das Gerät regelmä-
•
ßig.
Passen Sie Ihre Arbeitsweise dem Gerät an.
•
Überlasten Sie das Gerät nicht.
•
Lassen Sie das Gerät gegebenenfalls über-
•
prüfen.
Schalten Sie das Gerät aus, wenn es nicht
•
benutzt wird.
Tragen Sie Handschuhe.
•
Restrisiken
Auch wenn Sie dieses Elektrowerkzeug
vorschriftsmäßig bedienen, bleiben immer
Restrisiken bestehen. Folgende Gefahren
können im Zusammenhang mit der Bauweise
und Ausführung dieses Elektrowerkzeuges
auftreten:
1. Lungenschäden, falls keine geeignete Staub-
schutzmaske getragen wird.
2. Gehörschäden, falls kein geeigneter Gehör-
schutz getragen wird.
3. Gesundheitsschäden, die aus Hand-Arm-
Schwingungen resultieren, falls das Gerät
über einen längeren Zeitraum verwendet wird
oder nicht ordnungsgemäß geführt und gewartet wird.
- 6 -
Anl_TH_CD_18_2_2B_SPK1.indb 6Anl_TH_CD_18_2_2B_SPK1.indb 6 02.10.12 07:5502.10.12 07:55
Page 7

5. Vor Inbetriebnahme
Lesen Sie vor der Inbetriebnahme Ihres Akkuschraubers unbedingt diese Hinweise:
1. Laden Sie den Akku-Pack nur mit dem mitgelieferten Ladegerät.
2. Nur scharfe Bohrer sowie einwandfreie und
geeignete Schrauberbits verwenden.
3. Beim Bohren und Schrauben in Wänden und
Mauern diese auf verborgene Strom-, Gasund Wasserleitung überprüfen.
6. Bedienung
6.1 Laden des Akkus (Abb. 2-3)
1. Akku (5) aus dem Handgriff heraus ziehen
(Bild 2), dabei die Rasttasten (8) auf der rechten und linken Seite des Akkus (5) drücken.
2. Vergleichen Sie, ob die auf dem Typenschild
angegebene Netzspannung mit der vorhandenen Netzspannung übereinstimmt. Stecken
Sie das Ladegerät (6) in die Steckdose und
verbinden Sie das Ladekabel (a) mit dem Ladeadapter (7). Die rote LED am Ladeadapter
(7) beginnt zu leuchten.
3. Stecken Sie den Akku (5) in den Ladeadapter. Die grüne und die rote LED signalisieren,
dass der Akku geladen wird.
4. Nach 3-5 h ist der Akku voll aufgeladen. Entnehmen Sie den Akku aus dem Ladeadapter
und ziehen sie das Ladegerät aus der Steckdose.
Achtung! Bei Vollladung erfolgt keine automatische Abschaltung.
Sollte das Laden des Akku-Packs nicht möglich
sein, überprüfen Sie bitte
ob an der Steckdose die Netzspannung vor-
•
handen ist.
ob ein einwandfreier Kontakt an den Lade-
•
kontakten des Ladegerätes vorhanden ist.
Sollte das Laden des Akku-Packs immer noch
nicht möglich sein, bitten wir Sie,
das Ladegerät
•
und den Akku-Pack
•
an unseren Kundendienst zu senden.
Im Interesse einer langen Lebensdauer des AkkuPacks sollten Sie für eine rechtzeitige Wiederaufladung des Akku-Packs sorgen. Dies ist auf jeden
Fall notwendig, wenn Sie feststellen, dass die
D
Leistung des Akku-Schraubers nachlässt.
Entladen Sie den Akku-Pack nie vollständig. Dies
führt zu einem Defekt des Akku-Packs!
6.2 Drehmoment-Einstellung (Abb. 4/Pos. 1)
Der Akkuschrauber ist mit einer mechanischen
Drehmomenteinstellung ausgestattet.
Das Drehmoment für eine bestimmte Schraubengröße wird am Stellring (1) eingestellt. Das Drehmoment ist von mehreren Faktoren abhängig:
von der Art und Härte des zu bearbeitenden
•
Materials.
von der Art und der Länge der verwendeten
•
Schrauben.
von den Anforderungen, die an die Schraub-
•
verbindung gestellt werden.
Das Erreichen des Drehmoments wird durch das
ratschende Ausrücken der Kupplung signalisiert.
Achtung! Stellring für das Drehmoment nur
bei Stillstand einstellen.
6.3 Bohren (Abb. 4/Pos. 1)
Zum Bohren stellen Sie den Einstellring für das
Drehmoment auf die letzte Stufe „Bohrer“. In der
Stufe Bohren ist die Rutschkupplung außer Betrieb. Beim Bohren ist das maximale Drehmoment
verfügbar.
6.4 Drehrichtungsschalter (Abb. 5/Pos. 3)
Mit dem Schiebeschalter über dem
Ein/Ausschalter können Sie die Drehrichtung
des Akku-Schraubers einstellen und den AkkuSchrauber gegen ungewolltes Einschalten
sichern. Sie können zwischen Links- und Rechtslauf wählen. Um eine Beschädigung des Getriebes zu vermeiden, darf die Drehrichtung nur im
Stillstand umgeschaltet werden. Befi ndet sich der
Schiebeschalter in der Mittelstellung, ist der Ein/
Ausschalter blockiert.
6.5 Ein/Ausschalter (Abb. 5/Pos. 4)
Mit dem Ein/Ausschalter können Sie die Drehzahl
stufenlos steuern. Je weiter Sie den Schalter
drücken, desto höher ist die Drehzahl des Akkuschraubers.
6.6 Werkzeugwechsel (Bild 6)
Achtung! Stellen Sie bei allen Arbeiten (z.B.
Werkzeugwechsel; Wartung; usw.) am Akkuschrauber den Drehrichtungsschalter (3) in
Mittelstellung.
- 7 -
Anl_TH_CD_18_2_2B_SPK1.indb 7Anl_TH_CD_18_2_2B_SPK1.indb 7 02.10.12 07:5502.10.12 07:55
Page 8

Drehen Sie das Bohrfutter (2) auf.
•
Die Bohrfutteröffnung (a) muss groß genug
•
sein, um das Werkzeug (Bohrer bzw. Schrauberbit) aufzunehmen.
Wählen Sie das geeignete Werkzeug aus.
•
Schieben Sie das Werkzeug soweit wie möglich in die Bohrfutteröffnung (a) hinein.
Drehen Sie das Bohrfutter (2) fest zu, und
•
prüfen Sie anschließend den festen Sitz des
Werkzeuges.
6.7 Schrauben
Verwenden Sie am besten Schrauben mit Selbstzentrierung (z. B. Torx, Kreuzschiltz), welches ein
sicheres Arbeiten gewährleistet. Achten Sie darauf, dass der verwendete Bit und die Schraube
in Form und Größe übereinstimmen. Nehmen Sie
die Drehmomenteinstellung, wie in der Anleitung
beschrieben, entsprechend der Schraubengröße
vor.
6.8 Magnet-Schraubenhalter (Bild 4/Pos. 9)
Am Magnet-Schraubenhalter können Schrauben
abgelegt werden, welche Sie während der Arbeit
dann griff bereit haben.
6.9 Umschaltung Gang 1 - Gang 2
(Abb. 4/Pos. 10)
Je nach Stellung des Umschalters können Sie mit
einer höheren oder niedrigeren Drehzahl arbeiten.
Um eine Beschädigung des Getriebes zu vermeiden, darf die Gangumschaltung nur im Stillstand
umgeschaltet werden.
6.10 Akku-Kapazitätsanzeige (Bild 2/ Pos. 11)
Drücken Sie auf den Schalter für Akku- Kapazitätsanzeige (12). Die Akku-Kapazitätsanzeige
(11) signalisiert ihnen den Ladezustand des Akkus anhand von 3 farbigen LED`s.
Alle LED`s leuchten:
Der Akku ist voll aufgeladen.
Gelbe und rote LED leuchten:
Der Akku verfügt über ausreichende Restladung.
Rote LED:
Der Akku ist leer, laden Sie den Akku auf
D
7. Reinigung, Wartung und
Ersatzteilbestellung
Ziehen Sie vor allen Reinigungsarbeiten den
Netzstecker.
7.1 Reinigung
Halten Sie Schutzvorrichtungen, Luftschlitze
•
und Motorengehäuse so staub- und schmutzfrei wie möglich. Reiben Sie das Gerät mit
einem sauberen Tuch ab oder blasen Sie es
mit Druckluft bei niedrigem Druck aus.
Wir empfehlen, dass Sie das Gerät direkt
•
nach jeder Benutzung reinigen.
Reinigen Sie das Gerät regelmäßig mit einem
•
feuchten Tuch und etwas Schmierseife. Verwenden Sie keine Reinigungs- oder Lösungsmittel; diese könnten die Kunststoffteile des
Gerätes angreifen. Achten Sie darauf, dass
kein Wasser in das Geräteinnere gelangen
kann. Das Eindringen von Wasser in ein Elektrogerät erhöht das Risiko eines elektrischen
Schlages.
7.2 Wartung
Im Geräteinneren befi nden sich keine weiteren zu
wartenden Teile.
7.3 Ersatzteilbestellung:
Bei der Ersatzteilbestellung sollten folgende Angaben gemacht werden;
Typ des Gerätes
•
Artikelnummer des Gerätes
•
Ident-Nummer des Gerätes
•
Ersatzteilnummer des erforderlichen Ersatz-
•
teils
Aktuelle Preise und Infos fi nden Sie unter
www.isc-gmbh.info
- 8 -
Anl_TH_CD_18_2_2B_SPK1.indb 8Anl_TH_CD_18_2_2B_SPK1.indb 8 02.10.12 07:5502.10.12 07:55
Page 9

8. Entsorgung und
Wiederverwertung
Das Gerät befi ndet sich in einer Verpackung um
Transportschäden zu verhindern. Diese Verpackung ist Rohstoff und ist somit wieder verwend-
bar oder kann dem Rohstoff kreislauf zurückge-
führt werden. Das Gerät und dessen Zubehör
bestehen aus verschiedenen Materialien, wie
z.B. Metall und Kunststoff e. Defekte Geräte ge-
hören nicht in den Hausmüll. Zur fachgerechten
Entsorgung sollte das Gerät an einer geeigneten
Sammelstellen abgegeben werden. Wenn Ihnen
keine Sammelstelle bekannt ist, sollten Sie bei
der Gemeindeverwaltung nachfragen.
9. Lagerung
Lagern Sie das Gerät und dessen Zubehör an
einem dunklen, trockenen und frostfreiem sowie
für Kinder unzugänglichem Ort. Die optimale
Lagertemperatur liegt zwischen 5 und 30 ˚C.
Bewahren Sie das Elektrowerkzeug in der Originalverpackung auf.
D
- 9 -
Anl_TH_CD_18_2_2B_SPK1.indb 9Anl_TH_CD_18_2_2B_SPK1.indb 9 02.10.12 07:5502.10.12 07:55
Page 10

D
Nur für EU-Länder
Werfen Sie Elektrowerkzeuge und Akkus nicht in den Hausmüll!
Recycling-Alternative zur Rücksendeauff orderung:
Der Eigentümer des Elektrogerätes ist alternativ anstelle Rücksendung zur Mitwirkung bei der sachgerechten Verwertung im Falle der Eigentumsaufgabe verpfl ichtet. Das Altgerät, ebenso die Akkus, kön-
nen hierfür auch einer Rücknahmestelle überlassen werden, die eine Beseitigung im Sinne der nationalen Kreislaufwirtschafts- und Abfallgesetze durchführt. Nicht betroff en sind den Altgeräten beigefügte
Zubehörteile und Hilfsmittel ohne Elektrobestandteile.
Der Nachdruck oder sonstige Ver vielfältigung von Dokumentation und Begleitpapieren der Produkte,
auch auszugsweise, ist nur mit ausdrücklicher Zustimmung der iSC GmbH zulässig.
Technische Änderungen vorbehalten
- 10 -
Anl_TH_CD_18_2_2B_SPK1.indb 10Anl_TH_CD_18_2_2B_SPK1.indb 10 02.10.12 07:5502.10.12 07:55
Page 11

D
- 11 -
Anl_TH_CD_18_2_2B_SPK1.indb 11Anl_TH_CD_18_2_2B_SPK1.indb 11 02.10.12 07:5502.10.12 07:55
Page 12

D
Garantiebestimmungen
Die Fa. iSC GmbH bzw. der zuständige Baumarkt garantiert die Behebung von Mängeln bzw. den Geräteaustausch entsprechend der unten stehenden Übersicht, wobei die gesetzlichen Gewährleistungsansprüche unberührt bleiben.
Kategorie Beispiel Garantieleistung
Mängel an Material oder Konstruktion
Verschleißteile* Bohrfutter 6 Monate
Verbrauchsmaterial/
Verbrauchsteile*
Fehlteile 5 Arbeitstage
* nicht zwingend im Lieferumfang enthalten!
Bezüglich Verschleißteilen, Verbrauchsmaterial und Fehlteilen garantiert die Fa. iSC GmbH bzw. der
zuständige Baumarkt eine Mängelbehebung bzw. eine Nachlieferung nur, wenn der Mangel innerhalb
von 24h (Verbrauchsmaterial), 5 Arbeitstagen (Fehlteilen) oder 6 Monaten (Verschleißteile) nach Kauf
angezeigt und das Kaufdatum durch Kaufbeleg nachgewiesen wird.
Bei Mängeln an Material oder Konstruktion, bitten wir Sie im Garantiefall das Gerät zusammen mit beiliegender Gerätekarte einzureichen und diese vollständig auszufüllen. Wichtig ist hierbei eine genaue
Fehlerbeschreibung anzugeben.
Beantworten Sie hierfür folgende Fragen:
Hat das Gerät bereits einmal funktioniert oder war es von Anfang an defekt?
•
Ist Ihnen vor dem Auftreten des Defektes etwas aufgefallen (Symptom vor Defekt)?
•
Welche Fehlfunktion weist das Gerät Ihrer Meinung nach auf (Hauptsymptom)?
•
Beschreiben Sie diese Fehlfunktion.
Bit-Einsätze/Bohrer Garantie nur bei Sofortdefekt
24 Monate
(24h nach Kauf / Kaufbelegdatum)
- 12 -
Anl_TH_CD_18_2_2B_SPK1.indb 12Anl_TH_CD_18_2_2B_SPK1.indb 12 02.10.12 07:5502.10.12 07:55
Page 13

D
Garantieurkunde
Sehr geehrte Kundin, sehr geehrter Kunde,
unsere Produkte unterliegen einer strengen Qualitätskontrolle. Sollte dieses Gerät dennoch einmal nicht
einwandfrei funktionieren, bedauern wir dies sehr und bitten Sie, sich an unseren Servicedienst unter
der auf dieser Garantiekarte angegebenen Adresse zu wenden. Gern stehen wir Ihnen auch telefonisch
über die untenangegebene Servicerufnummer zur Verfügung. Für die Geltendmachung von Garantieansprüchen gilt folgendes:
1. Diese Garantiebedingungen regeln zusätzliche Garantieleistungen. Ihre gesetzlichen Gewährleis-
tungsansprüche werden von dieser Garantie nicht berührt. Unsere Garantieleistung ist für Sie
kostenlos.
2. Die Garantieleistung erstreckt sich ausschließlich auf Mängel, die auf Material- oder Herstellungs-
fehler zurückzuführen sind und ist auf die Behebung dieser Mängel bzw. den Austausch des Gerätes beschränkt. Bitte beachten Sie, dass unsere Geräte bestimmungsgemäß nicht für den gewerblichen, handwerklichen oder industriellen Einsatz konstruiert wurden. Ein Garantievertrag kommt
daher nicht zustande, wenn das Gerät in Gewerbe-, Handwerks- oder Industriebetrieben sowie bei
gleichzusetzenden Tätigkeiten eingesetzt wird.
Von unserer Garantie sind ferner Ersatzleistungen für Transportschäden, Schäden durch Nichtbe-
achtung der Montageanleitung oder aufgrund nicht fachgerechter Installation, Nichtbeachtung der
Gebrauchsanleitung (wie durch z.B. Anschluss an eine falsche Netzspannung oder Stromart), missbräuchliche oder unsachgemäße Anwendungen (wie z.B. Überlastung des Gerätes oder Verwendung von nicht zugelassenen Einsatzwerkzeugen oder Zubehör), Nichtbeachtung der War tungsund Sicherheitsbestimmungen, Eindringen von Fremdkörpern in das Gerät (wie z.B. Sand, Steine
oder Staub), Gewaltanwendung oder Fremdeinwirkungen (wie z. B. Schäden durch Herunterfallen)
sowie durch verwendungsgemäßen, üblichen Verschleiß ausgeschlossen. Dies gilt insbesondere
für Akkus, auf die wir dennoch eine Garantiezeit von 12 Monaten gewähren. Der Garantieanspruch
erlischt, wenn an dem Gerät bereits Eingriff e vorgenommen wurden.
3. Die Garantiezeit beträgt 2 Jahre und beginnt mit dem Kaufdatum des Gerätes. Garantieansprüche
sind vor Ablauf der Garantiezeit innerhalb von zwei Wochen, nachdem Sie den Defekt erkannt
haben, geltend zu machen. Die Geltendmachung von Garantieansprüchen nach Ablauf der Garantiezeit ist ausgeschlossen. Die Reparatur oder der Austausch des Gerätes führt weder zu einer
Verlängerung der Garantiezeit noch wird eine neue Garantiezeit durch diese Leistung für das Gerät
oder für etwaige eingebaute Ersatzteile in Gang gesetzt. Dies gilt auch bei Einsatz eines Vor-OrtServices.
4. Für die Geltendmachung Ihres Garantieanspruches übersenden Sie bitte das defekte Gerät porto-
frei an die unten angegebene Adresse. Fügen Sie den Verkaufsbeleg im Original oder einen sonstigen datierten Kaufnachweis bei. Bitte bewahren Sie deshalb den Kassenbon als Nachweis gut auf!
Beschreiben Sie uns bitte den Reklamationsgrund möglichst genau. Ist der Defekt des Gerätes von
unserer Garantieleistung erfasst, erhalten Sie umgehend ein repariertes oder neues Gerät zurück.
Selbstverständlich beheben wir gegen Erstattung der Kosten auch gerne Defekte am Gerät, die vom
Garantieumfang nicht oder nicht mehr erfasst sind. Dazu senden Sie das Gerät bitte an unsere Serviceadresse.
Für Verschleiß-/Verbrauchs- und Fehlteile verweisen wir auf die Einschränkungen dieser Garantie gemäß den Garantiebestimmungen dieser Bedienungsanleitung.
iSC GmbH · Eschenstraße 6 · 94405 Landau/Isar (Deutschland)
Telefon: +49 [0] 180 5 120 509 · Telefax +49 [0] 180 5 835 830
Außerhalb Deutschlands fallen stattdessen Gebühren für ein reguläres Gespräch ins dt. Festnetz an.
(Festnetzpreis: 14 ct/min, Mobilfunkpreise maximal: 42 ct/min)
E-Mail: info@isc-gmbh.info · Internet: www.isc-gmbh.info
- 13 -
Anl_TH_CD_18_2_2B_SPK1.indb 13Anl_TH_CD_18_2_2B_SPK1.indb 13 02.10.12 07:5502.10.12 07:55
Page 14
Garantie JA NEIN Kaufbeleg-Nr. / Datum:
1
3
Service Hotline kontaktieren oder bei iSC-Webadresse anmelden - es wird Ihnen eine Retourennummer zugeteilt l
Fehlerbeschreibung und Art.-Nr. und I.-Nr. angeben l
4
Garantiefall JA/NEIN ankreuzen sowie Kaufbeleg-Nr. und Datum angeben und eine Kopie des Kaufbeleges beilegen
2
Ihre Anschrift eintragen
Sehr geehrte Kundin, sehr geehrter Kunde,
bitte beschreiben Sie uns die von Ihnen festgestellte Fehlfunktion Ihres Gerätes als Grund Ihrer Beanstandung möglichst genau. Dadurch können wir für Sie Ihre Reklamation schneller bearbeiten
und Ihnen schneller helfen. Eine zu ungenaue Beschreibung mit Begriff en wie „Gerät funktioniert nicht“ oder „Gerät defekt“ verzögert hingegen die Bearbeitung erheblich.
4
D
Straße / Nr.:
PLZ: Ort:
3
Welcher Fehler ist aufgetreten (genaue Angabe): Art.-Nr.: I.-Nr.:
2
Name:
(Festnetzpreis: 14 ct/min, Mobilfunkpreise maximal: 42 ct/min; Außerhalb Deutschlands fallen stattdessen Gebühren für ein reguläres Gespräch ins dt. Festnetz an.)
1
Service Hotline: 01805 120 509 · www.isc-gmbh.info · Mo-Fr 8:00-18:00 Uhr
Retouren-Nr. iSC:
Telefon:
Mobil:
- 14 -
Anl_TH_CD_18_2_2B_SPK1.indb 14Anl_TH_CD_18_2_2B_SPK1.indb 14 02.10.12 07:5502.10.12 07:55
Page 15

GB
Caution - Read the operating instructions to reduce the risk of inquiry
Wear ear-muff s. The impact of noise can cause damage to hearing.
Wear a breathing mask. Dust which is injurious to health can be generated when working on wood
and other materials. Never use the device to work on any materials containing asbestos!
Wear safety goggles. Sparks generated during working or splinters, chips and dust emitted by the device can cause loss of sight.
Change the gear only when the drill is at a standstill. If you fail to observe this point, the gearing may be damaged.
- 15 -
Anl_TH_CD_18_2_2B_SPK1.indb 15Anl_TH_CD_18_2_2B_SPK1.indb 15 02.10.12 07:5502.10.12 07:55
Page 16

Important!
When using the equipment, a few safety precautions must be observed to avoid injuries and
damage. Please read the complete operating
instructions and safety regulations with due care.
Keep this manual in a safe place, so that the information is available at all times. If you give the
equipment to any other person, hand over these
operating instructions and safety regulations as
well. We cannot accept any liability for damage
or accidents which arise due to a failure to follow
these instructions and the safety instructions.
1. Safety regulations
The corresponding safety information can be
found in the enclosed booklet.
Caution!
Read all safety regulations and instructions.
Any errors made in following the safety regulations and instructions may result in an electric
shock, fi re and/or serious injury.
Keep all safety regulations and instructions
in a safe place for future use.
2. Layout and items supplied
2.1 Layout (Fig. 1a/1b)
1. Torque adjustment (setting ring)
2. Quick-change drill chuck
3. Changeover switch
4. On/Off switch
5. Battery
6. Charging unit
7. Charging adapter
8. Pushlock button
9. Magnetic screw holder
10. Selector switch for 1st/2nd gear
11. Battery capacity indicator
12. Switch for battery capacity indicator
GB
2.2 Items supplied
Please check that the article is complete as specifi ed in the scope of delivery. If parts are missing,
please contact our service center or the nearest
branch of the DIY store where you made your
purchase at the latest within 5 work days after
purchasing the article and upon presentation of
a valid bill of purchase. Also, refer to the warranty
table in the warranty provisions at the end of the
operating instructions.
Open the packaging and take out the equip-
•
ment with care.
Remove the packaging material and any
•
packaging and/or transportation braces (if
available).
Check to see if all items are supplied.
•
Inspect the equipment and accessories for
•
transport damage.
If possible, please keep the packaging until
•
the end of the guarantee period.
Important!
The equipment and packaging material are
not toys. Do not let children play with plastic
bags, foils or small parts. There is a danger of
swallowing or suff ocating!
Cordless drill/screwdriver
•
Battery (2x)
•
Charging unit
•
Charging adapter
•
Original operating instructions
•
Safety instructions
•
3. Proper use
The cordless drill/screwdriver is designed for tightening and undoing screws, as well as for drilling
in wood, metal and plastic.
The equipment is to be used only for its prescribed purpose. Any other use is deemed to be a
case of misuse. The user / operator and not the
manufacturer will be liable for any damage or injuries of any kind caused as a result of this.
Please note that our equipment has not been designed for use in commercial, trade or industrial
applications. Our warranty will be voided if the
machine is used in commercial, trade or industrial
businesses or for equivalent purposes.
- 16 -
Anl_TH_CD_18_2_2B_SPK1.indb 16Anl_TH_CD_18_2_2B_SPK1.indb 16 02.10.12 07:5502.10.12 07:55
Page 17

4. Technical data
Motor supply voltage: ...............................18V DC
Idling speed: .......................... 0-350/0-1100 min
Torque settings: ........................................... 19+1
Clockwise/Counter-clockwise: ........................Yes
Clamping range of drill chuck: .......... max. 10 mm
Battery charge voltage: ..........................18 V DC
Battery charge current: ..............................0.55 A
Battery charger supply voltage: .......230 V ~ 50Hz
Charging time: ..............................max. 3-5 hours
Battery type: ................................................ NiCd
Weight: .......................................................1.7 kg
Sound and vibration
Sound and vibration values were measured in
accordance with EN 60745.
sound pressure level ..................... 66.4 dB(A)
L
pA
K
uncertainty .............................................3 dB
pA
sound power level .......................77.4 dB(A)
L
WA
K
uncertainty ............................................. 3 dB
WA
Wear ear-muff s.
The impact of noise can cause damage to hearing.
Total vibration values (vector sum of three directions) determined in accordance with EN 60745.
Drilling in metal
Vibration emission value a
K uncertainty = 1.5 m/s
Screwing without hammer action
Vibration emission value ah ≤ 2.5 m/s
K uncertainty = 1.5 m/s
Warning!
The specifi ed vibration value was established in
accordance with a standardized testing method. It
may change according to how the electric equipment is used and may exceed the specifi ed value
in exceptional circumstances.
The specifi ed vibration value can be used to
compare the equipment with other electric power
tools.
The specifi ed vibration value can be used for initi-
al assessment of a harmful eff ect.
2
2
≤ 2.5 m/s
h
2
2
GB
Keep the noise emissions and vibrations to a
minimum.
Only use appliances which are in perfect wor-
•
king order.
-1
Service and clean the appliance regularly.
•
Adapt your working style to suit the appliance.
•
Do not overload the appliance.
•
Have the appliance serviced whenever ne-
•
cessary.
Switch the appliance off when it is not in use.
•
Wear protective gloves.
•
Residual risks
Even if you use this electric power tool in
accordance with instructions, certain residual risks cannot be rules out. The following
hazards may arise in connection with the
equipment’s construction and layout:
1. Lung damage if no suitable protective dust
mask is used.
2. Damage to hearing if no suitable ear protection is used.
3. Health damage caused by hand-arm vibrations if the equipment is used over a prolonged period or is not properly guided and
maintained.
5. Before starting the equipment
Be sure to read the following information before
you put the cordless screwdriver into operation:
1. Charge the battery only with the charging unit
supplied.
2. Only ever use sharp drill bits and screwdriver
bits which are suitable for the purpose and in
faultless condition.
3. Always check for concealed electric cables
and gas and water pipes when drilling and
screwing in walls.
6. Operation
6.1 Charging the battery (Fig. 2-3)
1. Remove the battery pack (5) from the handle
(Fig. 2) by pressing the pushlock buttons (8)
on the left and right side of the battery pack
(5).
2. Check that your mains voltage is the same
as that marked on the rating plate. Plug the
battery charger (6) into the power socket and
connect the charging cable (a) to the charging adapter (7). The red LED on the charging
- 17 -
Anl_TH_CD_18_2_2B_SPK1.indb 17Anl_TH_CD_18_2_2B_SPK1.indb 17 02.10.12 07:5502.10.12 07:55
Page 18

adapter (7) then comes on.
3. Plug the battery pack (5) into the charging
adapter. The green LED and the red LED will
come on to indicate that the battery pack is
being charged.
4. The battery pack is fully charged after 3-5
hours. Remove the batter y from the charging
adapter and disconnect the charging unit
from the power socket.
Caution! The battery charger does not switch
off automatically when the battery is fully
charged.
If the battery pack fails to charge, check for the
following:
Voltage at the power socket
•
Good contact at the charging contacts of the
•
charging unit
If the battery pack still fails to charge, send
the charging unit
•
and the battery pack
•
to our customer service center.
To ensure that the battery pack provides long service, you should take care to recharge it promptly.
You must recharge the battery pack when you
notice that the power of the cordless equipment
drops. Never fully discharge the batter y pack. This
will cause it to develop a defect!
6.2 Torque setting (Fig. 4 / Item 1)
The cordless screwdriver is fi tted with a mechani-
cal torque selector.
The torque for a particular screw size is set with
the setting ring (1). The torque is dependent on a
number of factors:
On the type and hardness of the material in-
•
volved
On the type and length of the screws used
•
On the requirements that the screw connec-
•
tion has to satisfy
The grating disengagement of the coupling indicates that the selected torque level has been
reached.
Caution! Only ever adjust the setting ring
when the equipment is at a standstill.
GB
6.3 Drilling (Fig. 4/Item 1)
For drilling purposes, adjust the setting ring for
the torque to the last setting “Drill”. In the drill
setting the slip coupling is non-functional. The
maximum torque is available for drilling.
6.4 Changeover switch (Fig. 5/Item 3)
The slide switch above the On/Off switch is for
setting the direction of rotation of the cordless
screwdriver and for preventing the cordless
screwdriver from being switched on inadvertently.
You can select between clockwise and counterclockwise rotation. To avoid causing damage to
the gearing, the direction of rotation must only be
changed when the screwdriver is at a standstill.
When the slide switch is in the middle position,
the On/Off switch is blocked.
6.5 On/Off switch (Fig. 5/Item 4)
Infi nitely variable speed control is possible with
the On/Off switch. The fur ther you push the
switch, the higher the speed of the cordless
screwdriver.
6.6 Changing the bit (Fig. 6)
Caution! Set the changeover switch (3) to its
center position whenever you carry out any work
(for example changing the tool, maintenance
work, etc.) on the cordless screwdriver.
Open the chuck (2).
•
The chuck opening (a) must be large enough
•
to hold the tool (drill bit or screwdriver bit).
Select the suitable tool. Push the tool as far
•
as possible into the chuck opening (a).
Tighten the chuck (2) and then check that the
•
tool is secure.
6.7 Screwing
It is advisable to use self-centering screws (e.g.
Torx, cross recessed head) as these will enable
you to work safely and reliably. Always make sure
that the bit used is of the same size and shape as
the screw. Set the torque to suit the screw size as
specifi ed in the instructions.
6.8 Magnetic screw holder (Fig. 4/Item 9)
Screws can be placed on the magnetic screw holder for easy reach during operation.
- 18 -
Anl_TH_CD_18_2_2B_SPK1.indb 18Anl_TH_CD_18_2_2B_SPK1.indb 18 02.10.12 07:5502.10.12 07:55
Page 19

6.9 Selector switch for 1st/2nd gear
(Fig. 4 / Item 10)
You can work with a higher or lower speed depending on the position of the selector switch.
Change the gear only when the drill is at a standstill. If you fail to observe this point, the gearing
may be damaged.
6.10 Battery capacity indicator
(Fig. 2/Item 11)
Press the button for the battery capacity indicator
(12). The battery capacity indicator (11) indicates
the charge state of the battery on 3 colored LEDs.
All the LEDs are lit:
The battery is fully charged.
The yellow and red LEDs are lit:
The battery has an adequate remaining charge.
Red LED:
The battery is empty, recharge the battery.
7. Cleaning, maintenance and
ordering of spare parts
Always pull out the mains power plug before starting any cleaning work.
7.1 Cleaning
Keep all safety devices, air vents and the
•
motor housing free of dirt and dust as far as
possible. Wipe the equipment with a clean
cloth or blow it with compressed air at low
pressure.
We recommend that you clean the device
•
immediately each time you have finished
using it.
Clean the equipment regularly with a moist
•
cloth and some soft soap. Do not use
cleaning agents or solvents; these could attack the plastic parts of the equipment. Ensure that no water can seep into the device. The
ingress of water into an electric tool increases
the risk of an electric shock.
GB
7.2 Maintenance
There are no parts inside the equipment which
require additional maintenance.
7.3 Ordering replacement parts:
Please quote the following data when ordering
replacement parts:
Type of machine
•
Article number of the machine
•
Identification number of the machine
•
Replacement part number of the part required
•
For our latest prices and information please go to
www.isc-gmbh.info
8. Disposal and recycling
The equipment is supplied in packaging to prevent it from being damaged in transit. The raw
materials in this packaging can be reused or
recycled. The equipment and its accessories are
made of various types of material, such as metal
and plastic. Never place defective equipment in
your household refuse. The equipment should
be taken to a suitable collection center for proper
disposal. If you do not know the whereabouts of
such a collection point, you should ask in your
local council offi ces.
9. Storage
Store the equipment and accessories out of
children’s reach in a dark and dry place at above
freezing temperature. The ideal storage temperature is between 5 and 30 °C. Store the electric
tool in its original packaging.
- 19 -
Anl_TH_CD_18_2_2B_SPK1.indb 19Anl_TH_CD_18_2_2B_SPK1.indb 19 02.10.12 07:5502.10.12 07:55
Page 20

GB
For EU countries only
Never place electric power tools or batteries in your household refuse!
Recycling alternative to the requested returning of equipment:
Instead of returning the equipment to the manufacturer, the owner of the electrical equipment is obliged
to ensure that the equipment is properly disposed of if relinquishing ownership. The old equipment as
well as any batteries can be returned to a suitable collection point that will dispose of the equipment in
accordance with the national recycling and waste disposal regulations. This does not apply to any accessories or aids without electrical components supplied with the old equipment.
The reprinting or reproduction by any other means, in whole or in part, of documentation and papers
accompanying products is permitted only with the express consent of the iSC GmbH.
Subject to technical changes
- 20 -
Anl_TH_CD_18_2_2B_SPK1.indb 20Anl_TH_CD_18_2_2B_SPK1.indb 20 02.10.12 07:5502.10.12 07:55
Page 21

GB
Warranty provisions
iSC GmbH or the DIY store where you made you purchase guarantees the repair of defects or replacement of the equipment in accordance with the overview below. Statutory guarantee claims are unaff ec-
ted.
Category Example Warranty
Defect with regard to material or
construction
Wear parts* Drill chuck 6 months
Consumables* Bit inserts/drill bits Warranty only in case of an im-
Missing parts 5 work days
* Not necessarily included in the scope of delivery!
For consumables, wear parts and missing parts iSC GmbH guarantees the correction of defects or a
new delivery only if the defect is reported within 24 hours (consumables), 5 work days (missing parts) or
6 months (wear parts) after purchase and the purchase date is verifi ed with the bill.
In case of defects concerning the material or construction, we kindly request you to submit the equipment together with the fully completed warranty card supplied with the equipment. It is important that
you enter an exact description of the defect.
To do so, answer the following questions:
Did the equipment work at all or was it defective from the beginning?
•
Did you notice anything (symptom or defect) prior to the failure?
•
What malfunction does the equipment have in your opinion (main symptom)?
•
Describe this malfunction.
24 months
mediate defect (24 hours after
purchase / date on the bill)
- 21 -
Anl_TH_CD_18_2_2B_SPK1.indb 21Anl_TH_CD_18_2_2B_SPK1.indb 21 02.10.12 07:5502.10.12 07:55
Page 22

GB
Warranty certifi cate
Dear Customer,
All of our products undergo strict quality checks to ensure that they reach you in perfect condition. In the
unlikely event that your device develops a fault, please contact our service department at the address
shown on this guarantee card. Of course, if you would prefer to call us then we are also happy to off er
our assistance under the service number printed below. Please note the following terms under which
guarantee claims can be made:
1. These guarantee terms cover additional guarantee rights and do not aff ect your statutory warranty
rights. We do not charge you for this guarantee.
2. Our guarantee only covers problems caused by material or manufacturing defects, and it is restricted to the rectifi cation of these defects or replacement of the device. Please note that our devices
have not been designed for use in commercial, trade or industrial applications. Consequently, the
guarantee is invalidated if the equipment is used in commercial, trade or industrial applications or
for other equivalent activities. The following are also excluded from our guarantee: compensation for
transport damage, damage caused by failure to comply with the installation/assembly instructions
or damage caused by unprofessional installation, failure to comply with the operating instructions
(e.g. connection to the wrong mains voltage or current type), misuse or inappropriate use (such as
overloading of the device or use of non-approved tools or accessories), failure to comply with the
maintenance and safety regulations, ingress of foreign bodies into the device (e.g. sand, stones or
dust), eff ects of force or external infl uences (e.g. damage caused by the device being dropped) and
normal wear resulting from proper operation of the device. This applies in particular to rechargeable
batteries for which we nevertheless issue a guarantee period of 12 months. The guarantee is rendered null and void if any attempt is made to tamper with the device.
3. The guarantee is valid for a period of 2 years starting from the purchase date of the device. Guarantee claims should be submitted before the end of the guarantee period within two weeks of the defect being noticed. No guarantee claims will be accepted after the end of the guarantee period. The
original guarantee period remains applicable to the device even if repairs are carried out or parts are
replaced. In such cases, the work performed or parts fi tted will not result in an extension of the gua-
rantee period, and no new guarantee will become active for the work performed or parts fi tted. This
also applies when an on-site service is used.
4. In order to assert your guarantee claim, please send your defective device postage-free to the
address shown below. Please enclose either the original or a copy of your sales receipt or another dated proof of purchase. Please keep your sales receipt in a safe place, as it is your proof of
purchase. It would help us if you could describe the nature of the problem in as much detail as possible. If the defect is covered by our guarantee then your device will either be repaired immediately
and returned to you, or we will send you a new device.
Of course, we are also happy off er a chargeable repair service for any defects which are not covered by
the scope of this guarantee or for units which are no longer covered. To take advantage of this service,
please send the device to our service address.
Also refer to the restrictions of this warranty concerning wear parts/consumables and missing parts as
set forth in the warranty conditions in these operating instructions.
- 22 -
Anl_TH_CD_18_2_2B_SPK1.indb 22Anl_TH_CD_18_2_2B_SPK1.indb 22 02.10.12 07:5502.10.12 07:55
Page 23

F
Avertissement - Lisez ce mode d’emploi pour diminuer le risque de blessures
Portez une protection de l’ouïe. L’exposition au bruit peut entraîner une perte de l’ouïe.
Portez un masque anti-poussière. Lors de travaux sur su bois et autres matériaux, de la poussière
nuisible à la santé peut être dégagée. Ne travaillez pas sur du matériau contenant de l’amiante !
Portez des lunettes de protection. Les étincelles générées pendant travail ou les éclats, copeaux et
la poussière sortant de l’appareil peuvent entraîner une perte de la vue.
Afi n d‘éviter d‘endommager l‘engrenage, le changement de vitesse doit se faire uniquement à
l‘arrêt
- 23 -
Anl_TH_CD_18_2_2B_SPK1.indb 23Anl_TH_CD_18_2_2B_SPK1.indb 23 02.10.12 07:5502.10.12 07:55
Page 24

Attention !
Lors de l’utilisation d’appareils, il faut respecter
certaines mesures de sécurité afi n d’éviter des
blessures et dommages. Veuillez donc lire attentivement ce mode d’emploi/ces consignes de
sécurité. Veillez à le conserver en bon état pour
pouvoir accéder aux informations à tout moment.
Si l’appareil doit être remis à d’autres personnes,
veillez à leur remettre aussi ce mode d’emploi/
ces consignes de sécurité. Nous déclinons toute
responsabilité pour les accidents et dommages
dus au non-respect de ce mode d’emploi et des
consignes de sécurité.
1. Consignes de sécurité
Vous trouverez les consignes de sécurité correspondantes dans le cahier en annexe.
Avertissement !
Veuillez lire toutes les consignes de sécurité
et instructions. Tout non-respect des consignes
de sécurité et instructions peut provoquer une
décharge électrique, un incendie et/ou des blessures graves.
Conservez toutes les consignes de sécurité
et instructions pour une consultation ultérieure.
F
achat à notre service après-vente ou au magasin
de bricolage compétent le plus proche muni
d‘une preuve d‘achat valable. Veuillez consulter
pour cela le tableau des garanties dans les conditions de garantie à la fi n du mode d‘emploi.
Ouvrez l’emballage et prenez l’appareil en le
•
sortant avec précaution de l’emballage.
Retirez le matériel d’emballage tout comme
•
les sécurités d’emballage et de transport (s’il
y en a).
Vérifiez si la livraison est bien complète.
•
Contrôlez si l’appareil et ses accessoires ne
•
sont pas endommagés par le transport.
Conservez l’emballage autant que possible
•
jusqu’à la fin de la période de garantie.
Attention !
L’appareil et le matériel d’emballage ne sont
pas des jouets ! Il est interdit de laisser des
enfants jouer avec des sacs et des fi lms en
plastique et avec des pièces de petite taille.
Ils risquent de les avaler et de s’étouff er !
Perceuse sans fil
•
Accumulateur (2x)
•
Chargeur
•
Adaptateur de charge
•
Mode d’emploi d’origine
•
Consignes de sécurité
•
2. Description de l’appareil et
volume de livraison
2.1 Description de l’appareil (fi gure 1)
1. Réglage du couple (bague d‘arrêt)
2. Mandrin à serrage rapide
3. Interrupteur du sens de rotation
4. Interrupteur marche/arrêt
5. Accumulateur
6. Chargeur
7. Adaptateur de charge
8. Touche à crans
9. Porte-vis à aimant
10. Commutateur inverseur 1. vitesse - 2. vitesse
11. Indicateur de charge de l‘accumulateur
12. Bouton indicateur de charge de
l‘accumulateur
2.2 Volume de livraison
Veuillez contrôler si l‘article est complet à l‘aide
de la description du volume de livraison. S‘il
manque des pièces, il faut vous adresser dans un
délai de 5 jours ouvrables maximum après votre
3. Utilisation conforme à
l’aff ectation
La perceuse sans fi l convient au vissage et dévis-
sage de vis, ainsi qu‘au perçage dans le bois, le
métal et le plastique.
La machine doit exclusivement être employée
conformément à son aff ectation. Chaque uti-
lisation allant au-delà de cette aff ectation est
considérée comme non conforme. Pour les
dommages en résultant ou les blessures de tout
genre, le producteur décline toute responsabilité
et l’opérateur/l’exploitant est responsable.
Veillez au fait que nos appareils, conformément
à leur aff ectation, n’ont pas été construits, pour
être utilisés dans un environnement professionnel, industriel ou artisanal. Nous déclinons toute
responsabilité si l’appareil est utilisé professionnellement, artisanalement ou dans des sociétés
industrielles, tout comme pour toute activité
équivalente.
- 24 -
Anl_TH_CD_18_2_2B_SPK1.indb 24Anl_TH_CD_18_2_2B_SPK1.indb 24 02.10.12 07:5502.10.12 07:55
Page 25

4. Données techniques
Alimentation en tension du moteur : ........18 V d.c.
Vitesse de rotation à vide : ... 0-350/0-1100 tr/min
Niveaux de couple : ..................................... 19+1
Marche droite-gauche ......................................oui
Envergure du mandrin de perceuse . 10 mm max.
Tension de charge accumulateur : ..........18 V d.c.
Courant de charge accumulateur : ............ 0,55 A
Tension réseau du chargeur : ............230V~ 50Hz
Durée de charge : ......................3-5 heures max.
Type d‘accu : ............................................... NiCd
Poids : ........................................................1,7 kg
Bruit et vibration
Les valeurs de bruit et de vibration ont été déterminées conformément à la norme EN 60745.
Niveau de pression acoustique L
Imprécision K
Niveau de puissance acoustique L
Imprécision K
Portez une protection acoustique.
L’exposition au bruit peut entraîner la perte de
l’ouïe.
Les valeurs totales des vibrations (somme des
vecteurs de trois directions) ont été déterminées
conformément à EN 60745.
Perçage dans le métal
Valeur d’émission de vibration ah ≤ 2,5 m/s
Insécurité K = 1,5 m/s
Visser sans choc
Valeur d’émission de vibration ah ≤ 2,5 m/s
Insécurité K = 1,5 m/s
Avertissement !
La valeur d’émission de vibration a été mesurée
selon une méthode d’essai normée et peut être
modifi ée, en fonction du type d’emploi de l’outil
électrique ; elle peut dans certains cas exceptionnels être supérieure à la valeur indiquée.
La valeur d’émission de vibration indiquée peut
être utilisée pour comparer un outil électrique à
un autre.
............................................3 dB
pA
............................................ 3 dB
WA
2
2
.... 66,4 dB(A)
pA
.. 77,4 dB(A)
WA
2
2
F
La valeur d’émission de vibration indiquée peut
également être utilisée pour estimer l’altération
au début.
Limitez le niveau sonore et les vibrations à
un minimum !
Utilisez exclusivement des appareils en ex-
•
cellent état.
Entretenez et nettoyez l’appareil régulière-
•
ment.
Adaptez votre façon de travailler à l’appareil.
•
Ne surchargez pas l’appareil.
•
Faites contrôler l’appareil le cas échéant.
•
Mettez l’appareil hors circuit lorsque vous ne
•
l’utilisez pas.
Portez des gants.
•
Risques résiduels
Même en utilisant cet outil électrique conformément aux prescriptions, il reste toujours
des risques résiduels. Les dangers suivants
peuvent apparaître en rapport avec la construction et le modèle de cet outil électrique :
1. Lésions des poumons si aucun masque anti-
poussière adéquat n’est porté.
2. Défi cience auditive si aucun casque anti-bruit
approprié n’est porté.
3. Atteintes à la santé issues des vibrations
main-bras, si l’appareil est utilisé pendant une
longue période ou s’il n’a pas été employé ou
entretenu dans les règles de l’art.
- 25 -
Anl_TH_CD_18_2_2B_SPK1.indb 25Anl_TH_CD_18_2_2B_SPK1.indb 25 02.10.12 07:5502.10.12 07:55
Page 26

5. Avant la mise en service
Avant la mise en service de votre visseuse sans
fi l, lisez obligatoirement ces indications :
1. Chargez l‘accumulateur uniquement avec le
chargeur livré.
2. N‘utilisez que des forets aff utés et des em-
bouts de vissage en parfait état et adaptés.
3. Lorsque vous percez ou vissez dans des
murs intérieurs ou extérieurs, vérifi ez si ceux-
ci ne contiennent pas de conduites cachées
de courant, de gaz et d‘eau.
6. Commande
6.1 Charge de l’accumulateur (fi g. 2-3)
1. Sortir l‘accumulateur (5) de la poignée
(fi gure 2) en appuyant sur les touches cran-
tées (8) sur les côtés droit et gauche de
l’accumulateur (5).
2. Comparez si la tension du secteur indiquée
sur la plaque signalétique correspond à la
tension secteur disponible. Enfi chez le char-
geur (6) dans la prise de courant et raccorder
le câble de charge (a) à l‘adaptateur de charge (7). Le voyant LED rouge de l‘adaptateur
de charge (7) s‘allume.
3. Insérer l‘accumulateur (5) dans l‘adaptateur
de charge. Les voyants LED rouge et vert signalent que l‘accumulateur est en train d‘être
chargé.
4. Au bout de 3 à 5 h, l‘accumulateur est complètement rechargé. Retirez l‘accumulateur
de l‘adaptateur de charge et débranchez le
chargeur de la prise de courant.
Attention ! Lorsque la charge est complète,
aucune mise hors circuit automatique n‘a
lieu.
S‘il est impossible de charger l‘accumulateur,
veuillez contrôler
si la tension réseau est présente au niveau de
•
la prise de courant.
si un contact correct est présent au niveau
•
des contacts de charge du chargeur.
Si le chargement de l‘accumulateur reste impossible, nous vous prions de bien vouloir renvoyer,
le chargeur
•
et le bloc accumulateur
•
à notre service après-vente.
F
Dans l‘intérêt d‘une longue durée de fonctionnement du bloc accumulateur, vous devez prendre
soin de recharger le bloc accumulateur en temps
voulu. Ceci devient absolument nécessaire
lorsque vous constatez que la puissance de la
visseuse sans fi l baisse. Ne déchargez jamais
complètement le bloc accumulateur. Ceci cause
l‘endommagement du bloc accumulateur !
6.2 Réglage du couple (fi g. 4/pos. 1)
La visseuse sans fi l est équipée d‘un réglage de
couple mécanique.
Le couple pour une taille de vis particulière se
règle à la bague d‘arrêt (1). Le couple dépend de
plusieurs facteurs ;
du type et de la dureté du matériau à travail-
•
ler.
du type et de la longueur de la vis utilisée.
•
de ce qu‘on attend des raccords vissés.
•
Lorsque l‘accouplement débraye en faisant un
bruit de crécelle, c‘est que le couple est atteint.
Attention ! Réglez la bague d‘arrêt pour le
couple uniquement lorsque l‘appareil est à
l‘arrêt.
6.3 Perçage (fi g. 4/pos. 1)
Pour percer, réglez la bague d‘arrêt pour le
couple sur le dernier cran « perceuse ». Au cran
perceuse, l‘accouplement à glissement est désactivé. Lors du perçage, le couple maximum est
disponible.
6.4 Interrupteur du sens de rotation
(fi g. 5/pos. 3)
On peut régler le sens de rotation de la visseuse
sans fi l à l‘aide de l‘interrupteur à coulisse situé
au-dessus de l‘interrupteur marche/arrêt et bloquer la visseuse contre toute nouvelle remise
en marche involontaire. Vous pouvez choisir
entre marche à gauche et marche à droite. Afi n
d‘éviter d‘endommager l‘engrenage, le sens de
rotation doit être uniquement commuté à l‘arrêt. Si
l‘interrupteur à coulisse se trouve en position médiane, l‘interrupteur marche/arrêt est bloqué.
6.5 Interrupteur marche/arrêt (fi g. 5/pos. 4)
Avec l‘interrupteur marche/arrêt, vous pouvez
commander la vitesse de rotation en continu. Plus
vous appuyez sur l‘interrupteur, plus la vitesse de
rotation de la visseuse sans fi l est élevée.
- 26 -
Anl_TH_CD_18_2_2B_SPK1.indb 26Anl_TH_CD_18_2_2B_SPK1.indb 26 02.10.12 07:5502.10.12 07:55
Page 27

6.6 Changement d‘outil (fi gure 6)
Attention ! Pour tous les travaux (par ex. change-
ment d‘outil ; maintenance ; etc.) sur la visseuse
sans fi l, positionnez l‘interrupteur de sens de rota-
tion (3) sur la position médiane.
Dévissez le mandrin de perceuse (2).
•
L‘ouverture du mandrin (a) doit être assez
•
grande pour recevoir l‘outil (foret ou embout
de vissage).
Choisissez l‘outil approprié. Poussez l‘outil le
•
plus loin possible dans l‘ouverture du mandrin
(a).
Serrez le mandrin (2) en le tournant ferme-
•
ment dans le sens des aiguilles d‘une montre
et vérifiez ensuite que l‘outil est bien fixé.
6.7 Vis
Utilisez de préférence des vis avec un centrage
autonome (par ex. torx, vis cruciforme) qui garantissent un travail en toute sécurité. Veillez à
ce que l‘embout utilisé et la vis correspondent du
point de vue de la forme et de la taille. Procédez
au réglage du couple en fonction de la taille de la
vis, comme décrit dans le mode d‘emploi.
6.8 Porte-vis à aimant (fi gure 4/pos. 9)
Sur le porte-vis à aimant, on peut déposer des vis
qui seront ainsi à disposition pendant le travail.
6.9 Commutation vitesse 1 – vitesse 2
(fi g. 4/pos. 10)
Selon la position du commutateur inverseur, vous
pouvez travailler avec une vitesse de rotation plus
ou moins grande. Afi n d‘éviter d‘endommager
l‘engrenage, le changement de vitesse doit se
faire uniquement à l‘arrêt.
6.10 Indicateur de charge de l‘accumulateur
(fi g. 2/pos. 11)
Appuyez sur le bouton indicateur de charge
de l‘accumulateur (12). L‘indicateur de charge de l‘accumulateur (11) vous indique l‘état
d‘autonomie de l‘accumulateur à l‘aide de trois
voyants LED colorés.
Tous les voyants LED sont allumés :
l‘accumulateur est complètement rechargé.
Les voyants LED jaune et rouge sont allumés:
l‘accumulateur dispose encore d‘un résidu de
charge suffi sant.
Voyant LED rouge :
l‘accumulateur est vide, il faut le recharger.
F
7. Nettoyage, maintenance et commande de pièces de rechange
Retirez la fi che de contact avant tous travaux de
nettoyage.
7.1 Nettoyage
Maintenez les dispositifs de protection, les
•
fentes à air et le carter de moteur aussi propres (sans poussière) que possible. Frottez
l’appareil avec un chiffon propre ou soufflez
dessus avec de l’air comprimé à basse pression.
Nous recommandons de nettoyer l’appareil
•
directement après chaque utilisation.
Nettoyez l’appareil régulièrement à l’aide d’un
•
chiffon humide et un peu de savon. N’utilisez
aucun produit de nettoyage ni détergeant;
ils pourraient endommager les pièces en
matières plastiques de l’appareil. Veillez à
ce qu’aucune eau n’entre à l’intérieur de
l’appareil. La pénétration de l’eau dans un
appareil électrique augmente le risque de
décharge électrique.
7.2 Maintenance
Aucune pièce à l’intérieur de l’appareil n’a besoin
de maintenance.
7.3 Commande de pièces de rechange :
Pour les commandes de pièces de rechange,
veuillez indiquer les références suivantes:
Type de l’appareil
•
No. d’article de l’appareil
•
No. d’identification de l’appareil
•
No. de pièce de rechange de la pièce requise
•
Vous trouverez les prix et informations actuelles à
l’adresse www.isc-gmbh.info
- 27 -
Anl_TH_CD_18_2_2B_SPK1.indb 27Anl_TH_CD_18_2_2B_SPK1.indb 27 02.10.12 07:5502.10.12 07:55
Page 28

8. Mise au rebut et recyclage
L‘appareil se trouve dans un emballage permettant d‘éviter les dommages dus au transport.
Cet emballage est une matière première et peut
donc être réutilisé ultérieurement ou être réintroduit dans le circuit des matières premières.
L‘appareil et ses accessoires sont en matériaux
divers, comme par ex. des métaux et matières
plastiques. Les appareils défectueux ne doivent
pas être jetés dans les poubelles domestiques.
Pour une mise au rebut conforme à la réglementation, l‘appareil doit être déposé dans un centre
de collecte approprié. Si vous ne connaissez pas
de centre de collecte, veuillez vous renseigner
auprès de l‘administration de votre commune.
9. Stockage
Entreposez l’appareil et ses accessoires dans
un endroit sombre, sec et à l’abri du gel tout
comme inaccessible aux enfants. La température
de stockage optimale est comprise entre 5 et 30
°C. Conservez l’outil électrique dans l’emballage
d’origine.
F
- 28 -
Anl_TH_CD_18_2_2B_SPK1.indb 28Anl_TH_CD_18_2_2B_SPK1.indb 28 02.10.12 07:5502.10.12 07:55
Page 29

F
Uniquement pour les pays de l‘Union Européenne
Ne jetez pas les outils électriques et les accumulateurs dans les ordures ménagères !
Possibilité de recyclage en alternative à la demande de renvoi :
le propriétaire de l‘appareil électrique est tenu, en guise d‘alternative à un renvoi, à contribuer à un recyclage eff ectué dans les règles de l‘art en cas de cessation de la propriété. L‘ancien appareil, ainsi que
les accumulateurs, peut être remis à un point de collecte dans ce but. Cet organisme devra l‘éliminer
conformément à la Loi nationale sur le cycle des matières et des déchets. Les accessoires et ressources fournies sans composants électroniques ne sont pas concernés.
Toute réimpression ou autre reproduction de la documentation et des papiers joints aux produits, même
sous forme d’extraits, est uniquement permise une fois l’accord explicite de l’ISC GmbH obtenu.
Sous réserve de modifi cations techniques
- 29 -
Anl_TH_CD_18_2_2B_SPK1.indb 29Anl_TH_CD_18_2_2B_SPK1.indb 29 02.10.12 07:5502.10.12 07:55
Page 30

F
Conditions de garantie
La société iSC Gmbh ou le magasin de bricolage compétent garantit l‘élimination des défauts ou le
remplacement de l‘appareil selon le plan qui suit, les droits de garantie légaux restent cependant inchangés.
Catégorie Exemple Prestation de garantie
Défauts de matériel ou de construction
Pièces d‘usure* mandrin de perceuse 6 mois
Matériel de consommation/
pièces de consommation*
Pièces manquantes 5 jours ouvrables
*Pas obligatoirement compris dans la livraison !
En ce qui concerne les pièces d‘usure, les matériels de consommation et les pièces manquantes, la société iSC Gmbh ou le magasin de bricolage compétent garantit la réparation des défauts et la livraison
complémentaire uniquement si les vices ont été déclarés dans un délai de 24h (matériel de consommation), 5 jours ouvrables (pièces manquantes) ou 6 mois (pièces d‘usure) après l‘achat sur présentation
d‘une preuve d‘achat datée.
En cas de vices de matériel ou de construction, nous vous demandons, dans le cas où cela est pris en
compte par la garantie, de nous rendre l‘appareil avec la carte de l‘appareil ci-jointe entièrement remplie. Il est important ce faisant de bien décrire l‘erreur.
Répondez pour cela aux questions suivantes :
est-ce que l‘appareil a fonctionné une fois ou était-il défectueux dés le départ ?
•
avez-vous remarqué quelque chose avant la panne (symptôme avant la panne) ?
•
quel est le défaut de fonctionnement de l‘appareil à votre avis (symptôme principal) ?
•
Décrivez ce défaut de fonctionnement.
embouts bit/forets Garantie uniquement en cas
24 mois
de défaut immédiat (24h après
l‘achat/sur présentation d‘une
preuve d‘achat datée)
- 30 -
Anl_TH_CD_18_2_2B_SPK1.indb 30Anl_TH_CD_18_2_2B_SPK1.indb 30 02.10.12 07:5502.10.12 07:55
Page 31

F
Bon de garantie
Chère Cliente, Cher Client,
Nos produits sont soumis à un contrôle de qualité très strict. Si cet appareil devait toutefois ne pas fonctionner impeccablement, nous en serions désolés. Dans un tel cas, nous vous prions de bien vouloir
prendre contact avec notre service après-vente à l‘adresse indiquée sur le bulletin de garantie. Nous
restons également volontiers à votre disposition au numéro de téléphone de service indiqué plus bas.
Pour faire valoir une demande de garantie, ce qui suit est valable :
1. Les conditions de garantie règlent les prestations de garantie supplémentaires. Vos droits de garantie légaux ne sont en rien altérés par la garantie présente. Notre prestation de garantie est gratuite.
2. La prestation de garantie s’applique exclusivement aux défauts occasionnés par des vices de fabrication ou de matériau et est limitée à l’élimination de ces défauts ou encore au remplacement
de l’appareil. Veillez au fait que nos appareils, conformément à leur aff ectation, n’ont pas été con-
struits pour être utilisés dans un environnement professionnel, industriel ou artisanal. Un contrat
de garantie ne peut avoir lieu dès lors que l’appareil est utilisé à des activités dans des entreprises
professionnelles, artisanales ou industrielles ou toute autre activité du même genre. Sont également exclus de notre garantie : les prestations de substitution de dommages dus aux transports,
les dommages occasionnés par le non-respect des instructions de montage ou en raison d’une
installation non conforme, du non-respect du mode d’emploi (comme par exemple le raccordement
à une mauvaise tension réseau ou à un mauvais type de courant), les applications abusives ou non
conformes (comme par exemple une surcharge de l’appareil ou encore l’emploi d’accessoires non
homologués), le non-respect des prescriptions de maintenance et de sécurité, l’infi ltration de corps
étrangers dans l’appareil (comme par exemple du sable, des pierres ou de la poussière), l’emploi
de la force ou l’infl uence extérieure (comme par exemple les dommages dus à une chute), ainsi que
l’usure normale conforme à l’utilisation. Ceci est particulièrement valable pour les accumulateurs
pour lesquels nous off rons toutefois une période de garantie de 12 mois. Le droit à la garantie dis-
paraît dès lors que des interventions ont lieu sur l’appareil.
3. Le délai de garantie s’élève à 2 ans et commence à la date de l’achat de l’appareil. Les demandes
de garanties doivent être présentées avant écoulement du délai de garantie, dans les deux semaines suivant le moment auquel le défaut a été reconnu. Toute reconnaissance de demande de
garantie après écoulement du délai de garantie est exclue. La réparation ou l’échange de l’appareil
n’entraîne nullement une prolongation de la durée de garantie. Elle ne fait pas non plus commencer
un nouveau délai de garantie, en raison de cette prestation, pour l’appareil ou pour toute autre pièce
de rechange intégrée. Ceci est également valable lorsqu’un service après-vente sur place a été
consulté.
4. Pour faire reconnaître votre demande de garantie, veuillez nous envoyer l’appareil défectueux franco de port à l’adresse indiquée ci-dessous. Ajoutez à l’envoi l’original du bon d’achat ou de tout autre preuve de l’achat datée. Veuillez donc toujours bien conserver le bon d’achat en guise de preuve
! Décrivez la raison de la réclamation le plus précisément possible. Si le défaut de l’appareil est
compris dans notre prestation de garantie, nous vous retournerons sans délai un appareil réparé ou
encore un nouveau.
Bien entendu, nous sommes prêts également à réparer les appareils défectueux contre remboursement
des frais, dès lors que l’appareil n’est plus ou pas garanti. Pour ce faire, veuillez envoyer l’appareil à notre adresse de service après-vente.
Pour les pièces d‘usure/de consommation et les pièces manquantes, nous renvoyons aux restrictions
de cette garantie conformément aux conditions de garantie de ce mode d‘emploi.
- 31 -
Anl_TH_CD_18_2_2B_SPK1.indb 31Anl_TH_CD_18_2_2B_SPK1.indb 31 02.10.12 07:5502.10.12 07:55
Page 32
I
Avvertimento - Per ridurre il rischio di lesioni leggete le istruzioni per l’uso
Portate cuffi e antirumore. L’ eff etto del rumore può causare la perdita dell’udito.
Mettete una maschera antipolvere. Facendo lavori su legno o altri materiali si può creare della polve-
re nociva alla salute. Non lavorate materiale contenente amianto!
Indossate gli occhiali protettivi. Scintille createsi durante il lavoro o schegge, trucioli e polveri scaraventate fuori dall’apparecchio possono causare la perdita della vista.
Per evitare danni al meccanismo, il cambio di marcia deve essere azionato solo ad utensile
fermo.
- 32 -
Anl_TH_CD_18_2_2B_SPK1.indb 32Anl_TH_CD_18_2_2B_SPK1.indb 32 02.10.12 07:5502.10.12 07:55
Page 33

Attenzione!
Nell’usare gli apparecchi si devono rispettare
diverse avvertenze di sicurezza per evitare lesioni e danni. Quindi leggete attentamente queste
istruzioni per l’uso/le avvertenze di sicurezza.
Conservate bene le informazioni per averle a
disposizione in qualsiasi momento. Se date
l’apparecchio ad altre persone, consegnate queste istruzioni per l’uso/le avvertenze di sicurezza
insieme all’apparecchio. Non ci assumiamo alcuna responsabilità per incidenti o danni causati
dal mancato rispetto di queste istruzioni e delle
avvertenze di sicurezza.
1. Avvertenze sulla sicurezza
Le relative avvertenze di sicurezza si trovano
nell’opuscolo allegato.
Avvertimento!
Leggete tutte le avvertenze di sicurezza e le
istruzioni. Dimenticanze nel rispetto delle avver-
tenze di sicurezza e delle istruzioni possono causare scosse elettriche, incendi e/o gravi lesioni.
Conservate tutte le avvertenze e le istruzioni
per eventuali necessità future.
2. Descrizione dell’apparecchio ed
elementi forniti
2.1 Descrizione dell’apparecchio (Fig. 1)
1. Impostazione momento torcente (anello di
regolazione)
2. Mandrino per punte da trapano a serraggio
rapido
3. Commutatore del senso di rotazione
4. Interruttore ON/OFF
5. Batteria
6. Caricabatterie
7. Alimentatore
8. Tasto di arresto
9. Supporto magnetico per viti
10. Commutatore 1° marcia/2° marcia
11. Indicatore di carica della batteria
12. Interruttore indicatore di carica della batteria
2.2 Elementi forniti
Verifi cate che l‘articolo sia completo sulla base
degli elementi forniti descritti. In caso di parti
mancanti, rivolgetevi al nostro Centro Servizio
Assistenza presentando un documento di acquisto valido entro e non oltre i 5 giorni lavorativi
I
dall‘acquisto o al centro fai-da-te competente
più vicino. Al riguardo fate attenzione alla Tabella
Garanzia nelle disposizioni di garanzia alla fi ne
delle istruzioni.
Aprite l’imballaggio e togliete con cautela
•
l’apparecchio dalla confezione.
Togliete il materiale d’imballaggio e anche i
•
fermi di trasporto / imballo (se presenti).
Controllate che siano presenti tutti gli elemen-
•
ti forniti.
Verificate che l’apparecchio e gli accessori
•
non presentino danni dovuti al trasporto.
Se possibile, conservate l’imballaggio fino
•
alla scadenza della garanzia.
Attenzione!
L’apparecchio e il materiale d’imballaggio
non sono giocattoli! I bambini non devono
giocare con sacchetti di plastica, fi lm e pic-
coli pezzi! Sussiste pericolo di ingerimento e
soff ocamento!
Trapano avvitatore a batteria
•
Batteria (2x)
•
Caricabatterie
•
Alimentatore
•
Istruzioni per l’uso originali
•
Avvertenze di sicurezza
•
3. Utilizzo proprio
Il trapano avvitatore a batteria è adatto sia per
avvitare e svitare viti che per perforare legno, metallo e plastica.
L’apparecchio deve venire usato solamente per lo
scopo a cui è destinato. Ogni altro tipo di uso che
esuli da quello previsto non è un uso conforme.
L’utilizzatore/l’operatore, e non il costruttore, è
responsabile dei danni e delle lesioni di ogni tipo
che ne risultino.
Tenete presente che i nostri apparecchi non sono
stati costruiti per l’impiego professionale, artigianale o industriale. Non ci assumiamo alcuna
garanzia quando l’apparecchio viene usato in
imprese commerciali, artigianali o industriali, o in
attività equivalenti.
- 33 -
Anl_TH_CD_18_2_2B_SPK1.indb 33Anl_TH_CD_18_2_2B_SPK1.indb 33 02.10.12 07:5502.10.12 07:55
Page 34

4. Caratteristiche tecniche
Alimentazione di tensione del motore .....18 V DC
Numero di giri a vuoto: ........... 0-350/0-1100 min
Livelli del momento torcente: ....................... 19+1
Rotazione destrorsa/sinistrorsa ........................Sì
Apertura del mandrino: ..................... max. 10 mm
Tensione di ricarica della batteria: .......... 18 V DC
Corrente di ricarica della batteria: ..............0,55 A
Tensione di rete del caricabatterie ....230V~ 50Hz
Tempo di ricarica: .............................max. 3-5 ore
Tipo di batteria: ...........................................NiCd
Peso: ..........................................................1,7 kg
Rumore e vibrazioni
I valori del rumore e delle vibrazioni sono stati
rilevati secondo la norma EN 60745.
Livello di pressione acustica L
Incertezza K
Livello di potenza acustica L
Incertezza K
Portate cuffi e antirumore.
L’ e ff etto del rumore può causare la perdita
dell’udito.
Valori complessivi delle vibrazioni (somma vettoriale delle tre direzioni) rilevati secondo la norma
EN 60745.
Trapanare su metallo
Valore emissione vibrazioni a
Incertezza K = 1,5 m/s
Avvitare senza percussione
Valore emissione vibrazioni ah ≤ 2,5 m/s
Incertezza K = 1,5 m/s
Avvertimento!
Il valore di emissione di vibrazioni indicato è stato
misurato secondo un metodo di prova normalizzato e può variare a seconda del modo in cui
l’elettroutensile viene utilizzato e, in casi eccezionali, può essere superiore al valore riportato.
Il valore di emissione di vibrazioni indicato può
essere usato per il confronto tra elettroutensili di
marchi diversi.
..............................................3 dB
pA
.............................................. 3 dB
WA
pA
.......... 77,4 dB (A)
WA
≤ 2,5 m/s
h
2
2
........ 66,4 dB (A)
2
2
I
Il valore di emissione di vibrazioni può essere
utilizzato anche per una valutazione preliminare
dei rischi.
Limitate al minimo lo sviluppo di rumore e le
-1
vibrazioni!
Utilizzate soltanto apparecchi in perfetto sta-
•
to.
Eseguite regolarmente la manutenzione e la
•
pulizia dell’apparecchio.
Adattate il vostro modo di lavorare
•
all’apparecchio.
Non sovraccaricate l’apparecchio.
•
Fate eventualmente controllare l’apparecchio.
•
Spegnete l’apparecchio se non lo utilizzate.
•
Indossate i guanti.
•
Rischi residui
Anche se questo elettroutensile viene utilizzato secondo le norme, continuano a sussistere rischi residui. In relazione alla struttura
e al funzionamento di questo elettroutensile
potrebbero presentarsi i seguenti pericoli:
1. Danni all’apparato respiratorio nel caso in cui
non venga indossata una maschera antipolvere adeguata.
2. Danni all’udito nel caso in cui non vengano
indossate cuffi e antirumore adeguate.
3. Danni alla salute derivanti da vibrazioni mano-braccio se l’apparecchio viene utilizzato a
lungo, non viene tenuto in modo corretto o se
la manutenzione non è appropriata.
5. Prima della messa in esercizio
Prima di mettere in esercizio l‘avvitatore a batteria
leggete assolutamente le seguenti avvertenze
1. Ricaricate la batteria solo con il caricabatterie
in dotazione.
2. Utilizzate solo punte affi late e inserti per cac-
ciavite adatti ed in perfetto stato.
3. In caso di perforazione e avvitamento su muri
e pareti, verifi cate che non siano presenti
linee elettriche e tubazioni nascoste di gas e
acqua.
- 34 -
Anl_TH_CD_18_2_2B_SPK1.indb 34Anl_TH_CD_18_2_2B_SPK1.indb 34 02.10.12 07:5502.10.12 07:55
Page 35

6. Uso
6.1 Ricarica della batteria (Fig. 2-3)
1. Estraete la batteria (5) dall‘impugnatura (Fig.
2), premendo i tasti di arresto (8) sul lato destro e sinistro della batteria (5).
2. Controllate che la tensione di rete indicata
sulla targhetta corrisponda alla tensione di
rete a disposizione. Inserite il caricabatterie
(6) nella presa e collegate il cavo di ricarica
(a) all‘adattatore di ricarica (7). La spia rossa
sull‘adattatore di ricarica (7) si illumina.
3. Inserite la batteria (5) nell‘adattatore di ricarica. La spia verde e quella rossa segnalano
che la batteria viene ricaricata.
4. Dopo 3-5 h la batteria è completamente carica. Togliete la batteria dall‘adattatore di ricarica e staccate la spina dalla presa di corrente.
Attenzione! Al termine della ricarica non avviene il disinserimento automatico.
2. Controllate che la tensione di rete indicata Se
la ricarica della batteria non fosse possibile,
verifi cate
che sulla presa di corrente sia presente la
•
tensione di rete
che ci sia un perfetto contatto dei contatti di
•
ricarica del caricabatterie.
Se la ricarica della batteria continuasse a non
essere possibile, spedite
il caricabatterie
•
e la batteria
•
al nostro servizio di assistenza clienti.
Per ottenere una lunga durata della batteria si
deve provvedere a una puntuale ricarica. Ciò è
comunque necessario quando ci si accorge della
diminuzione delle prestazioni dell‘avvitatore a
batteria. Non fate scaricare mai completamente la
batteria. Questo potrebbe danneggiarla!
6.2 Impostazione del momento torcente
(Fig. 4/Pos. 1)
L’avvitatore a batteria è dotato di un’impostazione
meccanica del momento torcente.
Il momento torcente per un determinato tipo di
vite viene regolato con l‘anello di regolazione (1).
Il momento torcente dipende da molteplici fattori:
dal tipo e dalla durezza del materiale da la-
•
vorare;
dal tipo e dalla lunghezza delle viti utilizzate;
•
I
dalle sollecitazioni a cui viene sottoposto il
•
collegamento a vite.
Il raggiungimento del momento torcente
viene segnalato dal rumore del distacco
dell‘accoppiamento.
Attenzione! Impostare l‘anello di regolazione
per il momento torcente solo con l‘utensile
fermo.
6.3 Trapano (Fig. 4/Pos. 1)
Per perforare impostate l‘anello di regolazione
per il momento torcente sull‘ultima posizione
„Trapano“. Il giunto a frizione è così fuori esercizio.
Durante la perforazione è disponibile il massimo
momento torcente.
6.4 Commutatore del senso di rotazione
(Fig. 5/Pos. 3)
Con l‘interruttore a scorrimento sopra l‘interruttore
ON/OFF potete regolare il senso di rotazione
dell‘avvitatore a batteria e assicurarlo contro
un‘accensione involontaria. Potete scegliere fra
rotazione sinistrorsa e destrorsa. Per evitare danni al meccanismo, il senso di rotazione può venire
cambiato solo ad utensile fermo. Se l‘interruttore
a scorrimento si trova in posizione centrale,
l‘interruttore ON/OFF è bloccato.
6.5 Interruttore ON/OFF (Fig. 5/Pos. 4)
Con l‘interruttore ON/OFF potete comandare
in continuo il numero di giri. Più a lungo premete l‘interruttore, maggiore è il numero di giri
dell‘avvitatore a batteria.
6.6 Cambio dell‘utensile (Fig. 6)
Attenzione! Prima di ogni operazione (per es.
cambio dell’utensile, manutenzione, ecc.) portate il commutatore del senso di rotazione (3)
sull’avvitatore a batteria in posizione centrale.
Allentate il mandrino (2).
•
L’apertura del mandrino (a) deve essere
•
abbastanza grande da accogliere l’utensile
(punta per trapano o inserto per giraviti).
Scegliete l’utensile appropriato. Inseritelo il
•
più possibile nell’apertura (a) del mandrino.
Avvitate bene il mandrino (2) e verificate quin-
•
di che l‘utensile sia ben serrato.
6.7 Viti
Utilizzate preferibilmente viti con autocentramento (per es. torx, intaglio a croce) che garantiscono
un lavoro sicuro. Fate attenzione che l‘inserto utilizzato e la vite corrispondano in forma e dimensioni. Provvedete alla regolazione del momento
- 35 -
Anl_TH_CD_18_2_2B_SPK1.indb 35Anl_TH_CD_18_2_2B_SPK1.indb 35 02.10.12 07:5502.10.12 07:55
Page 36

torcente, come descritto nelle istruzioni, in base
alle dimensioni delle viti.
6.8 Supporto magnetico per viti (Fig. 4/Pos. 9)
È possibile mettere le viti sul supporto magnetico
per averle a portata di mano durante il lavoro.
6.9 Commutazione 1° marcia - 2° marcia
(Fig. 4/Pos. 10).
A seconda della posizione del commutatore potete lavorare con un maggiore o minore numero
di giri. Per evitare danni al meccanismo, il cambio
di marcia deve essere azionato solo ad utensile
fermo.
6.10 Indicazione di carica della batteria
(Fig. 2/Pos. 11)
Premete l’interruttore per l’indicazione di carica
della batteria (12). L‘indicatore di carica della batteria (11) segnala lo stato di carica per mezzo di 3
LED colorati.
Tutti le spie sono illuminate:
la batteria è completamente carica.
La spia gialla e quella rossa sono illuminate:
la batteria dispone di una suffi ciente carica resi-
dua.
Spia rossa:
la batteria è scarica, ricaricatela.
7. Pulizia, manutenzione e
ordinazione dei pezzi di ricambio
Prima di qualsiasi lavoro di pulizia staccate la spina dalla presa di corrente.
7.1 Pulizia
Tenete il più possibile i dispositivi di protezio-
•
ne, le fessure di aerazione e la carcassa del
motore liberi da polvere e sporco. Strofinate
l’apparecchio con un panno pulito o soffiatelo
con l’aria compressa a pressione bassa.
Consigliamo di pulire l’apparecchio subito
•
dopo averlo usato.
Pulite l’apparecchio regolarmente con un
•
panno asciutto ed un po’ di sapone. Non usate detergenti o solventi perché questi ultimi
potrebbero danneggiare le parti in plastica
dell’apparecchio. Fate attenzione che non
possa penetrare dell’acqua nell’interno
dell’apparecchio. La penetrazione di acqua
I
in un elettroutensile aumenta il rischio di una
scossa elettrica.
7.2 Manutenzione
All’interno dell’apparecchio non si trovano altre
parti sottoposte ad una manutenzione qualsiasi.
7.3 Ordinazione di pezzi di ricambio:
Volendo commissionare dei pezzi di ricambio, si
dovrebbe dichiarare quanto segue:
modello dell’apparecchio
•
numero dell’articolo dell’apparecchio
•
numero d’ident. dell’apparecchio
•
numero del pezzo di ricambio del ricambio
•
necessitato.
Per i prezzi e le informazioni attuali si veda
www.isc-gmbh.info
8. Smaltimento e riciclaggio
L‘apparecchio si trova in un imballaggio per evitare i danni dovuti al trasporto. Questo imballaggio
rappresenta una materia prima e può perciò essere utilizzato di nuovo o riciclato. L‘apparecchio
e i suoi accessori sono fatti di materiali diversi,
per es. metallo e plastica. Gli apparecchi difettosi
non devono essere gettati nei rifi uti domestici. Per
uno smaltimento corretto l‘apparecchio va consegnato ad un apposito centro di raccolta. Se non
vi è noto nessun centro di raccolta, rivolgetevi per
informazioni all‘amministrazione comunale.
9. Conservazione
Conservate l’apparecchio e i suoi accessori in un
luogo buio, asciutto, al riparo dal gelo e non accessibile ai bambini. La temperatura ottimale per
la conservazione è compresa tra i 5 e i 30 °C.
Conservate l’elettroutensile nell’imballaggio originale.
- 36 -
Anl_TH_CD_18_2_2B_SPK1.indb 36Anl_TH_CD_18_2_2B_SPK1.indb 36 02.10.12 07:5502.10.12 07:55
Page 37

I
Solo per paesi membri dell‘UE
Non smaltite gli elettroutensili e le batterie nei rifi uti domestici!
Alternativa di riciclaggio alla richiesta di restituzione
Il proprietario dell‘apparecchio elettrico è tenuto, in alternativa alla restituzione, a collaborare in modo
che lo smaltimento venga eseguito correttamente in caso di cessione dell‘apparecchio. L‘apparecchio
vecchio e le batterie possono anche venire consegnato ad un centro di raccolta che provvede poi allo
smaltimento secondo le norme nazionali sul riciclaggio e sui rifi uti. Non ne sono interessati gli accessori
e i mezzi ausiliari senza elementi elettrici forniti insieme ai vecchi apparecchi.
La ristampa o l’ulteriore riproduzione, anche parziale, della documentazione o dei documenti
d’accompagnamento dei prodotti è consentita solo con l’esplicita autorizzazione da parte della
iSC GmbH.
Con riserva di apportare modifi che tecniche
- 37 -
Anl_TH_CD_18_2_2B_SPK1.indb 37Anl_TH_CD_18_2_2B_SPK1.indb 37 02.10.12 07:5502.10.12 07:55
Page 38

I
Disposizioni di garanzia
La ditta iSC GmbH, ovvero il centro fai-da-te competente, garantisce l‘eliminazione di difetti ovvero la
sostituzione dell‘apparecchio in conformità con la tabella seguente, senza che ciò infl uisca sui diritti di
garanzia previsti dalla legge.
Categoria Esempio Prestazione di garanzia
Difetti di materiale o fabbricazione
Parti soggette ad usura * Mandrino 6 mesi
Materiale di consumo/
parti di consumo *
Parti mancanti 5 giorni lavorativi
* non necessariamente compreso tra gli elementi forniti!
Relativamente a parti soggette ad usura, materiale di consumo e parti mancanti, la ditta iSC GmbH, ovvero il centro fai-da-te responsabile, garantisce un‘eliminazione dei difetti ovvero una fornitura sostitutiva
solo se il difetto viene comunicato entro 24h (materiale di consumo), 5 giorni lavorativi (parti mancanti)
o 6 mesi (parti soggette ad usura) dall‘acquisto e se la data di acquisto viene documentata tramite il
documento di acquisto.
In caso di difetti del materiale o di fabbricazione vi preghiamo in caso di garanzia di presentare
l‘apparecchio con il certifi cato di garanzia accluso, compilato in tutte le sue parti. In questo caso è im-
portante che riportiate una precisa descrizione del difetto.
A tal fi ne rispondete alle seguenti domande.
L‘apparecchio ha già funzionato una volta o era difettoso fin dall‘inizio?
•
Avete notato qualcosa prima che si manifestasse il difetto (sintomo prima del difetto)?
•
A vostro parere che cosa non funziona nell‘apparecchio (sintomo principale)?
•
Descrivete che cosa non funziona.
Inserti/punte per trapano Garanzia solo in caso di difetto
24 mesi
immediato (24h dopo acquisto/
data documento di acquisto)
- 38 -
Anl_TH_CD_18_2_2B_SPK1.indb 38Anl_TH_CD_18_2_2B_SPK1.indb 38 02.10.12 07:5502.10.12 07:55
Page 39

I
Certifi cato di garanzia
Gentili clienti,
i nostri prodotti sono soggetti ad un rigido controllo di qualità. Se l’apparecchio non dovesse tuttavia
funzionare correttamente, ci scusiamo e vi preghiamo di rivolgervi al nostro servizio di assistenza clienti
all’indirizzo indicato in questa scheda di garanzia. Siamo a vostra disposizione anche telefonicamente
al numero del servizio assistenza sotto indicato. Per la rivendicazione dei diritti di garanzia vale quanto
segue:
1. Queste condizioni di garanzia regolano ulteriori prestazioni di garanzia. La presente garanzia non
tocca i vostri diritti al ricorso di garanzia previsti dalla legge. Le nostre prestazioni di garanzia sono
per voi gratuite.
2. La prestazione di garanzia riguarda esclusivamente le anomalie riconducibili a difetti del materiale o
di produzione ed è limitata all’eliminazione di queste anomalie o alla sostituzione dell’apparecchio.
Tenete presente che i nostri apparecchi non sono stati costruiti per l’impiego professionale, artigianale o industriale. Un contratto di garanzia non viene concluso quando l’apparecchio viene usato
in imprese commerciali, artigianali o industriali, o con attività equivalenti. Dalla nostra garanzia
sono escluse inoltre le prestazioni di risarcimento per danni dovuti al trasporto o danni causati
dalla mancata osservanza delle istruzioni per il montaggio o per installazione non corretta, dalla
mancata osservanza delle istruzioni per l’uso (come per es. collegamento a tensione di rete o tipo
di corrente non corretto), dall’uso improprio o illecito (come per es. sovraccarico dell’apparecchio o
utilizzo di utensili o accessori non consentiti), dalla mancata osservanza delle norme di sicurezza e
di manutenzione, dalla penetrazione di corpi estranei nell’apparecchio (come per es. sabbia, pietre
o polvere), dall’impiego della forza o dall’infl usso esterno (come per es. danni dovuti a caduta) e
dall’usura normale e dovuta all’impiego. Ciò vale particolarmente per batterie, per esse concediamo tuttavia 12 mesi di garanzia. Il diritti di garanzia decadono quando sono già eff ettuati interventi
sull’apparecchio.
3. Il periodo di garanzia è 2 anni e inizia alla data d’acquisto dell’apparecchio. I diritti di garanzia devono essere fatti valere prima della scadenza del periodo di garanzia, entro due settimane dopo avere
accertato il difetto. È esclusa la rivendicazione di diritti di garanzia dopo la scadenza del relativo
periodo. La riparazione o la sostituzione dell’apparecchio non comporta una proroga del periodo di
garanzia e con questa prestazione per l’apparecchio o per pezzi di ricambio eventualmente installati
non inizia un nuovo periodo di garanzia. Questo vale anche nel caso si ricorra ad un ser vizio sul
posto.
4. Per la rivendicazione dei vostri diritti di garanzia inviate l’apparecchio difettoso franco di porto
all’indirizzo sotto indicato. Allegate lo scontrino di cassa in originale o un’altra prova d’acquisto che
riporti la data. Conservate bene perciò lo scontrino di cassa come prova! Indicate il motivo di reclamo nel modo più dettagliato possibile. Se il difetto dell’apparecchio rientra nella nostra prestazione
di garanzia, ricevete l’apparecchio riparato o un apparecchio nuovo a stretto giro di posta.
Naturalmente eff ettuiamo a pagamento anche riparazioni sull’apparecchio che non rientrano o non rien-
trano più nella garanzia. A tale scopo inviate l’apparecchio all’indirizzo del ser vizio assistenza.
Per parti mancanti, di consumo e soggette ad usura rimandiamo alle limitazioni di questa garanzia secondo le Disposizioni di garanzia di queste istruzioni per l‘uso.
- 39 -
Anl_TH_CD_18_2_2B_SPK1.indb 39Anl_TH_CD_18_2_2B_SPK1.indb 39 02.10.12 07:5502.10.12 07:55
Page 40

DK/N
Advarsel Læs betjeningsvejledningen for at reducere risikoen for personskade
Brug høreværn. Støjudviklingen fra maskinen kan forårsage høretab.
Brug støvmaske. Ved bearbejdning af træ og andre materialer kan der dannes sundhedsskadeligt støv.
Der må ikke arbejdes i asbestholdigt materiale!
Brug beskyttelsesbriller. Gnister, som opstår under arbejdet, eller splinter, spån og støv, som står ud
fra maskinen, kan forårsage synstab.
For at undgå at drevet beskadiges, må gearskift kun foretages, når maskinen står stille.
- 40 -
Anl_TH_CD_18_2_2B_SPK1.indb 40Anl_TH_CD_18_2_2B_SPK1.indb 40 02.10.12 07:5502.10.12 07:55
Page 41

Vigtigt!
Ved brug af el-værktøj er der visse sikkerhedsforanstaltninger, der skal respekteres for at undgå
skader på personer og materiel. Læs derfor betjeningsvejledningen / sikkerhedsanvisningerne
grundigt igennem. Opbevar betjeningsvejledningen et praktisk sted, så du altid kan tage den frem
efter behov. Husk at lade betjeningsvejledningen
/ sikkerhedsanvisningerne følge med værktøjet,
hvis du overdrager det til andre. Vi fraskriver
os ethvert ansvar for skader på personer eller
materiel, som måtte opstå som følge af, at anvisningerne i denne betjeningsvejledning, navnlig
vedrørende sikkerhed, tilsidesættes.
1. Sikkerhedsanvisninger
Relevante sikkerhedsanvisninger fi nder du i det
medfølgende hæfte.
Advarsel!
Læs alle sikkerhedsanvisninger og øvrige anvisninger. Følges anvisningerne, navnlig sikker-
hedsanvisningerne, ikke nøje som beskrevet, kan
elektrisk stød, brand og/eller svære kvæstelser
være følgen. Alle sikkerhedsanvisninger og
øvrige anvisninger skal gemmes.
DK/N
med forevisning af gyldig købskvittering. Vær
her opmærksom på garantioversigten, der er
indeholdt i garantibestemmelserne bagest i vejledningen.
Åbn pakken, og tag forsigtigt maskinen ud af
•
emballagen.
Fjern emballagematerialet samt emballage-/
•
og transportsikringer (hvis sådanne forefindes).
Kontroller, at der ikke mangler noget.
•
Kontroller maskine og tilbehør for transports-
•
kader.
Opbevar så vidt muligt emballagen indtil ga-
•
rantiperiodens udløb.
Vigtigt!
Maskinen og emballagematerialet er ikke
legetøj! Børn må ikke lege med plastikposer,
folier og smådele! Fare for indtagelse og
kvælning!
Akku-bore-/skruemaskine
•
Batteri (2x)
•
Oplader
•
Ladeadapter
•
Original betjeningsvejledning
•
Sikkerhedsanvisninger
•
2. Produktbeskrivelse og
leveringsomfang
2.1 Produktbeskrivelse (fi g. 1)
1. Drejningsmoment-indstilling (justerring)
2. Selvspændende borepatron
3. Rotationsinverter
4. Tænd/Sluk-knap
5. Akkumulatorbatteri
6. Oplader
7. Ladeadapter
8. Anslagsknap
9. Magnet-skrueholder
10. Omskifter 1. gear – 2. gear
11. Batteri-kapacitetsindikator
12. Knap batteri-kapacitetsindikator
2.2 Leveringsomfang
Kontroller på grundlag af det beskrevne leveringsomfang, at varen er komplet. Hvis nogle dele
mangler, bedes du senest inden 5 hverdage efter
købet af varen henvende dig til vores servicecenter eller nærmeste kompetente byggemarked
3. Formålsbestemt anvendelse
Akku-bore/skruemaskinen er beregnet til i- og
udskruning af skruer samt til boring i træ, metal
og kunststof.
Saven må kun anvendes i overensstemmelse
med dens tiltænkte formål. Enhver anden form
for anvendelse er ikke tilladt. Vi fraskriver os ethvert ansvar for skader, det være sig på personer
eller materiel, som måtte opstå som følge af, at
maskinen ikke er blevet anvendt korrekt. Ansvaret
bæres alene af brugeren/ejeren.
Bemærk, at vore produkter ikke er konstrueret til
erhvervsmæssig, håndværksmæssig eller industriel brug. Vi fraskriver os ethvert ansvar, såfremt
produktet anvendes i erhvervsmæssigt, håndværksmæssigt, industrielt eller lignende øjemed.
- 41 -
Anl_TH_CD_18_2_2B_SPK1.indb 41Anl_TH_CD_18_2_2B_SPK1.indb 41 02.10.12 07:5502.10.12 07:55
Page 42

4. Tekniske data
Spændingsforsyning motor: ....................18 V d.c.
Omdrejningstal, ubelastet: ..... 0-350/0-1100 min
Drejningsmomenttrin: .................................. 19+1
Højre-venstre-gang: ..........................................Ja
Spændvidde borepatron: ...............Maks. 10 mm
Ladespænding akkumulatorbatteri: ........18 V d.c.
Ladestrøm akkumulatorbatteri: ..................0,55 A
Netspænding oplader: ......................230V~ 50Hz
Ladetid: ............................................. Maks. 3-5 t.
Akkumulatorbatteri, type: ............................NiCd
Vægt: ..........................................................1,7 kg
Støj og vibration
Støj- og vibrationstal er beregnet i henhold til
EN 60745.
Lydtryksniveau L
Usikkerhed K
Lydeff ektniveau L
Usikkerhed K
Brug høreværn.
Støjudviklingen fra maskinen kan forårsage høretab.
Samlede svingningstal (vektorsum for tre retninger) beregnet i henhold til EN 60745.
Boring i metal
Svingningsemissionstal a
Usikkerhed K = 1,5 m/s*
Skruer uden slag
Svingningsemissionstal a
Usikkerhed K = 1,5 m/s*
Advarsel!
Det angivne svingningsemissionstal er målt ud
fra en standardiseret prøvningsmetode og kan
- afhængig af den måde, el-værktøjet anvendes
på - ændre sig og i undtagelsestilfælde ligge over
den angivne værdi.
Det angivne svingningsemissionstal kan anvendes til at sammenligne et el-værktøj med et andet.
Det angivne svingningsemissionstal kan også anvendes til en indledende skønsmæssig vurdering
af den negative påvirkning.
.............................. 66,4 dB(A)
pA
............................................. 3 dB
pA
............................ 77,4 dB(A)
WA
............................................3 dB
WA
2
≤ 2,5 m/s
h
2
≤ 2,5 m/s
h
DK/N
Støjudvikling og vibration skal begrænses til
et minimum!
Brug kun intakte og ubeskadigede maskiner.
•
Vedligehold og rengør maskinen med jævne
-1
•
mellemrum.
Tilpas arbejdsmåden efter maskinen.
•
Overbelast ikke maskinen.
•
Lad i givet fald maskinen underkaste et efter-
•
syn.
Sluk maskinen, når den ikke benyttes.
•
Bær handsker.
•
Tilbageværende risici
Også selv om du betjener el-værktøjet forskriftsmæssigt, er der stadigvæk nogle risikofaktorer at tage højde for. Følgende farer kan
opstå, alt efter el-værktøjets type og konstruktionsmåde:
1. Lungeskader, såfremt der ikke bæres egnet
støvmaske.
2. Høreskader, såfremt der ikke bæres egnet
høreværn.
3. Helbredsskader, som følger af hånd-armvibration, såfremt værktøjet benyttes over et
længere tidsrum eller ikke håndteres og vedligeholdes forskriftsmæssigt.
5. Inden brug
Nedenstående anvisninger skal læses, inden du
tager akku-skruemaskinen i brug:
1. Akkupack’en må kun lades op med den medfølgende oplader.
2. Brug kun skarpe bor, skruebits skal være intakte og formålsegnede.
3. Ved boring og skruning i vægge og mure skal
disse først undersøges for skjulte strøm-, gasog vandledninger.
- 42 -
Anl_TH_CD_18_2_2B_SPK1.indb 42Anl_TH_CD_18_2_2B_SPK1.indb 42 02.10.12 07:5502.10.12 07:55
Page 43

6. Betjening
6.1 Opladning af batteri (fi g. 2-3)
1. Træk akku‘en (5) ud af håndtaget (fi g. 2),
mens du trykker anslagsknapperne (8) ind på
akku‘ens (5) højre og venstre side.
2. Kontroller, at spændingsangivelsen på
mærkepladen svarer til den forhåndenværende netspænding. Sæt opladeren (6) i
stikdåsen, og forbind ladekablet (a) med
ladeadapteren (7). Den røde lysdiode på ladeadapteren (7) begynder at lyse.
3. Sæt akku‘en (5) i ladeadapteren. Den grønne
og røde lysdiode signalerer, at batteriet oplades.
4. Efter 3-5 t. er batteriet fuldt opladet. Tag
akku‘en ud af ladeadapteren, og træk opladeren ud af stikdåsen.
Vigtigt! Ingen automatisk frakobling ved fuld
opladning.
Hvis det ikke er muligt at oplade akku-pack’en,
skal du kontrollere,
om der er netspænding i stikkontakten.
•
om forbindelsen til ladekontakterne på opla-
•
deren er i orden.
Hvis det stadigvæk ikke er muligt at oplade
akkupack’en, bedes du indsende
opladeren
•
og akkupack’en
•
til vores kundeservice.
Sørg for at genoplade akkupack’en i god tid for
at sikre en lang levetid. Genopladning skal under
alle omstændigheder ske, hvis du konstaterer, at
akku-skruemaskinens ydelse er nedsat.
Undgå, at akkupack’en afl ades helt. Det vil
ødelægge akkupack’en!
6.2 Indstilling af drejningsmoment
(fi g. 4/pos. 1)
Akku-skruemaskinen er udstyret med en mekanisk indstilling af drejningsmoment.
Drejningsmomentet for en bestemt skruestørrelse
indstilles på justerringen (1). Drejningsmomentet
afhænger af fl ere faktorer:
af arbejdsemnets art og hårdhed
•
af de anvendte skruers art og længde
•
af de krav, som stilles til skrueforbindelsen.
•
DK/N
Når drejningsmomentet er nået, rykker koblingen
ud.
Vigtigt! Drejningsmomentet må kun indstilles
på justerringen, når maskinen står stille.
6.3 Boring (fi g. 4/pos. 1)
For at bore skal justerringen til drejningsmomentet stilles på det sidste trin „Boremaskine“. I
modus ‚boring‘ er glidekoblingen ude af funktion.
Ved boring er det muligt at køre med maksimalt
drejningsmoment.
6.4 Rotationsinverter (fi g. 5/pos. 3)
Med skydekontakten oven over tænd/slukknappen kan du indstille akku-skruemaskinens
omdrejningsretning og sikre akku-skruemaskinen
mod utilsigtet indkobling. Der kan vælges mellem
venstre- og højregang. For at undgå at drevet
beskadiges, skal omskift af omdrejningsretning
foretages, når maskinen står stille. Når skydekontakten er i midterstilling, er tænd/sluk-knappen
blokeret.
6.5 Tænd/Sluk-knap (fi g. 5/pos. 4)
Med tænd/sluk-knappen kan du styre hastigheden trinløst. Jo længere du trykker knappen ind,
desto højere er akku-skruemaskinens omdrejningstal.
6.6 Værktøjsskift (fi g. 6)
Vigtigt! Rotationsinverteren (3) på akku-skru-
emaskinen skal sættes i midterstilling, inden
arbejder på selve maskinen påbegyndes (f.eks.
værktøjsskift; vedligeholdelse; osv.).
Skru borepatronen (2) på.
•
Borepatronens åbning (a) skal være stor nok
•
til at kunne holde værktøjet (bor eller skruebit).
Vælg et egnet værktøj. Sæt værktøjet så langt
•
op i borepatronens åbning (a) som muligt.
Drej borepatronen (2) i, så den sidder helt
•
fast, og kontroller, at værktøjet sidder fast.
6.7 Skruer
Det er bedst at anvende skruer med selvcentrering (f.eks. torx, krydskærv) – det gør arbejdet
mere sikkert. Vær opmærksom på, om bit’en og
skruen passer sammen i form og størrelse. Foretag indstilling af drejningsmoment under hensyntagen til skruestørrelsen, således som beskrevet i
vejledningen.
- 43 -
Anl_TH_CD_18_2_2B_SPK1.indb 43Anl_TH_CD_18_2_2B_SPK1.indb 43 02.10.12 07:5502.10.12 07:55
Page 44

6.8 Magnet-skrueholder (fi g. 4/pos. 9)
Skruer kan henlægges på magnet-skrueholderen,
så de er lige ved hånden under arbejdet.
6.9 Omskifter gear 1 - gear 2 (fi g. 4/pos. 10.)
Du kan arbejde med et højere eller lavere omdrejningstal, alt efter omskifterens stilling. For at
undgå at drevet beskadiges, må gearskift kun
foretages, når maskinen står stille.
6.10 Batteri-kapacitetsindikator
(fi g. 2/pos. 11)
Tryk på knap til batteri-kapacitetsindikator (12).
Batteri-kapacitetsindikatoren (11) angiver batteriets ladetilstand med 3 farvede lysdioder.
Alle dioder lyser:
Batteriet er fuldt opladet.
Gul og rød diode lyser:
Batteriet råder over tilstrækkelig restkapacitet.
Rød lysdiode:
Batteriet er afl adet; oplad batteriet.
7. Rengøring, vedligeholdelse og
reservedelsbestilling
Træk stikket ud af stikkontakten inden vedligeholdelsesarbejde.
7.1 Rengøring
Hold så vidt muligt beskyttelsesanordninger,
•
luftsprækker og motorhuset fri for støv og
snavs. Gnid maskinen ren med en ren klud,
eller foretag trykluftudblæsning med lavt tryk.
Vi anbefaler, at maskinen rengøres hver gang
•
efter brug.
Rengør af og til maskinen med en fugtig klud
•
og lidt blød sæbe. Undgå brug af rengøringseller opløsningsmiddel, da det vil kunne
ødelægge maskinens kunststofdele. Pas på,
at der ikke kan trænge vand ind i maskinens
indvendige dele. Trænger der vand ind i et elværktøj, øger det risikoen for elektrisk stød.
7.2 Vedligeholdelse
Der fi ndes ikke yderligere dele, som skal
vedligeholdes inde i maskinen.
7.3 Reservedelsbestilling:
Ved bestilling af reservedele skal følgende oplyses:
DK/N
Savens type.
•
Savens artikelnummer.
•
Savens identifikationsnummer.
•
Nummeret på den nødvendige reservedel.
•
Aktuelle priser og øvrige oplysninger fi nder du på
internetadressen www.isc-gmbh.info
8. Bortskaff else og genanvendelse
Produktet leveres indpakket for at undgå transportskader. Emballagen består af råmaterialer
og kan genanvendes eller indleveres på genbrugsstation. Produktet og dets tilbehør består af
forskelligartede materialer, f.eks. metal og plast.
Defekte produkter må ikke smides ud som almindeligt husholdningsaff ald. For at sikre en fagmæs-
sig korrekt bortskaff else skal produktet indleveres
på et aff aldsdepot. Hvis du ikke har kendskab til
lokalt aff aldsdepot, så kontakt din kommune.
9. Opbevaring
Maskinen og dens tilbehør skal opbevares på et
mørkt, tørt og frostfrit sted uden for børns rækkevidde. Den optimale lagertemperatur ligger
mellem 5 og 30˚C. Opbevar el-værktøjet i den
originale emballage.
- 44 -
Anl_TH_CD_18_2_2B_SPK1.indb 44Anl_TH_CD_18_2_2B_SPK1.indb 44 02.10.12 07:5502.10.12 07:55
Page 45

DK/N
Kun i EU-lande
Smid ikke el-apparater og akkumulatorbatterier ud som almindeligt husholdningsaff ald!
Recycling-alternativ til tilbagesendelse:
Hvis ikke maskinen tilbagesendes, er ejeren forpligtet til at bortskaff e maskinen og dens dele ifølge
miljøforskrifterne. Det brugte produkt, inkl. batterier, kan indleveres på genbrugsstation – spørg evt. personalet her, eller forhør dig hos din kommune. Tilbehør og hjælpemidler, som følger med maskinen, og
som ikke indeholder elektriske dele, er ikke omfattet af ovenstående.
Genoptryk eller anden kopiering af dokumentation og følgedokumenter til produkter, også i uddrag, er
kun tilladt med udtrykkelig tilladelse fra iSC GmbH.
Ret til tekniske ændringer forbeholdes
- 45 -
Anl_TH_CD_18_2_2B_SPK1.indb 45Anl_TH_CD_18_2_2B_SPK1.indb 45 02.10.12 07:5502.10.12 07:55
Page 46

DK/N
Garantibestemmelser
iSC GmbH eller kompetent byggemarked garanterer afhjælpning af mangler eller vareombytning i henhold til nedenstående oversigt, idet lovfastsatte garantikrav ikke berøres heraf.
Kategori Eksempel Garanti
Mangler i materiale eller konstruktion
Sliddele* Borepatron 6 måneder
Forbrugsmateriale/
forbrugsdele*
Manglende dele 5 hverdage
* er ikke nødvendigvis indeholdt i leveringsomfanget!
Med hensyn til sliddele, forbrugsmateriale og manglende dele garanterer Fa. iSC GmbH resp. kompetent byggemarked afhjælpning af mangler eller omlevering under forudsætning af, at manglen er blevet
anmeldt inden for 24 t (forbrugsmateriale), 5 hverdage (manglende dele) eller 6 måneder (sliddele) efter
købet, og at købsdatoen dokumenteres ved fremvisning af købskvittering.
Ved mangler i materiale eller konstruktion, som er omfattet af garantien, bedes varen indsendt sammen
med vedlagte produktkort i udfyldt stand. Det er vigtigt, at der anføres en nøjagtig fejlbeskrivelse.
Derfor bedes følgende spørgsmål besvares:
Har produktet fungeret, eller var det defekt fra begyndelsen?
•
Har du bemærket noget usædvandligt, inden defekten opstod (symptom før defekt)?
•
Hvilken fejlfunktion mener du, at produktet er berørt af (hovedsymptom)?
•
Beskriv venligst fejlfunktionen.
Bit-indsatse/bor Garanti kun ved omgående
24 måneder
defekt (24 t efter køb / dato på
købskvittering)
- 46 -
Anl_TH_CD_18_2_2B_SPK1.indb 46Anl_TH_CD_18_2_2B_SPK1.indb 46 02.10.12 07:5502.10.12 07:55
Page 47

DK/N
Garantibevis
Kære kunde!
Vore produkter er underlagt streng kvalitetskontrol. Hvis produktet alligevel på et tidspunkt skulle udvise
fejl, beklager vi naturligvis dette og beder dig kontakte vores kundeservice på adressen, som står angivet på dette garantibevis. Du kan naturligvis også ringe til os på det nedenfor angivne servicenummer.
For indfrielse af garantikrav gælder følgende:
1. Nærværende garanti fastsætter betingelserne for udvidede garantiydelser. Garantibestemmelser
fastsat ved lov berøres ikke af nærværende garanti. Vores garantiydelse er gratis.
2. Garantiydelsen omfatter udelukkende mangler, som kan føres tilbage til materiale- eller produktionsfejl, og begrænser sig til afhjælpning af disse resp. levering af erstatningsprodukt. Bemærk, at vore
produkter ikke er konstrueret til erhvervsmæssig, håndværksmæssig eller industriel brug. Garantiaftale kan derfor ikke anses for indgået, såfremt produktet anvendes i erhvervsmæssigt, håndværksmæssigt, industrielt eller lignende øjemed. Endvidere dækker garantien ikke erstatningsydelser
for transportskader, skader som følge af tilsidesættelse af montagevejledningens anvisninger eller
som følge af usagkyndig installation, tilsidesættelse af brugsanvisningen (f.eks. tilslutning til forkert
netspænding eller strømtype), misbrug eller usagkyndig anvendelse (f.eks. overbelastning eller brug
af værktøj eller tilbehør, som ikke er godkendt), tilsidesættelse af vedligeholdelses- og sikkerhedsforskrifter, indtrængen af fremmedlegemer i apparatet (f.eks. sand, sten eller støv), brug af vold eller
eksterne påvirkninger udefra (f.eks. fordi produktet tabes) samt skader, der hidrører fra almindelig
slitage. Dette gælder især batterier, som vi dog alligevel yder 12 måneders garanti på. Garantien
mister sin gyldighed, hvis der allerede er blevet foretaget indgreb i apparatet.
3. Garantiperioden udgør 2 år at regne fra købsdatoen. Garantikrav skal gøres gældende inden for to
uger, efter at defekten er blevet konstateret. Garantikrav kan ikke gøres gældende efter garantiperiodens udløb. Reparation eller udskiftning af apparatet medfører ikke forlængelse af garantiperioden,
heller ikke for eventuelt indbyggede reser vedele. Dette gælder også servicearbejder, der foretages
på stedet.
4. For at kunne gøre garantikrav gældende skal du sende det defekte produkt portofrit til nedenstående adresse. Original købskvittering eller lignende dateret dokumentation skal vedsendes. Købskvitteringen skal gemmes som dokumentation! Beskriv venligst så nøjagtigt som muligt grunden til din
reklamation. Er defekten omfattet af garantien, vil produktet omgående blive repareret og returneret,
eller du vil modtage et helt nyt.
Mod betaling udbedrer vi naturligvis også gerne defekter på produktet, som ikke/ikke længere er omfattet af garantien. Du skal blot indsende produktet til vores serviceadresse.
Hvad angår slid- og forbrugsdele samt manglende dele henviser vi til garantiens begrænsninger i henhold til garantibestemmelserne i nærværende betjeningsvejledning.
- 47 -
Anl_TH_CD_18_2_2B_SPK1.indb 47Anl_TH_CD_18_2_2B_SPK1.indb 47 02.10.12 07:5502.10.12 07:55
Page 48

S
Varning - Läs igenom bruksanvisningen för att sänka risken för skador
Bär hörselskydd. Buller kan leda till att hörseln förstörs.
Bär dammskyddsmask. Vid bearbetning av trä och andra material fi nns det risk för att hälsovådligt
damm uppstår. Asbesthaltiga material får inte bearbetas!
Använd skyddsglasögon. Medan du använder elverktyget fi nns det risk för att gnistor uppstår eller att
splitter, spån och damm slungas ut ur verktyget. Dessa kan leda till att du blir blind.
För att undvika att maskinens växel förstörs, får du endast växla medan maskinen står stilla.
- 48 -
Anl_TH_CD_18_2_2B_SPK1.indb 48Anl_TH_CD_18_2_2B_SPK1.indb 48 02.10.12 07:5502.10.12 07:55
Page 49

Obs!
Innan maskinen kan användas måste särskilda
säkerhetsanvisningar beaktas för att förhindra
olyckor och skador. Läs därför noggrant igenom
denna bruksanvisning och dessa säkerhetsanvisningar. Förvara dem på ett säkert ställe så att du
alltid kan hitta önskad information. Om maskinen
ska överlåtas till andra personer måste även
denna bruksanvisning och dessa säkerhetsanvisningar medfölja. Vi över tar inget ansvar för olyckor
eller skador som har uppstått om denna bruksanvisning eller säkerhetsanvisningarna åsidosätts.
1. Säkerhetsanvisningar
Gällande säkerhetsanvisningar fi nns i det bifoga-
de häftet.
Varning!
Läs alla säkerhetsanvisningar och instruktioner. Försummelser vid iakttagandet av säker-
hetsanvisningarna och instruktionerna kan förorsaka elstöt, brand och/eller svåra skador. Förvara
alla säkerhetsanvisningar och instruktioner
för framtiden.
2. Beskrivning av maskinen samt
leveransomfattning
2.1 Beskrivning av maskinen (bild 1)
1. Inställningsring för vridmoment
2. Snabbchuck
3. Omkopplare för rotationsriktning
4. Strömbrytare
5. Batteri
6. Laddare
7. Laddningsadapter
8. Spärrknapp
9. Magnet-skruvhållare
10. Omkopplare 1:a växeln – 2:a växeln
11. Kapacitetsindikering för batteri
12. Knapp för indikering av batteriets kapacitet
2.2 Leveransomfattning
Kontrollera att produkten är komplett med hjälp av
beskrivningen av leveransen. Om delar saknas vill
vi be dig ta kontakt med vårt servicecenter eller
byggmarknaden där du köpte produkten inom
fem dagar efter att du köpte artikeln. Tänk på att
du måste visa upp ett giltigt kvitto. Beakta även
garantitabellen i garantibestämmelserna i slutet
av bruksanvisningen.
S
Öppna förpackningen och ta försiktigt ut pro-
•
dukten ur förpackningen.
Ta bor t förpackningsmaterialet samt förpack-
•
nings- och transportsäkringar (om förhanden).
Kontrollera att leveransen är komplett.
•
Kontrollera om produkten eller tillbehörsdelar-
•
na har skadats i transporten.
Spara om möjligt på förpackningen tills ga-
•
rantitiden har gått ut.
Varning!
Produkten och förpackningsmaterialet är
ingen leksak! Barn får inte leka med plastpåsar, folie eller smådelar! Risk för att barn
sväljer delar och kvävs!
Batteridriven borrmaskin/skruvdragare
•
Batteri (2 st)
•
Laddare
•
Laddningsadapter
•
Original-bruksanvisning
•
Säkerhetsanvisningar
•
3. Ändamålsenlig användning
Den batteridrivna borrmaskinen/skruvdragaren
är avsedd för att skruva in och lossa skruvar samt
för att borra i trä, metall och plast.
Maskinen får endast användas till sitt avsedda
ändamål. Användningar som sträcker sig utöver
detta användningsområde är ej ändamålsenliga.
För materialskador eller personskador som resulterar av sådan användning ansvarar användaren/
operatören själv. Tillverkaren påtar sig inget
ansvar.
Tänk på att våra produkter endast får användas
till ändamålsenligt syfte och inte har konstruerats
för yrkesmässig, hantverksmässig eller industriell
användning. Vi ger därför ingen garanti om produkten ska användas inom yrkesmässiga, hantverksmässiga eller industriella verksamheter eller
vid liknande aktiviteter.
- 49 -
Anl_TH_CD_18_2_2B_SPK1.indb 49Anl_TH_CD_18_2_2B_SPK1.indb 49 02.10.12 07:5502.10.12 07:55
Page 50

4. Tekniska data
Spänningsförsörjning motor .................... 18 V DC
Tomgångsvarvtal .................... 0-350/0-1100 min
Vridmomentssteg ........................................ 19+1
Höger-/vänstergång ...........................................ja
Spännvidd chuck .............................max. 10 mm
Laddningsspänning batteri ..................... 18 V DC
Laddningsström batteri ..............................0,55 A
Nätspänning laddare.......................230 V~ 50 Hz
Laddningstid ................................... max. 3-5 tim.
Batterityp ..................................................... NiCd
Vikt .............................................................1,7 kg
Buller och vibration
Buller- och vibrationsvärden har bestämts enligt
EN 60745.
Ljudtrycksnivå L
Osäkerhet K
Ljudeff ektnivå L
Osäkerhet K
Bär hörselskydd.
Buller kan leda till att hörseln förstörs.
Totala vibrationsvärden (vektorsumma i tre riktningar) har bestämts enligt EN 60745.
Borrning i metall
Vibrationsemissionsvärde a
Osäkerhet K = 1,5 m/s
Skruvdragning utan slag
Vibrationsemissionsvärde ah ≤ 2,5 m/s
Osäkerhet K = 1,5 m/s
Varning!
Vibrationsemissionsvärdet som anges har mätts
upp med en standardiserad provningsmetod och
kan variera beroende på vilket sätt som elverktyget används. I undantagsfall kan det faktiska
värdet avvika från det angivna värdet.
Vibrationsemissionsvärdet som anges kan användas om man vill jämföra olika elverktyg.
Vibrationsemissionsvärdet som anges kan även
användas för en första bedömning av inverkan
från elverktyget.
.............................. 66,4 dB(A)
pA
..............................................3 dB
pA
............................... 77,4 dB(A)
WA
.............................................. 3 dB
WA
2
≤ 2,5 m/s
h
2
2
2
S
Begränsa uppkomsten av buller och vibration
till ett minimum!
Använd endast intakta maskiner.
•
Underhåll och rengör maskinen regelbundet.
-1
•
Anpassa ditt arbetssätt till maskinen.
•
Överbelasta inte maskinen.
•
Lämna in maskinen för översyn vid behov.
•
Slå ifrån maskinen om den inte används.
•
Bär handskar.
•
Kvarstående risker
Kvarstående risker föreligger alltid även om
detta elverktyg används enligt föreskrift. Följande risker kan uppstå på grund av elverktygets konstruktion och utförande:
1. Lungskador om ingen lämplig dammfi lter-
mask används.
2. Hörselskador om inget lämpligt hörselskydd
används.
3. Hälsoskador som uppstår av hand- och
armvibrationer om maskinen används under
längre tid eller om det inte hanteras och underhålls enligt föreskrift.
5. Innan du använder maskinen
Läs tvunget igenom dessa anvisningar innan du
använder den batteridrivna skruvdragaren:
1. Ladda batteriet endast med den medföljande
laddaren.
2. Använd endast skarpa borr samt intakta och
lämpliga bits.
3. Innan du borrar eller skruvar i väggar och murar måste du kontrollera om dessa innehåller
ström-, gas- eller vattenledningar.
- 50 -
Anl_TH_CD_18_2_2B_SPK1.indb 50Anl_TH_CD_18_2_2B_SPK1.indb 50 02.10.12 07:5502.10.12 07:55
Page 51

6. Använda maskinen
6.1 Ladda batteriet (bild 2-3)
1. Tryck in spärrknapparna (8) på höger och
sida av batteriet (5) och dra sedan ut det ur
handtaget (bild 2).
2. Kontrollera att nätspänningen som anges på
märkskylten stämmer överens med nätspänningen i vägguttaget. Sätt in laddaren (6) i
stickuttaget och anslut laddningskabeln (a)
till laddningsadaptern (7). Den röda lysdioden
på laddningsadaptern (7) tänds.
3. Sätt in batteriet (5) i laddningsadaptern. Den
gröna och den röda lysdioden signalerar att
batteriet laddas.
4. Efter 3-5 timmar har batteriet laddats upp helt.
Ta ut batteriet ur laddningsadaptern och dra
ut laddaren ur vägguttaget.
Obs! Laddaren kopplas inte ifrån när batteriet har laddats färdigt.
Om batteriet inte kan laddas upp måste du kontrollera
att nätspänning finns i vägguttaget.
•
att det finns fullgod kontakt vid laddningskon-
•
takterna i laddaren.
Om batteriet fortfarande inte kan laddas måste du
skicka in
laddaren och
•
batteriet
•
till vår kundtjänstavdelning.
För att batteriets livslängd ska bli så lång som
möjligt måste du alltid ladda batteriet i god tid.
Detta är alltid nödvändigt om du märker att prestandan i den batteridrivna skruvdragaren börjar
försvagas. Se till att batteriet aldrig laddas ur helt.
Detta leder till att batteriet förstörs!
6.2 Ställa in vridmomentet (bild 4/pos. 1)
Den batteridrivna skruvdragaren är utrustad med
en mekanisk vridmoments¬inställning.
Ställ in vridmomentet för en viss skruvstorlek med
ställringen (1). Vridmomentet är beroende av fl era
olika faktorer:
materialets typ och hårdhet
•
skruvarnas typ och längd
•
krav som ställs på skruvförbindningen
•
När vridmomentet har nåtts hörs kan du höra hur
kopplingen slirar.
S
Obs! Ställringen för vridmomentet får endast
ställas in när maskinen står stilla.
6.3 Borrning (bild 4/pos. 1)
Om du vill borra, ställ inställningsringen för vridmomentet på det sista läget „Borr“. I läget „Borr“
är slirkopplingen ur drift. Därmed har du maximalt
vridmoment när du borrar.
6.4 Omkopplare för rotationsriktning
(bild 5/pos. 3)
Ställ in den batteridrivna skrudragarens rotationsriktning med den skjutbara omkopplaren ovanför
strömbrytaren. Denna omkopplare kan du även
använda för att skydda maskinen mot oavsiktlig
inkoppling. Du kan välja mellan vänster- och
högergång. För att undvika att maskinens växel
förstörs, får du endast skifta rotationsriktning medan maskinen står stilla. Om omkopplaren står i
mellersta läget är strömbrytaren blockerad.
6.5 Strömbrytare (bild 5/pos. 4)
Varvtalet kan styras steglöst med strömbrytaren.
Ju mer strömbrytaren trycks in, desto högre blir
varvtalet i den batteridrivna skruvdragaren.
6.6 Byta verktyg (bild 6)
Obs! Inför alla arbeten (t ex byte av verktyg, un-
derhåll) på den batteridrivna skruvdragaren måste du ställa omkopplaren för rotationsriktningen
(3) i mittläge.
Vrid chucken (2) så att den öppnas.
•
Öppningen (a) i chucken måste vara tillräck-
•
ligt stor för verktyget (borr resp. bits).
Välj ett passande verktyg. Skjut in verktyget i
•
chuckens öppning (a) så långt som möjligt.
Vrid åt chucken (2) hårt och kontrollera däref-
•
ter att verktyget sitter fast.
6.7 Skruvning
Använd helst självcentrerande skruvar (t ex torx,
krysskruv) som garanterar ett säkert arbetsresultat. Se till att bitsen och skruven stämmer överens
i form och storlek. Ställ in vridmomentet enligt
beskrivningen med hänsyn till skruvens storlek.
6.8 Magnet-skruvhållare (bild 4/pos. 9)
Du kan placera skruvar på magnet-skruvhållaren
och därmed hålla dem i beredskap medan du använder skruvdragaren.
- 51 -
Anl_TH_CD_18_2_2B_SPK1.indb 51Anl_TH_CD_18_2_2B_SPK1.indb 51 02.10.12 07:5502.10.12 07:55
Page 52

6.9 Skifta från 1:a till 2:a växeln
(bild 4/pos. 10)
Beroende på omkopplarens läge kan du använda maskinen med högre eller lägre varvtal. För
att undvika att maskinens växel förstörs, får du
endast växla medan maskinen står stilla.
6.10 Kapacitetsindikering för batteriet
(bild 2/pos. 11)
Tryck på knappen (12) för indikering av batteriets
kapacitet. Kapacitetsindikeringen (11) visar batteriets laddningsnivå med tre kulörta lysdioder.
Samtliga lysdioder är tända:
Batteriet är fulladdat.
Den gula och den röda lysdioden är tända:
Batteriet har tillräcklig restkapacitet.
Röd lysdiod:
Batteriet är tomt, ladda upp batteriet.
7. Rengöring, Underhåll och
reservdelsbeställning
Dra alltid ut stickkontakten inför alla rengöringsarbeten.
7.1 Rengöra maskinen
Håll skyddsanordningarna, ventilationsöpp-
•
ningarna och motorkåpan i så damm- och
smutsfritt skick som möjligt. Torka av maskinen med en ren duk eller blås av den med
tryckluft med svagt tryck.
Vi rekommenderar att du rengör maskinen
•
efter varje användningstillfälle.
Rengör maskinen med jämna mellanrum med
•
en fuktig duk och en aning såpa. Använd inga
rengörings- eller lösningsmedel. Dessa kan
skada maskinens plastdelar. Se till att inga
vätskor tränger in i maskinens inre. Om vatten
tränger in i ett elverktyg höjs risken för elektriska slag.
7.2 Underhåll
I maskinens inre fi nns inga delar som kräver un-
derhåll.
S
7.3 Reservdelsbeställning
Lämna följande uppgifter vid beställning av reservdelar:
Maskintyp
•
Maskinens artikel-nr.
•
Maskinens ident-nr.
•
Reservdelsnummer för erforderlig reservdel
•
Aktuella priser och ytterligare information fi nns på
www.isc-gmbh.info
8. Skrotning och återvinning
Produkten ligger i en förpackning som fungerar
som skydd mot transportskador. Denna förpackning består av olika material som kan återvinnas.
Lämna in förpackningen till ett insamlingsställe för
återvinning. Produkten och dess tillbehör består
av olika material som t ex metaller och plaster.
Defekta produkter får inte kastas i hushållssoporna. Lämna in produkten till ett insamlingsställe
i din kommun för professionell avfallshantering.
Hör efter med din kommun om du inte vet var
närmsta insamlingsställe fi nns.
9. Förvaring
Förvara produkten och dess tillbehör på en mörk,
torr och frostfri plats samt otillgängligt för barn.
Den bästa förvaringstemperaturen är mellan 5
och 30˚C. Förvara elverktyget i originalförpackningen.
- 52 -
Anl_TH_CD_18_2_2B_SPK1.indb 52Anl_TH_CD_18_2_2B_SPK1.indb 52 02.10.12 07:5502.10.12 07:55
Page 53

S
Endast för EU-länder
Kasta inte elverktyg och batterier i hushållssoporna.
Återvinnings-alternativ till begäran om återsändning:
Som ett alternativ till returnering är ägaren av elutrustningen skyldig att bidra till ändamålsenlig avfallshantering för det fall att utrustningen ska skrotas. Efter att den förbrukade utrustningen samt batterierna
har lämnats in till en avfallsstation, kan de omhändertas i enlighet med gällande nationella lagstiftning
om återvinning och avfallshantering. Detta gäller inte för tillbehörsdelar och hjälpmedel utan elektriska
komponenter vars syfte har varit att komplettera den förbrukade utrustningen.
Eftertryck eller annan duplicering av dokumentation och medföljande underlag för produkterna, även
utdrag, är endast tillåtet med uttryckligt tillstånd från iSC GmbH.
Med förbehåll för tekniska ändringar.
- 53 -
Anl_TH_CD_18_2_2B_SPK1.indb 53Anl_TH_CD_18_2_2B_SPK1.indb 53 02.10.12 07:5502.10.12 07:55
Page 54

S
Garantibestämmelser
Firman iSC GmbH resp. byggmarknaden där du köpte produkten garanterar att åtgärda brister eller byta
ut produkten enligt nedanstående översikt, varvid lagstadgade garantianspråk inte påverkas.
Kategori Exempel Garanti
Brister i material eller konstruktion
Slitagedelar* Chuck 6 månader
Förbrukningsmaterial/
förbrukningsdelar*
Delar som saknas 5 arbetsdagar
* ingår inte tvunget i leveransomfattningen!
När det gäller slitagedelar, förbrukningsmaterial och delar som saknas garanterar fi rman iSC GmbH
resp. byggmarknaden där du köpte produkten endast att bristerna åtgärdas resp. reservdelar skickas ut
om bristerna reklameras inom 24 timmar (förbrukningsmaterial), 5 arbetsdagar (delar som saknas) resp.
6 månader (slitagedelar) efter köp och köpdatum kan påvisas med kvitto.
Vid brister i material eller konstruktion vill vi be dig att skicka in produkten tillsammans med ett komplett
ifyllt produktkort. Det är viktigt att du ger en detaljerad beskrivning av felet.
Besvara följande frågor:
Fungerade produkten först eller var den defekt från början?
•
Märkte du av någonting innan produkten slutade att fungera (symptomer före defekt)?
•
Enligt din åsikt, vilken funktion är felaktig i produkten (huvudsymptom)?
•
Beskriv den felaktiga funktionen.
Bits/borr Garanti endast vid omedelbar
24 månader
defekt (24 tim efter köp / köpdatum)
- 54 -
Anl_TH_CD_18_2_2B_SPK1.indb 54Anl_TH_CD_18_2_2B_SPK1.indb 54 02.10.12 07:5502.10.12 07:55
Page 55

S
Garantibevis
Bästa kund,
Våra produkter genomgår en sträng kvalitetskontroll. Om denna produkt mot förmodan inte fungerar på
rätt sätt, beklagar vi detta och ber dig att kontakta vår serviceavdelning under adressen som anges på
garantikortet. Vi står även gärna till tjänst på telefon under servicenumret som anges nedan. Följande
punkter gäller för att du ska kunna göra anspråk på garantin:
1. I dessa garantivillkor regleras extra garantitjänster. Garantianspråk som regleras enligt lag påverkas
inte av denna garanti. Våra garantitjänster är gratis för dig.
2. Garantitjänsterna täcker endast in sådana brister som kan härledas till material- eller fabrikationsfel
och är begränsade till arbetsuppgifter som syftar till att åtgärda dessa brister eller byta ut produkten.
Tänk på att våra produkter endast får användas till ändamålsenligt syfte och inte har konstruerats
för yrkesmässig, hantverksmässig eller industriell användning. Ett garantiavtal sluts därför ej om
produkten ska användas inom yrkesmässiga, hantverksmässiga eller industriella verksamheter eller
vid liknande aktiviteter. Vår garanti omfattar dessutom inte ersättning för transportskador, skador
som kan härledas till missaktade monteringsanvisningar eller ej föreskriven installation, åsidosatt
bruksanvisning (t ex anslutning till felaktig nätspänning eller strömart), missbruk eller ej ändamålsenliga användningar (t ex överbelastning av produkten eller användning av ej godkända insatsverktyg eller tillbehör), åsidosatta underhålls- och säkerhetsbestämmelser, främmande partiklar
som har trängt in i produkten (t ex sand, sten eller damm), yttre våld eller yttre påverkan (t ex skador
om produkten har fallit ned) samt normalt och användningsbundet slitage. Detta gäller särskilt för
batterier som täcks av en 12 månaders garanti. Anspråk på garanti upphör att gälla om ingrepp redan har gjorts i produkten.
3. Garantitiden uppgår till 2 år och gäller från datumet när produkten köptes. Medan garantitiden fortfarande gäller ska anspråk på garanti ställas inom två veckor efter att defekten fastställdes. Det är inte
möjligt att ställa anspråk på garanti efter att garantitiden har löpt ut. Garantitiden förlängs inte när
produkten repareras eller byts ut, dessutom medför sådana arbeten inte att en ny garantitid börjar
gälla för produkten eller för ev. reservdelar som har monterats in. Detta gäller även vid hembesök.
4. För att du ska kunna ställa anspråk på garantin ska den defekta produkten skickas in i tillräckligt
frankerat skick till adressen som anges nedan. Bifoga kvittot i original eller ett annat daterat köpebevis. Förvara därför kassakvittot på en säker plats! Beskriv orsaken till reklamationen så noggrant
som möjligt. Om defekten i produkten täcks av våra garantitjänster, får du genast en reparerad eller
ny apparat av oss.
Givetvis kan vi även, mot debitering, åtgärda skador som antingen inte täcks av garantin eller som har
uppstått efter garantitidens slut. Skicka in produkten till nedanstående serviceadress.
För slitage- och förbrukningsdelar samt för delar som saknas hänvisar vi till begränsningarna i garantin
enligt garantibestämmelserna som ingår i denna bruksanvisning.
- 55 -
Anl_TH_CD_18_2_2B_SPK1.indb 55Anl_TH_CD_18_2_2B_SPK1.indb 55 02.10.12 07:5502.10.12 07:55
Page 56

HR/BIH
Upozorenje - pročitajte upute za uporabu kako bi se smanjio rizik od ozljeđivanja
Nosite zaštitu za sluh. Buka može utjecati na gubitak sluha.
Nosite masku za zaštitu od prašine. Kod obrade drva i drugih materijala može doći do stvaranja
prašine štetne po zdravlje. Azbestni materijali ne smiju se obrađivati!
Nosite zaštitne naočale. Iskre koje nastaju za vrijeme rada, iverje, piljevina i prašina koji izlaze iz
uređaja mogu izazvati gubitak vida.
Da biste izbjegli oštećenje pogona, promjenu brzine vrtnje treba obavljati samo kad uređaj ne
radi.
- 56 -
Anl_TH_CD_18_2_2B_SPK1.indb 56Anl_TH_CD_18_2_2B_SPK1.indb 56 02.10.12 07:5502.10.12 07:55
Page 57

Pozor!
Prilikom uporabe uređaja morate se pridržavati
sigurnosnih propisa kako biste spriječili nastanak
ozljeda i šteta. Zato pažljivo pročitajte ove upute
za uporabu/sigurnosne napomene. Dobro ih
sačuvajte tako da vam informacije u svako doba
budu na raspolaganju. Ako biste ovaj uređaj trebali predati drugim osobama, molimo da im proslijedite i ove upute za uporabu. Ne preuzimamo
jamstvo za štete nastale zbog nepridržavanja ovih
uputa za uporabu i sigurnosnih napomena.
1. Sigurnosne napomene
Odgovarajuće sigurnosne napomene pronaći
ćete u priloženoj bilježnici.
Upozorenje!
Pročitajte sve sigurnosne napomene i upute.
Propusti kod pridržavanja sigurnosnih napomena
i uputa mogu uzrokovati električni udar, požar i/ili
teške povrede. Sačuvajte sve sigurnosne na-
pomene i upute za ubuduće.
2. Opis uređaja i sadržaj isporuke
2.1 Opis uređaja (slika 1)
1. Podešavanje okretnog momenta (prsten za
podešavanje)
2. Zaglavnik za brzo pritezanje svrdla
3. Sklopka za smjer vrtnje
4. Sklopka za uključivanje/isključivanje
5. Baterija
6. Punjač
7. Adapter punjača
8. Razdjelna tipka
9. Magnetski držač vijaka
10. Preklopnik 1. brzina vrtnje - 2. brzina vrtnje
11. Pokazivač kapaciteta baterije
12. Sklopka pokazivača kapaciteta baterije
HR/BIH
2.2 Sadržaj isporuke
Molimo vas da pomoću opisanog sadržaja
isporuke provjerite cjelovitost artikla. Ako su neki
dijelovi neispravni, nakon kupnje artikla obratite
se našem servisnom centru ili najbližoj nadležnoj
trgovini najkasnije u roku od 5 radnih dana uz
predočenje važeće potvrde o kupnji. Molimo vas
da u vezi s tim obratite pozornost na tablicu o
jamstvu u jamstvenim odredbama na kraju uputa.
Otvorite pakovinu i pažljivo izvadite uređaj.
•
Uklonite ambalažu kao i dijelove za sigurnost
•
pakiranja / za sigurnost tijekom transporta
(ako postoje).
Provjerite je li sadržaj isporuke cjelovit.
•
Prekontrolirajte postoje li na uređaju i dijelovi-
•
ma pribora transportna oštećenja.
Po mogućnosti sačuvajte pakovinu do isteka
•
jamstvenog roka.
Pozor!
Uređaj i materijal pakovine nisu igračke za
djecu! Djeca se ne smiju igrati plastičnim
vrećicama, folijama i sitnim dijelovima! Postoji opasnost da ih progutaju i tako se uguše!
Baterijska bušilica-odvijač
•
Baterija (2x)
•
Punjač
•
Adapter punjača
•
Originalne upute za uporabu
•
Sigurnosne napomene
•
3. Namjenska uporaba
Baterijska bušilica prikladna je za uvrtanje i
otpuštanje vijaka kao i za bušenje u drvu, metalu
i plastici.
Uređaj se smije koristiti samo namjenski. Svaka
drugačija uporaba nije namjenska. Za štete ili
ozljede svih vrsta nastale zbog nenamjenskog
korištenja odgovoran je korisnik/rukovatelj a nikako proizvođač.
Molimo da obratite pozornost na to da naši
uređaji nisu pogodni za korištenje u komercijalne,
obrtničke ili industrijske svrhe. Ne preuzimamo
jamstvo ako se uređaj koristi u komercijalne i industrijske svrhe kao i u sličnim djelatnostima.
- 57 -
Anl_TH_CD_18_2_2B_SPK1.indb 57Anl_TH_CD_18_2_2B_SPK1.indb 57 02.10.12 07:5502.10.12 07:55
Page 58

4. Tehnički podaci
Naponsko napajanje motora: ................. 18 V d. c.
Broj okretaja u praznom hodu: 0-350/0-1100 min
Stupnjevi okretnog momenta: ......................19+1
Desni-lijevi smjer vrtnje: ................................... da
Otvor zaglavnika za pritezanje
svrdla: ............................................ maks. 10 mm
Napon punjenja baterije: ....................... 18 V d. c.
Struja punjenja baterije: .............................0,55 A
Mrežni napon punjača: ......................230V~ 50Hz
Vrijeme punjenja: ............................maks. 3-5 sati
Tip baterije: .................................................NiCd
Težina: ........................................................ 1,7 kg
Buka i vibracije
Vrijednosti buke i vibracija određene su prema
normi EN 60745.
Razina zvučnog tlaka L
Nesigurnost K
Intenzitet buke L
Nesigurnost K
Nosite zaštitu za sluh.
Buka može utjecati na gubitak sluha.
Ukupne vrijednosti vibracija (vektorski zbroj triju
pravaca) određene su prema normi EN 60745.
Bušenje u metalu
Vrijednost emisije vibracija a
Nesigurnost K = 1,5 m/s
Uvrtanje vijaka bez udarca
Vrijednost emisije vibracija ah ≤ 2,5 m/s
Nesigurnost K = 1,5 m/s
Upozorenje!
Navedena vrijednost emisije vibracija izmjerena
je prema normiranom postupku ispitivanja i može
se, ovisno o načinu korištenja elektroalata, promijeniti a u izuzetnim slučajevima može biti i veća
od navedene vrijednosti.
Navedena vrijednost emisije vibracija može se
koristiti u svrhu usporedbe elektroalata jedne tvrtke s elektroalatom neke druge tvrtke.
Navedena vrijednost emisije vibracija može se
također koristiti za početnu procjenu ugrožavanja
zdravlja.
................... 66,4 dB (A)
pA
............................................ 3 dB
pA
............................. 77,4 dB (A)
WA
........................................... 3 dB
WA
2
≤ 2,5 m/s
h
2
2
2
HR/BIH
Ograničite stvaranje buke i vibracija na minimum!
Koristite samo besprijekorne uređaje.
•
Redovito čistite i održavajte uređaj.
-1
•
Svoj način rada prilagodite uređaju.
•
Nemojte preopterećivati uređaj.
•
Po potrebi predajte uređaj na kontrolu.
•
Isključite uređaj kad ga ne koristite.
•
Nosite zaštitne rukavice.
•
Ostali rizici
Čak i kad se ovi elektroalati koriste propisno, uvijek postoje neki drugi rizici. Sljedeće
opasnosti mogu nastati vezi s izvedbom i
konstrukcijom elektroalata:
1. Oštećenja pluća ako se ne nosi prikladna
maska za zaštitu od prašine.
2. Oštećenja sluha ako se ne nosi prikladna
zaštita za sluh.
3. Zdravstveni problemi koji nastaju kao posljedica vibracija na šaku-ruku u slučaju da se
uređaj koristi tijekom dužeg vremena ili se
nepropisno koristi i održava.
5. Prije puštanja u rad
Prije korištenja baterijskog odvijača obavezno
pročitajte ove napomene:
1. Punite bateriju samo priloženim punjačom.
2. Koristite samo oštra svrdla i besprijekorne
nastavke za odvijač.
3. Prilikom bušenja i uvrtanja vijaka u zidove
prethodno provjerite ima li u njima skrivenih
strujnih kablova ili cijevi za plin i vodu.
- 58 -
Anl_TH_CD_18_2_2B_SPK1.indb 58Anl_TH_CD_18_2_2B_SPK1.indb 58 02.10.12 07:5502.10.12 07:55
Page 59

6. Rukovanje
6.1 Punjenje baterije (sl. 2-3)
1. Bateriju (5) izvadite iz ručke (sl. 2), pritom
pritisnite razdjelnu tipku (8) na desnoj ili lijevoj
strani baterije (5).
2. Usporedite odgovara li napon naveden na
tipskoj pločici postojećem mrežnom naponu.
Uključite uređaj za punjenje (6) u utičnicu i
spojite kabel za punjenje (a) s adapterom
punjača (7). Crveni LED na adapteru punjača
(7) počinje svijetliti.
3. Priključite bateriju (5) na adapter punjača.
Zeleni i crveni LED signaliziraju da se baterija
puni.
4. Nakon 3-5 sati baterija je potpuno napunjena.
Izvadite bateriju iz adaptera i isključite uređaj
za punjenje iz utičnice.
Pozor! Kad se baterija napuni, uređaj se neće
automatski isključiti.
Ako punjenje baterije ne bi bilo moguće, provjerite
ima li u utičnici napona
•
jesu li kontakti na uređaju za punjenje bespri-
•
jekorni.
Ako punjenje akumulatora i dalje nije moguće,
molimo Vas da
punjač
•
i akumulator
•
pošaljete našoj servisnoj službi.
U interesu duljeg vijeka trajanja akumulatora pobrinite se za pravovremeno ponovno punjenje. To
je u svakom slučaju potrebno ako utvrdite da se je
smanjila snaga baterijskog izvijača.
Nemojte u potpunosti isprazniti baterije. To će
dovesti do njihovog kvara!
6.2 Podešavanje okretnog momenta
(sl. 4/poz. 1)
Baterijski odvijač ima mehaničko podešavanje
okretnog momenta.
Okretni moment podešava se na za to
predviđenom prstenu (1) za određenu veličinu vijka. Potreban okretni moment ovisi o više faktora:
o vrsti i tvrdoći materijala koji se obrađuje
•
o vrsti i duljini korištenih vijaka
•
o zahtjevima za vijčani spoj
•
Kad je željeni okretni moment podešen, spojka
daje signal.
HR/BIH
Pozor! Prsten za podešavanje okretnog momenta podešavajte samo dok uređaj ne radi.
6.3 Bušenje (sl. 4/poz. 1)
Za bušenje okrenite prsten za podešavanje okretnog momenta na posljednji stupanj „Svrdlo“. Na
stupnju Bušenje klizna spojka nije u funkciji. Kod
bušenja je na raspolaganju maksimalni okretni
moment.
6.4 Regulacija broja okretaja (sl. 5/poz. 3)
Pomoću klizne sklopke iznad sklopke za
uključivanje/isključivanje možete podesiti smjer vrtnje baterijskog odvijača i osigurati ga od
neželjenog uključivanja. Možete odabrati lijevi
ili desni smjer vrtnje. Da biste izbjegli oštećenje
pogona, promjenu smjera vrtnje treba obavljati samo kad uređaj ne radi. Ako se klizna
sklopka nalazi u srednjem položaju, sklopka za
uključivanje/isključivanje je blokirana.
6.5 Sklopka za uključivanje/isključivanje
(sl. 5/poz. 4)
Pomoću sklopke za uključivanje/isključivanje
možete kontinuirano upravljati brojem okretaja.
Što više pritišćete sklopku, veći je broj okretaja
baterijskog odvijača.
6.6 Zamjena alata (sl. 6)
Pozor! Kod svih radova (npr. zamjena alata,
održavanje itd.) na baterijskom odvijaču sklopku
za smjer vrtnje (3) stavite u srednji položaj.
Odvrnite zaglavniik za svrdlo (2).
•
Otvor zaglavnika (a) mora biti dovoljno velik
•
kako bi mogao prihvatiti alat (svrdlo odn. nastavak za odvijač).
Odaberite prikladan alat. Gurnite alat što dub-
•
lje u otvor zaglavnika (a).
Okretom pričvrstite zaglavnik (2) i na kraju
•
provjerite je li alat dobro pričvršćen.
6.7 Uvrtanje vijaka
Najbolje je da koristite vijke sa samocentriranjem
(npr. torks, križni vijak) koji omogućuju siguran
rad. Pripazite na to da korišteni nastavak svojim
oblikom i veličinom odgovara vijku. Podešavanje
okretnog momenta provedite, kao što je opisano
u uputama, prema veličini vijka.
6.8 Magnetni držač vijaka (sl. 4/poz. 9)
Na magnetnom držaču vijaka možete držati vijke
koji su Vam tijekom rada na taj način uvijek pri
ruci.
- 59 -
Anl_TH_CD_18_2_2B_SPK1.indb 59Anl_TH_CD_18_2_2B_SPK1.indb 59 02.10.12 07:5502.10.12 07:55
Page 60

6.9 Promjena brzine vrtnje 1 – 2 (sl. 4/poz. 10)
Ovisno o položaju preklopnika, možete raditi s
većim ili manjim brojem okretaja. Da biste izbjegli
oštećenje pogona, promjenu brzine vrtnje treba
obavljati samo kad uređaj ne radi.
6.10 Prikaz kapaciteta baterije (sl. 2/poz. 11)
Pritisnite sklopku za prikaz kapaciteta baterije
(12). Prikaz kapaciteta baterije (11) signalizira
stanje napunjenosti baterije pomoću 3 LED diode
u boji.
Svijetle sve LED diode:
Baterija je potpuno napunjena.
Svijetle žuta i crvena LED dioda:
Baterija je dovoljno napunjena.
Crvena LED dioda:
Baterija je prazna; napunite je.
7. Čišćenje, održavanje i naručivanje
rezervnih dijelova
Prije svih radova čišćenja izvucite mrežni utikač.
7.1 Čišćenje
Zaštitne naprave, prolaze za zrak i kućište
•
motora treba uvijek očistiti od prašine i
nečistoća. Istrljajte uređaj čistom krpom ili ga
ispušite komprimiranim zrakom pod niskim
tlakom.
Preporučujemo da očistite uređaj odmah na-
•
kon svake uporabe.
Redovito čistite uređaj mokrom krpom i s
•
malo kalijevog sapuna. Ne koristite otapala
ili sredstva za čišćenje; ona bi mogli oštetiti
plastične dijelove uređaja. Pripazite na to da
u unutrašnjost uređaja ne dospije voda. Prodiranje vode u električni uređaj povećava rizik
od električnog udara.
7.2 Održavanje
U unutrašnjosti uređaja nema dijelova koje bi trebalo održavati.
HR/BIH
7.3 Naručivanje rezervnih dijelova:
Kod naručivanja rezervnih dijelova trebali biste
navesti sljedeće podatke:
Tip uređaja
•
Kataloški broj uređaja
•
Identifikacijski broj uređaja
•
Broj potrebnog rezervnog dijela
•
Aktualne cijene nalaze se na web stranici
www.isc-gmbh.info
8. Zbrinjavanje u otpad i recikliranje
Uređaj je zapakiran kako bi se tijekom transporta
spriječila oštećenja. Ova ambalaža je sirovina
i može se ponovno upotrijebiti ili predati na
reciklažu. Uređaj i njegov pribor sastavljeni su
od raznih materijala, kao npr. metala i plastike. Elektrouređaji se ne smiju bacati u obično
kućno smeće. Uređaj bi, u svrhu stručnog
zbrinjavanja, trebalo predati odgovarajućem
sakupljalištu takvog otpada. Ako ne znate gdje se
takvo sakupljalište nalazi, raspitajte se u svojoj
općinskoj upravi.
9. Skladištenje
Uređaj i njegov pribor spremite na tamno i suho
mjesto zaštićeno od smrzavanja, kojem djeca nemaju pristup. Optimalna temperatura skladištenja
je između 5 i 30 ˚C. Elektroalat čuvajte u originalnoj pakovini.
- 60 -
Anl_TH_CD_18_2_2B_SPK1.indb 60Anl_TH_CD_18_2_2B_SPK1.indb 60 02.10.12 07:5502.10.12 07:55
Page 61

HR/BIH
Samo za zemlje članice EU
Elektroalate i baterije ne bacajte u kućno smeće!
Alternativa s recikliranjem nasuprot zahtjevu za povrat:
Vlasnik električnog uređaja alternativno je obvezan da umjesto povrata uređaja u slučaju odricanja
vlasništva sudjeluje u stručnom zbrinjavanju uređaja. Stari uređaj kao i baterije mogu se u tu svrhu predati mjestu za preuzimanje takvih uređaja koje provodi uklanjanje u smislu državnih zakona o otpadu i
recikliranju. Zakonom nisu obuhvaćeni dijelovi pribora ugrađeni u stare uređaje i pomoćni materijali bez
električnih elemenata.
Kopiranje ili umnožavanje dokumentacije i popratnih materijala o proizvodu, čak i djelomično, dopušteno
je samo uz izričito dopuštenje tvrtke iSC GmbH.
Zadržavamo pravo na tehničke izmjene
- 61 -
Anl_TH_CD_18_2_2B_SPK1.indb 61Anl_TH_CD_18_2_2B_SPK1.indb 61 02.10.12 07:5502.10.12 07:55
Page 62

HR/BIH
Jamstvene odredbe
Firma iSC GmbH odnosno nadležna trgovina jamči uklanjanje nedostataka odnosno zamjenu u jamstvenom roku u skladu s niže navedenim pregledom, pri čemu se ne dira pravo na zakonske zahtjeve za
reklamacijom.
Kategorija Primjer Jamstvo
Nedostatak na materijalu ili
konstrukciji
Potrošni dijelovi* Zaglavnik za svrdlo 6 mjeseci
Potrošni materijal/ potrošni
dijelovi*
Neispravni dijelovi 5 radnih dana
* nije obavezno u sadržaju isporuke!
Obzirom na potrošne dijelove, potrošni materijal i neispravne dijelove tvrtka iSC GmbH jamči uklanjanje
nedostatka odnosno dodatnu isporuku samo ako se nedostatak predoči u roku od 24 sata (potrošni
materijal), 5 radnih dana (neispravni dijelovi) ili 6 mjeseci (potrošni dijelovi) nakon kupnje i dokaže datumom kupnje na računu.
Kod nedostataka na materijalu ili konstrukciji molimo vas da nam u slučaju jamstva pošaljete uređaj
zajedno s priloženim i potpuno ispunjenim jamstvenim listom (karticom). Pritom je važno da se greška
točno opiše.
Za to odgovorite na sljedeća pitanja:
Je li uređaj već jednom radio ispravno ili je otpočetka neispravan?
•
Jeste li uočili nešto prije pojave kvara (simptom prije kvara)?
•
U čemu je, po vašem mišljenju, kvar u funkcioniranju uređaja (glavni simptom)?
•
Opišite taj kvar.
Nastavci/svrdla Jamstvo samo u slučaju
24 mjeseca
trenutačnog kvara (24 sata nakon kupnje / datum na računu)
- 62 -
Anl_TH_CD_18_2_2B_SPK1.indb 62Anl_TH_CD_18_2_2B_SPK1.indb 62 02.10.12 07:5502.10.12 07:55
Page 63

HR/BIH
Jamstveni list
Poštovani kupče,
naši proizvodi podliježu strogoj kontroli kvalitete. Žao nam je ako bi ipak došlo do toga da uređaj ne
funkcionira besprijekorno i zamolili bismo Vas da se u tom slučaju obratite na adresu naše servisne
službe navedenu ispod ovog jamstva. Također smo Vam na raspolaganju na dolje navedenom telefonskom broju servisne službe. Za traženje jamstvenog zahtjeva vrijedi sljedeće:
1. Ovi jamstveni uvjeti reguliraju dodatne jamstvene usluge. Ovo jamstvo ne zadire u Vaše zakonsko
pravo zahtjeva za ostvarenje jamstvenih usluga. Realizacija jamstvenih usluga je besplatna.
2. Jamstvena usluga obuhvaća isključivo nedostatke nastale zbog greške na materijalu ili tijekom
proizvodnje i ograničen je na uklanjanje tih nedostataka odnosno zamjenu uređaja. Molimo da
obratite pažnju na to da naši uređaji nisu konstruirani za korištenje u komercijalne svrhe niti u obrtu
i industriji. Prema tome, ugovor o jamstvu ne može se ostvariti ako se uređaj koristi u obrtničkim ili
industrijskim pogonima kao i u sličnim djelatnostima. Nadalje su iz jamstva isključene usluge zamjene proizvoda u slučaju transportnih oštećenja, šteta zbog nepridržavanja uputa za montažu ili zbog
nestručne instalacije, nepridržavanja uputa za uporabu (kao npr. zbog priključka na pogrešni mrežni
napon ili vrstu struje), zbog zloporaba ili nestručnih primjena (kao npr. preopterećenje uređaja ili
korištenje nedopuštenih alata ili pribora), u slučaju nepridržavanja uputa za održavanje i sigurnosnih
odredbi, zbog prodiranja stranih tijela u uređaj (npr. pijeska, kamenja ili prašine), nasilne primjene ili
vanjskih utjecaja (kao npr. oštećenja zbog pada) kao i zbog uobičajenog trošenja tijekom korištenja.
To naročito vrijedi za baterije za koje ipak dajemo jamstvo od 12 mjeseci. Zahtjev za jamstvo prestaje biti valjan ako su na uređaju već izvršeni neki zahvati.
3. Jamstveni rok iznosi 2 godine a započinje s datumom kupnje uređaja. Jamstveni zahtjevi ostvaruju
se prije isteka jamstvenog roka unutar dvije godine nakon što ste uočili kvar. Ostvarenje jamstvenog
zahtjeva nakon isteka jamstvenog roka je isključeno. Popravkom ili zamjenom uređaja ne produljuje
se jamstveni rok niti se tom uslugom ostvarujenovi jamstveni rok za uređaj ili ostale ugrađene rezervne dijelove. To također vrijedi i kod korištenja servisa na licu mjesta.
4. Da biste ostvarili svoj jamstveni zahtjev, molimo Vas da nam pošaljete neispravan uređaj bez
ćanja poštarine na dolje navedenu adresu. Priložite originalni računa za kupnju uređaja ili neki
pla
drugi dokaz o kupnji s datumom. Molimo Vas da zbog tog razloga dobro sačuvate račun kao dokaz!
Što točnije opišite razlog reklamacije. Ako naša jamstvena usluga obuhvaća kvar nastao na Vašem
uređaju, odmah ćemo Vam vratiti popravljeni ili novi uređaj.
Razumljivo je da ćemo za naknadu troškova ukloniti i kvarove koje jamstvena usluga ne obuhvaća. U
tom slučaju pošaljite uređaj na adresu našeg servisa.
Za habajuće/potrošne dijelove i neispravne dijelove upozoravamo na ograničenje ovog jamstva u skladu
s jamstvenim uvjetima u ovim uputama za uporabu.
- 63 -
Anl_TH_CD_18_2_2B_SPK1.indb 63Anl_TH_CD_18_2_2B_SPK1.indb 63 02.10.12 07:5502.10.12 07:55
Page 64

RS
Upozorenje - pročitajte uputstva za upotrebu kako bi se smanjio rizik od povreda
Nosite zaštitu za sluh. Buka može da utiče na gubitak sluha.
Nosite zaštitnu masku protiv prašine. Prilikom obrade drveta i drugih materijala nastaje prašina
opasna po zdravlje. Azbestni materijali ne smeju se obrađivati!
Nosite zaštitne naočari. Tokom rada dolazi do iskrenja ili iz uređaja izlazi iver, strugotina i prašina koji
mogu uticati na gubitak vida.
Da biste sprečili oštećenja pogona, smer obrtanja sme da se prebacuje samo kada je uređaj u
stanju mirovanja.
- 64 -
Anl_TH_CD_18_2_2B_SPK1.indb 64Anl_TH_CD_18_2_2B_SPK1.indb 64 02.10.12 07:5502.10.12 07:55
Page 65

Pažnja!
Kod korišćenja uređaja morate se pridržavati
bezbednosnih propisa kako biste sprečili povrede
i štete. Zbog toga pažljivo pročitajte ova uputstva
za upotrebu/bezbednosne napomene. Dobro ih
sačuvajte tako da Vam informacije u svako doba
budu na raspolaganju. Ako biste ovaj uređaj
trebali predati drugim licima, molimo Vas da im
prosledite i ova uputstva za upotrebu. Ne preuzimamo garanciju za štete koje bi nastale zbog
nepridržavanja ovih uputstava za upotrebu i bezbednosnih napomena.
1. Sigurnosna uputstva
Odgovarajuća sigurnosna uputstva pronaći ćete u
priloženoj knjižici.
Upozorenje!
Pročitajte sve bezbednosne napomene i
uputstva. Propusti kod pridržavanja bezbednos-
nih napomena i uputstava mogu da prouzroče
el.udar, požar i/ili teške povrede. Sačuvajte
sve bezbednosne napomene i uputstva za
buduće korišćenje.
2. Opis uređaja i sadržaj isporuke
2.1 Opis uređaja (slika 1)
1. Podešavanje obrtno momenta (prsten za
podešavanje)
2. Stezna glava za brzo pritezanje burgije
3. Prekidač za smer obrtanja
4. Prekidač za uključivanje/isključivanje
5. Akumulator
6. Uređaj za punjenje
7. Adapter za punjenje
8. Taster za fi ksiranje
9. Magnetski držač zavrtanja
10. Preklopnik 1. brzina vrtnje – 2. brzina vrtnje
11. Prikaz kapaciteta akumulatora
12. Prekidač prikaza kapaciteta akumulatora
RS
2.2 Sadržaj isporuke
Molimo vas da pomoću opisanog sadržaja isporuke proverite potpunost artikla. Ako neki delovi nedostaju, nakon kupovine artikla obratite se našem
servisnom centru ili najbližoj nadležnoj prodavnici
najkasnije u roku od 5 radnih dana uz predočenje
važeće potvrde o kupovini. Molimo vas da sa time
u obratite pažnju na tabelu o garanciji na kraju
uputstava.
Otvorite pakovanje i pažljivo izvadite uređaj.
•
Uklonite materijal za pakovanje kao i delove
•
za bezbednost pakovanja / bezbednost tokom transporta (ako postoje).
Proverite da li je sadržaj isporuke potpun.
•
Prekontrolišite da li na uređaju i delovima pri-
•
bora ima transprotnih oštećenja.
Po mogućnosti sačuvajte pakovanje do isteka
•
garantnog roka.
Pažnja!
Uređaj i materijal za pakovanje nisu dečje
igračke! Deca ne smeju da se igraju
plastičnim kesama, folijama i sitnim delovima! Postoji opasnost da ih progutaju i tako
se uguše!
Akumulatorska bušilica-izvijač
•
Akumulator (2x)
•
Uređaj za punjenje
•
Adapter za punjenje
•
Originalna uputstva za upotrebu
•
Bezbednosne napomene
•
3. Namensko korišćenje
Akumulatorska bušilica-izvijač prikladna je za
uvrtanje i otpuštanje zavrtanja kao i za bušenje u
drvetu, metalu i plastici.
Uređaj sme da se koristi samo za namenu za
koju je predviđen. Svaka drugačija upotreba nije
namenska. Za štete ili povrede svih vrsta koje iz
toga proizađu, odgovoran je korisnik/rukovaoc, a
nikako proizvođač.
Molimo da obratite pažnju na to da naši uređaji
nisu podesni za korišćenje u komercijalne, zanatske ili industrijske svrhe. Ne preuzimamo
garanciju ako se uređaj koristi u komercijalne i
industrijske svrhe kao i sličnim delatnostima.
- 65 -
Anl_TH_CD_18_2_2B_SPK1.indb 65Anl_TH_CD_18_2_2B_SPK1.indb 65 02.10.12 07:5502.10.12 07:55
Page 66

4. Tehnički podaci
Naponsko napajanje motora: .................. 18 V d.c.
Broj obrtaja u praznom hodu: . 0-350/0-1100 min
Stepeni obrtnog momenta: .......................... 19+1
Desni-levi smer obrtanja: ................................. da
Otvor stezne glave za burgiju: ........ maks. 10 mm
Napon punjenja akumulatora: ................18 V d.c.
Struja punjenja akumulatora:........................0,5 A
Napon mreže za uređaj
za punjenje: ..................................... 230 V~ 50 Hz
Vreme punjenja: ....................... maks. 3-5 časova
Tip akumulatora: .........................................NiCd
Težina: ........................................................ 1,7 kg
Buka i vibracije
Vrednosti buke i vibracija utvrđene su u skladu s
normom EN 60745.
Nivo zvučnog pritiska L
Nesigurnost K
Intenzitet buke L
Nesigurnost K
Nosite zaštitu za sluh.
Buka može da utiče na gubitak sluha.
Ukupne vrednosti vibracija (vektorska suma triju
pravaca) utvrđene su u skladu s normom EN
60745.
Bušenje u metalu
Vrednost emisije vibracija a
Nesigurnost K = 1,5 m/s
Uvrtanje bez udarca
Vrednost emisije vibracija ah ≤ 2,5 m/s
Nesigurnost K = 1,5 m/s
Upozorenje!
Navedena vrednost emisije vibracija izmerena je
prema normiranom postupku kontrole i može da
se, zavisno od načina korišćenja električnih alata,
promeni, a u iznimnim slučajevima može biti i
veća od navedene vrednosti.
Pomenuta vrednost emisije vibracija može se
koristiti u svrhu uspoređivanja električnog alata
jedne fi rme s električnim alatom neke druge fi rme.
.................... 66,4 dB(A)
pA
............................................ 3 dB
pA
.............................. 77,4 dB(A)
WA
........................................... 3 dB
WA
2
≤ 2,5 m/s
h
2
2
2
RS
Navedena vrednost emisije vibracija može takođe
da se koristi za početnu procenu ugrožavanja
zdravlja.
-1
Ograničite stvaranje buke i vibracija na minimum!
Koristite samo besprekorne uređaje.
•
Redovno održavajte i čistite uređaj.
•
Prilagodite svoj način rada uređaju.
•
Ne preopterećujte uređaj.
•
Prema potrebi pošaljite uređaj na kontrolu.
•
Ako uređaj ne upotrebljavate, onda ga
•
isključite.
Nosite zaštitne rukavice.
•
Ostali rizici
Čak i kada se ovi električni alati koriste
propisno, uvek postoje i neki drugi rizici.
Sledeće opasnosti mogu nastati u vezi s izvedbom i konstrukcijom električnog alata:
1. Oštećenja pluća, ako se ne nosi
odgovarajuća maska za zaštitu od prašine.
2. Oštećenja sluha, ako se ne nosi
odgovarajuća zaštita za sluh.
3. Zdravstvene poteškoće koje nastanu kao
posledica vibracija na šaku-ruku, ako se
uređaj koristi tokom dužeg vremena ili se nepropisno koristi i održava.
5. Pre puštanja u pogon
Pre korišćenja akumulatorskog izvijača obavezno
pročitajte ove napomene:
1. Akumulator punite samo priloženim
punjačem.
2. Smeju da se koriste samo oštre burgije kao i
besprekorni i podesni nastavci izvijača.
3. Kod bušenja i uvrtanja zavrtanja u zidove
proverite da li u njima postoje sakriveni strujni
i gasni vodovi ili vodovodne cevi.
- 66 -
Anl_TH_CD_18_2_2B_SPK1.indb 66Anl_TH_CD_18_2_2B_SPK1.indb 66 02.10.12 07:5502.10.12 07:55
Page 67

6. Rukovanje
6.1 Punjenje akumulatora (sl. 2-3)
1. Izvadite akumulator (5) iz ručke (slika 2), pri
tom pritisnite taster za fi ksiranje (8) na desnoj
ili levoj strani akumulatora (5).
2. Uporedite da li napon naveden na tablici s
oznakom tipa odgovara postojećem mrežnom
naponu. Uključite uređaj za punjenje (6) u
utičnicu i spojite kabl za punjenje (a) s adapterom punjača (7). Počinje da svetli crveni
LED na adapteru punjača (7).
3. Umetnite akumulator (5) u adapter za punjenje. Zeleni i crveni LED signaliziraju da se
akumulator puni.
4. Nakon 3-5 časovа akumulator je potpuno
napunjen. Izvadite akumulator iz adaptera i
isključite uređaj za punjenje iz utičnice.
Pažnja! Kad je akumulator napunjen ne dolazi do automatskog isključivanja.
Ako punjenje akumulatora nije moguće, molimo
Vas da proverite
da li na utičnici postoji napon
•
da li su kontakti na uređaju za punjenje be-
•
sprekorni.
Ako punjenje akumulatora još uvek nije moguće,
molimo Vas da
uređaj za punjenje
•
i akumulator
•
pošaljete našem servisu.
Da bi akumulator imao dugi vek trajanja, pobrinite
se za njegovo pravovremeno ponovo punjenje. To
je u svakom slučaju potrebno onda kada utvrdite
da je učinak akumulatorskog izvijača slab. Nikada
nemojte da do kraja ispraznite akumulator. To će
uzrokovati kvar akumulatora!
6.2 Podešavanje obrtnog momenta
(sl. 4/poz. 1)
Akumulatorski izvijač ima mehaničko
podešavanje obrtnog momenta.
Obrtni moment se za određenu veličinu zavrtnja
podešava na za to predviđenom prstenu (1).
Obrtni moment zavisi od više faktora:
od vrste i tvrdoće materijala koji se obrađuje.
•
od vrste i dužine korišćenih zavrtanja.
•
od zahteva postavljenih za spojeve sa zavrtn-
•
jima.
RS
Postizanje obrtnog momenta signalizira se brzim
izbacivanjem spojke.
Pažnja! Prsten za podešavanje obrtnog momenta podešavajte samo dok uređaj ne radi.
6.3 Bušenje (sl. 4/poz. 1)
Da biste bušili, prsten za podešavanje obrtnog
momenta stavite na poslednji stepen „Burgija“.
Na stepenu Bušenje klizna spojka nalazi se van
funkcije. Kod bušenja se raspolaže maksimalnim
obrtnim momentom.
6.4 Prekidač za smer vrtnje (sl. 5/poz. 3)
Pomoću kliznog prekidača iznad prekidača za
uključivanje/isključivanje možete da podesite
smer vrtnje akumulatorskog izvijača i osigurate
ga od neželjenog uključivanja. Možete da izaberete levi ili desni smer vrtnje. Da biste sprečili
oštećenje pogona, smer vrtnje sme da se prebacuje samo kada je uređaj u stanju mirovanja.
Ako se klizni prekidač nalazi u srednjem položaju,
prekidač za uključivanje/isključivanje je blokiran.
6.5 Prekidač za uključivanje/isključivanje
(slika 5/poz. 4)
Pomoću prekidača za uključivanje/isključivanje
možete da kontinualno upravljate brojem obrtaja. Što više pritišćete prekidač, to veći biće broj
obrtaja akumulatorskog izvijača.
6.6 Zamena alata (slika 6)
Pažnja! Kod svih radova (npr. zamena alata,
održavanje itd.) na akumulatorskom izvijaču
prekidač za smer vrtnje (3) stavite u srednji
položaj.
Odvrnite steznu glavu burgije (2).
•
Otvor stezne glave (a) mora da bude dovoljno
•
velik kako bi mogao da prihvati alat (burgiju
odn. nastavak izvijačа).
Izaberite prikladan alat. Gurnite alat što dublje
•
u otvor stezne glave (a).
Obrtanjem pričvrstite steznu glavu (2) i na
•
kraju proverite da li je alat dobro pričvršćen.
6.7 Uvrtanje zavrtnja
Najbolje je da koristite zavrtnje sa samocentriranjem (npr. torks, unakrsni urez) koji osiguravaju
bezbedan rad. Pazite na to da korišćeni nastavak
svojim oblikom i veličinom odgovara zavrtnju.
Podešavanje obrtnog momenta vršite u skladu
sa veličinom zavrtnja, kao što je opisano u uputstvima.
- 67 -
Anl_TH_CD_18_2_2B_SPK1.indb 67Anl_TH_CD_18_2_2B_SPK1.indb 67 02.10.12 07:5502.10.12 07:55
Page 68

6.8 Magnetski držač zavrtanja (slika 4/poz. 9)
Na magnetskom držaču zavrtanja možete da
držite zavrtnje koji su vam tokom rada na taj način
uvek pri ruci.
6.9 Promena brzine vrtnje 1 - 2 (sl. 4/poz. 10)
Zavisno od položaja preklopnika, možete da
radite s većim ili manjim brojem obrtaja. Da biste
sprečili oštećenje pogona, promena brzine vrtnje
sme da se vrši samo kada uređaj nije u pogonu.
6.10 Prikaz kapaciteta akumulatora
(slika 2/poz. 11)
Pritisnite prekidač za prikaz kapaciteta akumulatora (12). Prikaz kapaciteta (11) signalizira stanje
napunjenosti akumulatora pomoću 3 LED-a u
boji.
Svetle svi LED-ovi:
Akumulator je potpuno napunjen.
Svetle žuti i crveni LED:
Akumulator je dovoljno napunjena.
Crveni LED:
Akumulator je prazan; napunite ga.
7. Čišćenje, održavanje i porudžbina
rezervnih delova
Pre svih radova čišćenja izvucite mrežni utikač.
7.1 Čišćenje
Zaštitne naprave, ventilacione otvore i kućište
•
motora uvek što bolje očistite od prašine i
prljavštine. Istrljajte uređaj čistom krpom ili ga
ispušite komprimiranim zrakom pod niskim
pritiskom.
Preporučamo da uređaj očistite odmah nakon
•
svakog korišćenja.
Uređaj redovno čistite vlažnom krpom i s
•
malo mekog sapuna. Nemojte koristiti otapala
i sredstva za čišćenje; oni bi mogli oštetiti
plastične dijelove uređaja. Pripazite na to da
u unutrašnjost uređaja ne dospije voda. Prodiranje vode u elektrouređaj povećava rizik od
električnog udara.
7.2 Održavanje
U unutrašnjosti uređaja nema delova koje bi trebalo održavati.
7.3 Porudžbina rezervnih delova:
RS
Kod porudžbine rezervnih delova trebali biste da
navedete sledeće podatke:
Tip uređaja
•
Kataloški broj uređaja
•
Identifikacioni broj uređaja
•
Broj potrebnog rezervnog dela
•
Aktuelne cene nalaze se na web strani
www.isc-gmbh.info
8. Zbrinjavanje u otpad i recikliranje
Uređaj je zapakovan kako bi se tokom transporta
sprečila oštećenja. Ova ambalaža je sirovina i
može ponovno da se upotrebi ili preda na recikliranje. Uređaj i njegov pribor sastavljeni su
od raznih materijala, kao npr. metala i plastike.
Neispravni uređaji ne smeju da se bacaju u kućni
otpad. Uređaj bi u svrhu stručnog zbrinjavanja
u otpad, trebalo da se preda odgovarajućem
sabiralištu takvog otpada. Ako ne znate gde se
takvo sabiralište nalazi, raspitajte se u svojoj
opštinskoj upravi.
9. Skladištenje
Uređaj i njegov pribor spremite na tamno i suvo
mesto zaštićeno od smrzavanja, kojem deca nemaju pristup. Optimalna temperatura za čuvanje
je između 5 i 30 ˚C. Električni alat čuvajte u originalnom pakovanju.
- 68 -
Anl_TH_CD_18_2_2B_SPK1.indb 68Anl_TH_CD_18_2_2B_SPK1.indb 68 02.10.12 07:5502.10.12 07:55
Page 69

RS
Samo za zemlje EU
Ne bacajte električne alate i akumulatore u kućno smeće!
Alternativa recikliranja nasuprot zahtevu za povraćaj:
Vlasnik električnog uređaja alternativno je obavezan da umesto povraćaja uređaja, u slučaju odricanja
vlasništva, učestvuje u stručnom odlaganju uređaja u otpad. Stari uređaj kao i akumulatori mogu da se u
tu svrhu predaju na mestu za preuzimanje takvih uređaja, koje sprovodi uklanjanje u smislu državnih zakona o otpadu i recikliranju. Zakonom nisu obuhvaćeni delovi pribora ugrađeni u stare uređaje i pomoćni
materijali bez električnih elemenata.
Potpuno ili delimično štampanje ili umnožavanje dokumentacije i službenih papira koji su priloženi proizvodu dozvoljeno je samo uz izričitu saglasnost fi rme iSC GmbH.
Zadržavamo pravo na tehničke promen
- 69 -
Anl_TH_CD_18_2_2B_SPK1.indb 69Anl_TH_CD_18_2_2B_SPK1.indb 69 02.10.12 07:5502.10.12 07:55
Page 70

RS
Garantne odredbe
Firma iSC GmbH odnosno nadležna prodavnica garantuje uklanjanje nedostataka odnosno zamenu u
garantnom roku, u skladu sa niže pomenutim pregledom, pri čemu se ne zadire u pravo na zakonske
zahteve za reklamaciju.
Kategorija Primer Garancija
Nedostatak na materijalu ili
konstrukciji
Brzoabajući delovi* Stega burgije 6 meseci
Potrošni materijal/ potrošni
delovi*
Neispravni delovi 5 radnih dana
* Nije obavezno da se nalazi u sadržaju isporuke!
S obzirom na brzoabajuće delove, potrošni materijal i neispravne delove fi rma iSC GmbH garantuje
uklanjanje nedostatka odnosno dodatnu isporuku samo ako se nedostatak predoči u roku od 24 sata
(potrošni materijal), 5 radnih dana (neispravni delovi) ili 6 meseci (brzoabajući delovi) nakon kupovine i
dokaže datumom kupovine na računu.
Kod nedostataka na materijalu ili konstrukciji molimo vas da nam u slučaju reklamacije pošaljete uređaj
zajedno s priloženim i potpuno ispunjenim garantnim listom (karticom). Pri tom je važno da se greška
tačno opiše.
Za to odgovorite na sledeća pitanja:
Da li je uređaj već jednom radio ispravno, ili je od samog početka neispravan?
•
Da li ste uočili nešto pre pojave kvara (simptom pre kvara)?
•
U čemu je, po vašem mišljenju, kvar u funkcionisanju uređaja (glavni simptom)?
•
Opišite taj kvar.
Nastavci/burgije Garancija samo u slučaju tre-
24 meseca
nutnog kvara (24 časova nakon
kupovine / datum na računu)
- 70 -
Anl_TH_CD_18_2_2B_SPK1.indb 70Anl_TH_CD_18_2_2B_SPK1.indb 70 02.10.12 07:5502.10.12 07:55
Page 71

RS
Garancijski list
Poštovani kupče,
naši proizvodi podvrgavaju se strogoj kontroli kvalitete. Žao nam je ako bi se ipak desilo da uređaj ne
funkcioniše besprekorno i zamolili bismo Vas da se u tom slučaju obratite na adresu naše servisne
službe navedenu ispod ove garancije. Takođe smo Vam na raspolaganju na dole navedenom telefonskom broju servisne službe. Kod zahteva za realizovanje garancije vredi sledeće:
1. Ovi garantni uslovi regulišu dodatne garancije. Ova garancija ne dotiče Vaše zakonsko pravo zahteva za ostvarenje garancije. Realizacija garancije je besplatna.
2. Garancija obuhvata isključivo nedostatke koji nastanu zbog pogreške na materijalu ili tokom proizvodnje i ograničen je na odstranjivanje tih nedostataka odnosno zamenu uređaja. Molimo da obratite pažnju na to da naši uređaji nisu konstruisani za korišćenje u komercijalne svrhe, niti u obrtu i
industriji. Prema tome ugovor o garanciji ne može da se ostvari, ako se uređaj koristi u obrtničkim ili
fabričkim pogonima, kao i u sličnim delatnostima. Nadalje su iz garancije isključene usluge zamene
proizvoda u slučaju transportnih oštećenja, šteta zbog nepridržavanja uputstava za montažu ili zbog
nestručne instalacije, nepridržavanja uputstava za upotrebu (kao npr. zbog priključka na pogrešan
mrežni napon ili vrstu struje), zbog zloupotreba ili nestručnih primena (kao npr. preopterećenje
uređaja ili korišćenje nedozvoljenih alata ili pribora), u slučaju nepridržavanja uputstava za
održavanje i bezbednosnih odredaba, zbog prodiranja stranih tela u uređaj (npr. peska, kamenja ili
prašine), nasilne primene ili spoljnih uticaja (kao npr. oštećenja zbog pada) kao i zbog uobičajenog
habanja tokom korišćenja. To naročito vredi za baterije za koje ipak dajemo garanciju od 12 meseci.
Zahtev za garanciju prestaje važiti ako su na uređaju već izvršeni neki zahvati.
3. Garantni rok iznosi 2 godine a počinje sa datumom kupnje uređaja. Garantni zahtjevi ostvaruju se
pre isteka garantnog roka unutar dve godine nakon što ste uočili kvar. Realizacija garantnog zahteva
nakon isteka garantnog roka je isključeno. Popravkom ili zamenom uređaja ne produžava se garantni rok niti se tom uslugom realizuje novi jamstveni rok za uređaj ili ostale ugrađ
To također važi i kod korišćenja servisa na licu mesta.
4. Da biste ostvarili svoj garantni zahtev, molimo Vas da nam pošaljete neispravan uređaj bez plaćanja
poštarine na dole navedenu adresu. Priložite original računa za kupnju uređaja ili neki drugi dokaz o
kupnji s datumom. Molimo Vas da iz tog razloga dobro sačuvate račun kao dokaz! Što tačnije opišite
razlog reklamacije. Ako naša garancija obuhvata kvar koji je nastao na Vašem uređaju, odmah ćemo
Vam vratiti popravljen ili novi uređaj.
Podrazumeva se da ćemo za nadoknadu troškova ukloniti i one kvarove koje garancija ne obuhvata. U
tom slučaju pošaljite uređaj na adresu našeg servisa.
Za brzoabajuće/potrošne delove i neispravne delove upozoravamo na ograničenje ove garancije u skladu sa garantnim uslovima u ovim uputstvima za upotrebu.
ene rezervne delove.
- 71 -
Anl_TH_CD_18_2_2B_SPK1.indb 71Anl_TH_CD_18_2_2B_SPK1.indb 71 02.10.12 07:5502.10.12 07:55
Page 72

CZ
Varování - Ke snížení rizika zranění si přečíst návod k obsluze
Noste ochranu sluchu. Působení hluku může způsobit ztrátu sluchu.
Noste ochrannou masku proti prachu. Při zpracování dřeva a jiných materiálů může vznikat zdraví
škodlivý prach. Materiál obsahující azbest nesmí být opracováván!
Noste ochranné brýle. Jiskry vznikající při práci nebo odštěpky dřeva, třísky a prachy vystupující z
přístroje mohou způsobit ztrátu viditelnosti.
Aby se zabránilo poškození převodovky, smí být přepínání směru otáčení prováděno pouze ve
vypnutém stavu.
- 72 -
Anl_TH_CD_18_2_2B_SPK1.indb 72Anl_TH_CD_18_2_2B_SPK1.indb 72 02.10.12 07:5502.10.12 07:55
Page 73

Pozor!
Při používání přístrojů musí být dodržována určitá
bezpečnostní opatření, aby se zabránilo zraněním
a škodám. Přečtěte si proto pečlivě tento návod
k obsluze / bezpečnostní pokyny. Dobře si ho/
je uložte, abyste měli tyto informace kdykoliv
po ruce. Pokud předáte přístroj jiným osobám,
předejte s ním prosím i tento návod k obsluze/
bezpečnostní pokyny. Nepřebíráme žádné ručení
za škody a úrazy vzniklé v důsledku nedodržování
tohoto návodu k obsluze a bezpečnostních
pokynů.
1. Bezpečnostní pokyny
Příslušné bezpečnostní pokyny naleznete v
přiložené brožurce.
Varování!
Přečtěte si všechny bezpečnostní pokyny a instrukce. Zanedbání při dodržování
bezpečnostních pokynů a instrukcí mohou mít
za následek úder elektrickým proudem, požár
a/nebo těžká zranění. Všechny bezpečnostní
pokyny a instrukce si uložte pro budoucí
použití.
2. Popis přístroje a rozsah dodávky
2.1 Popis přístroje (obr. 1)
1. Nastavení točivého momentu (stavěcí
kroužek)
2. Rychloupínací sklíčidlo
3. Přepínač směru otáčení
4. Za-/vypínač
5. Akumulátor
6. Nabíječka
7. Nabíjecí adaptér
8. Západkové tlačítko
9. Magnetický držák šroubů
10. Přepínač 1. rychl. stupeň – 2. rychl. stupeň
11. Indikace kapacity akumulátoru
12. Spínač indikace kapacity akumulátoru
CZ
2.2 Rozsah dodávky
Zkontrolujte prosím úplnost výrobku na základě
popsaného rozsahu dodávky. V případě
chybějících dílů se prosím obraťte nejpozději
během 5 pracovních dnů po zakoupení výrobku
za předložení platného dokladu o koupi na naše
servisní středisko nebo na nejbližší příslušné stavební centrum. Dbejte prosím na tabulku o záruce
v záručních podmínkách na konci návodu.
Otevřete balení a přístroj opatrně vyjměte z
•
balení.
Odstraňte obalový materiál a ochrany balení /
•
dopravní pojistky (jsou-li k dispozici).
P řekontrolujte, zda je rozsah dodávky úplný.
•
Zkontrolujte přístroj a příslušenství, zda neby-
•
ly při přepravě poškozeny.
Balení si pokud možno uložte až do uplynutí
•
záruční doby.
Pozor!
Přístroj a obalový materiál nejsou dětská
hračka! Děti si nesmějí hrát s plastovými
sáčky, fóliemi a malými díly! Hrozí nebezpečí
spolknutí a udušení!
Akumulátorový vrtací šroubovák
•
Akumulátor (2x)
•
Nabíječka
•
Nabíjecí adaptér
•
Originální návod k obsluze
•
Bezpečnostní pokyny
•
3. Použití podle účelu určení
Akumulátorový vrtací šroubovák je vhodný na
utahování a povolování šroubů, jakož také na vrtání do dřeva, kovu a plastu.
Přístroj smí být používán pouze podle svého
účelu určení. Každé další, toto překračující
použití, neodpovídá použití podle účelu určení. Za
z toho vyplývající škody nebo zranění všeho druhu ručí uživatel/obsluhující osoba a ne výrobce.
Dbejte prosím na to, že naše přístroje nebyly
podle svého účelu určení konstruovány pro
živnostenské, řemeslnické nebo průmyslové
použití. Nepřebíráme proto žádné ručení, pokud
je přístroj používán v živnostenských, řemeslných
nebo průmyslových podnicích a při srovnatelných
činnostech.
- 73 -
Anl_TH_CD_18_2_2B_SPK1.indb 73Anl_TH_CD_18_2_2B_SPK1.indb 73 02.10.12 07:5502.10.12 07:55
Page 74

4. Technická data
Zdroj napětí motoru: ................................18 V d.c.
Otáčky naprázdno: ................ 0-350/0-1100 min-1
Stupně točivého momentu: .........................19+1
Pravý - levý chod ............................................ ano
Rozevření sklíčidla: ..........................max. 10 mm
Nabíjecí napětí akumulátoru: ..................18 V d.c.
Nabíjecí proud akumulátoru: ...................... 0,55 A
Síťové napětí nabíječky: .................. 230 V~ 50 Hz
Doba nabíjení: ................................ max. 3-5 hod.
Typ akumulátoru: ......................................... NiCd
Hmotnost: ..................................................1,7 kg
Hluk a vibrace
Hluk a vibrace změřeny podle normy EN 60745.
Hladina akustického tlaku L
Nejistota K
Hladina akustického výkonu L
Nejistota K
Noste ochranu sluchu.
Působení hluku může způsobit ztrátu sluchu.
Hodnoty celkových vibrací (vektorový součet tří
směrů) změřeny podle normy EN 60745.
Vrtání do kovů
Emisní hodnota vibrací a
Nejistota K = 1,5 m/s
Šroubování bez příklepu
Emisní hodnota vibrací a
Nejistota K = 1,5 m/s
Varování!
Uvedená emisní hodnota vibrací byla změřena
podle normované zkušební metody a může se
měnit v závislosti na druhu a způsobu použití
elektrického přístroje, a ve výjimečných případech
se může nacházet nad uvedenou hodnotou.
Uvedená emisní hodnota vibrací může být použita
ke srovnání jednoho elektrického přístroje s jinými
přístroji.
Uvedená emisní hodnota vibrací může být také
použita k úvodnímu posouzení negativních vlivů.
................................................. 3 dB
pA
................................................3 dB
WA
............. 66,4 dB(A)
pA
WA
≤ 2,5 m/s
h
2
≤ 2,5 m/s
h
2
......... 77,4 dB(A)
2
2
CZ
Omezte tvorbu hluku a vibrace na minimum!
Používejte pouze přístroje v bezvadném sta-
•
vu.
Pravidelně provádějte údržbu a čištění
•
přístroje.
P řizpůsobte Váš způsob práce přístroji.
•
Nepřetěžujte přístroj.
•
V případě potřeby nechte přístroj zkontrolo-
•
vat.
P řístroj vypněte, pokud ho nepoužíváte.
•
Noste rukavice.
•
Zbývající rizika
I přesto, že obsluhujete elektrický přístroj
podle předpisů, existují vždy zbývající rizika. V souvislosti s konstrukcí a provedením
elektrického přístroje se mohou vyskytnout
následující nebezpečí:
1. Poškození plic, pokud se nenosí žádná vhodná ochranná maska proti prachu.
2. Poškození sluchu, pokud se nenosí žádná
vhodná ochrana sluchu.
3. Poškození zdraví, které je následkem vibrací na ruce a paže, pokud se přístroj
používá delší dobu nebo není řádně veden a
udržován.
5. Před uvedením do provozu
Před uvedením akumulátorového šroubováku do
provozu si bezpodmínečně přečtěte tyto pokyny:
1. Nabíjejte akumulátorový článek pouze doda-
nou nabíječkou.
2. Používat pouze ostré vrtáky a bezvadné a
vhodné bity.
3. Při vrtání a šroubování do stěn a zdí zkontro-
lovat, zda se tam nenachází skryté elektrické,
plynové a vodovodní vedení.
- 74 -
Anl_TH_CD_18_2_2B_SPK1.indb 74Anl_TH_CD_18_2_2B_SPK1.indb 74 02.10.12 07:5502.10.12 07:55
Page 75

6. Obsluha
6.1 Nabíjení akumulátoru (obr. 2-3)
1. Akumulátor (5) vytáhnout z rukojeti (obr. 2),
přitom stlačit západková tlačítka (8) na pravé
a levé straně akumulátoru (5).
2. Porovnejte, zda souhlasí síťové napětí uvedené na typovém štítku se síťovým napětím, které je k dispozici. Zastrčte nabíječku (6) do zásuvky a spojte nabíjecí kabel (a) s nabíjecím
adaptérem (7). Červená LED na nabíjecím
adaptéru (7) se rozsvítí.
3. Zastrčte akumulátor (5) do nabíjecího adap-
téru. Zelená a červená LED signalizují, že je
akumulátor nabíjen.
4. Po 3-5 hod. je akumulátor plně nabitý.
Vyjměte akumulátor z nabíjecího adaptéru a
vytáhněte nabíječku ze zásuvky.
Pozor! Po plném nabití nenásleduje žádné
automatické vypnutí.
Pokud by nabíjení akumulátorového článku nebylo možné, zkontrolujte
zda je v zásuvce síťové napětí.
•
zda je bezvadný kontakt na nabíjecích kon-
•
taktech nabíječky.
Pokud by ještě stále nabíjení nebylo možné,
prosíme Vás, abyste
nabíječku
•
a akumulátorový článek
•
poslali na náš zákaznický servis.
V zájmu dlouhé životnosti akumulátoru, byste
se měli starat o včasné nabití akumulátorového článku. Toto je v každém případě třeba
tehdy, když zjistíte, že výkon akumulátorového
šroubováku klesá. Akumulátorový článek nikdy
kompletně nevybíjejte. Toto vede k defektu akumulátorového článku!
CZ
6.2 Nastavení točivého momentu
(obr. 4/pol. 1)
Akumulátorový šroubovák je vybaven mechanickým nastavováním točivého momentu.
To čivý moment pro určitou velikost šroubu se nas-
tavuje na stavěcím kroužku (1). Točivý moment je
závislý na několika faktorech:
Na druhu a tvrdosti zpracovávaného materiá-
•
lu.
Na druhu a délce použitých šroubů.
•
Na požadavcích, které jsou stanoveny pro
•
pevnost šroubového spoje.
Dosažení točivého momentu je signalizováno chrastivým vypojením spojky.
Pozor! Stavěcí kroužek pro točivý moment
nastavovat pouze ve vypnutém stavu.
6.3 Vrtání (obr. 4/pol. 1)
Na vrtání nastavte stavěcí kroužek pro točivý moment na poslední stupeň „Vrták“. Ve stupni vrtání
je kluzná třecí spojka mimo provoz. Při vrtání je k
dispozici maximální točivý moment.
6.4 Přepínač směru otáčení (obr. 5/pol. 3)
Pomocí posuvného vypínače nad za-/vypínačem
můžete nastavit směr otáčení akumulátorového
šroubováku a zajistit ho proti nechtěnému zapnutí. Můžete zvolit mezi levým a pravým chodem.
Aby se zabránilo poškození převodovky, smí být
přepínání směru otáčení prováděno pouze ve
vypnutém stavu. Pokud se posuvný vypínač nalézá ve středové poloze, je za-/vypínač blokován.
6.5 Za-/vypínač (obr. 5/pol. 4)
Pomocí za-/vypínače může být plynule řízen
počet otáček. Čím více stlačujete vypínač, tím
vyšší bude počet otáček akumulátorového
šroubováku.
6.6 Výměna nástroje (obr. 6)
Pozor! Při všech pracích (např. výměna nást-
roje; údržba; atd.) nastavte na akumulátorovém
šroubováku přepínač směru otáčení (3) do
středové polohy.
Otáčením otevřete sklíčidlo (2).
•
Otvor sklíčidla (a) musí být dostatečně veliký,
•
aby bylo možné nástroj (vrták, resp. bit) upnout.
Zvolte vhodný nástroj. Zastrčte nástroj do ot-
•
voru sklíčidla (a) tak dalece, jak je to možné.
Sklíčidlo pevně utáhněte (2) a poté zkontroluj-
•
te pevné usazení nástroje.
- 75 -
Anl_TH_CD_18_2_2B_SPK1.indb 75Anl_TH_CD_18_2_2B_SPK1.indb 75 02.10.12 07:5502.10.12 07:55
Page 76

6.7 Šrouby
Použijte nejlépe šrouby se samočinným centrováním (např. šrouby Torx, s křížovou drážkou),
které zaručují bezpečnou práci. Dbejte na to, aby
tvar a velikost použitého bitu a šroubu souhlasily.
Nastavení točivého momentu proveďte tak, jak je
popsáno v návodu, odpovídajíc velikosti šroubů.
6.8 Magnetický držák šroubů (obr. 4/pol. 9)
Na magnetickém držáku šroubů mohou být
odloženy šrouby, které máte pak během práce k
dispozici k okamžitému použití.
6.9 Přepínání 1. rychl. stupeň – 2. rychl.
stupeň (obr. 4/pol. 10)
Podle polohy přepínače můžete pracovat buď s
vyšším nebo nižším počtem otáček. Aby se zabránilo poškození převodovky, smí být přepínání
rychlostí prováděno pouze ve vypnutém stavu.
6.10 Indikace kapacity akumulátoru
(obr. 2/pol. 11)
Stiskněte spínač indikace kapacity akumulátoru
(12). Indikace kapacity akumulátoru (11) signalizuje stav nabití akumulátoru pomocí 3 barevných
LED.
Všechny LED svítí:
Akumulátor je plně nabitý.
Žlutá a červená LED svítí:
Akumulátor disponuje dostatečným zbytkovým
nabitím.
Červená LED:
Akumulátor je prázdný, akumulátor znovu nabijte
7. Čištění, údržba a objednání
náhradních dílů
Před všemi čisticími pracemi vytáhněte síťovou
zástrčku.
7.1 Čištění
Udržujte bezpečnostní zařízení, větrací otvory
•
a kryt motoru tak prosté prachu a nečistot, jak
jen to je možné. Otřete přístroj čistým hadrem
nebo ho profoukněte stlačeným vzduchem při
nízkém tlaku.
Doporučujeme přímo po každém použití
•
přístroj vyčistit.
Pravidelně přístroj čistěte vlhkým hadrem
•
a trochou mazlavého mýdla. Nepoužívejte
CZ
čisticí prostředky nebo rozpouštědla; tyto
by mohly narušit plastové díly přístroje.
Dbejte na to, aby se do přístroje nedostala
voda. Vniknutí vody do elektrického přístroje
zvyšuje riziko úderu elektrickým proudem.
7.2 Údržba
Uvnitř přístroje se nevyskytují žádné další díly
vyžadující údržbu.
7.3 Objednání náhradních dílů:
Při objednávce náhradních dílů je třeba uvést
následující údaje:
Typ přístroje
•
Číslo artiklu přístroje
•
Identifikační číslo přístroje
•
Číslo požadovaného náhradního dílu
•
Aktuální ceny a informace naleznete na
www.isc-gmbh.info
8. Likvidace a recyklace
Přístroj je uložen v balení, aby bylo zabráněno
poškození při přepravě. Toto balení je surovina a
tím znovu použitelné nebo může být dáno zpět do
cirkulace surovin. Přístroj a jeho příslušenství jsou
vyrobeny z rozdílných materiálů, jako např. kov
a plasty. Defektní přístroje nepatří do domovního
odpadu. K odborné likvidaci by měl být přístroj
odevzdán na příslušném sběrném místě. Pokud
žádné takové sběrné místo neznáte, měli byste se
informovat na místním zastupitelství.
9. Skladování
Skladujte přístroj a jeho příslušenství na tmavém,
suchém a nezamrzajícím místě a mimo dosah
dětí. Optimální teplota skladování leží mezi 5 a 30
˚C. Uložte elektrický přístroj v originálním balení.
- 76 -
Anl_TH_CD_18_2_2B_SPK1.indb 76Anl_TH_CD_18_2_2B_SPK1.indb 76 02.10.12 07:5502.10.12 07:55
Page 77

CZ
Jen pro země EU
Elektrické přístroje a akumulátory neodhazujte do domovního odpadu!
Alternativa recyklace k výzvě na zpětné odeslání výrobku:
Vlastník elektrického přístroje je povinen alternativně namísto zpětného odeslání zařízení spolupůsobit
při jeho správném zužitkování v případě, že se vzdá jeho vlastnictví. Starý přístroj, rovněž akumulátory,
lze v takovém případě odevzdat také ve sběrně, která provede odstranění ve smyslu národního zákona
o recyklaci a odpadech. Tyto předpisy se nevztahují na díly příslušenství a pomocné prostředky bez
elektrických součástí přidané ke starým přístrojům.
Patisk nebo jiné rozmnožování dokumentace a průvodních listin, také ve výtažcích, je přípustný pouze s
výslovným souhlasem fi rmy iSC GmbH.
Technické změny vyhrazeny
- 77 -
Anl_TH_CD_18_2_2B_SPK1.indb 77Anl_TH_CD_18_2_2B_SPK1.indb 77 02.10.12 07:5502.10.12 07:55
Page 78

CZ
Záruční podmínky
Firma iSC GmbH, resp. příslušné stavební centrum ručí za odstranění poruch resp. výměnu přístroje na
základě níže uvedeného přehledu, přičemž zákonem stanovené nároky na záruku zůstávají nedotčeny.
Kategorie Příklad Záruka
Nedostatky materiálu nebo
konstrukční nedostatky
Rychle opotřebitelné díly* Sklíčidlo 6 měsíců
Spotřební materiál/
spotřební díly*
Chybějící díly 5 pracovních dnů
* není nutně obsaženo v rozsahu dodávky!
Ohledně rychle opotřebitelných dílů, spotřebního materiálu a chybějících dílů ručí fi rma iSC GmbH, resp.
příslušné stavební centrum za odstranění nedostatků resp. dodatečné dodání pouze tehdy, pokud je nedostatek oznámen během 24 hod. (spotřební materiál), 5 pracovních dnů (chybějící díly) nebo 6 měsíců
(rychle opotřebitelné součásti) po zakoupení na základě přiloženého dokladu o koupi.
V případě nedostatků materiálu nebo konstrukčních nedostatků Vás prosíme v případě záruky p
dodat spolu s přiloženou kompletně vyplněnou záruční kartou přístroje. Důležité je uvést přesný popis
chyby.
Odpovězte k tomu na následující otázky:
Fungoval přístroj předtím nebo byl od začátku defektní?
•
Všimli jste si něčeho před vyskytnutím poruchy (příznak před poruchou)?
•
Jakou chybnou funkci přístroj podle Vašeho názoru vykazuje (hlavní příznak)?
•
Popište tuto chybnou funkci.
Šroubovací bity/vrtáky Záruka pouze v případě
24 měsíců
okamžité chyby (24 hod. po zakoupení / datum dokladu o koupi)
řístroj
- 78 -
Anl_TH_CD_18_2_2B_SPK1.indb 78Anl_TH_CD_18_2_2B_SPK1.indb 78 02.10.12 07:5502.10.12 07:55
Page 79

CZ
Záruční list
Vážená zákaznice, vážený zákazníku,
naše výrobky podléhají přísné kontrole kvality. Pokud i přesto tento přístroj bezvadně nefunguje, velice
toho litujeme a prosíme Vás, abyste se obrátili na náš zákaznický servis, jehož adresa je uvedena na
tomto záručním listu. Rádi Vám budeme k dispozici také telefonicky na níže uvedeném servisním čísle.
Pro uplatňování nároků na záruku platí následující:
1. Tyto záruční podmínky upravují dodatečný záruční servis. Vašich zákonných nároků na záruku se
tato záruka netýká. Náš záruční servis je pro Vás bezplatný.
2. Záruční servis se vztahuje výhradně na nedostatky, které lze odvodit z vad materiálu nebo výrob-
ních vad a je také omezen pouze na odstranění těchto nedostatků, resp. výměnu přístroje. Dbejte
prosím na to, že naše přístroje nebyly podle svého účelu určení konstruovány pro živnostenské,
řemeslnické nebo průmyslové použití. Záruční smlouva tak není realizována, pokud byl přístroj
používán v živnostenských, řemeslných nebo průmyslových podnicích a při srovnatelných
činnostech. Z naší záruky je dále vyloučeno poskytnutí náhrady za dopravní škody, škody
způsobené nedodržováním montážního návodu nebo z důvodů neodborné instalace, nedodržování
návodu k použití (jako např. připojení na chybné síťové napětí nebo druh proudu), nedovoleného
nebo neodborného používání (jako např. přetížení přístroje nebo použití neschválených vložných
nástrojů nebo př
cizích těles do přístroje (jako např. písek, kameny nebo prach), použití násilí nebo poškození
v důsledku cizích vlivů (jako např. škody způsobené pádem), jakož také běžného opotřebení
způsobeného používáním. To platí obzvláště pro akumulátory, na které přesto poskytujeme záruční
lhůtu 12 měsíců. Nárok na záruku zaniká, pokud bylo do přístroje již zasahováno.
3. Záruční doba činí 2 roky a začíná datem koupě přístroje. Nároky na záruku před vypršením záruční
doby je třeba uplatňovat během dvou týdnů od zjištění defektu. Uplatňování nároků na záruku po
vypršení záruční doby je vyloučeno. Oprava nebo výměna přístroje nevede k prodloužení záruční
doby, ani k zahájení nové záruční doby za provedený výkon pro přístroj nebo pro případné zamontované náhradní díly. Toto platí také v případě servisu v místě Vašeho bydliště.
4. Při uplatňování Vašeho nároku na záruku zašlete prosím přístroj bez poštovného na níže uvedenou
adresu. Přiložte originál prodejního dokladu nebo jiného datovaného potvrzení o koupi. Pokladní
lístek si proto dobře uložte jako důkaz! Popište nám prosím pokud možno přesně důvod reklamace.
Je-li defekt přístroje v našem záručním servisu obsažen, obdržíte obratem opravený nebo nový
přístroj.
Samozřejmě rádi za úhradu nákladů odstraníme defekty na přístroji, které nespadají nebo již nespadají
do rozsahu záruky. K tomu nám přístroj prosím zašlete na naši servisní adresu.
V případě rychle opotřebitelných dílů/spotřebních dílů a chybějících dílů poukazujeme na omezení této
záruky podle záručních podmínek uvedených v tomto návodu k obsluze.
íslušenství), nedodržování pokynů pro údržbu a bezpečnostních pokynů, vniknutí
- 79 -
Anl_TH_CD_18_2_2B_SPK1.indb 79Anl_TH_CD_18_2_2B_SPK1.indb 79 02.10.12 07:5502.10.12 07:55
Page 80

SK
Výstraha - Aby ste znížili riziko poranenia, prečítajte si návod na obsluhu
Používajte ochranu sluchu. Pôsobenie hluku môže spôsobiť poškodenie sluchu.
Používajte ochrannú masku proti prachu. Pri práci s drevom a inými materiálmi môže vznikať zdra-
viu škodlivý prach. Materiál obsahujúci azbest nesmie byť spracovávaný!
Noste ochranné okuliare. Iskry vznikajúce pri práci alebo úlomky, triesky a prach vystupujúci z prístroja by mohli viesť k trvalému poškodeniu zraku.
Aby sa zabránilo poškodeniu prevodovky, smú sa prepínať otáčkové stupne iba vtedy, keď je
prístroj v stave pokoja.
- 80 -
Anl_TH_CD_18_2_2B_SPK1.indb 80Anl_TH_CD_18_2_2B_SPK1.indb 80 02.10.12 07:5502.10.12 07:55
Page 81

Pozor!
Pri používaní prístrojov sa musia dodržiavať
príslušné bezpečnostné opatrenia, aby bolo
možné zabrániť prípadným zraneniam a vecným
škodám. Preto si starostlivo prečítajte tento návod na obsluhu/bezpečnostné pokyny. Následne
ich starostlivo uschovajte, aby ste mali vždy k
dispozícii potrebné informácie. V prípade, že
budete prístroj požičiavať tretím osobám, prosím
odovzdajte im spolu s prístrojom tento návod na
obsluhu/bezpečnostné pokyny. Nepreberáme
žiadne ručenie za nehody ani škody, ktoré vzniknú nedodržaním tohto návodu na obsluhu a
bezpečnostných pokynov.
1. Bezpečnostné pokyny
Príslušné bezpečnostné pokyny nájdete v
priloženej brožúrke.
Výstraha!
Prečítajte si všetky bezpečnostné predpisy a pokyny. Nedostatky pri dodržovaní
bezpečnostných predpisov a pokynov môžu
mať za následok úraz elektrickým prúdom, vznik požiaru a/alebo ťažké poranenia. Všetky
bezpečnostné predpisy a pokyny si odložte
pre budúce použitie.
2. Popis prístroja a objem dodávky
2.1 Popis prístroja (obr. 1)
1. Nastavenie točivého momentu (nastavovací
krúžok)
2. Rýchloupínacie skľučovadlo
3. Prepínač smeru otáčania
4. Vypínač zap/vyp
5. Akumulátor
6. Nabíjačka
7. Nabíjací adaptér
8. Aretačné tlačidlo
9. Magnetický držiak skrutiek
10. Prepínač 1. stupeň - 2. stupeň
11. Zobrazenie kapacity akumulátora
12. Spínač zobrazenia kapacity akumulátora
SK
stredisko alebo na najbližšie príslušné nákupné
stredisko. Prosím, pozrite si záručnú tabuľku v
záručných podmienkach na konci návodu.
Otvorte balenie a opatrne vyberte prístroj von
•
z balenia.
Odstráňte obalový materiál ako aj obalové/
•
transportné poistky (pokiaľ sú obsiahnuté).
Skontrolujte, či obsah dodávky kompletný.
•
Skontrolujte, či nedošlo k poškodeniu prístro-
•
ja a príslušenstva transportom.
Pokiaľ možno, uschovajte si obal až do konca
•
záručnej doby.
Pozor!
Prístroj a obalový materiál nie sú hračky! Deti
sa nesmú hrať s plastovými vreckami, fóliami
ani malými dielmi! Hrozí nebezpečenstvo
prehltnutia a udusenia!
Akumulátorový vŕtací skrutkovač
•
Akumulátor (2x)
•
Nabíjačka
•
Nabíjací adaptér
•
Originálny návod na obsluhu
•
Bezpečnostné predpisy
•
3. Správne použitie prístroja
Akumulátorový vŕtací skrutkovač je vhodný na
skrutkovanie a uvoľňovanie skrutiek, ako aj na
vŕtanie dreva, kovu a plastu.
Prístroj smie byť použitý len na ten účel, na ktorý
bol určený. Akékoľvek iné odlišné použitie sa
považuje za nespĺňajúce účel použitia. Za škody
alebo zranenia akéhokoľvek druhu spôsobené
nesprávnym používaním ručí používateľ / obsluhujúca osoba, nie však výrobca.
Prosím berte ohľad na skutočnosť, že naše prístroje neboli svojim určením konštruované na profesionálne, remeselnícke ani priemyselné použitie.
Nepreberáme žiadne záručné ručenie, ak sa
prístroj bude používať v profesionálnych, remeselníckych alebo priemyselných prevádzkach ako
aj na činnosti rovnocenné s takýmto použitím.
2.2 Objem dodávky
Prosím, skontrolujte kompletnosť výrobku na
základe uvedeného objemu dodávky. V prípade
chýbajúcich častí sa prosím obráťte do 5 pracovných dní od zakúpenia výrobku s predložením
platného dokladu o kúpe na naše servisné
- 81 -
Anl_TH_CD_18_2_2B_SPK1.indb 81Anl_TH_CD_18_2_2B_SPK1.indb 81 02.10.12 07:5502.10.12 07:55
Page 82

4. Technické údaje
Napájanie napätím motora ......................18 V d.c.
Otáčky pri voľnobehu: ............ 0-350/0-1100 min
Stupne točivého momentu: .........................19+1
Pravo-ľavo-točivý pohyb ................................ áno
Šírka skľučovadla vrtáka: ................. max. 10 mm
Nabíjacie napätie akumulátora: ..............18 V d.c.
Nabíjací prúd akumulátora: ........................ 0,55 A
Sieťové napätie nabíjačky ............... 230 V~ 50 Hz
Čas nabíjania: ................................max. 3-5 hod.
Typ akumulátora: ......................................... NiCd
Hmotnosť: ..................................................1,7 kg
Hlučnosť a vibrácie
Hodnoty hlučnosti a vibrácií boli merané podľa
európskej normy EN 60745.
Hladina akustického tlaku L
Nepresnosť K
Hladina akustického výkonu L
Nepresnosť K
Používajte ochranu sluchu.
Pôsobenie hluku môže spôsobiť poškodenie
sluchu.
Celkové hodnoty vibrácií (súčet vektorov troch
smerov) stanovené v súlade s EN 60745.
Vŕtanie do kovu
Emisná hodnota vibrácie a
Faktor neistoty K = 1,5 m/s
Skrutkovanie bez príklepu
Emisná hodnota vibrácie ah ≤ 2,5 m/s
Faktor neistoty K = 1,5 m/s
Výstraha!
Uvedená emisná hodnota vibrácií bola nameraná
podľa normovaného skúšobného postupu a môže
sa meniť v závislosti od druhu a spôsobu použitia
elektrického náradia a vo výnimočných prípadoch
sa môže nachádzať nad uvedenou hodnotou.
Uvedená emisná hodnota vibrácií sa môže použiť
za účelom porovnania elektrického prístroja s
inými prístrojmi.
Uvedená emisná hodnota vibrácií sa môže taktiež
použiť za účelom východiskového posúdenia
vplyvov.
............................................3 dB
pA
...........................................3 dB
WA
............ 66,4 dB (A)
pA
........ 77,4 dB (A)
WA
2
≤ 2,5 m/s
h
2
2
2
SK
Obmedzte tvorbu hluku a vibráciu na minimum!
Používajte len prístroje v bezchybnom stave.
•
Pravidelne vykonávajte údržbu a čistenie
-1
•
prístroja.
Prispôsobte spôsob práce prístroju.
•
Prístroj nepreťažujte.
•
V prípade potreby nechajte prístroj
•
skontrolovať.
Prístroj vypnite, pokiaľ ho nepoužívate.
•
Používajte rukavice.
•
Zvyškové riziká
Aj napriek tomu, že budete elektrický prístroj
obsluhovať podľa predpisov, budú existovať
zvyškové riziká. V súvislosti s konštrukciou
a vyhotovením elektrického prístroja môže
dôjsť k výskytu týchto nebezpečenstiev:
1. Poškodenie pľúc, pokiaľ sa nenosí žiadna
vhodná ochranná maska proti prachu.
2. Poškodenie sluchu, pokiaľ sa nenosí žiadna
vhodná ochrana sluchu.
3. Poškodenie zdravia, ktoré je následkom vibrácie rúk a ramien, pokiaľ sa prístroj bude
používať dlhšiu dobu alebo sa nevedie a
neudržuje správnym spôsobom.
5. Pred uvedením do prevádzky
Pred uvedením Vášho akumulátorového
skrutkovača do prevádzky si bezpodmienečne
prečítajte tieto pokyny:
1. Nabíjajte akumulátor len pomocou priloženej
nabíjačky.
2. Používajte len ostré vrtáky ako aj bezchybné
a vhodné skrutkovacie hroty.
3. Pri vŕtaní a skrutkovaní na stenách a múroch
je potrebné skontrolovať, či sa v nich nenachádzajú skryté elektrické, plynové vedenia
alebo vodovody.
- 82 -
Anl_TH_CD_18_2_2B_SPK1.indb 82Anl_TH_CD_18_2_2B_SPK1.indb 82 02.10.12 07:5502.10.12 07:55
Page 83

6. Obsluha
6.1 Nabitie akumulátora (obr. 2-3)
1. Akumulátor (5) vytiahnite z rukoväte (obr. 2),
pritom stlačte aretačné tlačidlá (8) na pravej a
ľavej strane akumulátora (5).
2. Porovnajte, či sieťové napätie uvedené na
typovom štítku zodpovedá prítomnému elektrickému napätiu siete. Zasuňte nabíjačku
(6) do zásuvky a zapojte nabíjací kábel (a)
do nabíjacieho adaptéra (7). Začne blikať
červená kontrolka LED na nabíjacom adaptéri
(7).
3. Zasuňte akumulátor (5) do nabíjacieho adap-
téra. Zelená a červená kontrolka LED signalizujú, že prebieha nabíjanie akumulátora.
4. Po 3-5 hodinách je akumulátor úplne nabitý.
Vyberte akumulátor z nabíjacieho adaptéra a
vytiahnite nabíjačku zo zásuvky.
Pozor! Pri plnom nabití sa neuskutoční automatické vypnutie nabíjania!
Ak by nemalo byť možné nabitie akumulátora,
skontrolujte prosím
či je v zásuvke prítomné sieťové napätie.
•
či je kontakt na nabíjacích kontaktoch
•
nabíjačky v bezchybnom stave.
Ak by ešte stále nemalo byť možné nabitie akumulátora prosíme vás, aby ste
nabíjačku
•
a akumulátor
•
zaslali nášmu zákazníckemu servisu.
V záujme dlhej životnosti akumulátora by ste
sa mali postarať o včasné opätovné nabíjanie
akumulátora. To je potrebné v každom prípade
vtedy, keď zistíte, že sa výkon akumulátorového
skrutkovača začne znižovať. Akumulátor by nemal
byť nikdy úplne vybitý. To totiž vedie k poškodeniu
akumulátora!
6.2 Nastavenie točivého momentu
(obr. 4/pol. 1)
Akumulátorový skrutkovač je vybavený mechanickým nastavením točivého momentu.
To čivý moment pre určitú veľkosť skrutky sa
nastavuje na nastavovacom krúžku (1). Točivý
moment je závislý od viacerých faktorov:
od druhu a tvrdosti spracovávaného materiá-
•
lu,
od druhu a dĺžky použitých skrutiek,
•
SK
od požiadaviek, ktoré sú dané pre pevnosť
•
skrutkového spojenia.
Dosiahnutie nastaveného točivého momentu je
signalizované rapkajúcim vypínaním spojky.
Pozor! Nastavovací krúžok točivého momentu nastavovať len, ak je prístroj v stave
pokoja.
6.3 Vŕtanie (obr. 4/pol. 1)
Na vŕtanie nastavte nastavovací krúžok točivého
momentu na posledný stupeň „vrták“. Na stupni
pre vŕtanie nie je klzná spojka aktívna. Pri vŕtaní je
k dispozícii maximálny točivý moment.
6.4 Prepínač smeru otáčania (obr. 5/pol. 3)
Pomocou tohto posuvného spínača umiestneného nad vypínačom (zap/vyp) môžete
nastaviť potrebný smer otáčania akumulátorového skrutkovača a akumulátorový skrutkovač
zabezpečiť proti samovoľnému zapnutiu. Môžete
voliť medzi ľavotočivým a pravotočivým smerom
otáčania. Aby sa zabránilo poškodeniu prevodovky, smie sa prepínať smer otáčania iba vtedy,
keď je prístroj v stave pokoja. Ak sa nachádza
posuvný vypínač v strednej polohe, je ním zablokovaný vypínač zap/vyp.
6.5 Vypínač zap/vyp (obr. 5/pol. 4)
Pomocou vypínača zap/vyp môžete plynulo riadiť
otáčky. Čím viac stlačíte tento vypínač, tým viac
sa zvýšia otáčky akumulátorového skrutkovača.
6.6 Výmena nástrojov (obr. 6)
Pozor! Pri všetkých prácach na akumulátorovom
skrutkovači (napr. výmena nástrojov, údržba atď.)
uveďte prepínač smeru otáčania (3) do prostrednej polohy.
Otáčaním otvorte skľučovadlo (2).
•
Otvor skľučovadla (a) musí byť dostatočne
•
veľký, aby sa do skľučovadla mohol vložiť
nástroj (vrták resp. skrutkovací hrot).
Zvoľte vhodný nástroj pre daný druh použitia.
•
Zasuňte nástroj čo najhlbšie do otvoru
skľučovadla (a).
Otáčaním pevne zatvorte skľučovadlo (2) a
•
skontrolujte potom pevné usadenie nástroja.
- 83 -
Anl_TH_CD_18_2_2B_SPK1.indb 83Anl_TH_CD_18_2_2B_SPK1.indb 83 02.10.12 07:5502.10.12 07:55
Page 84

6.7 Skrutky
Používajte pokiaľ možno skrutky so samočinným
centrovaním (napr. Torx, krížová skrutka), ktoré
zaručujú bezpečnú prácu. Dbajte na to, aby sa
zhodovali veľkosti a tvary použitého skrutkovacieho hrotu a skrutky. Nastavte točivý moment tak,
ako to je popísané v tomto návode podľa veľkosti
použitej skrutky.
6.8 Magnetický držiak skrutiek (obr. 4/pol. 9)
Na magnetickom držiaku skrutiek môžete uložiť
skrutky, ktoré potom budete mať pri práci k dispozícii.
6.9 Prepnutie 1. stupeň - 2. stupeň
(obr. 4/pol. 10)
Podľa polohy prepínača môžete pracovať s
vyššími alebo nižšími otáčkami. Aby sa zabránilo poškodeniu prevodovky, smú sa prepínať
otáčkové stupne iba vtedy, keď je prístroj v stave
pokoja.
6.10 Zobrazenie kapacity akumulátora
(obr. 2/pol. 11)
Zatlačte na spínač pre zobrazenie kapacity akumulátora (12). Zobrazenie kapacity akumulátora
(11) signalizuje stav nabitia akumulátora pomocou 3 farebných kontroliek LED.
Všetky kontrolky LED svietia:
Akumulátor je úplne nabitý.
Svieti žltá a červená kontrolka LED:
Akumulátor má dostatočné zvyškové nabitie.
Červená kontrolka LED:
Akumulátor je prázdny, nabite akumulátor.
SK
7. Čistenie, údržba a objednanie
náhradných dielov
Pred všetkými údržbovými a čistiacimi prácami
vytiahnite kábel zo siete.
7.1 Čistenie
Udržujte ochranné zariadenia, vzduchové
•
otvory a kryt motora vždy v čistom stave bez
prachu a nečistôt. Utrite prístroj čistou utierkou alebo ho vyčistite vyfúkaním stlačeným
vzduchom pri nastavení na nízky tlak.
Odporúčame, aby ste prístroj čistili priamo po
•
každom použití.
Čistite prístroj pravidelne pomocou vlhkej
•
utierky a malého množstva tekutého mydla.
Nepoužívajte žiadne agresívne čistiace prostriedky ani riedidlá; tieto prostriedky by mohli
napadnúť umelohmotné diely prístroja. Dbajte
na to, aby sa do vnútra prístroja nedostala
voda. Vniknutie vody do elektrického prístroja
zvyšuje riziko úrazu elektrickým prúdom.
7.2 Údržba
Vo vnútri prístroja sa nenachádzajú žiadne ďalšie
diely vyžadujúce údržbu.
7.3 Objednávanie náhradných dielov:
Pri objednávaní náhradných dielov je potrebné
uviesť nasledovné údaje:
Typ prístroja
•
Výrobné číslo prístroja
•
Identifikačné číslo prístroja
•
Číslo potrebného náhradného dielu
•
Aktuálne ceny a informácie nájdete na stránke
www.isc-gmbh.info
- 84 -
Anl_TH_CD_18_2_2B_SPK1.indb 84Anl_TH_CD_18_2_2B_SPK1.indb 84 02.10.12 07:5502.10.12 07:55
Page 85

8. Likvidácia a recyklácia
Prístroj sa nachádza v obale za účelom zabránenia poškodeniu pri transporte. Tento obal je vyrobený zo suroviny a tým pádom je ho možné znovu
použiť alebo sa môže dať do zberu na recykláciu
surovín. Prístroj a jeho príslušenstvo sa skladajú
z rôznych materiálov, ako sú napr. kovy a plasty.
Poškodené prístroje nepatria do domového odpadu. Prístroj by sa mal odovzdať k odbornej likvidácii na príslušnom zbernom mieste. Pokiaľ Vám
nie je známe takéto zberné miesto, informujte sa
prosím na miestnej samospráve.
9. Skladovanie
Skladujte prístroj a jeho príslušenstvo na tmavom,
suchom a nezamŕzajúcom mieste mimo dosahu
detí. Optimálna teplota pre skladovanie je medzi
5 až 30 °C. Skladujte tento elektrický prístroj v originálnom balení.
SK
- 85 -
Anl_TH_CD_18_2_2B_SPK1.indb 85Anl_TH_CD_18_2_2B_SPK1.indb 85 02.10.12 07:5502.10.12 07:55
Page 86

SK
Len pre krajiny EÚ
Elektrické prístroje a akumulátory neodhadzujte do domového odpadu!
Recyklačná alternatíva k výzve na spätné zaslanie výrobku:
Majiteľ elektrického prístroja je alternatívne namiesto spätnej zásielky povinný spolupracovať pri riadnej
recyklácii prístroja v prípade vzdania sa jeho vlastníctva. Starý prístroj, ako aj akumulátory, môžu byť
za týmto účelom taktiež odovzdané na zbernom mieste, ktoré vykoná odstránenie v zmysle národného
zákona o recyklácii a odpadovom hospodárstve. Netýka sa to pridaných dielov príslušenstva k starým
prístrojom a pomocných prostriedkov bez elektronických komponentov.
Dodatočná tlač alebo iné reprodukovanie dokumentácie a sprievodných dokladov výrobkov, taktiež ich
častí, je prípustná len s výslovným súhlasom spoločnosti iSC GmbH.
Technické zmeny vyhradené
- 86 -
Anl_TH_CD_18_2_2B_SPK1.indb 86Anl_TH_CD_18_2_2B_SPK1.indb 86 02.10.12 07:5502.10.12 07:55
Page 87

SK
Záručné podmienky
Spoločnosť iSC GmbH resp. príslušné nákupné stredisko garantuje odstránenie porúch resp. výmenu
prístroja na základe nižšie uvedeného prehľadu, pričom zákonom stanovené nároky na záruku zostávajú nedotknuté.
Kategória Príklad Záručné plnenie
Materiálové alebo konštrukčné
nedostatky
Diely podliehajúce opotrebeniu* Skľučovadlo 6 mesiacov
Spotrebný materiál / spotrebné
diely*
Chýbajúce diely 5 pracovných dní
* nie je bezpodmienečne obsiahnuté v objeme dodávky!
Ohľadne dielov podliehajúcich opotrebeniu, spotrebného materiálu a chýbajúcich dielov garantuje
spoločnosť iSC GmbH resp. príslušné nákupné stredisko za odstránenie chyby resp. dodatočné dodanie iba v prípade, ak sa daný nedostatok oznámi do 24 h (spotrebný materiál), 5 pracovných dní (chýbajúce časti) alebo 6 mesiacov (diely podliehajúce opotrebeniu) od zakúpenia na základe priloženého
dokladu o kúpe.
V prípade materiálových alebo konštrukčných nedostatkov Vás prosíme v prípade záručného plnenia
dodať prístroj spolu s priloženou kompletne vyplnenou prístrojovou kartou. Je dôležité uviesť presný
popis chyby.
Odpovedajte k tomu na nasledovné otázky:
Fungoval prístroj predtým alebo bol od začiatku chybný?
•
Všimli ste si niečo pred vyskytnutím poruchy (symptóm pred poruchou)?
•
Aké chybné funkcie podľa Vás prístroj vykazuje (hlavný symptóm)?
•
Popíšte túto chybnú funkciu.
Bitové násady/vrtáky Záruka iba v prípade okamžitej
24 mesiacov
chyby (24h po zakúpení / dátum
dokladu o kúpe)
- 87 -
Anl_TH_CD_18_2_2B_SPK1.indb 87Anl_TH_CD_18_2_2B_SPK1.indb 87 02.10.12 07:5502.10.12 07:55
Page 88

SK
Záručný list
Vážená zákazníčka, vážený zákazník,
naše výrobky podliehajú prísnej kontrole kvality. V prípade, že nebude prístroj napriek tomu bezchybne
fungovať, je nám to veľmi ľúto a prosíme Vás, aby ste sa obrátili na našu servisnú službu na adrese
uvedenej na tomto záručnom liste. Radi Vám budeme k dispozícii taktiež telefonicky na uvedenom servisnom telefónnom čísle. Pri uplatňovaní nárokov na záručné plnenie platia nasledujúce podmienky:
1. Tieto záručné podmienky upravujú dodatočné záručné plnenie. Vaše zákonné nároky na záruku nie
sú touto zárukou dotknuté. Naše záručné plnenie je pre Vás zadarmo.
2. Záručné plnenie sa vzťahuje výlučne len na nedostatky, ktoré sú spôsobené chybami materiálu ale-
bo výrobnými chybami, a je obmedzené na odstránenie týchto nedostatkov resp. výmenu prístroja.
Prosím, dbajte na to, že naše prístroje neboli svojim určením konštruované na profesionálne, remeselnícke ani priemyselné použitie. Táto záručná zmluva sa preto neuzatvára, ak sa prístroj bude
používať v profesionálnych, remeselníckych alebo priemyselných prevádzkach ako aj na činnosti
rovnocenné s takýmto použitím. Z našej záruky sú okrem toho vylúčené náhradné plnenie za škody
pri transporte, škody spôsobené nedodržaním návodu na montáž alebo na základe neodbornej
inštalácie, nedodržaním návodu na použitie (ako napr. pripojením na nesprávne sieťové napätie
alebo druh prúdu), zneužívaním alebo nesprávnym používaním (ako napr. preťaženie prístroja alebo použitie neprípustných pracovných nástrojov alebo príslušenstva), nedodržaním pokynov pre
údržbu a bezpečnostných pokynov, vniknutím cudzích telies do prístroja (ako napr. piesok, kamene
alebo prach), použitím násilia alebo cudzieho pôsobenia (napr. škody spôsobené pádom), a taktiež
je vylúčené bežné opotrebenie primerané použitiu. To sa týka predovšetkým akumulátorov, na ktoré
napriek tomu garantujeme záručnú dobu 12 mesiacov. Nárok na záruku zaniká, ak už boli na prístroji svojvoľne uskutočnené zásahy.
3. Doba záruky je 2 roky a začína sa dátumom nákupu prístroja. Nároky na záruku sa musia uplatniť
pred koncom uplynutia záručnej doby do dvoch týždňov od zistenia nedostatku. Uplatnenie nárokov na záruku po uplynutí záručnej doby je vylúčené. Oprava alebo výmena prístroja nevedie k
predľženiu záručnej doby ani nedochádza na základe tohto plnenia ku vzniku novej záručnej doby
pre prístroj ani pre akékoľvek inštalované náhradné diely. To platí taktiež pri nasadení miestneho
servisu.
4. Pre uplatnenie nároku na záruku nám prosím zašlite defektný prístroj oslobodený od poštovného na
dole uvedenú adresu. Priložte predajný doklad v origináli alebo iný doklad o zakúpení s dátumom.
Prosím, starostlivo si preto uschovajte pokladničný blok ako doklad o zakúpení! Prosím, popíšte
nám čo najpresnejšie dôvod reklamácie. Ak spadá defekt prístroja pod naše záručné plnenie, dostanete obratom naspäť opravený alebo nový prístroj.
Samozrejme Vám radi opravíme závady na prístroji na vaše náklady, ak tieto závady nespadajú alebo už
nespadajú do rozsahu záruky. Prosím, pošlite nám v takom prípade prístroj na našu servisnú adresu.
Ohľadne dielov podliehajúcich opotrebeniu / spotrebných a chýbajúcich dielov poukazujeme na obmedzenia tejto záruky podľa záručných podmienok uvedených v tomto návode na obsluhu.
- 88 -
Anl_TH_CD_18_2_2B_SPK1.indb 88Anl_TH_CD_18_2_2B_SPK1.indb 88 02.10.12 07:5502.10.12 07:55
Page 89

ISC GmbH · Eschenstraße 6 · D-94405 Landau/Isar
Konformitätserklärung
D erklärt folgende Konformität gemäß EU-Richtlinie und
Normen für Artikel
GB explains the following conformity according to EU directi-
ves and norms for the following product
F déclare la conformité suivante selon la directive CE et les
normes concernant l’article
I dichiara la seguente conformità secondo la direttiva UE e
le norme per l’articolo
NL verklaart de volgende overeenstemming conform EU
richtlijn en normen voor het product
E declara la siguiente conformidad a tenor de la directiva y
normas de la UE para el artículo
P declara a seguinte conformidade, de acordo com a
directiva CE e normas para o artigo
DK attesterer følgende overensstemmelse i medfør af
EU-direktiv samt standarder for artikel
S förklarar följande överensstämmelse enl. EU-direktiv och
standarder för artikeln
FIN vakuuttaa, että tuote täyttää EU-direktiivin ja standardien
vaatimukset
EE tõendab toote vastavust EL direktiivile ja standarditele
CZ vydává následující prohlášení o shodě podle směrnice EU
a norem pro výrobek
SLO potrjuje sledečo skladnost s smernico EU in standardi za
izdelek
SK vydáva nasledujúce prehlásenie o zhode podľa smernice
EÚ a noriem pre výrobok
H a cikkekhez az EU-irányvonal és Normák szerint a
következő konformitást jelenti ki
Akku-Bohrschrauber TH-CD 18-2 2B / Ladegerät LG TH-CD 18-2 2B (Einhell)
87/404/EC_2009/105/EC
2005/32/EC_2009/125/EC
2006/95/EC
2006/28/EC
X
2004/108/EC
2004/22/EC
1999/5/EC
97/23/EC
90/396/EC_2009/142/EC
89/686/EC_96/58/EC
X
2011/65/EC
Standard references: EN 60745-1; EN 60745-2-1; EN 60745-2-2; EN 55014-1;
EN 55014-2; EN 61000-3-2; EN 61000-3-3; EN 60335-1; EN 60335-2-29
X
2006/42/EC
Annex IV
Notifi ed Body:
Notifi ed Body No.:
Reg. No.:
2000/14/EC_2005/88/EC
Annex V
Annex VI
Noise: measured LWA = dB (A); guaranteed LWA = dB (A)
P = KW; L/Ø = cm
Notifi ed Body:
2006/28/EC
Emission No.:
PL deklaruje zgodność wymienionego poniżej artykułu z
następującymi normami na podstawie dyrektywy WE.
BG декларира съответното съответствие съгласно
Директива на ЕС и норми за артикул
LV paskaidro šādu atbilstību ES direktīvai un standartiem
LT apibū
dina šį atitikimą EU reikalavimams ir prekės normoms
RO declară următoarea conformitate conform directivei UE şi
normelor pentru articolul
GR δηλώνει την ακόλουθη συμμόρφωση σύμφωνα με την
Οδηγία ΕΚ και τα πρότυπα για το προϊόν
HR potvrđuje sljedeću usklađenost prema smjernicama EU i
normama za artikl
BIH potvrđuje sljedeću usklađenost prema smjernicama EU i
normama za artikl
RS potvrđuje sledeću usklađenost prema smernicama EZ i
normama za artikal
RUS следующим удостоверяется, что следующие продукты
соответствуют директивам и нормам ЕС
UKR проголошує про зазначену нижче відповідність виробу
директивам та стандартам ЄС на виріб
MK ја изјавува следната сообрзност согласно
ЕУ-директивата и нормите за артикли
TR Ürünü ile ilgili AB direktifl eri ve normları gereğince aşağıda
açıklanan uygunluğu belirtir
N erklærer følgende samsvar i henhold til EU-direktivet og
standarder for artikkel
IS Lýsir uppfyllingu EU-reglna og annarra staðla vöru
Landau/Isar, den 17.08.2012
First CE: 12 Archive-File/Record: NAPR007051
Art.-No.: 45.135.50 I.-No.: 11022 Documents registrar: Georg Riedel
Subject to change without notice Wiesenweg 22, D-94405 Landau/Isar
Unger/Product-ManagementWeichselgartner/General-Manager
- 89 -
Anl_TH_CD_18_2_2B_SPK1.indb 89Anl_TH_CD_18_2_2B_SPK1.indb 89 02.10.12 07:5502.10.12 07:55
Page 90

- 90 -
Anl_TH_CD_18_2_2B_SPK1.indb 90Anl_TH_CD_18_2_2B_SPK1.indb 90 02.10.12 07:5502.10.12 07:55
Page 91

- 91 -
Anl_TH_CD_18_2_2B_SPK1.indb 91Anl_TH_CD_18_2_2B_SPK1.indb 91 02.10.12 07:5502.10.12 07:55
Page 92

EH 10/2012 (01)
Anl_TH_CD_18_2_2B_SPK1.indb 92Anl_TH_CD_18_2_2B_SPK1.indb 92 02.10.12 07:5502.10.12 07:55
 Loading...