

Page 1

GQS 2540; EX; UK
Electric Silent Shredder
Artikel-Nr.: 3430596
Ident-Nr.: 11013
Komponenten / Ersatzteile
Position Artikel-Nr. Beschreibung
Position Artikel-Nr. Beschreibung
1 343059101008 feeding barrel
4 343058001014 feeding inlet
5 343058001015 shell
6 343058001016 quadrate buna
7 343058001017 capacitor 42.5uf/450v
8 343058001018 lock washer 8
9 343058001019 washer
10 343058001020 2nd inner gear
11 343058001021 diaphragm plate
12 343058001022 2nd planetary gear
13 343058001023 blade shaft
14 343058001024 flat key 10x60 10 x 60
16 343058001026 bushing 8x12x12 8 x 12 x 12
17 343058001027 blade frame
21 343059101006 knob zur Gegenmesser-Einstellung
24 343058001034 retainer block für Messerwalze
Page 2

Komponenten / Ersatzteile
Position Artikel-Nr. Beschreibung
25 343058001035 O-ring 8.2x1.9
26 343058001036 blade
30 343058501040 end cover
35 343058001045 gear box
36 343058001046 oil sealing 28x17x6
43 343058001053 safety cover
48 343059101001 grass box (transparent), green
64 343059101005 cover of wheel (Green) Gardenline
65 343059101004 wheel
66 343058001076 bushing 8x12x39 für Rad
67 343058001077 flat washer 8 für Rad
68 343058001078 hex head bolt M8x85 M8x85 für Rad
69 343058001079 self-locked nut M8 für Rad
75 343058001085 screw M6x25 M6 x 25
76 343059101003 fixing base
79 343058501089 output barrel
80 343058001090 interlock switch JR01-15/2
81 343058001091 safety cover für Sicherheitsschalter
90 343058001100 fan
97 343059601097 power cord GB plug 3m
98 343058001108 impact circle
100 343058001110 over current
101 343059101010 switch
103 343058001113 switch KR-06B
108 343058501118 special hex bolt M6x85 M6 x 85 Innensechskant
109 343058501119 hex nut M6
901 343059101002 underframe assy.
902 343059101009 foot assy
903 343058001903 knob
Page 3
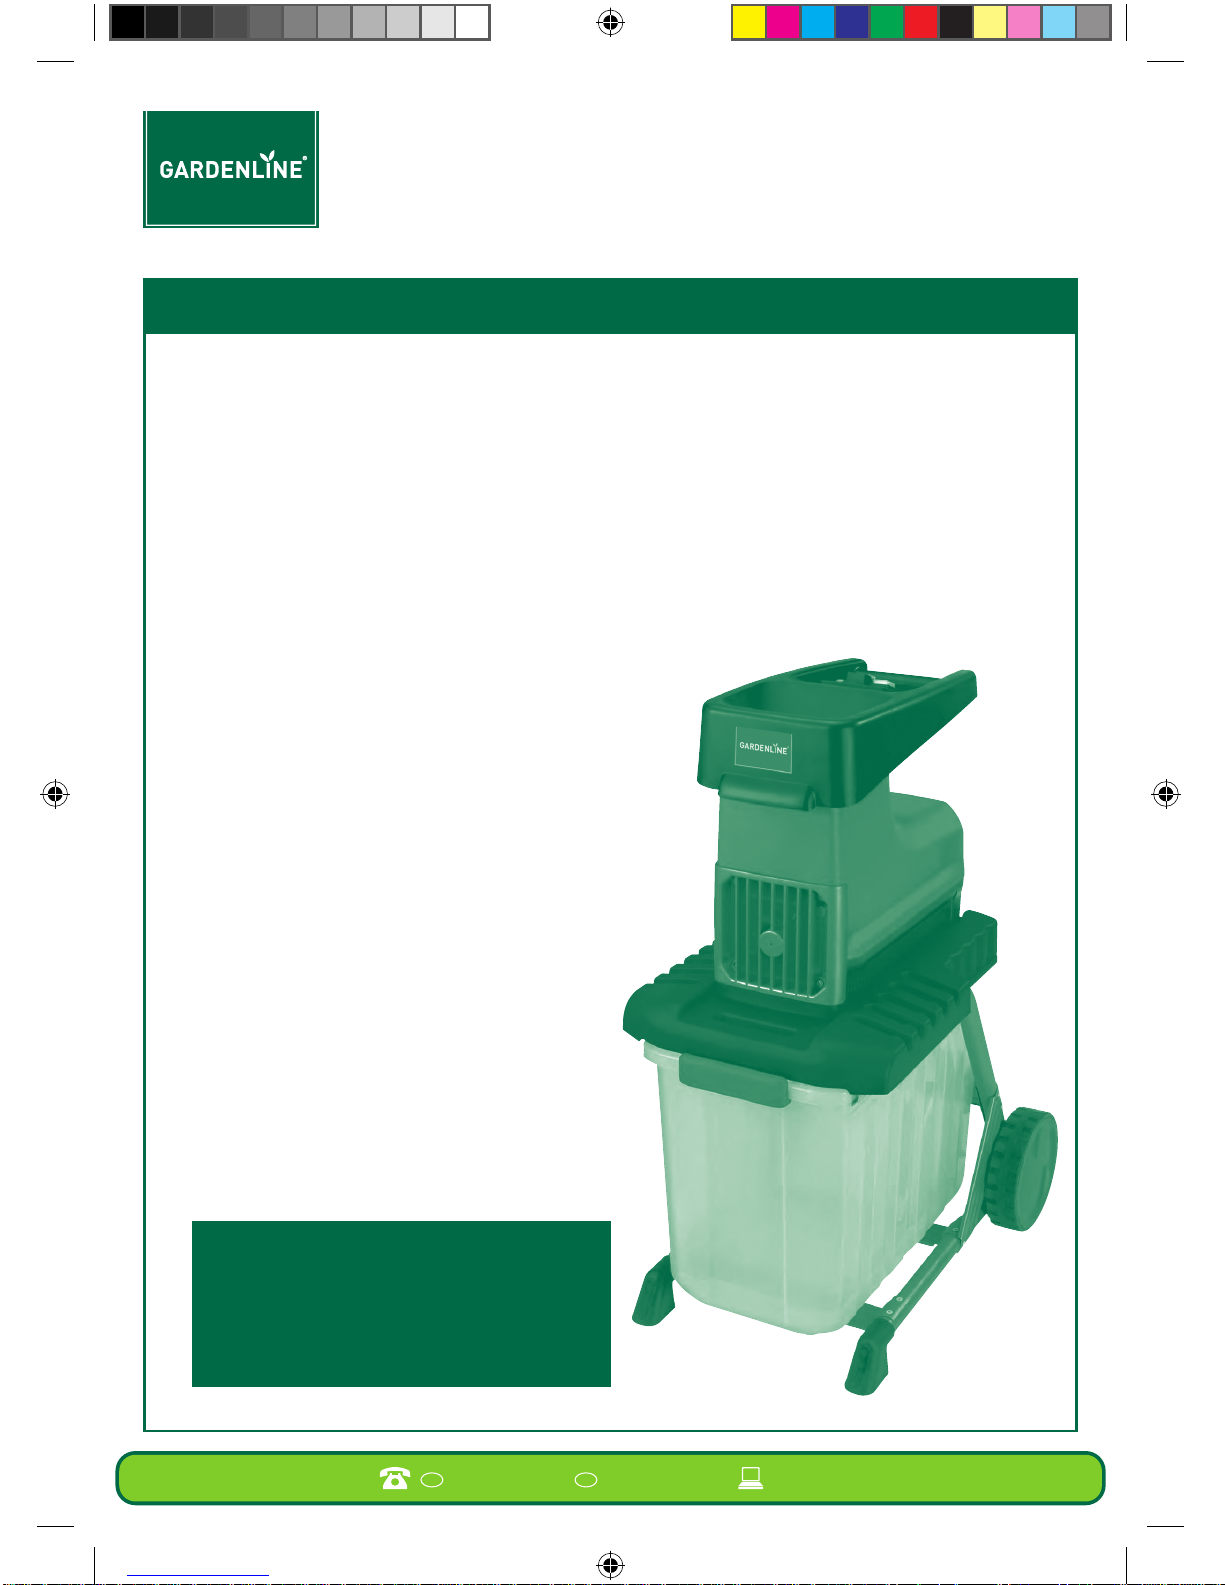
Garden Shredder
Quick Set-Up Guide
GB IRE
MODEL: GQS 2540AFTER SALES SUPPORT 0151 649 1500 1890 946 244 www.einhell.co.uk
Using the Garden Shredder
Easy Steps to getting Started
1 Unpack the Garden Shredder:
a) Open carton carefully and remove
all items.
b) Ensure you have all items before
you discard the packaging.
2 Assemble unit:
To assemble this unit please refer to the
user guide.
3 Now you have assembled the unit please
ensure the collection box is fully in place
and locked in position. This will engage
the safety switch.
If the collection box is not locked in place
the unit WILL NOT OPERATE.
4 Now you are ready to use the unit please
check the cable is securely connected to
the unit.
Please remember max size of branches
is 40 mm.
The Cutter/Counter blade setting is pre
set at factory and should not need any
initial adjustment.
However, please ensure that the Cutter
blade / Counter blade gap setting is correct
at all times (0.5 to 1.0mm) – if not this may
result in the unit not functioning correctly.
If necessary adjustment can be made
via the adjusting button.
IMPORTANT!
Please do not over adjust the adjusting
button so the Counter blade meets the
cutter as this will damage the blade
(refer to user guide).
56525_34.305.96_11013_qgs.indd 1 10/04/2013 10:52
Page 4
Garden Shredder
Operating Instructions - User Guide
www.einhell.co.uk
AFTER SALES SUPPORT
MODEL: GQS 2540
0151 649 1500
1890 946 244
IRE
GB
After Sales Support
Now you have purchased a Gardenline
®
product you can rest assured in the
knowledge that as well as your
3 year parts and labour guarantee
you have the added peace of
mind of dedicated helplines
and web support.
®®
56525_34.305.96_11013_ug.indd 1 10/04/2013 10:53
Page 5

GB IRE
MODEL: GQS 2540AFTER SALES SUPPORT 0151 649 1500 1890 946 244 www.einhell.co.uk
2
Contents
Page
3 Welcome
4 General Information and Safety Instructions
9 Assembly and Parts List
13 Features
15 Instructions
22 Useful information
26 FAQ
27 Warranty Card
56525_34.305.96_11013_ug.indd 2 10/04/2013 10:53
Page 6

3
Welcome 1
Congratulations!
You have made an excellent choice with the purchase of this quality
Gardenline® product.
By doing so you now have the assurance and peace of mind which comes from
purchasing a product that has been manufactured to the highest standards of
performance and safety, supported by the high quality standards of ALDI.
We want you to be completely satisfied with your purchase so this Gardenline
®
product is backed by a comprehensive manufacturer’s 3 year warranty and an
outstanding after sales service through our dedicated Helpline.
We hope you will enjoy using your purchase for many years to come.
If you require technical support or in the unlikely event that your purchase is
faulty please telephone our Helpline for immediate assistance. Faulty product
claims made within the 3 year warranty period will be repaired or replaced free
of charge provided that you have satisfactory proof of purchase (keep your till
receipt safe!). This does not affect your statutory rights. However, be aware
that the warranty will become null and void if the product is found to have
been deliberately damaged, misused or disassembled.
GB IRE
MODEL: GQS 2540AFTER SALES SUPPORT 0151 649 1500 1890 946 244 www.einhell.co.uk
56525_34.305.96_11013_ug.indd 3 10/04/2013 10:53
Page 7

4
General safety regulations for this electrical tool
This equipment is not designed to be used by people (including children) with
limited physical, sensory or mental capacities or those with no experience and/
or knowledge unless they are supervised by a person who is responsible for their
safety or they have received instructions from such a person in how to use the
equipment safely.
Children must always be supervised in order to ensure that they do not play
with the equipment.
Safety instructions for garden shredder
IMPORTANT!
Read and follow the operating instructions and safety information before
using for the first time.
When using equipment, a few safety precautions must be observed to avoid
injuries and damage. Please read the complete operating manual with due
care. Keep this manual in a safe place, so that the information is available
at all times. If you give the equipment to any other person, give them
these operating instructions as well. We accept no liability for damage
or accidents which arise due to non-observance of these instructions and
the safety information.
CAUTION!
Read all safety regulations and instructions. Any errors made in following the
safety regulations and instructions may result in an electric shock, fire and/or
serious injury. Keep all safety regulations and instructions in a safe place for
future use.
General Information and Safety Instructions 2
GB IRE
MODEL: GQS 2540AFTER SALES SUPPORT 0151 649 1500 1890 946 244 www.einhell.co.uk
56525_34.305.96_11013_ug.indd 4 10/04/2013 10:53
Page 8
5
General Information and Safety Instructions 2
GB IRE
MODEL: GQS 2540AFTER SALES SUPPORT 0151 649 1500 1890 946 244 www.einhell.co.uk
• The shredder is not to be used by individuals under 16 years of age or any other
persons who are not acquainted with these instructions for use.
• The operator is responsible for the safety of third parties within the working
radius of the shredder.
• Make sure that the shredder is properly closed (loading funnel and ejector) before
you start up the motor.
• The shredder must be placed on a flat and firm surface where it can stand securely.
• Always wear gloves and safety goggles when working with the shredder.
• We recommend ear-muffs when working with shredders which have no
noise-insulating features.
• Each time before you leave the shredder, switch off the motor and pull out
the power plug.
• Maintenance and cleaning work on the shredder as well as the removal or
adjustment of any safety devices may only be performed when the motor is
at a standstill and the power plug has been pulled out.
• The safety devices supplied with the shredder (e.g. the ejector) must be used.
• The shredder must be assembled correctly before it is put into operation.
• Examine the shredder each time before you use it. Do not use the shredder if any
safety devices are damaged or worn. Never put safety devices out of operation.
• Use the shredder only for the purpose specified in these instructions.
• Work only in good visibility.
• Always make sure of your footing while working.
• Never leave the shredder unattended. Store the shredder in a safe place
during interruptions.
• If you interrupt your work to move to a different position it is imperative
to switch off the shredder while you are relocating it.
IMPORTANT!
Read carefully before use Keep for later reference.
CAUTION!
The ON/OFF switch must be set to OFF and the power plug removed from
the socket-outlet before cleaning or doing any other work on the shredder
and whenever the cable becomes tangled. The shredder will continue to
run briefly after it is switched off.
56525_34.305.96_11013_ug.indd 5 10/04/2013 10:53
Page 9

6
General Information and Safety Instructions 2
GB IRE
MODEL: GQS 2540AFTER SALES SUPPORT 0151 649 1500 1890 946 244 www.einhell.co.uk
• Never use the shredder in the rain or in moist or wet conditions.
• Protect the shredder from the damp and rain.
• Always wear suitable clothing to protect your head, hands and feet from injury.
Wear a helmet, goggles or visor, high boots or strong shoes, long trousers made
of tough material, and work gloves.
• Keep the shredder away from other persons, particularly children and pets.
• Do not use the shredder without an RCD protection device, the maximum operating
current must be not greater than 30mA.
• Keep the air vents clear of dirt.
• After use, unplug the machine and check it for damage.
• When you are not using the shredder, keep it in a dry place out of the reach
of children.
• Check the screws regularly to see that they are properly tightened.
• The mains voltage of your supply must be the same as the voltage specified
on the rating plate.
• Power cables used with the shredder must not be of a lighter duty class than
HO7RN-F rubber insulated flexible cables according to DIN 57282/ VDE 0282 with
a minimum cross sectional area of 1.5 mm
2
.
• Plug connectors must be equipped with earthing contacts and the coupling must
be rain-water protected.
• If the Power Cord or plug is damaged do not use the machine. Have the cable
replaced with an approved part by a suitably qualified person.
• Use only original replacement parts for repair and maintenance purposes.
• Have repairs carried out only by a qualified electrician.
• Examine the shredder for signs of wear or damage each time before you use
it and after any collisions. Have essential repairs carried out without delay.
• Never use replacement parts or accessories which are not foreseen or
recommended by the manufacturer.
CAUTION!
The guard is vital for your safety and for the safety of others, and it is also
essential for the shredder to work correctly. Failure to observe this instruction
will not only create a potential hazard, it will also result in the loss of your
rights under the warranty.
56525_34.305.96_11013_ug.indd 6 10/04/2013 10:53
Page 10

7
General Information and Safety Instructions 2
GB IRE
MODEL: GQS 2540AFTER SALES SUPPORT 0151 649 1500 1890 946 244 www.einhell.co.uk
• Pull out the power plug before carrying out any inspection, cleaning or other work
on the shredder and whenever it is not being used.
• Before you begin your work, examine the material you want to shred. Remove any
foreign bodies.
• Continue to watch out for foreign bodies while you are working. If you come across
any foreign bodies while shredding, shut down the machine and remove the items
in question.
• Keep the machine away from other persons, particularly children and pets.
• Use the machine only in the way described in these operating instructions.
• The electric circuit must be protected at your Distribution Board at least by
a 16A fuse.
• The efficiency of the machine will be greatly reduced if a connecting cable with
too small a cross section is used. A conductor cross section of at least 3x1.5 mm
2
is
required for cables up to 25 m long, and one of at least 3x2.5 mm2 for cables longer
than 25 m.
• If the machine has to be lifted for transporting, be sure to switch off the motor
first and wait for the cutter to come to a standstill. Each time before you leave the
machine, switch off the motor and pull out the power plug. Before you connect
the machine to the power supply, make sure that the loading funnel is properly
connected to the motor housing and the release screw tightened.
• If the garden refuse shredder vibrates excessively, turn off the motor, pull out the
power plug, and find out immediately what is causing the vibrations. Intensive
vibration is usually a sign that something is wrong.
• Do not wear loose clothing or clothing with hanging belts or cords.
• Do not use the machine on a paved area that has been gravelled where discharged
material may cause injuries.
• Ensure that the loading funnel inlet is empty before you start the machine.
• Keep your head and body away from the infeed opening.
• Do not move your hands, other body parts or clothing into the infeed chamber,
ejector chute or near other moving parts.
• Make sure that you are balanced and standing on a firm surface at all times.
Do not stretch forwards.
• Never stand higher than the machine when feeding material into it.
• Keep away from the discharge zone when you start the machine.
56525_34.305.96_11013_ug.indd 7 10/04/2013 10:53
Page 11

8
General Information and Safety Instructions 2
GB IRE
MODEL: GQS 2540AFTER SALES SUPPORT 0151 649 1500 1890 946 244 www.einhell.co.uk
• If foreign bodies get into the cutting tool or the machine generates unusual noises
or vibrates in a strange way, switch off the motor immediately and allow the
machine to come to a standstill.
Pull out the mains plug and carry out the following work:
- Check the machine for signs of damage
- Check that all the parts are secure and tighten them if necessary.
- Have any damaged parts replaced or repaired, but use only spare parts
of the same type and equivalent quality
• If the machine is blocked switch off the motor and pull out the mains before you
start the cleaning procedure. Ensure that the motor is clear of waste and other
accumulations to protect the motor from suffering damage or possibly catching fire.
• Ensure that all the covers and guards are in position and in good working order.
• Do not tip the machine whilst the motor is running.
• Switch off the machine before you fit or remove the collection container.
• The tool must only be used outdoors in a clear open space.
• Damaged or illegible labels must be replaced.
• Allow the tool to cool before carrying out any maintenance work, adjustments, etc.
• Never use the machine while other people or animals are nearby.
• When inserting material take special care to ensure that it does not contain any
metal, stones, bottles, cans or other foreign bodies.
• Do not allow processed material to accumulate within the discharge area;
this could prevent the machine being able to discharge correctly and result
in material recoiling through the infeed opening.
• When servicing the cutting tool, remember that it may still be moving due to the
starting mechanism, even if the motor is not running because of the cover interlock.
• Children must not be permitted to use the machine.
• Wear ear protectors, gloves and safety goggles. Wear these throughout the time
the machine is in operation.
• Before starting the machine, check all screws, nuts, bolts and other fastening
materials to ensure that they are secure and that all covers and guards are in
position. Damaged or illegible labels must be replaced.
• Connect the equipment to the power supply only via an earth-leakage circuit
breaker with max. 30mA tripping current.
56525_34.305.96_11013_ug.indd 8 10/04/2013 10:53
Page 12

9
GB IRE
MODEL: GQS 2540AFTER SALES SUPPORT 0151 649 1500 1890 946 244 www.einhell.co.uk
Assembly and Parts List 3
Layout (see Fig. 1-3)
1 Motor unit
2 Shredded material debris box
3 Base frame
4 Wheels
5 Wheel caps
6 Knob for setting the counter blade
7 Integral power cable with 13A plug fitted
8 Transport handle
9 Reverse running switch
10 ON/OFF switch
11 Legs (including fastening screw)
12 3x screws for fitting the motor unit
13 3x washers for fitting the motor unit
14 2x sets of screws for fitting the wheels
(including wheel sleeves, washers and nuts)
15 2x open-ended spanners (10/13 mm)
16 1x Philips Screwdriver
17 Funnel
Assembling the shredder
Items supplied
• Open the packaging and take out the equipment with care.
• Remove the packaging material and any packaging and/or transportation
braces (if available).
• Check to see if all items are supplied.
• Inspect the equipment and accessories for transport damage.
• If possible, please keep the packaging until the end of the guarantee period.
56525_34.305.96_11013_ug.indd 9 10/04/2013 10:53
Page 13

10
Assembly and Parts List 3
GB IRE
MODEL: GQS 2540AFTER SALES SUPPORT 0151 649 1500 1890 946 244 www.einhell.co.uk
Fig. 1
Fig. 3Fig. 2
56525_34.305.96_11013_ug.indd 10 10/04/2013 10:53
Page 14

11
Assembly and Parts List 3
GB IRE
MODEL: GQS 2540AFTER SALES SUPPORT 0151 649 1500 1890 946 244 www.einhell.co.uk
Fig. 4 Fig. 5
Fig. 7Fig. 6
Before starting the equipment
1 Screw the motor unit (Fig. 4/Item 1) and the base frame (Fig. 4/Item 3) together.
Use the screws (Fig. 3/Item 12) and washers (Fig. 3/Item 13) to do so (See Fig. 5) .
2 Fit the wheels to the base frame. To do so, slide one sleeve each into the hole in
each of the wheels (Fig. 6). Then insert one screw with one washer through each
sleeve (Fig. 7) and screw the wheels to the base frame (Fig. 8). To do so, fit one
washer in front of the tubular rod and one behind it. Press the wheel caps onto
the wheels (Fig. 9).
3 Fit the legs (Fig. 10/Item 11) to the base frame as shown in Fig. 10.
4 Slide the shredded material debris box into the mount with the safety switch
(Fig. 12/Item A) at the front as shown in Fig. 11. Ensure that the shredded material
debris box runs above the guide rails (Fig. 4/Item A).
5 Lock the shredded material debris box with the safety switch (Fig. 12/Item A)
in position by pushing upwards.
56525_34.305.96_11013_ug.indd 11 10/04/2013 10:53
Page 15

12
Assembly and Parts List 3
GB IRE
MODEL: GQS 2540AFTER SALES SUPPORT 0151 649 1500 1890 946 244 www.einhell.co.uk
Fig. 11Fig. 10
Fig. 8 Fig. 9
Fig. 12
56525_34.305.96_11013_ug.indd 12 10/04/2013 10:53
Page 16

13
GB IRE
MODEL: GQS 2540AFTER SALES SUPPORT 0151 649 1500 1890 946 244 www.einhell.co.uk
Features 4
Explanation of the warning signs on the equipment (see Fig. 17)
1 IMPORTANT!
Read the operating instructions and follow the warnings and
safety instructions.
2 IMPORTANT!
Take care when the blades are rotating. Do not put your
hands or feet into openings when the machine is running.
3 IMPORTANT!
Keep other persons and animals away from the danger zone.
4 IMPORTANT!
Protect the machine from the damp and never expose it to rain.
5 IMPORTANT!
Always wear safety goggles, ear muffs, protective gloves and heavy-duty
work clothes!
6 Always set the ON/OFF switch to OFF and pull the power plug out of the
socket-outlet before doing any work on the shredder, e.g. cleaning the
shredder and making adjustments, or if the power cable becomes damaged.
7 Explanation of the safety switch on the debris box
The switch is in the “Lock is closed” position:
The shredded material debris box is locked. The shredder can be switched on.
The switch is in the “Lock is open” position:
The shredded material debris box is not locked and can be removed.
The shredder cannot be switched on.
8 Explanation of the lever for adjusting the counter blade
Turning clockwise reduces the distance between the cutting unit and the
counter blade. Turning counter-clockwise increases the distance between
the cutting unit and the counter blade.
9 Direction Selection switch: For a description of the changeover switch
see point Fig 13 / Item C.
56525_34.305.96_11013_ug.indd 13 10/04/2013 10:53
Page 17

14
Features 4
GB IRE
MODEL: GQS 2540AFTER SALES SUPPORT 0151 649 1500 1890 946 244 www.einhell.co.uk
CAUTION!
The cutters continue to run for a few seconds after the motor is switched off.
Fig. 17
Disconnect mains plug
before working on blade!
56525_34.305.96_11013_ug.indd 14 10/04/2013 10:53
Page 18

15
GB IRE
MODEL: GQS 2540AFTER SALES SUPPORT 0151 649 1500 1890 946 244 www.einhell.co.uk
Instructions 5
Proper use
This electric garden refuse shredder is designed only for shredding organic garden
waste. Place biologically degradable material, e.g. leaves, branches, dead flowers
etc., into the loading funnel inlet.
The machine is to be used only for its prescribed purpose. Any other use is
deemed to be a case of misuse. The user / operator and not the manufacturer
will be liable for any damage or injuries of any kind caused as a result of this.
Please note that our equipment has not been designed for use in commercial,
trade or industrial applications. Our warranty will be voided if the machine is
used in commercial, trade or industrial businesses or for equivalent purposes.
Operation
Please observe the statutory regulations governing noise abatement during
operating times, which may differ from town to town.
Mains connection
Connect the 13A plug on the mains cable to a suitable 13A socket of the
mains electricity supply. Be sure to observe the relevant information in the
safety instructions.
ON/OFF switch (Fig. 13/Item B)
• Press the green button “1” to switch on the shredder.
• Press the red button “0” to switch it off.
NOTE!
The device has a zero voltage switch. This prevents the device restarting
unintentionally after a power failure.
Safety switch (Fig. 12/Item A)
When using the device the shredded material debris box must be securely in
position and the safety switch locked as shown in Fig. 12.
Direction selection switch (Fig.13/Item C)
IMPORTANT!
The switch for selecting the direction of rotation can only be moved when
the shredder is switched off.
56525_34.305.96_11013_ug.indd 15 10/04/2013 10:53
Page 19

16
Instructions 5
Direction Change Switch
Position “ ”
The material is automatically drawn in by the blade and shredded.
Position “ ”
The blade rotates in the opposite direction to release jammed material. After
moving the selector switch to the “ ” position, press and hold the green button of
the ON/OFF switch (B). The blade will start to rotate in the opposite direction. As
soon as you release the ON/OFF switch, the shredder will stop automatically.
IMPORTANT!
Always wait until the shredder has reached a standstill before you switch it
on again.
NOTE!
If the switch for selecting the direction of rotation is in its centre position,
the motor will not start.
CAUTION!
Large items or pieces of wood will be discharged both in the cutting and in the
release direction after the blade has been started and reversed several times.
GB IRE
MODEL: GQS 2540AFTER SALES SUPPORT 0151 649 1500 1890 946 244 www.einhell.co.uk
Fig. 12 Fig. 13
56525_34.305.96_11013_ug.indd 16 10/04/2013 10:53
Page 20

17
Instructions 5
GB IRE
MODEL: GQS 2540AFTER SALES SUPPORT 0151 649 1500 1890 946 244 www.einhell.co.uk
Motor protection (Fig. 13 / Item D)
An overload (for example if the blade is jammed) will cause the machine to cut
out after a few seconds. To protect the motor from damage the motor protection
switch stops the power supply automatically. Wait for at least one minute before
you press the reset button so that you can restart the machine.
Then press the ON/OFF switch.
If the blade becomes jammed, turn the switch for selecting the direction of
rotation to the position “ ” before you switch on the shredder again.
Practical tips
• Be sure to observe the safety instructions within this booklet.
• Wear work gloves, goggles and ear protection.
• Feed in the material you want to shred at the funnel on the side with
the larger opening (Fig. 1/Item 17).
• The material is drawn into the shredder automatically.
CAUTION!
Long pieces of material projecting out of the funnel inlet may whiplash when
it is drawn in – keep a safe distance between yourself and the machine.
• Judge the quantity of material which you put into the funnel inlet so that the
funnel does not clog.
• If you want to shred withered, damp material that has been lying in the garden
for several days, alternate between putting in this material and dry branches.
This will help to prevent the loading funnel becoming clogged with material.
• Do not shred soft waste (e.g. kitchen waste) – put it straight in the compost box.
• Entangled branches and leaves should be separated and shredded before loading
any more material.
• Do not allow the discharge opening to become clogged with shredded material -
risk of jamming.
• Do not cover the ventilation slits.
• Do not place heavy material or thick branches into the machine continuously.
This may cause the blade to jam.
• Use a plunger or hook to remove jammed objects from the funnel or
discharge openings.
IMPORTANT!
The material will be crushed, mashed and shredded by the cutting unit,
thus accelerating the decomposition process for composting.
56525_34.305.96_11013_ug.indd 17 10/04/2013 10:53
Page 21

18
Instructions 5
GB IRE
MODEL: GQS 2540AFTER SALES SUPPORT 0151 649 1500 1890 946 244 www.einhell.co.uk
Emptying the shredded material debris box
The level of material in the shredded material debris box can be checked
by looking through the clear box.
Always empty the shredded material debris box in good time to prevent
it from overfilling. To empty it, proceed as follows:
• Switch off the device at the ON/OFF switch.
• Release the shredded material debris box. To do so, press the safety switch
(Fig. 12/Item A) down.
• Take the shredded material debris box out at the front.
Adjusting the counter blade (Fig. 14)
The counter blade and cutting unit are perfectly adjusted at the factory. Only if it
suffers wear does the counter blade require adjustment (switch the machine on
for this purpose). To ensure the best possible results from your shredder, the gap
between the counter blade (item B) and the shredding blade (item A) should be
approx. 0.50 mm.
There is an adjustment device on the right-hand side of the plastic housing for
this purpose. Turn the knob clockwise so that the screw (item C) moves towards
the shredding blade. After a half-turn the counter blade will have moved 0.50 mm
closer to the shredding blade. After completing this adjustment check whether the
blade produces the desired results.
Fig. 14
56525_34.305.96_11013_ug.indd 18 10/04/2013 10:53
Page 22

19
Instructions 5
GB IRE
MODEL: GQS 2540AFTER SALES SUPPORT 0151 649 1500 1890 946 244 www.einhell.co.uk
IMPORTANT!
If the shredding blade touches the counter blade, it will cut it and small metal
chips may fall out of the discharge opening. This is not a fault, but it must only
be adjusted as much as necessary since otherwise the counter blade will suffer
premature wear. Therefore proceed with caution when making this adjustment.
When the counter blade cannot be adjusted any more, it has reached its wear
limits and must be replaced.
IMPORTANT!
Wear work gloves!
Remove the cover from the cutting unit (Fig. 15/Item A) by removing the 4 Allen
screws (Fig. 15/Item B). The counter blade (Fig. 16/Item B) can now be taken
out. Insert a new counter blade (you must turn the adjustment device counterclockwise until the new counter blade fits in the mount). Fit the cover with the
4 Allen screws. Then adjust the counter blade correctly as described on page 18.
Replacing the power cable
If the power cable for this equipment is damaged, it must be replaced by an
electrician or similarly trained person to avoid danger.
Cleaning, maintenance and ordering of spare parts
Always pull out the mains power plug before starting any cleaning work.
Maintenance and storage
• Clean the machine regularly. This will help to keep the machine in good working
order and is the basis for a long working life.
• Keep the vent slots clean while you work.
• Clean the plastic body and other plastic parts with a mild household cleaning
agent and a damp cloth. Do not use any aggressive agents or solvents for
cleaning purposes.
• Never clean the shredder by spraying with water.
• Prevent water getting inside the machine at all cost.
• Check the chassis securing screws from time to time to ensure that they are tight.
• If you do not intend to use the shredder for a lengthy period, protect it from
corrosion using environmentally friendly oil.
• Store the device in a dry room.
• Store the device out of reach of children.
56525_34.305.96_11013_ug.indd 19 10/04/2013 10:53
Page 23

20
GB IRE
MODEL: GQS 2540AFTER SALES SUPPORT 0151 649 1500 1890 946 244 www.einhell.co.uk
Instructions 5
The equipment must be cleaned and protected at the end of the season
IMPORTANT!
Wear work gloves!
Remove the plug from the mains. Unlock and remove the shredded material debris
box. Loosen the knob (Fig. 15a/Item 6) anticlockwise by 5 turns, to release the
cutter counter blade. Fully loosen the 4 Allen screws (Fig. 15a/Item K). Note: The
Allen screws can only be loosened, and not removed.
Fig. 15bFig. 15a
Fig. 16
56525_34.305.96_11013_ug.indd 20 10/04/2013 10:53
Page 24

21
GB IRE
MODEL: GQS 2540AFTER SALES SUPPORT 0151 649 1500 1890 946 244 www.einhell.co.uk
Fully loosen the retaining screw from underneath the base frame, and (Fig. 15b/
Item L). Remove the cover (Fig. 15a/Item M) from the cutting unit. The counter
blade (Fig. 16/Item F) and the cutting unit (Fig. 16/Item G), can now be removed
and checked. Worn or damaged parts must be replaced. Use only the appropriate
parts from the Manufacturer (see “Ordering replacement parts”).
Clean the cutting compartment, the counter blade and the cutting unit and cover
them with a thin coat of vegetable oil before installing everything again. At the
beginning of the new season the counter blade must be correctly adjusted as
described on page 18.
To assemble, proceed in the reverse order, making sure that the cutting blade is
properly aligned (note the curvature of the blade teeth). Ensure all the screws are
tight, and then re-adjust the counter blade as described on page 18.
Ordering replacement parts
Please quote the following data when ordering replacement parts:
- Type of machine (GQS 2540)
- Article number of the machine (34.305.96)
- Identification number of the machine (11013)
- Replacement part number or description of the part required
For our latest prices and information please go to www.einhell.co.uk
Instructions 5
56525_34.305.96_11013_ug.indd 21 10/04/2013 10:53
Page 25

22
GB IRE
MODEL: GQS 2540AFTER SALES SUPPORT 0151 649 1500 1890 946 244 www.einhell.co.uk
Useful Information 6
Troubleshooting
The motor
does not start
Power failure. Check the mains lead, plug and fuse.
Motor circuit breaker
has been triggered.
Press the Reset button (see page 17).
The safety switch is not
making contact.
Insert the debris box correctly and
push the safety switch upwards until
it engages (Fig. 12).
The switch for selecting
the direction of rotation
is in its centre position.
Set the direction of rotation on
the switch.
Material is not
drawn in by the
shredder
The shredding blade is
running in reverse.
Change the direction of rotation.
Material blockage in
the lling funnel.
Change the direction of rotation and
pull the material out of the funnel.
Feed in thick branches again so that
the blade does not immediately
engage again in the notches it
previously cut.
The shredding blade
is jammed.
Change the direction of rotation.
The blade will now release the
jammed material.
The material is
not shredded
properly
The counter blade is
not set correctly.
Adjust the counter blade.
See page 18 for how to do so.
56525_34.305.96_11013_ug.indd 22 10/04/2013 10:53
Page 26

23
Useful Information 6
GB IRE
MODEL: GQS 2540AFTER SALES SUPPORT 0151 649 1500 1890 946 244 www.einhell.co.uk
Keep the noise emissions and vibrations to a minimum
• Only use appliances which are in perfect working order.
• Service and clean the appliance regularly.
• Adapt your working style to suit the appliance.
• Do not overload the appliance.
• Have the appliance serviced whenever necessary.
• Switch the appliance off when it is not in use.
• Wear protective gloves.
Residual risks
Even if you use this electric power tool in accordance with instructions,
certain residual risks cannot be ruled out. The following hazards may
arise in connection with the equipment’s construction and layout:
1 Damage to hearing if no suitable ear protection is used.
2 Health damage caused by hand-arm vibrations if the equipment is used
over a prolonged period or is not properly guided and maintained.
Technical data
Voltage 230-240 V ~ 50 Hz
Power rating 2500 W (S6-40%)
2000 W (S1)
Cutting unit idling speed 40 min
Branch diameter max. 40 mm
Sound pressure level 83,6 db(A)
K uncertainty 3 dB(A)
Sound power level 91,8 db(A)
Weight 29.2 kg
Protection class l
L
WA
L
pA
-1
56525_34.305.96_11013_ug.indd 23 10/04/2013 10:53
Page 27

24
GB IRE
MODEL: GQS 2540AFTER SALES SUPPORT 0151 649 1500 1890 946 244 www.einhell.co.uk
Useful Information 6
For EU countries only
Never place any electric tools in your household refuse.
To comply with European Directive 2002/96/EC concerning old electric and
electronic equipment and its implementation in national laws, old electric tools
have to be separated from other waste and disposed of in an environmentfriendly fashion, e.g. by taking to a recycling depot.
Recycling alternative to the demand to return electrical devices: As an alternative
to returning the electrical device, the owner is obliged to cooperate in ensuring
that the device is properly recycled if ownership is relinquished. This can also
be done by handing over the used device to a returns centre, which will dispose
of it in accordance with national commercial and industrial waste management
legislation. This does not apply to the accessories and auxiliary equipment which
are included with the used device.
The reprinting or reproduction by any other means, in whole or in part,
of documentation and papers accompanying products is permitted only
with the express consent of Einhell UK Ltd.
Disposal and recycling
The unit is supplied in packaging to prevent it being damaged in transit.
This packaging is raw material and can therefore be reused or can be returned
to the raw material system.
The unit and its accessories are made of various types of material, such as metal
and plastic. Defective components must be disposed of as special waste. Ask your
dealer or your local council.
Given unfavorable conditions in the power supply the equipment may cause
the voltage to drop temporarily. If the supply impedance “Z” at the connection
point to the public power supply exceeds 0.399 Ω it may be necessary to take
further measures before the equipment can be used as intended from this power
supply. If necessary, you can ask your local electricity supply company for the
impedance value.
56525_34.305.96_11013_ug.indd 24 10/04/2013 10:53
Page 28

25
MODEL: GQS 2540
GB
0844 801 8701
IRE
1890 946 244 www.einhell.co.uk
Useful Information 6
GB IRE
MODEL: GQS 2540AFTER SALES SUPPORT 0151 649 1500 1890 946 244 www.einhell.co.uk
56525_34.305.96_11013_ug.indd 25 10/04/2013 10:53
Page 29

FAQ 7
How do I claim for
a warranty matter?
1. Fill in the Warranty card and send to the
Einhell UK Ltd Address.
2. Contact Einhell UK Ltd, using one of the Telephone
numbers for AFTER SALES SUPPORT.
3. Or contact via the Einhell UK Ltd website.
How do I obtain spare
parts (not covered by
the warranty)?
Make sure you have the information from the product
data label, or page 20 of this manual, and then: -
1. Contact Einhell UK Ltd, using one of the Telephone
numbers for AFTER SALES SUPPORT, and choose the
option for Spare Parts.
2. Or contact via the Einhell UK Ltd website, where spares
information & prices are available.
What do I do if I
accidentally cut the
mains cable?
To avoid danger, immediately unplug from the mains supply
and get an electrician or suitably qualied person to: -
1. Fit a waterproof connector to re-join the cable.
2. Or replace the mains cable into the unit.
26
GB IRE
MODEL: GQS 2540AFTER SALES SUPPORT 0151 649 1500 1890 946 244 www.einhell.co.uk
56525_34.305.96_11013_ug.indd 26 10/04/2013 10:53
Page 30

Warranty Card 8
MODEL: GQS 2540AFTER SALES SUPPORT
GB
0151 649 1500
IRE
1890 946 244 www.einhell.co.uk
Garden Shredder
Your details:
Name
Address
Email
Date of purchase*
Location of purchase
*We recommend you keep the receipt with this warranty card
IRL
GB
0151 649 1500
1890 946 244
www.einhell.co.uk
MODEL: GQS 2540
Monday to Thursday 8:45am - 5pm,
Friday 8:45am - 3pm. Calls cost 10p
per minute from a landline, calls from
mobiles may vary.
Return your completed warranty card to:
Einhell UK Ltd
Unit 9, Stadium Court
Wirral International Business Park
Plantation Road
Bromborough
CH62 3QG
www.einhell.co.uk/warranty
AFTER SALES SUPPORT
YEAR WARRANTY
IMPORTANT!
KEEP THIS FORM SAFE: Only complete and return this form to the address below in the unlikely event of a
warranty claim, if you are requested by the manufacturer to return the item for replacement. Then please
complete this form and send it together with your receipt (proof of purchase) to the address below.
Description of malfunction:
27
56525_34.305.96_11013_ug.indd 27 10/04/2013 10:53
Page 31

56525_34.305.96_11013_ug.indd 28 10/04/2013 10:53
 Loading...