


FREELEXO SMART
D Originalbetriebsanleitung
Mähroboter
GB Original operating instructions
Robot lawn mower
F Instructions d’origine
Tondeuse robot
I Istruzioni per l’uso originali
Robot tagliaerba
DK/ Original betjeningsvejledning
N Robotplæneklipper
S Original-bruksanvisning
Robotgräsklippare
CZ Originální návod k obsluze
Robotická sekačka
SK Originálny návod na obsluhu
Robotická kosačka
NL Originele handleiding
Maairobot
FIN Alkuperäiskäyttöohje
Robottiruohonleikkuri
SLO Originalna navodila za uporabo
Robotna kosilnica
H Eredeti használati utasítás
Robotfűnyíró
RO Instrucţiuni de utilizare originale
Robot de tuns gazonul
GR Πρωτότυπες Οδηγίες χρήσης
Χλοοκοπτικο ρομποτ
P Manual de instruções original
Robô corta-relvas
HR/ Originalne upute za uporabu
BIH Robot za košnju
RS Originalna uputstva za upotrebu
Robotska kosačica
PL Instrukcją oryginalną
Kosiarka automatyczna
E Manual de instrucciones original
Robot cortacésped
TR Orijinal Kullanma Talimatı
Çim biçme robotu
EE Originaalkasutusjuhend
Robotniiduk
13
Art.-Nr.: 34.138.10 I.-Nr.: 21022
Anl_FREELEXO_SMART_SPK13.indb 1Anl_FREELEXO_SMART_SPK13.indb 1 10.10.2022 12:42:4510.10.2022 12:42:45

1
2
435
23
1
9
1011 12
624
7
6
8
2
22
16 17
12 “
30 cm
21
20
19
13
25
10 cm
4 “
0
181514
- 2 -
Anl_FREELEXO_SMART_SPK13.indb 2Anl_FREELEXO_SMART_SPK13.indb 2 10.10.2022 12:42:4710.10.2022 12:42:47

3 4
<8m
>0,8m
>30cm
5a 5b
5c
18
>2m
>1m
6a
19
1819
>30cm
13
- 3 -
Anl_FREELEXO_SMART_SPK13.indb 3Anl_FREELEXO_SMART_SPK13.indb 3 10.10.2022 12:42:5210.10.2022 12:42:52

6b
> 30 cm
18
45°
90°
45°
> 20 cm
> 30 cm
6c
35%
b= 100cm
a= 35 cm
6d
max. 35%
6f
6e
>30cm
>40cm
> 30 cm
max. 17%
6g
>30cm
0cm
- 4 -
Anl_FREELEXO_SMART_SPK13.indb 4Anl_FREELEXO_SMART_SPK13.indb 4 10.10.2022 12:43:1010.10.2022 12:43:10

6h
6i
>0,8m
6j
6l
6k
>10cm
>30cm
6m
o
n
- 5 -
Anl_FREELEXO_SMART_SPK13.indb 5Anl_FREELEXO_SMART_SPK13.indb 5 10.10.2022 12:43:1810.10.2022 12:43:18

7a
7b
3m
1m
7c
15
19
9a 9b
50
8
60
61
62
7
7
7
64
65
66
63
5451 56 53
Anl_FREELEXO_SMART_SPK13.indb 6Anl_FREELEXO_SMART_SPK13.indb 6 10.10.2022 12:43:3210.10.2022 12:43:32
55 52
- 6 -
67

10
A
9
11
24
USB
12
11
10
13b
13a
B
A
- 7 -
Anl_FREELEXO_SMART_SPK13.indb 7Anl_FREELEXO_SMART_SPK13.indb 7 10.10.2022 12:43:4410.10.2022 12:43:44

14
ABC D E
T2A
GHFI
- 8 -
Anl_FREELEXO_SMART_SPK13.indb 8Anl_FREELEXO_SMART_SPK13.indb 8 10.10.2022 12:43:5910.10.2022 12:43:59

Inhaltsverzeichnis
1. Sicherheitshinweise
2. Gerätebeschreibung und Lieferumfang
3. Bestimmungsgemäße Verwendung
4. Technische Daten
5. Inbetriebnahme
6. Bedienung
7. Reinigung, Wartung und Ersatzteilbestellung
8. Lagerung
9. Transport
10. Entsorgung und Wiederverwertung
11. Anzeige der Ladestation und Fehlerbehebung
12. Anzeige des Mähroboters und Fehlerbehebung
13. Anzeige Ladegerät
D
Gefahr! - Zur Verringerung des Verletzungsrisikos Bedienungsanleitung lesen.
Dieses Gerät darf nicht von Kindern benutzt werden. Dieses Gerät kann von Personen mit verringerten
physischen, sensorischen oder mentalen Fähigkeiten oder Mangel an Erfahrung und Wissen benutzt
werden, wenn sie beaufsichtigt oder bezüglich des sicheren Gebrauchs des Gerätes unterwiesen
wurden und die daraus resultierenden Gefahren verstehen. Kinder dürfen nicht mit dem Gerät spielen.
Reinigung und Benutzer-Wartung dürfen nicht von Kindern durchgeführt werden.
- 9 -
Anl_FREELEXO_SMART_SPK13.indb 9Anl_FREELEXO_SMART_SPK13.indb 9 10.10.2022 12:44:0010.10.2022 12:44:00

D
Gefahr!
Beim Benutzen von Geräten müssen einige Sicherheitsvorkehrungen eingehalten werden, um
Verletzungen und Schäden zu verhindern. Lesen
Sie diese Bedienungsanleitung / Sicherheitshinweise deshalb sorgfältig durch. Bewahren Sie diese gut auf, damit Ihnen die Informationen jederzeit
zur Verfügung stehen. Falls Sie das Gerät an andere Personen übergeben sollten, händigen Sie
diese Bedienungsanleitung / Sicherheitshinweise
bitte mit aus. Wir übernehmen keine Haftung für
Unfälle oder Schäden, die durch Nichtbeachten
dieser Anleitung und den Sicherheitshinweisen
entstehen.
1. Sicherheitshinweise
Die entsprechenden Sicherheitshinweise fi nden
Sie im beiliegenden Heftchen!
Warnung!
Lesen Sie alle Sicherheitshinweise, Anweisungen, Bebilderungen und technischen
Daten, mit denen dieses Elektrowerkzeug
versehen ist. Versäumnisse bei der Einhaltung
der nachfolgenden Anweisungen können elektrischen Schlag, Brand und/oder schwere Verletzungen verursachen.
Bewahren Sie alle Sicherheitshinweise und
Anweisungen für die Zukunft auf.
Erklärung der verwendeten Symbole
(siehe Bild 14)
A. WARNUNG - Vor Betrieb der Maschine die
Bedienungsanleitung durchlesen!
B. WARNUNG - Beim Betrieb der Maschine ent-
sprechenden Sicherheitsabstand einhalten!
C. WARNUNG - Vor der Durchführung von
Arbeiten an der Maschine oder vor dem
Anheben der Maschine Sperrvorrichtung betätigen! ACHTUNG - Rotierende Messer nicht
berühren!
D. WARNUNG - Nicht auf der Maschine mitfah-
ren! ACHTUNG - Rotierende Messer nicht
berühren!
E. Schutzklasse II (Doppelisolierung).
F. Lagerung der Akkus nur in trockenen Räu-
men mit einer Umgebungstemperatur von
+10°C - +40°C. Akkus nur in geladenem Zu-
stand lagern (mind. 40% geladen).
G. Schutzklasse III
H. Träge Sicherung 2 A
I. Nur für den Gebrauch in trockenen Räumen.
J. WARNUNG: Zum Laden der Batterie nur das
abnehmbare Netzteil NT24/1 / PS24/1 benutzen, das mit diesem Gerät geliefert wurde.
Achtung!
Ziehen Sie während eines Gewitters den Netzstecker und trennen Sie den Begrenzungsdraht von
der Ladestation.
2. Gerätebeschreibung und
Lieferumfang
2.1 Gerätebeschreibung (Bild 1/2)
1. Mähroboter
2. Bedienfeld
3. STOP-Taste/Entriegelungstaste der
Displayabdeckung
4. Schnitthöhenverstellung
5. Regensensor
6. Tragegriff
7. Hauptschalter
8. Hinterrad
9. Akkufachdeckel
10. Klingen
11. Messerscheibe
12. Vorderrad
13. Netzteil(-kabel)
14. Befestigungshaken
15. Befestigungsschraube
16. Kabelverbinder
17. Ersatzklingen
18. Begrenzungsdraht
19. Ladestation
20. Ladestift
21. LED-Anzeige
22. Sechskantschlüssel
23. Displayabdeckung
24. USB-Anschluss
25. Lineal (zum Heraustrennen)
2.2 Lieferumfang und Auspacken
Bitte überprüfen Sie die Vollständigkeit des Artikels anhand des beschriebenen Lieferumfangs.
Bei Fehlteilen wenden Sie sich bitte spätestens
innerhalb von 5 Arbeitstagen nach Kauf des Artikels unter Vorlage eines gültigen Kaufbeleges an
unser Service Center oder an die Verkaufsstelle,
bei der Sie das Gerät erworben haben. Bitte
beachten Sie hierzu die Gewährleistungstabelle
in den Service-Informationen am Ende der Anleitung.
Öffnen Sie die Verpackung und nehmen Sie
•
das Gerät vorsichtig aus der Verpackung.
Entfernen Sie das Verpackungsmaterial so-
•
- 10 -
Anl_FREELEXO_SMART_SPK13.indb 10Anl_FREELEXO_SMART_SPK13.indb 10 10.10.2022 12:44:0010.10.2022 12:44:00

D
wie Verpackungs-/ und Transportsicherungen
(falls vorhanden).
Überprüfen Sie, ob der Lieferumfang vollstän-
•
dig ist.
Kontrollieren Sie das Gerät und die Zubehör-
•
teile auf Transportschäden.
Bewahren Sie die Verpackung nach Möglich-
•
keit bis zum Ablauf der Garantiezeit auf.
Gefahr!
Gerät und Verpackungsmaterial sind kein
Kinderspielzeug! Kinder dürfen nicht mit
Kunststoff beuteln, Folien und Kleinteilen
spielen! Es besteht Verschluckungs- und Erstickungsgefahr!
Lieferumfang, Montagematerial und Zubehör
(teilweise nicht im Lieferumfang enthalten):
Den Lieferumfang entnehmen Sie bitte dem beigelegten Informationsblatt zum Lieferumfang.
Mähroboter
•
Netzteil(-kabel)
•
Ladestation
•
Befestigungsschrauben (4 Stück)
•
Ersatzklingen
•
Befestigungshaken
•
Begrenzungsdraht
•
Kabelverbinder
•
Sechskantschlüssel
•
Akku
•
Ladegerät
•
Lineal (zum Heraustrennen)
•
Originalbetriebsanleitung
•
Sicherheitshinweise
•
mäß. Für daraus hervorgerufene Schäden oder
Verletzungen aller Art haftet der Benutzer/Bediener und nicht der Hersteller.
Bitte beachten Sie, dass unsere Geräte bestimmungsgemäß nicht für den gewerblichen, handwerklichen oder industriellen Einsatz konstruiert
wurden. Wir übernehmen keine Gewährleistung,
wenn das Gerät in Gewerbe-, Handwerks- oder
Industriebetrieben sowie bei gleichzusetzenden
Tätigkeiten eingesetzt wird.
4. Technische Daten
Spannung ..................................................... 18 V
Motordrehzahl ......................................3500 min
Schutzart ......................................................IPX4
Schutzklasse .....................................................III
Gewicht ......................................................8,4 kg
Schnittbreite ...............................................18 cm
Anzahl der Klingen ............................................. 3
Max. Steigung .............................................. 35 %
Schallleistungspegel LWA ....................... 57 dB (A)
Unsicherheit K ..................................... 2,3 dB (A)
Schnitthöhenverstellung ...... 20-60 mm; stufenlos
Zulässige Länge des
Begrenzungsdrahtes .......................... max. 250 m
Begrenzungsdrahtkabelantenne
Betriebsfrequenzband: .................... 0-148,5 KHz
Maximale Sendeleistung: ..............67,05 dBuA/m
-1
Benötigte Hilfsmittel
(nicht im Lieferumfang enthalten)
Hammer
•
Zange
•
Abisolierzange
•
Wasserwaage (optional)
•
3. Bestimmungsgemäße
Verwendung
Der Mähroboter ist für die private Benutzung
im Haus- und Hobbygarten geeignet und ausschließlich für das Mähen von Rasenfl ächen
bestimmt.
Die Maschine darf nur nach ihrer Bestimmung
verwendet werden. Jede weitere darüber hinausgehende Verwendung ist nicht bestimmungsge-
Anl_FREELEXO_SMART_SPK13.indb 11Anl_FREELEXO_SMART_SPK13.indb 11 10.10.2022 12:44:0110.10.2022 12:44:01
GSM-Verbindung:
Betriebsfrequenzband: ..... E-GSM900 / DCS1800
Maximale Sendeleistung: ........................33 dBm
LTE (CAT-M bzw. NB-IoT)-Verbindung
Betriebsfrequenzband: ...... Band 1 / 3 / 8 / 20 / 28
Maximale Sendeleistung: .........................21dBm
Netzteil
Eingangsspannung: ........ 100- 240 V ~ 50 /60 Hz
Ausgangsspannung: ............................. 24 V d. c.
Ausgangsstrom: .......................................... 1,5 A
Schutzklasse: ................................................II /
Die Geräuschwerte wurden entsprechend den
Normen EN ISO 3744:1995 und ISO 11094: 1991
ermittelt.
- 11 -
쓑

D
Warnung!
Dieses Gerät erzeugt während des Betriebs
ein elektromagnetisches Feld. Dieses Feld
kann unter bestimmten Umständen aktive
oder passive medizinische Implantate beeinträchtigen. Um die Gefahr von ernsthaften
oder tödlichen Verletzungen zu verringern,
empfehlen wir Personen mit medizinischen
Implantaten ihren Arzt und den Hersteller
vom medizinischen Implantat zu konsultieren, bevor das Gerät bedient wird.
5. Inbetriebnahme
Lesen Sie die gesamte Betriebsanleitung, bevor Sie mit der Installation des Mähroboters
beginnen. Die Qualität der Installation wirkt
sich darauf aus, wie gut später der Mähroboter arbeitet.
5.1 Funktionsprinzip
Der Mähroboter wählt seine Richtung zufällig.
Der Garten wird dabei komplett gemäht, indem
der Mähroboter alle Bereiche innerhalb der vom
Begrenzungsdraht (18) eingeschlossenen Fläche
bearbeitet. Sobald der Mähroboter einen korrekt
installierten Begrenzungsdraht (18) erkennt, dreht
der Mähroboter um und fährt in eine andere Richtung innerhalb des Bereichs. Alle Bereiche, die
Sie innerhalb der Fläche schützen möchten – z. B.
Gartenteiche, Bäume, Möbel oder Blumenbeete
– müssen auch mit dem Begrenzungsdraht (18)
abgegrenzt werden. Der Begrenzungsdraht (18)
muss einen abgeschlossenen Kreis bilden. Falls
der Mähroboter innerhalb des Mähbereichs auf
ein Hindernis triff t, fährt er rückwärts und mäht in
eine andere Richtung weiter (Bild 3).
5.2 Sensoren
Der Mähroboter ist mit mehreren Sicherheitssensoren ausgestattet.
Hebesensor:
•
Falls der Mähroboter von hinten um mehr als
30° vom Boden angehoben wird, oder ein
Vorderrad (12) den Bodenkontakt verliert,
werden der Mähroboter und die Rotation der
Klingen (10) sofort gestoppt.
Neigungssensor:
•
Falls der Mähroboter sich stark in eine Richtung neigt, werden der Mähroboter und die
Rotation der Klingen (10) sofort gestoppt.
Hindernissensor:
•
Der Mähroboter erkennt Hindernisse auf sei-
nem Weg. Wenn der Mähroboter mit einem
Hindernis kollidiert, werden der Mähroboter
und die Rotation der Klingen (10) sofort
gestoppt und er fährt rückwärts weg vom
Hindernis.
Regensensor:
•
Der Mähroboter ist mit einem Regensensor
(5) ausgestattet, um zu verhindern, dass der
Mähroboter im Regen arbeitet. Der Mähroboter kehrt zur Ladestation (19) zurück, wenn
Regen erkannt wird, und wird dort komplett
aufgeladen. Nachdem der Regensensor (5)
wieder getrocknet ist, bleibt der Mähroboter
zwei weitere Stunden in der Ladestation (19).
Erst dann nimmt er die Arbeit wieder auf, sofern er sich noch in einem aktiven Zeitfenster
befindet. Ist der Regensensor (5) aktiviert,
(empfohlen, um den Rasen zu schonen) so
ist im Display (50) eine helle Wolke zu sehen.
Hat der Sensor ausgelöst, erscheint eine
dunkle Wolke mit Regentropfen. Schließen
Sie die beiden Metallsensoren nicht mit Metall oder einem anderen leitfähigen Material
kurz. Dies beeinträchtigt die korrekte Funktion
des Mähroboters.
5.3 Vorbereitung
Fertigen Sie zuerst eine Skizze Ihres Rasens an.
Zeichnen Sie auch Hindernisse mit ein und erstellen Sie einen Plan, wie Sie diese schützen möchten. Dadurch wird es einfacher, eine gute Position
für die Ladestation (19) zu fi nden und den Be-
grenzungsdraht (18) um Büsche, Blumenbeete,
etc. zu verlegen (Bild 4). Bei einer Rasenhöhe
über 60 mm muss der Rasen gekürzt werden, um
den Mähroboter nicht übermäßig zu belasten und
die Betriebseffi zienz zu beeinträchtigen. Verwen-
den Sie dazu einen konventionellen Rasenmäher
oder einen Trimmer.
Räumen Sie alle losen Gegenstände vom Rasen,
welche durch den Mähroboter beschädigt werden können oder den Mähroboter beschädigen
können.
Halten Sie folgende Werkzeuge bereit: Hammer,
Zange, Abisolierzange und Wasserwaage (optional).
Montage des Akkus
Für den Betrieb des Mähroboters wird ein Akku
(A) der Power-X-Change-Serie benötigt. Ach-
tung: Der Akku (A) kann je nach Modellvariante
nicht im Lieferumfang Ihres Mähroboters enthalten sein.
Öff nen Sie den Akkufachdeckel (9). Drücken Sie
die Rasttaste des Akkus (A) und schieben Sie
- 12 -
Anl_FREELEXO_SMART_SPK13.indb 12Anl_FREELEXO_SMART_SPK13.indb 12 10.10.2022 12:44:0210.10.2022 12:44:02

D
den Akku (A) in die dafür vorgesehene Akkuaufnahme. Schließen Sie den Akkufachdeckel (9)
und achten Sie auf korrektes Einrasten (Bild 10).
Zum Entfernen des Akkus (A) öff nen Sie den Ak-
kufachdeckel (9). Drücken Sie die Rasttaste des
Akkus (A) und ziehen Sie den Akku (A) heraus.
5.4 Ladestation
5.4.1 Standort der Ladestation
Ermitteln Sie zunächst den besten Standort für
die Ladestation (19). Es wird eine Außensteckdose benötigt, welche permanent Strom liefert,
damit der Mähroboter immer funktioniert. Die Ladestation (19) muss auf einer ebenen Oberfl äche
auf Höhe der Grasnarbe platziert werden. Achten
Sie darauf, dass der Bereich fl ach und trocken
ist. Wählen Sie einen Platz im Schatten aus, da
der Akku am besten in einer kühlen Umgebung
geladen wird. Achten Sie zusätzlich darauf, dass
der Begrenzungsdraht mindestens 2 m vor der
Ladestation (19) und 1m hinter der Ladestation
gerade verlegt wird (Bild 5a). Kurven direkt vor
der Ladestation (19) können zu Schwierigkeiten
beim Andocken zum Ladevorgang führen.
5.4.2 Lokalisierung der Ladestation
Wenn der Akku fast leer ist, kehrt der Mähroboter
zur Ladestation (19) zurück, indem er dem Begrenzungsdraht (18) gegen den Uhrzeigersinn
bis zur Ladestation (19) folgt. Achten Sie deshalb
darauf, die Ladestation (19) korrekt ausgerichtet
zu platzieren (Bild 5b).
5.4.3 Anschluss der Ladestation an das Netz-
teil
1. Bevor Sie die Ladestation (19) mit der Strom-
versorgung verbinden, stellen Sie sicher,
dass die Netzspannung 100-240 V bei 50/60
Hz beträgt.
2. Verbinden Sie das Netzteil (13) direkt mit
einer Steckdose. Nutzen Sie das Kabel für
keine andere Anwendung.
3. Verwenden Sie kein beschädigtes Netzteil
(13). Wenden Sie sich bei Schäden an Kabeln oder am Netzteil (13) sofort zum Austausch an einen autorisierten Fachmann.
4. Laden Sie den Mähroboter nicht in feuchter
Umgebung auf. Laden Sie den Mähroboter
nicht bei Temperaturen über 40 °C oder unter
5 °C auf.
5. Halten Sie den Mähroboter und das Netzteil
(13) fern von Wasser, Wärmequellen und
Chemikalien. Halten Sie das Kabel des Netzteils (13) fern von scharfen Kanten, um Schäden zu vermeiden.
6. Verbinden Sie das Netzteil (13) mit der Ladestation (19) (Bild 5c).
Um den Akku des Mähroboters bereits während
der Installation zu laden, schalten Sie den Mähroboter zunächst über den Hauptschalter (7) ein
und stellen Sie den Mähroboter in die Ladestation
(19).
5.4.4 Informationen zum Ladevorgang
Der Mähroboter kehrt in einer der folgenden Situationen zur Ladestation (19) zurück:
Sie senden den Mähroboter manuell zurück.
•
Der Akkuladezustand sinkt auf unter 30 %.
•
Die tägliche Arbeitszeit ist zu Ende.
•
Der Regensensor hat ausgelöst.
•
Der Mähroboter ist überhitzt.
•
Der Modus „Kantenmähen“ bzw. „Spotmo-
•
wing“ wurde außerhalb des eingestellten Arbeitsfensters gestartet und vom Mähroboter
abgeschlossen.
Dabei fährt der Mähroboter entlang des Begrenzungsdrahtes (18) selbstständig bis zur Ladestation (19).
Wenn der Mähroboter zurück zur Ladestation
(19) fährt, sucht er sich den Begrenzungsdraht
(18) und fährt im Gegenuhrzeigersinn am Begrenzungsdraht (18) entlang.
Während des Ladevorgangs des Akkus leuchtet
die LED-Anzeige (21) an der Ladestation (19) rot.
Leuchtet die LED-Anzeige (21) an der Ladestation (19) grün, zeigt dies an, dass der Akku
vollständig geladen ist. Nach dem vollständigen
Aufl aden nimmt der Mähroboter die Arbeit wieder
auf, oder bleibt bis zum nächsten Arbeitszeitfenster in der Ladestation (19).
Sollte sich beim Zurückfahren zur Ladestation
(19) ein Hindernis auf dem Begrenzungsdraht
(18) befi nden, bleibt der Mähroboter nach meh-
reren Versuchen vor dem Hindernis stehen und
kann nicht zurück zur Ladestation (19) gelangen.
Entfernen Sie alle Hindernisse auf dem Begrenzungsdraht (18).
Falls die Temperatur des Akkus 45 °C überschreitet, wird der Ladevorgang abgebrochen, um
Schäden am Akku zu vermeiden. Nachdem die
Temperatur wieder gesunken ist, wird der Ladevorgang automatisch fortgesetzt.
Falls die Temperatur der Steuerung des Mähroboters 65 °C überschreitet, kehrt der Mähroboter in
die Ladestation (19) zurück. Nachdem die Temperatur wieder gesunken ist, wird die Arbeit entsprechend der Einstellungen wiederaufgenommen.
Falls der Akku leer wird, bevor der Mähroboter zur
- 13 -
Anl_FREELEXO_SMART_SPK13.indb 13Anl_FREELEXO_SMART_SPK13.indb 13 10.10.2022 12:44:0210.10.2022 12:44:02

D
Ladestation (19) zurückkehrt, kann der Mähroboter nicht mehr gestartet werden. Bringen Sie den
Mähroboter zurück zur Ladestation (19) und lassen Sie den Hauptschalter (7) eingeschaltet. Der
Mähroboter wird automatisch aufgeladen.
5.5 Begrenzungsdraht
ACHTUNG! Durchtrennte Begrenzungsdrähte
und Folgeschäden unterliegen nicht der Garantie!
5.5.1 Verlegung des Begrenzungsdrahtes
Der Begrenzungsdraht (18) kann sowohl auf dem
Boden als auch im Boden verlegt werden. Bei
hartem oder trockenem Boden können die Befestigungshaken (14) beim Einschlagen brechen.
Bewässern Sie den Rasen vor der Installation
des Begrenzungsdrahtes, wenn der Boden sehr
trocken ist.
Installation auf dem Boden
•
Legen Sie den Begrenzungsdraht (18) fest
auf den Boden und befestigen Sie ihn mit den
beiliegenden Befestigungshaken (14), wenn
Sie den Rasen später nicht vertikutieren
oder lüften möchten. Die Position des Begrenzungsdrahtes können Sie in den ersten
Wochen der Nutzung des Mähroboters noch
anpassen. Nach einiger Zeit wird der Begrenzungsdraht jedoch vom Gras überwachsen
sein und nicht mehr zu sehen sein. Installieren Sie den Begrenzungsdraht mit einem
maximalen Abstand von 1 m zwischen den
Befestigungshaken (14). Verringern Sie den
Abstand zwischen den Befestigungshaken
an unebenen Stellen des Rasens. Vermeiden
Sie Situationen bei denen der Draht nicht am
Boden aufliegt. Stellen Sie sicher, dass der
Begrenzungsdraht durch den Mähroboter
nicht durchtrennt werden kann.
Installation im Boden
•
Graben Sie den Begrenzungsdraht bis zu 5
cm tief ein. Dadurch wird das Beschädigen
des Begrenzungsdrahtes (18) beispielsweise
beim Vertikutieren oder Lüften verhindert.
schen den Begrenzungsdrähten) und eine Länge
von max. 8 m hat (Bild 3).
5.5.3 Abstand zur Gartengrenze
Wenn sich der Mähroboter einem Begrenzungsdraht (18) nähert, wird dieser durch die Sensoren vorne im Mähroboter erkannt. Bevor der
Mähroboter allerdings umdreht, überfährt er den
Begrenzungsdraht (18) um bis zu 30 cm. Berücksichtigen Sie dies bei der Planung des Mähbereichs (Bild 6a).
5.5.4 Verlegen des Drahtes an Ecken
Vermeiden Sie, dass Sie den Begrenzungsdraht
(18) an den Ecken in einem rechten Winkel (90°)
verlegen. Um sicherzustellen, dass der Mähroboter nicht zu weit über den Begrenzungsdraht
(18) hinausfährt, verlegen Sie stattdessen den
Begrenzungsdraht (18) wie abgebildet in Bild 6b.
5.5.5 Berechnung der Steigung des Rasens
Der Mähroboter kann Steigungen von bis zu
35% überwinden. Vermeiden Sie deshalb steilere Steigungen. Die Steigung lässt sich mit der
überwundenen Höhe über die Distanz bestimmen
(Bild 6c).
Beispiel: a/b = 35 cm/100 cm = 35 %
5.5.6 Installation des Begrenzungsdrahts an
Steigungen
An Steigungen kann der Mähroboter besonders
durch nasses Gras ins Rutschen kommen und
dadurch den Begrenzungsdraht (18) überfahren.
Daher wird empfohlen auf folgenden Punkte zu
achten (Bild 6d):
Am oberen Teil eines Hangs sollte der Be-
•
grenzungsdraht (18) nicht an Steigungen
über 35 % installiert werden. Halten Sie hier
den Abstand von 30 cm zu Hindernissen und
Rasenkanten ein.
Am unteren Teil eines Hangs sollte der Be-
•
grenzungsdraht (18) nicht an Steigungen
über 17 % installiert werden. Halten Sie hier
den Abstand von 40 cm zu Hindernissen und
Rasenkanten ein.
Hinweis!
Reservieren Sie 1m Draht am hinteren Ende der
Ladestation, um spätere Korrekturen durchführen
zu können.
5.5.2 Engstellen
Falls die Rasenfl äche eine Engstelle enthält, kann
Ihr Mähroboter darin arbeiten, solange der Korridor eine Breite von mindestens 1,4 m (80 cm zwi-
Anl_FREELEXO_SMART_SPK13.indb 14Anl_FREELEXO_SMART_SPK13.indb 14 10.10.2022 12:44:0310.10.2022 12:44:03
5.5.7 Fahrwege und gepfl asterte Gehwege
Trennen Sie erhöhte Gehwege, Flächen mit
•
Schotter oder Rindenmulch, tieferliegende
Beete oder ähnliche Gebiete ab. Verlegen Sie
den Begrenzungsdraht (18) in einem Abstand
von mindestens 30 cm (Bild 6e und 6g).
Mit der Grasnarbe bündig verlaufende Geh-
•
wege müssen nicht abgetrennt werden, da
diese vom Mähroboter einfach überfahren
- 14 -

D
werden können. Der Begrenzungsdraht (18)
darf auch über Gehwege verlegt werden (Bild
6f und 6g).
5.5.8 Begrenzungsinseln
Schützen Sie Hindernisse im Mähbereich durch
das Anlegen von Begrenzungsinseln. Dadurch
kann eine Kollision mit empfi ndlichen Objekten,
Gartenteichen, Bäumen, Möbel, Blumenbeeten
etc. verhindert werden (Bild 6h und 6i).
Rollen Sie den Begrenzungsdraht (18) von
•
den Rändern zu den zu schützenden Objekten hin aus.
Fixieren Sie den Begrenzungsdraht (18) mit
•
Befestigungshaken (14) im Uhrzeigersinn um
das zu schützende Objekt.
Umzäunen Sie die Begrenzungsinseln kom-
•
plett und führen Sie den Begrenzungsdraht
(18) zu dem Punkt zurück, an dem Sie den
Rand des Rasens verlassen haben.
Der Abstand zwischen Begrenzungsinseln
•
sollte mindestens 0,8 m betragen. Verbinden
Sie andernfalls die Objekte zu einer gemeinsamen Begrenzungsinsel (Bild 6h).
Der Begrenzungsdraht (18), hin zur und weg
•
von der Begrenzungsinsel sollte parallel und
sehr nah beieinander verlegt werden. - Ach-
tung! Begrenzungsdrähte (18) dürfen
sich nicht kreuzen! - Fixieren Sie dazu die
parallelen Begrenzungsdrähte (18) gemeinsam mit denselben Befestigungshaken (14)
auf dem Boden (Bild 6i).
Der Mähroboter wird im Mähbereich die
•
beiden parallelen Begrenzungsdrähte (18)
überfahren, jedoch an einfach ausgelegten
Begrenzungsdrähten (18) wird der Mähroboter stoppen.
5.5.9 Hindernisse
Hindernisse mit einer Höhe über 10 cm
•
(Bild 6j)
Feste Hindernisse mit einer Höhe über 10
cm, z. B. Bäume, Wände, Zäune, Gartenmöbel etc., werden von den Kollisionssensoren erkannt. Kollidiert der Mähroboter mit
einem Hindernis, stoppt dieser, schaltet das
Mähwerk ab, fährt rückwärts und dreht, um
den Mähvorgang in eine andere Richtung
fortzusetzen. Weiche, instabile und wertvolle
Hindernisse müssen durch eine Begrenzungsdrahtinsel geschützt werden.
Steine und niedrige Hindernisse
•
Steine, Felsen und niedrige Hindernisse unter 10 cm im Mähbereich müssen geschützt
werden, da sie durch den Mähroboter sonst
überfahren werden können. Andernfalls kann
es zu Beschädigung und Blockierung des
Mähroboters kommen.
Bäume (Bild 6k)
•
Bäume werden durch den Mähroboter wie
Hindernisse behandelt. Sollten allerdings
Baumwurzeln mit einer Höhe von weniger als
10 cm aus dem Boden hervorstehen, sollte
dieser Bereich geschützt werden. Dies verhindert, dass Schäden an den Wurzeln sowie
am Mähroboter auftreten. Halten Sie zwischen dem Begrenzungsdraht (18) und dem
Hindernis einen Abstand von mindestens 30
cm ein.
5.5.10 Haupt- und Nebenfl äche (Bild 6l)
Als Nebenfl äche (B) wird ein Arbeitsbereich
bezeichnet, der nicht direkt mit der Hauptfl äche
(A), z.B. über eine Rasenfl äche oder einen Weg,
verbunden ist. Um eine separate Nebenfl äche (B)
zu erstellen, verlegen Sie den Begrenzungsdraht
(18) von der Hauptfl äche (A) zur Nebenfl äche (B)
und wieder zurück. Der Begrenzungsdraht (18)
zur und von der Nebenfl äche (B) sollte parallel
und sehr nah beieinander verlegt werden. - Ach-
tung! Begrenzungsdrähte (18) dürfen sich
nicht kreuzen! - Fixieren Sie dazu die parallelen
Begrenzungsdrähte (18) gemeinsam mit denselben Befestigungshaken (14) auf dem Boden.
Um die Nebenfl äche (B) mähen zu können, müs-
sen Sie den Mähroboter manuell in die Nebenfl ä-
che (B) tragen. Starten Sie dort das gewünschte
Mähprogramm und wählen Sie im Untermenü
„Nebenfl äche“ aus (siehe „Einstellungen des
Mähroboters“). Der Mähroboter wird in der Nebenfl äche (B) nicht versuchen den Begrenzungs-
draht (18) in Richtung der Ladestation (19) zu
folgen, wenn der Akkuladezustand niedrig ist.
5.6 Verbinden der Ladestation
Schließen Sie die Verlegung des kompletten Begrenzungsdrahtes (18) ab, bevor Sie diesen mit
der Ladestation verbinden. Reservieren Sie an
beiden Enden zusätzlich 1 m Begrenzungsdraht
(18), um spätere Anpassungen durchführen zu
können.
Isolieren Sie den Begrenzungsdraht (18) an den
Enden zum Anschluss an die Ladestation (19) auf
einer Länge von 10 bis 15 mm mit einer Abisolierzange ab.
Ziehen Sie den Netzstecker, bevor Sie den
Begrenzungsdraht (18) an der Ladestation (19)
anschließen. Der zur Vorderseite der Ladestation (19) verlegte Begrenzungsdraht (18) muss
über die Kabelhalterungen an der Unterseite der
- 15 -
Anl_FREELEXO_SMART_SPK13.indb 15Anl_FREELEXO_SMART_SPK13.indb 15 10.10.2022 12:44:0310.10.2022 12:44:03

D
Ladestation (19) nach hinten verlegt werden.
Verbinden Sie diesen Begrenzungsdraht (18) mit
dem linken, schwarzen Anschluss. Anschließend
führen Sie den hinteren Begrenzungsdraht (18)
durch das Loch (Zugentlastung) im Anschlussbereich und verbinden diesen mit dem rechten,
roten Anschluss (Bild 7a).
Achtung! Begrenzungsdrähte (18) dürfen
sich nicht kreuzen!
Stellen Sie anschließend die Verbindung mit der
Stromversorgung her. Die LED-Anzeige (21) an
der Ladestation (19) sollte nach der korrekten
Installation konstant grün leuchten. Wenn die
LED nicht leuchtet, prüfen Sie zunächst die Anschlüsse. Falls die LED zwar leuchtet, aber nicht
konstant grün, lesen Sie die Tabelle „Anzeige Ladestation und Fehlerbehebung“ am Ende dieser
Betriebsanleitung.
5.7 Einschalten und Prüfen der Installation
Sobald die LED-Anzeige (21) an der Ladestation
(19) grün leuchtet, ist der Mähbereich für den
Mähroboter bereit. Bitte stellen Sie zuerst sicher,
dass die Befestigungshaken (14) am Begrenzungsdraht (18) komplett eingeschlagen sind.
Stellen Sie den Mähroboter ca. 3m hinter der
Ladestation (19) vor den Begrenzungsdraht (18).
Dabei sollte der Mähroboter in einem 90° Winkel
dem Begrenzungsdraht (18) zugewandt stehen
(Bild 7b). Schalten Sie den Hauptschalter (7) ein
(ON) (Bild 8).
Entsperren Sie den Mähroboter mit Hilfe der PIN
(siehe Kapitel „Sperrvorrichtung / PIN“). Drücken
Sie die Taste „MODE“ (52). Wählen Sie anschließend mit den Navigationstasten (55) den Punkt
„zur Ladestation“ und bestätigen Sie mit der Taste
„OK“ (56).
Drücken Sie die Taste „START“ (53) und schließen Sie anschließend die Displayabdeckung.
Jetzt folgt der Mähroboter dem Begrenzungsdraht (18) gegen den Uhrzeigersinn. Beobachten
Sie den Mähroboter während der kompletten
Fahrt entlang des Begrenzungsdrahtes (18), bis
dieser wieder in der Ladestation (19) steht. Sollte
der Mähroboter an manchen Stellen Probleme
haben, korrigieren Sie gegebenenfalls den Begrenzungsdraht (18) und wiederholen Sie den
Vorgang. Der Akku des Mähroboters wird nun
vollständig geladen. Falls Probleme beim Andocken bestehen, kann es sein, dass Sie die Ladestation (19) seitlich neu positionieren müssen, bis
das Andocken ohne Probleme funktioniert.
Mit der roten STOP-Taste (3) können Sie den
Mähroboter jederzeit anhalten. Nach dem Betätigen der STOP-Taste (3) wird der Mähroboter
gestoppt und wartet auf weitere Anweisungen.
5.8 Befestigung der Ladestation
Nachdem die ordnungsgemäße Funktion des
Mähroboters gewährleistet ist und eine passende
Position für die Ladestation (19) gefunden wurde,
muss die Ladestation (19) mit den Befestigungsschrauben (15) fi xiert werden. Schrauben Sie die
Befestigungsschrauben (15) mit dem Sechskantschlüssel (22) komplett in den Boden (Bild 7c).
5.9 Akku-Kapazitätsanzeige
Drücken Sie auf den Schalter für Akku-Kapazitätsanzeige. Die Akku-Kapazitätsanzeige signalisiert Ihnen den Ladezustand des Akkus anhand
von 3 LEDs (Bild 13b).
Alle 3 LED‘s leuchten:
Der Akku ist voll aufgeladen.
2 oder 1 LED(‘s) leuchten
Der Akku verfügt über ausreichende Restladung.
1 LED blinkt:
Der Akku ist leer, laden Sie den Akku auf.
Alle LED’s blinken:
Die Temperatur des Akkus ist unterschritten. Entfernen Sie den Akku vom Gerät und lassen Sie
den Akku einen Tag bei Raumtemperatur liegen.
Tritt der Fehler wieder auf, so wurde der Akku
tiefentladen und ist defekt. Entfernen Sie den
Akku vom Gerät. Ein defekter Akku darf nicht
mehr verwendet bzw. geladen werden.
Achtung!
Wenn Sie einen Multi-Ah Pack (z.B. 4-6Ah) verwenden, stellen Sie diesen bitte immer auf die
höhere Kapazität. Durch die schonende Ladung
und Entladung beim Mähroboter ist die Nutzung
der geringeren Kapazität zur Verlängerung der
Lebensdauer nicht notwendig.
5.10 Laden des Akkus mit dem Ladegerät
Im normalen Betrieb wird der Akku (A) des
Mähroboters über die Ladestation (19) geladen.
Für die unabhängige Verwendung des Akkus (A)
der Power-X-Change-Serie, kann dieser auch im
externen Ladegerät Power-X-Charger geladen
werden. Achtung! – Das Ladegerät (Bild 13a /
Pos. B) kann je nach Modellvariante nicht im Lieferumfang Ihres Mähroboters enthalten sein.
1. Vergleichen Sie, ob die auf dem Typenschild
- 16 -
Anl_FREELEXO_SMART_SPK13.indb 16Anl_FREELEXO_SMART_SPK13.indb 16 10.10.2022 12:44:0410.10.2022 12:44:04

D
angegebene Netzspannung mit der vorhandenen Netzspannung übereinstimmt. Stecken
Sie den Netzstecker des Ladegeräts (B) in
die Steckdose. Die grüne LED beginnt zu
blinken.
2. Stecken Sie den Akku (A) auf das Ladegerät
(B) (Bild 13a).
3. Unter Punkt „Anzeige Ladegerät“ fi nden Sie
eine Tabelle mit den Bedeutungen der LED
Anzeige am Ladegerät.
Während des Ladens kann sich der Akku etwas
erwärmen. Dies ist jedoch normal.
Sollte das Laden des Akku-Packs nicht möglich
sein, überprüfen Sie bitte,
ob an der Steckdose die Netzspannung vor-
•
handen ist.
ob ein einwandfreier Kontakt an den Lade-
•
kontakten vorhanden ist.
Sollte das Laden des Akku-Packs immer noch
nicht möglich sein, bitten wir Sie,
das Ladegerät
•
und den Akku-Pack
•
an unseren Kundendienst zu senden.
Für einen fachgerechten Versand kontaktieren Sie bitte unseren Kundendienst oder die
Verkaufsstelle, bei der das Gerät erworben
wurde.
Beachten Sie beim Versand oder Entsorgung
von Akkus bzw. Akkugerät, dass diese einzeln in Kunststoff beutel verpackt werden, um
Kurzschlüsse und Brand zu vermeiden!
Im Interesse einer langen Lebensdauer des AkkuPacks sollten Sie für eine rechtzeitige Wiederaufladung des Akku-Packs sorgen. Dies ist auf jeden
Fall notwendig, wenn Sie feststellen, dass die
Leistung des Geräts nachlässt. Entladen Sie den
Akku-Pack nie vollständig. Dies führt zu einem
Defekt des Akku-Packs!
6. Bedienung
6.1 Hauptschalter
Der Mähroboter ist mit einem Hauptschalter (7)
ausgestattet. Schalten sie den Mähroboter über
den Hauptschalter (7) ein (ON) und aus (OFF)
(Bild 8). Nach dem Einschalten des Mähroboters
wird dieser mit der PIN verriegelt.
6.2 Bedienfeld
Der Mähroboter wurde bereits werksseitig programmiert und Standardeinstellungen daran vorgenommen. Diese können bei Bedarf allerdings
verändert werden. Auch wenn die Werkseinstellungen für die meisten Gärten geeignet sind,
sollten Sie sich mit den verfügbaren Optionen
trotzdem vertraut machen.
Erklärung des Bedienfelds mit LCD-Anzeige
(Bild 9a)
50. LCD-Display
51. Taste „SET“ – Einstellungs-Taste
52. Taste „MODE“ – Mähprogramm-Taste
53. Taste „START” – Start-Taste
54. Taste „BACK” – Zurück-Taste
55. Navigationstasten
56. Taste „OK“ –Bestätigungs-Taste
Erklärung der Symbole auf der LCD-Display
(Bild 9b):
60. Signalstärke der Netzwerkverbindung
61. Signalerkennung Begrenzungsdrahtes
62. Regensensor- Status
63. Batterie-Status
64. Manuelles Mähen
65. Zeitplan-Steuerung
66. SMART-Steuerung
67. Zurück zur Ladestation
6.3 Schnitthöhenverstellung
Achtung! Das Verstellen der Schnitthöhe darf nur
bei ausgeschaltetem Mähroboter vorgenommen
werden. Drücken Sie dazu die STOP-Taste (3).
Der Mähroboter ermöglicht über die Schnitthöhenverstellung (4) eine stufenlose Anpassung der
Schnitthöhe zwischen 20 und 60 mm, welche auf
der Skala abgelesen werden kann.
Bei einer Rasenhöhe über 60 mm muss der Rasen auf mindestens 60 mm gekürzt werden, um
den Mähroboter nicht übermäßig zu belasten und
die Betriebseffi zienz zu beeinträchtigen. Verwen-
den Sie dazu einen konventionellen Rasenmäher
oder einen Trimmer.
Nach Abschluss der Installation kann die Schnitthöhe über die Schnitthöhenverstellung (4) angepasst werden. Beginnen Sie immer mit einer
höheren Schnitthöhe und reduzieren Sie diese in
kleinen Schritten bis zur gewünschten Höhe.
6.4 Sperrvorrichtung / PIN
Die Sperrvorrichtung verhindert eine nicht autorisierte Nutzung des Mähroboters ohne einen gültigen Code. Dazu müssen Sie einen persönlichen
vierstelligen Sicherheitscode eingeben.
- 17 -
Anl_FREELEXO_SMART_SPK13.indb 17Anl_FREELEXO_SMART_SPK13.indb 17 10.10.2022 12:44:0410.10.2022 12:44:04

D
Entriegelung
Bevor Sie den Mähroboter in Betrieb nehmen,
müssen Sie die korrekte PIN eingeben (StandardPIN: „0-0-0-0“). Geben Sie die PIN mithilfe der
Navigationstasten (55) ein.
Standard PIN: Neue PIN:
0 0 0 0 _ _ _ _
PIN ändern
Um die PIN zu ändern, gehen Sie wie folgt vor:
1. Entriegeln Sie das Bedienfeld.
2. Drücken Sie zunächst die Taste „SET“ (51),
um Einstellungen vorzunehmen.
3. Navigieren Sie im Menü des LCD-Displays
(50) mit den Navigationstasten (55) zum
Punkt „Allgemein“ und anschließend „PINCode“
4. Geben Sie zuerst die aktuelle PIN (StandardPIN 0-0-0-0) mithilfe der Navigationstasten
(55) ein.
5. Anschließend geben Sie mithilfe der Navigationstasten (55) Ihre persönliche PIN ein.
6. Bestätigen Sie die vorgenommenen Einstellungen.
7. Wiederholen Sie Schritt 5. und 6., um die
neue PIN zu bestätigen.
8. Achtung! Notieren Sie die neue PIN!
PIN anfordern bei Verlust
Halten Sie die Quittung und die Seriennummer
des Mähroboters bereit. Sie brauchen diese, um
Ihre PIN zu erhalten!
Variante A:
1. Drücken Sie im verriegelten Status die Taste
„SET“ (51) für 6 Sekunden.
2. Die PUK wird nun im Display (50) angezeigt.
3. Wenden Sie sich an den Kundendienst, um
Ihre PIN zu erhalten.
Variante B:
1. Schließen Sie am USB-Anschluss (24) wie
abgebildet einen leeren USB-Stick an (Bild
11).
2. Schalten Sie den Hauptschalter (7) ein (ON).
3. Der Mähroboter speichert automatisch die
PUK auf Ihren USB-Stick ab und beendet den
Vorgang mit einem Pfeifton.
4. Ziehen Sie den USB-Stick ab. Lesen Sie die
Daten auf dem USB-Stick an einem Computer aus. Durch den Mähroboter wurde eine
Textdatei (*.txt) erstellt. Diese Datei enthält
eine PUK, einen persönlichen Code. Wenden
Sie sich an den Kundendienst, um Ihre PIN
zu erhalten.
6.5 Einstellungen des Mähroboters
Im Hauptmenü des LCD-Displays (50) fi nden Sie
die aktuellen Datums- und Uhrzeiteinstellung des
Mähroboters, sowie den aktuellen Ladezustand.
Ebenso wird der Status des Regensensors, des
Drahtsignals sowie des ausgewählten Mähprogramms in der Symbolleiste anzeigt. Über
das Bedienfeld haben Sie die Optionen, mit der
Taste „SET“ (51) Einstellungen am Mähroboter
durchzuführen und mit der Taste „MODE“ (52)
den Mähroboter mit unterschiedlichen Mähprogrammen zu starten. Wechseln Sie mit den
Navigationstasten (55) zur gewünschten Stelle,
um Einstellungen vorzunehmen. Drücken Sie
die „BACK“-Taste (54) um das jeweilige Menü zu
verlassen.
Einstellungen – Taste „SET“ (51)
Mit der Taste „SET“ (51) können Sie grundlegende Einstellungen an Ihrem Mähroboter vornehmen. Wechseln Sie mit den Navigationstasten
(55) zur gewünschten Stelle und bestätigen oder
verwerfen Sie die vorgenommenen Einstellungen
anschließend mit der Taste „OK“ (56) oder der
„Back“-Taste (54).
Zone
•
Bei sehr verwinkelten Gärten kann der
Mähroboter Probleme haben, jeden Bereich
zu erreichen und den Rasen vollständig zu
mähen. In diesem Fall können mehrere Startpunkte auf dem Begrenzungsdraht (18) gewählt werden. So kann der Mähroboter auch
in schwer zugängliche Gebiete Ihres Gartens
gelangen. Der Mähroboter wird die gewählte
Distanz am Begrenzungsdraht (18) zurücklegen und in diesem Bereich seinen Mähvorgang starten (Bild 6m). Wechseln Sie mithilfe
der Navigationstasten (55) zur gewünschten
Stelle, die Sie verändern möchten und stellen
Sie die jeweilige Distanz und Häufigkeit ein.
Die Ladestation (19) wird automatisch als
Startpunkt 1 definiert. Die zwei weiteren Startpunkte können frei gewählt werden. Messen
Sie hierfür die Distanz zwischen Ladestation
(19) und Startpunkt im Uhrzeigersinn entlang
des Begrenzungsdrahtes (18). Über die Häufigkeit bestimmen Sie, wie oft der Mähroboter
aus der Ladestation (19) heraus seine Arbeit
startet, oder von den jeweiligen Startpunkten
aus.
Kantenmähen
•
Der Mähroboter mäht einmal wöchentlich zu
Beginn seines Arbeitsfensters die Rasenkante und startet anschließend mit dem Mähvorgang. Die werkseitige Standardeinstellung
- 18 -
Anl_FREELEXO_SMART_SPK13.indb 18Anl_FREELEXO_SMART_SPK13.indb 18 10.10.2022 12:44:0510.10.2022 12:44:05

D
ist „Ein“.
Fehlerspeicher
•
Sie erhalten Informationen über zuletzt aufgetretene Fehlermeldungen Ihres Mähroboters.
Regensensor
•
Der Regensensor (5) lässt sich über diese
Einstellung ein- und ausschalten. Die werkseitige Standardeinstellung für den Sensor
ist „Ein“. Eine detaillierte Beschreibung zum
Regensensor ist in „Inbetriebnahme“ unter
„Sensoren“ nachzulesen.
Allgemein
•
- PIN-Code: Sie können die PIN des Mähroboters ändern und Ihre persönliche PIN
verwenden. Dazu gehen Sie wie im Kapitel
„Sperrvorrichtung / PIN“ beschrieben vor.
Achtung! Notieren Sie die neue PIN.
- Datum & Zeit: Wechseln Sie mithilfe der
Navigationstasten (55) an die entsprechende
Stelle und nehmen Sie die gewünschten Einstellungen vor.
- Sprache: Wechseln Sie mithilfe der Navigationstasten (55) zur gewünschten Sprache.
- Softwareversion: Hier ist die aktuelle Softwareversion des Mähroboters vermerkt.
Werkeinstellungen: Setzen Sie den Mähro-
•
boter auf den Auslieferungszustand zurück.
Mähprogramme – Taste „MODE“ (52)
Wechseln Sie mit den Navigationstasten (55)
zum gewünschten Mähprogramm, um dieses zu
starten.
Manuell
•
Im manuellen Modus können Sie den Mähroboter einmalig mit unterschiedlichen Mähprogrammen starten.
Sie haben jeweils die Möglichkeit, zwischen
der Primär-Fläche / Hauptfläche und der
Sekundär-Fläche / Nebenfläche zu wählen.
Genauere Informationen zu den beiden Flächen finden Sie im Kapitel „Inbetriebnahme“
unter dem Punkt „Begrenzungsdraht“.
- Mähen
Starten Sie den Mähroboter, um den Rasen
einmalig zu Mähen. Der Mähroboter mäht bis
die Akku-Kapazität zu Neige geht und kehrt
selbstständig zu Ladestation zurück
- Kantenmähen
Stellen Sie den Mähroboter in die Nähe
des Begrenzungsdrahtes (18) oder starten
Sie den Mähroboter während er sich in der
Ladestation (19) befi ndet. Der Mähroboter
folgt dem Begrenzungsdraht (18) mit eingeschaltetem Mähwerk im Uhrzeigersinn bis zur
Rückseite der Ladestation (19). Anschließend
kehrt der Mähroboter zurück zur Ladestation
(19), sofern kein aktives Arbeitsfenster vorliegt.
- Spot Mowing
Es kann vorkommen, dass Ihr Mähroboter
manche Stellen nicht ausreichend gründlich
mäht. Stellen Sie den Mähroboter an eine gewünschte Stelle und starten Sie den Mähroboter. Der Mähroboter wird beginnen den
Rasen in Spiralform zu mähen, bis er auf ein
Hindernis oder den Begrenzungsdraht (18)
stößt. Anschließend kehrt der Mähroboter zurück zur Ladestation (19), sofern kein aktives
Arbeitsfenster vorliegt.
Zeitplan
•
Wechseln Sie mit den Navigationstasten (55)
zum entsprechenden Wochentag, an dem
Sie Einstellungen vornehmen möchten. Der
Mähroboter wird im normalen Betriebsmodus
automatisch am entsprechenden Wochentag
zur eingestellten Zeit beginnen Ihren Rasen
zu mähen. Für die Mähzeiteinstellung wird
als Richtwert 8 Stunden pro Tag bei 500 m²
empfohlen. Je nach Gartengröße und Komplexität ist die gewählte Arbeitszeit anzupassen.
Zur Ladestation
•
Schicken Sie Ihren Mähroboter zurück in die
Ladestation (19). Der Mähroboter sucht sich
den Begrenzungsdraht (18) und folgt diesem
gegen den Uhrzeigersinn zur Ladestation
(19). Hier entfällt die Option der SekundärFläche / Nebenfläche.
6.6 Steuerung des Mähroboters
Startvorgang
1. Drücken Sie die STOP-Taste (3) und öff nen
Sie die Displayabdeckung (23) vollständig.
2. Entriegeln Sie das Bedienfeld (2).
3. Wählen Sie über die Taste „MODE“ (52) das
gewünschte Mähprogramm sowie die jeweilige Arbeitsfl äche.
4. Drücken Sie die Taste „START“ (53).
5. Schließen Sie die Displayabdeckung (23).
Der Mähroboter arbeitet nun entsprechend der
Mähzeiteinstellung. Während der Arbeitszeit wird
der Akkuladezustand über und auf dem LCD-Display (50) angezeigt. Sobald der Akkuladezustand
auf 30% fällt, kehrt der Mähroboter automatisch
zur Ladestation (19) zurück.
- 19 -
Anl_FREELEXO_SMART_SPK13.indb 19Anl_FREELEXO_SMART_SPK13.indb 19 10.10.2022 12:44:0510.10.2022 12:44:05

D
Abbrechen des Mähvorgangs
1. Drücken Sie die STOP-Taste (3), um den
Mähroboter sofort anzuhalten.
2. Öff nen Sie die Displayabdeckung (23) voll-
ständig.
3. Entriegeln Sie das Bedienfeld (2).
4. Drücken Sie die Taste „MODE“ (52) und wählen Sie „Zur Ladestation“, um den Mähroboter
am Begrenzungsdraht (18) entlang zur Ladestation (19) zurückzusenden.
5. Drücken Sie die Taste „START“ (53).
6. Schließen Sie die Displayabdeckung (23).
STOP-Status:
Durch Drücken der STOP-Taste (3) befi ndet sich
der Mähroboter in einem STOP-Status, welcher
im LCD-Display (50) angezeigt wird. Der Mähroboter pausiert seinen Mähbetrieb bis dieser wieder aufgehoben wird.
Nach Entriegelung des Bedienfeldes (2) erscheint
ein Fenster, welches die Aufhebung des STOPStatus vorschlägt. Durch Bestätigung ist der Status aufgehoben. Andernfalls bleibt der Mähroboter gestoppt. Wird der Mähroboter gestartet oder
zurück zur Ladestation (19) geschickt, wird der
STOP-Status ebenfalls aufgehoben. Schließen
Sie die Displayabdeckung (23).
6.7 Steuerung des Mähroboters mit Hilfe der
App
Über die App haben Sie vielseitige Einstellmöglichkeiten für Ihren Mähroboter und können
zusätzlich Statistiken sowie den aktuellen Status
abrufen. Der Mähroboter kann sowohl manuell
als auch in einem festgelegten Arbeitsintervall
gestartet werden. Mit Hilfe der App verfügen Sie
zusätzlich über den SMART-Modus, in welcher
der Mähroboter selbstständig aufgrund von Wetterdaten sein Arbeitsintervall festlegt. Die App
zeigt Ihnen im Betrieb Fehlermeldungen sowie
Warnungen an und kann Sie mithilfe von PushBenachrichtigungen informieren. Schließen Sie
zunächst die Registrierung Ihres Mähroboter ab,
um alle Funktionen der App zu nutzen.
6.7.1 App Herunterladen
Laden Sie sich zuerst die Einhell-App für Ihren
Mähroboter auf Ihrem Smartphone herunter. Die
Einhell-App ist über folgenden Link und QR-Code
erreichbar:
iOS: http://qr.einhell.com/12e103ce
Android: http://qr.einhell.com/176c0443
6.7.2 Registrierung des Mähroboters
Ihr Gerät verfügt über eine IoT-Funktion (Internet
of Things / Internet der Dinge). Ihr Mähroboter
kann sich über einen integrierten SIM-Chip mit
dem verfügbaren Mobilfunknetzwerk verbinden
und ist somit unabhängig von einer Bluetoothoder WLAN-Verbindung. In den ersten 5 Jahren
entstehen für Sie keine Nutzungsgebühren des
Mähroboters im Mobilfunknetz, da diese über
den Kaufpreis abgedeckt werden. Infos über die
verbleibende Laufzeit und eine mögliche Verlängerung können über die App eingesehen werden.
Im Werkszustand ist die Funktion deaktiviert und
der Mähroboter versucht sich mit dem Netzwerk
zu verbinden, dabei ist das Verbindungsymbol auf
dem LCD-Display (50) durchgestrichen. Um Ihren
Mähroboter zu aktivieren, folgen Sie den Anweisungen in der App.
Eine erfolgreiche Verbindung mit dem Netzwerk
wird auf dem LCD-Display (50) angezeigt und die
vielseitigen Einstellungsmöglichkeiten und Funktionen der App stehen Ihnen nun zur Verfügung.
Stellen Sie sicher, dass der Mähroboter sowie
Ihr Smartphone eine sichere Internetverbindung
haben, sobald Sie Einstellungen in der App
vornehmen. Für den automatischen Betrieb des
Mähroboters in einem programmierten Arbeitszeitraum mit dem SMART-Modus muss lediglich
der Mähroboter mit dem Internet verbunden sein.
6.7.3 Zurücksetzen der Registrierung
Sollte bei Erstinbetriebnahme Ihres Mähroboters
das Verbindungssymbol im LCD-Display (50)
nicht durchgestrichen sein, muss der Mähroboter
zurückgesetzt und auf Sie registriert werden.
Kontaktieren Sie dazu unseren Kundendienst und
halten Sie die Quittung und die Seriennummer
des Mähroboters bereit.
- 20 -
Anl_FREELEXO_SMART_SPK13.indb 20Anl_FREELEXO_SMART_SPK13.indb 20 10.10.2022 12:44:0610.10.2022 12:44:06

D
6.8 Betrieb des Mähroboters
Der Mähroboter bietet vielseitige Betriebsmodi,
wodurch Sie den Mähroboter auf verschiedene
Arten in Betrieb nehmen können. Über die App
haben Sie vielseitige Einstellungsmöglichkeiten
des Mähroboters und können Statistiken und
dessen aktuellen Status abrufen. Zusätzlich zeigt
Ihnen die App im Betrieb Fehlermeldungen sowie
Warnungen an.
Sie können der Mähroboter sowohl manuell am
Bedienfeld (2) des Mähroboters als auch mit Hilfe
der App betreiben.
6.8.1 Manuelles Mähen
Starten Sie den Mähroboter manuell über die
App. Der Mähroboter beginnt den Rasen für
genau einen Zyklus zu mähen, bis der Akkuladezustand unter 30 % sinkt. Daraufhin fährt der
Mähroboter in die Ladestation (19) zurück und
beendet der Mähroboter seinen Arbeitsvorgang.
Der Mähroboter wird so vollständig manuell betrieben und wir auch nicht zu einem eingestellten
Zeitraum beginnen den Rasen zu mähen.
6.8.2 Zeitplan-Steuerung
Sie können über die Navigationstasten (55) am
Mähroboter Einstellungen des Zeitplans vornehmen. Dadurch mäht der Mähroboter den Rasen
zu den angegebenen Zeiten selbstständig. Die
Einstellungen können ebenfalls in der App vorgenommen werden und an den Mähroboter übertragen werden.
6.8.3 SMART-Steuerung
Der SMART-Modus des Mähroboters ermöglicht
einen automatischen Betrieb mit optimierten
Betriebszeiten für Ihren Garten und den aktuellen
Witterungsverhältnissen. Das entsprechende
Arbeitsintervall wird vom Mähroboter selbständig
täglich entsprechend individuell angepasst. Stellen Sie sicher, dass der Mähroboter stets über
eine Verbindung mit dem Netzwerk verfügt. Um
den SMART-Modus nutzen zu können, werden
zunächst einige spezifi sche Daten benötigt. Neh-
men Sie dazu die entsprechenden Einstellungen
in der App vor:
Ortangabe: Über diese Angabe können
•
standortspezifische Wetterdaten abgerufen
werden und der Mähroboter wird, angepasst
an die Witterungsverhältnisse mähen.
Intensität: Geben Sie an mit welcher In-
•
tensität der Mähroboter den Rasen mähen
soll. Dies ist abhängig vom Wachstum Ihres
Rasens. Beginnen Sie zunächst mit einer
geringen Intensität und passen Sie diese ge-
gebenenfalls an.
Mähfläche: Geben Sie die geschätzte
•
Mähfläche an. Dabei relevant ist nur die zu
mähende Fläche in der sich der Mähroboter
bewegen soll.
Zeitplan: Definieren Sie Zeitintervalle, zu
•
welchen der Mähroboter nicht mähen soll.
Es kann sinnvoll sein die Mähzeiten entspre-
chend einzuschränken.
Der Mähroboter wird bevorzugt am Tag mähen
um zu verhindern, dass der Mähroboter auf dämmerungs- bzw. nachtaktive Tiere, wie z.B. Igel,
triff t. Der Mähroboter berechnet seinen individu-
ellen Zeitplan aufgrund der angegeben Daten
fortlaufend.
6.8.4 Fehlermeldungen und Warnungen
Überprüfen Sie regelmäßig die App, um Fehlermeldungen und Warnungen zu erhalten. Sie
erhalten Fehlermeldungen, Warnungen sowie
Erinnerungen per Push-Benachrichtigung auf
Ihr Smartphone. Wenn Sie dies nicht wünschen,
können Sie die Benachrichtigungs-Einstellungen
in der App anpassen. Stellen Sie sicher, dass
die Hintergrunddaten der Einhell-App auf Ihrem
Smartphone aktiviert sind und Ihr Smartphone
über eine aktive Internetverbindung verfügt.
7. Reinigung, Wartung und
Ersatzteilbestellung
Gefahr!
Vor allen Reinigungs- und Wartungsarbeiten ist
das Gerät spannungsfrei zu schalten, hierzu ziehen Sie den Netzstecker aus der Steckdose und
schalten das Gerät über den Hauptschalter (7)
aus (OFF) (Bild 8). Entnehmen Sie außerdem den
Akku aus dem Mähroboter.
Vorsicht! Arbeitshandschuhe tragen!
7.1 Reinigung
Halten Sie Schutzvorrichtungen, Luftschlitze
•
und Motorengehäuse so staub- und schmutz-
frei wie möglich. Reiben Sie das Gerät mit
einem sauberen Tuch ab oder blasen Sie es
mit Druckluft bei niedrigem Druck aus.
Der Mähroboter darf nicht mit fließendem
•
Wasser, insbesondere unter Hochdruck, ge-
reinigt werden.
Reinigen Sie das Gerät regelmäßig mit einem
•
feuchten Tuch und etwas Schmierseife. Ver-
wenden Sie keine Reinigungs- oder Lösungs-
mittel; diese könnten die Kunststoffteile des
Gerätes angreifen. Achten Sie darauf, dass
- 21 -
Anl_FREELEXO_SMART_SPK13.indb 21Anl_FREELEXO_SMART_SPK13.indb 21 10.10.2022 12:44:0610.10.2022 12:44:06

D
kein Wasser in das Geräteinnere gelangen
kann.
Säubern Sie den Mähroboter möglichst mit
•
Bürsten oder Lappen.
Kontrollieren Sie die Beweglichkeit der Klin-
•
gen (10) und der Messerscheibe (11).
Verwenden Sie zur Reinigung der Ladekon-
•
takte am Mähroboter (1) und Ladestation
(19), Reinigungsmittel für Metall oder ein sehr
feines Schleifpapier. Säubern Sie diese, um
einen effizienten Ladevorgang zu gewährleisten.
7.2 Wartung
Abgenutzte oder beschädigte Klingen (10)
•
sowie deren Befestigungsschrauben sind immer satzweise zu ersetzen.
Ersetzen Sie verschlissene oder beschädigte
•
Teile.
Für eine lange Lebensdauer sollten alle
•
Schraubteile sowie die Räder und Achsen
gereinigt und anschließend geölt werden.
Die regelmäßige Pflege des Mähroboters
•
sichert nicht nur lange Zeit seine Haltbarkeit
und Leistungsfähigkeit, sondern trägt auch
zu einem sorgfältigen und einfachen Mähen
Ihres Rasens bei.
Die am stärksten dem Verschleiß ausgesetz-
•
ten Bauteile sind die Klingen (10). Prüfen Sie
regelmäßig den Zustand der Klingen (10)
sowie die Befestigung derselben. Sollten
übermäßige Vibrationen des Mähroboters
auftreten, kann dies bedeuteten, dass die
Klingen (10) beschädigt sind bzw. durch Stöße verformt wurden. Sind die Klingen (10) abgenutzt oder beschädigt, müssen diese sofort
ausgewechselt werden.
Kontrollieren Sie regelmäßig das Schnittbild
•
des Rasens. Durch unscharfe Klingen werden Grashalme nur unsauber abgeschnitten.
Dadurch kann der Rasen an der Oberfläche
leicht vertrocknen und wird braun. Wechseln
Sie daher die Klingen regelmäßig, um einen
sauberen und geraden Schnitt zu erhalten.
Kontrollieren Sie regelmäßig die Untersei-
•
te des Mähroboter auf Verschmutzungen.
Reinigen Sie den Mähroboter regelmäßig.
Beseitigen Sie stärkere Verunreinigungen
umgehend.
In den ersten Wochen nach der Inbetriebnah-
•
me und vorherigem Mähen mit einem konventionellen Rasenmäher, kann es schnell zu
starken Verunreinigungen Ihres Mähroboters
kommen. Kontrollieren Sie daher die Unterseite Ihres Mähroboters in diesem Zeitraum
häufiger.
Kürzen Sie den Rasen nur in kleinen Schrit-
•
ten, um eine starke Verunreinigung zu vermei-
den.
Im Geräteinneren befinden sich keine weite-
•
ren zu wartenden Teile.
7.2.1 Auswechseln der Klingen
Verwenden Sie nur Originalklingen, da andernfalls Funktion und Sicherheit nicht gewährleistet
sind.
Der Mähroboter ist mit drei an einer Messerscheibe (11) montierten Klingen (10) ausgestattet. Diese Klingen (10) haben eine Lebensdauer von bis
zu 3 Monaten (wenn keine Hindernisse getroff en
werden). Bitte ersetzen Sie alle drei Klingen (10)
gleichzeitig, um eine Beeinträchtigung der Effi zi-
enz und Balance Ihres Gerätes auszuschließen.
Zum Wechseln der Klingen (10) gehen Sie wie
folgt vor (Bild 12) - Achtung! - Handschuhe tragen:
1. Blockieren Sie mit einem Schraubendreher
die Rotation der Messerscheibe (11). Stecken
Sie hierfür den Schraubendreher durch die
vorgesehenen Löcher in der Messerscheibe
(11) und dem Schutzkamm.
2. Lösen Sie die Befestigungsschrauben.
3. Nehmen Sie die Klingen (10) ab und ersetzen
Sie diese gegen neue. Ersetzen Sie alle drei
Klingen (10) immer satzweise.
4. Anschließend ziehen Sie die Befestigungs-
schraube wieder fest. Stellen Sie sicher, dass
sich die neuen Klingen (10) frei drehen las-
sen.
Führen Sie regelmäßig eine allgemeine Kontrolle
des Mähroboters durch und entfernen Sie alle angesammelten Rückstände. Vor jedem Saisonstart
den Zustand der Klingen (10) unbedingt überprüfen. Wenden Sie sich bei Reparaturen an unsere
Kundendienststelle. Verwenden Sie nur Original
Ersatzteile.
7.2.2 Software Update
Wenn Sie die Software updaten möchten, kopieren Sie die neue Software auf einen leeren
USB-Stick (gegebenenfalls den USB-Stick zuvor
formatieren). Stellen Sie sicher, dass der Akku
vollständig geladen ist, bevor Sie folgende Schritte ausführen.
1. Stellen Sie den Mähroboter in den Mäh-
bereich. Der Mähroboter darf sich beim
Software-Update nicht in der Ladestation
befi nden.
2. Schließen Sie am USB-Anschluss wie abge-
- 22 -
Anl_FREELEXO_SMART_SPK13.indb 22Anl_FREELEXO_SMART_SPK13.indb 22 10.10.2022 12:44:0710.10.2022 12:44:07

D
bildet einen USB-Stick an (Bild 11).
3. Schalten Sie den Hauptschalter (7) ein (ON).
4. Der Mähroboter startet nun das Update der
Software und zeigt den aktuellen Status an.
5. Ist der Update-Vorgang abgeschlossen, ziehen Sie den USB-Stick ab und starten Sie
den Mähroboter über den Hauptschalter (7)
neu.
7.2.3 Reparatur des Begrenzungsdrahtes
Sollte es zu einer Durchtrennung des Begrenzungsdrahtes (18) an einer beliebigen Stelle kommen, verwenden Sie zur Reparatur die beiliegenden Kabelverbinder (16). Dazu führen Sie beide
Enden des durchtrennten Begrenzungsdrahtes
(18) in den Kabelverbinder (16) ein und drücken
ihn mit der Hilfe einer Zange zusammen.
Verbinden sie den Netzstecker mit der Steckdose. Überprüfen Sie anschließend anhand der
LED-Anzeige (21) an der Ladestation (19) die
Funktion.
7.3 Ersatzteilbestellung:
Bei der Ersatzteilbestellung sollten folgende Angaben gemacht werden:
Typ des Gerätes
•
Artikelnummer des Gerätes
•
Ident-Nummer des Gerätes
•
Ersatzteilnummer des erforderlichen Ersatz-
•
teils
Aktuelle Preise und Infos fi nden Sie unter
www.Einhell-Service.com
Ersatzklingen Art.-Nr.: 34.140.20
8. Lagerung
Laden Sie den Akku vor der Lagerung über den
Winter vollständig auf und schalten Sie den
Mähroboter über den Hauptschalter (7) aus
(OFF). Entnehmen Sie den Akku aus dem Gerät.
Trennen Sie das Netzteil (13) von der Stromversorgung und der Ladestation (19).
Der Begrenzungsdraht (18) kann über den Winter
im Freien gelassen werden. Stellen Sie allerdings
sicher, dass die Anschlüsse gegen Korrosion
geschützt sind. Trennen Sie dafür die Anschlüsse
des Begrenzungsdrahtes (18) von der Ladestation (19).
Lagern Sie das Gerät und dessen Zubehör an einem dunklen, trockenen und frostfreien sowie für
Kinder unzugänglichen Ort. Die optimale Lagertemperatur liegt zwischen 5 °C und 30 °C. Bewahren Sie das Gerät in der Originalverpackung auf.
9. Transport
Schalten Sie das Gerät über den Hauptschal-
•
ter (7) aus (OFF) (Bild 8).
Bringen Sie, falls vorhanden, Transport-
•
schutzvorrichtungen an.
Schützen Sie das Gerät gegen Schäden und
•
starke Vibrationen, die insbesondere beim
Transport in Fahrzeugen auftreten.
Sichern Sie das Gerät gegen Verrutschen
•
und Kippen.
Tragen Sie den Mähroboter am Tragegriff (6)
•
mit der Messerscheibe (11) vom Körper weg
gerichtet.
10. Entsorgung und
Wiederverwertung
Das Gerät befi ndet sich in einer Verpackung,
um Transportschäden zu verhindern. Diese
Verpackung ist Rohstoff und ist somit wiederver-
wendbar oder kann dem Rohstoff kreislauf zurück-
geführt werden. Das Gerät und dessen Zubehör
bestehen aus verschiedenen Materialien, wie
z.B. Metall und Kunststoff e. Defekte Geräte ge-
hören nicht in den Hausmüll. Zur fachgerechten
Entsorgung sollte das Gerät an einer geeigneten
Sammelstelle abgegeben werden. Wenn Ihnen
keine Sammelstelle bekannt ist, sollten Sie bei
der Gemeindeverwaltung nachfragen.
- 23 -
Anl_FREELEXO_SMART_SPK13.indb 23Anl_FREELEXO_SMART_SPK13.indb 23 10.10.2022 12:44:0710.10.2022 12:44:07

D
11. Anzeige der Ladestation und Fehlerbehebung
LED-Anzeige (21) Beschreibung Lösung
Aus - Keine Stromversorgung - Prüfen Sie die Stromversorgung
Leuchtet Grün - Bereit zum Mähen
Blinkt Grün - Begrenzungsdraht (18)
Leuchtet Rot - Akku wird geladen - Warten Sie, bis der Akku vollständig gela-
- Akku vollständig geladen
- Begrenzungsdraht (18) angeschlossen
durchtrennt
- Untersuchen Sie den Begrenzungsdraht
(18) auf einen Bruch
den ist.
12. Anzeige des Mähroboters und Fehlerbehebung
Fehlermeldung des Mähroboters im LCD Display (50)
Fehler Mögliche Ursache Beseitigung
Kein Signal - Begrenzungsdraht falsch
angeschlossen
- Keine Stromversorgung
- Begrenzungsdraht (18)
durchtrennt
Außerhalb - Begrenzungsdraht falsch
angeschlossen
- Mähroboter außerhalb des
Mähbereichs
Batteriefehler - Bei dem Mähroboter ist ein
Batteriefehler aufgetreten
- Akku lässt sich nicht laden
- Akku hat das Ende seiner
Lebensdauer erreicht
Prüfen Sie, ob die LED-Anzeige (21) an der
Ladestation (19) grün leuchtet.
- Stellen Sie sicher, dass der Begrenzungsdraht (18) korrekt und mittig unter der
Ladestation (19) verlegt ist.
- Prüfen Sie die Position der Ladestation
(19).
- Stellen Sie sicher, dass der Begrenzungsdraht (18) korrekt und mittig unter der
Ladestation (19) verlegt ist.
- Stellen Sie sicher, dass sich der Mähroboter im Mähbereich befi ndet.
- Stellen Sie sicher, dass der Akku richtig
montiert wurde.
- Prüfen Sie, ob der Hauptschalter (7)
eingeschaltet (ON) ist, während sich der
Mähroboter in der Ladestation (19) befi n-
det.
- Prüfen Sie die Position der Ladestation
(19). Tauschen Sie falls erforderlich den
Akku aus.
- 24 -
Anl_FREELEXO_SMART_SPK13.indb 24Anl_FREELEXO_SMART_SPK13.indb 24 10.10.2022 12:44:0810.10.2022 12:44:08

D
Fehlermeldung des Mähroboters im LCD Display (50)
Fehler Mögliche Ursache Beseitigung
Batterie-Temperaturfehler
Zu hohe / zu niedrige Akkutemperatur bzw. Übertemperatur
der Steuerung
- Bei einer Batterietemperatur
über 65 °C kehrt der Mähroboter zur Ladestation (19)
zurück.
- Bei einer Batterietemperatur
über 45 °C oder unter 0 °C
wird der Ladevorgang gestoppt und der Mähroboter
wartet an der Ladestation
- Verlegen Sie die Arbeitszeit im Sommer
auf die frühen Morgenstunden und vermeiden Sie den Betrieb des Mähroboters
während der heißen Stunden des Tages.
- Nach dem Abkühlen des Akkus bzw. der
Steuerung in den zulässigen Temperaturbereich, kehrt der Mähroboter automatisch in den programmierten Betrieb
zurück.
(19).
Mäher angehoben - Hebesensor kontinuierlich für
10 Sekunden ausgelöst
Drücken Sie die STOP-Taste (3), um die
Displayabdeckung (23) zu öff nen. Starten
Sie den Mähvorgang über das Bedienfeld
(2) neu:
- Falls dieser Fehler häufi ger auftritt, prüfen
Sie den Mähbereich auf Hindernisse mit
einer Höhe über 10 cm und entfernen Sie
diese oder trennen Sie die Hindernisse
mit dem Begrenzungsdraht (18) vom
Mähbereich ab.
Mäher blockiert - Hindernissensor innerhalb
einer Minute mehrfach aktiviert
- Hindernissensor für 10 Sekunden dauerhaft aktiviert
- Hindernissensor während
der Fahrt zurück zu Ladestation (19) dreimal aktiviert
Drücken Sie die STOP-Taste (3), um die
Displayabdeckung (23) zu öff nen. Starten
Sie den Mähvorgang über das Bedienfeld
(2) neu:
- Prüfen Sie, ob der Mähroboter durch
ein Hindernis blockiert oder zwischen
Bäumen, Büschen etc. eingeklemmt ist.
Beseitigen Sie das Hindernis oder vermeiden Sie diesen Bereich.
- Falls dieser Fehler häufi ger auftritt, prüfen
Sie die Verlegung des Begrenzungsdrahtes (18). Achten Sie besonders auf enge
Winkel, Korridore, Zäune, Felsen etc. und
passen Sie das Layout des Begrenzungsdrahtes (18) an, falls erforderlich.
- Prüfen Sie, ob das Gras zu hoch ist und
der Mähroboter blockiert wird. Mähen Sie
das Gras in diesem Fall auf unter 60 mm.
Zu nahe an Station - Mähroboter wurde zu nahe
an der Ladestation (19) zurückgeschickt.
Drücken Sie die STOP-Taste (3), um die
Displayabdeckung (23) zu öff nen. Starten
Sie den Mähvorgang über das Bedienfeld
(2) neu:
- Der Mähroboter sollte mit einem Mindestabstand von 2 m zurück zur Ladestation
(19) geschickt werden.
- 25 -
Anl_FREELEXO_SMART_SPK13.indb 25Anl_FREELEXO_SMART_SPK13.indb 25 10.10.2022 12:44:0810.10.2022 12:44:08

D
Fehlermeldung des Mähroboters im LCD Display (50)
Fehler Mögliche Ursache Beseitigung
Umgefallen - Mähroboter wurde für 10 Se-
kunden dauerhaft gekippt
- Mähroboter für längere Zeit
in eine Richtung geneigt
Drücken Sie die STOP-Taste (3), um die
Displayabdeckung (23) zu öff nen. Starten
Sie den Mähvorgang über das Bedienfeld
(2) neu:
- Bringen Sie den Mähroboter auf eine ebene Fläche und starten Sie ihn neu.
- Falls der Mähroboter aufgrund eines steilen Abhangs im Mähbereich gekippt ist,
passen Sie den Begrenzungsdraht (18)
entsprechend an, um starke Steigungen
zu vermeiden.
Radfehler - Hinterräder (8) wurden durch
ein Hindernis angehoben
- Hinterräder (8) können sich
durch unebenen Rasen frei
drehen
Drücken Sie die STOP-Taste (3), um die
Displayabdeckung (23) zu öff nen. Starten
Sie den Mähvorgang über das Bedienfeld
(2) neu:
- Bringen Sie den Mähroboter auf eine ebene Fläche und starten Sie ihn neu
STOP-Knopf Fehler Die Displayabdeckung (23) ist
geöff net, aber die STOP-Taste
(3) wurde nicht ausgelöst
Drücken Sie die STOP-Taste (3), um die
Displayabdeckung (23) zu öff nen. Starten
Sie den Mähvorgang über das Bedienfeld
(2) neu:
- Überprüfen Sie, dass sich die Displayabdeckung (23) mit der STOP-Taste (3) frei
öff nen und schließen lässt.
- Überprüfen Sie die Funktionalität der
STOP-Taste (3).
PCB Übertemperatur
Zu hohe / zu niedrige Akkutemperatur bzw. Übertemperatur
der Steuerung
- Bei einer Batterietemperatur
über 65 °C kehrt der Mähroboter zur Ladestation (19)
zurück.
- Bei einer Batterietemperatur
über 45 °C oder unter 0 °C
wird der Ladevorgang gestoppt und der Mähroboter
wartet an der Ladestation
- Verlegen Sie die Arbeitszeit im Sommer
auf die frühen Morgenstunden und vermeiden Sie den Betrieb des Mähroboters
während der heißen Stunden des Tages.
- Nach dem Abkühlen des Akkus bzw. der
Steuerung in den zulässigen Temperaturbereich, kehrt der Mähroboter automatisch in den programmierten Betrieb
zurück.
(19).
Regen - Der Regensensor (5) hat
ausgelöst.
- Warten Sie bis der Mähroboter trocken ist.
- Eine detaillierte Beschreibung zum Sensor ist in Kapitel 5.2 nachzulesen.
Sensorfehler - Mähroboter wurde aufgrund
eines Sensorfehlers angehalten
Schalten Sie den Hauptschalter (7) aus
(OFF) und wieder ein (ON), um den Mähroboter neu zu starten.
- 26 -
Anl_FREELEXO_SMART_SPK13.indb 26Anl_FREELEXO_SMART_SPK13.indb 26 10.10.2022 12:44:0910.10.2022 12:44:09

D
Fehlermeldung des Mähroboters im LCD Display (50)
Fehler Mögliche Ursache Beseitigung
Motorfehler/
Motorüberstrom
- Mähroboter aufgrund eines
Überstroms im Motor oder
eines Motorfehlers angehalten
Schalten Sie den Hauptschalter (7) aus
(OFF) und wieder ein (ON), um den Mähroboter neu zu starten.
- Prüfen Sie die Höhe des Grases im Mähbereich und mähen Sie bei Bedarf mit
einem konventionellen Rasenmäher das
Gras auf unter 60 mm.
- Erhöhen Sie die Schnitthöhe. Beginnen
Sie immer mit einer höheren Schnitthöhe
und reduzieren Sie diese in kleinen Schritten bis zur gewünschten Höhe.
- Untersuchen Sie die Messerscheiben (11)
und Räder auf Verschmutzung und reinigen Sie diese Teile gründlich.
- Prüfen Sie die Hinterräder und die Messerscheibe (11) auf Blockaden. Falls Sie
diese Blockaden nicht lösen können,
wenden Sie sich an den zuständigen Kundendienst.
Betriebsfehler - Mähroboter wurde aufgrund
eines Betriebsfehlers angehalten
Schalten Sie den Hauptschalter (7) aus
(OFF) und wieder ein (ON), um den Mähroboter neu zu starten.
Fehlersuche
Fehler Mögliche Ursache Beseitigung
Der Mähroboter
steht im Mähbereich.
Der Mähroboter
lässt sich nicht ein-
- Akkuspannung zu gering
- Fehler am Stromkreis oder
der Elektronik
- Bringen Sie den Mähroboter zum Aufl a-
den zur Ladestation (19) zurück.
- Schalten Sie den Hauptschalter (7) an
(ON).
- Wenden Sie sich an den Kundendienst.
schalten.
Der Mähroboter
kann nicht in die Ladestation fahren.
- Ladestation (19) nicht korrekt
installiert.
- Stellen Sie sicher, dass die LED-Anzeige
(21) an der Ladestation (19) grün leuchtet.
- Stellen Sie sicher, dass die Begrenzungsdrähte (18) an der Ladestation (19)
angeschlossen sind und der vordere
Begrenzungsdraht (18) mittig unter der
Ladestation (19) verlegt ist.
- Stellen Sie sicher, dass die Ladestation
(19) korrekt positioniert ist.
Der Mähroboter
stoppt, bzw. fährt
unkontrolliert in der
Nähe von Begren-
- Begrenzungsdraht (18) nicht
richtig um die Begrenzungsinseln installiert.
- Passen Sie die Position des Begrenzungsdrahtes (18) an.
- Achten Sie darauf, dass der Begrenzungsdraht (18) sich nicht kreuzt.
zungsinseln.
- 27 -
Anl_FREELEXO_SMART_SPK13.indb 27Anl_FREELEXO_SMART_SPK13.indb 27 10.10.2022 12:44:1010.10.2022 12:44:10

D
Fehlersuche
Fehler Mögliche Ursache Beseitigung
Der Mähroboter ist
sehr laut.
- Klingen (10) beschädigt
- An den Klingen (10) haften
viele Fremdstoff e an
- Mähroboter zu nah an Hindernissen gestartet
- Messerantrieb oder Antriebsmotor beschädigt
- Andere Teile des Mähroboters beschädigt
- Tauschen Sie die Klingen (10) aus. Die
3 Klingen (10) müssen gleichzeitig getauscht werden.
- Die Betriebseffi zienz des Mähroboters
hängt von der Schärfe der Klingen (10)
ab. Halten Sie die Klingen (10) deshalb in
gutem Zustand.
- Schalten Sie den Mähroboter sicher ab
und tragen Sie Arbeitshandschuhe, während Sie die Klingen (10) reinigen, um
Schnittverletzungen zu vermeiden.
- Lassen Sie den Motor durch den Kundendienst reparieren oder austauschen.
Der Mähroboter
bleibt in der Ladestation. Der Mähroboter kehrt immer
wieder zur Ladesta-
- Falsche Arbeitszeiteinstellungen
- Akku leer
- Regensensor ausgelöst
- Erhöhte Akkutemperatur
- Prüfen Sie die Arbeitszeiteinstellungen.
- Der Mähroboter beginnt und beendet seine Arbeit je nach eingestelltem Zeitfenster. Außerhalb dieses Zeitfensters bleibt
der Mähroboter in der Ladestation (19).
tion zurück.
Der Mähroboter
bleibt auf Begrenzungsdraht stehen
und kann die Ladestation nicht erreichen.
- Akku leer
- Die Länge des Begrenzungsdrahts (18) und damit der
Weg zur Ladestation (19) ist
für den verwendeten Akku zu
lang.
- Entfernen Sie mögliche Hindernisse auf
dem Begrenzungsdraht (18). Achten Sie
beim Verlegung des Begrenzungsdrahtes
(18) auf einen ausreichenden Abstand zu
Hindernissen.
- Bitte verwenden Sie einen Akku mit höherer Kapazität.
- Achtung: Bei Verwendung eines MultiAh-Akkus (z.B. 4-6 Ah) die höhere Kapazität einstellen. Durch die schonende
Ladung und Entladung beim Mähroboter
ist die Nutzung der geringeren Kapazität
zur Verlängerung der Lebensdauer nicht
notwendig.
ACHTUNG! Durchtrennte Begrenzungsdrähte und Folgeschäden unterliegen nicht der
Garantie!
- 28 -
Anl_FREELEXO_SMART_SPK13.indb 28Anl_FREELEXO_SMART_SPK13.indb 28 10.10.2022 12:44:1010.10.2022 12:44:10

13. Anzeige Ladegerät
D
Anzeigestatus
Rote LED Grüne LED
Bedeutung und Maßnahme
Aus Blinkt Betriebsbereitschaft
Das Ladegerät ist an das Netz angeschlossen und betriebsbereit,
Akku ist nicht im Ladegerät
An Aus Laden
Das Ladegerät lädt den Akku im Schnellladebetrieb.
Die entsprechenden Ladezeiten fi nden Sie direkt am Ladegerät.
Hinweis! Je nach vorhandener Akkuladung können die tatsächlichen
Ladezeiten von den angegebenen Ladezeiten etwas abweichen.
Aus An Der Akku ist aufgeladen und einsatzbereit. (READY TO GO)
Danach wird bis zur vollständigen Ladung auf eine Schonladung umgeschaltet.
Lassen Sie hierzu den Akku etwa 15 min. länger am Ladegerät.
Maßnahme:
Entnehmen Sie den Akku aus dem Ladegerät. Trennen Sie das Ladegerät vom Netz.
Blinkt Aus Anpassungsladung
Das Ladegerät befi ndet sich im Modus für schonende Ladung.
Hierbei wird der Akku aus Sicherheitsgründen langsamer geladen und
benötigt mehr Zeit. Dies kann folgende Ursachen haben:
- Akku wurde sehr lange Zeit nicht mehr geladen.
- Die Akkutemperatur liegt nicht im Idealbereich zwischen 10° C und
45° C.
Maßnahme:
Warten Sie bis der Ladevorgang abgeschlossen ist, der Akku kann
trotzdem weiter geladen werden.
Blinkt Blinkt Fehler
Ladevorgang ist nicht mehr möglich. Der Akku ist defekt.
Maßnahme:
Ein defekter Akku darf nicht mehr geladen werden.
Entnehmen Sie den Akku aus dem Ladegerät.
An An Temperaturstörung
Der Akku ist zu heiß (z. B. direkte Sonnenbestrahlung) oder zu kalt
(unter 0° C)
Maßnahme:
Entnehmen Sie den Akku und bewahren Sie diesen
1 Tag bei Raumtemperatur (ca. 20° C) auf.
- 29 -
Anl_FREELEXO_SMART_SPK13.indb 29Anl_FREELEXO_SMART_SPK13.indb 29 10.10.2022 12:44:1110.10.2022 12:44:11

D
Nur für EU-Länder
Werfen Sie Elektrowerkzeuge nicht in den Hausmüll!
Gemäß europäischer Richtlinie 2012/19/EU über Elektro- und Elektronik-Altgeräte und Umsetzung in
nationales Recht müssen verbrauchte Elektrowerkzeuge getrennt gesammelt werden und einer umweltgerechten Wiederverwertung zugeführt werden.
Recycling-Alternative zur Rücksendeauff orderung:
Der Eigentümer des Elektrogerätes ist alternativ anstelle Rücksendung zur Mitwirkung bei der sachgerechten Verwertung im Falle der Eigentumsaufgabe verpfl ichtet. Das Altgerät kann hierfür auch einer
Rücknahmestelle überlassen werden, die eine Beseitigung im Sinne der nationalen Kreislaufwirtschafts- und Abfallgesetze durchführt. Nicht betroff en sind den Altgeräten beigefügte Zubehörteile und
Hilfsmittel ohne Elektrobestandteile.
Bitte beachten Sie bei der Entsorgung, dass Akkus und Leuchtmittel (z. B. Glühbirne) dem Gerät entnommen werden.
Der Nachdruck oder sonstige Vervielfältigung von Dokumentation und Begleitpapieren der Produkte,
auch auszugsweise, ist nur mit ausdrücklicher Zustimmung der Einhell Germany AG zulässig.
Technische Änderungen vorbehalten
Diese Sendung enthält Lithium-Ionen-Batterien.
Gemäß Sondervorschrift 188 unterliegt diese Sendung nicht den Vorschriften des ADR. Sorgsam
behandeln. Entzündungsgefahr bei Beschädigung des Versandstücks. Bei Beschädigung des Versandstücks: Kontrolle und erforderlichenfalls erneutes Verpacken.
Für zusätzliche Informationen rufen Sie bitte die 0049 9951 95920-66 an.
- 30 -
Anl_FREELEXO_SMART_SPK13.indb 30Anl_FREELEXO_SMART_SPK13.indb 30 10.10.2022 12:44:1110.10.2022 12:44:11

D
Service-Informationen
Wir unterhalten in allen Ländern, welche in der Garantieurkunde benannt sind, kompetente ServicePartner, deren Kontakte Sie der Garantieurkunde entnehmen. Diese stehen Ihnen für alle ServiceBelange wie Reparatur, Ersatzteil- und Verschleißteil-Versorgung oder den Bezug von Verbrauchsmaterialien zur Verfügung.
Es ist zu beachten, dass bei diesem Produkt folgende Teile einem gebrauchsgemäßen oder natürlichen
Verschleiß unterliegen bzw. folgende Teile als Verbrauchsmaterialien benötigt werden.
Kategorie Beispiel
Verschleißteile* Akku
Verbrauchsmaterial/ Verbrauchsteile* Klingen
Fehlteile
* nicht zwingend im Lieferumfang enthalten!
Bei Mängel oder Fehlern bitten wir Sie, den Fehlerfall im Internet unter www.Einhell-Service.com anzumelden. Bitte achten Sie auf eine genaue Fehlerbeschreibung und beantworten Sie dazu in jedem Fall
folgende Fragen:
Hat das Gerät bereits einmal funktioniert oder war es von Anfang an defekt?
•
Ist Ihnen vor dem Auftreten des Defektes etwas aufgefallen (Symptom vor Defekt)?
•
Welche Fehlfunktion weist das Gerät Ihrer Meinung nach auf (Hauptsymptom)?
•
Beschreiben Sie diese Fehlfunktion.
- 31 -
Anl_FREELEXO_SMART_SPK13.indb 31Anl_FREELEXO_SMART_SPK13.indb 31 10.10.2022 12:44:1210.10.2022 12:44:12

D
Garantieurkunde
Sehr geehrte Kundin, sehr geehrter Kunde,
unsere Produkte unterliegen einer strengen Qualitätskontrolle. Sollte dieses Gerät dennoch einmal nicht
einwandfrei funktionieren, bedauern wir dies sehr und bitten Sie, sich an unseren Servicedienst unter
der auf dieser Garantiekarte angegebenen Adresse zu wenden. Gerne stehen wir Ihnen auch telefonisch über die angegebene Servicerufnummer zur Verfügung. Für die Geltendmachung von Garantieansprüchen gilt folgendes:
1. Diese Garantiebedingungen richten sich ausschließlich an Verbraucher, d. h. natürliche Personen,
die dieses Produkt weder im Rahmen ihrer gewerblichen noch anderen selbständigen Tätigkeit
nutzen wollen. Diese Garantiebedingungen regeln zusätzliche Garantieleistungen, die der u. g.
Hersteller zusätzlich zur gesetzlichen Gewährleistung Käufern seiner Neugeräte verspricht. Ihre
gesetzlichen Gewährleistungsansprüche werden von dieser Garantie nicht berührt. Unsere Garantieleistung ist für Sie kostenlos.
2. Die Garantieleistung erstreckt sich ausschließlich auf Mängel an einem von Ihnen erworbenen neuen Gerät des u. g. Herstellers, die auf einem Material- oder Herstellungsfehler beruhen und ist nach
unserer Wahl auf die Behebung solcher Mängel am Gerät oder den Austausch des Gerätes beschränkt. Bitte beachten Sie, dass unsere Geräte bestimmungsgemäß nicht für den gewerblichen,
handwerklichen oder berufl ichen Einsatz konstruiert wurden. Ein Garantievertrag kommt daher nicht
zustande, wenn das Gerät innerhalb der Garantiezeit in Gewerbe-, Handwerks- oder Industriebetrieben verwendet wurde oder einer gleichzusetzenden Beanspruchung ausgesetzt war.
3. Von unserer Garantie ausgenommen sind:
- Schäden am Gerät, die durch Nichtbeachtung der Montageanleitung oder aufgrund nicht fachgerechter Installation, Nichtbeachtung der Gebrauchsanleitung (wie durch z.B. Anschluss an eine
falsche Netzspannung oder Stromart) oder Nichtbeachtung der Wartungs- und Sicherheitsbestimmungen oder durch Aussetzen des Geräts an anomale Umweltbedingungen oder durch mangelnde
Pfl ege und Wartung entstanden sind.
- Schäden am Gerät, die durch missbräuchliche oder unsachgemäße Anwendungen (wie z.B. Überlastung des Gerätes oder Verwendung von nicht zugelassenen Einsatzwerkzeugen oder Zubehör),
Eindringen von Fremdkörpern in das Gerät (wie z.B. Sand, Steine oder Staub, Transportschäden),
Gewaltanwendung oder Fremdeinwirkungen (wie z. B. Schäden durch Herunterfallen) entstanden
sind.
- Schäden am Gerät oder an Teilen des Geräts, die auf einen gebrauchsgemäßen, üblichen oder
sonstigen natürlichen Verschleiß zurückzuführen sind.
4. Die Garantiezeit beträgt 24 Monate und beginnt mit dem Kaufdatum des Gerätes. Garantieansprüche sind vor Ablauf der Garantiezeit innerhalb von zwei Wochen, nachdem Sie den Defekt erkannt
haben, geltend zu machen. Die Geltendmachung von Garantieansprüchen nach Ablauf der Garantiezeit ist ausgeschlossen. Die Reparatur oder der Austausch des Gerätes führt weder zu einer
Verlängerung der Garantiezeit noch wird eine neue Garantiezeit durch diese Leistung für das Gerät
oder für etwaige eingebaute Ersatzteile in Gang gesetzt. Dies gilt auch bei Einsatz eines Vor-OrtServices.
5. Für die Geltendmachung Ihres Garantieanspruches melden Sie bitte das defekte Gerät an unter:
www.Einhell-Service.com. Halten Sie bitte den Kaufbeleg oder andere Nachweise Ihres Kaufs des
Neugeräts bereit. Geräte, die ohne entsprechende Nachweise oder ohne Typenschild eingesendet
werden, sind von der Garantieleistung aufgrund mangelnder Zuordnungsmöglichkeit ausgeschlossen. Ist der Defekt des Gerätes von unserer Garantieleistung erfasst, erhalten Sie umgehend ein
repariertes oder neues Gerät zurück.
Selbstverständlich beheben wir gegen Erstattung der Kosten auch gerne Defekte am Gerät, die vom
Garantieumfang nicht oder nicht mehr erfasst sind. Dazu senden Sie das Gerät bitte an unsere Serviceadresse.
Für Verschleiß-, Verbrauchs- und Fehlteile verweisen wir auf die Einschränkungen dieser Garantie gemäß den Service-Informationen dieser Bedienungsanleitung.
Einhell Service · Eschenstraße 6 · 94405 Landau/Isar (Deutschland)
- 32 -
Anl_FREELEXO_SMART_SPK13.indb 32Anl_FREELEXO_SMART_SPK13.indb 32 10.10.2022 12:44:1210.10.2022 12:44:12

D
Sehr geehrte Kundin,
sehr geehrter Kunde,
LIEBE MÖGLICHMACHER,
wir haben das Ziel, alles dafür zu tun, damit Sie mit Einhell all Ihre Projekte möglich machen können. Aus diesem
Grund ist Service bei uns gelebter Anspruch: mit über 20 Jahren Erfahrung und mehr als 120 kompetenten und
persönlichen Ansprechpar tnern hat es sich der Einhell Service auf die Fahnen geschrieben, Sie bei allen Fragen
zu Ihrem Produkt zu unterstützen. Dazu gehört ein beratendes Technikerteam, bis zu 10 Jahre Ersatzteilverfügbarkeit, 24 Stunden Versandservice, eine leistungsfähige Reparatur-Organisation und ein ȵ ächendeckendes
Service-Partnernetz.
Über unser Onlineportal www.Einhell-Service.com sind viele unserer verfügbaren Services jetzt noch
schneller und einfacher für Sie erreichbar – r und um die Uhr, sieben Tage die Woche.
ERSATZTEILE
PREISINFORMATIONEN
GARANTIEVERLÄNGERUNGEN
Einhell Service · Eschenstraße 6 · 9 4405 Landau an der Isar
Ser vice-Hot line: 09951 - 959 2 037 01-2053 3517
Hilfe stellung be i Selbstmo ntage: 09951 - 959 203 5 01-2053 3515
Inbet riebnahme S ervice: 0 9951 - 959 2036 01-2053 3516
E-Mail: Service-DE@Einhell.com Service-AT@Einhell.com
Deutschland Österreich
ZUBEHÖR
VERFÜGBARKEITEN
REPARATURSERVICE
Wir freuen uns auf Ihren Besuch unter
PRODUKTINFORMATIONEN
TRACK & TRACE
SERVICE-STELLEN
VOR ORT
Einhell-Service.com
>>>
- 33 -
Anl_FREELEXO_SMART_SPK13.indb 33Anl_FREELEXO_SMART_SPK13.indb 33 10.10.2022 12:44:1310.10.2022 12:44:13
GB
Table of contents
1. Safety regulations
2. Layout and items supplied
3. Intended use
4. Technical data
5. Starting up
6. Operation
7. Cleaning, maintenance and ordering spare parts
8. Storage
9. Transport
10. Disposal and recycling
11. Indicators on the charging station and troubleshooting
12. Indicators on the robot lawn mower and troubleshooting
13. Charger indicator
Danger! - Read the operating instructions to reduce the risk of injury.
Children are not allowed to use this equipment. This equipment can be used by people with limited physical, sensory or mental capacities or those with no experience and knowledge if they are supervised or
have received instruction in how to use the equipment safely and understand the dangers which result
from such use. Children are not allowed to play with the equipment.
Children are not allowed to clean the equipment or carry out user-level maintenance work.
- 34 -
Anl_FREELEXO_SMART_SPK13.indb 34Anl_FREELEXO_SMART_SPK13.indb 34 10.10.2022 12:44:1410.10.2022 12:44:14

GB
Danger!
When using the equipment, a few safety precautions must be observed to avoid injuries and
damage. Please read the complete operating
instructions and safety regulations with due care.
Keep this manual in a safe place, so that the information is available at all times. If you give the
equipment to any other person, hand over these
operating instructions and safety regulations as
well. We cannot accept any liability for damage
or accidents which arise due to a failure to follow
these instructions and the safety instructions.
1. Safety regulations
The corresponding safety information can be
found in the enclosed booklet.
Warning!
Read all the safety information, instructions,
illustrations and technical data provided on
or with this power tool. Failure to adhere to the
following instructions may result in electric shock,
fi re and/or serious injury.
Keep all the safety information and instructions in a safe place for future use.
Explanation of the symbols used (see Fig. 14)
A. WARNING - Read the operating instructions
before you start using the machine.
B. WARNING - Keep a safe distance away from
the machine when it is in operation.
C. WARNING - Always actuate the locking me-
chanism before carrying out any work on the
machine or before lifting the machine. CAUTION - Do not touch rotating blades
D. WARNING - Do not ride on the machine.
CAUTION - Do not touch rotating blades
E. Protection class II (double-insulated)
F. Store the battery only in dry rooms with an
ambient temperature of +10°C to +40°C.
Place only charged batteries in storage (charged at least 40%).
G. Protection class III
H. Slow fuse 2 A
I. For use in dry rooms only.
J. WARNING: To charge the battery, use only
the removable power supply unit NT24/1 /
PS24/1 delivered with this tool.
Important!
Always pull out the power plug and disconnect
the perimeter wire from the charging station during a storm.
2. Layout and items supplied
2.1 Layout (Fig. 1/2)
1. Robot lawn mower
2. Control panel
3. STOP button / release button for the display
cover
4. Cutting height adjustment facility
5. Rain sensor
6. Carry-handle
7. Main switch
8. Rear wheel
9. Battery compartment cover
10. Blades
11. Blade plate
12. Front wheel
13. Power supply unit (cable)
14. Fastening peg
15. Fastening screw
16. Cable connector
17. Spare blades
18. Perimeter wire
19. Charging station
20. Charging pin
21. LED indicator
22. Hexagon key
23. Display cover
24. USB connection
25. Ruler (for detaching)
2.2 Items supplied and unpacking
Please check that the article is complete as
specifi ed in the scope of delivery. If parts are
missing, please contact our service center or the
sales outlet where you made your purchase at
the latest within 5 working days after purchasing
the product and upon presentation of a valid bill
of purchase. Also, refer to the warranty table in
the service information at the end of the operating
instructions.
Open the packaging and take out the equip-
•
ment with care.
Remove the packaging material and any
•
packaging and/or transportation braces (if
available).
Check to see if all items are supplied.
•
Inspect the equipment and accessories for
•
transport damage.
If possible, please keep the packaging until
•
the end of the guarantee period.
- 35 -
Anl_FREELEXO_SMART_SPK13.indb 35Anl_FREELEXO_SMART_SPK13.indb 35 10.10.2022 12:44:1410.10.2022 12:44:14

GB
Danger!
The equipment and packaging material are
not toys. Do not let children play with plastic
bags, foils or small parts. There is a danger of
swallowing or suff ocating!
Scope of delivery, assembly material and accessories (some not included):
Details of the scope of delivery can be found in
the enclosed related information sheet.
Robot lawn mower
•
Power supply unit (cable)
•
Charging station
•
Fastening screws (4 pcs)
•
Spare blades
•
Fastening pegs
•
Perimeter wire
•
Cable connectors
•
Hexagon key
•
Rechargeable battery
•
Charger
•
Ruler (for detaching)
•
Original operating instructions
•
Safety information
•
Required aids (not supplied)
Hammer
•
Pair of pliers
•
Wire stripper
•
Spirit level (optional)
•
4. Technical data
Voltage ........................................................ 18 V
Motor speed ......................................... 3500 rpm
Protection .....................................................IPX4
Protection class .................................................III
Weight ........................................................8.4 kg
Cutting width ..............................................18 cm
Number of blades .............................................. 3
Max. gradient .............................................. 35%
Sound power level L
Uncertainty K ...................................... 2,3 dB (A)
Cutting height
adjustment .......... 20-60 mm; infi nitely adjustable
Permissible length of perimeter wire .. max. 250 m
Perimeter wire cable antenna
Operating frequency band ............... 0-148.5 KHz
Maximum transmission power .......67.05 dBuA/m
GSM connection:
Operating frequency band:
........................................ E-GSM900 / DCS1800
Maximum transmission power: ................ 33 dBm
LTE connection (CAT-M or NB-IoT)
Operating frequency band: Band 1 / 3 / 8 / 20 / 28
Maximum transmission power: .................21dBm
............................ 57 dB(A)
WA
3. Intended use
The robot lawn mower is intended for private use,
i.e. for use in home and garden environments and
only for mowing lawns.
The equipment is allowed to be used only for its
prescribed purpose. Any other use is deemed to
be a case of misuse. The user/operator and not
the manufacturer will be liable for any damage or
injuries of any kind resulting from such misuse.
Please note that our equipment has not been designed for use in commercial, trade or industrial
applications. Our warranty will be voided if the
equipment is used in commercial, trade or industrial businesses or for equivalent purposes.
Anl_FREELEXO_SMART_SPK13.indb 36Anl_FREELEXO_SMART_SPK13.indb 36 10.10.2022 12:44:1510.10.2022 12:44:15
Power supply unit
Input voltage: ...................100- 240 V ~ 50 /60 Hz
Output voltage: ....................................... 24 V DC
Output current: ............................................ 1.5 A
Protection class: ...........................................II /
Sound values were measured in accordance with
the standards EN ISO 3744:1995 and ISO 11094:
1991.
Warning!
This equipment generates an electromagnetic fi eld during operation. Under certain
circumstances this fi eld may actively or pas-
sively impede medical implants. To reduce
the risk of serious or fatal injuries, we recommend persons with medical implants to consult their doctor and the manufacturer of the
medical implant prior to using the equipment.
- 36 -
쓑

GB
5. Starting up
Read the operating instructions fully before
you start work on the installation of the robot
lawn mower. The quality of the installation
work aff ects how eff ectively the robot lawn
mower works later on.
5.1 How it works
The robot lawn mower chooses its direction on
a random basis. The robot lawn mower works its
way over every area which is enclosed within the
perimeter wire (18), so that the entire garden gets
mowed. Whenever the robot lawn mower detects
a correctly installed perimeter wire (18), the robot
lawn mower turns about and drives in a diff erent
direction within the area. All zones that you wish
to protect within the lawn area – e.g. garden
ponds, trees, furniture or fl ower beds – must be
cordoned off by the perimeter wire (18). The pe-
rimeter wire (18) must form a closed circuit. If the
robot lawn mower bumps into an obstacle within
the mowing area, it reverses and then continues
mowing in a diff erent direction (Fig. 3).
5.2 Sensors
The robot lawn mower is equipped with a number
of safety sensors.
Lifting sensor:
•
If the robot lawn mower is raised at the back
by more than 30° from the ground or if a front
wheel (12) loses contact with the ground, the
robot lawn mower and the rotation of the blades (10) will be stopped immediately.
Tilting sensor:
•
If the robot lawn mower tilts severely in any direction, the robot lawn mower and the rotation
of the blades (10) are stopped immediately.
Obstruction sensor:
•
The robot lawn mower is able to detect obstacles in its path. If the robot lawn mower collides with an obstacle, the robot lawn mower
and the rotation of the blades will be stopped
immediately and the mower will reverse away
from the obstacle.
Rain sensor:
•
The robot lawn mower is equipped with a rain
sensor (5) to prevent the robot lawn mower
from operating in the rain. The robot lawn mower returns to the charging station (19) when
it detects rain and is completely recharged
there. Once the rain sensor (5) is dry again,
the robot lawn mower will stay in the charging
station (19) for another two hours. Only then
will it begin working again, provided it is still
in an active time window. If the rain sensor (5)
has been activated (this is recommended in
order to exert less stress on the lawn), you will
see a bright cloud in the display (50). If the
sensor triggers, a dark cloud with rain drops
will appear. Do not short-circuit the two metal
sensors with metal or any other conductive
material. This will impede the correct operation of the robot lawn mower.
5.3 Preparations
First, draw a sketch of your lawn. Include obstacles in your sketch and draw up a plan for how you
intend to protect them. This will make it easier to
fi nd a good position for the charging station (19)
and to lay the perimeter wire (18) around bushes,
fl ower beds, etc. (Fig. 4). If the grass is taller than
60 mm it has to be shortened fi rst to avoid expo-
sing the robot lawn mower to excessive load and
adversely aff ecting its operating effi ciency. Use a
conventional lawn mower or trimmer to do this.
Remove all loose objects from the lawn which
could get damaged by the robot lawn mower or
damage the robot lawn mower itself.
Have the following tools ready: A hammer, tongs,
a wire stripper and a spirit level (optional).
Fitting the rechargeable battery
A battery (A) from the Power-X-Change series
is needed to operate the robot lawn mower. Im-
portant: Depending on the model of your robot
lawn mower, it might not come complete with the
battery (A). Open the battery compartment cover
(9). Press the pushlock button of the battery (A)
and push the battery (A) into the mount provided.
Close the battery compartment cover (9) and
make sure that it latches in place correctly (Fig.
10). To remove the battery (A), open the battery
cover (9). Press the pushlock button of the battery
(A) and pull out the battery (A).
5.4 Charging station
5.4.1 Position of the charging station
Determine the best position for the charging station fi rst (19). An outdoor socket outlet is required
which supplies a permanent supply of electricity
so that the robot lawn mower works at all times.
The charging station (19) must be placed on a
fl at area at the level of the turf. Make sure that the
area is fl at and dry. Select a position which is in
the shade, because it is best if the rechargeable
battery is charged up in a cool area. Also note
that the perimeter wire has to be laid in a straight
line for least 2 m in front of the charging station
(19) (Fig. 5a). Curves immediately in front of the
- 37 -
Anl_FREELEXO_SMART_SPK13.indb 37Anl_FREELEXO_SMART_SPK13.indb 37 10.10.2022 12:44:1510.10.2022 12:44:15

GB
charging station (19) could cause problems when
docking for charging.
5.4.2 Localization of the charging station
When the rechargeable battery is almost empty,
the robot lawn mower returns to the charging
station (19) by following the perimeter wire (18) in
a counterclockwise direction until it reaches the
charging station (19). Make sure, therefore, that
the charging station (19) faces in the right direction when you position it. (Fig. 5b)
5.4.3 Connecting the charging station to the
power supply unit
1. Before you connect the charging station (19)
to the power supply, check that the mains power supply is 100-240 V at 50/60 Hz.
2. Connect the power supply unit (13) directly to
a socket outlet. Do not use the cable for any
other use.
3. Do not use the power supply unit if it is damaged (13). In the event of any damage to
cables or the power supply unit (13), contact
an authorized professional immediately for
replacement.
4. Do not charge up the robot lawn mower in a
damp location. Do not charge up the robot
lawn mower at temperatures above 40°C or
below 5°C.
5. Keep the robot lawn mower and the power
supply unit (13) away from water, sources of
heat and chemicals. Keep the cable of the power supply unit (13) away from sharp edges
in order to prevent damage.
6. Connect the power supply unit (13) to the
charging station (19). (Fig. 5c)
To charge up the rechargeable battery for the
robot lawn mower straight away while you are
still doing the installation work, fi rst switch on the
robot lawn mower with the main switch (7) and
place the robot lawn mower in the charging station (19).
„Boundary cut“ mode or „Spot mowing“ mode
•
was started outside the set work window and
has been completed by the robot lawn mower.
In these cases the robot lawn mower automatically runs along the perimeter wire (18) until it
reaches the charging station (19).
When the robot lawn mower wants to return to the
charging station (19), it will fi rst look for the peri-
meter wire (18) and then move along the perimeter wire (18) in counter-clockwise direction.
The LED indicator (21) on the charging station
(19) lights up red while charging of the rechargeable battery is in progress.
When the LED indicator (21) on the charging
station (19) turns to green, this indicates that the
rechargeable battery is fully charged. Once it has
been fully charged, the robot lawn mower resumes operation or remains in the charging station
until the next work time window (19).
If there is an obstacle on the perimeter wire (18)
during the trip back to the charging station (19),
the robot lawn mower will come to a stop in front
of the obstacle after several attempts and will not
be able to get back to the charging station (19).
Remove all obstacles on the perimeter wire (18).
If the temperature of the rechargeable battery exceeds 45°C, charging will stop in order to prevent
damage to the rechargeable battery. Charging
resumes automatically once the temperature has
dropped again.
If the temperature of the controller of the robot
lawn mower exceeds 65°C, the robot lawn mower
will return to the charging station (19). Operation
resumes in accordance with the settings once the
temperature has dropped again.
If the rechargeable battery becomes empty before the robot lawn mower has returned to the charging station (19), it will not be possible for the robot lawn mower to start up again. Bring the robot
lawn mower back to the charging station (19) and
leave the main switch (7) switched on. The robot
lawn mower will be charged up automatically.
5.4.4 Information about charging
The robot lawn mower returns to the charging station (19) in each of the following situations:
You send the robot lawn mower back manu-
•
ally.
The battery charge level drops below 30%.
•
The end of the daily work time has been
•
reached.
The rain sensor has tripped.
•
The robot lawn mower has become overhea-
•
ted.
Anl_FREELEXO_SMART_SPK13.indb 38Anl_FREELEXO_SMART_SPK13.indb 38 10.10.2022 12:44:1610.10.2022 12:44:16
5.5 Perimeter wire
IMPORTANT! Severed perimeter wires and
consequential damages are not covered by
the warranty!
5.5.1 Laying the perimeter wire
The perimeter wire (18) can be laid both on the
ground and in the ground. The fastening pegs
(14) can break when hammered in if the ground
is hard or dry. Water the lawn before installing the
perimeter wire if the ground is very dry.
- 38 -

GB
Installation on the ground
•
Lay the perimeter wire (18) securely on the
ground and fasten it with the supplied fastening pegs (14) if you do not intend to scarify
or aerate the lawn any time later. You can still
adjust the position of the perimeter wire again
during the first few weeks of using the robot
lawn mower. After a certain time, however,
the perimeter wire will become overgrown
with grass and no longer visible. Install the
perimeter wire with a maximum distance of
1 m between fastening pegs (14). Reduce
the distance between the fastening pegs on
uneven areas of the lawn. Avoid situations in
which the wire is not actually on the ground.
Make sure that the perimeter wire cannot be
severed by the robot lawn mower.
Installation in the ground
•
Bury the perimeter wire in the ground at a
depth of up to 5 cm. This will prevent the
perimeter wire (18) getting damaged during
scarifying or aeration, for example.
Important!
Keep a reserve of 1 m of wire at the rear end of
the charging station so that you can make corrections at a later time.
5.5.2 Narrow points
If the lawn has a narrow point, your robot lawn
mower will be able to operate there as long as the
corridor has a width of at least 1.4 m (80 cm between the perimeter wires) and a maximum length
of 8 m. (Fig. 3).
basis of the height divided by the distance. (Fig.
6c)
Example: a/b = 35 cm/100 cm = 35%
5.5.6 Installation of the perimeter wire on
gradients
The robot lawn mower can slip on gradients,
especially if the grass is wet, and run over the
perimeter wire (18) as a result. It is therefore
recommendable to pay attention to the following
points (Fig. 6d):
In the area at the top of a slope, the perimeter
•
wire (18) should not be installed on gradients
over 35%. Make sure that a distance of 30 cm
from obstacles and the edges of the lawn is
maintained.
In the area at the bottom of a slope, the
•
perimeter wire (18) should not be installed
on gradients over 17%. Make sure that a dis-
tance of 40 cm from obstacles and the edges
of the lawn is maintained.
5.5.7 Driveways and paved paths
Cordon off raised pathways, areas surfaced
•
with gravel or containing bark mulch, lower
lying beds or other similar areas. Lay the peri-
meter wire (18) at a distance of at least 30 cm
away. (Fig. 6e and 6g)
Paths which are flush with the turf do not
•
need to be cordoned off, because the robot
lawn mower can simply run over them. You
can also lay the perimeter wire (18) over
paths. (Fig. 6f and 6g)
5.5.3 Distance to the garden perimeter
When the robot lawn mower approaches a perimeter wire (18), the perimeter wire is detected by
the sensors in the front of the robot lawn mower.
Before the robot lawn mower turns about, however, it runs over the perimeter wire (18) by up to
30 cm. Please bear this in mind when planning
your mowing area. (Fig. 6a)
5.5.4 Laying the wire in corners
Avoid laying the perimeter wire (18) at a rightangle (90°) in corners. To make sure that the
robot lawn mower does not run too far beyond the
perimeter wire (18), lay the perimeter wire (18) as
shown in Fig. 6b.
5.5.5 Calculating the gradient of the lawn
The robot lawn mower can cope with gradients
of up to 35%. You therefore need to avoid steeper
gradients. The gradient can be determined on the
Anl_FREELEXO_SMART_SPK13.indb 39Anl_FREELEXO_SMART_SPK13.indb 39 10.10.2022 12:44:1610.10.2022 12:44:16
5.5.8 Perimeter islands
To protect obstacles in the mowing area, create
perimeter islands. This will enable collisions with
delicate objects, garden ponds, trees, furniture,
fl ower beds, etc., to be avoided. (Fig. 6h and 6i)
Roll out the perimeter wire (18) from the
•
edges to the objects you want to protect.
Secure the perimeter wire (18) with fastening
•
pegs (14) in a clockwise direction around the
object you want to protect.
Completely enclose the perimeter islands and
•
then run the perimeter wire (18) back to the
point at which you left the edge of the lawn.
Perimeter islands need to be at least 0.8 m
•
apart. Alternatively, combine the objects to
make them into a joint perimeter island. (Fig.
6h)
The perimeter wires (18) to and from the pe-
•
rimeter island should be laid parallel and very
close to one another. - Caution! Perimeter
- 39 -

GB
wires (18) must not cross over! - You
should therefore fasten both the parallel perimeter wires (18) to the ground together using
the same fastening peg (14). (Fig. 6i)
The robot lawn mower will run over the two
•
parallel perimeter wires (18) in the mowing
area, but the robot lawn mower will stop where single perimeter wires (18) are laid.
5.5.9 Obstacles
Obstacles with a height over 10 cm
•
(Fig. 6j)
Solid obstacles which are over 10 cm in
height, e.g. trees, walls, fences, garden
furniture, etc., are detected by the collision
sensors. If the robot lawn mower collides with
an obstacle, it will stop, switch off the mower
unit, reverse and turn so that it can continue
mowing in the other direction. Soft, unstable
and valuable obstacles need to be protected
by a perimeter wire island.
Stones and low obstacles
•
Stones, rocks and low obstacles of less than
10 cm in the mowing area need to be protected, because otherwise the robot lawn mower
could run over them. If not, this could result
in the robot lawn mower getting damaged or
blocked.
Trees (Fig. 6k)
•
The robot lawn mower treats trees as obstacles. However, where any tree roots project
above the ground to a height of less than 10
cm, the area in which they are located needs
to be protected. This will prevent damage to
the roots and to the robot lawn mower. Make
sure that the minimum distance between the
perimeter wire (18) and the obstacle is 30 cm.
5.5.10 Main area and secondary area (Fig. 6l)
A secondary area (B) designates a work area
which is not directly connected to the main area
(A), e.g. via a stretch of lawn or a path. To create
a separate secondary area (B) lay the perimeter
wire (18) from the main area (A) to the secondary
area (B) and back again. The perimeter wire (18)
to and from the secondary area (B) should be laid
such that the return run is parallel and very close
to the forward run. - Caution! Perimeter wires
(18) must not cross over each other! - You
should therefore fasten the parallel perimeter
wires (18) to the ground jointly using the same
fastening pegs (14).
To be able to mow the secondary area (B) you
must carry the robot lawn mower by hand into the
secondary area (B). Start the required mowing
program and select “Secondary area” in the submenu (see „Settings of the robot lawn mower“).
When the robot lawn mower is in the secondary
area (B) it will not try to follow the perimeter wire
(18) towards the charging station (19) if the battery charge level is low.
5.6 Connecting the charging station
Finish laying the complete perimeter wire (18)
before you connect it to the charging station.
Keep an extra length of 1 m of perimeter wire (18)
at each end so that you can make further adjustments at a later time.
Using a wire stripper, remove a length of 10 to 15
mm of the insulation at the ends of the perimeter
wire (18) for connecting to the charging station
(19).
Pull out the power plug before you connect the
perimeter wire (18) to the charging station (19).
The perimeter wire (18) laid to the front end of
the charging station (19) must be run to the back
via the cable holders on the underside of the
charging station (19). Connect this perimeter wire
(18) to the connection on the left (black). Then
pass the rear perimeter wire (18) through the hole
(stress-relief) in the connection area and connect
it to the connection on the right (red) (Fig. 7a).
Important! Perimeter wires (18) must not
cross over!
Then connect the power supply. The LED indicator (21) on the charging station (19) should light
up green and stay on permanently. If the LED
does not light up, check the connections fi rst. If
the LED lights up green but not permanently, read
the “Indicators on the charging station and troubleshooting” table at the end of these operating
instructions.
5.7 Switching on and checking the
installation
As soon as the LED indicator (21) on the charging
station (19) lights up green, the mowing area is
ready for the robot lawn mower. Please check fi rst
that all the fastening pegs (14) on the perimeter
wire (18) have been fully tapped in. Place the robot lawn mower about 3 m to the rear of the charging station (19) in front of the perimeter wire (18).
The robot lawn mower needs to be facing the
perimeter wire (18) at an angle of 90° (Fig. 7b).
Switch on the main switch (7) (ON) (Fig. 8).
Unlock the robot lawn mower by entering the PIN
(see the section “Locking mechanism / PIN”).
Press the “MODE“ button (52). Then use the na-
- 40 -
Anl_FREELEXO_SMART_SPK13.indb 40Anl_FREELEXO_SMART_SPK13.indb 40 10.10.2022 12:44:1710.10.2022 12:44:17

GB
vigation buttons (55) to select the point “Back to
station” and confi rm with the “OK“ button (56).
Press the “START” button (53) and then close the
display cover (23). The robot lawn mower will now
follow the perimeter wire (18) in a counterclockwise direction. Observe the robot lawn mower
during the complete trip along the perimeter wire
(18) until it is back in the charging station (19). If
the robot lawn mower has any problems at any
points, correct the perimeter wire (18) if necessary and repeat the operation. The rechargeable
battery of the robot lawn mower will now be fully
charged. If any problems occur with docking, you
may need to reposition the charging station (19)
sideways until docking works without any problems.
To stop the robot lawn mower at any time, press
the red STOP button (3). When you press the
STOP button (3), the robot lawn mower will come
to a stop and wait for further instructions.
5.8 Securing the charging station
Once the robot lawn mower is working properly
and a suitable position for the charging station
(19) has been found, the charging station (19)
must be fi xed in place using the fastening screws
(15). Use the hexagon key (22) to secure the fastening screws (15) fully in the ground. (Fig. 7c)
5.9 Battery charge level indicator
Press the button for the battery charge level indicator. The battery charge level indicator indicates
the charge state of the battery by means of 3
LEDs (Fig. 13b).
All 3 LEDs are lit:
The battery is fully charged.
2 or 1 LED(s) are lit:
The battery has an adequate remaining charge.
Important!
When using a multi-Ah pack (e.g. 4-6Ah), always
set the higher capacity. Thanks to the gentle
charging and discharging of the robot lawn mower
there is no need to use the lower capacity in order
to extend the working life.
5.10 Charging the rechargeable battery with
the charger
In normal operation the battery (A) of the robot
lawn mower is charged via the charging station
(19). For independent use of the battery (A) from
the Power-X-Change series it can also be charged in the external Power-X-Charger. Important!
– Depending on the model of your robot lawn mower, it might not come complete with the battery
charger (Fig. 13a/Item B).
1. Check that your mains voltage is the same as
that marked on the rating plate of the battery
charger. Insert the power plug of the charger
(A) into the socket outlet. The green LED will
then begin to fl ash.
2. Insert the rechargeable battery (B) into the
battery charger (A) (Fig. 13a).
3. In the section entitled „Charger indicator“ you
will fi nd a table with an explanation of the LED
indicator on the charger.
The rechargeable battery can become a little
warm during the charging. This is normal.
If the battery pack fails to charge, check:
whether there is voltage at the socket outlet
•
whether there is good contact at the charging
•
contacts
If the battery pack still fails to charge, send
the charger
•
and the battery pack
•
to our customer service center.
1 LED fl ashes:
The battery is empty, recharge the battery.
All LEDs blink:
The battery temperature is too low. Remove the
battery from the equipment, keep it at room temperature for one day. If the fault reoccurs, this means that the rechargeable battery has undergone
exhaustive discharge and is defective. Remove
the battery from the equipment. Never use or
charge a defective battery.
Anl_FREELEXO_SMART_SPK13.indb 41Anl_FREELEXO_SMART_SPK13.indb 41 10.10.2022 12:44:1710.10.2022 12:44:17
To ensure that items are properly packaged
and delivered when you send them to us,
please contact our customer service or the
point of sale at which the equipment was
purchased.
When shipping or disposing of batteries and
cordless tools, always ensure that they are
packed individually in plastic bags to prevent
short circuits and fi res.
To ensure that the battery pack provides long service, you should take care to recharge it promptly.
You must recharge the battery pack when you
- 41 -

GB
notice that the performance of the device drops.
Never allow the battery pack to become fully discharged. This will cause it to develop a defect.
6. Operation
6.1 Main switch
The robot lawn mower is equipped with a main
switch (7). Use the main switch (7) to switch the
robot lawn mower on (ON) and off (OFF) (Fig. 8).
Once the robot lawn mower has been switched
on, it is locked by a PIN.
6.2 Control panel
The robot lawn mower has already been programmed at the factory and default settings have
been made for it. However, these can be changed
if required. Even though the factory settings will
be suitable for most gardens, you should still
familiarize yourself with the available options nevertheless.
Explanation of the control panel with LCD
(Fig. 9a)
50. LCD
51. “SET” button
52. “MODE” button
53. “START” button
54. ”BACK” button
55. Navigation buttons
56. “OK” button
Explanation of the symbols on the LCD
(see Fig. 9b):
60. Signal strength of the network connection
61. Signal detection of the perimeter wire
62. Rain sensor status
63. Battery status
64. Manual mowing
65. Time schedule control
66. SMART control
67. Back to the charging station
6.3 Cutting height adjustment facility
Important! Adjust the cutting height only when
the robot lawn mower has been switched off . Do
this by pressing the STOP button (3). The cutting
height adjustment facility (4) allows the cutting
height of the robot lawn mower to be set to infi ni-
tely adjustable settings between 20 and 60 mm,
which can be viewed on the scale.
If the grass is taller than 60 mm it has to be shortened to a maximum of 60 mm fi rst to avoid expo-
sing the robot lawn mower to excessive load and
adversely aff ecting its operating effi ciency. Use a
conventional lawn mower or trimmer to do this.
After installation has been completed, the cutting
height can be adjusted using the cutting height
adjustment facility (4). Always start with a higher
cutting height and reduce it in small steps until
you reach the desired height.
6.4 Locking mechanism / PIN
The locking mechanism prevents the unauthorized use of the robot lawn mower without a valid
code. You have to enter a personal four-digit security code for this.
Lock release
Before you start using the robot lawn mower, you
have to enter the correct PIN (standard PIN: “0-00-0”). Enter the PIN with the help of the navigation
buttons (55).
Standard PIN: New PIN:
0 0 0 0 _ _ _ _
Changing the PIN
To change the PIN, proceed as follows.
1. Unlock the control panel.
2. First press the “SET” button (51) in order to
make your settings.
3. Use the navigation buttons (55) to navigate in
the menu on the LCD (50) to the point “Gene-
ral information” and then „PIN code”.
4. First enter the current PIN (standard PIN 0-0-
0-0) with the help of the navigation buttons
(55).
5. Then use the navigation buttons (55) to enter
your personal PIN.
6. Confi rm the settings you have just made.
7. Repeat step 5. and step 6 in order to confi rm
the new PIN.
8. Important! Make a note of the new PIN.
Requesting your PIN if you lose it
Have the receipt and the serial number of the
robot lawn mower ready. You need them in order
to get your PIN.
Version A:
1. Press and hold the „SET” button (51) for 6
seconds in locked status.
2. The PUK will now appear in the display (50).
3. Contact the customer services team to obtain
your PIN.
- 42 -
Anl_FREELEXO_SMART_SPK13.indb 42Anl_FREELEXO_SMART_SPK13.indb 42 10.10.2022 12:44:1810.10.2022 12:44:18

GB
Version B:
1. Connect an empty USB stick to the USB connection (24) as shown (Fig. 11).
2. Switch on the main switch (7) (ON).
3. The robot lawn mower will automatically save
the PUK to your USB stick and will then end
the operation with a beep.
4. Pull out the USB stick. Import the data from
the USB stick to a computer. A text fi le (*.txt)
will have been created by the robot lawn
mower. This fi le contains a PUK, a personal
code. Please contact the customer services
team to obtain your PIN.
6.5 Settings of the robot lawn mower
The main menu on the LCD (50) shows you the
current date and time settings of the robot lawn
mower, as well as the current charge level. At the
same time the status of the rain sensor and of the
wire signal and of the selected mowing program
will appear in the toolbar. On the control panel
you can use either the “SET” button (51) to make
settings on the robot lawn mower or the “MODE”
button (52) to start the robot lawn mower with
various mowing programs. Use the navigation
buttons (55) to go to the option where you want to
make the settings. Press the “BACK” button (54)
in order to exit the respective menu.
Making settings with the “SET” button (51)
The “SET” button (51) can be used to make the
basic settings on your robot lawn mower. Use
the navigation buttons (55) to move to where you
want to go and then use the “OK” button (56) to
confi rm or the “Back” button (54) to discard the
settings you have made.
Zone
•
Where gardens have lots of angles, the robot
lawn mower may have problems reaching
every part of the lawn and mowing it completely. In this case you can select several starting points on the perimeter wire (18). This will
enable the robot lawn mower to get to even
those parts of your garden that are difficult to
reach. The robot lawn mower will run the selected distance along the perimeter wire (18)
and then start mowing in this part of the garden (Fig. 6m). Use the navigation buttons (55)
to go to the point that you wish to change and
enter the distance and frequency accordingly.
The charging station (19) is automatically
defined as starting point 1. The two other starting points can be selected as you wish. For
this you must measure the distance between
the charging station (19) and the starting
point in clockwise direction along the perimeter wire (18). With the frequency setting you
decide how often the robot lawn mower starts
its work from the charging station (19) or from
the respective starting points.
Boundary cut
•
Once a week the robot lawn mower will mow
the edge of the lawn at the beginning of its
work window before it starts the mowing operation. The default factory setting is “On”.
Error log
•
From here you will be informed about the
latest error messages concerning your robot
lawn mower.
Rain sensor
•
The rain sensor (5) can be switched on and
off with this setting. The default factory setting
for this sensor is “On”. A detailed description
of the rain sensor can be found in the section
“Starting up” under “Sensors”.
General
•
- PIN code: You can replace the default
PIN for the robot lawn mower with your own
choice of PIN. To do so, proceed as described
in the chapter “Locking mechanism / PIN”.
Important! Make a note of the new PIN.
- Date & time: Use the navigation buttons
(55) to go to the point that you want to change
and make the settings accordingly.
- Language: Use the navigation buttons (55)
to activate the language that you want.
- Software version: The current version of
the robot lawn mower software is noted here.
Factory settings: Reset the robot lawn mo-
•
wer to the as-delivered state.
Mowing programs – “MODE” button (52)
Use the navigation buttons (55) to go to the mowing program that you want to start.
Manual
•
In manual mode you can start the robot lawn
mower once with a different mowing program.
You can always choose between “Main area”
and “Secondary area”. More details of the
two areas can be found in the section “Before
using for the first time” under “Perimeter wire”.
- Mowing
When you start the robot lawn mower to mow
the lawn, the mower will switch to normal operating mode with the set time schedule.
- Boundary cut
Place the robot lawn mower close to the perimeter wire (18) or start the mower while it is in
the charging station (19). With its mower unit
activated, the robot lawn mower will follow
- 43 -
Anl_FREELEXO_SMART_SPK13.indb 43Anl_FREELEXO_SMART_SPK13.indb 43 10.10.2022 12:44:1810.10.2022 12:44:18

GB
the perimeter wire (18) in counter-clockwise
direction until it reaches the rear of the charging station (19). Provided no work window is
active, the robot lawn mower will then return
to the charging station (19).
- Spot mowing
It may happen that your robot lawn mower
fails to mow some spots sufficiently. Place the
robot lawn mower at the spot in question and
start the mower. The robot lawn mower will
begin to mow the lawn in a spiral pattern until
it collides with an obstacle or the perimeter
wire (18). Provided no work window is active,
the robot lawn mower will then return to the
charging station (19).
Time schedule
•
Use the navigation buttons (55) to move to
the day of the week for which you want to
make the settings. In normal operating mode,
the robot lawn mower will automatically begin
to mow your lawn at the set time on the respective day. It is recommended to base the
mowing time setting on 8 hours per day for
500 m² as a guideline. The selected working
time may need to be adapted to take account
of the garden’s size and complexity.
Back to station
•
Send your robot lawn mower back to the
charging station (19). The robot lawn mower
will look for the perimeter wire (18) and follow
it counter-clockwise to the charging station
(19). The secondary area option does not
exist in this case.
6.6 Controlling the robot lawn mower
Starting procedure
1. Press the “STOP” button (3) and open the
display cover (23) fully.
2. Unlock the control panel (2).
3. Use the“MODE” button (52) to select the mowing program and the respective work area
you want.
4. Press the “START” button (53).
5. Close the display cover (23).
The robot lawn mower will now operate in accordance with the mowing time setting. During
work time the battery charge level will appear on
the LCD (50). Whenever the battery charge level
drops to 30%, the robot lawn mower will return
automatically to the charging station (19).
Canceling the mowing operation
1. To bring the robot lawn mower to an immediate stop, press the STOP button (3).
2. Open the display cover (23) fully.
3. Unlock the control panel (2).
4. Press the “MODE” button (52) and select
“Back to station” in order to send the robot
lawn mower along the perimeter wire (18) and
back to the charging station (19).
5. Press the “START” button (53).
6. Close the display cover (23).
STOP status:
When you press the STOP button (3), the robot
lawn mower will adopt a STOP status. This will be
indicated in the LCD (50). The robot lawn mower
will interrupt its mowing until this STOP status is
canceled.
When the control panel (2) is unlocked, a window
will appear and ask if you want to cancel the
STOP status. If you confi rm, the status will be
canceled. If you don’t confi rm, the robot lawn mo-
wer will remain stopped. If the robot lawn mower
is started or returned to the charging station (19),
the STOP status will be canceled likewise. Close
the display cover (23).
6.7 Controlling the robot lawn mower with the
help of the app
The app provides you with numerous setting options for your robot lawn mower and also lets you
view its statistics and current status. The robot
lawn mower can be started manually as well as in
fi xed intervals. With the app you also have access
to SMART mode in which the robot lawn mower
chooses its work intervals itself on the basis of
weather data. The app presents you with error
messages and warnings, and it can also use push
notifi cations to keep you informed. To be able to
use all the app’s functions you must complete the
registration of your robot lawn mower.
6.7.1 Downloading the app
First download the Einhell app for your robot lawn
mower to your smart-phone. The Einhell app is
available via the following link and QR code:
iOS: http://qr.einhell.com/12e103ce
- 44 -
Anl_FREELEXO_SMART_SPK13.indb 44Anl_FREELEXO_SMART_SPK13.indb 44 10.10.2022 12:44:1910.10.2022 12:44:19

GB
Android: http://qr.einhell.com/176c0443
6.7.2 Registering the robot lawn mower
The robot lawn mower comes with an IoT function
(IoT = Internet of Things). It uses an integrated
SIM chip to connect to the available mobile phone
network, making it independent of Bluetooth or
WLAN. In the fi rst 5 years you will not be charged
anything for using the robot lawn mower in the
mobile phone network; these costs are covered
by the purchase price. Information about the remaining period of use and the possibility of an extension can be consulted in the app. In the factory
default state the function is deactivated and the
robot lawn mower will try to connect to the network (indicated by a line through the connection
symbol on the LCD (50)). To activate your robot
lawn mower, follow the instructions in the app.
When connection to the network is successful
this will be indicated on the LCD (50) and you
can now use the app’s numerous setting options
and functions. Once you have made any settings
in the app, make sure that both the robot lawn
mower and your smart-phone have a secure
internet connection. For the robot lawn mower to
be operated automatically in SMART mode over
a programmed work period, the only requirement
is for the robot lawn mower to be connected with
the internet.
6.7.3 Resetting the registration
If there is no line through the connection symbol
on the LCD (50) when you start up your robot
lawn mower for the fi rst time, you will need to
reset the robot lawn mower and register it on your
name. To do so, get in touch with our customer
service center and have the purchase receipt and
serial number of your robot lawn mower ready to
hand.
6.8 Operating the robot lawn mower
The robot lawn mower has numerous operating
modes, which means that you start up the robot
lawn mower in diff erent ways. The app provides
you with numerous setting options for your robot
lawn mower and also lets you view its statistics
and current status. The app also presents you
with error messages and warnings during operation.
You can operate the robot lawn mower manually
at its control panel (2) as well as by using the app.
6.8.1 Manual mowing
Start the robot lawn mower manually with the app.
The robot lawn mower will begin to mow the lawn
for exactly one cycle until the battery charge level
drops below 30 %. At this point the robot lawn
mower will return to the charging station (19) and
end its work cycle. Operation of the robot lawn
mower is fully manual in this case – it will not begin to mow again at a preselected time.
6.8.2 Time schedule control
You can use the navigation buttons (55) on the
robot lawn mower to enter settings in the time
schedule. The robot lawn mower will then mow
the lawn automatically at the set times. These settings can also be entered in the app for sending
to the robot lawn mower.
6.8.3 SMART control
In SMART mode the robot lawn mower is able
to work automatically with optimized operating
times for your garden and for the current weather
conditions. Every day the robot lawn mower automatically adapts the respective work interval
accordingly on an individual basis. Make sure that
the robot lawn mower is always connected to the
network. Some specifi c data are needed in order
to be able to use SMART mode. The app requires
you to enter the following information:
Location: This entry enables access to
•
location-specific weather data so that the robot lawn mower can mow in accordance with
weather conditions.
Intensity: Enter the degree of intensity with
•
which you want the robot lawn mower to mow
the lawn. This depends on the growth of your
lawn. Begin with low intensity and adjust as
required.
Area to be mowed: Enter the estimated size
•
of the area you want to mow. Only the area of
lawn you want the robot lawn mower to mow
is relevant.
Time schedule: Define the time intervals
•
when you don’t want the robot lawn mower to
mow. It can make sense to limit the mowing
times accordingly.
The robot lawn mower is used preferably during
day-time hours in order to prevent it from colliding
with semi-nocturnal and nocturnal animals such
as hedgehogs. The robot lawn mower calculates
its individual time schedule continuously on the
basis of the data provided.
- 45 -
Anl_FREELEXO_SMART_SPK13.indb 45Anl_FREELEXO_SMART_SPK13.indb 45 10.10.2022 12:44:1910.10.2022 12:44:19

GB
6.8.4 Error messages and warnings
Check the app at regular intervals for error messages and warnings. You will receive error messages, warnings and push notifi cations on your
smart-phone. This can be stopped by altering the
notifi cation settings in the app. Make sure that the
background data of the Einhell app are activated
on your smart-phone and that your smart-phone
has an active internet connection.
7. Cleaning, maintenance and
ordering spare parts
Hazard!
The equipment must be disconnected from the
power supply (pull out the power plug and switch
off the equipment by the main switch (7) (OFF)
(Fig. 8) prior to performing any cleaning and
maintenance work. Also take the battery out of
the robot lawn mower.
Caution! Wear work gloves!
7.1 Cleaning
Keep all safety devices, air vents and the
•
motor housing free of dirt and dust as far as
possible. Wipe the equipment with a clean
cloth or blow it down with compressed air at
low pressure.
Do not clean the robot lawn mower with run-
•
ning water, particularly with high-pressure
water.
Clean the equipment regularly with a damp
•
cloth and some soft soap. Do not use
cleaning agents or solvents; these may be aggressive to the plastic parts in the equipment.
Ensure that no water can get into the interior
of the equipment.
For best results, clean the robot lawn mower
•
with a brush or rag.
Check the freedom of movement of the bla-
•
des (10) and the blade plate (11)
Use cleaning product for metal or very fine
•
abrasive paper to clean the charging contacts
on the robot lawn mower (1) and the charging
station (19). Clean them in order ensure efficient charging.
7.2 Maintenance
Worn or damaged blades (10) and their fas-
•
tening screws must always be replaced as a
set.
Replace excessively worn or damaged parts
•
immediately.
In order to ensure that you enjoy the equip-
•
ment for many years to come, all screwed
parts, as well as the wheels and axles, should
be cleaned and lubricated.
Keeping your robot lawn mower in good
•
condition not only ensures a long lifespan
and high performance, but also enables the
equipment to thoroughly cut your grass with
minimal effort.
The blades (10) are subject to more wear and
•
tear than any other component. Therefore,
routinely check the condition of the blades
(10) and make sure that they are tightly fastened. An excessively vibrating robot lawn
mower can indicate that the blades (10) are
damaged or have become deformed from
striking an object. If the blades (10) are worn
or damaged, they must be replaced immediately.
Check the appearance of the cut lawn at re-
•
gular intervals. The grass will not be cleanly
cut if the blades are not sharp. This can result
in the surface of the lawn drying out easily
and turning brown. It is important therefore to
change the blades regularly in order to obtain
a clean and straight cut.
Check the bottom of the robot lawn mower
•
for dirt at regular intervals. Clean your robot
lawn mower regularly. Remove heavy soiling
immediately.
Heavy soiling of the robot lawn mower is
•
possible in the first weeks of using it for the
first time after a conventional law mower had
previously been used. In these first few weeks
you should check the bottom of your robot
lawn mower more often.
Shorten the lawn only in small steps in order
•
to prevent heavy soiling.
There are no other parts inside the equipment
•
which require maintenance.
7.2.1 Replacing the blades
Only replace the blades with genuine blades, as
this will ensure top performance and safety.
The robot lawn mower is equipped with three blades (10) fi tted to a blade plate (11). These blades
(10) have a service life of up to 3 months (if they
do not strike any obstacles). Please replace all
three blades (10) at the same time to ensure that
there is no possibility of any impairment to the
effi ciency and balance of your equipment.
To change the blades (10), proceed as follows
(Fig. 12) - Caution! - Wear work gloves:
1. Use a screwdriver to block the rotation of
- 46 -
Anl_FREELEXO_SMART_SPK13.indb 46Anl_FREELEXO_SMART_SPK13.indb 46 10.10.2022 12:44:2010.10.2022 12:44:20

GB
the blade plate (11). Do this by inserting the
screwdriver through the holes in the blade
plate (11) and the protective ridge.
2. Undo the fastening screws
3. Remove the blades (10) and replace them
with new ones. Always replace all three blades (10) as a set.
4. Then retighten the fastening screw. Check
that the new blades (10) are able to rotate
freely.
Perform a general inspection of the robot lawn
mower at regular intervals and remove any deposits which may have accumulated. At the start of
each season, ensure that you check the condition
of the blades (10). If repairs are necessary, please
contact our customer service center. Use only
genuine spare parts.
7.2.2 Software update
If you want to update the software, copy the new
software to an empty USB stick (format the USB
stick fi rst if necessary). Make sure that the rechar-
geable battery is fully charged before you carry
out the following steps.
1. Place the robot lawn mower in the area to be
mowed. The robot lawn mower must not be
in the charging station during the software
update.
2. Connect a USB stick to the USB connection
as shown in the illustration. (Fig. 11).
3. Switch on the main switch (7) (ON).
4. The robot lawn mower will now start updating
the software and will display the current sta-
tus.
5. Pull out the USB stick and restart the robot
lawn mower with the main switch (7).
7.2.3 Repairing the perimeter wire
If the perimeter wire (18) gets severed at any
point, use the supplied cable connectors (16) to
repair it. To do so, insert both ends of the severed
perimeter wire (18) into the cable connector (16)
and squeeze it together with the help of a pair of
pliers. Connect the power plug to the socket outlet. Then check whether it is working properly by
checking the LED indicator (21) on the charging
station (19).
7.3 Ordering spare parts
Please provide the following information when
ordering spare parts:
Type of unit
•
Article number of the unit
•
ID number of the unit
•
Spare part number of the required spare part
•
For our latest prices and information please go to
www.Einhell-Service.com
Replacement blades Art. No.: 34.140.20
8. Storage
Fully charge up the rechargeable battery before
putting it into storage over winter and switch
off the robot lawn mower at the main switch (7)
(OFF). Take the rechargeable battery out of the
equipment. Disconnect the power supply unit (13)
from the power supply and the charging station
(19).
The perimeter wire (18) can be left outdoors over
winter. However, make sure that the connections
are protected against corrosion. To do so, disconnect the connections of the perimeter wire (18)
from the charging station (19).
Store the equipment and accessories out of
children‘s reach in a dark and dry place at above
freezing temperature. The ideal storage temperature is between 5 and 30°C. Store the equipment
in its original packaging.
9. Transport
Switch off the equipment at the main switch
•
(7) (OFF). (Fig. 8).
Fit the shipping protectors, if any.
•
Protect the machine from damage and the
•
strong vibrations that can occur particularly
when transporting in vehicles.
Secure the machine against slipping and tip-
•
ping over.
Carry the robot lawn mower by the carry-
•
handle (6) with the blade plate (11) facing
away from your body.
- 47 -
Anl_FREELEXO_SMART_SPK13.indb 47Anl_FREELEXO_SMART_SPK13.indb 47 10.10.2022 12:44:2010.10.2022 12:44:20

10. Disposal and recycling
GB
The equipment is supplied in packaging to prevent it from being damaged in transit. The raw
materials in this packaging can be reused or
recycled. The equipment and its accessories are
made of various types of material, such as metal
and plastic. Never place defective equipment in
your household refuse. The equipment should
be taken to a suitable collection center for proper
disposal. If you do not know the whereabouts of
such a collection point, you should ask in your
local council offi ces.
For EU countries only
Never place any electric power tools in your
household refuse.
To comply with European Directive 2012/19/EC
concerning old electric and electronic equipment
and its implementation in national laws, old electric power tools have to be separated from other
waste and disposed of in an environment-friendly
fashion, e.g. by taking to a recycling depot.
Recycling alternative to the return request:
As an alternative to returning the equipment to
the manufacturer, the owner of the electrical
equipment must make sure that the equipment
is properly disposed of if he no longer wants to
keep the equipment. The old equipment can be
returned to a suitable collection point that will
dispose of the equipment in accordance with the
national recycling and waste disposal regulations.
This does not apply to any accessories or aids
without electrical components supplied with the
old equipment.
Please note that batteries and lamps (e.g. light
bulbs) must be removed from the tool before it is
disposed of.
The reprinting or reproduction by any other means, in whole or in part, of documentation and
papers accompanying products is permitted only
with the express consent of the Einhell Germany
AG.
Subject to technical changes
This consignment contains lithium-ion batteries.
In accordance with special provision 188 this
consignment is not subject to the ADR regulations. Handle with care. Danger of ignition in case
of damage to the consignment package. If the
consignment package is damaged: Check and if
necessary repackage.
For further information contact: 0049 9951 95920-
66. Outside Germany charges will apply instead
for a regular call to a landline number in Germany.
- 48 -
Anl_FREELEXO_SMART_SPK13.indb 48Anl_FREELEXO_SMART_SPK13.indb 48 10.10.2022 12:44:2110.10.2022 12:44:21

GB
11. Indicators on the charging station and troubleshooting
LED indicator (21) Description Solution
Off - No power supply - Check the power supply
Lit up green - Ready for mowing
Flashing green - Perimeter wire (18) is se-
Lit up red - Rechargeable battery is
- Rechargeable battery is fully
charged
- Perimeter wire (18) connected
vered
charging
- Inspect the perimeter wire (18) for a break
- Wait until the rechargeable battery is fully
charged.
12. Indicators on the robot lawn mower and troubleshooting
Fault messages of the robot lawn mower in the LCD display (50)
Fault Possible cause Remedy
No signal - Perimeter wire is not properly
connected
- No power supply
- The perimeter wire (18) is
severed
Outside border - Perimeter wire is not properly
connected
- The robot lawn mower is outside the mowing area
Battery error - There is a battery error on
the robot lawn mower
- The rechargeable battery
does not charge up
- The rechargeable battery
has reached the end of its
service life
Check whether the LED indicator (21) at the
charging station (19) is lit up green
- Make sure that the perimeter wire (18) has
been laid correctly and centrally under the
charging station (19)
- Check the position of the charging station
(19)
- Make sure that the perimeter wire (18) has
been laid correctly and centrally under the
charging station (19)
- Check that the robot lawn mower is inside
the mowing area
- Make sure that the rechargeable battery
has been correctly fi tted
- Check whether the main switch (7) is ON
while the robot lawn mower is in the charging station (19)
- Check the position of the charging station
(19) Replace the rechargeable battery if
necessary.
- 49 -
Anl_FREELEXO_SMART_SPK13.indb 49Anl_FREELEXO_SMART_SPK13.indb 49 10.10.2022 12:44:2110.10.2022 12:44:21
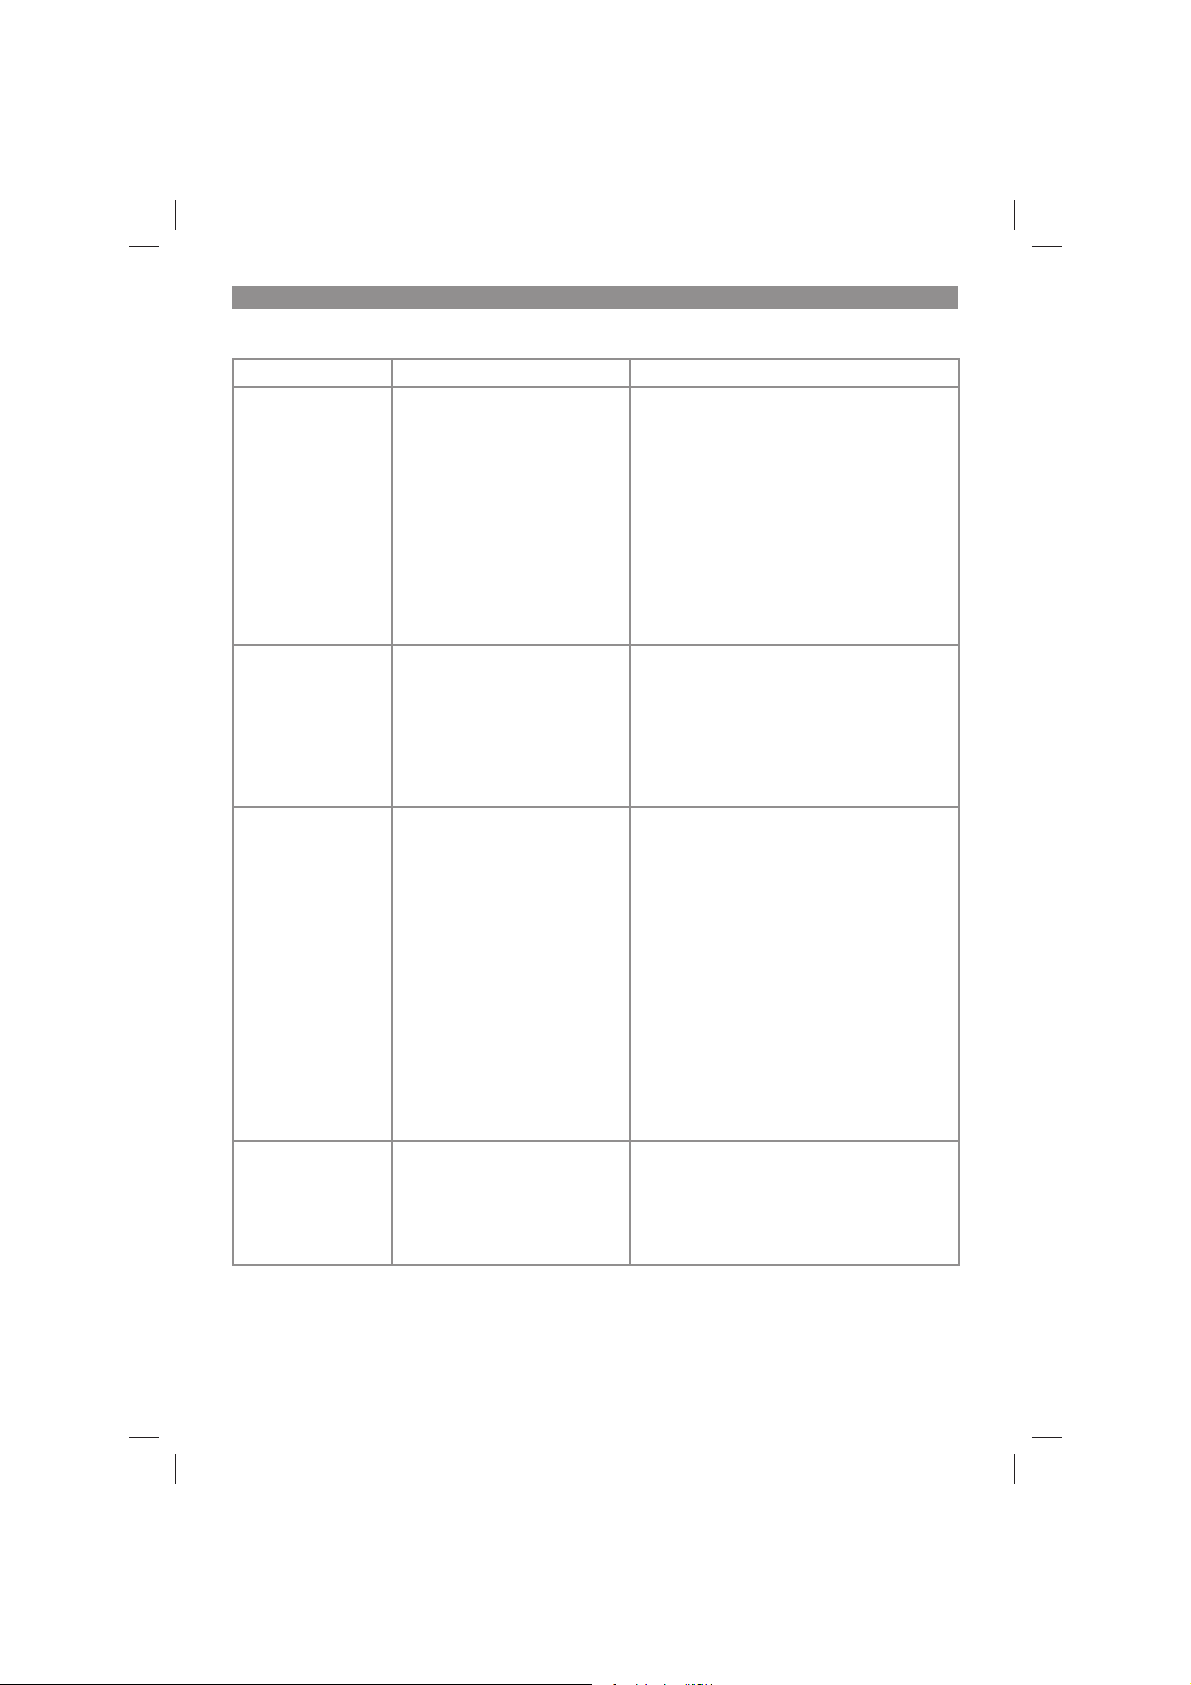
GB
Fault messages of the robot lawn mower in the LCD display (50)
Fault Possible cause Remedy
Battery temperature
error
The temperature of the rechargeable battery is too high/low
or the controller is overheated
- If the battery temperature
exceeds 65°C, the robot
lawn mower will return to the
charging station (19)
- If the battery temperature exceeds 45°C or drops below
0°C, charging will be stopped
and the robot lawn mower
will wait at the charging stati-
- Set the work time in summer to the early
hours of morning and avoid running the
robot lawn mower during the hours of the
day when it is hot
- After the rechargeable battery or controller has cooled down to the permissible
temperature range, the robot lawn mower
automatically returns to programmed operation
on (19)
Mower lifted - The lifting sensor has been
continually tripped for 10 seconds
Press the STOP button (3) to open the display cover (23). Restart the mowing operation via the control panel (2):
- If this fault occurs frequently, check the
mowing area for obstacles taller than 10
cm and either remove them or cordon
them off from the mowing area with peri-
meter wire (18).
Mower blocked - The obstruction sensor has
tripped several times within
one minute
- The obstruction sensor has
been constantly activated for
10 seconds
- The obstruction sensor has
tripped three times on the
way back to the charging station (19)
Press the STOP button (3) to open the display cover (23). Restart the mowing operation via the control panel (2):
- Check whether the robot lawn mower
is blocked by an obstacle or jammed
between trees, bushes, etc. Remove the
obstacle or avoid this area.
- If this fault occurs frequently, check the
way in which the perimeter wire (18) has
been laid. Pay particular attention to tight
angles, corridors, fences, rocks, etc., and
adjust the layout of the perimeter wire (18)
if necessary.
- Check whether the grass is too tall and
the robot lawn mower gets blocked. If this
is the case, mow the grass with a conventional law mower to below 60 mm.
Too close to garage - The robot lawn mower was
sent back too close to the
charging station (19).
Press the STOP button (3) in order to open
the display cover (23). Re-start the mowing
operation on the control panel (2):
- The robot lawn mower should be sent
back to the charging station (19) at a minimum distance of 2 m.
- 50 -
Anl_FREELEXO_SMART_SPK13.indb 50Anl_FREELEXO_SMART_SPK13.indb 50 10.10.2022 12:44:2210.10.2022 12:44:22

GB
Fault messages of the robot lawn mower in the LCD display (50)
Fault Possible cause Remedy
Rolling over - The robot lawn mower was
constantly tilted for 10 seconds
- The robot lawn mower has
been tilted for a prolonged
time in one direction
Press the STOP button (3) to open the display cover (23). Restart the mowing operation via the control panel (2):
- Move the robot lawn mower to a level area
and restart it.
- If the robot lawn mower has tilted because
of a steep slope in the mowing area, adjust the perimeter wire (18) accordingly to
avoid severe inclines.
Wheel slip - The rear wheels (8) have
lifted due to an obstacle
- The rear wheels (8) can rotate freely due to an uneven
lawn
STOP button error The display cover (23) is open
but the STOP button (3) was
not pressed
Press the STOP button (3) to open the display cover (23). Restart the mowing operation via the control panel (2):
- Move the robot lawn mower to a level area
and restart
Press the STOP button (3) to open the display cover (23). Restart the mowing operation via the control panel (2):
- Check whether the display cover (23)
can be opened and closed freely with the
STOP button (3).
- Check whether the STOP button (3) functions correctly.
PCB overtemp. The temperature of the rechar-
geable battery is too high/low
or the controller is overheated
- If the battery temperature
exceeds 65°C, the robot
lawn mower will return to the
charging station (19).
- If the battery temperature exceeds 45°C or drops below
0°C, charging will be stopped
and the robot lawn mower
will wait at the charging stati-
- Set the work time in summer to the early
hours of morning and avoid running the
robot lawn mower during the hours of the
day when it is hot.
- After the rechargeable battery or controller has cooled down to the permissible
temperature range, the robot lawn mower
will automatically return to the programmed operating mode
on (19).
Rain - The rain sensor (5) has trip-
ped.
- Wait until the robot lawn mower has dried
out.
- A detailed description of the sensor can
be found in section 5.2.
Sensor fault - The robot lawn mower was
stopped due to a sensor error
Switch off the main switch (7) (OFF) and
then switch it back on (ON) again to restart
the robot lawn mower.
- 51 -
Anl_FREELEXO_SMART_SPK13.indb 51Anl_FREELEXO_SMART_SPK13.indb 51 10.10.2022 12:44:2210.10.2022 12:44:22

GB
Fault messages of the robot lawn mower in the LCD display (50)
Fault Possible cause Remedy
Motor fault /
motor overcurrent
- The robot lawn mower has
come to a stop because of
overcurrent in the motor or
because of a motor fault
Switch off the main switch (7) (OFF) and
then switch it back on again (ON) to restart
the robot lawn mower.
- Check the height of the grass in the
mowing area and, if necessary, mow the
grass to below 60 mm using a conventional lawn mower.
- Increase the cutting height. Always start
with a higher cutting height and reduce it
in small steps until you reach the desired
height.
- Inspect the blade plates (11) and wheels
for dirt and give these parts a thorough
clean.
- Check the rear wheels and the blade plate
(11) for blockages. If you are unable to
remove the blockages, contact the responsible customer service center.
Breakdown - The robot lawn mower was
stopped due to an operating
error
Switch off the main switch (7) (OFF) and
then switch it back on again (ON) to restart
the robot lawn mower.
Troubleshooting
Fault Possible cause Remedy
The robot lawn mower comes to a stop
in the mowing area.
The robot lawn
- Battery voltage too low
- Fault in the power circuit or
the electronic components
- Bring the robot lawn mower back to the
charging station (19) for charging.
- Switch on the main switch (7) (ON).
- Contact your customer service center.
mower cannot be
switched on:
The robot lawn
mower cannot move
into the charging
station.
- The charging station (19) is
not installed correctly.
- Make sure that the LED indicator (21) on
the charging station (19) is lit up green.
- Make sure that the perimeter wires (18)
are connected at the charging station (19)
and that the front perimeter wire (18) is
laid in the middle underneath the charging
station (19).
- Make sure that the charging station (19) is
positioned correctly.
The robot lawn mower stops or travels
out of control when
near perimeter is-
- The perimeter wire (18) has
not been installed correctly
around the perimeter islands.
- Adjust the position of the perimeter wire
(18).
- Make sure that the perimeter wire (18)
does not cross over itself
lands.
- 52 -
Anl_FREELEXO_SMART_SPK13.indb 52Anl_FREELEXO_SMART_SPK13.indb 52 10.10.2022 12:44:2310.10.2022 12:44:23

GB
Troubleshooting
Fault Possible cause Remedy
The robot lawn mower is very loud.
- Damaged blades (10)
- A large amount of foreign
bodies adhere to the blades
(10)
- The robot lawn mower has
started too close to obstacles
- Damaged blade drive or
drive motor
- Other parts of the robot lawn
mower are damaged
- Replace the blades (10). The 3 blades
(10) must all be replaced together at the
same time.
- The operating effi ciency of the robot lawn
mower is dependent on the sharpness of
the blades (10). You should therefore ensure that the blades (10) are maintained in
good condition.
- Switch off the robot lawn mower safely
and wear work gloves while you clean the
blades (10) in order to avoid getting cut.
- Arrange for the motor to be repaired or
replaced by your customer service center.
The robot lawn
mower stays in the
charging station.
The robot lawn mower keeps returning
to the charging
station
The robot lawn mower comes to a halt
on the perimeter
wire and is unable
to get back to the
charging station.
- Incorrect work time settings
- The rechargeable battery is
empty
- The rain sensor has been
triggered
- The battery temperature is
high
- The battery is empty
- The length of the perimeter
wire (18) and therefore the
distance to the charging station (19) is too great for the
battery being used.
- Check the work time settings.
- The robot lawn mower will begin and end
its work in accordance with the set time
window. Outside this time window the
robot lawn mower stays in the charging
station (19).
- Remove all possible obstacles from the
perimeter wire (18). When you layout out
the perimeter wire (18), be sure to keep it
far enough away from any obstacles.
- Please use a battery with higher capacity.
- Important: When using a Multi-Ah battery (e.g. 4-6 Ah), set the higher capacity.
Thanks to the gentle charging and discharging of the robot lawn mower there is
no need to use the lower capacity in order
to extend the working life.
IMPORTANT! Severed perimeter wires and consequential damages are not covered by the warranty!
- 53 -
Anl_FREELEXO_SMART_SPK13.indb 53Anl_FREELEXO_SMART_SPK13.indb 53 10.10.2022 12:44:2410.10.2022 12:44:24

13. Charger indicator
GB
Indicator status
Red LED Green LED
Explanations and actions
Off Flashing Ready for use
The charger is connected to the mains and is ready for use; there is no
battery pack in the charger
On Off Charging
The charger is charging the battery pack in quick charge mode. The charging times are shown directly on the charger.
Important! The actual charging times may vary slightly from the stated
charging times depending on the existing battery charge.
Off On The battery is charged and ready for use. (READY TO GO)
The unit then changes over to gentle charging mode until the battery is
fully charged.
To do this, leave the rechargeable battery on the charger for approx. 15
minutes longer.
Action:
Take the battery pack out of the charger. Disconnect the charger from the
mains supply.
Flashing Off Adapted charging
The charger is in gentle charging mode.
For safety reasons the charging is performed less quickly and takes more
time. The reasons can be:
- The rechargeable battery has not been used for a very long time.
- The battery temperature is outside the ideal range.
Action:
Wait for the charging to be completed; you can still continue to charge the
battery pack.
Flashing Flashing Fault
Charging is no longer possible. The battery pack is defective.
Action:
Never charge a defective battery pack.
Take the battery pack out of the charger.
On On Temperature fault
The battery pack is too hot (e.g. due to direct sunshine) or too cold
(below 0° C).
Action:
Remove the battery pack and keep it at room temperature (approx. 20° C)
for one day .
- 54 -
Anl_FREELEXO_SMART_SPK13.indb 54Anl_FREELEXO_SMART_SPK13.indb 54 10.10.2022 12:44:2410.10.2022 12:44:24

GB
Service information
We have competent service partners in all countries named on the guarantee certifi cate whose contact
details can also be found on the guarantee certifi cate. These partners will help you with all service re-
quests such as repairs, spare and wearing part orders or the purchase of consumables.
Please note that the following parts of this product are subject to normal or natural wear and that the
following parts are therefore also required for use as consumables.
Category Example
Wear parts* Battery
Consumables* Blades
Missing parts
* Not necessarily included in the scope of delivery!
In the eff ect of defects or faults, please register the problem on the internet at www.Einhell-Service.com.
Please ensure that you provide a precise description of the problem and answer the following questions
in all cases:
Did the equipment work at all or was it defective from the beginning?
•
Did you notice anything (symptom or defect) prior to the failure?
•
What malfunction does the equipment have in your opinion (main symptom)?
•
Describe this malfunction.
- 55 -
Anl_FREELEXO_SMART_SPK13.indb 55Anl_FREELEXO_SMART_SPK13.indb 55 10.10.2022 12:44:2510.10.2022 12:44:25

GB
Warranty certifi cate
Dear Customer,
All of our products undergo strict quality checks to ensure that they reach you in perfect condition. In the
unlikely event that your device develops a fault, please contact our service department at the address
shown on this guarantee card. You can also contact us by telephone using the service number shown.
Please note the following terms under which guarantee claims can be made:
1. These guarantee terms apply to consumers only, i.e. natural persons intending to use this product
neither for their commercial activities nor for any other self-employed activities. These warranty
terms regulate additional warranty services, which the manufacturer mentioned below promises to
buyers of its new products in addition to their statutory rights of guarantee. Your statutory guarantee
claims are not aff ected by this guarantee. Our guarantee is free of charge to you.
2. The warranty services cover only defects due to material or manufacturing faults on a product which
you have bought from the manufacturer mentioned below and are limited to either the rectifi cation of
said defects on the product or the replacement of the product, whichever we prefer.
Please note that our devices are not designed for use in commercial, trade or professional applications. A guarantee contract will not be created if the device has been used by commercial, trade or
industrial business or has been exposed to similar stresses during the guarantee period.
3. The following are not covered by our guarantee:
- Damage to the device caused by a failure to follow the assembly instructions or due to incorrect
installation, a failure to follow the operating instructions (for example connecting it to an incorrect
mains voltage or current type) or a failure to follow the maintenance and safety instructions or by exposing the device to abnormal environmental conditions or by lack of care and maintenance.
- Damage to the device caused by abuse or incorrect use (for example overloading the device or the
use or unapproved tools or accessories), ingress of foreign bodies into the device (such as sand,
stones or dust, transport damage), the use of force or damage caused by external forces (for example by dropping it).
- Damage to the device or parts of the device caused by normal or natural wear or tear or by normal
use of the device.
4. The guarantee is valid for a period of 24 months starting from the purchase date of the device. Guarantee claims should be submitted before the end of the guarantee period within two weeks of the
defect being noticed. No guarantee claims will be accepted after the end of the guarantee period.
The original guarantee period remains applicable to the device even if repairs are carried out or
parts are replaced. In such cases, the work performed or parts fi tted will not result in an extension
of the guarantee period, and no new guarantee will become active for the work performed or parts
fi tted. This also applies if an on-site service is used.
5. To make a claim under the guarantee, please register the defective device at:
www.Einhell-Service.com. Please keep your bill of purchase or other proof of purchase for the new
device. Devices that are returned without proof of purchase or without a rating plate shall not be
covered by the guarantee, because appropriate identifi cation will not be possible. If the defect is co-
vered by our guarantee, then the item in question will either be repaired immediately and returned to
you or we will send you a new replacement.
Of course, we are also happy off er a chargeable repair service for any defects which are not covered by
the scope of this guarantee or for units which are no longer covered. To take advantage of this service,
please send the device to our service address.
Also refer to the restrictions of this warranty concerning wear parts, consumables and missing parts as
set out in the service information in these operating instructions.
- 56 -
Anl_FREELEXO_SMART_SPK13.indb 56Anl_FREELEXO_SMART_SPK13.indb 56 10.10.2022 12:44:2510.10.2022 12:44:25

F
Sommaire
1. Consignes de sécurité
2. Description de l‘appareil et contenu de la livraison
3. Utilisation conforme à l’aff ectation
4. Données techniques
5. Mise en service
6. Commande
7. Nettoyage, maintenance et commande de pièces de rechange
8. Stockage
9. Transport
10. Mise au rebut et recyclage
11. Affi chage de la station de recharge et élimination des erreurs
12. Affi chage de la tondeuse robot et élimination des erreurs
13. Affi chage chargeur
Danger! - Lisez ce mode d’emploi pour diminuer le risque de blessures
Cet appareil ne doit pas être utilisé par les enfants. Cet appareil peut être utilisé par les personnes
avec des capacités physiques, sensorielles ou intellectuelles diminuées ou en manque d‘expérience
et de connaissances à condition qu‘elles soient surveillées ou aient reçu les instructions relatives à
l‘utilisation sûre de l‘appareil et qu‘elles comprennent les risques résultant de cette utilisation. Les enfants n‘ont pas le droit de jouer avec l‘appareil.
Les enfants ne doivent pas eff ectuer le nettoyage et la maintenance de l‘utilisateur.
- 57 -
Anl_FREELEXO_SMART_SPK13.indb 57Anl_FREELEXO_SMART_SPK13.indb 57 10.10.2022 12:44:2610.10.2022 12:44:26

F
Danger !
Lors de l’utilisation d’appareils, il faut respecter
certaines mesures de sécurité afi n d’éviter des
blessures et dommages. Veuillez donc lire attentivement ce mode d’emploi/ces consignes de
sécurité. Veillez à le conserver en bon état pour
pouvoir accéder aux informations à tout moment.
Si l’appareil doit être remis à d’autres personnes,
veillez à leur remettre aussi ce mode d’emploi/
ces consignes de sécurité. Nous déclinons toute
responsabilité pour les accidents et dommages
dus au non-respect de ce mode d’emploi et des
consignes de sécurité.
1. Consignes de sécurité
Vous trouverez les consignes de sécurité correspondantes dans le cahier en annexe.
Avertissement !
Veuillez lire toutes les consignes de sécurité,
instructions, illustrations et caractéristiques
techniques de cet outil électrique. Toute omis-
sion lors du respect des instructions ci-après peut
entraîner des décharges électriques, un incendie
et/ou de graves blessures.
Conservez toutes les consignes de sécurité
et toutes les instructions pour l’avenir.
Explication des symboles utilisés
(cf. fi gure 14)
A. AVERTISSEMENT - Avant de faire fonction-
ner la machine, lisez le mode d’emploi !
B. AVERTISSEMENT - Lors du fonctionnement
de la machine, respectez une distance de
sécurité correspondante !
C. AVERTISSEMENT - Avant de réaliser des tra-
vaux sur la machine ou avant de soulever la
machine, actionnez le dispositif de verrouillage ! ATTENTION - Ne pas toucher les lames
en rotation !
D. AVERTISSEMENT - Ne montez pas sur la
machine ! ATTENTION - Ne pas toucher les
lames en rotation !
E. Catégorie de protection II (double isolation)
F. Stockage des accumulateurs uniquement
dans des pièces sèches à une température
ambiante de +10 °C à +40 °C. Ne stockez les
accumulateurs que lorsqu’ils sont chargés
(charge min. 40 %).
G. Catégorie de protection III
H. Fusible lent 2 A
I. À utiliser uniquement dans des endroits secs.
J. AVERTISSEMENT : Utilisez uniquement le
bloc d’alimentation NT24/1 / PS24/1 amovible, qui a été livré avec cet appareil, pour
recharger la batterie.
Attention !
Pendant un orage, débranchez la fi che de contact
et débranchez le fi l de délimitation de la station
de recharge.
2. Description de l‘appareil et
contenu de la livraison
2.1 Description de l‘appareil (fi gures 1/2)
1. Tondeuse robot
2. Zone de commande
3. Touche STOP / Touche de déverrouillage du
recouvrement d’écran
4. Réglage de la hauteur de coupe
5. Capteur de pluie
6. Poignée de transport
7. Interrupteur principal
8. Roue arrière
9. Couvercle du compartiment à accumulateur
10. Lames
11. Disque à couteaux
12. Roue avant
13. (Câble de) bloc d‘alimentation
14. Crochet de fixation
15. Vis de fi xation
16. Connecteur de câble
17. Lames de rechange
18. Fil de délimitation
19. Station de recharge
20. Broche de charge
21. Affi chage LED
22. Clé allen
23. Recouvrement d‘écran
24. Borne USB
25. Règle (pour la séparation)
2.2 Contenu de la livraison et déballage
Veuillez contrôler si l‘article est complet à l‘aide
de la description du volume de livraison. S‘il
manque des pièces, adressez-vous dans un délai
de 5 jours maximum après votre achat à notre
service après-vente ou au magasin où vous avez
acheté l‘appareil muni d‘une preuve d‘achat valable. Veuillez consulter pour cela le tableau des
garanties dans les informations service aprèsvente à la fi n du mode d‘emploi.
Ouvrez l’emballage et prenez l’appareil en le
•
sortant avec précaution de l’emballage.
Retirez le matériel d’emballage tout comme
•
- 58 -
Anl_FREELEXO_SMART_SPK13.indb 58Anl_FREELEXO_SMART_SPK13.indb 58 10.10.2022 12:44:2610.10.2022 12:44:26

F
les sécurités d’emballage et de transport (s’il
y en a).
Vérifiez si la livraison est bien complète.
•
Contrôlez si l’appareil et ses accessoires ne
•
sont pas endommagés par le transport.
Conservez l’emballage autant que possible
•
jusqu’à la fin de la période de garantie.
Danger !
L’appareil et le matériel d’emballage ne sont
pas des jouets ! Il est interdit de laisser des
enfants jouer avec des sacs et des fi lms en
plastique et avec des pièces de petite taille.
Ils risquent de les avaler et de s’étouff er !
Contenu de la livraison, matériel de montage
et accessoires (certains ne sont pas compris) :
Pour connaître le contenu de la livraison, veuillez
vous référer à la fi che d’information jointe corres-
pondante.
Tondeuse robot
•
(Câble de) bloc d‘alimentation
•
Station de recharge
•
Vis de fixation (4 pièces)
•
Lames de rechange
•
Crochet de fixation
•
Fil de délimitation
•
Connecteur de câble
•
Clé allen
•
Accumulateur
•
Chargeur
•
Règle (pour la séparation)
•
Mode d‘emploi d‘origine
•
Consignes de sécurité
•
Outils nécessaires
(non compris dans la livraison)
Marteau
•
Pince
•
Pince à dénuder
•
Niveau à bulle d’air (en option)
•
3. Utilisation conforme à
l’aff ectation
La tondeuse robot convient à un usage privé
dans le jardin domestique et familial et est exclusivement destinée à la tonte de surfaces de
gazon.
La machine doit être exclusivement utilisée
conformément à son aff ectation. Toute utilisation
allant au-delà de cette aff ectation est considérée
comme non conforme. Pour les dommages en
résultant ou les blessures de tout genre, le fabricant décline toute responsabilité et l’utilisateur/
l’opérateur est responsable.
Veillez au fait que nos appareils, conformément
au règlement, n’ont pas été conçus pour être
utilisés dans un environnement professionnel,
industriel ou artisanal. Nous déclinons toute
responsabilité si l’appareil venait à être utilisé
professionnellement, artisanalement ou par des
sociétés industrielles, tout comme pour toute activité équivalente.
4. Données techniques
Tension ....................................................... 18 V
Vitesse de rotation du moteur ............3500 tr/min
Type de protection .......................................IPX4
Catégorie de protection .....................................III
Poids ..........................................................8,4 kg
Largeur de coupe ........................................18 cm
Nombre de lames ............................................. 3
Pente max. ................................................. 35 %
Niveau de puissance acoustique L
Imprécision K ..................................... 2,3 dB (A)
Réglage de la hauteur
de coupe ......................... 20-60 mm ; en continu
Longueur admissible
du fi l de délimitation ..........................max. 250 m
Fil de délimitation servant de câble antenne
Bande de fréquence de fonctionnement
......................................................... 0-148,5 KHz
Puissance d’émission maximum ....67,05 dBuA/m
Connexion GSM :
Bande de fréquence de fonctionnement :
......................................... E-GSM900 / DCS1800
Puissance d’émission maximum : ...........33 dBm
Connexion LTE (CAT-M ou NB-IoT)
Bande de fréquence de fonctionnement :
.........................................Bande 1 / 3 / 8 / 20 / 28
Puissance d’émission maximum : ...........21 dBm
.... 57 dB (A)
WA
- 59 -
Anl_FREELEXO_SMART_SPK13.indb 59Anl_FREELEXO_SMART_SPK13.indb 59 10.10.2022 12:44:2710.10.2022 12:44:27

F
Bloc d‘alimentation
Tension d’entrée : ............ 100- 240 V ~ 50 /60 Hz
Tension de sortie : ................................. 24 V d. c.
Courant de sortie : ....................................... 1,5 A
Catégorie de protection : ..............................II /
Les valeurs de bruit ont été déterminées conformément aux normes EN ISO 3744:1995 et ISO
11094:1991.
Avertissement !
Cet appareil produit un champ électromagnétique pendant son fonctionnement. Dans
certaines conditions, ce champ peut altérer
le fonctionnement d‘implants médicaux actifs
ou passifs. Afi n de réduire les risques de
blessures graves ou mortelles, nous recommandons aux personnes qui possèdent un
implant médical de consulter leur médecin
et leur fabricant d‘implants médicaux avant
d‘utiliser la machine.
쓑
5. Mise en service
Lisez l‘intégralité du mode d‘emploi avant
de commencer l‘installation de la tondeuse
robot. La qualité de l‘installation aura un eff et
sur la qualité de travail de la tondeuse robot.
5.1 Principe de fonctionnement
La tondeuse robot choisit sa direction au hasard.
Le jardin est entièrement tondu par le fait que la
tondeuse robot traite toutes les zones situées à
l‘intérieur de la surface entourée par le fi l de déli-
mitation (18). Dès que la tondeuse robot détecte
un fi l de délimitation installé correctement (18),
il fait demi-tour et se déplace dans une autre direction à l‘intérieur de la zone. Toutes les zones,
que vous souhaitez protéger à l‘intérieur de la
surface - par ex. étangs de jardin, arbres, meubles ou parterres de fl eurs - doivent également être
délimitées avec le fi l de délimitation (18). Le fi l de
délimitation (18) doit former un cercle fermé. Si la
tondeuse robot rencontre un obstacle à l‘intérieur
de la zone de tonte, elle recule et continue de
tondre dans une autre direction (fi gure 3).
5.2 Capteurs
La tondeuse robot est équipée de plusieurs capteurs de sécurité.
Capteur de levage :
•
Si la tondeuse robot est soulevée par l’arrière
de plus de 30° du sol, ou si une roue avant
(12) perd le contact avec le sol, la tondeuse
robot et la rotation des lames (10) sont immédiatement arrêtées.
Capteur d‘inclinaison :
•
Si la tondeuse robot s‘incline fortement dans
un sens, la tondeuse robot et la rotation des
lames (10) sont immédiatement arrêtées.
Capteur d‘obstacle :
•
La tondeuse robot détecte des obstacles sur
son chemin. Lorsque la tondeuse robot heurte un obstacle, la tondeuse robot et la rotation
des lames sont immédiatement arrêtées et
elle s’éloigne de l’obstacle en reculant.
Capteur de pluie :
•
La tondeuse robot est équipée d‘un capteur
de pluie (5) afin d‘éviter que la tondeuse
robot travaille sous la pluie. La tondeuse
robot retourne à la station de recharge (19)
lorsque la pluie est détectée et y est complètement chargée. Une fois que le capteur
de pluie (5) est à nouveau sec, la tondeuse
robot reste dans la station de recharge (19)
pendant deux heures supplémentaires. Ce
n’est qu’alors qu’elle reprend le travail, si elle
est encore dans une plage horaire active. Si
le capteur de pluie (5) est activé, (recommandé pour ménager le gazon) un nuage clair
apparaît sur l’écran (50). Si le capteur s’est
déclenché, un nuage sombre avec goutte de
pluie apparaît. Ne court-circuitez pas les deux
capteurs métalliques avec du métal ou tout
autre matériau conducteur. Cela affecte le
bon fonctionnement de la tondeuse robot.
5.3 Préparation
Tout d’abord, faites un croquis de votre pelouse.
Dessinez également les obstacles et établissez
un plan pour les protéger. Cela facilite la recherche d‘une bonne position pour la station de
recharge (19) et la pose du fi l de délimitation (18)
autour des arbustes, des parterres de fl eurs, etc.
(fi gure 4). Si la hauteur de gazon est supérieure à
60 mm, le gazon doit être raccourci pour ne pas
surcharger excessivement la tondeuse robot et
aff ecter l‘effi cacité de fonctionnement. Utilisez
pour ce faire une tondeuse conventionnelle ou un
coupe-herbe.
Enlevez tout objet détaché du gazon qui pourrait
être endommagé par la tondeuse robot ou endommager la tondeuse robot.
Préparez les outils suivants : marteau, pince,
pince à dénuder et niveau à bulle d’air (en option).
- 60 -
Anl_FREELEXO_SMART_SPK13.indb 60Anl_FREELEXO_SMART_SPK13.indb 60 10.10.2022 12:44:2710.10.2022 12:44:27

F
Montage de l’accumulateur
La tondeuse robot nécessite un accumulateur
(A) de la série Power-X-Change pour fonctionner.
Attention : En fonction de votre modèle de tondeuse robot, l’accumulateur (A) peut ne pas être
compris dans la livraison. Ouvrez le couvercle
du compartiment à accumulateur (9). Appuyez
sur la touche à cran de l’accumulateur (A) et faites glisser l’accumulateur (A) dans le logement
d’accumulateur prévu à cet eff et. Fermez le
couvercle du compartiment à accumulateur (9)
et veillez à un enclenchement correct (fi gure 10).
Pour retirer l’accumulateur (A), ouvrez le couvercle du compartiment à accumulateur. Appuyez sur
la touche à cran de l’accumulateur (A) et retirez
l’accumulateur (A).
5.4 Station de recharge
5.4.1 Emplacement de la station de recharge
Déterminez d’abord le meilleur emplacement
pour la station de recharge (19). Une prise de
courant extérieure, qui fournit du courant en permanence, est nécessaire pour que la tondeuse
robot fonctionne toujours. La station de recharge
(19) doit être placée sur une surface plane à la
hauteur du gazon. Veillez à ce que la zone soit
plate et sèche. Choisissez un endroit à l’ombre
car l‘accumulateur se charge le mieux dans un
environnement frais. De plus, assurez-vous que
le fi l de délimitation est placé droit au moins 2
m devant la station de recharge (19) (fi gure 5a).
Les courbes directement devant la station de
recharge (19) peuvent entraîner des diffi cultés
d’amarrage pour la charge.
5.4.2 Localisation de la station de recharge
Lorsque l‘accumulateur est presque vide, la tondeuse robot retourne à la station de recharge (19)
en suivant le fi l de délimitation (18) dans le sens
antihoraire jusqu‘à la station de recharge (19). Par
conséquent, veillez à placer la station de recharge (19) correctement orientée. (fi gure 5b)
5.4.3 Raccordement de la station de recharge
au bloc d‘alimentation
1. Avant de connecter la station de recharge
(19) à l‘alimentation électrique, assurez-vous
que la tension réseau est de 100-240 V pour
50/60 Hz.
2. Branchez le bloc d‘alimentation (13) direc-
tement à une prise de courant. N‘utilisez le
câble pour aucune autre application.
3. N‘utilisez aucun bloc d‘alimentation endom-
magé (13). En cas de dommage au niveau
des câbles ou du bloc d‘alimentation (13),
contactez immédiatement un spécialiste agréé pour remplacement.
4. Ne chargez pas la tondeuse robot dans un
environnement humide. Ne chargez pas la
tondeuse robot à des températures supérieures à 40 °C ou inférieures à 5 °C.
5. Maintenez la tondeuse robot et le bloc
d‘alimentation (13) à l‘écart de l‘eau, de
sources de chaleur et de produits chimiques.
Maintenez le câble du bloc d‘alimentation
(13) à l‘écart des arêtes acérées afi n d‘éviter
tout dommage.
6. Connectez le bloc d‘alimentation (13) à la
station de recharge (19). (fi gure 5c)
Pour charger l‘accumulateur de la tondeuse robot
pendant l‘installation, allumez la tondeuse robot
via l‘interrupteur principal (7) et placez-la dans la
station de recharge (19).
5.4.4 Informations sur le processus
de charge
La tondeuse robot retourne à la station de recharge (19) dans une des situations suivantes :
Vous renvoyez manuellement la tondeuse
•
robot.
Le niveau de charge de l‘accumulateur passe
•
en dessous de 30 %.
Le temps de travail quotidien est terminé.
•
Le capteur de pluie s‘est déclenché.
•
La tondeuse robot est en surchauffe.
•
Le mode « Tonte des bordures » ou « Spot-
•
mowing » a été lancé en dehors de la plage
de travail réglée et terminé par la tondeuse
robot.
La tondeuse robot roule automatiquement le long
du fi l de délimitation (18) jusqu‘à la station de
recharge (19).
Lorsque la tondeuse robot retourne à la station
de recharge (19), elle cherche le fi l de délimitati-
on (18) et roule le long du fi l de délimitation (18)
dans le sens contraire à celui des aiguilles d’une
montre.
Pendant la charge de l‘accumulateur, l‘affi chage
LED (21) rouge de la station de recharge (19) est
allumé.
Si l‘affi chage LED (21) vert de la station de
recharge (19) est allumé, cela signifi e que
l‘accumulateur est complètement chargé. Une
fois la charge terminée, la tondeuse robot reprend
son travail ou reste dans la station de recharge
(19) jusqu’au prochain créneau horaire de travail.
S‘il y a un obstacle sur le fi l de délimitation (18)
lors du retour à la station de recharge (19), la ton-
- 61 -
Anl_FREELEXO_SMART_SPK13.indb 61Anl_FREELEXO_SMART_SPK13.indb 61 10.10.2022 12:44:2810.10.2022 12:44:28

F
deuse robot, après plusieurs tentatives, s‘arrête
devant l‘obstacle et ne peut pas retourner à la
station de recharge (19). Retirez tous les obstacles sur le fi l de délimitation (18).
Si la température de l‘accumulateur excède
45 °C, le processus de charge est interrompu
pour éviter d‘endommager l‘accumulateur. Une
fois que la température a baissé, la charge se
poursuit automatiquement.
Si la température de la commande de la tondeuse
robot dépasse 65 °C, la tondeuse robot retourne
à la station de recharge (19). Une fois que la
température a baissé, le travail reprend conformément aux réglages.
Si l‘accumulateur devient vide avant que la tondeuse robot retourne à la station de recharge
(19), la tondeuse robot ne peut plus être démarrée. Ramenez la tondeuse robot à la station de
recharge (19) et laissez l‘interrupteur principal
(7) sur marche. La tondeuse robot est chargée
automatiquement.
5.5 Fil de délimitation
ATTENTION ! Les fi ls de délimitation coupés
et les dommages indirects ne sont pas couverts par la garantie !
5.5.1 Pose du fi l de délimitation
Le fi l de délimitation (18) peut être posé à la fois
sur le sol et dans le sol. Sur un sol dur ou sec, les
crochets de fi xation (14) peuvent se briser lors de
l’impact. Arrosez le gazon avant d‘installer le fi l de
délimitation, lorsque le sol est très sec.
Installation sur le sol
•
Placez le fil de délimitation (18) fermement
sur le sol et fixez-le à l‘aide des crochets de
fixation (14) joints, si vous ne souhaitez pas
scarifier ou aérer le gazon à un moment ultérieur. Vous pouvez adapter la position du fil de
délimitation pendant les premières semaines
d‘utilisation de la tondeuse robot. Cependant,
après un certain temps, le fil de délimitation
sera recouvert par l‘herbe et ne sera plus
visible. Installez le fil de délimitation à une
distance maximum de 1 m entre le crochet
(14). Réduisez la distance entre les crochets
de fixation sur les surfaces inégales du gazon. Évitez les situations dans lesquelles le fil
ne touche pas le sol. Assurez-vous que le fil
de délimitation ne peut pas être coupé par la
tondeuse robot.
Installation dans le sol
•
Enterrez le fil de délimitation jusqu‘à 5 cm de
profondeur. Cela évite d‘endommager le fil de
délimitation (18), par exemple lors de la scarification ou de l‘aération.
Remarque !
Réservez 1 m de fi l à l‘extrémité arrière de la
station de recharge pour pouvoir eff ectuer les
corrections futures.
5.5.2 Passages étroits
S‘il y a un passage étroit sur la surface à tondre,
votre tondeuse robot peut y travailler aussi longtemps que le corridor mesure au moins 1,4 m (80
cm entre les fi ls de délimitation) de large et au
maximum 8 m de long. (fi gure 3)
5.5.3 Distance par rapport aux limites du
jardin
Lorsque la tondeuse robot s‘approche d‘un fi l de
délimitation (18), celui-ci est détecté par les capteurs situés à l‘avant de la tondeuse robot. Mais
avant que la tondeuse robot fasse demi-tour, elle
passe sur le fi l de délimitation (18) de 30 cm max.
Tenez-en compte lors de la planifi cation de la
zone de tonte. (fi gure 6a)
5.5.4 Pose du fi l dans les coins
Évitez de poser le fi l de délimitation (18) à angle
droit (90°) dans les coins. Pour s’assurer que la
tondeuse robot ne passe pas trop loin sur le fi l de
délimitation (18), posez le fi l de délimitation (18)
comme représenté sur la fi gure 6b.
5.5.5 Calcul de la pente du gazon
La tondeuse robot peut surmonter des pentes allant jusqu‘à 35 %. Évitez les pentes plus abruptes.
La pente peut être déterminée avec la hauteur
surmontée sur la distance. (fi gure 6c)
Exemple : a/b = 35 cm/100 cm = 35 %
5.5.6 Installation du fi l de délimitation sur des
pentes
Sur les pentes, la tondeuse robot peut glisser notamment dans l‘herbe humide et passer ainsi sur
le fi l de délimitation (18). Il est donc recommandé
de faire attention aux points suivants (fi gure 6d) :
Au sommet d‘une pente, le fil de délimitation
•
(18) ne doit pas être installé sur des pentes
supérieures à 35 %. Respectez ici une distance de 30 cm par rapport aux obstacles et
aux bordures de gazon.
Au bas d‘une pente, le fil de délimitation (18)
•
ne doit pas être installé sur des pentes supérieures à 17 %. Respectez ici une distance
de 40 cm par rapport aux obstacles et aux
bordures de gazon.
- 62 -
Anl_FREELEXO_SMART_SPK13.indb 62Anl_FREELEXO_SMART_SPK13.indb 62 10.10.2022 12:44:2810.10.2022 12:44:28

F
5.5.7 Voies carrossables et chemins pavés
Délimitez les chemins surélevés, les surfaces
•
recouvertes de gravier ou de paillis d‘écorce,
les plates-bandes plus bases ou zones similaires. Posez le fil de délimitation (18) à une
distance d‘au moins 30 cm. (figures 6e et 6g)
Les chemins affleurant au gazon ne doivent
•
pas nécessairement être séparés, étant donné qu‘ils peuvent facilement être parcourus
par la tondeuse robot. Le fil de délimitation
(18) peut également être posé sur les chemins. (figures 6f et 6g)
5.5.8 Îlots de délimitation
Protégez les obstacles dans la zone de tonte
en créant des îlots de délimitation. Cela peut
empêcher une collision avec des objets sensibles, des étangs de jardin, des arbres, des meubles, des parterres de fl eurs, etc. (fi gures 6h et 6i)
Déroulez le fil de délimitation (18) des bordu-
•
res vers les objets à protéger.
Fixez le fil de délimitation (18) à l‘aide de cro-
•
chets de fixation (14) dans le sens des aiguilles d‘une montre autour de l‘objet à protéger.
Clôturez complètement les îlots de délimi-
•
tation et ramenez le fil de délimitation (18) à
l‘endroit où vous avez quitté le bord du gazon.
La distance entre les îlots de délimitation
•
devrait être d’au moins 0,8 m. Dans le cas
contraire, associez les objets dans un îlot de
délimitation commun. (figure 6h)
Le fil de délimitation (18) à destination et en
•
provenance de l‘îlot de délimitation doit être
posé parallèle et très rapproché. - Attention
! Les fils de délimitation (18) ne doivent
pas se croiser ! - Pour ce faire, fixez les fils
de limitation (18) parallèles avec les mêmes
crochets de fixation (14) sur le sol. (figure 6i)
Dans la zone de tonte, la tondeuse robot
•
passe sur les deux fils de délimitation (18)
parallèles, mais ne s‘arrête qu‘au niveau d‘un
fil de délimitation (18) simple.
Pierres et obstacles bas
•
Les pierres, les rochers et les obstacles bas
de moins de 10 cm dans la zone de tonte doivent être protégés étant donné que, dans le
cas contraire, la tondeuse robot peut passer
dessus. La tondeuse robot pourrait sinon être
endommagé et bloqué.
Arbres (figure 6k)
•
Les arbres sont traités comme des obstacles
par la tondeuse robot. Toutefois, si des racines d’arbres de moins de 10 cm de hauteur
dépassent du sol, cette zone doit être protégée. Cela évite les dommages au niveau des
racines et de la tondeuse robot. Respectez
une distance d‘au moins 30 cm entre le fil de
délimitation (18) et l’obstacle.
5.5.10 Surface principale et secondaire
(fi g. 6l)
On appelle surface secondaire (B), une zone de
travail qui n‘est pas reliée directement à la surface principale (A) mais par ex. par le biais d‘une
surface de gazon ou d‘un chemin. Pour créer une
surface secondaire (B) séparée, posez le fi l de
délimitation (18) de la surface principale (A) vers
la surface secondaire (B) et retour. Le fi l de déli-
mitation (18) vers et depuis la surface secondaire
(B) doit être posé en parallèle et très près l‘un
de l‘autre. - Attention ! Les fi ls de délimitation
(18) ne doivent pas se croiser ! - Pour ce faire,
fi xez les fi ls de délimitation (18) parallèles avec
les mêmes crochets de fi xation (14) sur le sol.
Pour pouvoir tondre la surface secondaire (B),
vous devez porter manuellement la tondeuse robot dans la surface secondaire (B). Lancez le programme de tonte souhaité et sélectionnez dans
le sous-menu « Surface secondaire » (voir « Réglages de la tondeuse robot »). La tondeuse robot
dans la surface secondaire (B) n’essaiera pas de
suivre le fi l de délimitation (18) en direction de
la station de recharge (19) lorsque le niveau de
charge de l’accumulateur est faible.
5.5.9 Obstacles
Obstacles d‘une hauteur supérieure à 10
•
cm (figure 6j)
Les obstacles fixes d‘une hauteur supérieure à 10 cm, par ex. arbres, murs, clôtures,
meubles de jardin, etc. sont détectés par les
capteurs de collision. Si la tondeuse robot
heurte un obstacle, elle s’arrête, éteint l’unité
de tonte, recule et tourne pour poursuivre la
tonte dans une autre direction. Les obstacles
mous, instables et précieux doivent être protégés par un îlot de fil de délimitation.
Anl_FREELEXO_SMART_SPK13.indb 63Anl_FREELEXO_SMART_SPK13.indb 63 10.10.2022 12:44:2910.10.2022 12:44:29
5.6 Connexion de la station de recharge
Terminez la pose du fi l de délimitation (18) com-
plet avant de le connecter à la station de recharge. Réservez 1 m de fi l de délimitation supplé-
mentaire (18) aux deux extrémités pour pouvoir
eff ectuer des ajustements ultérieurs.
Dénudez le fi l de délimitation (18) aux extrémités
sur une longueur de 10 à 15 mm à l‘aide d‘une
pince à dénuder pour le brancher à la station de
recharge (19).
Tirez la fi che de contact avant de connecter le fi l
de délimitation (18) à la station de recharge (19).
- 63 -

F
Le fi l de délimitation (18) placé à l‘avant de la sta-
tion de recharge (19) doit être posé vers l‘arrière
au-dessus des supports de câble au niveau de
la partie inférieure de la station de recharge (19).
Connectez ce fi l de délimitation (18) à la borne
gauche noire. Ensuite, faites passer le fi l de déli-
mitation arrière (18) par le trou (décharge de traction) dans la zone de raccordement et connectezle à la borne droite rouge (fi gure 7a).
Attention ! Les fi ls de délimitation (18) ne do-
ivent pas se croiser !
Puis établissez la connexion avec l‘alimentation
électrique. L‘affi chage LED (21) vert de la station
de recharge (19) doit être allumé en permanence
après une installation correcte. Si la LED ne
s‘allume pas, vérifi ez d‘abord les raccords. Si la
LED est allumée, mais pas vert fi xe, reportez-
vous au tableau « Affi chage de la station de re-
charge et élimination des erreurs » à la fi n de ce
mode d‘emploi.
5.7 Mise en marche et contrôle de
l‘installation
Dès que l‘affi chage LED (21) vert de la station de
recharge (19) s’allume, la zone de tonte est prête
pour la tondeuse robot. Assurez-vous d‘abord
que les crochets de fi xation (14) du fi l de délimi-
tation (18) sont complètement enfoncés. Placez
la tondeuse robot environ 3 m derrière la station
de recharge (19) devant le fi l de délimitation (18).
La tondeuse robot doit se trouver ce faisant face
au fi l de délimitation (18) à un angle de 90° (fi gure
7b). Activez l‘interrupteur principal (7) (ON) (fi gure
8).
Déverrouillez la tondeuse robot à l’aide du code
PIN (voir chapitre « Dispositif de verrouillage / PIN
»). Appuyez sur la touche « MODE » (52). Sélectionnez ensuite « Station de recharge » avec les
touches de navigation (55) et confi rmez avec la
touche « OK » (56).
Appuyez sur la touche « START » (53) et fermez
ensuite le recouvrement d’écran (23). La tondeuse robot suit maintenant le fi l de délimitation (18)
dans le sens antihoraire. Observez la tondeuse
robot pendant tout le trajet le long du fi l de délimi-
tation (18) jusqu‘à ce qu‘elle soit à nouveau dans
la station de recharge (19). Si la tondeuse robot
a des problèmes à certains endroits, corrigez le
cas échéant le fi l de délimitation (18) et répétez
l‘opération. L‘accumulateur de la tondeuse robot
est maintenant complètement chargé. S‘il y a des
problèmes d‘amarrage, vous devrez peut-être
repositionner la station de recharge (19) sur le
côté jusqu’à ce que l‘amarrage fonctionne sans
problème.
Avec le bouton rouge STOP (3), vous pouvez
arrêter la tondeuse robot à tout moment. Après
avoir appuyé sur le bouton STOP (3), la tondeuse
robot s’arrête et attend d’autres instructions.
5.8 Fixation de la station de recharge
Une fois que le bon fonctionnement de la tondeuse robot est assuré et qu’une position adaptée
a été trouvée pour la station de recharge (19), la
station de recharge (19) doit être fi xée avec les
vis de fi xation (15). Vissez les vis de fi xation (15)
avec la clé à six pans (22) complètement dans le
sol. (fi gure 7c)
5.9 Indicateur de charge de l’accumulateur
Appuyez sur l’interrupteur pour l’indicateur de
charge de l’accumulateur. L’indicateur de charge
de l’accumulateur vous indique l‘état de charge
de l‘accumulateur à l‘aide de trois voyants LED
(fi gure 13b).
Les 3 voyants LED sont allumés :
L’accumulateur est complètement rechargé.
2 ou 1 voyant LED est (sont) allumé(s) :
L‘accumulateur dispose encore d‘un résidu de
charge suffi sant.
1 voyant LED clignote :
L’accumulateur est vide, il faut le recharger.
Tous les voyants LED clignotent :
La température de l’accumulateur est trop faible.
Retirez l’accumulateur de l’appareil et laissez-le
reposer pendant un jour à température ambiante.
Si l’erreur survient à nouveau, cela signifi e que
l’accumulateur est en décharge profonde et défectueux. Retirez l’accumulateur de l’appareil. Un
accumulateur défectueux ne doit plus être utilisé
ou chargé.
Attention !
Si vous utilisez un bloc Multi-Ah (par ex. 4-6
Ah), réglez-le toujours sur la capacité maximum.
Grâce à la charge et décharge lente de la tondeuse robot, il n’est pas nécessaire d’utiliser la capacité inférieure pour prolonger la durée de vie.
5.10 Charge de l‘accumulateur avec le chargeur
En mode normal, l’accumulateur (A) de la tondeuse robot est chargé par le biais de la station
de recharge (19). Pour une utilisation indépen-
- 64 -
Anl_FREELEXO_SMART_SPK13.indb 64Anl_FREELEXO_SMART_SPK13.indb 64 10.10.2022 12:44:2910.10.2022 12:44:29

F
dante de l’accumulateur (A) de la série PowerX-Change, celui-ci peut aussi être chargé dans
le chargeur externe Power-X-Charger. Attention !
– En fonction de votre modèle de tondeuse robot,
le chargeur (fi gure 13a / pos. B) peut ne pas être
compris dans la livraison.
1. Comparez si la tension du secteur indiquée
sur la plaque signalétique correspond à la
tension réseau disponible. Branchez la fi che
de contact du chargeur (A) dans la prise de
courant. Le voyant LED vert commence à clignoter.
2. Mettez l’accumulateur (B) sur le chargeur (A)
(fi gure 13a).
3. Au point « Affi chage chargeur », vous trou-
verez un tableau avec les signifi cations des
affi chages LED sur le chargeur.
Pendant la charge, il est possible que
l‘accumulateur chauff e quelque peu. C‘est cepen-
dant normal.
S‘il est impossible de charger le bloc accumulateur, veuillez contrôler,
si la tension réseau est présente au niveau de
•
la prise de courant
si un contact correct est présent au niveau
•
des contacts de charge du chargeur.
Si le chargement du bloc accumulateur reste
impossible, nous vous prions de bien vouloir
renvoyer,
le chargeur
•
et le bloc accumulateur
•
à notre service après-vente.
Pour un envoi correct, nous vous prions de
contacter notre service après-vente ou le
point de vente où vous avez acheté l’appareil.
6. Commande
6.1 Interrupteur principal
La tondeuse robot est équipée d‘un interrupteur principal (7). Allumez la tondeuse robot via
l‘interrupteur principal (7) (ON) et éteignez-la via
l‘interrupteur principal (7) (OFF) (fi gure 8). Après
la mise en circuit de la tondeuse robot, celle-ci est
verrouillée avec le code PIN.
6.2 Zone de commande
La tondeuse robot a déjà être programmée côté
usine et présente des réglages par défaut. Ces
réglages peuvent cependant être modifi és en cas
de besoin. Même si les réglages d‘usine conviennent à la plupart des jardins, vous devriez vous
familiariser avec les options disponibles.
Explication de la zone de commande avec
écran LCD (fi gure 9a)
50. Écran LCD
51. Touche « SET » – Touche de réglage
52. Touche « MODE » – Touche de programme
de tonte
53. Touche « START » – Touche de démarrage
54. Touche « BACK » – Touche de retour
55. Touches de navigation
56. Touche « OK » – Touche de confi rmation
Explication des symboles sur l’écran LCD (fi gure
9b) :
60. Intensité du signal de la connexion au réseau
61. Détection de signal du fi l de délimitation
62. État du capteur pluie
63. État de la batterie
64. Tonte manuelle
65. Commande calendrier
66. Commande SMART
67. Retour à la station de recharge
Veillez à ce que, lors de l’envoi ou de la mise
au rebut, les accumulateurs ou les appareils
sans fi l soit emballés séparément dans des
sacs en plastique afi n d’éviter les courts-
circuits ou un incendie !
Dans l‘intérêt d‘une longue durée de fonctionnement du bloc accumulateur, vous devez prendre
soin de recharger le bloc accumulateur en temps
voulu. Ceci est dans tous les cas indispensable
lorsque vous constatez une diminution de la
puissance de l‘appareil. Ne déchargez jamais
complètement le bloc accumulateur. Ceci cause
l‘endommagement du bloc accumulateur !
Anl_FREELEXO_SMART_SPK13.indb 65Anl_FREELEXO_SMART_SPK13.indb 65 10.10.2022 12:44:3010.10.2022 12:44:30
6.3 Réglage de la hauteur de coupe
Attention ! Le réglage de la hauteur de coupe ne
doit être eff ectué que lorsque la tondeuse robot
est arrêtée. Appuyez pour ce faire sur la touche
STOP (3). La tondeuse robot permet une adaptation continue de la hauteur de coupe entre 20
et 60 mm, lisible sur la graduation, par le biais du
réglage de la hauteur de coupe (4).
Si la hauteur de gazon est supérieure à 60 mm, le
gazon doit être raccourci à au moins 60 mm pour
ne pas surcharger excessivement la tondeuse robot et aff ecter l‘effi cacité de fonctionnement. Uti-
lisez pour ce faire une tondeuse conventionnelle
ou un coupe-herbe.
- 65 -

F
À la fi n de l‘installation, la hauteur de coupe peut
être adaptée par le biais du réglage de la hauteur
de coupe (4). Commencez toujours par une hauteur de coupe plus élevée et réduisez-la petit à
petit jusqu‘à la hauteur souhaitée.
6.4 Dispositif de verrouillage / PIN
Le dispositif de verrouillage empêche une utilisation non autorisée de la tondeuse robot sans
code valable. Pour ce faire, vous devez saisir un
code de sécurité personnel à quatre chiff res.
Déverrouillage
Avant de mettre la tondeuse robot en service,
vous devez saisir le bon code PIN (PIN standard
: « 0-0-0-0 »). Saisissez le code PIN à l’aide des
touches de navigation (55).
Code PIN standard : Nouveau code PIN :
0 0 0 0 _ _ _ _
Modifi er le code PIN
Pour modifi er le code PIN, procédez comme suit :
1. Déverrouillez la zone de commande.
2. Appuyez d’abord sur la touche « SET » (51)
pour procéder aux réglages.
3. Naviguez dans le menu de l’écran LCD (50)
avec les touches de navigation (55) vers «
Généralités » puis « Code PIN »
4. Saisissez d’abord le code PIN actuel (PIN
standard 0-0-0-0) à l’aide des touches de navigation (55).
5. Saisissez ensuite votre code PIN personnel à
l’aide des touches de navigation (55).
6. Confi rmez les réglages.
7. Répétez les étapes 5. et 6. pour confi rmer le
nouveau code PIN.
8. Attention ! Notez le nouveau code PIN
Demander un code PIN en cas de perte
Préparez le reçu et le numéro de série de la tondeuse robot. Vous en avez besoin pour obtenir
votre code PIN !
Variante A :
1. Appuyez à l’état verrouillé sur la touche «
SET » (51) pendant 6 secondes.
2. PUK s’affi che maintenant à l’écran (50).
3. Adressez-vous au service après-vente pour
obtenir votre PIN.
Variante B :
1. Branchez une clé USB vierge sur la borne
USB (24) comme illustré (fi gure 11).
2. Activez l‘interrupteur principal (7) (ON).
3. La tondeuse robot enregistre automatique-
ment PUK sur votre clé USB et termine le
processus avec un siffl ement.
4. Retirez la clé USB. Lisez les données de
la clé USB sur un ordinateur. La tondeuse
robot a créé un fi chier texte (*.txt). Ce fi chier
contient un code PUK, un code personnel.
Adressez-vous au service après-vente pour
obtenir votre PIN.
6.5 Réglages de la tondeuse robot
Dans le menu principal de l’écran LCD (50), vous
trouverez les réglages de date et d’heure actuels
de la tondeuse robot ainsi que l’état de charge
actuel. De la même manière, l’état du capteur de
pluie, du signal de câble ainsi que du programme
de tonte sélectionné s’affi che dans la barre des
symboles. La zone de commande vous off re
l’option de procéder à des réglages sur la tondeuse robot avec la touche « SET » (51) et de démarrer la tondeuse robot avec diff érents programmes
de tonte avec la touche « MODE » (52). Passez
à l’endroit souhaité pour eff ectuer des réglages
à l’aide des touches de navigation (55). Appuyez
sur la touche « BACK » (54) pour quitter le menu
respectif.
Réglages – Touche « SET » (51)
La touche « SET » (51) vous permet de procéder
à des réglages de base sur votre tondeuse robot.
Passez à l’endroit souhaité à l’aide des touches
de navigation (55) puis confi rmez ou annulez les
réglages avec la touche « OK » (56) ou la touche
« BACK » (54).
Zone
•
Dans le cas de jardins très sinueux, la tondeuse robot peut avoir des problèmes pour atteindre chaque zone et tondre l’ensemble du
gazon. Dans ce cas, il est possible de sélectionner plusieurs points de départ sur le fil de
délimitation (18). La tondeuse robot peut ainsi
accéder aux zones difficilement accessibles
de votre jardin. La tondeuse robot parcourt la
distance sélectionnée sur le fil de délimitation
(18) et démarre son processus de tonte dans
cette zone (figure 6m). Passez à l’endroit que
vous souhaitez modifier à l’aide des touches
de navigation (55) et réglez la distance et la
fréquence. La station de recharge (19) est
automatiquement définie comme point de
départ 1. Les deux autres points de départ
peuvent être choisis librement. Mesurez pour
ce faire la distance entre la station de recharge (19) et le point de départ dans le sens des
aiguilles d’une montre le long du fil de délimitation (18). La fréquence vous permet de
- 66 -
Anl_FREELEXO_SMART_SPK13.indb 66Anl_FREELEXO_SMART_SPK13.indb 66 10.10.2022 12:44:3010.10.2022 12:44:30

F
déterminer combien de fois la tondeuse robot
commence son travail depuis la station de
recharge (19) ou depuis les points de départ
respectifs.
Tonte bordures
•
La tondeuse robot tond la bordure de gazon
une fois par semaine au début de sa plage de
travail et commence ensuite la tonte. Le capteur a été réglé en usine sur « Marche ».
Mémoire d’erreurs
•
Vous obtenez des informations sur les derniers messages d’erreur survenus de votre
tondeuse robot.
Capteur de pluie
•
Le capteur de pluie (5) peut être activé et désactivé par le biais de ce réglage. Le capteur
a été réglé par défaut en usine sur « Marche
». Une description détaillée du capteur de
pluie se trouve dans « Mise en service » dans
la rubrique « Capteurs ».
Généralités
•
- Code PIN : Vous pouvez modifier le code
PIN de la tondeuse robot et utiliser votre code
PIN personnel. Procédez pour ce faire comme décrit au chapitre « Dispositif de verrouillage / PIN ». Attention ! Notez le nouveau
code PIN.
- Date et heure : Passez à l’endroit correspondant à l’aide des touches de navigation
(55) et effectuez les réglages souhaités.
- Langue : Passez à la langue souhaitée à
l’aide des touches de navigation (55).
- Version du logiciel : Indique la version actuelle du logiciel de la tondeuse robot.
Réglages d’usine : Réinitialisez la tondeuse
•
robot à l’état de livraison.
Programmes de tonte – Touche « MODE »
(52)
Passez au programme de tonte souhaité à l’aide
des touches de navigation (55) pour le démarrer.
Manuel
•
En mode manuel, vous pouvez démarrer la
tondeuse robot une fois avec différents programmes de tonte.
Vous avez la possibilité de choisir entre la
surface primaire / surface principale et la
surface secondaire / surface accessoire. Vous
trouverez de plus amples informations sur les
deux surfaces dans le chapitre « Mise en service » au point « Fil de délimitation ».
- Tonte
Démarrez la tondeuse robot pour tondre le
gazon et la tondeuse robot passe au mode
normal avec le calendrier réglé.
- Tonte bordures
Placez la tondeuse robot à proximité du fi l
de délimitation (18) ou démarrez la tondeuse
robot pendant qu’elle se trouve dans la station de recharge (19). La tondeuse robot suit
le fi l de délimitation (18) avec unité de tonte
enclenchée dans le sens des aiguilles d’une
montre jusqu’à l’arrière de la station de recharge (19). Puis, la tondeuse robot retourne
à la station de recharge (19) s’il n’y a plus de
plage de travail active.
- Spot Mowing
Il se peut que votre tondeuse robot ne tonde
pas suffi samment certains endroits. Placez la
tondeuse robot à un endroit souhaité et démarrez la tondeuse robot. La tondeuse robot
commence à tondre le gazon en formant une
spirale jusqu’à ce qu’elle heurte un obstacle
ou le fi l de délimitation (18). Puis, la tondeuse
robot retourne à la station de recharge (19)
s’il n’y a plus de plage de travail active.
Calendrier
•
Passez au jour de la semaine correspondant
pour lequel vous souhaitez procéder aux
réglages à l’aide des touches de navigation
(55). En mode normal, la tondeuse robot
commence automatiquement à tondre votre
gazon le jour de la semaine correspondant à
l’heure réglée. Pour le réglage du temps de
tonte, une valeur indicative de 8 heures par
jour pour 500 m² est recommandée. Adaptez
le temps de travail sélectionné en fonction de
la taille et de la complexité du jardin.
Station de recharge
•
Renvoyez votre tondeuse robot à la station de
recharge (19). La tondeuse robot cherche le
fil de délimitation (18) et le suit dans le sens
contraire à celui des aiguilles d’une montre
vers la station de recharge (19). Il n’y a pas
d’option surface secondaire / surface auxiliaire.
6.6 Commande de la tondeuse robot
Démarrage
1. Appuyez sur la touche STOP (3) et ouvrez
entièrement le recouvrement d’écran (23).
2. Déverrouillez la zone de commande (2).
3. Sélectionnez le programme de tonte souhaité
ainsi que la surface de travail respective avec
la touche « MODE » (52).
4. Appuyez sur la touche « START » (53).
5. Fermez le recouvrement d’écran (23).
- 67 -
Anl_FREELEXO_SMART_SPK13.indb 67Anl_FREELEXO_SMART_SPK13.indb 67 10.10.2022 12:44:3110.10.2022 12:44:31

F
La tondeuse robot travaille maintenant conformément aux temps de tonte réglés. Pendant le temps de travail, l’état de charge de
l’accumulateur est surveillé et indiqué sur
l’écran LCD (50). Dès que l’état de charge de
l’accumulateur passe sous 30 %, la tondeuse
robot retourne automatiquement à la station de
recharge (19).
Annulation de la tonte
1. Appuyez sur la touche STOP (3) pour arrêter
immédiatement la tondeuse robot.
2. Ouvrez entièrement le recouvrement d’écran
(23).
3. Déverrouillez la zone de commande (2).
4. Appuyez sur la touche « MODE » (52) et sélectionnez « Station recharge » pour renvoyer
la tondeuse robot à la station de recharge
(19) le long du fi l de délimitation (18).
5. Appuyez sur la touche « START » (53).
6. Fermez le recouvrement d’écran (23).
État STOP :
Appuyer sur la touche STOP (3) pour mettre la
tondeuse robot dans un état STOP, qui s’affi che
sur l’écran LCD (50). La tondeuse robot met la
tonte en pause jusqu’à ce que cet état soit à nouveau annulé.
Après le déverrouillage de la zone de commande
(2), une fenêtre, qui propose l’annulation de l’état
STOP, s’affi che. Confi rmer pour annuler l’état.
Dans le cas contraire, la tondeuse robot reste arrêtée. Démarrer la tondeuse robot ou la renvoyer
vers la station de recharge (19) annule également
l’état stop. Fermez le recouvrement d’écran (23).
6.7 Commande de la tondeuse robot à l’aide
de l’application
L’application vous off re diff érentes possibilités de
réglage de votre tondeuse robot et vous permet
également de récupérer des statistiques ainsi
que l’état actuel. La tondeuse robot peut être
démarrée aussi bien manuellement que dans un
intervalle de travail défi ni. Avec l’application vous
disposez également du mode SMART, dans lequel la tondeuse robot défi nit de façon autonome
son intervalle de travail sur la base des données
météorologiques. L’application vous indique les
messages d’erreur et les avertissements pendant le fonctionnement et peut vous informer à
l’aide de notifi cations Push. Terminez d’abord
l’enregistrement de votre tondeuse robot pour utiliser toutes les fonctions de l’application.
6.7.1 Téléchargement de l’application
Commencez par télécharger l’application Einhell
pour votre tondeuse robot sur votre smartphone.
L’application Einhell est accessible via le lien et
code QR suivant :
iOS : http://qr.einhell.com/12e103ce
Android : http://qr.einhell.com/176c0443
6.7.2 Enregistrement de la tondeuse robot
Votre appareil dispose d’une fonction IoT (Internet
of Things / Internet des objets). Votre tondeuse
robot peut se connecter au réseau mobile disponible via une puce SIM intégrée et est donc indépendante d’une connexion Bluetooth ou WiFi. Les
5 premières années, vous ne payez pas de frais
d’utilisation pour la tondeuse robot dans le réseau
mobile, étant donné qu’ils sont couverts par le
prix d’achat. Les informations sur la durée restante et une possible prolongation peuvent être
consultées via l’application. Dans l’état d’usine,
la fonction est désactivée et la tondeuse robot
essaie de se connecter au réseau, le symbole de
connexion sur l’écran LCD (50) est alors barré.
Pour activer votre tondeuse robot, suivez les instructions de l’application.
Une connexion réussie au réseau est indiquée
sur l’écran LCD (50) et les multiples possibilités
de réglage et fonctions de l’application sont
maintenant disponibles. Assurez-vous que la
tondeuse robot et votre smartphone disposent
d’une connexion Internet sécurisée dès que vous
procédez aux réglages dans l’application. Pour le
fonctionnement automatique de la tondeuse robot
dans une période de travail programmée avec le
mode SMART, la tondeuse robot doit simplement
être connectée à Internet.
- 68 -
Anl_FREELEXO_SMART_SPK13.indb 68Anl_FREELEXO_SMART_SPK13.indb 68 10.10.2022 12:44:3110.10.2022 12:44:31

F
6.7.3 Réinitialisation de l’enregistrement
Si le symbole de connexion sur l’écran LCD (50)
n’est pas barré lors de la première mise en service de votre tondeuse robot, la tondeuse robot
doit être réinitialisée et enregistrée à votre nom.
Contactez pour ce faire notre service après-vente
et préparez le reçu et le numéro de série de la
tondeuse robot.
6.8 Fonctionnement de la tondeuse robot
La tondeuse robot off re de multiples modes de
fonctionnement, vous permettant d’utiliser la tondeuse robot de diff érentes manières. L’application
vous off re diff érentes possibilités de réglage de
la tondeuse robot et vous permet également de
récupérer des statistiques ainsi que l’état actuel.
L’application vous indique également les messages d’erreur et les avertissements pendant le
fonctionnement.
Vous pouvez exploiter la tondeuse robot aussi
bien manuellement sur le panneau de commande (2) de la tondeuse robot qu’à l’aide de
l’application.
6.8.1 Tonte manuelle
Démarrez la tondeuse robot manuellement via
l’application. La tondeuse robot commence
à tondre le gazon pendant exactement un
cycle jusqu’à ce que le niveau de charge de
l’accumulateur baisse en dessous de 30 %. La
tondeuse robot retourne alors à la station de
recharge (19) et la tondeuse robot termine son
processus de travail. La tondeuse robot fonctionne de manière entièrement manuelle et ne commencera pas non plus à tondre le gazon à une
période réglée.
6.8.2 Commande calendrier
Vous pouvez paramétrer le calendrier via les
boutons de navigation (55) de la tondeuse robot. La tondeuse robot tond ainsi le gazon de
manière autonome aux heures indiquées. Les
réglages peuvent également être eff ectués dans
l’application et transmis à la tondeuse robot.
6.8.3 Commande SMART
Le mode SMART de la tondeuse robot permet un
fonctionnement automatique avec des heures de
fonctionnement optimisées pour votre jardin et les
conditions météorologiques actuelles. L’intervalle
de travail correspondant est adapté quotidiennement de façon autonome et personnalisée par la
tondeuse robot. Assurez-vous que la tondeuse
robot dispose toujours d’une connexion au réseau. Pour pouvoir utiliser le mode SMART, quel-
ques données spécifi ques sont nécessaires dans
un premier temps. Pour ce faire, procédez aux
réglages correspondants dans l’application :
Indication de lieu : Cette indication permet
•
de récupérer les données météorologiques
spécifiques au lieu et la tondeuse robot tond
en fonction des conditions météorologiques.
Intensité : Indiquez l’intensité à laquelle la
•
tondeuse robot doit tondre le gazon. Cela
dépend de la croissance de votre gazon.
Commencez d’abord par une faible intensité
et adaptez-la le cas échéant.
Surface de tonte : Indiquez la surface de
•
tonte estimée. Seule la zone de tonte dans laquelle la tondeuse robot doit se déplacer est
importante ce faisant.
Calendrier : Définissez des intervalles de
•
temps auxquels la tondeuse robot ne doit
pas tondre. Il peut être judicieux de limiter les
temps de tonte en conséquence.
La tondeuse robot va tondre de préférence en
journée pour éviter de rencontrer des animaux
actifs au crépuscule ou la nuit comme les hérissons. La tondeuse robot calcule en permanence
son calendrier individuel sur la base des données
indiquées.
6.8.4 Messages d’erreur et avertissements
Vérifi ez régulièrement l’application pour recevoir
les messages d’erreur et les avertissements.
Vous recevez les messages d’erreur, les avertissements et les rappels sous forme de notifi cation
push sur votre smartphone. Si vous ne le souhaitez pas, vous pouvez ajuster les paramètres de
notifi cation dans l’application. Assurez-vous que
les données d’arrière-plan de l’application Einhell
sont activées sur votre smartphone et que votre
smartphone dispose d’une connexion Internet
active.
7. Nettoyage, maintenance et
commande de pièces de
rechange
Danger !
Avant tous travaux de nettoyage et de maintenance, mettez l‘appareil hors tension en
retirant la fi che de contact de la prise et en
mettant l‘appareil hors circuit via l‘interrupteur
principal (7) (OFF) (fi gure 8). Retirez également
l’accumulateur de la tondeuse robot.
Attention ! Portez des gants de travail !
- 69 -
Anl_FREELEXO_SMART_SPK13.indb 69Anl_FREELEXO_SMART_SPK13.indb 69 10.10.2022 12:44:3210.10.2022 12:44:32

F
7.1 Nettoyage
Maintenez les dispositifs de protection, les
•
fentes à air et le carter de moteur aussi propres et sans poussière que possible. Frottez
l‘appareil avec un chiffon propre ou soufflez
dessus avec de l‘air comprimé à basse pression.
La tondeuse robot ne doit pas être nettoyée à
•
l’eau courante, en particulier pas sous haute
pression.
Nettoyez l‘appareil régulièrement à l‘aide
•
d‘un chiffon humide et un peu de savon noir.
N‘utilisez aucun produit de nettoyage ni solvant ; ils pourraient endommager les pièces
en matières plastiques de l‘appareil. Veillez
à ce qu‘aucune eau n‘entre à l‘intérieur de
l‘appareil.
Nettoyez si possible la tondeuse robot avec
•
une brosse ou des chiffons
Contrôlez la mobilité des lames (10) et du
•
disque à couteaux (11)
Pour nettoyer les contacts de charge au ni-
•
veau de la tondeuse robot (1) et de la station
de recharge (19), utilisez des produits de nettoyage pour métal ou un papier abrasif très
fin. Nettoyez-les pour assurer l‘efficacité de
l‘opération de charge.
7.2 Maintenance
Les lames (10) usées ou endommagées et
•
leurs vis de fixation doivent toujours être remplacées par jeu.
Remplacez les pièces usées ou endomma-
•
gées.
Pour obtenir une longue durée de vie, toutes
•
les pièces vissées, ainsi que les roues et essieux doivent être nettoyés et ensuite huilés.
Seul un entretien régulier de la tondeuse ro-
•
bot lui assure durabilité et performance dans
le temps, mais surtout vous assure une tonte
facile et soigneuse de votre gazon.
Les composants les plus exposés à l‘usure
•
sont les lames (10). Vérifiez régulièrement
l‘état des lames (10) ainsi que leur fixation.
Si des vibrations anormales de la tondeuse
robot se produisent, cela signifie que les
lames (10) sont endommagées ou ont été déformées par un choc. Lorsque les lames (10)
sont usées ou endommagées, elles doivent
immédiatement être remplacées.
Contrôlez régulièrement la coupe du gazon.
•
Les lames émoussées ne permettent qu’une
coupe imparfaite des brins d’herbe. Ainsi, la
surface du gazon sèche plus facilement et
brunit. Remplacez donc régulièrement les la-
mes afin d’obtenir une coupe nette et droite.
Contrôlez régulièrement la présence de
•
saletés en dessous de la tondeuse robot.
Nettoyez régulièrement la tondeuse robot.
Éliminez immédiatement les encrassements
plus importants.
Les premières semaines suivant la mise en
•
service, surtout après avoir tondu avec une
tondeuse conventionnelle, votre tondeuse
robot peut s’encrasser rapidement. Contrôlez
donc plus fréquemment le dessous de votre
tondeuse robot durant cette période.
Ne coupez le gazon que par petites étapes
•
pour éviter un encrassement important.
Aucune autre pièce à l‘intérieur de l‘appareil
•
n‘a besoin de maintenance.
7.2.1 Remplacement des lames
Utilisez exclusivement des lames d’origine, sinon
le fonctionnement et la sécurité ne sont pas garantis le cas échéant.
La tondeuse robot est équipée de trois lames
(10) montées au niveau d‘un disque à couteaux
(11). Ces lames (10) ont une durée de vie allant
jusqu‘à 3 mois (en l‘absence de contact avec des
obstacles). Veuillez remplacer les trois lames (10)
en même temps afi n d‘exclure une altération en
termes d‘effi cacité et d‘équilibre de votre appareil.
Pour remplacer les lames (10), procédez comme
suit (fi g. 12) - Attention ! - Portez des gants :
1. Bloquez la rotation du disque à couteaux (11)
avec un tournevis. Insérez pour ce faire le
tournevis par les trous prévus dans le disque
à couteaux (11) et le peigne de protection.
2. Desserrez les vis de fi xation
3. Retirez les lames (10) et remplacez-les par
des nouvelles. Remplacez toujours le jeu de
trois lames (10).
4. Ensuite, serrez fermement la vis de fi xation.
Assurez-vous que les nouvelles lames (10)
tournent librement.
Eff ectuez régulièrement un contrôle général de la
tondeuse robot et retirez tous les dépôts accumulés. Avant tout début de saison, contrôlez absolument l‘état des lames (10). Pour les réparations,
adressez-vous à notre service client. Utilisez
exclusivement des pièces d’origine.
7.2.2 Mise à jour logicielle
Si vous souhaitez mettre à jour le logiciel, copiez
le nouveau logiciel sur une clé USB vide (si nécessaire, formatez la clé USB au préalable). Assurez-vous que l’accumulateur est complètement
chargé avant d’eff ectuer les opérations suivantes.
- 70 -
Anl_FREELEXO_SMART_SPK13.indb 70Anl_FREELEXO_SMART_SPK13.indb 70 10.10.2022 12:44:3210.10.2022 12:44:32

F
1. Placez la tondeuse robot dans la zone de tonte. La tondeuse robot ne doit pas se trouver
dans la station de recharge lors de la mise à
jour du logiciel.
2. Branchez une clé USB sur la borne USB
comme illustré. (fi gure 11)
3. Activez l‘interrupteur principal (7) (ON).
4. La tondeuse robot lance à présent la mise à
jour du logiciel et indique l’état actuel.
5. Si le processus de mise à jour est terminé,
retirez la clé USB et redémarrez la tondeuse
robot via l’interrupteur principal (7).
7.2.3 Réparation du fi l de délimitation
En cas de coupure du fi l de délimitation (18)
à quelque endroit que ce soit, utilisez les connecteurs de câble (16) joints pour réparation.
Pour ce faire insérez les deux extrémités du fi l
de délimitation (18) coupé dans le connecteur
de câble (16) et comprimez-les à l‘aire d‘une
pince. Raccordez la fi che de contact avec la prise.
Vérifi ez ensuite le fonctionnement à l‘aide de
l‘affi chage LED (21) au niveau de la station de
recharge (19).
7.3 Commande de pièces de rechange :
Veuillez indiquer ce qui suit pour toute commande
de pièces de rechange ;
Type de l‘appareil
•
Référence de l‘appareil
•
Numéro d‘identification de l‘appareil
•
Numéro de la pièce de rechange requise
•
Vous trouverez les prix et informations actuelles à
l‘adresse www.Einhell-Service.com
Lames de rechange Réf. : 34.140.20
8. Stockage
Chargez complètement l‘accumulateur avant le
stockage pendant l‘hiver et mettez la tondeuse
robot hors circuit via l‘interrupteur principal (7)
(OFF). Retirez l’accumulateur de l‘appareil. Coupez le bloc d‘alimentation (13) de l‘alimentation
électrique et de la station de recharge (19).
Entreposez l‘appareil et ses accessoires dans un
endroit sombre, sec, à l’abri du gel et inaccessible aux enfants. La température de stockage optimale est comprise entre 5 °C et 30 °C. Conservez
l‘appareil dans l‘emballage d‘origine.
9. Transport
Mettez l‘appareil hors circuit par le biais de
•
l‘interrupteur principal (7) (OFF). (figure 8)
Montez les dispositifs de protection pour le
•
transport, s‘il y en a.
Protégez l‘appareil des dommages et des
•
fortes vibrations survenant en particulier lors
du transport dans un véhicule.
Bloquez l‘appareil contre tout glissement et
•
basculement.
Portez la tondeuse robot par la poignée de
•
transport (6) en éloignant le disque à couteaux (11) du corps.
10. Mise au rebut et recyclage
L‘appareil se trouve dans un emballage permettant d‘éviter les dommages dus au transport.
Cet emballage est une matière première et peut
donc être réutilisé ultérieurement ou être réintroduit dans le circuit des matières premières.
L‘appareil et ses accessoires sont en matériaux
divers, comme par ex. des métaux et matières
plastiques. Les appareils défectueux ne doivent
pas être jetés dans les poubelles domestiques.
Pour une mise au rebut conforme aux règles de
l‘art, l‘appareil doit être déposé dans un centre de
collecte approprié. Si vous ne connaissez pas de
centre de collecte, veuillez-vous renseigner auprès de l‘administration de votre commune.
Le fi l de délimitation (18) peut rester dehors pen-
dant l‘hiver. Assurez-vous cependant que les raccords sont protégés contre la corrosion. Coupez
pour ce faire les raccords du fi l de délimitation
(18) de la station de recharge (19).
- 71 -
Anl_FREELEXO_SMART_SPK13.indb 71Anl_FREELEXO_SMART_SPK13.indb 71 10.10.2022 12:44:3310.10.2022 12:44:33

F
11. Affi chage de la station de recharge et élimination des erreurs
Affi chage LED
(21)
Éteint - Pas d‘alimentation électrique - Contrôle de l‘alimentation électrique
Vert en permanence - Prêt à la tonte
Vert clignotant - Fil de délimitation (18) coupé - Contrôlez si le fi l de délimitation (18) est
Rouge en
permanence
- Accumulateur complètement
- Fil de délimitation (18) rac-
- Accumulateur en charge - Attendez jusqu‘à ce que l‘accumulateur
Description Solution
chargé
cordé
cassé
soit complètement chargé.
12. Affi chage de la tondeuse robot et élimination des erreurs
Message d‘erreur de la tondeuse robot sur l‘écran LDC (50)
Erreur Cause probable Suppression
Pas de signal - Fil de délimitation mal rac-
cordé
- Pas d‘alimentation électrique
- Fil de délimitation (18) coupé
Hors bords - Fil de délimitation mal rac-
cordé
- Tondeuse robot en dehors
de la zone de tonte
Erreur batterie - Une erreur de batterie est
survenue sur la tondeuse
robot
- L‘accumulateur ne se laisse
pas charger
- L‘accumulateur a atteint sa
fi n de vie
Vérifi ez si l‘affi chage LED (21) vert de la sta-
tion de recharge (19) est allumé
- Assurez-vous que le fi l de délimitation
(18) est posé correctement et au milieu
sous la station de recharge (19).
- Vérifi ez la position de la station de rechar-
ge (19).
- Assurez-vous que le fi l de délimitation
(18) est posé correctement et au milieu
sous la station de recharge (19).
- Assurez-vous que la tondeuse robot se
trouve dans la zone de tonte.
- Assurez-vous que l‘accumulateur a été
monté correctement.
- Vérifi ez si l‘interrupteur principal (7) est
activé (ON), pendant que la tondeuse robot se trouve dans la station de recharge
(19).
- Vérifi ez la position de la station de re-
charge (19). Remplacez si nécessaire
l‘accumulateur.
- 72 -
Anl_FREELEXO_SMART_SPK13.indb 72Anl_FREELEXO_SMART_SPK13.indb 72 10.10.2022 12:44:3310.10.2022 12:44:33

F
Message d‘erreur de la tondeuse robot sur l‘écran LDC (50)
Erreur Cause probable Suppression
Erreur de température de batterie
Température d‘accumulateur
trop haute / trop basse ou
surtempérature de la commande
- Lorsque la température de
batterie est supérieure à
65 °C, la tondeuse robot retourne à la station de rechar-
- Placez le temps de travail en été au petit
matin et évitez de faire fonctionner la
tondeuse robot aux heures chaudes de la
journée.
ge (19).
- Lorsque la température de
batterie est supérieure à
45 °C ou inférieure à 0 °C,
le processus de charge est
arrêté et la tondeuse robot
- Après le refroidissement de
l‘accumulateur ou de la commande dans
la plage de température admissible, la
tondeuse robot retourne automatiquement
dans le mode programmé.
attend à la station de recharge (19).
Tondeuse soulevée - Capteur de levage déclen-
ché en continu pendant 10
secondes
Appuyez sur la touche STOP (3) pour ouvrir
le recouvrement d‘écran (23). Redémarrez la
tonte via la zone de commande (2) :
- Si cette erreur est fréquente, contrôlez
la zone de tonte quant à la présence
d‘obstacles d‘une hauteur supérieure à 10
cm et retirez-les ou séparez les obstacles
de la zone de tonte avec le fi l de délimita-
tion (18).
Tondeuse bloquée - Capteur d’obstacle activé
plusieurs fois en l’espace
d’une minute
- Capteur d’obstacle activé
durablement pendant 10 secondes
- Capteur d’obstacle activé
trois fois pendant le retour à
la station de recharge (19)
Appuyez sur la touche STOP (3) pour ouvrir
le recouvrement d‘écran (23). Redémarrez la
tonte via la zone de commande (2) :
- Vérifi ez si la tondeuse robot est bloquée
par un obstacle ou est coincée entre des
arbres, arbustes, etc. Éliminez l‘obstacle
ou évitez cette zone.
- Si cette erreur est fréquente, contrôlez la
pose du fi l de délimitation (18). Faites at-
tention aux angles serrés, corridors, clôtures, rochers, etc. et adaptez le parcours
du fi l de délimitation (18) si nécessaire.
- Vérifi ez si l‘herbe est trop haute et la ton-
deuse robot est bloquée. Dans ce cas,
tondez l‘herbe à moins de 60 mm.
Trop près de la
station
- La tondeuse robot a été renvoyée trop près de la station
de recharge (19)
Appuyez sur la touche STOP (3) pour ouvrir
le recouvrement d’écran (23). Redémarrez la
tonte via la zone de commande (2) :
- La tondeuse robot doit être renvoyée à
la station de recharge (19) avec une distance minimum de 2 m.
- 73 -
Anl_FREELEXO_SMART_SPK13.indb 73Anl_FREELEXO_SMART_SPK13.indb 73 10.10.2022 12:44:3410.10.2022 12:44:34

F
Message d‘erreur de la tondeuse robot sur l‘écran LDC (50)
Erreur Cause probable Suppression
Renversé - La tondeuse robot a été bas-
culée durablement pendant
10 secondes
- La tondeuse robot est inclinée dans une direction pendant une durée prolongée
Appuyez sur la touche STOP (3) pour ouvrir
le recouvrement d‘écran (23). Redémarrez la
tonte via la zone de commande (2) :
- Amenez la tondeuse robot sur une surface plane et redémarrez-la.
- Si la tondeuse robot a basculé en raison
d‘une pente abrupte dans la zone de
tonte, adaptez le fi l de délimitation (18) en
conséquence pour éviter des pentes trop
fortes.
Erreur roue - Les roues arrière (8) ont été
soulevées par un obstacle
- Les roues arrière (8) peuvent
tourner librement en raison
d‘un gazon irrégulier.
Erreur bouton STOP Le recouvrement d‘écran (23)
est ouvert, mais la touche
STOP (3) n‘a pas été déclenchée
Appuyez sur la touche STOP (3) pour ouvrir
le recouvrement d‘écran (23). Redémarrez la
tonte via la zone de commande (2) :
- Amenez la tondeuse robot sur une surface plane et redémarrez-la
Appuyez sur la touche STOP (3) pour ouvrir
le recouvrement d‘écran (23). Redémarrez la
tonte via la zone de commande (2) :
- Vérifi ez que le recouvrement d‘écran (23)
s‘ouvre et se ferme librement avec la touche STOP (3).
- Vérifi ez la fonctionnalité de la touche
STOP (3).
Surtempérature
PCB
Température d‘accumulateur
trop haute / trop basse ou
surtempérature de la commande
- Lorsque la température de
batterie est supérieure à
65 °C, la tondeuse robot retourne à la station de rechar-
- Placez le temps de travail en été au petit
matin et évitez de faire fonctionner la
tondeuse robot aux heures chaudes de la
journée.
ge (19).
- Lorsque la température de
batterie est supérieure à
45 °C ou inférieure à 0 °C,
le processus de charge est
arrêté et la tondeuse robot
- Après le refroidissement de
l‘accumulateur ou de la commande dans
la plage de température admissible, la
tondeuse robot retourne automatiquement
dans le mode programmé.
attend à la station de recharge (19).
Pluie - Le détecteur de pluie (5)
s‘est déclenché.
- Attendez que la tondeuse robot soit
sèche.
- Une description détaillée du capteur se
trouve au chapitre 5.2.
Erreur capteur - La tondeuse robot a été ar-
rêtée en raison d‘une erreur
de capteur
Désactivez l‘interrupteur principal (7) (OFF)
et réactivez-le (ON) pour redémarrer la tondeuse robot.
- 74 -
Anl_FREELEXO_SMART_SPK13.indb 74Anl_FREELEXO_SMART_SPK13.indb 74 10.10.2022 12:44:3410.10.2022 12:44:34

F
Message d‘erreur de la tondeuse robot sur l‘écran LDC (50)
Erreur Cause probable Suppression
Erreur moteur /
Surintensité moteur
- Tondeuse robot arrêtée en
raison d‘une surintensité
dans le moteur ou d‘une erreur de moteur
Désactivez l‘interrupteur principal (7) (OFF)
et réactivez-le (ON) pour redémarrer la tondeuse robot.
- Vérifi ez la hauteur de l‘herbe dans la zone
de tonte et tondez l‘herbe en cas de besoin avec une tondeuse conventionnelle à
moins de 60 mm.
- Augmentez la hauteur de coupe. Commencez toujours par une hauteur de coupe plus élevée et réduisez-la petit à petit
jusqu‘à la hauteur souhaitée.
- Contrôlez l‘encrassement des disques à
couteaux (11) et des roues et nettoyez-les
à fond.
- Contrôlez la présence de blocages au
niveau des roues arrière et du disque à
couteaux (11). Si vous ne parvenez pas à
éliminer ces blocages, adressez-vous au
service après-vente compétent.
Erreur fonctionnement
- La tondeuse robot a été arrêtée en raison d‘une erreur
de fonctionnement
Désactivez l‘interrupteur principal (7) (OFF)
et réactivez-le (ON) pour redémarrer la tondeuse robot.
Détection d’anomalies
Erreur Cause probable Suppression
La tondeuse robot
se trouve dans la
zone de tonte.
La tondeuse robot
ne s‘allume pas.
La station de recharge ne peut pas
rejoindre la station
de recharge.
- Tension de l‘accumulateur
trop faible
- Erreur au niveau du circuit électrique ou de
l‘électronique
- La station de recharge (19)
n‘est pas installée correctement.
- Retournez la tondeuse robot à la station
de recharge (19) pour y être rechargée.
- Activez l‘interrupteur principal (7) (ON).
- Adressez-vous au service après-vente.
- Assurez-vous que l‘affi chage LED (21)
vert de la station de recharge (19) est allumé.
- Assurez-vous que les fi ls de délimitati-
on (18) soient raccordés à la station de
recharge (19) et que le fi l de délimitation
avant (18) soit posé au milieu sous la station de recharge (19).
- Assurez-vous que la station de recharge
(19) est positionnée correctement.
La tondeuse robot
s’arrête ou roule de
manière incontrôlée
à proximité d’îlots
- Le fi l de délimitation (18)
n‘est pas installé correctement autour des îlots de
délimitation.
- Adaptez la position du fi l de délimitation
(18).
- Veillez à ce que le fi l de délimitation (18)
ne se coupe pas
de délimitation.
- 75 -
Anl_FREELEXO_SMART_SPK13.indb 75Anl_FREELEXO_SMART_SPK13.indb 75 10.10.2022 12:44:3510.10.2022 12:44:35

F
Détection d’anomalies
Erreur Cause probable Suppression
La tondeuse robot
est très bruyante.
La tondeuse robot
reste dans la station de recharge.
La tondeuse robot
retourne régulièrement à la station de
recharge.
La tondeuse robot
reste sur le fi l de dé-
limitation et ne peut
pas atteindre la station de recharge.
- Lames (10) endommagées
- De nombreux corps étrangers adhèrent aux lames
(10)
- La tondeuse robot a démarré
trop près des obstacles
- Entraînement de lame ou
moteur d‘entraînement endommagé
- D‘autres pièces de la tondeuse robot sont endommagées
- Temps de travail mal réglé
- Accumulateur vide
- Capteur de pluie déclenché
- Température d’accumulateur
accrue
- Accumulateur vide
- La longueur du fi l de délimi-
tation (18) et ainsi le chemin
vers la station de recharge
(19) est trop long pour
l’accumulateur utilisé.
- Remplacez les lames (10). Il faut remplacer les 3 lames (10) en même temps.
- L‘effi cacité opérationnelle de la tondeuse
robot dépend de l‘aff ûtage des lames
(10). C‘est pourquoi, maintenez les lames
(10) dans un bon état.
- Éteignez la tondeuse robot de façon sûre
et portez des gants de travail pendant que
vous nettoyez les lames (10) pour éviter
des blessures par coupure.
- Faites réparer ou remplacer le moteur par
le service après-vente.
- Contrôlez les réglages du temps de travail.
- La tondeuse robot commence et termine
son travail dans le créneau horaire réglé.
En dehors de ce créneau horaire, la
tondeuse robot reste dans la station de
recharge (19).
- Retirez tous les obstacles possibles sur
le fi l de délimitation (18). Veillez lors de
la pose du fi l de délimitation (18) à une
distance suffi sante par rapport aux obsta-
cles.
- Veuillez utiliser un accumulateur de plus
grande capacité.
- Attention : En cas d’utilisation d’un accumulateur Multi-Ah (par ex. 4-6 Ah), réglez
la capacité supérieure. Grâce à la charge
et décharge lente de la tondeuse robot, il
n’est pas nécessaire d’utiliser la capacité
inférieure pour prolonger la durée de vie.
ATTENTION ! Les fi ls de délimitation coupés et les dommages indirects ne sont pas couverts
par la garantie !
- 76 -
Anl_FREELEXO_SMART_SPK13.indb 76Anl_FREELEXO_SMART_SPK13.indb 76 10.10.2022 12:44:3610.10.2022 12:44:36

F
13. Affi chage chargeur
État de l’affi chage
Voyant
LED rouge
Voyant
LED vert
Arrêt Clignote État prêt à l’emploi
Le chargeur est raccordé au réseau et est prêt à l’emploi, la batterie n’est
pas dans le chargeur.
Marche Arrêt Chargement
Le chargeur charge la batterie en mode de charge rapide. Les temps de
charge correspondants se trouvent directement sur le chargeur.
Remarque ! Selon la charge actuelle de la batterie, les temps de charge
réels peuvent diff érer quelque peu des temps de charge indiqués.
Arrêt Marche La batterie est chargée et prête à l’emploi. (READY TO GO)
Ensuite, on commute sur un processus de charge lent jusqu’au chargement complet.
Pour ce faire, laissez la batterie env. 15 min plus longtemps sur le chargeur.
Mesures :
Retirez la batterie du chargeur. Débranchez le chargeur du réseau.
Clignote Arrêt Charge d’adaptation
Le chargeur est en mode de charge lente.
Dans ce cas, la batterie se charge plus lentement pour des raisons de sécurité et nécessite plus de temps. Cela peut avoir les causes suivantes :
- L’accumulateur n’a pas été rechargé depuis longtemps.
- La température de la batterie ne se trouve pas dans la zone idéale
Mesures :
Attendez jusqu’à ce que le processus de charge soit terminé, la batterie
peut quand même encore être rechargée.
Clignote Clignote Erreur
Le processus de charge n’est plus possible. La batterie est défectueuse.
Mesures :
Une batterie défectueuse ne doit plus être rechargée.
Retirez la batterie du chargeur.
Marche Marche Perturbation thermique
La batterie est trop chaude (par ex. exposition directe au soleil) ou trop
froide (en dessous de 0 °C)
Mesures :
Retirez la batterie et conservez-la un jour à température ambiante
(env. 20 °C).
Signifi cation et mesures
- 77 -
Anl_FREELEXO_SMART_SPK13.indb 77Anl_FREELEXO_SMART_SPK13.indb 77 10.10.2022 12:44:3610.10.2022 12:44:36

F
Uniquement pour les pays de l’Union Européenne
Ne jetez pas les outils électriques dans les ordures ménagères!
Selon la norme européenne 2012/19/CE relative aux appareils électriques et systèmes électroniques
usés et selon son application dans le droit national, les outils électriques usés doivent être récoltés à
part et apportés à un recyclage respectueux de l’environnement.
Possibilité de recyclage en alternative à la demande de renvoi :
Le propriétaire de l’appareil électrique est obligé, en guise d’alternative à un envoi en retour, à contribuer à un recyclage eff ectué dans les règles de l’art en cas de cessation de la propriété. L’ancien appareil
peut être remis à un point de collecte dans ce but. Cet organisme devra l’éliminer dans le sens de la Loi
sur le cycle des matières et les déchets. Ne sont pas concernés les accessoires et ressources fournies
sans composants électroniques.
Veuillez noter que lors de la mise au rebut, les accumulateurs et les moyens d’éclairage (par ex. ampoule) sont retirés de l’appareil.
Toute réimpression ou autre reproduction de la documentation et des papiers joints aux produits, même
sous forme d’extraits, est uniquement permise une fois l’accord explicite de l’Einhell Germany AG obtenu.
Sous réserve de modifi cations techniques
- 78 -
Anl_FREELEXO_SMART_SPK13.indb 78Anl_FREELEXO_SMART_SPK13.indb 78 10.10.2022 12:44:3710.10.2022 12:44:37

F
Informations service après-vente
Nous disposons dans tous les pays mentionnés dans le bon de garantie de partenaires de service
après-vente compétents dont vous trouverez les coordonnées dans le bon de garantie. Ceux-ci se
tiennent à votre disposition pour tout ce qui concerne le service après-vente comme les réparations,
l‘approvisionnement en pièces de rechange et d‘usure ou l‘achat de pièces de consommation.
Il faut tenir compte du fait que pour ce produit les pièces suivantes sont soumises à une usure liée à
l‘utilisation ou à une usure naturelle ou que les pièces suivantes sont nécessaires en tant que consommables.
Catégorie Exemple
Pièces d‘usure* accumulateur
Matériel de consommation/
pièces de consommation*
Pièces manquantes
*Pas obligatoirement compris dans la livraison !
En cas de vices ou de défauts, nous vous prions d‘enregistrer le cas du défaut sur internet à l‘adresse
www.Einhell-Service.com. Veuillez donner une description précise du défaut et répondre dans tous les
cas aux questions suivantes :
est-ce que l‘appareil a fonctionné une fois ou était-il défectueux dés le départ ?
•
avez-vous remarqué quelque chose avant la panne (symptôme avant la panne) ?
•
quel est le défaut de fonctionnement de l‘appareil à votre avis (symptôme principal) ?
•
Décrivez ce défaut de fonctionnement.
Lames
- 79 -
Anl_FREELEXO_SMART_SPK13.indb 79Anl_FREELEXO_SMART_SPK13.indb 79 10.10.2022 12:44:3710.10.2022 12:44:37

F
Bon de garantie
Chère cliente, cher client,
nos produits sont soumis à un contrôle de qualité très strict. Si toutefois, il arrivait que cet appareil ne
fonctionne pas parfaitement, nous en sommes désolés et nous vous prions de vous adresser à notre
service après-vente à l‘adresse indiquée sur le bon de garantie. Nous nous tenons également volontiers
à votre disposition par téléphone au numéro de service après-vente indiqué. La garantie est valable
dans les conditions suivantes :
1. Ces conditions de garantie s‘adressent uniquement à des consommateurs, c‘est à dire à des personnes physiques qui ne souhaitent ni utiliser ce produit dans le cadre de leur activité industrielle ou
artisanale, ni dans le cadre de toute autre activité indépendante. Les conditions de garantie réglementent les prestations de garantie supplémentaires que le fabricant mentionné ci-dessous promet
aux acheteurs de ses appareils en supplément de la prestation de garantie légale. Vos droits légaux
en matière de garantie restent inchangés. Notre prestation de garanti est gratuite pour vous.
2. La prestation de garantie s‘étend exclusivement aux défauts résultant d‘une erreur de fabrication ou
de matériau d‘un appareil neuf du fabricant mentionné ci-dessous et acheté par vos soins. La prestation de garantie se limite selon notre décision soit à la résolution de tels défauts sur l‘appareil, soit
à l‘échange de l‘appareil.
Veillez au fait que nos appareils, conformément au règlement, n‘ont pas été conçus pour être utilisés dans un environnement professionnel, industriel ou artisanal. Il n‘y a donc pas de contrat de
garantie quand l‘appareil a été utilisé professionnellement, artisanalement ou par des sociétés industrielles ou exposé à une sollicitation semblable pendant la durée de la garantie.
3. Sont exclus de notre garantie :
- les dommages liés au non-respect des instructions de montage ou en raison d‘une installation
incorrecte, au non-respect du mode d‘emploi (en raison par ex. du branchement de l‘appareil sur la
tension de réseau ou le type de courant incorrect), au non-respect des dispositions de maintenance
et de sécurité ou résultant d‘une exposition de l‘appareil à des conditions environnementales anormales ou d‘un manque d‘entretien et de maintenance.
- les dommages résultant d‘une utilisation abusive ou non conforme (comme par ex. une surcharge
de l‘appareil ou une utilisation d‘outils ou d‘accessoires non autorisés), de la pénétration d‘objets
étrangers dans l‘appareil (comme par ex. du sable, des pierres ou de la poussière), de l‘utilisation
de la force ou de la violence (comme par ex. les dommages liés aux chutes).
- les dommages sur l‘appareil ou des parties de l‘appareil résultant de l‘usure normale liée à
l‘utilisation de l‘appareil ou de toute autre usure naturelle.
4. La durée de garantie est de 24 mois et débute à la date d‘achat de l‘appareil. Les droits à la garantie
doivent être revendiqués avant l‘expiration de la durée de garantie dans un délai de deux semaines
après avoir constaté le défaut. La revendication de droits à la garantie après expiration de la durée
de garantie est exclue. La réparation ou l‘échange de l‘appareil n‘entraîne ni une extension de la durée de garantie ni le début d‘une nouvelle durée de garantie pour cet appareil ou toute autre pièce
de rechange installée sur l‘appareil. Cela est valable également dans le cas d‘une intervention du
service après-vente à domicile.
5. Pour faire valoir vos droits à la garantie, veuillez enregistrer l‘appareil défectueux à l‘adresse suivante :
www.Einhell-Service.com. Veuillez garder à disposition la preuve d‘achat ou tout autre justifi catif
de l‘achat de votre nouvel appareil. Les appareils envoyés sans les justifi catifs correspondants ou
sans plaque signalétique sont exclus de la prestation de garantie en raison de l‘impossibilité de les
enregistrer. Si le défaut de l‘appareil est inclut dans la garantie, vous recevrez sans délai un appareil
réparé ou un nouvel appareil.
Bien entendu, nous réparons volontiers les défauts de votre appareil qui ne sont pas ou plus compris
dans l‘étendue de la garantie contre le remboursement des frais de réparation. Pour cela, veuillez envoyer l‘appareil à notre adresse de service après-vente.
Pour les pièces d‘usure, de consommation et manquantes, nous renvoyons aux restrictions de cette garantie conformément aux informations du service après-vente de ce mode d‘emploi.
- 80 -
Anl_FREELEXO_SMART_SPK13.indb 80Anl_FREELEXO_SMART_SPK13.indb 80 10.10.2022 12:44:3810.10.2022 12:44:38

I
Indice
1. Avvertenze sulla sicurezza
2. Descrizione dell’apparecchio ed elementi forniti
3. Utilizzo proprio
4. Caratteristiche tecniche
5. Messa in esercizio
6. Uso
7. Pulizia, manutenzione e ordinazione dei pezzi di ricambio
8. Conservazione
9. Trasporto
10. Smaltimento e riciclaggio
11. Indicazioni della stazione di ricarica ed eliminazione degli errori
12. Indicazioni del robot tagliaerba ed eliminazione degli errori
13. Indicatori caricabatterie
Pericolo! - Per ridurre il rischio di lesioni leggete le istruzioni per l’uso.
Questo apparecchio non deve essere utilizzato dai bambini. I bambini devono essere sorvegliati in
modo che non giochino con l‘apparecchio. La pulizia e la manutenzione non devono essere eseguite dai
bambini. L‘apparecchio non deve essere utilizzato da persone con capacità fi siche, sensoriali o mentali
ridotte o con esperienze e conoscenze insuffi cienti, a meno che esse non vengano sorvegliate o istruite
da una persona per loro responsabile.
- 81 -
Anl_FREELEXO_SMART_SPK13.indb 81Anl_FREELEXO_SMART_SPK13.indb 81 10.10.2022 12:44:3810.10.2022 12:44:38

I
Pericolo!
Nell’usare gli apparecchi si devono rispettare
diverse avvertenze di sicurezza per evitare lesioni e danni. Quindi leggete attentamente queste
istruzioni per l’uso/le avvertenze di sicurezza.
Conservate bene le informazioni per averle a
disposizione in qualsiasi momento. Se date
l’apparecchio ad altre persone, consegnate queste istruzioni per l’uso/le avvertenze di sicurezza
insieme all’apparecchio. Non ci assumiamo alcuna responsabilità per incidenti o danni causati
dal mancato rispetto di queste istruzioni e delle
avvertenze di sicurezza.
1. Avvertenze sulla sicurezza
Le relative avvertenze di sicurezza si trovano
nell’opuscolo allegato.
Avvertimento!
Leggete tutte le avvertenze di sicurezza, le
istruzioni, le illustrazioni e le caratteristiche
tecniche che accompagnano il presente elettroutensile. Il mancato rispetto delle seguenti
istruzioni può causare scosse elettriche, incendi
e/o gravi lesioni.
Conservate tutte le avvertenze di sicurezza e
le istruzioni per eventuali necessità future.
Spiegazione dei simboli utilizzati
(vedi Fig. 14)
A. AVVERTIMENTO - Leggete attentamen-
te le istruzioni per l‘uso prima di utilizzare
l‘apparecchio!
B. AVVERTIMENTO - Quando l‘apparecchio è in
funzione tenete la distanza di sicurezza corrispondente!
C. AVVERTIMENTO - Attivate la funzione di bl-
occo prima di eseguire lavori all‘apparecchio
o prima di sollevarlo! ATTENZIONE - Non
toccate le lame rotanti
D. AVVERTIMENTO - Non salite
sull‘apparecchio! ATTENZIONE - Non toccate
le lame rotanti
E. Grado di protezione II (isolamento doppio)
F. Conservazione delle batterie soltanto in locali
asciutti con una temperatura ambiente di
+10°C - +40°C. Conservate le batterie solo se
sono cariche (almeno al 40%).
G. Grado di protezione III
H. Fusibile ritardato 2 A
I. Utilizzate l‘apparecchio soltanto in locali asci-
utti.
J. AVVERTIMENTO: Per caricare la batteria im-
piegate solo l’alimentatore rimovibile NT24/1 /
PS24/1 fornito con l’apparecchio.
Attenzione!
Durante un temporale togliete la spina dalla presa
di corrente e staccate il fi lo perimetrale dalla sta-
zione di ricarica.
2. Descrizione dell’apparecchio ed
elementi forniti
2.1 Descrizione dell’apparecchio (Fig. 1/2)
1. Robot tagliaerba
2. Pannello di comando
3. Tasto di STOP / tasto di sbloccaggio della
copertura del display
4. Regolazione dell‘altezza di taglio
5. Sensore di pioggia
6. Maniglia di trasporto
7. Interruttore principale
8. Ruota posteriore
9. Coperchio del vano batteria
10. Lame
11. Disco portalame
12. Ruota anteriore
13. (Cavo dell‘)alimentatore
14. Gancio di fi ssaggio
15. Vite di fi ssaggio
16. Connettore per cavi
17. Lame di ricambio
18. Filo perimetrale
19. Stazione di ricarica
20. Contatto di ricarica
21. Spia LED
22. Chiave a brugola
23. Copertura del display
24. Porta USB
25. Righello (per separare)
2.2 Elementi forniti e disimballaggio
Verifi cate che l‘articolo sia completo sulla base
degli elementi forniti descritti. In caso di parti
mancanti, rivolgetevi al nostro Centro Servizio Assistenza o al punto vendita in cui avete acquistato
l‘apparecchio presentando un documento di acquisto valido entro e non oltre i 5 giorni lavorativi
dall‘acquisto dell‘articolo. Al riguardo fate attenzione alla Tabella Garanzia nelle informazioni sul
Servizio Assistenza alla fi ne delle istruzioni.
Aprite l’imballaggio e togliete con cautela
•
l’apparecchio dalla confezione.
Togliete il materiale d’imballaggio e anche i
•
fermi di trasporto / imballo (se presenti).
- 82 -
Anl_FREELEXO_SMART_SPK13.indb 82Anl_FREELEXO_SMART_SPK13.indb 82 10.10.2022 12:44:3910.10.2022 12:44:39

I
Controllate che siano presenti tutti gli elemen-
•
ti forniti.
Verificate che l’apparecchio e gli accessori
•
non presentino danni dovuti al trasporto.
Se possibile, conservate l’imballaggio fino
•
alla scadenza della garanzia.
Pericolo!
L’apparecchio e il materiale d’imballaggio
non sono giocattoli! I bambini non devono
giocare con sacchetti di plastica, fi lm e pic-
coli pezzi! Sussiste pericolo di ingerimento e
soff ocamento!
Elementi forniti, materiale di montaggio e
accessori (in parte non compresi tra gli elementi forniti):
Per gli elementi forniti si veda il relativo foglietto
informativo accluso.
Robot tagliaerba
•
(Cavo dell‘) alimentatore
•
Stazione di ricarica
•
Viti di fissaggio (4 pezzi)
•
Lame di ricambio
•
Gancio di fissaggio
•
Filo perimetrale
•
Connettore per cavi
•
Chiave a brugola
•
Batteria
•
Caricabatterie
•
Righello (per separare)
•
Istruzioni per l‘uso originali
•
Avvertenze di sicurezza
•
Mezzi ausiliari necessari (non compresi tra
gli elementi forniti)
Martello
•
Pinza
•
Pinza spelafili
•
Livella (opzionale)
•
3. Utilizzo proprio
Il robot tagliaerba è adatto all‘uso privato in giardini di piccole dimensioni ed esclusivamente per
tagliare tappeti erbosi.
L’apparecchio deve venire usato solamente per lo
scopo a cui è destinato. Ogni altro tipo di uso che
esuli da quello previsto non è un uso conforme.
L’utilizzatore/l’operatore, e non il costruttore, è
responsabile dei danni e delle lesioni di ogni tipo
che ne risultino.
Tenete presente che i nostri apparecchi non sono
stati costruiti per l’impiego professionale, artigianale o industriale. Non ci assumiamo alcuna
garanzia quando l’apparecchio viene usato in
imprese commerciali, artigianali o industriali, o in
attività equivalenti.
4. Caratteristiche tecniche
Tensione ...................................................... 18 V
Numero di giri del motore ..................... 3500 min
Tipo di protezione ........................................IPX4
Grado di protezione ......................................... III
Peso ............................................................8,4 kg
Larghezza di taglio .....................................18 cm
Numero di lame ................................................ 3
Pendenza max. .......................................... 35 %
Livello di potenza acustica LWA ............ 57 dB (A)
Incertezza K ....................................... 2,3 dB (A)
Regolazione dell‘altezza
di taglio ........................... 20-60 mm; in continuo
Lunghezza del fi lo
perimetrale consentita .......................max. 250 m
Antenna fi lare come cavo perimetrale
Banda di frequenza d’esercizio ........ 0-148,5 KHz
Potenza di trasmissione massima
.......................................................67,05 dBuA/m
Collegamento GSM:
Banda di frequenza di esercizio:
........................................ E-GSM900 / DCS1800
Potenza di trasmissione massima: ..........33 dBm
Collegamento LTE (CAT-M ovvero NB-IoT)
Banda di frequenza di esercizio:
........................................Banda 1 / 3 / 8 / 20 / 28
Potenza di trasmissione massima: ...........21dBm
Alimentatore
Tensione in entrata: ......... 100- 240 V ~ 50 /60 Hz
Tensione in uscita: .................................. 24 V DC
Corrente in uscita: ....................................... 1,5 A
Grado di protezione: .....................................II /
I valori di emissione dei rumori sono stati rilevati
secondo le norme EN ISO 3744:1995 e ISO
11094: 1991.
쓑
-1
- 83 -
Anl_FREELEXO_SMART_SPK13.indb 83Anl_FREELEXO_SMART_SPK13.indb 83 10.10.2022 12:44:3910.10.2022 12:44:39

I
Avvertimento!
Questo apparecchio sviluppa un campo
elettromagnetico durante l‘esercizio. In determinate circostanze questo campo può
danneggiare dispositivi medici impiantati
attivi o passivi. Per ridurre il rischio di lesioni
gravi o mortali, consigliamo alle persone con
dispositivi medici impiantati di consultare il
proprio medico e il produttore del dispositivo
prima di utilizzare l‘apparecchio.
5. Messa in esercizio
Leggete tutte le istruzioni per l‘uso prima di
iniziare l‘installazione del robot tagliaerba. La
qualità dell‘installazione infl uisce poi sulle
prestazioni del robot tagliaerba.
5.1 Principio di funzionamento
Il robot tagliaerba sceglie casualmente la propria
direzione. Il robot tagliaerba taglia tutta l‘erba
del giardino lavorando su tutte le zone all‘interno
della superfi cie delimitata dal fi lo perimetrale (18).
Non appena il robot tagliaerba riconosce un fi lo
perimetrale (18) installato correttamente, esso
si gira e prosegue in un‘altra direzione all‘interno
dell‘area. Anche tutte le zone che volete proteggere all‘interno della superfi cie – ad es. laghetti,
alberi, mobili o aiuole – devono essere delimitate
con il fi lo perimetrale (18). Il fi lo perimetrale (18)
deve racchiudere uno spazio circoscritto. Se il
robot tagliaerba incontra un ostacolo all‘interno
della zona di taglio, torna indietro e prosegue il
lavoro in un‘altra direzione (Fig. 3).
5.2 Sensori
Il robot tagliaerba è dotato di numerosi sensori di
sicurezza.
Sensore di sollevamento:
•
Se il robot tagliaerba viene sollevato da dietro
di oltre 30° dal terreno oppure se una ruota
anteriore (12) si stacca dal terreno, vengono
subito fermati sia il robot che la rotazione delle lame (10).
Sensore di inclinazione:
•
Se il robot tagliaerba si inclina notevolmente
in una direzione, vengono subito fermati sia il
robot che la rotazione delle lame (10).
Sensore ostacoli:
•
Il robot tagliaerba riconosce gli ostacoli sul
suo percorso. Se il robot tagliaerba entra in
collisione con un ostacolo, vengono subito
fermati sia il robot che la rotazione delle lame
e l’apparecchio torna indietro allontanandosi
dall‘ostacolo.
Sensore di pioggia:
•
Il robot tagliaerba è dotato di un sensore di
pioggia (5) per evitare che funzioni quando
piove. Quando il robot tagliaerba riconosce
che sta piovendo, torna alla stazione di ricarica (19) dove viene completamente ricaricato.
Una volta che il sensore di pioggia (5) è di
nuovo asciutto, il robot tagliaerba rimane per
altre due ore nella stazione di ricarica (19).
Solo a questo punto riprende il lavoro se si
trova ancora in un periodo di attività. Se il
sensore di pioggia (5) è attivato (consigliato
per non danneggiare il prato), sul display (50)
è visibile una nuova chiara. Quando il sensore
interviene appare una nuvola scura con un
goccia di pioggia. Non cortocircuitate i due
sensori metallici con metallo o un altro materiale conduttore. Ciò può compromettere il
corretto funzionamento del robot tagliaerba.
5.3 Preparazione
Eseguite prima un disegno schematico del prato.
Riportate anche gli ostacoli sul disegno e stabilite
come li desiderate proteggere. In questo modo
è più semplice trovare una buona posizione per
la stazione di ricarica (19) e posare il fi lo peri-
metrale (18) intorno a cespugli, aiuole ecc (Fig.
4). Se il manto erboso è alto più di 60 mm deve
essere accorciato per non sovraccaricare troppo
l‘apparecchio e diminuire l‘effi cienza di funziona-
mento. Utilizzate a tale scopo un convenzionale
tagliaerba o un tagliabordi.
Rimuovete dal prato tutti gli oggetti sparsi che
potrebbero essere danneggiati dal robot tagliaerba o danneggiare il robot stesso.
Tenete pronti i seguenti attrezzi: martello, pinza,
pinza spelafi li e livella (opzionale).
Montaggio della batteria
Per l‘esercizio del robot tagliaerba è necessaria
una batteria (A) della serie Power X Change. At-
tenzione: a seconda della variante del modello è
possibile che la batteria (A) non sia compresa tra
gli elementi forniti con il robot tagliaerba. Aprite il
coperchio del vano batteria (9). Premete il tasto di
arresto della batteria (A) e spingete la batteria (A)
nell‘apposito vano. Chiudete il coperchio del vano
batteria (9) e controllate che scatti correttamente
in posizione (Fig. 10). Per rimuovere la batteria (A)
aprite il coperchio del relativo vano (9). Premete
il tasto di arresto della batteria (A) ed estraete la
batteria (A).
- 84 -
Anl_FREELEXO_SMART_SPK13.indb 84Anl_FREELEXO_SMART_SPK13.indb 84 10.10.2022 12:44:4010.10.2022 12:44:40

I
5.4 Stazione di ricarica
5.4.1 Posizione della stazione di ricarica
Determinate innanzitutto la posizione migliore
per la stazione di ricarica (19). È necessaria una
presa elettrica per esterni che fornisca continuamente corrente di modo che il robot tagliaerba
funzioni sempre. La stazione di ricarica (19)
deve essere posizionata su una superfi cie piana
all‘altezza della cotica erbosa. Controllate che la
zona sia in piano e asciutta. Scegliete un punto
all‘ombra perché è meglio se la batteria viene
caricata in un ambiente fresco. Fate attenzione
inoltre che il fi lo perimetrale venga posato dritto
almeno per gli ultimi 2 m davanti alla stazione
di ricarica (19) (Fig. 5a). Eventuali curve proprio
davanti alla stazione di ricarica (19) possono causare diffi coltà di aggancio per la ricarica.
5.4.2 Localizzazione della stazione di ricarica
Quando la batteria è quasi scarica, il robot tagliaerba torna alla stazione di ricarica (19) seguendo
il fi lo perimetrale (18) in senso antiorario fi no alla
stazione di ricarica (19). Fate pertanto attenzione
a posizionare la stazione di ricarica (19) orientata
correttamente. (Fig. 5b)
5.4.3 Collegamento della stazione di ricarica
all‘alimentatore
1. Prima di collegare la stazione di ricarica (19)
all‘alimentazione di corrente accertatevi che
la tensione di rete sia di 100-240 V e 50/60
Hz.
2. Collegate l‘alimentatore (13) direttamente a
una presa elettrica. Non utilizzate il cavo per
altre applicazioni.
3. Non usate un alimentatore (13) danneggiato.
In caso di danni ai cavi o all‘alimentatore (13)
contattate subito un tecnico autorizzato per la
sostituzione.
4. Non ricaricate il robot tagliaerba in un ambiente umido. Non ricaricate il robot tagliaerba
a temperature superiori ai 40 °C o inferiori ai
5 °C.
5. Tenete il robot tagliaerba e l‘alimentatore (13)
lontani da acqua, fonti di calore e sostanze
chimiche. Tenete il cavo dell‘alimentatore (13)
lontano da spigoli vivi per evitare danni.
6. Collegate l‘alimentatore (13) alla stazione di
ricarica (19). (Fig. 5c)
Per ricaricare la batteria già durante
l‘installazione, accendete prima il robot tagliaerba
con l‘interruttore principale (7) e posizionatelo
sulla stazione di ricarica (19).
5.4.4 Informazioni sull‘operazione di ricarica
Il robot tagliaerba ritorna alla stazione di ricarica
(19) in una delle seguenti situazioni:
Siete voi a far tornare indietro il robot tagliaer-
•
ba in modo manuale.
La stato di carica della batteria scende sotto
•
al 30 %.
Il tempo di lavoro quotidiano è terminato.
•
Il sensore di pioggia è intervenuto.
•
Il robot tagliaerba è surriscaldato.
•
La modalità “Taglio bordi” ovvero “Spot mo-
•
wing” è stata avviata fuori dal tempo di lavoro
impostato e conclusa dal robot tagliaerba.
In questi casi il robot tagliaerba torna da solo alla
stazione di ricarica (19) lungo il fi lo perimetrale
(18).
Quando il robot tagliaerba torna alla stazione di
ricarica (19), cerca il fi lo perimetrale (18) e lo per-
corre in senso antiorario.
Durante l‘operazione di ricarica della batteria la
spia LED (21) sulla stazione di ricarica (19) è illuminata in rosso.
Quando la spia LED (21) sulla stazione di ricarica
(19) è illuminata in verde signifi ca che la batteria è
completamente carica. Dopo la ricarica completa
il robot tagliaerba riprende il lavoro oppure rimane
nella stazione di ricarica (19) fi no all‘intervallo di
lavoro successivo.
Se durante il ritorno alla stazione di ricarica (19) si
dovesse trovare un ostacolo lungo il fi lo perimet-
rale (18), dopo diversi tentativi il robot tagliaerba
rimane fermo davanti all‘ostacolo e non può raggiungere la stazione di ricarica (19). Rimuovete tutti
gli ostacoli lungo il fi lo perimetrale (18).
Se la temperatura della batteria supera i 45 °C,
l‘operazione di ricarica viene interrotta per evitare
danni alla batteria. Una volta scesa di nuovo la
temperatura, l‘operazione di ricarica viene ripresa
automaticamente.
Se la temperatura dell‘unità di controllo del robot
tagliaerba supera i 65 °C, il robot tagliaerba torna
alla stazione di ricarica (19). Una volta scesa
di nuovo la temperatura, il lavoro viene riprese
secondo le impostazioni. Se la batteria si scarica
prima che il robot tagliaerba torni alla stazione di
ricarica (19), il robot tagliaerba non può più essere avviato. Riportate il robot tagliaerba alla stazione di ricarica (19) e lasciate inserito l‘interruttore
principale (7). Il robot tagliaerba viene ricaricato
automaticamente.
- 85 -
Anl_FREELEXO_SMART_SPK13.indb 85Anl_FREELEXO_SMART_SPK13.indb 85 10.10.2022 12:44:4010.10.2022 12:44:40

I
5.5 Filo perimetrale
ATTENZIONE! Fili perimetrali tagliati e danni
conseguenti non sono coperti dalla garanzia!
5.5.1 Posa del fi lo perimetrale
Il fi lo perimetrale (18) può essere posato sia
appoggiato sul terreno che nel terreno stesso. In
caso di terreno duro e secco i ganci di fi ssaggio
(14) possono rompersi quando vengono piantati.
Irrigate il prato prima di installare il fi lo perimetrale
se il terreno è molto secco.
Installazione sul terreno
•
Posate il filo perimetrale (18) teso sul terreno
e fissatelo con gli appositi ganci (14) acclusi se non avete intenzione di scarificare o
arieggiare il prato in un momento successivo.
La posizione del filo perimetrale può essere
adeguata nelle prime settimane di utilizzo del
robot tagliaerba. Dopo un certo tempo il filo
perimetrale verrà però superato dall‘erba e
non sarà più visibile. Installate il filo perimetrale con i ganci di fissaggio (14) a una distanza
massima di 1 m tra loro. Nei punti irregolari
del prato riducete la distanza tra i ganci di
fissaggio. Evitate situazioni in cui il filo non sia
appoggiato sul terreno. Accertatevi che il filo
perimetrale non possa essere tranciato dal
robot tagliaerba.
Installazione nel terreno
•
Interrate il filo perimetrale fino a una profondità di 5 cm. In questo modo si evitano per
esempio danni al filo perimetrale (18) durante
operazioni di scarificatura e aerazione.
Avvertenza!
Lasciate 1m di fi lo sul retro della stazione di rica-
rica per poter apportare successivamente eventuali correzioni.
5.5.2 Punti stretti
Se la superfi cie del prato comprende punti stretti,
il robot tagliaerba può lavorarci fi no a una larghez-
za del corridoio di almeno 1,4 m (80 cm tra i fi li
perimetrali) e una lunghezza max. di 8 m. (Fig. 3)
5.5.3 Distanza dal bordo del giardino
Quando il robot tagliaerba si avvicina a un fi lo
perimetrale (18), quest‘ultimo viene riconosciuto
dai sensori anteriori del robot tagliaerba. Tuttavia,
prima di girarsi il robot tagliaerba supera il fi lo
perimetrale (18) per un tratto anche di 30 cm. Tenetelo in considerazione nella pianifi cazione della
zona di taglio. (Fig. 6a)
5.5.4 Posa del fi lo negli angoli
Evitate di posare il fi lo perimetrale (18) negli
angoli formando un angolo retto (90°). Per assicurarsi che il robot tagliaerba non vada troppo
oltre il fi lo perimetrale (18), posate piuttosto il fi lo
perimetrale (18) come indicato nella Fig. 6b.
5.5.5 Calcolo della pendenza del prato
Il robot tagliaerba può superare pendenze fi no
al 35%. Evitate quindi pendenze maggiori. La
pendenza può essere misurata con il rapporto tra
l‘altezza superata e la distanza. (Fig. 6c)
Esempio: a/b = 35 cm/100 cm = 35 %
5.5.6 Installazione del fi lo perimetrale su
pendenze
Il robot tagliaerba può scivolare sulle pendenze,
in particolare in caso di erba bagnata, e quindi superare il fi lo perimetrale (18). Pertanto si consiglia
di fare attenzione ai seguenti punti (Fig. 6d):
Sulla parte superiore di un pendio il filo peri-
•
metrale (18) non dovrebbe essere installato
con pendenze superiori a 35 %. Mantenete
qui una distanza di 30 cm da ostacoli e bordi
del prato.
Sulla parte inferiore di un pendio il filo perime-
•
trale (18) non dovrebbe essere installato con
pendenze superiori a 17 %. Mantenete qui
una distanza di 40 cm da ostacoli e bordi del
prato.
5.5.7 Tratti di strada e vialetti lastricati
Separate vialetti rialzati, superfici con piet-
•
risco o corteccia decorativa, aiuole a una
profondità maggiore o zone simili. Posate il
filo perimetrale (18) a una distanza di almeno
30 cm. (Fig. 6e e 6g)
Non è necessario separare i vialetti alla stes-
•
sa altezza della cotica erbosa, perché il robot
tagliaerba può semplicemente passarci sop-
ra. Il filo perimetrale (18) può essere posato
anche sui vialetti. (Fig. 6f e 6g)
5.5.8 Isole
Proteggete gli ostacoli nella zona di taglio realizzando delle isole. In questo modo si può evitare
una collisione con oggetti fragili, laghetti, alberi,
mobili, aiuole ecc. (Fig. 6h e 6i)
Srotolate il filo perimetrale (18) dai bordi ver-
•
so gli oggetti da proteggere.
Fissate il filo perimetrale (18) con i ganci
•
di fissaggio (14) in senso orario intorno
all‘oggetto da proteggere.
Circondate completamente le isole e riportate
•
- 86 -
Anl_FREELEXO_SMART_SPK13.indb 86Anl_FREELEXO_SMART_SPK13.indb 86 10.10.2022 12:44:4110.10.2022 12:44:41

I
il filo perimetrale (18) al punto in cui vi siete
allontanati da bordo del prato.
La distanza fra le isole deve essere almeno
•
di 0,8 m. Altrimenti raggruppate gli oggetti in
un‘unica isola. (Fig. 6h)
I fili perimetrali (18) da e verso l‘isola dovreb-
•
bero essere posati in parallelo e molto vicini
l‘uno all‘altro. - Attenzione! I fili perimetrali
(18) non devono incrociarsi! - A tale scopo
fissate insieme i fili perimetrali paralleli (18)
sul terreno con gli stessi ganci di fissaggio
(14). (Fig. 6i)
Il robot tagliaerba supererà nella zona di
•
taglio i due fili perimetrali paralleli (18), ma si
fermerà sui fili perimetrali (18) posati singolarmente.
5.5.9 Ostacoli
Ostacoli con un‘altezza superiore a 10 cm
•
(Fig. 6j)
Gli ostacoli fissi con un‘altezza superiore a
10 cm, come ad es. alberi, pareti, recinzioni,
mobili da giardino ecc., vengono rilevati dai
sensori di collisione. Se il robot tagliaerba si
scontra con un ostacolo, si ferma, spegne il
gruppo di taglio, torna indietro e si gira per
continuare l‘operazione di taglio in un‘altra
direzione. Gli ostacoli fragili, instabili e di valore devono essere protetti con un‘isola di filo
perimetrale.
Pietre e ostacoli bassi
•
Pietre, rocce e ostacoli sotto i 10 cm di altezza nella zona di taglio devono essere protetti,
perché altrimenti il robot tagliaerba può passarci sopra. Ciò può causare danni e il blocco
del robot tagliaerba.
Alberi (Fig. 6k)
•
Gli alberi vengono trattati dal robot tagliaerba
come ostacoli. Ma se dal terreno dovessero
sporgere radici con un‘altezza inferiore a
10 cm, tale zona dovrebbe essere protetta.
Questo impedisce danni alle radici e al robot
tagliaerba. Tenete una distanza di almeno 30
cm tra il filo perimetrale (18) e l‘ostacolo.
5.5.10 Area principale e secondaria (Fig. 6l)
Per area secondaria (B) si intende una zona di
lavoro che non è collegata direttamente all’area
principale (A), ad es. tramite una superfi cie erbo-
sa o un viottolo. Per creare un’area secondaria (B)
separata posate il fi lo perimetrale (18) dall’area
principale (A) a quella secondaria (B) e ritorno. I
fi li perimetrali (18) da e verso l’area secondaria
(B) dovrebbero essere posati in parallelo e molto
vicini l‘uno all‘altro. - Attenzione! I fi li perimet-
rali (18) non devono incrociarsi! - A tale scopo
fi ssate insieme i fi li perimetrali paralleli (18) sul
terreno con gli stessi ganci di fi ssaggio (14).
Per poter tagliare l’erba dell’area secondaria (B)
dovete portare il robot tagliaerba in tale zona (B)
manualmente. Avviate qui il programma di taglio
desiderato e selezionate nel sottomenù “Area
secondaria” (vedi “Impostazioni del robot tagliaerba”). Nell’area secondaria (B) il tagliaerba non
cercherà di seguire il fi lo perimetrale (18) fi no alla
stazione di ricarica (19) quando il livello di carica
della batteria è basso.
5.6 Collegamento alla stazione di ricarica
Portate a termine la posa di tutto il fi lo perimetrale
(18) prima di collegarlo alla stazione di ricarica.
Lasciate a entrambe le estremità 1 m extra di fi lo
perimetrale (18) per poter eff ettuare successiva-
mente eventuali adeguamenti.
Isolate il fi lo perimetrale (18) alle estremità con
una pinza spelafi li su una lunghezza tra 10 e 15
mm per il collegamento alla stazione di ricarica
(19).
Staccate la spina dalla presa prima di collegare il
fi lo perimetrale (18) alla stazione di ricarica (19). Il
fi lo perimetrale (18) posato sul lato anteriore della
stazione di ricarica (19) deve essere portato sul
retro tramite i portacavi posizionati sul lato inferiore della stazione di ricarica (19). Collegate questo
fi lo perimetrale (18) all‘attacco nero a sinistra.
Poi fate passare il fi lo perimetrale posteriore (18)
attraverso il foro (supporto antistrappo) nella zona
dell’attacco e collegatelo all’attacco rosso a destra (Fig. 7a).
Attenzione! I fi li perimetrali (18) non devono
incrociarsi!
Eff ettuate poi il collegamento all‘alimentazione di
corrente. Dopo una corretta installazione la spia
LED (21) della stazione di ricarica (19) dovrebbe
rimanere illuminata in verde. Se il LED non è illuminato, controllate prima di tutti gli attacchi. Se il
LED è illuminato, ma non rimane illuminato in verde, leggete la tabella „Indicazioni della stazione
di ricarica ed eliminazione degli errori“ alla fi ne di
queste istruzioni per l‘uso.
5.7 Accensione e verifi ca dell‘installazione
Non appena la spia LED (21) della stazione di
ricarica (19) è illuminata in verde, la zona di taglio
è pronta per il robot tagliaerba. Accertatevi prima
che i ganci di fi ssaggio (14) del fi lo perimetrale
(18) siano completamente inseriti nel terreno.
Mettete il robot tagliaerba ca. 3m dietro la sta-
- 87 -
Anl_FREELEXO_SMART_SPK13.indb 87Anl_FREELEXO_SMART_SPK13.indb 87 10.10.2022 12:44:4110.10.2022 12:44:41

I
zione di ricarica (19) davanti al fi lo perimetrale
(18). Nel farlo il robot tagliaerba dovrebbe essere
rivolto verso il fi ltro perimetrale (18) a un angolo di
90° (Fig. 7b). Inserite (ON) l‘interruttore principale
(7) (Fig. 8).
Sbloccate il robot tagliaerba inserendo il PIN (si
veda il capitolo “Funzione di blocco/PIN”). Premete il tasto “MODE” (52). Selezionate poi con i
tasti di navigazione (55) il punto “Alla stazione” e
confermate premendo il tasto “OK” (56).
Premete il tasto “START” (53) e chiudete poi la
copertura del display (23). Ora il robot tagliaerba segue il fi lo perimetrale (18) in senso orario.
Osservate il robot tagliaerba per tutto il percorso
lungo il fi lo perimetrale (18) fi no a quando si trova
di nuovo nella stazione di ricarica (19). Se il robot
tagliaerba dovesse avere problemi in alcuni punti,
correggete eventualmente il fi lo perimetrale (18)
e ripetete il procedimento. La batteria del robot
tagliaerba viene ora ricaricata completamente. In
caso di problemi durante l‘aggancio è possibile
che la stazione di ricarica (19) debba essere riposizionata di lato fi no a quando l‘aggancio avviene
senza diffi coltà.
Con il tasto rosso di STOP (3) potete fermare il
robot tagliaerba in qualsiasi momento. Dopo aver
azionato il tasto di STOP (3), il robot tagliaerba
viene fermato e attende ulteriori istruzioni.
5.8 Fissaggio della stazione di ricarica
Una volta garantito il corretto funzionamento del
robot tagliaerba e trovata una posizione adeguata per la stazione di ricarica (19), la stazione di
ricarica (19) deve essere fi ssata con le viti di fi s-
saggio (15). Avvitate le viti di fi ssaggio (15) com-
pletamente nel terreno con la chiave esagonale
(22). (Fig. 7c)
5.9 Indicazione di carica della batteria
Premete l’interruttore per l’indicazione di carica
della batteria. L‘indicazione di carica della batteria
segnala lo stato di carica per mezzo di 3 LED
(Fig. 13b).
Tutti e 3 i LED sono illuminati:
La batteria è completamente carica.
1 LED o 2 LED sono illuminati:
La batteria dispone di una suffi ciente carica re-
sidua.
1 LED lampeggia:
La batteria è scarica, ricaricatela.
Tutti i LED lampeggiano:
La temperatura della batteria è scesa al di
sotto del valore minimo. Togliete la batteria
dall‘apparecchio e lasciatela un giorno a temperatura ambiente. Se l‘errore si presenta di nuovo,
la batteria si è scaricata completamente ed è
difettosa. Togliete la batteria dall‘apparecchio.
Una batteria difettosa non deve più venire usata
ovvero ricaricata.
Attenzione!
Se utilizzate una batteria Multi-Ah (ad es. 4-6 Ah)
impostate sempre la capacità maggiore. Non è
necessario utilizzare la capacità minore della
batteria del robot tagliaerba per aumentare la sua
durata utile dato che si scarica e ricarica con sollecitazioni ridotte.
5.10 Ricarica della batteria con il caricabat-
terie
In esercizio normale la batteria (A) del robot tagliaerba viene caricata tramite la stazione di ricarica
(19). Per l‘utilizzo indipendente della batteria (A)
della serie Power X Change, questa può essere
caricata con un caricabatterie Power X Charger
esterno. Attenzione! – A seconda della variante
del modello è possibile che il caricabatterie (Fig.
13a / Pos. B) non sia compreso tra gli elementi
forniti con il robot tagliaerba.
1. Controllate che la tensione di rete indicata
sulla targhetta corrisponda alla tensione di
rete a disposizione. Inserite la spina di ali-
mentazione del caricabatterie (A) nella presa
di corrente. Il LED verde inizia a lampeggiare.
2. Inserite la batteria (B) sul caricabatterie (A)
(Fig. 13a).
3. Al punto „Indicatori caricabatterie“ trovate una
tabella con i signifi cati degli indicatori LED sul
caricabatterie.
Durante la ricarica la batteria si può riscaldare un
po‘. Ma ciò è del tutto normale.
Se la ricarica della batteria non fosse possibile,
verifi cate
che sia presente tensione di rete sulla presa
•
di corrente;
che ci sia un perfetto contatto dei contatti di
•
ricarica.
Se continuasse a non essere possibile ricaricare
la batteria, inviate
il caricabatterie
•
e la batteria
•
al nostro servizio di assistenza clienti.
- 88 -
Anl_FREELEXO_SMART_SPK13.indb 88Anl_FREELEXO_SMART_SPK13.indb 88 10.10.2022 12:44:4210.10.2022 12:44:42

I
Per un invio corretto contattate il nostro servizio di assistenza clienti o il punto vendita
dove avete acquistato l’apparecchio.
Nel caso di invio o smaltimento di batterie
ovvero di apparecchi a batteria metteteli in
sacchetti di plastica separati per evitare cortocircuiti e incendi!
Per ottenere una lunga durata della batteria si
deve provvedere a una puntuale ricarica. Ciò è
comunque necessario quando ci si accorge della
diminuzione delle prestazioni dell‘apparecchio.
Non fate scaricare mai completamente la batteria.
Questo potrebbe danneggiarla!
6. Uso
6.1 Interruttore principale
Il robot tagliaerba è dotato di un interruttore principale (7). Con l‘interruttore principale (7) accendete (ON) e spegnete (OFF) il robot tagliaerba
(Fig. 8). Dopo l‘accensione del robot tagliaerba,
questo viene bloccato con il PIN.
6.2 Pannello di comando
Il robot tagliaerba è stato già programmato in
fabbrica e confi gurato con impostazioni standard.
Queste possono tuttavia essere modifi cate se
necessario. Anche se le impostazioni di fabbrica
sono adatte per la maggior parte dei giardini,
dovreste comunque informarvi sulle opzioni disponibili.
Spiegazione del pannello di controllo con
display LCD (Fig. 9a)
50. Display LCD
51. Tasto “SET” – Tasto di impostazione
52. Tasto “MODE” – Tasto del programma di taglio
53. Tasto “START” – Tasto di avvio
54. Tasto “BACK” – Tasto per tornare indietro
55. Tasti di navigazione
56. Tasto “OK” – Tasto di conferma
Spiegazione dei simboli sul display LCD
(Fig. 9b):
60. Intensità del segnale di connessione alla rete
61. Riconoscimento del segnale del fi lo perimet-
rale
62. Stato del sensore di pioggia
63. Stato della batteria
64. Taglio manuale
65. Comando orari programmati
66. Comando SMART
67. Ritorno alla stazione di ricarica
6.3 Regolazione dell‘altezza di taglio
Attenzione! La regolazione dell‘altezza di taglio
deve essere eseguita solamente a robot tagliaerba spento. A tale fi ne premete il tasto di STOP (3).
Il robot tagliaerba consente di adeguare in continuo l‘altezza di taglio con l‘apposita regolazione
(4) tra 20 e 60 mm e di controllarla sulla scala.
Se il manto erboso è alto più di 60 mm deve
essere accorciato ad almeno 60 mm per non
sovraccaricare troppo l‘apparecchio e diminuire
l‘effi cienza di funzionamento. Utilizzate a tale sco-
po un convenzionale tagliaerba o un tagliabordi.
Al termine dell‘installazione l‘altezza di taglio può
essere adeguata con l‘apposita regolazione (4).
Iniziate sempre con un‘altezza di taglio più alta e
riducetela poco per volta fi no all‘altezza deside-
rata.
6.4 Funzione di blocco / PIN
La funzione di blocco evita un impiego non autorizzato del robot tagliaerba senza un codice
valido. A tale scopo dovete immettere un codice
di sicurezza personale di quattro cifre.
Sbloccaggio
Prima di mettere in esercizio il robot tagliaerba
dovete immettere il PIN corretto (PIN standard:
„0-0-0-0“). Immettete il PIN utilizzando i tasti di
navigazione (55).
PIN standard: Nuovo PIN:
0 0 0 0 _ _ _ _
Cambiare PIN
Per cambiare il PIN procedete nel modo seguente:
1. Sbloccate il pannello di comando.
2. Per eseguire le impostazioni premete innanzitutto il tasto “SET” (51).
3. Nel menù del display LDC (50) usate i tasti di
navigazione (55) per andare al punto “Generali” e poi “Codice PIN”.
4. Per prima cosa immettete il PIN attuale (PIN
standard: 0-0-0-0) tramite i tasti di navigazione (55).
5. Poi immettete il vostro PIN personale sempre
tramite i tasti di navigazione (55).
6. Confermate le impostazioni eff ettuate.
7. Ripetete l‘operazione 5 e 6 per confermare il
nuovo PIN.
8. Attenzione! Prendete nota del nuovo PIN!
- 89 -
Anl_FREELEXO_SMART_SPK13.indb 89Anl_FREELEXO_SMART_SPK13.indb 89 10.10.2022 12:44:4210.10.2022 12:44:42

I
Richiesta del PIN in caso di perdita
Tenete pronti la ricevuta e il numero di serie del
robot tagliaerba. Vi servono per ricevere il PIN!
Variante A:
1. Con display bloccato premete il tasto “SET”
(51) per 6 secondi.
2. Sul display (50) appare ora il PUK.
3. Contattate il servizio clienti per ricevere il vostro PIN.
Variante B:
1. Collegate una penna USB vuota alla porta
USB (24) come indicato nella fi gura (Fig. 11).
2. Inserite l‘interruttore principale (7) (ON).
3. Il robot tagliaerba memorizza automaticamente il PUK sulla penna USB ed emette un
segnale acustico al termine dell’operazione.
4. Estraete la penna USB. Trasferite i dati della
penna USB in un computer. Il robot tagliaerba ha creato un fi le di testo (*.txt). Questo
fi le contiene un PUK, un codice personale.
Contattate il servizio clienti per ricevere il vostro PIN.
6.5 Impostazioni del robot tagliaerba
Nel menù principale del display LCD (50) trovate
le impostazioni attuali di data e ora del robot tagliaerba e lo stato di carica attuale. Nella barra dei
simboli viene mostrato anche lo stato del sensore
di pioggia, del segnale del fi lo e del programma di
taglio selezionato. Tramite il pannello di comando
avete la possibilità di eseguire le impostazioni del
robot tagliaerba premendo il tasto “SET” (51) e di
avviare l’apparecchio con diversi programmi di taglio premendo il tasto “MODE” (52). Utilizzando i
tasti di navigazione (55) passate al punto desiderato per eseguire le impostazioni. Premete il tasto
“BACK” (54) per uscire dal rispettivo menù.
Impostazioni – Tasto “SET” (51)
Con il tasto “SET” (51) potete eseguire le impostazioni fondamentali del robot tagliaerba.
Utilizzando i tasti di navigazione (55) passate al
punto desiderato e poi confermate o annullate
le impostazioni eseguite con il tasto “OK” (56) o
“BACK” (54).
Zona
•
In giardini dalla forma molto complessa il
robot tagliaerba potrebbe avere problemi a
raggiungere ogni zona e tagliare ovunque
il manto erboso. In questo caso è possibile
scegliere più punti di partenza sul filo perimetrale (18). Il robot tagliaerba può così
raggiungere anche le zone più difficili del giardino. Il robot tagliaerba percorrerà la distanza
selezionata lungo il filo perimetrale (18) e
inizierà l’operazione di taglio in tale zona (Fig.
6m). Con i tasti di navigazione (55) andate al
punto che desiderate cambiare e impostate
rispettivamente la distanza e la frequenza.
La stazione di ricarica (19) viene definita
automaticamente come punto di partenza 1.
Gli altri due punti di partenza possono essere
scelti liberamente. A tale scopo misurate la
distanza tra la stazione di ricarica (19) e il
punto di partenza in senso orario lungo il filo
perimetrale (18). Con la frequenza determinate quanto spesso il robot tagliaerba inizia
a lavorare partendo dalla stazione di ricarica
(19) o dai rispettivi punti di partenza.
Taglio bordi
•
Una volta alla settimana il robot tagliaerba
inizia il tempo di lavoro tagliando il bordo
del prato e poi passa all’operazione di taglio
normale. L’impostazione di fabbrica standard
è “ON”.
Memoria errori
•
Vi vengono fornite informazioni sugli ultimi
messaggi di errore relativi al robot tagliaerba.
Sensore pioggia
•
Questa impostazione permette di inserire e disinserire il sensore di pioggia (5).
L’impostazione di fabbrica standard per il
sensore è “ON”. Una descrizione dettagliata
del sensore di pioggia è riportata in “Messa in
esercizio” al punto “Sensori”.
Generali
•
- Codice PIN: potete cambiare il PIN del
robot tagliaerba e impiegare un vostro PIN
personale. A tale scopo procedete come descritto nel capitolo “Funzione di blocco/PIN“.
Attenzione! Prendete nota del nuovo PIN.
- Data e ora: utilizzando i tasti di navigazione
(55) passate al punto corrispondente ed eseguite le impostazioni desiderate.
- Lingua: utilizzando i tasti di navigazione
(55) passate alla lingua desiderata.
- Versione software: qui è riportata la versione attuale del software del robot tagliaerba.
Impostazioni di fabbrica: resettate il robot
•
tagliaerba allo stato di consegna.
Programmi di taglio – Tasto “MODE” (52)
Utilizzando i tasti di navigazione (55) passate al
programma di taglio desiderato per avviarlo.
Manuale
•
In modalità manuale potete eseguire un avvio
del robot tagliaerba con diversi programmi di
taglio.
Avete la possibilità di scegliere rispettivamen-
- 90 -
Anl_FREELEXO_SMART_SPK13.indb 90Anl_FREELEXO_SMART_SPK13.indb 90 10.10.2022 12:44:4310.10.2022 12:44:43

I
te tra l’area primaria/area principale e l’area
secondaria. Per informazioni più dettagliate
sulle due aree si veda il capitolo “Messa in
esercizio” al punto “Filo perimetrale”.
- Taglio
Avviate il robot tagliaerba per tagliare il prato
e l’apparecchio passa al modo di esercizio
normale con il programma degli orari impostato.
- Taglio bordi
Posizionate il robot tagliaerba nelle vicinanze
del filo perimetrale (18) oppure avviatelo
mentre si trova nella stazione di ricarica (19).
Il robot tagliaerba con gruppo di taglio inserito
segue il filo perimetrale (18) in senso orario
fino al retro della stazione di ricarica (19).
Il robot tagliaerba torna poi alla stazione di
ricarica (19) se non si trova in un periodo di
attività.
- Spot Mowing
Può capitare che il robot tagliaerba non tagli
in modo sufficiente alcune zone del prato.
Posizionate il robot tagliaerba in un punto desiderato e avviatelo. Il robot tagliaerba inizierà
a tagliare il prato con un movimento a spirale
fino quando incontra un ostacolo o il filo perimetrale (18). Il robot tagliaerba torna poi alla
stazione di ricarica (19) se non si trova in un
periodo di attività.
Orari programmati
•
Utilizzando i tasti di navigazione (55) passate
al giorno della settimana per il quale volete
effettuare le impostazioni. Nel modo di esercizio normale il robot tagliaerba inizia automaticamente a tagliare il prato all’ora impostata
del relativo giorno. Per impostare il tempo di
taglio si consigliano come regola generale
8 ore al giorno per una superficie di 500 m².
Il tempo di lavoro selezionato deve essere
adeguato in base alle dimensioni e alla complessità del giardino.
Alla stazione
•
Fate tornare il robot tagliaerba alla stazione
di ricarica (19). Il robot tagliaerba cerca il filo
perimetrale (18) e lo segue in senso antiorario fino alla stazione di ricarica (19). In questo
caso non è disponibile l’opzione dell’area
secondaria.
6.6 Comando del robot tagliaerba
Procedura di avvio
1. Premete il tasto di STOP (3) e aprite completamente la copertura del display (23).
2. Sbloccate il pannello di comando (2).
3. Selezionate il programma di taglio desiderato
e la relativa area di lavoro con il tasto “MODE”
(52).
4. Premete il tasto “START” (53).
5. Chiudete la copertura del display (23).
Ora il robot tagliaerba funziona in base
all’impostazione del tempo di taglio. Durante il
tempo di lavoro, il livello di carica della batteria
viene monitorato e visualizzato sul display LCD
(50). Non appena il livello di carica della batteria
scende al 30%, il robot tagliaerba torna automaticamente alla stazione di ricarica (19).
Interruzione dell’operazione di taglio
1. Premete il tasto di STOP (3) per arrestare subito il robot tagliaerba.
2. Aprite completamente la copertura del display (23).
3. Sbloccate il pannello di comando (2).
4. Premete il tasto „MODE“ (52) e selezionate
poi “Alla stazione” per far tornare il robot tagliaerba alla stazione di ricarica (19) lungo il fi lo
perimetrale (18).
5. Premete il tasto “START” (53).
6. Chiudete la copertura del display (23).
Stato di STOP:
Premendo il tasto STOP (3) il robot tagliaerba si
trova in uno stato di STOP che viene indicato sul
display LCD (50). Il robot interrompe l’esercizio
tagliaerba fi no a quando viene ripreso.
Una volta sbloccato il pannello di comando (2)
appare una fi nestra che propone di porre termine
allo stato di STOP. Confermando si pone termine
allo stato. Il caso contrario il robot tagliaerba rimane fermo. Si pone fi ne allo stato di STOP anche
se il robot tagliaerba viene avviato o rimandato
alla stazione di ricarica (19). Chiudete la copertura del display (23).
6.7 Comando del robot tagliaerba tramite la
app
La app off re numerose possibilità di regolazione
per il robot tagliaerba e permette inoltre di richiamare le statistiche e lo stato attuale. Il robot tagliaerba può essere avviato sia in manuale che in un
intervallo di lavoro defi nito. Grazie alla app è inolt-
re disponibile la modalità SMART con la quale è
il robot tagliaerba a defi nire il propriointervallo di
lavoro sulla base dei dati metereologici. Durante
l’esercizio la app riporta i messaggi di errore e gli
avvertimenti e vi può informare tramite notifi che
push. Per poter utilizzare tutte le funzioni della
app bisogna prima concludere la registrazione
del robot tagliaerba.
- 91 -
Anl_FREELEXO_SMART_SPK13.indb 91Anl_FREELEXO_SMART_SPK13.indb 91 10.10.2022 12:44:4310.10.2022 12:44:43

I
6.7.1 Download della app
Scaricate innanzitutto la app di Einhell per il robot
tagliaerba sul vostro smartphone. La app di Einhell può essere scaricata con il link e il codice QR
seguenti:
iOS: http://qr.einhell.com/12e103ce
Android: http://qr.einhell.com/176c0443
6.7.2 Registrazione del robot tagliaerba
Il vostro apparecchio dispone di una funzione IoT
(Internet of Things / Internet delle cose). Il robot
tagliaerba può collegarsi tramite un chip SIM
integrato a una rete di telefonia mobile disponibile e non dipende quindi da una connessione
Bluetooth o WiFI. Per i primi 5 anni non vengono
applicati costi di utilizzo per la connessione alla
rete di telefonia mobile perché sono compresi
nel prezzo di acquisto del robot tagliaerba. Sulla
app sono disponibili informazioni sulla durata
rimanente e sulle possibilità di rinnovo. Nella versione di fabbrica questa funzione è disattivata e
il robot tagliaerba cerca di connettersi a una rete,
per questo il simbolo di collegamento sul display
LCD (50) è barrato. Per attivare il robot tagliaerba
seguite le istruzioni riportate nella app.
Una volta eff ettuato, il collegamento alla rete vi-
ene indicato sul display LCD (50) e le numerose
possibilità di regolazione e funzioni della app
sono a vostra disposizione. Accertatevi che il
robot tagliaerba e il vostro smartphone abbiamo
una connessione internet sicura non appena
eseguite impostazioni nella app. Per l‘esercizio
in automatico del robot tagliaerba in un periodo
di lavoro programmato nella modalità SMART
deve essere collegato a internet soltanto il robot
tagliaerba.
6.7.3 Reset della registrazione
Se alla prima messa in esercizio del robot tagliaerba il simbolo di collegamento sul display
LCD (50) non fosse barrato, il robot tagliaerba
deve essere resettato e registrato a vostro nome.
Contattate a tale scopo il nostro servizio clienti e
tenete pronti la ricevuta e il numero di serie del
robot tagliaerba.
6.8 Esercizio del robot tagliaerba
Il robot tagliaerba off re svariati modi di esercizio
che consentono di farlo funzionare in diverse
modalità. La app off re numerose possibilità di
regolazione per il robot tagliaerba e permette di
richiamare le statistiche e lo stato attuale. La app
mostra inoltre messaggi di errore e avvertimenti
durante l‘esercizio.
Potete far funzionare il robot tagliaerba sia manualmente con il pannello di comandi (2) che
attraverso la app.
6.8.1 Taglio manuale
Avviate il robot tagliaerba con la app in modo
manuale. Il robot tagliaerba inizia a tagliare il prato esattamente per un ciclo fi no a che il livello di
carica della batteria scende al di sotto del 30 %.
A quel punto il robot tagliaerba torna alla stazione
di ricarica (19) e termina la fase di lavoro. Il robot
tagliaerba viene così utilizzato in modo del tutto
manuale e anche in un intervallo di tempo impostato non inizia a tagliare il prato.
6.8.2 Comando orari programmati
Con i tasti di navigazione (55) del robot tagliaerba
potete impostare gli orari programmat. In questo
modo il robot tagliaerba taglia il prato automaticamente negli orari impostati. Le regolazioni possono essere eseguite anche nella app e trasmesse
al robot tagliaerba.
6.8.3 Comando SMART
La modalità SMART del robot tagliaerba permette
un esercizio automatico con tempi ottimizzati per
il vostro giardino e per le condizioni meteorologiche attuali. L’intervallo di lavoro corrispondente
viene adeguato automaticamente ogni giorno
dal robot tagliaerba su questa base. Accertatevi
che il robot tagliaerba disponga sempre di un
collegamento alla rete. Per poter utilizzare il modo
SMART sono prima necessari alcuni dati specifi -
ci. A questo fi ne eseguite le impostazioni corris-
pondenti nella app:
Indicazione del luogo: con questa indicazi-
•
one è possibile richiamare i dati meteorologici
specifici del luogo e il robot tagliaerba effettua
- 92 -
Anl_FREELEXO_SMART_SPK13.indb 92Anl_FREELEXO_SMART_SPK13.indb 92 10.10.2022 12:44:4310.10.2022 12:44:43

I
il taglio sulla base delle condizioni meteorologiche.
Frequenza: indicate la frequenza con la
•
quale il robot tagliaerba deve tagliare il prato.
Essa dipende dalla crescita dell’erba. Iniziate
con una frequenza bassa e poi eventualmente adeguatela.
Area di taglio: indicate l’area di taglio stima-
•
ta. A questo scopo è rilevante solo l’area da
tagliare in cui si deve muovere il robot tagliaerba.
Orari programmati: definite intervalli di
•
tempo nei quali il robot tagliaerba non deve
funzionare. Può essere utile ridurre i tempi di
taglio in modo corrispondente.
Il robot tagliaerba si attiva preferibilmente durante
il giorno per evitare di incontrare animali crepuscolari o notturni, come ad es. i ricci. Il robot tagliaerba calcola continuamente i suoi orari programmati individuali sulla base dei dati immessi.
6.8.4 Messaggi di errore e avvertimenti
Verifi cate regolarmente la app per ricevere mes-
saggi di errore e avvertimenti. I messaggi di errore, gli avvertimenti e anche i promemoria vengono
inviati tramite notifi che push sul vostro smart-
phone. Se non lo desiderate potete modifi care le
impostazioni di notifi ca nella app. Accertatevi che
i dati in background della app di Einhell siano attivati sul vostro smartphone e che questo disponga
di una connessione internet attiva.
7. Pulizia, manutenzione e
ordinazione dei pezzi di ricambio
Pericolo!
Prima di ogni lavoro di pulizia e manutenzione deve essere scollegata la tensione
dell‘apparecchio; per farlo staccate la spina dalla
presa elettrica e spegnete (OFF) l‘apparecchio
con l‘interruttore principale (7) (Fig. 8). Togliete
inoltre la batteria dal robot tagliaerba.
Attenzione! Indossate guanti da lavoro!
7.1 Pulizia
Tenete il più possibile liberi da polvere e
•
sporco i dispositivi di protezione, le fessure di
aerazione e la carcassa del motore. Passate
un panno pulito sull‘apparecchio o pulitelo
con un getto di aria compressa a bassa pres-
sione.
Il robot tagliaerba non deve essere pulito
•
sotto l‘acqua corrente, in particolare non con
getto ad alta pressione.
Pulite l‘apparecchio regolarmente con
•
un panno umido e un po‘ di sapone. Non
usate detergenti o solventi, perché questi
ultimi potrebbero danneggiare le parti in
plastica dell‘apparecchio. Fate attenzione
che non possa penetrare acqua all‘interno
dell‘apparecchio.
Per quanto possibile pulite il robot tagliaerba
•
con una spazzola o uno straccio.
Controllate la mobilità delle lame (10) e del
•
disco portalame (11).
Per la pulizia dei contatti di ricarica del robot
•
tagliaerba (1) e della stazione di ricarica (19)
utilizzate detergente per metallo o un foglio
abrasivo a grana molto fine. Puliteli per assicurare un‘operazione di ricarica efficiente.
7.2 Manutenzione
Le lame (10) e le relative viti di fissaggio usu-
•
rate o danneggiate devono essere sempre
sostituite in set.
Sostituite le parti usurate o danneggiate.
•
Per una lunga durata, tutte le parti avvitate, le
•
ruote e gli assi devono venire puliti ed infine
oliati.
La cura regolare del robot tagliaerba non
•
soltanto lo conserva a lungo in buono stato e
ben efficiente, ma contribuisce anche a tagliare il prato in modo più semplice e accurato.
Le lame (10) sono le parti più esposte
•
all‘usura. Controllate regolarmente le condizioni e il fissaggio delle lame (10). Se si
dovessero notare delle vibrazioni eccessive
del robot tagliaerba, può significare che le
lame (10) siano danneggiate ovvero che siano state deformate da colpi. Se le lame (10)
sono usurate o danneggiate, devono essere
sostituite immediatamente.
Controllate regolarmente il risultato di taglio
•
del prato. Se le lame non sono affilate gli steli
d‘erba non vengono tagliati in modo preciso.
La superficie del manto erboso può seccarsi
leggermente e ingiallirsi. Cambiate perciò
regolarmente le lame per avere sempre un
taglio preciso e dritto.
Controllate regolarmente che il lato inferiore
•
del robot tagliaerba non sia sporco. Pulite
regolarmente il robot tagliaerba. Pulitelo immediatamente se è molto sporco.
Nella prime settimane dopo la messa in eser-
•
cizio e dopo tagli con un tagliaerba convenzionale, il robot tagliaerba può sporcarsi molto
rapidamente. Controllate quindi più spesso
il lato inferiore del robot tagliaerba in questo
- 93 -
Anl_FREELEXO_SMART_SPK13.indb 93Anl_FREELEXO_SMART_SPK13.indb 93 10.10.2022 12:44:4410.10.2022 12:44:44

I
periodo di tempo.
Accorciate il prato solo un po‘ alla volta per
•
evitare notevoli quantità di sporco.
All‘interno dell‘apparecchio non si trovano alt-
•
re parti che richiedano manutenzione.
7.2.1 Sostituzione delle lame
Usate solamente lame originali, perché altrimenti
non sono garantiti il funzionamento e la sicurezza.
Il robot tagliaerba è dotato di tre lame (10) montate su un disco portalame (11). Queste lame (10)
hanno una durata utile che arriva a 3 mesi (se
non entrano in collisione con ostacoli). Sostituite
tutte e tre le lame (10) contemporaneamente per
non pregiudicare il funzionamento e l‘equilibrio
dell‘apparecchio.
Per sostituire le lame (10) procedete nel modo
seguente (Fig. 12) - Attenzione! - Portate guanti:
1. Bloccate la rotazione del disco portalame
(11) con un cacciavite. A tale scopo inserite il
cacciavite attraverso gli appositi fori nel disco
portalame (11) e nel pettine di protezione.
2. Allentate le viti di fi ssaggio
3. Togliete le lame (10) e sostituitele con quel-
le nuove. Sostituite tutte e tre le lame (10)
sempre in set.
4. Quindi serrate di nuovo saldamente la vite di
fi ssaggio. Accertatevi che le nuove lame (10)
ruotino liberamente.
Eseguite regolarmente un controllo generale
del robot tagliaerba e togliete tutti i depositi e le
incrostazioni. All‘inizio di ogni stagione controllate
assolutamente lo stato delle lame (10). Per le
riparazioni rivolgetevi al nostro centro assistenza
clienti. Usate solamente ricambi originali.
7.2.2 Update del software
Se desiderate aggiornare il software, copiate il
nuovo software su una penna USB vuota (formattate eventualmente prima la penna USB). Accertatevi che la batteria sia completamente carica
prima di eseguire le operazioni successive.
1. Mettete il robot tagliaerba nella zona di taglio.
Il robot tagliaerba non deve trovarsi nella sta-
zione di ricarica durante l‘update del software.
2. Collegate una penna USB alla porta USB
come indicato nella fi gura. (Fig. 11)
3. Inserite l‘interruttore principale (7) (ON).
4. Ora il robot tagliaerba inizia l’update del soft-
ware e indica lo stato attuale.
5. Una volta conclusa l’operazione di update
scollegate la penna USB e riavviate il robot
tagliaerba tramite l’interruttore principale (7).
7.2.3 Riparazione del fi lo perimetrale
Se in un qualsiasi punto dovesse venire tranciato
il fi lo perimetrale (18), utilizzate per la riparazione
i connettori per cavi (16) fornito. A tale scopo
inserite le due estremità del fi lo perimetrale (18)
tranciato nel connettore per cavi (16) e comprimetelo con una pinza. Collegate la spina alla
presa di corrente. Controllate poi il funzionamento
tramite la spia LED (21) della stazione di ricarica
(19).
7.3 Ordinazione di pezzi di ricambio:
Volendo commissionare dei pezzi di ricambio, si
dovrebbe dichiarare quanto segue:
modello dell’apparecchio
•
numero dell’articolo dell’apparecchio
•
numero d’ident. dell’apparecchio
•
numero del pezzo di ricambio del ricambio
•
necessitato.
Per i prezzi e le informazioni attuali si veda
www.Einhell-Service.com
N. art. delle lame di ricambio: 34.140.20
8. Conservazione
Caricate completamente la batteria prima di riporla per l‘inverno e spegnete (OFF) il robot tagliaerba con l‘interruttore principale (7). Togliete la batteria dall‘apparecchio. Scollegate l‘alimentatore
(13) dall‘alimentazione di corrente e dalla stazione di ricarica (19). Il fi lo perimetrale (18) può
essere lasciato all‘aperto durante l‘inverno. Accertatevi tuttavia che gli attacchi siano protetti dalla
corrosione. A tale fi ne scollegate gli attacchi del
fi lo perimetrale (18) dalla stazione di ricarica (19).
Conservate l‘apparecchio e i suoi accessori in
un luogo buio, asciutto, al riparo dal gelo e non
accessibile ai bambini. La temperatura ottimale
per la conservazione è compresa tra i 5 e i 30 °C.
Conservate l‘apparecchio nella confezione originale.
- 94 -
Anl_FREELEXO_SMART_SPK13.indb 94Anl_FREELEXO_SMART_SPK13.indb 94 10.10.2022 12:44:4510.10.2022 12:44:45

9. Trasporto
Spegnete (OFF) l‘apparecchio con
•
l‘interruttore principale (7). (Fig. 8)
Se presenti, applicate i dispositivi di sicurezza
•
per il trasporto.
Proteggete l‘apparecchio da danni e forti
•
vibrazioni che si presentano in particolare in
caso di trasporto in veicoli.
Assicurate l‘apparecchio in modo che non
•
scivoli e non si ribalti.
Trasportate il robot tagliaerba per la maniglia
•
di trasporto (6) con il disco portalame (11)
orientato in direzione opposta al vostro corpo.
10. Smaltimento e riciclaggio
L‘apparecchio si trova in un imballaggio per evitare i danni dovuti al trasporto. Questo imballaggio
rappresenta una materia prima e può perciò essere utilizzato di nuovo o riciclato. L‘apparecchio
e i suoi accessori sono fatti di materiali diversi,
per es. metallo e plastica. Gli apparecchi difettosi
non devono essere gettati nei rifi uti domestici. Per
uno smaltimento corretto l‘apparecchio va consegnato ad un apposito centro di raccolta. Se non
vi è noto nessun centro di raccolta, rivolgetevi per
informazioni all‘amministrazione comunale.
I
Solo per paesi membri dell’UE
Non smaltite gli elettroutensili nei rifi uti domestici!
Secondo la direttiva europea 2012/19/CE sui
rifi uti di apparecchiature elettriche ed elettroniche
e il suo recepimento nelle normative nazionali, gli
elettroutensili usati devono venire raccolti separatamente e venire smaltiti in modo ecocompatibile.
Alternativa di riciclaggio alla richiesta di restituzione:
il proprietario dell’apparecchio elettrico è tenuto
in alternativa, invece della restituzione, a collaborare in modo che lo smaltimento venga eseguito correttamente in caso ceda l’apparecchio.
L’apparecchio vecchio può anche venire consegnato ad un centro di raccolta che provvede poi
allo smaltimento secondo le norme nazionali sul
riciclaggio e sui rifi uti. Non ne sono interessati gli
accessori e i mezzi ausiliari senza elementi elettrici forniti insieme ai vecchi apparecchi.
In caso di smaltimento fate attenzione che batterie e dispositivi di illuminazione (ad es. lampadine) vengano rimossi dall‘apparecchio.
La ristampa o l’ulteriore riproduzione, anche
parziale, della documentazione o dei documenti
d’accompagnamento dei prodotti è consentita
solo con l’esplicita autorizzazione da parte della
Einhell Germany AG.
Con riserva di apportare modifi che tecniche
- 95 -
Anl_FREELEXO_SMART_SPK13.indb 95Anl_FREELEXO_SMART_SPK13.indb 95 10.10.2022 12:44:4510.10.2022 12:44:45

I
11. Indicazioni della stazione di ricarica ed eliminazione degli errori
Spia LED (21) Descrizione Soluzione
Spenta - Manca l‘alimentazione di
corrente
È illuminata in verde - Pronto per tagliare
- Batteria completamente carica
- Filo perimetrale (18) collegato
Lampeggia in verde - Filo perimetrale (18) trancia-to- Controllate se il fi lo perimetrale (18) è rot-
È illuminata in rosso - La batteria viene caricata - Attendete che la batteria sia completa-
- Verifi cate l‘alimentazione di corrente
to
mente ricaricata.
12. Indicazioni del robot tagliaerba ed eliminazione degli errori
Messaggio di errore del robot tagliaerba sul display LCD (50)
Errore Possibile causa Eliminazione
Nessun segnale - Filo perimetrale collegato in
modo scorretto
- Manca l‘alimentazione di
corrente
- Filo perimetrale (18)
tranciato
Fuori range - Filo perimetrale collegato in
modo scorretto
- Robot tagliaerba al di fuori
della zona di taglio
Errore batteria - Nel robot tagliaerba si è veri-
fi cato un errore di batteria
- La batteria non può essere
ricaricata
- La batteria ha raggiunto la
fi ne della durata utile
Controllate se la spia LED (21) della stazione di ricarica (19) è illuminata in verde
- Accertatevi che il fi lo perimetrale (18) sia
posato correttamente e al centro sotto la
stazione di ricarica (19).
- Controllate la posizione della stazione di
ricarica (19).
- Accertatevi che il fi lo perimetrale (18) sia
posato correttamente e al centro sotto la
stazione di ricarica (19).
- Assicuratevi che il robot tagliaerba sia nella zona di taglio.
- Accertatevi che la batteria sia stata montata correttamente.
- Controllate se l’interruttore principale (7) è
inserito (ON) mentre il robot tagliaerba si
trova nella stazione di ricarica (19).
- Controllate la posizione della stazione di
ricarica (19). Sostituite se necessario la
batteria.
- 96 -
Anl_FREELEXO_SMART_SPK13.indb 96Anl_FREELEXO_SMART_SPK13.indb 96 10.10.2022 12:44:4610.10.2022 12:44:46

I
Messaggio di errore del robot tagliaerba sul display LCD (50)
Errore Possibile causa Eliminazione
Errore temperatura
batteria
Temperatura eccessiva/insuffi ciente della batteria ovvero
sovratemperatura dell‘unità di
comando
- Se la temperatura della batteria supera i 65 °C il robot
tagliaerba torna alla stazione
di ricarica (19).
- Con una temperatura della
batteria superiore a 45 °C o
inferiore a 0 °C l‘operazione
di ricarica viene fermata e il
robot tagliaerba attende nella
- Impostate il tempo di lavoro in estate alle
prime ore del mattino ed evitate che il
robot tagliaerba lavori durante le ore calde
della giornata.
- Una volta che la temperatura della batteria ovvero dell‘unità di controllo torna nel
range consentito, il robot tagliaerba torna
automaticamente all‘esercizio programmato.
stazione di ricarica (19).
Sollevato - Sensore di sollevamento
intervenuto per 10 secondi
consecutivi
Premete il tasto di STOP (3) per aprire
la copertura del display (23). Riavviate
l’operazione di taglio tramite il pannello di
comando (2):
- Se questo errore si verifi ca con frequenza,
controllate se la zona di taglio presenta
ostacoli con un‘altezza superiore a 10 cm
e rimuoveteli oppure separateli dalla zona
di taglio con il fi lo perimetrale (18).
Bloccato - Sensore ostacoli attivato 10
volte in un minuto
- Sensore ostacoli attivato più
volte in un minuto
- Sensore ostacoli continuamente attivo per 10 secondi
- Sensore ostacoli attivato tre
volte durante il ritorno alla
stazione di ricarica (19)
Premete il tasto di STOP (3) per aprire
la copertura del display (23). Riavviate
l’operazione di taglio tramite il pannello di
comando (2):
- Controllate se il robot tagliaerba è bloccato da un ostacolo o incastrato tra alberi,
cespugli ecc. Eliminate l‘ostacolo o escludete questa zona.
- Se questo errore si verifi ca con frequenza,
controllate la posa del fi lo perimetrale
(18). Fate particolare attenzione ad angoli
stretti, corridoi, recinzioni, pietre ecc. e
adeguate se necessario la disposizione
del fi lo perimetrale (18).
- Controllate se l‘erba è troppo alta e il
robot tagliaerba si blocca. In questo caso
tagliate l‘erba sotto i 60 mm.
Troppo vicino
a stazione
- Il robot tagliaerba è stato fatto tornare troppo vicino alla
stazione di ricarica (19).
Premete il tasto di STOP (3) per aprire
la copertura del display (23). Riavviate
l’operazione di taglio tramite il pannello di
comando (2):
- Il robot tagliaerba dovrebbe essere fatto
tornare alla stazione di ricarica (19) con
una distanza minima di 2 m.
- 97 -
Anl_FREELEXO_SMART_SPK13.indb 97Anl_FREELEXO_SMART_SPK13.indb 97 10.10.2022 12:44:4610.10.2022 12:44:46

I
Messaggio di errore del robot tagliaerba sul display LCD (50)
Errore Possibile causa Eliminazione
Caduto - Il tagliaerba è stato ribaltato
in modo continuo per 10 secondi
- Il robot tagliaerba è rimasto
inclinato in una direzione per
diverso tempo
Premete il tasto di STOP (3) per aprire
la copertura del display (23). Riavviate
l’operazione di taglio tramite il pannello di
comando (2):
- Mettete il robot tagliaerba su una superfi -
cie piana e riavviatelo.
- Se il robot tagliaerba si è ribaltato a causa
di un pendio ripido nella zona di taglio,
adeguate di conseguenza il fi lo perimetra-
le (18) per evitare forti pendenze.
Errore ruote - Le ruote posteriori (8) vengo-
no sollevate da un ostacolo
- Le ruote posteriori (8) possono girare a vuoto in caso di
superfi ci irregolari
Premete il tasto di STOP (3) per aprire
la copertura del display (23). Riavviate
l’operazione di taglio tramite il pannello di
comando (2):
- Mettete il robot tagliaerba su una superfi -
cie piana e riavviatelo
Errore tasto di
STOP
La copertura del display (23) è
aperta, ma il tasto di STOP (3)
non è stato azionato.
Premete il tasto di STOP (3) per aprire
la copertura del display (23). Riavviate
l’operazione di taglio tramite il pannello di
comando (2):
- Controllate che la copertura del display
(23) possa essere aperta e chiusa senza
problemi con il tasto di STOP (3).
- Controllate il funzionamento del tasto di
STOP (3).
Sovratemperatura
PCB
Temperatura eccessiva/insuffi ciente della batteria ovvero
sovratemperatura dell‘unità di
comando
- Se la temperatura della batteria supera i 65 °C il robot
tagliaerba torna alla stazione
di ricarica (19).
- Con una temperatura della
batteria superiore a 45 °C o
inferiore a 0 °C l‘operazione
di ricarica viene fermata e il
robot tagliaerba attende nella
- Impostate il tempo di lavoro in estate alle
prime ore del mattino ed evitate che il
robot tagliaerba lavori durante le ore calde
della giornata.
- Una volta che la temperatura della batteria ovvero dell‘unità di controllo torna nel
range consentito, il robot tagliaerba torna
automaticamente all‘esercizio programmato.
stazione di ricarica (19).
Pioggia - Il sensore di pioggia (5) è
intervenuto.
- Attendete che il robot tagliaerba sia asciutto.
- Una descrizione dettagliata del sensore è
riportata al capitolo 5.2.
Errore sensore - Il robot tagliaerba si è fer-
mato a causa di un errore
sensore
Disinserite (OFF) e reinserite (ON)
l‘interruttore principale (7) per riavviare il
robot tagliaerba.
- 98 -
Anl_FREELEXO_SMART_SPK13.indb 98Anl_FREELEXO_SMART_SPK13.indb 98 10.10.2022 12:44:4710.10.2022 12:44:47
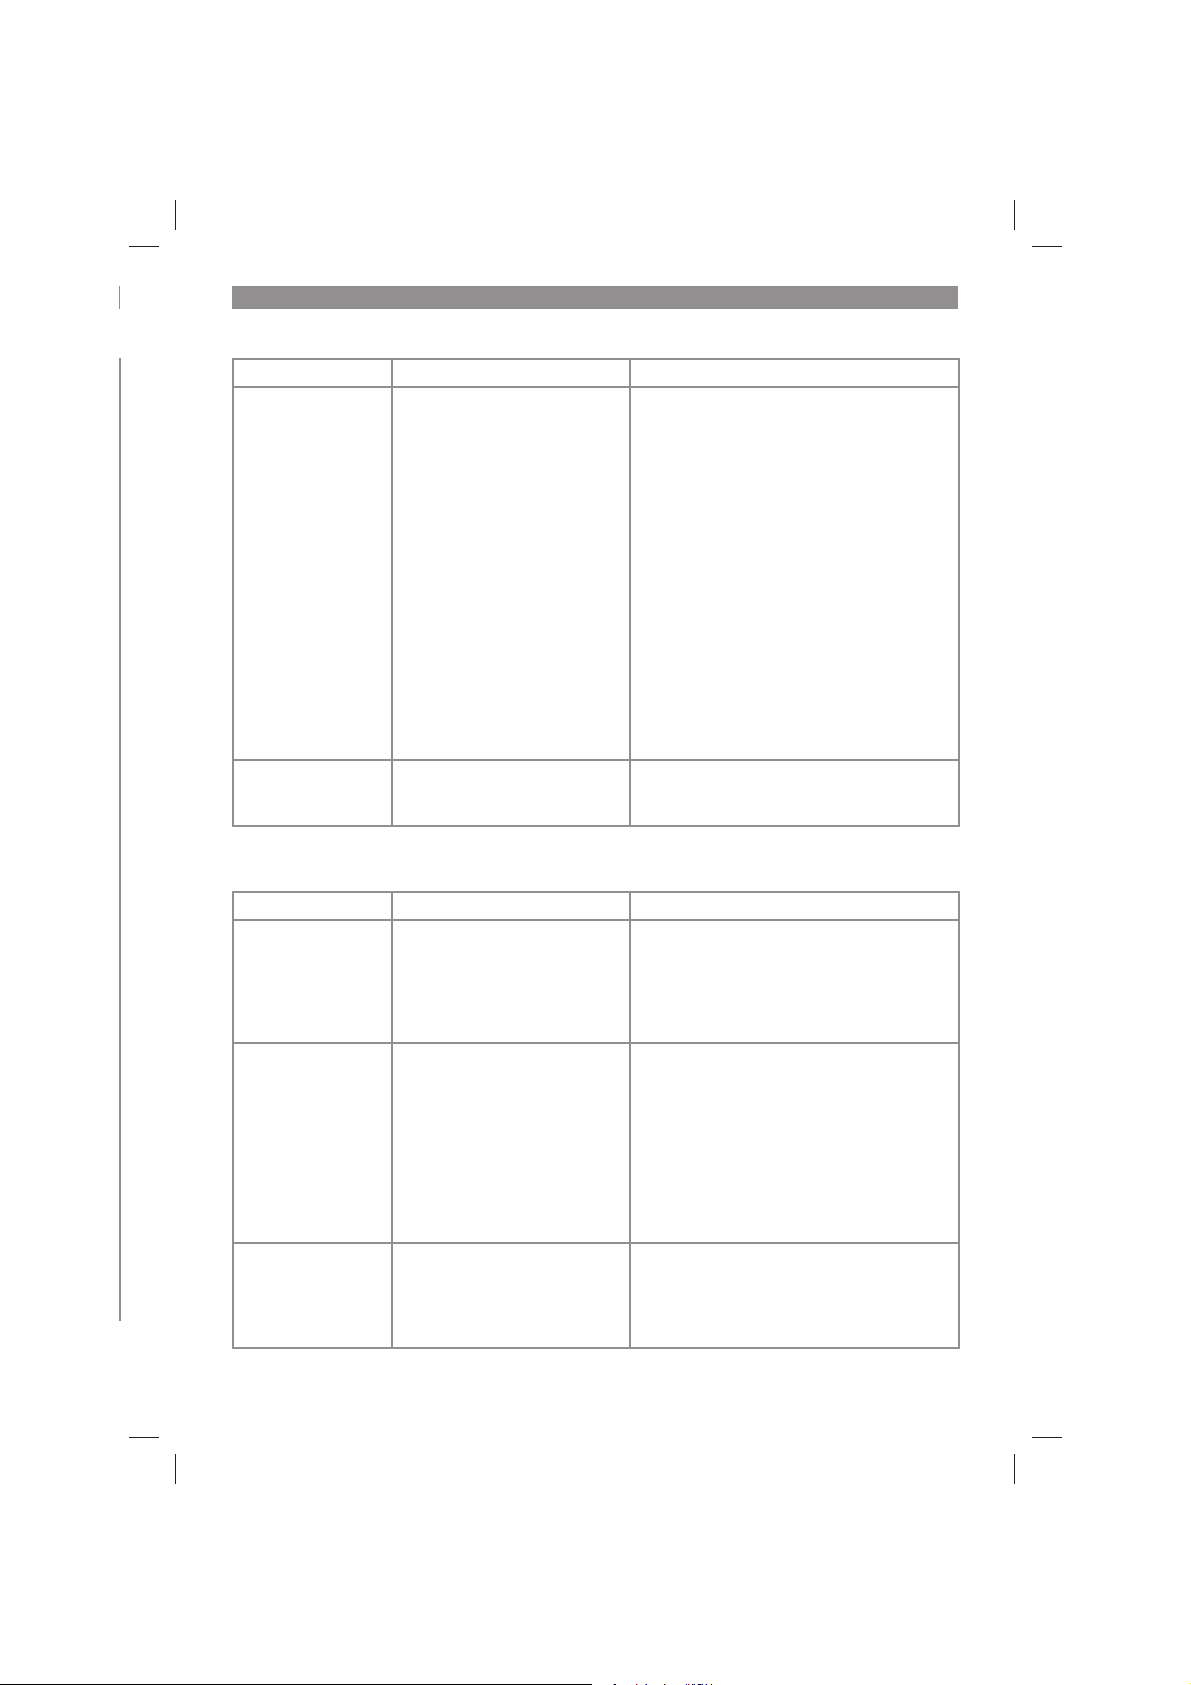
I
Messaggio di errore del robot tagliaerba sul display LCD (50)
Errore Possibile causa Eliminazione
Errore motore /
sovracorrente
motore
- Robot tagliaerba fermo a
causa di sovracorrente nel
motore o di un errore del motore
Disinserite (OFF) e reinserite (ON)
l‘interruttore principale (7) per riavviare il
robot tagliaerba.
- Controllate l‘altezza dell‘erba nella zona
di taglio e tagliate se necessario l‘erba a
meno di 60 mm con un tagliaerba convenzionale.
- Aumentate l‘altezza di taglio. Iniziate
sempre con un‘altezza di taglio più alta e
riducetela poco per volta fi no all‘altezza
desiderata.
- Controllate se il disco portalame (11) e le
ruote sono sporchi e pulite attentamente
queste parti.
- Controllate che le ruote posteriori e il
disco portalame (11) non siano bloccati.
Se non è possibile rimuovere i blocchi
rivolgetevi al servizio assistenza clienti
responsabile.
Guasto - Il robot tagliaerba si è ferma-
to a causa di un guasto
Disinserite (OFF) e reinserite (ON)
l‘interruttore principale (7) per riavviare il
robot tagliaerba.
Ricerca degli errori
Errore Possibile causa Eliminazione
Il robot tagliaerba è
fermo nella zona di
taglio.
Non è possibile
- Tensione della batteria insuffi ciente
- Errore nel circuito elettrico o
nei componenti elettronici
- Riportate il robot tagliaerba alla stazione
di ricarica (19) per caricarlo.
- Inserite (ON) l‘interruttore principale (7).
- Rivolgetevi al servizio clienti.
inserire il robot tagliaerba.
Il robot tagliaerba
non riesce ad entrare nella stazione di
ricarica.
- Stazione di ricarica (19) non
installata correttamente.
- Accertatevi che la spia verde (21) della
stazione di ricarica (19) sia illuminata in
verde.
- Accertatevi che i fi li perimetrali (18) siano
collegati alla stazione di ricarica (19) e
che il fi lo perimetrale (18) anteriore sia po-
sato al centro sotto la stazione di ricarica
(19).
- Assicuratevi che la stazione di ricarica
(19) sia posizionata correttamente.
Il robot tagliaerba
si ferma ovvero si
muove in modo incontrollato nella vi-
- Filo perimetrale (18) non installato correttamente intorno
alle isole.
- Adeguate la posizione del fi lo perimetrale
(18).
- Fate attenzione che tratti del fi lo perimet-
rale (18) non siano sovrapposti.
cinanze delle isole.
- 99 -
Anl_FREELEXO_SMART_SPK13.indb 99Anl_FREELEXO_SMART_SPK13.indb 99 10.10.2022 12:44:4710.10.2022 12:44:47

I
Ricerca degli errori
Errore Possibile causa Eliminazione
Il robot tagliaerba fa
molto rumore.
- Lame (10) danneggiate
- Alle lame (10) rimangono
attaccati corpi estranei
- Robot tagliaerba avviato
troppo vicino agli ostacoli
- Azionamento delle lame o
motore di azionamento danneggiati
- Altre parti del robot tagliaerba danneggiate
- Sostituire le lame (10). Le 3 lame (10)
devono essere sostituite contemporaneamente.
- L‘effi cienza di funzionamento del robot ta-
gliaerba dipende dall‘affi latura delle lame
(10). Mantenete pertanto le lame (10) in
buone condizioni.
- Spegnete il robot tagliaerba in modo sicuro e portate guanti di lavoro durante la
pulizia delle lame (10) per evitare lesioni
da taglio.
- Fate riparare o sostituire il motore dal servizio clienti.
Il robot tagliaerba rimane nella stazione
di ricarica. Il robot
tagliaerba ritorna
sempre alla stazione di ricarica.
Il robot tagliaerba
rimane fermo sul fi lo
perimetrale e non
può raggiungere la
stazione di ricarica.
- Tempo di lavoro non impostato correttamente
- Batteria scarica
- Sensore di pioggia intervenuto
- Temperatura elevata della
batteria
- Batteria scarica
- Il fi lo perimetrale (18) e
quindi il percorso fi no alla
stazione di ricarica (19) sono
troppo lunghi per la batteria
utilizzata.
- Controllate le impostazioni del tempo di
lavoro.
- Il robot tagliaerba inizia e termina il lavoro
a seconda del periodo di tempo impostato. Al di fuori di questo periodo di tempo il
robot tagliaerba rimane nella stazione di
ricarica (19).
- Rimuovete possibili ostacoli lungo il fi lo
perimetrale (18). Nel posare il fi lo perime-
trale (18) fate attenzione che ci sia una
distanza suffi ciente dagli ostacoli.
- Utilizzate una batteria con una capacità
maggiore.
- Attenzione: se utilizzate una batteria Multi-Ah (ad es. 4-6 Ah) impostate la capacità
maggiore. Non è necessario utilizzare la
capacità minore della batteria del robot
tagliaerba per aumentare la sua durata
utile dato che si scarica e ricarica con sollecitazioni ridotte.
ATTENZIONE! Fili perimetrali tagliati e danni conseguenti non sono coperti dalla garanzia!
- 100 -
Anl_FREELEXO_SMART_SPK13.indb 100Anl_FREELEXO_SMART_SPK13.indb 100 10.10.2022 12:44:4810.10.2022 12:44:48
 Loading...