

Page 1

D Originalbetriebsanleitung
Elektrisches Kaminfeuer
Dieses Produkt ist nur für gut isolierte Räume
oder für den gelegentlichen Gebrauch geeignet.
GB Original operating instructions
Electric fi replace
This product is only suitable for well insulated
spaces or occasional use.
F Instructions d’origine
Feu de cheminée électrique
Ce produit ne peut être utilisé que dans des locaux bien isolés ou de manière occasionnelle.
I Istruzioni per l’uso originali
Camino elettrico con eff etto
fi amma
Il presente prodotto è adatto solo a ambienti correttamente isolati o ad un uso occasionale.
NL Originele handleiding
Elektrisch open haardvuur
Dit product is uitsluitend geschikt voor goed geïsoleerde plaatsen of voor incidenteel gebruik.
EF 1800
E Manual de instrucciones original
Chimenea eléctrica
Este producto está indicado únicamente en lugares abrigados o para una utilización punctual.
9
Art.-Nr.: 23.381.01 I.-Nr.: 11016
Anl_EF_1800_SPK9.indb 1Anl_EF_1800_SPK9.indb 1 22.11.2018 06:58:4222.11.2018 06:58:42
Page 2
1
1
2
5
3
4
6
2
Anl_EF_1800_SPK9.indb 2Anl_EF_1800_SPK9.indb 2 22.11.2018 06:58:4622.11.2018 06:58:46
11
10
- 2 -
14
12
13
15
Page 3
3 4
5 6
150
150
150
14
12
B
7 8
C
C
+
C
C
C
1
- 3 -
Anl_EF_1800_SPK9.indb 3Anl_EF_1800_SPK9.indb 3 22.11.2018 06:58:4722.11.2018 06:58:47
+
Page 4
9
10
D H K
E
D
E
K
L
H
L
- 4 -
Anl_EF_1800_SPK9.indb 4Anl_EF_1800_SPK9.indb 4 22.11.2018 06:58:4822.11.2018 06:58:48
Page 5

D
Gefahr! – Zur Verringerung des Verletzungsrisikos Bedienungsanleitung lesen
- 5 -
Anl_EF_1800_SPK9.indb 5Anl_EF_1800_SPK9.indb 5 22.11.2018 06:58:4922.11.2018 06:58:49
Page 6

D
Gefahr!
Beim Benutzen von Geräten müssen einige Sicherheitsvorkehrungen eingehalten werden, um
Verletzungen und Schäden zu verhindern. Lesen
Sie diese Bedienungsanleitung / Sicherheitshinweise deshalb sorgfältig durch. Bewahren Sie diese gut auf, damit Ihnen die Informationen jederzeit
zur Verfügung stehen. Falls Sie das Gerät an andere Personen übergeben sollten, händigen Sie
diese Bedienungsanleitung / Sicherheitshinweise
bitte mit aus. Wir übernehmen keine Haftung für
Unfälle oder Schäden, die durch Nichtbeachten
dieser Anleitung und den Sicherheitshinweisen
entstehen.
1. Sicherheitshinweise
Gefahr!
Lesen Sie alle Sicherheitshinweise und Anweisungen. Versäumnisse bei der Einhaltung der
Sicherheitshinweise und Anweisungen können
elektrischen Schlag, Brand und/oder schwere
Verletzungen verursachen. Bewahren Sie alle
Sicherheitshinweise und Anweisungen für
die Zukunft auf.
Überprüfen Sie, ob das Gerät in einem
•
einwandfreien Zustand geliefert wurde. Bei
eventuellen Beschädigungen Gerät nicht
anschließen.
Verlegen Sie das Netzkabel so, dass man
•
nicht über das Kabel stolpern kann.
Netzleitung nicht über bei Betrieb heiße Ge-
•
räteteile führen.
Netzstecker nie an der Netzleitung aus der
•
Steckdose ziehen! Gerät nie an der Netzleitung tragen oder durch Ziehen am Kabel
bewegen.
Netzleitung nie um das Gerät wickeln.
•
Netzleitung nie einklemmen, über scharfe
•
Kanten ziehen, über heiße Herdplatten oder
offene Flammen legen.
Gerät nur in geschlossenen, trockenen Räu-
•
men verwenden.
Dieses Heizgerät nicht in unmittelbarer Nähe
•
einer Badewanne, einer Dusche oder eines
Schwimmbeckens benutzen.
Das Heizgerät nicht im Badezimmer verwen-
•
den.
Gerät niemals in Wasser tauchen – Lebens-
•
gefahr!
Niemals Gerät mit nassen Händen bedienen.
•
Gerät nie öffnen und Spannung führende Tei-
•
le berühren – Lebensgefahr!
Gerät so aufstellen, dass der Netzstecker
•
jederzeit zugänglich ist.
Ist das Gerät längere Zeit außer Betrieb,
•
Netzstecker ziehen!
Gerät nicht unmittelbar unter einer Steckdose
•
aufstellen.
Gehäuse kann sich bei längerem Betrieb
•
stark erwärmen. Das Gerät so aufstellen,
dass ein zufälliges Berühren ausgeschlossen
ist.
Gerät darf nicht in Räumen in denen feuer-
•
gefährliche Stoffe (z.B. Lösungsmittel usw.)
oder Gase verwendet oder gelagert werden
betrieben werden.
Leicht entflammbare Stoffe oder Gase vom
•
Gerät fernhalten.
Nicht in feuergefährdeten Räumen (z.B. Holz-
•
schuppen) betreiben.
Heizgerät nur mit vollständig ausgerollter
•
Netzleitung betreiben.
Keine Fremdkörper in Geräteöffnungen ein-
•
führen – Gefahr von Stromschlag und Gerätebeschädigung.
Kinder und Personen unter Medikamenten-
•
oder Alkoholeinfluss sind vom Gerät fernzuhalten.
Warnung: Um eine Überhitzung des Heizge-
•
rätes zu vermeiden, darf das Heizgerät nicht
abgedeckt werden – Brandgefahr! Beachten
Sie das Symbol auf dem Gerät (Abb. 10).
Wartungsarbeiten und Reparaturen dürfen
•
nur vom autorisierten Fachpersonal ausgeführt werden.
Die Netzleitung muss regelmäßig auf De-
•
fekte oder Beschädigungen geprüft werden.
Eine beschädigte Netzleitung darf nur vom
Elektrofachmann oder der ISC GmbH unter
Berücksichtigung der einschlägigen Bestimmungen ausgetauscht werden.
Installieren Sie zur elektrischen Sicherheit
•
einen Fehlerstromschutzschalter (RCD).
Das Gerät nur an eine geerdete Steckdose
•
anschließen.
Bedienelemente dürfen von einer sich unter
•
der Dusche, mit Flüssigkeit gefüllten Gefäß
oder in der Badewanne befindlichen Person
nicht berührt werden können.
Kinder jünger als 3 Jahre sind fernzuhal-
•
ten, es sei denn, sie werden ständig überwacht.
Kinder ab 3 Jahren und jünger als 8 Jahre
•
dürfen das Gerät nur ein- und ausschalten,
wenn sie beaufsichtigt werden oder bezüglich
des sicheren Gebrauchs des Gerätes unter-
- 6 -
Anl_EF_1800_SPK9.indb 6Anl_EF_1800_SPK9.indb 6 22.11.2018 06:58:4922.11.2018 06:58:49
Page 7

D
wiesen wurden und die daraus resultierenden
Gefahren verstanden haben, vorausgesetzt,
dass das Gerät in seiner normalen Gebrauchslage platziert oder installiert ist. Kinder ab 3 Jahren und jünger als 8 Jahre dürfen
nicht den Stecker in die Steckdose stecken,
das Gerät nicht regulieren, das Gerät nicht
reinigen und/oder nicht die Wartung durch
den Benutzer durchführen.
Dieses Gerät kann von Kindern ab 8 Jahren
•
und darüber sowie von Personen mit verringerten physischen, sensorischen oder
mentalen Fähigkeiten oder Mangel an Erfahrung und Wissen benutzt werden, wenn sie
beaufsichtigt oder bezüglich des sicheren
Gebrauchs des Gerätes unterwiesen wurden
und die daraus resultierenden Gefahren
verstehen. Kinder dürfen nicht mit dem Gerät
spielen. Reinigung und Benutzer-Wartung
dürfen nicht von Kindern ohne Beaufsichtigung durchgeführt werden.
Vorsicht – Einige Teile des Produktes kön-
•
nen sehr heiß werden und Verbrennungen
verursachen. Besondere Vorsicht ist geboten, wenn Kinder und schutzbedürftige
Personen anwesend sind.
2. Gerätebeschreibung und
Lieferumfang
Öffnen Sie die Verpackung und nehmen Sie
•
das Gerät vorsichtig aus der Verpackung.
Entfernen Sie das Verpackungsmaterial so-
•
wie Verpackungs-/ und Transportsicherungen
(falls vorhanden).
Überprüfen Sie, ob der Lieferumfang vollstän-
•
dig ist.
Kontrollieren Sie das Gerät und die Zubehör-
•
teile auf Transportschäden.
Bewahren Sie die Verpackung nach Möglich-
•
keit bis zum Ablauf der Garantiezeit auf.
Gefahr!
Gerät und Verpackungsmaterial sind kein
Kinderspielzeug! Kinder dürfen nicht mit
Kunststoff beuteln, Folien und Kleinteilen
spielen! Es besteht Verschluckungs- und Erstickungsgefahr!
10 Heizgerät
11 Wandhalter oben
12 Haltewinkel
13 Dübel Ø 6 mm (6 St.)
14 Schraube 4x30 mm (6 St.)
15 Schraube 4x8 mm (2 St.)
Originalbetriebsanleitung
•
3. Bestimmungsgemäße
Verwendung
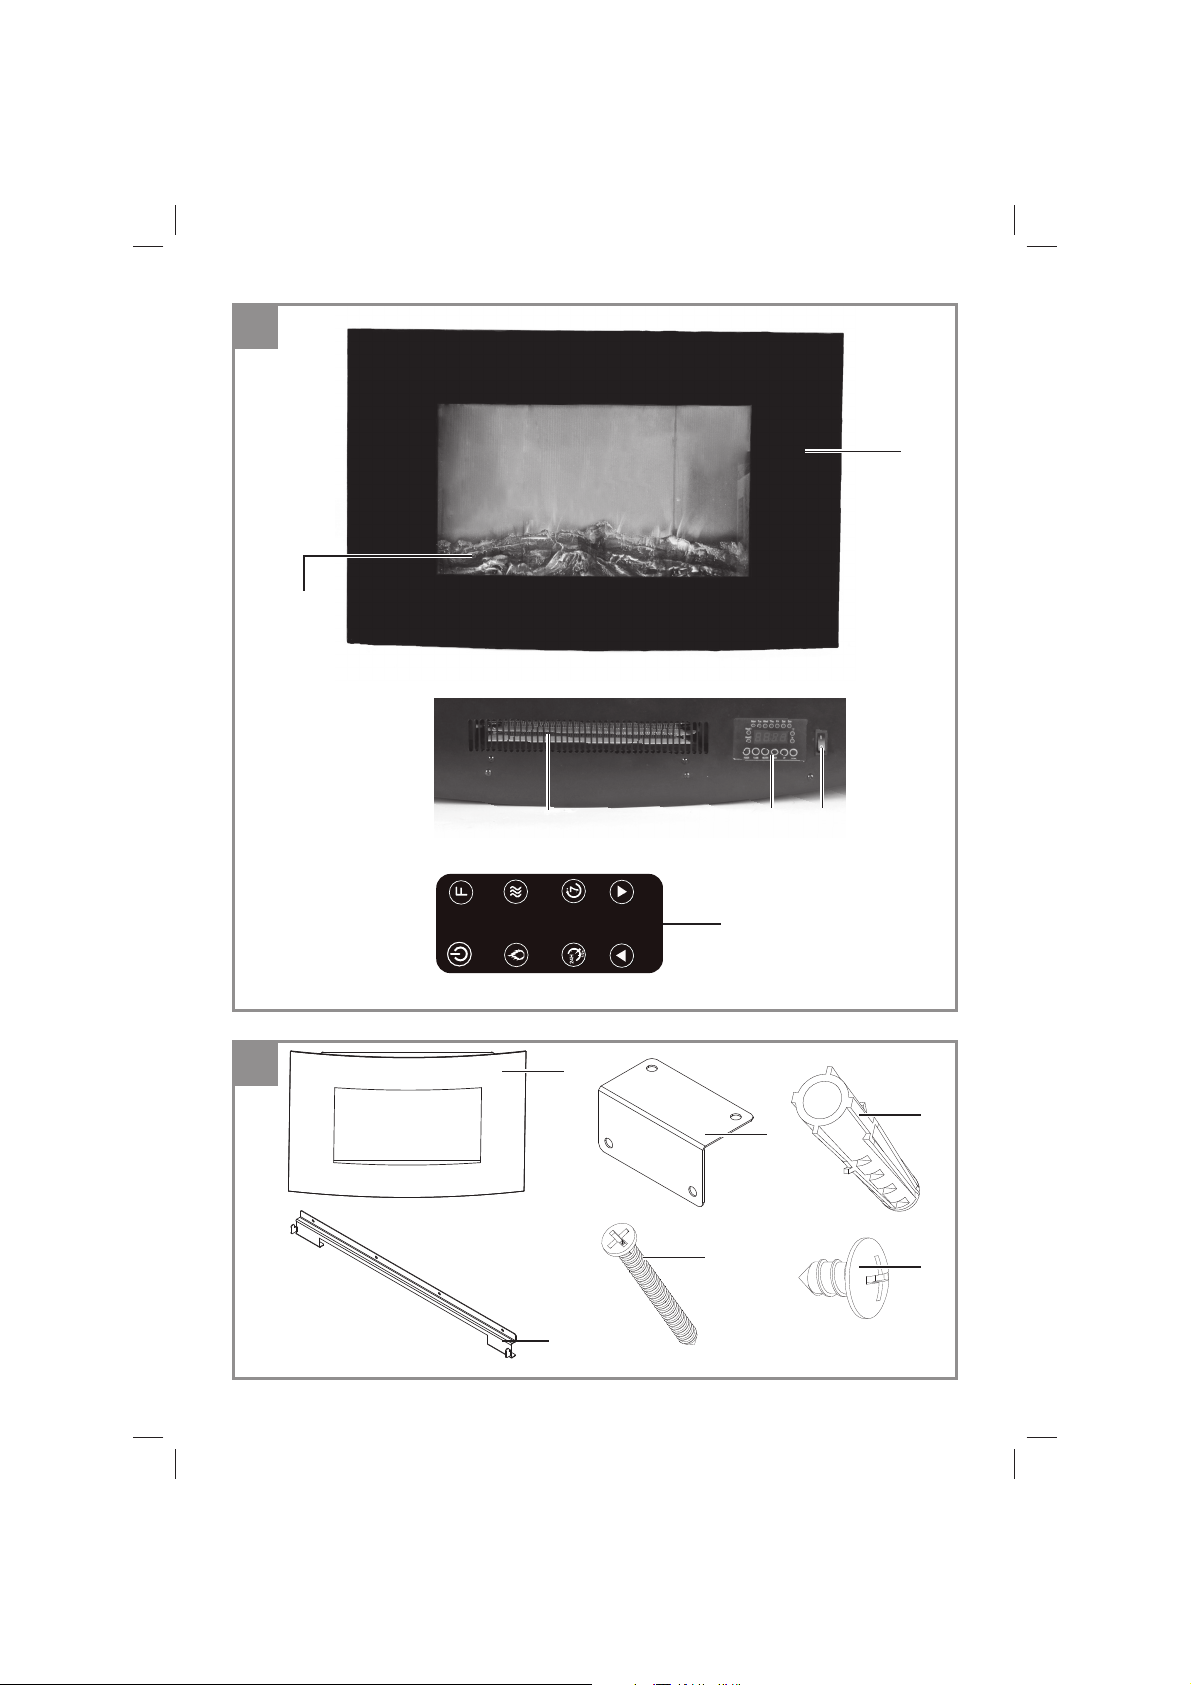
2.1 Gerätebeschreibung (Bild 1)
1 Glasfront
2 Feuerstelle – Dekoelement
3 Luftauslass und Heizelement
4 Bedienungselemente
5 Hauptschalter
6 Fernbedienung (incl. Batterie CR2025)
2.2 Lieferumfang (Bild 2)
Bitte überprüfen Sie die Vollständigkeit des Artikels anhand des beschriebenen Lieferumfangs.
Bei Fehlteilen wenden Sie sich bitte spätestens
innerhalb von 5 Arbeitstagen nach Kauf des Artikels unter Vorlage eines gültigen Kaufbeleges an
unser Service Center oder an die Verkaufstelle,
bei der Sie das Gerät erworben haben. Bitte
beachten Sie hierzu die Gewährleistungstabelle
in den Service-Informationen am Ende der Anleitung.
Anl_EF_1800_SPK9.indb 7Anl_EF_1800_SPK9.indb 7 22.11.2018 06:58:4922.11.2018 06:58:49
Das Gerät ist nur als Zusatzheizung in trockenen,
geschlossenen Räumen bestimmt. Das Gerät
darf nur an einer Wand montiert verwendet
werden. Die Montage an einer nicht tragfähigen
oder brennbaren Wand, an Schrägen oder an der
Decke ist untersagt.
Das Gerät darf nur nach dessen Bestimmung verwendet werden. Jede weitere darüber hinausgehende Verwendung ist nicht bestimmungsgemäß.
Für daraus hervorgerufene Schäden oder Verletzungen aller Art haftet der Benutzer/Bediener und
nicht der Hersteller.
Bitte beachten Sie, dass unsere Geräte bestimmungsgemäß nicht für den gewerblichen, handwerklichen oder industriellen Einsatz konstruiert
wurden. Wir übernehmen keine Gewährleistung,
wenn das Gerät in Gewerbe-, Handwerks- oder
Industriebetrieben sowie bei gleichzusetzenden
Tätigkeiten eingesetzt wird.
- 7 -
Page 8

D
4. Technische Daten
Nennspannung: ......................220-240 V ~ 50 Hz
Heizleistung max.: ................................... 1800 W
Schutzklasse: ...................................................... I
Schutzart: ................................................... IP X0
Gerätemaße: ................................88 x 56 x 15 cm
5. Vor Inbetriebnahme
Überzeugen Sie sich vor dem Anschließen, dass
die Daten auf dem Typenschild mit den Netzdaten
übereinstimmen.
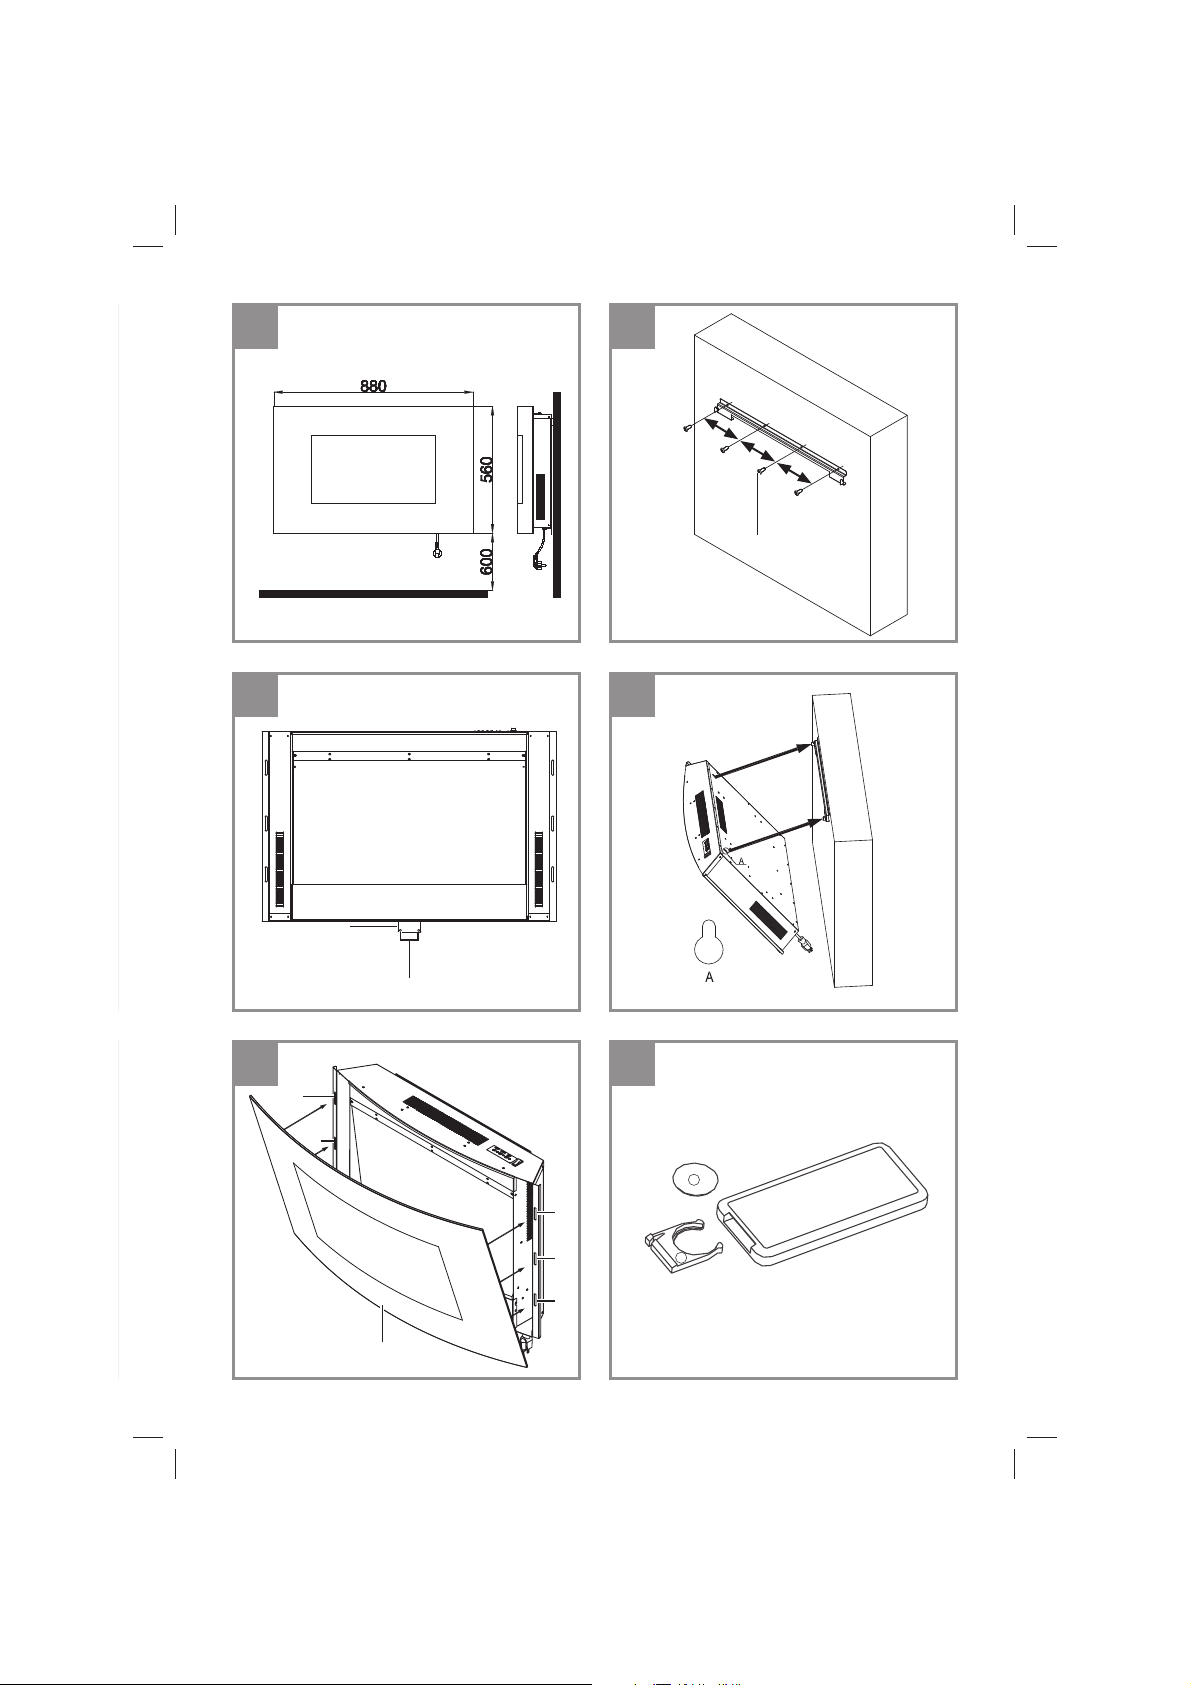
5.1 Wandmontage
Vorsicht!
Um Glasbruch zu vermeiden, entfernen Sie die
Glasfront vom Gerät und montieren Sie sie erst
wieder am Schluss.
Die Mindestabstände sind einzuhalten. Das Gerät
darf nur in senkrechter Stellung und komplett
montiert betrieben werden.
(Abb. 3) Es sind zum Gehäuse Mindestabstände
von 20 cm seitlich, 100 cm zur Zimmerdecke,
60 cm zum Fußboden und 100 cm nach vorne
einzuhalten.
Beachten Sie Punkt 1 - Sicherheitshinweise.
Vorsicht! Stellen Sie sicher, dass sich im Bereich
der Bohrlöcher keine elektrischen Leitungen
oder andere Installationen (z.B. Wasserrohre)
befi nden. Achten Sie auf festen, waagerechten
Sitz des Gerätes an der Wand. Verwenden Sie
nur geeignetes Befestigungsmaterial an einer
tragfähigen Wand. Die mitgelieferten Dübel und
Schrauben sind geeignet für: Beton, Naturstein
im dichtem Gefüge, Vollziegel, Kalksand-Vollstein,
Vollstein aus Leichtbeton und Porenbeton (Gasbeton).
1. Abb. 4: Markieren Sie waagerecht die Positionen der vier Bohrlöcher vom oberen Wandhalter (11) an einer tragfähigen Wand. Die
Bohrlöcher liegen 150 mm auseinander.
2. Bohren Sie anschließend vier Löcher (Ø 6
mm) in die Wand und setzen Sie die Dübel
(Abb. 2 / Pos. 13) ein. Platzieren Sie die Löcher vom oberen Wandhalter (Abb. 4 / Pos.
11) über die Bohrlöcher und befestigen Sie
den Wandhalter mit 4 Schrauben 4x30 mm
(Pos. 14). Achten Sie darauf, dass die Haken
am Wandhalter nach oben zeigen (Abb. 4).
3. Abb. 5: Montieren Sie den Haltewinkel (12)
mit 2 Schrauben 4x8 mm (Abb. 2 / Pos. 15)
mittig an die Unterseite des Heizergehäuses.
4. Abb. 6: Hängen Sie das Gehäuse an den
Wandhalter. Achten Sie darauf, dass die Haken am Wandhalter in die Gehäuselöcher (A)
eingreifen.
5. Abb. 5: Übertragen Sie die Löcher (B) vom
Haltewinkel (12) auf die Wand und nehmen
Sie das Heizergehäuse wieder ab.
6. Bohren Sie zwei Löcher (Ø 6 mm) in die
Wand, setzen Sie die Dübel (Abb. 2 / Pos. 13)
ein und hängen Sie das Gehäuse wieder an
den oberen Wandhalter (Abb. 6). Achten Sie
auf das Eingreifen der Haken in die Gehäuselöcher (A).
7. Abb. 5: Fixieren Sie den Haltewinkel mit 2
Schrauben 4x30 mm (Abb. 2 / Pos. 14) an der
Wand.
8. Abb. 7: Nehmen Sie eine zweite Person zur
Hilfe und hängen Sie die Glasfront (1) mit den
daran vorhandenen seitlichen Haken in die
dafür vorgesehenen Langlöcher (C) am Gehäuse ein.
5.2 Fernbedienung
Hinweis: Es ist eine Knopfzelle Typ CR 2025 zu
verwenden (in der Fernbedienung enthalten).
Ziehen Sie vor Benutzung den Kontaktschutz
(Kunststoff plättchen) aus dem Gehäuse.
Hinweis! Es kann einige Sekunden dauern, bis
nach drücken der Taster auf der Fernbedienung
das Gerät reagiert. Drücken Sie innerhalb von
2 Sekunden die Taster der Fernbedienung nicht
mehrere Male.
Benutzen Sie niemals einen anderen als den
•
angegebenen Batterietyp.
Wird die Fernbedienung längere Zeit nicht
•
benutzt, entnehmen Sie bitte die Batterie um
ein Auslaufen zu verhindern.
Halten Sie die Fernbedienung in die Richtung
•
des Heizers. Die Reichweite beträgt max. 5
Meter.
Direkte Sonneneinstrahlung und Gegenstän-
•
de können den Aktionsradius der Fernbedienung erheblich beeinträchtigen.
Behandeln Sie die Fernbedienung sorgfältig.
•
Lassen Sie sie nicht fallen, vermeiden Sie
Hitze und Feuchtigkeit.
- 8 -
Anl_EF_1800_SPK9.indb 8Anl_EF_1800_SPK9.indb 8 22.11.2018 06:58:4922.11.2018 06:58:49
Page 9

D
Batterie ersetzen (Abb. 8):
1. Öff nen Sie den Batteriefachdeckel indem Sie
die Verriegelung (F) zur Mitte hin drücken und
gleichzeitig das Batteriefach herausziehen.
2. Beachten Sie beim Einlegen der Batterie
dass die Polarität der Batterie mit der Angabe
am Gehäuse übereinstimmt.
3. Drücken Sie den Batteriefachdeckel in die
Fernbedienung.
Sie sind zur Rückgabe gebrauchter Batterien als
Endnutzer gesetzlich verpfl ichtet. Die Rückgabe
kann bei den öff entlichen Sammelstellen der Ge-
meinde oder überall dort, wo sie verkauft werden,
erfolgen. Beachten Sie auch Kapitel 11.
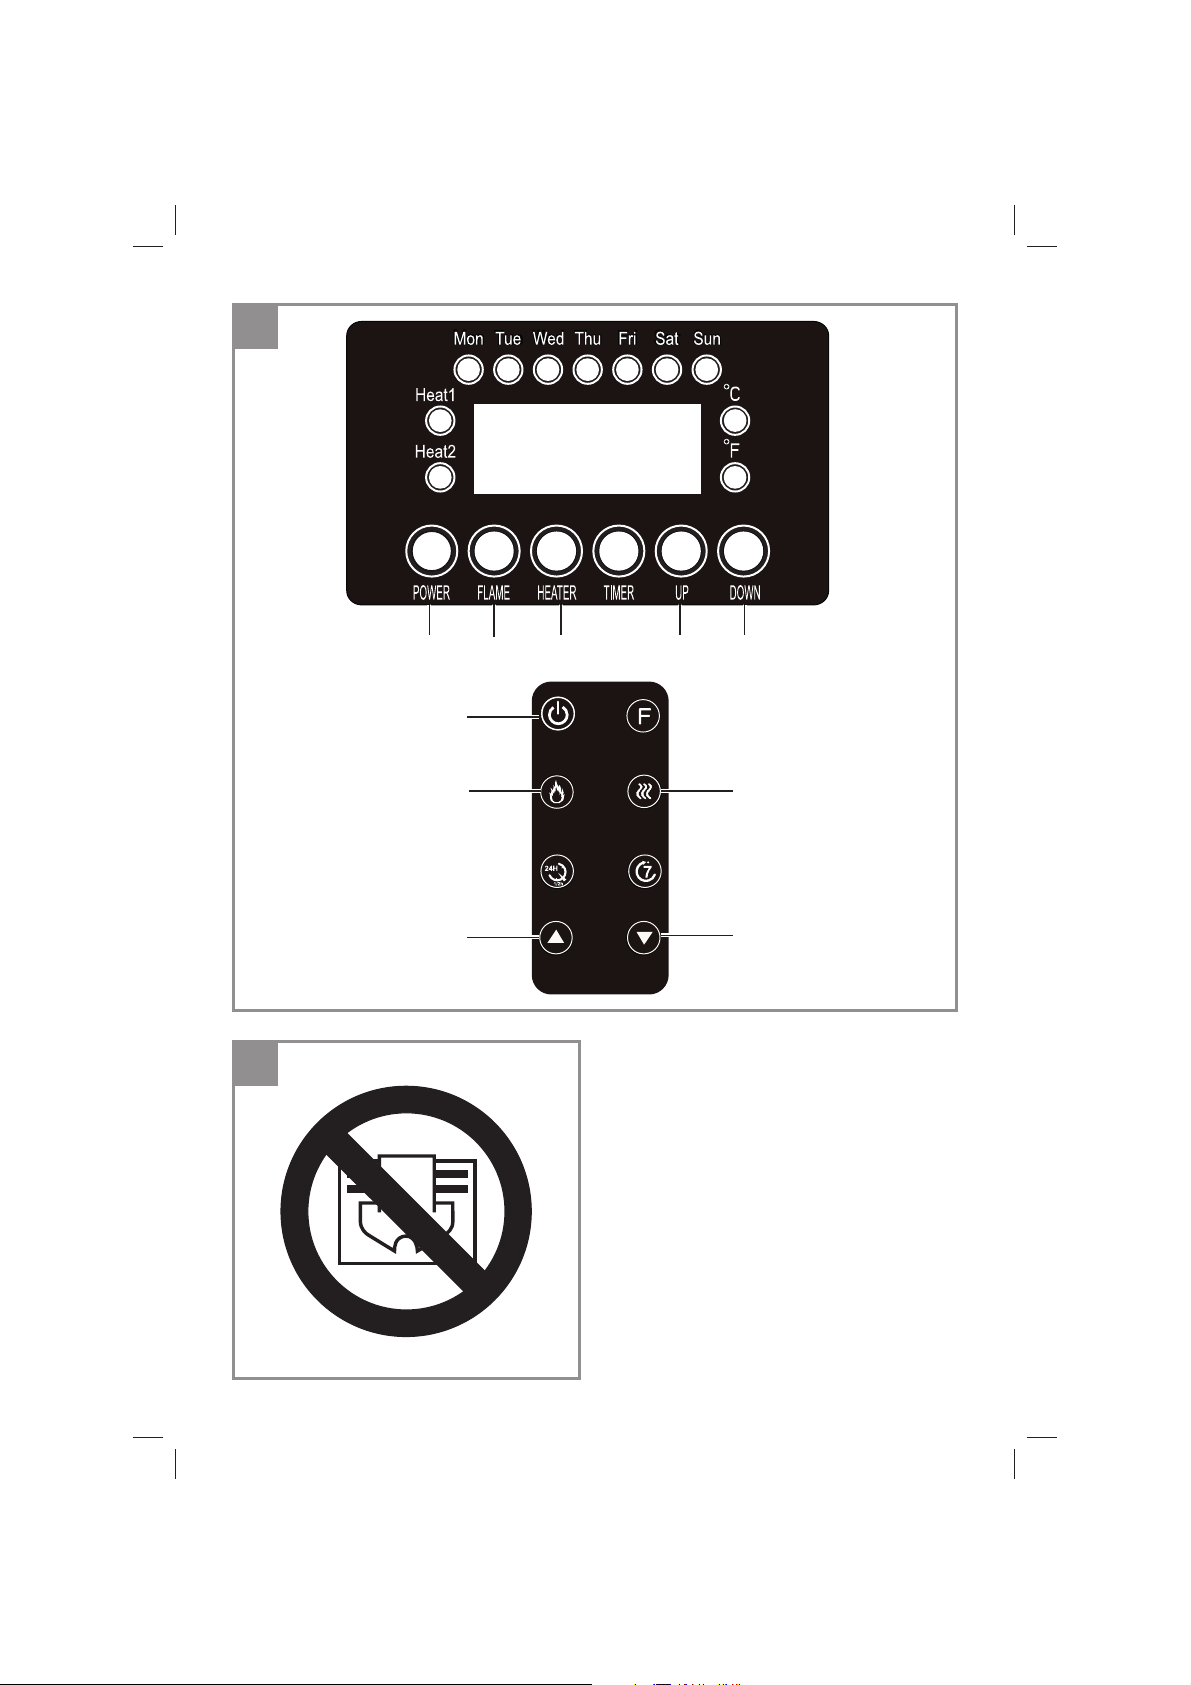
6. Bedienung
Hinweis: Alle Betätigungen werden durch einen
kurzen Signalton bestätigt.
Beachten Sie die unter Punkt 1 angeführten Sicherheitshinweise.
Bei Erstinbetriebnahme oder nach längerer
Betriebspause kann es zu einer kurzzeitigen Geruchsbildung kommen. Dies ist kein Fehler.
6.1 Netzspannung ein- und ausschalten
(Abb. 1)
Mit dem Hauptschalter (5) wird das Gerät vollständig vom Stromnetz getrennt. Schalten Sie als
Erstes den Hauptschalter ein „I“ bzw. als Letztes
aus „0“ wenn Sie das Gerät nicht mehr benötigen.
6.2 Gerät ein- und ausschalten (Abb. 9)
Drücken Sie den Taster „Power “ (D). Das Gerät
schaltet ein, Flammeneff ekt und Display werden
aktiviert. Zum Ausschalten drücken Sie den Taster „Power “ (D) erneut. Der Flammeneff ekt und
das Display erlöschen.
6.3 Dimmerfunktion ein- und ausschalten
(Abb. 9)
Drücken Sie den Taster „Flame (E). Die Helligkeit
des Flammeneff ekts kann durch mehrmaliges
Drücken in 5 Stufen eingestellt werden.
6.4 Temperaturanzeige °C/°F (Abb. 9)
Hinweis: Nur am Gerät umschaltbar.
Es ist möglich sich die Temperatur in °C oder °F
anzeigen zu lassen.
Zum Umschalten drücken Sie die „DOWN“ Taste
für 5 Sekunden.
6.5 Solltemperatur einstellen (Abb. 9)
Hinweise: Die einzustellende Solltemperatur
entspricht der am integrierten Temperaturfühler
gemessenen, und am Display angezeigten, Gerätetemperatur. Diese kann von der tatsächlichen
Raumtemperatur etwas abweichen. Wird die
eingestellte Solltemperatur überschritten, schaltet
die Heizfunktion ab. Wird die eingestellte Solltemperatur unterschritten, schaltet die Heizfunktion
wieder ein.
6.5.1 Einstellung am Gerät (Abb. 9)
Drücken Sie die Taste „UP“ um die Temperatureinstellung (15°C – 35°C bzw. 59°F – 95°F) zu
starten. Anschließend drücken Sie die Tasten
„UP“ oder „DOWN“ zur Temperatureinstellung.
Die Temperatur wird jeweils um 1°C erhöht bzw.
gesenkt.
6.5.2 Einstellung mit Fernbedienung (Abb. 9)
Drücken Sie zur Temperatureinstellung (15°C –
35°C bzw. 59°F – 95°F) die Taste „F“. Die Temperatur wird pro Tastendruck um 1°C erhöht und beginnt nach Erreichen von 35°C wieder bei 15°C.
6.6 Heizfunktion ein- und ausschalten (Abb.
9)
Betätigen Sie bei eingeschaltetem Heizer die
„Heater“ Taste (H) bis die LED „Heat 1“ für 900
W Heizleistung erscheint. Bei nochmaliger Betätigung der „Heater“ Taste (H) leuchtet die LED
„Heat 2“ für 1800 W Heizleistung. Bei erneuter
Betätigung der „Heater“ Taste (H) wird die Heizleistung ausgeschaltet.
6.7 Zeitautomatik - Ein- und Ausschaltzeit
programmieren (Abb. 9)
Hinweise:
Schalten Sie das Gerät wie zuvor beschrie-
•
ben ein.
Es kann pro Tag eine Einschaltzeit und eine
•
Ausschaltzeit eingestellt werden. Überlegen
Sie sich vorab, zu welchen Zeiten das Gerät
einschalten bzw. ausschalten soll und notieren Sie sich diese Zeiten.
Einschaltzeit programmieren: Eine kleine
•
LED neben der „10 Minuten – Anzeige“ (z.B.
10:5.1) erscheint.
Ausschaltzeit programmieren: Eine kleine
•
LED neben der „Minuten – Anzeige“ (z.B.
10:51.) erscheint.
Für alle Einstellungen blinkt die Anzeige für 5
•
Sekunden. Während dieser Zeit sind Einstellungen möglich. Wird 5 Sekunden lang keine
Taste gedrückt, ist die aktuelle Einstellung
- 9 -
Anl_EF_1800_SPK9.indb 9Anl_EF_1800_SPK9.indb 9 22.11.2018 06:58:4922.11.2018 06:58:49
Page 10

D
automatisch gespeichert.
6.7.1 Tageweise Programmierung am Gerät
oder mit der Fernbedienung (Abb. 9)
Einschaltzeit
Drücken Sie die Taste „TIMER“ bzw. „7“ ein-
•
mal. Die LED „Mon“ und die Stundenanzeige
blinken.
Drücken Sie die Tasten „UP (auf)“ (K) oder
•
„DOWN (ab)“ (L) und stellen Sie für Montag
die Einschaltzeit in Stunden ein.
Drücken Sie die Taste „TIMER“ bzw. „24H“
•
und stellen Sie mit den Tasten „UP“ (K) und
„DOWN“ (L) für Montag die Einschaltzeit in
Minuten ein.
Ausschaltzeit
Drücken Sie innerhalb 5 Sekunden nochmals
•
die Taste „TIMER“ bzw. „7“. Die LED „Mon“
und die Stundenanzeige blinken.
Drücken Sie „UP“ (K) oder „DOWN“ (L) um
•
für Montag die Ausschaltzeit in Stunden einzustellen.
Drücken Sie die Taste „TIMER“ bzw. „24H“
•
und stellen Sie mit „UP“ (K) und „DOWN“
(L) für Montag die Ausschaltzeit in Minuten
einzustellen.
Drücken Sie die Taste „TIMER“ bzw. „7“ nochmals, programmieren Sie für Dienstag. Wiederholen Sie den Programmiervorgang für alle anderen
Wochentage.
Um einen Wochentag (z.B. Dienstag) bei der Programmierung zu überspringen, drücken Sie sooft
auf die Taste „TIMER“ bzw. „7“ bis der nächste
Tag (z.B. Mittwoch) zur gewünschten Programmierung erscheint.
6.7.2 Wochenweise Programmierung mit der
Fernbedienung (Abb. 9)
Hinweis: Zusätzlich zu der zuvor beschriebenen
tageweisen Programmierung der Ein- und Ausschaltzeit können Sie diese mit der Fernbedienung auch wochenweise programmieren.
Einschaltzeit Stunde programmieren (Abb. 9)
Drücken Sie die Taste „7“. Die LED „Mon“ und
•
die Stundenanzeige blinken.
Drücken Sie die Tasten „UP“ (K) oder
•
„DOWN“ (L) um für Montag die Einschaltzeit
in Stunden einzustellen.
Drücken Sie nochmals die Taste „7“. Pro-
•
grammieren Sie für Dienstag.
Wiederholen Sie den Vorgang für die restli-
•
chen Wochentage.
Sind alle Wochentage programmiert, wird
•
nach 5 Sekunden (keine Taste drücken) die
aktuelle Einstellung automatisch gespeichert.
Einschaltzeit Minuten programmieren (Abb.
9)
Drücken Sie die Tasten „7“ und anschließend
•
„24H“. Die LED „Mon“ und die Minutenanzeige blinken.
Drücken Sie die Tasten „UP“ (K)“ oder
•
„DOWN“ (L) um für Montag die Einschaltzeit
in Minuten einzustellen.
Drücken Sie nochmals die Tasten „7“ und
•
anschließend „24H“. Programmieren Sie für
Dienstag.
Wiederholen Sie den Vorgang für die restli-
•
chen Wochentage.
Sind alle Wochentage programmiert, wird
•
nach 5 Sekunden (keine Taste drücken) die
aktuelle Einstellung automatisch gespeichert.
Ausschaltzeit Stunde programmieren (Abb. 9)
Drücken Sie die Tasten „7“ und anschließend
•
2x „24H“. Die LED „Mon“ und die Stundenanzeige blinken.
Drücken Sie die Tasten „UP“ (K)“ oder
•
„DOWN“ (L) um für Montag die Ausschaltzeit
in Stunden einzustellen.
Drücken Sie nochmals die Tasten „7“ und
•
anschließend 2x „24H“. Programmieren Sie
für Dienstag.
Wiederholen Sie den Vorgang für die restli-
•
chen Wochentage.
Sind alle Wochentage programmiert, wird
•
nach 5 Sekunden (keine Taste drücken) die
aktuelle Einstellung automatisch gespeichert.
Ausschaltzeit Minuten programmieren (Abb.
9)
Drücken Sie die Tasten „7“ und anschließend
•
3x „24H“. Die LED „Mon“ und die Minutenanzeige blinken.
Drücken Sie die Tasten „UP“ (K)“ oder
•
„DOWN“ (L) um für Montag die Ausschaltzeit
in Minuten einzustellen.
Drücken Sie die nochmals die Tasten „7“ und
•
anschließend 3x „24H“. Programmieren Sie
für Dienstag.
Wiederholen Sie den Vorgang für die restli-
•
chen Wochentage.
Sind alle Wochentage programmiert, wird
•
nach 5 Sekunden (keine Taste drücken) die
aktuelle Einstellung automatisch gespeichert.
- 10 -
Anl_EF_1800_SPK9.indb 10Anl_EF_1800_SPK9.indb 10 22.11.2018 06:58:4922.11.2018 06:58:49
Page 11

D
6.8 Aktuelle Uhrzeit einstellen (Abb. 9)
Hinweis: Nur am Gerät einstellbar.
Wird 5 Sekunden lang keine Taste gedrückt, ist
die aktuelle Einstellung automatisch gespeichert.
Schalten Sie den Heizer mit der Taste „POW-
•
ER“ (D) aus.
Drücken Sie die Taste „TIMER“ 3 Sekunden
•
lang. Die Stundenanzeige blinkt für 5 Sekunden.
Stellen Sie mit den „UP“ und „DOWN“ Tasten
•
die aktuelle Stunde ein.
Drücken Sie die Taste „TIMER“, die Minuten-
•
anzeige blinkt für 5 Sekunden.
Stellen Sie mit den „UP“ und „DOWN“ Tasten
•
die aktuellen Minuten ein.
Drücken Sie die Taste „TIMER“ sooft, bis die
•
LED für den aktuellen Wochentag leuchtet.
Währenddessen blinken abwechselnd die
Stunden und die Minutenanzeige.
6.9 Zeitautomatik aktivieren (Abb. 9)
Schalten Sie das Gerät mit der Taste „POWER“
(D) aus. Das Gerät schaltet zum nächsten Schaltpunkt mit der zuletzt eingestellten Heizfunktion,
Solltemperatureinstellung und hellstem Flammeneff ekt ein.
6.10 Funktion „Fenster off en“
Sinkt bei eingeschalteter Heizfunktion die Temperatur innerhalb 10 Minuten um 5°C, ertönt für
einige Sekunden ein Signal und die Heizfunktion
schaltet aus.
6.11 Überhitzungsschutz
Bei übermäßiger Erwärmung schaltet sich die
Heizleistung oder das Gerät automatisch ab. Ist
dies der Fall, schalten Sie das Gerät komplett aus
und ziehen Sie den Netzstecker. Lassen Sie das
Gerät etwa 15 Minuten abkühlen. Nach Beseitigung der Ursache (z.B. abgedecktes Luftgitter)
kann das Gerät wie zuvor beschrieben wieder
eingeschaltet werden. Sollte es zum wiederholten
Ansprechen des Überhitzungsschutzes kommen oder sich das Gerät nicht mehr einschalten
lassen, wenden Sie sich bitte an Ihren Kundendienst.
7. Austausch der
Netzanschlussleitung
Gefahr!
Wenn die Netzanschlussleitung dieses Gerätes
beschädigt wird, muss sie durch den Hersteller
oder seinen Kundendienst oder eine ähnlich qualifi zierte Person ersetzt werden, um Gefährdun-
gen zu vermeiden.
8. Reinigung, Wartung und
Ersatzteilbestellung
Gefahr!
Ziehen Sie vor allen Reinigungsarbeiten den
Netzstecker.
Das Gerät muss abgekühlt sein.
8.1 Reinigung
Halten Sie Schutzvorrichtungen, Luftschlitze
•
und Motorengehäuse so staub- und schmutzfrei wie möglich.
Verunreinigungen durch Staub mit einem
•
Staubsauger entfernen.
Reinigen Sie das Gerät regelmäßig mit einem
•
feuchten Tuch. Verwenden Sie keine Reinigungs- oder Lösungsmittel; diese könnten die
Kunststoffteile des Gerätes angreifen. Achten
Sie darauf, dass kein Wasser in das Geräteinnere gelangen kann. Das Eindringen von
Wasser in ein Elektrogerät erhöht das Risiko
eines elektrischen Schlages.
Die Glasfront kann mit herkömmlichem Glas-
•
reiniger gesäubert werden.
8.2 Wartung
Im Geräteinneren befi nden sich keine weiteren zu
wartenden Teile.
Heizelemente oder die für den Flammeneff ekt
verwendeten LEDs dürfen nur von einem qualifi zierten Elektrofachmann oder dem von Einhell
beauftragten Kundendienst unter Berücksichtigung der einschlägigen Bestimmungen ausgetauscht werden.
- 11 -
Anl_EF_1800_SPK9.indb 11Anl_EF_1800_SPK9.indb 11 22.11.2018 06:58:4922.11.2018 06:58:49
Page 12

8.3 Ersatzteilbestellung:
Bei der Ersatzteilbestellung sollten folgende Angaben gemacht werden;
Typ des Gerätes
•
Artikelnummer des Gerätes
•
Ident-Nummer des Gerätes
•
Ersatzteilnummer des erforderlichen Ersatz-
•
teils
Aktuelle Preise und Infos fi nden Sie unter
www.isc-gmbh.info
9. Entsorgung und
Wiederverwertung
Das Gerät befi ndet sich in einer Verpackung um
Transportschäden zu verhindern. Diese Verpackung ist Rohstoff und ist somit wieder verwend-
bar oder kann dem Rohstoff kreislauf zurückge-
führt werden. Das Gerät und dessen Zubehör
bestehen aus verschiedenen Materialien, wie
z.B. Metall und Kunststoff e. Defekte Geräte ge-
hören nicht in den Hausmüll. Zur fachgerechten
Entsorgung sollte das Gerät an einer geeigneten
Sammelstellen abgegeben werden. Wenn Ihnen
keine Sammelstelle bekannt ist, sollten Sie bei
der Gemeindeverwaltung nachfragen.
D
10. Lagerung
Lagern Sie das Gerät und dessen Zubehör an
einem dunklen, trockenen und frostfreiem Ort. Die
optimale Lagertemperatur liegt zwischen 5 und
30 ˚C. Bewahren Sie das Elektrowerkzeug in der
Originalverpackung auf.
11. Entsorgung der Batterien
Batterien beinhalten Umwelt gefährdende Materialien. Werfen Sie Batterien nicht in den Hausmüll,
ins Feuer oder ins Wasser. Batterien sollen gesammelt, recycelt oder umweltfreundlich entsorgt
werden. Senden Sie verbrauchte Batterien an die
iSC GmbH, Eschenstraße 6 in D-94405 Landau.
Dort wird vom Hersteller eine fachgerechte Entsorgung gewährleistet.
- 12 -
Anl_EF_1800_SPK9.indb 12Anl_EF_1800_SPK9.indb 12 22.11.2018 06:58:4922.11.2018 06:58:49
Page 13
D
12. Hinweise zur Fehlerbeseitigung
Wird das Gerät richtig betrieben, dürften keine Störungen auftreten. Bei Störungen prüfen Sie die folgenden Möglichkeiten, bevor Sie den Kundendienst verständigen.
Störung Mögliche Ursache Behebung
Gerät heizt nicht Netzstecker nicht eingesteckt
Netzstecker einstecken
Fernbedienung
funktioniert nicht
Hauptschalter nicht eingeschaltet
Gerät in Standby
Heizleistung ausgeschaltet
Thermostat zu niedrig eingestellt
„Timer“ hat Gerät ausgeschaltet
Batterie leer
Fernbedienung außerhalb Reichweite
Direkte Sonneneinstrahlung auf Heizgerät
Hauptschalter einschalten
„Power“ Taste betätigen
Heizleistung einstellen
Temperatur erhöhen
Zeitvorwahl ändern
Batterie tauschen
Distanz zum Heizgerät verringern
Sonneneinstrahlung verringern (abdunkeln)
- 13 -
Anl_EF_1800_SPK9.indb 13Anl_EF_1800_SPK9.indb 13 22.11.2018 06:58:4922.11.2018 06:58:49
Page 14

D
13. Erforderliche Angaben zu elektrischen Einzelraumheizgeräten
- 14 -
Anl_EF_1800_SPK9.indb 14Anl_EF_1800_SPK9.indb 14 22.11.2018 06:58:4922.11.2018 06:58:49
Page 15
D
Nur für EU-Länder
Werfen Sie Elektrowerkzeuge nicht in den Hausmüll!
Gemäß europäischer Richtlinie 2012/19/EU über Elektro- und Elektronik-Altgeräte und Umsetzung in
nationales Recht müssen verbrauchte Elektrowerkzeuge getrennt gesammelt werden und einer umweltgerechten Wiederverwertung zugeführt werden.
Recycling-Alternative zur Rücksendeauff orderung:
Der Eigentümer des Elektrogerätes ist alternativ anstelle Rücksendung zur Mitwirkung bei der sachgerechten Verwertung im Falle der Eigentumsaufgabe verpfl ichtet. Das Altgerät kann hierfür auch einer
Rücknahmestelle überlassen werden, die eine Beseitigung im Sinne der nationalen Kreislaufwirtschafts- und Abfallgesetze durchführt. Nicht betroff en sind den Altgeräten beigefügte Zubehörteile und
Hilfsmittel ohne Elektrobestandteile.
Der Nachdruck oder sonstige Vervielfältigung von Dokumentation und Begleitpapieren der Produkte,
auch auszugsweise, ist nur mit ausdrücklicher Zustimmung der iSC GmbH zulässig.
Technische Änderungen vorbehalten
- 15 -
Anl_EF_1800_SPK9.indb 15Anl_EF_1800_SPK9.indb 15 22.11.2018 06:58:5022.11.2018 06:58:50
Page 16

D
Service-Informationen
Wir unterhalten in allen Ländern, welche in der Garantieurkunde benannt sind, kompetente ServicePartner, deren Kontakte Sie der Garantieurkunde entnehmen. Diese stehen Ihnen für alle ServiceBelange wie Reparatur, Ersatzteil- und Verschleißteil-Versorgung oder den Bezug von Verbrauchsmaterialien zur Verfügung.
Es ist zu beachten, dass bei diesem Produkt folgende Teile einem gebrauchsgemäßen oder natürlichen
Verschleiß unterliegen bzw. folgende Teile als Verbrauchsmaterialien benötigt werden.
Kategorie Beispiel
Verschleißteile* Batterie
Verbrauchsmaterial/ Verbrauchsteile*
Fehlteile
* nicht zwingend im Lieferumfang enthalten!
Bei Mängel oder Fehlern bitten wir Sie, den Fehlerfall im Internet unter www.isc-gmbh.info anzumelden.
Bitte achten Sie auf eine genaue Fehlerbeschreibung und beantworten Sie dazu in jedem Fall folgende
Fragen:
Hat das Gerät bereits einmal funktioniert oder war es von Anfang an defekt?
•
Ist Ihnen vor dem Auftreten des Defektes etwas aufgefallen (Symptom vor Defekt)?
•
Welche Fehlfunktion weist das Gerät Ihrer Meinung nach auf (Hauptsymptom)?
•
Beschreiben Sie diese Fehlfunktion.
- 16 -
Anl_EF_1800_SPK9.indb 16Anl_EF_1800_SPK9.indb 16 22.11.2018 06:58:5022.11.2018 06:58:50
Page 17

D
Garantieurkunde
Sehr geehrte Kundin, sehr geehrter Kunde,
unsere Produkte unterliegen einer strengen Qualitätskontrolle. Sollte dieses Gerät dennoch einmal nicht
einwandfrei funktionieren, bedauern wir dies sehr und bitten Sie, sich an unseren Servicedienst unter
der auf dieser Garantiekarte angegebenen Adresse zu wenden. Gerne stehen wir Ihnen auch telefonisch über die angegebene Servicerufnummer zur Verfügung. Für die Geltendmachung von Garantieansprüchen gilt folgendes:
1. Diese Garantiebedingungen richten sich ausschließlich an Verbraucher, d. h. natürliche Personen,
die dieses Produkt weder im Rahmen ihrer gewerblichen noch anderen selbständigen Tätigkeit
nutzen wollen. Diese Garantiebedingungen regeln zusätzliche Garantieleistungen, die der u. g.
Hersteller zusätzlich zur gesetzlichen Gewährleistung Käufern seiner Neugeräte verspricht. Ihre
gesetzlichen Gewährleistungsansprüche werden von dieser Garantie nicht berührt. Unsere Garan-
tieleistung ist für Sie kostenlos.
2. Die Garantieleistung erstreckt sich ausschließlich auf Mängel an einem von Ihnen erworbenen neu-
en Gerät des u. g. Herstellers, die auf einem Material- oder Herstellungsfehler beruhen und ist nach
unserer Wahl auf die Behebung solcher Mängel am Gerät oder den Austausch des Gerätes be-
schränkt. Bitte beachten Sie, dass unsere Geräte bestimmungsgemäß nicht für den gewerblichen,
handwerklichen oder berufl ichen Einsatz konstruiert wurden. Ein Garantievertrag kommt daher nicht
zustande, wenn das Gerät innerhalb der Garantiezeit in Gewerbe-, Handwerks- oder Industriebe-
trieben verwendet wurde oder einer gleichzusetzenden Beanspruchung ausgesetzt war.
3. Von unserer Garantie ausgenommen sind:
- Schäden am Gerät, die durch Nichtbeachtung der Montageanleitung oder aufgrund nicht fach-
gerechter Installation, Nichtbeachtung der Gebrauchsanleitung (wie durch z.B. Anschluss an eine
falsche Netzspannung oder Stromart) oder Nichtbeachtung der Wartungs- und Sicherheitsbestim-
mungen oder durch Aussetzen des Geräts an anomale Umweltbedingungen oder durch mangelnde
Pfl ege und Wartung entstanden sind.
- Schäden am Gerät, die durch missbräuchliche oder unsachgemäße Anwendungen (wie z.B. Über-
lastung des Gerätes oder Verwendung von nicht zugelassenen Einsatzwerkzeugen oder Zubehör),
Eindringen von Fremdkörpern in das Gerät (wie z.B. Sand, Steine oder Staub, Transportschäden),
Gewaltanwendung oder Fremdeinwirkungen (wie z. B. Schäden durch Herunterfallen) entstanden
sind.
- Schäden am Gerät oder an Teilen des Geräts, die auf einen gebrauchsgemäßen, üblichen oder
sonstigen natürlichen Verschleiß zurückzuführen sind.
4. Die Garantiezeit beträgt 24 Monate und beginnt mit dem Kaufdatum des Gerätes. Garantieansprü-
che sind vor Ablauf der Garantiezeit innerhalb von zwei Wochen, nachdem Sie den Defekt erkannt
haben, geltend zu machen. Die Geltendmachung von Garantieansprüchen nach Ablauf der Ga-
rantiezeit ist ausgeschlossen. Die Reparatur oder der Austausch des Gerätes führt weder zu einer
Verlängerung der Garantiezeit noch wird eine neue Garantiezeit durch diese Leistung für das Gerät
oder für etwaige eingebaute Ersatzteile in Gang gesetzt. Dies gilt auch bei Einsatz eines Vor-Ort-
Services.
5. Für die Geltendmachung Ihres Garantieanspruches melden Sie bitte das defekte Gerät an unter:
www.isc-gmbh.info. Halten Sie bitte den Kaufbeleg oder andere Nachweise Ihres Kaufs des Neu-
geräts bereit. Geräte, die ohne entsprechende Nachweise oder ohne Typenschild eingesendet wer-
den, sind von der Garantieleistung aufgrund mangelnder Zuordnungsmöglichkeit ausgeschlossen.
Ist der Defekt des Gerätes von unserer Garantieleistung erfasst, erhalten Sie umgehend ein repa-
riertes oder neues Gerät zurück.
Selbstverständlich beheben wir gegen Erstattung der Kosten auch gerne Defekte am Gerät, die vom
Garantieumfang nicht oder nicht mehr erfasst sind. Dazu senden Sie das Gerät bitte an unsere Serviceadresse.
Für Verschleiß-, Verbrauchs- und Fehlteile verweisen wir auf die Einschränkungen dieser Garantie gemäß den Service-Informationen dieser Bedienungsanleitung.
iSC GmbH · Eschenstraße 6 · 94405 Landau/Isar (Deutschland)
- 17 -
Anl_EF_1800_SPK9.indb 17Anl_EF_1800_SPK9.indb 17 22.11.2018 06:58:5022.11.2018 06:58:50
Page 18

D
Sehr geehrte Kundin, sehr geehrter Kunde,
um Ihnen noch mehr Service zu bieten, haben Sie die Möglichkeit auf unserem Onlineportal weitere
Informationen abzurufen.
Sollten einmal Probleme oder Fragen zu Ihrem Produkt auftreten, können Sie schnell und einfach unter
www.isc-gmbh.info viele Aktionen durchführen. Hier einige Beispiele:
Ersatzteile bestellen
•
Aktuelle Preisauskünfte
•
Verfügbarkeiten der Ersatzteile
•
Servicestellen Vorort für Benzingeräte
•
Defekte Geräte anmelden
•
Garantieverlängerungen (nur bei bestimmten Geräten)
•
Bestellverfolgung
•
Wir freuen uns auf Ihren Besuch online unter www.isc-gmbh.info!
Telefon: 09951 / 95 920 00 ·Telefax: 09951/95 917 00
E-Mail: info@einhell.de · Internet: www.isc-gmbh.info
iSC GmbH · Eschenstraße 6 · 94405 Landau/Isar (Deutschland)
- 18 -
Anl_EF_1800_SPK9.indb 18Anl_EF_1800_SPK9.indb 18 22.11.2018 06:58:5022.11.2018 06:58:50
Page 19

GB
Danger! - Read the operating instructions to reduce the risk of injury
- 19 -
Anl_EF_1800_SPK9.indb 19Anl_EF_1800_SPK9.indb 19 22.11.2018 06:58:5022.11.2018 06:58:50
Page 20

GB
Danger!
When using the equipment, a few safety precautions must be observed to avoid injuries and
damage. Please read the complete operating
instructions and safety regulations with due care.
Keep this manual in a safe place, so that the information is available at all times. If you give the
equipment to any other person, hand over these
operating instructions and safety regulations as
well. We cannot accept any liability for damage
or accidents which arise due to a failure to follow
these instructions and the safety instructions.
1. Safety regulations
Danger!
Read all safety regulations and instructions.
Any errors made in following the safety regulations and instructions may result in an electric
shock, fi re and/or serious injury.
Keep all safety regulations and instructions
in a safe place for future use.
Check that the equipment has been delivered
•
in perfect condition. If it has suffered any da-
mage, do not connect the equipment to the
power supply.
Position the power cable so that there is no
•
danger of tripping over it.
Do not pass the power cable over hot parts of
•
the equipment during operation.
Never use the power cable to pull the power
•
plug out of the socket-outlet! Never use the
power cable to carry the equipment or try
to move the equipment by pulling the power
cable.
Never wind the power cable around the fan
•
heater.
Never jam the power cable between objects
•
or pull the cable over sharp edges or position
the cable over hot plates or open flames.
Use the equipment in enclosed, dry areas
•
only.
Do not use this heater in the immediate vicini-
•
ty of a bath, shower or swimming pool.
Do not use the heater in a bathroom.
•
Never immerse the equipment in water – dan-
•
ger of fatal accident!
Never use the equipment with wet hands.
•
Never open the appliance or touch live parts –
•
danger of fatal accident!
Position the equipment in such a way that the
•
power plug is accessible at all times.
If the equipment is not used for a lengthy
•
period of time, disconnect it from the power
supply!
Do not position the equipment directly below
•
a socket.
If the equipment is used for a lengthy time,
•
the housing can become very hot. Position
the equipment in such a way as to prevent
accidental touching.
Do not use the equipment in rooms in which
•
inflammable materials (for example solvents,
etc.) or gases are used or stored.
Keep highly inflammable substances and ga-
•
ses away from the equipment.
Do not use in areas where there is a fire risk
•
(for example wooden sheds).
Only use the heater with its power lead fully
•
extended.
Do not insert any foreign objects in the
•
equipment’s openings – danger of electric
shock and damage to the equipment.
Keep children and people on medication or
•
under the influence of alcohol away from the
equipment.
Warning: Do not cover the heater. If you fail to
•
observe this point, the heater may suffer from
overheating. Risk of fire! Pay attention to the
symbol on the equipment (Fig. 10).
Maintenance and repair work may only be
•
carried out by authorized trained personnel.
Check the power cable at regular intervals
•
for signs of defects or damage. A damaged
power cable may be replaced only by an electrician or ISC GmbH in compliance with the
relevant regulations.
For electrical safety purposes we recommend
•
that you install a residual current device
circuit-breaker (RCD).
Connect the equipment to an earthed socket
•
outlet only.
It must be impossible for the control elements
•
to be touched by a person in a shower, in a
vessel filled with liquid or in a bathtub.
Children younger than 3 years must be
•
kept away unless they are continuously
supervised.
Children of 3 years and younger than 8 years
•
are allowed to use the equipment only if they
are supervised or have received instruction
in how to use the equipment safely and
understand the dangers which result from
such use, provided that the equipment is
positioned or installed in its normal place of
use. Children of 3 years and younger than 8
years are not allowed to insert the plug into
- 20 -
Anl_EF_1800_SPK9.indb 20Anl_EF_1800_SPK9.indb 20 22.11.2018 06:58:5022.11.2018 06:58:50
Page 21

GB
the socket, regulate the equipment, clean the
equipment and/or perform the maintenance
which a user is expected to perform.
This equipment can be used by children of
•
8 years and older and by people with limited
physical, sensory or mental capacities or tho-
se with no experience and knowledge if they
are supervised or have received instruction
in how to use the equipment safely and un-
derstand the dangers which result from such
use. Children are not allowed to play with the
equipment. Unless supervised, children are
not allowed to clean the equipment or carry
out user-level maintenance work.
Caution – Some parts of the product
•
can become very hot and cause burns.
Special care is required when children
and persons in need of protection are
present.
2. Layout and items supplied
2.1 Layout (Fig. 1)
1 Glass front panel
2 Hearth – decorative element
3 Air outlet and heating element
4 Operating elements
5 Main switch
6 Remote control (incl. battery CR 2025)
Danger!
The equipment and packaging material are
not toys. Do not let children play with plastic
bags, foils or small parts. There is a danger of
swallowing or suff ocating!
10 Heater
11 Wall bracket for the top
12 Fixing bracket
13 Dowel Ø 6 mm (6x)
14 Screw 4x30 mm (6x)
15 Screw 4x8 mm (2x)
Original operating instructions
•
3. Proper use
The equipment is designed exclusively for use
as an additional heater in dry, closed rooms.
The equipment is allowed to be mounted only
on a wall. Never mount the equipment on a wall
which is not capable of bearing the load or which
is combustible, on angled surfaces, or on the
ceiling.
The equipment is to be used only for its prescribed purpose. Any other use is deemed to be a
case of misuse. The user / operator and not the
manufacturer will be liable for any damage or injuries of any kind caused as a result of this.
2.2 Items supplied (Fig. 2)
Please check that the article is complete as
specifi ed in the scope of delivery. If parts are
missing, please contact our service center or the
sales outlet where you made your purchase at
the latest within 5 working days after purchasing
the product and upon presentation of a valid bill
of purchase. Also, refer to the warranty table in
the service information at the end of the operating
instructions.
Open the packaging and take out the equip-
•
ment with care.
Remove the packaging material and any
•
packaging and/or transportation braces (if
available).
Check to see if all items are supplied.
•
Inspect the equipment and accessories for
•
transport damage.
If possible, please keep the packaging until
•
the end of the guarantee period.
Anl_EF_1800_SPK9.indb 21Anl_EF_1800_SPK9.indb 21 22.11.2018 06:58:5022.11.2018 06:58:50
Please note that our equipment has not been designed for use in commercial, trade or industrial
applications. Our warranty will be voided if the
machine is used in commercial, trade or industrial
businesses or for equivalent purposes.
4. Technical data
Rated voltage: ....................... 220-240 V ~ 50 Hz
Max. heat rating ..................................... 1800 W
Protection class: ................................................. I
Protection type: .......................................... IP X0
Equipment dimensions: .............. 88 x 56 x 15 cm
- 21 -
Page 22

GB
5. Before starting the equipment
Before you connect the equipment to the mains
supply make sure that the data on the rating plate
are identical to the mains data.
5.1 Wall-mounting
Caution!
In order to avoid breaking the glass, remove the
glass front panel from the equipment and only fi t it
back in place again at the end.
The minimum clearances must be observed. The
equipment is allowed to be used only when it is
completely assembled and in a vertical position.
(Fig. 3) Ensure that a minimum clearance of 20
cm to the sides, 100 cm to the ceiling, 60 cm to
the fl oor and 100 cm to the front of the housing
are maintained. Observe point 1 - Safety information.
Caution! Make sure that there are no electric
cables or other installations (for example water
pipes) near the drill holes. Ensure that the equipment is secured fi rmly and horizontally to the wall.
Use only suitable fastening material on a wall
capable of bearing the load. The supplied dowels
and screws are suitable for the following: Concrete, natural stone with a dense structure, solid
brick, solid limestone bricks, solid lightweight
concrete bricks and aerated concrete.
1. Fig. 4: Mark the positions of the four drill holes
for the top wall bracket (11) horizontally on
a wall capable of bearing the load. The drill
holes are arranged 150 mm apart.
2. Then drill four holes (Ø 6 mm) in the wall and
insert the dowels (Fig. 2/Item 13). Place the
holes in the top wall bracket (Fig. 4/Item 11)
over the drill holes and secure the wall bra-
cket using 4 screws 4x30 mm (Item 14). En-
sure that the hooks on the wall bracket point
upwards (Fig. 4).
3. Fig. 5: Fit the fi xing bracket (12) using two 4x8
mm screws (Fig. 2/Item 15) to the middle on
the underside of the heater housing.
4. Fig. 6: Hang the housing on the wall bracket.
Ensure that the hooks on the wall bracket
latch into the holes in the housing (A).
5. Fig. 5: Transfer the holes (B) in the fi xing bra-
cket (12) to the wall and remove the heater
housing again.
6. Drill two holes (Ø 6 mm) in the wall, insert the
dowels (Fig. 2/Item 13) and hang the housing
on the top wall bracket again (Fig. 6). Ensure that the hooks latch into the holes in the
housing (A).
7. Fig. 5: Secure the fi xing bracket using two
4x30 mm screws (Fig. 2/Item 14) to the wall.
8. Fig. 7: Arrange another person to help you
and hang the glass front panel (1) in the slots
(C) provided on the housing by the hooks provided on the side of the glass front panel.
5.2 Remote control
Note: All modes and functions can be set using
the buttons on the appliance as well as with the
remote control. The remote control requires a CR
2025 button cell (included in the remote control).
Pull the contact protection (small plastic plates)
out of the housing before use.
Important! It may take a few seconds for the
equipment to react when you press the buttons
on the remote control. Do not press the buttons
on the remote control repeatedly within 2 seconds.
Never use a battery type other than the spe-
•
cified one.
If the remote control is not used for a lengthy
•
period of time, remove the battery to prevent
it leaking.
Point the remote control towards the heater.
•
The range is max. 5 meters.
Direct sunlight and objects can considerably
•
reduce the range of the remote control.
Handle the remote control with care. Do not
•
drop it and keep it away from heat and moisture.
Inserting the battery (Fig. 8):
1. Open the battery compartment cover by
pressing the lock (F) towards the middle and
pulling the battery compartment out at the
same time.
2. Make sure you fi t the battery with the + and
– terminals correctly positioned as shown on
the housing.
3. Press the battery compartment cover into the
remote control.
As the end user you are legally required to return
spent batteries. You can hand them in at public
collection points provided by your council or sales
outlets where batteries of this type are sold. Observe the instructions in section 11 as well.
- 22 -
Anl_EF_1800_SPK9.indb 22Anl_EF_1800_SPK9.indb 22 22.11.2018 06:58:5022.11.2018 06:58:50
Page 23

GB
6. Operation
Note: Every press of a button is confi rmed by a
short audio signal.
Read the safety regulations in section 1.
When the equipment is used for the fi rst time or
after a long period of rest, it may emit an odor for
a short time. This is not a fault.
6.1 Switching the mains voltage on/off
(Fig. 1)
The main switch (5) disconnects the equipment
completely from the mains power supply. The fi rst
step when you want to use the equipment is to
turn on (“I”) the main switch; the last step when
you no longer need the equipment is to turn off
(“0”) the main switch.
6.2 Switching the equipment on and off
(Fig. 9)
Press the “Power” button (D). The equipment
comes on and the fl ame eff ect and display will be
activated. To switch off , press the “Power” button
(D) again. The fl ame eff ect and display will go out.
6.3 Switching the dimmer function on and off
(Fig. 9)
Press the “Flame” button (E). The brightness of
the fl ame eff ect, for which there are 5 settings,
can be adjusted by pressing the button several
times.
6.4 Temperature indicator in °C/°F (Fig. 9)
Note: Only selectable on the equipment.
The temperature can be displayed in either °C
or °F.
To switch from one to the other, press the
“DOWN” button for 5 seconds.
6.5 Setting the desired temperature (Fig. 9)
Note: The desired temperature to be set
corresponds to the equipment temperature
measured on the integrated temperature
sensor and shown on the display. This may
vary slightly from the actual room temperature.
If the temperature exceeds the set desired
temperature, the heating function switches off .
If the temperature falls below the set desired
temperature, the heating function switches on
again.
6.5.1 Adjusting the setting on the equipment
(Fig. 9)
Press the “UP” button to start the temperature
setting function (15°C – 35°C or 59°F – 95°F).
Then press the “UP” or “DOWN” buttons to adjust
the temperature setting. The temperature will be
increased or decreased by 1°C each time.
6.5.2 Adjusting the setting using the remote
control (Fig. 9)
Press the “F” button to start the temperature
setting function (15°C – 35°C or 59°F – 95°F). The
temperature will be increased by 1°C with each
press of the button and starts again at 15°C when
35°C has been reached.
6.6 Switching the heating function on and off
(Fig. 9)
With the heater switched on, press the “Heater”
button (H) until the “Heat 1” LED for 900 W heat
output appears. If you press the “Heater” button
(H) again, the “Heat 2” LED for 1800 W heat
output appears. Pressing the “Heater” button (H)
again switches the heat output off .
6.7 Programming the automatic timer for
switching on and off (Fig. 9)
Note:
Switch on the appliance as previously
•
described.
One switch ON time and one switch OFF time
•
can be set for each day. Think in advance
about when you want the equipment to switch
on and off and make a note of those times.
Programming the switch ON time: A small
•
LED next to the “10 minutes display” (e.g.
10:5.1) appears.
Programming the switch OFF time: A small
•
LED next to the “Minutes display” (e.g. 10:51.)
appears.
The display flashes for 5 seconds for all
•
settings. Settings can be made during this
time. If no button is pressed for 5 seconds the
current setting will be saved automatically.
6.7.1 Programming days on the equipment or
using the remote control (Fig. 9)
Switch ON time
Press the “TIMER” or “7” button once. The
•
“Mon” LED and the hours display will flash.
Press the “UP” (K) or “DOWN” (L) buttons and
•
set the switch ON time for Monday in hours.
Press the “TIMER” or “24H” button and use
•
the “UP” (K) and “DOWN” (L) buttons to set
- 23 -
Anl_EF_1800_SPK9.indb 23Anl_EF_1800_SPK9.indb 23 22.11.2018 06:58:5022.11.2018 06:58:50
Page 24

GB
the switch ON time for Monday in minutes.
Switch OFF time
Press the “TIMER” or “7” button again within
•
5 seconds. The “Mon” LED and the hours
display will flash.
Press “UP” (K) or “DOWN” (L) to set the
•
switch OFF time for Monday in hours.
Press the “TIMER” or “24H” button and use
•
“UP” (K) and “DOWN” (L) to set the switch
OFF time for Monday in minutes.
Press the “TIMER” or “7” button again to program
Tuesday. Repeat these programming steps for all
the other days of the week.
To skip a day of the week (e.g. Tuesday) when you
are programming, press the “TIMER” or “7” button
as often as necessary until the next day you want
to program (e.g. Wednesday) appears.
6.7.2 Programming weeks using the remote
control (Fig. 9)
Note: In addition to programming days as
described above, you can also program the
switch ON and OFF times on a weekly basis as
well using the remote control.
Programming the hour switch ON time
(Fig. 9)
Press the “7” button. The “Mon” LED and the
•
hours display will flash.
Press the “UP” (K) or “DOWN” (L) buttons to
•
set the switch ON time for Monday in hours.
Press the “7” button again. Program Tuesday.
•
Repeat these programming steps for the
•
other days of the week.
Once all the days of the week have been
•
programmed, the current setting will be saved
automatically after 5 seconds (do not press
any of the buttons).
Programming the minutes switch ON time
(Fig. 9)
Press the “7” button and then “24H”. The
•
“Mon” LED and the minutes display will flash.
Press the “UP” (K) or “DOWN” (L) buttons to
•
set the switch ON time for Monday in minutes.
Press the “7” button again and then “24H”.
•
Program Tuesday.
Repeat these programming steps for the
•
other days of the week.
Once all the days of the week have been
•
programmed, the current setting will be saved
automatically after 5 seconds (do not press
any of the buttons).
Programming the hour switch OFF time (Fig.
9)
Press the “7” button and then press the “24H”
•
button twice. The “Mon” LED and the hours
display will flash.
Press the “UP” (K) or “DOWN” (L) buttons to
•
set the switch OFF time for Monday in hours.
Press the “7” button again and then press
•
“24H” twice. Program Tuesday.
Repeat these programming steps for the
•
other days of the week.
Once all the days of the week have been
•
programmed, the current setting will be saved
automatically after 5 seconds (do not press
any of the buttons).
Programming the minutes switch OFF time
(Fig. 9)
Press the “7” button and then press the “24H”
•
button three times. The “Mon” LED and the
minutes display will flash.
Press the “UP” (K) or “DOWN” (L) buttons
•
to set the switch OFF time for Monday in
minutes.
Press the “7” button again and then press
•
“24H” three times. Program Tuesday.
Repeat these programming steps for the
•
other days of the week.
Once all the days of the week have been
•
programmed, the current setting will be saved
automatically after 5 seconds (do not press
any of the buttons).
6.8 Setting the current time (Fig. 9)
Note: This can only be set on the equipment.
If no button is pressed for 5 seconds the current
setting will be saved automatically.
Switch off the heater with the “POWER”
•
button (D).
Press the “TIMER” button for 3 seconds. The
•
hours display will flash for 5 seconds.
Use the “UP” and “DOWN” buttons to set the
•
current hour.
Press the “TIMER” button; the minutes display
•
will flash for 5 seconds.
Use the “UP” and “DOWN” buttons to set the
•
current minutes.
Press the “TIMER” as often as necessary
•
until the LED for the current day of the week
appears. The hours and minutes displays
flash alternately during this time.
- 24 -
Anl_EF_1800_SPK9.indb 24Anl_EF_1800_SPK9.indb 24 22.11.2018 06:58:5022.11.2018 06:58:50
Page 25

GB
6.9 Activating the automatic timer (Fig. 9)
Switch off the equipment with the “POWER”
button (D). The equipment will switch on at the
next switching point with the last heating function,
desired temperature and fl ame eff ect to have
been set.
6.10 “Windows open” function
If the temperature drops by 5°C within 10 minutes
while the heating function is switched on, a signal
will sound for several seconds and the heating
function will switch off .
6.11 Overheating protection
In case of excessive heating, the heat output or
the equipment will shut down automatically. In
this case switch off the equipment completely
and unplug it from the mains power. Allow the
appliance to cool for about 15 minutes. After
eliminating the cause (e.g. a covered air grille),
the equipment can be switched on again as
described above. If the overheating guard triggers
repeatedly or the equipment cannot be switched
on, please contact your customer services
workshop.
7. Replacing the power cable
Danger!
If the power cable for this equipment is damaged,
it must be replaced by the manufacturer or its
after-sales service or similarly trained personnel
to avoid danger.
8. Cleaning, maintenance and
ordering of spare parts
Danger!
Always pull out the mains power plug before
starting any cleaning work.
The equipment must have cooled down.
8.1 Cleaning
Keep all safety devices, air vents and the
•
motor housing free of dirt and dust as far as
possible.
Remove dust with a vacuum cleaner.
•
Clean the equipment regularly with a damp
•
cloth. Do not use cleaning agents or solvents;
these may be aggressive to the plastic parts
in the equipment. Ensure that no water can
get into the interior of the equipment. The
ingress of water into an electric power tool
increases the risk of an electric shock.
The glass front can be cleaned with a
•
conventional glass cleaning agent.
8.2 Maintenance
There are no parts inside the equipment which
require additional maintenance.
Heating elements or the LEDs used for the
fl ame eff ect may only be replaced by a qualifi ed
electrician or by the customer service authorized
by Einhell in compliance with the relevant
regulations.
8.3 Ordering replacement parts:
Please quote the following data when ordering
replacement parts:
Type of machine
•
Article number of the machine
•
Identification number of the machine
•
Replacement part number of the part required
•
For our latest prices and information please go to
www.isc-gmbh.info
9. Disposal and recycling
The equipment is supplied in packaging to
prevent it from being damaged in transit. The
raw materials in this packaging can be reused or
recycled. The equipment and its accessories are
made of various types of material, such as metal
and plastic. Never place defective equipment in
your household refuse. The equipment should
be taken to a suitable collection center for proper
disposal. If you do not know the whereabouts of
such a collection point, you should ask in your
local council offi ces.
10. Storage
Store the equipment and accessories in a dark
and dry place at above freezing temperature. The
ideal storage temperature is between 5 and 30
°C. Store the electric tool in its original packaging.
- 25 -
Anl_EF_1800_SPK9.indb 25Anl_EF_1800_SPK9.indb 25 22.11.2018 06:58:5022.11.2018 06:58:50
Page 26

11. Disposing of batteries
Batteries contain materials that are harmful to
the environment. Never place batteries in your
household refuse, in fi re or in water. Batteries
should be collected, recycled or disposed of
by environment-friendly means. Send your old
batteries to iSC GmbH, Eschenstrasse 6 in
D-94405 Landau. You can then be sure that the
equipment will be correctly disposed of by the
manufacturer.
GB
- 26 -
Anl_EF_1800_SPK9.indb 26Anl_EF_1800_SPK9.indb 26 22.11.2018 06:58:5022.11.2018 06:58:50
Page 27

GB
12. Troubleshooting
If the equipment is operated properly you should experience no problems with malfunctions or faults.
In the event of any malfunctions or faults, please check the following before you contact your customer
services.
Problem Possible cause Remedy
The equipment
does not heat
The power plug is not connected
The main switch is not turned on
Connect the power plug
Turn on the main switch
Remote control
does not work
Equipment in standby
Heat output switched off
The thermostat is set too low
“Timer” has switched off the
equipment
Battery discharged
Remote control beyond range
Direct sunlight on the heater
Press the “Power” button
Adjust the heat output
Increase the temperature
Change the selected time
Replace the battery
Reduce the distance to the heater
Reduce the sunlight (provide shading)
- 27 -
Anl_EF_1800_SPK9.indb 27Anl_EF_1800_SPK9.indb 27 22.11.2018 06:58:5022.11.2018 06:58:50
Page 28

GB
13. Information requirements for electric local space heaters
Model identifier(s): EF 1800
Item Symbol Value Unit Item Unit
Heat output
Nominal heat output
P
1,8 kW manual heat charge control, with integrated thermostat -
nom
Type of heat input, for electric storage local space heaters
only (select one)
Minimum heat
output (indicative)
Maximum continuous heat output
Auxiliary electricity
consumption
At nominal heat
output
At minimum heat
output
In standby mode
P
P
el
el
min
max,c
max
min
el
sB
0,9 kW
1,8 kW
1,681 kW
0,870 kW
0,000 kW
manual heat charge control with room and/or
outdoor temperature feedback
electronic heat charge control with room and/or
outdoor temperature feedback
fan assisted heat output -
Type of heat output/room temperature control (select
one)
single stage heat output and no room tempera- ture
control
Two or more manual stages, no room tempera- ture
control
with mechanic thermostat room temperature
control
with electronic room temperature control no
electronic room temperature control plus day
timer
electronic room temperature control plus week
timer
Other control options (multiple selections possible)
room temperature control, with presence detection
room temperature control, with open window
detection
with distance control option yes
with adaptive start control no
with working time limitation no
with black bulb sensor no
Contact details ISC GmbH, Eschenstr. 6, D-94405 Landau/Isar
-
-
no
no
no
no
yes
no
yes
- 28 -
Anl_EF_1800_SPK9.indb 28Anl_EF_1800_SPK9.indb 28 22.11.2018 06:58:5022.11.2018 06:58:50
Page 29

GB
For EU countries only
Never place any electric power tools in your household refuse.
To comply with European Directive 2012/19/EC concerning old electric and electronic equipment and
its implementation in national laws, old electric power tools have to be separated from other waste and
disposed of in an environment-friendly fashion, e.g. by taking to a recycling depot.
Recycling alternative to the return request:
As an alternative to returning the equipment to the manufacturer, the owner of the electrical equipment
must make sure that the equipment is properly disposed of if he no longer wants to keep the equipment.
The old equipment can be returned to a suitable collection point that will dispose of the equipment in
accordance with the national recycling and waste disposal regulations. This does not apply to any accessories or aids without electrical components supplied with the old equipment.
The reprinting or reproduction by any other means, in whole or in part, of documentation and papers
accompanying products is permitted only with the express consent of the iSC GmbH.
Subject to technical changes
- 29 -
Anl_EF_1800_SPK9.indb 29Anl_EF_1800_SPK9.indb 29 22.11.2018 06:58:5122.11.2018 06:58:51
Page 30

GB
Service information
We have competent service partners in all countries named on the guarantee certifi cate whose contact
details can also be found on the guarantee certifi cate. These partners will help you with all service re-
quests such as repairs, spare and wearing part orders or the purchase of consumables.
Please note that the following parts of this product are subject to normal or natural wear and that the
following parts are therefore also required for use as consumables.
Category Example
Wear parts* Batteries
Consumables*
Missing parts
* Not necessarily included in the scope of delivery!
In the eff ect of defects or faults, please register the problem on the internet at www.isc-gmbh.info. Ple-
ase ensure that you provide a precise description of the problem and answer the following questions in
all cases:
Did the equipment work at all or was it defective from the beginning?
•
Did you notice anything (symptom or defect) prior to the failure?
•
What malfunction does the equipment have in your opinion (main symptom)?
•
Describe this malfunction.
- 30 -
Anl_EF_1800_SPK9.indb 30Anl_EF_1800_SPK9.indb 30 22.11.2018 06:58:5122.11.2018 06:58:51
Page 31

GB
Warranty cer tifi cate
Dear Customer,
All of our products undergo strict quality checks to ensure that they reach you in perfect condition. In the
unlikely event that your device develops a fault, please contact our service department at the address
shown on this guarantee card. You can also contact us by telephone using the service number shown.
Please note the following terms under which guarantee claims can be made:
1. These guarantee terms apply to consumers only, i.e. natural persons intending to use this product
neither for their commercial activities nor for any other self-employed activities. These warranty
terms regulate additional warranty services, which the manufacturer mentioned below promises to
buyers of its new products in addition to their statutory rights of guarantee. Your statutory guarantee
claims are not aff ected by this guarantee. Our guarantee is free of charge to you.
2. The warranty services cover only defects due to material or manufacturing faults on a product which
you have bought from the manufacturer mentioned below and are limited to either the rectifi cation of
said defects on the product or the replacement of the product, whichever we prefer.
Please note that our devices are not designed for use in commercial, trade or professional applications. A guarantee contract will not be created if the device has been used by commercial, trade or
industrial business or has been exposed to similar stresses during the guarantee period.
3. The following are not covered by our guarantee:
- Damage to the device caused by a failure to follow the assembly instructions or due to incorrect
installation, a failure to follow the operating instructions (for example connecting it to an incorrect
mains voltage or current type) or a failure to follow the maintenance and safety instructions or by exposing the device to abnormal environmental conditions or by lack of care and maintenance.
- Damage to the device caused by abuse or incorrect use (for example overloading the device or the
use or unapproved tools or accessories), ingress of foreign bodies into the device (such as sand,
stones or dust, transport damage), the use of force or damage caused by external forces (for example by dropping it).
- Damage to the device or parts of the device caused by normal or natural wear or tear or by normal
use of the device.
4. The guarantee is valid for a period of 24 months starting from the purchase date of the device. Guarantee claims should be submitted before the end of the guarantee period within two weeks of the
defect being noticed. No guarantee claims will be accepted after the end of the guarantee period.
The original guarantee period remains applicable to the device even if repairs are carried out or
parts are replaced. In such cases, the work performed or parts fi tted will not result in an extension
of the guarantee period, and no new guarantee will become active for the work performed or parts
fi tted. This also applies if an on-site service is used.
5. To make a claim under the guarantee, please register the defective device at: www.isc-gmbh.info.
Please keep your bill of purchase or other proof of purchase for the new device. Devices that are
returned without proof of purchase or without a rating plate shall not be covered by the guarantee,
because appropriate identifi cation will not be possible. If the defect is covered by our guarantee,
then the item in question will either be repaired immediately and returned to you or we will send you
a new replacement.
Of course, we are also happy off er a chargeable repair service for any defects which are not covered by
the scope of this guarantee or for units which are no longer covered. To take advantage of this service,
please send the device to our service address.
Also refer to the restrictions of this warranty concerning wear parts, consumables and missing parts as
set out in the service information in these operating instructions.
- 31 -
Anl_EF_1800_SPK9.indb 31Anl_EF_1800_SPK9.indb 31 22.11.2018 06:58:5122.11.2018 06:58:51
Page 32

F
Danger! - Lisez ce mode d’emploi pour diminuer le risque de blessures
- 32 -
Anl_EF_1800_SPK9.indb 32Anl_EF_1800_SPK9.indb 32 22.11.2018 06:58:5122.11.2018 06:58:51
Page 33

F
Danger !
Lors de l’utilisation d’appareils, il faut respecter
certaines mesures de sécurité afi n d’éviter des
blessures et dommages. Veuillez donc lire attentivement ce mode d’emploi/ces consignes de
sécurité. Veillez à le conserver en bon état pour
pouvoir accéder aux informations à tout moment.
Si l’appareil doit être remis à d’autres personnes,
veillez à leur remettre aussi ce mode d’emploi/
ces consignes de sécurité. Nous déclinons toute
responsabilité pour les accidents et dommages
dus au non-respect de ce mode d’emploi et des
consignes de sécurité.
1. Consignes de sécurité
Vous trouverez les consignes de sécurité correspondantes dans le cahier en annexe.
Danger !
Veuillez lire toutes les consignes de sécurité
et instructions. Tout non-respect des consignes
de sécurité et instructions peut provoquer une
décharge électrique, un incendie et/ou des blessures graves.
Conservez toutes les consignes de sécurité
et instructions pour une consultation ultérieure.
Contrôlez si l’appareil a bien été livré dans un
•
état irréprochable. En cas d’endommagement
quelconque, ne branchez pas l’appareil sur
réseau.
Posez le câble réseau de manière qu’il soit
•
impossible de trébucher dessus.
Ne passez pas le câble réseau au-dessus
•
des pièces chaudes de l’appareil pendant
son fonctionnement.
Ne débranchez jamais la fiche de contact de
•
la prise en tirant le câble réseau ! Ne portez
jamais l’appareil par le câble réseau et ne le
déplacez pas en le tirant par le câble.
N’enroulez jamais le câble réseau autour de
•
l’appareil.
Ne coincez jamais le câble réseau, ne le tirez
•
pas au-dessus d’arêtes acérées, de plaques
de four brûlantes ni de flammes nues.
Utilisez l’appareil uniquement dans des pi-
•
èces fermées et sèches.
Ne pas utiliser le chauffage à proximité d’une
•
baignoire, d’une douche ou d’une piscine.
Ne pas utiliser l’appareil de chauffage dans la
•
salle de bain.
Ne jamais plonger l’appareil dans l’eau. Dan-
•
ger de mort !
Ne jamais commander l’appareil avec des
•
mains mouillées.
Ne jamais ouvrir l’appareil et toucher les
•
pièces conductrices de tension. Danger de
mort !
Placez l’appareil de sorte que la fiche de con-
•
tact soit toujours accessible.
Si l’appareil n’est pas utilisé pendant une
•
longue durée, débranchez la fiche de contact !
Ne pas placer l’appareil directement sous
•
une prise.
Le boitier peut chauffer fortement après une
•
utilisation prolongée. Positionnez l’appareil
de telle manière que personne ne puisse le
toucher accidentellement.
L’appareil ne doit pas être mis en service
•
dans des pièces dans lesquelles des substances dangereuses (par ex. des solvants,
etc.) ou des gaz sont utilisés ou entreposés.
Éloignez les matières ou les gaz facilement
•
inflammables de l’appareil.
Ne le mettez pas en service dans des sal-
•
les à risque d’incendie (par ex. où il y a des
copeaux de bois).
Utiliser l’appareil uniquement avec le câble
•
réseau complètement déroulé.
Ne pas introduire de corps étrangers
•
dans les ouvertures de l’appareil. Risque
d’électrocution et d’endommagement de
l’appareil.
Les enfants et personnes sous l’effet de mé-
•
dicaments ou de l’alcool doivent être maintenues à l’écart de l’appareil.
Avertissement : Afin d’éviter une surchauffe
•
de l’appareil de chauffage, ne le couvrez pas.
Risque d’incendie ! Attention à l’icône sur
l’appareil. (fig. 10).
Les travaux de maintenance et les répara-
•
tions doivent uniquement être effectués par
un personnel spécialisé autorisé.
Le câble réseau doit être régulièrement con-
•
trôlé pour détecter d’éventuels défauts ou endommagements. Un câble réseau endommagé doit uniquement être remplacé par un(e)
spécialiste électricien(ne) ou par l’entreprise
ISC GmbH en prenant en considération les
prescriptions applicables.
Pour garantir la sécurité électrique, installez
•
un disjoncteur à courant de défaut (RCD).
Brancher l’appareil uniquement sur une prise
•
de courant avec mise à la terre.
Les éléments de commande ne doivent pas
•
pouvoir être touchés par une personne se
- 33 -
Anl_EF_1800_SPK9.indb 33Anl_EF_1800_SPK9.indb 33 22.11.2018 06:58:5122.11.2018 06:58:51
Page 34

F
trouvant sous la douche, dans un contenant
rempli d’eau ou une baignoire.
Les enfants en dessous de 3 ans doivent être
•
tenus à l’écart sauf s’ils sont surveillés en
permanence.
Les enfants entre 3 ans et 8 ans ont le droit
•
d’éteindre et d’allumer l’appareil lorsqu’ils
sont surveillés ou lorsqu’ils ont été instruits en
ce qui concerne l’utilisation sûre de l’appareil
et qu’ils ont compris les risques qui en résultent, et à condition que l’appareil soit placé ou
installé dans sa situation d’utilisation normale.
Les enfants entre 3 et 8 ans ne sont pas autorisés à brancher la fiche dans la prise de
courant, à régler l’appareil, à le nettoyer et/
ou à exécuter la maintenance que l’utilisateur
doit habituellement faire.
Cet appareil peut être utilisé par les enfants
•
à partir de 8 ans et les personnes avec des
capacités physiques, sensorielles ou intellectuelles diminuées ou possédant un manque
d’expérience et/ou de connaissances à condition qu’elles soient surveillées ou aient reçu
les instructions relatives à l’utilisation sûre de
l’appareil et qu’elles comprennent les risques
résultant de cette utilisation. Les enfants
n’ont pas le droit de jouer avec l’appareil. Les
enfants ne doivent pas effectuer le nettoyage
et la maintenance de l’utilisateur sans surveillance.
Attention — quelques pièces du produit
•
peuvent être brûlantes et causer des
brûlures. Soyez particulièrement prudent
lorsque des enfants et des personnes fragiles sont présents.
2.2 Volume de livraison (fi gure 2)
Veuillez contrôler si l‘article est complet à l‘aide
de la description du volume de livraison. S‘il
manque des pièces, adressez-vous dans un délai
de 5 jours maximum après votre achat à notre
service après-vente ou au magasin où vous avez
acheté l‘appareil muni d‘une preuve d‘achat valable. Veuillez consulter pour cela le tableau des
garanties dans les informations service aprèsvente à la fi n du mode d‘emploi.
Ouvrez l’emballage et prenez l’appareil en le
•
sortant avec précaution de l’emballage.
Retirez le matériel d’emballage tout comme
•
les sécurités d’emballage et de transport (s’il
y en a).
Vérifiez si la livraison est bien complète.
•
Contrôlez si l’appareil et ses accessoires ne
•
sont pas endommagés par le transport.
Conservez l’emballage autant que possible
•
jusqu’à la fin de la période de garantie.
Danger !
L’appareil et le matériel d’emballage ne sont
pas des jouets ! Il est interdit de laisser des
enfants jouer avec des sacs et des fi lms en
plastique et avec des pièces de petite taille.
Ils risquent de les avaler et de s’étouff er !
10 Chauff age
11 Fixation murale supérieure
12 Équerre de fi xation
13 Cheville Ø 6 mm (6 pces)
14 Vis 4x30 mm (6 pces)
15 Vis 4x8 mm (2 pces)
Mode d‘emploi d‘origine
•
2. Description de l’appareil et
volume de livraison
2.1. Description de l‘appareil (fi gure 1)
1 Vitre frontale
2 Foyer / Élément de décoration
3 Sortie d’air et élément de chauff age
4 Éléments de commande
5 Interrupteur principal
6 Télécommande (avec pile CR2025)
Anl_EF_1800_SPK9.indb 34Anl_EF_1800_SPK9.indb 34 22.11.2018 06:58:5122.11.2018 06:58:51
3. Utilisation conforme à
l’aff ectation
L’appareil est uniquement conçu pour servir de
chauff age supplémentaire dans des endroits secs
et fermés. L‘appareil doit être uniquement monté
au mur. Tout montage sur un mur non portant ou
infl ammable, incliné ou au plafond est interdit.
La machine doit exclusivement être employée
conformément à son aff ectation. Chaque uti-
lisation allant au-delà de cette aff ectation est
considérée comme non conforme. Pour les
dommages en résultant ou les blessures de tout
genre, le producteur décline toute responsabilité
et l’opérateur/l’exploitant est responsable.
- 34 -
Page 35

F
Veillez au fait que nos appareils, conformément
à leur aff ectation, n’ont pas été construits, pour
être utilisés dans un environnement professionnel, industriel ou artisanal. Nous déclinons toute
responsabilité si l’appareil est utilisé professionnellement, artisanalement ou dans des sociétés
industrielles, tout comme pour toute activité
équivalente.
4. Données techniques
Tension nominale : ................ 220-240 V ~ 50 Hz
Puissance de chauff age max. : .............. 1800 W
Catégorie de protection : .................................... I
Type de protection : .................................... IP X0
Dimensions de l’appareil : .......... 88 x 56 x 15 cm
5. Avant la mise en service
Assurez-vous, avant de connecter la machine,
que les données se trouvant sur la plaque de
signalisation correspondent bien aux données du
réseau.
5.1 Montage mural
Attention !
Pour éviter tout bris de verre, retirez la vitre frontale de l’appareil et remontez-la seulement à la fi n.
Il faut respecter les espaces minimums. L‘appareil
peut être exploité uniquement en position verticale et complètement monté.
(Fig. 3) Entre le bâti et l‘entourage du chauff age, il
faut respecter des distances minimales de 20 cm
sur les côtés, 100 cm jusqu‘au plafond, 60 cm par
rapport au sol et 100 cm à l‘avant du chauff age.
Respectez le point 1 - Instructions de sécurité.
Attention ! Assurez-vous qu‘aucun câble ni
aucune installation ne se trouve dans la zone
des trous de perçage (p. ex. des conduits d‘eau).
Veillez à ce que l‘appareil soit fi xé au mur de ma-
nière solide et verticale. Utilisez uniquement du
matériel de fi xation adapté sur un mur solide. Les
chevilles et vis jointes conviennent : au béton, à la
pierre naturelle à grainure fi ne, à la brique pleine,
à la brique pleine silico-calcaire, à la brique pleine
en béton léger et au béton cellulaire (béton-gaz).
1. Fig. 4 : Marquez la position horizontale des
quatre trous de perçage de la fi xation murale
supérieure (11) sur un mur solide. Les quatre
trous de perçage se situent à 150 mm les uns
des autres.
2. Percez ensuite quatre trous (Ø 6 mm) dans
le mur et insérez les chevilles (fi g. 2/pos.
13). Placez les trous de la fi xation murale
supérieure (fi g. 4/pos. 11) sur les trous de
perçage et fi xez la fi xation murale à l’aide de
4 vis 4x30 mm (pos. 14). Veillez à ce que les
crochets de la fi xation murale soient orientés
vers le haut (fi g. 4).
3. Fig. 5 : Montez l’équerre de fi xation (12) à
l’aide de 2 vis 4x8 mm (fi g. 2/pos.15) au cen-
tre de la partie inférieure du boitier du chauffage.
4. Fig. 6 : Accrochez le boitier à la fi xation mu-
rale. Accrochez les crochets de la fi xation
murale dans les trous du boitier (A).
5. Fig. 5 : Recopiez les trous (B) de la fi xation
murale (12) sur le mur et retirez le boitier du
chauff age.
6. Percez deux trous (Ø 6 mm) dans le mur,
insérez les chevilles (fi g. 2/pos. 13) et ac-
crochez le boitier de nouveau sur la fi xation
murale supérieure (fi g. 6). Veillez à bien ac-
crocher les crochets dans les trous du boitier
(A).
7. Fig. 5 : Fixez l’équerre de fi xation au mur à
l’aide de 2 vis 4x30 mm (fi g. 2/pos. 14).
8. Fig. 7 : Demandez l’aide d’une deuxième
personne et placez la vitre frontale (1) à l’aide
des crochets situés sur ses côtés dans les
trous longitudinaux (C) prévus à cet eff et sur
le carter.
5.2 Télécommande
Remarque : toutes les fonctions peuvent être activées aussi bien avec les boutons-poussoirs de
l’appareil qu’avec la télécommande. Utilisez une
pile de type CR 2025 (dans la télécommande).
Retirez la protection du contact (petite plaque en
plastique) du carter avant utilisation.
Remarque ! Après avoir actionné la touche de la
télécommande, l’appareil peut mettre quelques
secondes à réagir. N’appuyez pas plusieurs fois
sur la touche de la télécommande dans un laps
de temps de 2 secondes.
- 35 -
Anl_EF_1800_SPK9.indb 35Anl_EF_1800_SPK9.indb 35 22.11.2018 06:58:5122.11.2018 06:58:51
Page 36

F
N’utilisez jamais un autre type de pile que
•
celui indiqué.
Si la télécommande n’est pas utilisée pen-
•
dant une durée prolongée, enlevez la pile afin
d’éviter qu’elle ne coule.
Orientez la télécommande vers le chauffage.
•
La portée est de max. 5 mètres.
Les rayonnements solaires directs et les ob-
•
jets peuvent faire fortement obstacle au rayon
d’action de la télécommande.
Manipulez la télécommande avec précaution.
•
Ne la laissez pas tomber, évitez la chaleur et
l’humidité.
Remplacez les piles (fi g. 8) :
1. Ouvrez le couvercle du compartiment à piles
en poussant le verrouillage (F) au centre et
en sortant en même temps le compartiment.
2. Veillez lors de l’insertion de la pile à ce que sa
polarité corresponde aux indications fi gurant
sur le boitier.
3. Enfoncez le couvercle du compartiment à
piles dans la télécommande.
En tant que consommateur fi nal, la loi vous oblige
à rapporter les piles usagées. Vous pouvez les
rapporter auprès de centres de collecte publics
de votre commune ou partout où elles sont vendues. Consultez également le chapitre 11.
6. Commande
Remarque : Toutes les actions sont confi rmées
par un bref signal sonore.
Veuillez respecter les consignes de sécurité du
point 1.
Lors de la première mise en service ou après un
arrêt prolongé de l’appareil, il est possible qu’une
odeur se dégage brièvement. Ceci n’est pas une
défaillance.
6.1 Mise en/hors circuit de la tension réseau
(fi g. 1)
L’interrupteur principal (5) permet de couper
entièrement l’appareil du réseau électrique.
Connectez en premier l’interrupteur principal « I »
et déconnectez-le en dernier « 0 » lorsque vous
n’avez plus besoin de l’appareil.
6.2 Mise en/hors circuit de l’appareil (fi g. 9)
Appuyez sur le bouton-poussoir « Power » (D).
L’appareil se met en circuit, l’eff et fl amme et
l’écran sont activés. Pour la mise hors circuit, appuyez à nouveau sur le bouton-poussoir
« Power » (D). L’eff et fl amme et l’écran
s’éteignent.
6.3 Mise en/hors circuit de la fonction
variateur (fi g. 9)
Appuyez sur le bouton-poussoir « Flame » (E).
L’intensité lumineuse des fl ammes se règle sur 5
paliers en appuyant à plusieurs reprises.
6.4 Affi chage de la température °C/°F (fi g. 9)
Remarque : Commutable uniquement sur
l’appareil.
Il est possible d’affi cher la température en °C ou
°F.
Pour basculer de l’un à l’autre, appuyez sur la
touche « DOWN » pendant 5 secondes.
6.5 Réglage de la température de consigne
(fi g. 9)
Remarques : La température de consigne à
régler correspond à la température de l’appareil,
mesurée par la sonde de température intégrée et
affi chée sur l’écran. Celle-ci peut diff érer quelque
peu de la température ambiante eff ective. Si la
température de consigne réglée est dépassée, la
fonction chauff age s’éteint. Si la température de
consigne réglée est sous-dépassée, la fonction
chauff age se rallume.
6.5.1 Réglage sur l’appareil (fi g. 9)
Appuyez sur la touche « UP » pour démarrer le
réglage de la température (15°C – 35°C ou 59°F –
95°F). Appuyez ensuite sur les touches
« UP » ou « DOWN » pour régler la température.
La température augmente ou diminue respectivement de 1°C.
6.5.2 Réglage par télécommande (fi g. 9)
Appuyez sur la touche « F » (15°C – 35°C ou
59°F – 95°F) pour régler la température. La température augmente de 1°C à chaque pression de
touche et redémarre à 15°C après avoir atteint
35°C.
6.6 Mise en/hors circuit de la fonction
chauff age (fi g. 9)
Lorsque le chauff age est allumé, actionnez la
touche « Heater » (H) jusqu’à ce que la LED
« Heat 1 » pour puissance de chauff age 900
W s’allume. En actionnant une nouvelle fois la
- 36 -
Anl_EF_1800_SPK9.indb 36Anl_EF_1800_SPK9.indb 36 22.11.2018 06:58:5122.11.2018 06:58:51
Page 37

F
touche « Heater » (H), la LED « Heat 2 » pour
puissance de chauff age 1800 W s’allume. En
actionnant à nouveau la touche « Heater » (H), la
puissance de chauff age s’éteint.
6.7 Programmation du système d’heure
automatique - temps de mise en/hors
circuit (fi g. 9)
Remarques :
Allumez l’appareil comme décrit
•
précédemment.
Il est possible de régler un temps de mise en
•
circuit et un temps de mise hors circuit pour
chaque jour. Réfléchissez auparavant aux
heures auxquelles l’appareil doit s’allumer et
s’éteindre et notez ces heures.
Programmer un temps de mise en circuit :
•
Une petite LED à côté de « 10 minutes – affichage » (par ex. 10:5.1) s’allume.
Programmer un temps de mise hors circuit :
•
Une petite LED à côté de « minutes – affichage » (par ex. 10:51.) s’allume.
Tous les réglages clignotent pendant 5
•
secondes. Il est possible d’effectuer des
réglages pendant ce laps de temps. Si
aucune touche n’est actionnée pendant
5 secondes, le réglage actuel est
automatiquement enregistré.
6.7.1 Programmation journalière sur
l’appareil ou par télécommande (fi g. 9)
Temps de mise en circuit
Appuyez une fois sur la touche « TIMER »
•
ou « 7 ». La LED « Mon » et l’affichage de
l’heure clignotent.
Appuyez sur les touches « UP (haut) » (K)
•
ou « DOWN (bas) » (L) et réglez le temps de
mise en circuit en heures pour lundi.
Appuyez sur la touche « TIMER » ou « 24H »
•
et réglez avec les touches « UP » (K) et
« DOWN » (L) le temps de mise en circuit en
minutes pour lundi.
Temps de mise hors circuit
Appuyez une nouvelle fois sur la touche
•
« TIMER » ou « 7 » en l’espace de 5 secon-
des. La LED « Mon » et l’affi chage de l’heure
clignotent.
Appuyez sur les touches « UP » (K) ou
•
« DOWN » (L) pour régler l’heure de mise
hors circuit en heures pour lundi.
Appuyez sur la touche « TIMER » ou « 24H »
•
et réglez avec les touches « UP » (K) et
« DOWN » (L) le temps de mise hors circuit
en minutes pour lundi.
Appuyez une nouvelle fois sur la touche « TIMER
» ou « 7 », programmez mardi. Répétez la
programmation pour tous les jours de la semaine.
Pour sauter un jour (par ex. mardi) lors de la
programmation, appuyez sur la touche « TIMER »
ou « 7 » autant de fois que nécessaire jusqu’à ce
que le prochain jour (par ex. mercredi) apparaît
pour la programmation souhaitée.
6.7.2 Programmation hebdomadaire par
télécommande (fi g. 9)
Remarque : En plus de la programmation
journalière des temps de mise en/hors circuit
décrite précédemment, vous pouvez également
les programmer hebdomadairement à l’aide de la
télécommande.
Programmer l’heure du temps de mise en
circuit (fi g. 9)
Appuyez sur la touche « 7 ». La LED « Mon »
•
et l’affichage de l’heure clignotent.
Appuyez sur les touches « UP » (K) ou
•
« DOWN » (L) pour régler le temps de mise
en circuit en heures pour lundi.
Appuyez une nouvelle fois sur la touche « 7 ».
•
Programmez mardi.
Répétez l’opération pour les autres jours de
•
la semaine.
Lorsque tous les jours de la semaine sont
•
programmés, l’enregistrement actuel
est automatiquement enregistré après 5
secondes (n’appuyez sur aucune touche).
Programmer les minutes du temps de mise
en circuit (fi g. 9)
Appuyez sur les touches « 7 » puis « 24H ».
•
La LED « Mon » et l’affichage des minutes
clignotent.
Appuyez sur les touches « UP » (K) ou
•
« DOWN » (L) pour régler le temps de mise
en circuit en minutes pour lundi.
Appuyez une nouvelle fois sur la touche « 7 »
•
puis sur « 24H ». Programmez mardi.
Répétez l’opération pour les autres jours de
•
la semaine.
Lorsque tous les jours de la semaine sont
•
programmés, l’enregistrement actuel est automatiquement enregistré après 5 secondes
(n’appuyez sur aucune touche).
- 37 -
Anl_EF_1800_SPK9.indb 37Anl_EF_1800_SPK9.indb 37 22.11.2018 06:58:5122.11.2018 06:58:51
Page 38

F
Programmer l’heure du temps de mise hors
circuit (fi g. 9)
Appuyez sur les touches « 7 » puis 2x
•
« 24H ». La LED « Mon » et l’affi chage de
l’heure clignotent.
Appuyez sur les touches « UP » (K) ou
•
« DOWN » (L) pour régler le temps de mise
hors circuit en heures pour lundi.
Appuyez une nouvelle fois sur la touche « 7 »
•
puis 2x sur « 24H ». Programmez mardi.
Répétez l’opération pour les autres jours de
•
la semaine.
Lorsque tous les jours de la semaine sont
•
programmés, l’enregistrement actuel
est automatiquement enregistré après 5
secondes (n’appuyez sur aucune touche).
Programmer les minutes du temps de mise
hors circuit (fi g. 9)
Appuyez sur les touches « 7 » puis 3x
•
« 24H ». La LED « Mon » et l’affi chage des
minutes clignotent.
Appuyez sur les touches « UP » (K) ou
•
« DOWN » (L) pour régler le temps de mise
hors circuit en minutes pour lundi.
Appuyez une nouvelle fois sur la touche « 7 »
•
puis 3x sur « 24H ». Programmez mardi.
Répétez l’opération pour les autres jours de
•
la semaine.
Lorsque tous les jours de la semaine sont
•
programmés, l’enregistrement actuel
est automatiquement enregistré après 5
secondes (n’appuyez sur aucune touche).
6.8 Réglage de l’heure actuelle (fi g. 9)
Remarque : Réglable uniquement sur l’appareil.
Si aucune touche n’est actionnée pendant 5
secondes, le réglage actuel est automatiquement
enregistré.
Éteignez le chauffage avec la touche
•
« POWER » (D).
Appuyez sur la touche « TIMER » pendant 3
•
secondes. L’affichage de l’heure clignote pendant 5 secondes.
Réglez l’heure actuelle avec les touches
•
« UP » et « DOWN ».
Appuyez sur la touche « TIMER », l’affichage
•
des minutes clignote pendant 5 secondes.
Réglez les minutes actuelles avec les touches
•
« UP » et « DOWN ».
Appuyez sur la touche « TIMER » autant de
•
fois que nécessaire jusqu’à ce que la LED du
jour de la semaine actuel s’allume. Pendant
ce temps, les heures et les minutes clignotent
en alternance.
6.9 Activation du système d’heure automatique (fi g. 9)
Éteignez l’appareil avec la touche « POWER »
(D). L’appareil se met en circuit au prochain point
de commutation avec la dernière fonction chauff a-
ge réglée, le réglage de température de consigne
et l’eff et fl amme le plus lumineux.
6.10 Fonction « Fenêtre ouverte »
Si la température baisse de 5°C en l’espace de 10
minutes lorsque la fonction chauff age est allumée,
un signal sonore est émis pendant quelques
secondes et la fonction chauff age s’éteint.
6.11 Protection contre la surchauff e
Lorsque l’appareil chauff e exagérément,
le chauff age ou l’appareil s’arrêtent
automatiquement. Si c’est le cas, éteignez
complétement l’appareil et débranchez la fi che
de contact. Laissez refroidir l’appareil pendant
environ 15 minutes. Après élimination de
l’origine (par ex. grille d’aération recouverte),
l’appareil peut être remis en circuit comme
décrit précédemment. Si la protection contre la
surchauff e se déclenche de façon répétée ou s’il
est impossible de remettre l’appareil en marche,
veuillez vous adresser à votre service aprèsvente.
7. Remplacement de le câble
d’alimentation réseau
Danger !
Si le câble d’alimentation réseau de cet appareil
est endommagée, il faut la faire remplacer par le
producteur ou son service après-vente ou par une
personne de qualifi cation semblable afi n d’éviter
tout risque.
- 38 -
Anl_EF_1800_SPK9.indb 38Anl_EF_1800_SPK9.indb 38 22.11.2018 06:58:5122.11.2018 06:58:51
Page 39

F
8. Nettoyage, maintenance et
commande de pièces de
rechange
Danger !
Retirez la fi che de contact avant tous travaux de
nettoyage.
L’appareil doit être refroidi.
8.1 Nettoyage
Maintenez les dispositifs de protection,
•
les fentes à air et le carter de moteur aussi
propres et sans poussière que possible.
Enlevez les impuretés dues à la poussière
•
avec un aspirateur.
Nettoyez l’appareil régulièrement à l’aide
•
d’un chiffon humide. N’utilisez aucun
produit de nettoyage ni solvant ; ils
pourraient endommager les pièces en
matières plastiques de l’appareil. Veillez à
ce qu’aucune eau n’entre à l’intérieur de
l’appareil. La pénétration de l’eau dans un
appareil électrique augmente le risque de
décharge électrique.
Le panneau en verre peut être nettoyé avec
•
un produit nettoyant pour le verre classique.
8.2 Maintenance
Aucune pièce à l’intérieur de l’appareil n’a besoin
de maintenance.
Les éléments de chauff e ou les LEDS utilisées
pour créer l’eff et des fl ammes doivent être
uniquement remplacés par un électricien qualifi é
ou par le service client désigné par Einhell en
respectant les dispositions applicables.
8.3 Commande de pièces de rechange :
Pour les commandes de pièces de rechange,
veuillez indiquer les références suivantes:
Type de l’appareil
•
No. d’article de l’appareil
•
No. d’identification de l’appareil
•
No. de pièce de rechange de la pièce requise
•
Vous trouverez les prix et informations actuelles à
l’adresse www.isc-gmbh.info
9. Mise au rebut et recyclage
L‘appareil se trouve dans un emballage permettant d‘éviter les dommages dus au transport.
Cet emballage est une matière première et peut
donc être réutilisé ultérieurement ou être réintroduit dans le circuit des matières premières.
L‘appareil et ses accessoires sont en matériaux
divers, comme par ex. des métaux et matières
plastiques. Les appareils défectueux ne doivent
pas être jetés dans les poubelles domestiques.
Pour une mise au rebut conforme à la réglementation, l‘appareil doit être déposé dans un centre
de collecte approprié. Si vous ne connaissez pas
de centre de collecte, veuillez vous renseigner
auprès de l‘administration de votre commune.
10. Stockage
Entreposez l’appareil et ses accessoires dans
un endroit sombre, sec et à l’abri du gel tout
comme inaccessible aux enfants. La température
de stockage optimale est comprise entre 5 et 30
°C. Conservez l’outil électrique dans l’emballage
d’origine.
11. Mise au rebut des piles
Les piles contiennent des substances toxiques
pour l‘environnement. Ne jetez pas les piles dans
les ordures ménagères, dans le feu ou dans l‘eau.
Les piles doivent être collectées, recyclées ou
éliminées dans le respect de l‘environnement. Envoyez vos piles usées à l‘entreprise ISC GmbH,
Eschenstraße 6 à D-94405 Landau /Allemagne.
Le fabricant y garantit une élimination selon les
règles de l’art.
- 39 -
Anl_EF_1800_SPK9.indb 39Anl_EF_1800_SPK9.indb 39 22.11.2018 06:58:5122.11.2018 06:58:51
Page 40

F
12. Consignes de dépannage
Lorsque l’appareil est correctement exploité, aucun dérangement ne devrait se produire. En cas de
dérangement, vérifi ez les possibilités suivantes avant d’appeler le service après-vente.
Dérangement Cause probable Élimination
L’appareil ne
chauff e pas
La fi che de contact n’est pas
branchée
Branchez la fi che de contact
La télécommande
ne fonctionne pas
L’interrupteur principal n’est pas
enclenché
Appareil en standby
Puissance de chauff age désactivée
Le thermostat est réglé sur une
température trop basse.
« Timer » a éteint l’appareil
La batterie est vide
La télécommande est hors de portée
Rayonnements solaires directs sur le
chauff age
Enclenchez l’interrupteur principal
Actionnez la touche « Power »
Réglez la puissance de chauff age
Augmentez la température
Modifi ez la présélection du temps
Remplacer la batterie
Se rapprocher du chauff age
Réduire les rayonnements solaires
directs (obscurcir)
- 40 -
Anl_EF_1800_SPK9.indb 40Anl_EF_1800_SPK9.indb 40 22.11.2018 06:58:5122.11.2018 06:58:51
Page 41

F
Uniquement pour les pays de l’Union Européenne
Ne jetez pas les outils électriques dans les ordures ménagères!
Selon la norme européenne 2012/19/CE relative aux appareils électriques et systèmes électroniques
usés et selon son application dans le droit national, les outils électriques usés doivent être récoltés à
part et apportés à un recyclage respectueux de l’environnement.
Possibilité de recyclage en alternative à la demande de renvoi :
Le propriétaire de l’appareil électrique est obligé, en guise d’alternative à un envoi en retour, à contribuer à un recyclage eff ectué dans les règles de l’art en cas de cessation de la propriété. L’ancien appareil
peut être remis à un point de collecte dans ce but. Cet organisme devra l’éliminer dans le sens de la Loi
sur le cycle des matières et les déchets. Ne sont pas concernés les accessoires et ressources fournies
sans composants électroniques.
Toute réimpression ou autre reproduction de la documentation et des papiers joints aux produits, même
sous forme d’extraits, est uniquement permise une fois l’accord explicite de l’ISC GmbH obtenu.
Sous réserve de modifi cations techniques
- 41 -
Anl_EF_1800_SPK9.indb 41Anl_EF_1800_SPK9.indb 41 22.11.2018 06:58:5122.11.2018 06:58:51
Page 42

F
Informations service après-vente
Nous disposons dans tous les pays mentionnés dans le bon de garantie de partenaires de service
après-vente compétents dont vous trouverez les coordonnées dans le bon de garantie. Ceux-ci se
tiennent à votre disposition pour tout ce qui concerne le service après-vente comme les réparations,
l‘approvisionnement en pièces de rechange et d‘usure ou l‘achat de pièces de consommation.
Il faut tenir compte du fait que pour ce produit les pièces suivantes sont soumises à une usure liée à
l‘utilisation ou à une usure naturelle ou que les pièces suivantes sont nécessaires en tant que consommables.
Catégorie Exemple
Pièces d‘usure* Batteries
Matériel de consommation/
pièces de consommation*
Pièces manquantes
*Pas obligatoirement compris dans la livraison !
En cas de vices ou de défauts, nous vous prions d‘enregistrer le cas du défaut sur internet à l‘adresse
www.isc-gmbh.info. Veuillez donner une description précise du défaut et répondre dans tous les cas aux
questions suivantes :
est-ce que l‘appareil a fonctionné une fois ou était-il défectueux dés le départ ?
•
avez-vous remarqué quelque chose avant la panne (symptôme avant la panne) ?
•
quel est le défaut de fonctionnement de l‘appareil à votre avis (symptôme principal) ?
•
Décrivez ce défaut de fonctionnement.
- 42 -
Anl_EF_1800_SPK9.indb 42Anl_EF_1800_SPK9.indb 42 22.11.2018 06:58:5122.11.2018 06:58:51
Page 43

F
Bon de garantie
Chère cliente, cher client,
nos produits sont soumis à un contrôle de qualité très strict. Si toutefois, il arrivait que cet appareil ne
fonctionne pas parfaitement, nous en sommes désolés et nous vous prions de vous adresser à notre
service après-vente à l‘adresse indiquée sur le bon de garantie. Nous nous tenons également volontiers
à votre disposition par téléphone au numéro de service après-vente indiqué. La garantie est valable
dans les conditions suivantes :
1. Ces conditions de garantie s‘adressent uniquement à des consommateurs, c‘est à dire à des per-
sonnes physiques qui ne souhaitent ni utiliser ce produit dans le cadre de leur activité industrielle ou
artisanale, ni dans le cadre de toute autre activité indépendante. Les conditions de garantie réglementent les prestations de garantie supplémentaires que le fabricant mentionné ci-dessous promet
aux acheteurs de ses appareils en supplément de la prestation de garantie légale. Vos droits légaux
en matière de garantie restent inchangés. Notre prestation de garanti est gratuite pour vous.
2. La prestation de garantie s‘étend exclusivement aux défauts résultant d‘une erreur de fabrication ou
de matériau d‘un appareil neuf du fabricant mentionné ci-dessous et acheté par vos soins. La prestation de garantie se limite selon notre décision soit à la résolution de tels défauts sur l‘appareil, soit
à l‘échange de l‘appareil.
Veillez au fait que nos appareils, conformément au règlement, n‘ont pas été conçus pour être utilisés dans un environnement professionnel, industriel ou artisanal. Il n‘y a donc pas de contrat de
garantie quand l‘appareil a été utilisé professionnellement, artisanalement ou par des sociétés industrielles ou exposé à une sollicitation semblable pendant la durée de la garantie.
3. Sont exclus de notre garantie :
- les dommages liés au non-respect des instructions de montage ou en raison d‘une installation
incorrecte, au non-respect du mode d‘emploi (en raison par ex. du branchement de l‘appareil sur la
tension de réseau ou le type de courant incorrect), au non-respect des dispositions de maintenance
et de sécurité ou résultant d‘une exposition de l‘appareil à des conditions environnementales anormales ou d‘un manque d‘entretien et de maintenance.
- les dommages résultant d‘une utilisation abusive ou non conforme (comme par ex. une surcharge
de l‘appareil ou une utilisation d‘outils ou d‘accessoires non autorisés), de la pénétration d‘objets
étrangers dans l‘appareil (comme par ex. du sable, des pierres ou de la poussière), de l‘utilisation
de la force ou de la violence (comme par ex. les dommages liés aux chutes).
- les dommages sur l‘appareil ou des parties de l‘appareil résultant de l‘usure normale liée à
l‘utilisation de l‘appareil ou de toute autre usure naturelle.
4. La durée de garantie est de 24 mois et débute à la date d‘achat de l‘appareil. Les droits à la garantie
doivent être revendiqués avant l‘expiration de la durée de garantie dans un délai de deux semaines
après avoir constaté le défaut. La revendication de droits à la garantie après expiration de la durée
de garantie est exclue. La réparation ou l‘échange de l‘appareil n‘entraîne ni une extension de la durée de garantie ni le début d‘une nouvelle durée de garantie pour cet appareil ou toute autre pièce
de rechange installée sur l‘appareil. Cela est valable également dans le cas d‘une intervention du
service après-vente à domicile.
5. Pour faire valoir vos droits à la garantie, veuillez enregistrer l‘appareil défectueux à l‘adresse su-
ivante : www.isc-gmbh.info. Veuillez garder à disposition la preuve d‘achat ou tout autre justifi catif
de l‘achat de votre nouvel appareil. Les appareils envoyés sans les justifi catifs correspondants ou
sans plaque signalétique sont exclus de la prestation de garantie en raison de l‘impossibilité de les
enregistrer. Si le défaut de l‘appareil est inclut dans la garantie, vous recevrez sans délai un appareil
réparé ou un nouvel appareil.
Bien entendu, nous réparons volontiers les défauts de votre appareil qui ne sont pas ou plus compris
dans l‘étendue de la garantie contre le remboursement des frais de réparation. Pour cela, veuillez envoyer l‘appareil à notre adresse de service après-vente.
Pour les pièces d‘usure, de consommation et manquantes, nous renvoyons aux restrictions de cette garantie conformément aux informations du service après-vente de ce mode d‘emploi.
- 43 -
Anl_EF_1800_SPK9.indb 43Anl_EF_1800_SPK9.indb 43 22.11.2018 06:58:5122.11.2018 06:58:51
Page 44

I
Pericolo! - Per ridurre il rischio di lesioni leggete le istruzioni per l’uso
- 44 -
Anl_EF_1800_SPK9.indb 44Anl_EF_1800_SPK9.indb 44 22.11.2018 06:58:5222.11.2018 06:58:52
Page 45

I
Pericolo!
Nell’usare gli apparecchi si devono rispettare
diverse avvertenze di sicurezza per evitare lesioni e danni. Quindi leggete attentamente queste
istruzioni per l’uso/le avvertenze di sicurezza.
Conservate bene le informazioni per averle a
disposizione in qualsiasi momento. Se date
l’apparecchio ad altre persone, consegnate queste istruzioni per l’uso/le avvertenze di sicurezza
insieme all’apparecchio. Non ci assumiamo alcuna responsabilità per incidenti o danni causati
dal mancato rispetto di queste istruzioni e delle
avvertenze di sicurezza.
1. Avvertenze sulla sicurezza
Pericolo!
Leggete tutte le avvertenze di sicurezza e le
istruzioni. Dimenticanze nel rispetto delle avver-
tenze di sicurezza e delle istruzioni possono causare scosse elettriche, incendi e/o gravi lesioni.
Conservate tutte le avvertenze e le istruzioni
per eventuali necessità future.
Controllate che l‘apparecchio sia stato con-
•
segnato in perfetto stato. In caso di eventuali
danni non collegate l‘apparecchio alla presa
di corrente.
Posate il cavo di alimentazione in modo che
•
non sia possibile inciamparvi.
Non fate passare il cavo di alimentazione su
•
parti dell‘apparecchio che diventano calde
durante il funzionamento.
Non staccate mai la spina dalla presa di
•
corrente tirando il cavo di alimentazione! Non
trasportate o spostate l‘apparecchio tirandolo
per il cavo di alimentazione.
Non avvolgete mai il cavo di alimentazione
•
all‘apparecchio.
Non incastrate mai il cavo di alimentazione,
•
non fatelo passare su spigoli appuntiti, non
appoggiatelo su piastre elettriche molto calde
o su fiamme libere.
Utilizzate l‘apparecchio solo in ambienti chiu-
•
si ed asciutti.
Non utilizzate questo apparecchio nelle im-
•
mediate vicinanze di una vasca da bagno,
una doccia o una piscina.
Non utilizzate l‘apparecchio in bagno.
•
Non immergete mai l‘apparecchio in acqua –
•
Pericolo di morte!
Non usate mai l‘apparecchio con le mani
•
bagnate.
Non aprite mai l‘apparecchio e non toccate
•
parti che conducono corrente – Pericolo di
morte!
Posizionate l‘apparecchio in modo che la spi-
•
na sia sempre accessibile.
Staccate la spina dalla presa di corrente se
•
l‘apparecchio non viene utilizzato per un periodo di tempo prolungato!
Non mettete l‘apparecchio direttamente sotto
•
una presa di corrente.
In caso di utilizzo prolungato il rivestimento si
•
può riscaldare molto. Installate l‘apparecchio
in modo che venga escluso un contatto casuale.
L‘apparecchio non deve essere usato in
•
ambienti nei quali vengono usate o tenute
sostanze (ad es. solventi, ecc.) o gas infiammabili.
Tenete lontani dall‘apparecchio sostanze o
•
gas facilmente infiammabili.
Non usate l‘apparecchio in locali con pericolo
•
di incendio (per es. rimesse in legno).
Usate l‘apparecchio solo con il cavo di ali-
•
mentazione completamente srotolato.
Non inserite corpi estranei nelle aperture
•
dell‘apparecchio – Pericolo di scossa elettrica
e di danni all‘apparecchio.
I bambini e le persone sotto l‘influsso di me-
•
dicinali o alcol devono essere tenuti lontani
dall‘apparecchio.
Avvertimento: l‘apparecchio non deve essere
•
coperto al fine di evitarne un surriscaldamento - Pericolo di incendio! Osservate il simbolo
sull‘apparecchio (Fig. 10).
I lavori di manutenzione e le riparazioni devo-
•
no essere eseguiti solo da personale specializzato autorizzato.
Si deve controllare regolarmente che il cavo
•
di alimentazione non presenti difetti o danni.
Un cavo di alimentazione danneggiato deve
essere sostituito soltanto da un elettricista
specializzato o da ISC GmbH, rispettando le
disposizioni in vigore.
Per garantire la sicurezza elettrica montate un
•
interruttore di sicurezza per correnti di guasto
(RCD).
Collegate l‘apparecchio solo a una presa di
•
corrente con messa a terra.
AVVERTIMENTO: questo apparecchio non
•
Gli elementi di comando non devono poter
essere toccati da una persona che si trovi
sotto la doccia, nella vasca da bagno o in una
vasca piena di liquido.
Tenete lontani i bambini di età inferiore a 3
•
anni, a meno che non siano continuamente
- 45 -
Anl_EF_1800_SPK9.indb 45Anl_EF_1800_SPK9.indb 45 22.11.2018 06:58:5222.11.2018 06:58:52
Page 46

I
sorvegliati.
Ai bambini di età compresa tra i 3 e gli 8
•
anni è consentito accendere e spegnere
l‘apparecchio solo se vengono sorvegliati
o sono stati istruiti circa il suo uso sicuro e
se hanno capito i rischi ad esso connessi,
a condizione che l‘apparecchio sia montato
o installato nella normale posizione d‘uso. I
bambini di età compresa tra i 3 e gli 8 anni
non devono inserire la spina nella presa di
corrente, regolare l‘apparecchio, pulirlo e/o
eseguire le operazioni di manutenzione a
carico dell‘utilizzatore.
Bambini a partire dagli 8 anni e persone con
•
capacità fisiche, sensoriali o mentali ridotte
o prive di esperienza e conoscenze possono
usare questo apparecchio solo se vengono
sorvegliati o sono stati istruiti riguardo l‘uso
sicuro dell‘apparecchio e conoscono i rischi a
esso connessi. I bambini non devono giocare
con l‘apparecchio. Le operazioni di pulizia e
di manutenzione a carico dell‘utilizzatore non
devono venire eseguite dai bambini se non
sono sorvegliati.
Attenzione – Alcune parti del prodotto
•
possono essere molto calde e causare
ustioni. Prestate particolare attenzione in
presenza di bambini e di persone bisognose di protezione.
2. Descrizione dell’apparecchio ed
elementi forniti
2.1 Descrizione dell‘apparecchio (Fig. 1)
1 Vetro frontale
2 Fuoco e legna – elemento decorativo
3 Uscita aria ed elemento riscaldante
4 Elementi di comando
5 Interruttore principale
6 Telecomando (incl. batteria CR 2025)
2.2 Elementi forniti (Fig. 2)
Verifi cate che l‘articolo sia completo sulla base
degli elementi forniti descritti. In caso di parti
mancanti, rivolgetevi al nostro Centro Servizio Assistenza o al punto vendita in cui avete acquistato
l‘apparecchio presentando un documento di acquisto valido entro e non oltre i 5 giorni lavorativi
dall‘acquisto dell‘articolo. Al riguardo fate attenzione alla Tabella Garanzia nelle informazioni sul
Servizio Assistenza alla fi ne delle istruzioni.
Aprite l’imballaggio e togliete con cautela
•
l’apparecchio dalla confezione.
Togliete il materiale d’imballaggio e anche i
•
fermi di trasporto / imballo (se presenti).
Controllate che siano presenti tutti gli elemen-
•
ti forniti.
Verificate che l’apparecchio e gli accessori
•
non presentino danni dovuti al trasporto.
Se possibile, conservate l’imballaggio fino
•
alla scadenza della garanzia.
Pericolo!
L’apparecchio e il materiale d’imballaggio
non sono giocattoli! I bambini non devono
giocare con sacchetti di plastica, fi lm e pic-
coli pezzi! Sussiste pericolo di ingerimento e
soff ocamento!
10 Apparecchio di riscaldamento
11 Supporto superiore per parete
12 Angolare di supporto
13 Tassello Ø 6 mm (6 pz.)
14 Vite 4x30 mm (6 pz.)
15 Vite 4x8 mm (2 pz.)
Istruzioni per l‘uso originali
•
3. Utilizzo proprio
L‘apparecchio è concepito per il riscaldamento supplementare di ambienti asciutti e chiusi.
L‘apparecchio deve essere usato solamente
montato ad una parete. È vietato il montaggio su
una parete non portante, infi ammabile, inclinata
o al soffi tto.
L’apparecchio deve venire usato solamente per lo
scopo a cui è destinato. Ogni altro tipo di uso che
esuli da quello previsto non è un uso conforme.
L’utilizzatore/l’operatore, e non il costruttore, è
responsabile dei danni e delle lesioni di ogni tipo
che ne risultino.
Tenete presente che i nostri apparecchi non sono
stati costruiti per l’impiego professionale, artigianale o industriale. Non ci assumiamo alcuna
garanzia quando l’apparecchio viene usato in
imprese commerciali, artigianali o industriali, o in
attività equivalenti.
- 46 -
Anl_EF_1800_SPK9.indb 46Anl_EF_1800_SPK9.indb 46 22.11.2018 06:58:5222.11.2018 06:58:52
Page 47

I
4. Caratteristiche tecniche
Tensione nominale: ............... 220-240 V ~ 50 Hz
Potenza di riscaldamento massima: ....... 1800 W
Grado di protezione: ........................................... I
Tipo di protezione: ..................................... IP X0
Dimensioni apparecchio: ............ 88 x 56 x 15 cm
5. Prima della messa in esercizio
Prima di inserire la spina nella presa di corrente
assicuratevi che i dati sulla targhetta di identifi ca-
zione corrispondano a quelli di rete.
5.1 Montaggio alla parete
Attenzione!
Smontate il vetro frontale dall’apparecchio e rimontatelo solo alla fi ne per evitare che si rompa.
Si devono rispettare le distanze minime.
L‘apparecchio deve essere fatto funzionare solo
se completamente montato e in posizione verticale.
(Fig. 3) Si devono rispettare le distanze minime
dal rivestimento di 20 cm sul lato, 100 cm verso
l‘alto, 60 cm verso il basso e 100 cm sul davanti.
Osservate il punto 1 - Avvertenze di sicurezza.
Attenzione! Accertatevi che nella zona dei fori
non ci siano cavi elettrici o altre installazioni (per
es. tubazioni dell‘acqua). Fate attenzione che
l‘apparecchio sia ben fi ssato alla parete e alline-
ato in orizzontale. Utilizzate solo materiale di fi s-
saggio adatto e usate una parete portante. I tasselli e le viti forniti sono adatti per: calcestruzzo,
pietra naturale dalla struttura compatta, mattoni
pieni, mattoni pieni di arenaria calcarea, mattoni
pieni di calcestruzzo leggero e calcestruzzo cellulare (poroso).
1. Fig. 4: Segnate su una parete portante le po-
sizioni dei quattro fori del supporto superiore
da parete (11) su una linea orizzontale. La
distanza fra i fori è di 150 mm.
2. Eseguite quindi quattro fori (Ø 6 mm) nella
parete e inserite i tasselli (Fig. 2 / Pos. 13).
Posizionate i fori del supporto superiore da
parete (Fig. 4 / Pos. 11) sui fori eseguiti e
fi ssate tale supporto con 4 viti 4x30 mm (Pos.
14). Fate attenzione che i ganci del supporto
da parete siano rivolti verso l‘alto (Fig. 4).
3. Fig. 5: Montate l’angolare di supporto (12)
con 2 viti 4x8 mm (Fig. 2 / Pos. 15) al centro
del lato inferiore dell’involucro del dispositivo
di riscaldamento.
4. Fig. 6: Agganciate l’involucro al supporto
da parete. Fate attenzione che i ganci del
supporto da parete si inseriscano nei fori
dell’involucro (A).
5. Fig. 5: Segnate i fori (B) dell’angolare di supporto (12) sulla parete e togliete l’involucro
del dispositivo di riscaldamento.
6. Eseguite due fori (Ø 6 mm) nella parete, inserite i tasselli (Fig. 2 / Pos. 13) e agganciate
di nuovo l’involucro al supporto superiore da
parete (Fig. 6). Fate attenzione che i ganci
entrino nei fori dell’involucro (A).
7. Fig. 5: Fissate l’angolare di supporto con 2 viti
4x30 mm (Fig. 2 / Pos. 14) alla parete.
8. Fig. 7: Con l’aiuto di una seconda persona agganciate il vetro frontale (1) con i relativi ganci
laterali nelle asole apposite (C) nell’involucro.
5.2 Telecomando
Avvertenza: tutte le funzioni possono essere
comandate sia con i tasti sull‘apparecchio che
con il telecomando. Si deve usare una batteria a
bottone di tipo CR 2025 (fornita con il telecomando). Prima dell‘utilizzo estraete la protezione da
contatto (piastrina di plastica) dall‘involucro.
Avvertenza! Possono essere necessari alcuni
secondi perché l’apparecchio reagisca dopo che
sono stati premuti i tasti del telecomando. Non
premete di nuovo i tasti del telecomando prima
che siano trascorsi 2 secondi.
Non utilizzate mai un tipo di batterie diverso
•
da quello indicato.
Se il telecomando non viene utilizzato per un
•
lungo periodo estraete la batteria per evitare
che si scarichi.
Tenete il telecomando in direzione del dispo-
•
sitivo di riscaldamento. La portata massima è
di 5 metri.
Un‘esposizione diretta ai raggi del sole e de-
•
gli oggetti frapposti possono influire negativamente sul raggio di azione del telecomando.
Trattate il telecomando con cura. Non fatelo
•
cadere, evitate calore e umidità.
- 47 -
Anl_EF_1800_SPK9.indb 47Anl_EF_1800_SPK9.indb 47 22.11.2018 06:58:5222.11.2018 06:58:52
Page 48

I
Come sostituire la batteria (Fig. 8)
1. Aprite il coperchio del vano della batteria
spingendo il bloccaggio (F) verso il centro ed
estraendo contemporaneamente il vano della
batteria.
2. Nell‘inserire la batteria controllate che la sua
polarità corrisponda alle indicazioni nello
scomparto.
3. Inserite coperchio del vano della batteria nel
telecomando.
L‘utilizzatore fi nale è tenuto per legge a restituire
le batterie esauste. La restituzione è possibile presso i centri di raccolta comunali oppure
ovunque si vendano batterie. Osservate anche il
capitolo 11.
6. Uso
Avvertenza: ogni volta che viene premuto
un pulsante viene emesso un breve segnale
acustico.
Osservate le avvertenze di sicurezza descritte al
punto 1.
Alla prima messa in esercizio o dopo una
lunga pausa di esercizio è possibile percepire
brevemente un odore. Non si tratta di
un‘anomalia.
6.1 Inserimento e disinserimento della
tensione di rete (Fig. 1)
Con l‘interruttore principale (5) l‘apparecchio
viene scollegato completamente dalla rete
elettrica. Inserite („I“) l‘interruttore principale per
primo e disinseritelo („0“) per ultimo quando avete
fi nito di utilizzare l‘apparecchio.
6.2 Accensione e spegnimento
dell‘apparecchio (Fig. 9)
Premete il tasto „Power“ (D). L‘apparecchio si
accende, l’eff etto fi amma e il display vengono at-
tivati. Per spegnere premete nuovamente il tasto
„Power“ (D). L’eff etto fi amma e il display vengono
disattivati.
6.3 Attivazione e disattivazione della funzione
dimmer (Fig. 9)
Premete il tasto „Flame” (E). La luminosità
dell’eff etto fi amma può essere regolata a 5 livelli
premendo più volte il tasto.
6.4 Indicazione della temperatura °C/°F
(Fig. 9)
Avvertenza: commutabile solo sull’apparecchio.
È possibile visualizzare la temperatura in °C o °F.
Per cambiare premete il tasto “DOWN” per 5
secondi.
6.5 Regolazione della temperatura nominale
(Fig. 9)
Avvertenze: la temperatura nominale da
impostare corrisponde alla temperatura
dell’apparecchio misurata dalla sonda di
temperatura integrata e indicata sul display.
Tale valore può variare leggermente rispetto alla
temperatura ambiente eff ettiva. Se la temperatura
nominale impostata viene superata, la funzione
di riscaldamento si disattiva. Se si scende al di
sotto della temperatura nominale impostata, la
funzione di riscaldamento si riattiva.
6.5.1 Regolazione sull’apparecchio (Fig. 9)
Premete il tasto “UP” per avviare la regolazione
della temperatura (15°C – 35°C ovvero 59°F –
95°F). Per regolare la temperatura premete poi
i tasti “UP” e “DOWN”. La temperatura viene
aumentata ovvero diminuita ogni volta di 1°C.
6.5.2 Regolazione con telecomando (Fig. 9)
Premete il tasto “F” per regolare la temperatura
(15°C – 35°C ovvero 59°F – 95°F). Ad ogni
pressione del tasto la temperatura viene
aumentata di 1°C e una volta raggiunti i 35°C
ricomincia da 15°C.
6.6 Attivazione e disattivazione della funzione
di riscaldamento (Fig. 9)
Con l’apparecchio acceso azionate il tasto
“Heater” (H) fi no a quando si illumina il LED “Heat
1” per la potenza di riscaldamento di 900 W.
Azionando di nuovo il tasto “Heater” (H) si illumina
il LED “Heat 2” per la potenza di riscaldamento
di 1800 W. Azionando ancora una volta il tasto
“Heater” (H) la funzione di riscaldamento viene
disattivata.
6.7 Timer - programmazione dell’orario di accensione e spegnimento (Fig. 9)
Avvertenze:
Accendete l‘apparecchio come sopra
•
descritto.
Possono essere programmati un orario di
•
accensione e un orario di spegnimento per
giorno. Pensate prima a quando desiderate
che l’apparecchio si accenda ovvero si
spenga e prendete nota degli orari.
- 48 -
Anl_EF_1800_SPK9.indb 48Anl_EF_1800_SPK9.indb 48 22.11.2018 06:58:5222.11.2018 06:58:52
Page 49

I
Programmazione dell‘orario di accen-
•
sione: Un piccolo LED si illumina vicino
all’indicazione “10 minuti” (ad es. 10:5.1).
Programmazione dell‘orario di spegni-
•
mento: Un piccolo LED si illumina vicino
all’Indicazione “Minuti” (ad es. 10:51.).
Per tutte le impostazioni l’indicazione
•
lampeggia per 5 secondi, durante i quali
è possibile effettuare le regolazioni. Se
non vengono premuti tasti per 5 secondi,
l’impostazione attuale viene salvata
automaticamente.
6.7.1 Programmazione giornaliera
sull’apparecchio oppure con il
telecomando (Fig. 9)
Orario di accensione
Premete una volta il tasto “TIMER” ovvero
•
“7”. Il LED “Mon” e l’indicazione dell’ora
lampeggiano.
Premete i tasti “UP (su)” (K) o “DOWN (giù)”
•
(L) e impostate l’ora di accensione per lunedì.
Premete il tasto “TIMER” ovvero “24H” e
•
impostate con i tasti “UP (su)” (K) e “DOWN
(giù)” (L) il minuto di accensione per lunedì.
Orario di spegnimento
Premete di nuovo entro 5 secondi il
•
testo “TIMER” ovvero “7”. Il LED “Mon” e
l’indicazione dell’ora lampeggiano.
Premete “UP” (K) o “DOWN” (L) per
•
impostare l’ora di spegnimento per lunedì.
Premete il tasto “TIMER” ovvero “24H” e
•
impostate con “UP” (K) e “DOWN” (L) il
minuto di spegnimento per lunedì.
Premete di nuovo il tasto “TIMER” ovvero
“7” e programmate per martedì. Ripetete il
procedimento di programmazione per tutti gli altri
giorni della settimana.
Per saltare un giorno della settimana (ad es.
martedì) nella programmazione premete più volte
il tasto “TIMER” ovvero “7” fi no a quando appare
il giorno successivo (ad es. mercoledì) per la
programmazione dell’orario desiderato.
6.7.2 Programmazione settimanale con il
telecomando (Fig. 9)
Avvertenza: oltre alla programmazione
giornaliera dell’orario di accensione e
spegnimento descritta in precedenza, con
il telecomando potete eseguire anche la
programmazione settimanale.
Programmazione dell’ora di accensione
(Fig. 9)
Premete il tasto “7”. Il LED “Mon” e
•
l’indicazione dell’ora lampeggiano.
Premete il tasto “UP” (K) o “DOWN” (L) per
•
impostare l’ora di accensione per lunedì.
Premete di nuovo il tasto “7”. Programmate
•
per martedì.
Ripetete il procedimento per gli altri giorni
•
della settimana.
Se tutti i giorni sono programmati, dopo 5
•
cinque secondi (non premete tasti) viene
salvata automaticamente l’impostazione
attuale.
Programmazione del minuto di accensione
(Fig. 9)
Premete il tasto “7” e poi “24H”. Il LED “Mon”
•
e l’indicazione dei minuti lampeggiano.
Premete il tasto “UP” (K) o “DOWN” (L) per
•
impostare il minuto di accensione per lunedì.
Premete di nuovo il tasto “7” e poi “24H”.
•
Programmate per martedì.
Ripetete il procedimento per gli altri giorni
•
della settimana.
Se tutti i giorni sono programmati, dopo 5
•
cinque secondi (non premete tasti) viene
salvata automaticamente l’impostazione
attuale.
Programmazione dell’ora di spegnimento
(Fig. 9)
Premete il tasto “7” e poi due volte “24H”.
•
Il LED “Mon” e l’indicazione dell’ora
lampeggiano.
Premete il tasto “UP” (K) o “DOWN” (L) per
•
impostare l’ora di spegnimento per lunedì.
Premete di nuovo il tasto “7” e poi due volte
•
“24H”. Programmate per martedì.
Ripetete il procedimento per gli altri giorni
•
della settimana.
Se tutti i giorni sono programmati, dopo 5
•
cinque secondi (non premete tasti) viene
salvata automaticamente l’impostazione
attuale.
Programmazione del minuto di spegnimento
(Fig. 9)
Premete il tasto “7” e poi tre volte “24H”.
•
Il LED “Mon” e l’indicazione dei minuti
lampeggiano.
Premete il tasto “UP” (K) o “DOWN” (L) per
•
impostare il minuto di spegnimento per
lunedì.
Premete di nuovi il tasto “7” e poi tre volte
•
- 49 -
Anl_EF_1800_SPK9.indb 49Anl_EF_1800_SPK9.indb 49 22.11.2018 06:58:5222.11.2018 06:58:52
Page 50

I
“24H”. Programmate per martedì.
Ripetete il procedimento per gli altri giorni
•
della settimana.
Se tutti i giorni sono programmati, dopo 5
•
cinque secondi (non premete tasti) viene
salvata automaticamente l’impostazione
attuale.
6.8 Impostazione dell’ora attuale (Fig. 9)
Avvertenza: regolabile solo sull’apparecchio.
Se non vengono premuti tasti per 5 secondi,
l’impostazione attuale viene salvata
automaticamente.
Spegnete il dispositivo di riscaldamento con il
•
tasto “POWER” (D).
Tenete premuto per 3 secondi il tasto
•
“TIMER”. L’indicazione dell’ora lampeggia per
5 secondi.
Impostate l’ora attuale con i tasti “UP” e
•
“DOWN”.
Premete il tasto “TIMER“, l’indicazione dei
•
minuti lampeggia per 5 secondi.
Impostate i minuti attuali con i tasti “UP” e
•
“DOWN”.
Premete il tasto più volte il tasto “TIMER” fino
•
a quando si illumina il LED per il giorno della
settimana attuale. Nel frattempo l’indicazione
delle ore e quella dei minuti lampeggiano in
modo alternato.
6.9 Attivazione del timer automatico (Fig. 9)
Spegnete l’apparecchio con il tasto “POWER” (D).
L’apparecchio si attiva al prossimo momento di
accensione con l’ultima funzione di riscaldamento
impostata, la regolazione della temperatura
nominale e l’eff etto fi amma più chiaro.
6.10 Funzione “Finestra aperta”
Se la temperatura scende di 5°C in 10 minuti
mentre la funzione di riscaldamento è attiva,
viene emesso un segnale acustico per alcuni
secondi e la funzione di riscaldamento viene
disattivata.
6.11 Protezione dal surriscaldamento
In caso di riscaldamento eccessivo, la funzione di
riscaldamento o l‘apparecchio si disinseriscono
automaticamente. In questo caso spegnete
completamente l’apparecchio e staccate la spina
dalla presa di corrente. Lasciate raff reddare
l‘apparecchio per ca. 15 minuti. Dopo aver
eliminato la causa (per es. griglia dell‘aria
coperta), l‘apparecchio può essere riacceso
come descritto in precedenza. Se la protezione
dal surriscaldamento dovesse intervenire
ripetutamente o non fosse più possibile inserire
l‘apparecchio, rivolgetevi al vostro servizio di
assistenza clienti.
7. Sostituzione del cavo di
alimentazione
Pericolo!
Se il cavo di alimentazione di questo apparecchio
viene danneggiato deve essere sostituito dal
produttore, dal suo servizio di assistenza clienti o
da una persona al pari qualifi cata al fi ne di evitare
pericoli.
8. Pulizia, manutenzione e
ordinazione dei pezzi di ricambio
Pericolo!
Prima di qualsiasi lavoro di pulizia staccate la
spina dalla presa di corrente.
L‘apparecchio deve essersi raff reddato.
8.1 Pulizia
Tenete il più possibile liberi da polvere e
•
sporco i dispositivi di protezione, le fessure di
aerazione e la carcassa del motore.
Eliminate i depositi di polvere con un aspira-
•
polvere.
Pulite l‘apparecchio regolarmente con un
•
panno umido. Non usate detergenti o solventi, perché questi ultimi potrebbero danneggiare le parti in plastica del dispositivo. Fate
attenzione che non possa penetrare acqua
all‘interno dell‘apparecchio. La penetrazione
di acqua in un apparecchio elettrico aumenta
il rischio di una scossa elettrica.
La copertura in vetro può essere pulita con un
•
comune detergente per vetri.
8.2 Manutenzione
All’interno dell’apparecchio non si trovano altre
parti sottoposte ad una manutenzione qualsiasi.
Gli elementi riscaldanti oppure i LED usati per
l’eff etto fi amma devono essere sostituiti solo
da un elettricista qualifi cato o dal servizio di
assistenza clienti incaricato da Einhell nel rispetto
delle disposizioni in vigore.
- 50 -
Anl_EF_1800_SPK9.indb 50Anl_EF_1800_SPK9.indb 50 22.11.2018 06:58:5222.11.2018 06:58:52
Page 51

8.3 Ordinazione di pezzi di ricambio:
Volendo commissionare dei pezzi di ricambio, si
dovrebbe dichiarare quanto segue:
modello dell’apparecchio
•
numero dell’articolo dell’apparecchio
•
numero d’ident. dell’apparecchio
•
numero del pezzo di ricambio del ricambio
•
necessitato.
Per i prezzi e le informazioni attuali si veda
www.isc-gmbh.info
9. Smaltimento e riciclaggio
L‘apparecchio si trova in un imballaggio per
evitare i danni dovuti al trasporto. Questo
imballaggio rappresenta una materia prima e
può perciò essere utilizzato di nuovo o riciclato.
L‘apparecchio e i suoi accessori sono fatti di
materiali diversi, per es. metallo e plastica. Gli
apparecchi difettosi non devono essere gettati
nei rifi uti domestici. Per uno smaltimento corretto
l‘apparecchio va consegnato ad un apposito
centro di raccolta. Se non vi è noto nessun
centro di raccolta, rivolgetevi per informazioni
all‘amministrazione comunale.
I
10. Conservazione
Conservate l’apparecchio e i suoi accessori in un
luogo buio, asciutto, al riparo dal gelo e non accessibile ai bambini. La temperatura ottimale per
la conservazione è compresa tra i 5 e i 30 °C.
Conservate l’elettroutensile nell’imballaggio originale.
11. Smaltimento delle batterie
Le batterie contengono materiali che danneggiano l‘ambiente. Non gettate le batterie nei
rifi uti domestici, nel fuoco o in acqua. Le batterie
devono venire raccolte, riciclate o smaltite rispettando l‘ambiente. Inviate batterie usate a iSC
GmbH, Eschenstraße 6 a D-94405 Landau. Così
il costruttore ne può garantire uno smaltimento
appropriato.
- 51 -
Anl_EF_1800_SPK9.indb 51Anl_EF_1800_SPK9.indb 51 22.11.2018 06:58:5222.11.2018 06:58:52
Page 52

I
12. Avvertenze per l‘eliminazione di anomalie
Se l‘apparecchio viene fatto funzionare correttamente non si dovrebbero verifi care anomalie. In caso di
anomalie, verifi cate le seguenti possibilità prima di rivolgervi al servizio assistenza.
Anomalia Possibile causa Soluzione
L'apparecchio non
riscalda
La spina non è inserita
L‘interruttore principale non è inserito
Inserite la spina
Inserite l‘interruttore principale
Il telecomando non
funziona
L’apparecchio è in stand-by
La funzione di riscaldamento è
disattivata
Il termostato è impostato troppo
basso
L’apparecchio è stato spento dal
“Timer”
Batteria scarica
Il telecomando è al di fuori della portata
L’apparecchio è esposto direttamente
ai raggi del sole
Azionate il tasto “Power”
Regolate la potenza di riscaldamento
Aumentate la temperatura
Modifi cate l’orario preselezionato
Sostituite la batteria
Riducete la distanza dall’apparecchio
Riducete l’esposizione ai raggi del
sole (riparare dalla luce)
- 52 -
Anl_EF_1800_SPK9.indb 52Anl_EF_1800_SPK9.indb 52 22.11.2018 06:58:5222.11.2018 06:58:52
Page 53

I
Solo per paesi membri dell’UE
Non smaltite gli elettroutensili nei rifi uti domestici!
Secondo la direttiva europea 2012/19/CE sui rifi uti di apparecchiature elettriche ed elettroniche e il suo
recepimento nelle normative nazionali, gli elettroutensili usati devono venire raccolti separatamente e
venire smaltiti in modo ecocompatibile.
Alternativa di riciclaggio alla richiesta di restituzione:
il proprietario dell’apparecchio elettrico è tenuto in alternativa, invece della restituzione, a collaborare in
modo che lo smaltimento venga eseguito correttamente in caso ceda l’apparecchio. L’apparecchio vecchio può anche venire consegnato ad un centro di raccolta che provvede poi allo smaltimento secondo
le norme nazionali sul riciclaggio e sui rifi uti. Non ne sono interessati gli accessori e i mezzi ausiliari sen-
za elementi elettrici forniti insieme ai vecchi apparecchi.
La ristampa o l’ulteriore riproduzione, anche parziale, della documentazione o dei documenti
d’accompagnamento dei prodotti è consentita solo con l’esplicita autorizzazione da parte della
iSC GmbH.
Con riserva di apportare modifi che tecniche
- 53 -
Anl_EF_1800_SPK9.indb 53Anl_EF_1800_SPK9.indb 53 22.11.2018 06:58:5222.11.2018 06:58:52
Page 54

I
Informazioni sul Servizio Assistenza
In tutti i Paesi indicati nel certifi cato di garanzia disponiamo di competenti partner per il Servizio Assis-
tenza (per i relativi dati di contatto si veda il certifi cato di garanzia), che sono a vostra disposizione per
tutte le richieste di assistenza come riparazione, fornitura di pezzi di ricambio e parti di usura o vendita
di materiali di consumo.
Si deve tenere presente che le seguenti parti di questo prodotto sono soggette a un‘usura naturale o
dovuta all‘uso ovvero che le seguenti parti sono necessarie come materiali di consumo.
Categoria Esempio
Parti soggette ad usura * Batterie
Materiale di consumo/parti di consumo *
Parti mancanti
* non necessariamente compreso tra gli elementi forniti!
In presenza di difetti o errori vi preghiamo di denunciare il caso sul sito internet www.isc-gmbh.info. Vi
preghiamo di descrivere con precisione l‘anomalia e a tal riguardo di rispondere in ogni caso alle seguenti domande:
L‘apparecchio ha già funzionato una volta o era difettoso fin dall‘inizio?
•
Avete notato qualcosa prima che si manifestasse il difetto (sintomo prima del difetto)?
•
A vostro parere che cosa non funziona nell‘apparecchio (sintomo principale)?
•
Descrivete che cosa non funziona.
- 54 -
Anl_EF_1800_SPK9.indb 54Anl_EF_1800_SPK9.indb 54 22.11.2018 06:58:5222.11.2018 06:58:52
Page 55

I
Certifi cato di garanzia
Gentili clienti,
i nostri prodotti sono soggetti ad un rigido controllo di qualità. Se l‘apparecchio non dovesse tuttavia
funzionare correttamente, ci scusiamo e vi preghiamo di rivolgervi al nostro servizio di assistenza clienti
all‘indirizzo indicato in questa scheda di garanzia. Siamo a vostra disposizione anche telefonicamente al
numero del Servizio Assistenza indicato. Per la rivendicazione dei diritti di garanzia vale quanto segue:
1. Le presenti condizioni di garanzia si rivolgono esclusivamente a consumatori, vale a dire a persone
fi siche che non intendono utilizzare questo prodotto né in ambito professionale né per altre attività
di lavoro autonomo. Le presenti condizioni di garanzia regolano prestazioni di garanzia supplemen-
tari che il produttore su indicato concede in aggiunta alla garanzia legale agli acquirenti di nuovi
apparecchi. La presente garanzia non tocca i vostri diritti al ricorso in garanzia previsti dalla legge.
Le nostre prestazioni di garanzia sono per voi gratuite.
2. La prestazione di garanzia riguarda esclusivamente i difetti di un nuovo apparecchio da voi
acquistato del produttore di cui sopra, riconducibili a errori di materiale o di produzione, ed è li-
mitata, a nostra discrezione, all‘eliminazione di questi difetti dell‘apparecchio o alla sostituzione
dell‘apparecchio stesso.
Tenete presente che i nostri apparecchi non sono stati costruiti per l‘impiego artigianale, professio-
nale o imprenditoriale. Pertanto un contratto di garanzia non viene concluso se l‘apparecchio è stato
usato entro il periodo di garanzia in attività artigianali, imprenditoriali o industriali o se è stato sotto-
posto a sollecitazioni equivalenti.
3. Sono esclusi dalla nostra garanzia:
- Danni all‘apparecchio causati dalla mancata osservanza delle istruzioni di montaggio o per
un‘installazione non corretta, dalla mancata osservanza delle istruzioni per l‘uso (come ad es. colle-
gamento a una tensione di rete o a un tipo di corrente non corretti), dalla mancata osservanza delle
norme relative alla manutenzione e alla sicurezza, dall‘esposizione dell‘apparecchio a condizioni
ambientali anomale o per la mancata esecuzione di pulizia e manutenzione.
- Danni all‘apparecchio dovuti a usi impropri o illeciti (come per es. sovraccarico dell‘apparecchio
o utilizzo di utensili di ricambio o accessori non consentiti), alla penetrazione di corpi estranei
nell‘apparecchio (come per es. sabbia, pietre o polvere, danni dovuti al trasporto), all‘impiego della
forza o a infl ussi esterni (come per es. danni causati da caduta).
- Danni all‘apparecchio o a parti di esso da ricondurre a un‘usura comune, dovuta all‘uso o di altro
tipo naturale.
4. Il periodo di garanzia è 24 mesi e inizia a partire dalla data di acquisto dell‘apparecchio. I diritti di
garanzia devono essere fatti valere prima della scadenza del periodo di garanzia, entro due settima-
ne dopo avere accertato il difetto. È esclusa la rivendicazione di diritti di garanzia dopo la scadenza
del relativo periodo. La riparazione o la sostituzione dell‘apparecchio non comporta una proroga del
periodo di garanzia e con questa prestazione per l‘apparecchio o per pezzi di ricambio eventual-
mente installati non inizia un nuovo periodo di garanzia. Ciò vale anche nel caso in cui si ricorra a un
servizio sul posto.
5. Per rivendicare il diritto di garanzia vi preghiamo di comunicare che l‘apparecchio è difettoso tramite
sito internet: www.isc-gmbh.info. Tenete a portata di mano il documento di acquisto o altri documenti
come prova dell‘acquisto del vostro apparecchio nuovo. Apparecchi inviati senza i relativi documenti
o senza targhetta d‘identifi cazione sono esclusi dalla prestazione di garanzia perché non possono
essere classifi cati in modo corrispondente. Se il difetto dell‘apparecchio rientra nella nostra presta-
zione di garanzia, ricevete prontamente l‘apparecchio riparato o un apparecchio nuovo.
Naturalmente eff ettuiamo a pagamento anche riparazioni sull‘apparecchio che non rientrano o non rien-
trano più nella garanzia. A tale scopo inviate l‘apparecchio all‘indirizzo del nostro Centro Assistenza.
Per parti mancanti, di consumo e soggette a usura rimandiamo alle limitazioni di questa garanzia secondo le informazioni sul Servizio Assistenza di queste istruzioni per l‘uso.
- 55 -
Anl_EF_1800_SPK9.indb 55Anl_EF_1800_SPK9.indb 55 22.11.2018 06:58:5222.11.2018 06:58:52
Page 56

NL
Gevaar! - Handleiding lezen om het letselrisico te verminderen
- 56 -
Anl_EF_1800_SPK9.indb 56Anl_EF_1800_SPK9.indb 56 22.11.2018 06:58:5222.11.2018 06:58:52
Page 57

NL
Gevaar!
Bij het gebruik van toestellen dienen enkele
veiligheidsmaatregelen te worden nageleefd om
lichamelijk gevaar en schade te voorkomen. Lees
daarom deze handleiding / veiligheidsinstructies
zorgvuldig door. Bewaar deze goed zodat u de informatie op elk moment kunt terugvinden. Mocht
u dit toestel aan andere personen doorgeven,
gelieve dan deze handleiding / veiligheidsinstructies mee te geven. Wij zijn niet aansprakelijk
voor ongevallen of schade die te wijten zijn aan
niet-naleving van deze handleiding en van de veiligheidsinstructies.
1. Veiligheidsaanwijzingen
Gevaar!
Lees alle veiligheidsinstructies en aanwijzingen. Nalatigheden bij de inachtneming van de
veiligheidsinstructies en aanwijzingen kunnen
elektrische schok, brand en/of zware letsels tot
gevolg hebben. Bewaar alle veiligheidsinstruc-
ties en aanwijzingen voor de toekomst.
Controleer of het apparaat in perfecte staat
•
is geleverd. Bij eventuele beschadigingen het
apparaat niet aansluiten.
Leg de netkabel zo, dat men er niet kan over
•
struikelen.
De netkabel niet over delen van het apparaat
•
leiden, die tijdens het bedrijf heet worden.
Netstekker nooit aan de netkabel uit het
•
stopcontact trekken! Het apparaat nooit aan
de netkabel dragen of bewegen door aan de
kabel te trekken.
Netkabel nooit rond het apparaat wikkelen.
•
De netkabel nooit klemmen, niet over scher-
•
pe randen trekken, noch boven warme kook-
platen of open vlammen leggen.
Apparaat alleen gebruiken in gesloten droge
•
ruimtes.
Dit verwarmingsapparaat niet gebruiken in de
•
onmiddellijke nabijheid van een badkuip, een
douche of een zwembad.
Het verwarmingsapparaat niet gebruiken in
•
de badkamer.
Apparaat nooit onderdompelen in water – le-
•
vensgevaar!
Nooit het apparaat met natte handen bedie-
•
nen.
Apparaat niet openen en nooit delen aanra-
•
ken waarop spanning staat – levensgevaar!
Het apparaat zo opstellen, dat de netstekker
•
altijd toegankelijk is.
Als het apparaat langere tijd buiten bedrijf is,
•
trek dan de netstekker uit het stopcontact!
Het apparaat niet recht onder een stopcon-
•
tact opstellen.
De behuizing kan bij langdurig bedrijf erg
•
warm worden. Het apparaat zo opstellen, dat
een toevallige aanraking uitgesloten is.
Het apparaat mag niet worden gebruikt in
•
ruimtes waarin brandgevaarlijke stoffen (bijv.
oplosmiddelen enz.) of gassen ingezet of
bewaard worden.
Licht ontbrandbare stoffen of gassen weg-
•
houden van het apparaat.
Niet inzetten in aan brandgevaar blootstaan-
•
de ruimtes (bijv. houten loods).
Verwarmingsapparaat alleen inzetten met
•
helemaal afgerolde netkabel.
Geen vreemde voorwerpen in de openin-
•
gen van het apparaat steken – gevaar van
elektrische schok en beschadiging van het
apparaat.
Kinderen en personen onder invloed van
•
medicamenten of alcohol weghouden van het
apparaat.
Waarschuwing: Om een oververhitting van
•
het verwarmingsapparaat te voorkomen mag
het niet worden afgedekt – brandgevaar!
Neem het symbool op het apparaat in acht
(fig. 10).
Onderhoudswerkzaamheden en reparaties
•
mogen alleen door geautoriseerd vakpersoneel worden uitgevoerd.
De netkabel moet regelmatig op defecten of
•
beschadigingen worden gecontroleerd. Een
beschadigde netkabel mag alleen door een
elektricien of door ISC GmbH met inachtneming van de geldende voorschriften worden
vervangen.
Installeer voor de elektrische veiligheid een
•
aardlekschakelaar (RCD).
Het apparaat alleen aansluiten aan een ge-
•
aard stopcontact.
Bedieningselementen mogen door een
•
persoon die zich onder de douche, onder
een met vloeistof gevuld vat of in de badkuip
bevindt, niet kunnen worden aangeraakt.
Kinderen jonger dan 3 jaar moeten uit de
•
buurt worden gehouden, tenzij permanent op
hen wordt toegezien.
Kinderen vanaf 3 jaar en jonger dan 8 jaar
•
mogen het apparaat alleen in- en uitschakelen als op hen wordt toegezien, of als ze met
betrekking tot het veilige gebruik van het apparaat werden geïnstrueerd en de daaruit re-
- 57 -
Anl_EF_1800_SPK9.indb 57Anl_EF_1800_SPK9.indb 57 22.11.2018 06:58:5222.11.2018 06:58:52
Page 58

NL
sulterende gevaren begrepen hebben, onder
voorwaarde dat het apparaat in zijn normale
gebruikspositie geplaatst of geïnstalleerd is.
Kinderen vanaf 3 jaar en jonger dan 8 jaar
mogen niet de stekker in het stopcontact ste-
ken, het apparaat niet regelen, het apparaat
niet reinigen en/of niet het onderhoud door de
gebruiker uitvoeren.
Dit apparaat kan door kinderen vanaf 8 jaar
•
en ouder en ook door personen met vermin-
derde fysieke, sensorische of mentale vaar-
digheden of een gebrek aan ervaring en ken-
nis worden gebruikt, mits deze onder toezicht
staan of met betrekking tot het veilige gebruik
van het apparaat geïnstrueerd werden en
begrijpen welke gevaren van het apparaat
kunnen uitgaan. Kinderen mogen niet met
het apparaat spelen. Reiniging en onderhoud
door de gebruiker mogen niet zonder toezicht
door kinderen worden uitgevoerd.
Voorzichtig – Sommige delen van het
•
product kunnen erg heet worden en
brandwonden veroorzaken. Bijzondere
voorzichtigheid is geboden, wanneer er
kinderen en bescherming behoevende
personen aanwezig zijn.
2. Beschrijving van het gereedschap
en leveringsomvang
2.1 Beschrijving van het apparaat (fi g. 1)
1 Glazen front
2 Stookplaats – decoratief element
3 Luchtuitlaat en verwarmingselement
4 Bedieningselementen
5 Hoofdschakelaar
6 Afstandsbediening (incl. batterij CR2025)
2.2 Leveringsomvang (fi g. 2)
Gelieve de volledigheid van het artikel te controleren aan de hand van de beschreven omvang
van de levering. Indien er onderdelen ontbreken,
gelieve u dan binnen 5 werkdagen na aankoop
van het artikel te wenden tot ons servicecenter of
tot het verkooppunt waar u het apparaat heeft gekocht, en leg een geldig bewijs van aankoop voor.
Gelieve daarvoor de garantietabel in de serviceinformatie aan het einde van de handleiding in
acht te nemen.
Open de verpakking en neem het toestel
•
voorzichtig uit de verpakking.
Verwijder het verpakkingsmateriaal alsmede
•
verpakkings-/transportbeveiligingen (indien
aanwezig).
Controleer of de leveringsomvang compleet
•
is.
Controleer het toestel en de accessoires op
•
transportschade.
Bewaar de verpakking indien mogelijk tot het
•
verloop van de garantieperiode.
Gevaar!
Het toestel en het verpakkingsmateriaal zijn
geen speelgoed voor kinderen! Kinderen mogen niet met plastic zakken, folies en kleine
stukken spelen! Er bestaat inslik- en verstikkingsgevaar!
10 Verwarmingsapparaat
11 Wandhouder boven
12 Bevestigingshoek
13 Plug Ø 6 mm (6 st.)
14 Schroef 4x30 mm (6 st.)
15 Schroef 4x8 mm (2 st.)
Originele handleiding
•
3. Reglementair gebruik
Het apparaat is alleen bedoeld als hulpverwarming in droge, gesloten ruimtes. Het apparaat
mag alleen aan een muur worden gemonteerd.
De montage aan een niet-stabiele of brandbare
muur, op schuine vlakken of aan het plafond is
verboden.
De machine mag slechts voor werkzaamheden
worden gebruikt waarvoor ze bedoeld is. Elk
ander verder gaand gebruik is niet reglementair.
Voor daaruit voortvloeiende schade of verwondingen van welke aard dan ook is de gebruiker/
bediener, niet de fabrikant, aansprakelijk.
Wij wijzen erop dat onze gereedschappen overeenkomstig hun bestemming niet geconstrueerd
zijn voor commercieel, ambachtelijk of industrieel
gebruik. Wij geven geen garantie indien het gereedschap in ambachtelijke of industriële bedrijven alsmede bij gelijk te stellen activiteiten wordt
gebruikt.
- 58 -
Anl_EF_1800_SPK9.indb 58Anl_EF_1800_SPK9.indb 58 22.11.2018 06:58:5222.11.2018 06:58:52
Page 59

NL
4. Technische gegevens
Nominale spanning: .............. 220-240 V ~ 50 Hz
Verwarmingsvermogen max.: ................. 1800 W
Beschermklasse: ............................................... I
Beschermklasse: ....................................... IP X0
Afmetingen: ................................ 88 x 56 x 15 cm
5. Vóór inbedrijfstelling
Controleer of de gegevens vermeld op het kenplaatje overeenkomen met de gegevens van
het stroomnet alvorens het gereedschap aan te
sluiten.
5.1 Wandmontage
Voorzichtig!
Om glasbreuk te vermijden verwijdert u het voorste glazen front van het apparaat en monteert u het
pas weer aan het einde.
De minimum afstanden moeten worden aangehouden. Het apparaat mag alleen in verticale
stand en volledig gemonteerd worden ingezet.
(Fig. 3) Tot de behuizing moeten minimum afstanden van 20 cm naar de zijkant, 100 cm naar het
plafond, 60 cm naar de vloer en 100 cm naar voor
worden aangehouden. Neem punt 1 - Veiligheidsinstructies in acht.
Voorzichtig! Vergewis u ervan dat er zich in de
buurt van de boorgaten geen elektrische leidingen of andere installaties (bijv. waterleidingen)
bevinden. Zorg ervoor dat het apparaat goed vast
en horizontaal tegen de muur zit. Gebruik alleen
geschikt bevestigingsmateriaal aan een stabiele
muur. De meegeleverde pluggen en schroeven
zijn geschikt voor: beton, natuursteen met compacte structuur, volle baksteen, volle kalkzandsteen, volle steen van lichtbeton en cellenbeton.
1. Fig. 4: Markeer horizontaal de posities van de
vier boorgaten van de bovenste wandhouder
(11) aan een stabiele muur. De boorgaten
liggen 150 mm uit elkaar.
2. Boor vervolgens vier gaten (Ø 6 mm) in de
muur en zet de pluggen (fi g. 2, pos. 13) erin.
Plaats de gaten van de bovenste wandhouder
(fi g. 4, pos. 11) over de boorgaten en beves-
tig de wandhouder met 4 schroeven 4x30
mm (pos. 14). Let erop dat de haken aan de
wandhouder naar boven wijzen (fi g. 4).
3. Fig. 5: Monteer de bevestigingshoek (12) met
2 schroeven 4x8 mm (fi g. 2, pos. 15) in het
midden aan de onderkant van de behuizing
van de verwarmer.
4. Fig. 6: Hang de behuizing aan de wandhouder. Let erop dat de haken aan de wandhouder in de gaten van de behuizing (A)
grijpen.
5. Fig. 5: Teken de gaten (B) van de bevestigingshoek (12) af op de muur en neem de de
behuizing van de verwarmer weer eraf.
6. Boor twee gaten (Ø 6 mm) in de muur, zet
de pluggen (fi g. 2, pos. 13) erin en hang de
behuizing weer aan de bovenste wandhouder
(fi g. 6). Let erop dat de haken ingrijpen in de
gaten van de behuizing (A).
7. Fig. 5: Fixeer de bevestigingshoek met 2
schroeven 4x30 mm (fi g. 2, pos. 14) aan de
muur.
8. Fig. 7: Haal er een tweede persoon bij om te
helpen en hang het glazen front (1) met de
daaraan voorziene zijdelingse haken in de
daartoe voorziene slobgaten (C) aan de behuizing.
5.2 Afstandsbediening
Aanwijzing: Alle functies kunnen zowel met de
drukknoppen op het apparaat als met de afstandsbediening worden geschakeld. Er moet
een knoopcel type CR 2025 worden gebruikt
(zit in de afstandsbediening). Trek vóór gebruik
de contactbeveiliging (kunststof plaatje) uit de
behuizing.
Aanwijzing! Het kan enkele seconden duren,
voordat het apparaat na indrukken van de knoppen op de afstandsbediening reageert. Druk
binnen 2 seconden niet meerdere malen op de
knoppen van de afstandsbediening.
Gebruik nooit een ander dan het vermelde
•
type batterij.
Als de afstandsbediening langere tijd niet
•
wordt gebruikt, neem de batterij dan eruit om
te verhinderen dat hij uitloopt.
Houd de afstandsbediening in de richting van
•
de verwarmer. De actieradius bedraagt max.
5 meter.
Direct instralend zonlicht en voorwerpen kun-
•
nen de actieradius van de afstandsbediening
aanzienlijk beïnvloeden.
Behandel de afstandsbediening met zorg.
•
Laat hem niet vallen, vermijd hitte en vocht.
- 59 -
Anl_EF_1800_SPK9.indb 59Anl_EF_1800_SPK9.indb 59 22.11.2018 06:58:5222.11.2018 06:58:52
Page 60

NL
Batterij vervangen (fi g. 8):
1. Open het deksel van het batterijvak door de
vergrendeling (F) naar het midden te drukken
en tegelijkertijd het batterijvak eruit te trekken.
2. Let er bij het plaatsen van de batterij op dat
de polariteit overeenstemt met de opgave aan
de behuizing.
3. Druk het deksel van het batterijvak in de afstandsbediening.
U bent als eindconsument wettelijk verplicht om
gebruikte batterijen in te leveren. De inlevering
kan gebeuren bij de openbare inzamelpunten van
de gemeente of overal waar ze verkocht worden.
Neem ook hoofdstuk 11 in acht.
6. Bediening
Aanwijzing: Elke bediening wordt bevestigd door
een korte signaaltoon.
Neem de onder punt 1 opgesomde
veiligheidsinstructies in acht.
Bij de eerste inbedrijfstelling of na langdurig nietgebruik is kortstondige geurvorming mogelijk. Dit
is geen fout.
6.1 Netspanning in- en uitschakelen (afb. 1)
Met de hoofdschakelaar (5) wordt het apparaat
volledig van het stroomnet geïsoleerd. Schakel
als eerste de hoofdschakelaar in ‘I’ resp. als
laatste uit ‘0’, als u het apparaat niet meer nodig
heeft.
6.2 Apparaat in- en uitschakelen (afb. 9)
Druk op de knop ‘Power’ (D). Het apparaat
schakelt in, vlammeneff ect en display worden
geactiveerd. Om het apparaat uit te schakelen
drukt u opnieuw op de knop ‘Power’ (D). Het
vlammeneff ect en het display doven.
6.3 Dimmerfunctie in- en uitschakelen (afb. 9)
Druk op de knop ‘Flame’ (E). De helderheid
van het vlammeneff ect kan door meermaals te
drukken worden ingesteld op 5 niveaus.
6.4 Temperatuurindicatie °C/°F (afb. 9)
Aanwijzing: Kan alleen worden omgeschakeld
aan het apparaat.
Het is mogelijk om de temperatuur in °C of °F te
laten weergeven.
Om de weergave om te schakelen drukt u de
‘DOWN’ toets 5 seconden lang in.
6.5 Gewenste temperatuur instellen (afb. 9)
Aanwijzingen: De in te stellen gewenste
temperatuur komt overeen met de aan de
geïntegreerde temperatuurvoeler gemeten,
en op het display weergegeven, temperatuur
van het apparaat. Deze kan iets afwijken
van de daadwerkelijke ruimtetemperatuur.
Als de ingestelde gewenste temperatuur
wordt overschreden, dan schakelt de
verwarmingsfunctie uit. Als de temperatuur daalt
onder de ingestelde gewenste temperatuur, dan
schakelt de verwarmingsfunctie weer in.
6.5.1 Instelling aan het apparaat (afb. 9)
Druk op de toets ‘UP’ om de temperatuurinstelling
(15°C – 35°C resp. 59°F – 95°F) te starten.
Vervolgens drukt u op de toetsen ‘UP’ of ‘DOWN’
om de temperatuur in te stellen. De temperatuur
wordt telkens met 1°C verhoogd resp. verlaagd.
6.5.2 Instelling met afstandsbediening (afb. 9)
Druk voor de temperatuurinstelling (15°C – 35°C
resp. 59°F – 95°F) op de toets ‘F’. De temperatuur
wordt met elke druk op de toets 1°C verhoogd en
begint na het bereiken van 35°C weer bij 15°C.
6.6 Verwarmingsfunctie in- en uitschakelen
(afb. 9)
Druk bij ingeschakelde verwarmer op de toets
‘Heater’ (H), tot de LED ‘Heat 1’ voor 900 W
verwarmingsvermogen verschijnt. Als de toets
‘Heater’ (H) nog eens wordt ingedrukt, dan brandt
de LED ‘Heat 2’ voor 1800 W verwarmingsvermogen. Als de toets ‘Heater’ (H) nog eens wordt
ingedrukt, dan wordt de verwarmer uitgeschakeld.
6.7 Tijdautomatiek - in- en uitschakeltijd
programmeren (afb. 9)
Aanwijzingen:
Schakel het apparaat in zoals hiervoor
•
beschreven.
Per dag kan een in- en een uitschakeltijd
•
worden ingesteld. Overweeg vooraf op welke
momenten het apparaat in resp. uit moet
schakelen en noteer deze tijden.
Inschakeltijd programmeren: er verschijnt een
•
kleine LED naast de ‘10 minuten – indicatie’
(bijv. 10:5.1).
Uitschakeltijd programmeren: er verschijnt
•
een kleine LED naast de ‘Minuten – indicatie’
(bijv. 10:51.).
Voor alle instellingen knippert de indicatie
•
5 seconden. Gedurende deze tijd zijn
instellingen mogelijk. Als 5 seconden lang
geen toets wordt ingedrukt, dan is de huidige
- 60 -
Anl_EF_1800_SPK9.indb 60Anl_EF_1800_SPK9.indb 60 22.11.2018 06:58:5222.11.2018 06:58:52
Page 61

NL
instelling automatisch opgeslagen.
6.7.1 Programmering aan het apparaat
voor een paar dagen of met de
afstandsbediening (afb. 9)
Inschakeltijd
Druk eenmaal op de toets ‘TIMER’ resp. ‘7’.
•
De LED ‘Mon’ en de urenindicatie knipperen.
Druk op de toetsen ‘UP (omhoog)’ (K) of
•
‘DOWN (omlaag)’ (L) en stel voor maandag
de inschakeltijd in uren in.
Druk op de toets ‘TIMER’ resp. ‘24H’ en stel
•
met de toetsen ‘UP’ (K) en ‘DOWN’ (L) voor
maandag de inschakeltijd in minuten in.
Uitschakeltijd
Druk binnen 5 seconden nog eens op de
•
toets ‘TIMER’ resp. ‘7’. De LED ‘Mon’ en de
urenindicatie knipperen.
Druk op ‘UP’ (K) of ‘DOWN’ (L) om voor
•
maandag de uitschakeltijd in uren in te
stellen.
Druk op de toets ‘TIMER’ resp. ‘24H’ en stel
•
met de toetsen ‘UP’ (K) en ‘DOWN’ (L) voor
maandag de uitschakeltijd in minuten in.
Druk nog eens op de toets ‘TIMER’ resp. ‘7’
en programmeer voor dinsdag. Herhaal de
programmering voor alle andere dagen van de
week.
Om een weekdag (bijv. dinsdag) bij de
programmering over te slaan drukt u zo vaak op
de toets ‘TIMER’ resp. ‘7’, tot de volgende dag
(bijv. woensdag) verschijnt voor de gewenste
programmering.
6.7.2 Programmering voor een paar weken
met de afstandsbediening (afb. 9)
Aanwijzing: In aanvulling tot de hiervoor
beschreven programmering van de in- en
uitschakeltijd voor een paar dagen kunt u deze
met de afstandsbediening ook programmeren
voor een paar weken.
Inschakeltijd uur programmeren (afb. 9)
Druk op de toets ‘7’. De LED ‘Mon’ en de
•
urenindicatie knipperen.
Druk op de toetsen ‘UP’ (K) of ‘DOWN’ (L) om
•
voor maandag de inschakeltijd in uren in te
stellen.
Druk nog eens op de toets ‘7’. Programmeer
•
voor dinsdag.
Herhaal het proces voor de overige dagen
•
van de week.
Als alle weekdagen zijn geprogrammeerd,
•
dan wordt na 5 seconden (geen toets
indrukken) de huidige instelling automatisch
opgeslagen.
Inschakeltijd minuten programmeren (afb. 9)
Druk op de toets ‘7’ en daarna op ‘24H’. De
•
LED ‘Mon’ en de minutenindicatie knipperen.
Druk op de toetsen ‘UP’ (K) of ‘DOWN’ (L) om
•
voor maandag de inschakeltijd in minuten in
te stellen.
Druk nog eens op de toets ‘7’ en daarna op
•
‘24H’. Programmeer voor dinsdag.
Herhaal het proces voor de overige dagen
•
van de week.
Als alle weekdagen zijn geprogrammeerd,
•
dan wordt na 5 seconden (geen toets
indrukken) de huidige instelling automatisch
opgeslagen.
Uitschakeltijd uur programmeren (afb. 9)
Druk op de toets ‘7’ en daarna 2x op ‘24H’. De
•
LED ‘Mon’ en de urenindicatie knipperen.
Druk op de toetsen ‘UP’ (K) of ‘DOWN’ (L) om
•
voor maandag de uitschakeltijd in uren in te
stellen.
Druk nog eens op de toets ‘7’ en daarna 2x
•
op ‘24H’. Programmeer voor dinsdag.
Herhaal het proces voor de overige dagen
•
van de week.
Als alle weekdagen zijn geprogrammeerd,
•
dan wordt na 5 seconden (geen toets
indrukken) de huidige instelling automatisch
opgeslagen.
Uitschakeltijd minuten programmeren (afb. 9)
Druk op de toets ‘7’ en daarna 3x op ‘24H’. De
•
LED ‘Mon’ en de minutenindicatie knipperen.
Druk op de toetsen ‘UP’ (K) of ‘DOWN’ (L) om
•
voor maandag de uitschakeltijd in minuten in
te stellen.
Druk nog eens op de toets ‘7’ en daarna 3x
•
op ‘24H’. Programmeer voor dinsdag.
Herhaal het proces voor de overige dagen
•
van de week.
Als alle weekdagen zijn geprogrammeerd,
•
dan wordt na 5 seconden (geen toets
indrukken) de huidige instelling automatisch
opgeslagen.
- 61 -
Anl_EF_1800_SPK9.indb 61Anl_EF_1800_SPK9.indb 61 22.11.2018 06:58:5222.11.2018 06:58:52
Page 62

NL
6.8 Huidige tijd instellen (afb. 9)
Aanwijzing: Kan alleen worden ingesteld aan
het apparaat. Als 5 seconden lang geen toets
wordt ingedrukt, dan is de huidige instelling
automatisch opgeslagen.
Schakel de verwarmer uit met de toets
•
‘POWER’ (D).
Druk de toets ‘TIMER’ 3 seconden lang in. De
•
urenindicatie knippert 5 seconden.
Stel met de ‘UP’ en ‘DOWN’ toetsen het
•
huidige uur in.
Druk op de toets ‘TIMER’, de minutenindicatie
•
knippert 5 seconden.
Stel met de ‘UP’ en ‘DOWN’ toetsen de
•
huidige minuten in.
Druk zo vaak op de toets ‘TIMER’, tot de
•
huidige weekdag brandt. Ondertussen
knipperen afwisselend de uren- en de
minutenindicatie.
6.9 Tijdautomatiek activeren (afb. 9)
Schakel het apparaat uit met de toets
‘POWER’ (D). Het apparaat schakelt op
het volgende schakelpunt met de het laatst
ingestelde verwarmingsfunctie, gewenste
temperatuurinstelling en helderste vlammeneff ect
in.
6.10 Functie ‘Raam open’
Als bij ingeschakelde verwarmingsfunctie de
temperatuur binnen 10 minuten 5°C daalt, dan
weerklinkt gedurende enkele seconden een
signaal en de verwarmingsfunctie schakelt uit.
6.11 Beveiliging tegen oververhitting
Bij overmatige verwarming schakelt het
verwarmingsvermogen of het apparaat
automatisch uit. Als dit het geval is, dan schakelt
u het apparaat compleet uit en trekt u de
netstekker uit het stopcontact. Laat het apparaat
ongeveer 15 minuten afkoelen. Na het verhelpen
van de oorzaak (bijv. afgedekt luchtrooster) kan
het apparaat zoals hiervoor beschreven weer
worden ingeschakeld. Als de beveiliging tegen
oververhitting herhaaldelijk reageert of als het
apparaat niet meer kan worden ingeschakeld,
gelieve u dan te wenden tot uw klantendienst.
7. Vervanging van de
netaansluitleiding
Gevaar!
Als de netaansluitleiding van dit apparaat
beschadigd wordt, dan moet hij door de fabrikant
of diens klantendienst of door een gelijkwaardig
gekwalifi ceerde persoon vervangen worden, om
gevaren te vermijden.
8. Reiniging, onderhoud en
bestellen van wisselstukken
Gevaar!
Trek vóór alle schoonmaakwerkzaamheden de
netstekker uit het stopcontact.
Het apparaat moet zijn afgekoeld.
8.1 Reiniging
Houd de veiligheidsinrichtingen, de
•
ventilatiespleten en het motorhuis zo veel
mogelijk vrij van stof en vuil.
Verontreinigingen door stof verwijderen met
•
een stofzuiger.
Maak het apparaat regelmatig schoon
•
met een vochtige doek. Gebruik geen
reinigings- of oplosmiddelen; die zouden de
kunststof delen van het apparaat kunnen
aantasten. Zorg ervoor dat geen water
binnenin het apparaat terecht kan komen. Het
binnendringen van water in een elektrische
apparaat verhoogt het risico van een
elektrische schok.
Het glazen front kan met gebruikelijke glasrei-
•
nigers worden schoongemaakt.
8.2 Onderhoud
In het toestel zijn er geen andere te onderhouden
onderdelen.
Verwarmingselementen of de voor het vlammeneff ect gebruikte LEDs mogen alleen door
een gekwalifi ceerde elektricien of de door Einhell
daarmee belaste klantendienst met inachtneming
van de geldende voorschriften worden vervangen.
- 62 -
Anl_EF_1800_SPK9.indb 62Anl_EF_1800_SPK9.indb 62 22.11.2018 06:58:5222.11.2018 06:58:52
Page 63

8.3 Bestellen van wisselstukken:
Gelieve bij het bestellen van wisselstukken volgende gegevens te vermelden:
Type van het toestel
•
Artikelnummer van het toestel
•
Ident-nummer van het toestel
•
Wisselstuknummer van het benodigd stuk
•
Actuele prijzen en info vindt u terug onder
www.isc-gmbh.info
9. Verwijdering en recyclage
Het toestel bevindt zich in een verpakking om
transportschade te voorkomen. Deze verpakking
is een grondstof en bijgevolg herbruikbaar of kan
naar de grondstofkringloop worden teruggevoerd.
Het toestel en zijn accessoires bestaan uit
diverse materialen, zoals b.v. metaal en kunststof.
Defecte toestellen horen niet thuis in het huisvuil.
Om zich van het toestel naar behoren te ontdoen
dient het naar een geschikte verzamelplaats te
worden gebracht. Als u geen verzamelplaats kent
gelieve u dan bij de gemeente te informeren.
10. Opbergen
NL
Bewaar het toestel en de accessoires op
een donkere, droge en vorstvrije plaats die
voor kinderen ontoegankelijk is. De optimale
opbergtemperatuur ligt tussen 5° C en 30°
C. Bewaar het elektrische gereedschap in de
originele verpakking.
11. Verwerking van de batterijen
Batterijen bevatten materialen die schadelijk zijn
voor het milieu. Gooi batterijen niet bij het huisvuil, in het vuur of in het water. Batterijen moeten
ingezameld, gerecycled of milieuvriendelijk verwerkt worden. Stuur verbruikte batterijen aan iSC
GmbH, Eschenstraße 6 in D-94405 Landau. Daar
wordt door de fabrikant een vakkundige verwerking verzekerd.
- 63 -
Anl_EF_1800_SPK9.indb 63Anl_EF_1800_SPK9.indb 63 22.11.2018 06:58:5222.11.2018 06:58:52
Page 64

NL
12. Informatie over het verhelpen van fouten
Als het apparaat juist wordt ingezet, dan zouden er geen storingen mogen optreden. Controleer bij
storingen de volgende mogelijkheden, voordat u de klantendienst op de hoogte brengt.
Storing Mogelijke oorzaak Oplossing
Apparaat verwarmt
niet
Netstekker niet ingestoken
Hoofdschakelaar niet ingeschakeld
Netstekker insteken
Hoofdschakelaar inschakelen
Afstandsbediening
werkt niet
Apparaat in standby
Verwarmingsvermogen uitgeschakeld
Thermostaat te laag ingesteld
‘Timer’ heeft apparaat uitgeschakeld
Batterij leeg
Afstandsbediening buiten actieradius
Rechtstreeks invallend zonlicht op
het verwarmingsapparaat
‘Power’ toets activeren
Verwarmingsvermogen instellen
Temperatuur verhogen
Tijdselectie wijzigen
Batterij vervangen
Afstand tot het verwarmingsapparaat
verkleinen
Invallend zonlicht verminderen
(verduisteren)
- 64 -
Anl_EF_1800_SPK9.indb 64Anl_EF_1800_SPK9.indb 64 22.11.2018 06:58:5222.11.2018 06:58:52
Page 65

NL
Enkel voor EU-landen
Elektrisch gereedschap hoort niet bij het huisvuil thuis!
Volgens de Europese richtlijn 2012/19/EG op afgedankte elektrische en elektronische toestellen en
omzetting in nationaal recht dienen afgedankte elektrische gereedschappen afzonderlijk te worden verzameld en milieuvriendelijk te worden gerecycleerd.
Recyclagealternatief i.p.v. het toestel terug te sturen:
De eigenaar van het elektrische toestel is alternatief verplicht, i.p.v. het toestel terug te sturen, mede te
werken bij de behoorlijke recyclage in geval hij zich van het eigendom ontdoet. Het afgedankte toestel
kan hiervoor ook bij een verzamelplaats worden afgegeven die voor een verwijdering als bedoeld in de
wetgeving in zake recyclage en afvalverwerking zorgt. Hieronder vallen niet bij de afgedankte toestellen
gevoegde accessoires en hulpmiddelen zonder elektrische componenten.
Nadruk of andere reproductie van documentatie en geleidepapieren van de producten, geheel of gedeeltelijk, enkel toegestaan mits uitdrukkelijke toestemming van iSC GmbH.
Technische wijzigingen voorbehouden
- 65 -
Anl_EF_1800_SPK9.indb 65Anl_EF_1800_SPK9.indb 65 22.11.2018 06:58:5222.11.2018 06:58:52
Page 66

NL
Service-informatie
Wij werken in alle landen die in het garantiebewijs zijn genoemd, samen met competente servicepartners, wier contactgegevens u kunt afl eiden uit het garantiebewijs. Deze staan voor alle diensten zoals
reparatie, het verschaff en van wisselstukken of slijtdelen of voor de aankoop van verbruiksmaterialen te
uwer beschikking.
U moet er rekening mee houden dat bij dit product de volgende delen onderhevig zijn aan een slijtage
door gebruik of een natuurlijke slijtage, resp. dat de volgende delen nodig zijn als verbruiksmaterialen.
Categorie Voorbeeld
Slijtstukken* batterijen
Verbruiksmateriaal/verbruiksstukken*
Ontbrekende onderdelen
* niet verplicht bij de leveringsomvang begrepen!
Bij gebreken of defecten verzoeken wij u om de fout te melden op het internet onder www.isc-gmbh.info.
Gelieve te zorgen voor een nauwkeurige beschrijving van de fout en daarbij in elk geval de volgende
vragen te beantwoorden:
Heeft het toestel reeds eenmaal gewerkt of was het vanaf het begin defect?
•
Is u iets opgevallen voordat het defect zich voordeed (symptoom vóór het defect)?
•
Welke foutieve werkwijze vertoont het toestel volgens u (hoofdsymptoom)?
•
Beschrijf deze foutieve werkwijze.
- 66 -
Anl_EF_1800_SPK9.indb 66Anl_EF_1800_SPK9.indb 66 22.11.2018 06:58:5222.11.2018 06:58:52
Page 67

NL
Garantiebewijs
Geachte klant,
onze producten worden onderworpen aan een strenge kwaliteitscontrole. Mocht dit apparaat echter ooit
niet naar behoren functioneren, spijt dit ons ten zeerste en vragen u zich te wenden tot onze servicedienst onder het adres vermeld op dit garantiebewijs. Wij staan ook graag telefonisch tot uw dienst via
het vermelde servicetelefoonnummer. Voor eisen in verband met het recht garantie geldt het volgende:
1. Deze garantievoorwaarden zijn uitsluitend gericht aan de gebruikers, d.w.z. natuurlijke personen die
dit product niet in het kader van hun ambachtelijke noch van een andere zelfstandige activiteit willen
gebruiken. Deze garantievoorwaarden regelen aanvullende garantieprestaties, die de hieronder genoemde fabrikant kopers van zijn nieuwe apparaten toezegt in aanvulling tot de wettelijke garantie.
Uw wettelijke garantieclaims blijven onaangetast door deze garantie. Onze garantieprestatie is voor
u gratis.
2. De garantieprestatie geldt uitsluitend voor gebreken aan een door u aangekocht nieuw apparaat
van de hieronder genoemde fabrikant die aantoonbaar berusten op een materiaal- of productiefout,
en is naar onze keuze beperkt tot het verhelpen van zulke gebreken aan het apparaat of de vervanging ervan.
Wij wijzen erop dat onze apparaten overeenkomstig hun bestemming niet ontworpen zijn voor commercieel, ambachtelijk of industrieel gebruik. Van een garantiecontract is derhalve geen sprake, als
het apparaat binnen de garantieperiode in commerciële, ambachtelijke of industriële bedrijven werd
ingezet of aan een daarmee gelijk te stellen belasting werd blootgesteld.
3. Van onze garantie zijn uitgesloten:
- Schade aan het apparaat als gevolg van niet-inachtneming van de montagehandleiding of op
grond van ondeskundige installatie, als gevolg van niet-inachtneming van de gebruiksaanwijzing
(zoals bijv. door aansluiting aan een verkeerde netspanning of stroomsoort) of niet-inachtneming
van de onderhouds- en veiligheidsvoorschriften, door blootstelling van het apparaat aan abnormale
omgevingsvoorwaarden of door nalatig onderhoud en verzorging.
- Schade aan het apparaat als gevolg van misbruik of ondeskundige toepassingen (zoals bijv. overbelasting van het apparaat of de inzet van niet toegelaten gereedschappen of toebehoren), binnendringen van vreemde voorwerpen in het apparaat (zoals bijv. zand, stenen of stof, transportschade),
gebruik van geweld of als gevolg van externe invloeden (zoals bijv. schade door vallen).
- Schade aan het apparaat of aan delen van het apparaat die valt te herleiden tot slijtage als gevolg
van gebruik, en als gevolg van normale of andere natuurlijke slijtage.
4. De garantieperiode bedraagt 24 maanden en gaat in op de datum van aankoop van het apparaat.
Garantieclaims dienen voor het verloop van de garantieperiode binnen de twee weken na het vaststellen van het defect geldend te worden gemaakt. Het indienen van garantieclaims na verloop van
de garantieperiode is uitgesloten. De herstelling of vervanging van het apparaat leidt niet tot een
verlenging van de garantieperiode noch wordt door deze prestatie een nieuwe garantieperiode voor
het apparaat of voor eventueel ingebouwde wisselstukken op gang gebracht. Dit geldt ook bij het ter
plaatse uitvoeren van een serviceactiviteit.
5. Gelieve om een garantieclaim in te dienen het defecte apparaat aan te melden onder: www.iscgmbh.info. Houd het aankoopbewijs of een ander bewijs van uw aankoop van het nieuwe apparaat
bij de hand. Apparaten die zonder bijhorende bewijzen of zonder typeplaatje worden teruggestuurd,
worden op grond van de ontbrekende mogelijkheid om het apparaat toe te kennen uitgesloten van
de garantieprestatie. Valt het defect van het apparaat binnen onze garantieprestatie, dan bezorgen
wij u per omgaande een gerepareerd of nieuw apparaat terug.
Uiteraard staan wij ook tot u dienst om, mits betaling van de kosten, defecten van het apparaat te verhelpen die buiten de garantieomvang vallen. Te dien einde stuurt u het apparaat aan ons serviceadres
op.
Voor slijtstukken, verbruiksmateriaal en ontbrekende onderdelen wordt verwezen naar de beperkingen
van deze garantie conform de service-informatie van deze handleiding.
- 67 -
Anl_EF_1800_SPK9.indb 67Anl_EF_1800_SPK9.indb 67 22.11.2018 06:58:5222.11.2018 06:58:52
Page 68

E
Peligro! - Leer el manual de instrucciones para reducir cualquier riesgo de sufrir daños
- 68 -
Anl_EF_1800_SPK9.indb 68Anl_EF_1800_SPK9.indb 68 22.11.2018 06:58:5222.11.2018 06:58:52
Page 69

E
Peligro!
Al usar aparatos es preciso tener en cuenta una
serie de medidas de seguridad para evitar lesiones o daños. Por este motivo, es preciso leer
atentamente este manual de instrucciones/advertencias de seguridad. Guardar esta información
cuidadosamente para poder consultarla en cualquier momento. En caso de entregar el aparato
a terceras personas, será preciso entregarles,
asimismo, el manual de instrucciones/advertencias de seguridad. No nos hacemos responsables
de accidentes o daños provocados por no tener
en cuenta este manual y las instrucciones de
seguridad.
1. Instrucciones de seguridad
Peligro!
Lea todas las instrucciones de seguridad e
indicaciones. El incumplimiento de dichas inst-
rucciones e indicaciones puede provocar descargas, incendios y/o daños graves. Guarde todas
las instrucciones de seguridad e indicaciones para posibles consultas posteriores.
Comprobar que el aparato haya sido suminis-
•
trado en buen estado. No conectar el aparato
en caso de que haya sufrido algún daño.
Colocar el cable de conexión de tal modo que
•
no se tropiece con él.
El cable de red no debe pasar por encima de
•
piezas del aparato a elevada temperatura.
No desenchufar tirando del cable. No trans-
•
portar o arrastrar jamás el aparato tirando del
cable.
No enrollar el cable alrededor del aparato.
•
No aplastar el cable o pasarlo por aristas
•
vivas, ni por encima de encimeras calientes
o llama viva.
Utilizar el aparato sólo en espacios cerrados
•
y secos.
No utilizar este calefactor en las inmediacio-
•
nes de una bañera, ducha o piscina.
No utilizar el calefactor en el baño.
•
No sumergir jamás el aparato en agua: ¡Peli-
•
gro de muerte!
No manejar jamás el aparato con las manos
•
húmedas.
No abrir jamás el aparato ni entrar en contac-
•
to con piezas portadoras de tensión: ¡Peligro
de muerte!
Colocar el aparato de tal forma que resulte
•
fácil acceder al enchufe.
Desenchufar el aparato en caso de dejarlo
•
fuera de servicio durante algún tiempo
No colocar directamente el aparato debajo
•
de un enchufe.
La caja se puede recalentar cuando el apa-
•
rato esté en funcionamiento durante largos
periodos de tiempo. Colocar el aparato de
manera que sea imposible tocarlo de forma
involuntaria.
No se puede poner en funcionamiento el
•
aparato en espacios donde se utilicen o almacenen gases o productos inflamables (p.
ej., disolventes, etc.).
Mantener alejados del aparato aquellos ga-
•
ses o productos altamente inflamables.
No poner en funcionamiento en recintos
•
con peligro de incendio (p. ej., cobertizos de
madera).
Poner en funcionamiento el calefactor solo
•
con el cable de red completamente desenrollado.
No introducir objetos en los orificios del apa-
•
rato, ¡peligro de descarga eléctrica y daños
en el aparato!
Mantener alejados a los niños del aparato,
•
así como a las personas que se encuentren
bajo los efectos de medicamentos o alcohol.
Advertencia: para evitar un sobrecalentami-
•
ento, el calefactor no debe cubrirse. Peligro
de incendio. Tener en cuenta el símbolo que
aparece sobre el aparato (fig. 10).
Los trabajos de mantenimiento y reparación
•
sólo deben ser realizados por personal especializado autorizado.
Comprobar regularmente que el cable de
•
red no sufra ningún tipo de defecto o daño.
Si el cable de red está dañado, solo lo podrá
cambiar un electricista o el servicio de ISC
GmbH teniendo en cuenta las disposiciones
pertinentes.
Para la seguridad eléctrica, instalar un dispo-
•
sitivo de protección diferencial (RCD).
Conectar el aparato únicamente a una toma
•
de corriente con puesta a tierra.
Las personas que se encuentren en la ducha,
•
en contacto con recipientes llenos de líquido
o en la bañera no deben tocar los elementos
de mando.
Mantener a los niños menores de 3 años
•
alejados a no ser que estén constantemente
vigilados.
Los niños entre los 3 y 8 años de edad solo
•
podrán encender y apagar el aparato bajo
vigilancia o una vez se les haya instruido en
el uso seguro del mismo y comprendan los
- 69 -
Anl_EF_1800_SPK9.indb 69Anl_EF_1800_SPK9.indb 69 22.11.2018 06:58:5322.11.2018 06:58:53
Page 70

E
posibles peligros que puede suponer su uso
siempre y cuando el aparato se encuentre
situado o instalado en una posición de uso
normal. Los niños entre los 3 y 8 años de
edad no podrán enchufar el aparato a la toma
de corriente, regular el aparato, limpiar el
aparato ni realizar el mantenimiento que corre a cargo del usuario.
Este aparato podrá ser utilizado por niños
•
a partir de 8 años y personas cuyas capacidades estén limitadas física, sensorial o
psíquicamente o que no dispongan de la
experiencia o los conocimientos necesarios,
siempre y cuando estén vigilados o hayan recibido formación o instrucciones sobre el funcionamiento seguro del aparato y comprendan los posibles peligros. Está prohibido que
los niños jueguen con el aparato. Los niños
no podrán realizar los trabajos de limpieza y
mantenimiento a no ser que estén vigilados
por un adulto.
¡Cuidado! Algunas piezas del producto
•
pueden estar muy calientes y provocar
quemaduras. Se ruega prestar especial
atención en presencia de niños o personas que necesiten protección.
2. Descripción del aparato y
volumen de entrega
2.1 Descripción del aparato (fi g. 1)
1 Frontal de cristal
2 Fuego decorativo
3 Salida de aire y elemento calefactor
4 Elementos de mando
5 Interruptor principal
6 Mando a distancia (incl. pila CR2025)
2.2 Volumen de entrega (fi g. 2)
Sirviéndose de la descripción del volumen de
entrega, comprobar que el artículo esté completo.
Si faltase alguna pieza, dirigirse a nuestro Service Center o a la tienda especializada más cercana en un plazo máximo de 5 días laborales tras
la compra del artículo presentando un recibo de
compra válido. A este respeto, observar la tabla
de garantía de las condiciones de garantía que se
encuentran al fi nal del manual.
Abrir el embalaje y extraer cuidadosamente
•
el aparato.
Retirar el material de embalaje, así como los
•
dispositivos de seguridad del embalaje y para
el transporte (si existen).
Comprobar que el volumen de entrega esté
•
completo.
Comprobar que el aparato y los accesorios
•
no presenten daños ocasionados durante el
transporte.
Si es posible, almacenar el embalaje hasta
•
que transcurra el periodo de garantía.
Peligro!
¡El aparato y el material de embalaje no son
un juguete! ¡No permitir que los niños jueguen con bolsas de plástico, láminas y piezas pequeñas! ¡Riesgo de ingestión y asfi xia!
10 Calefactor
11 Soporte de pared arriba
12 Ángulo de fi jación
13 Tacos Ø 6 mm (6 uds.)
14 Tornillos 4x30 mm (6 uds.)
15 Tornillos 4x8 mm (2 uds.)
Manual de instrucciones original
•
3. Uso adecuado
El aparato ha sido concebido únicamente para
calentar adicionalmente en recintos cerrados y
secos. El aparato sólo debe emplearse si se halla
instalado en una pared. Está totalmente prohibido
montar el aparato en una pared que no posea la
sufi ciente capacidad de carga o sea de un mate-
rial infl amable, así como en paredes inclinadas o
en techos.
Utilizar la máquina sólo en los casos que se indican explícitamente como de uso adecuado. Cualquier otro uso no será adecuado. En caso de uso
inadecuado, el fabricante no se hace responsable
de daños o lesiones de cualquier tipo; el responsable es el usuario u operario de la máquina.
Tener en consideración que nuestro aparato no
está indicado para un uso comercial, industrial o
en taller. No asumiremos ningún tipo de garantía
cuando se utilice el aparato en zonas industriales, comerciales o talleres, así como actividades
similares.
- 70 -
Anl_EF_1800_SPK9.indb 70Anl_EF_1800_SPK9.indb 70 22.11.2018 06:58:5322.11.2018 06:58:53
Page 71

E
4. Características técnicas
Tensión nominal: ................... 220-240 V ~ 50 Hz
Potencia calorífi ca máx.: ........................ 1800 W
Clase de protección: .......................................... I
Tipo de protección: .................................... IP X0
Dimensiones del aparato: .......... 88 x 56 x 15 cm
5. Antes de la puesta en marcha
Antes de conectar la máquina, asegurarse de
que los datos de la placa de identifi cación coinci-
dan con los datos de la red eléctrica.
5.1 Montaje en pared
¡Cuidado!
Para evitar que el cristal se rompa, retirar el frontal de cristal del aparato y volver a montarlo al
fi nal de todo.
Se deben mantener las distancias mínimas. El
aparato sólo se puede poner en funcionamiento
en posición vertical y cuando esté completamente montado.
(fi g. 3) Respetar las siguientes distancias mí-
nimas con respecto a la carcasa: 20 cm en los
laterales, 100 cm arriba, 60 cm abajo y 100 cm
delante.
Observar el punto 1 „Instrucciones de seguridad“.
¡Cuidado! Asegurarse de que no se hallen ni
cables eléctricos ni otras instalaciones en la zona
de las perforaciones (p. ej., conductos de agua).
Asegurarse de que el aparato esté bien fi jado a
la pared, en posición horizontal. Utilizar exclusivamente material de sujeción adecuado en una
pared que posea la sufi ciente capacidad de car-
ga. Los tacos y tornillos suministrados son adecuados para: hormigón, piedra natural consistente,
ladrillo macizo, ladrillo macizo de arena calcárea,
ladrillo macizo de hormigón ligero, hormigón con
celdillas (hormigón esponjoso).
1. Fig. 4: Marcar en línea horizontal las posiciones de las cuatro perforaciones del soporte
de pared superior (11) a una pared que tenga
capacidad de carga. Las dos perforaciones
deben encontrarse a una distancia de 150
mm entre ellas.
2. Taladrar a continuación cuatro agujeros (Ø
6 mm) en la pared e introducir los tacos (fi g.
2/pos. 13). Colocar los agujeros del soporte
de pared superior (fi g. 4/pos. 11) sobre las
perforaciones y fi jar el soporte de pared con
4 tornillos 4x30 mm (pos. 14). Asegurarse de
que los ganchos en el soporte de pared miren hacia arriba (fi g. 4).
3. Fig. 5: Montar el ángulo de fi jación (12) con 2
tornillos 4x8 mm (fi g. 2/pos. 15) en el centro
de la parte inferior de la carcasa del calefactor.
4. Fig. 6: Colgar la carcasa al soporte de pared.
Asegurarse de que los ganchos en el soporte
de pared entren bien en los agujeros de la
carcasa (A).
5. Fig. 5: Copiar los agujeros (B) del ángulo de
fi jación (12) en la pared y volver a quitar la
carcasa del calefactor.
6. Taladrar dos agujeros (Ø 6 mm) en la pared,
poner los tacos (fi g. 2/pos. 13) y colgar de
nuevo la carcasa en el soporte superior de
pared (fi g. 6). Asegurarse de que los ganchos
entren bien en los agujeros de la carcasa (A).
7. Fig. 5: Fijar el ángulo de fi jación con 2 tornil-
los 4x30 mm (fi g. 2/pos. 14) a la pared.
8. Fig. 7: Solicite que una segunda persona le
ayude y cuelgue el frontal de cristal (1) introduciendo los ganchos laterales en los agujeros longitudinales (C) de la carcasa previstos
para ello.
5.2 Mando a distancia
Aviso: Todas las funciones se pueden conectar
tanto pulsando los botones del aparato como
por medio del mando a distancia. Utilizar una
pila de botón CR 2025 (incluida en el mando a
distancia). Antes de empezar a usarse, retirar la
protección de los contactos (plaquita de plástico)
de la carcasa.
¡Advertencia! Es posible que, tras pulsar el
botón en el mando a distancia, el aparato tarde
unos segundos en reaccionar. Esperar siempre a
que transcurran al menos 2 segundos para volver
a tocar el pulsador del mando a distancia.
No utilizar nunca con otro tipo de pila que no
•
sea el indicado.
Si el mando a distancia no se utiliza durante
•
un largo espacio de tiempo, retirar la pila para
evitar que se derrame.
Mantener el mando a distancia dirigido al
•
calefactor. El radio de alcance es de máx. 5
metros.
La luz solar directa u otros objetos pueden
•
afectar considerablemente al radio de acción
- 71 -
Anl_EF_1800_SPK9.indb 71Anl_EF_1800_SPK9.indb 71 22.11.2018 06:58:5322.11.2018 06:58:53
Page 72

E
del mando a distancia.
Tratar el mando a distancia con cuidado. No
•
dejar que se caiga, mantenerlo alejado del
calor y la humedad.
Cómo cambiar la pila (fi g. 8):
1. Abrir la tapa del compartimento de pilas moviendo el cierre (F) hacia el centro y sacando
al mismo tiempo el compartimento de la pila.
2. A la hora de colocar la batería, asegurarse de
que la polaridad de la misma coincide con los
datos de la carcasa.
3. Presionar la tapa del compartimento de pilas
en el mando a distancia.
Los usuarios fi nales están obligados a devolver
las pilas usadas. La devolución se puede hacer
en un punto de recogida pública del municipio en
cuestión o en el comercio donde se hayan adquirido. Tener en cuenta también el capítulo 11.
6. Manejo
Advertencia: Cada vez que se pulsa un botón se
indica mediante una breve señal acústica.
Tener en cuenta las instrucciones de seguridad
indicadas en el punto 1.
La primera vez que se ponga en marcha, o si
se pone en marcha después de haber estado
inactivo durante mucho tiempo, es posible que al
principio desprenda olores. Eso no signifi ca que
haya una avería.
6.1 Cómo encender y apagar la tensión de
red (fi g. 1)
Con el interruptor principal (5), el aparato se
puede desconectar completamente de la toma
de corriente. Para encender el aparato, poner
primero el interruptor principal en „I“ y, cuando
ya no se necesite el aparato, poner el interruptor
principal en „0“.
6.2 Cómo encender y apagar el aparato
(fi g. 9)
Pulsar el botón „Power“ (D). El aparato se
enciende, se activa el efecto de las llamas y el
display. Para apagarlo, volver a presionar el botón
„Power“ (D). El efecto de las llamas y el display
se apagan.
6.3 Cómo encender y apagar el dimmer
(fi g. 9)
Pulsar el botón „Flame“ (E). El brillo del efecto de
las llamas se puede regular en 5 niveles distintos
simplemente presionando varias veces.
6.4 Indicación de temperatura °C/°F (fi g. 9)
Advertencia: Sólo se puede cambiar en el
aparato.
Cabe la posibilidad de visualizar la temperatura
tanto en °C como en °F.
Para cambiar entre las dos posibilidades, pulsar
el botón „DOWN“ durante 5 segundos.
6.5 Cómo ajustar la temperatura teórica
(fi g. 9)
Advertencias: La temperatura teórica a ajustar
corresponde a la temperatura del aparato que se
mide en la sonda térmica integrada y se muestra
en el display. Dicha temperatura puede diferir de
la temperatura ambiental real. Si se supera la
temperatura teórica, se apaga la función de calor.
Si la temperatura es inferior a la temperatura
teórica, la función de calor se vuelve a encender.
6.5.1 Ajuste en el aparato (fi g. 9)
Pulsar el botón „UP“ para iniciar el ajuste de
temperatura (15°C – 35°C o 59°F – 95°F). A
continuación, pulsar los botones „UP“ o „DOWN“
para ajustar la temperatura. La temperatura se
aumenta o baja 1°C.
6.5.2 Ajuste en el mando a distancia (fi g. 9)
Para ajustar la temperatura (15°C – 35°C o 59°F –
95°F), pulsar el botón „F“. Cada vez que se pulsa
el botón, la temperatura va aumentando 1°C y, al
llegar a los 35°C, vuelve a los 15°C.
6.6 Cómo encender y apagar la función de
calor (fi g. 9)
Con el calefactor encendido, pulsar el botón
„Heater“ (H) hasta que aparezca el LED „Heat 1“
correspondiente a una potencia de 900 W. Si se
vuelve a pulsar el botón „Heater“ (H), se enciende
el LED „Heat 2“ correspondiente a una potencia
de 1800 W. Si se vuelve a pulsar el botón „Heater“ (H), se apaga la potencia calorífi ca.
6.7 Temporizador - programación de la hora
de conexión y desconexión (fi g. 9)
Advertencias:
Encender el aparato según se ha indicado
•
anteriormente.
Se pueden programar una hora de conexión
•
y una de desconexión al día. Plantearse
- 72 -
Anl_EF_1800_SPK9.indb 72Anl_EF_1800_SPK9.indb 72 22.11.2018 06:58:5322.11.2018 06:58:53
Page 73

E
previamente a qué horas se desea conectar o
desconectar el aparato y anotarlas.
Programar la hora de conexión: se enciende
•
un pequeño LED al lado del „decimal de los
minutos“ (p. ej. 10:5.1).
Programar la hora de desconexión: se enci-
•
ende un pequeño LED al lado de la „unidad
de los minutos“ (p. ej. 10:51.).
La indicación parpadea durante 5 segundos
•
para cada ajuste. Durante ese tiempo se
pueden realizar los ajustes. Si no se pulsa
ningún botón durante 5 segundos, el ajuste
actual se guarda de manera automática.
6.7.1 Programación diaria en el aparato o con
el mando a distancia (fi g. 9)
Hora de conexión
Pulsar una vez el botón „TIMER“ o „7“. El
•
LED „Mon“ (lunes) y el indicador de horas
parpadean.
Pulsar el botón „UP“ (subir) (K) o „DOWN“
•
(bajar) (L) y programar para el lunes las horas
de la hora de conexión.
Pulsar el botón „TIMER“ o „24H“ y programar
•
con los botones „UP“ (K) y „DOWN“ (L) para
el lunes los minutos de la hora de conexión.
Hora de desconexión
En un plazo de 5 segundos, volver a pulsar el
•
botón „TIMER“ o „7“. El LED „Mon“ (lunes) y
el indicador de horas parpadean.
Pulsar „UP“ (K) o „DOWN“ (L) para programar
•
para el lunes las horas de la hora de
desconexión.
Pulsar el botón „TIMER“ o „24H“ y programar
•
con „UP“ (K) y „DOWN“ (L) para el lunes los
minutos de la hora de desconexión.
Si se pulsa de nuevo el botón „TIMER“ o „7“, se
programa para el martes. Repetir el proceso de
programación para el resto de días de la semana.
Para poder saltarse un día (p. ej., el martes) en la
programación, ir pulsando el botón „TIMER“ o „7“
hasta que aparezca el día (p. ej. el miércoles) que
se desea programar.
6.7.2 Programación semanal con el mando a
distancia (fi g. 9)
Advertencia: Además de la programación diaria
de la hora de conexión/desconexión descrita
más arriba, con el mando a distancia también se
puede programar semanalmente.
Cómo programar las horas de la hora de
conexión (fi g. 9)
Pulsar el botón „7“. El LED „Mon“ (lunes) y el
•
indicador de horas parpadean.
Pulsar „UP“ (K) o „DOWN“ (L) para programar
•
para el lunes las horas de la hora de
conexión.
Pulsar de nuevo el botón „7“. Programar para
•
el martes.
Repetir el proceso para el resto de días de la
•
semana.
Una vez programados todos los días de la
•
semana, transcurridos 5 segundos (sin pulsar
ningún botón) se guarda automáticamente el
ajuste actual.
Cómo programar los minutos de la hora de
conexión (fi g. 9)
Pulsar el botón „7“ y seguidamente „24H“. El
•
LED „Mon“ (lunes) y el indicador de minutos
parpadean.
Pulsar „UP“ (K) o „DOWN“ (L) para programar
•
para el lunes los minutos de la hora de
conexión.
Pulsar de nuevo el botón „7“ y seguidamente
•
„24H“. Programar para el martes.
Repetir el proceso para el resto de días de la
•
semana.
Una vez programados todos los días de la
•
semana, transcurridos 5 segundos (sin pulsar
ningún botón) se guarda automáticamente el
ajuste actual.
Cómo programar las horas de la hora de
desconexión (fi g. 9)
Pulsar el botón „7“ y seguidamente 2 veces
•
„24H“. El LED „Mon“ (lunes) y el indicador de
horas parpadean.
Pulsar „UP“ (K) o „DOWN“ (L) para programar
•
para el lunes las horas de la hora de
desconexión.
Pulsar de nuevo el botón „7“ y seguidamente
•
2 veces „24H“. Programar para el martes.
Repetir el proceso para el resto de días de la
•
semana.
Una vez programados todos los días de la
•
semana, transcurridos 5 segundos (sin pulsar
ningún botón) se guarda automáticamente el
ajuste actual.
Cómo programar los minutos de la hora de
desconexión (fi g. 9)
Pulsar el botón „7“ y seguidamente 3 veces
•
„24H“. El LED „Mon“ (lunes) y el indicador de
minutos parpadean.
- 73 -
Anl_EF_1800_SPK9.indb 73Anl_EF_1800_SPK9.indb 73 22.11.2018 06:58:5322.11.2018 06:58:53
Page 74

E
Pulsar „UP“ (K) o „DOWN“ (L) para programar
•
para el lunes los minutos de la hora de
desconexión.
Pulsar de nuevo el botón „7“ y seguidamente
•
3 veces „24H“. Programar para el martes.
Repetir el proceso para el resto de días de la
•
semana.
Una vez programados todos los días de la
•
semana, transcurridos 5 segundos (sin pulsar
ningún botón) se guarda automáticamente el
ajuste actual.
6.8 Cómo ajustar la hora actual (fi g. 9)
Advertencia: Sólo se puede ajustar en el
aparato. Si no se pulsa ningún botón durante 5
segundos, el ajuste actual se guarda de manera
automática.
Apagar el calefactor con el botón „POWER“
•
(D).
Pulsar el botón „TIMER“ durante 3 segundos.
•
El indicador de horas parpadea durante 5
segundos.
Ajustar la hora actual con los botones „UP“ Y
•
„DOWN“.
Pulsar el botón „TIMER“, el indicador de
•
minutos parpadea durante 5 segundos.
Ajustar los minutos actuales con los botones
•
„UP“ Y „DOWN“.
Ir pulsando el botón „TIMER“ hasta que se
•
encienda el LED del día actual. Mientras
tanto, los indicadores de horas y minutos
parpadean de forma alterna.
6.9 Cómo activar el temporizador (fi g. 9)
Apagar el aparato con el botón „POWER“ (D).
El aparato se enciende en el siguiente punto
de activación con la última función de calor
programada, el ajuste de la temperatura teórica y
el efecto de las llamas más claro.
6.10 Función „Ventana abierta“
Si, con la función de calor encendida, la
temperatura baja 5° en 10 minutos, se emite
durante unos segundos una señal y la función de
calor se apaga.
6.11 Protección contra sobrecalentamiento
En caso de sobrecalentamiento, la potencia
calorífi ca o el aparato se desconectan
automáticamente. En tal caso, apagar
completamente el aparato y desenchufarlo de
la red. Dejar que el aparato se enfríe durante
unos 15 minutos. Tras solucionar el fallo (p. ej., la
rejilla de ventilación se encuentra cubierta), se
podrá volver a encender el aparato según se ha
indicado anteriormente. Si la protección contra
sobrecalentamiento salta de manera repetida
o no se puede volver a encender el aparato,
ponerse en contacto con el servicio de asistencia
técnica.
7. Cambio del cable de conexión a
la red eléctrica
Peligro!
Cuando el cable de conexión a la red de este
aparato esté dañado, deberá ser sustituido por
el fabricante o su servicio de asistencia técnica
o por una persona cualifi cada para ello, evitando
así cualquier peligro.
8. Mantenimiento, limpieza y pedido
de piezas de repuesto
Peligro!
Desenchufar siempre antes de realizar algún trabajo de limpieza.
El aparato se tiene que enfriar.
8.1 Limpieza
Evitar al máximo posible que la suciedad y
•
el polvo se acumulen en los dispositivos de
seguridad, las rendijas de ventilación y la carcasa del motor.
Limpiar el polvo con un aspirador.
•
Limpiar regularmente el aparato con un paño
•
húmedo. No utilizar productos de limpieza o
disolventes; ya que podrían deteriorar las piezas de plástico del aparato. Es preciso evitar
que entre agua en el interior del aparato. Si
entra agua en el aparato eléctrico existirá mayor riesgo de una descarga eléctrica.
El frontal de cristal se puede limpiar con un
•
limpiacristales convencional.
8.2 Mantenimiento
No hay que realizar el mantenimiento a más
piezas en el interior del aparato.
Para cambiar los elementos calefactores o los
LED que se utilicen para el efecto de llamas, se
deberá recurrir a un electricista cualifi cado o al
servicio de asistencia técnica de Einhell teniendo
siempre en cuenta las disposiciones pertinentes.
- 74 -
Anl_EF_1800_SPK9.indb 74Anl_EF_1800_SPK9.indb 74 22.11.2018 06:58:5322.11.2018 06:58:53
Page 75

8.3 Pedido de piezas de recambio:
Al solicitar recambios se indicarán los datos
siguientes:
Tipo de aparato
•
No. de artículo del aparato
•
No. de identidad del aparato
•
No. del recambio de la pieza necesitada.
•
Encontrará los precios y la información actual en
www.isc-gmbh.info
9. Eliminación y reciclaje
El aparato está protegido por un embalaje para
evitar daños producidos por el transporte. Este
embalaje es materia prima y, por eso, se puede
volver a utilizar o llevar a un punto de reciclaje.
El aparato y sus accesorios están compuestos
de diversos materiales, como, p. ej., metal y
plástico. Los aparatos defectuosos no deben
tirarse a la basura doméstica. Para su eliminación
adecuada, el aparato debe entregarse a una
entidad recolectora prevista para ello. En caso de
no conocer ninguna, será preciso informarse en
el organismo responsable del municipio.
10. Almacenamiento
E
Guardar el aparato y sus accesorios en un
lugar oscuro, seco, protegido de las heladas e
inaccesible para los niños. La temperatura de
almacenamiento óptima se encuentra entre los
5 y 30 ˚C. Guardar la herramienta eléctrica en su
embalaje original.
11. Eliminación de las pilas
Las pilas contienen materiales nocivos para el
medio ambiente. No tirar las pilas al cubo de
la basura, al fuego o al agua. Las pilas deben
eliminarse o reciclarse de forma ecológica. Enviar
las pilas gastadas a iSC GmbH, Eschenstraße 6,
D-94405 Landau. El fabricante garantiza que así
se eliminarán de forma adecuada.
- 75 -
Anl_EF_1800_SPK9.indb 75Anl_EF_1800_SPK9.indb 75 22.11.2018 06:58:5322.11.2018 06:58:53
Page 76

E
12. Indicaciones para la eliminación de fallos
Si el aparato se maneja de manera adecuada, no se producirán averías. En caso de avería, comprobar
si se trata de alguno de los casos siguientes antes de consultar al servicio de asistencia técnica.
Avería Posibles causas Solución
El aparato no
calienta
Aparato desenchufado
Interruptor principal no conectado
Enchufar el aparato
Conectar el interruptor principal
El mando a
distancia no
funciona
Aparato en standby
Potencia calorífi ca apagada
Termostato ajustado a una
temperatura demasiado baja
El „Timer“ ha apagado el aparato
Batería vacía
Mando a distancia fuera del radio de
alcance
Radiación directa en el calefactor
Pulsar el botón „Power“
Ajustar la potencia calorífi ca
Subir la temperatura
Cambiar la preselección de tiempo
Cambiar pilas
Acercarse al calefactor
Reducir la radiación solar (oscurecer)
- 76 -
Anl_EF_1800_SPK9.indb 76Anl_EF_1800_SPK9.indb 76 22.11.2018 06:58:5322.11.2018 06:58:53
Page 77

E
Sólo para países miembros de la UE
No tirar herramientas eléctricas en la basura casera.
Según la directiva europea 2012/19/CE sobre aparatos usados electrónicos y eléctricos y su aplicación
en el derecho nacional, dichos aparatos deberán recojerse por separado y eliminarse de modo ecológico para facilitar su posterior reciclaje.
Alternativa de reciclaje en caso de devolución:
El propietario del aparato eléctrico, en caso de no optar por su devolución, está obligado a reciclar adecuadamente dicho aparato eléctrico. Para ello, también se puede entregar el aparato usado a un centro
de reciclaje que trate la eliminación de residuos respetando la legislación nacional sobre residuos y
su reciclaje. Esto no afecta a los medios auxiliares ni a los accesorios sin componentes eléctricos que
acompañan a los aparatos usados.
Sólo está permitido copiar la documentación y documentos anexos del producto, o extractos de los
mismos, con autorización expresa de iSC GmbH.
Nos reservamos el derecho a realizar modifi caciones técnicas
- 77 -
Anl_EF_1800_SPK9.indb 77Anl_EF_1800_SPK9.indb 77 22.11.2018 06:58:5322.11.2018 06:58:53
Page 78

E
Información de servicio
En todos los países mencionados en el certifi cado de garantía disponemos de distribuidores compe-
tentes cuyos datos de contacto podrán consultar en dicho certifi cado. Dichos distribuidores están a su
disposición para cualquier asunto relacionado con el servicio como reparación, suministro de piezas de
repuesto y desgaste, o con respecto a los materiales de consumo.
Es preciso tener en cuenta, que las siguientes piezas de este producto se someten a desgaste natural
o provocado por el uso o que se necesitan las siguientes piezas como materiales de consumo.
Categoría Ejemplo
Piezas de desgaste* Baterías
Material de consumo/Piezas de consumo*
Falta de piezas
*¡no tiene por qué estar incluido en el volumen de entrega!
En caso de defi ciencia o fallo, rogamos que lo registre en la página web www.isc-gmbh.info. Describa
exactamente el fallo y responda siempre a las siguientes preguntas:
¿Ha funcionado el aparato en algún momento o estaba defectuoso desde el principio?
•
¿Le ha llamado algo la atención antes de surgir el fallo (indicio antes del fallo)?
•
¿Qué fallo de funcionamiento le parece que presenta el aparato (indicio principal)?
•
Describa ese fallo en el funcionamiento.
- 78 -
Anl_EF_1800_SPK9.indb 78Anl_EF_1800_SPK9.indb 78 22.11.2018 06:58:5322.11.2018 06:58:53
Page 79

E
Certifi cado de garantía
Estimado cliente:
Nuestros productos están sometidos a un estricto control de calidad. No obstante, lamentaríamos que
este aparato dejara de funcionar correctamente, en tal caso, le rogamos que se dirija a nuestro servicio
de atención al cliente en la dirección indicada en la parte inferior de la presente tarjeta de garantía. Con
mucho gusto le atenderemos también telefónicamente en el número de servicio indicado a continuación. Para hacer válido el derecho de garantía, proceda de la siguiente forma:
1. Estas condiciones de garantía van dirigidas exclusivamente a los consumidores, es decir, personas
naturales que no desean emplear este producto en el marco de su actividad comercial ni autónoma. Estas condiciones de garantía regulan prestaciones adicionales de garantía que el fabricante
abajo mencionado se compromete a otorgar, de manera adicional a la garantía legal, a los compradores de sus nuevos aparatos. Las prestaciones de garantía que le corresponden conforme a ley
no se ven afectadas por la presente. Nuestra prestación de garantía es gratuita para usted.
2. La garantía se extiende exclusivamente a defectos en un aparato nuevo adquirido por usted del
fabricante abajo mencionado, ocasionados por fallos de material o de producción, y está limitada,
según nuestra elección, a la reparación de los defectos o al cambio del aparato.
Es preciso tener en consideración que nuestro aparato no está indicado para un uso comercial,
industrial o en taller. Por lo tanto, no procederá un contrato de garantía cuando se utilice el aparato
dentro del periodo de garantía en zonas industriales, comerciales o talleres, así como actividades
similares.
3. Nuestra garantía no cubre:
- Daños en el aparato ocasionados por la no observancia de las instrucciones de montaje o por una
instalación no profesional, no observancia de las instrucciones de uso (como, p. ej., conexión a una
tensión de red o corriente no indicada) o la no observancia de las disposiciones de mantenimiento
y seguridad o por la exposición del aparato a condiciones anormales del entorno o por la falta de
cuidado o mantenimiento.
- Daños en el aparato ocasionados por aplicaciones impropias o indebidas (como, p. ej., sobrecarga del aparato o uso de herramientas o accesorios no homologados), introducción de cuerpos
extraños en el aparato (como, p. ej., arena, piedras o polvo, daños producidos por el transporte),
uso violento o infl uencias externa (como, p. ej., daños por caídas).
- Daños en el aparato o en piezas del aparato provocados por el desgaste natural, habitual o producido por el uso.
4. El periodo de garantía es de 24 meses y comienza en la fecha de la compra del aparato. El derecho
de garantía debe hacerse válido, antes de fi nalizado el plazo de garantía, dentro de un periodo de
dos semanas una vez detectado el defecto. El derecho de garantía vence una vez transcurrido el
plazo de garantía. La reparación o cambio del aparato no conllevará ni una prolongación del plazo
de garantía ni un nuevo plazo de garantía ni para el aparato ni para las piezas de repuesto montadas. Esto también se aplica en el caso de un servicio in situ.
5. Para hacer efectivo su derecho a garantía, registre su aparato defectuoso en: www.isc-gmbh.info.
Tenga a mano el recibo de compra o cualquier otro comprobante que acredite la compra del aparato nuevo. La garantía no cubre aquellos aparatos que se envíen sin el comprobante pertinente
o sin la placa de identifi cación puesto que resulta difícil clasifi carlos del modo correspondiente. Si
nuestra prestación de garantía incluye el defecto aparecido en el aparato, recibirá de inmediato un
aparato reparado o nuevo de vuelta.
Naturalmente, también solucionaremos los defectos del aparato que no se encuentren comprendidos
o ya no se encuentren comprendidos en la garantía, en este caso contra reembolso de los costes. Para
ello, envíe el aparato a nuestra dirección de servicio técnico.
Para piezas de desgaste, de repuesto y falta de piezas nos remitimos a las limitaciones de esta garantía
conforme a la información de servicio de este manual de instrucciones.
- 79 -
Anl_EF_1800_SPK9.indb 79Anl_EF_1800_SPK9.indb 79 22.11.2018 06:58:5322.11.2018 06:58:53
Page 80

ISC GmbH · Eschenstraße 6 · D-94405 Landau/Isar
Konformitätserklärung
D erklärt folgende Konformität gemäß EU-Richtlinie und
Normen für Artikel
GB explains the following conformity according to EU directi-
ves and norms for the following product
F déclare la conformité suivante selon la directive CE et les
normes concernant l’article
I dichiara la seguente conformità secondo la direttiva UE e
le norme per l’articolo
NL verklaart de volgende overeenstemming conform EU
richtlijn en normen voor het product
E declara la siguiente conformidad a tenor de la directiva y
normas de la UE para el artículo
P declara a seguinte conformidade, de acordo com as
diretiva CE e normas para o artigo
DK attesterer følgende overensstemmelse i medfør af
EU-direktiv samt standarder for artikel
S förklarar följande överensstämmelse enl. EU-direktiv och
standarder för artikeln
FIN vakuuttaa, että tuote täyttää EU-direktiivin ja standardien
vaatimukset
EE tõendab toote vastavust EL direktiivile ja standarditele
CZ vydává následující prohlášení o shodě podle směrnice EU
a norem pro výrobek
SLO potrjuje sledečo skladnost s smernico EU in standardi za
izdelek
SK vydáva nasledujúce prehlásenie o zhode podľa smernice
EÚ a noriem pre výrobok
H a cikkekhez az EU-irányvonal és Normák szerint a
következő konformitást jelenti ki
Elektrisches Kaminfeuer EF 1800 (Einhell)
PL deklaruje zgodność wymienionego poniżej artykułu z
następującymi normami na podstawie dyrektywy WE.
BG декларира съответното съответствие съгласно
Директива на ЕС и норми за артикул
LV paskaidro šādu atbilstību ES direktīvai un standartiem
LT apibūdina šį atitikimą EU reikalavimams ir prekės normoms
RO declară următoarea conformitate conform directivei UE şi
normelor pentru articolul
GR δηλώνει την ακόλουθη συμμόρφωση σύμφωνα με την
Οδηγία ΕΚ και τα πρότυπα για το προϊόν
HR potvrđuje sljedeću usklađenost prema smjernicama EU i
normama za artikl
BIH potvrđuje sljedeću usklađenost prema smjernicama EU i
normama za artikl
RS potvrđuje sledeću usklađenost prema smernicama EZ i
normama za artikal
RUS следующим удостоверяется, что следующие продукты
соответствуют директивам и нормам ЕС
UKR проголошує про
директивам та стандартам ЄС на виріб
MK ја изјавува следната сообрзност согласно
ЕУ-директивата и нормите за артикли
TR Ürünü ile ilgili AB direktifl eri ve normları gereğince aşağıda
açıklanan uygunluğu belirtir
N erklærer følgende samsvar i henhold til EU-direktivet og
standarder for artikkel
IS Lýsir uppfyllingu EU-reglna og annarra staðla vöru
зазначену нижче відповідність виробу
2014/29/EU
X
2005/32/EC_2009/125/EC
X
2014/35/EU
2006/28/EC
X
2014/30/EU
2014/32/EU
2014/53/EC
2014/68/EU
90/396/EC_2009/142/EC
89/686/EC_96/58/EC
X
2011/65/EU
2006/42/EC
Annex IV
Notifi ed Body:
Notifi ed Body No.:
Reg. No.:
2000/14/EC_2005/88/EC
Annex V
Annex VI
Noise: measured LWA = dB (A); guaranteed LWA = dB (A)
P = KW; L/Ø = cm
Notifi ed Body:
2012/46/EU
Emission No.:
Standard references: EN 60335-1; EN 60335-2-30; EN 62233;
EN 55014-1; EN 55014-2; EN 61000-3-2; EN 61000-3-3
Landau/Isar, den 04.10.2018
First CE: 18 Archive-File/Record: NAPR015607
Art.-No.: 23.381.01 I.-No.: 11016 Documents registrar: Josef Landauer
Subject to change without notice Wiesenweg 22, D-94405 Landau/Isar
- 80 -
Liu/Product-ManagementWeichselgartner/General-Manager
Anl_EF_1800_SPK9.indb 80Anl_EF_1800_SPK9.indb 80 22.11.2018 06:58:5322.11.2018 06:58:53
Page 81

- 81 -
Anl_EF_1800_SPK9.indb 81Anl_EF_1800_SPK9.indb 81 22.11.2018 06:58:5322.11.2018 06:58:53
Page 82

- 82 -
Anl_EF_1800_SPK9.indb 82Anl_EF_1800_SPK9.indb 82 22.11.2018 06:58:5322.11.2018 06:58:53
Page 83

- 83 -
Anl_EF_1800_SPK9.indb 83Anl_EF_1800_SPK9.indb 83 22.11.2018 06:58:5322.11.2018 06:58:53
Page 84

EH 11/2018 (01)
Anl_EF_1800_SPK9.indb 84Anl_EF_1800_SPK9.indb 84 22.11.2018 06:58:5322.11.2018 06:58:53
 Loading...