

Page 1

Contents of the Package . ...........................................................................2
Accessories Introduction.............................................................................3
Ineractive Kit setting...................................................................................5
Operation Guide for Windows OS ............................................................6
Operation Guide for Mac..........................................................................25
Operation Guide for Linux......................................................................33
Troubleshooting ........................................................................................ 35
IK-US10
INTERACTIVE FUNCTION MANUAL
Page 2
2
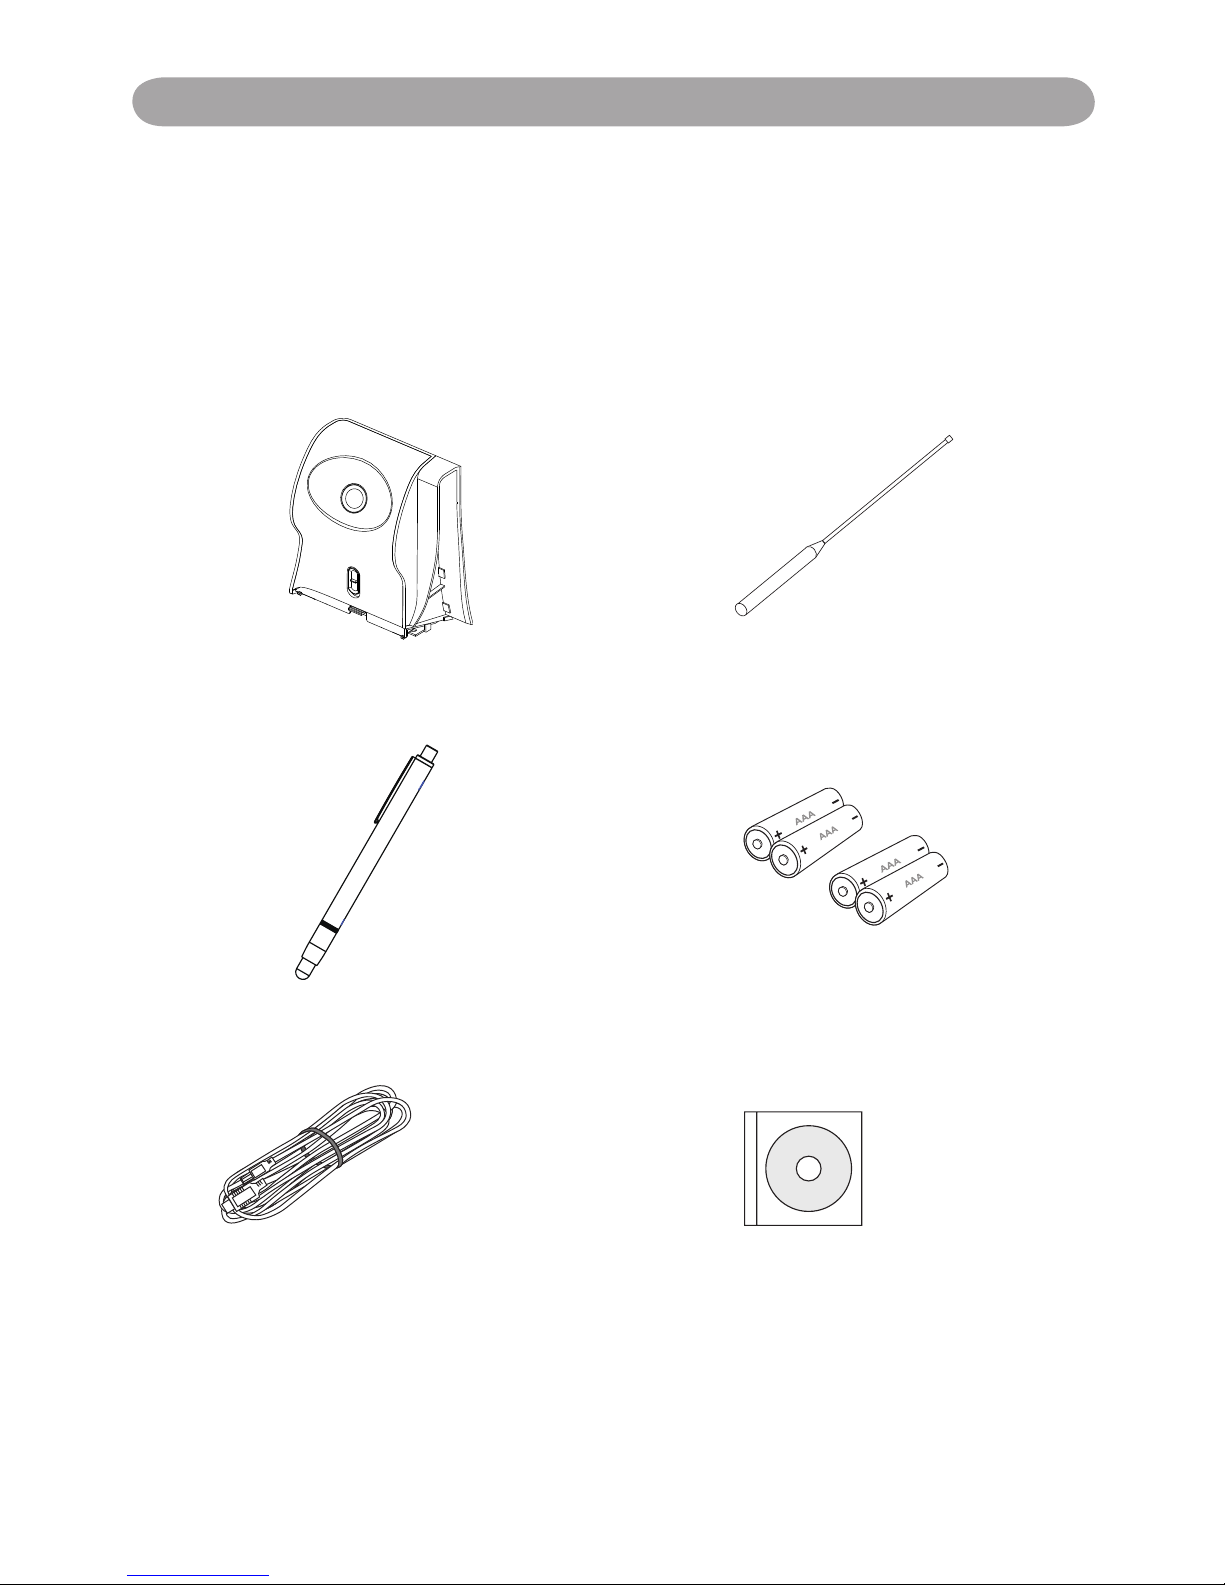
Contents of the Package
Please make sure that following items are included in the box. If any
items are missing, contact your dealer.
1. Interactive Kit
(IR camera unit)
2. Pointer
3. Light Pen 4. Batteries (AAA)
5. USB Cable 6. Owner's Manual (CD)
Page 3
3
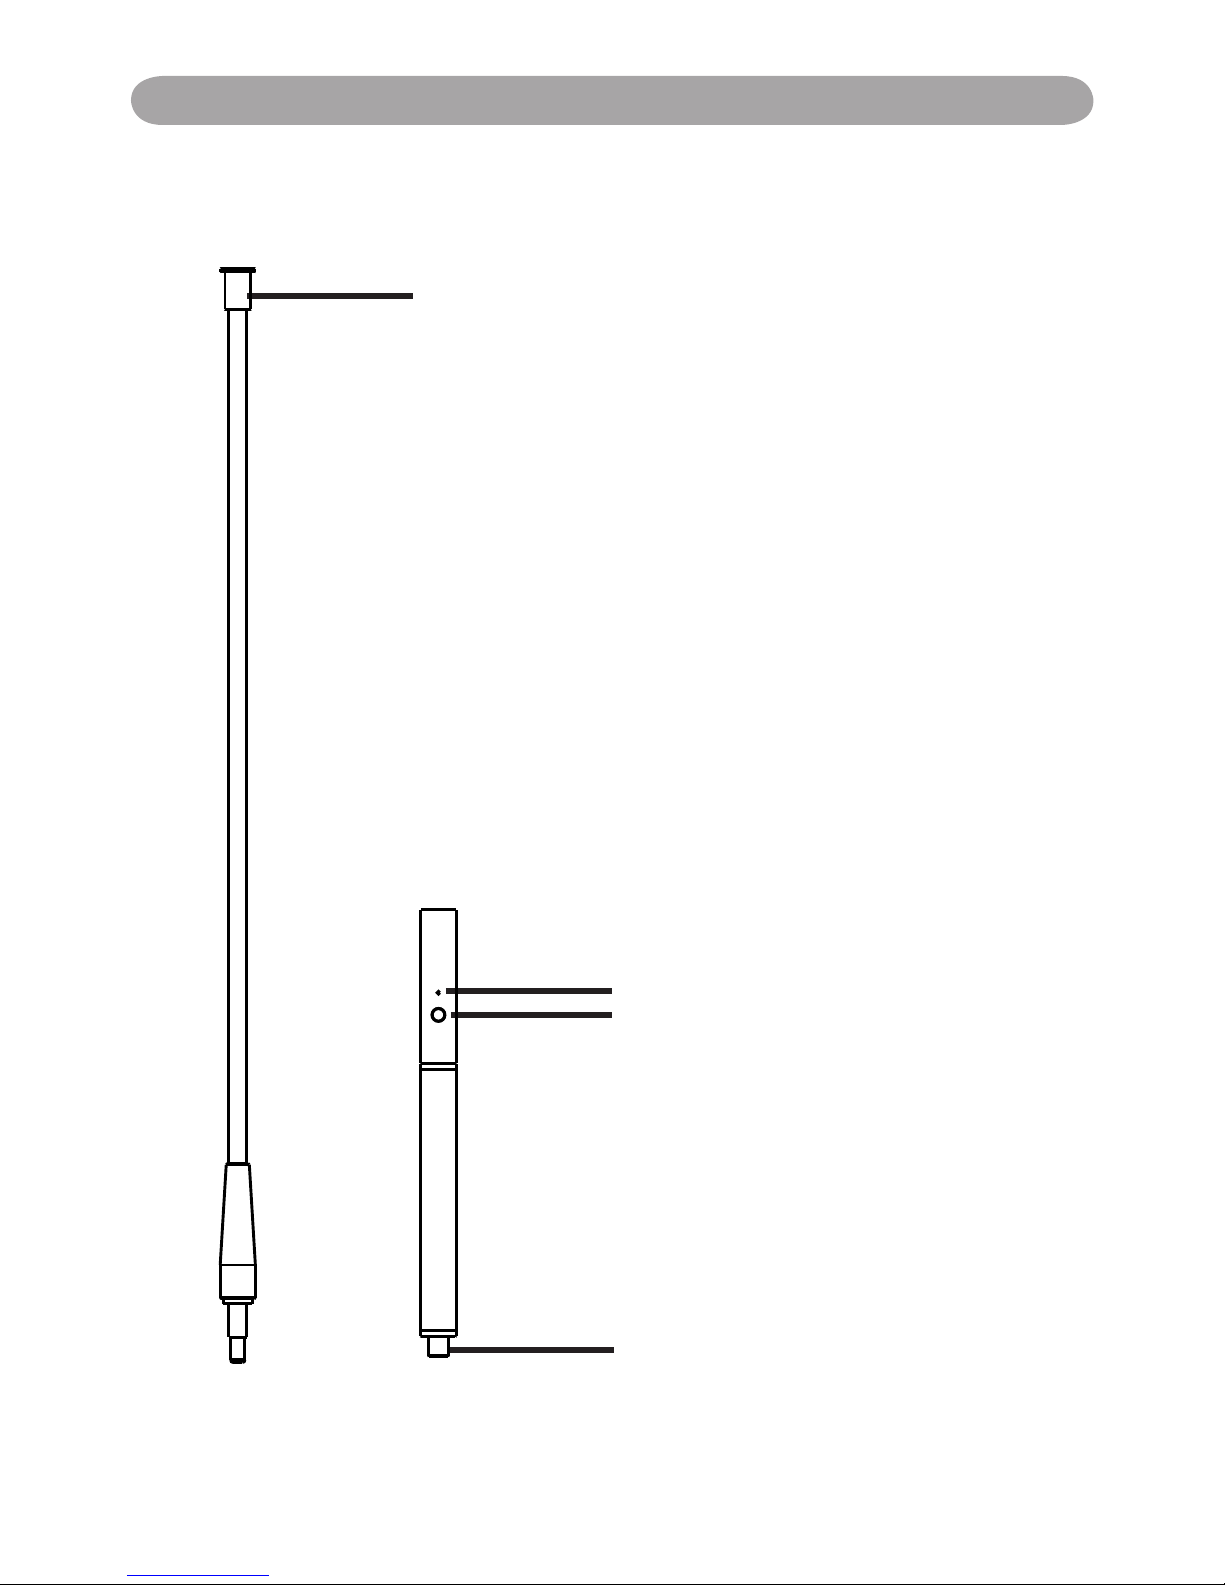
Function Key on the "Pointer Body"
Before using the Pointer.
Screw the Rod part into the pointer
body rmly please.
How to use this
While pressing the button IR is
emitted from the tip of the rod and
the CMOS sensor in the projector
detects the position of it. While the
signal is emitted, the LED Lamp also
lights green.
1) Position the tip of pointer on the
screen.
2) Push the button to click the target
as a mouse or push and hold the
button to draw a line as a pen.
LED Lamp
Button: Mouse Left Key
IR
Power switch
Accessories Introduction
Page 4
4
光光光光光光光光光光光
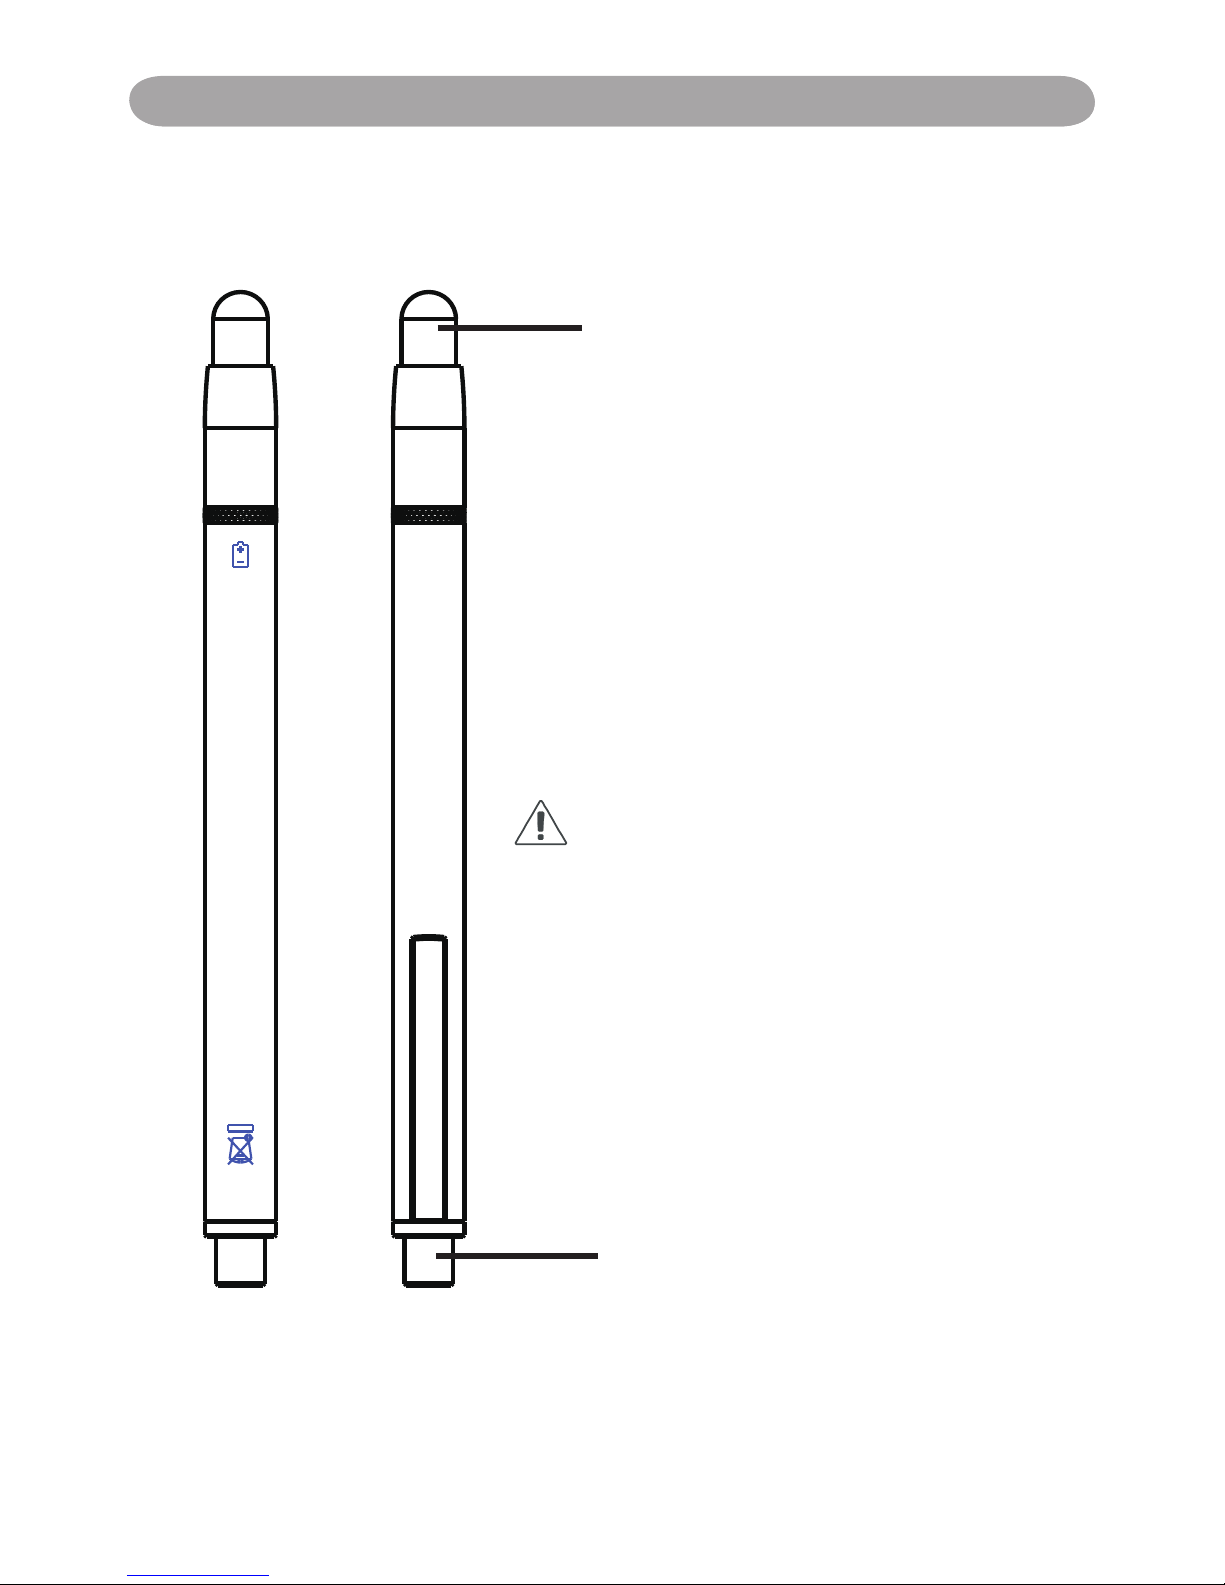
Function Key on the "Light Pen"
Pen tip with touch sensor
Power switch
How to use this
While the tip of pen is pressed to the
hard screen, IR is emitted from it and the
projector detects the position of it.
1) Position the tip of the pen on the screen.
2) Press and hold the tip of the pen to the
hard screen and you can draw a line as a
pen.
CAUTION
Touch sensor is located in the tip of the pen
therefore, the Battery is consumes if the tip
is pressed . If the pen is not used, please
store it in off position of Power switch to
avoid the consumption of the battery.
(Please conrm the "off position" as below;
LED lamp of the pen tip does not light when
the tip is pressed.)
Back side
Front side
Accessories Introduction
Page 5
5
Operation Guide for Windows OS
Interactive Kit Settings
Interactive kit Settings
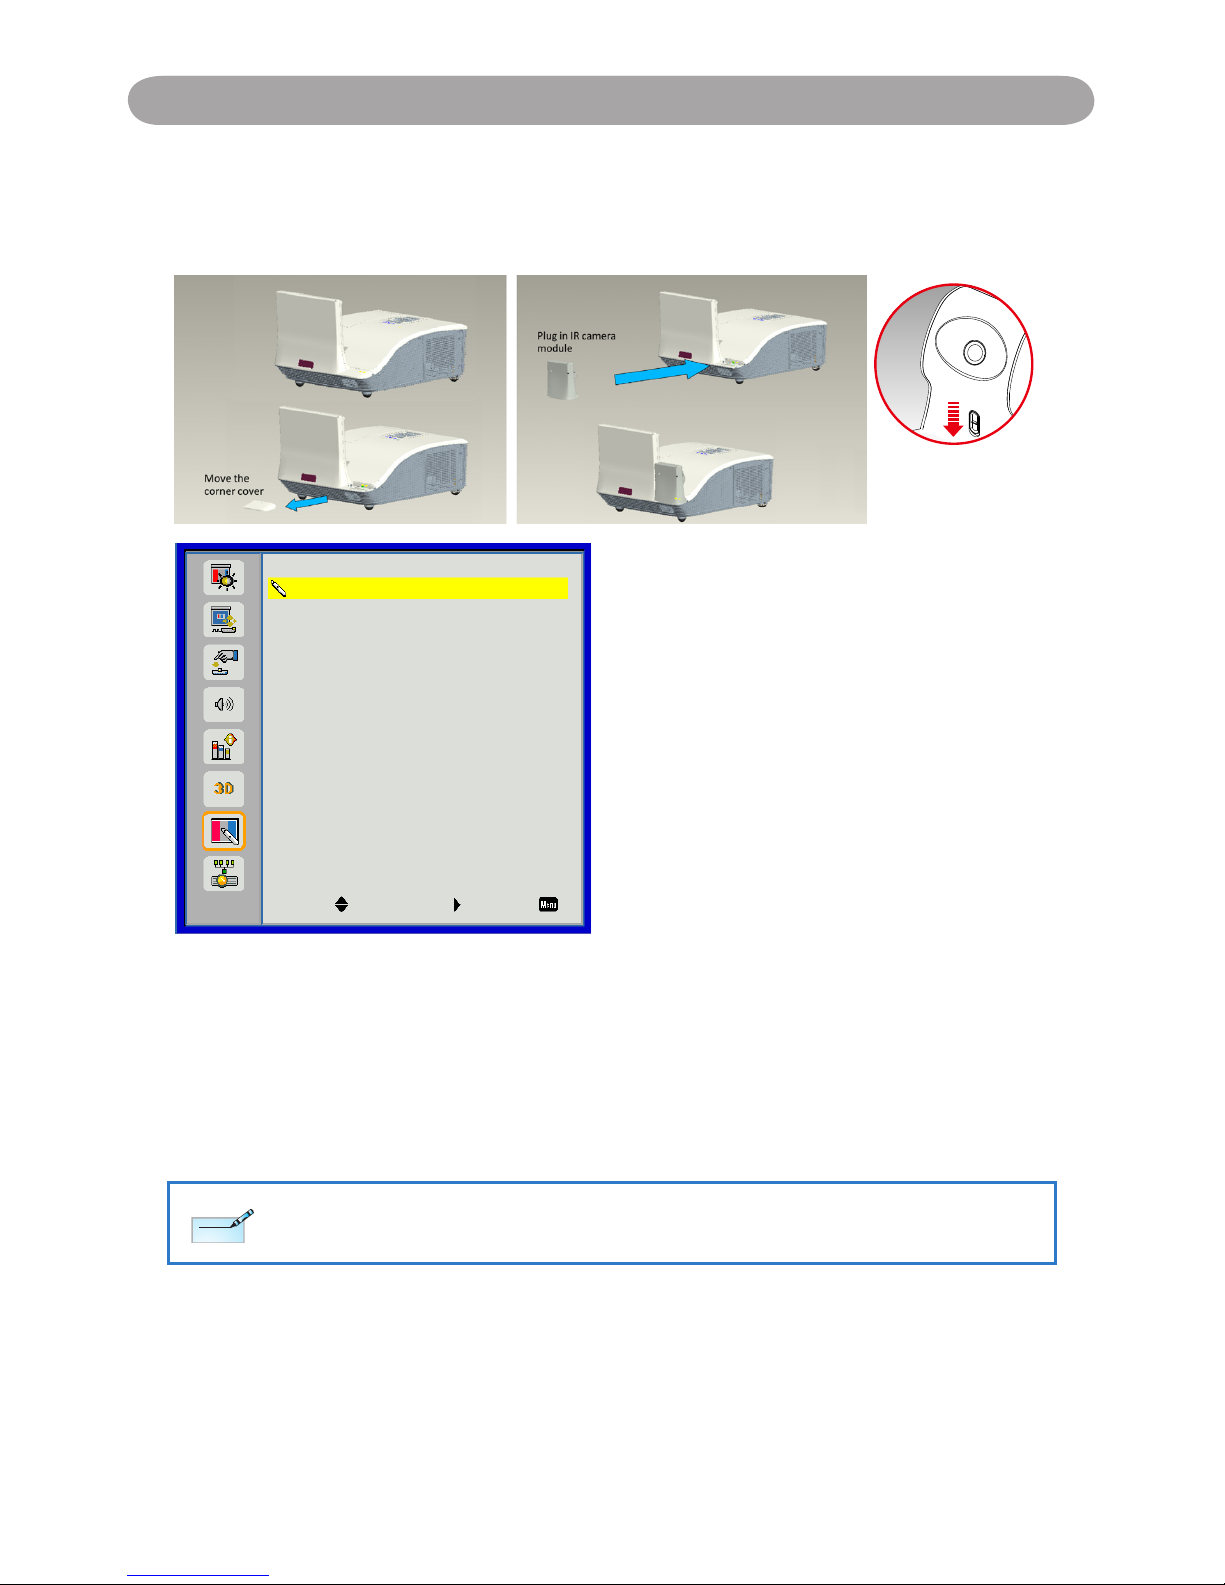
The IR camera Interactive function needs an external IR camera. Please refer to
below gure and plug in IR camera to projector before projector was installed.
* Push down to lock
the camera after
installation
Interactive
Interactive Settings
PB Setting
Off
Select Enter Exit
Use this feature to select the Interactive Pen function.
Choose “Off” to disable the Interactive Pen function. `
Choose “IR Camera” to enable the Interactive Pen function. `
You need to unplug the Mini USB cable that connects NB/desktop with the projector
before using the Interactive function. After you complete the Interactive Settings in
OSD, use Mini USB cable to connect NB/desktop with the projector.
The Interactive function is available when displaying graphic source from HDMI/VGA input. Other sources
are not supported.
If “3D” or “Dynamic Black” function is enabling, “Interactive” feature is disabling.
Note
Note
Page 6

6
Operation Guide for Windows OS
System Requirements
To ensure the interactive function work properly, please check
your computer system to see if it meets the following conditions.
LightPen-Dual
System Requirements
OS Required Microsoft Windows XP(SP2)(32bit) /
Vista (32bit)/Windows 7 (32bit/64bit) or
above
Processor Type Intel® Core™2 Duo 2.0GHz or above
(dedicated GPU is recommended)
RAM 2GB above
Min. Free disk space 100 MB
Interactive function is provided by "LightPen-Dual" software.
Operation Guide for Windows OS
Page 7
7
Operation Guide for Windows OS
2. Software Installation
2.1 Driver Installation
*When you connect supplied USB cable between projector and your PC,
the folder of SPDriver will pop-up. Please double click the "win.exe" and
completed the installation process from step 4.
Step 1. Insert the "Owner's Manual" CD-ROM into the CD drive.
Step 2. Open the "LightPen Software for Windows" folder in the CD-
ROM.
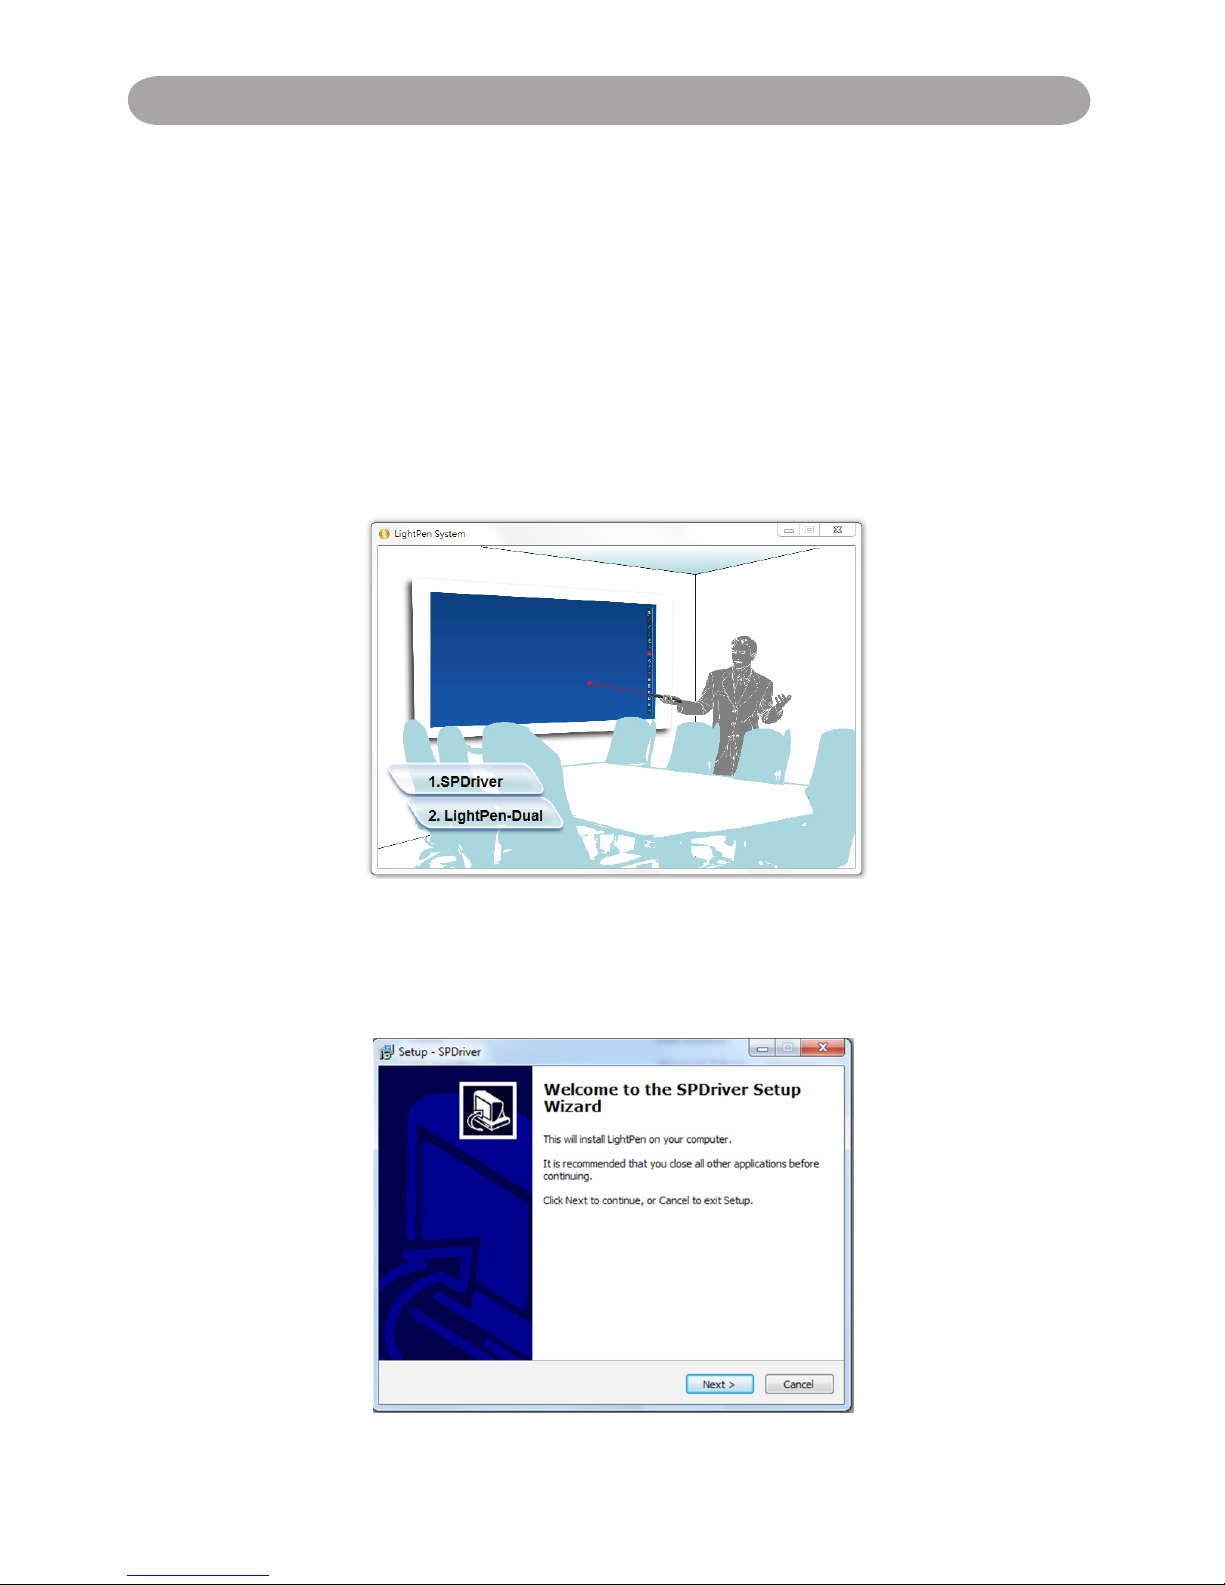
Step 3. Double click the " Setup.exe" by mouse.
And then the window will appear as below.
Step 4.
(1) Click " SPDriver" by mouse.
And then "Setup Wizard" window will appear as below.
Click "Next" to install.
Page 8
8
Operation Guide for Windows OS
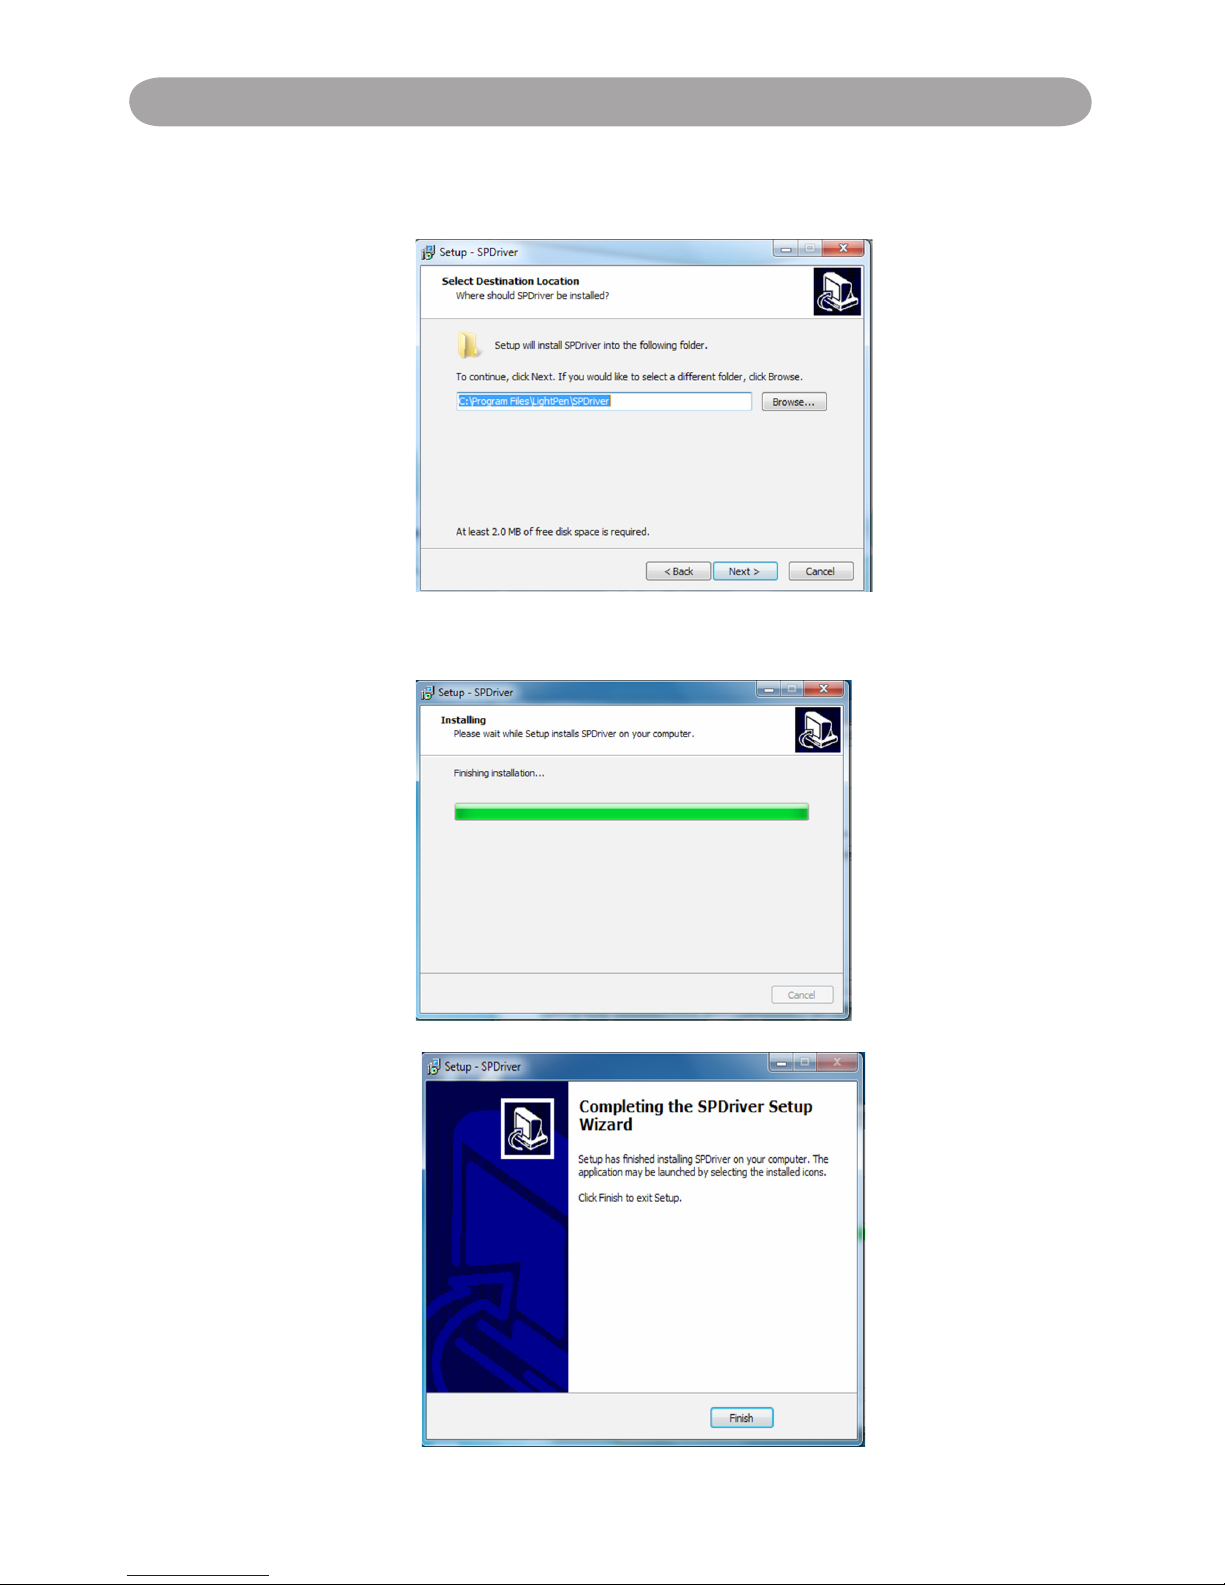
(2) You can choose to install folder depend on your requirements, or
use the default folder. Then click "Next" to continue.
(3)Please wait for a while for the installation.Installation is
nished.
Page 9

9
Operation Guide for Windows OS
2.2 LightPen Software Installation
Step 1. Insert the "Owner's Manual" CD-ROM into the CD drive.
Step 2. Open the "LightPen Software for Windows" folder in the CD-ROM.
Step 3. Double click " Setup.exe" by mouse.
And then the window will appear as below.
Step 4.
(1) click " LightPen-Dual" by mouse.
And then "Setup Wizard" window will appear as below.
Click "Next" to install.
Page 10
10
Operation Guide for Windows OS
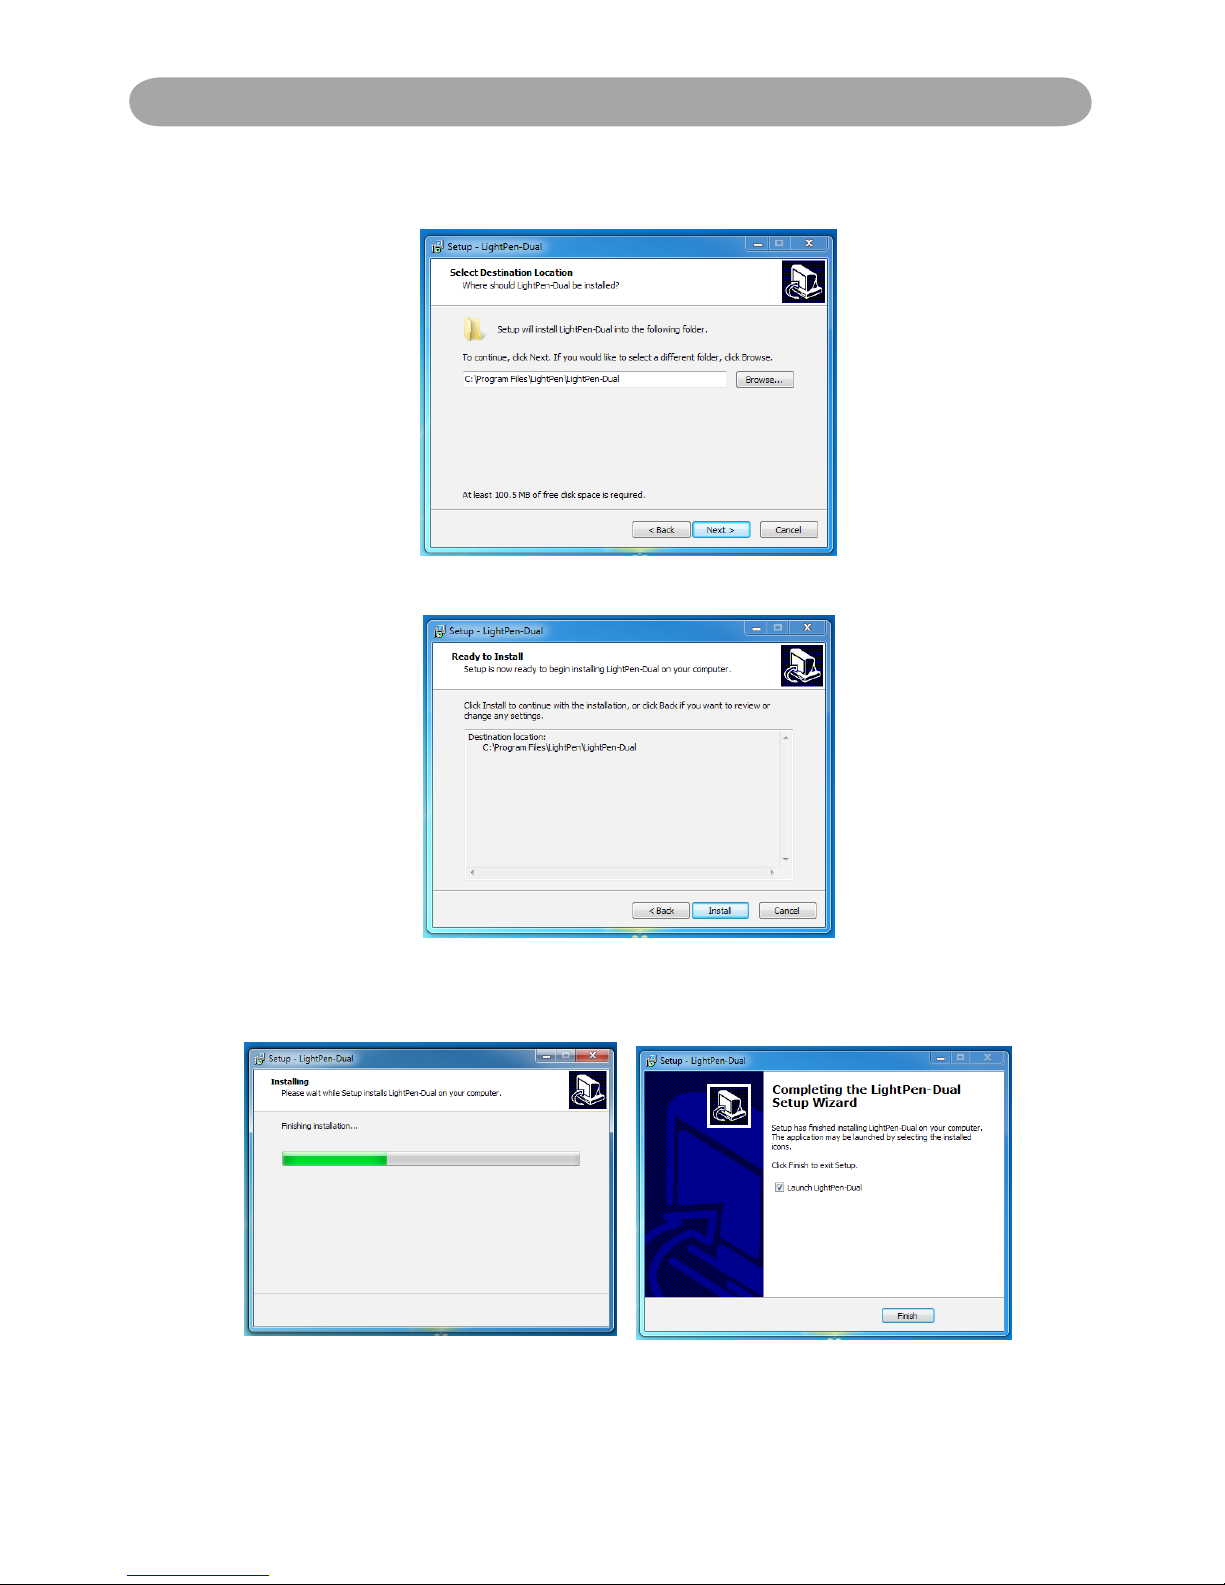
(2) You can choose to install folder depend on your requirements, or use the
default folder. Then click "Next" to continue.
(3) Conrm the information listed and select "Install".
(4) Please wait for a while for the installation. Installation is nished.
Page 11
11
Operation Guide for Windows OS
3. Initial Setup for Interactive Function
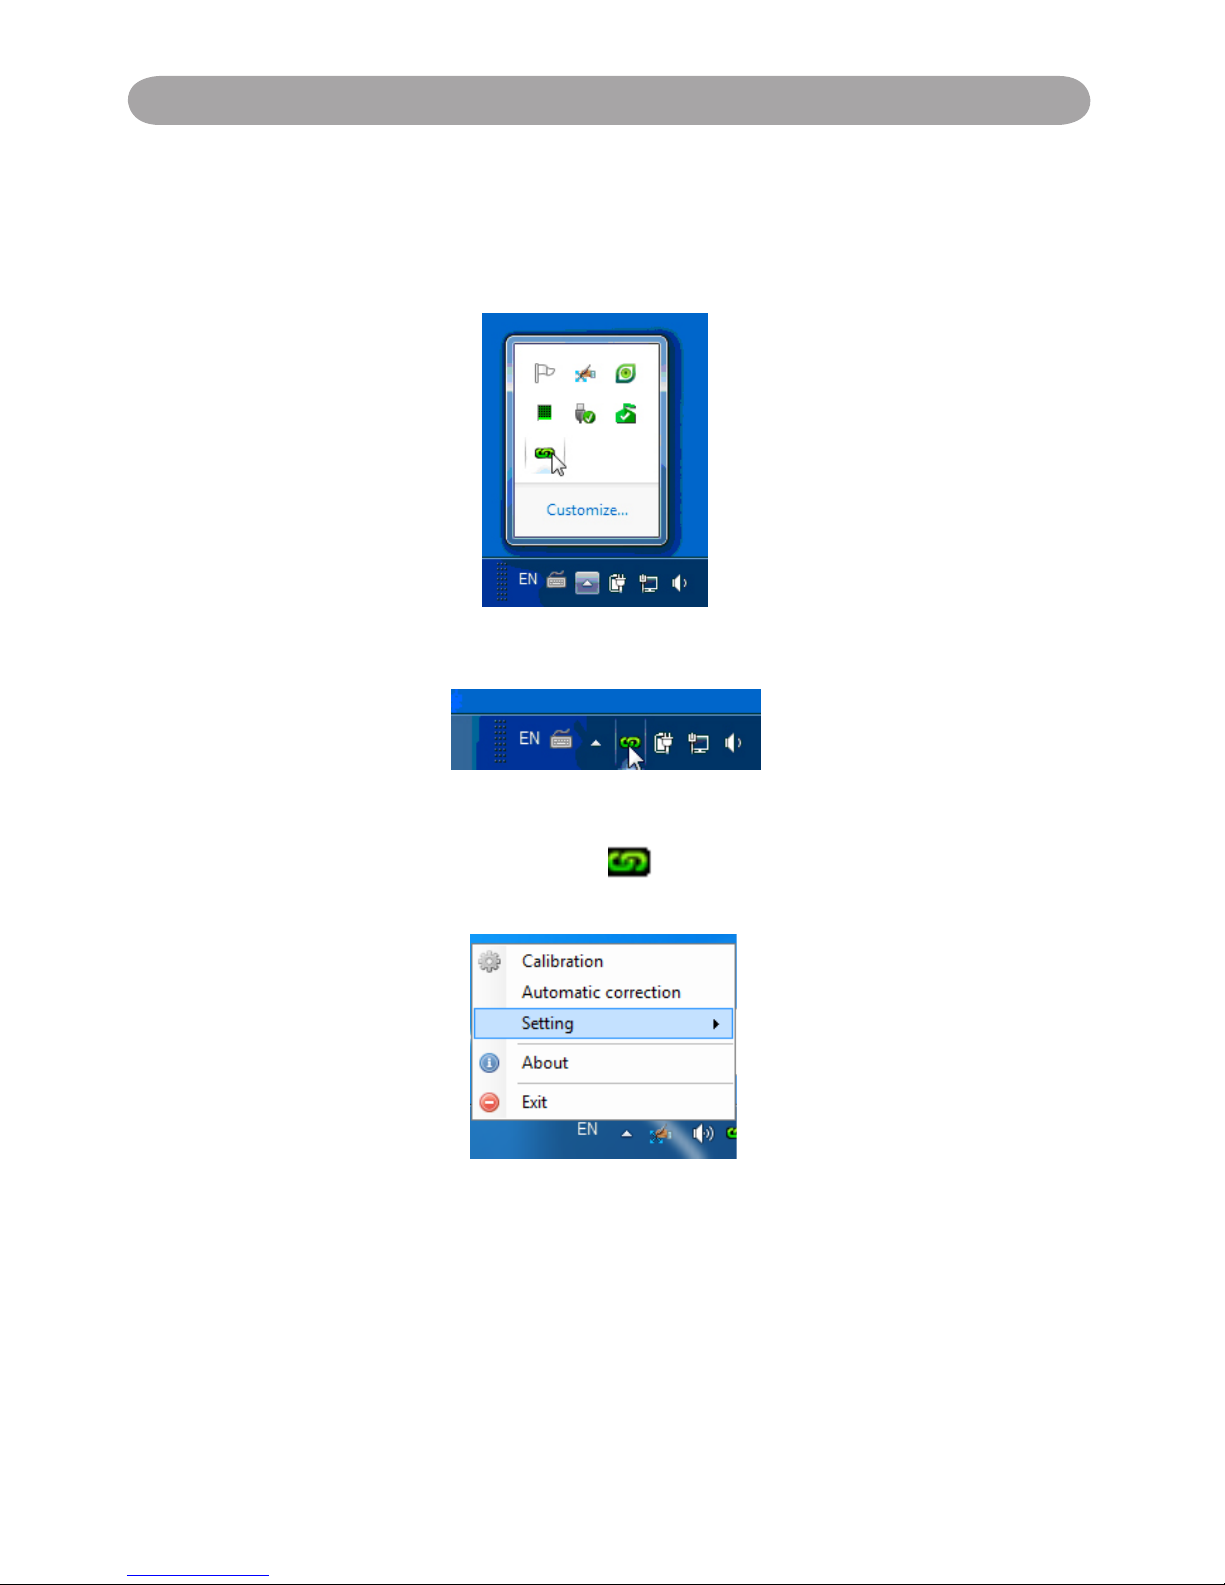
3.1 After SPDriver nished,from "Start Menu/LightPen/SPDriver/SPDriver"
to execute it. Connect supplied USB cable between projector and your
PC which show below icon.
(Windows 7/VISTA)
(Win XP)
3.2 Click the mouse left key on the icon in the task bar to show the
menu.
* The default Mouse Mode is available for Win XP and Win Vista only.
* The Microsoft Windows 7 OS support multi-point touch control. When
using your projector with a PC running Microsoft Windows 7 OS, you
may select to use the default Mouse mode or the Multi-point Touch
Control mode.
Page 12

12
Operation Guide for Windows OS
3.3 Calibration:
3.3.1 Select the "Calibration" to enter the calibration process. Use your pen or
pointer to touch the circle shown on the screen. Then another circle appear,
repeat this process until the 4th circle is ninshed.
3.3.2 After calibration by 4 points on the screen, PC system will save data, as
shown as below, please wait.
3.3.3 After you have nished calibration, you can use either pen or pointer as a
mouse on the projection board or wall.
Page 13

13
Operation Guide for Windows OS
3.4 Auto Calibration:
3.4.1 Select "Auto Calibration" to calibrate the interactive function. The
warning message will popup as Fig.1. DO NOT block the image (as
Fig.2)shown on the screen while auto calibration is running.
Fig.1
Fig.2
3.4.2 After you have finished the calibration, you can use either pen or
pointer as a mouse on the projection board or wall.
3.4.3 If the "auto calibrating failed" message prompts as shown in Fig.3,
please take the steps below for troubleshooting, then do auto
calibration again.
Fig.3
1. Turn lights off or reduce the ambient light to calibration screen
2. Do not walk in front of or shake lens during calibrating
3. Adjust focus to sharpen the images
Page 14

14
Operation Guide for Windows OS
3.5 How to execute driver again
Execute the driver from "Start Menu / LightPen / SPDriver/ SPDriver"
.
4. How To Use Interactive Function in LightPen-Dual
4.1 LightPen-Dual Function
When you complete the installtion of LightPen-Dual and from "Start Menu/
LightPen/LightPen-Dual" to start it, you see the tool bar in the right side as shown
below.
Page 15

15
Operation Guide for Windows OS
4.2 Function of each icon in the Tool bar
Icon Description
Mouse
Change function to Computer Mouse.
Red pen
Change function to red pen.
Green pen
Change function to green pen.
Blue pen
Change function to blue pen.
Marker pen
Change function to marker pen.
Drawing tool
Draw a circle, a square, a triangle or a straight line.
Fineness and
color of pen
Select the neness and color of pen.
Eraser
Erase drawning.
Clean all
Erase drawning on the screen all at once.
Save le
Save the current page into le in computer.
Dual Pen
Support two pens writing at the same time
White Board
Change function to white board.
Page up
Go to last page.
Page down
Go to next page.
Edit tool
Edit drawing.
Keyboard
On screen keyboard.
Exit
Exit the application.
Page 16

16
Operation Guide for Windows OS
4.3 Advanced function in Tool bar
(1) Drawing Tool
Select , then Drawing Tool function menu will be shown on the screen
as below. Plese select the icon you want to use.
(2) Dual Pen
Select , then Dual Pen Mode setting menu will be shown on the screen
as below. Please choose the screen mode to use.
Icon Description
Use two pens at the same time on
full screen by same setting
Use two pens at the same time on
two split screen by different setting
Page 17

17
Operation Guide for Windows OS
(2.1) <Full Screen Mode>
Use two pens at the same time on full screen by the same tool setting.
<Split Screen Mode>
Use two pens at the same time on two split screen with different tool
setting.
Page 18

18
Operation Guide for Windows OS
(2.2)The description of two pens function
Icon Description
Red pen
Change function to red pen.
Green pen
Change function to green pen.
Blue pen
Change function to blue pen.
White pen
Change function to white pen.
Thin round pen
Draw with a thin round script.
Thick round
pen
Draw with a thick round script.
Thick angle pen
Draw with an angle script.
Eraser
Erase drawning.
Clean all
Erase drawning on the screen all at once.
Insert Image
Insert an image as the background.
Save le
Save the current page into le in computer.
Exit
Exit the application.
Page 19

19
Operation Guide for Windows OS
(3) Whiteboard Mode
Select screen will change to white color background. Original Page
up and Page down function icon on Toolbar also change to
import background icon and import whiteboard icon.
i. Select , you can see the below interface. You can select any picture you
want to be used on background.
ii. Select , background will turn to White board mode.
If you want to exit White board mode, just click again
.
Page 20

20
Operation Guide for Windows OS
4.4 Mouse Mode
Mouse pointer can be replaced by the Pointer or LightPen.
The left click or double click can be done by pressing the button when using
Pointer or the tip of the Light Pen on the screen.
If mouse pointer stays at the same position for 2-3 seconds, then it can be
automatically changed to mouse right key function.
(4) Edit Tool
Select , edit tool bar is shown as blow. Please select the function you want
to use.
Icon Description
Select drawing line as an object. An
object can enlarge, decrease, or move.
Rotate the drawing object you choice.
Print the current page you are seeing.
Undo the last operation.
Redo the last operation.
Spotlight function.
Curtain function.
change the vertical toolbar to a horizontal
toolbar.
switch the toolbar position to the right/
left side.
Page 21

21
Operation Guide for Windows OS
4.5
Switch to Mouse or Pen mode
Mouse mode or Pen mode can be changed by clicking the tip of the Pointer or
the Pen on the top or bottom edge slightly outside of the projected image.
In case of the Mouse mode, icon is shown in the task bar.
In case of the Red Pen mode, icon is shown in the task bar
.
Menu icon with yellow square mark is shown in the tool bar therefore,
it is convenience to conrm the present situation.
Page 22

22
Operation Guide for Windows OS
4.6
Change Toolbar Location
There is a quick way to change the position of the tool bar or hide/show it.
Place the tip of "Pointer" or "Light Pen" on the left or right edge slightly
outside the projected image, then press the button of the pointer or the tip of
the pen to the screen.
4.7
How to execute LightPen-Dual software again
Execute the driver from "Start Menu / LightPen / LightPen-Dual / LightPenDual".
Page 23

23
Operation Guide for Windows OS
5. PowerPoint Tool
This function can be executed by LightPen-Dual.
*The PowerPoint Tool does not support Microsoft Ofce PowerPoint 2002.*
If you click mouse icon on the task bar and select "PowerPoint Tool setting"
as "ON", when you use PowerPoint and show your PowerPoint file as
"Presentation mode", PowerPoint tool will be shown in the right side of
screen.
When you exit "Presentation mode", PowerPoint tool will be closed
automatically.
Page 24

24
Operation Guide for Windows OS
5.1 Function of each icon in PowerPoint Tool bar
Icon Description
Make toolbar as a small icon.
Change PowerPoint Toolbar to another side.
Change function to Computer Mouse.
Change function to Computer Mouse Right Key.
Change function to red pen.
Erase drawning.
Erase drawning on the screen all at once.
Go to last page.
Go to next page.
Select page.
Exit Presentation Mode.
Page 25

25
光光光光光光光光光光光
1. System Requirements
To ensure the interactive function work properly, please check your computer
system to see if it meets the following conditions.
LightPen3
System Requirements
OS Required Mac OS X v10.5 above
Processor Type Intel processeor
RAM 512 MB above
Min. Free disk space 100 MB
2. Software Installation
2.1 Driver Installation
*When you connect supplied USB cable between projector and your PC, the
folder of SPDriver will pop-up. Please completed the installation process from
step 3.
Step 1. Insert the "Owner's Manual" CD-ROM into the CD drive.
Step 2. Open the "LightPen Software for Mac" folder in the CD-ROM and
copy“mac.zip” to the disk.
Step 3. Double click and move SPDriver ICON to computer and execute it.
2.2 LightPen Installation
Step 1. Insert the "Owner's Manual" CD-ROM into the CD drive.
Step 2. Open the "LightPen Software for Mac" folder in the CD-ROM and
copy“LightPen3.zip” to the disk.
Step 3. Double click and move LightPen3 ICON to computer screen and
execute it.
Interactive function is provided by "LightPen3" software
Operation Guide for Mac
Page 26

26
光光光光光光光光光光光Operation Guide for Mac
3. Initial Setup for Interactive Function
3.1 Connect supplied USB cable between projector and your PC which show
below icon.
3.2 Click the mouse left key on the icon in the task bar to show the menu.
3.3 Select the "Calibration" to enter the calibration process. Use your pen or
pointer to touch the circle shown on the screen. Then another circle appear,
repeat this process until the 4th circle is ninshed.
3.4 After you have finished calibration, you can use either pen or pointer as a
mouse on the projection board or wall.
Page 27

27
光光光光光光光光光光光光光光光光光光光光光光
Operation Guide for Mac
4. How To Use Interactive Function in LightPen3
4.1 LightPen-Dual Function
When you complete the installtion of LightPen3 and start it, you see the tool
bar in the right side as shown below.
Page 28

28
光光光光光光光光光光光
28
光光光光光光光光光光光
Operation Guide for Mac
4.2 Function of each icon in the Tool bar
Icon Description
Mouse
Change function to Computer Mouse.
Red pen
Change function to red pen.
Green pen
Change function to green pen.
Blue pen
Change function to blue pen.
Marker pen
Change function to marker pen.
Drawing tool
Draw a circle, a square, a triangle or a straight
line.
Fineness and
color of pen
Select the neness and color of pen.
Eraser
Erase drawning.
Clean all
Erase drawning on the screen all at once.
Save le
Save the current page into le in computer.
White Board
Change function to white board.
Page up
Go to last page.
Page down
Go to next page.
Edit tool
Edit drawing.
Keyboard
On screen keyboard.
Exit
Exit the application.
Page 29

29
光光光光光光光光光光光
29
光光光光光光光光光光光
Operation Guide for Mac
4.3 Advanced function in Tool bar
(1) Drawing Tool
Select , then Drawing Tool function menu will be shown on the screen as
below. Plese select the icon you want to use.
(2) Whiteboard Mode
Select , screen will change to white color background. Original Page
up and Page down function icon on Toolbar also change to import
background icon and import whiteboard icon.
i. Select , you can see the below interface. You can select any picture you
want to be used on background.
Page 30

30
光光光光光光光光光光光
ii. Select , background will turn to White board mode.
If you want to exit White board mode, just click again.
(3) Edit Tool
Select , edit tool bar is shown as blow. Please select the function you want
to use.
Icon Description
Select drawing line as an object. An
object can enlarge, decrease, rotate,
delete or move .
Rota te th e dr awing ob ject you
choice.
Prin t th e cu rrent pag e yo u ar e
seeing.
Undo the last operation.
Redo the last operation.
光光光光光光光光光光光
Operation Guide for Mac
Page 31

31
光光光光光光光光光光光光光光光光光光光光光光
Operation Guide for Mac
4.4
Switch to Mouse or Pen mode
Mouse mode or Pen mode can be changed by clicking the tip of the Pointer
or the Pen on the top or bottom edge slightly outside of the projected image.
In case of the Mouse mode, icon is shown in the task bar.
In case of the Red Pen mode, icon is shown in the task bar.
Menu icon with yellow square mark is shown in the tool bar therefore, it is
convenience to conrm the present situation.
Page 32

32
光 Windows 光光光光光光
Operation Guide for Mac
4.5
Change Toolbar Location
There is a quick way to change the position of the tool bar or hide/show it.
Place the tip of "Pointer" or "Light Pen" on the left or right edge slightly
outside the projected image, then press the button of the pointer or the tip of
the pen to the screen.
Page 33

33
光光光光光光光光光光光Operation Guide for Linux
1. System Requirements
To ensure the interactive function work properly, please check your computer
system to see if it meets the following conditions.
Driver
System Requirements
OS Required Linux OS Ubuntu 10.04,Debian 5.05, Suse 11.3
Processor Type Intel Pentium-4 2.0GHz or above
(dedicated GPU is recommended)
RAM 512 MB above
Min. Free disk space 100 MB
2. Driver Installation
<Installation from USB device>
When you connect supplied USB cable between projector and your PC, the
folder of SPDriver will pop-up. Please completed the installation process from
step 3.
*Please login as root user before installation.
<Installation from CD-ROM>
Step 1. Insert the "Owner's Manual" CD-ROM into the CD drive.
Step 2. Open “SPDriver for Linux” folder.
Step 3. Choose 1-setup and continue the installation process.
Step 4. Installation is complete.
Interactive function is provided by "SPDriver".
Page 34

34
Operation Guide for Linux
3. Initial Setup for Interactive Function
3.1 Connect supplied USB cable between projector and your PC which show
below icon.
3.2 Click the mouse left key on the icon in the task bar to show the menu.
3.3 Select the "Calibration" to enter the calibration process. Use your pen or
pointer to touch the circle shown on the screen. Then another circle appear,
repeat this process until the 4th circle is ninshed.
3.4 After you have finished calibration, you can use either pen or pointer as a
mouse on the projection board or wall.
Page 35

35
Troubleshooting
Q1: Why does the message “No LightPen found” appear?
A: It may be caused by following:
(1) Your computer and projector are not properly connected. Please make
sure the USB cable is properly inserted in both your computer and projector.
(1-1) Insert the USB cable again if you see the screen as shown below.
(1-2) If the SPDriver Icon as shown as the following image (A), it
indicates that USB cable is not connected or the USB port is out
of order. If icon is shown as (B), it means you can use LightPen
program.
(A)
(B)
(2) Please use the USB cable included with your projector.If a USB exten-
sion is needed, please contact your dealer.
(3) The USB port of your computer is not working. Please contact your IT
staff.
Q2: How come the round calibration target does not execute
properly?
A: (1) Please check whether the pointer or light pen is working:
(1-1) Please make sure the pointer or light pen has a battery of adequate
power and has been turned on.
(1-2) When using the pointer or light pen, please avoid writing in
shadow areaa (see gure below) and maintain a 25 degree angle
against the projection screen.The pointer
or light pen is available for use only when
signals transmitted by it can be received
by the sensors.
CMOS Sensor
Page 36

36
Troubleshooting
Keep the light pen and project screen
at an angle of 25 degree or more
against each other
Avoid writing in shadowy areas.
(2) The ambient lighting may be too bright to work properly. Please
keep the projection screen and sensors from direct ambient lights.
Strong ambient light is usually caused by the following:
(2-1) Sunlight through the windows near the screen.
(2-2) Light source working close to the sensor or the screen.
Please quit the SPDriver and execute again, if you see the window
shown as Q5. Please take the light out until you can't see any light in
Window
.
Q3: How come the cursor is not located where the light pen is
pointed to?
A: It may be caused by the following:
(1) Poor system calibration. Try to point to the "center" of circle target when
you run calibration.(See Page 11~12 or Page 26, Page 34)
(2) The project location, projection size, or projection distance may be
changed.
(3) The projection resolution may have been changed.
Please calibrate again to solve this problem.
Q4: How come the cursor jumps around?
A:
The ambient lighting may be too bright to work properly. Please keep
the projection screen and sensors from ambient light interference,
especially direct sun light.(Please refer to Q2.)
Page 37

37
Troubleshooting
Q5: Why does the message "Strong lighting in the environment
may cause light pen to stop functioning normally." appear?
A: Too strong an ambient lighting may interfere with the functions of
sensors contained in your projector. Please keep the sensors of your
projector away from direct ambient lights.
Q6: How come the SPDriver have no response of virtual keyboard
function when the setting of SPDriver as <Mouse mode> on
Windows Vista\Windows 7 operating system ?
A: Ther virtual keyboard function of SPDriver may be restricted by the
default setting of the <User Account Control, UAC> on the Windows
operating system. User can modify the setting by following steps.
1. Choose the setting page from <Srart menu / Control Panel / User
Accounts>.
Page 38

38
Troubleshooting
2. Select <Change User Account Control settings>.
3. Change the leavel of User Account Control as"Never notify",then
click "OK" to conrm.
4. Restart the computer to complete the process.
Note: Since SP driver is resident in the PC, the driver displayed is
an invalid one when connects to the SP module again.
Page 39

Specications
Senson size 1/4"
IR band 940nm
Detect frame rate 60 fps
Resolution 2560 x 1920 (Interpolated)•
640 x 480 (Native)•
Input port Mini USB type
Calibration 4 points manual calibration on Windows / Mac / Linux •
OS
Auto calibration on Windows OS•
Driver install Driver included; Auto run on Windows OS
Throw ratio 0.35
Multi-touch 2 touch points (Windows 7 and Windows 8 compliant)
Dual-pen mode On Windows OS
Projection image size 70" ~100"
power consumption 200mA
Built-in memory 8MB
Standard package
contents
Interactive Kit (IR Camera Unit) x 1•
Light Pen x1•
Pointer x 1•
USB cable (A - Mini B type) x 1•
Battery x 4•
Owner's Manual (CD) x 1•
Page 40

U.S.A.
EIKI International, Inc.
30251 Esperanza
Rancho Santa Margarita
CA 92688-2132
U.S.A.
Tel: 800-242-3454 (949)-457-0200
Fax: 800-457-3454 (949)-457-7878
E-Mail: usa@eiki.com
Canada
EIKI CANADA - Eiki International, Inc.
P.O. Box 156, 310 First St. - Unit 2,
Midland, ON, L4R 4K8, Canada
Tel: 800-563-3454 (705)-527-4084
Fax: 800-567-4069 (705)-527-4087
E-Mail: canada@eiki.com
Deutschland & Österreich
EIKI Deutschland GmbH
Am Frauwald 12
65510 Idstein
Deutschland
Tel: +49-6126-9371-0
Fax: +49-6126-9371-14
E-Mail: info@eiki.de
Eastern Europe
EIKI CZECH SPOL. s.r.o.
Nad Cementárnou 1163/4a
Praha 4, Podolí
147 00
Czech Republic
Tel: +420 241 410 928
+420 241 403 095
Fax: +420 241 409 435
E-Mail: info@eiki.cz
China
EIKI (Shanghai) Co., Ltd.
LAKESIDE OASIS MIDDLE RING
BUSINESS CENTRE
Block 1, Room 606,
1628, Jin Sha Jiang Road
Shanghai, 200333
CHINA
Tel: 86-21-3251-3993
Service Hot line: 86-21-3251-3995
Fax: 86-21-3251-3997
E-mail: info@eiki-china.com
South East Asia
EIKI Industrial (M) Sdn Bhd
No. 11, Nouvelle Industrial Park,
Lorong Teknologi B, Taman Sains Selangor
1, Kota Damansara PJU5,
47810 Petaling Jaya, Selangor Darul Ehsan,
Malaysia
Tel: +603-6157-9330
Fax: +603-6157-1320
E-Mail: sales@eiki.my
Japan & Worldwide
EIKI Industrial Company Limited.
6-23 Teramoto, Itami-shi, Hyogo,
664-0026 JAPAN
Tel: +81-72-782-9492
Fax: +81-72-781-5435
WorldWide Website http://www.eiki.com
 Loading...