

Eicon Networks DIVA LAN ISDN User Manual

DIVA LAN ISDN Modem
User’s Guide

First Edition (August 1999) 206-312-01
DIVA LAN ISDN Modem is a trademark of Eicon Technology Corporation.
All other brand and product names are trademarks or registered trademarks of their respective owners.
Changes are periodically made to the information herein; these changes will be incorporated into new
editions of the publication. Eicon Technology may make improvements and/or changes in the products
and/or programs described in this publication at any time.
If you have comments on this manual or the products it describes, address them to: Eicon Technology
Corporation,
Attention: Corporate Publications,
9800 Cavendi sh Blvd.,
Montreal, Quebec, Canada,
H4M 2V9
Telephone: (514) 745-5500
Fax: (514) 745-5588
Eicon Technology may use or distribute whatever information you supply in any way it believes
appropriate without incurring any obligations to you.
Copyright © 1998-1999 Eicon Technology Corporation. All rights reserved, including those to reproduce
this publication or parts thereof in any form without permission in writing from Eicon Technology
Corporation

Table of Contents
Chapter One:
Introduction ......................................................................................................... 9
Introducing the DIVA LAN ISDN Modem ........................................................ 10
Creating your own LAN for resource sharing .............................................................. 10
Connecting to the Internet ........................................................................................... 10
Connecting to a corporate network ............................................................................. 11
Creating a VPN ........................................................................................................... 11
Attaching telephones and fax machines ...................................................................... 11
Connecting more computers ....................................................................................... 12
Total network security .................................................................................................. 12
Compression for faster throughput .............................................................................. 12
Bandwidth on-demand ................................................................................................ 13
Advanced ISDN tariff management ............................................................................. 13
Advanced diagnostics ................................................................................................. 13
Unsupported configurations ........................................................................................ 13
Summary of features ....................................................................................... 14
Contacting customer services ........................................................................ 15
World wide web ........................................................................................................... 15
Chapter Two:
Getting Started .................................................................................................. 16
1. Installation overview .................................................................................... 17
2. Prepare for installation ................................................................................ 18
Verify your package contents ...................................................................................... 18
Verify the configuration of your computers .................................................................. 18
To use the advanced configuration options ................................................................. 19
3. Choose a connection protocol ................................................................... 20
Important ISDN concepts ............................................................................................ 20
ISDN channel usage ................................................................................................... 20
Choosing a connection protocol .................................................................................. 21
Summary ..................................................................................................................... 22
4. Order an ISDN Line ...................................................................................... 23
5. Gather Internet account information .......................................................... 24
Gather X.25 information .............................................................................................. 24
Gather V.120 information ............................................................................................. 24
6. Install the DIVA LAN ISDN Modem ............................................................. 26
7. Install Modem Monitor (Windows 95/98/NT4) ............................................ 28
8. Connecting a non-Windows computer to the DIVA LAN ISDN Modem .. 31
9. Configuring the Internet connection .......................................................... 33
To configure the Internet connection ........................................................................... 33
10. Using your DIVA LAN ISDN Modem ......................................................... 38
How long will the line stay connected? ........................................................................ 38
Registering your DIVA LAN ISDN Modem .................................................................. 38
What’s next? ................................................................................................................ 38

DIVA LAN ISDN Modem User’s Guide Table of Contents 4
Chapter Three:
Using Modem Monitor ...................................................................................... 39
Starting Modem Monitor .................................................................................. 40
Start menu program group .......................................................................................... 40
Properties dialog box ...................................................................................... 42
Utilities dialog box ........................................................................................... 43
Options dialog box .......................................................................................... 44
Status Viewer ................................................................................................... 45
Chapter Four:
The Web-based Configuration Interface ......................................................... 46
Starting the web-based configuration interface ........................................... 47
To start the web-based configuration interface ............................................................ 47
Saving configuration settings ...................................................................................... 48
Getting help ................................................................................................................. 48
General settings and connection profiles ..................................................... 49
General settings .......................................................................................................... 49
Connection profile settings .......................................................................................... 49
Editing the ISP profile ...................................................................................... 50
Editing LAN settings ........................................................................................ 52
Saving and restoring configuration files ....................................................... 53
To save/restore configuration settings ......................................................................... 53
Viewing status information ............................................................................. 54
System status .............................................................................................................. 54
Front panel display ...................................................................................................... 54
Obtaining statistics .......................................................................................... 55
Upgrading the DIVA LAN ISDN Modem firmware .......................................... 56
Resetting to factory defaults .......................................................................... 57
Chapter Five:
Minimizing ISDN Charges ................................................................................ 58
The Cost Control page .................................................................................... 59
Idle timer ..................................................................................................................... 59
Data call thresholds ..................................................................................................... 60
ISDN billing intervals ................................................................................................... 60
Configuring BACP ............................................................................................ 61
Configuring AO/DI ............................................................................................ 63
X.25 on the D-channel ................................................................................................ 65
Setting ISDN active intervals .......................................................................... 67
Spoofing NetBIOS services ............................................................................ 68
Data compression ............................................................................................ 69
Manual dialing .................................................................................................. 70
Restricting analog calls ................................................................................... 71
Data over voice ................................................................................................. 72
Traffic filtering .................................................................................................. 73

DIVA LAN ISDN Modem User’s Guide Table of Contents 5
Chapter Six:
Security.............................................................................................................. 74
Security features .............................................................................................. 75
System password ............................................................................................. 76
Automatic log out ............................................................................................ 77
Network address translation ........................................................................... 78
Security benefits .......................................................................................................... 78
NAT static mappings .................................................................................................... 78
Remote management ....................................................................................... 81
Incoming data calls .......................................................................................... 83
Call screening .................................................................................................. 86
Call authentication ........................................................................................... 87
To set up call authentication ........................................................................................ 87
Callback ............................................................................................................ 88
Callback modes ........................................................................................................... 88
Callback options .......................................................................................................... 88
Delay before host calls back ........................................................................................ 89
Timeout waiting for callback ........................................................................................ 89
To set up callback ........................................................................................................ 89
Manual dialing .................................................................................................. 90
Custom security features ................................................................................ 91
Chapter Seven:
Setting up the Phone Ports.............................................................................. 92
Setting phone numbers manually .................................................................. 93
Connecting modems and fax machines ........................................................ 94
Connecting multiple analog devices .............................................................. 94
Call bumping .................................................................................................... 95
How it works ................................................................................................................ 95
Requirements .............................................................................................................. 95
To enable call bumping ................................................................................................ 95
Restricting analog calls ................................................................................... 96
Supplementary services ................................................................................. 97
Call Forwarding ........................................................................................................... 97
Call Waiting ................................................................................................................. 98
VoiceMail ..................................................................................................................... 98
Caller ID ...................................................................................................................... 98
Three-way Conference Calling .................................................................................... 98
Call Transfer ................................................................................................................ 99
Feature Key values ...................................................................................................... 99
Chapter Eight:
Connecting to a Corporate Network ............................................................. 100
Overview ......................................................................................................... 101
1. Gather information ..................................................................................... 102
Gather X.25 information ............................................................................................ 102

DIVA LAN ISDN Modem User’s Guide Table of Contents 6
2. Configure the Corporate profile ............................................................... 103
Using the corporate connection ................................................................... 107
How long will the line stay connected? ...................................................................... 107
Support for Microsoft Network Neighborhood ........................................................... 107
NetBIOS name resolution ......................................................................................... 107
Timeouts ................................................................................................................... 107
Dynamic IP addressing ............................................................................................. 107
What’s next? ................................................................................................... 108
Chapter Nine:
Advanced Installations ................................................................................... 109
Connection retries ......................................................................................... 110
Installing on an existing LAN ........................................................................ 112
Using Modem Monitor ............................................................................................... 112
Manual installation ..................................................................................................... 112
Adjusting configuration settings on the LAN .............................................................. 114
Connecting more than four computers ........................................................ 115
Creating a virtual private network ................................................................ 116
To create a VPN ........................................................................................................ 116
Connecting to the VPN .............................................................................................. 117
Concurrent Internet and Intranet connections ............................................ 119
Selecting a connections protocol .............................................................................. 119
Defining routes .......................................................................................................... 119
Installation and configuration procedure ................................................................... 119
IP routes .......................................................................................................... 120
About IP addresses ................................................................................................... 120
Why routes are needed ............................................................................................. 123
The Routing Information Protocol (RIP) .................................................................... 126
Defining routes for the DIVA LAN ISDN Modem ....................................................... 126
IP filters ........................................................................................................... 128
How filtering works .................................................................................................... 128
Default filters ............................................................................................................. 129
To define a filter ......................................................................................................... 129
IP filtering examples .................................................................................................. 132
Making a V.120 connection ........................................................................... 136
SecurID support ............................................................................................. 138
Chapter Ten:
Other Configuration Tools ............................................................................. 140
Configuration options ................................................................................... 141
Web interface ................................................................................................. 142
TFTP interface ................................................................................................ 143
Enabling TFTP server support .................................................................................. 143
Uploading/downloading configuration files ................................................................ 144
Loading new firmware via TFTP ................................................................................ 144
DTMF interface ............................................................................................... 145
How it works .............................................................................................................. 145
Commands ................................................................................................................ 145

DIVA LAN ISDN Modem User’s Guide Table of Contents 7
Command line interface (CLI) ....................................................................... 146
Establishing a Telnet connection via IP ..................................................................... 146
Establishing a serial connection ................................................................................ 146
Using the command line interface ............................................................................. 147
About configuration context ....................................................................................... 148
Connection profiles ................................................................................................... 148
Default profiles .......................................................................................................... 148
Command line reference ........................................................................................... 148
Loading firmware with the CLI ................................................................................... 148
Appendix A:
TCP/IP Configuration...................................................................................... 150
Installing and configuring TCP/IP for Windows 95/98 ................................ 151
Installing TCP/IP ....................................................................................................... 151
Configuring TCP/IP ................................................................................................... 151
Installing TCP/IP for Windows NT ................................................................ 154
Configuring TCP/IP on an iMac .................................................................... 155
Appendix B:
Technical Information..................................................................................... 156
DIVA LAN ISDN Modem indicator lights ...................................................... 157
DIVA LAN ISDN Modem connectors ............................................................. 159
Resetting the DIVA LAN ISDN Modem ......................................................... 160
Resetting operational settings ................................................................................... 160
Resetting to factory defaults ...................................................................................... 160
Termination ..................................................................................................... 161
Determining termination requirements ...................................................................... 161
Installing the resistor ................................................................................................. 161
Appendix C:
Command Line Reference.............................................................................. 162
Notational Conventions ................................................................................. 163
Commands .................................................................................................... 164
AO/DI ............................................................................................................... 165
Callback .......................................................................................................... 166
Call screening ................................................................................................ 167
Call thresholds ............................................................................................... 168
DHCP ............................................................................................................... 169
DNS ................................................................................................................. 172
Ethernet .......................................................................................................... 173
General ............................................................................................................ 174
IP filters ........................................................................................................... 177
IP NAT ............................................................................................................. 180
IP routing ........................................................................................................ 181
IP various ........................................................................................................ 182

DIVA LAN ISDN Modem User’s Guide Table of Contents 8
ISDN ................................................................................................................ 184
ISDN Access Time ......................................................................................... 187
LAPD ............................................................................................................... 188
Logging and Mail Trace ................................................................................. 189
MLPPP ............................................................................................................. 190
Phone .............................................................................................................. 191
PPP .................................................................................................................. 194
Profiles ............................................................................................................ 197
Q.931 ............................................................................................................... 198
RIP ................................................................................................................... 199
SNMP ............................................................................................................... 201
TCP .................................................................................................................. 202
TFTP ................................................................................................................ 203
Time Protocol ................................................................................................. 204
UDP ................................................................................................................. 205
V.120 ................................................................................................................ 206
V.120 Scripting ............................................................................................... 208
X.25 .................................................................................................................. 209
Appendix D:
Regulatory Information .................................................................................. 211

Chapter One
Introduction
Eicon T echnology's DIVA LAN ISDN Modem provides af fordable workgr oup computing for branch
offices, small businesses, and home offices.
This chapter summarizes the features of the DIVA LAN ISDN Modem and shows ho w it can be used
in a variety of applications.

Chapter One: Introduction Introducing the DIVA LAN ISDN Modem 10
Introducing the DIVA LAN ISDN Modem
The DIVA LAN ISDN Modem is a powerful networking solution for SOHO (small office/home office) and
branch off ice users. It creates a complete networking , phone, fa x, and data communications system in one box.
The DIVA LAN ISDN Modem is easy to install, use, and maintain, without the need for technical support from
the remote, corporate office.
The DIVA LAN ISDN Modem can be used in a variety of applications. This section presents a brief overview
of some of the more common applications, and their features.
Creating your own LAN for resource sharing
The DIVA LAN ISDN Modem has a built-in 10 Mbps Ethernet hub with four ports. By connecting computers
(or other devices, such as printers) to these ports, they become part of a LAN (local area network), and can
share data and resources with each other.
Share data and resources
DIVA LAN ISDN Modem
B1 B2 D
Ethernet
ISDN
LINK
FAULT POWER
E4/CE1 E2 E3
ISDN Line
DIVA LAN ISDN Modem
Connecting three computers and a network printer to the DIVA LAN ISDN Modem.
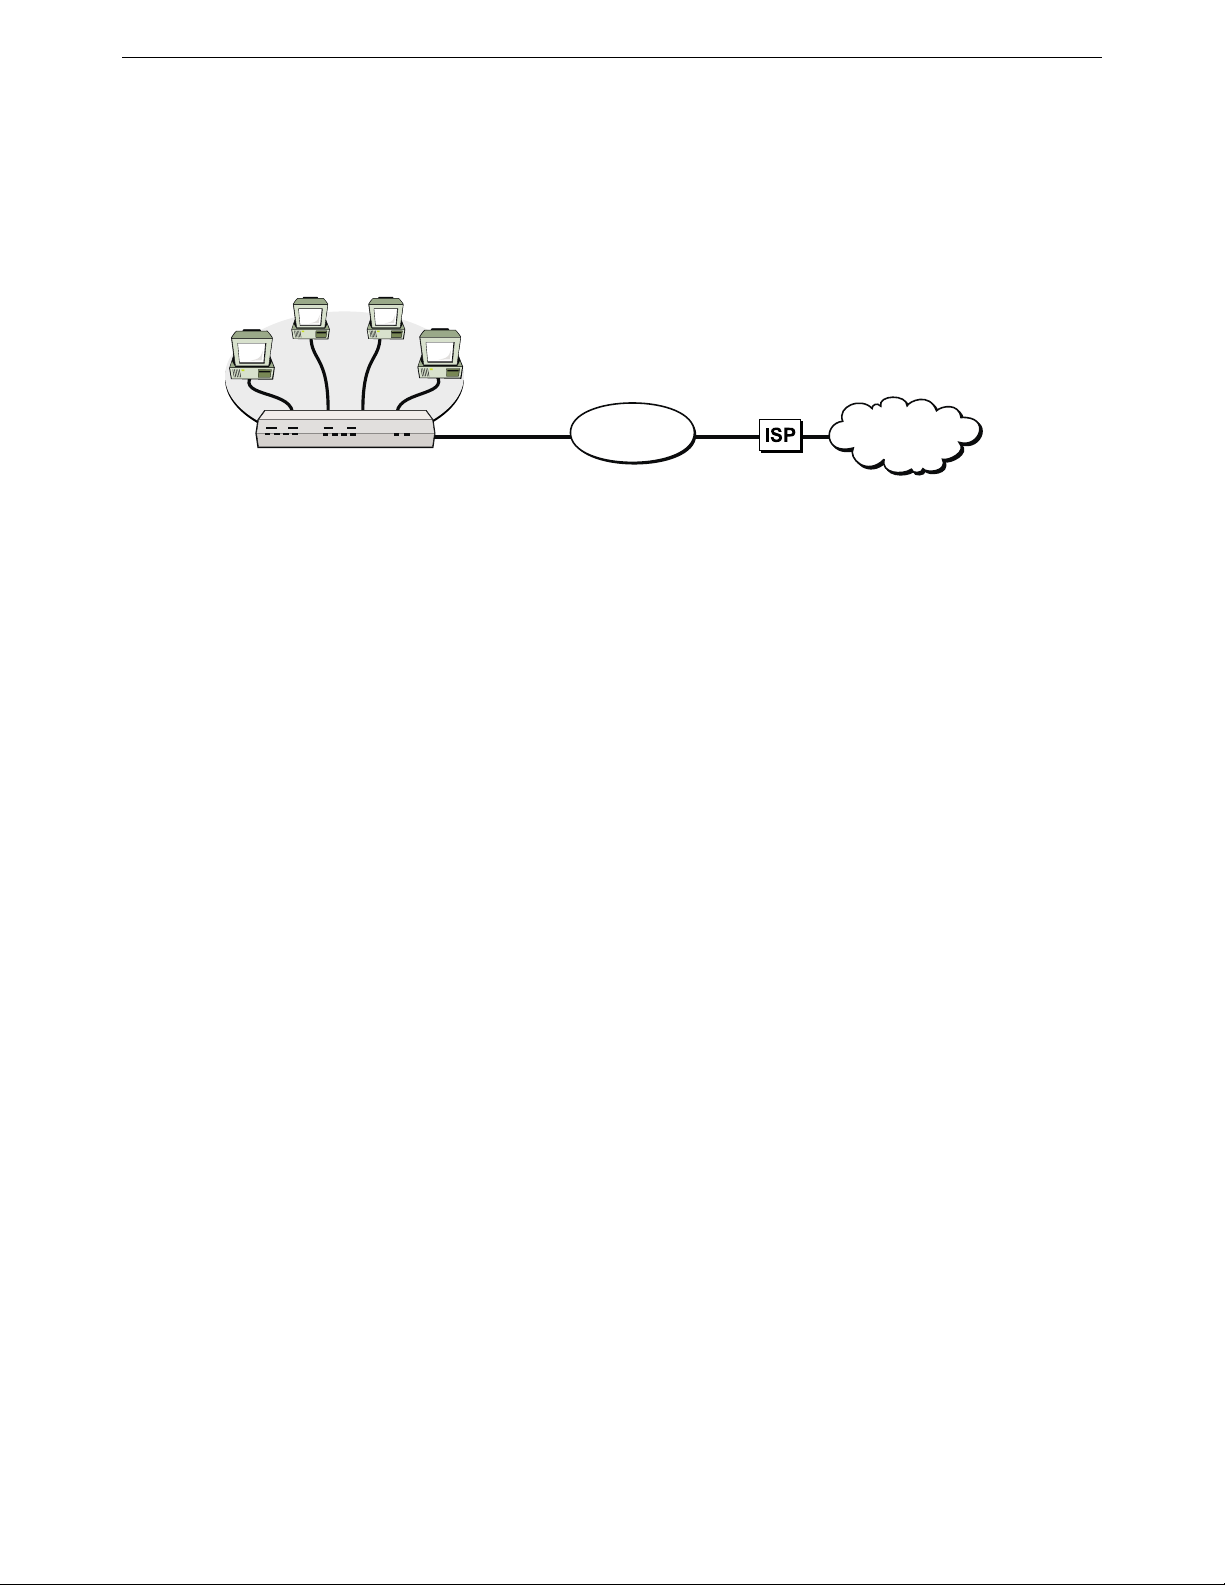
Connecting to the Internet
In this application, the DIVA LAN ISDN Modem enables you to connect one or more computers to the Internet
for e-mail, web surfing, and file transfers.
DIVA LAN ISDN Modem
B1 B2 D
Ethernet
ISDN
LINK
FAULT POWER
E4/CE1 E2 E3
DIVA LAN ISDN Modem
How it works: Y ou connect the DIVA LAN ISDN Modem to an ISDN line (which is part of the telep hone network).
You also set up an account with an ISP (Internet Service Provider), obtaining the necessary phone numbers, user
name, and passwor d. O nce the DIVA LAN ISDN Modem is configur ed with this inf ormation, it automaticall y calls
the ISP and uses its services to send and receive data on the Internet.
ISDN Line
ISDN
Network
Internet

Chapter One: Introduction Introducing the DIVA LAN ISDN Modem 11
Connecting to a corporate network
This option enables you to connect one or more computers to your corporate LAN for f ile sharing, e-mail, data
transfer. Generally, this type of connection takes place via a direct, dial-up link with the corporate LAN.
u
s
,
e
s
e
l
i
f
,
l
i
a
m
-
e
d
n
e
S
n
e
t
w
o
r
k
r
e
s
o
u
r
c
e
s
DIVA LAN ISDN Modem
ISDN
LINK
B1 B2 D
Ethernet
FAULT POWER
E4/CE1 E2 E3
ISDN Line
ISDN
Network
ISDN Line
Corporate NetworkDIVA LAN ISDN Modem
How it works: You connect the DIVA LAN ISDN Modem to an ISDN line (which is part of the telephone
network). You also contact the corporate network and obtain its ISDN phone number and associated user
names and passwords. Once the DIVA LAN ISDN Modem is configured with this information, it automatically
calls the remote site to send data to it, for example, when a local users sends e-mail, or shares folders with
Windows Network Neighborhood.
Note
You cannot connect to a corporate network i f it is also using a DIVA LAN ISDN Modem.
Creating a VPN
Connect branch offices and telecommuters into an enterprise-wide Virtual Private Network (VPN) over the
Internet. This eliminates the long-distance charges, network management problems, and security
responsibilities associated with traditional WANs.
u
s
,
e
s
e
l
i
f
,
l
i
a
m
-
e
d
n
e
S
n
e
t
w
o
r
k
r
e
s
o
u
r
c
e
s
DIVA LAN ISDN Modem
B1 B2 D
Ethernet
ISDN
LINK
FAULT POWER
E4/CE1 E2 E3
ISDN Line ISDN Line
Internet
Corporate NetworkDIVA LAN ISDN Modem
Note
You cannot connect to a corporate network i f it is also using a DIVA LAN ISDN Modem.
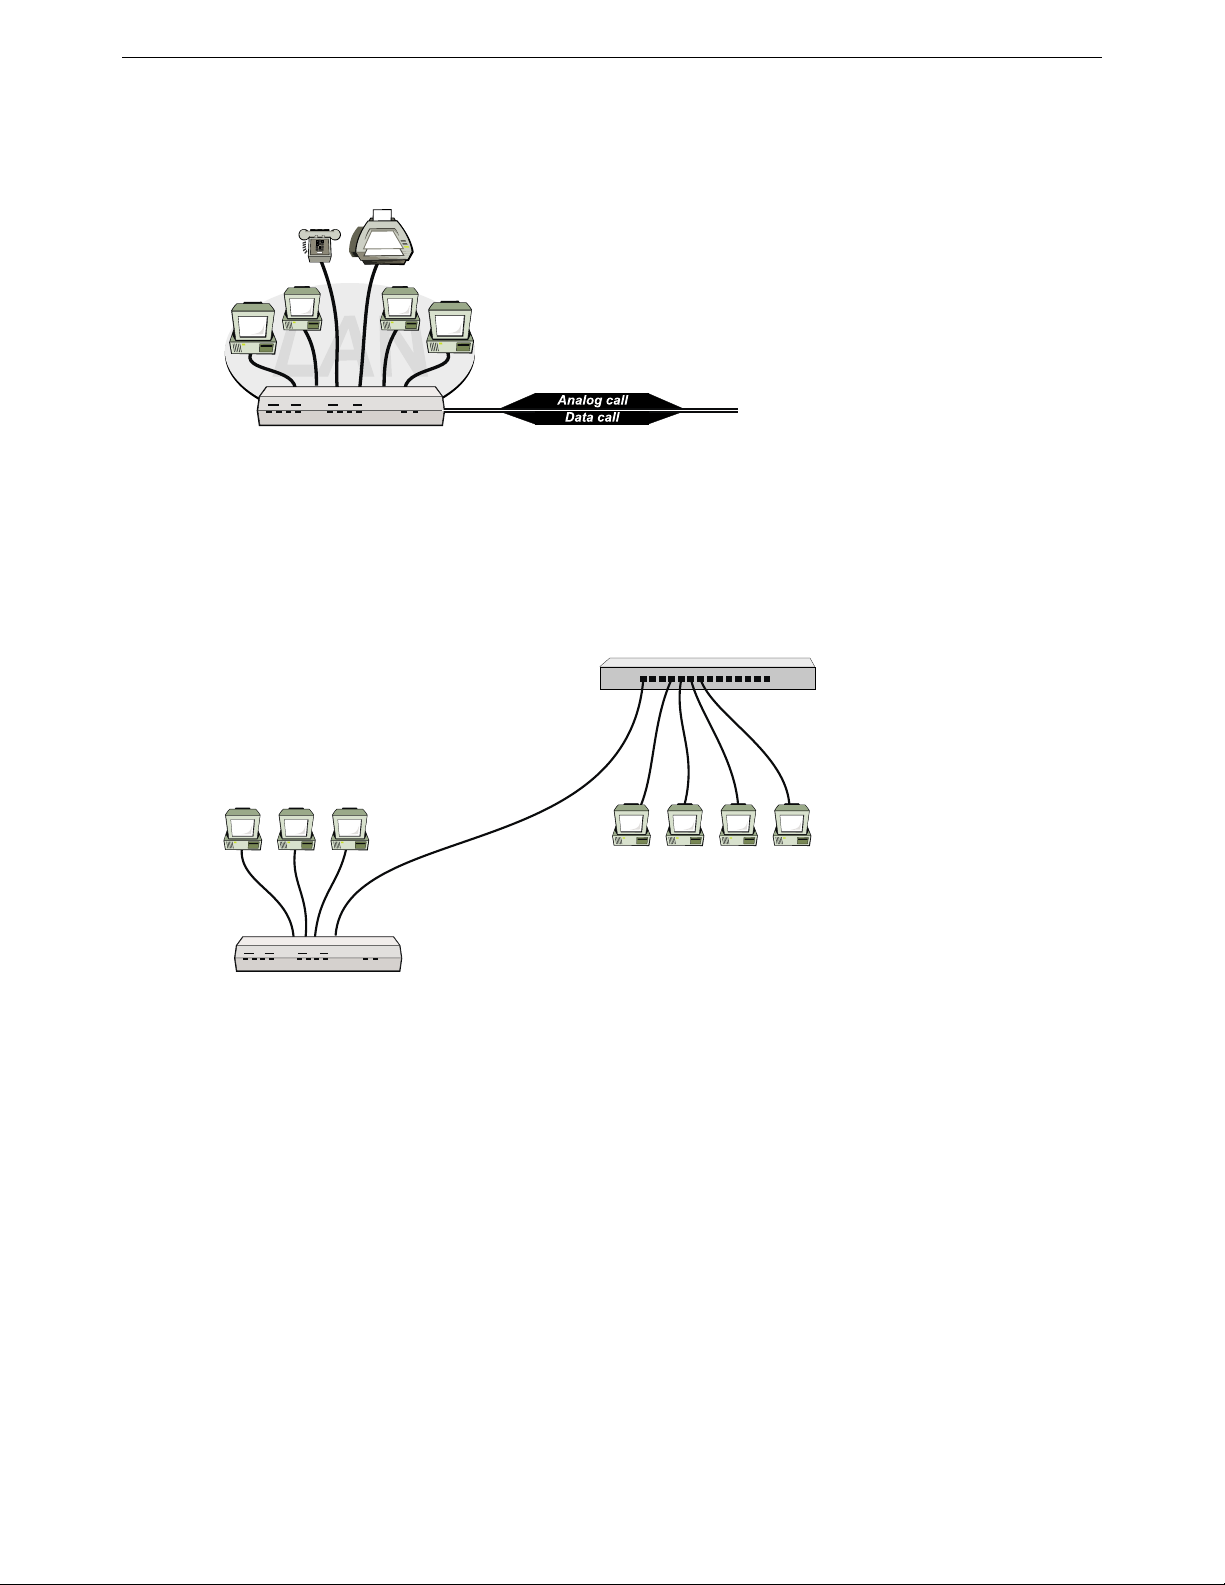
Attaching telephones and fax machines
The DIVA LAN ISDN Modem is available in a version that features two analog ports for the connection of
telephones, fax machines, and analog modems. The DIVA LAN ISDN Modem takes advantage of the
flexibility of ISDN to enable you to make or receive phone calls or faxes, while at the same time connecting to
the Internet or a corporate network with your computers. This can eliminate the need to install additional
analog phone lines.
Chapter One: Introduction Introducing the DIVA LAN ISDN Modem 12
The DIVA LAN ISDN Modem supports caller ID, call transfer, call wa iting, call holding, call forwarding, and
3-way conference call features.
DIVA LAN ISDN Modem
B1 B2 D
Ethernet
ISDN
LINK
FAULT POWER
E4/CE1 E2 E3
ISDN Line
DIVA LAN ISDN Modem
Connecting more computers
By attaching a DIVA LAN ISDN Modem to an Ethernet hub from other manufacturers, you can interconnect
more than four computers (or other devices), enabling them to share the ISDN connection provided by the
DIVA LAN ISDN Modem.
Third-party Ethernet Hub
DIVA LAN ISDN Modem
B1 B2 D
Ethernet
ISDN
LINK
FAULTPOWER
E4/CE1 E2 E3
DIVA LAN ISDN Modem
Connecting the DIVA LAN ISDN Modem to a third-party Ethernet hub.
In this example, all computers can share the ISDN link to exchange data, send e-mail, or s urf the Web. There is
no need for multiple modems, phone lines, or ISP accounts.
Note
Two DIVA LAN ISDN Modems cannot be connected in this manner.
Total network security
The Network Address Translation (NAT) feature keeps local IP addresses hidden so that your computers are
invisible to the outside world.
Password security, filtering, and the ability to disable support for in coming calls prevents intruders from
breaking into the DIVA LAN ISDN Modem itself.
Compression for faster throughput
The DIVA LAN ISDN Modem provid es data compressio n to achie v e throughput rates of up to 5 12 kbps. That's
four times the ISDN remote access speed of 128 kbps.

Chapter One: Introduction Introducing the DIVA LAN ISDN Modem 13
Bandwidth on-demand
The DIVA LAN ISDN Modem's bandwidt h-on-demand feature automatically monitors data traffic and
engages the second B-channel only when needed, reducing ISDN costs.
Advanced ISDN tariff management
The DIVA LAN ISDN Modem can be configured to:
• Disable ISDN access during peak tariff rates or limit the total line usage in minutes for a given time
period.
• Set a maximum number of connecti ons for a given period.
• Filter out specific IP protocols which consume a lot of bandwidth.
• Control broadcast traffic such as NetBEUI and TCP from reconnecting the ISDN line.
Advanced diagnostics
• On-screen display of B-channel status.
• Significant events are recorded in the Event Viewer.
• Events trigger visual or audible alarms.
• Common errors are described in non-technical languag e inside th e Ev en t Viewer, so that users don’t need
to analyze PPP or ISDN traces.
• Detailed ISDN information for the last two calls is retained.
• Reports list ISDN diagnostics in plain language along with help information. This is part icularly us ef ul
for solving ISDN line provisioning problems.
• Detailed traces (including ISDN (Q.931), PPP, X.25, LAPD) are availabl e enabling technical perso nnel to
isolate complex communications problems.
Unsupported configurations
The DIVA LAN ISDN Modem cannot be used in the following configurations:
• Two DIVA LAN ISDN Modems cannot be interconnected (daisy-chained) via their Ethernet ports.
• The DIVA LAN ISDN Modem cannot be used on both sides when connecting to a corporate network. The
corporate network must have its own gateway.

Chapter One: Introduction Summary of features 14
Summary of features
Note
The DIVA LAN ISDN Modem is available with or without analog phone ports. Phone related features
are only avai lable on models with analog phone ports.
Key features of the DIVA LAN ISDN Modem include:
Physical characteristics
• Ethernet hub with four ports
• Two analog ports
• Console port (serial)
• Status LEDs (four ISDN, four Ethernet, power, fault)
ISDN support
• Available with U or S/T interface
• Support for international switches
• Always On/Dynamic ISDN (AO/DI)
Voice call handling
• Call bumping (Dynamic Bandwidth Allocation) on incoming and outgoing calls
• Advanced calling features, including call forwarding, three-way calling, etc.
• Delivers CallerID digits to the analog ports
• PHONE ports have a REN of 3
PPP features
• PPP, Multilink PPP, BACP, BOD, AO/DI, V.120
• Compression: Ascend, MPPP, MS-STAC, STAC1, and STAC3
• Authentication: PAP/CHAP, MS-CHAP
Installation
• Quick install via wizards
• Auto detection of common problems, including line presence, incorrect configuration, etc.
Usage/tariff management
• Connectivity timers to restrict usage to particular days and times
• Usage limits can be set based on number of calls or time connected
• Call filtering
LAN protocol
• Supports static and dynamic IP routing
• Supports IP PAT and NAT
• Performs IP spoofing and packet filtering
• Can act as a DHCP server
• TFTP server support

Chapter One: Introduction Contacting customer services 15
Administration
• Web-based, TELNET, and command line management interfaces
• Configure using IP via the Ethernet or ISDN ports, or by using a direct serial link via the console port
• DTMF interface permits configuration with a touch tone telephone
• Statistics with real-time updates
• Ability to save and restore configuration locally or remotely
• SNMP MIB II support
Contacting customer services
To obtain technical support for Eicon products, contact your Eicon Technology supplier.
World wide web
Information about Eicon Technology products and services—including documentation and sof tw are up dat es —
is available from our web site at www.eicon.com/support

Chapter Two
Getting Started
This chapter explains ho w to inst all and conf igur e the DIVA LAN ISDN Modem to provide Int ernet
access for up to four computers.
If this type of installation does not meet your needs, instructions for creating other types of
installations are found in Chapter Eight and Chapter Nine.
Chapter Two: Getting Started 1. Installation overview 17
1. Installation overview
The steps in this chapter explain how to install and configure DIVA LAN ISDN Modem to provide Internet
access for up to four computers.
The following diagram illustrates the key components that are part of this installation.
DIVA LAN ISDN Modem
ISDN
LINK
B1 B2 D
Ethernet
FAULT POWER
E4/CE1 E2 E3
ISDN Line
ISDN
Network
Internet
DIVA LAN ISDN Modem
The installation process is composed of the following steps:
• Step 1. Installation overview
• Step 2. Prepare for installation
• Step 3. Choose a connection protocol
• Step 4. Order an ISDN Line
• Step 5. Gather Internet account information
• Step 6. Install the DIVA LAN ISDN Modem
• Step 7. Insta l l Modem Monitor (Windows 95/98/NT4)
• Step 8. Connecting a non-Windows computer to the DIVA LAN ISDN Modem
• Step 9. Configuring the Internet connection
• Step 10. Using your DIVA LAN ISDN Modem

Chapter Two: Getting Started 2. Prepare for installation 18
2. Prepare for installation
To ensure that the installation of your DIVA LAN ISDN Modem is quick and trouble free, take a few moments
to prepare for installation.
Verify your package contents
Your package should contain the following:
DIVA LAN ISDN Modem
LAN ISDN Modem
DIVA
B1 B2 D
ISDN
Ethernet
E1 E2 E3
LINK
FAULT P OWE R
E4/C
Ethernet Cable (Blue)
RJ45 RJ45
Use this to connect your computer to
the DIVA LAN ISDN Modem via its
Ethernet port.
ISDN Cable (Grey)
RJ45 RJ11
Use this to connect the DIVA LAN
ISDN Modem to your ISDN line.
Console Cable (Beige)
DB9RJ45
Power Supply
CD-ROM
Use this to install the DIVA LAN
ISDN Modem software and read
the documentation.
Quick Install Booklet
DIVA
Terminating Resistor
Advanced users only. Connects your
computer to the DIVA LAN ISDN
Modem via the CONSOLE port.
Only included if you purchased
the S/T model.
Verify the configuration of your computers
To connect to the DIVA LAN ISDN Modem
Each computer that will be connected to the DIVA LAN ISDN Modem must have:
• A 10BASE-T Ethernet network interface card, properly installed and configured to use the TCP/IP
protocol. Consult the documentation that came with your card for instructions on how to do this.
100 Mbps Ethernet cards can only be connected to the DIVA LAN ISDN Modem if they support
auto-sensing.
• the TCP/IP communications protocol configured as follows:
• it must be set to obtain its IP address automatically (DHCP clien t)
• it must not be configured to use a DNS server
See Appendix A for information on configuring TCP/IP.

Chapter Two: Getting Started 2. Prepare for installation 19
To configure the DIVA LAN ISDN Modem
The computer you are going to use to configure the DIVA LAN ISDN Modem must have:
• Web browser software (Netscape 3.01 or later, or Internet Explorer 4 or later).
Internet Explorer 4 is included on the DIVA LAN ISDN Modem CD for computers running Windows 95,
Windows 98, or NT 4.0 or later. NT 4.0 requires SP3 or SP4 available on the DIVA LAN ISDN Modem CD.
• The Web browser must be configured as follows:
• Connect to the Internet via a local area network (LAN).
• Do not to connect through a proxy server.
To run the Modem Monitor software
The Modem Monitor software provides an easy way to manage the DIVA LAN ISDN Modem. To install and
run this software you need:
• IBM-compatible 486, or Pentium-based computer running Microsoft Windows 95/98/NT4.0 or later
• CD-ROM drive
To use the advanced configuration options
For the advanced user, the DIVA LAN ISDN Modem offers additional configuration options. These options
and their requirements are as follows:
• The command line interface (CLI) gives you complete access to all the DIVA LAN ISDN Modem
configuration parameters. To access this interface you require Telnet software or a terminal emulation
program.
• TFTP (trivial file transfer protocol) gives you access to all configuration files on the DIVA LAN ISDN
Modem. You need TFTP client software to use this option. A TFTP program is included on the DIVA LAN
ISDN Modem CD.
• The DTMF interface enables you to define certain DIVA LAN ISDN Modem configuration settings using
a ordinary touch tone phone.
See Chapter Ten for more information on these configuration options.

Chapter Two: Getting Started 3. Choose a connection protocol 20
3. Choose a connection protocol
The usage of the ISDN link is governed by the type of connection protocol you choose. The connection
protocol defines the rules by which ISDN channels are enabled and disabled. The type of protocol you choose
to use depends on the type of connections you plan to make.
Important ISDN concepts
Before you can decide on a connection protocol, you must become familiar with the following ISDN concepts.
ISDN channels
ISDN lines are defined in terms of channels, with each channel supporting a specific type of communication.
The DIVA LAN ISDN Modem supports two ISDN channel types:
• D-channel: The Device channel is used to control the setup of ISDN connections on the other channels.
They can also be used to transmit packet data traffic. The D-channel has a transmission speed of 16 kbps.
• B-channel: Bearer channels are used to carry data or voice traffic. They have a transmission speed of 56
or 64 kbps.
ISDN access interfaces
An access interface is the physical connection between you and an ISDN network. It defi nes the number of Dand B-channels that are available to you and the total transmission speed of the connection. The DIVA LAN
ISDN Modem supports a single Basic Rate Interface (BRI), which is comprised of one D-channel (16 kbps)
and two B-channels (64 kbps) for a total user bit rate of 144 kbps.
Each ISDN B-channel can have its own telephone number. Although in some cases you will only get one
number for both channe ls unless yo u order supplementary services.
ISDN channel usage
The following diagram shows all the potential connections a DIVA LAN ISDN Modem could make, if it was
configured to support an Internet connection, a corpor ate networ k conn ectio n, incom ing data calls, and analog
calls on both PHONE ports.
Internet Connection
Corporate Network Connection
Incoming Data Call Connection
PHONE port #1
PHONE port #2
All connections, both data and voice, are carried on the B-channels. (AO/DI enables you to also use the
D-channel for data connections, but this exception will be discussed later.) The DIVA LAN ISDN Modem
dynamically assigns B-channels on-demand. Therefore, there is no guarantee which B-channel a specific
connection will receive. The same is true for your ISDN phone numbers and your SPIDs. Your first phone
number does not necessarily map to ISDN channel B1.
Connections are mapped as follows:
ISDN BRI Line
D-channel
1st B-channel
2nd B-channel
• PHONE port 1 always uses the first ISDN phone number (and SPID).
• PHONE port 2 always uses the second ISDN phone number (and SPID).
• To help avoid conflicts, the DIVA LAN ISDN Modem always tries to establish data connections using
phone number 2 first, in an attempt to leave PHONE port 1 free. Of course, if phone number 2 is in use,
the data connection is established using phone number 1.
• When an analog or data connection is established, the first available ISDN B-channel is assigned to it.

Chapter Two: Getting Started 3. Choose a connection protocol 21
Choosing a connection protocol
Since the DIVA LAN ISDN Modem supports so many potential connections, a set of rules is needed to control
how the two ISDN B-channels are shared between connections. These rules are based on the type of
connection protocol you decide to use for your data traffic. The DIVA LAN ISDN Modem supports the two
protocols: PPP and V.120.
• PPP is a widely-used standard for t ransferring da ta on point- to-point lin ks. The DIVA LAN ISDN Modem
supports four variations of the PPP protoc ol: PPP, Multilink PPP, Multilink PPP+BACP, and Multilink
PPP+AO/DI. Each version has its own specific features as detailed later in this section.
• V.120 was designed to allo w no n-ISDN de vices t o communicate w ith the ISD N netwo rk. The DIVA LAN
ISDN Modem provides support for V.120, so you can connect with such legacy systems. For example, in
many countries around the world, Compuserve offers access to their network over ISDN, using the V.120
protocol.
By choosing the correct protocol variation for your connection, you control how the ISDN channels are
assigned and how the DIVA LAN ISDN Modem provides support for analog calls.
PPP
PPP operates on a single ISDN B-channel. Since two B-channels are available, the DIVA LAN ISDN Modem
can support two PPP connections at the s ame time. This is useful if you n eed to ha v e tw o conne ctions that n eed
to be established at the same time. For example, to maintain a connection to the Internet and to a remote
corporate network, or if you intend to support incoming data calls.
By default, the DIVA LAN ISDN Modem is configured to supp ort call bumping. However, a PPP connection
will never be disconnected to allo w an incoming or outgoing analog call to connect. If two PPP connections are
active, no analog calls can be made or received.
Multilink PPP
When you activate multilink PPP (MLPPP), the DIVA LAN ISDN Modem combines both your B-channels
into a single 128 kbps communications link. Both B-channels remain in use as long as the connection is active,
which may result in excessive ISDN connection charges if the link is frequently idle.
MLPPP reserves both B-channels for its exclusive use. This means that if your Internet connection uses
MLPPP, you will not be able to make or receive other data calls.
Analog calls, however, are governed by a different set of rules. By default, the DIVA LAN ISDN Modem is
configured to support call bumping. Call bumping causes MLPPP to drop one B-channel when you make or
receive an analog call. This reduces the throughput of the data call to 64 kbps. When the analog call is done,
MLPPP re-establishes the second B-channel, returning the data connection to 128 kbps.
Only one PHONE port can be used when an MLPPP connection is active. This can be either PHONE 1 or
PHONE 2.
Multilink PPP + BACP
To save on communications charges, you can use BACP in combination with MLPPP. The DIVA LAN ISDN
Modem uses BACP to monitor incoming and outgoing traff i c, and to open o r close the s econd B-chann el as the
traffic volume warrants. This reduces your communications charges by ensuring that two ISDN channels are
never active when one is sufficient. For information on how to configure BACP, see “Configuring BACP” on
page 61.
As with MLPPP, MLPPP + BACP reserves both B-channels for its exclusive use. This means that if your
Internet connection uses MLPPP + BACP, you will not be able to make or receive other data calls.
As with MLPPP, call bumping causes MLPPP + BACP to drop one B-channel (if both are active), when you
make or receive an analog call.

Chapter Two: Getting Started 3. Choose a connection protocol 22
Only one PHONE port can be used when an MLPPP + BACP connection is active. However, since MLPPP +
BACP may only be using one B-channel, either PHONE 1 or PHONE 2 may not be available. For example, if
PHONE 2 was in use when the data connection was established, the data connection uses telephone number 1.
Even though telephone number 2 becomes available when PHONE 2 hangs up, the data connection does not
switch over. If you try to use PHONE 1, you will get a busy signal.
Multilink PPP + AO/DI
Always On/Dynamic ISDN uses the ISDN D-channel to maintain a permanent connection to your ISP or
corporate network. This connection operates at 9.6 kbps using the X.25 protocol. It can be used to send and
receive low-bandwidth data, such as e-mail or web-based push content.
AO/DI incorporates BACP, and uses it to monitor incoming and outgoing traffic. When traffic volume
warrants, it enables one or two B-channels to meet the demand. For information on AO/DI, see “Configuring
AO/DI” on page 63.
As with MLPPP, MLPPP + AO/DI reserves both B-channels for its exclusive use. This means that if your
Internet connection uses MLPPP + AO/DI, you will not be able to make or receive other data calls.
MLPPP + AO/DI can drop both B-channels, allowing you to make or receive two analog calls. Since the data
connection is still active on the D-channel, you can use both phone ports at any time. Note, however, that the
speed of the D-channel (9.6 kbps) is much slower than a B-channel (64 kbps).
V. 12 0
V.120 was designed to allow non-ISDN devices to communicate with the ISDN network. The DIVA LAN
ISDN Modem provides support for V.120, so you can connect with such legacy systems. For e xample, in ma ny
countries around the world, Compuserve offers access to their network over ISDN, using the V.120 protocol.
V.120 operates on a single ISDN B-channel. Since two B-channels are a vailable, the DIVA LAN ISDN Modem
can support two V.120 connections at the same time. In general, you should use V.120 only when the site you
are connecting to requires it. Once the V.120 connection is active, the DIVA LAN ISDN Modem automatically
establishes a PPP connection on top of it. This is why you will see this option listed as PPP over V.120 on the
configuration screens.
A V.120 connection will never be disconnected to allow an incoming or outgoing analog call. If two V.120
connections are active, no analog calls can be made.
Summary
The following summary will help you determine how ISDN channels are assigned by the various connection
protocols. This summary assumes that call bumping is enabled.
• If a data connection using any MLPPP-related protocol is connected, it reserves both ISDN B-channels.
This means that no other data call can be established.
• If a data connection using MLPPP is connected, only one PHONE port can be used at a time.
• If a data connection using MLPPP-BACP is connected, one PHONE port (in most cases PHONE 2), will
not be available.
• If a data connection using MLPPP-AO/DI is connected on one or both ISD N B-channels, one or both
B-channels will be dropped to allow an incoming or outgoing analog call to connect.
• Data connections using PPP or V.120 are established first on telephone number 1, then on telephone
number 2. If two PPP or V.120 data connections are active, no PHONE ports are available.
• If both PHONE ports are in use, no data calls can be established. Unless you are using AO/DI, which can
make use of the D-channel.

Chapter Two: Getting Started 4. Order an ISDN Line 23
4. Order an ISDN Line
Call your local phone company and order an ISDN Basic Rate line.
To make ordering an ISDN line easier, Bellcore, in conjunction with the North American ISDN User’s Forum
(NIUF) and Local Exchange Carriers (LEC), have created several pre-defined ISDN packages which you can
order by simply specifying an ISDN ordering code (IOC).
Ordering Code Features
EZ-ISDN 1 or
IOC: “U”
Offers voice and data on both ISDN channels and supports advanced calling features such
as call conference, call transfer, and caller ID on the first ISDN number. You may have to
request these features individual ly, and there may be an addition al charge for each one.
EZ-ISDN 1A or
IOC: “V”
IOC: “S” Offers voice and data on both B-channels, but without any advanced calling features. If
EZ-ISDN 3 or 3A If you want to use Always On/Dynamic ISDN (AO/DI).
Capability Package AB Same as IOC U, but with advanced calling support on both channels and support for
Capability Package AC Same as IOC V, but with advanced calling support on both channels and support for
Same as EZ-ISDN 1, but adds Voice Mail support.
you select this package, be sure to get Additional Call Offeri ng (ACO). ACO is required
for call bumping (also known as dynamic bandwidth allocation) and call wai ting to work
correctly. IOC “S1” includes ACO, however it is not supported everywhere.
AO/DI.
AO/DI.
Information to record when ordering your line
Item Description
ISDN phone number(s) The phone number assigned to your ISDN line. Some providers will give you two phone
SPID(s) SPIDs (service profile IDs) identify the set of features and servic es provide d by the ISDN
numbers—one for each ISDN channel.
switch to which the ISDN device is connected .
When you subscribe to an ISDN line your provider allocates a SPID in the same way they
allocate an ISDN phone number. In some cases, the SPID is the same as the phone
number, in other cases it is the phone number with other digits added to it. It depends on
your provide r.
Find out if your ISDN line supports AutoSPID. AutoSPID is a new National ISDN
protocol feature that en ables the DIVA LAN ISDN Modem to automatically configure all
parameters for your ISDN line.
However, e ven if your ISDN line supports AutoSPID, it is a good idea to write down your
SPIDs.
Switch type The type of ISDN switch used by your provider. During configuration, the DIVA LAN
ISDN Modem automatically tries to detect the switch type your line is connected to.
However, if auto-detection fails, you need to manually specify the switch type. Three
types are support e d: National ISDN-1, AT&T 5ESS, or AT&T 5ESSPP (5ESS
Point-to-Point).
Billing intervals Find out how your pro v ide r b ills for ISDN usa g e. With this information on hand you can
configure the DIVA LAN ISDN Modem to minimize your connection costs. See
“Multilink PPP + BACP” on page 21.

Chapter Two: Getting Started 5. Gather Internet account information 24
5. Gather Internet account information
Obtain an account with an ISP (Internet Service Provider) and record the following:
Item Description
ISP’s ISDN phone number(s) This is the phone number the DIVA LAN ISDN Modem dials to access the ISP.
Some ISPs will give you two phone numbers—one for each ISDN channel.
Your ISP may al so have a backup number for each channel in case the primary
number is busy or unavailable.
User name Name the DIVA LAN ISDN Modem will use to access the ISP.
Password Password the DIVA LAN ISDN Modem will use to access the ISP.
Primary DNS server address
Secondary DNS server addre s s
X.25 information If you intend to use AO/DI, collect the information on page 24 as well.
To reach other sites on the Internet you need to use your ISP’s DNS server. In
most cases, the DIVA LAN ISDN Modem will automatically discover the
addresses of these servers. Howe ver, if it is unable to do so, you will have to enter
them manually.
Addresses are written as four numbers separated by periods. Each number can
range from 0 to 255. For example: 123.123.123.123 or 192.16 8.1.1
Gather X.25 information
If you intend to use AO/DI, you will require the following information:
Item Description
Remote X.25 address The X.25 address of your ISP or the corporate network you want to connect to.
Local X.25 address The X.25 DTE address assigned to the DIVA LAN ISDN Modem. This may not
Default window size
Maximum window size
Default packet size
Maximum packet size
Number of VCs Number of virtual circuits. The DIVA LAN ISDN Modem supports up to 4
be required on some X.25 switches.
The DIVA LAN ISDN Modem supports windows sizes from 1 to 7.
The DIVA LAN ISDN Modem supports packet sizes from 64 to 1024 bytes.
two-way virtua l circ u its .
ISDN TEI type Determine if TEI assignment is static, dynamic, or shared. If static, get the
number assigned to the D-channel.
Gather V.120 information
If you intend to use V.120, you will require the following information:
Item Description
Mode Two modes are supported: Unacknowledged or Multiframe.
Maximum transmit frame size
Maximum receive frame size
This is the maximum size of a V.120 information field that can be transmitted or
received. The DIVA LAN ISDN Modem supports frame sizes from 16 to 260
bytes.

Chapter Two: Getting Started 5. Gather Internet account information 25
Item Description
Window size Applies to Multiframe mode only. The DIVA LAN ISDN Modem supports
windows sizes from 1 to 7.
Maximum retry count Applies to Multiframe mode only. Defines the maximum number of
Retransmission timer (T200) Applies to Multiframe mode only. Defines how long to wait before retransmitti ng
Link Integrity timer (T203) Applies to Multiframe mode only. Defines the maximum time the connection can
Idle timer Defines the maximum time the connection can remain idle without data frames
retransmissions of an unacknowledged frame.
an unacknowledged fra me.
remain idle without data or control frames being exchanged.
being exchange d.
V.120 scripting
To su ccessf ully log on to your ISP, you will need to define a script to automatically execute the log on process
for you. The DIVA LAN ISDN Modem contains a pre-defined scrip t t hat s hou ld work in the majority of cases.
However, you may need to modify this script for your installation.
To modify this script, you need to determine the sequence of events that occur when logging on to your ISP,
and the input that must be sent. For example:
• Step 1: Your ISP issues the prompt “Login:” and expects you to send your user name, then press Enter.
• Step 2: Your ISP issues the prompt “password:” and expects you to send your password, then press Enter.
For more information on scriptin g see “Making a V.120 connection” on page 136.
Chapter Two: Getting Started 6. Install the DIVA LAN ISDN Modem 26
6. Install the DIVA LAN ISDN Modem
Installing the DIVA LAN ISDN Modem is as simple as plugging it in and con necting a few cables. Before you
begin make sure that each computer has the required prerequisites as explained in the section “Verify the
configuration of your computers” on page 18.
Note
The DIVA LAN ISDN Modem is available with or without analog phone ports. Phone related features
are only available on models with analog phone ports.
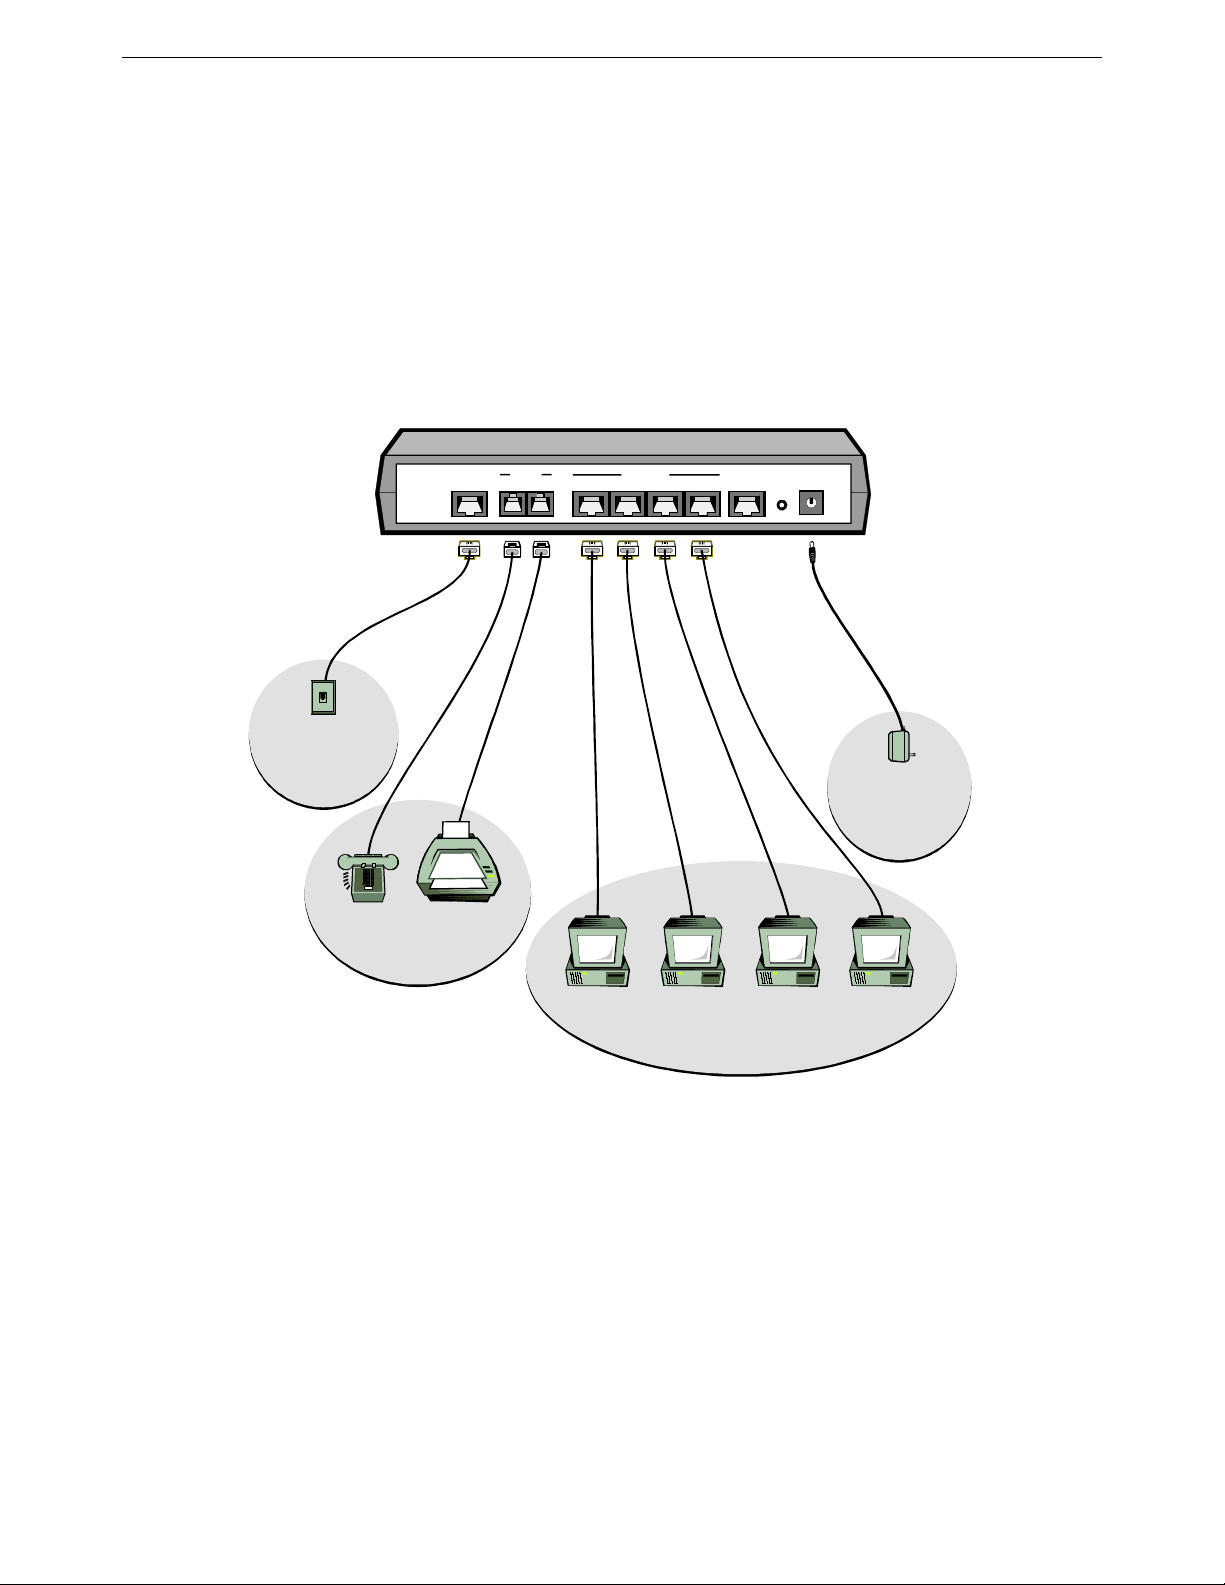
Consult the following diagram as you perform the installation.
ISDN Wall Outlet
GREY
PHONE
ISDN
12
FaxPhone
Computer Computer Computer Computer
ETHERNET
E4 E3 E2 E1 CONSOLE
BLUE
Reset
POWER
12VD C
Power Supply
To install the DIVA LAN ISDN Modem
Connect the DIVA LAN ISDN Modem to your ISDN line using the supplied grey ISDN cable. Plug the
1.
RJ45 connector (big end) into the DIVA LAN ISDN Modem and plug the RJ11 connector (small end) into
your ISDN wall outlet.
• If you are installing a DIVA LAN ISDN Modem with a U interface, make sure that it is the only
device connected to your ISDN line.
• If you are installing a DIVA LAN ISDN Modem with an S/T interface, you may need to connect the
terminating resistor. See “Termination” on page 161 for more information.
You can connect analog devices, such as telephones or fax machines, to the PHONE ports. It is
2.
recommended that you use PHONE 1 for voice and PHONE 2 for data (modem or fax).
Turn off your computers and then connect them to the Ethernet port s on the DIVA LAN ISDN Modem. It
3.
does not matter which Ethernet port you plug your computers into. All Ethernet ports are the same. One
Ethernet cable (blue) is supplied as part of the DIVA LAN ISDN Modem package. If you are connecting
more than one computer, printer, or other network resource, you will require additional Ethernet cables.

Chapter Two: Getting Started 6. Install the DIVA LAN ISDN Modem 27
Connect the power supply to the POWER jack on the DIVA LAN ISDN Modem, and plug it into a power
4.
outlet.
Wait at least 1 0 seconds for the DIVA LAN ISDN Modem to initialize.
5.
Turn on your computers.
6.
You are now ready to install the Modem Monitor software and configure the DIVA LAN ISDN Modem.
7.
Note
Do not connect the beige cable. It is for advanced configuration options only. See Chapter Eight.
Chapter Two: Getting Started 7. Install Modem Monitor (Windows 95/98/NT4) 28
7. Install Modem Monitor (Windows 95/98/NT4)
Note
If you are using an operating syste m other than Windows 95/98/NT4, turn to page 31.
Modem Monitor provides quick access to the DIVA LAN ISDN Modem Web- based configuration interface, as
well as online help, and utilities.
Modem Monitor runs under Windows 95/98/NT4. It should be installed only on the computer you are going to
use to configure the DIVA LAN ISDN Modem. Other computers that are connected to the DIVA LAN ISDN
Modem must be configured as explained in the section “Verify the configuration of your computers” on page
18. Other than this, they require no additional software to be installed.
To install Modem Monitor
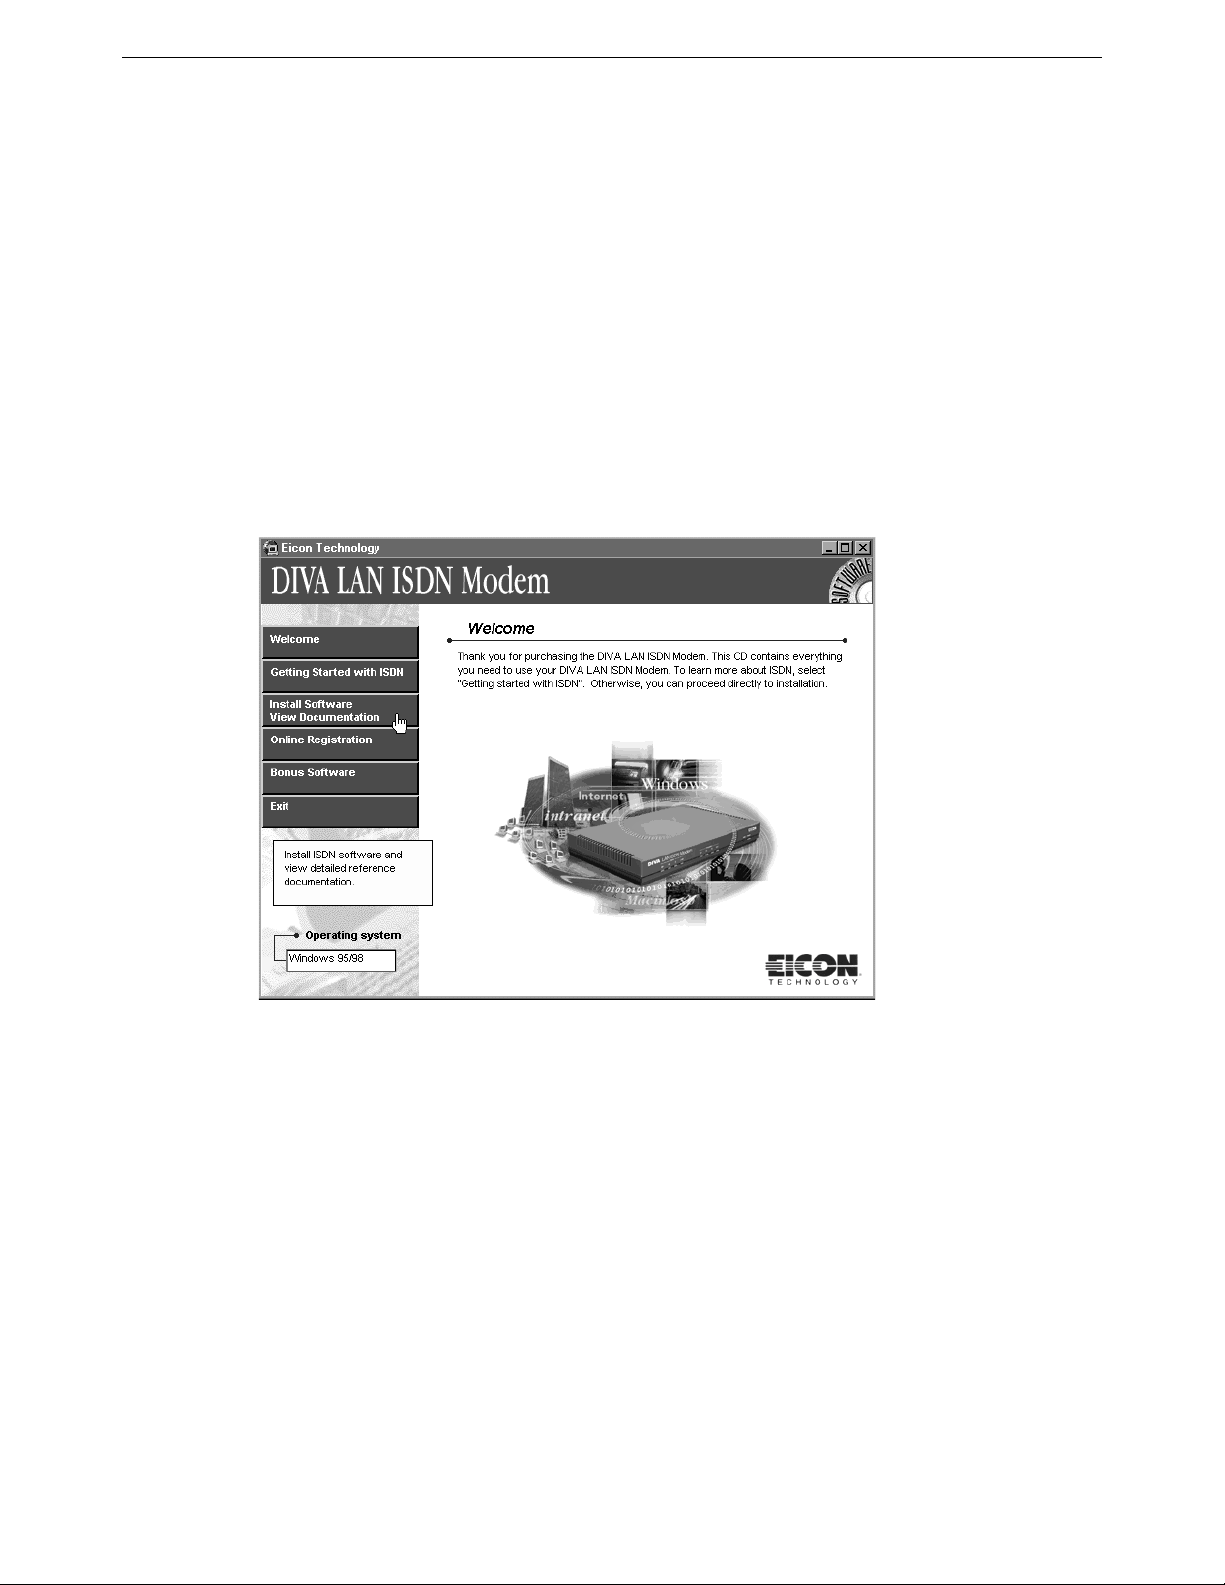
Insert the DIVA LAN ISDN Modem CD into the CD-ROM drive on your computer. The setup program
1.
will automatically start. If it does not, click “CDSETUP.EXE” in the root folder of the CD.
On the W elcome screen, click Install Software/View Documentation.
2.
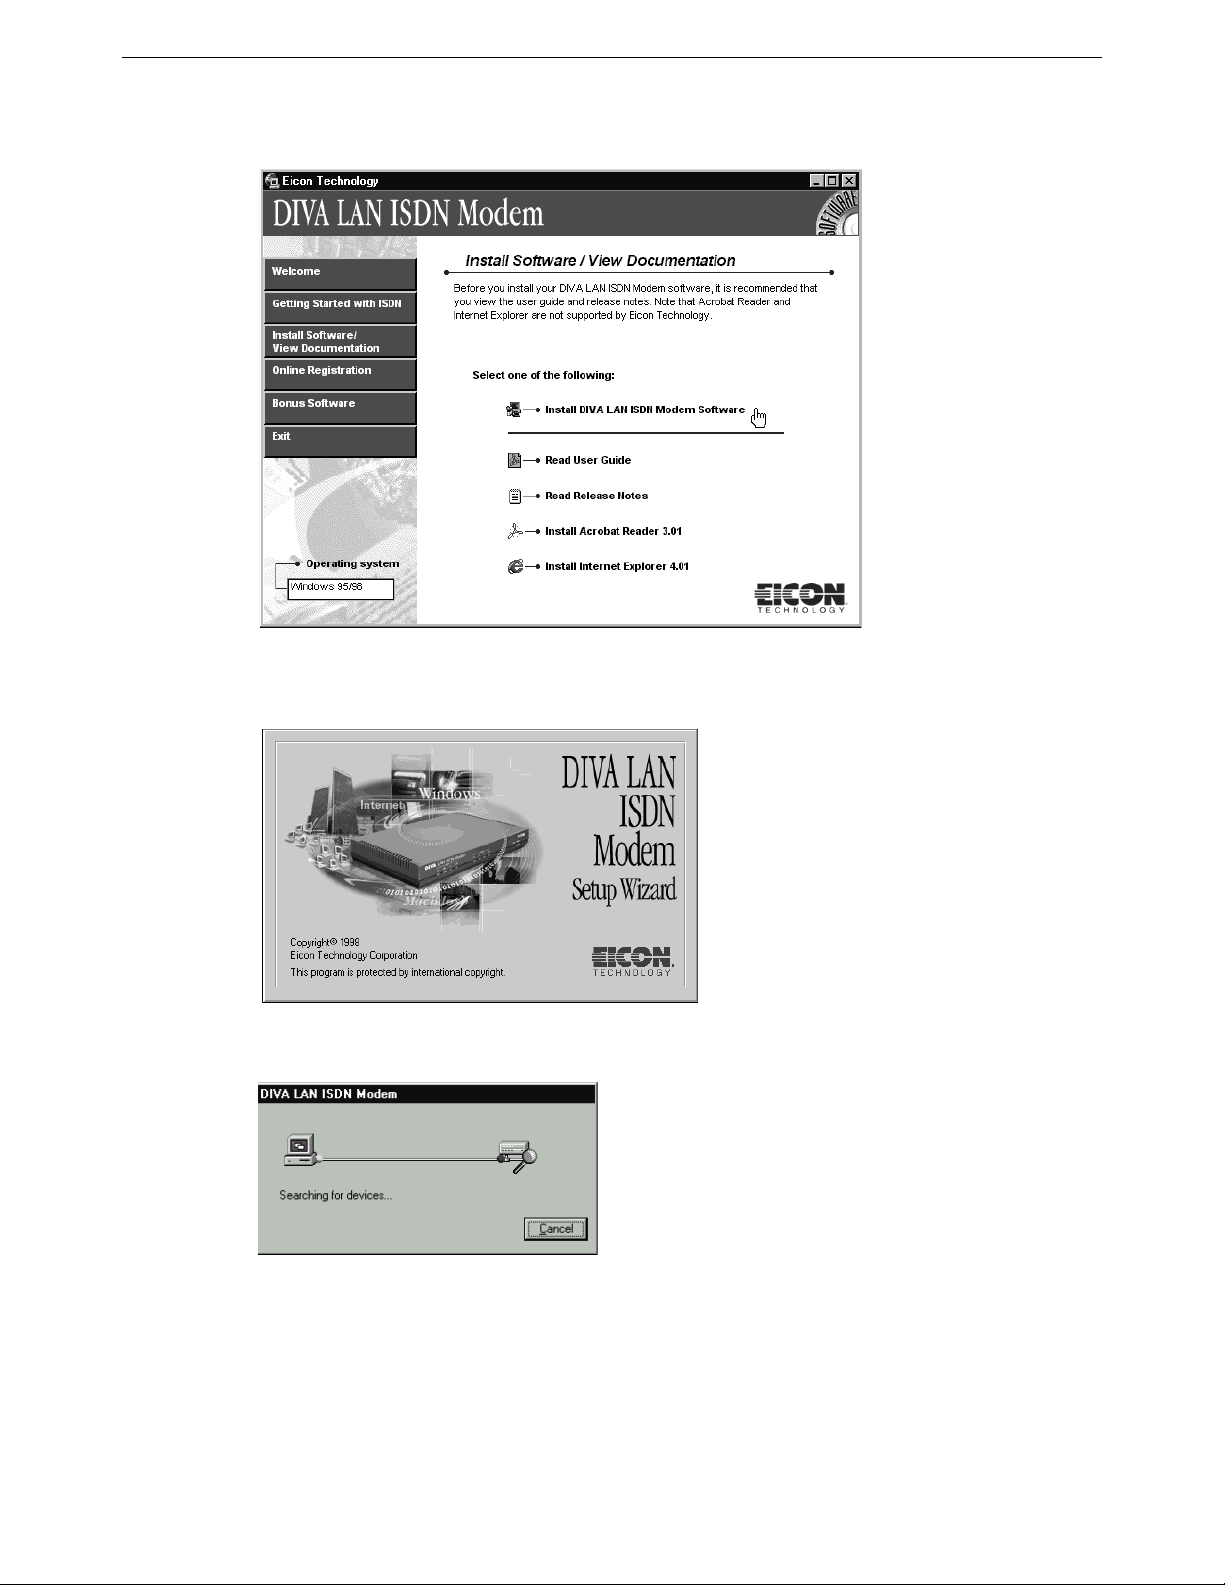
Chapter Two: Getting Started 7. Install Modem Monitor (Windows 95/98/NT4) 29
On the Install Software screen, click Install DIVA LAN ISDN Modem Software.
3.
The DIVA LAN ISDN Modem Setup Wizard starts. Follow the directions on your screen to install the
4.
software.
Once installation is complete, the Setup Wizard then attempts to contact the DIVA LAN ISDN Modem.
5.
Once detected, the Setup Wizard starts the Network Wizard. The Network W i zard will verify that you can
6.
communicate with the DIVA LAN ISDN Modem. If a problem is found, t he Network Wizard will help
you correct it.
If at any point you are prompted to upgrade the firmware on your DIVA LAN ISDN Modem, do so. The
procedure is automatic. In certain cases, the firmware on the CD-ROM may be more recent than that
installed in the DIVA LAN ISDN Modem. For more information on firmware upgrades see “Upgrading
the DIVA LAN ISDN Modem firmware” on page 56.
Chapter Two: Getting Started 7. Install Modem Monitor (Windows 95/98/NT4) 30
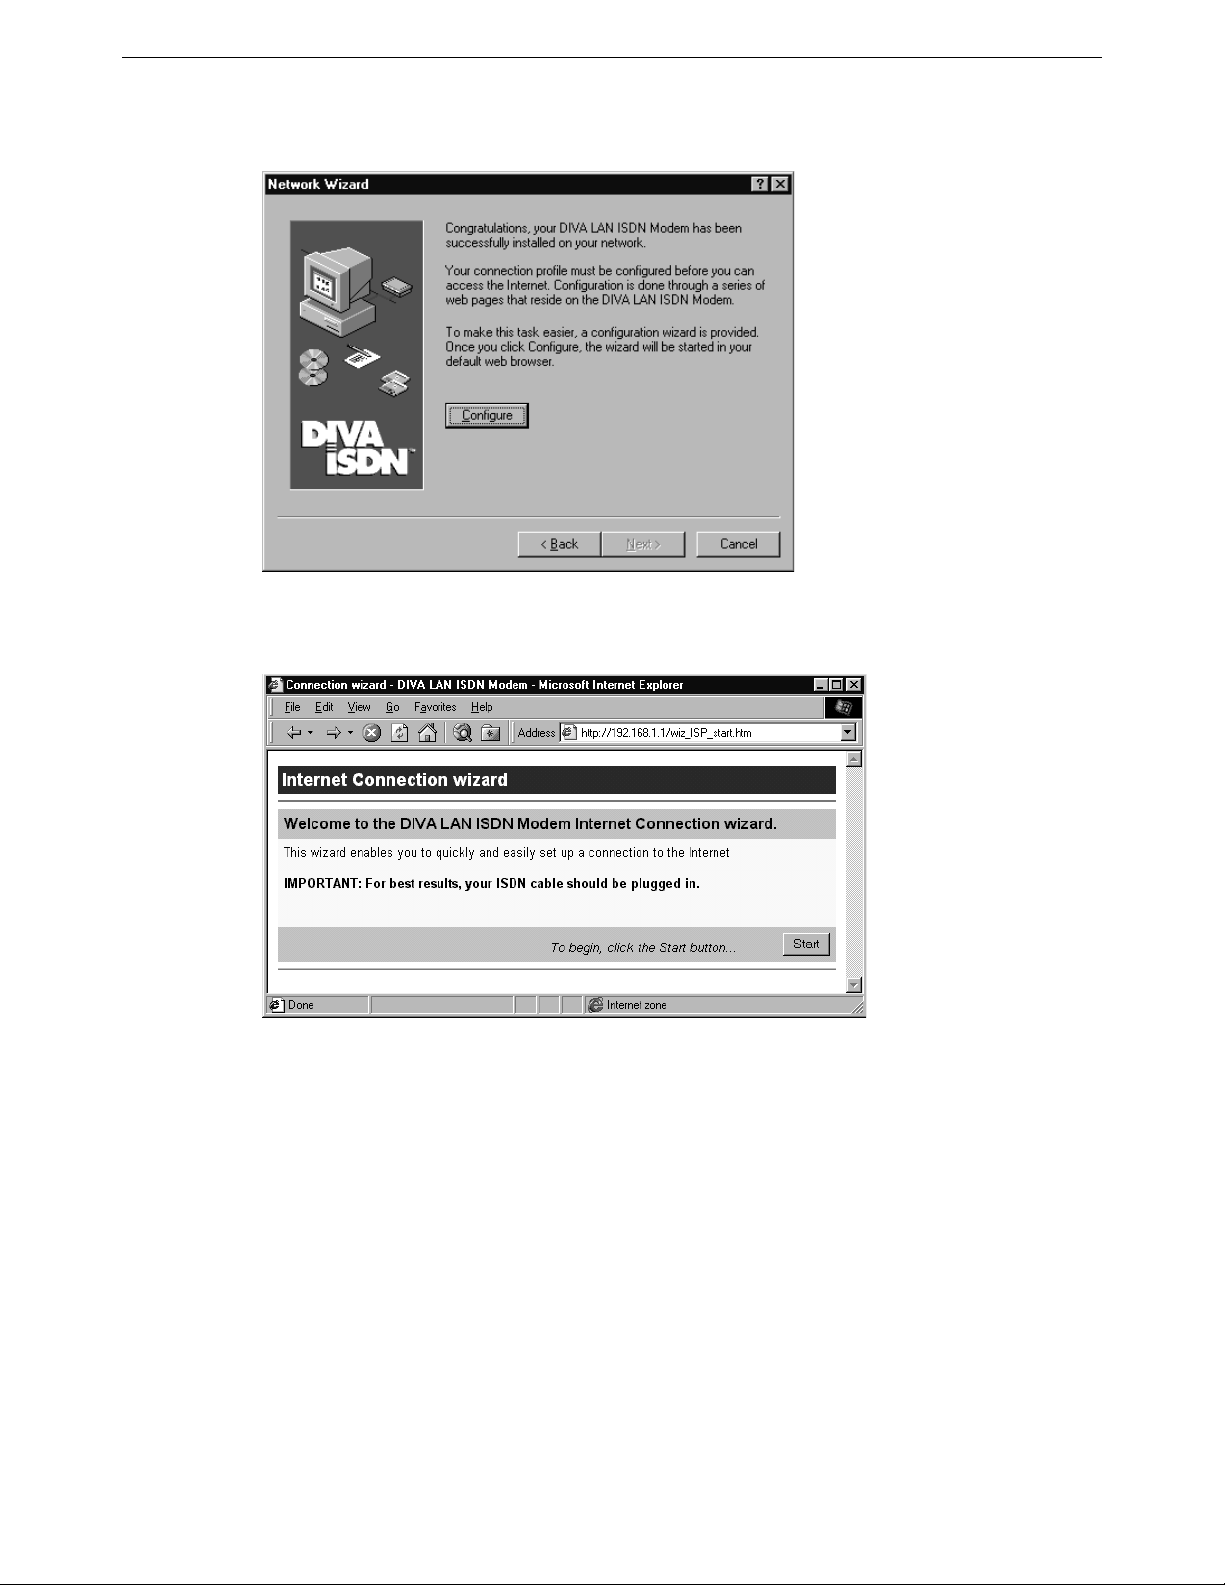
When the Network Wizard is done, you will see the following dialog box.
7.
Click Configure.The DIVA LAN ISDN Modem launches your default Web browser and displays the first
8.
page of the Internet wizard.
If your Web browser is unable to load this page, make sure that:
• it is configured to use the LAN, and not a dial-up connection
• it is not set to use a proxy server
Turn to the section “Configuring the Internet connection” on page 33 for a complete walkthrough of the
9.
wizard.
 Loading...