

Eicon 1530 WAN Router
User’s Guide
www.eicon.com

Second Edition (December 2001) 206-391-02
Eicon, Eicon Networks, and Diva are either registered trademarks or trademarks of Eicon
Networks Corporation.
Microsoft, Windows, and Windows NT are either registered trademarks or trademarks of
Microsoft Corporation in the United States and/or other countries.
Adobe and Acrobat are either registered trademarks or trademarks of Adobe Systems
Incorporated in the United States and/or other countries.
Apple and Macintosh are trademarks of Apple Computer, Inc. in the United States and/or other
countries.
IBM is a registered trademark of IBM Corporation in the United States and/or other countries.
All other brand and product names are trademarks or registered trademarks of their respective
owners.
Changes are periodically made to the information herein; these changes will be incorporated
into new editions of the publication. Eicon Networks may make improvements and/or changes
in the products and/or programs described in this publication at any time.
Eicon Networks Corporation may use or distribute whatever information you supply in any way
it believes appropriate without incurring any obligations to you.
Eicon Networks Corporation is a business unit of i-data international a-s.
Copyright © 2001 Eicon Networks Corporation. All rights reserved, including those to
reproduce this publication or parts thereof in any form without permission in writing from
Eicon Networks Corporation.
2

Contents
Introduction ....................................................................................................6
Overview ................................................................................................................................... 7
Package Contents..................................................................................................................... 8
Specifications............................................................................................................................ 9
Setup ............................................................................................................. 11
System Requirements.............................................................................................................12
Connect the Cables ................................................................................................................ 13
Verify Computer TCP/IP Settings............................................................................................ 14
Log in to the Eicon 1530 .........................................................................................................15
Modify VHSI Settings .............................................................................................................. 17
Create a Profile ....................................................................................................................... 19
Modify LAN Settings (if required) ............................................................................................ 21
Reset the Device..................................................................................................................... 22
Test WAN Access.................................................................................................................... 23
Adjusting LAN Settings (if required)........................................................................................ 24
Changing TCP/IP Settings to DHCP....................................................................................... 25
Technical Support ................................................................................................................... 27
Using your Eicon 1530................................................................................. 28
Ports and Indicator Lights ....................................................................................................... 29
Resetting the Device via the Reset Button ............................................................................. 30
Accessing the Configuration Menu ......................................................................................... 31
Upgrading Firmware via a Web Browser ................................................................................ 35
Saving and Resetting Configuration Settings ......................................................................... 36
Changing the VHSI Port Protocol ........................................................................................... 37
Creating and Editing Profiles .................................................................................................. 39
Security.........................................................................................................41
Overview ................................................................................................................................. 42
Security Features Summary ................................................................................................... 43
System Password ................................................................................................................... 44
Automatic Log Out .................................................................................................................. 45
Network Address Translation (NAT) ........................................................................................ 46
Remote Management ............................................................................................................. 49
Authentication (PPP only) .......................................................................................................51
Manual Dialing ........................................................................................................................ 52
Custom Security Features using IP Filters.............................................................................. 53
3

Web Interface Settings Glossary ................................................................61
System Menu .......................................................................................................................... 62
Connection Menu.................................................................................................................... 63
Connection Menu > Connection Group (when protocol is set to PPP) ................................... 64
Connection Menu > Connection Group (when protocol is set to X.25) ................................... 65
Connection Menu > Connection Group (when protocol is set to Frame Relay) ...................... 67
Connection Menu > IP Group ................................................................................................. 68
Connection Menu > RIP Group............................................................................................... 69
Connection Menu > Authentication Group (when protocol is set to PPP)............................... 70
Connection Menu > DNS Group ............................................................................................. 71
IP Menu................................................................................................................................... 72
Routes Menu (IP Tree)............................................................................................................ 73
Filters Menu (IP Tree) ............................................................................................................. 74
NAT Mapping Menu (IP Tree).................................................................................................. 75
Time Client Menu (IP Tree) ..................................................................................................... 76
SNMP Menu (IP Tree).............................................................................................................77
DHCP Menu (IP Tree) .............................................................................................................78
LAN Menu ............................................................................................................................... 80
LAN Menu > RIP Group .......................................................................................................... 81
LAN Menu > DNS Parameters Group ..................................................................................... 82
VHSI Port Menu ...................................................................................................................... 83
VHSI Port Menu > Delays Group ............................................................................................ 85
Protocol Menu (VHSI Tree) (when protocol is set to X.25) .................................................... 86
Protocol Menu (VHSI Tree) > Virtual Circuits Group (when protocol is set to X.25) ............... 88
Protocol Menu (VHSI Tree) > Timers Group (when protocol is set to X.25) ........................... 89
HDLC Menu (VHSI/Protocol Tree) (when protocol is set to X.25)........................................... 90
HDLC Menu (VHSI/Protocol Tree) > X32 Services Group (when protocol is set to X.25) ...... 92
HDLC Menu (VHSI/Protocol Tree) > Timers Group (when protocol is set to X.25)................. 93
Protocol Menu (VHSI Tree) (when protocol is set to Frame Relay) ........................................ 94
Protocol Menu (VHSI Tree) Dynamic DLCI Group (when protocol is set to Frame Relay) ..... 96
Static DLCI Menu (VHSI/Protocol Tree) (when protocol is set to Frame Relay) ..................... 97
Dialer Menu (VHSI Tree).........................................................................................................98
Selecting an Interface Cable ....................................................................... 99
Interface Cables available from Eicon Networks................................................................... 100
Interface Cable Specifications............................................................................................... 101
The V.24 Interface................................................................................................................. 102
The V.35 Interface................................................................................................................. 104
Contents 4

Command Line Interface ...........................................................................106
Overview ............................................................................................................................... 107
General Commands .............................................................................................................. 108
Time and Date Commands ................................................................................................... 110
Log Commands..................................................................................................................... 111
Mail Trace Commands .......................................................................................................... 112
Profile Commands ................................................................................................................113
Context Commands .............................................................................................................. 114
DHCP Commands ................................................................................................................ 115
Direct Commands .................................................................................................................118
HAYES Commands............................................................................................................... 119
V25BIS Commands .............................................................................................................. 122
DNS DOMAIN Commands.................................................................................................... 124
ETHERNET Commands ....................................................................................................... 125
Frame Relay Commands ...................................................................................................... 126
HDLC Commands................................................................................................................. 129
IP Route Commands............................................................................................................. 132
UDP and TCP Commands .................................................................................................... 133
IP Filter Commands ..............................................................................................................134
NAT Commands....................................................................................................................137
IP Commands ....................................................................................................................... 138
VHSI Port Configuration Commands .................................................................................... 140
PPP Commands ................................................................................................................... 143
RIP Commands..................................................................................................................... 146
SNMP Commands ................................................................................................................ 148
TFTP Commands.................................................................................................................. 149
Time Protocol Commands .................................................................................................... 150
X.25 Commands ...................................................................................................................151
Regulatory and Warranty Information......................................................157
Index............................................................................................................161
5

Introduction
Overview ...................................................................................................................... 7
Package Contents ........................................................................................................ 8
Specifications ............................................................................................................... 9
6

Overview
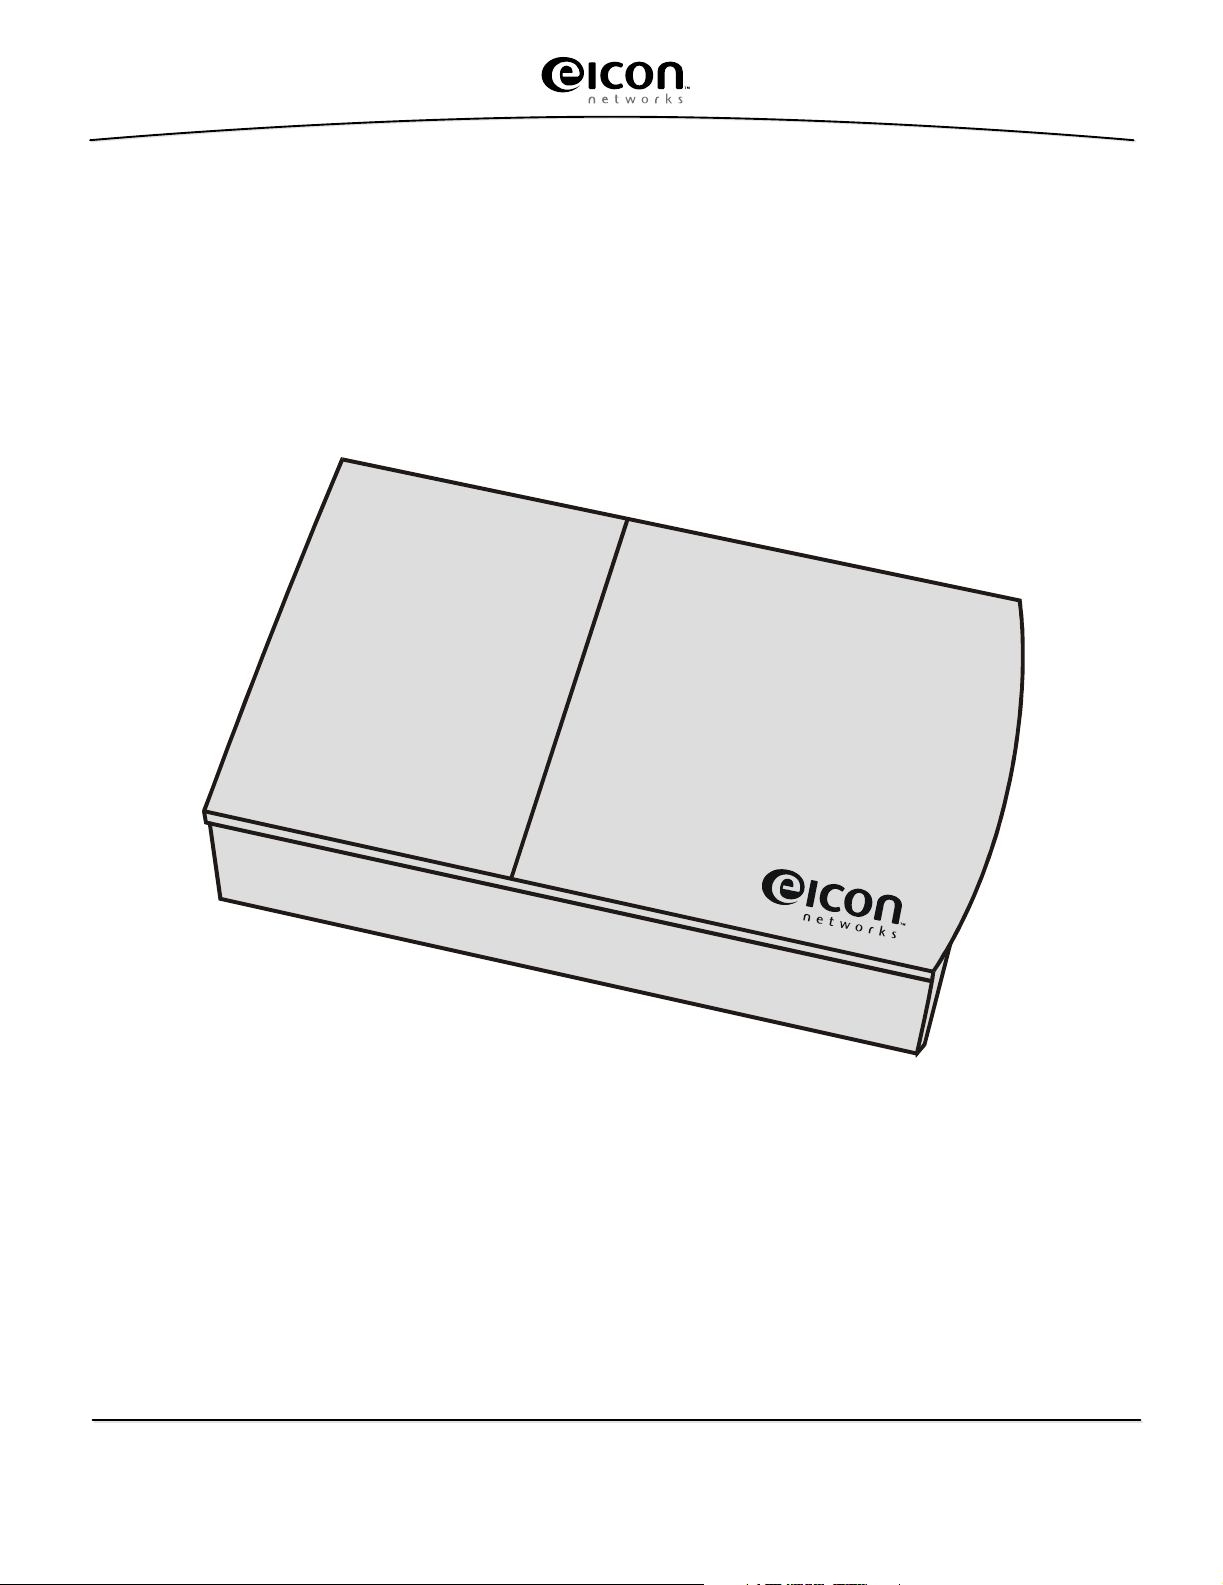
Thank you for purchasing the Eicon 1530 WAN Router.
The Eicon 1530 is an intelligent Ethernet-to-WAN router that supports PPP, Frame Relay, and
X.25 protocols. The Eicon 1530’s VHSI port can transfer data at speeds from 2400 bps to
2048 kbps, depending on the interface used.
Hardware Features
The Eicon 1530 features a 36-pin VHSI (Very High Speed Interface) port, that supports both
V.24 and V.35 interfaces. The intelligent controller on the Eicon 1530 detects the type of cable
connected to the VHSI port and the actual board configuration, and will then select the
matching interface.
The Eicon 1530 can be used on a LAN and can also be used as a DHCP server. You can also
connect the Eicon 1530 directly to a single computer (crossover cable required, sold
separately).
Upgradable Firmware
The Eicon 1530’s firmware (a set of software instructions that tells the device how to operate)
is stored in flash memory on the device. This makes it easy to upgrade the firmware when new
versions become available.
Ease of Use
Changing settings is a straight-forward process, as parameters are accessed via a web browser.
You can also make changes using the command line interface, which is accessed using a telnet
application or programs such as HyperTerminal, through the Ethernet connection.
About this Guide
This guide describes how to install and configure the Eicon 1530 on any computer capable of
support an Ethernet card and TCP/IP. The installation instructions compliment those found in
the Quickstart Guide, which is also included with your package. This guide also describes how
to make changes to certain features.
Note: This guide does not describe how to configure the device for any one particular networking situation.
For information on what any particular setting should be, consult your network administrator.
For instructions on setting up communications protocols and using applications that access the
external network, consult the documentation provided with your software.
Introduction 7
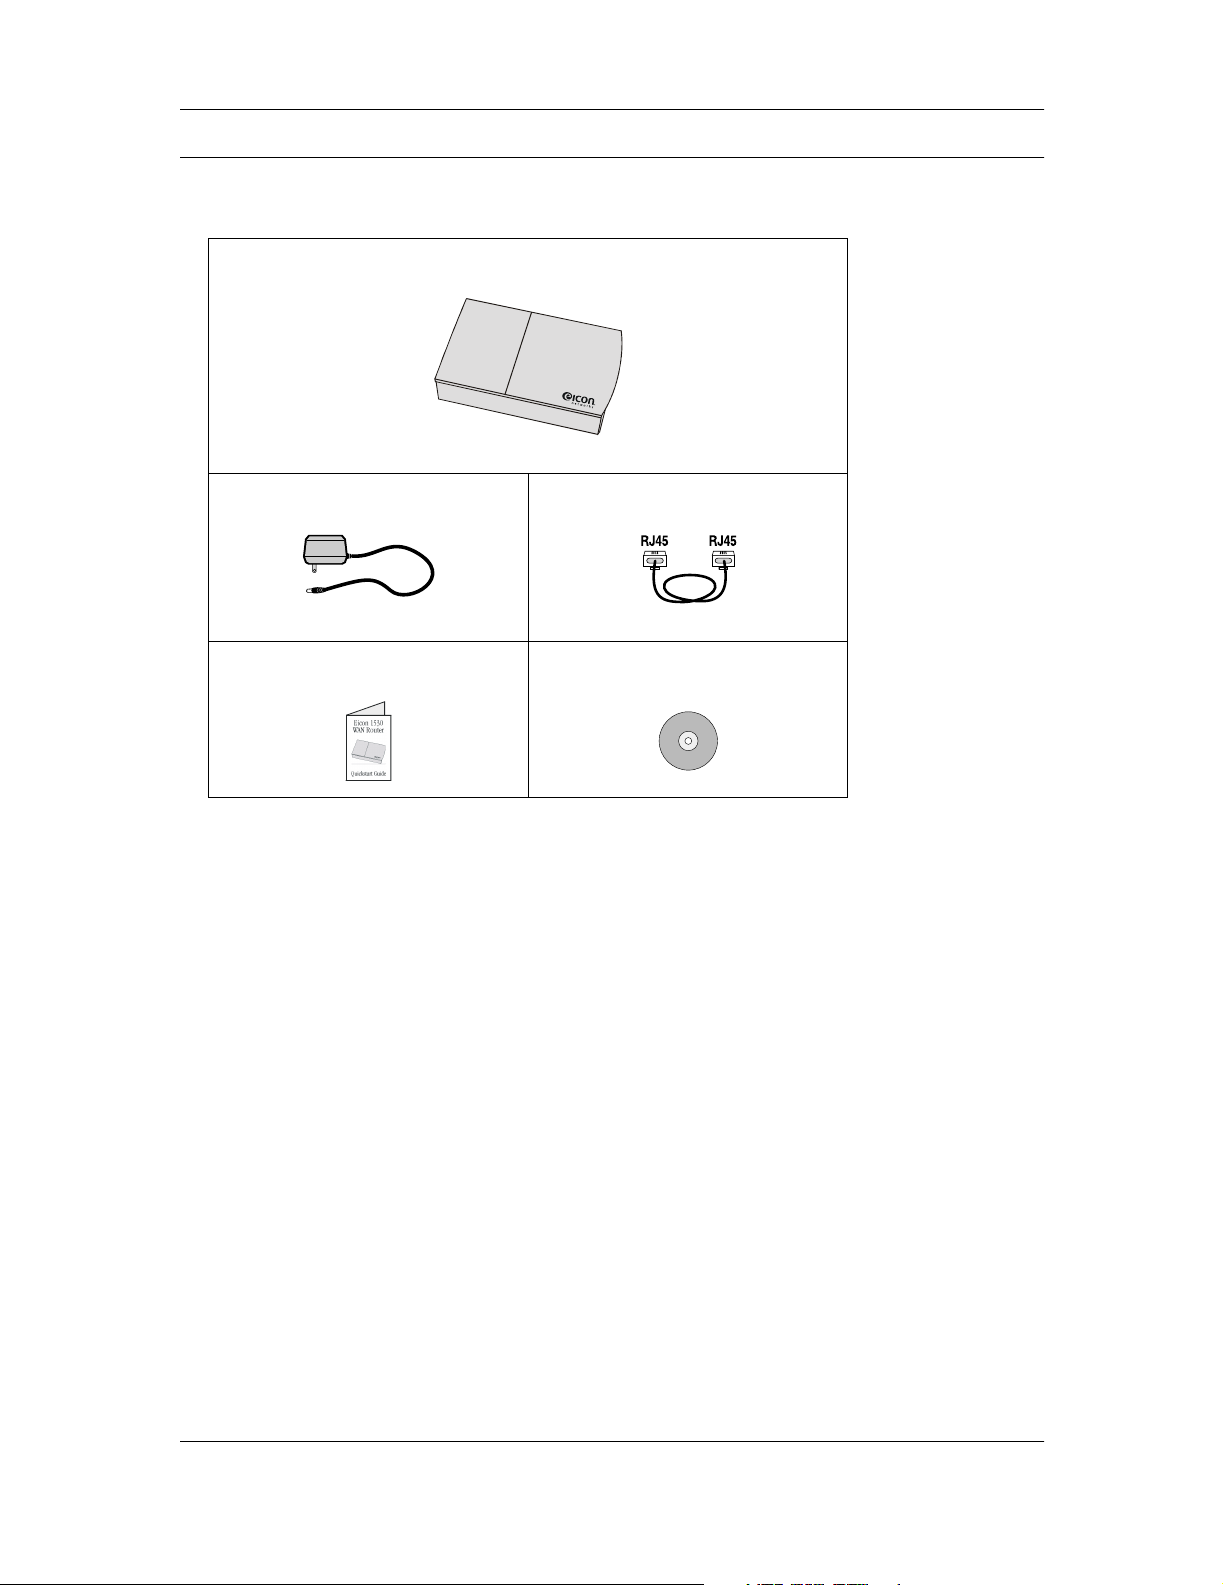
Package Contents
Your package should contain the following:
Eicon 1530
Power Adapter Ethernet Cable (Blue)
Quickstart Guide CD-ROM
VHSI cables are not included with your Eicon 1530. Cables can be ordered from Eicon
Networks, or you can build your own (see the User’s Guide).
Note: The blue cable is a straight-through Ethernet cable and is used to connect the Eicon 1530 to a
network hub. To connect to a single computer, a crossover cable (sold separately) is required.
About the Eicon 1530 CD-ROM
The Eicon 1530 CD-ROM contains the following:
• User’s Guide in PDF and HTML formats.
• Quickstart in PDF format.
• Release notes in text format.
• Installers for Adobe Acrobat Reader (for reading PDF files) and Microsoft Internet Explorer.
Introduction 8

Specifications
Hardware Features
• VHSI (Very High Speed Interface) port, supports V.24 and V.35 interfaces
• Ethernet 10BaseT RJ45 port
• AUX port (DB9 V.24 serial interface) (currently unsupported)
• Power jack
• Hard Reset button
• Indicators lights
• Flash memory for convenient firmware upgrade (if available)
VHSI Port (Synchronous)
• 36-pin high-density D-type connector
• Auto-detection of the following interface types:
– V.24 (EIA RS232-C)
–V.35
• Speeds: 2400 bps to 2048 Kbps, depending on interface
• Protocol support: PPP, Frame Relay, X.25, Frame Relay
Indicator Lights
• Power status
• VHSI port status
• AUX port status (currently unused)
• Ethernet connector status (located on the connector itself)
• Ethernet activity (located on the connector itself)
Protocol support
• PPP:
– PPP compression (PPP CCP, PPP LZS-STAC, MPPC, Ascend LZS)
– Security: PAP, CHAP, MS-CHAP
•X.25:
– CCITT/ITU compliance: X.25, X.32, and X.121 (1984)
– Up to eight X.25 virtual circuits (includes PVCs and SVCs)
– PVC and SVC support with inactivity timeouts
– Compression (Eicon Stacker, CISCO, Bay Networks)
•Frame Relay:
– IP over Frame Relay (RFC 2427)
– Maximum of 8 DLCI
– Routing between DLCI
– Congestion management (FECN, BENC)
– Extended LSN
– Automatic LMI detection
– Congestion control (FECN & BECN)
– Frame Relay compression (FRF.9)
Introduction 9

LAN Protocol support
• IP routing (dynamic and static)
• IP Network Address Translation (NAT)
• IP spoofing and packet filtering
• DHCP Server and DHCP Relay Agent
• BOOTP, TFTP, Telnet, ARP, and DNS
Environmental Requirements
• Operating temperature: 0°C to +50°C
• Storage temperature: -20°C to +70°C
• Operating humidity: 0 to 90% (non-condensing)
Power Requirements
• External AC wall mount adapter providing 9-15VDC/1A
• Power consumption: 5 Watts maximum
Warranty
• Five years
Certification
•CE
• FCC Part 15 Class B
• CSA/NRTL (UL)
• Industry Canada
Management Utilities
• Web-based configuration interface
• Command line interface
Packaging Contents
• Eicon 1530 WAN Router
• Straight-through Ethernet cable (blue)
• Power adapter
• QuickStart Guide
• Eicon 1530 CD-ROM (contains documentation)
Note: A VHSI port cable is not included, but can be ordered separately from Eicon Networks.
Introduction 10

Setup
System Requirements ............................................................................................... 12
Step 1: Connect the Cables ...................................................................................... 13
Step 2: Verify Computer TCP/IP Settings.............................................................. 14
Step 3: Log in to the Eicon 1530 ..............................................................................15
Step 4: Modify VHSI Settings.................................................................................. 17
Step 5: Create a Profile.............................................................................................19
Step 6: Modify LAN Settings (if required) .............................................................21
Step 7: Reset the Device............................................................................................ 22
Step 8: Test WAN Access ..........................................................................................23
Adjusting LAN Settings (if required) ...................................................................... 24
Changing TCP/IP Settings to DHCP ...................................................................... 25
Technical Support ..................................................................................................... 27
11

System Requirements
Before you begin, review the system requirements, as outlined below.
If you are connecting the Eicon 1530 directly to a computer, the following is required:
• A 10Base-T Ethernet network interface card, properly installed and configured to use the
TCP/IP protocol. A 100 Mbps Ethernet card can be used if the card supports auto-sensing.
• TCP/IP communications protocol configured to obtain its IP address automatically (DHCP
client), and not configured to use a DNS server.
If you are unsure about these topics, consult the documentation for your operating system or
network adapter for more information.
Web Browser Requirements
The Eicon 1530 is configured via web pages stored on the device itself. To access the web
interface, you must be have Netscape Navigator 4 or Microsoft Internet Explorer 4, or later.
Additionally, your Web browser must be configured to connect to the Internet via a local area
network (LAN) and not through a proxy server.
An installer for Microsoft Internet Explorer is included on the Eicon 1530 CD-ROM for all
Windows operating systems except Windows 3.1. Windows NT 4.0 requires SP3 or later,
available from http://www.microsoft.com/.
Setup 12
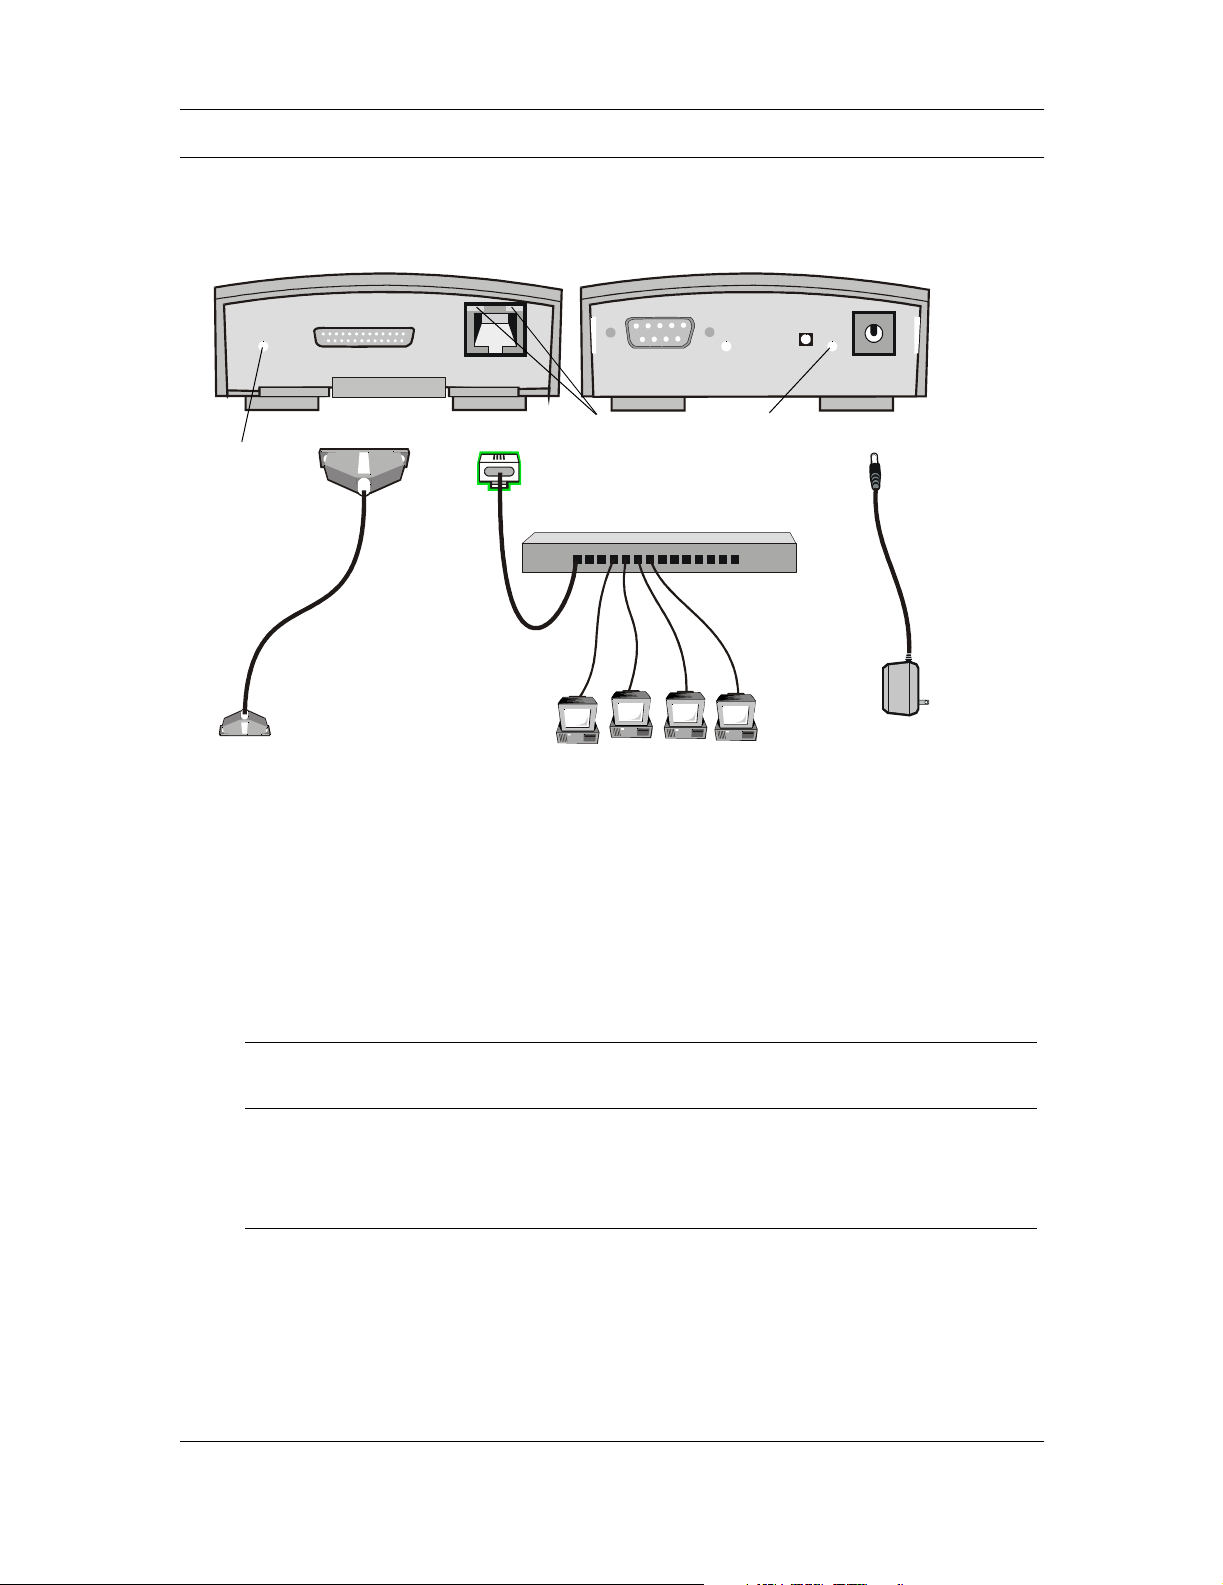
Step 1: Connect the Cables
Leave your computer on when connecting the cables.
Front of device
VHSI Port Ethernet Port
VHSI
Light
VHSI
cable
To modem or
leased line
1.
Connect the power adapter. The Power indicator light should turn green.
Note: For more information on indicator lights, see Ports and Indicator Lights on page 29.
Blue
Ethernet
cable
(straight-
through)
Ethernet
Lights
Ethernet Hub
Back of device
Powe r
Light
Powe r
Powe r
adapter
2.
Connect your VHSI Cable.
Connect the appropriate end of the cable to the VHSI port of the Eicon 1530, and connect
the other end to your modem or leased line connector.
Note: VHSI cables are not included with your Eicon 1530. Cables can be ordered from Eicon Networks,
or you can build your own (see the User’s Guide).
3.
Connect the Ethernet cable.
LAN Plug one end of the included blue Ethernet cable into your network hub, then
plug the other end into the Eicon 1530’s Ethernet port.
Single
Computer
Note: To connect the Eicon 1530 to a single computer, a crossover cable (sold
separately) is required.
Plug one end of your crossover cable into the Ethernet port on your computer,
then plug the other end into the Eicon 1530’s Ethernet port.
The green light at the top left corner of the Ethernet port should turn on when the cable is
connected properly.
What’s Next?
See Step 2: Verify Computer TCP/IP Settings on page 14.
Setup 13

Step 2: Verify Computer TCP/IP Settings
The Eicon 1530 settings are changed via a series of web pages that reside on the Eicon 1530
itself. However, to access these pages, your TCP/IP settings must be configured appropriately,
as described below.
IP Address Recommendations
• Set your Ethernet card to acquire its IP address dynamically if:
– You are connecting the Eicon 1530 to a single computer.
– You are installing on a LAN and wish to use the Eicon 1530 as your DHCP server.
The Eicon 1530, which has a built-in DHCP server, will assign an IP address to your
computer’s Ethernet card. Most network cards are configured this way by default.
• Set the IP address of your Ethernet card to the address 192.168.1.2 and subnet mask to
255.255.255.0, with the default gateway left blank, if:
– Your LAN already has an existing DHCP server.
– Your LAN uses static IP addressing.
By changing your IP address and subnet mask to these values, you are ensuring that your
computer is on the same subnet as the Eicon 1530, whose IP address is 192.168.1.1 by default.
Later you will change the Eicon 1530’s IP address to one more appropriate for your LAN.
Note: For information on changing TCP/IP settings, see Changing TCP/IP Settings to DHCP, or consult
the documentation included with your operating system.
LAN Setup Notes
• Due to the wide range of networking equipment and topologies that are in use worldwide,
your configuration needs may fall outside the instructions presented here. Contact your
network administrator or other support person to help you with the installation.
• The Eicon 1530’s internal DHCP server is enabled by default. However, if the Eicon 1530
detects the presence of the an existing DHCP server, the Eicon 1530 will disable its own DHCP
server automatically. To re-enable the Eicon 1530 DHCP server, remove the other server from
the LAN and press the reset button on the Eicon 1530.
Restarting your computer
For some operating systems, you must restart your computer after changing TCP/IP settings. If
you are using the Eicon 1530 as a DHCP server on your LAN, or if you have connected the
Eicon 1530 to a single computer, restarting will force your computer to acquire a new IP
address.
If you are using Windows, you can do the following:
• Windows 95/98/Me: Click ‘Start’, ‘Run’, type ‘winipcfg’, and click ‘OK’. Click ‘Renew All’.
• Windows NT/2000/XP: Launch a command prompt, type ‘ipconfig /release’ and press Enter,
then ‘ipconfig /renew’ and press Enter.
What’s Next?
See Step 3: Log in to the Eicon 1530 on page 15.
Setup 14
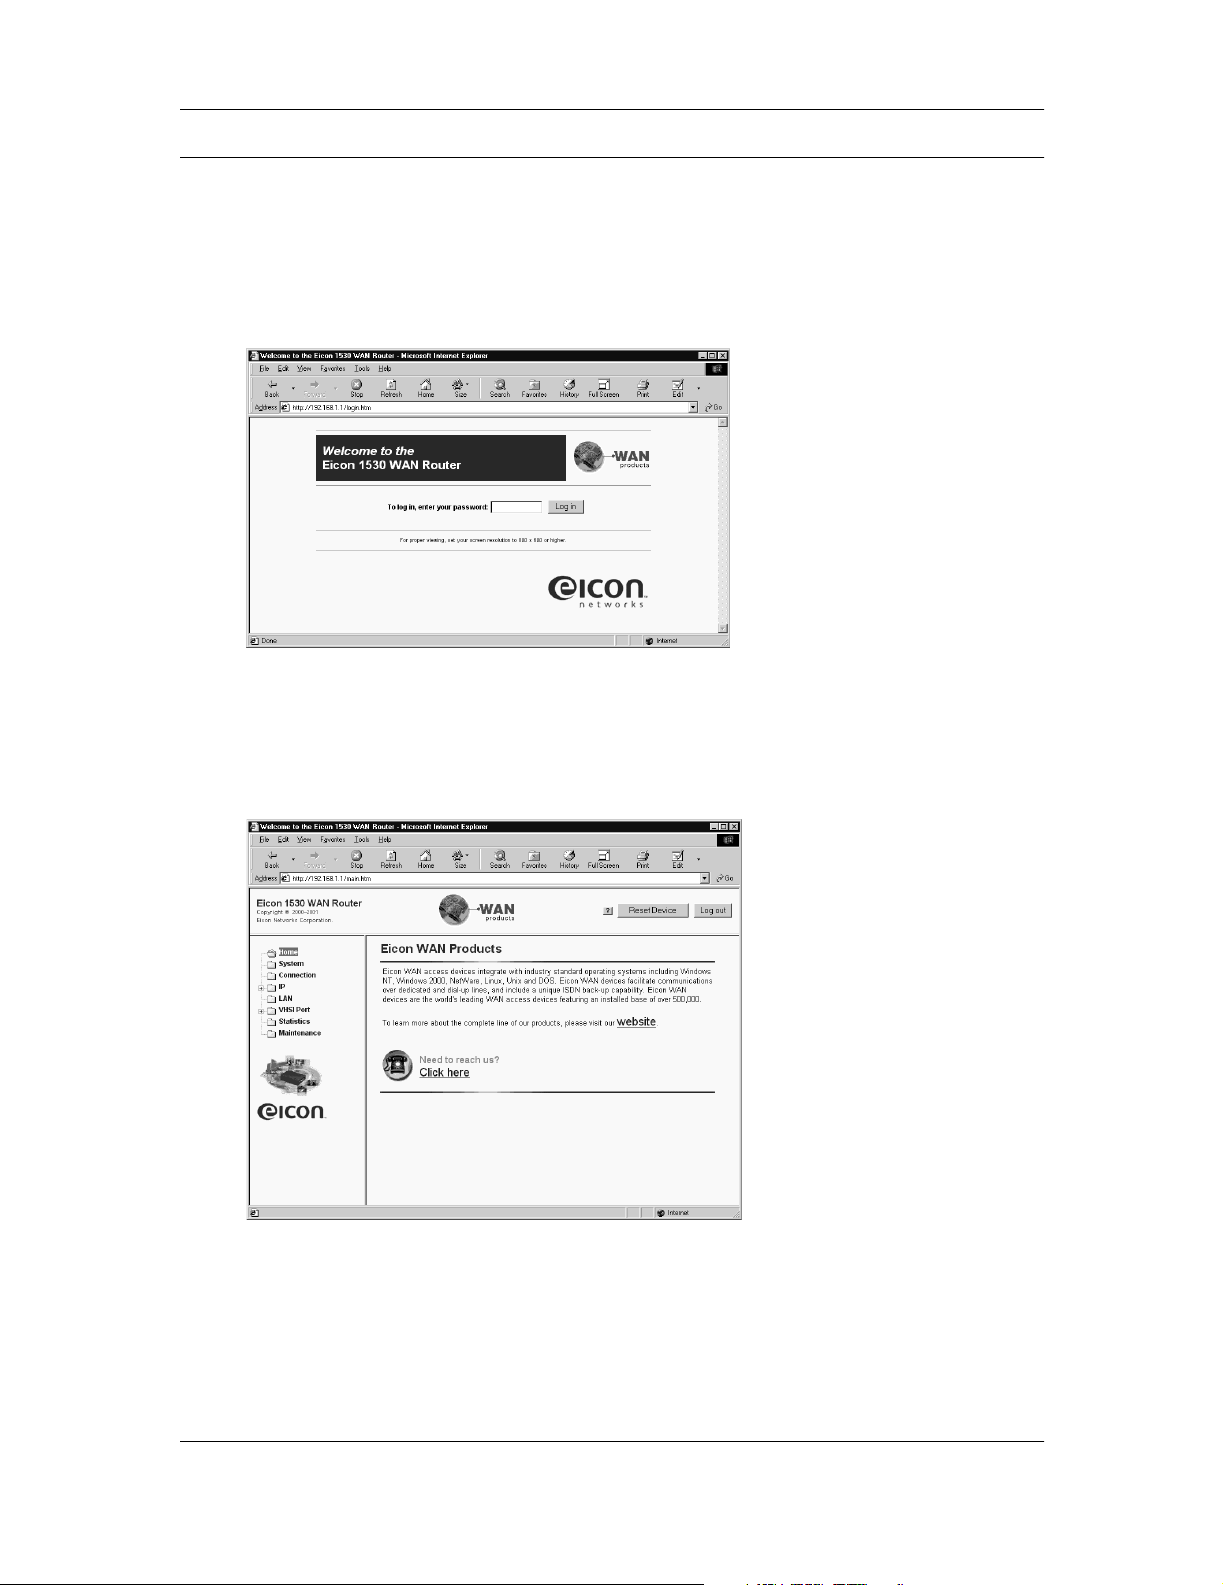
Step 3: Log in to the Eicon 1530
Whenever you wish to change settings on the Eicon 1530, you must first log in, as shown below.
1.
Launch your web browser and click ‘File’, ‘Open’.
2.
Enter 192.168.1.1 as the web page to open.
3.
Click ‘OK’. You should see the ‘Log in’ page.
Note: If you do not see the ‘Log in’ page, see Troubleshooting on the following page.
4.
Click the ‘Log in’ button.
Note: By default there is no password.
5.
The main menu should appear, as shown below.
What’s Next?
See Step 4: Modify VHSI Settings on page 17.
Setup 15

Troubleshooting
If you cannot access the ‘Log in’ page:
• Verify that the Ethernet cable is connected properly. The green light at the top left of the
Ethernet port should be on (see Ports and Indicator Lights on page 29 for more information).
• Verify that your computer’s TCP/IP settings are configured according to your situation. As
the Eicon 1530’s default IP address is 192.168.1.1, you will not be able to access the web
pages unless your computer is on the same subnet (assigned an IP address that starts with
192.168.1 and is using the same subnet mask).
• Verify that your web browser is configured to use the LAN and not a dial-up connection, and
that your browser is not set to use a proxy server. See Adjusting Browser Settings (below)
for instructions on how to do this.
If you cannot access the ‘Log in’ page over a LAN:
• Verify that your computer is on the same physical segment as the Eicon 1530.
• Verify that the Eicon 1530 is the only device on your LAN using the address 192.168.1.1. To
see if this is the case, remove the Eicon 1530 from the LAN, then PING the address
192.168.1.1. If you receive a reply, a device on the LAN already has this address. In this case,
the best solution is to connect the Eicon 1530 to a single computer as described below.
• In general, if you cannot access the ‘Log in’ page, connect the Eicon 1530 to a single computer
for configuration purposes. Later on you can reconnect the Eicon 1530 to the LAN. Note that
a crossover cable (sold separately) is required; the blue cable included with your package will
not work when connecting directly to a single computer.
Adjusting Browser Settings
If you are not able to access the configuration pages, verify your browser settings as described
below. Note that the steps may vary slightly depending on the browser version used.
• Internet Explorer version 5 or later:
– From the ‘Tools’ menu, select ‘Internet Options’, click the ‘Connections’ tab, then click
‘Setup’.
– Select the option ‘I want to set up my Internet connection manually’, then click ‘Next’.
– Select ‘I want to connect through a local area network’, then click ‘Next’.
– Clear all proxy options, then click ‘Next’.
– Clear the option ‘Connect to the Internet immediately’, then click ‘Finish’.
• Internet Explorer previous to version 5:
– From the ‘View’ menu, select ‘Internet Options’, then click the ‘Connection’ tab.
– Verify that ‘Connect to the internet using a local area network’ is enabled.
– Verify that the ‘Proxy Server’ option is disabled.
• Netscape Navigator (do one of the following):
– Under Options, click ‘Network Preferences’, then ‘Proxies’. Verify that the ‘No Proxies’
option is selected.
– Under the ‘Edit’ menu, click ‘Preferences’, ‘Advanced’, then ‘Proxies’. Verify that the
‘Direct Connection to the Internet’ is enabled.
Once finished making changes, click ‘OK’, then retry accessing the web configuration pages.
Setup 16
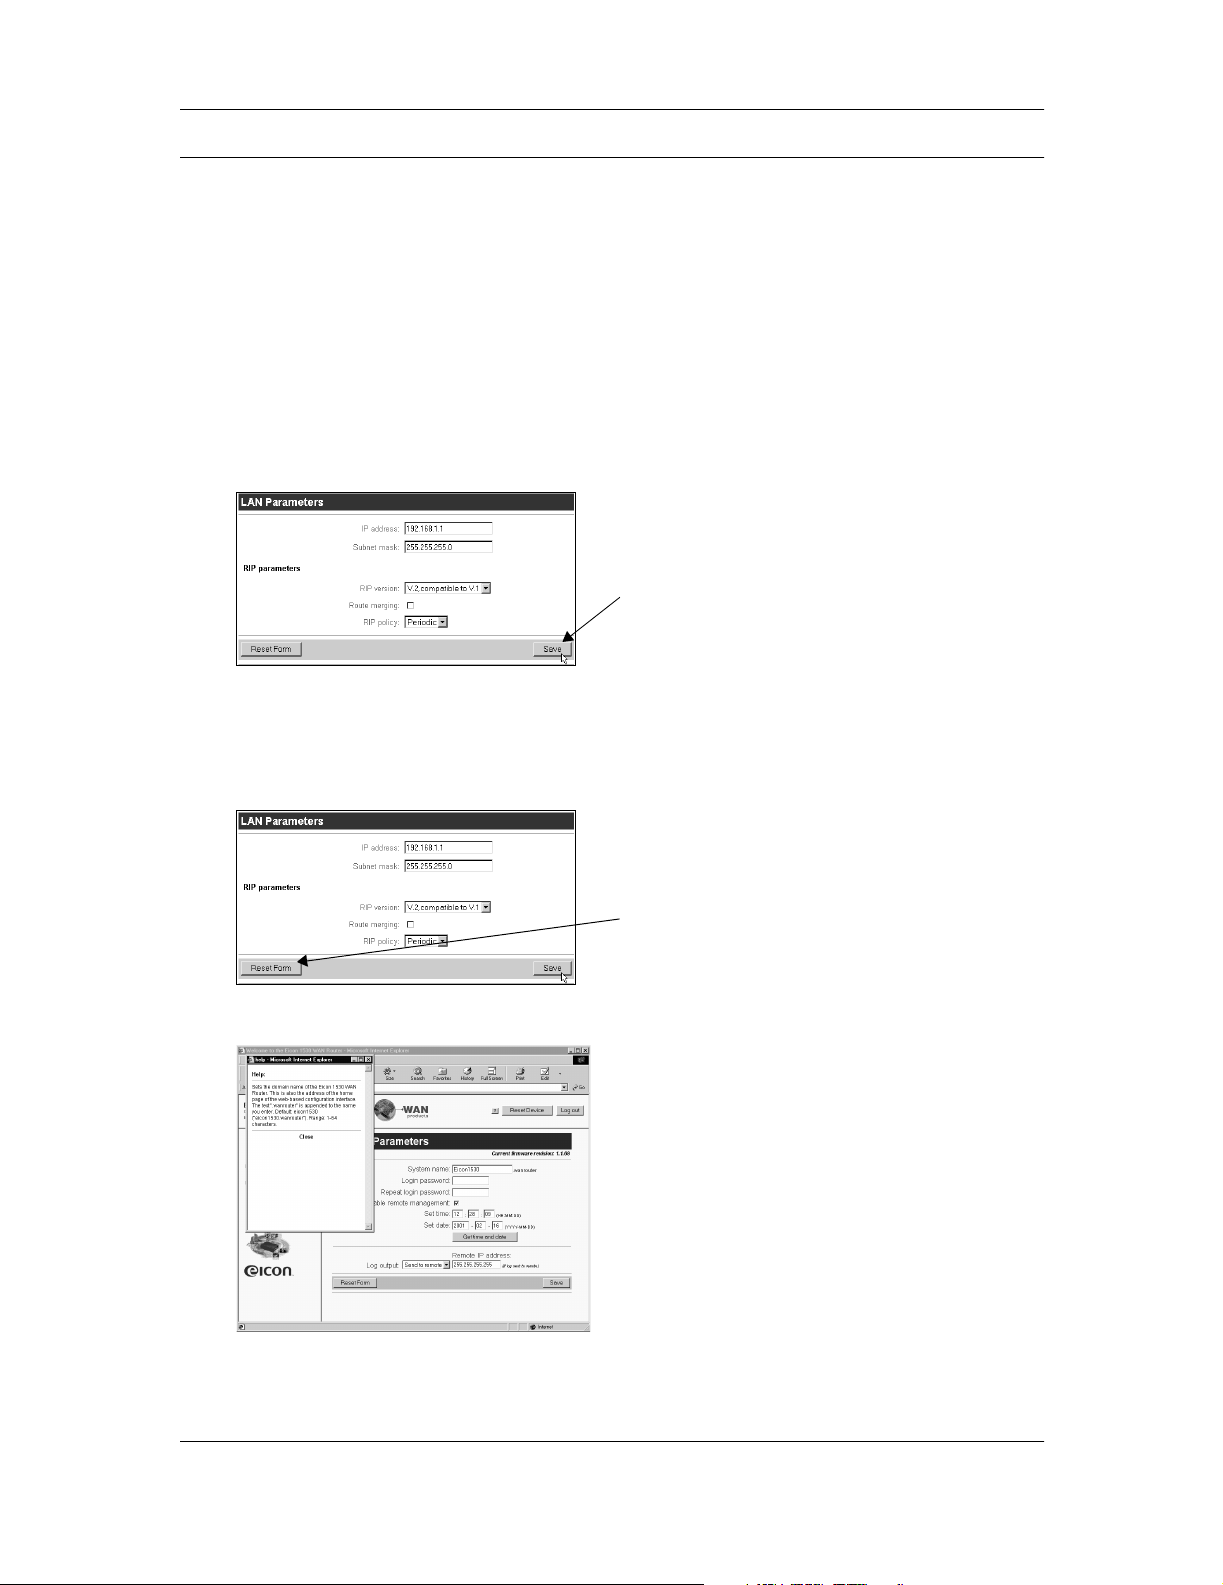
Step 4: Modify VHSI Settings
Once you have logged into the Eicon 1530 web interface, the first setting you should verify is
the choice of protocol for the VHSI port (set to ‘X.25’ by default). The protocol should be
selected first because all profile settings (which define particular connections) are deleted when
the protocol is changed.
About the Web Interface
The Eicon 1530 settings are changed via web pages that reside on the Eicon 1530 itself.
• When making changes using the web interface, make sure to click the ‘Save’ button on
each page. The ‘Save’ button is located at the bottom right of each web page. If you move to
another page without saving, your changes will not be saved to the device.
‘Save’
button
Once saved, the new settings will not take effect until you reset the device. It is not necessary
to do a reset until you have completed all the steps in this quickstart.
• The ‘Reset Form’ button, located at the bottom left of each page, reverts all settings in the
current page back to the original values when the page was opened.
‘Reset
for m’
button
• Clicking a setting name displays context-sensitive help.
• Once you have finished making changes to all settings, you must click the ‘Reset’ button,
located at the top of the browser window, for the settings to take effect.
Setup 17
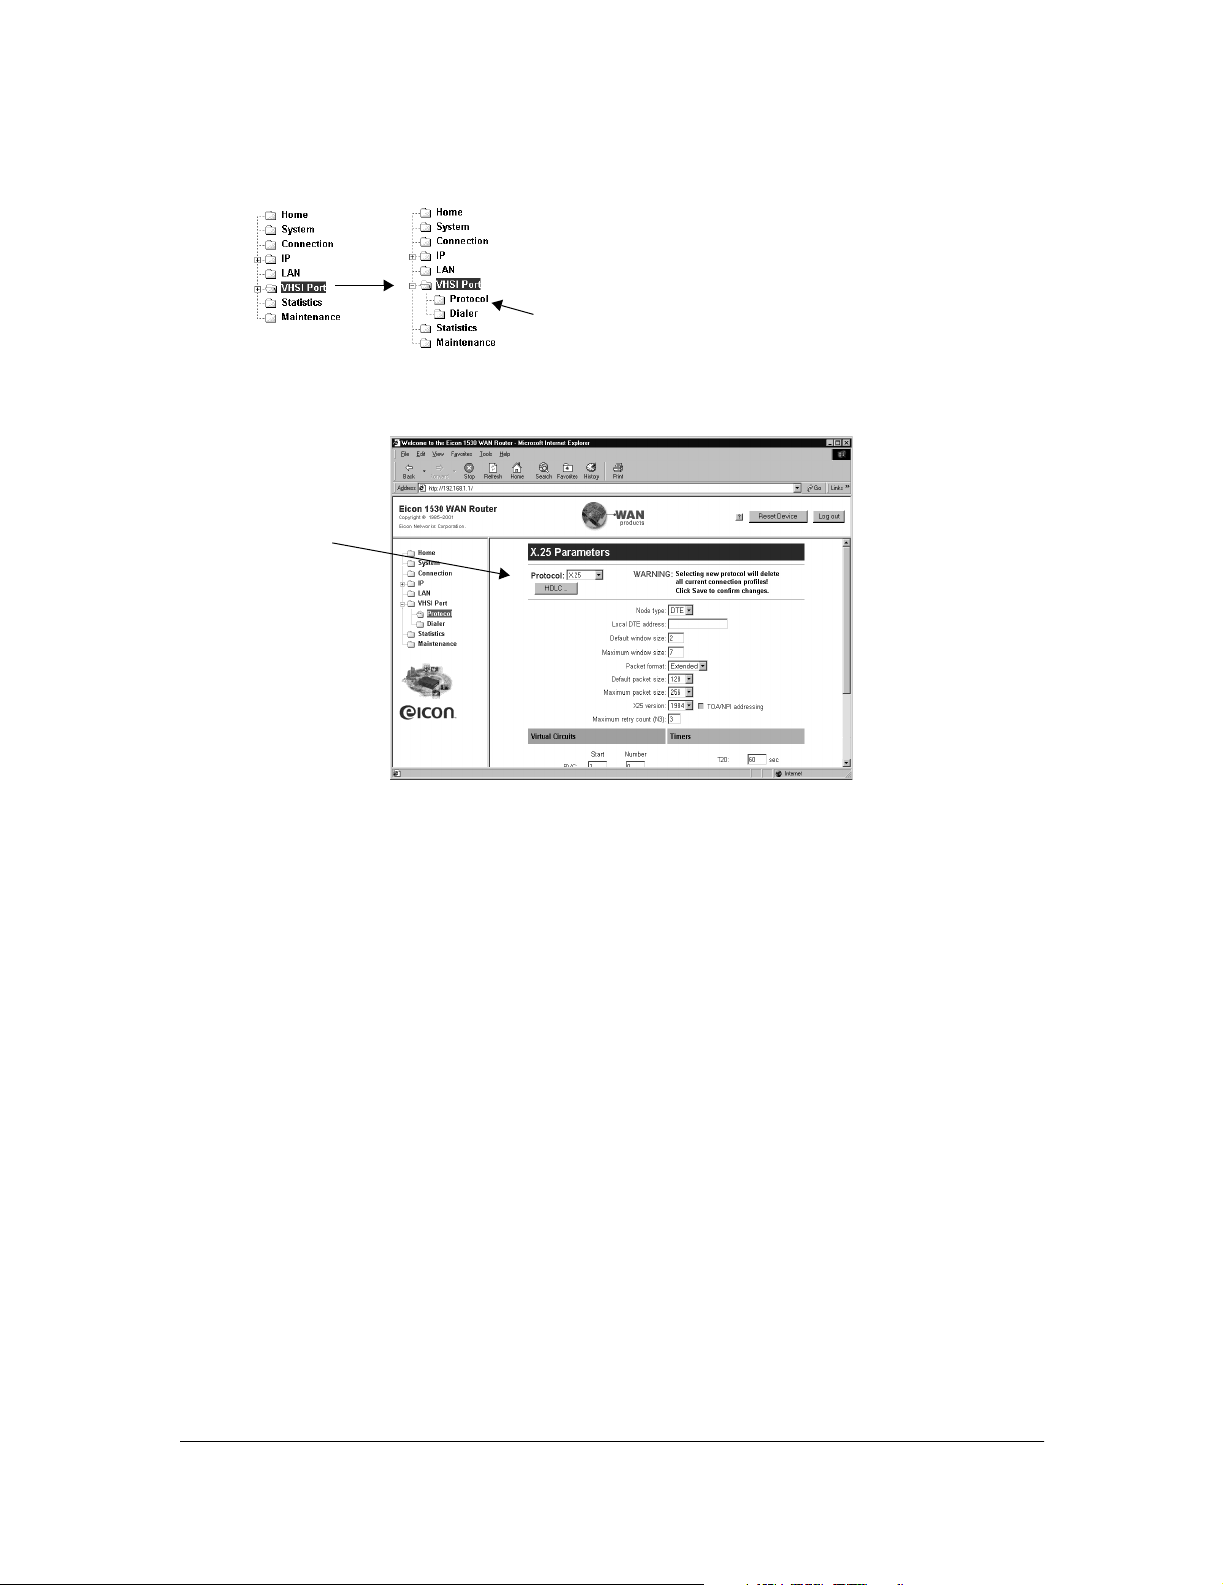
Choosing a VHSI Protocol
1.
From the Link List (the menu at the left of the screen), click on the small ‘+’ next to ‘VHSI
Port’ to expand the VHSI Port group, then click the ‘Protocol’ link.
2.
From the ‘Protocol’ drop-down menu, select a protocol.
‘Protocol’
drop-down
menu
‘Protocol’
link
3.
Click the ‘Save’ button, located at the bottom right of the web page, when finished.
Note: If you do not click ‘Save’, the changes will be lost when you move to another page.
Modifying Other VHSI Settings
After choosing a protocol, make changes to your VHSI settings, if required. The settings
presented will depend on the protocol chosen.
Note: You can bring up context-sensitive help for each setting by clicking on the setting name. Also, when
making changes, ensure that the new settings are consistent with those of your network provider.
• If the protocol is set to X.25 or Frame Relay:
– Verify all settings as presented on the Protocol page (this should be the current page) and
click ‘Save’.
– If required to make changes to HDLC or Static DLCI settings, click the ‘HDLC’ (for X.25)
or ‘Static DLCI’ (for Frame Relay) link (located at the top of the Protocol page), make any
required changes, then click ‘Save’.
• If the VHSI port is connected to a dial-up line, click ‘Dialer’ in the Link List. Make any
required changes, then click ‘Save’.
• Click ‘VHSI Port’ in the Link List. Make any required changes, then click ‘Save’.
What’s Next?
See Step 5: Create a Profile on page 19.
Setup 18
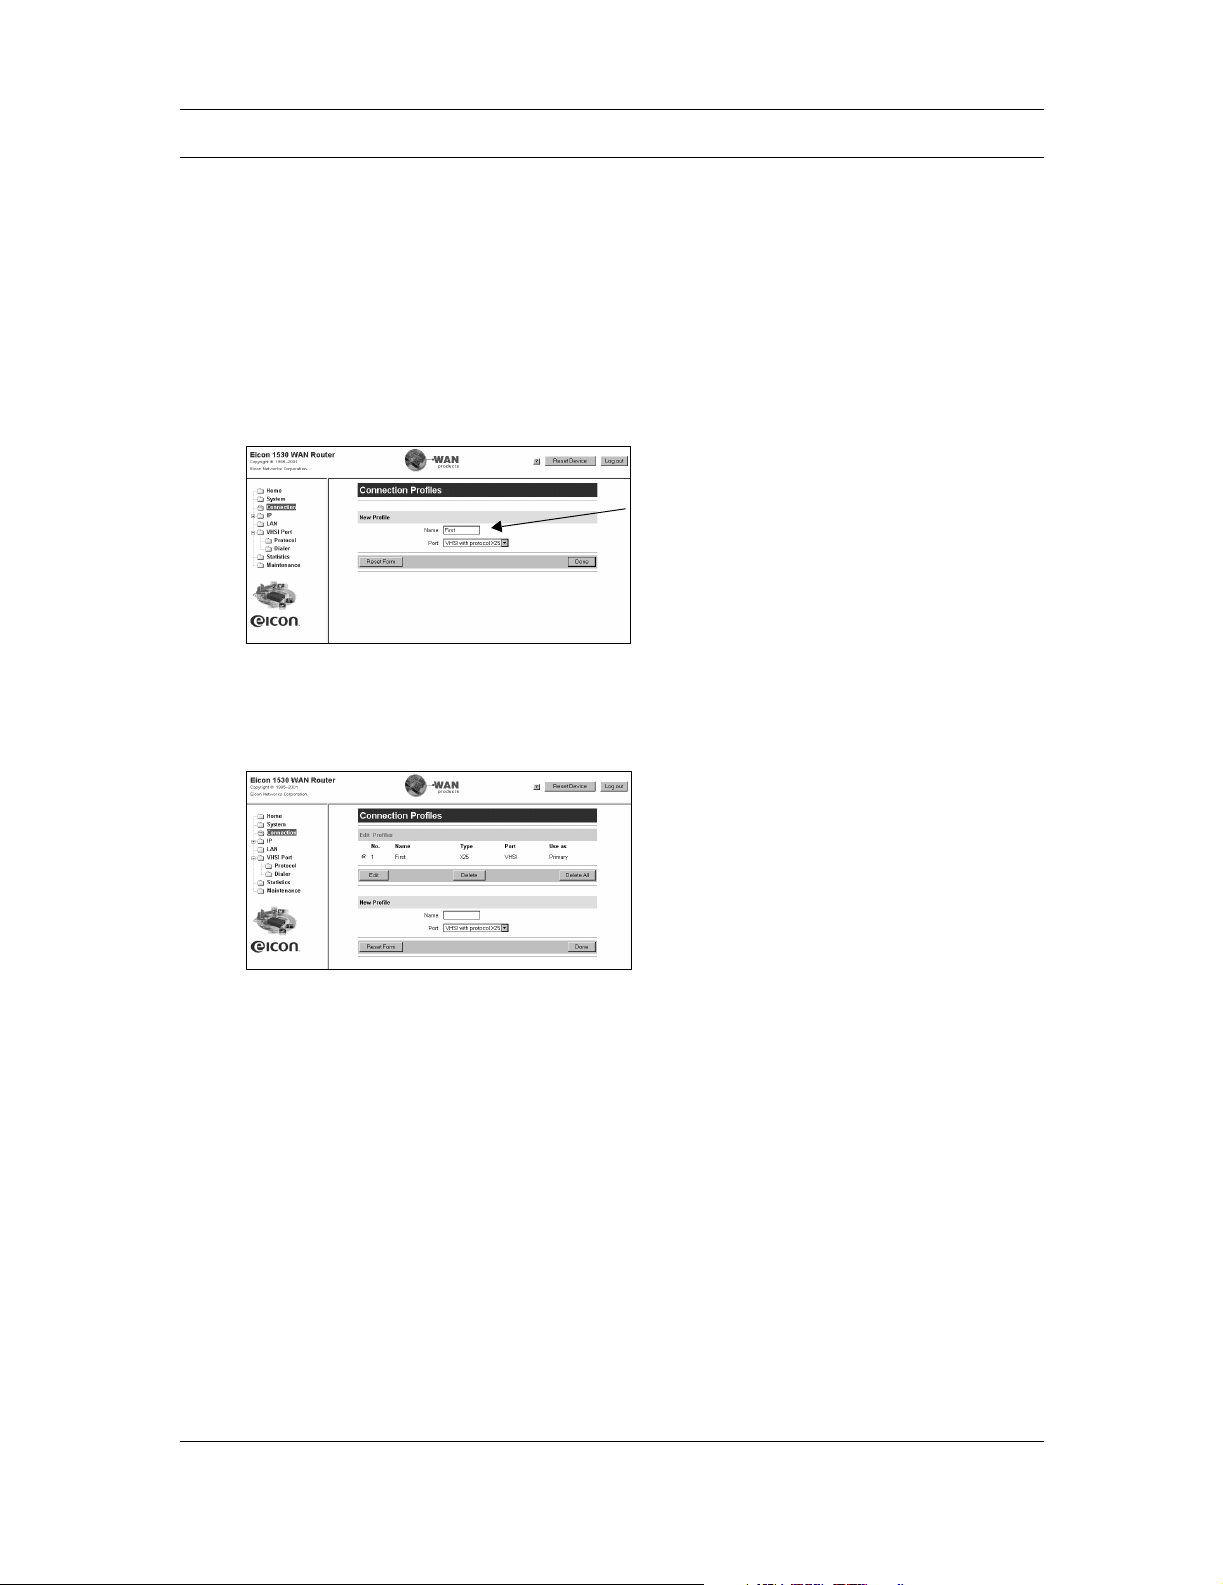
Step 5: Create a Profile
Settings for particular connections are contained in profiles on the Eicon 1530.
Note: When you change protocols for the VHSI interface, all profile information is lost. To avoid having to
re-enter configuration information, choose the protocol first, as described at the beginning in Step 4: Modify
VHSI Settings on page 17.
Creating a Profile
1.
From the Link List, click the ‘Connection’ link. The ‘Connection Profiles’ page appears.
2.
To add a profile, enter the name in the ‘Name’ field, then click the ‘Done’ button.
‘Name’
field
Note: With X.25 or Frame Relay, you can create up to eight profiles. For PPP, you can create only one
profile.
3.
The web page for your new profile will be displayed.
4.
To edit the profile, make sure it is selected and click ‘Edit”.
5.
Make the required changes to the profile. Be sure to scroll down and inspect all parameters.
In particular:
• If you are using X.25, make sure to enter the remote DTE address and remote IP address.
• If you are using Frame Relay, make sure the local DLCI number is the same as the remote
DLCI.
• If you are using PPP, make sure to enter the IP information at the bottom of the page.
6.
Click the ‘Save’ button (located at the bottom right of the page) when finished.
Setup 19
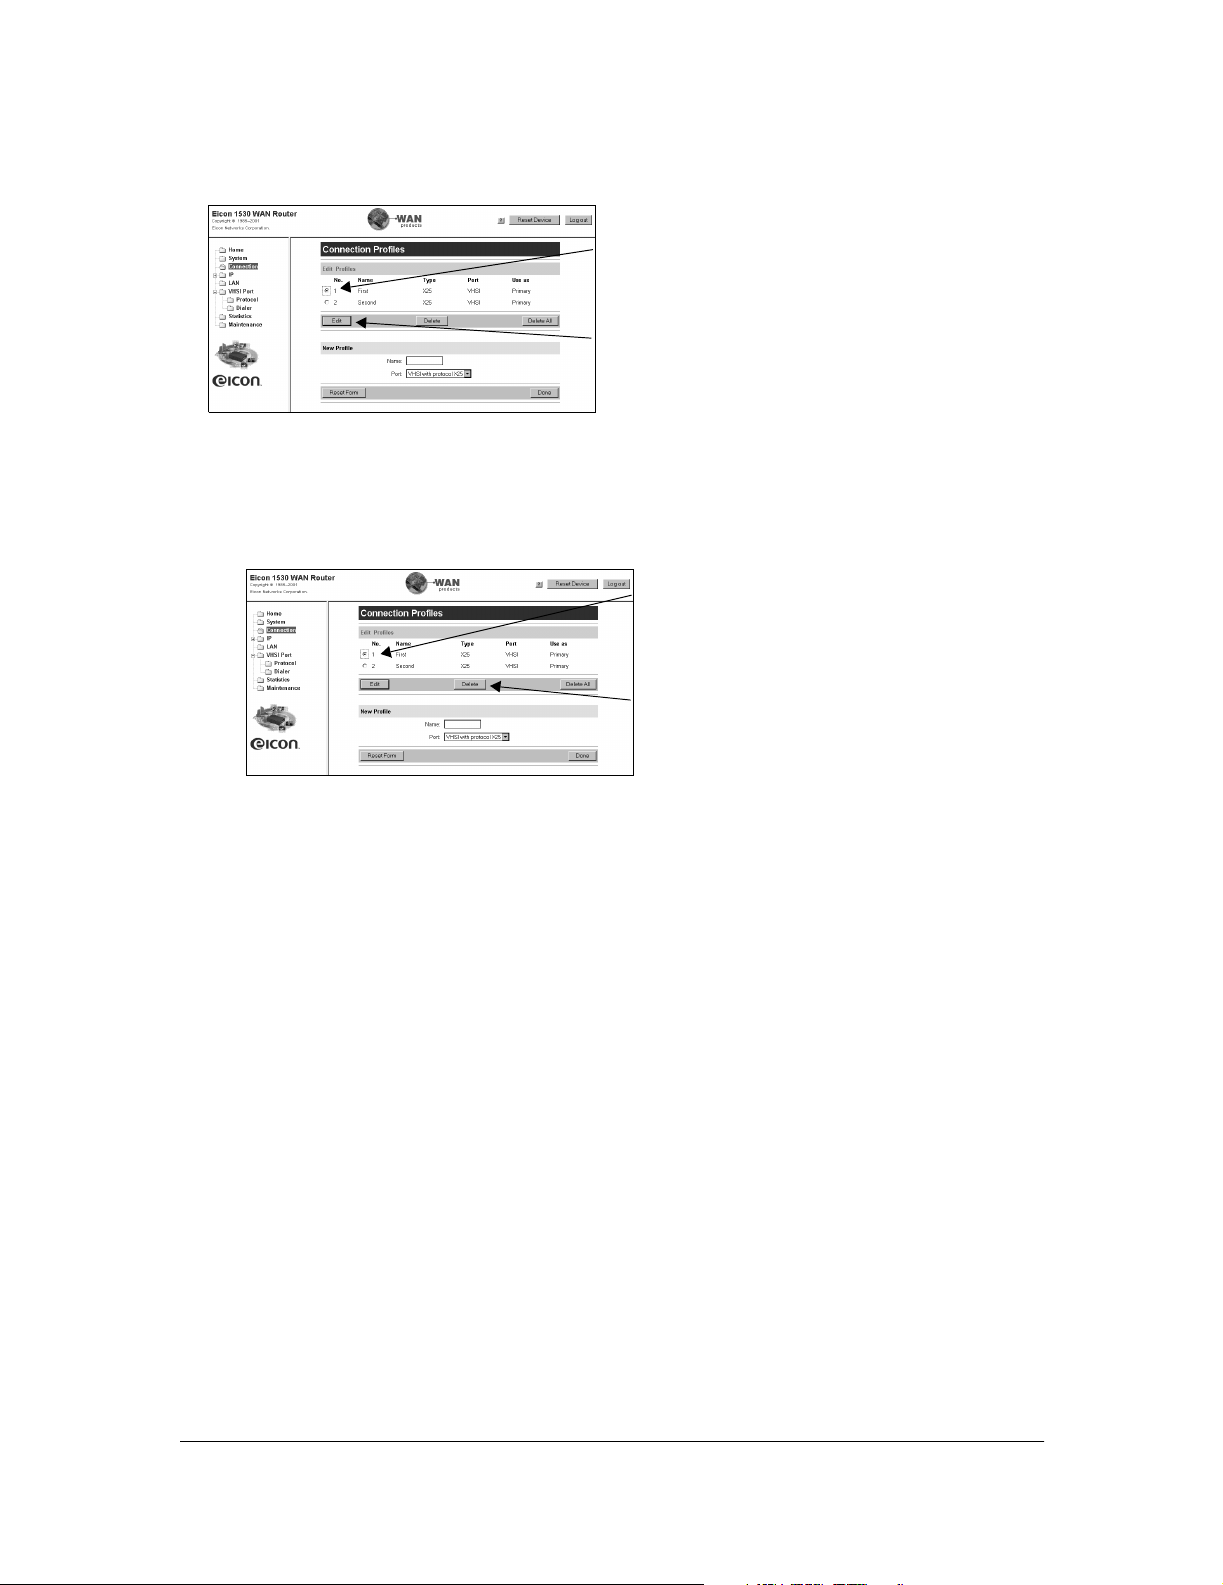
Switching Between Profiles
When you have more than one profile, selecting the associated radio button allows you to select
which profile to edit.
1. Select
Profile
2. Click
‘Edit”.
Deleting Profiles
To delete a profile:
1.
Select the profile and click ‘Delete’.
1. Select
profile
2. Click
‘Delete’.
To delete all profiles, click the ‘Delete All’ button.
What’s Next?
See Step 6: Modify LAN Settings (if required) on page 21.
Setup 20
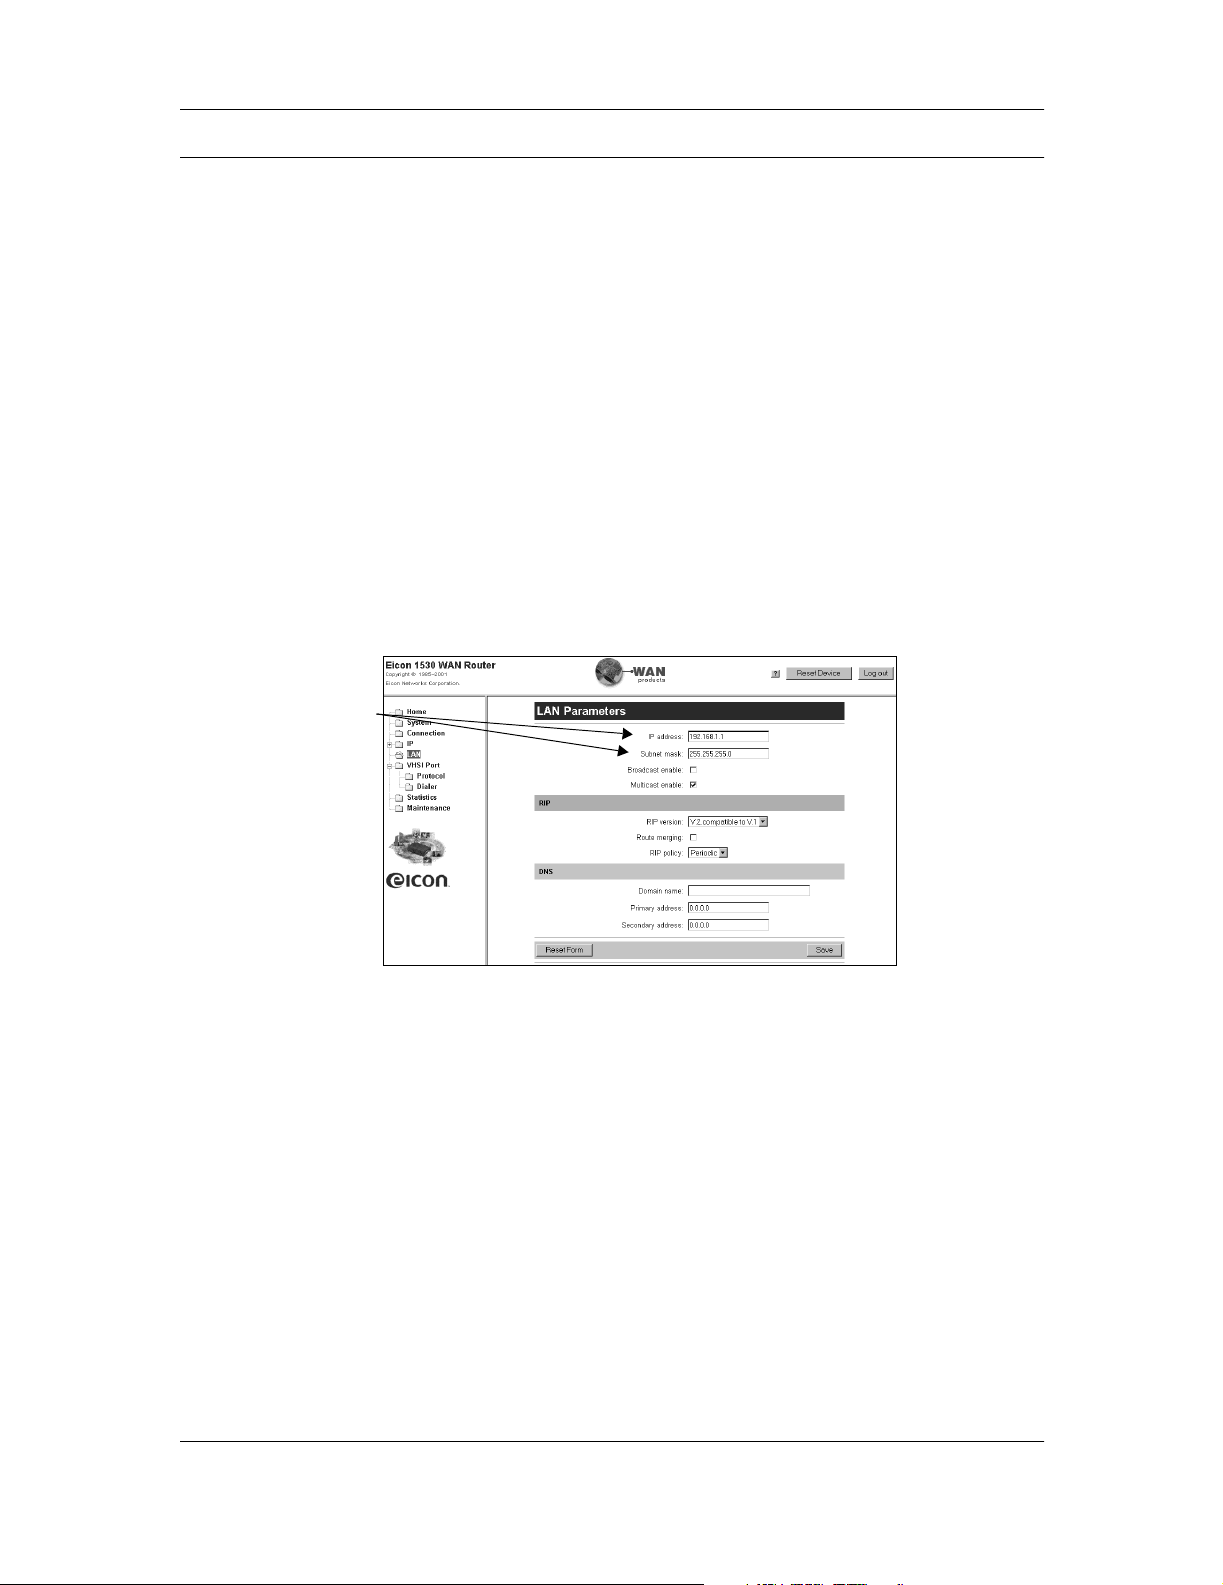
Step 6: Modify LAN Settings (if required)
The following changes may be required if you are connecting the Eicon 1530 to a LAN.
Change Device IP Address
The Eicon 1530’s default IP address of 192.168.1.1 may or may not be suitable for your LAN.
If you are unsure as to whether or not the IP address should be changed, consult your support
personnel. Some guidelines are given below.
• Eicon 1530 as DHCP server: You do not have to change the Eicon 1530’s IP address.
• Existing DHCP server: You must change the Eicon 1530’s IP address so it is outside the
range of dynamically assigned ones, or you must reserve the address.
• Computers with fixed IP addresses: You must change the Eicon 1530’s IP address so that
it corresponds to what is available on your network.
To change the device IP address:
1.
From the Link List, click ‘LAN’. The Eicon 1530 displays the LAN parameters page.
2.
Modify the ‘IP address’ and ‘Subnet Mask’ settings to addresses appropriate for your LAN.
‘IP address’ and
‘Subnet Mask’
settings
3.
Click the ‘Save’ button.
Disable DHCP
If your LAN has an existing DHCP server, you should disable the Eicon 1530’s DHCP server.
Note: The Eicon 1530 automatically de-activates its own DHCP server if an existing DHCP server is
detected. To re-activate this feature, remove the existing server from the LAN and reset the Eicon 1530.
To disable the DHCP server:
1.
In the Link List, click the ‘+’ next to ‘IP’, then click ‘DHCP’ from the submenu.
2.
In the ‘DHCP’ page, clear the ‘Enable DHCP’ checkbox.
3.
Click the ‘Save’ button.
What’s Next?
See Step 7: Reset the Device on page 22.
Setup 21
Step 7: Reset the Device
For your settings to take effect, you must reset the device by clicking the ‘Reset Device’ button
at the top of the browser window.
‘Reset Device’
button
Notes:
• Normally you are returned to the welcome page after performing a reset. However, if the LAN
IP address has been changed, you will lose contact with the Eicon 1530. If this is the case,
you should receive an error message from your browser after about 45 seconds. To re-establish
contact with the device, open the web configuration interface using the new IP address.
• If you changed the IP address of your computer in order to configure the Eicon 1530, you may
need to return these settings to their original state.
• If you are using the Eicon 1530 as your DHCP server, you may need to restart your computer
in order to acquire a new IP address from the device. If you are using Windows, you can do
the following to acquire a new IP address without restarting:
Windows 95/98/Me: Click ‘Start’, ‘Run’, type ‘winipcfg’, and click ‘Enter’. Click ‘Renew
All’.
Windows NT/2000/XP: Launch a command prompt, type ‘ipconfig /release’ and press Enter,
then ‘ipconfig /renew’ and press Enter.
What’s Next?
See Step 8: Test WAN Access on page 23.
Setup 22

Step 8: Test WAN Access
Once you have made the required changes, test that you have access to the remote device using
your WAN application. You can also ping the remote device to which you are attempting to
connect.
Troubleshooting
If you cannot access the WAN:
• Check your configuration settings (see Step 4: Modify VHSI Settings on page 17). Verify
that your settings are consistent with those of your network provider.
• Verify that your TCP/IP settings are correct for your situation (DHCP client or static IP
address) and that you have restarted your computer. If you cannot access the ‘Log in’ page
again, follow the instructions and suggestions given in Step 3: Log in to the Eicon 1530 on
page 15.
What’s Next?
• If you are using the Eicon 1530 over a LAN, see Adjusting LAN Settings (if required) on
page 24 to verify if you must modify other LAN settings.
• To learn more about your Eicon 1530, see Using your Eicon 1530 on page 28.
Setup 23
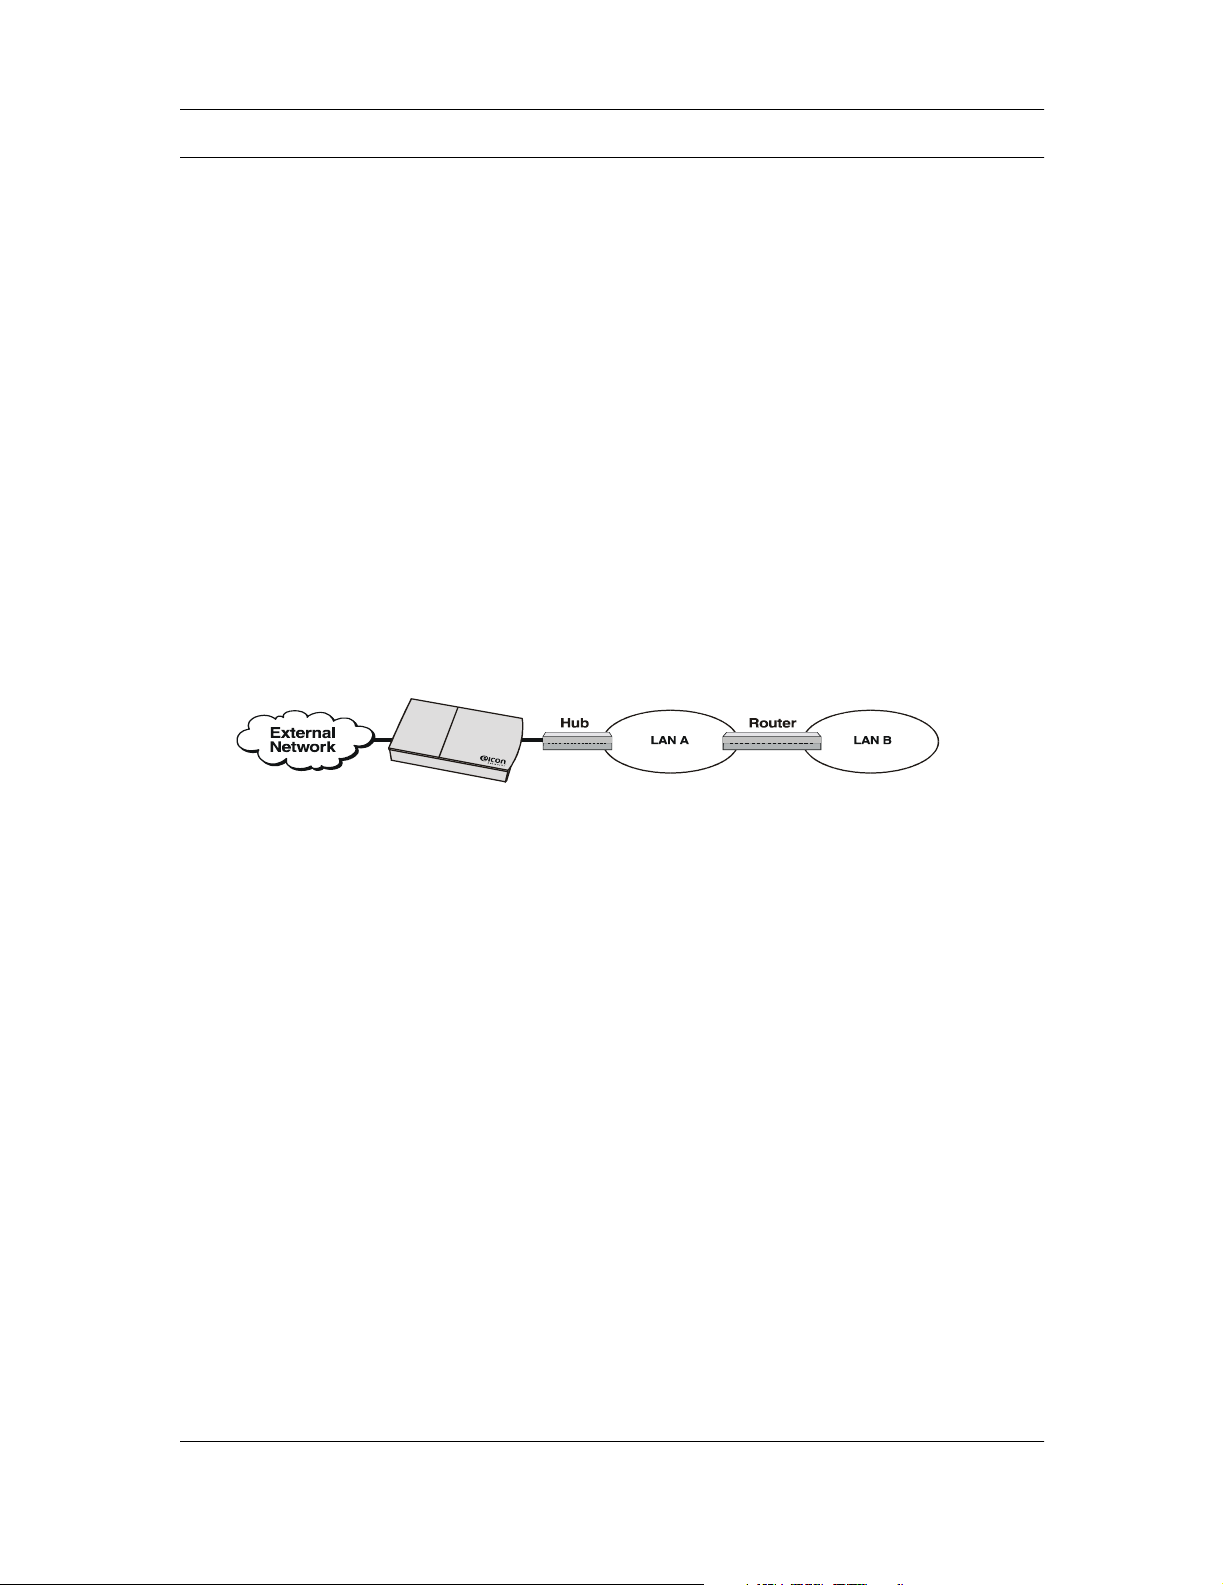
Adjusting LAN Settings (if required)
Depending on your setup, you may have to adjust some of the configuration settings on your
computers or servers in order to communicate with the Eicon 1530. Due to the diversity of
networking equipment and topologies, this section can only cover the most common setups. If
you setup is more complex, contact your network administrator (or other support personnel) to
help with the installation.
Once you make these changes, the computers on your network may need to be restarted in
order to acquire the new settings.
• If your LAN uses static addressing: Set the ‘Default Gateway’ and ‘DNS Server’ settings
of each computer to the address of the Eicon 1530. These settings are normally found in the
TCP/IP settings for your operating system.
• If your LAN has a DHCP server: Configure your DHCP server to return the address of the
Eicon 1530 as the ‘Default Gateway’ and ‘DNS Server’ to all clients.
• If your LAN has a router: Most likely, your router is configured as the default gateway for
your computers. In this case, you will need to configure the routing table on your router to
re-direct the appropriate traffic to the Eicon 1530, as well as add a route on the Eicon 1530 to
direct appropriate traffic to the router.
Consider the following example:
Eicon 1530
Traffic from LAN A addressed to LAN B is forwarded by the router to LAN B.
Traffic from LAN B addressed to the external network needs to be forwarded by the router to
the Eicon 1530. This requires you to configure a route on the router.
Traffic from the external network to LAN B needs to be forwarded to the router. This requires
you to configure a route on the Eicon 1530. No route is needed for traffic to LAN A.
Setup 24

Changing TCP/IP Settings to DHCP
For most connection scenarios, your computer must have TCP/IP configured to act as a DHCP
client. This allows your computer to dynamically acquire its IP address and other settings from
the Eicon 1530.
Note: If you do not want to use the Eicon 1530’s DHCP feature, you must change the IP address of your
computer to 192.168.1.2, or 192.168.1.3, etc., as the default IP address is 192.168.1.1.
The following procedures describe how to set your TCP/IP settings for Windows 95,
Windows 98, Windows NT 4.0, Windows 2000, and Windows XP. For other platforms, consult
the documentation for your operating system.
• TCP/IP Settings for Windows 95/98/Me ............................................................ 25
• TCP/IP Settings for Windows NT 4.0................................................................. 26
• TCP/IP Settings for Windows 2000/XP..............................................................26
TCP/IP Settings for Windows 95/98/Me
The following procedure describes how to verify and install TCP/IP on Windows 95,
Windows 98, or Windows Me. Note that if you have more than one Ethernet adapter installed
on your system, you must only change the settings for the adapter used by the Eicon 1530.
1.
Click ‘Start’, ‘Settings’, ‘Control Panel’.
2.
Double-click the ‘Network’ icon. The ‘Network’ dialog box appears. By default, the
‘Configuration’ tab is displayed.
3.
If ‘TCP/IP’ is not listed for your network adapter in the ‘Components’ list, you must add it,
as described below.
• Click ‘Add’. The ‘Select Network Component Type’ dialog box appears.
• Select ‘Protocol’, then click ‘Add’. The ‘Select Network Protocol’ window appears.
• In the ‘Manufacturer’ box, select ‘Microsoft’.
• In ‘Network Protocols’, select ‘TCP/IP’.
• Click ‘OK’. Once installation is complete, you are returned to the Network window.
• Do not click the ‘OK’ button yet; next you will verify your TCP/IP settings.
4.
In the list of components, select ‘TCP/IP’ for your network card, then click ‘Properties’. The
‘TCP/IP Properties’ dialog box appears.
5.
Click the ‘IP Address’ tab and select ‘Obtain an IP address automatically’. This defines your
machine as a DHCP client.
6.
Click the ‘WINS Configuration’ tab and select ‘Use DHCP for WINS Resolution’.
7.
Click the ‘Gateway’ tab and remove all existing gateways.
8.
Click the ‘DNS Configuration’ tab and select ‘Disable DNS.’ This instructs your computer
to obtain DNS server information via DHCP.
9.
Click ‘OK’, then click ‘OK’ again.
Note: You may be asked to insert your original Windows installation CD-ROM.
10.
Click ‘Yes’ when prompted to restart your system.
Setup 25

TCP/IP Settings for Windows NT 4.0
The following procedure describes how to install TCP/IP on Windows NT 4.0. Note that if you
have more than one Ethernet adapter installed on your system, you must only change the
settings for the adapter used by the Eicon 1530.
1.
Click ‘Start’, ‘Settings’, ‘Control Panel’.
2.
Double-click the ‘Network’ icon. The Network dialog box appears.
3.
Click the ‘Protocols’ tab.
4.
If ‘TCP/IP’ is not listed, you must install it, as described below.
• From the ‘Protocols’ tab, click ‘Add’.
• Select ‘TCP/IP protocol’ as your network protocol, then click ‘OK’.
• Click ‘Yes’ to use DHCP.
• When prompted, insert the original Windows NT installation CD and enter d:\i386 (where
d: is the drive letter of your CD drive), and click ‘Continue’.
• Do not click the ‘OK’ button yet; next you will verify your TCP/IP settings.
5.
Click the ‘Protocols’ tab.
6.
Select ‘TCP/IP protocol’, then click ‘Properties’.
7.
Select ‘Obtain an IP address from a DHCP server’.
8.
Click the ‘DNS’ tab. Delete any DNS addresses are configured.
9.
Click ‘OK’.
10.
Restart your computer if requested to do so.
TCP/IP Settings for Windows 2000/XP
Windows 2000/XP automatically created a network adapter profile (named ‘Local Area
Connection’ by default) when the adapter was installed. Note that if you have more than one
Ethernet adapter installed on your system, you must only change the settings for the adapter
used by the Eicon 1530.
1.
Click ‘Start’, ‘Settings’ then ‘Network and Dial-up Connections’ (‘Network Connections’
for Windows XP).
2.
In the Network and Dial-up Connections (Network Connections for Windows XP),
right-click the appropriate adapter entry and click ‘Properties’. The properties window for
this adapter is displayed.
3.
Select ‘Internet Protocol (TCP/IP)’, then click ‘Properties’.
4.
The settings should be ‘Obtain an IP address automatically’ and ‘Obtain DNS server
automatically’.
5.
Click ‘OK’, then ‘OK’ again, then click ‘Close’.
6.
Restart your computer if requested to do so.
Setup 26

Technical Support
To obtain technical support for Eicon Networks products, visit our web site at:
http://www.eicon.com/support/
For the latest information on the Eicon 1530, visit:
http://www.eicon.com/wan1530/
For customer service, contact your Eicon Networks supplier.
Setup 27

Using your Eicon 1530
Ports and Indicator Lights .......................................................................................29
Resetting the Device via the Reset Button .............................................................. 30
Accessing the Configuration Menu .........................................................................31
Upgrading Firmware via a Web Browser............................................................... 35
Saving and Resetting Configuration Settings......................................................... 36
Changing the VHSI Port Protocol........................................................................... 37
Creating and Editing Profiles .................................................................................. 39
28
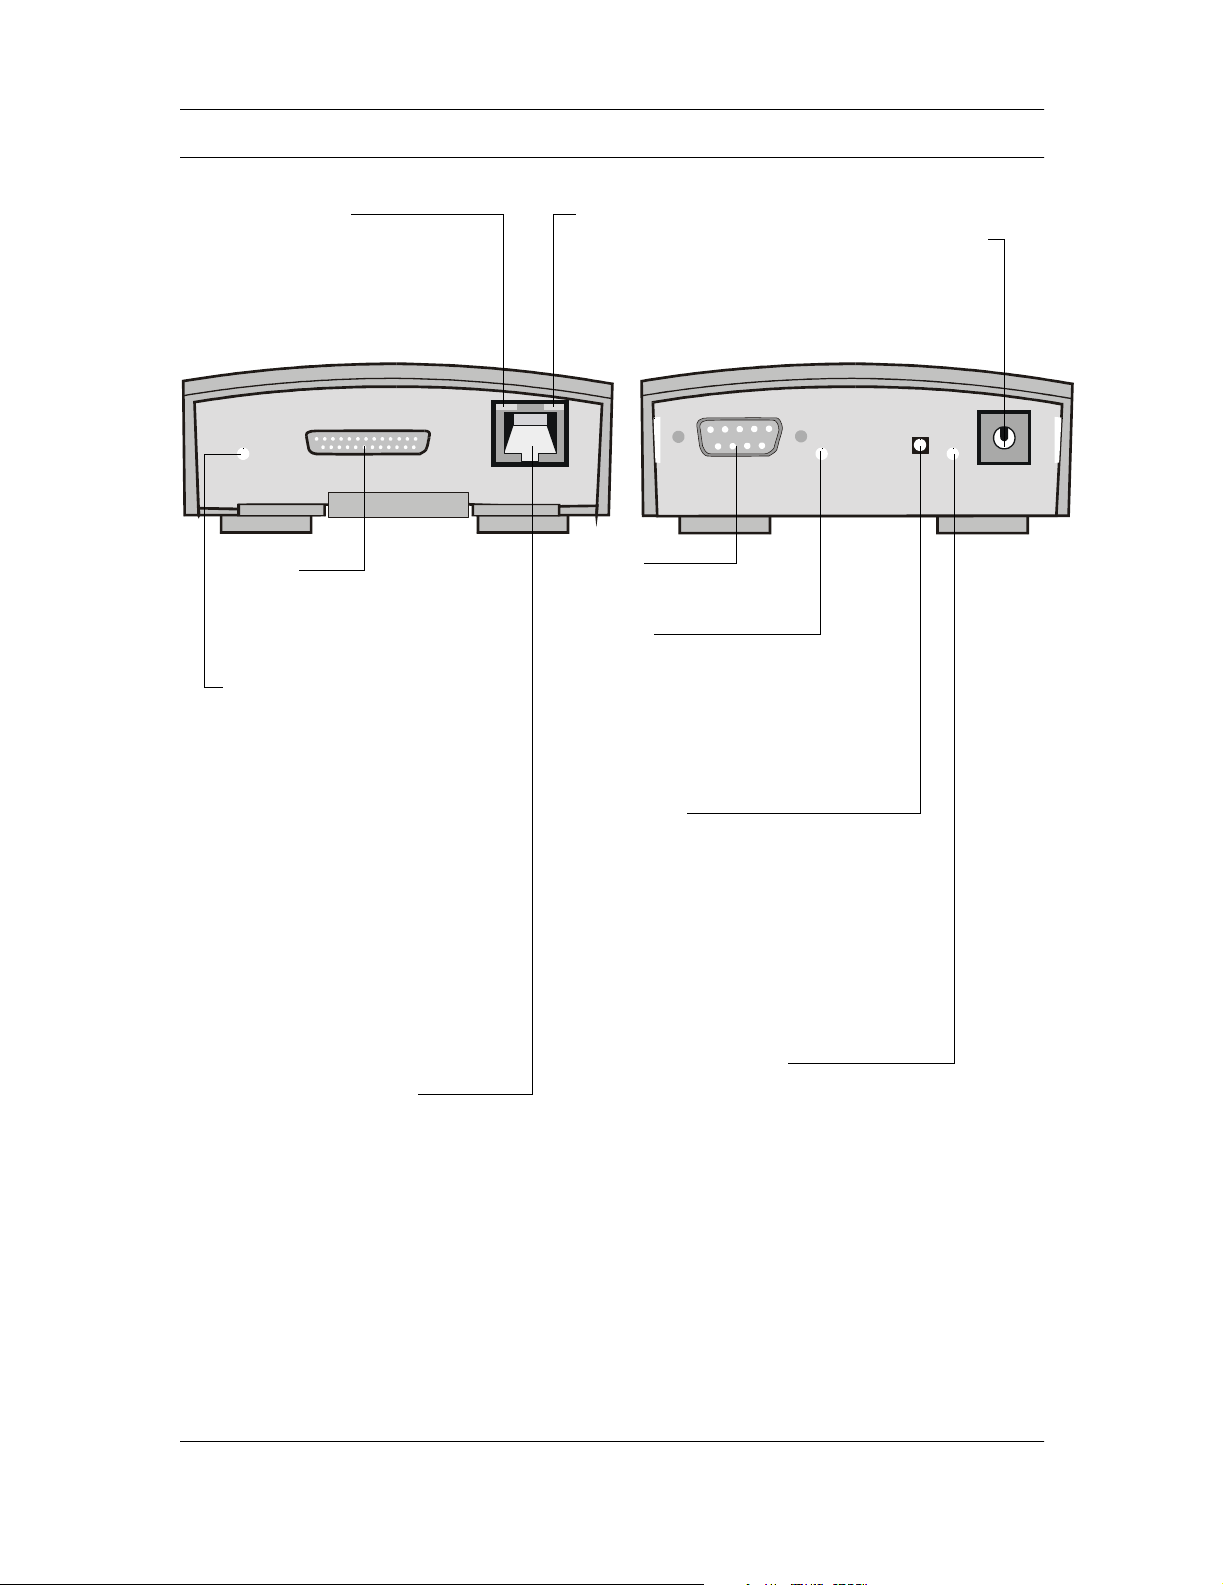
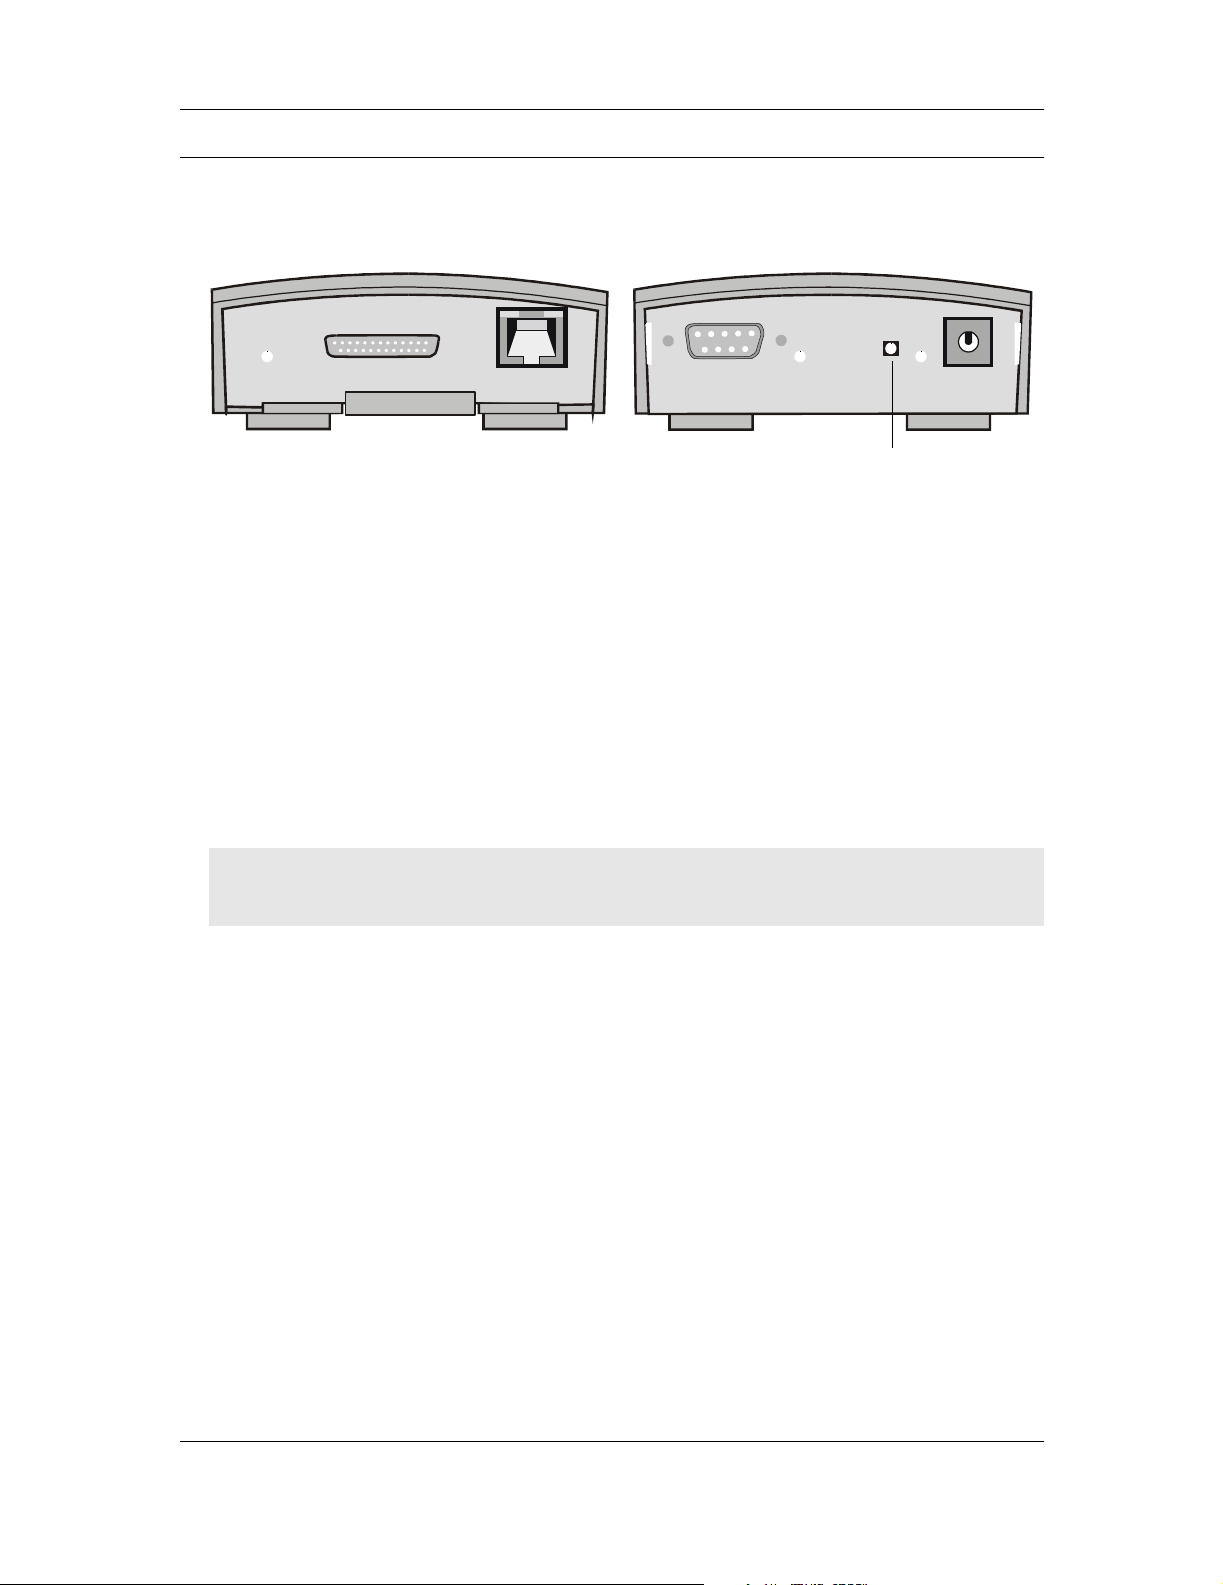
Ports and Indicator Lights
Green Ethernet Light
ON: The Ethernet cable is connected properly.
OFF: The Ethernet cable is not connected, or
the wrong cable is connected (straight-through
or crossover).
Front of Unit Back of Unit
VHSI Port
Used for connecting your
Eicon 1530 to the wide
area network.
VHSI Light
If you are using X.25:
ON: The X.25 layer is ready.
FLASHING: The X.25 layer is not ready.
OFF: The X.25 port is closed or the
cable is disconnected.
If you are using PPP:
ON: The PPP layer is connected.
FLASHING: The PPP layer is trying to
connect to a remote site.
OFF: The PPP layer is closed or the
cable is disconnected.
If you are using Frame Relay:
ON: The Frame Relay layer is
connected.
FLASHING: The Frame Relay layer is
opening.
OFF: The Frame Relay layer is closed or
the cable is disconnected.
Ethernet Port
Used for connecting to the Eicon 1530 to a
computer or LAN.
A straight-through cable (the blue cable) is
used for connecting to a LAN.
A crossover cable (sold separately) is
required to connect the Ethernet port
directly to a computer.
Amber Ethernet Light
FLASHING: Data is being sent or
received via the Ethernet cable.
OFF: Data is not being sent or
received via the Ethernet cable.
AUX Po rt
Auxiliary port (currently not used).
AUX Ligh t
Shows the status of the
AUX port (currently unused).
Also lights up to indicate the
status of a factory reset (see
Reset Settings to Factory
Defaults on page 30).
Reset Button
Used for resetting the Eicon 1530.
Pressing this button once resets
the device.
Warning! All configuration settings
are lost if you hold down the Reset
button for 15 seconds, which returns
all settings back to factory defaults.
Power Light
ON: Power adapter is properly connected.
FLASHING: Device is in boot mode. If you
are not upgrading firmware while in boot
mode, press the Reset button once to return
the device to normal.
If you are upgrading firmware while in boot
mode, do not press Reset for at least one
minute after transferring the firmware to the
device.
Power Connector
Used for connecting
the Eicon 1530 to an
electrical outlet.
Using your Eicon 1530 29
Resetting the Device via the Reset Button
The Reset button for the Eicon 1530 is shown below.
Front of Device Back of Device
Reset
button
Normal Reset
If you press the Reset button once quickly, you will do a ‘normal’ reset. This reboots the
device, and your settings are left intact.
You can also do a normal reset using the ‘Reset’ button at the top of the browser window when
you are using the web interface.
Reset Settings to Factory Defaults
Warning: Resetting to factory defaults erases all configuration settings.
To reset to factory defaults, hold down the ‘Reset’ button for at least 15 seconds. The AUX light
will turn on, then will go off after 15 seconds, indicating the reset is complete.
Note: This procedure will return the default IP address of the Eicon 1530 to 192.168.1.1. If you changed
the IP address of the Eicon 1530 from this default setting, you will need to use the default IP address
192.168.1.1 to access the configuration menu.
You can also reset to factory defaults using the Web-based configuration interface (see Saving
and Resetting Configuration Settings on page 36) as well as the Reset Factory command (see
General Commands on page 108 for more information).
Entering Boot Monitor Mode
If you hold down the reset button for five seconds and less than 15 seconds, you will enter Boot
Monitor mode, which is used for troubleshooting purposes only. Press the ‘Reset’ button once
more to return the device back to normal operation.
Using your Eicon 1530 30
 Loading...