

Page 1
Manual addendum / Zusatztext Anleitung / Addendum au manuel / Aggiunta manuale
The “Battery Installation and ESC Arming” section of the manual included with the X-Vert
EN
transmitter and aircraft. The correct settings are given below:
Installation
1. Lower the throttle stick fully.
2. Center the throttle trim.
3. Power on the transmitter and wait approximately 5 seconds.
4. Open the battery hatch.
5. Apply the loop side (soft side) of the hook and loop tape to the bottom of your battery and
the hook side to the battery tray. Use enough hook and loop material to ensure the battery
is held securely in place through even the most violent aerobatic maneuvers.
NOTICE: Failure to use adequate hook and loop material may allow the battery to become
dislodged or ejected in fl ight. Movement of the battery in fl ight may cause a change of the
center of gravity and loss of control.
6. Install the fully charged battery centered in the battery compartment.
7. Connect the battery lead to the aircraft power lead, noting correct polarity.
CAUTION: Connecting the battery to the aircraft power lead with reversed polarity will
cause damage to the fl ight controller and the battery. Damage caused by incorrectly
connecting the battery is not covered under warranty.
8. The aircraft must be either vertical on the landing gear or horizontal on its back to initialize.
Keep the aircraft immobile and away from wind or the fl ight control system may not initialize.
CAUTION: Always keep hands away from the propeller. When armed, the motor will
turn the propeller in response to any throttle movement.
9. Close the battery hatch.
10. Refer to the Center of Gravity section to ensure the model balances at the recommended CG.
EFL1800, EFL1850
™
aircraft gave incorrect information for the throttle trim settings in step 1 when powering on the
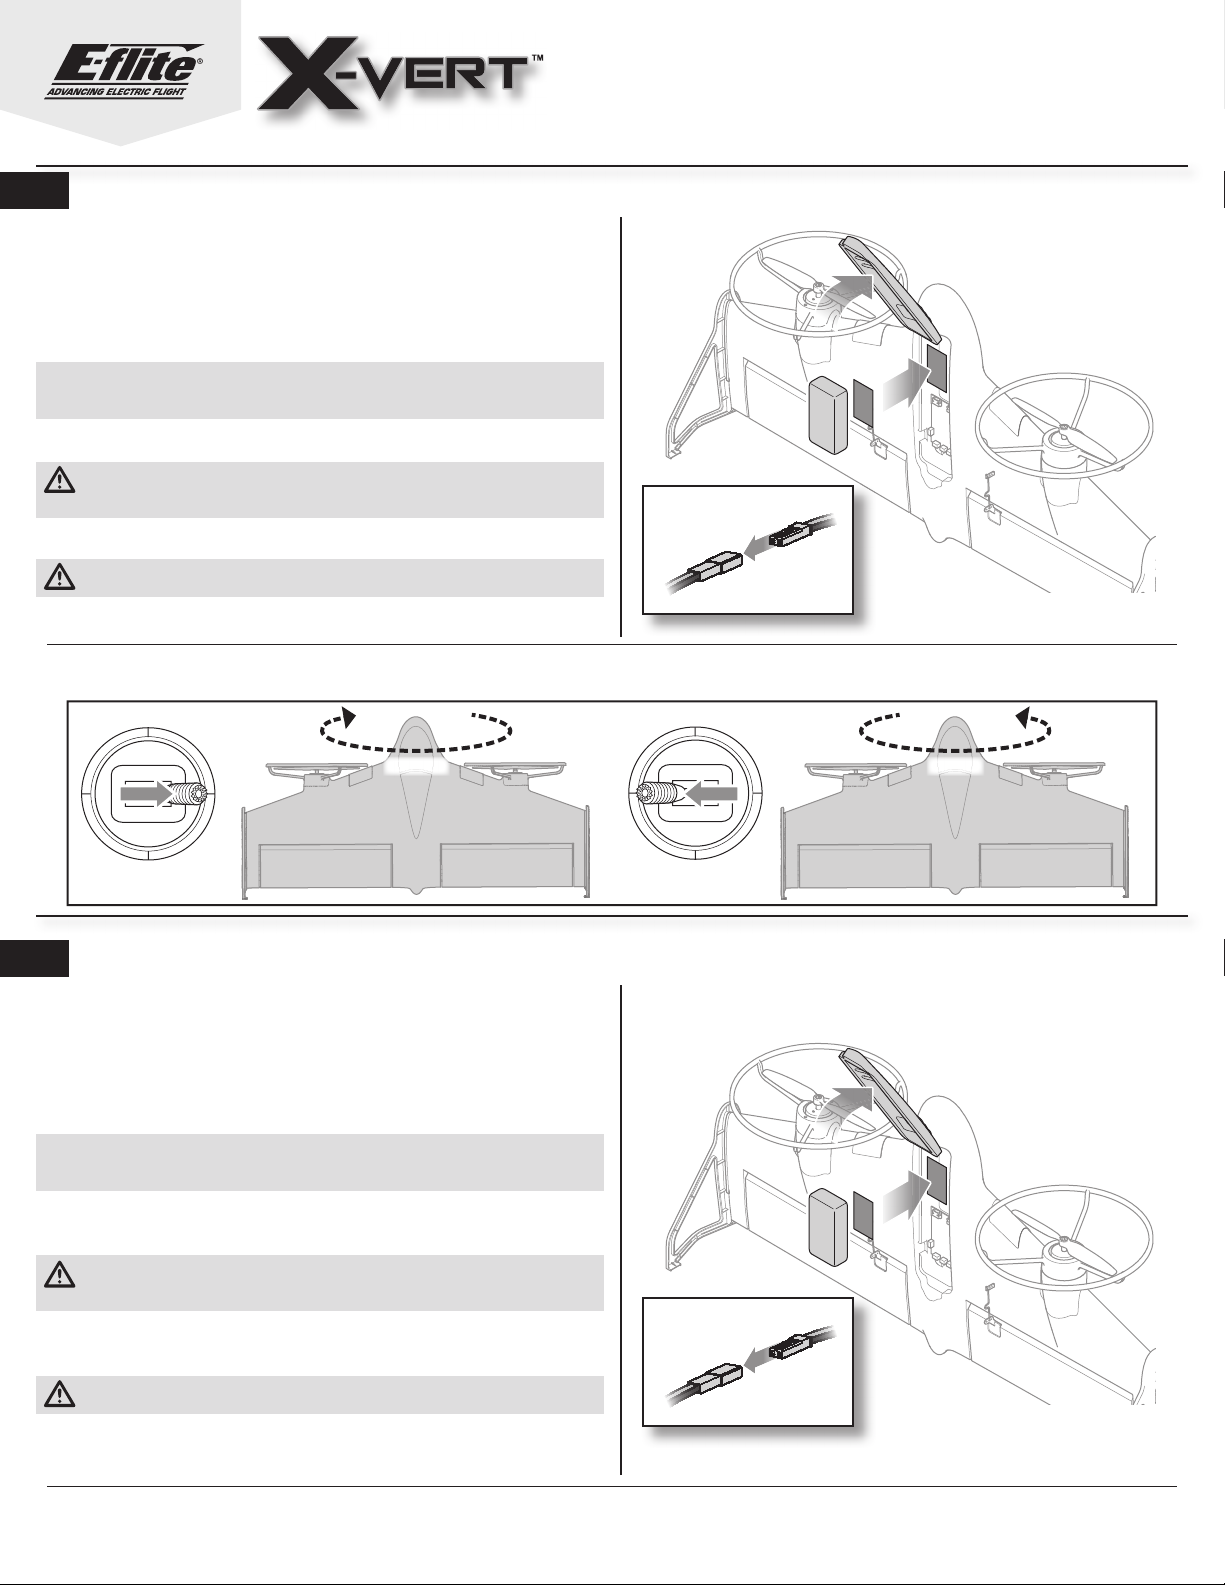
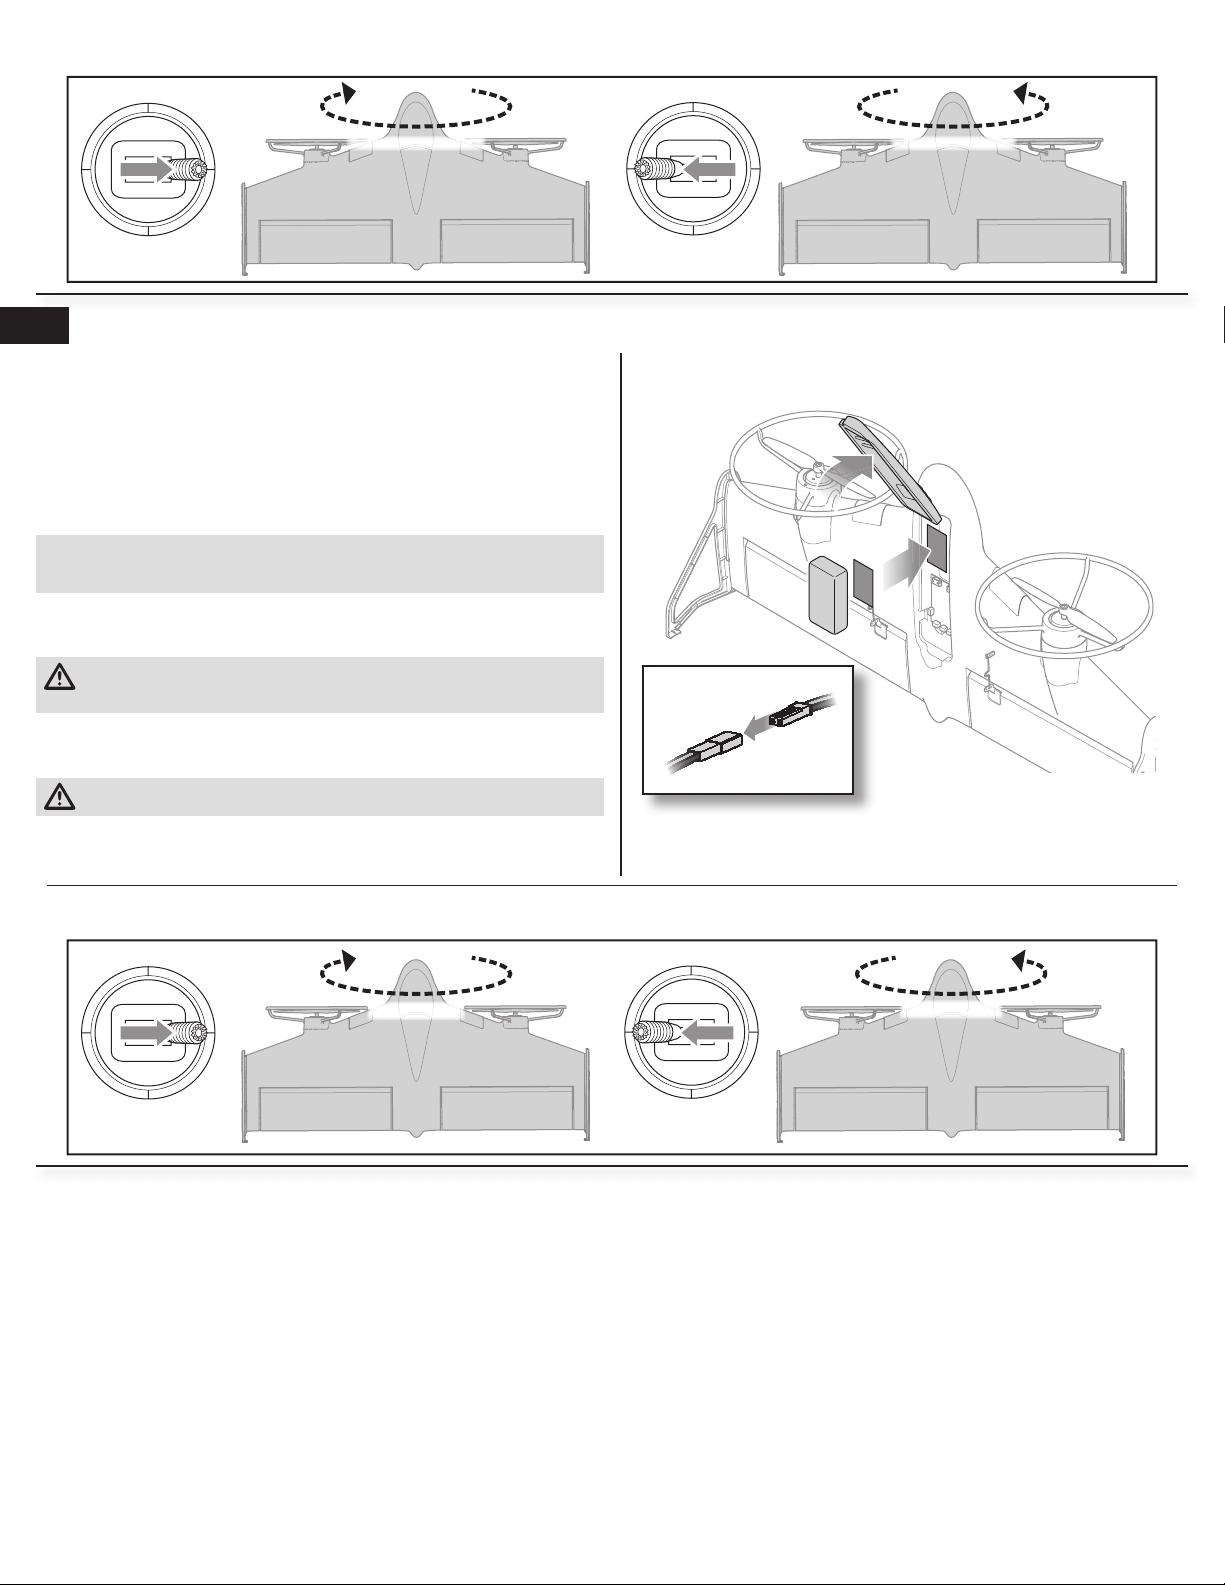
Additionally, the “Understanding the Primary Flight Controls” section of the manual included with the X-Vert incorrectly displayed the yaw rotation direction
in multirotor fl ight mode. The diagram below illustrates the correct yaw rotation direction response to the given rudder control inputs.
Rudder
Yaw right Yaw left
Rudder right Rudder left
Der Abschnitt „Einsatz der Akkus und Ausrüstung mit Geschwindigkeitsregler“ des im Lieferumfang des Flugzeugs X-Vert enthaltenen Handbuchs umfasst inkorrekte Informationen zu den
DE
Einstellungen der Gastrimmung in Schritt 1, wenn der Empfänger und das Flugzeug eingeschaltet werden. Die korrekten Einstellungen sind folgende:
Montage
1. Den Gashebel vollständig senken.
2. Die Gastrimmung mittig einstellen.
3. Den Sender einschalten und ungefähr 5Sekunden warten.
4. Die Akku-Abdeckung öffnen.
5. Die Schlingenseite (glatte Seite) des optionalen Klettbands an der Unterseite des Akkus und
die Hakenseite an der Akkuhalterung befestigen. Ausreichend Klettband verwenden, um
sicherzustellen, dass der Akku auch bei heftigen Manövern in der Luft gut fi xiert ist.
HINWEIS: Wird zu wenig Klettband verwendet, kann der Akku im Flug verrutschen oder sich
ganz aus seiner Position lösen. Wenn sich der Akku im Flug bewegt, kann dies den Schwerpunkt
verschieben und zu einem Kontrollverlust führen.
6. Den voll aufgeladenen Akku mittig im Akku-Fach montieren.
7. Den Batteriestecker an das Stromanschlusskabel des Flugzeugs anschließend und dabei
auf die richtige Polarität achten.
ACHTUNG: Wird der Akku mit falscher Polarität an das Stromanschlusskabel des Flugzeugs
angeschlossen, können Flug-Steuerung und Akku beschädigt werden. Schäden, die durch
einen falsch angeschlossenen Akku entstehen, sind nicht von der Garantie gedeckt.
8. Das Flugzeug muss für die Initialisierung entweder vertikal auf dem Fahrwerk stehen oder
horizontal auf dem Rücken liegen. Das Flugzeug still und nicht in den Wind halten, da sich das
Flug-Steuerungssystem ansonsten nicht initialisiert.
ACHTUNG: Die Hände immer weg vom Propeller halten. Der Motor wird im
eingeschalteten Zustand den Propeller als Reaktion auf eine Gashebelbewegung drehen.
9. Die Akku-Abdeckung schließen.
10. Weitere Informationen dazu, ob das Flugzeug den empfohlenen Schwerpunkt hat, siehe im
Abschnitt zum Schwerpunkt.
Top view Top view
Page 2
Des Weiteren wird im Abschnitt „Die primären Flug-Steuerungen“ des im Lieferumfang des X-Vert enthaltenen Handbuchs die Rotationsrichtung der Gierachse im Multi-Rotor-Flugmodus
inkorrekt angezeigt. Im unten stehenden Diagramm ist die korrekte Rotationsrichtung der Gierachse in Übereinstimmung mit den eingehenden Ruder-Steuersignalen angegeben.
Seitenruder
Gieren nach rechts Gieren nach links
Seitenruder nach rechts Seitenruder nach links
La section «Installation de la batterie et armement du variateur de vitesse» du manuel inclus avec l’appareil X-Vert donne des informations erronées sur les réglages du trim des gaz à
FR
l’étape 1 lors de l’allumage de l’émetteur et de l’appareil. Les bons réglages sont donnés ci-dessous:
Installation
1. Abaissez entièrement la manette des gaz.
2. Centrez le trim des gaz.
3. Baissez le manche et le trim des gaz aux niveaux les plus bas. Allumez l’émetteur, puis
attendez environ 5 secondes.
4. Ouvrez la trappe de batterie.
5. Mettez le côté en forme de boucle (côté souple) du crochet et la bande à boucle sur la
partie inférieure de votre batterie et le côté en forme de crochet sur le support de batterie.
Utilisez suffi samment de crochets et de bande pour vous assurer que la batterie est bien
maintenue et que la fi xation résistera même aux acrobaties aériennes les plus violentes.
REMARQUE : En cas d’utilisation de crochets ou de bandes inappropriés, la batterie pourrait
être déplacée ou éjectée en vol. Tout mouvement de la batterie en vol peut provoquer une
modifi cation du centre de gravité et une perte de contrôle.
6. Placez la batterie entièrement chargée au centre du compartiment de batterie.
7. Raccordez le câble de la batterie au câble d’alimentation de l’appareil en respectant bien
la polarité.
ATTENTION: Un raccordement de la batterie au câble d’alimentation de l’appareil avec une
polarité inversée endommagera le contrôleur de vol et la batterie. Les dégâts résultants d’un
mauvais raccordement de la batterie ne sont pas pris en charge dans le cadre de la garantie.
8. Lors du démarrage de l’appareil, ce dernier doit être placé soit à la verticale sur son train
d’atterrissage, soit à l’horizontale sur le dos. Maintenez l’appareil immobile et à l’abri du vent,
ou le système de contrôle de vol ne démarrera pas.
ATTENTION: N’approchez pas les mains de l’hélice. Lorsqu’il est armé, le moteur fait
tourner l’hélice en réponse à tout mouvement d’accélération.
9. Fermez la trappe de batterie.
10. Consultez la section Centre de gravité pour vous assurer que le modèle est équilibré au
centre de gravité recommandé.
Ansicht
von oben
Ansicht
von oben
De plus, la section «Comprendre les commandes de vol principales» du manuel inclus avec l’appareil X-Vert affi chent de façon erronée la direction de rotation de lacet en mode de vol
multirotor. Le schéma ci-dessous illustre la bonne réponse de direction de rotation de lacet aux saisies de commande de gouverne de direction données.
Dérive
Lacet à droite
Manche de dérive
à droite
Vue du haut Vue du haut
Lacet à gauche
Manche de dérive
à gauche
Page 3

Il paragrafo “Installare la batteria e armare l’ESC” del manuale accluso all’aeromodello X-Vert riportava informazioni non corrette riguardanti le impostazioni del trim della manetta al pas-
IT
saggio 1 durante l’accensione della trasmittente e dell’aeromodello. Le impostazioni corrette sono indicate di seguito:
Installazione
1. Abbassare completamente la leva della manetta.
2. Portare la leva della manetta in posizione centrale.
3. Accendere la trasmittente, quindi aspettare circa 5 secondi.
4. Aprire lo sportello del vano batteria.
5. Applicare la parte soffi ce del nastro a strappo nella parte inferiore della batteria e la
parte adesiva nel portabatteria. Usare una quantità suffi ciente di materiale a strappo
per garantire che la batteria rimanga saldamente fi ssata al suo posto anche durante le
manovre acrobatiche più aggressive.
AVVISO: l’inosservanza di questa indicazione può far sì che la batteria si stacchi o venga proiettata fuori dal velivolo durante il volo. Lo spostamento della batteria durante il volo può causare la
variazione del centro di gravità e la perdita di controllo.
6. Installare la batteria completamente carica in posizione centrale nell’apposito scomparto.
7. Collegare il cavo della batteria al cavo di alimentazione del velivolo, facendo attenzione alla
polarità corretta.
ATTENZIONE: il collegamento della batteria al cavo di alimentazione del velivolo con la
polarità invertita causa danni al fl ight controller e alla batteria. I danni causati dal
collegamento errato della batteria non sono coperti dalla garanzia.
8. Affi nché l’inizializzazione si avvii, il velivolo deve trovarsi in posizione diritta sul carrello
d’atterraggio oppure in posizione orizzontale capovolto. Tenere il modello immobile e al
riparo dal vento, altrimenti può verifi carsi che il fl ight controller non si inizializzi.
ATTENZIONE: tenere sempre le mani lontano dall’elica. Quando è armato, il motore fa
girare l’elica in risposta a ogni movimento dell’acceleratore.
9. Chiudere lo sportello del vano batteria.
10. Consultare la sezione Baricentro per accertarsi che il baricentro del modello si trovi nel
punto indicato.
Inoltre, il paragrafo “Comprendere i principali comandi di volo” del manuale accluso all’aeromodello X-Vert visualizzava in modo non corretto il senso di rotazione dell’imbardata in modalità di volo multirotore. Lo schema seguente illustra il senso di rotazione corretto dell’imbardata in risposta agli input forniti dai comandi del timone.
Direzionale
Vista dall’alto Vista dall’alto
Imbardata a destra
Direzionale a destra Direzionale a sinistra
Imbardata a sinistra
©2017 Horizon Hobby, LLC.
E-fl ite and X-Vert are trademarks or registered trademarks of Horizon Hobby, LLC.
All other trademarks, service marks and logos are property of their respective owners.
Created 6/17 56261 EFL1800, EFL1850
 Loading...