

Page 1

Copies of the I/B. Please reproduce them without any
changes except under special instruction from Team
International BELGIUM. The pages must be reproduced
and folded in order to obtain a booklet A5 (+/- 148.5 mm
width x 210 mm height). When folding, make sure you
keep the good numbering when you turn the pages of
the I/B. Don’t change the page numbering. Keep the
language integrity.
Front cover page (first page)
Assembly page 1/34
Fax +32 2 359 95 50
Partygebäck-Maker
Party Pastries Maker
Appareil de cuisson de
gâteaux pour les fêtes
Partysnackmaker
Macchina per dolci
Орешница/Вафельница
I/B Version
050511
Art.-Nr. ZN 3
230V~ 700W
Page 2
Copies of the I/B. Please reproduce them without any
changes except under special instruction from Team
International BELGIUM. The pages must be reproduced
and folded in order to obtain a booklet A5 (+/- 148.5 mm
width x 210 mm height). When folding, make sure you
keep the good numbering when you turn the pages of
the I/B. Don’t change the page numbering. Keep the
language integrity.
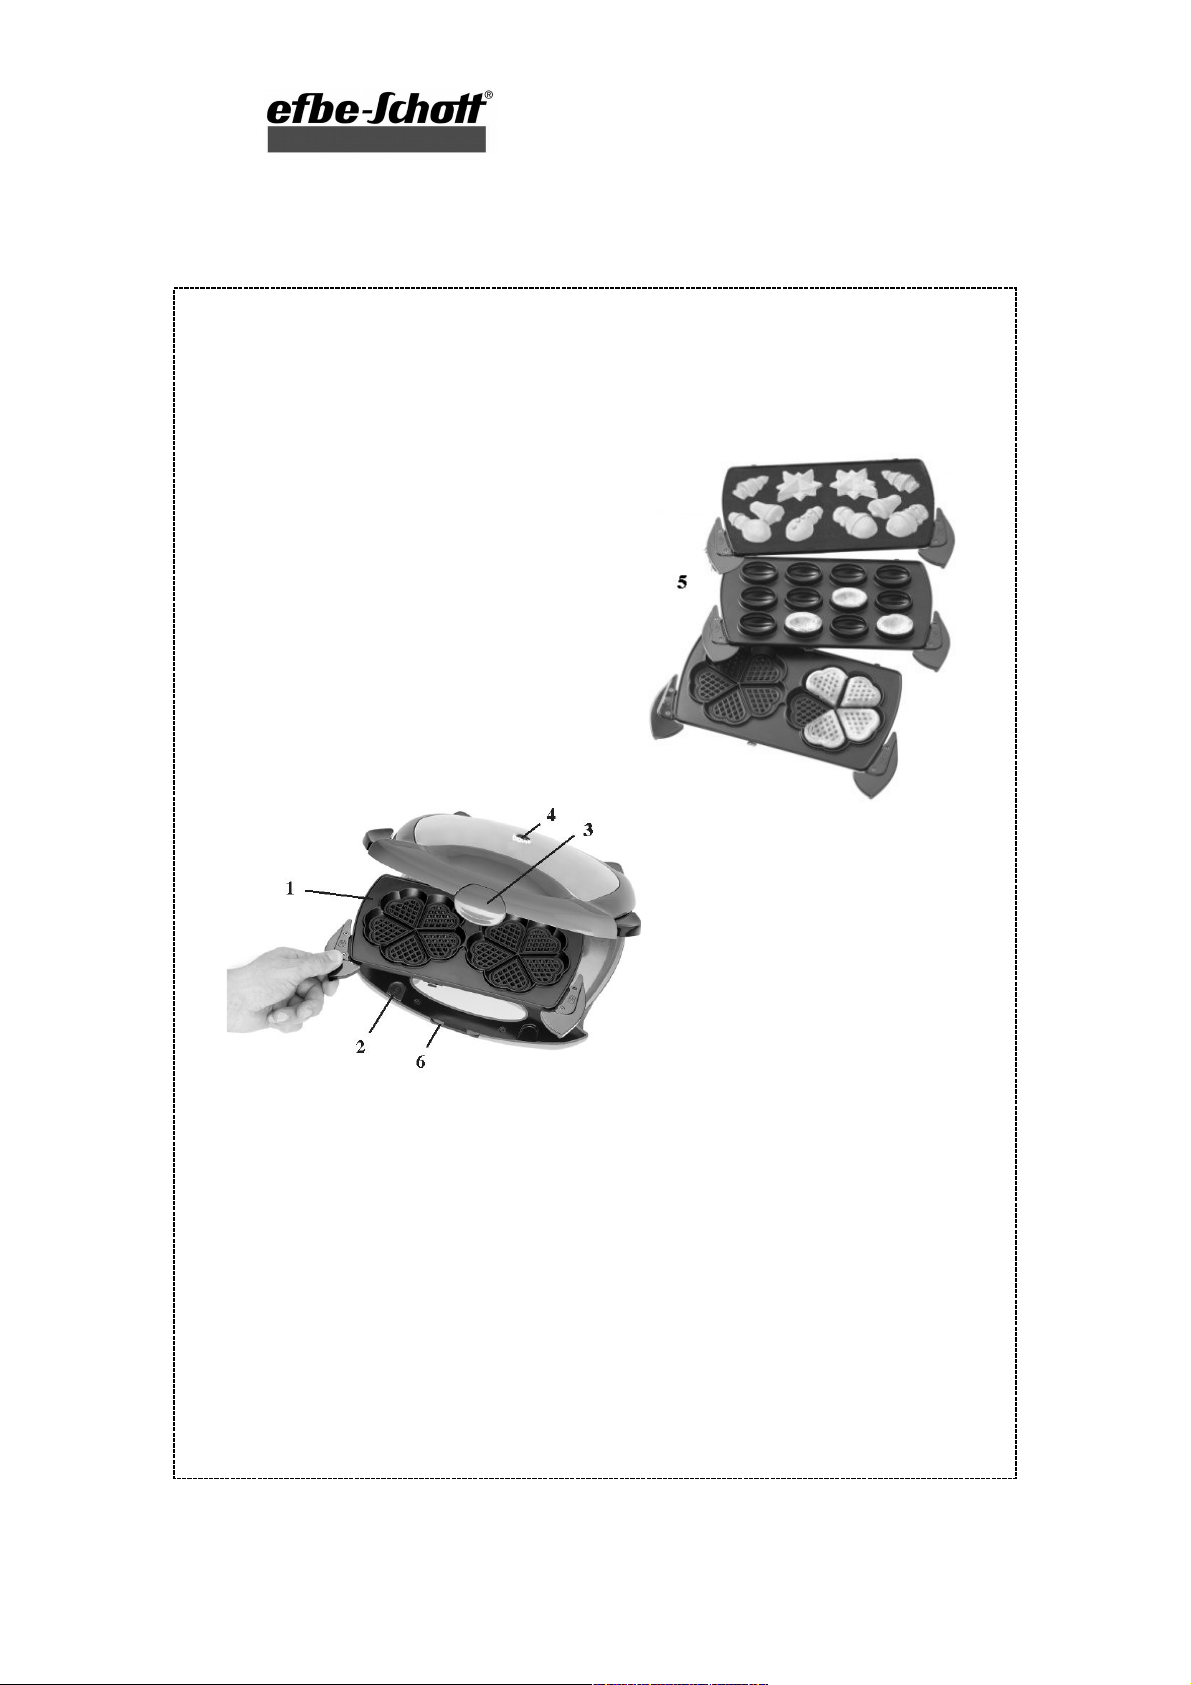
D
1. Wechselplatten im Gerät
2. Entarretierungstaste
3. Verschluss
4. Kontrolllampe
5. Wechselplatten
6. Griff
2
Assembly page 2/34
Fax +32 2 359 95 50
Page 3

Copies of the I/B. Please reproduce them without any
changes except under special instruction from Team
International BELGIUM. The pages must be reproduced
and folded in order to obtain a booklet A5 (+/- 148.5 mm
width x 210 mm height). When folding, make sure you
keep the good numbering when you turn the pages of
the I/B. Don’t change the page numbering. Keep the
language integrity.
GB
1. Baking plates in the appliance
2. Release button
3. Locking clip
4. Pilot light
5. Spare baking plates
6. Handle
F
1. Plaques de cuisson dans
l'appareil
2. Bouton de déverrouillage
3. Loquet de fermeture
4. Témoin lumineux
5. Plaques de rechange
6. Poignée
NL
1. Bakplaten in het toestel
2. Ontgrendelingsknop
3. Sluitingsclipje
4. Controlelampje
5. Wisselplaten
6. Handvat
I
1. Piastre
2. Pulsante per estrazione delle
piastre
3. Gancio di chiusura
4. Spia luminosa
5. Piastre di ricambio
6. Maniglia
RU
1. Сменные панели в приборе
2. Клавиша для смены панелей
3. Затвор
4. Индикатор выпекания
5. Сменные панели
6. Ручка
Herzlichen Glückwunsch zum Kauf Ihres neuen Gerätes. Wir freuen uns, dass Sie sich für dieses
Produkt entschieden haben, und bedanken uns für Ihr Vertrauen. Damit Sie viel Freude an
Ihrem neuen Gerät haben, bitten wir Sie, die nachfolgenden Hinweise sorgfältig zu beachten
sowie diese Bedienungsanleitung gut aufzubewahren und an den jeweiligen Benutzer
weiterzugeben.
Mit diesem Gerät können Sie wohlschmeckendes Gebäck, Waffeln, süße aber auch pikante
Snacks für Ihre Feiern im Familienkreis, mit Freunden zubereiten.
Damit Sie mit Ihrer „Zaubernuss“ viel Freude haben, lesen Sie bitte die nachfolgende
Gebrauchsanweisung sorgfältig durch.
WICHTIGE SICHERHEITSVORSCHRIFTEN
Kontrollieren Sie, ob die Netzspannung mit der auf dem Gerät vermerkten Spannung
übereinstimmt bevor Sie das Gerät benutzen.
Lassen Sie Ihr Gerät niemals bei Gebrauch unbeaufsichtigt. Halten Sie Kinder oder
hilfsbedürftige Personen vom Gerät fern.
Überprüfen Sie regelmäßig, ob die Anschlussleitung nicht beschädigt ist. Bei Beschädigung
der Anschlussleitung oder des Gerätes letzteres nicht benutzen. Eine beschädigte
Anschlussleitung sollte von einem Fachmann
(*)
ausgewechselt werden.
Benutzen Sie das Gerät nur zu Haushaltszwecken, wie in der Bedienungsanleitung
angegeben.
Tauchen Sie das Gerät niemals in Wasser oder andere Flüssigkeiten, weder zum Reinigen,
noch zu einem anderen Zweck. Geben Sie das Gerät niemals in die Spülmaschine.
Benutzen Sie das Gerät nicht in der Nähe einer Wärmequelle. Stellen Sie das Gerät nicht
auf heiße Flächen (z.B. Herdplatten) oder in die Nähe von offenen Flammen.
Entfernen Sie den Stecker aus der Steckdose bevor Sie das Gerät reinigen.
Für Reparaturen wenden Sie sich an einen Fachmann
(*)
.
3
Assembly page 3/34
Fax +32 2 359 95 50
Page 4

Copies of the I/B. Please reproduce them without any
changes except under special instruction from Team
International BELGIUM. The pages must be reproduced
and folded in order to obtain a booklet A5 (+/- 148.5 mm
width x 210 mm height). When folding, make sure you
keep the good numbering when you turn the pages of
the I/B. Don’t change the page numbering. Keep the
language integrity.
Benutzen Sie das Gerät nicht im Freien und bewahren Sie es an einem trockenen Platz auf.
Benutzen Sie nur Zubehör, welches vom Lieferanten empfohlen wurde. Anderes Zubehör
stellt eine Gefahr für den Benutzer dar und das Gerät könnte dadurch beschädigt
werden. Benutzen Sie das Gerät auf keinen Fall, wenn es sichtbare bzw. erkennbare
Beschädigungen aufweist.
Ziehen Sie niemals an der Anschlussleitung, um das Gerät zu bewegen. Achten Sie darauf,
dass die Anschlussleitung nicht irgendwo hängen bleibt und dies zum Fall des Gerätes
führen könnte. Wickeln Sie die Anschlussleitung nicht um das Gerät oder knicken Sie diese
nicht.
Stellen Sie das Gerät auf einen Tisch oder auf eine ebene Fläche damit es nicht umfällt.
Achten Sie darauf, dass das Gerät vollständig erkaltet ist bevor Sie es reinigen oder
wegräumen.
Achten Sie darauf, dass die Anschlussleitung nicht mit den heißen Teilen des Gerätes in
Kontakt kommt.
Achten Sie darauf, dass das Gerät sehr heiß werden kann. Berühren Sie das Gerät
während des Betriebes nur an den Handgriffen.
Achten Sie darauf, dass die heißen Teile während des Backvorganges nicht mit leicht
entflammbarem Material, wie Gardinen, Tischdecken, usw. in Berührung kommen.
Brandgefahr!
Vor dem ersten Gebrauch wischen Sie bitte die Backplatten mit einem feuchten Tuch
sorgfältig aus und trocknen sie hinterher sorgfältig ab. Tauchen Sie bitte das Gerät nie in
Wasser oder andere Flüssigkeiten, weder zum Reinigen, noch zum anderen Zweck. Geben
Sie das Gerät niemals in die Spülmaschine.
Zur Reinigung verwenden Sie bitte keine metallischen oder spitzen Gegenstände.
Beachten Sie, dass Kratzer in der Antihaftbeschichtung die Eigenschaften des Gerätes
negativ beeinflussen.
Benutzen Sie einen Holzspatel oder einen wärmebeständigen Plastikspatel, um die
Nahrung aus dem Gerät zu nehmen.
Ziehen Sie den Stecker aus der Steckdose, wenn das Gerät nicht benutzt wird, da das
Gerät keinen An-/Aus-Schalter besitzt.
Bereiten Sie nur Nahrungsmittel zu, die zum Backen und zum Verzehr geeignet sind.
(*)
Fachmann: anerkannter Kundendienst des Lieferanten oder des Importeurs, der für derartige
Reparaturen zuständig ist. Für eventuelle Reparaturen wenden Sie sich bitte an diesen
Kundendienst.
INBETRIEBNAHME
Während des ersten Gebrauchs kann es durch die Antihaft-Beschichtung zu leichter
Rauchentwicklung kommen. Dies stellt jedoch keine Gefahr dar für den Benutzer und
weist auch nicht auf einen Defekt am Gerät hin. Nach ca. 30 Sekunden entsteht kein
Rauch mehr und Sie können das Gerät ungehindert weiter benutzen. Dieser Rauch ist
NICHT schädlich.
Vor dem ersten Gebrauch sind die Platten mit einem feuchten Tuch zu reinigen. Die
Antihaft-Beschichtung der Platten macht das Einreiben mit Butter, Öl oder Fett nicht
unbedingt notwendig.
Legen Sie die gewünschten Platten in das Gerät, indem Sie auf die Taste 2 in der
Nähe des Handgriffs (6) drücken.
Schließen Sie das Gerät, stecken die Anschlussleitung in die Steckdose und heizen es
auf.
Die Kontrolllampe (4) leuchtet und zeigt an, dass das Gerät funktioniert, das heißt, es
heizt sich auf.
Sobald die richtige Back-End-Temperatur erreicht wird, erlischt die Kontrolllampe.
4
Assembly page 4/34
Fax +32 2 359 95 50
Page 5

Copies of the I/B. Please reproduce them without any
changes except under special instruction from Team
International BELGIUM. The pages must be reproduced
and folded in order to obtain a booklet A5 (+/- 148.5 mm
width x 210 mm height). When folding, make sure you
keep the good numbering when you turn the pages of
the I/B. Don’t change the page numbering. Keep the
language integrity.
Achtung! Während des Gebrauchs wird das Gerät heiß, berühren sie es nur am
Griff(6).
Gebrauch als Waffelautomat
Öffnen Sie das aufgeheizte Gerät (lösen Sie dazu die Griffverriegelung 3).
Füllen Sie den Waffelteig in die Mitte das Waffelautomaten und schließen Sie den Deckel.
Drücken Sie den Deckel einen Moment fest herunter, damit sich der Teig gleichmässig
verteilt. Füllen Sie nicht zuviel Teig ein, dieser läuft ansonsten an den Seiten heraus.
Backen Sie die Waffeln je nach gewünschtem Bräunungsgrad ca. 3 Minuten. Wenn die
Waffel fertig ist, nehmen Sie diese bitte mit einem Kunststoffspachtel heraus. Benutzen Sie
keine scharfen oder spitzen Gegenstände, da ansonsten die Beschichtung der Backfläche
beschädigt werden kann.
Nach Beendigung des Backens ziehen Sie den Netzstecker.
WAFFELREZEPTE
SANDWAFFELN
200 g Butter
200 g Zucker
4 Eier
1 geriebene Zitronenschale
Salz
200 g Weizenmehl
HEFEWAFFELN
25 g Hefe
¼ l Milch
125 g Butter
50 g Zucker
6 Eier
1 geriebene Zitronenschale
Salz
375 g Weizenmehl
EINFACHE WAFFELN MIT BACKPULVER
125 g Butter
150 g Zucker
1 geriebene Zitronenschale
Salz
3 Eier
¼ l Milch
250 g Mehl
1 Teelöffel Backpulver
KNUSPRIGE WAFFELN
200 g Margarine
150 g Zucker
4 Eier
350 g Mehl
1 Esslöffel Rum
1 Päckchen Vanillezucker
½ Päckchen Backpulver
ca. 150-200 ml Wasser (keine Milch)
APFELWAFFELN
150 g Margarine oder Butter
200 g Zucker
4 Eier
½ Teelöffel Salz
250 g Mondamin (Stärkemehl)
1 gestr. Teelöffel Backpulver
1 gestr. Teelöffel Zimt
1 Messerspitze geriebene Nelken
2 in kleine Würfel geschnittene Äpfel
Gebrauch zum Herstellen von Zaubernüssen oder Hohlkörperfiguren
Öffnen Sie das aufgeheizte Gerät (lösen Sie dazu die Griffverriegelung 3).
Füllen Sie jetzt den Teig in die unteren Aussparungen des Partygebäck-Makers (Rezepte
finden Sie beiliegend). Achten Sie darauf, nicht zu viel Teig einzufüllen, da dieser sonst an
5
Assembly page 5/34
Fax +32 2 359 95 50
Page 6

Copies of the I/B. Please reproduce them without any
changes except under special instruction from Team
International BELGIUM. The pages must be reproduced
and folded in order to obtain a booklet A5 (+/- 148.5 mm
width x 210 mm height). When folding, make sure you
keep the good numbering when you turn the pages of
the I/B. Don’t change the page numbering. Keep the
language integrity.
den Seiten herausläuft. Am besten ist es, wenn Sie den Teig zu kleinen Kugeln rollen und in
die Öffnungen geben.
Klappen Sie den Deckel herunter und schließen Sie den Verschluss(3).
Nach ca. 3 Minuten ist der Teig fertig gebacken. Nun öffnen Sie den Deckel und
entnehmen mit einem geeigneten Gegenstand (Achtung: kein Metall) die fertig
gebackenen Teiglinge.
Den entstandenen Grad entfernen Sie vorsichtig mit einem Messer.
Nach dem Erkalten füllen Sie diese nun mit der entsprechenden Füllung, bestreichen die
Ränder mit der Füllung und fügen die beiden Hälften zusammen.
Unser so entstandenes Partygebäck hat die Form einer Nuss. Wir haben deshalb dem
Partygebäck-Maker auch den Namen „Zaubernuss“ gegeben. Verfahren Sie in gleicher
Vorgehensweise zum Herstellen der anderen Hohlkörperfiguren.
ANREGUNGEN UND REZEPTE
Wir empfehlen Ihnen die nachfolgenden Gebäckmischungen. Ihrem Erfindungsreichtum und
Ihrer Kreativität wollen wir damit keine Grenzen setzen.
Allgemeines Rezept für den Teig:
Zutaten: 400g Mehl
100g Zucker
250g Margarine
2 Eier
¼ TL Backpulver
1Päck. Vanillezucker
6
Assembly page 6/34
Fax +32 2 359 95 50
Page 7

Copies of the I/B. Please reproduce them without any
changes except under special instruction from Team
International BELGIUM. The pages must be reproduced
and folded in order to obtain a booklet A5 (+/- 148.5 mm
width x 210 mm height). When folding, make sure you
keep the good numbering when you turn the pages of
the I/B. Don’t change the page numbering. Keep the
language integrity.
Zubereitung: 1. Margarine, Zucker und Eier verrühren
2. Backpulver und Vanillezucker mit Mehl vermischen
3. Alles gut durchkneten
Rezept für den süßen Teig:
Zutaten: 500-600g Mehl
220g Zucker
200g weiche Butter oder Margarine
200g Schmant
1 Ei, 2 Eiweiße
1 TL Backpulver
1Päck. Vanillezucker
Zubereitung: 1. Butter, Zucker, 1 Ei, Vanillezucker gut verrühren und 2 Eiweiße dazugeben
2. Schmant unterrühren
3. Das Mehl mit dem Backpulver vermischen und mit der Butter-/Zucker-mischung
zu einem Teig kneten
Rezept für den salzigen Teig:
Zutaten: 200g Mehl
125g Margarine
1 Ei
¼ TL Backpulver
1Prise Zucker
3 Messerspitzen Salz
Zubereitung: 1. Ei, Salz, Zucker mit der weichen Margarine verrühren
2. Mehl und Backpulver vermischen
3. Alles gut durchkneten
Ihre selbst gebackenen Zaubernüsse können Sie mit den verschiedensten Zutaten füllen, z.B.
Marmelade, Schlagsahne, Nougatcreme, süßem Quark, Apfelmus, Vanillecreme, Buttercreme,
Honig, Pudding, kleine Beerenfrüchte, Karamell, Käsecremes.
Durch Zugabe von Rosinen, Mandeln, u.a. können Sie die Füllungen geschmacklich verfeinern.
Weitere Tipps:
Herstellung von Weihnachtsschmuck: Legen Sie vor dem Verkleben der Nusshälften einen
Faden zwischen diese. Dann wickeln Sie die „Zaubernüsse“ in Silber- oder Goldfolie und
hängen sie mit Hilfe des Fadens an den Weihnachtsbaum.
Für Kindergeburtstage: Stellen Sie Schüsseln mit verschiedenen Zutaten in die Mitte des Tisches.
Die Kinder können sich die mit Hilfe eines Erwachsenen zubereiteten Nüsse selbst füllen.
Genauso könnte dieses Gerät auch Ihre Party beleben.
Man kann natürlich die Teighälften auch füllen ohne Sie anschließend zusammenzufügen. Auf
diese Art kann man kleine Appetitshäppchen aber auch Dekorationen für das Büffet gestalten.
7
Assembly page 7/34
Fax +32 2 359 95 50
Page 8

Copies of the I/B. Please reproduce them without any
changes except under special instruction from Team
International BELGIUM. The pages must be reproduced
and folded in order to obtain a booklet A5 (+/- 148.5 mm
width x 210 mm height). When folding, make sure you
keep the good numbering when you turn the pages of
the I/B. Don’t change the page numbering. Keep the
language integrity.
REINIGUNG UND PFLEGEHINWEISE
Gerät vom Netz trennen und das Gerät und die Platten abkühlen lassen bevor sie
gereinigt werden.
Wischen Sie die Außenseite mit einem feuchten Tuch ab, und vergewissern Sie sich dass
keine Feuchtigkeit, Öl oder Fett in das Gerät dringt.
Um die Platten zu reinigen, können Sie diese entweder in dem Gerät lassen oder sie
herausnehmen (dafür drücken Sie auf die Taste 2 in der Nähe des Handgriffs und
entfernen Sie diese). Wenn Sie sie in dem Gerät lassen, reinigen Sie sie nur mit einem Tuch
oder Küchenpapier. Wenn Sie sie aus dem Gerät entfernen, können Sie sie unter
fließendem Wasser reinigen. Trocknen Sie sie gut ab. Geben Sie die Platten niemals in die
Spülmaschine.
Niemals mit metallenen Gegenständen reinigen oder Schleif- und Scheuermittel
verwenden.
Gerät nicht in Wasser oder andere Flüssigkeiten tauchen.
KUNDENDIENST
efbe Elektrogeräte GmbH
Gustav-Töpfer-Straße 6
07422 Bad Blankenburg / Thüringen
Deutschland
Tel : Deutschland 036741 70268 International 0049 36741 70268
Fax: Deutschland 036741 70227 International 0049 36741 70227
8
Assembly page 8/34
Fax +32 2 359 95 50
Page 9

Copies of the I/B. Please reproduce them without any
changes except under special instruction from Team
International BELGIUM. The pages must be reproduced
and folded in order to obtain a booklet A5 (+/- 148.5 mm
width x 210 mm height). When folding, make sure you
keep the good numbering when you turn the pages of
the I/B. Don’t change the page numbering. Keep the
language integrity.
Congratulations on the purchase of your new appliance. We are pleased with your decision to
buy this product and thank you for your trust. In order to get the most out of your appliance,
we ask you to read this instruction manual carefully and to keep it in order to pass it on to any
user of this appliance.
With this appliance you can prepare tasty pastries, waffles, salty or sweet snacks with our family
and friends. To get the most out of your new "Miracle Nut" Party Pastries Maker please read the
following instructions carefully.
IMPORTANT SAFEGUARDS
Check that your mains voltage corresponds to that stated on the appliance.
Never leave the appliance unsupervised when in use. Keep out of reach of children or
incompetent persons.
From time to time check the cord for damages. Never use the appliance if cord or
appliance shows any signs of damage. Should the cord be damaged, it must be
replaced by a competent qualified electrician
(*)
.
Only use the appliance for domestic purposes and in the way indicated in these
instructions.
Never immerse the appliance in water or any other liquid for any reason whatsoever.
Never place it into the dishwasher.
Never use the appliance near hot surfaces. Do not put the appliance on a hot surface
(e.g. cooking plate) or near a flame.
Before cleaning, always unplug the appliance from the power supply.
All repairs should be made by a competent qualified electrician
(*)
.
Never use the appliance outside and always place it in a dry environment.
Never use accessories which are not recommended by the producer. They could
constitute a danger to the user and risk to damage the appliance. Never use the
appliance if it shows visible damages.
Never move the appliance by pulling the cord. Make sure the cord cannot get caught in
any way. Do not wind the cord around the appliance and do not bend it.
Stand the appliance on a table or flat surface.
Make sure the appliance has cooled down before cleaning and storing it.
Make sure the cord never comes into
The temperature of the accessible surfaces may be very high when the appliance is in
use. Never touch the hot parts of the appliance, make use of the handles.
Make sure the appliance never comes into contact with inflammable materials, such as
curtains, cloth, etc…when it is in use, as a fire might occur.
Before use, wipe the baking plates with a damp cloth and dry thoroughly. Never immerse
the appliance in water or any other liquid, neither to clean it, nor for any reason
whatsoever. Never put the appliance in the dishwasher.
Never use scratching objects to clean the appliance, as these could damage the non-
stick coating of the baking plates.
Use a wooden spatula or a heat resistant plastic spatula to take the food out of the
appliance.
Always unplug the appliance when it is not in use, especially since it is not equipped with
an on/off switch.
Only use the appliance for food that is supposed to be cooked.
(*)
Competent qualified electrician: after sales department of the producer or importer or any
person who is qualified, approved and competent to perform this kind of repairs in order to
avoid all danger. In any case you should return the appliance to this electrician.
9
Assembly page 9/34
Fax +32 2 359 95 50
Page 10

Copies of the I/B. Please reproduce them without any
changes except under special instruction from Team
International BELGIUM. The pages must be reproduced
and folded in order to obtain a booklet A5 (+/- 148.5 mm
width x 210 mm height). When folding, make sure you
keep the good numbering when you turn the pages of
the I/B. Don’t change the page numbering. Keep the
language integrity.
UK STYLE PLUG WIRING INSTRUCTIONS (IN THE UK ONLY)
This product must only be used from a 13 amp power socket. If a BS1363 approved 13 amp
plug is used, it should be fitted with a 13 amp fuse. The wires on the power cord are colour
coded:
blue = neutral, brown = live, green or green & yellow = earth.
The blue wire must be connected to the terminal marked N or coloured in black.
The brown wire must be connected to the terminal marked L or coloured in red.
The green (& yellow) wire must be connected to the terminal marked E or coloured in green (&
yellow).
USE
Protective coating burn off will cause smoking on first use. However, this does not indicate
any defect of the appliance. After about 30 seconds the smoke will disappear and you
will be able to use the appliance normally. This smoke is NOT harmful.
When using for the first time, wipe the surface of the plates with a damp cloth, then dry. You
may season the plates with butter, margarine or cooking fat. Since the appliance has a
non-stick surface, the use of butter or oil is optional.
Place the desired plates in the appliance by pressing the button 2 near the handle (6).
Close the appliance, plug it in and let it heat.
The pilot light (4) will indicate that the appliance is working, i.e. that it is heating.
The pilot light will go out when the cooking temperature is reached.
Caution: during operation, the appliance becomes hot, only touch its handle (6).
Waffle maker mode
Open the heated appliance (to do so, release the locking clip 3)
Pour dough evenly onto the bottom grid but not all the way to the edges. Then close the
appliance. Press the lid down for a short moment so that the dough spreads evenly. Do
not overfill as the dough might come out through the sides of the appliance.
Bake until golden brow, about 3 minutes. When the waffles are ready, remove them with a
wooden or heat resistant plastic spatula. Never use sharp objects as these could damage
the non-stick coating.
When you have finished baking, unplug the cord from the outlet and leave the grids open
to cool.
WAFFLE RECIPES
SHORTBREAD WAFFLES
200 g butter
200 g sugar
4 eggs
twist of lemon
200 g plain flour
YEAST WAFFLES
25 g yeast
¼ l milk
125 g butter
50 g sugar
6 eggs
twist of lemon
pinch of salt
375 g plain flour
10
Assembly page 10/34
Fax +32 2 359 95 50
Page 11

Copies of the I/B. Please reproduce them without any
changes except under special instruction from Team
International BELGIUM. The pages must be reproduced
and folded in order to obtain a booklet A5 (+/- 148.5 mm
width x 210 mm height). When folding, make sure you
keep the good numbering when you turn the pages of
the I/B. Don’t change the page numbering. Keep the
language integrity.
TRADITIONAL WAFFLES
125 g butter
150 g sugar
twist of lemon
pinch of salt
3 eggs
¼ l milk
250 g plain flour
1 tsp baking powder
CRISP WAFFLES
200 g butter
150 g sugar
4 eggs
350 g plain flour
1 dsp rum
few drops vanilla essence
150-200 ml water (not milk)
APPLE WAFFLES
150 g butter
200 g sugar
4 eggs
1 tsp baking powder
250 g plain flour
pinch of salt
small pinch of ground cloves
1 tsp cinnamon
2 apples peeled and diced
Making party pastries
Open the heated appliance (to do so, release the locking clip 3)
Pour dough evenly onto the lower party pastries plate (for recipes, see below). Do not
overfill as the dough might come out through the sides of the appliance. For best results
we advise you to roll the dough into small balls and to put these in the notches of the
plate.
Close the lid and the locking clip (3).
Slightly grease the baking surfaces (top and bottom). You can remove the pastries easier.
Plug in the appliance. The appliance starts heating. There are two lamps. Red: Mains
voltage is fed/appliance is heating. Green: You can use the appliance. This means when
the green lamp lights, you can fill dough.
Open the appliance (release the grip lock).
The appliance needs about 3 minutes to bake the dough. Open the cover and remove
the baked snacks with a suitable tool (Caution! No metal tool.)
Carefully remove the dough around the rims with a knife.
Allow the snacks to cool, then fill and put the halves together.
The pastries are shaped like nuts. This explains why we named it "miracle nut"
RECOMMENDATIONS AND RECIPES
We recommend the following pastries. Of course there are no limits to your own imagination
and creative mind.
Recipe for the dough:
Ingredients: 400 g flour
100 g sugar
250 g margarine
2 eggs
1/4 teaspoonful baking powder
1 bag vanilla sugar
11
Assembly page 11/34
Fax +32 2 359 95 50
Page 12

Copies of the I/B. Please reproduce them without any
changes except under special instruction from Team
International BELGIUM. The pages must be reproduced
and folded in order to obtain a booklet A5 (+/- 148.5 mm
width x 210 mm height). When folding, make sure you
keep the good numbering when you turn the pages of
the I/B. Don’t change the page numbering. Keep the
language integrity.
Preparation: 1. Mix the margarine, sugar and eggs
2. Mix baking powder, vanilla sugar and flour
3. Knead everything thoroughly
Recipe for sweet dough:
Ingredients: 500-600 g flour
220 g sugar
200 g margarine or butter
200 g cream
1 egg, 2 egg whites
1teaspoon of baking powder
1 bag vanilla sugar
Preparation: 1. Mix the margarine, 1 egg and vanilla sugar thoroughly and add 2 egg whites
2. Add the cream and mix.
3. Mix the baking powder with the flour and add it to the dough, together with
the mixture of butter and sugar.
Recipe for salty dough:
Ingredients: 200 g flour
125 g margarine
1 egg
1/4 teaspoonful baking powder
1 pinch of sugar
3 pinches of salt
Preparation: 1. Mix the egg, salt and sugar with the melted margarine
2. Mix flour and baking powder
3. Knead everything thoroughly
You can fill the miracle nuts with different fillings, e.g., jam, cream, nougat cream, sweet curd,
apple puree, vanilla cream, honey, pudding, small berries, caramel, cheese cream.
Refine the filling with almonds, raisins, and the like.
More tips:
Christmas ornaments: Place a thread between the half nuts before putting them together.
Then wrap the nuts in silver or gold foil and use them as decoration on your Christmas tree.
For you children's birthday parties: Place cups with different ingredients in the middle of a table
and then allow the children to fill their own "miracle nuts".
Similarly, you can use the appliance to add spice to your party.
Of course, you can fill and eat the half nuts as appetizers or decorate your cold buffet with
them.
12
Assembly page 12/34
Fax +32 2 359 95 50
Page 13

Copies of the I/B. Please reproduce them without any
changes except under special instruction from Team
International BELGIUM. The pages must be reproduced
and folded in order to obtain a booklet A5 (+/- 148.5 mm
width x 210 mm height). When folding, make sure you
keep the good numbering when you turn the pages of
the I/B. Don’t change the page numbering. Keep the
language integrity.
CLEANING
Before cleaning, unplug and wait for the appliance and the plates to cool down.
Wipe the outside with only a slightly moistened cloth ensuring that no moisture, oil or
grease enters the cooling slots.
To clean the plates you can let them in the appliance or remove them from the
appliance (therefore press on the button 2 near the handle and remove them. If you let
them in the appliance, wipe the plates with a damp cloth or towel. If you remove them
from the appliance, you can wash them under running water. Dry them afterwards. Never
place the plates into the dishwasher.
Do not clean the inside or outside with any abrasive scouring pad or steel wool as this will
damage the finish.
Do not immerse in water or any other liquid.
CUSTOMER SERVICE
efbe Elektrogeräte GmbH
Gustav-Töpfer-Straße 6
07422 Bad Blankenburg / Thüringen
Germany
Tel. : Germany 036741 70268 International 0049 36741 70268
Fax: Germany 036741 70227 International 0049 36741 70227
13
Assembly page 13/34
Fax +32 2 359 95 50
Page 14

Copies of the I/B. Please reproduce them without any
changes except under special instruction from Team
International BELGIUM. The pages must be reproduced
and folded in order to obtain a booklet A5 (+/- 148.5 mm
width x 210 mm height). When folding, make sure you
keep the good numbering when you turn the pages of
the I/B. Don’t change the page numbering. Keep the
language integrity.
Toutes nos félicitations pour l'achat de votre nouvel appareil. Nous sommes très heureux de
votre décision pour l’achat de ce produit et vous remercions pour votre confiance. Pour
profiter pleinement des plaisirs de cet appareil, veuillez suivre attentivement les instructions et
veuillez garder le mode d'emploi et le transmettre à tout autre utilisateur de cet appareil.
Avec cet appareil il vous sera possible de préparer de délicieux petits fours, gaufres et snacks
salés ou sucrés en famille ou entre amis.
Afin de profiter pleinement de votre appareil, veuillez lire la notice attentivement.
POUR VOTRE SÉCURITÉ
Avant d'utiliser l'appareil, vérifiez que la tension du réseau correspond bien à celle de
l'appareil.
Ne laissez jamais votre appareil sans surveillance lorsque celui-ci est en marche. Ne le
laissez ni à la portée des enfants ni à la portée de personnes non responsables.
Vérifiez de temps en temps si le cordon n’est pas endommagé. N'utilisez pas votre
appareil si le cordon ou l'appareil lui-même est endommagé de quelle que façon que ce
soit. Si le câble est endommagé, il doit être remplacé par un service qualifié compétent
(*)
.
N’utilisez l'appareil que pour des usages domestiques et de la manière indiquée dans la
notice.
Ne plongez jamais l'appareil dans l'eau ou dans tout autre liquide ni pour son nettoyage ni
pour toute autre raison. Ne le mettez jamais au lave-vaisselle.
N'utilisez pas l'appareil près de sources de chaleur. Ne le placez pas sur une surface
chaude (p. ex.: un réchaud) ni à proximité d'une flamme.
Débranchez l'appareil avant de le nettoyer.
Toute réparation doit être réalisée par un service qualifié compétent
(*)
.
Veillez à ne pas utiliser l'appareil à l'extérieur et entreposez-le dans un endroit sec.
Ne pas utiliser des accessoires non recommandés par le fabricant, cela peut présenter un
danger pour l’utilisateur et risque d’endommager l’appareil. N'utilisez pas l'appareil s'il y a
des dommages visibles.
Ne déplacez jamais l’appareil en tirant sur le câble. Veillez à ce que le cordon
d’alimentation ne puisse être accidentellement accroché et ce, afin d’éviter toute chute
de l’appareil. Evitez d’enrouler le cordon autour de l’appareil et ne le tordez pas.
Posez cet appareil sur une table ou un support suffisamment stable pour éviter sa chute.
Veuillez laisser refroidir votre appareil avant nettoyage et avant rangement.
Veillez à ce que le cordon n’entre pas en contact avec des surfaces chaudes de
l’appareil.
La température des surfaces accessibles peut être élevée lorsque l'appareil fonctionne.
Ne pas toucher les surfaces chaudes de l’appareil, faites usage des poignées.
Veillez à ce que l’appareil ne rentre pas en contact avec des matériaux facilement
inflammables comme les rideaux, les tissus,... lorsqu’il est en fonctionnement car le feu
pourrait se déclarer.
Avant l'utilisation nettoyez les plaques de cuisson avec un chiffon humide et séchez-les
soigneusement. N'immergez pas l'appareil dans l'eau ou tout autre liquide, ni pour son
nettoyage ni pour toute autre raison. Ne le mettez jamais au lave-vaisselle.
N'utilisez pas d'objets griffants afin de ne pas griffer le revêtement spécial des plaques de
cuisson car il perdrait alors son caractère anti-adhésif.
Utilisez une spatule en bois classique ou en plastique spécialement étudié pour résister à la
chaleur pour retirer la nourriture de l'appareil.
Débranchez votre appareil lorsqu’il n’est pas en utilisation d’autant qu’il ne comporte pas
d’interrupteur.
Ne faites cuire que des aliments appropriés à la cuisson et propres à la consommation.
14
Assembly page 14/34
Fax +32 2 359 95 50
Page 15

Copies of the I/B. Please reproduce them without any
changes except under special instruction from Team
International BELGIUM. The pages must be reproduced
and folded in order to obtain a booklet A5 (+/- 148.5 mm
width x 210 mm height). When folding, make sure you
keep the good numbering when you turn the pages of
the I/B. Don’t change the page numbering. Keep the
language integrity.
(*)
Service qualifié compétent: Service après vente du fabricant ou de l'importateur ou une
personne qualifiée, reconnue et habilitée à faire ce genre de réparation afin d'éviter tout
danger. Dans tous les cas, veuillez retourner l'appareil auprès de ce service.
UTILISATION
Lors de la première utilisation la couche anti-adhésive produira de la fumée. Cela
n'indique en aucun cas que l'appareil est défectueux. Après 30 secondes la fumée
s'estompera et vous pourrez utiliser votre appareil sans problème. Cette fumée n'est pas
nocive.
Lorsque vous utilisez votre appareil pour la première fois, essuyez-le avec un chiffon
humide. Les plaques étant anti-adhésives, l'utilisation de beurre est facultative mais vous
pouvez, si vous le souhaitez, les enduire de beurre, de margarine ou de toute autre graisse
de cuisson.
Placez les plaques que vous désirez utiliser dans l’appareil en appuyant sur le bouton
2 situé près de la poignée (6).
Fermez votre appareil, branchez-le et laissez-le chauffer.
Le témoin lumineux (4) s'allume, vous indiquant ainsi que l’appareil est en
fonctionnement et qu'il chauffe.
Lorsque la température est atteinte, le témoin s’éteint.
Attention, pendant l'utilisation, l'appareil chauffe, touchez uniquement la poignée
(6).
Fonction gaufrier
Ouvrez l'appareil chaud (à l'aide du loquet de fermeture (3)).
Déposez un peu de pâte au milieu de l’appareil et refermez-le. Serrez la poignée un
instant de façon à ce que la pâte se répartisse de manière uniforme sur la plaque de
cuisson. Ne mettez pas trop de pâte sinon celle-ci risque de déborder sur les côtés.
Faites cuire selon vos goûts (environ 3 minutes). Lorsque la gaufre est cuite, retirez-la
de l’appareil à l’aide d’une spatule en bois ou en plastique. N'utilisez pas d'ustensiles en
métal car ils pourraient endommager le revêtement anti-adhésif des plaques.
Lorsque vous avez terminé d’utiliser l’appareil, débranchez-le.
RECETTES
GAUFRES SABLÉES
200 g de beurre
200 g de sucre
4 œufs
1 zeste de citron
200 g de farine
GAUFRES À LEVURE
25 g de levure de bière
¼ l de lait
125 g de beurre
50 g de sucre
6 œufs
1 zeste de citron
sel
375 g de farine
GAUFRES TRADITIONNELLES
125 g de beurre
150 g de sucre
1 zeste de citron
sel
3 œufs
¼ l de lait
250 g de farine
1 c. à c. de levure
15
Assembly page 15/34
Fax +32 2 359 95 50
Page 16

Copies of the I/B. Please reproduce them without any
changes except under special instruction from Team
International BELGIUM. The pages must be reproduced
and folded in order to obtain a booklet A5 (+/- 148.5 mm
width x 210 mm height). When folding, make sure you
keep the good numbering when you turn the pages of
the I/B. Don’t change the page numbering. Keep the
language integrity.
GAUFRES CROUSTILLANTES
200 g de beurre
150 g de sucre
4 œufs
350 g de farine
1 c. à s. de rhum
1 sachet de sucre vanillé
1 sachet de levure
150-200 ml d’eau (pas de lait)
GAUFRES AUX POMMES
150 g de beurre
250 g de sucre
4 œufs
½ c. à c. de sel
250 g de maïzena
1 c. à c. de levure
1 petite pincée de clous de girofle moulus
1 pincée de cannelle
2 pommes épluchées et coupées en petits
cubes
Fonction gateaux pour les fêtes
Nettoyez les plaques de cuisson avec un tissu humide avant le premier emploi.
Remplissez maintenant la pâte dans les évidements de la plaque de cuisson des
gâteaux apéritifs (vous trouvez la recette plus loin dans ce mode d'emploi). Faites
attention de ne pas mettre trop de pâte, cele-ci pourrait couler sur les côtes. Cela
fonctionne au mieux lorsque vous roulez la pâte en petites boules et que vous les
introduisez dans les évidements.
Rabattez le couvercle et fermez le verrouillage (3).
Après environ 3 minutes, la pâte est entièrement cuite. Ouvrez alors le couvercle et
retirez la forme de pâte cuite finie avec un objet adéquat (Attention: pas d'objet en
métal).
Retirez prudemment la bavure survenue avec un couteau.
Remplissez alors les formes de pâte avec la farce après le refroidissement, enduisez
les rebords avec de la farce et assemblez deux moitiés entre-elles.
Notre gâteau ainsi réalisé à la forme d’une noix. Nous avons, de ce fait, donné le
nom de „Noix magique“ à notre appareil de cuisson de gâteaux pour les fêtes.
SUGGESTION ET RECETTES
Nous vous recommandons des mélanges de pâtes à gâteaux suivants. Nous ne voulons pas
ainsi limiter votre richesse en matière d’invention et votre créativité.
Recette générale pour la pâte:
Ingrédients: 400g de farine
100g de sucre
250g de margarine
2 œufs
¼ cuillère à café de levure chimique
1 paquet de sucre vanillé
Préparation: 1. Mélangez la margarine, le sucre et les oeufs.
2. Mélangez la levure chimique, le sucre vanillé et la farine
3. Malaxez le tout.
16
Assembly page 16/34
Fax +32 2 359 95 50
Page 17

Copies of the I/B. Please reproduce them without any
changes except under special instruction from Team
International BELGIUM. The pages must be reproduced
and folded in order to obtain a booklet A5 (+/- 148.5 mm
width x 210 mm height). When folding, make sure you
keep the good numbering when you turn the pages of
the I/B. Don’t change the page numbering. Keep the
language integrity.
Recette pour la pâte sucrée:
Ingrédients: 500-600g de farine
220g de sucre
200g de margarine ou de beurre
200g de crème
1 œuf et 2 blancs d'oeufs
1 cuillère à café de levure chimique
1 paquet de sucre vanillé
Préparation: 1. Mélangez le beurre, le sucre, l'oeuf et le sucre vanillé et ajoutez les 2 blancs
d'oeufs.
2. Ajoutez la crème et mélangez.
3. Mélangez la farine et la levure et malaxez avec le beurre afin d'obtenir une
pâte.
Recette pour la pâte salée:
Ingrédients: 200 g de farine
125g de margarine
1 œuf
¼ de cuillère à café de levure chimique
1 pincée de sucre
3 pincées de sel
Préparation: 1. Mélangez l'oeuf, le sucre le sel et la margarine ramollie.
2. Mélangez la farine et la levure.
3. Malaxez le tout
Vous pouvez remplir les noix magiques que vous avez cuites vous-même, avec les ingrédients
les plus divers, par exemple, de la marmelade, de la crême fraîche, de la crême de nougat,
du fromage blanc sucré, de la compote de pomme, de la crême à la vanille, de la crême au
beurre, du miel, du flan, des petits fruits de baies, du caramel, de le crême de fromage.
Par l’apport de raisins secs, d’amandes et autres, vous pouvez affiner les farces selon le goût.
Autres conseils:
Fabrications de décorations de Noël: Disposez, avant le collage de la moitié de la noix, un fil
entre celles-ci. Enroulez alors les „Noix magiques“ dans une feuille argentée ou dorée et
suspendez-la à l’aide du fil à un sapin de Noël.
Pour les anniversaires des enfants: Disposez des récipients avec différents ingrédients au milieu
de la table. Avec l’aide d’un adulte les enfants peuvent remplir eux-même une noix préparée.
Cet appareil peut animer votre réception de la même manière.
On peut naturellement remplir les moitiés de forme de pates sans les assembler. De cette
manière, on peut agencer le buffet avec de petits amuses-geules mais aussi avec des
décorations.
17
Assembly page 17/34
Fax +32 2 359 95 50
Page 18

Copies of the I/B. Please reproduce them without any
changes except under special instruction from Team
International BELGIUM. The pages must be reproduced
and folded in order to obtain a booklet A5 (+/- 148.5 mm
width x 210 mm height). When folding, make sure you
keep the good numbering when you turn the pages of
the I/B. Don’t change the page numbering. Keep the
language integrity.
NETTOYAGE
Veuillez retirer la fiche de la prise de courant et attendre que l’appareil et les plaques
refroidissent totalement avant de les nettoyer.
Essuyez l’extérieur de l’appareil à l’aide d’un chiffon légèrement humide, en vous assurant
que l'humidité, l’huile ou la graisse ne s’infiltre pas dans les aérations de refroidissement de
l’appareil.
Pour nettoyer les plaques, vous pouvez soit les laisser dans l’appareil, soit les enlever (pour
cela appuyez sur le bouton 2 situé près de la poignée et enlevez-les. Si vous les laissez
dans l’appareil, nettoyez les plaques à l’aide de papier absorbant ou d’un chiffon doux. Si
vous les enlevez de l’appareil, vous pouvez les laver à l’eau courante. Séchez-les bien. Ne
le mettez jamais au lave-vaisselle.
Ne nettoyez jamais votre appareil (extérieur et intérieur) à l’aide de produits abrasifs car
cela abîmerait le revêtement.
N’utilisez pas d’ustensiles métalliques ou pointus car ils pourraient endommager le
revêtement anti-adhésif de l’appareil.
N'IMMERGEZ PAS L'APPAREIL DANS L'EAU OU TOUT AUTRE LIQUIDE.
SERVICE CLIENTELE
efbe Elektrogeräte GmbH
Gustav-Töpfer-Straße 6
07422 Bad Blankenburg / Thüringen
Allemagne
Tel. : Allemagne 036741 70268 International 0049 36741 70268
Fax : Allemagne 036741 70227 International 0049 36741 70227
18
Assembly page 18/34
Fax +32 2 359 95 50
Page 19

Copies of the I/B. Please reproduce them without any
changes except under special instruction from Team
International BELGIUM. The pages must be reproduced
and folded in order to obtain a booklet A5 (+/- 148.5 mm
width x 210 mm height). When folding, make sure you
keep the good numbering when you turn the pages of
the I/B. Don’t change the page numbering. Keep the
language integrity.
Hartelijk gefeliciteerd met de aankoop van uw nieuw toestel. Wij verheugen ons zeer dat
besloten hebt dit product te kopen en dank u voor uw vertrouwen. Wij raden u aan volgende
instructies aandachtig te lezen zodat u zo veel mogelijk van de vreugdes van dit toestel kunt
genieten. Hou deze gebruiksaanwijzing goed bij en geef ze door aan elke gebruiker van dit
toestel.
Met dit toestel kunt u lekkere gebakjes, wafels of zoete of zoute snackjes toebereiden met
familie en vrienden.
Opdat u volop zou kunnen genieten van de vreugdes van dit toestel, is het noodzakelijk dat u
volgende instructies aandachtig leest.
BELANGRIJKE VEILIGHEIDSVOORSCHRIFTEN
Controleer of de netspanning overeenkomt met deze van het toestel vooraleer u het
gebruikt.
Laat uw toestel tijdens het gebruik nooit zonder toezicht. Houd het toestel buiten het
bereik van kinderen of van ontoerekeningsvatbare personen.
Controleer regelmatig of het snoer niet beschadigd is. Gebruik het toestel niet indien het
snoer of het toestel zelf enige beschadiging zouden vertonen. Een beschadigd snoer
dient te worden vervangen door een bekwame gekwalificeerde dienst
(*)
.
Gebruik het toestel enkel voor huishoudelijk gebruik en op de wijze zoals vermeld in de
gebruiksaanwijzing.
Dompel het toestel nooit onder in water of in enige andere vloeistof, noch om het te
reinigen, noch om welke andere reden ook. Steek het nooit in een afwasmachine.
Gebruik het toestel niet in de nabijheid van warmtebronnen. Plaats het toestel nooit op
een warm oppervlak (bv. kookplaat) of in de buurt van een vlam.
Trek de stekker uit het stopcontact vooraleer u het toestel reinigt.
Herstellingen dienen te worden uitgevoerd door een bekwame gekwalificeerde dienst
(*)
.
Gebruik het toestel niet buiten en berg het op in een droge plaats.
Gebruik geen accessoires die niet door de fabrikant aanbevolen werden. Dit kan
gevaarlijk zijn voor de gebruiker en het toestel beschadigen. Gebruik het toestel in geen
geval indien het zichtbare schade vertoont.
Trek nooit aan het snoer om het toestel te verplaatsen. Zorg dat het elektriciteitssnoer
nergens kan achterhaken en daardoor de val van het toestel veroorzaken. Draai het
snoer niet rond het toestel en plooi het niet.
Zet het toestel op een tafel of op een voldoende stabiel oppervlak zodat het niet valt.
Wacht tot het toestel volledig is afgekoeld alvorens het te reinigen of op te bergen.
Zorg dat het snoer niet in aanraking komt met de warme onderdelen van het toestel.
Wanneer het toestel in werking is, kunnen toegankelijke delen ervan een zeer hoge
temperatuur bereiken. De warme onderdelen van het toestel niet aanraken, gebruik het
handvat.
Zorg ervoor dat de warme onderdelen van het toestel tijdens het gebruik niet in aanraking
komen met gemakkelijk ontvlambare materialen, zoals gordijnen, een tafelkleed,… en
dergelijke vermits deze in brand zouden kunnen vliegen.
Voor het gebruik, gelieve de bakplaten met een vochtige doek te reinigen en zorgvuldig
af te drogen. Dompel het toestel nooit onder in water of enig andere vloeistof, noch om
het te reinigen, noch om welke andere reden ook. Steek het nooit in de vaatwasmachine.
Gebruik tijdens de reiniging nooit metalen of scherpe voorwerpen. Deze zouden de
antiaanbaklaag van de bakplaten beschadigen.
Gebruik een klassieke houten spatel of een warmtebestendige plastiek spatel om de
voedingsmiddelen uit het toestel te halen.
19
Assembly page 19/34
Fax +32 2 359 95 50
Page 20

Copies of the I/B. Please reproduce them without any
changes except under special instruction from Team
International BELGIUM. The pages must be reproduced
and folded in order to obtain a booklet A5 (+/- 148.5 mm
width x 210 mm height). When folding, make sure you
keep the good numbering when you turn the pages of
the I/B. Don’t change the page numbering. Keep the
language integrity.
Trek de stekker uit het stopcontact als het toestel niet werkt, vermits het geen schakelaar
bevat.
Kook enkel eetwaren geschikt om te koken en voor consumptie.
(*)
Bekwame gekwalificeerde dienst: klantendienst van de fabrikant of de invoerder, die erkend
en bevoegd is om dergelijke herstellingen te doen zodat elk gevaar vermeden wordt. Gelieve
het toestel bij problemen naar deze dienst terug te brengen.
GEBRUIKSAANWIJZING
Tijdens het eerste gebruik zal de antiaanbaklaag gaan roken. Dit duidt in geen geval op
een slechte werking van het toestel. Na ongeveer 30 seconden zal de rook ophouden en
kunt u het toestel normaal gebruiken. Deze rook is NIET schadelijk.
Neem voor het eerste gebruik de bovenzijde van de kookplaten met een vochtige doek
af en wrijf deze daarna droog. De antiaanbaklaag van de kookplaten maakt het gebruik
van boter facultatief, maar U mag de kookplaten met boter, olie of vet insmeren.
Plaats de gewenste kookplaten in het toestel indien u op de knop 2 dichtbij de
handgreep (6) drukt.
Sluit het toestel, steek de stekker in het stopcontact en laat het opwarmen.
Het controlelampje (4) zal branden om aan te duiden dat het toestel werkt en opwarmt.
Het controlelampje zal uitgaan wanneer de temperatuur bereikt is.
Opgelet, tijdens het gebruik wordt het toestel warm, raak enkel het handvat (6) aan.
Wafelijzer-functie
Open het opgewarmde toestel (door middel van het sluitingsclipje (3) ).
Plaats deeg in het midden van de onderste bakplaat en sluit het deksel. Zorg ervoor dat u
niet te veel deeg in het toestel plaatst, anders zou het deeg langs de zijkanten kunnen
lopen. Druk het deksel enkele seconden naar beneden zodat het deeg zich gelijkmatig in
het toestel verdeelt.
Na ongeveer 3 minuten bakken hebben de wafels een goudbruine kleur.
Gebruik een houten of plastic spatel om de wafels uit het toestel te halen. Gebruik nooit
scherpe of metalen voorwerpen daar deze de antiaanbaklaag zouden kunnen
beschadigen.
Wanneer het bakken beëindigd is, trek de stekker uit het stopcontact.
WAFELRECEPTEN
ZANDWAFELS
200 g boter
200 g suiker
4 eieren
1 geraspte citroenschil
200 g tarwebloem
GISTWAFELS
25 g gist
¼ l melk
125 g boter
50 g suiker
6 eieren
1 geraspte citroenschil
zout
375 g tarwebloem
GEWONE WAFELS MET BAKPOEDER
125 g boter
150 g suiker
1 geraspte citroenschil
zout
3 eieren
¼ l melk
250 g bloem
1 theelepeltje bakpoeder
20
Assembly page 20/34
Fax +32 2 359 95 50
Page 21

Copies of the I/B. Please reproduce them without any
changes except under special instruction from Team
International BELGIUM. The pages must be reproduced
and folded in order to obtain a booklet A5 (+/- 148.5 mm
width x 210 mm height). When folding, make sure you
keep the good numbering when you turn the pages of
the I/B. Don’t change the page numbering. Keep the
language integrity.
KROKANTE WAFELS
200 g margarine
150 g suiker
4 eieren
350 g bloem
1 eetlepel rum
1 pakje vanillesuiker
1 pakje bakpoeder
ca. 150-200 ml water geen melk
APPELWAFELS
150 g margarine
200 g suiker
4 eieren
½ theelepeltje zout
250 g zetmeel (Mondamin)
1 afgestreken theelepel bakpoeder
1 snuifje gemalen kruidnagel
2 in kleine blokjes gesneden appels
Om partysnacks te maken
Open het opgewarmde toestel (door middel van het sluitingsclipje (3) ).
Doet u nu het deeg in de onderste uitsparingen van de partysnack-maker (recepten vindt
u verderop). Let erop dat u niet te veel deeg neemt, omdat dit er anders aan de kanten
uitloopt. U kunt van het deeg het best kleine bolletjes rollen en deze in de openingen
doen.
Klapt u het deksel naar beneden en sluit u de sluitingsclipje (3).
Na ongeveer 3 minuten is het deeg klaar gebakken. Nu opent u het deksel en neemt de
klaar gebakken deegvormpjes er met een geschikt voorwerp (let op: geen metaal) uit.
De ontstane 'braam' voorzichtig met een mes verwijderen.
Na het koud worden doet u de betreffende vulling erin, bestrijkt de randen met de vulling
en voegt de beide helften samen.
De zo ontstane partysnack heeft de vorm van een noot. We hebben de partysnack-
maker daarom de naam „tovernoot” gegeven.
TIPS EN RECEPTEN
Wij bevelen u de volgende snackmixen aan, maar natuurlijk willen wij geen grenzen stellen
aan uw eigen vindingrijkheid en creativiteit.
Algemeen recept voor het deeg:
Ingrediënten: 400g meel
100g suiker
250g margarine
2 eieren
¼ theelepel bakpoeder
1 pakje vanillesuiker
Toebereiding: 1. Meng de margarine met suiker en de eieren.
2. Meng de bakpoeder met vanillesuiker en meel.
3. Kneed het geheel.
Recept voor het zoete deeg:
Ingrediënten: 500-600g meel
220g suiker
200g margarine of boter
200g room
1 ei, 2 eiwitten
1 theelepel bakpoeder
1 pakje vanillesuiker
21
Assembly page 21/34
Fax +32 2 359 95 50
Page 22

Copies of the I/B. Please reproduce them without any
changes except under special instruction from Team
International BELGIUM. The pages must be reproduced
and folded in order to obtain a booklet A5 (+/- 148.5 mm
width x 210 mm height). When folding, make sure you
keep the good numbering when you turn the pages of
the I/B. Don’t change the page numbering. Keep the
language integrity.
Toebereiding: 1. Meng de boter, suiker en een ei en voeg de 2 eiwitten toe.
2. Voeg de room toe.
3. Meng het meel met de bakpoeder en meng met de boter tot u een deeg
verkrijgt.
Recept voor het zoute deeg:
Ingrediënten: 200g meel
125 g margarine
1 ei
¼ theelepel bakpoeder
1 snuifje suiker
3 snuifjes zout
Toebereiding: 1. Meng de boter, suiker en het ei met de malse margarine
2. Meng het meel en de bakpoeder.
3. Kneed het geheel.
Uw zelf gebakken tovernoten kunt u met de meest verschillende ingrediënten vullen,
bijvoorbeeld jam, slagroom, nogacrème, zoete kwark, appelmoes, vanillecrème, botercrème,
honing, pudding, kleine bessen, karamel, kaascrèmes.
Door rozijnen, amandelen en dergelijke toe te voegen, kunt u de smaak van de vullingen nog
verfijnen.
Nog meer tips:
Maken van kerstversiering: legt u voor het samenkleven van de noothelften hier een draad
tussen. Dan wikkelt u de tovernoot in zilver- of goudfolie en hangt ze met behulp van de draad
aan de kerstboom.
Voor een kinderverjaardag: plaatst u schotels met verschillende ingrediënten in het midden
van de tafel. De kinderen kunnen nu, eventueel met wat hulp van de volwassenen, zelf de
klaargemaakte noten vullen.
Op die manier kan dit toestel ook uw party opfleuren.
En natuurlijk kunt u ook de beide helften afzonderlijk vullen zonder ze daarna samen te
voegen. Op deze manier kunt u lekkere kleine hapjes of ook decoraties voor het buffet
maken.
REINIGING
Haal de stekker uit het stopcontact. Laat het toestel en de kookplaten eerst afkoelen.
Reinig de buitenkant met een zachte, vochtige doek. Let erop, dat er geen vocht of olie
via de koelspleten naar binnen sijpelt.
Om de kookplaten te reinigen kunt u ze ofwel in het toestel laten of ze uit het toestel
verwijderen (druk daarvoor op knop 2 dichtbij de handgreep en neem ze eraf. Als u de
platen in het toestel laat, reinig deze met keukenpapier of met een zachte doek. Als u ze
uit het toestel neemt, kunt u ze onder water reinigen. Laat ze goed drogen. Zet ze nooit in
een vaatwasmachine.
Schuur nooit de binnen- of buitenkant en gebruik geen staalwol, omdat U anders de
oppervlakten ernstig beschadigt.
Gebruik geen scherpe of ijzeren voorwerpen.
Dompel niet onder in water of andere vloeistoffen.
22
Assembly page 22/34
Fax +32 2 359 95 50
Page 23

Copies of the I/B. Please reproduce them without any
changes except under special instruction from Team
International BELGIUM. The pages must be reproduced
and folded in order to obtain a booklet A5 (+/- 148.5 mm
width x 210 mm height). When folding, make sure you
keep the good numbering when you turn the pages of
the I/B. Don’t change the page numbering. Keep the
language integrity.
KLANTENDIENST
efbe Elektrogeräte GmbH
Gustav-Töpfer-Straße 6
07422 Bad Blankenburg / Thüringen
Duitsland
Tel. : Duitsland 036741 70268 Internationaal 0049 36741 70268
Fax: Duitsland 036741 70227 Internationaal 0049 36741 70227
23
Assembly page 23/34
Fax +32 2 359 95 50
Page 24

Copies of the I/B. Please reproduce them without any
changes except under special instruction from Team
International BELGIUM. The pages must be reproduced
and folded in order to obtain a booklet A5 (+/- 148.5 mm
width x 210 mm height). When folding, make sure you
keep the good numbering when you turn the pages of
the I/B. Don’t change the page numbering. Keep the
language integrity.
AVVERTENZE
Leggere attentamente le seguenti istruzioni e conservarle per future consultazioni.
Controllare che la tensione della Vs. rete corrisponda a quella dell’apparecchio.
Non lasciare l’apparecchio incustodito quando è in funzione. Non tenerlo alla
portata dei bambini e di persone irresponsabili.
Controllare periodicamente il cavo di alimentazione. Non usare l’apparecchio se il
cavo o l’apparecchio stesso mostrassero qualsiasi danno.
Questo apparecchio è concepito per il solo uso domestico e nel modo indicato in
queste istruzioni.
Non immergere per alcun motivo l’apparecchio in acqua o in qualsiasi altro liquido.
Mai mettere l’apparecchio in lavastoviglie.
Un cavo danneggiato deve essere sostituito da un servizio assistenza qualificato
(*)
.
Tutte le riparazioni devono essere fatte da un servizio assistenza qualificato
(*)
.
Prima di pulire l’apparecchio, staccare la spina dalla presa di corrente.
Non usare l’apparecchio all’esterno; dopo l’uso riporlo in un ambiente asciutto.
Non usare accessori non raccomandati dal costruttore: può essere pericoloso per
l’utente e danneggiare l’apparecchio.
Non tirare il cavo per spostare l’apparecchio. Assicurarsi che il cavo elettrico non si
impigli per evitare una caduta dell’apparecchio. Non avvolgere il cavo intorno
all’apparecchio e non attorcigliarlo.
Posizionare l’apparecchio su un tavolo o una superficie sufficientemente stabile.
Assicurarsi che l’apparecchio si sia completamente raffreddato prima di pulirlo o
riporlo.
Assicurarsi che il cavo di alimentazione non entri in contatto con le parti calde
dell’apparecchio.
La temperatura delle superfici accessibili può essere molto calda durante il
funzionamento: non toccare questa superfici, ma servirsi delle apposite impugnature.
Assicurarsi che l’apparecchio non entri in contatto con materiali infiammabili, come
tende, tovaglie, ecc., quando è in funzione, poiché sono tutte possibili fonti di incendio.
Fare attenzione a non graffiare il rivestimento antiaderente delle piastre, poiché
piccole parti di esso potrebbero ritrovarsi fra i cibi. Utilizzare solo strumenti in legno o in
plastica termoresistente.
Staccare sempre la spina dalla presa di corrente quando l’apparecchio non è in
funzione, soprattutto se non è dotato di un interruttore ON/OFF.
Questo apparecchio è destinato esclusivamente alla cottura di cibi.
(*)
Servizio assistenza qualificato: Servizio Assistenza del fabbricante o dell’importatore,
riconosciuto ed autorizzato ad effettuare riparazioni.
24
Assembly page 24/34
Fax +32 2 359 95 50
Page 25

Copies of the I/B. Please reproduce them without any
changes except under special instruction from Team
International BELGIUM. The pages must be reproduced
and folded in order to obtain a booklet A5 (+/- 148.5 mm
width x 210 mm height). When folding, make sure you
keep the good numbering when you turn the pages of
the I/B. Don’t change the page numbering. Keep the
language integrity.
UTILIZZARE L’APPARECCHIO
Durante il primo utilizzo dell’apparecchio, la pellicola protettiva produce del fumo.
Questo NON è nocivo e non compromette l’apparecchio.
Prima di utilizzare l’apparecchio per la prima volta, pulire le piastre con un panno umido e
poi asciugare.
Mettere le piastre desiderate nell’apparecchio, pressionando il pulsante per estrazione
delle piastre (2) che si trova accanto la maniglia (6).
Chiudere l’apparecchio, collegare la spina alla presa di corrente. Si accenderà la spia
arancio e la spia (4).
Quando l’apparecchio ha raggiunto la temperatura si spegne la spia.
Attenzione: la temperatura delle superfici accessibili può essere molto calda durante il
funzionamento: non toccare questa superfici, ma servirsi delle apposite impugnature.
Idea per cialde
Aprire l’apparecchio con il gancio di chiusura (3).
Depositare un piccolo quantitativo di pasta per cialde o wafer al centro
dell'apparecchio. Chiudere il coperchio dell'apparecchio per permettere alla pasta di
disporsi in maniera uniforme sulla piastra di cottura. Si raccomanda di non inserire troppa
pasta in quanto potrebbe fuoriuscire dai bordi dell'apparecchio.
Far cuocere la pasta secondo i Vostri gusti (circa 3 minuti). Aprire l'apparecchio e togliere
le cialde o i wafer con l'aiuto di una spatola in legno o in plastica termoresistente.
Dopo l'uso spegnere l'apparecchio disinserendo la spina dalla presa di corrente.
ALCUNE RICETTE
CIALDE DI PASTA FROLLA
200 g di burro
200 g di zucchero
4 uova
buccia di limone
200 g di farina
CIALDE LIEVITATE
25 g di lievito di birra
¼ di latte
125 g di burro
50 g di zucchero
6 uova
buccia di limone
sale
375 g di farina
CIALDE TRADIZIONALI
125 g di burro
150 g di zucchero
buccia di limone
sale
3 uova
¼ di latte
250 g di farina
1 cucchiaino di lievito
CIALDE CROCCANTI
200 g di burro
150 g zucchero
4 uova
350 g di farina
1 cucchiaio di rhum
1 bustina di zucchero vanigliato
1 bustina di lievito
150-200 ml di acqua (non di latte)
CIALDE ALLE MELE
150 g di burro
200 g di zucchero
4 uova
½ cucchiaino di sale
250 g di Maizena
1 cucchiaino di lievito
1 manciata di chiodi di garofano macinati
1 manciata di cannella
2 mele sbucciate e tagliate a cubetti
25
Assembly page 25/34
Fax +32 2 359 95 50
Page 26

Copies of the I/B. Please reproduce them without any
changes except under special instruction from Team
International BELGIUM. The pages must be reproduced
and folded in order to obtain a booklet A5 (+/- 148.5 mm
width x 210 mm height). When folding, make sure you
keep the good numbering when you turn the pages of
the I/B. Don’t change the page numbering. Keep the
language integrity.
Per fare dolci
Aprire l’apparecchio con il gancio di chiusura (3).
Posizionate la pasta sulla piastra inferiore. Fare attenzione a non esagerare affinché non
fuoriesca dall’apparecchio.
Chiudere l’apparecchio e bloccarlo con il gancio di chiusura (3).
La cottura dura circa tre minuti. Alla fine, aprire l’apparecchio e togliere la pasta cotta
con uno strumento apposito (Attenzione: non usare strumenti in metallo).
Lasciarla raffreddare, quindi riempire le due metà secondo i gusti.
Terminato l’uso, staccare la spina dalla presa di corrente e lasciare aperto l’apparecchio
affinché si raffreddi.
RICETTE
Pasta senza zucchero per ripieni piccanti
200 g di farina
25 g di formaggio Parmigiano
¼ di cucchiaio di lievito
1 uovo
1 cucchiaio di sale
125 g di burro
Fa sciogliere il burro. Mescolare la farina, il sale e il lievito. Aggiungere il burro sciolto. Quindi
aggiungere le uova, il Parmigiano e mescolare fino ad ottenere un impasto omogeneo.
Lasciare riposare per 10-15 minuti.
Pasta per ripieni dolci
75 g di burro
75 g di zucchero
1 bustina di vaniglia
2 uova
125 g di farina
6 cucchiai di acqua tiepida
50 g di mandorle
½ cucchiaio di rum
Mescolare il burro con lo zucchero. Aggiungere la vaniglia, le uova, la farina e l’acqua tiepida.
Mescolare il tutto. Aggiungere infine le mandorle e il rum e lasciar riposare per 10-15 minuti.
E’ possibile riempire la pasta in diversi modi: prosciutto, crema, crema di torrone, purea di
mele, crema alla vaniglia, miele…
E’ possibile rifinire i piatti con mandorle o uvetta.
Altri consigli
Fabbricazione di decorazioni natalizie: prima di unire le due metà di noce mettete un filo tra di
esse. Avvolgete quindi le "Noci magiche" in un foglio di carta argentata o dorata e
appendetele all' albero di Natale.
Per i compleanni: ponete dei recipienti con diversi ingredienti al centro della tavole . I bambini
potranno, con l'aiuto di un adulto, riempire le noci già preparate con cio' che preferiscono.
26
Assembly page 26/34
Fax +32 2 359 95 50
Page 27

Copies of the I/B. Please reproduce them without any
changes except under special instruction from Team
International BELGIUM. The pages must be reproduced
and folded in order to obtain a booklet A5 (+/- 148.5 mm
width x 210 mm height). When folding, make sure you
keep the good numbering when you turn the pages of
the I/B. Don’t change the page numbering. Keep the
language integrity.
Questo apparecchio puo' ugualmente animare i vostri party: le mezze noci possono essere
farcite senza essere chiuse costituendo cosi' dei deliziosi stuzzichini e formando un elemento
decorativo sul vostro buffet.
PULIZIA
Prima di pulire l’apparecchio, scollegare la spina e lasciarlo raffreddare.
Asciugare la parte esterna dell’apparecchio con un panno leggermente umido,
assicurarsi che l’umidità, olio ed il grasso di cottura non si infiltrino all’interno delle asole di
raffreddamento dell’apparecchio.
Per pullire le piastre, potete lasciarle nell'apparecchio, o toglierle (spingere sul pulsante 2
che si trova accanto la maniglia (6) e toglierle (vedi il disegno). Se lasciate le piastre
nell'apparecchio, pulirle con un pezzo di carta assorbente o con uno straccio. Se togliete
le piastre dall'apparecchio, potete lavarle sott' acqua corrente. Asciugare bene le
piastre. Non mettere nella lavastoglie.
Non pulire l’apparecchio (sia la parte interna che esterna) con prodotti abrasivi per non
rovinare il rivestimento.
Non immergere l’apparecchio in acqua o in altri liquidi.
ASSISTENZA CLIENTI
efbe Elektrogeräte GmbH
Gustav-Töpfer-Straße 6
07422 Bad Blankenburg / Thüringen
Germania
Tel. : Germania 036741 70268 Internazionale 0049 36741 70268
Fax: Germania 036741 70227 Internazionale 0049 36741 70227
27
Assembly page 27/34
Fax +32 2 359 95 50
Page 28

Copies of the I/B. Please reproduce them without any
changes except under special instruction from Team
International BELGIUM. The pages must be reproduced
and folded in order to obtain a booklet A5 (+/- 148.5 mm
width x 210 mm height). When folding, make sure you
keep the good numbering when you turn the pages of
the I/B. Don’t change the page numbering. Keep the
language integrity.
Уважаемый покупатель!
Мы очень рады, что Вы приобрели прибор марки efbe-Schott. Этим прибором Вы можете
выпекать вкусное печенье, сладкие и пикантные вафли для праздников, а так же
приготовлять сэндвичи.
Просим внимательно прочесть инструкцию по эксплуатации перед использованием
этого прибора.
Важные указания по технике безопасности
Надо проверить, чтобы напряжение в сети соответствовало напряжению
указанному на корпусе прибора.
Не оставляйте включенный прибор без присмотра. Держите детей и
нуждающихся в помощи людей от прибора на расстоянии.
Не включайте прибор в сеть если его корпус или сетевой шнур имеют видимые
повреждения. В случае повреждения сетевого шнура, обращайтесь к специалисту.
(*)
Данный прибор является бытовым электроприбором, употребление его только
так, как в инструкции по эксплуатации указано.
Запрещается погружать прибор в воду или другую жидкость. Прибор не
предназначен для полоскания в посудомоечной машине.
Не используйте прибор вблизи открытого огня, не ставьте прибор на горячие
плитки.
Перед чисткой прибора обязательно отключите его от сети.
По всем вопросам связанных с ремонтом, обращайтесь к
квалифицированныму специалисту.(*)
Не пользуйтесь прибором на улице. Прибор и кабель должны храниться так,
чтобы они не попадали под воздействие влаги.
Употребляйте только принадлежности рекомендованные поставщиком, другие
принадлежности ставят опасность повреждения прибора. Не включайте прибор в
сеть если он имеет видимые повреждения.
Запрещается тянуть прибор за сетевой шнур для передвигания, не допускайте
провисания сетевого шнура или его сгибания. Не наматывайте сетевой шнур вокруг
прибора.
Установите прибор на стол или горизонтальную поверхность и следите за тем,
чтобы прибор не упал.
Перед каждой чисткой прибор должен полностью остыть.
Следите за тем, чтобы сетевой шнур не прикасался к горячим частям прибора.
Во избежание ожогов не трогайте горячие части прибора.
Во время работы прибор сильно нагревается, трогайте его только за ручку.
Обязательно следите за тем, чтобы прибор во время работы не прикасался к
гардинам или скатертям. Опасность пожара!
Перед первым употреблением протрите рабочую поверхность влажной тряпкой
и в последствии вытрите её насухо. Запрещается погружать тостер в воду или другую
жидкость. Прибор не предназначен для полоскания в посудомоечной машине.
Запрещается применять для чистки прибора острые или металлические
предметы.
Царапины на антипригарной рабочей поверхности негативно влияют на работу
прибора.
Готовые вафли можно вынуть деревянной лопаткой из прибора чтобы его не
поцарапать.
28
Assembly page 28/34
Fax +32 2 359 95 50
Page 29

Copies of the I/B. Please reproduce them without any
changes except under special instruction from Team
International BELGIUM. The pages must be reproduced
and folded in order to obtain a booklet A5 (+/- 148.5 mm
width x 210 mm height). When folding, make sure you
keep the good numbering when you turn the pages of
the I/B. Don’t change the page numbering. Keep the
language integrity.
Всегда извлекайте вилку из розетки, когда Вы прибором не пользуетесь, потому
что он не имеет включателя/выключателя.
Прибор предназначен только для кулинарных приготовлений.
(*) Специалист: уполномоченное бюро поставщика или импортера по обслуживанию
клиентов, которое осуществляет такой ремонт. При необходимости ремонта обращайтесь в
это бюро.
Эксплуатация
Противопригорающее покрытие производит при первом включении обусловленный
производственными причинами запах и выделение дыма. На работу прибора это не
влияет и не ставит никакой опасности при пользовании этого прибора. После 30 сек.
этот прцесс прекращается и прибор готов полностью к работе.
Перед первым использованием протрите рабочую поверхность влажной тряпкой, не
обязательно смазывать её растительным маслом или жиром.
Вложите желательную панель в прибор, при этом нажмите на клавишу (2) вблизи от
ручки (6).
Закройте прибор, вставьте штепсельную вилку в розетку и нагрейте прибор.
Зажглись две контрольные лампочки (4), то прибор справный и он нагревается.
Когда прибор достиг необходимой температуры для выпекания, выключается зелёная
контрольная лампочка.
Внимание! Во время работы прибор сильно нагревается, трогайте его только за ручку
(6).
Использование прибора (вафельницы).
Когда прибор нагрелся, откройте его (откройте затвор(3)).
На середину вафельного автомата дайте вафельное тесто и закройте крышку
прибора. Следите за тем, чтобы теста не было замного, потому что оно по сторонам
может вытекать.
Выпекайте вафли приблизительно 3 мин. до желательной степени подрумянывания.
Когда вафли готовы, нужно вынуть их пластмассовой лопаткой из прибора.
Запрещается применять для этого острые предметы, потому что можно поцарапать
противоприлипающее покрытие.
После окончания работы вытягивайте вилку из розетки.
Рецепты для приготовления вафель.
Песочные вафли
200 гр масла
200 гр сахара
4 яйца
Цитрусовая цедра
Соль
200 гр муки
Простые вафли
125 гр сливочного масла
150 гр сахара
Цитрусовая цедра
Соль
3 яйца
¼ л молока
250 гр муки
1 чайная ложка разрыхрытеля
(пекарского порошка)
29
Assembly page 29/34
Fax +32 2 359 95 50
Page 30

Copies of the I/B. Please reproduce them without any
changes except under special instruction from Team
International BELGIUM. The pages must be reproduced
and folded in order to obtain a booklet A5 (+/- 148.5 mm
width x 210 mm height). When folding, make sure you
keep the good numbering when you turn the pages of
the I/B. Don’t change the page numbering. Keep the
language integrity.
Вафли из дрожжевого теста
25 гр дрожжей
¼ л молока
125 гр сливочного масла
50 гр сахара
6 яиц
Цитрусовая цедра
Соль
375 гр муки
Вафли хрустящие
200 гр маргарина
150 гр сахара
4 яйца
350 гр муки
1 столовая ложка рома
1 пакетик сахара-ванилина
½ пакетик пекарского порошка
150-200 мл. воды (не применять молоко)
Вафли с яблоками
150 гр маргарина или масла
200 гр сахара
4 яйца½ чайной ложки соли
250 крахмаля
1 чайная ложка пекарского порошка
1 чайная ложка корицы
на кончик ножа размельченной гвоздики
2 яблока нарезанных на мелкие ломтики
Употребление прибора для приготовления вафельных орехов и печенья с другими
мотивами.
Когда прибор нагрелся, откройте его (откройте затвор(3)).
На нижнюю часть прибора вложите в полуформы тесто. Смотрите за тем, чтобы
теста не было замного, потому что оно по сторонам может вытекать. Самый лучший
вариант, это делать с теста маленькие шарики и вставлять его в полуформы.
Закройте крышку прибора и зафиксируйте ручки при помощи шарнира.
3 минуты и орешки готовы. Откройте крышку и выньте половинки вафель при помощи
деревянной вилки или т.п. предмета. Чтобы не повредить неподгораемое покрытие
полуформ, не используйте для этого острые или режущие предметы.
После охлаждения наполняйте половинки начинкой и складывайте в форму орешка.
Это печенье в форме ореха получило у нас наименование «Волшебный орех». Для
выпечки печенья других мотивов, поступайте таким же образом.
Рецепты и советы
Мы рекомендуем Вам следующие рецепты для печенья, но это не обозначает что Вы
сами не можете изобретать. Вы можете применять свои личные рецепты.
Общий рецепт для теста:
400 грамм муки
100 грамм сахара
250 грамм маргарины
2 яйца
¼ чайной ложки пекарского порошка
1 пакетик сахара-ванилина
Приготовление: 1. Хорошо смешать маргарин, сахар и яйца
2. Смешать пекарский порошок, сахар и муку
3. Выше указанную смесь старательно перемешать
30
Assembly page 30/34
Fax +32 2 359 95 50
Page 31

Copies of the I/B. Please reproduce them without any
changes except under special instruction from Team
International BELGIUM. The pages must be reproduced
and folded in order to obtain a booklet A5 (+/- 148.5 mm
width x 210 mm height). When folding, make sure you
keep the good numbering when you turn the pages of
the I/B. Don’t change the page numbering. Keep the
language integrity.
Рецепт для сладкого теста:
500-600 гр муки
220 гр сахара
200 гр сливочного масла или маргарина
200 гр сметаны
1 яйцо, 2 яичные белка
1 чайная ложка пекарского порошка
1 пакетик сахара-ванилина
Приготовление: 1. Масло, сахар, 1 яйцо, сахар-ванилин хорошо перемешать и добавить
2 белка
2. Добвить сметану и хорошо перемешать
3. Муку смешать с пекарским порошком, добавить к выше указанной
смесии сделать хорошее тесто.
Рецепт для солёного теста:
200 гр муки
125т гр маргарина
1 яйцо
¼ чайной ложки пекарского порошка
1 щепотку сахара
3 раза на кончику ножа соли
Приготовление: 1. Яйцо, соль, сахар хорошо смешать с маргарином
2. Муку смешать с пекарским порошком
3. Всё вместе хорошо перемешать
Ваши орешные половинки можно наполнять различной начинкой.
Например: Джемом, взбитыми сливками, ореховой нугой, сладким творогом, ванильным
кремом, сливочным кремом, мёдом.
Начинку можно утончить изюмом или миндалем.
Другие предложения:
Орешки можно использовать как украшение для ёлки при завертывание в золотую или
серебряную фольгу. Для этого надо положить нитку между двумя половинками, наполнить
начинкой, сложить в форму орешка и завернуть в фольгу. Потом можно украсить
новогоднюю ёлку.
Детские дни рожденья:
Поставьте на средину стола блюда с различными начинками. Дети сами могут наполнять
начинкой готовые половинки орешков (как им нравится).
Можно тоже половинки наполнять начинкой и не складывать в форму ореха, таким
способом украсить стол аппетитными кусочками.
Чистка и уход
Перед чисткой отключить прибор от сети и дать ему полностью остыть.
Вытрите его снаружи влажной тряпкой и убедитесь в том что масло, жир или влага
не попадают в прибор.
Сменные панели можно чистить в приборе или вынимать их из прибора (для этого
нужно нажать клавишу (2) возле ручки прибора.
Если Вы хотите почистить панели в приборе то применяйте для этого тряпку или
кухонною бумагу. Если их вынуть из прибора, можно прополоскать сменные панели
31
Assembly page 31/34
Fax +32 2 359 95 50
Page 32

Copies of the I/B. Please reproduce them without any
changes except under special instruction from Team
International BELGIUM. The pages must be reproduced
and folded in order to obtain a booklet A5 (+/- 148.5 mm
width x 210 mm height). When folding, make sure you
keep the good numbering when you turn the pages of
the I/B. Don’t change the page numbering. Keep the
language integrity.
под текущей водой. Обязательно вытрите их насухо. Запрещается давать панели в
посудомоечную машину.
Запрещается применять для чистки прибора острые предметы.
Запрещается давать прибор в воду или другую жидкость.
Сервисный пункт на территории России
Россия ООО «ЛИСС-Т»
г. Москва
ул. Академика Пилюгина,
д. 26, корп. 3
Тел.: (095) 935-31-26; (095) 935-00-86
32
Assembly page 32/34
Fax +32 2 359 95 50
Page 33

Copies of the I/B. Please reproduce them without any
changes except under special instruction from Team
International BELGIUM. The pages must be reproduced
and folded in order to obtain a booklet A5 (+/- 148.5 mm
width x 210 mm height). When folding, make sure you
keep the good numbering when you turn the pages of
the I/B. Don’t change the page numbering. Keep the
language integrity.
33
Assembly page 33/34
Fax +32 2 359 95 50
Page 34

Back cover page (last page)
Assembly page 34/34
 Loading...