

Edwards Signaling Series 49 AdaptaBeacon, Series 50 AdaptaBeacon, Series 50SIN AdaptaBeacon, Series 51 AdaptaBeacon, Series 52 AdaptaBeacon Installation Guide
Page 1
Installation Instructions for Catalog Series 49, 50, 50SIN,
51 and 52 AdaptaBeacon
DescriptionDescription
Description
DescriptionDescription
Catalog Series 49, 50, 50SIN, 51 and 52 AdaptaBeacon signals are UL and cUL listed, general purpose visual and
visual/audible signaling appliances. The 49 and 50 series
are flashing lights. The 50SIN is a steady-on light. The 51
series are combination flashing lights with horn. The 51
series come in single and double horn versions; the double
horn version is denoted by a 2H in its catalog number.
The 52 series are rotating lights.
The 49, 50, 50SIN, 51 and 52 series signals are suitable for
indoor or outdoor (weatherproof) installation and utilize a standard base that allows direct surface mounting,
mounting on a 4" (102 mm) octagon box, or mounting
on 1/2" (13 mm) NPT conduit. For outdoor installation,
the signals must be mounted on conduit.
For product specification details see Table 2. Refer to
Table 3 for available replacement lamps, flashers, domes
and lenses.
PLC Compatibility
The electrical input load requirements for PLC compatible signaling devices are listed in Table 1. Signaling
devices may be directly connected to output cards that
meet these input load requirements.
®
Signals
InstallationInstallation
Installation
InstallationInstallation
WARNINGS
To prevent electrical shock, ensure that power is
disconnected before installing the signal.
To prevent electrical shock, use care when
disassembling the signal to pre vent tearing of the
permanently affixed gaskets provided for
weatherproofing.
Install in accordance with the latest edition of the National Electrical Code and local regulations.
1. For the 49, 50, 50SIN, 51 and 52 series signals, remove
the base from the signal using one of the following
applicable procedures.
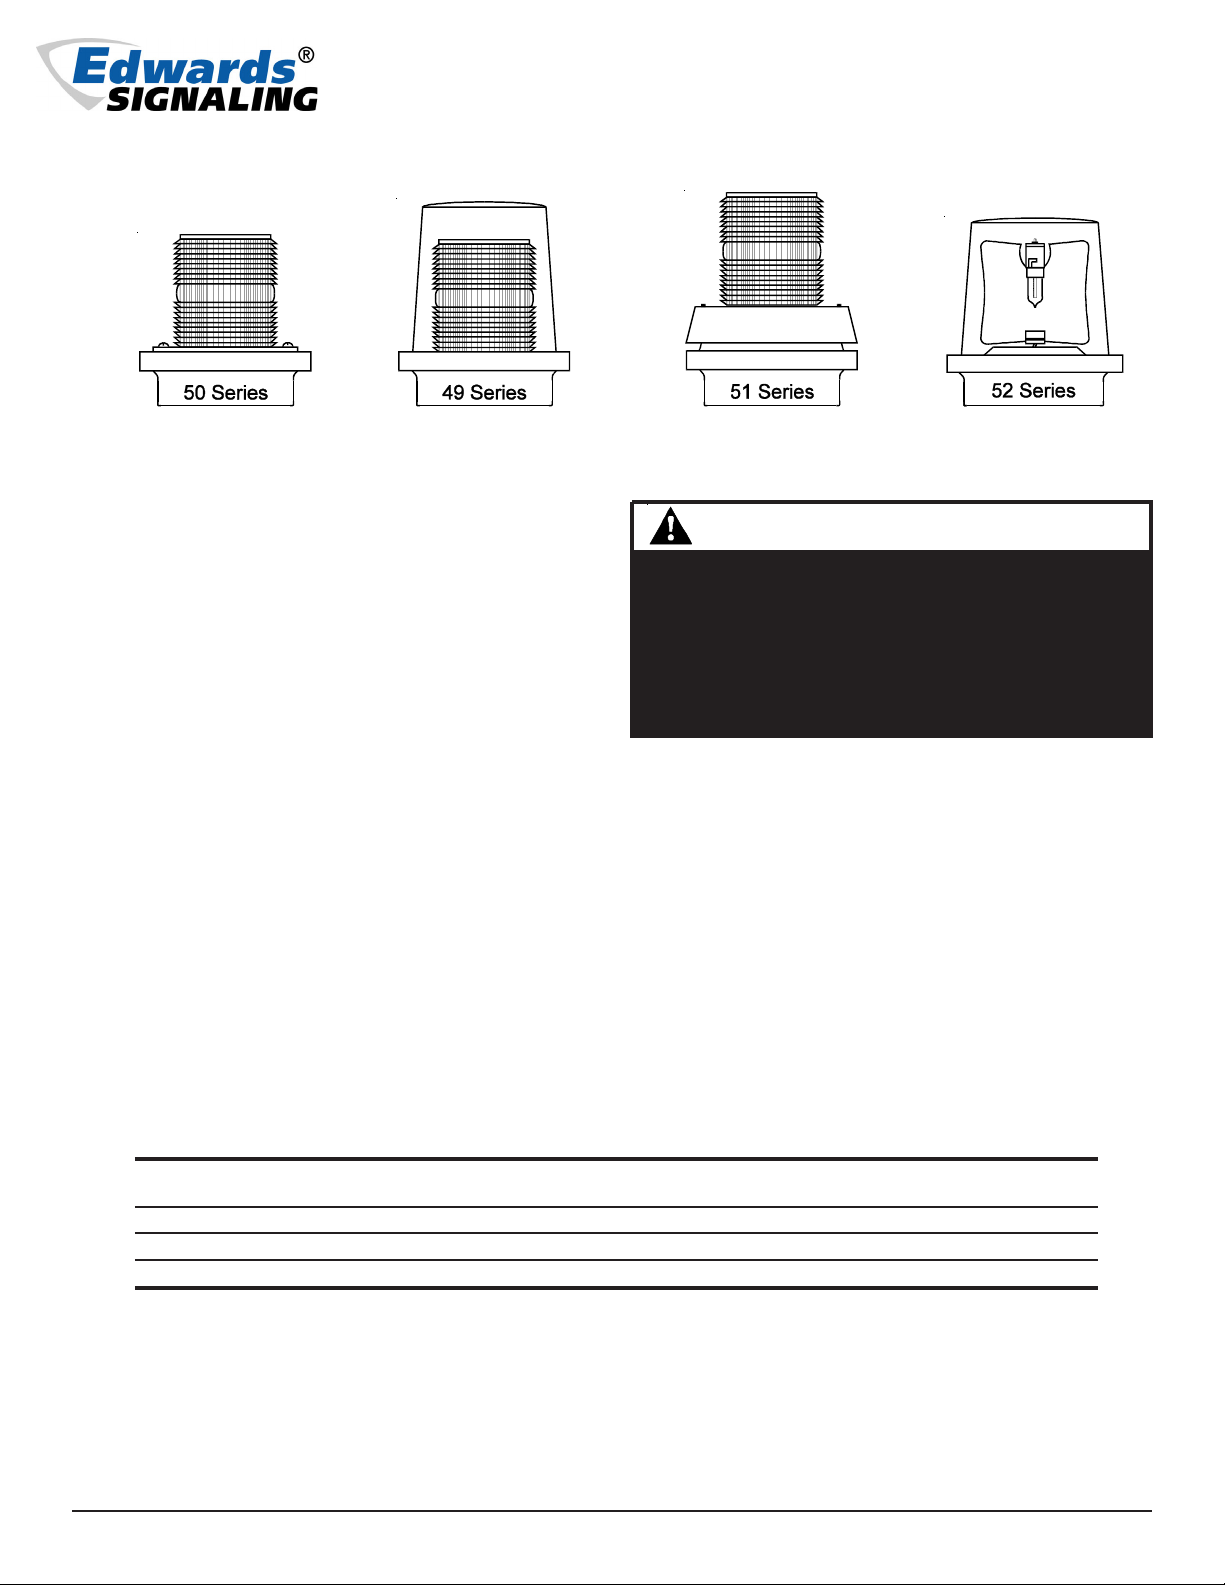
49 Series: See Figure 1. Remove the screw in the
clamp ring, remove the ring, and lift off the dome.
Loosen the three screws in the base of the lens and
turn the lens clockwise to remove. Then remove the
two screws that are partially set into the raised area
of the lamp assembly mounting plate, lift the
assembly off of the base, and pull the wire leads out
of the conduit entrance hole in the base. Proceed to
step 2 for installation of the base.
Table 1. PLC Compatibility
Operating Maximum off state Continuous on Surge (inrush/duration)
Cat. No. voltage* leakage current (mA) current (mA) (A/ms**)
50( )-N5-40WH 120V AC 25 300 2/8
50SIN( )-N5-40WH 120V AC 25 290 0.47/8
51( )-N5-40W 120V AC 25 350 2/8
*All AC volts at 60 Hz
**Amps/milliseconds
P-047550-0541 ISSUE 13 © 2003
Page 2
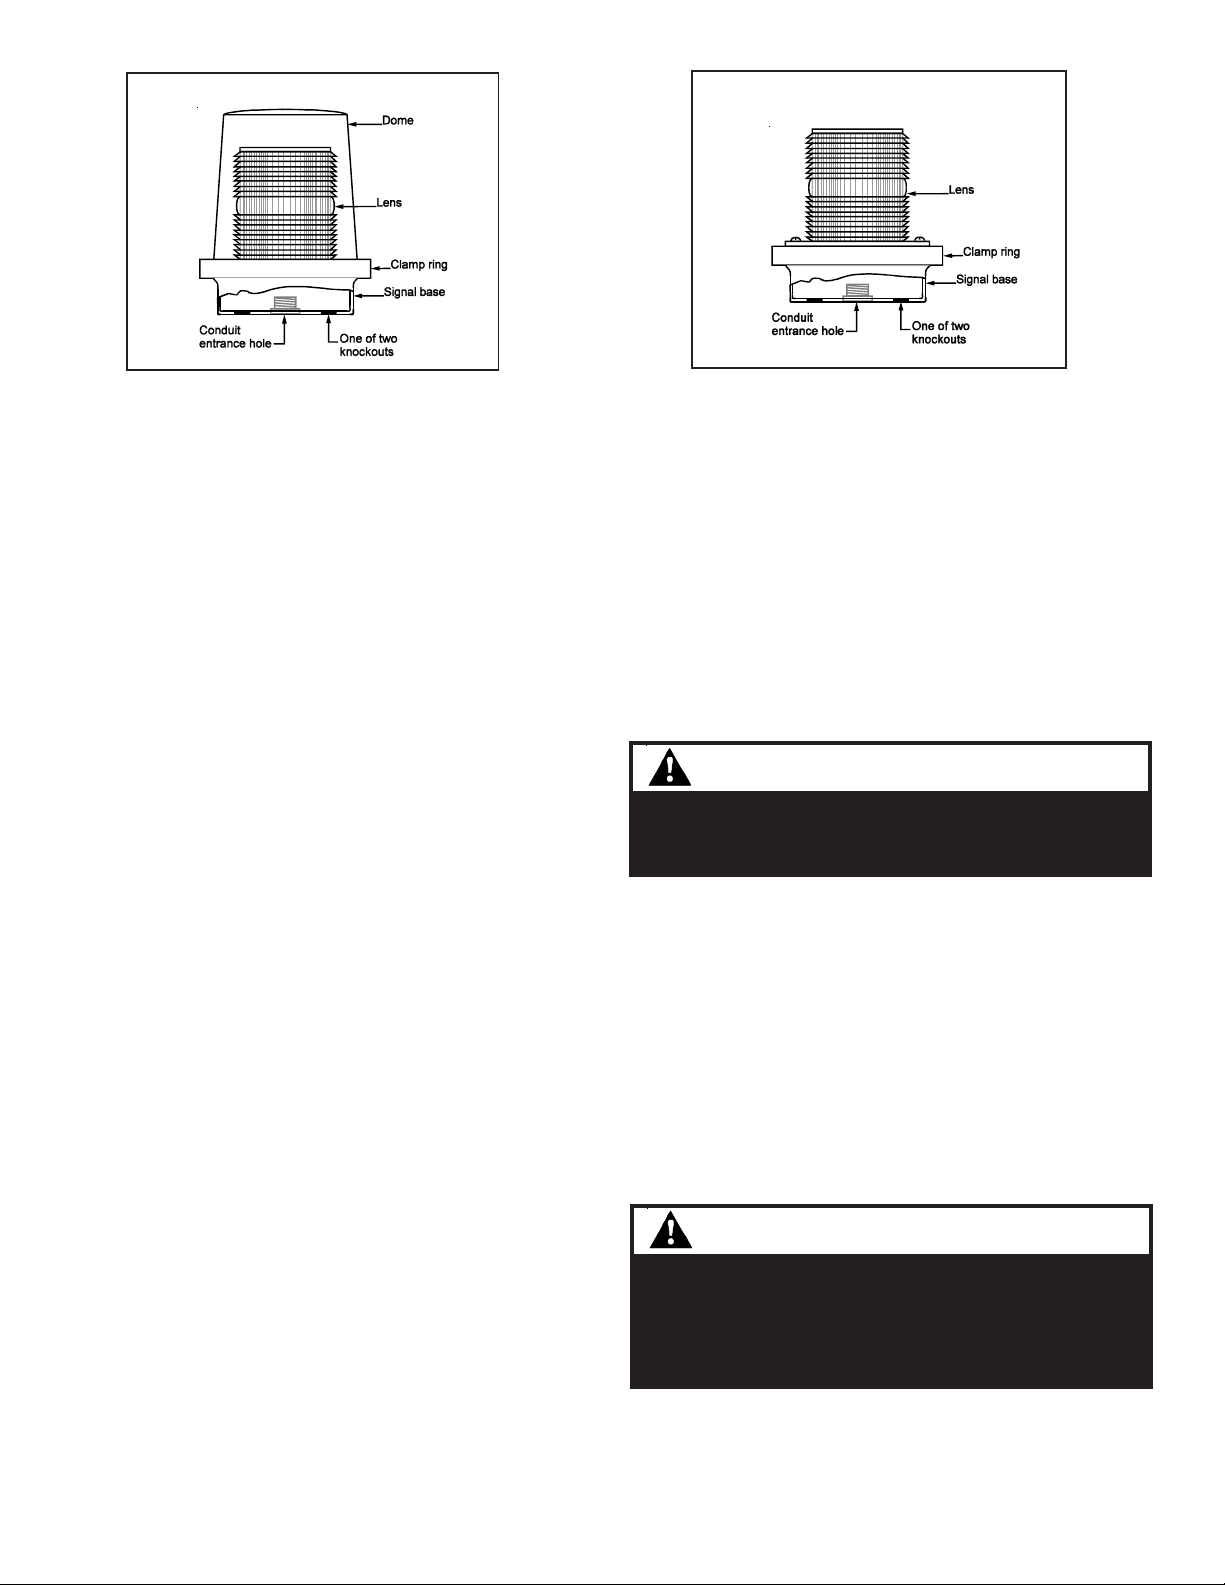
Figure 1. Catalog Series 49 Flashing Lights
Figure 2. Catalog Series 50 and 50SIN
Flashing Lights
50 and 50SIN Series: See Figure 2. Remove the
screw in the clamp ring, remove the ring, lift the lens/
lamp assembly off of the base, and pull the wire leads
out of the conduit entrance hole in the base. Proceed
to step 2 for installation of the base.
51 Series: See Figure 3. Remove the screw in the
clamp ring, remove the ring, lift the lens/lamp
assembly off of the base, and pull the wire leads out
of the conduit entrance hole in the base. Proceed to
step 2 for installation of the base.
52 Series: See Figure 4. Remove the screw in the
clamp ring, remove the ring, and lift off the dome.
Then remove the two screws in the rotating lamp
assembly mounting plate, lift the assembly off of the
base, and pull the wire leads out of the conduit
entrance hole in the base. Proceed to step 2 for
installation of the base.
2. For indoor installation, the signal may be direct
surface mounted, mounted on a 4" (102 mm) octagon
box, or mounted on 1/2" (13 mm) NPT conduit. For
outdoor (weatherproof) installation, the signal must
be conduit mounted. Install the signal base using
one of the following applicable mounting
procedures.
Direct Surface Mounting (indoor installation only)
NOTE: For proper operation of the 52 series rotating
lights, the signals must be installed with the
dome facing either directly up or directly
down.
Remove the two knockouts for mounting screws from
the bottom of the signal base.
Route the field wiring from the required power source
through the conduit entrance hole in the base. Power
source requirements are in Tables 2 and 3.
Route the field wiring from the required power source
through the conduit entrance hole in the base. Power
source requirements are in Tables 2 and 3.
Fasten the base to the octagon box (not supplied) by
installing the screws supplied with the box through the
knockout holes in the base. Proceed to step 3 for wiring
connections.
Mounting on 1/2" (13 mm) NPT Conduit (indoor or
outdoor installation)
NOTE: For proper operation of the 52 series rotating
lights when mounting indoors, the signals
must be installed with the dome facing either
directly up or directly down.
WARNING
To prevent leakage and potential electrical shoc k
when mounting outdoor s, the signals must be
installed with the dome facing directl y up.
Route the field wiring from the required power source
through the conduit entrance hole in the base. Power
source requirements are in Table 2 located on the last
page of these instructions.
Install the base on the conduit (not supplied). Proceed
to step 3 for wiring connections.
3. Using wire nuts (not supplied), connect the field
wiring to the signal's wire leads. Polarity is not
important. A green ground wire is provided on all
units. Connect the green ground wire lead in
accordance with local codes. Place the connected
wires inside of the base and reassemble the signal
on the base.
Fasten the base to the surface by installing two #10 wood
screws (not supplied) or other suitable hardware through
the knockout holes in the base. Proceed to step 3 for
wiring connections.
Mounting on a 4" (102 mm) Octagon Box (indoor
installation only)
NOTE: For proper operation of the 52 series rotating
lights, the signals must be installed with the
dome facing either directly up or directly
down.
Remove the two knockouts for mounting screws from
the bottom of the signal base.
P-047550-0541 ISSUE 13
WARNINGS
To avoid risk of injur y, do not remove or insert lamp
when unit is ener gized.
To avoid risk of injur y, install lens before energizing
the unit.
4. Turn on power and verify that the signal operates
properly.
Page 3

Figure 3. Catalog Series 51 Flashing Lights
TT
rr
oubleshootingoubleshooting
T
r
oubleshooting
TT
rr
oubleshootingoubleshooting
Should the lamp fail to operate, check that power is on.
If power is on, either the lamp or the solid state flasher
module (the module is not used in the 52 series signals)
requires replacement. Replace the lamp first as directed
in the "Lamp Replacement" section that follows. Should
the replacement lamp also fail to operate, the flasher
module must be replaced. Refer to Table 3 for the required replacement flasher. Instructions for replacing
the flasher are provided with the flasher.
NOTE: Should both the lamp and horn fail to operate
in a 51 Series signal, replace the flasher
module.
MaintenanceMaintenance
Maintenance
MaintenanceMaintenance
with Horn
WARNINGS
To avoid risk of injury, do not remove or insert lamp
when unit is ener gized.
To avoid risk of injur y, install lens before energizing
the unit.
Figure 4. Catalog Series 52 Rotating Lights
WARNING
To prevent electrical shock, use care when
disassembling the signal to pre vent tearing of the
permanently affixed gaskets provided for
weatherproofing.
49 Series: See Figure 1. Remove the screw in the clamp
ring, remove the ring, and lift off the dome. Loosen the
three screws in the base of the lens and turn the lens
clockwise to remove. Replace the lamp.
50 and 50SIN Series: See Figure 2. Remove the three
screws from the top of the trim ring and lift off the lens
and ring. Replace the lamp.
51 Series: See Figure 3. Remove the three screws from
the top of the skirt and lift off the lens and skirt. Replace the lamp.
CAUTION
To prevent damage to the lens and/or dome,
use abrasive materials or cleaners.
do not
Lamp Replacement
Refer to Table 3 for the required lamp. After disconnecting power, replace the lamp using one of the following applicable procedures:
WARNING
To prevent electrical shock, ensure that power is
disconnected prior to disassemb ly.
52 Series: See Figure 4. Remove the screw in the clamp
ring, remove the ring, and lift off the dome. Replace
the lamp.
Cleaning
The signal's lens and/or dome should be peridodically
cleaned to maintain optimum light visibility. These items
may be cleaned with a soft cloth or sponge using mild
detergent. Ensure that the lens or dome is completely
dry before replacing.
P-047550-0541 ISSUE 13
Page 4

Table 2. Specifications
Catalog Number Rated Voltage Current
49(*)-R5 240V 50/60 Hz 0.10 amp
50(*)-R5 240V 50/60 Hz 0.10 amp
52(*)-R5 240V 50/60 Hz 0.10 amp
49(*)-N5-40WH 120V 50/60 Hz 0.30 amp
50(*)-N5-40WH 120V 50/60 Hz 0.30 amp
50SIN(*)-N5-40WH 120V 50/60 Hz 0.29 amp
51(*)-N5-40W 120V 50/60 Hz 0.29 amp
52(*)-N5-40WH 120V 50/60 Hz 0.35 amp
50(*)-G5-20WH 24V 50/60 Hz 0.80 amp
51(*)-G5-20W 24V 50/60 Hz 1.1 amp
52(*)-G5-20WH 24V 50/60 Hz 0.80 amp
Table 3. Replacement Parts
Replacement lamps, flashers, lenses and domes for the 49, 50, 50SIN, 51 and 52 series signals may be obtained from your
Edwards distr ibutor. The catalog n umbers or part numbers for these components are as f ollows.
Replacement Component
Signal Catalog Number Replacement Component Part Number
49(*)-N5-40WH, 50(*)-N5-40WH, Lamp - 40 Watt Halogen 50LMP-40WH or 50LMP-40W**
50SIN(*)-N5-40WH, 52(*)-N5-40WH 25T8DC**
51(*)-N5-40W Lamp - 40 Watt 50LMP-40W or 25T8DC
49(*)-R5, 50(*)-R5, 52 (*)-R5 Lamp - 25 Watt P-041917-0039 or
industry trade no. 25T8/240V/DC/CL
50(*)-G5-20WH, 52(*)-G5-20WH Lamp - 20 Watt Halogen 50LMP-20WH or industry trade no. 1638**
51(*)-G5-20W Lamp - 20 Watt 50LMP-20W or industry trade no. 1638
49(*)-N5-40WH, 50(*)-N5-40WH, Solid state flasher module P-041917-0026
51(*)-N5-40W
50(*)-G5-20WH, 51(*)-G5-20W Solid state flasher module P-041917-0029
49(*)-R5, 50(*)-R5 Solid state flasher module P-041917-0038
51(*)-N5-40W Horn 123A-N5
51(*)-G5-20W Horn 123A-G5
49(*)-N5-40WH, 49(*)-R5 Dome (Clear) 52-LC
52(*)-G5-20WH, 52(*)-N5-40WH, Dome 52-L(*)
52(*)-R5 (Amber, Blue, Clear, Green, Magenta or Red)
49(*)-N5-40WH, 49(*)-R5, Lens 92-L(*)
50(*)-N5-40WH, 50(*)-R5, (Amber, Blue, Clear, Green, Magenta or Red)
50(*)-G5-20WH, 50SIN(*)-N5-40WH,
51(*)-G5-20W, 51(*)-N5-40W
*Specify color of item by adding one of the following letters to the catalog number: A - amber, B - blue, C - clear, G - green,
M - magenta, or R - red (e .g., a red dome f or the 52 ser ies signal is 52-LR).
**The listed non-halogen b ulb may be used instead of the halogen b ulb.
P-047550-0541 ISSUE 13
 Loading...