

Page 1

ClearSight System / EV1000 Clinical Platform
Setup guide
Applying the finger cu
1. Select the proper size ClearSight finger
cu by using the ClearSight finger cu
sizing aid.
2. Place the middle phalanx of the patient’s
pointer, middle, or ring finger onto
the cu and gently lead the cu cable in
between two finger to the back side of the
hand. The cu must be lined up between
the first and second knuckles (1).
3. Line the middle phalanx of the finger between the two green lines
on the inside of the cu.
4. Wrap the ClearSight finger cu tightly around the finger. Do not rotate
the ClearSight finger cu after application (2).
5. Gently lead the cu cable and air hose between two fingers toward the
back of the hand (3).
6. Connect the ClearSight finger cu to the pressure controller (3).
7. If using a second finger cu, repeat steps 1-4 on adjacent
finger with cu #2.
Applying the heart reference sensor (HRS)
1. Connect the HRS to the pressure
controller (4).
2. Attach the finger end of the HRS to
a single ClearSight finger cu (5).
3. Attach the heart end of the HRS to
the patient at the phlebostatic axis (6).
1 2
3
54
6
NOTE: Changing body position during the measurement
may require reapplication of the heart end of the HRS.
Page 2
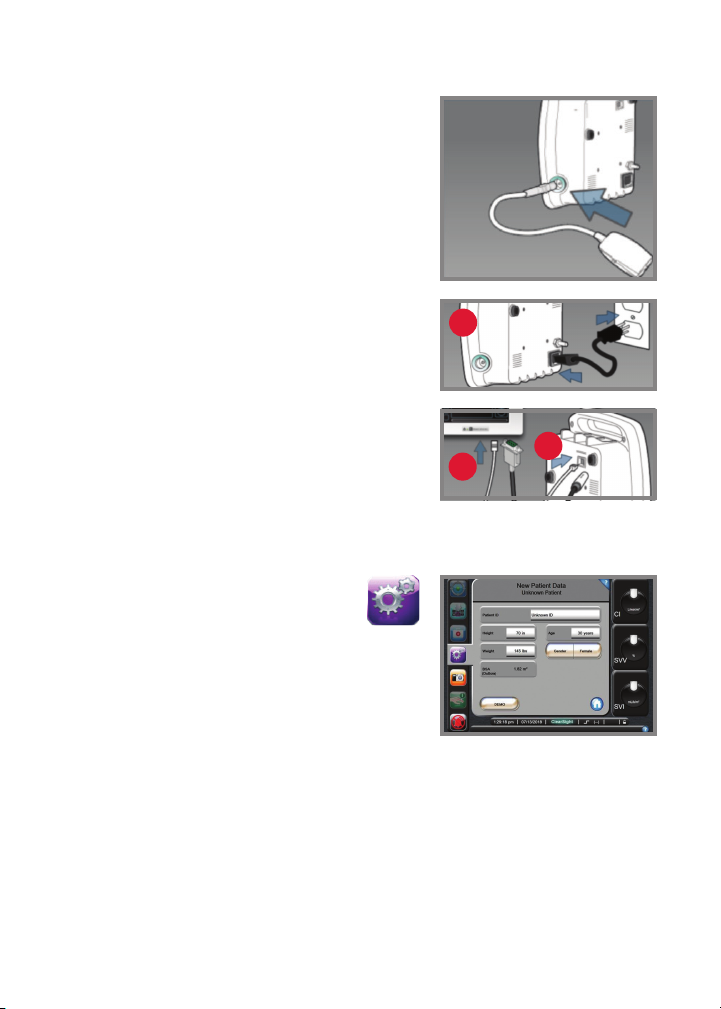
Connecting the pressure
controller to the pump unit
1. Connect the pressure controller cord
to the right side of the pump unit.
Connecting the pump unit to the
EV1000 monitor
1. Connect the pump unit to the power cord
and connect to an electrical outlet (1).
2. Connect the system power cable and
the Ethernet cable to the EV1000
monitor panel (2) and pump unit (3).
Entering patient data
1. Tap the Settings icon on the
navigation bar.
2. Tap the Patient Data button.
3. Tap the New Patient Data button or update
existing patient information by tapping the
grey rectangles next to each field.
1
3
2
NOTE: Accurate measurements of cardiac output can only
be obtained if the following patient data are properly entered:
gender, age, weight, and height.
4. Tap the Home button to confirm.
Page 3

Zeroing the HRS
1. Place both ends of the HRS at the
same vertical level.
2. Tap the Clinical Actions icon on the
navigation bar.
3. Tap the Zero & Waveform button.
4. Tap the Zero button under Align &
Zero HRS.
NOTE: The HRS can be zeroed before being
placed on a patient.
Connecting the pump unit
to the patient monitor
1. Connect patient monitor adapter cable
to the pump unit and pressure cable (4).
2. Connect pressure cable to the patient
monitor (5).
3. Move pressure output selection
to zero position (6).
4. Press the Zero button on
connected patient monitor (7).
5. Move the pressure output
selection to signal position (8).
4
5
7
6
8
Page 4

Start/stop a measurement and view arterial waveform
1. Zero the HRS sensor (see Zeroing the HRS).
2. Tap the Start Monitoring icon on the navigation bar (1).
An arterial waveform will appear at the top of the screen (2).
3. Press the Home button to confirm.
4. You may also view the arterial waveform on the trend
screen by tapping the Screen Selection icon on the
navigation bar, selecting the Trend Screen icon, and
tapping the Arterial Pressure Waveform icon (3).
5. Use the same icon to remove the waveform (3).
6. To stop a measurement, tap the Start Monitoring icon
on the navigation bar (1).
2
1
CAUTION: Federal (United States) law restricts this device to sale by or on the order of a
physician. See instructions for use for full prescribing information, including indications,
contraindications, warnings, precautions and adverse events.
Edwards, Edwards Lifesciences, the stylized E logo, ClearSight, and EV1000
are trademarks of Edwards Lifesciences Corporation. All other trademarks
are the property of their respective owners.
© 2018 Edwards Lifesciences Corporation. All rights reserved.
PP--US-2699v1.0
Edwards Lifesciences
One Edwards Way, Irvine CA 92614 USA
edwards.com
3
 Loading...