

Page 1
VolumeView Set
EV1000 Clinical Platform
Setup Guide
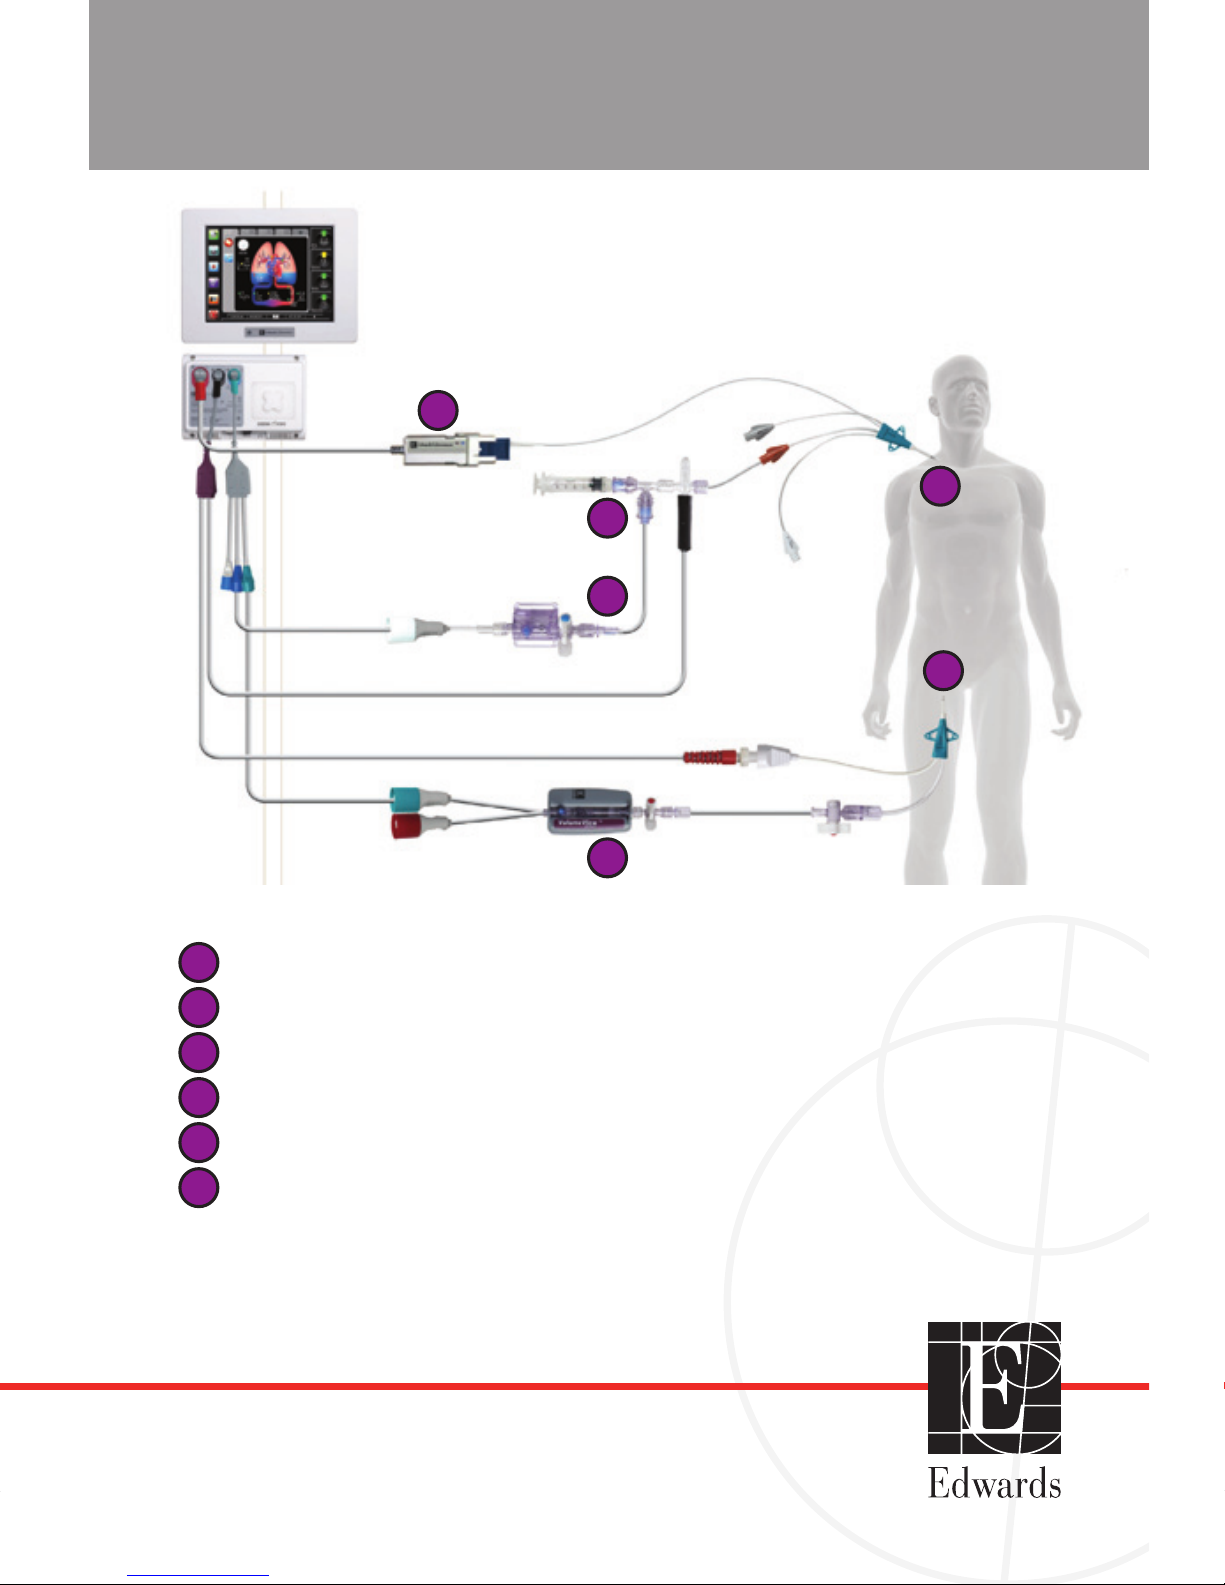
System Setup
VolumeView sensor
VolumeView femoral arterial catheter
VolumeView thermistor manifold
PreSep oximetry catheter
TruWave pressure transducer
Oximetry cable
1
2
3
4
5
6
1
2
3
4
5
6
Page 2

EV1000 Clinical Platform Startup with the VolumeView Set
Before startup, please ensure monitor, cables and patient cables
are all connected.
1. Turn on monitor and databox. System self-test starts.
2. Enter new patient data OR continue with existing patient.
3. Set up and prime VolumeView sensor and TruWave CVP
transducer and connect to databox.
4. Ensure the sensor and transducer
are level to patient’s phlebostatic
axis and zero transducers on monitor
using Clinical Actions button.
5. Choose continuous parameters,
and define alarms/target range.
6. Start transpulmonary thermodilution - inject bolus
and review and edit boluses results.
7. Monitor patient in real time with one of the six available
screens.
Thermodilution Bolus - VolumeView Set
1. Insert the VolumeView femoral arterial catheter
according to the directions for use.
2. Insert a CVC (if using PreSep CVC, refer to PreSep
catheter setup guide).
3. Ensure the TruWave central venous pressure
transducer and VolumeView sensor are primed
and then connected to the EV1000 databox.
4. Ensure the sensor and transducer
are level to patient’s phlebostatic
axis and zero transducers on monitor
using Clinical Actions button.
5. Connect the VolumeView sensor
to the VolumeView femoral arterial
catheter and confirm the appropriate
waveforms and pressures are displayed.
6. Connect the databox thermistor cable to the VolumeView
femoral arterial thermistor and confirm appropriate temperature
on the EV1000 monitor.
7. Prime the VolumeView set manifold, removing all air.
Connect the TruWave central venous pressure transducer
to the VolumeView manifold and then
connect it to the central venous catheter
and confirm the appropriate waveform
and pressure are displayed.
8. Connect the in-line injectate thermistor
probe to the VolumeView manifold.
9. Connect a pre-chilled syringe
with (15 or 20 ml) normal saline to
the VolumeView manifold valve/port.
10. Touch the Clinical Actions button and
then touch the Thermodilution button
to start the TPTD procedure.
11. Select the desired injectate volume on
the keypad (prefer 15 or 20 ml).
12. Select Lung Resection, if appropriate,
as well as the descriptor (for example
RUL = right upper lobectomy).
13. Select Parameters, to choose indexed or non-indexed
parameter.
14. Touch Start Set.
15. Wait is highlighted until the thermal baseline is reached.
16. When Inject is highlighted, use a rapid, smooth, continuous
method to inject the cold solution with the volume amount
previously selected.
17. Observe the calculation.
18. Repeat steps 14 and 15.
19. Touch review to edit the series of boluses.
20. Touch Accept.
2
Page 3

6. Connect the databox thermistor cable to the VolumeView
femoral arterial thermistor and confirm appropriate temperature
on the EV1000 monitor.
7. Prime the VolumeView set manifold, removing all air.
Connect the TruWave central venous pressure transducer
to the VolumeView manifold and then
connect it to the central venous catheter
and confirm the appropriate waveform
and pressure are displayed.
8. Connect the in-line injectate thermistor
probe to the VolumeView manifold.
9. Connect a pre-chilled syringe
with (15 or 20 ml) normal saline to
the VolumeView manifold valve/port.
10. Touch the Clinical Actions button and
then touch the Thermodilution button
to start the TPTD procedure.
11. Select the desired injectate volume on
the keypad (prefer 15 or 20 ml).
12. Select Lung Resection, if appropriate,
as well as the descriptor (for example
RUL = right upper lobectomy).
13. Select Parameters, to choose indexed or non-indexed
parameter.
14. Touch Start Set.
15. Wait is highlighted until the thermal baseline is reached.
16. When Inject is highlighted, use a rapid, smooth, continuous
method to inject the cold solution with the volume amount
previously selected.
17. Observe the calculation.
18. Repeat steps 14 and 15.
19. Touch review to edit the series of boluses.
20. Touch Accept.
87
9
Page 4

For professional use. CAUTION: Federal (United States) law
restricts this device to sale by or on the order of a physician.
See instructions for use for full prescribing information,
including indications, contraindications, warnings,
precautions and adverse events.
Edwards Lifesciences devices placed on the European market meeting the
essential requirements referred to in Article 3 of the Medical Device Directive
93/42/EEC bear the CE marking of conformity.
Edwards, Edwards Lifesciences, the stylized E logo, EV1000, PreSep, TruWave,
and VolumeView are trademarks of Edwards Lifesciences Corporation.
© 2012 Edwards Lifesciences Corporation.
All rights reserved. AR07460
Edwards Lifesciences I edwards.com
USA
I
Switzerland I Japan I Singapore I Brazil
System Setup
VolumeView sensor
VolumeView femoral arterial catheter
VolumeView thermistor manifold
PreSep oximetry catheter
TruWave pressure transducer
Oximetry cable
1
2
3
4
5
6
1
 Loading...