

Page 1
progressiv
hybrid lite
hybrid lite LED
FullHD DVB-C/T2 Receiver
User’s Guide
hybrid lite
Page 2

CONTENTS
►Safety ................................................................................................................ 4-5
►Remote control ................................................................................................... 6
►Description .........................................................................................................7
►Features ............................................................................................................... 8
►Information bar (InfoBar) ..................................................................................9
►EDIVISION – Your electronic program guide ............................................10-11
►Channel ..............................................................................................................12
Edit channel ..........................................................................................................................12
Edit favourites .......................................................................................................................14
►Installation ........................................................................................................16
Terrestrial Installation ........................................................................................................... 16
Cable Installation ..................................................................................................................18
Network ID Scan ..................................................................................................................18
►Menu system settings ......................................................................................18
Language ..............................................................................................................................18
A/V Control ............................................................................................................................ 19
Time setting ...........................................................................................................................19
Timer ....................................................................................................................................20
Parental Control ....................................................................................................................21
Factory setting ....................................................................................................................... 21
Information ............................................................................................................................22
►System ..............................................................................................................22
Software Update ..................................................................................................................22
Miscellaneous Settings .........................................................................................................24
Card information ................................................................................................................... 24
2 Version of 14 June 2016
Page 3

►Media ..................................................................................................................25
File List .................................................................................................................................. 25
Memory Information ..............................................................................................................25
Check-Speed USB ................................................................................................................ 26
USB Safely Remove .............................................................................................................26
►Internet ...............................................................................................................27
Ethernet Settings ................................................................................................................... 27
YouTube ................................................................................................................................ 28
Web TV .................................................................................................................................28
Pss Reader ...........................................................................................................................28
Weather Forecast .................................................................................................................. 29
Google Maps ........................................................................................................................ 29
Version of 14 June 2016 3
Page 4

►Important safety instructions
1) Please read these instructions carefully.
2) Keep these instructions in a safe place for future reference.
3) Pay extra attention to «warning» points.
4) Follow all instructions.
5) Do not use the device near water.
6) Clean with a dry cloth only.
7) Do not use near heat sources, such as radiators, heat accumulators, ovens or other devices (including
ampliers) generating heat.
8) Only operate this product with the type of power source indicated on the label. If you are unsure about the
type of power supply you use at home, ask your electricity supplier. Disconnect the device from the mains
before maintenance or installation procedure.
9) Protect the mains cable from damage.
10) Only use auxiliary devices/accessories specied by the manufacturer.
11) Disconnect the device during thunderstorms or extended periods of non-use.
12) All maintenance work should be carried out by qualied service personnel. Maintenance is required when
the device is damaged in any way, including damage to the mains cable or mains plug. Also in case the
device becomes exposed to liquids or moisture, was dropped or does not function properly.
13) Make sure that the ventilation slots are always unobstructed.
14) Attention should be paid to the environmental aspect of battery disposal.
15) Only use the device in moderate climate.
WARNING: In order to avoid the risk of re or electric shock, do not expose this device to rain or moisture.
WARNING: The batteries should not be exposed to excessive heat and heat sources such as direct sunlight,
re, etc.
4 Version of 14 June 2016
Page 5

This symbol indicates that there is risk of electric shock.
This symbol indicates that the operating instructions contain important operating and maintenance
information.
This symbol indicates that the product has a double insulation between voltage and user accessible
parts. Only use parts provided by the manufacturer during repair.
This symbol on the product or in the operating instructions indicates that the electrical or electronic
device must be disposed of separately from household waste at the end of the service life. Separate
collection systems exist for recycling.
For further information, please contact your local authorities or your dealer where you purchased the product.
Version of 14 June 2016 5
Page 6
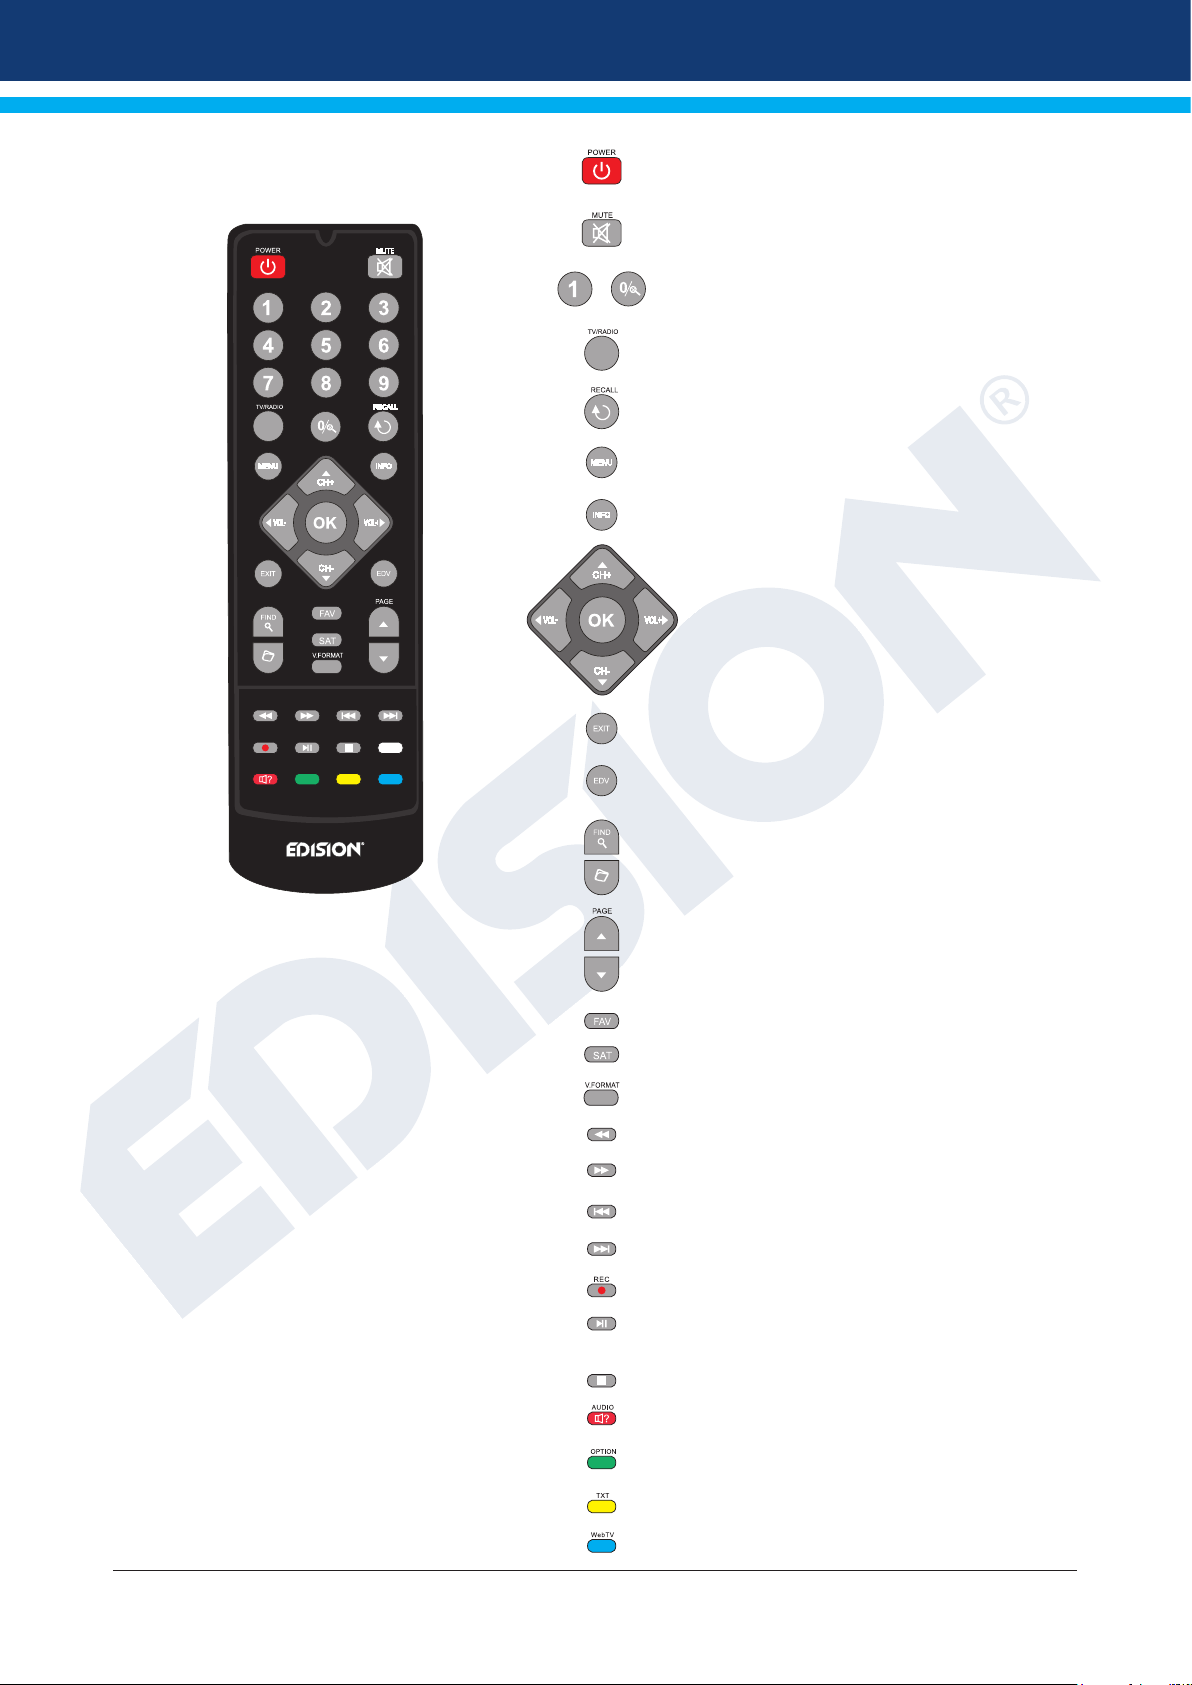
►Remote control
On / Off button
Mute On/Off
Selection of TV/Radio program.
...
Input of numbers or letters in
the menus
Toggles between TV and Radio mode
REC
ZOOM
OPTIONAUDIO TXT
TV/AV
WebTV
Returns to the previous program
Displays the main menu
Displays the information bar
Use the arrow buttons to navigate through
the menu. UP and DOWN buttons change
the channel while LEFT and RIGHT buttons change the volume. The OK button
displays the Channel List and conrms
a selection
Exits a Menu/Dialogue window.
Selection of the electronic program
guide EDIVISION.
Program List Search
Displays a le list
Channel List
Scroll Forwards or
Backwards
Displays the favourite lists
Displays the satellite lists
Changes the TV display format
Allows fast backward
Allows fast forward
Moves to the beginning
or previous Recording / Image
Moves to the end
or next Recording / Image
Starts recording manually
Starts playback / Pauses playback
Finishes TimeShift, a recording
or a playback
Calls up the Audio menu
Option button. Switching between
TV/AV
TV/AV mode (Not in HDMI mode).
Calls up the Subtitle / Teletext menu
WebTV button
6 Version of 14 June 2016
Page 7
►Description
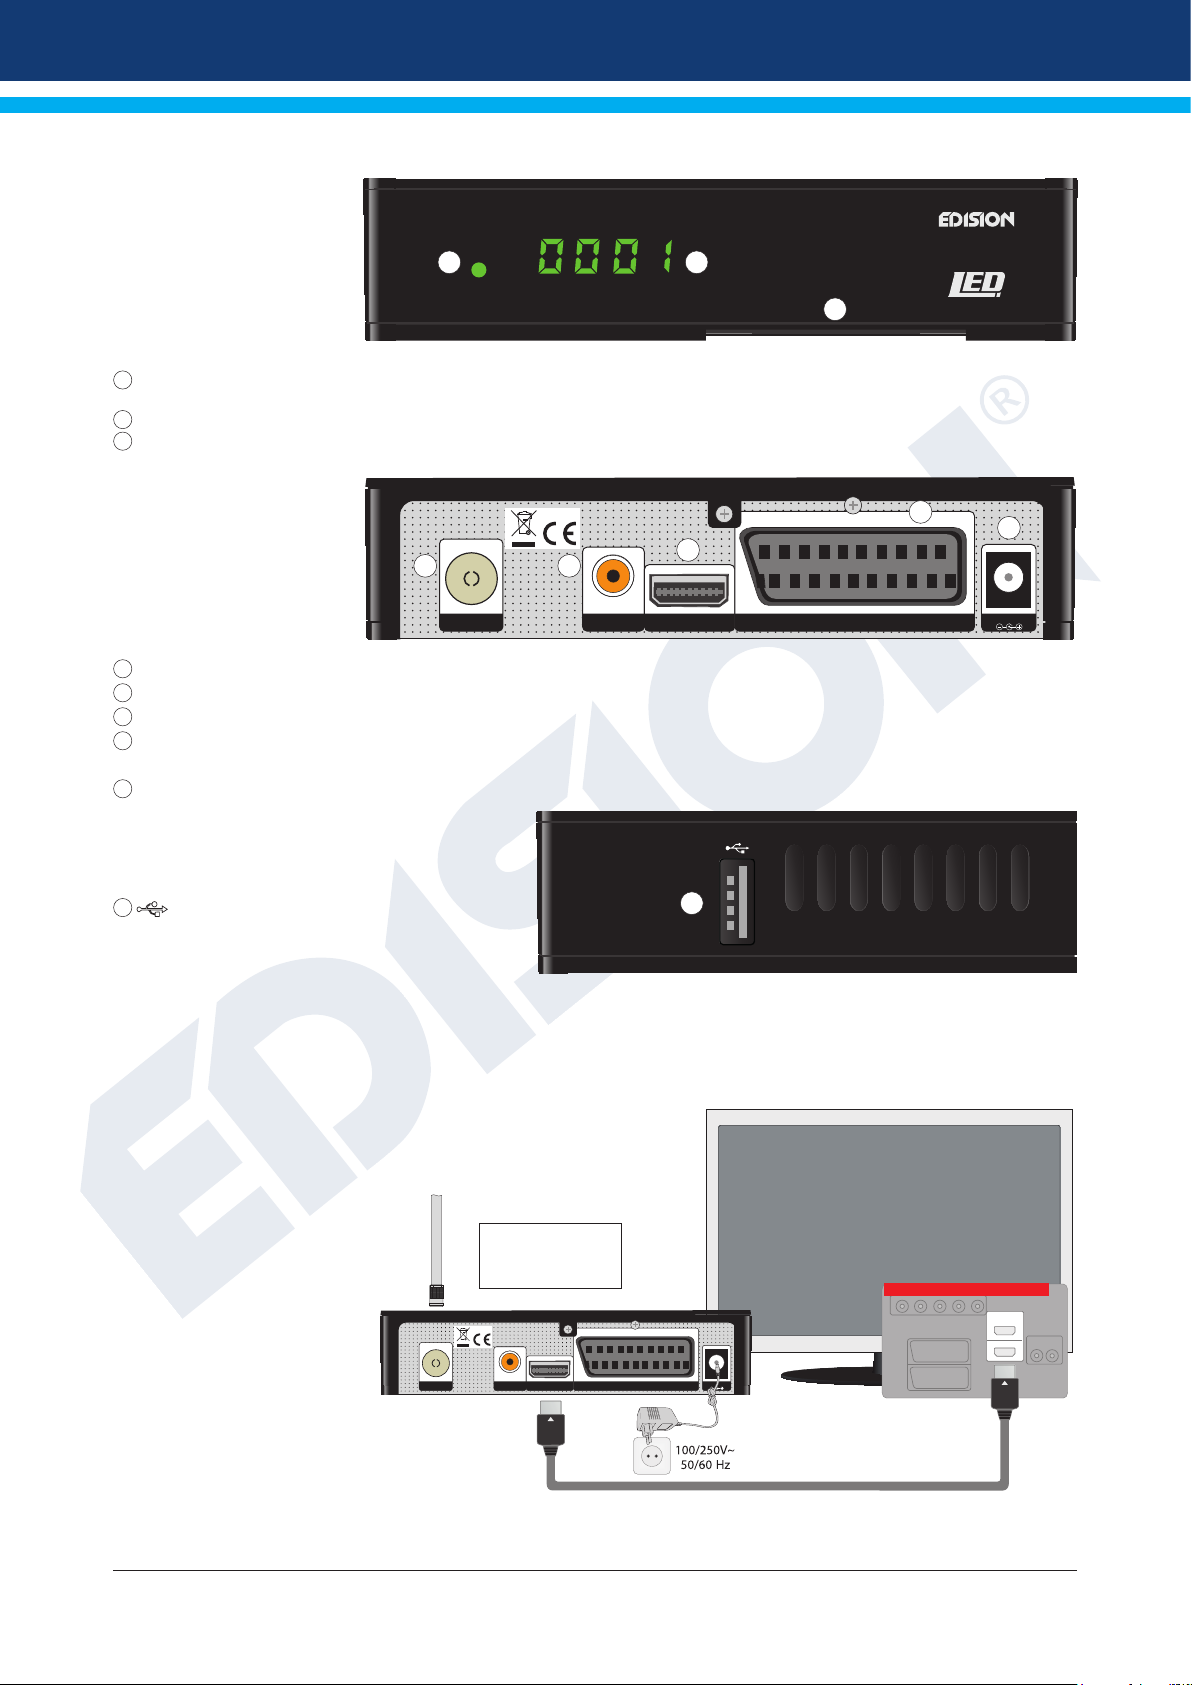
Front Panel
1
Infrared sensor for the reception of remote
control commands
2
Display LED, displays current information
3
Card reader
hybrid lite
1 2
3
Back Panel
4 5
4
ANT IN: Input for connecting the signal from the antenna
5
S/PDIF: Audio interface for amplier/audio console
6
HDMI: Connection to an HDTV quality TV
7
SCART: For connecting to a TV set,
using SCART cable [not for HD TV]
8
Connection for an adapter (DC 5V / 1,0A)
Subpage
9
/USB: Connection for USB storage devices
Connecting and switching on
Note: For trouble-free signal reception your antenna
and cable installation should be calibrated
and inspected by a qualied professional with a digital
TV-level-measuring instrument.
•
Connect the receiver’s HDMI-output to the HDMI-input
of your television set (TV), for HDTV quality.
• Then connect the coaxial cable
from the terrestrial
antenna to the ANT IN input
of the receiver.
• Insert the batteries into the remote.
Further information you will nd at
the back of this instruction manual.
• Connect the receiver to the mains
power supply network, by means
of it’s power supply unit included
in the package.
coaxial-wire Antenna
ANT IN:
input from terrestrial
antenna.
HDMI:
Output receiver
coaxial-wire
HDMI SCART
S/PDIFANT IN
HDMI
kabel
7
8
6
S/PDIFANT IN
HDMI SCART
DC 5V/1,0 A
9
TV set connection panel
Use an HDMI input!
HDMI in
2
1
DC 5V/1,0 A
Power socket
HD mi
kabel
• The receiver starts with the BOOT-process
HDMI cable
and will be ready for you to enjoy in a few minutes.
Version of 14 June 2016 7
Page 8
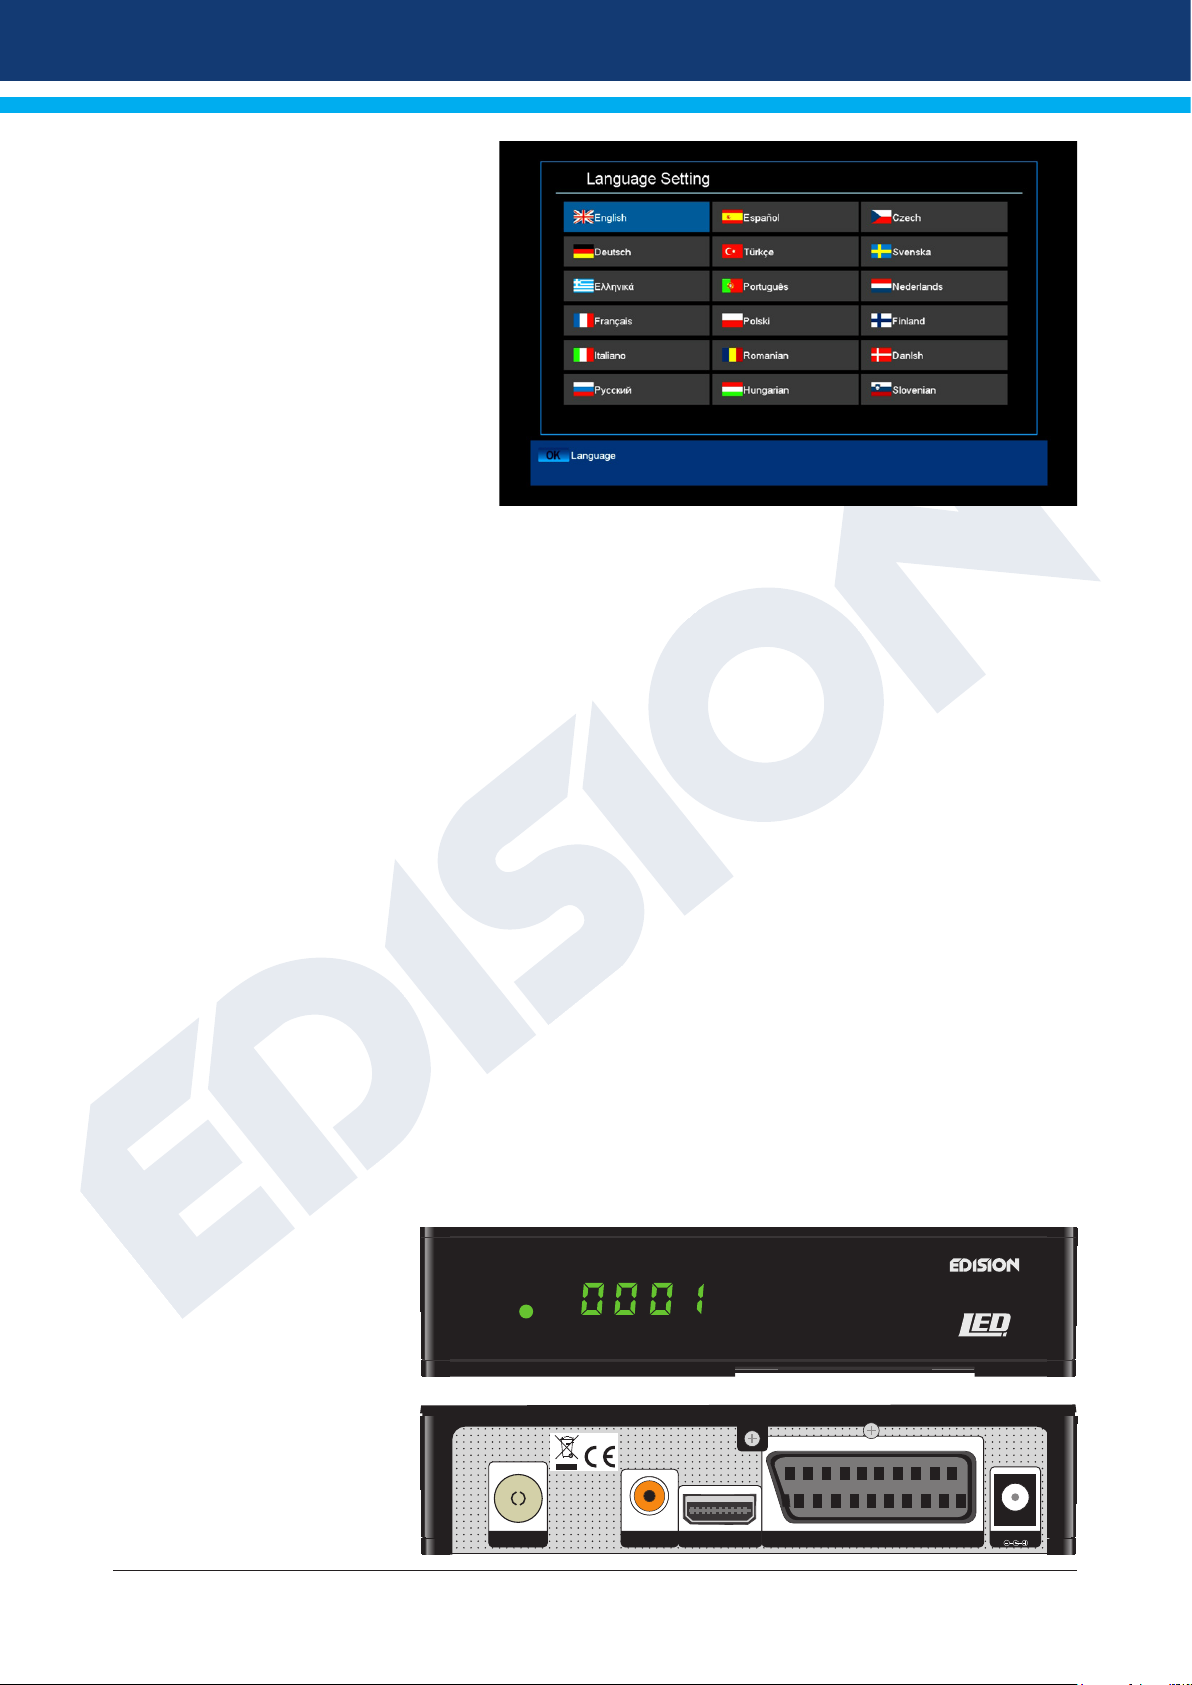
Language Selection
►Features
• Type: DVB-T2 / DVB-C, Hybrid Full HD receiver.
• Digital Terrestrial, Mpeg-4.
• Resolution 480p, 576p, 720p/50Hz, 720p/60Hz, 1080i/50Hz, 1080i/60Hz, 1080p/50Hz, 1080p/60Hz TV-
Standard
• 1 x Card Reader
• 1 x HDMI Output for Full HD video/audio
• 1 x SCART
• 1 x USB
• RF in
• LED Display
• 6000-TV/radio channels memory.
• PAL/NTSC Auto-switch.
• Multilingual OnScreenDisplay.
• EDIVISION electronic program guide.
• Supports Picture In Grak (PIG)
• Channel Edit and Favourite lists.
• Auto and Manual channel search.
• Αυτοματοποιημένος χρονοδιακόπτης Οn/Off
• 3G Connection (με USB 3G Modem)
• Wi Connection (μόνο με WiFi USB Dongle)
• PVR μέσω USB
• Επιλογή Τime Shift
• Subtitle support.
• Teletext support.
• Last channel selection auto-save.
• Software backup and Upgrade,
via USB.
• Supports FAT 16/32, NTFS
• Parental Control.
• Eco-mode standby 0,8 Watt
• 100~240V Voltage, 50Hz/60Hz
• Media player MP3/JPEG/BMP/
AVI/DivX/VOB/MKV
• Dimensions: 145x120x35 mm
(Π x Β x Υ)
• Color: black
• Warranty: 2 years.
S/PDIFANT IN
HDMI SCART
hybrid lite
DC 5V/1,0 A
8 Version of 14 June 2016
Page 9
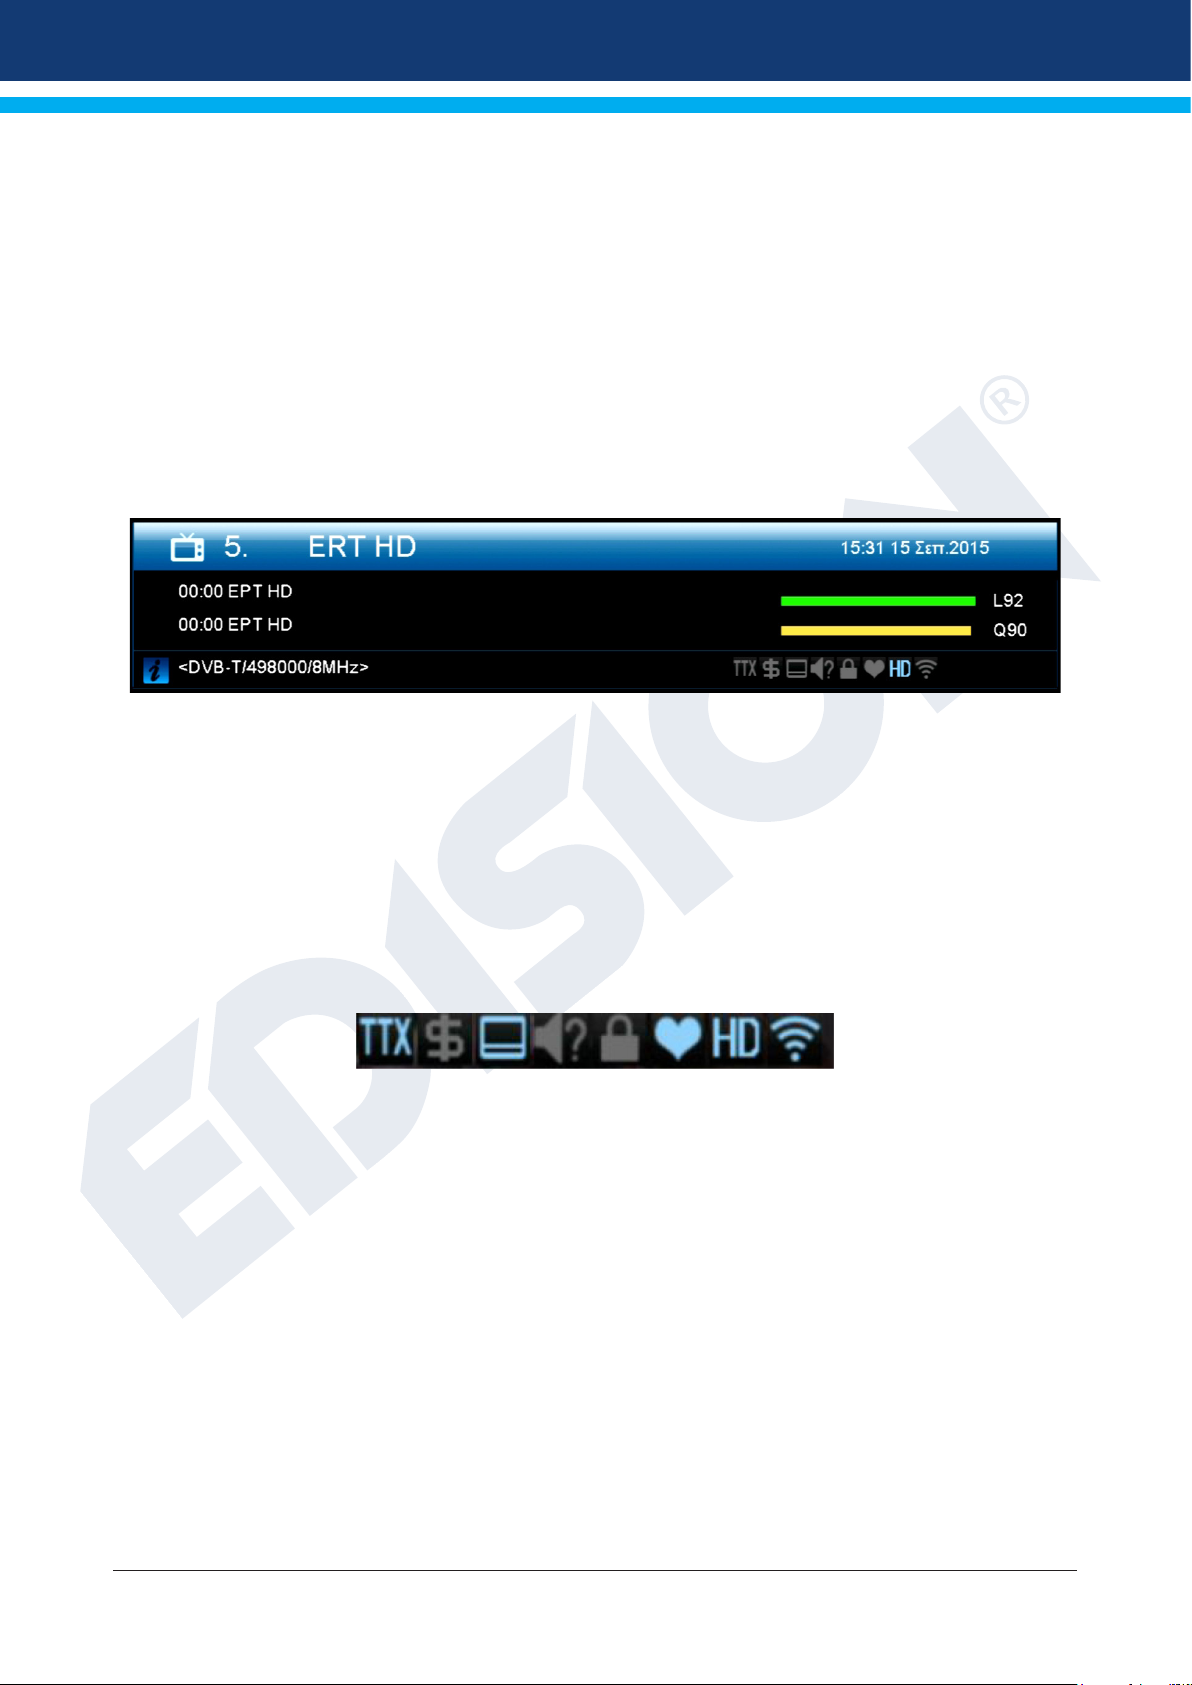
►Information bar (InfoBar)
When in the TV/Radio mode, the ‘INFO’ button displays an information bar (InfoBar) at the lower edge of the
screen. This bar is faded-in up to 10 seconds.
How to change the duration of fading of the information bar:
1. Press the ‘MENU’ button to open the main menu.
2. Use the left/right arrow buttons to navigate to the ‘System’ item.
3. Use the up/down arrow buttons to navigate to the ‘Other settings’ menu item and press
the OK button.
4. Use the left/right arrow buttons to select the value in seconds you want to set (max. 10s)
in the ‘OSD time exceeded’ item.
5. Press the EXIT button to exit the menu.
The InfoBar in TV or Radio mode shows the following information about the current program and selected
station:
- the place in the program list
- the name of the station
- the current program (as far as information is available) including start time
- the following program (as far as information is available) including start time
- the name of the favourite list
- the time
- indicates the availability of Teletext for the current program
- indicates if the transmitted program is encrypted
- indicates if subtitles are available
- indicates if the sound broadcasted is in stereo or mono format, left or right balance
- indicates if the program is blocked (child protection)
- indicates that the station is present in a favourite list
- indicates if the program is transmitted in HD
- indicates if Wi-Fi network connection exists
Functions and settings:
If the InfoBar is displayed, detailed information about the current program can be displayed (if available) by
(repeated) pressing the ‘INFO’ button. If multiple information pages are available, scroll through these pages
by using the ‘PAGE+’/’PAGE-’ buttons. Use the left/right arrow buttons to switch between the information
of the current and next program. Use the red button to display further (technical) information. Use the EXIT
button to exit the menu with the detailed information.
Use the EXIT button again to switch off the InfoBar.
Version of 14 June 2016 9
Page 10
►EDIVISION - Your electronic program guide
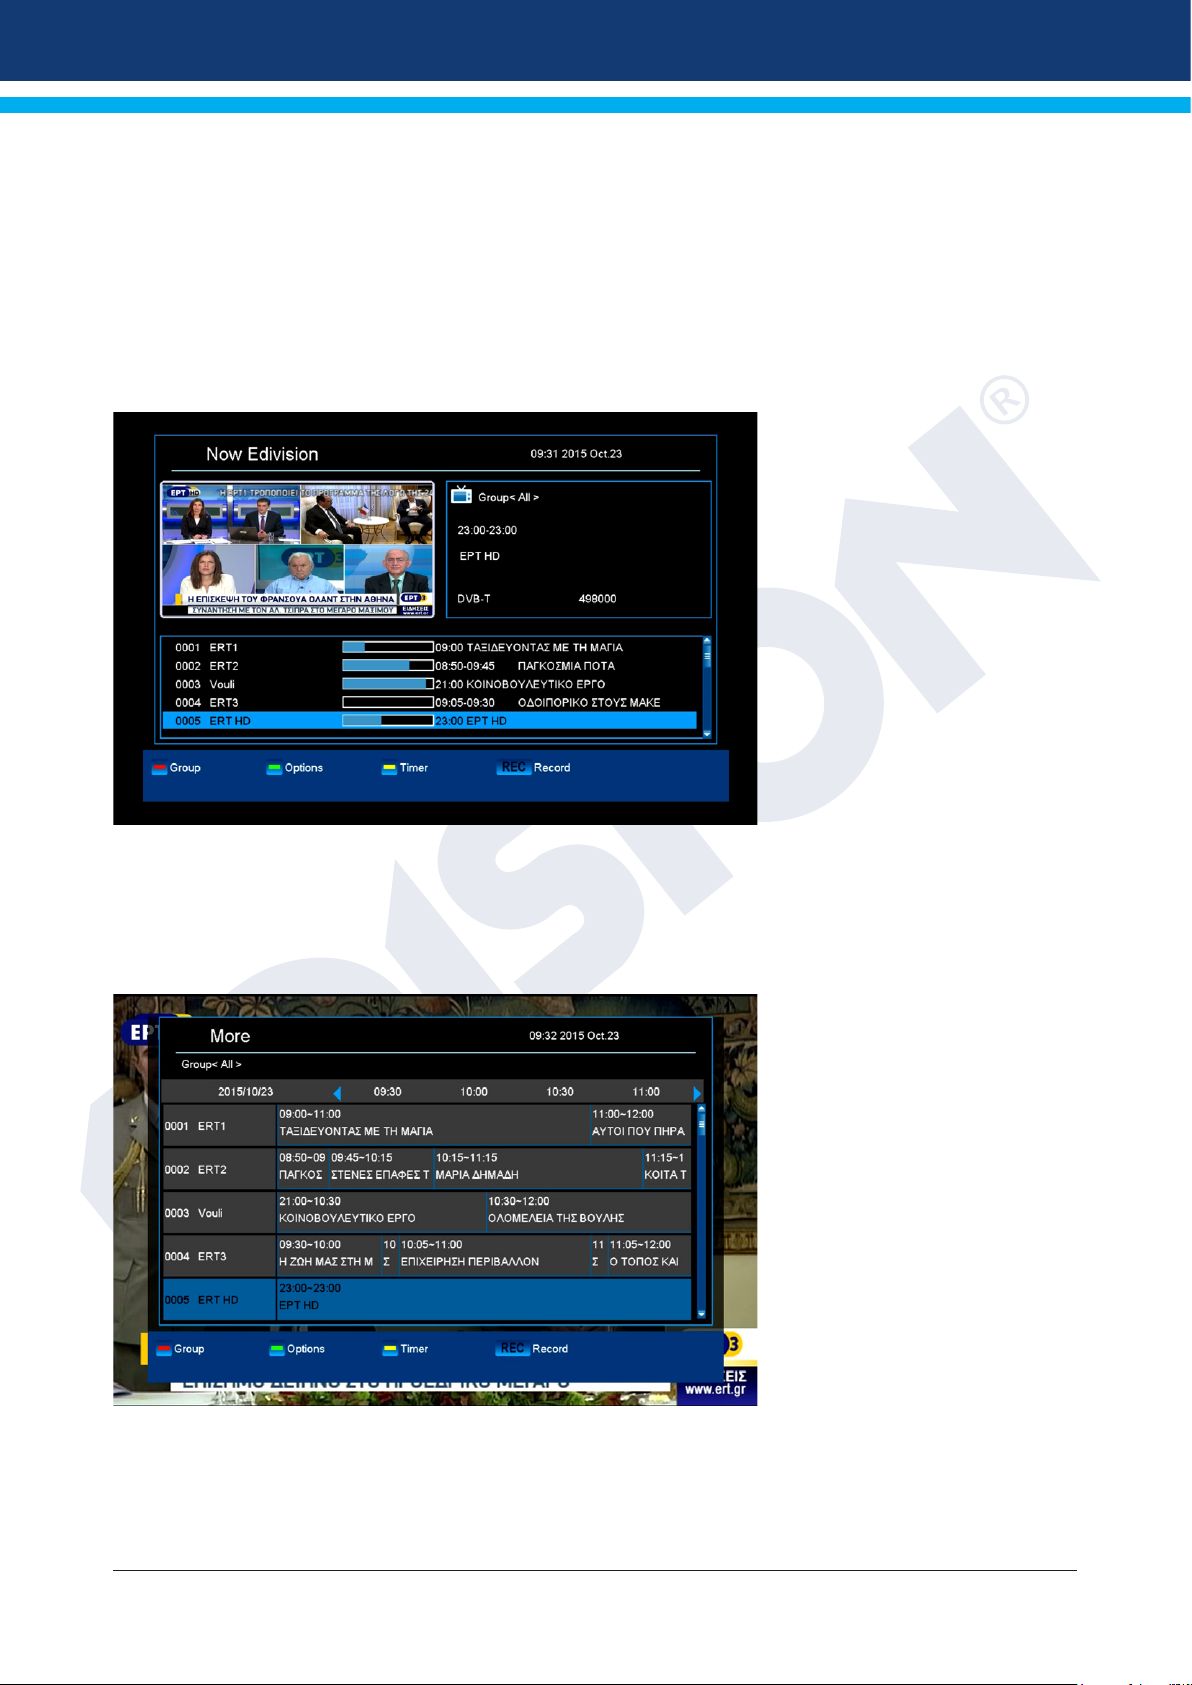
Standard: EDIVISION is an electronic program guide with its own OSD menu. EDIVISION presents the
information provided by the service provider in detailed views. In addition, up to 8 time-controlled recordings
(Timer) can be programmed from here. Note that not all channels/program providers provide program-related
information.
Use the EDIVISION button on the remote control to start your program guide.
Functions and settings:
The window of ‘EDIVISION’ is
structured differently, depending
on in which mode you are.
The mode (now, next, more,
timetable) can be changed with
the green button.
Information can be found at the
top left in the modes ‘Now’ and
‘Next’ on the current or next
program and on the channel
in text format, at the top right,
the current TV picture (in TV
mode). In the lower area, the
current program list can be
found which can be navigated
with the up/down arrow buttons
and another channel can be
chosen with the OK button. If
the channel provides programrelated information, it will be displayed in the list (e.g. duration of the program in form of bars, program title).
Press the OK button to display detailed information about the program, if available. Use the left/right arrow
buttons to switch between ‘Now’ and ‘Next EDIVISION modes.
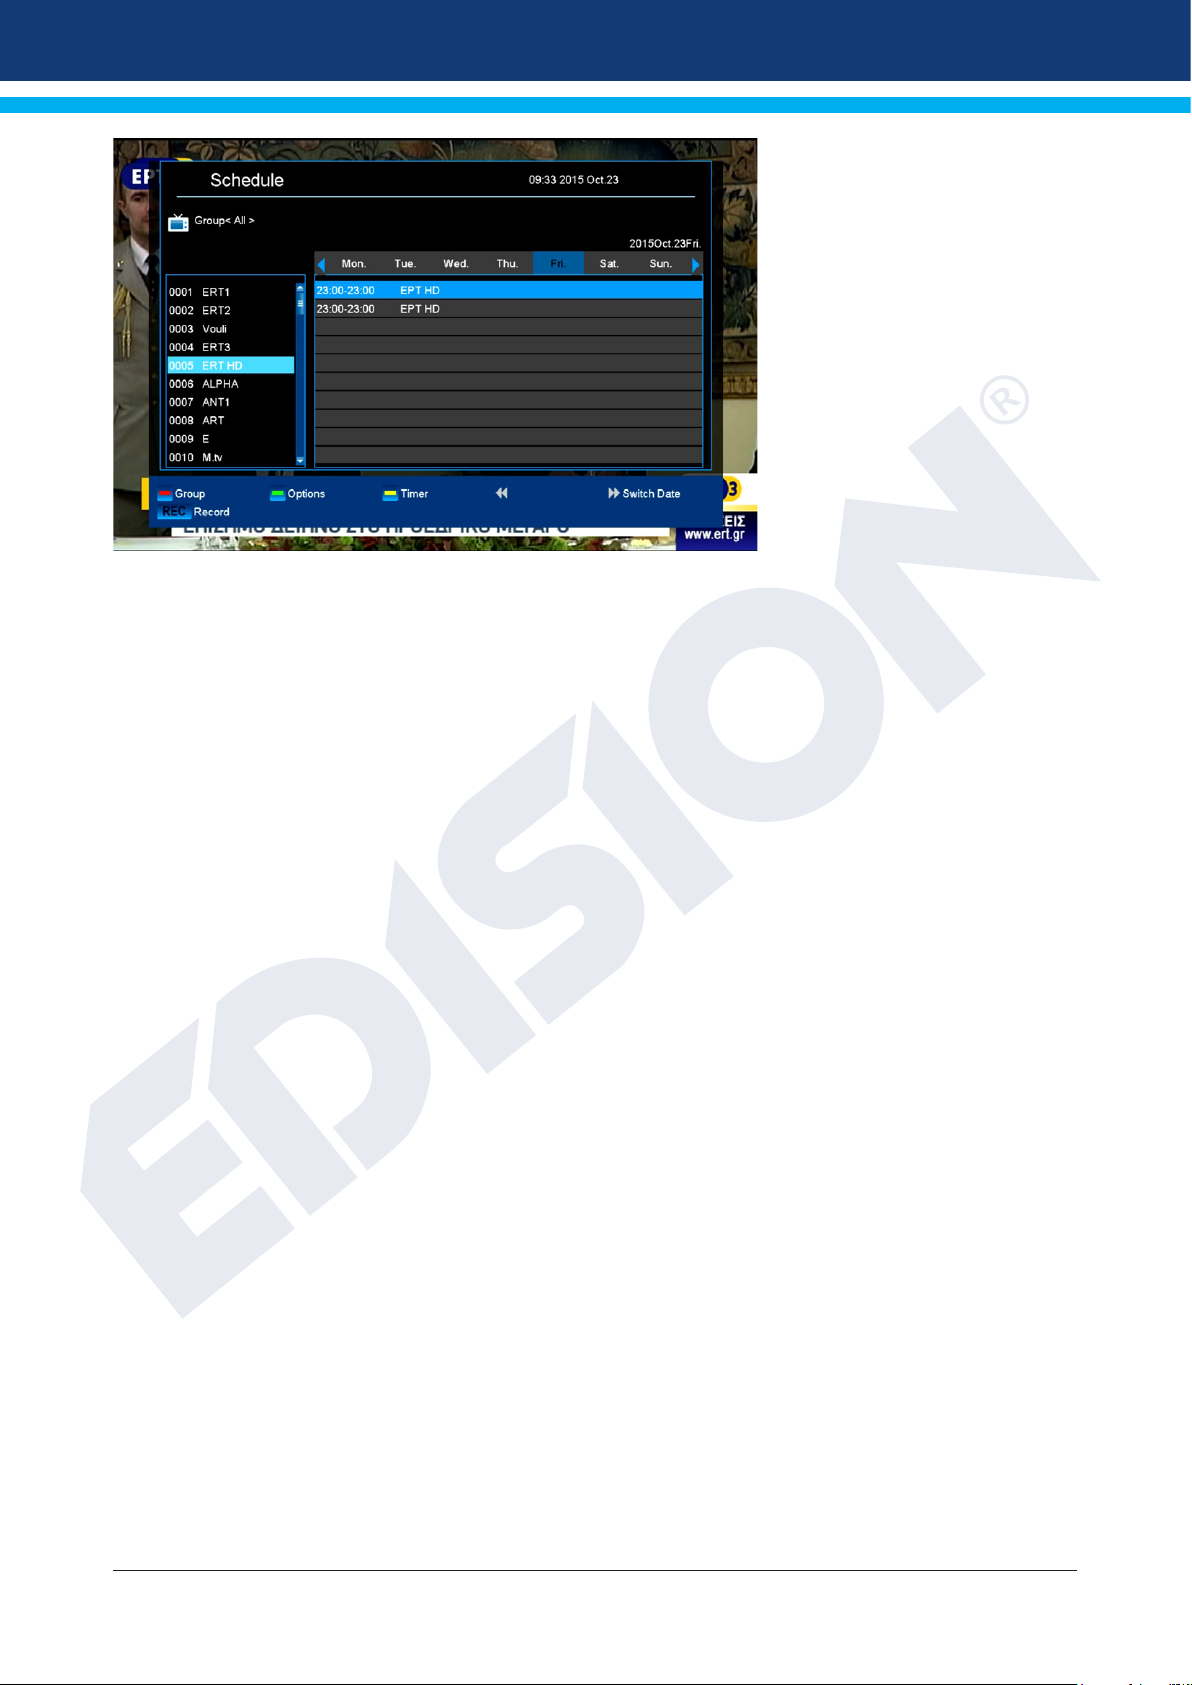
The ‘More’ mode displays
program information in chart
form and chronological order.
Use the left/right arrow
buttons to navigate between
a channel’s temporal program
information and use the up/
down arrow buttons to move
the cursor (yellow marking) in
the channel list. The OK button
may possibly has to be pressed
if another channel was selected
and the program-related
information should be displayed
(if available). If the cursor is
located on the right-hand side
of a program title, detailed
information about this program
can be displayed by pressing the
OK button.
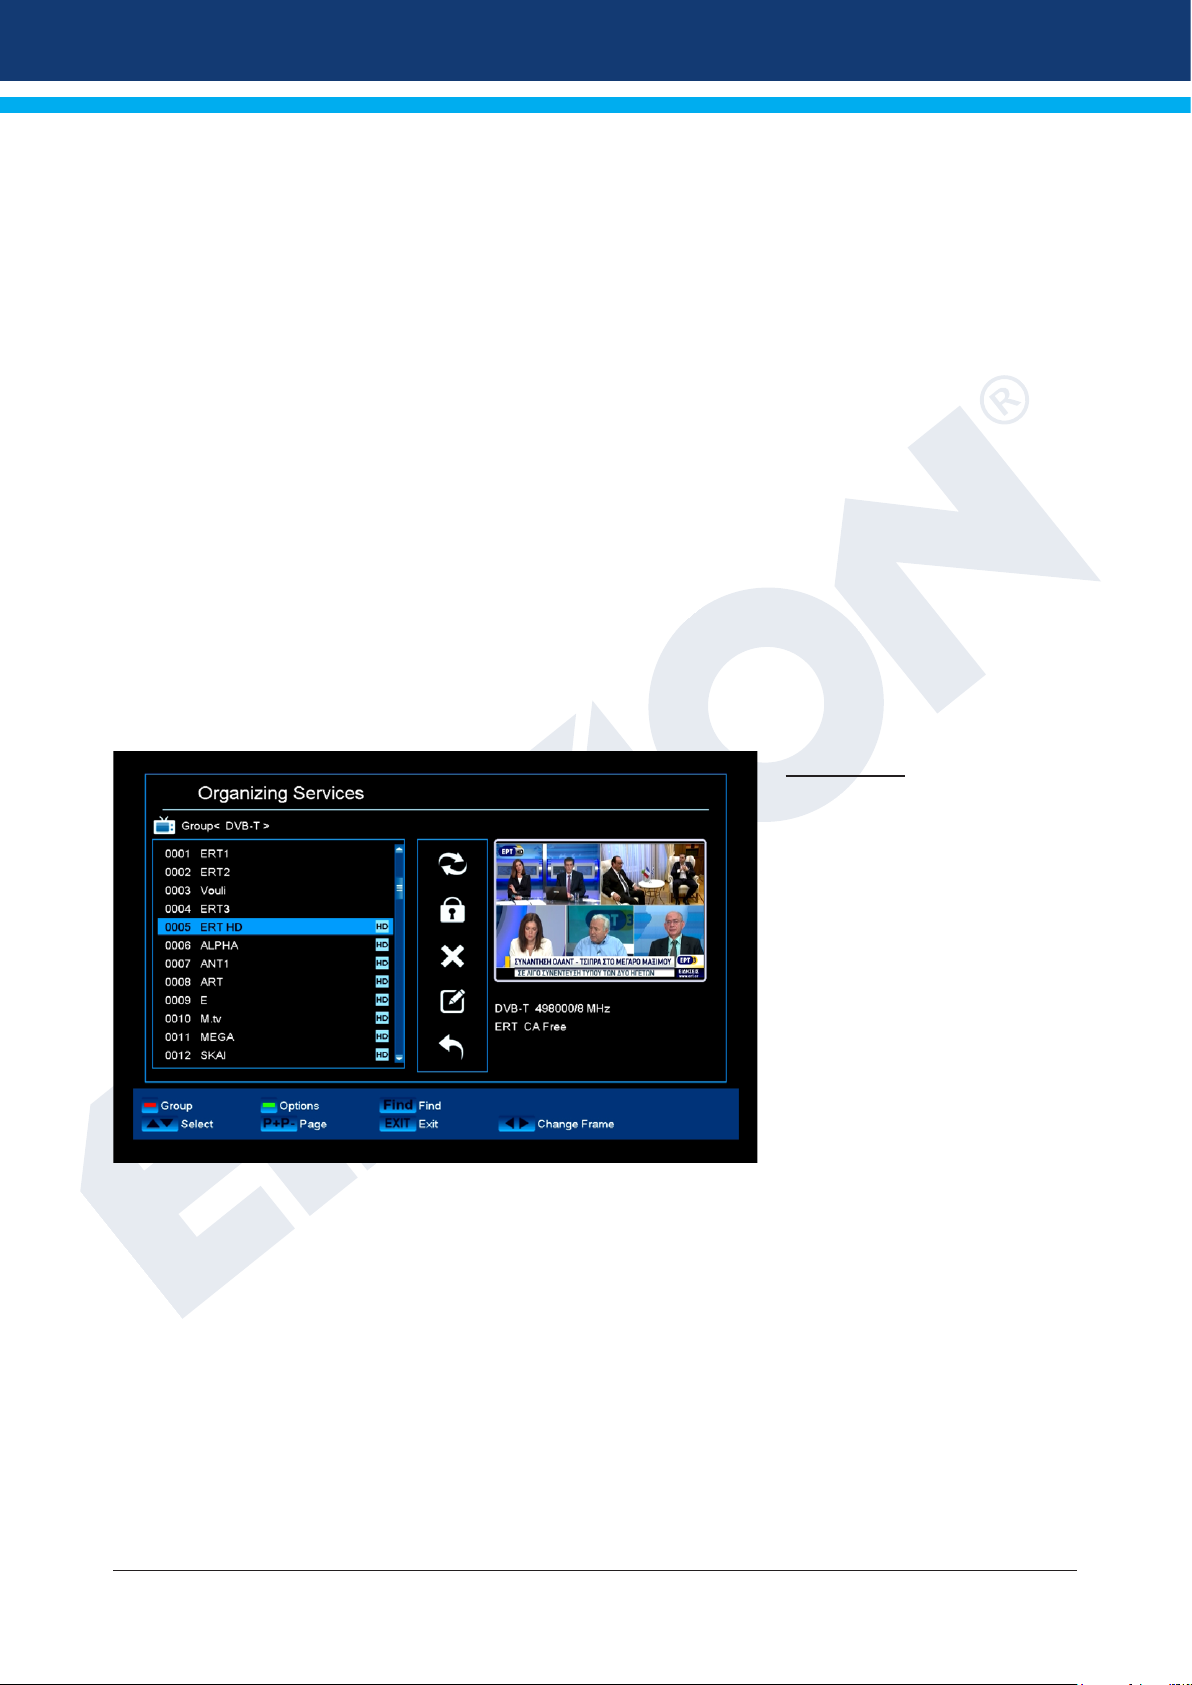
The ‘Timetable’ mode displays the currently selected program list in chart form on the left and program
information in weekly format on the right. Use the left/right arrow buttons.
10 Version of 14 June 2016
Page 11
EDIVISION window in
‘Timetable’ mode
To navigate in the channel list
and by using the PREV/NEXT
buttons to navigate with daily
overview.
Use the up/down arrow
buttons to navigate between
the weekdays in the respective
list. If the cursor is located on
the right-hand column side
of a program title, even more
detailed information about this
program can be displayed (if
available) by pressing the OK
button.
The following functions and buttons can be used in all modes:
The red button displays an overview of the existing channel lists (groups). Use the arrow buttons to
navigate through this overview and the OK button to set the channel list to be used by EDIVISION.
The green button calls up a menu allowing to switch between the different views of EDIVISION by using the
up/down arrow buttons and the OK button.
The yellow button calls up a Popup Timer Menu. Select the ‘VCR’ item to program time-based events (e.g.
recordings). Select the item Timer List to see the programmed events.
If you want to make a recording on a certain date in the future, select the item ‘USB/HDD Recorder’. Use the
up/down arrow buttons in the following window to navigate between the menu items and the left/right arrow
buttons and OK button to set the values. The following settings can be made in the menu ‘Timer’.
Timer number: Calling up the timer menu automatically switches to the next (available) programmable timer.
Use the left/right arrow buttons the OK button and the up/down arrow buttons to switch between timers. Up
to 8 different events can be programmed.
Timer mode: Set the recording mode here. Choose whether the recording is carried out once, daily,
weekly or monthly.
Timer service: Set the service entry ‘Recording TV channel’ here for a TV recording and ‘Recording Radio
channel’ for a radio recording.
Station: Set the channel here.
Date: Set the start date of the recording here.
Start time: Set the start time here.
Duration: Set the duration of the recording here (recording length).
After making changes and in order to keep them, conrm with ‘Yes’ in the appearing dialogue window. Exit
the timer menu with the EXIT button.
Note: An error message appears under certain circumstances. As a rule, an incorrect start time or start date
was given. Check the information!
Also note that a recording is only possible if a corresponding USB memory device is already connected to
the receiver.
Exit ‘EDIVISION’ by pressing the EXIT button.
Version of 14 June 2016 11
Page 12
►Menu program
► Channel
►Menu Installation
► Settings
► System
► Media
► Internet
► Channel
► Edit channel
► Edit favourites
Edit channel
Your channel list(s) for TV
or Radio channels can be
customized in this menu.
Notes: Make sure the receiver
is in the correct mode. If wanting
to edit radio channel lists, the
receiver must be in radio mode.
The TV/Radio button enables
switching between TV and Radio
mode.
Standard: The left column of
the menu window shows the list
of the channels of the currently
selected channel list, the right
column shows the symbols for
‘Move’, ‘Lock’, ‘Delete’, ‘Rename’ and ‘Skip’.
Functions and settings in the menu:
Use the left/right arrow buttons to switch back and forth between the columns in the menu window, the up/
down arrow buttons to move the cursor up or down in the respective column.
Mark one or more channels in the left column by pressing the OK button. Use the red button to display
an overview of all channel lists/channel groups and enable an appropriate selection. The window overview
displays the list in which you currently are.
The green button displays other possible options. The following options are available:
Select all: All channels are selected.
Deselect all: All channels are deselected.
Select other: All channels are selected that were previously not selected.
12 Version of 14 June 2016
Page 13

Select TP: All channels of a transponder can be selected here.
The ‘FIND’ button allows quick search for channel (names). A search window appears after pressing this
button. Entry into the search eld is done via a letter or numeric eld actuated with the arrow buttons and
by pressing the OK button. Provided that channels with appropriate initial characters are found in the current
list, they will be displayed on the left-hand side. Exit the search window with the EXIT button.
How to move a channel:
1. Move the cursor (yellow bar) in the channel list to the channel to be moved.
2. Change now with the right arrow button in the right part of the menu and navigate the cursor with
the up/down buttons to the ‘Move’ symbol. The symbol is highlighted in colour.
3. Press the OK button.
4. Use now the up/down arrow buttons to move the selected channel in the list. It is also possible
to use the page buttons.
5. By pressing the OK button, the channel remains at the new position and exits the ‘Move’ mode.
Tip: It is possible to move multiple channels simultaneously by selecting the respective channels rst in the
channel list (left menu page) with the OK button and then carrying out steps 2-5 as explained above.
How to lock a channel:
1. Move the cursor (yellow bar) in the channel list to the channel to be locked.
2. Change now with the right arrow button in the right part of the menu and navigate the cursor with
the up/down buttons on the ‘Lock’ symbol. The symbol is highlighted in colour.
3. Press the OK button. The ‘Lock’ symbol appears now in the channel list behind the channel name.
Tip: It is possible to lock multiple channels simultaneously by selecting the respective channels rst in the
channel list (left menu page) with the OK button and then carrying out steps 2-3 as explained above.
How to unlock a channel:
1. Move the cursor (yellow bar) in the channel list to the locked channel.
2. Change now with the right arrow button in the right part of the menu and navigate the cursor
to the ‘Lock’ symbol. The symbol is highlighted in colour.
3. Press the OK button. Enter 0000 or the code specied by you and the channel is unlocked.
The ‘Locked’ symbol is removed from the channel list.
Tip: It is possible to unlock multiple channels simultaneously by selecting the respective channels rst in the
channel list (left menu page) with the OK button and then carrying out steps 2-3 as explained above.
How to delete a channel:
1. Move the cursor (yellow bar) in the channel list to the channel to be deleted.
2. Change now with the right arrow button in the right part of the menu and navigate the cursor
to the ‘Delete’ symbol. The symbol is highlighted in colour.
3. Press the OK button. The channel is removed from the list.
Tip: It is possible to delete multiple channels simultaneously by selecting the respective channels rst in the
channel list (left menu page) with the OK button and then carrying out steps 2-3 as explained above.
How to name a channel:
1. Move the cursor (yellow bar) in the channel list to the channel to be renamed.
2. Change now with the right arrow button in the right part of the menu and navigate the cursor
to the ‘Rename’ symbol. The symbol is highlighted in colour.
3. Press the OK button.
4. A window appears with the input eld. Select the character and letter with the arrow buttons
and OK button. The last character (your input) can be deleted by navigating the cursor to the ‘<’
Version of 14 June 2016 13
Page 14
character in the letter eld. A space is added by navigating with the arrow buttons to the character.
Conrm your entry by navigating with the arrow buttons to the ‘OK’ area. The new name is now
added to the channel list. The input window can be exited at all times by using the EXIT button
and thereby cancelling the process.
Skip channel
If a channel in the list should not be deleted and also not be displayed, simply skip this channel when
scrolling through the list.
How to select a channel to be skipped:
1. Move the cursor (yellow bar) in the program list to the channel selected to be skipped
(not to be displayed).
2. Change now to the right part of the menu and navigate the cursor to the ‘Skip’ symbol.
The symbol is highlighted in colour.
3. Press the OK button. The program list now displays the ‘Skip’ character behind the channel name,
i.e. when scrolling through the list during TV or Radio mode, the channel will be skipped.
Exit the ‘Edit channel’ menu by pressing the EXIT button. If changes were made, a dialogue window
appears prompting you to conrm these changes. The changed settings are saved by selecting ‘Yes’.
Note: Channel is only deleted, moved and/or locked upon conrmation with ‘Yes’. NO changes are saved
when selecting ‘No’.
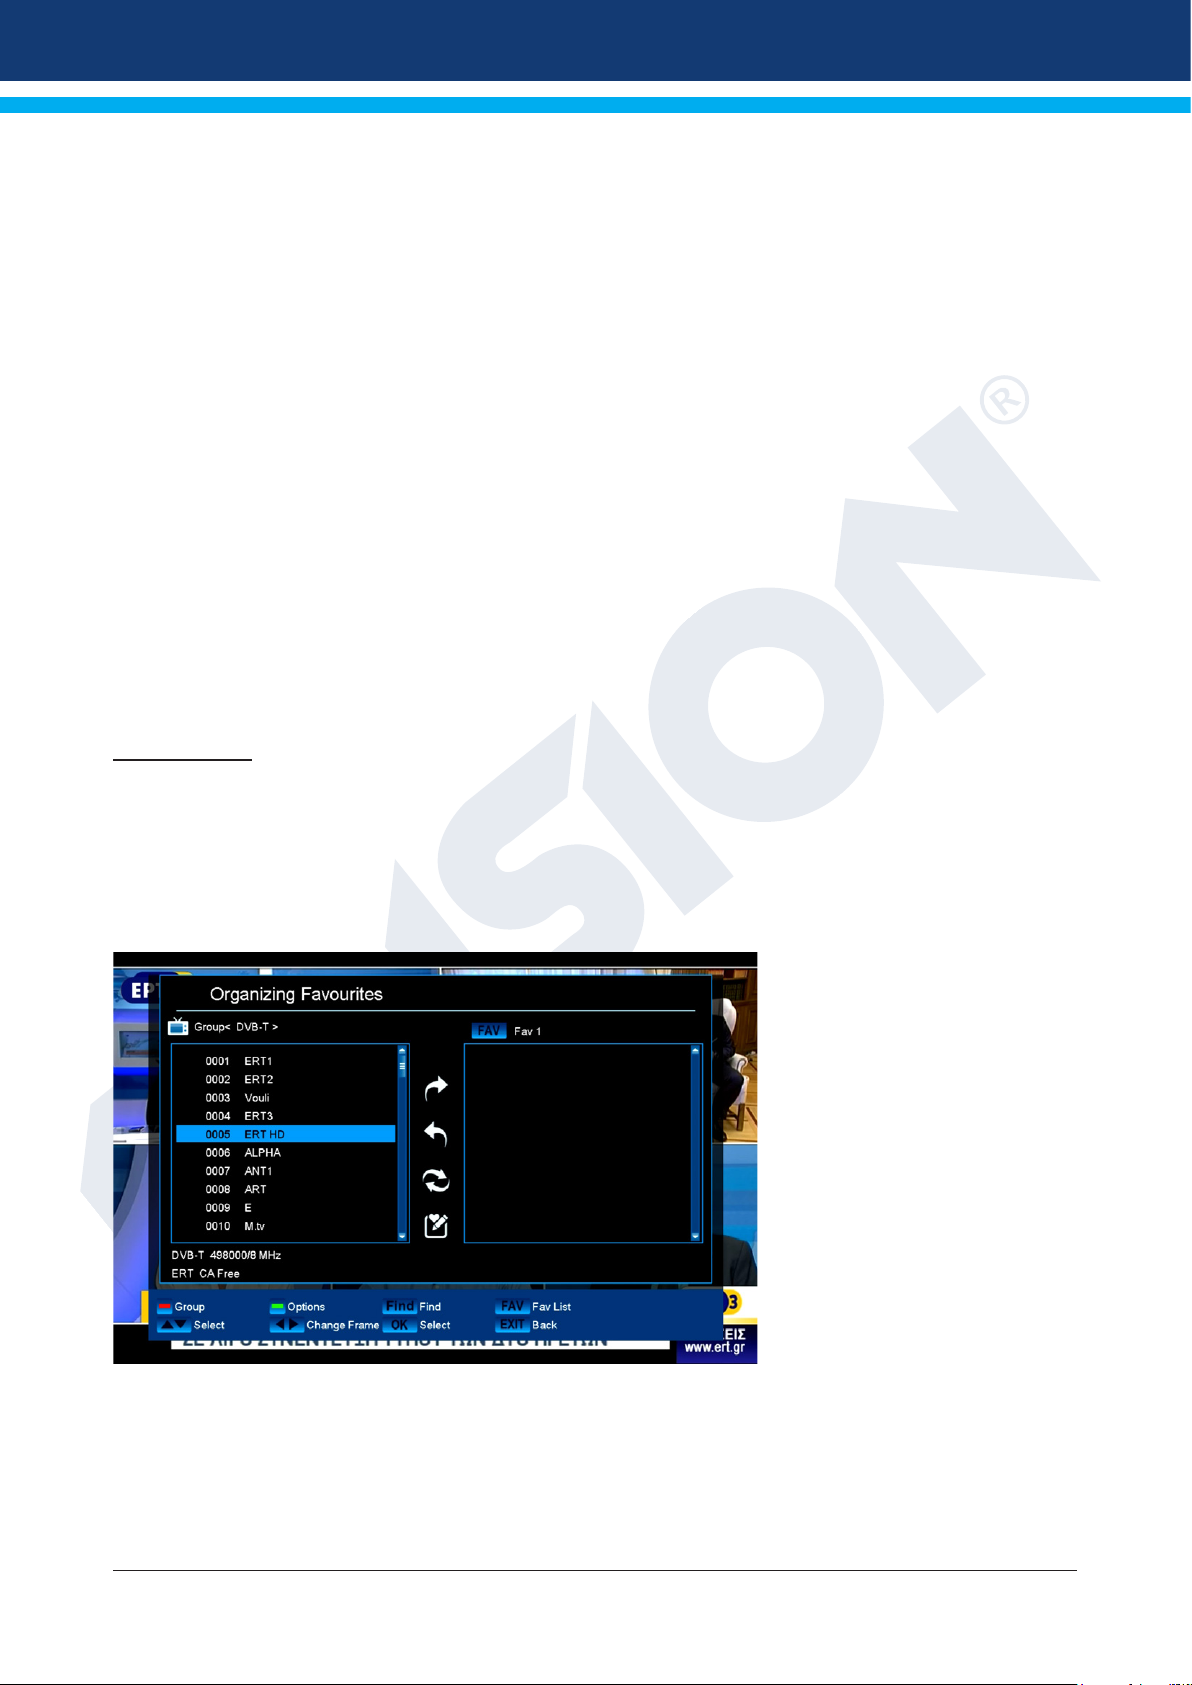
Edit favourites
Your favourite lists for TV or Radio programs can be customized in this menu in order to suit your personal
choices.
Standard: This menu is divided into 3 columns. The list of the available channels can be found on the left
side, depending on the overview selected. The currently selected favourite list can be found on the right side.
The ‘Add’, ‘Remove’, ‘Move’ and Rename’ symbols can be found in the centre.
Functions and settings in the
menu:
Use the left/right arrow
buttons to switch back and
forth between the columns
in the menu window, the up/
down arrow buttons to move
the cursor up or down in the
respective list. Select one or
more channels by pressing the
OK button.
When in the left column, it is
possible to display an overview
of all lists (except the favourite
list) with the red button and
select another group/list with the
arrow buttons and OK button. The title of the left column shows the list currently displayed.
The green button displays other possible options for channel lists. The following options are available:
Select all: All channels are selected.
Deselect all: All channels are deselected.
Select other: All channels are selected that were previously not selected.
Select TP: All channels of a transponder can be selected here.
14 Version of 14 June 2016
Page 15

When in the left column, the ‘FIND’ button enables quick search of channel names. The search window
appears after pressing this button. Entry into the search eld is done via a letter or numeric eld actuated
with the arrow buttons and by pressing the OK button. Provided that channels with appropriate initial
characters are found in the list, these will be displayed on the left-hand side. Exit the search window with the
EXIT button.
The ‘FAV’ button enables switching of the favourite list in order to view or edit it. Press the ‘FAV’ button,
to display the overview of the favourite lists. Use the up/down arrow buttons and OK button to select the
favourite list to be edited. The list will then appear on the right side of the menu. The channels are marked on
the left side with a symbol already available in the selected favourite list.
How to add a channel to a favourite list:
1. Move the cursor (yellow bar) in the channel list in the left menu window to the channel to be added.
2. Change now to the central part of the menu and navigate the cursor to the ‘Add’ symbol.
The symbol is highlighted in colour.
3. Press the OK button. The channel is inserted at the end of the favourite list. The channel
is marked with a symbol on the left side of the menu.
Tip: It is possible to add multiple channels simultaneously to the favourite list by selecting the respective
channels rst in the channel list (left menu page) with the OK button and then carrying out steps 2-3 as
explained above.
How to remove a channel from a favourite list:
1. Move the cursor (yellow bar) in the favourite list in the right menu window to the channel you want
to be removed.
2. Change now to the central part of the menu and navigate the cursor to the ‘Remove’ symbol.
The symbol is highlighted in colour.
3. Press the OK button. The channel is removed from the favourite list. The channel
is no longer marked with a symbol on the left side of the menu.
Tip: It is possible to remove multiple channels simultaneously from the favourite list by selecting the
respective channels rst in the favourite list (right menu page) with the OK button and then carrying out steps
2-3 as explained above.
How to move a channel in a favourite list:
1. Move the cursor (yellow bar) in the favourite list in the right menu window to the channel
to be moved.
2. Change now to the central part of the menu and navigate the cursor to the ‘Move’ symbol.
The symbol is highlighted in colour.
3. Press the OK button.
4. Use now the up/down arrow buttons to move the selected channel. The channel now moves up
and down in the list.
5. By pressing the OK button, the channel remains at the new position and exits the ‘Move’ mode.
Tip: It is possible to move multiple channels simultaneously by selecting the respective channels rst in the
channel list (left menu page) with the OK button and then carrying out steps 2-5 as explained above.
How to name a favourite list:
1. Press the ‘FAV’ button and select the favourite list to be renamed.
2. Change now to the central part of the menu and navigate the cursor to the ‘Rename’ symbol.
The symbol is highlighted in colour.
3. Press the OK button.
4. A window appears with the input eld. Select the character and letter with the arrow buttons
and OK button. The last character (your input) can be deleted by navigating the cursor to the
Version of 14 June 2016 15
Page 16
‘<-’ character in the letter eld. A space is added by navigating with the arrow buttons to the
character ‘--‘. Conrm your entry by navigating with the arrow buttons to the ‘OK’ area. The input
window can be exited at all times by using the EXIT button and thereby cancelling the process.
Exit the ‘Edit favourites’ menu by pressing the EXIT button. If changes were made, a dialogue window
appears prompting you to conrm these changes. The changed settings are saved by selecting ‘Yes’.
Note: Upon conrmation with ‘Yes’, channels are only deleted, moved and/or added from/to favourite lists or
names of favourite lists are changed. NO changes are saved when selecting ‘No’.
►Menu installation
► Terrestrial Installation
► Cable Installation
► Network ID Scan
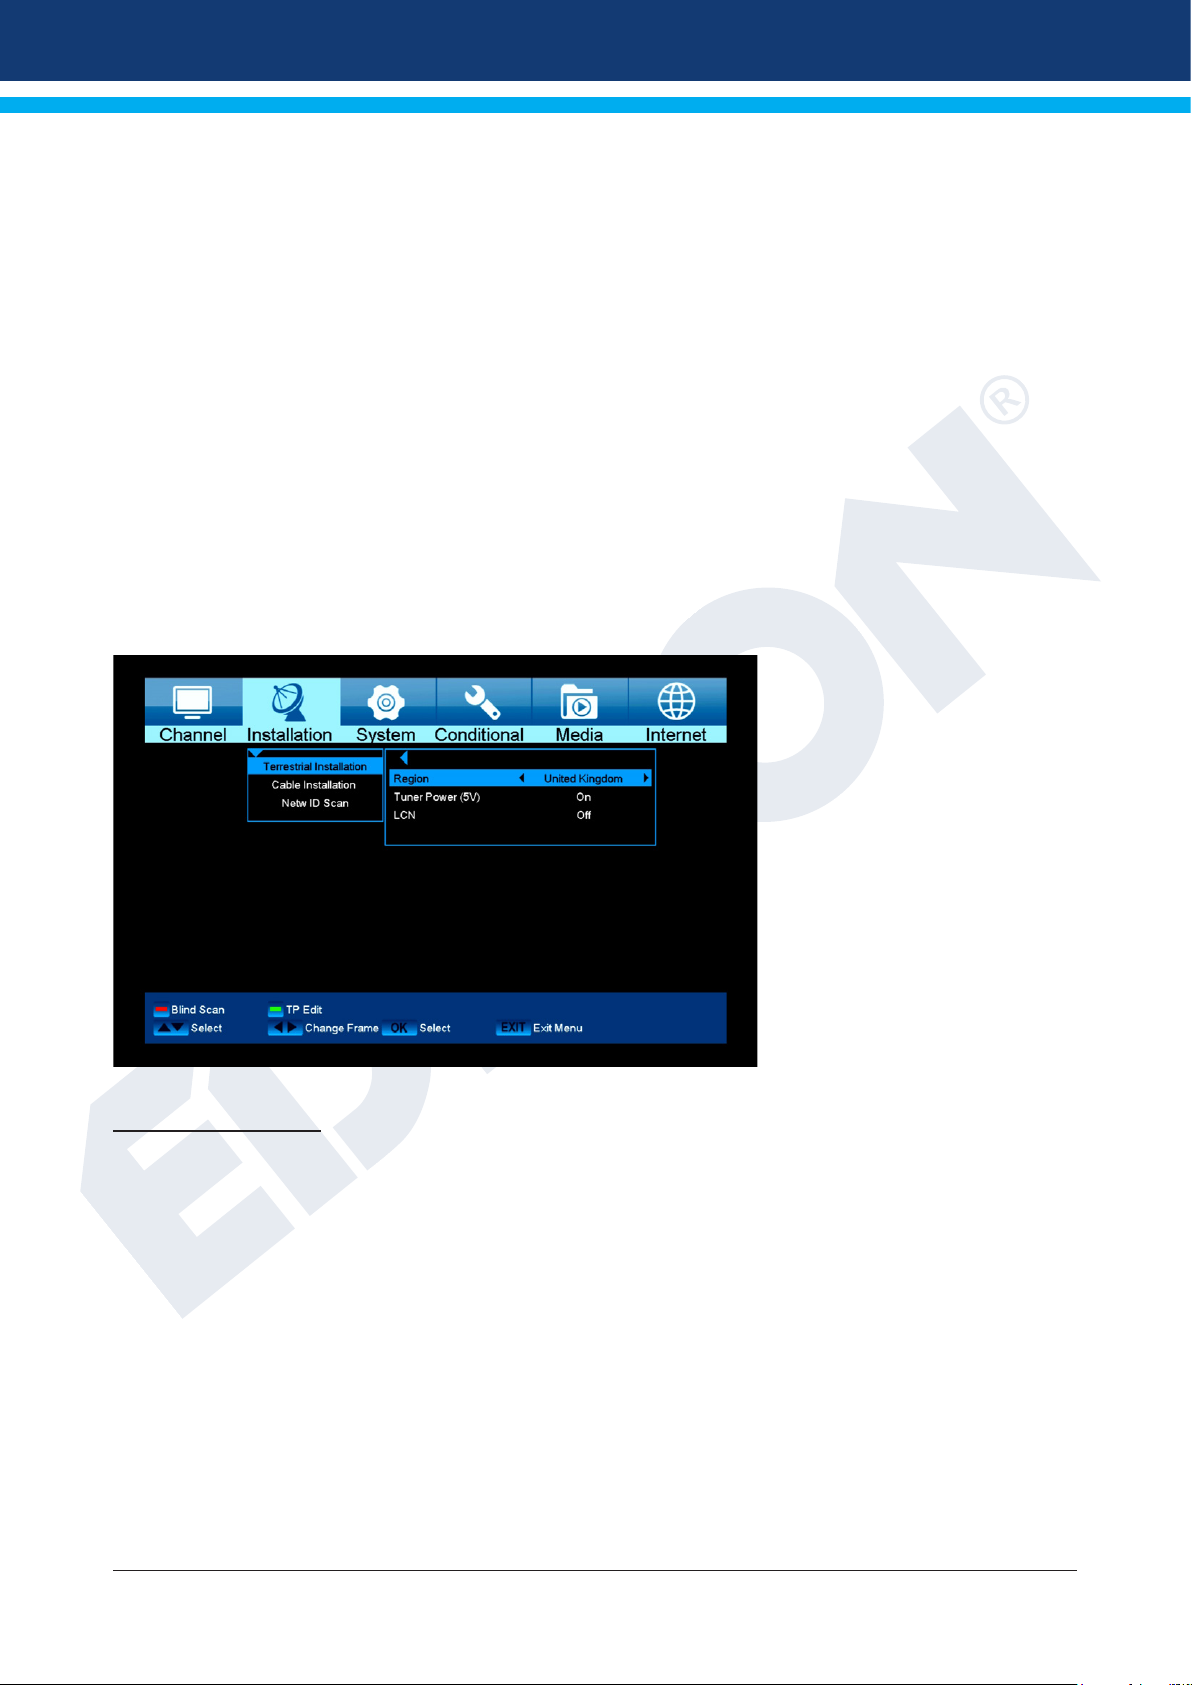
Terrestrial Installation
Press [OK] key to enter the selected item.
1 You can select the Bandwidth by region (country).
2 You can set the Tuner Power ON/OFF.
3 Press [Red] key can directly into blind scan mode to scan the current programs.
4 Press [Green] key to enter the following menu.
Scan Mode.
1 There are two modes. You can scan channel by channel or by frequency”.
2 When scan band is UHF and region is “France”, the range of Ch No. is from 21 to 69.
3
4 Press [Red] key to enter blind scan menu, or press [Green] key to enter TP scan menu.
5 Press [Exit] key to exit the scanning.
16 Version of 14 June 2016
When scan Band is VHF and region is “France”, the range of Ch No. is from 1 to 9. (it’s according to region)
Page 17
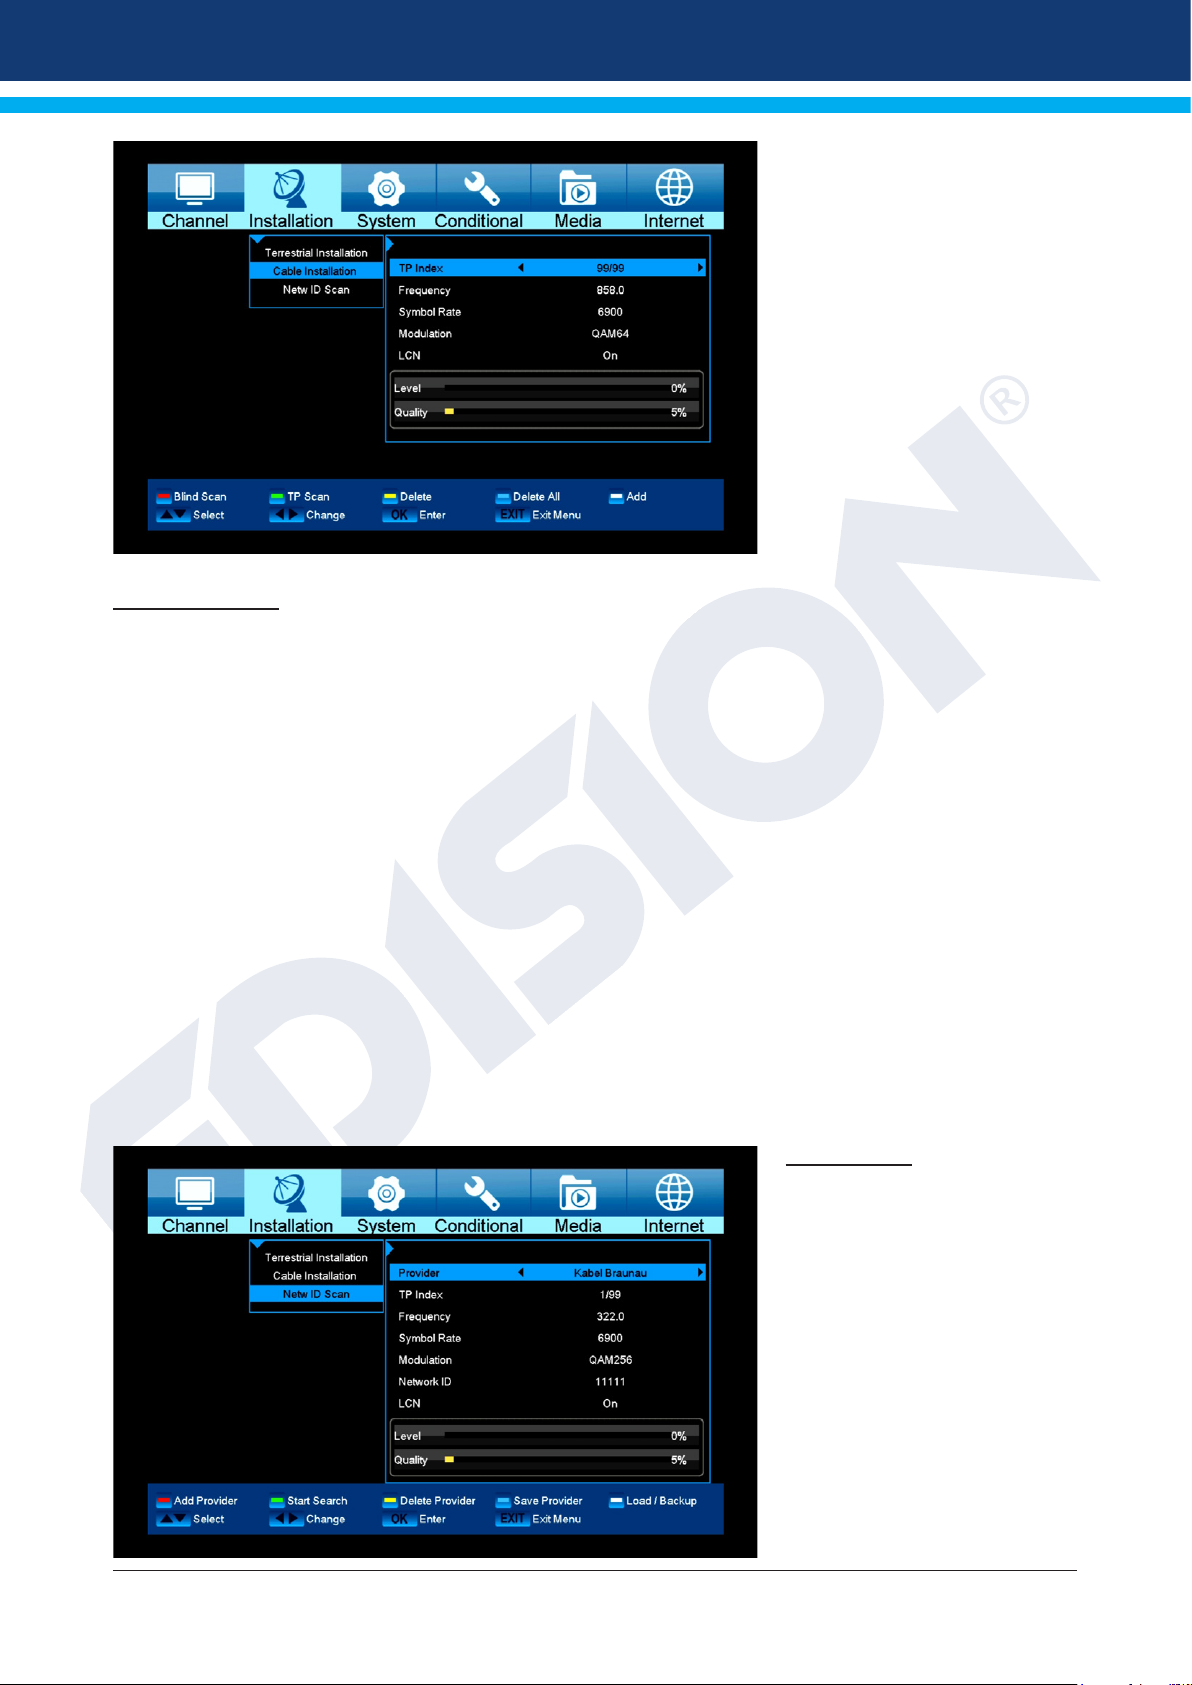
Cable Installation
Press [OK] key to enter the selected item.
1 You can select the Scan Mode, Manual Scan or Blind Scan.
2 You can input the Frequency by use the numeric button of the RCU.
3 You can input the Second Frequency by use the numeric button of the RCU,
if you set the Scan Mode to Blind Scan.
4 You can input the Symbol Rate by use the numeric button of the RCU.
5 You can select the QAM value among 16QAM, 32QAM, 64QAM, 128QAM and 256QAM.
6 You can turn ON or OFF the NIT Search, if you set the Scan Mode to Manual Scan.
7 When you complete your modication, press OK button on Search item to enter Scan menu
and then.
8 Press OK button, it will begin to scan.
Netw ID Scan
For ready-made channels from
cable providers. Then press the
red button.
Version of 14 June 2016 17
Page 18
►Menu system settings
► Languages
► A/V Control
► Time setting
► Timer
► Parental Control
► Factory setting
► Information
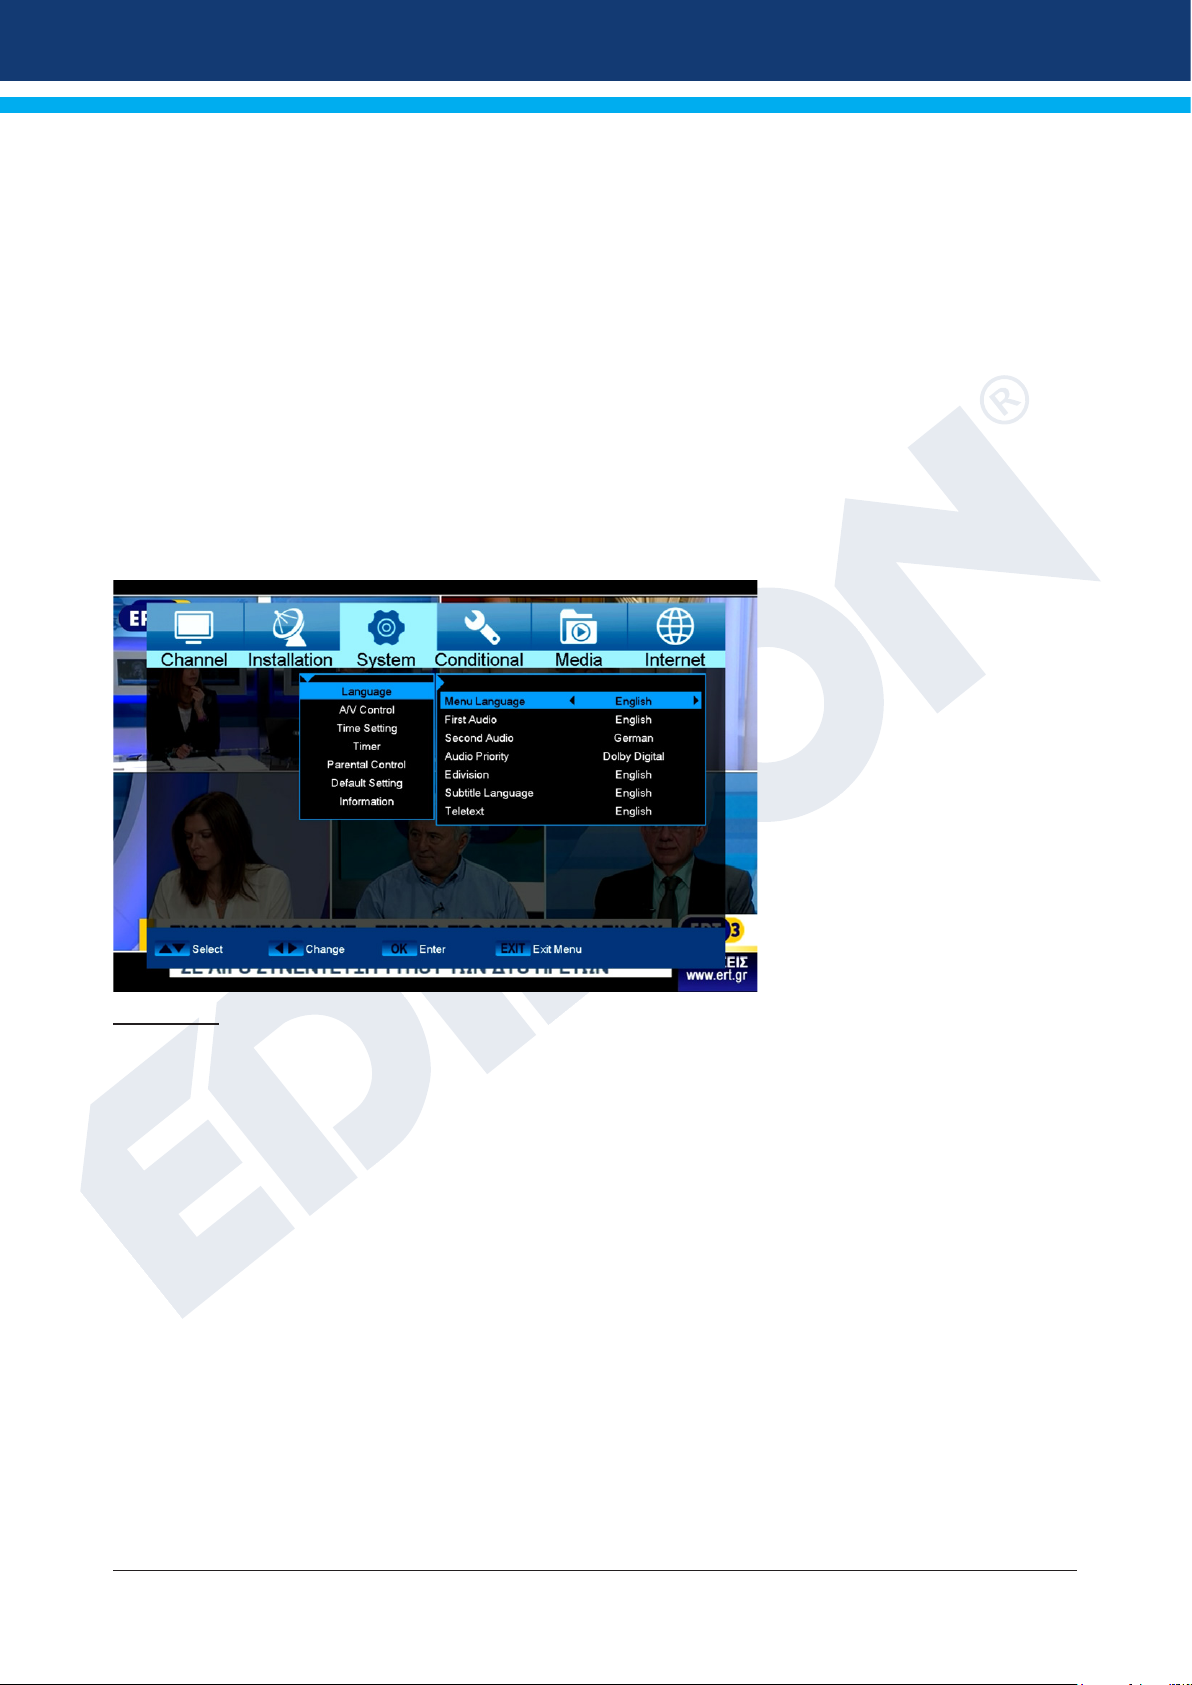
Languages
Functions and settings in the menu:
Menu language: Select the language in which the Menu is displayed.
First audio: Set the audio language here for the rst channel.
Second audio: Set the audio language here for the second channel.
Audio priority: Specify here which preferred audio mode (if available) should be used.
EDIVISION: Specify the language here in which the electronic program guide EDIVISION (EDV)
should be displayed. (The program provider must support the language).
Subtitle language: Specify the language here in which the subtitle information will be displayed.
(Language must be supported by the service provider).
Teletext: Specify the language here in which the teletext/video text information
will be displayed. (Language must be supported by the service provider).
Exit the ‘Language’ menu by pressing the EXIT button.
Minors’ protection
This menu is only accessible by entering a PIN code. The default setting of the PIN code is: 0000.
Functions and settings in the menu:
Menu lock: Set here whether to allow or deny access to the menu. If the ‘On’ value is selected
18 Version of 14 June 2016
Page 19
in this item, accessing the menu is only possible via PIN code. Channel bar,
EDIVISION and favourite lists are exempt.
Channel lock: Specify here whether or not channels can be locked in general.
New password: Specify a new password here.
Conrm password: Repeat the new password.
Exit the ‘Youth Protection’ menu by pressing the EXIT button.
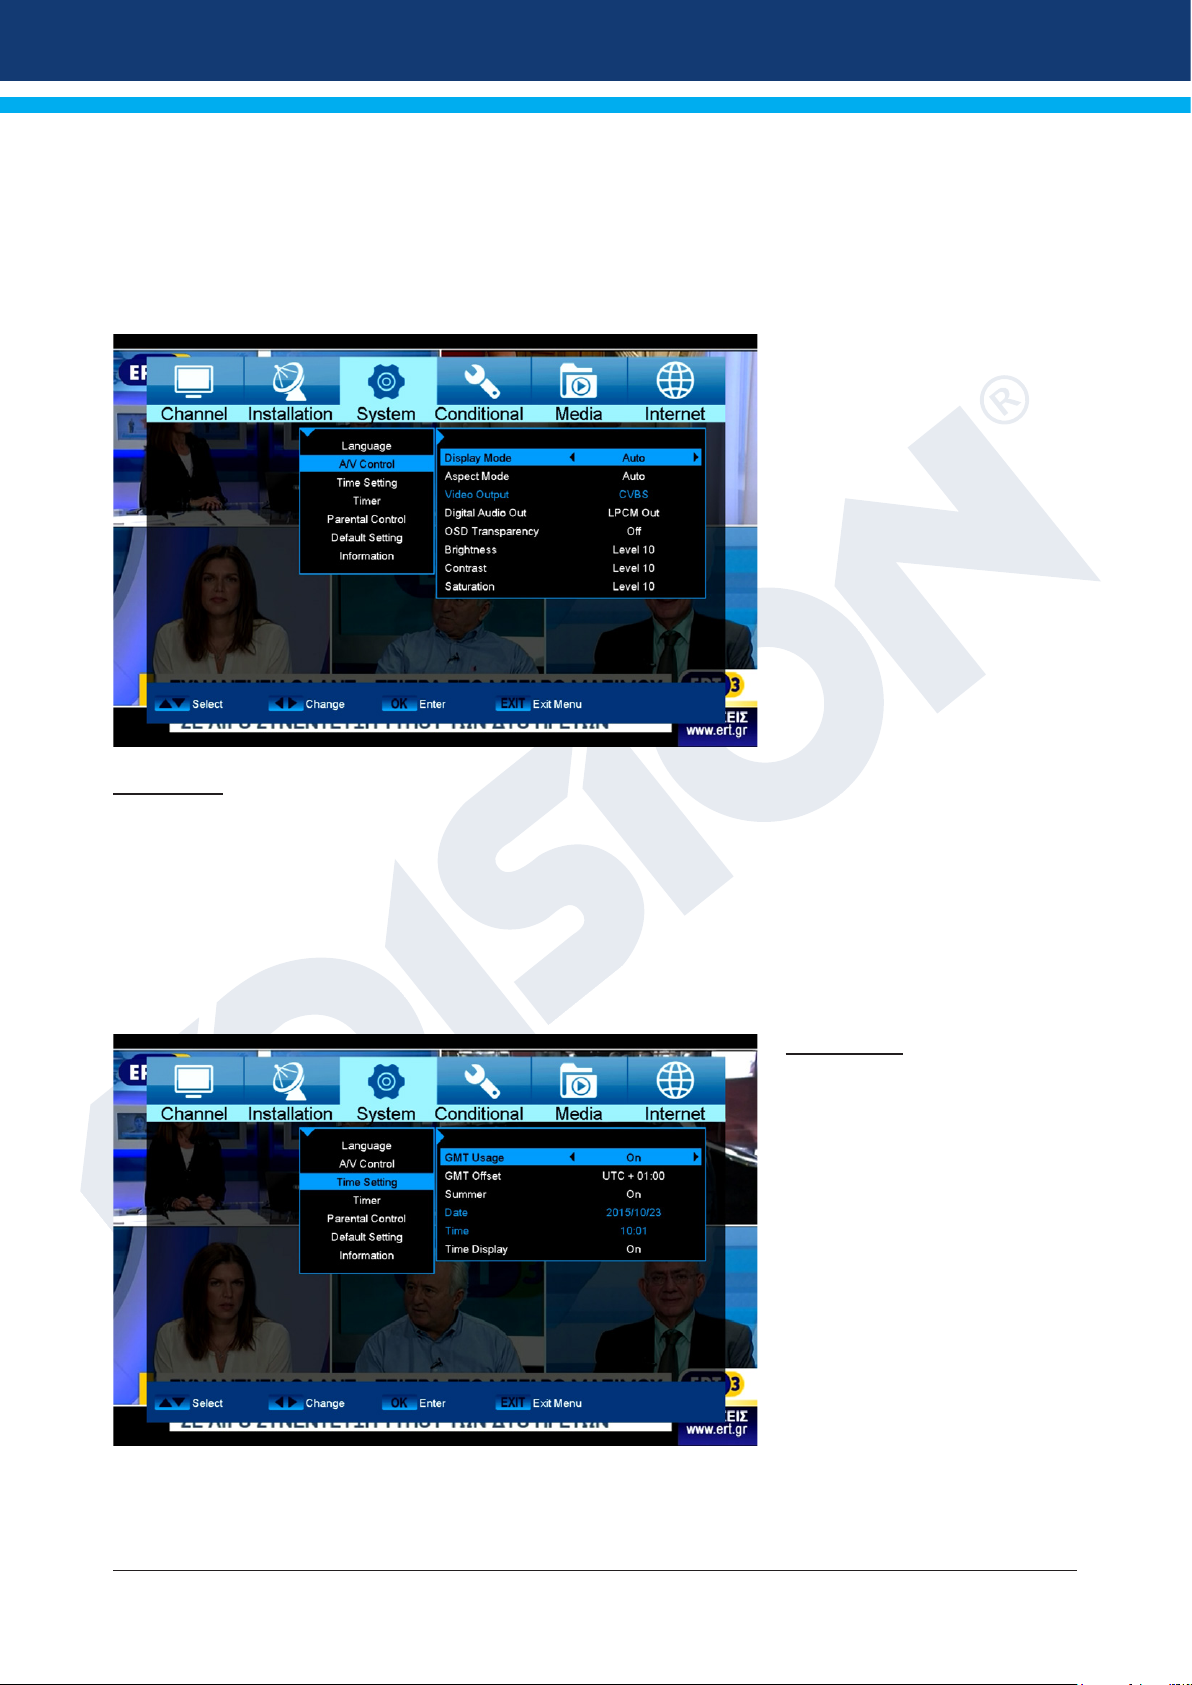
A/V Control
Functions and settings in the menu:
Display Mode: Select here between the options Auto, By Native TV, 720p_50,
720p_60, 1080i_50 or 1080i_60.
Aspect Mode: Determine here the aspect ratio with which the image will be
displayed. (16:9, 4:3PS, 4:3LB, AUTO)
Video Output: Select the colour mode for image reproduction.
Digital Audio Out: Specify here the mode in which the digital audio output should work.
Time setting
Functions and settings in the
menu:
GMT user: Select ‘On’ here
and the receiver automatically
obtains the current time and
date (via satellite signal). When
the ‘Off’ option is selected
here, date and time can be
self-determined in the following
items.
Adjust GMT: This item can only
be reached when the ‘On’ option
was set for the ‘GMT user’ item.
It will be possible to specify here
the difference between your
local time and GMT (Greenwich
Mean Time). For Germany/Austria/Switzerland/ Luxembourg applies: UTC+01:00. For Athens/Bucharest/
Istanbul applies: UTC+02:00. Scroll with the left/right arrow buttons to the value you want to set.
Summer: Specify here whether daylight saving time should be considered.
Version of 14 June 2016 19
Page 20
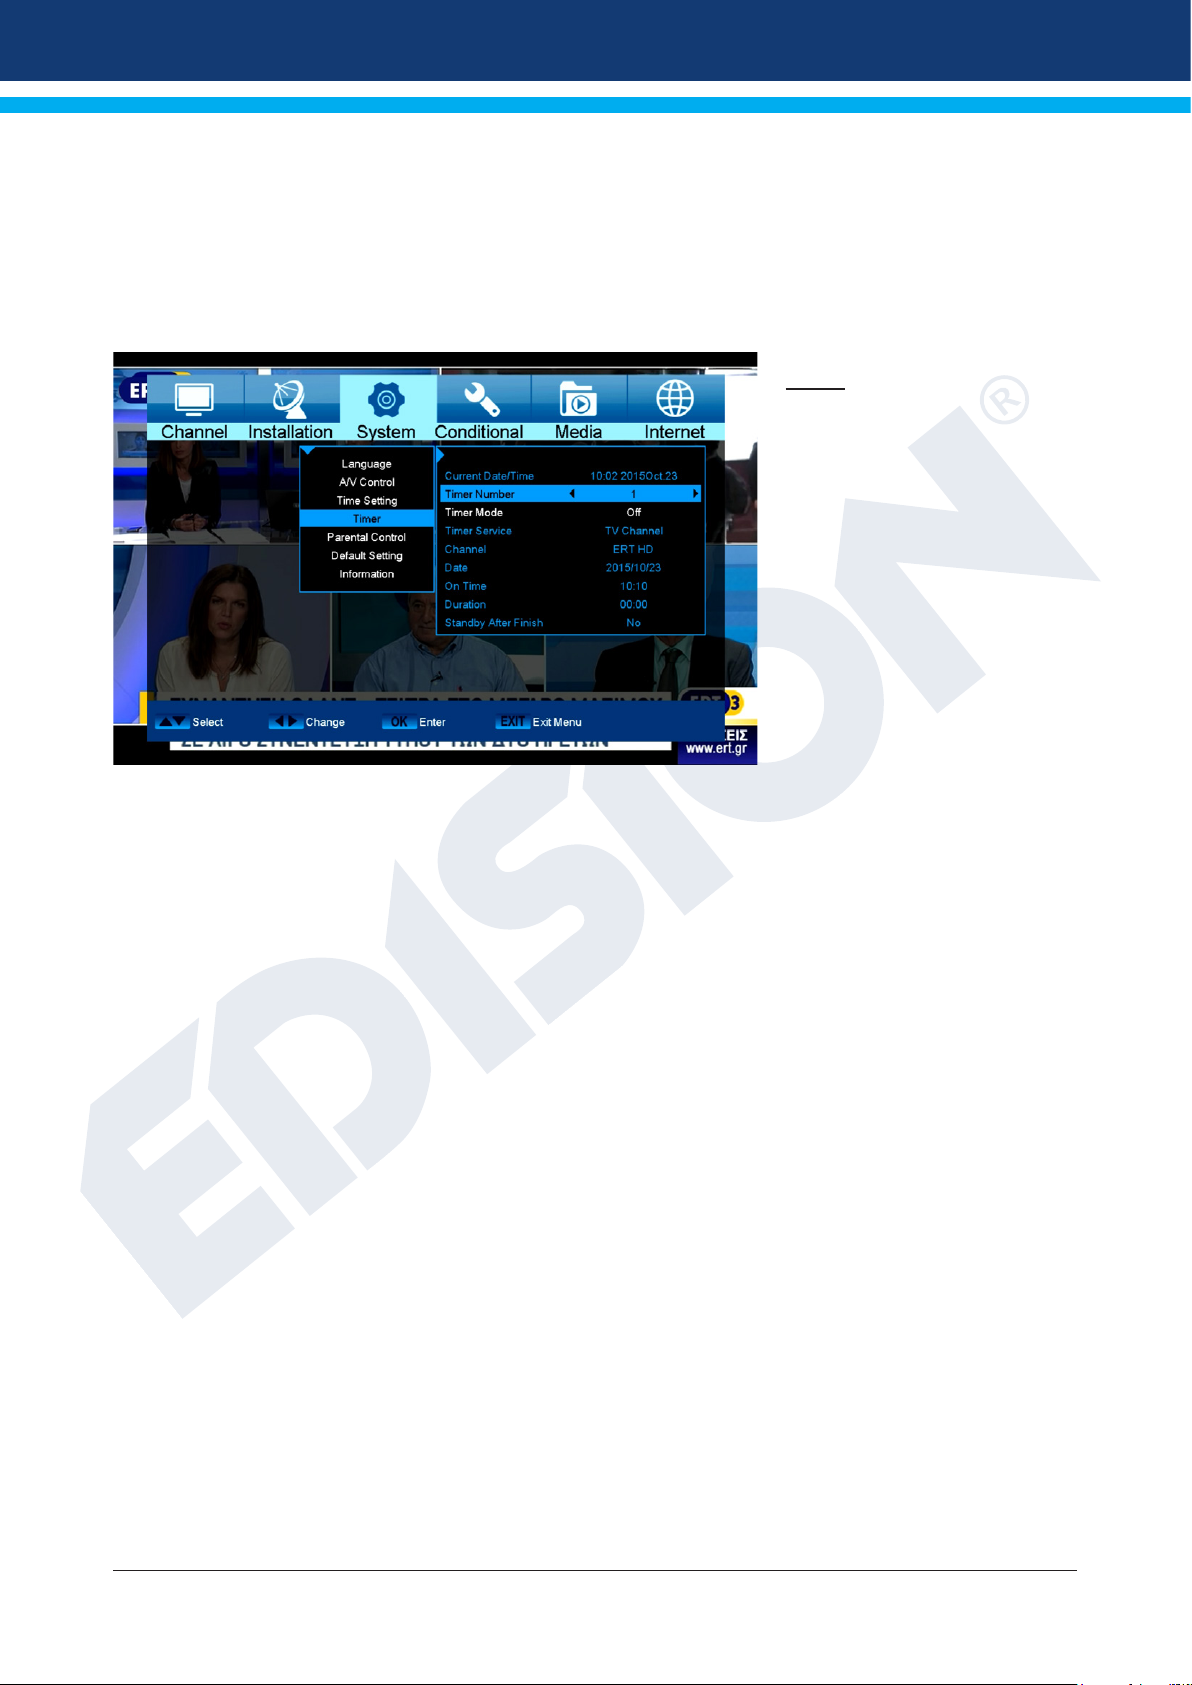
Date: This item can only be reached when the ‘Off’ option was set for the ‘GMT User’ item. Enter the date
via the number buttons.
Time: This item can only be reached when the ‘Off’ option was set for the ‘GMT User’ item. Enter the time
via the number buttons.
Time display: Specify whether (On) or not (Off) the time should be displayed in the front display of the
receiver.
Exit the ‘Time Settings’ menu by pressing the EXIT button.
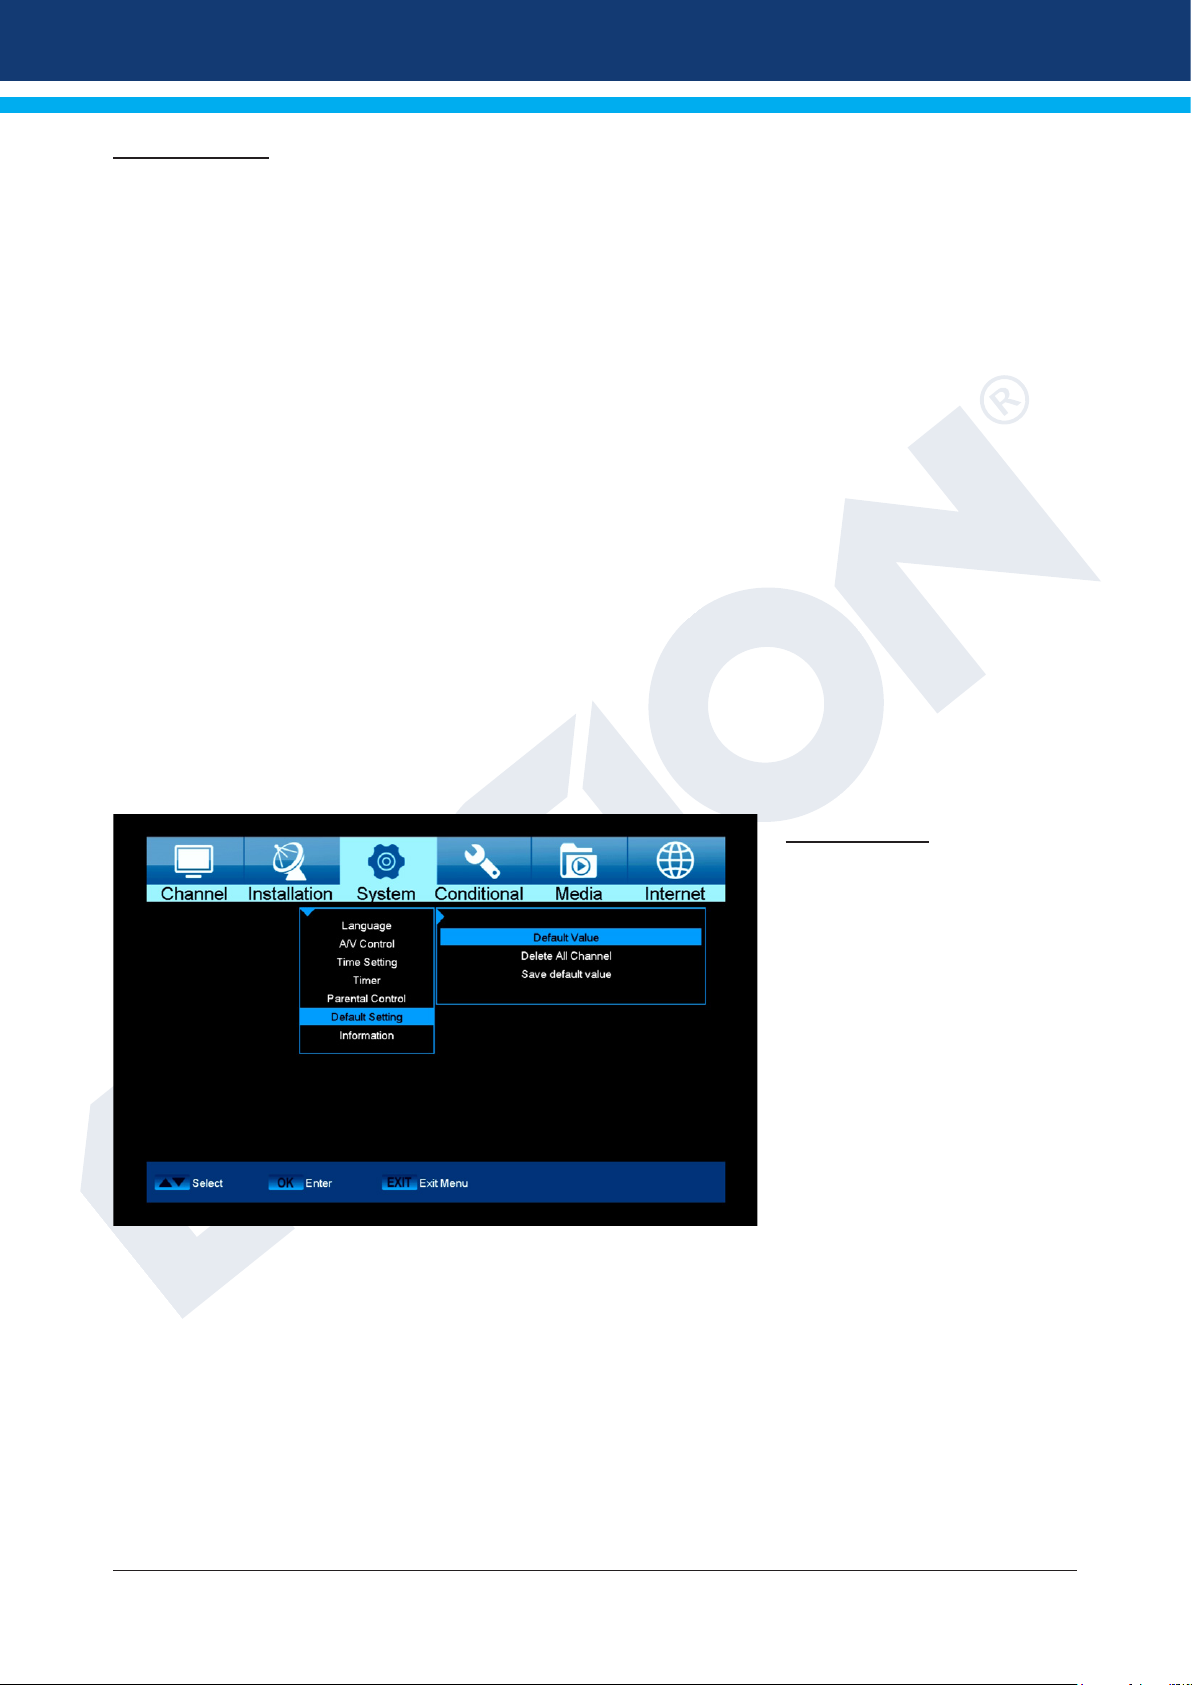
Timer
Up to 8 time-based events can
be programmed in this menu.
In addition to programming
recordings of Radio or TV
channels, it is also possible to
display events, such as a nice
birthday or anniversary greeting
at a certain time or specify to
which channel to be woken
up. Information on recordings
can also be found in section
EDIVISION.
Functions and settings in the
menu:
Timer number: Calling up the timer menu automatically switches to the next (available) programmable timer.
Use the left/right arrow buttons or OK button and the up/down arrow
buttons to switch between (programmed) timers.
Timer mode: Set the recording mode here. Choose whether the recording is carried
out once, daily, weekly or monthly.
Timer service: Specify a service here. Select the item ‘Recording TV Channel’ or
‘Recording Radio Channel’ for recordings. If wanting to be woken with
a specic channel, select the ‘TC Channel’ or ‘Radio Channel’ here.
Select the ‘Message’ input if wanting to display a message on the
screen at a certain time. Wake-up message: This item only appears
when coming across the ‘Message’ setting in the previous item. This
allows to choose between ‘Birthday’, Anniversary’ or ‘General’.
Station: This item does NOT appear when coming across the ‘Message’
setting in the ‘Timer Service’ item. Otherwise, set the channel here to
be recorded or to which to be woken up.
Date: Set the (start) date of the recording here.
Start time: Set the start time here.
Duration: This item is only changeable if the ‘Recording TV Channel’ value or
‘Recording Radio Channel’ value was set at the ‘Timer Service’ item.
Then set the duration of the recording here (recording length).
Standby at the end: This item is only changeable if the ‘Recording TV Channel’ value or
‘Recording Radio Channel’ value was set at the ‘Timer Service’ item. It
is then possible to determine whether the receiver should switch into
standby mode after recording.
Exit the timer menu with the EXIT button. After making changes and wanting to keep them, conrm with
‘Yes’ in the appearing dialogue window.
Note: An error message appears under certain circumstances. As a rule, an incorrect start time or start date
was given. Check the information!
Note: A recording is only possible if a compatible USB memory device is connected to the receiver.
Note: A list of all programmed Timers can be found as follows: Press the EDIVISION button in the TV mode
and then the yellow button, and then select ‘Timer List’ in the appearing menu window.
20 Version of 14 June 2016
Page 21
Parental Control
You can set a password for “Installation” menu conguration. You can also set a password for channel
locking. (For lock channel settings, please refer to LOCK section) Here in ‘Parental Control’ you can nd out
how to set and/or change the password.
1 In “Parental Lock” function, press [OK] key, there will pop a dialogue for you to input the password.
When you input the correct password, you will see a screen like below:
2 Menu Lock determines whether or not a user has to enter a password for the “Installation” menu.
If the setting of “Menu Lock” is “On”, it means that the user has to key-in the password,
if set to “Off” it means unlocked.
3 Channel Lock determines whether or not a user has to enter a password in order to play the locked
channels. If the setting is “On”, play the channels with lock mark will show up a dialogue
on the screen and ask for the password. If the setting of “Channel Lock ”is “Off”,
the Lock function is invalid.
4 New Password is used for revising password; you can input the new password in this item by using
number keys directly. After you lled in 4 digital numbers, the highlight will auto skip to Conrm
Password and ask you to input the new password again. If the password is correct, the screen will
show up a message of “Saving Data, Please Wait…” After nish saving and drawback to “System
Setup” menu, the revising is complete.
5 Press [Menu] key to draw back from the “Parental Lock” menu.
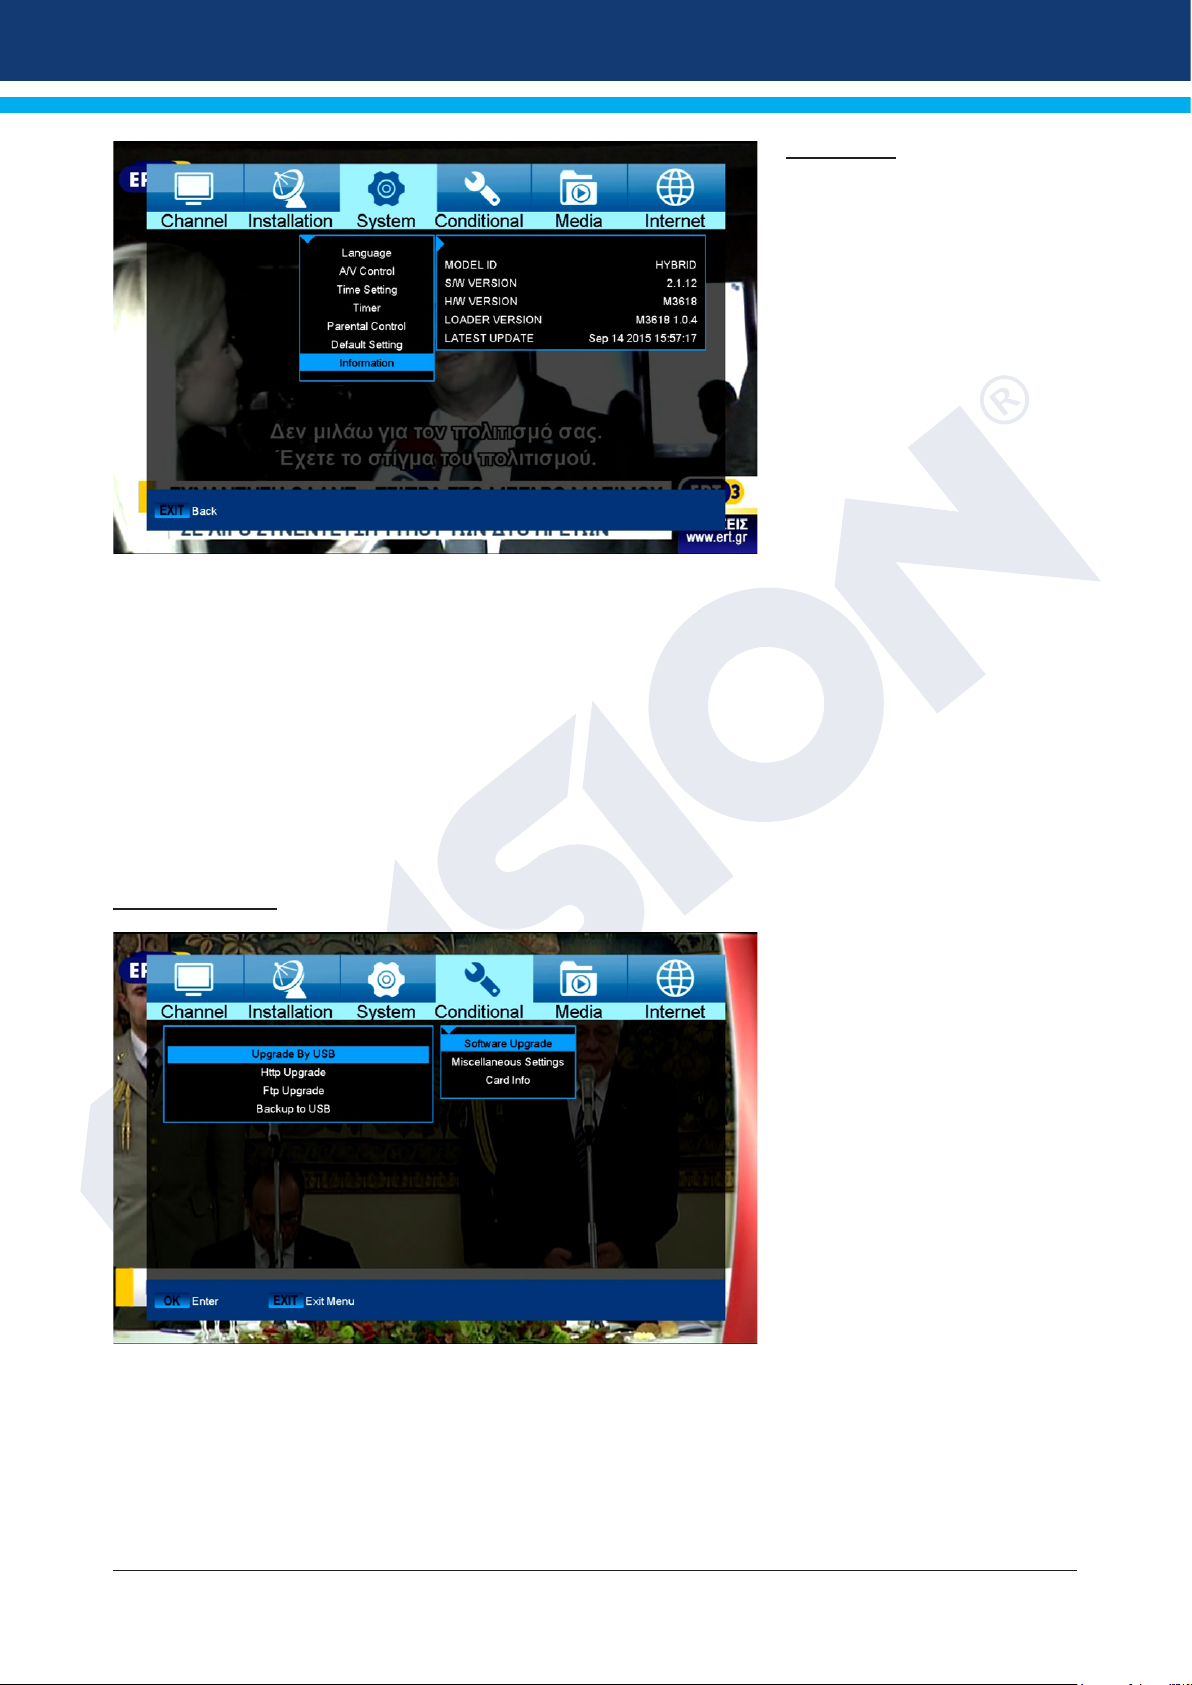
Factory setting
Use the up/down arrow buttons
to select one of the following
menu items and press the OK
button.
Functions and settings in the menu:
Factory setting: Use of this function deletes ALL user programmed values and reinstalls factory
settings. After selecting with the OK button, enter the PIN code (as a rule 0000).
A warning window appears afterwards.
Delete all channels: The channel lists are deleted here.
Save as factory setting:
The current conguration can be specied here as factory setting.
Exit the ‘Factory Setting’ menu by pressing the EXIT button.
Note: The ‘USB’ menu is only accessible if a suitable USB memory device is plugged in and recognised by
the receiver.
Version of 14 June 2016 21
Page 22
►System
► Software Update
Information
Information about the device is
displayed here. This information
may be relevant when contacting
your dealer. Furthermore, the
version of the receiver software
can be found here.
Exit the ‘Information’ menu by
pressing the EXIT button.
► Miscellaneous Settings
► Card information
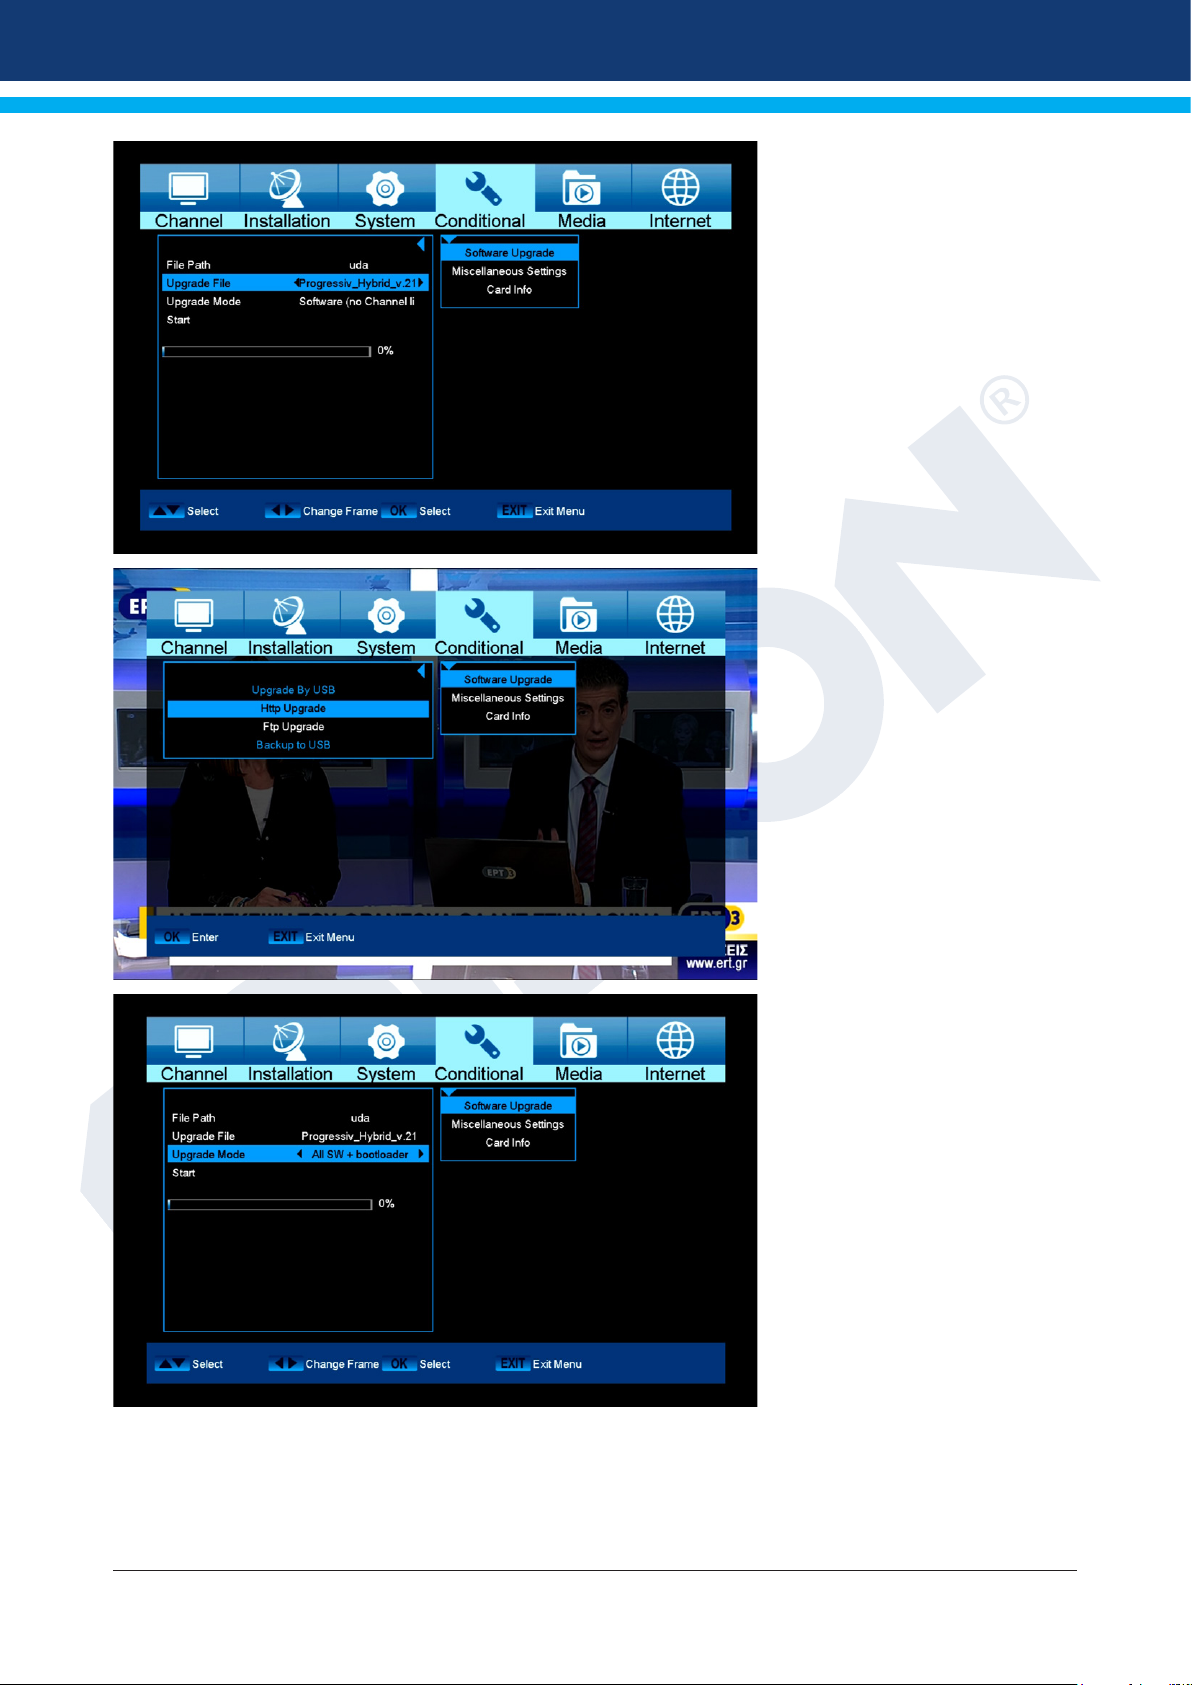
Software Update
Http Upgrade
Auto Upgrade
When selecting this menu item,
the receiver tries to connect
with the factory-set server
by EDISION. A correct cable
conguration and providing
the proper values in ‘Network
Settings’ menu item according
to your network, the receiver
connects and retrieves the le
list from the server. File name,
date, time and le size are
displayed. Select the software
le on the ‘.abs’ le type and
press the red button. It is
possible to select the part of the
software to be updated in the appearing dialogue window. After selection, the upgrade process starts and
moves to the following stages:
- Connect...
- Download...
- Delete...
- Write...
- Restart...
22 Version of 14 June 2016
Page 23
If the upgrade process is not
started, it is possible to exit
the ‘Auto Upgrade’ menu by
pressing the EXIT button.
Update from USB/HDD
Standard: This menu is only
accessible if a suitable USB
data storage is connected and
recognised by the receiver.
Otherwise, this menu is not
accessible.
Another prerequisite for a
‘USB/HDD Update’ is that
the appropriate software le
is located on the USB data
storage. This le with the
‘.abs’ le extension can be
downloaded from the Edision
website via a PC with Internet
connection.
http://www.edision.gr
“Progressiv HD C nano plus”
Save the downloaded le from
your PC onto the USB data
storage and plug this USB data
storage device into the USB port
of “Progressiv HD C nano plus”.
Note: In these circumstances,
the upload speed via USB
depends on the data in the USB
memory. It is recommended to
prepare the USB memory device
rst via the «HDD formatting»
(ALL data will be deleted) item in
the ‘USB’/’Memory Information’
menu (to format, start with the
yellow button) and then save the
software le (.abs) inside.
Functions and settings in the
menu:
Open le: If the receiver has
found les to be updated on the
USB memory device, they will
be displayed. Specify the le
to be updated with the arrow
buttons or OK button. If no les
were found, it will be indicated
with ‘No File’.
Update Mode: Use the
arrow buttons or OK button to
set the parts of the software to be updated.
Start: If the software le and Update Mode are specied, navigate with the up/down arrow buttons to the
‘Start’ item. Press the OK button and the Update process starts.
Attention: The software update starts immediately after pressing the OK button and must not be interrupted.
Version of 14 June 2016 23
Page 24
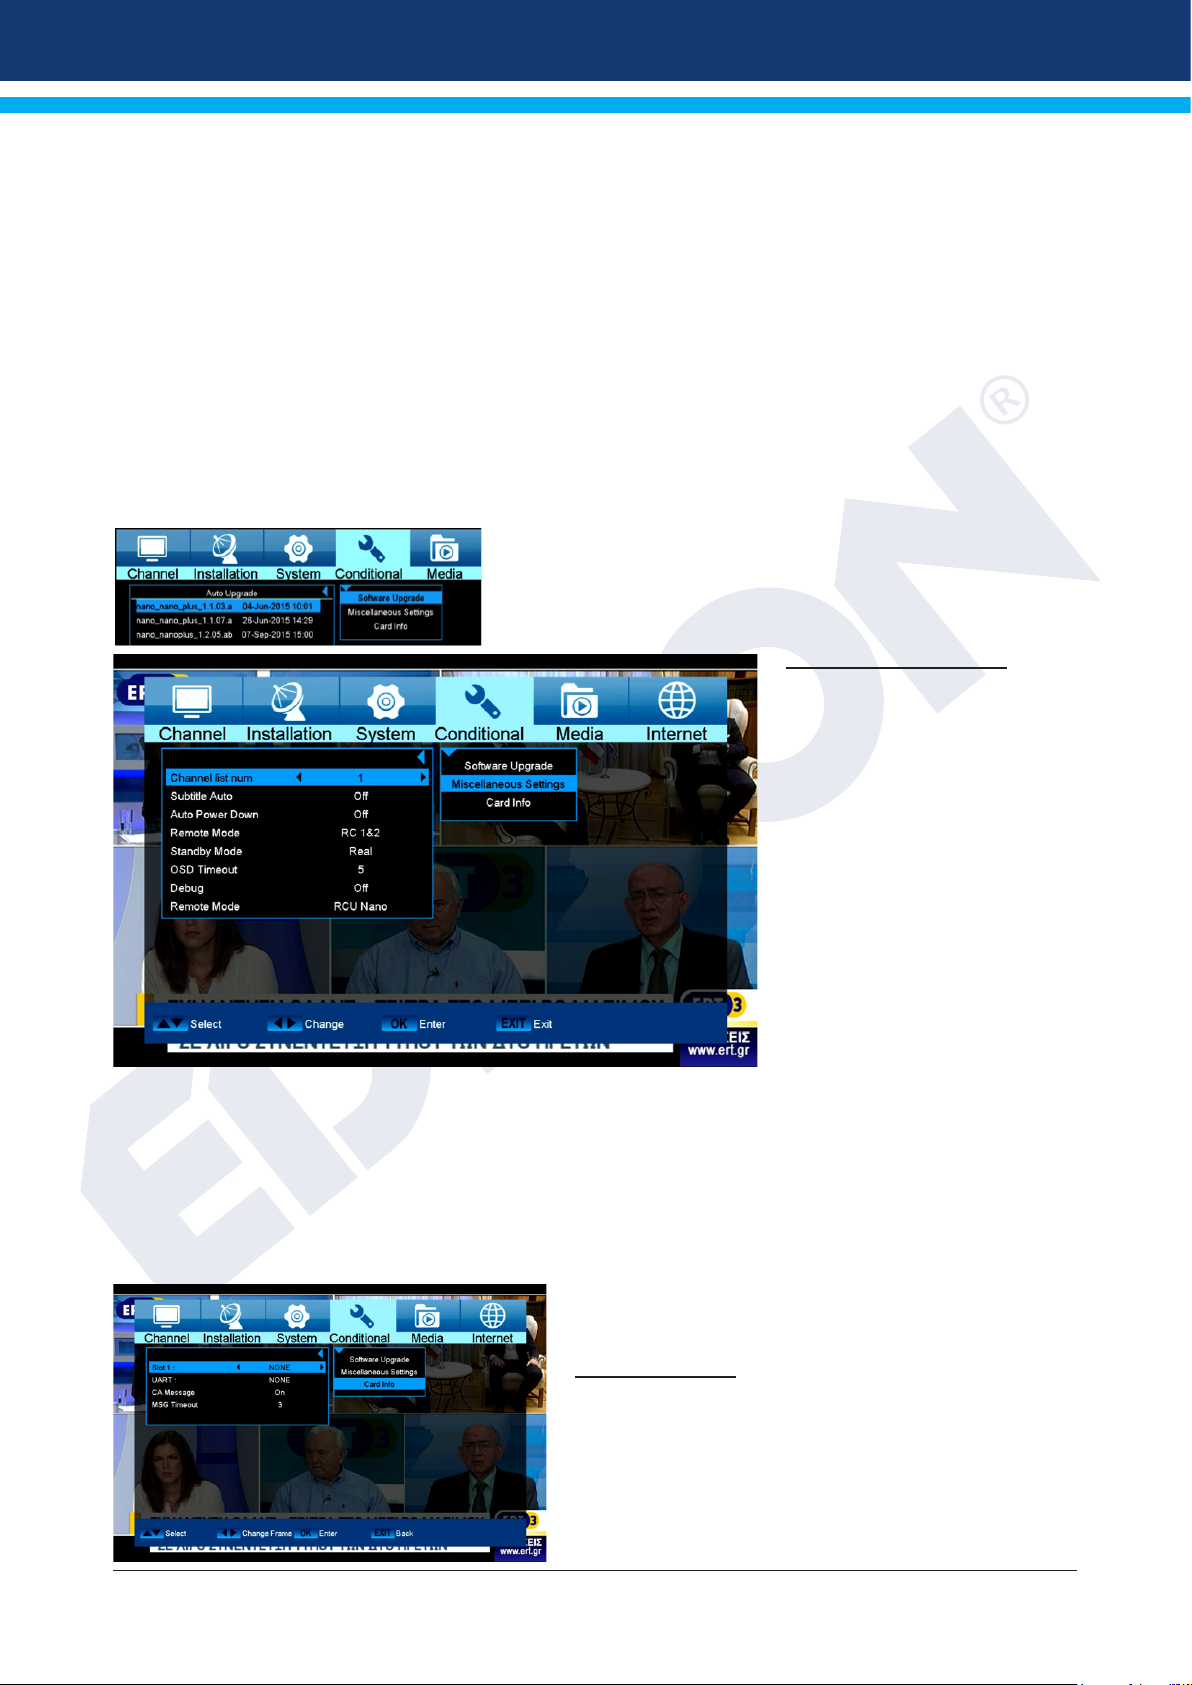
Backup to USB/HDD
Functions and settings in the menu:
Backup of the le: Determine the le name for the backup le here. Press the OK button to display a
letter and number eld and specify with the arrow buttons and OK button the name for the backup le. Delete
the last character by navigating in the letter eld with the arrow buttons to the area ‘<-’ and press the OK
button. Conrm the input by navigating to the OK area and pressing the ‘OK’ button on the remote control.
Use the ‘EXIT’ button to exit the input window.
Backup to USB/HDD: Navigate with the up/down arrow buttons to this menu item and press the OK button
to start the backup.
Http Update
In a few steps to the current version. Please select the option Http Update and then Auto Update. It is
possible on the next page to select the desired option to be transferred to the box. Please pay attention to
the date in the image name.
NEW Version
Use the red button to start the process. Please select how to
transfer the le. Use the OK button to start the ash process.
The ash process starts automatically after the download.
Miscellaneous Settings
When you enter to
“Miscellaneous Settings” menu,
you see a screen with the
following options:
1 Subtitle Auto: You can press
[Left/Right] key to select “On”
or “Off”. If the current channel
has subtitle information, it will
be showed up automatically
while this function is “ON”, if this
function is “OFF”, you need turn
on the subtitle manually by press
[Yellow] key.
2 Auto Power Down: You can
press [Left/Right] key to select
the time or “Off”, if you select
time, duration this time if no any operation on receiver, it will go to standby mode.
3 Standby mode: if set to “Real”, Press power key receiver will be in real standby status, the consumption will
be less than 0.5 Watt. If it’s set to “Fake”, Press power key, receiver will be in fake standby status.
4 OSD Timeout: When you switch channels in full screen, there will show up some information about current
channel on the lower of the screen. And regarding to the duration of these information show up on the
screen, you can press [OK] and [up/ down] key to set the time. The range of the duration is “1 second ~ 10
seconds”.
5 OSD Position: control display position of the info bar
in full screen mode. You can choose “bottom” or “top”.
Card information
Standard information: At your disposal is one reader
Smart Card (reader). If you place the card here suppliers
of various subscription programs, you can watch many
programs that are encoded with this system. In this
menu you will nd information on the Smart Card, which
you placed on the port.
24 Version of 14 June 2016
Page 25
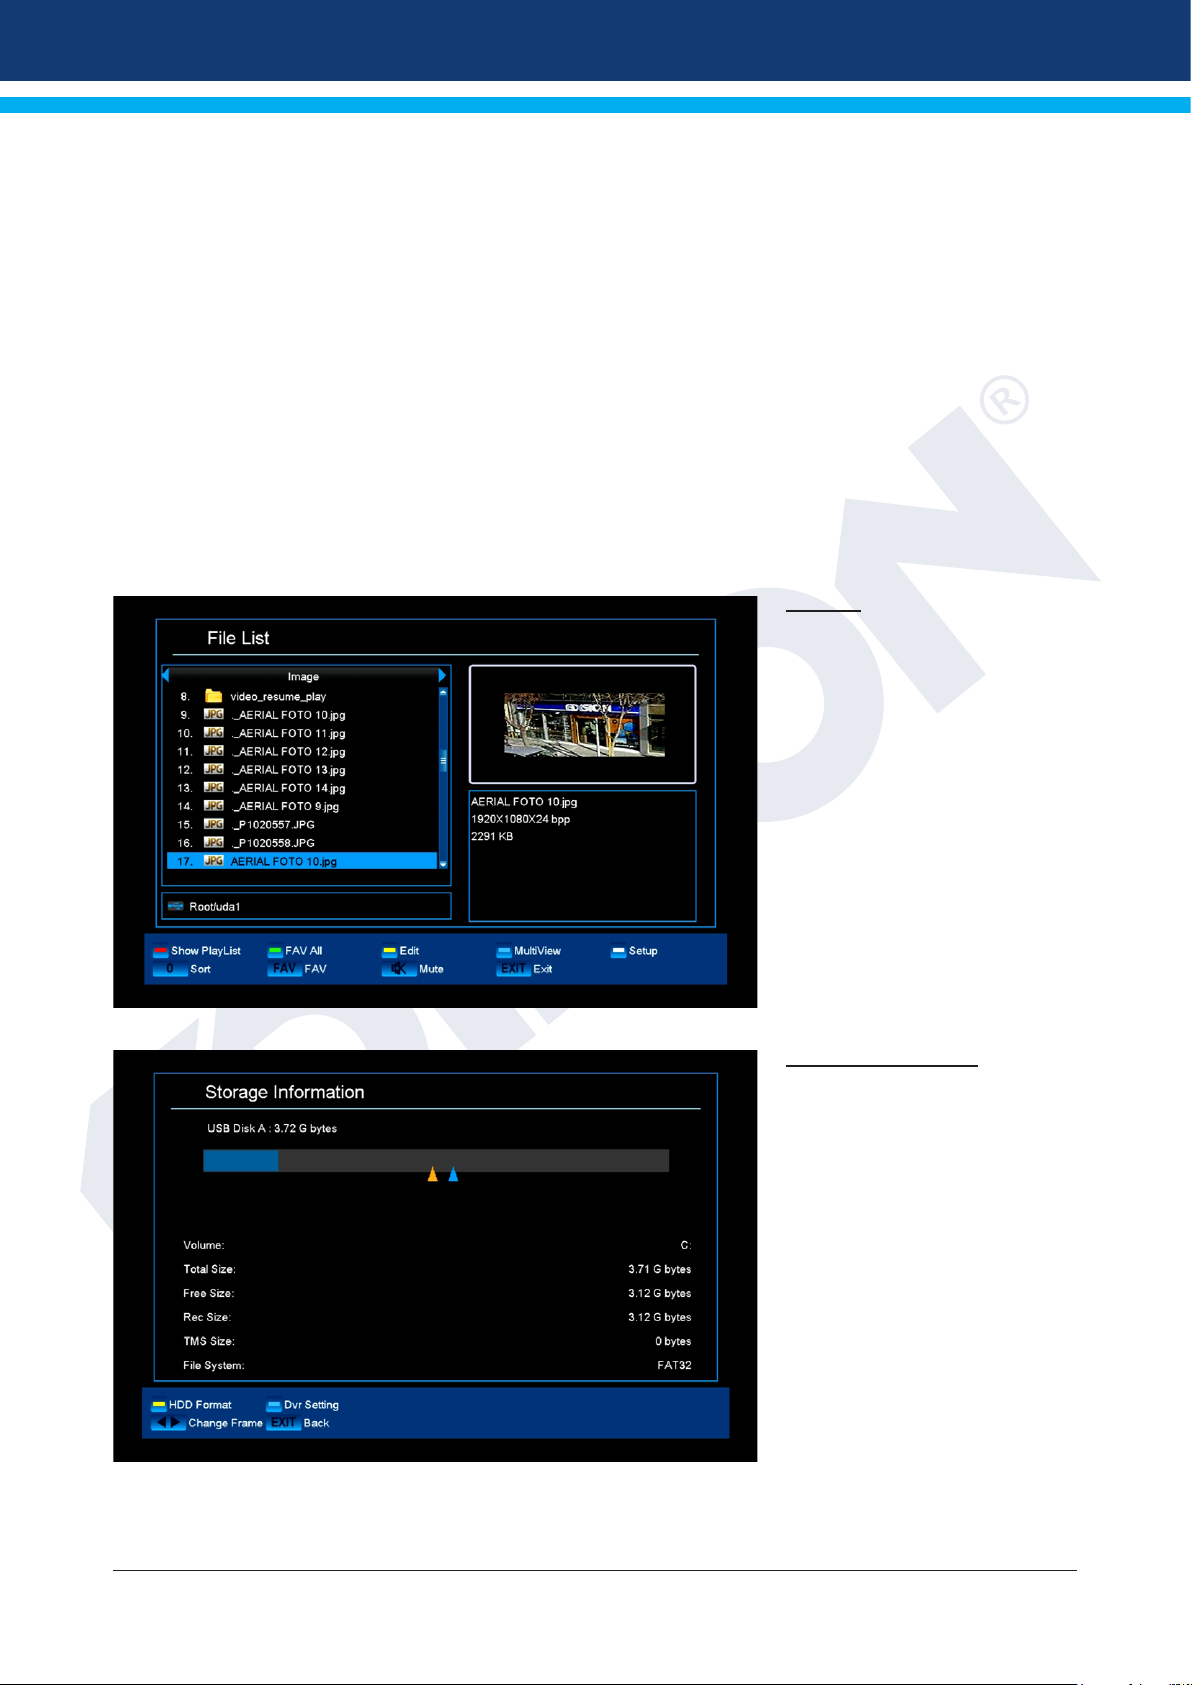
Functions and settings in the menu:
Port: Show information about an existing card into port.
Information Smart Card: Here you can set if you want to display information about the inserted card or not.
Exit the menu «Smart Card» or «Info Smart Card» by pressing the EXIT button.
►Media
► File List
► Memory Information
► Check-Speed USB
► USB Safely Remove
File List
The arrow buttons enable the
selection between «Image»,
«Video», «Software», «All» or
«Music» mode.
Your images can be viewed from
the USB medium in the image
mode.
Your videos can be played from
the USB medium in the video
mode.
Your music can be played from
the USB medium in the music
mode.
Memory Information
Information can be found in this
menu about the connected USB
memory device.
Volume: Displays the name.
Total memory: Displays
the total memory capacity.
Available memory: Displays
the available memory capacity.
File system: Displays the le
system used.
It is possible to format the USB
memory by pressing the yellow
button (HDD formatting).
Specify in the ‘HDD Formatting’
menu the le system with which
the USB memory should be formatted (FAT or NTFS). Please note that this will delete all existing les on this
USB memory.
Version of 14 June 2016 25
Page 26
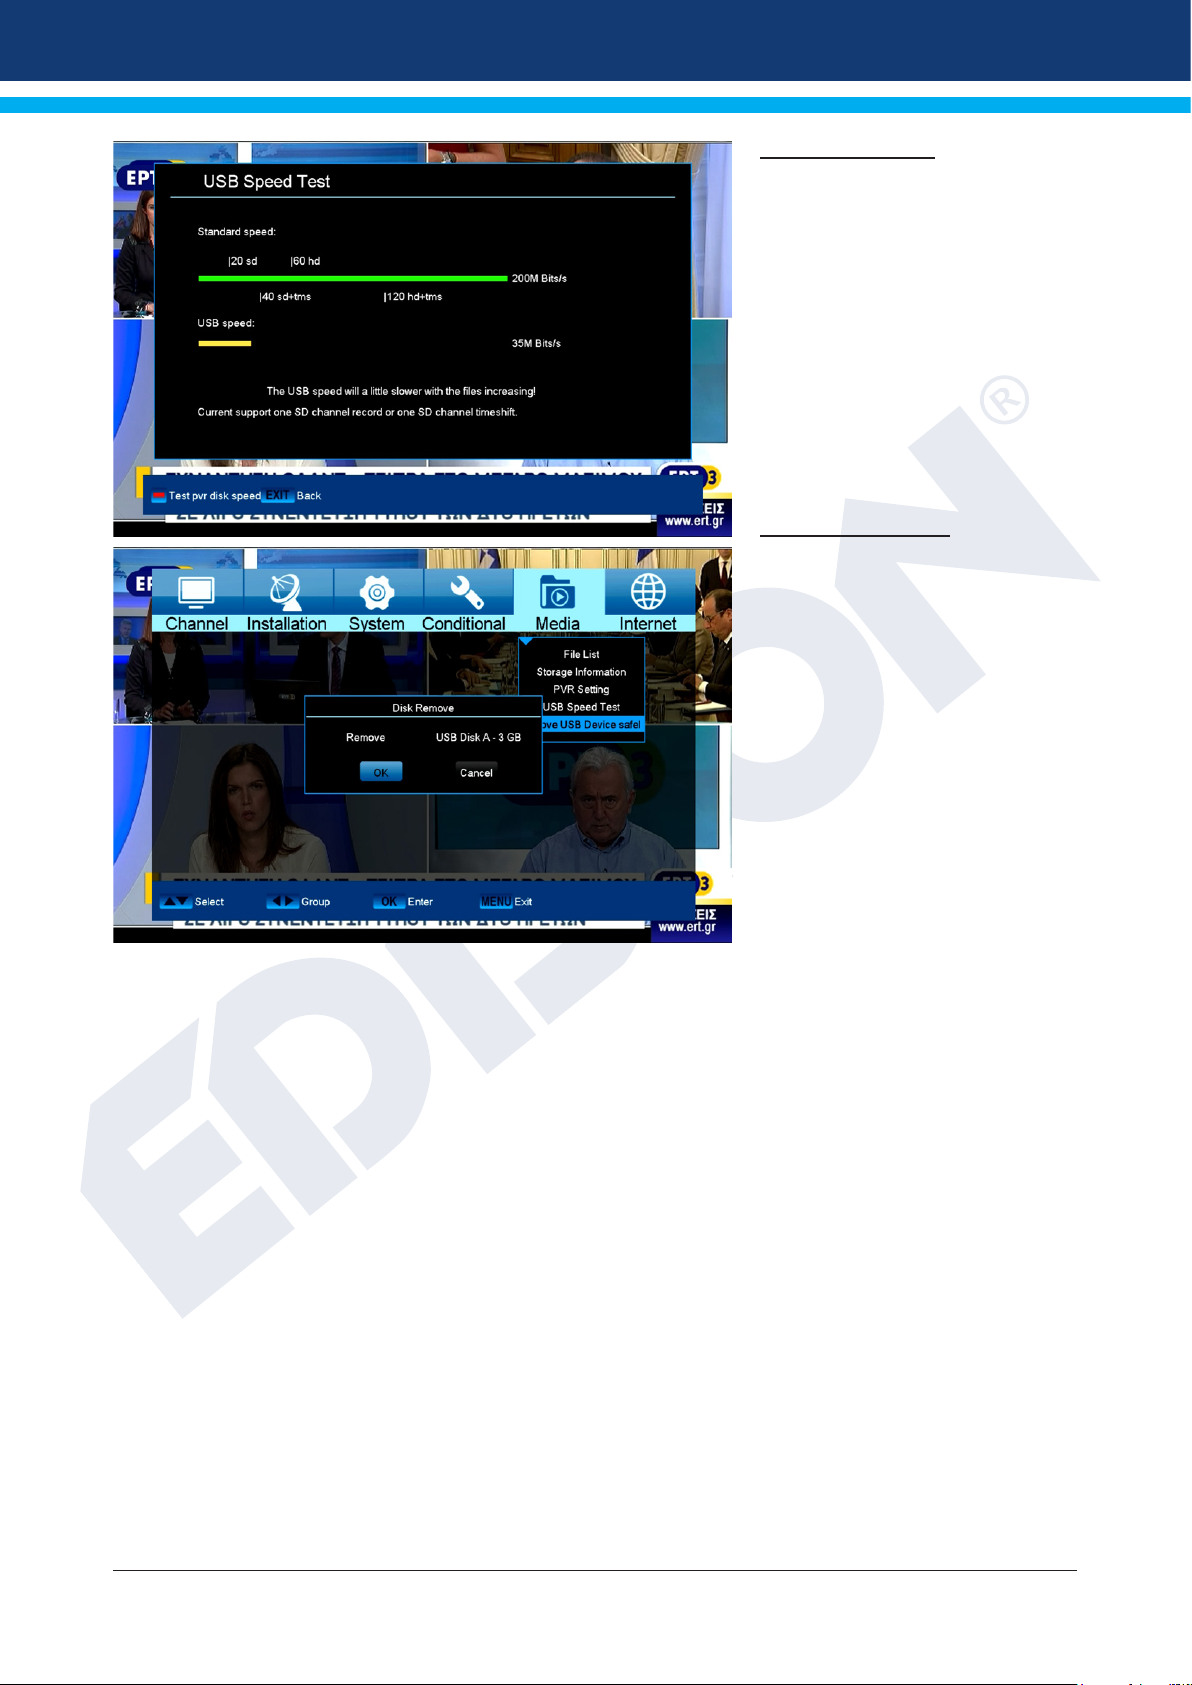
Check-Speed USB
In this menu item you can
control the speed of the connected
USB memory device. The window
displays the estimated transfer /
write speed and if this speed is
suitable for storing high denition
channel content. Furthermore you
see how many channels can be
recorded simultaneously.
Exit menu «USB / HDD Speed
Test» by pressing the EXIT button.
USB Safely Remove
Safely remove the USB device
26 Version of 14 June 2016
Page 27
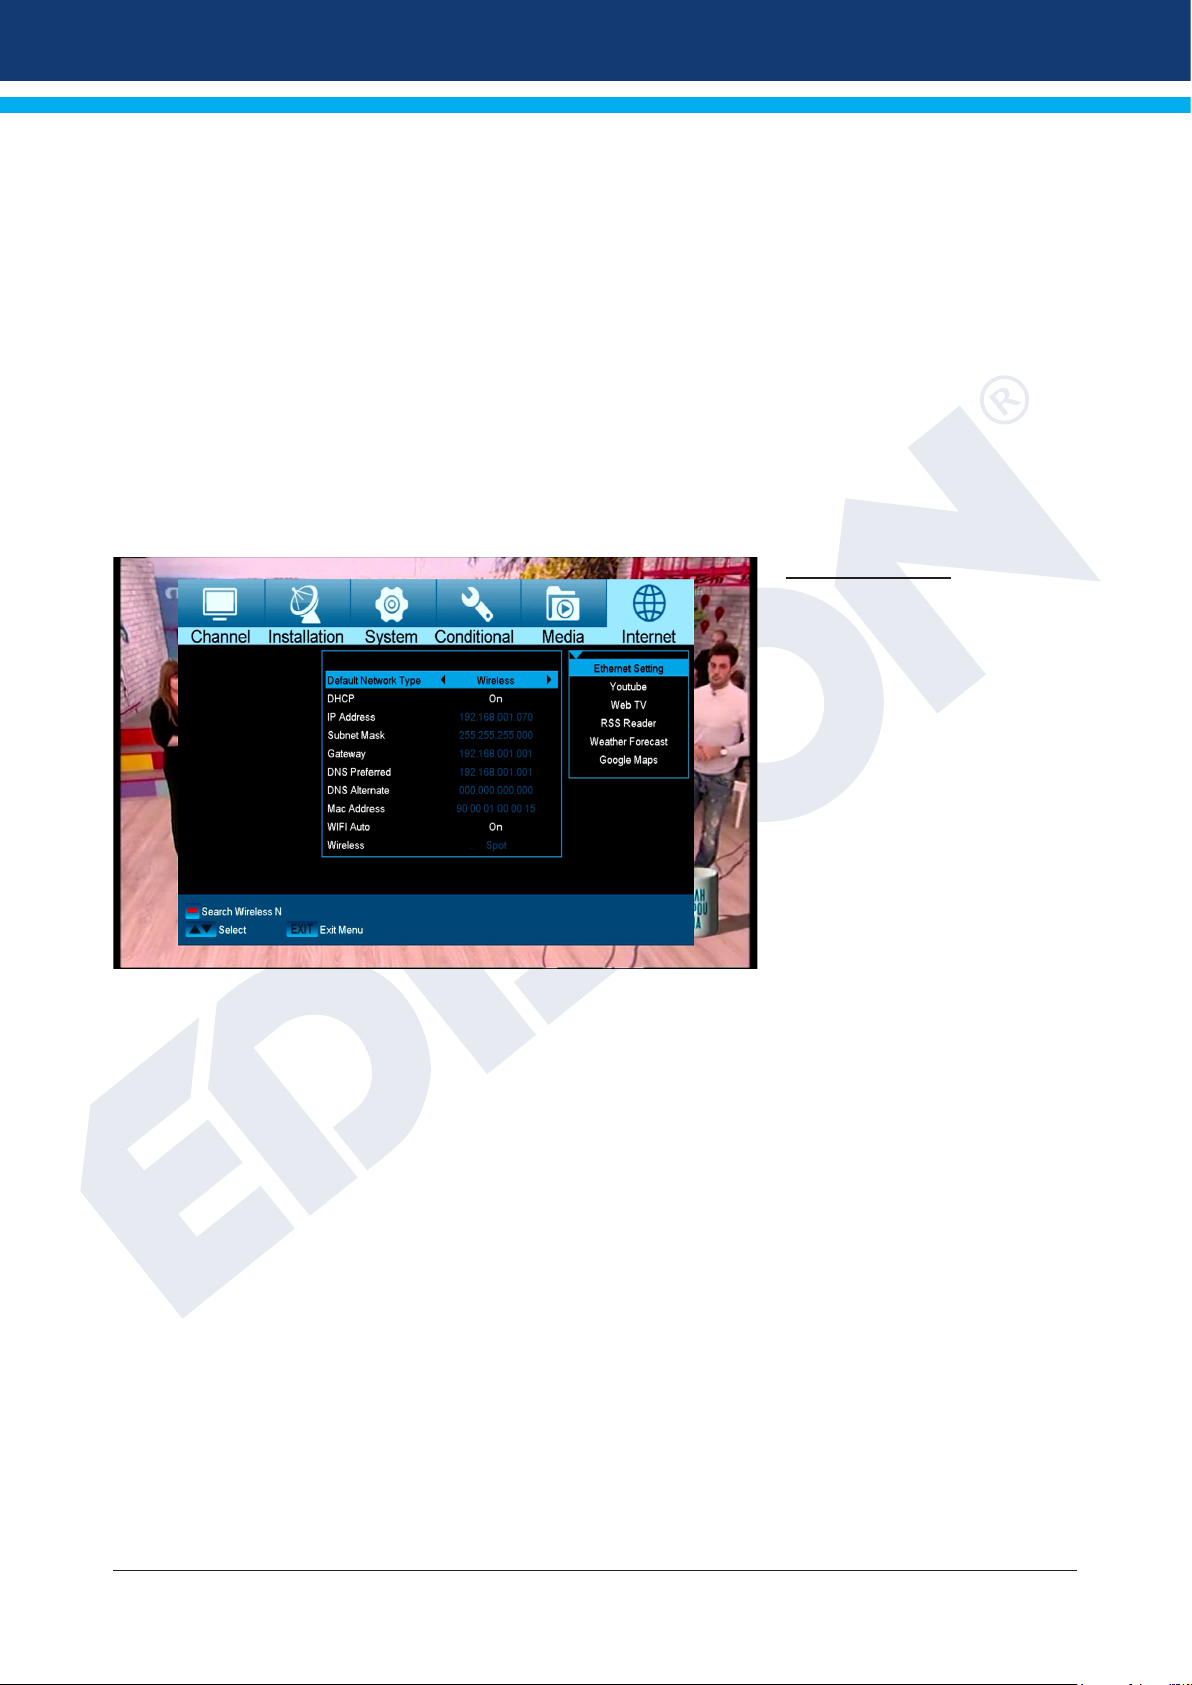
►Internet
► Ethernet Settings
► YouTube
► Web TV
► Rss Reader
► Weather Forecast
► Google Maps
Ethernet Settings
Note: The IP Address, Subnet
Mask, Gateway, DNS Preferred
and DNS Alternate items are
only accessible if the ‘Off’ value
is set at the ‘DHCP’ item.
Functions and settings in the
menu:
DHCP: When running a
DHCP server on your network,
it is possible to assign an IP
address automatically to the
receiver. For this purpose, set
the ‘On’ value here. If DHCP is
not used in your network, enter
the appropriate values manually
for the following items.
IP Address: Enter an unassigned IP address from your network here.
Subnet Mask: Enter the subnetmask corresponding to the network here.
Gateway: Enter the IP address of the Gateway to the Internet here.
DNS Preferred: The IP address for a so-called name server (DNS Server) can be indicated here.
DNS Alternate: The IP address for an alternative name server (DNS Server) can be indicated here.
Mac Address: This item is dened hardware-sided and shows the identier of the network interface.
This item is not changeable.
WIFI Auto Start:
Wireless: WLAN name (SID)
Note: Use the numeric buttons on the remote control to input numbers.
Exit the ‘Network Local Settings’ menu by pressing the EXIT button.
Automatic connection with the WLAN after switching on.
Version of 14 June 2016 27
Page 28
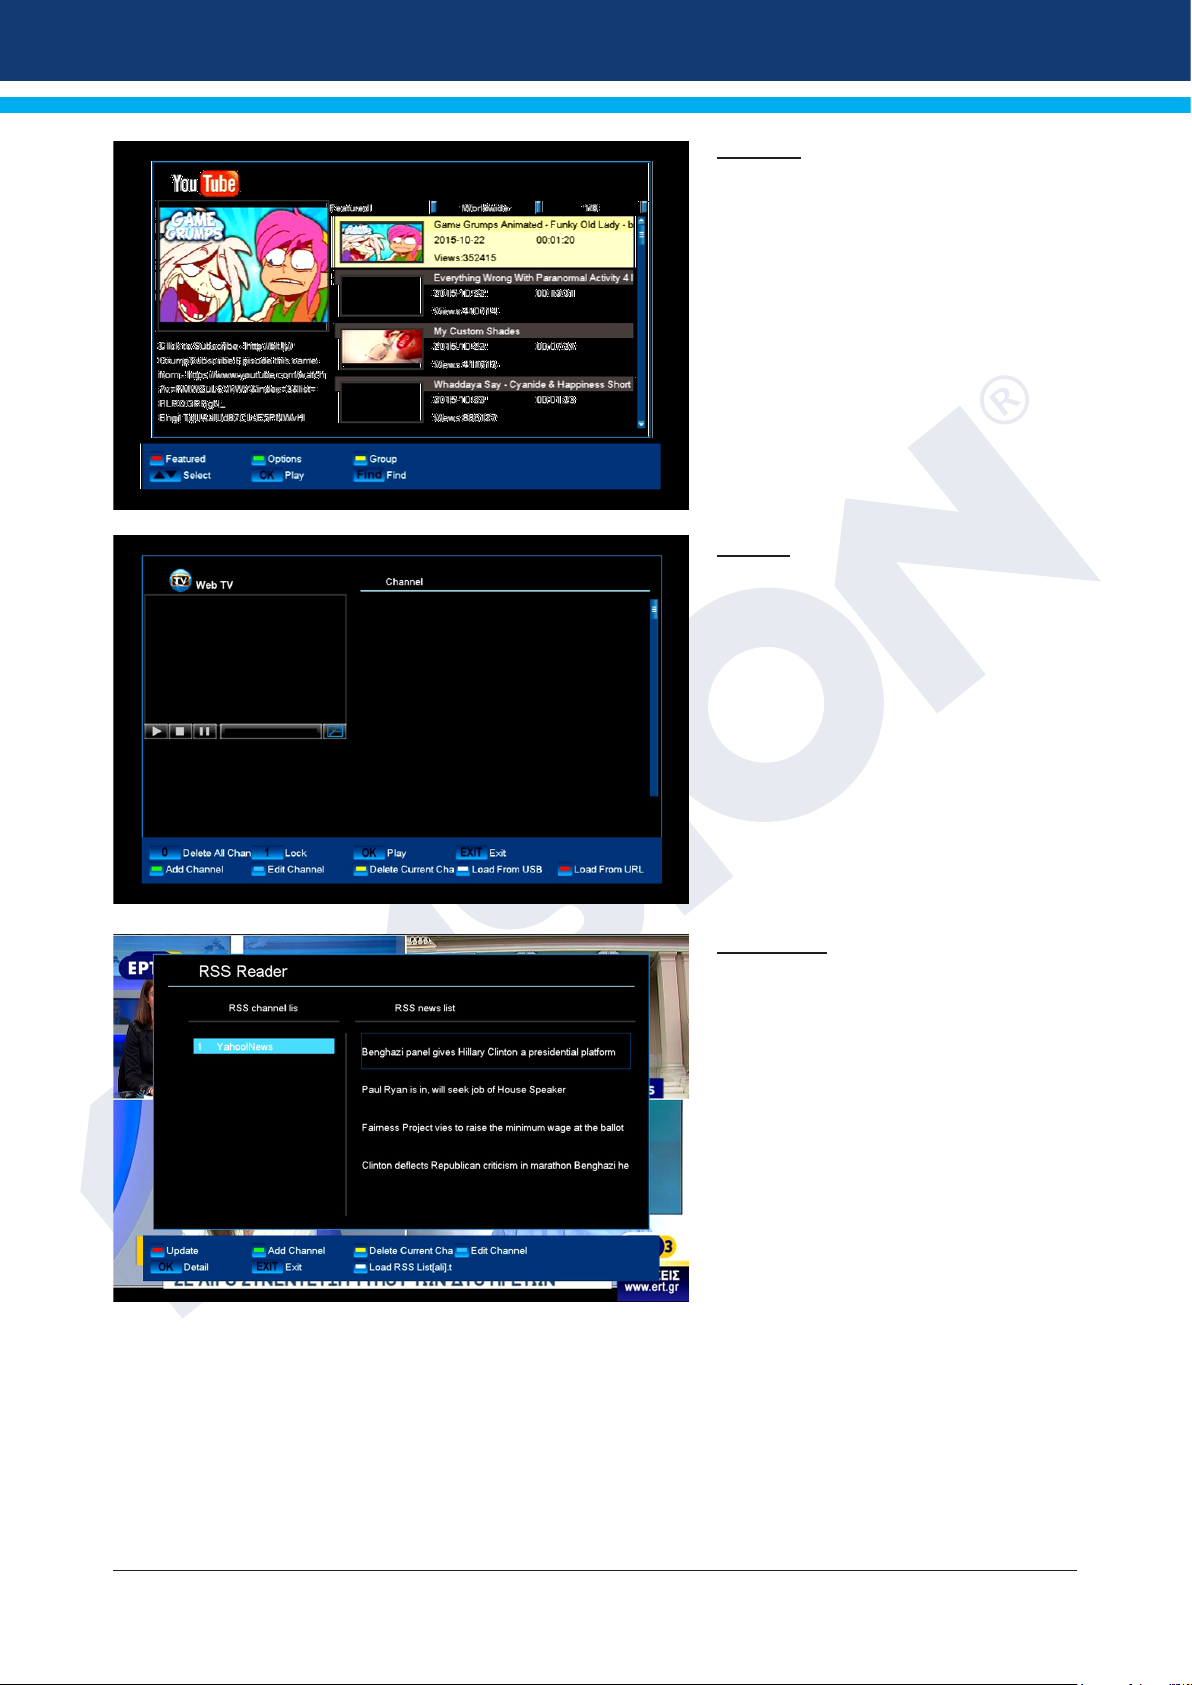
ΥουΤube
Access your favorite YouTube videos
Web TV
Features Web TV
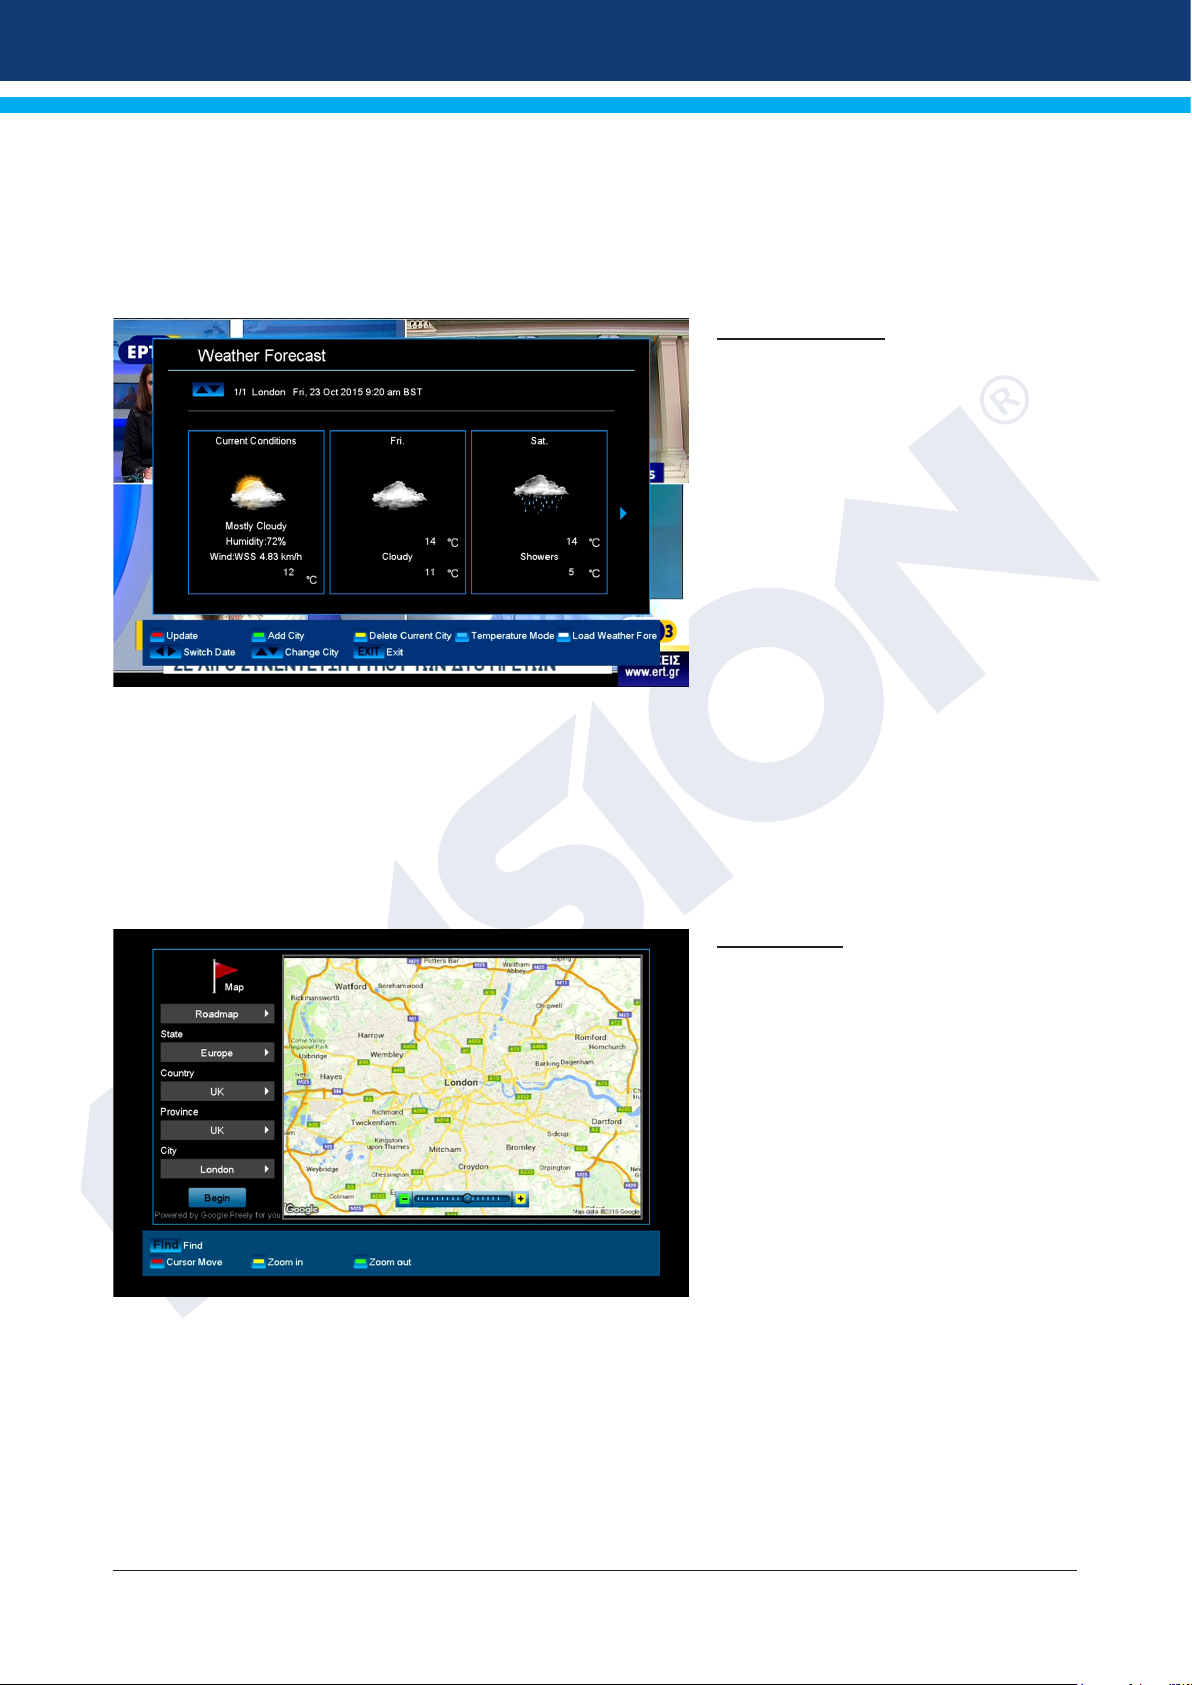
Rss Reader
This menu item offers access to brief
information from the Internet. The list of
the information providers (RSS channel
list) can be found in the left column and
in the right column (RSS news list),
news reports and information provided,
if available via Internet.
Use the up/down arrow buttons to
switch line-by-line in the lists and the
left/right arrow buttons to switch the
column. Use the OK button to display
more information about the messages in
the right column.
The selected list is updated by pressing the red button, the green button adds a new channel, the yellow
button removes a channel from the list and the blue button edits a channel entry.
How to add an information channel:
1. Make sure that your receiver is connected to the Internet.
2. Press the green button on the Internet/RSS Reader menu.
3. Indicate a name for the channel. Use the numbers or letter keys of the remote control.
4. Enter this address (URL) of the channel.
5. Press the red button to conrm the information.
28 Version of 14 June 2016
Page 29
Notes: Use the numeric key 1 to input the following special characters: . , * ? ! @ . Enter the characters _ - / :
via the ZOOM or 0 button. Use the yellow button to delete a character, the green button to switch between
lower and upper case spelling. RSS information channels can be found on the Internet.
Exit the ‘RSS Reader’ menu by pressing the EXIT button.
Weather Forecast
It is possible with an Internet connection
to have this menu item display current
weather data for the coming days about
a specic location. Press the green
button and use the arrow buttons to
select and navigate in the letter eld and
the OK button to specify a new location.
To conrm, navigate to the OK eld
and press the OK button on the remote
control.
If several locations are specied, use
the up/down arrow buttons to switch
between the weather data of the various
locations.
Use the left/right arrow buttons to browse a few days forward or back again.
Exit the ‘Weather Forecast’ menu by pressing the EXIT button.
Google Maps
Google Maps offers powerful, userfriendly mapping technology and local
business information, such as their
exact location, contact information and
guidance to your destination.
Version of 14 June 2016 29
Page 30

www.edision.gr
HDMI SCART
DC 5V/1,0 A
S/PDIFANT IN
S/PDIFANT IN
HDMI SCART
DC 5V/1,0 A
 Loading...