


BR-6476AC
User Manual
10-2020 / v1.1

CONTENTS
I. Product Information .............................................................................. 1
I-1. Package Contents .......................................................................................................... 1
I-2. LED Status ...................................................................................................................... 2
I-3. Back Panel ...................................................................................................................... 3
II. Installation ............................................................................................ 5
II-1. Wi-Fi Router Mode ........................................................................................................ 8
II-2. WISP Mode .................................................................................................................. 11
II-3. Universal Repeater Mode ............................................................................................ 14
II-4. Access Point Mode....................................................................................................... 17
II-5. WPS Setup .................................................................................................................... 20
II-6. Reset to Factory Default Settings ................................................................................ 20
III. Browser Based Configuration Interface ................................................. 21
III-1. Login ............................................................................................................................. 21
III-2. Main Menu .................................................................................................................. 23
III-2-1. Commonly used web elements ................................................................................... 24
III-2-2. Setup Wizard ................................................................................................................ 25
III-2-3. Status ........................................................................................................................... 27
III-2-3-1. System Status ............................................................................................................... 28
III-2-3-2. LAN Status .................................................................................................................... 28
III-2-3-3. Wireless 2.4GHz ........................................................................................................... 29
III-2-3-4. Wireless 5GHz .............................................................................................................. 29
III-2-3-5. WAN Status .................................................................................................................. 30
III-3. Network ....................................................................................................................... 30
III-3-1. WAN Settings ............................................................................................................... 31
III-3-2. WAN Speed .................................................................................................................. 34
IV. Appendix ............................................................................................. 64
IV-1. Configuring your IP address ......................................................................................... 64
IV-1-1. How to check that your computer uses a dynamic IP address ................................... 65
IV-1-1-1. Windows 7 ................................................................................................................... 65
IV-1-1-2. Windows 8 ................................................................................................................... 69
IV-1-1-3. Windows 10 ................................................................................................................. 73
IV-1-1-4. Mac OS ......................................................................................................................... 75
IV-1-2. How to modify the IP address of your computer ........................................................ 77
IV-1-2-1. Windows 7 ................................................................................................................... 77
IV-1-2-2. Windows 8 ................................................................................................................... 80
IV-1-2-3. Windows 10 ................................................................................................................. 84

IV-1-2-4. Mac .............................................................................................................................. 86
IV-1-3. How to Find Your Network Security Key ..................................................................... 89
IV-1-3-1. Windows 7 & 8 ............................................................................................................. 89
IV-1-3-2. Windows 10 ................................................................................................................. 91
IV-1-3-3. Mac .............................................................................................................................. 93
IV-1-4. How to Find Your Router’s IP Address ......................................................................... 95
IV-1-4-1. Windows 7 ................................................................................................................... 95
IV-1-4-2. Windows 8 ................................................................................................................... 98
IV-1-4-3. Window 10 .................................................................................................................101
IV-1-4-4. Mac ............................................................................................................................103
IV-2. Connecting to a Wi-Fi network ..................................................................................105
IV-3. Troubleshooting .........................................................................................................106

I. Product Information
BR-6476AC
(5GHz Antennas x 2 + 2.4GHz
Antenna x 2 with 5dBi)
Power Adapter
Ethernet Cable
Quick Installation Guide
I-1. Package Contents
Before you start using this product, please check if there is anything missing in
the package, and contact your dealer to claim the missing item(s):
Download product material here
https://www.edimax.com/download
1

I-2. LED Status
LED
Names
LED Status
Description
5G
5G
Flashing
The 5G connection has been activated.
Off
Wi-Fi is not active.
2.4G
2.4G
Flashing
The 2.4G connection has been activated.
Off
Wi-Fi is not active.
WAN
On
WAN activity.
Flashing
WAN port connected but inaccessible.
Off
WAN port not connected.
LAN
On
Ethernet port is connected to a network
device.
Off
Ethernet port is not connected to a network
device.
WPS
Flashing
Negotiation is in progress through Wi-Fi
Protected Setup.
Off
WPS is disabled or standby.
2

I-3. Back Panel
10/100Mbps
WAN Port
10/100 Mbps
LAN Ports 1–4
WPS/Reset Button
Power Port
BR 6476AC 5GHz Antennas x 2 + 2.4GHz Antenna x 2
with 5dBi
3

I-4. Safety Information
In order to ensure the safe operation of the device and its users, please read
and act in accordance with the following safety instructions.
1. The device is designed for indoor use only; do not place it outdoors.
2. Do not place the device in or near hot/humid places, such as a kitchen or
bathroom.
3. Do not pull any connected cable with force; carefully disconnect it from the
BR-6476AC.
4. Handle the device with care. Accidental damage will void the warranty of
the device.
5. The device contains small parts which are a danger to small children under
3 years old. Please keep the device out of reach of children.
6. Do not place the device on paper, cloth, dust, corrosive liquids or other
flammable materials. The device may become hot during use.
7. There are no user-serviceable parts inside the device. If you experience
problems with the device, please contact your dealer of purchase and ask
for help.
8. The device is an electrical device and as such, if it becomes wet for any
reason, do not attempt to touch it without switching the power supply off.
Contact an experienced electrical technician for further help.
9. Plug this product directly into a wall socket (100-240V~, 50/60Hz). Do not
use an extension cord between this product and the AC power source.
10. The Operating temperature is 0℃~40℃ (32℉~104℉). The Storage
temperature is -40℃~70℃ (-40℉~158℉).
4

II. Installation
1. Plug the included power adapter into the device’s 12V DC power port and
the other end into an electrical socket.
2. Ensure that the LED is lit. If not, the device is not properly connected.
3. Use a Wi-Fi device (e.g. computer, tablet, smartphone) to search for a Wi-Fi
network with the SSID “edimax_2.4G_xx or edimax_5G_xx(xx is the last two
codes of MAC Address)” and connect to it.
iOS 4 or Android 4 and above are required for setup on a
smartphone or tablet.
5

4. Open a web browser and enter the URL http://192.168.2.1 and begin the
setup process.
If you cannot access http://192.168.2.1, please make sure your
computer is set to use a dynamic IP address. Refer to IV-1.
Configuring your IP address for more information.
5. Enter new password, confirmed and click “NEXT’ to continue.
6

6. Select the mode for your BR-6476AC and click “NEXT” to continue.
Wi-Fi Router
The device connects to your modem and
enables Internet (wireless and Ethernet)
access on your network devices.
WISP Mode
The device connects wirelessly to your
Wireless Internet Service Provider and
provides 2.4GHz and/or 5GHz Internet
(wireless and Ethernet) access for your
network devices.
Universal Repeater
The device will act as a wireless range
extender that will help you to extend your
Wi-Fi network. The device acts as a client and
AP at the same time. It its client function to
connect to a root AP, and uses its AP function
to service wireless clients within its coverage.
Access Point
The device connects to an existing router via
Ethernet cable and provides Internet (wireless
and Ethernet) access for your network
devices.
Follow the appropriate instructions for your operating mode:
7

II-1. Wi-Fi Router Mode
1. Connect the blue WAN port of your BR-6476AC to the LAN port of your
modem using an Ethernet cable, and then log on to http://192.168.2.1.
2. Select “Router” mode and click “NEXT”.
3. You can select “Dynamic IP”, “Static IP”, and “PPPOE” mode.
8

4. Confirm the configuration details for your wireless network, then click
“NEXT” to continue.
5. Please click “Save” to reboot the device and activate the configuration.
9

6. Please wait a moment until the BR-6476AC is ready.
7. When the setup is complete. Please close the browser window.
8. The BR-6476AC is working and ready for use. You can now connect to the
device’s new SSID. Please refer to IV-2. Connecting to a Wi-Fi network if
you require more guidance.
10
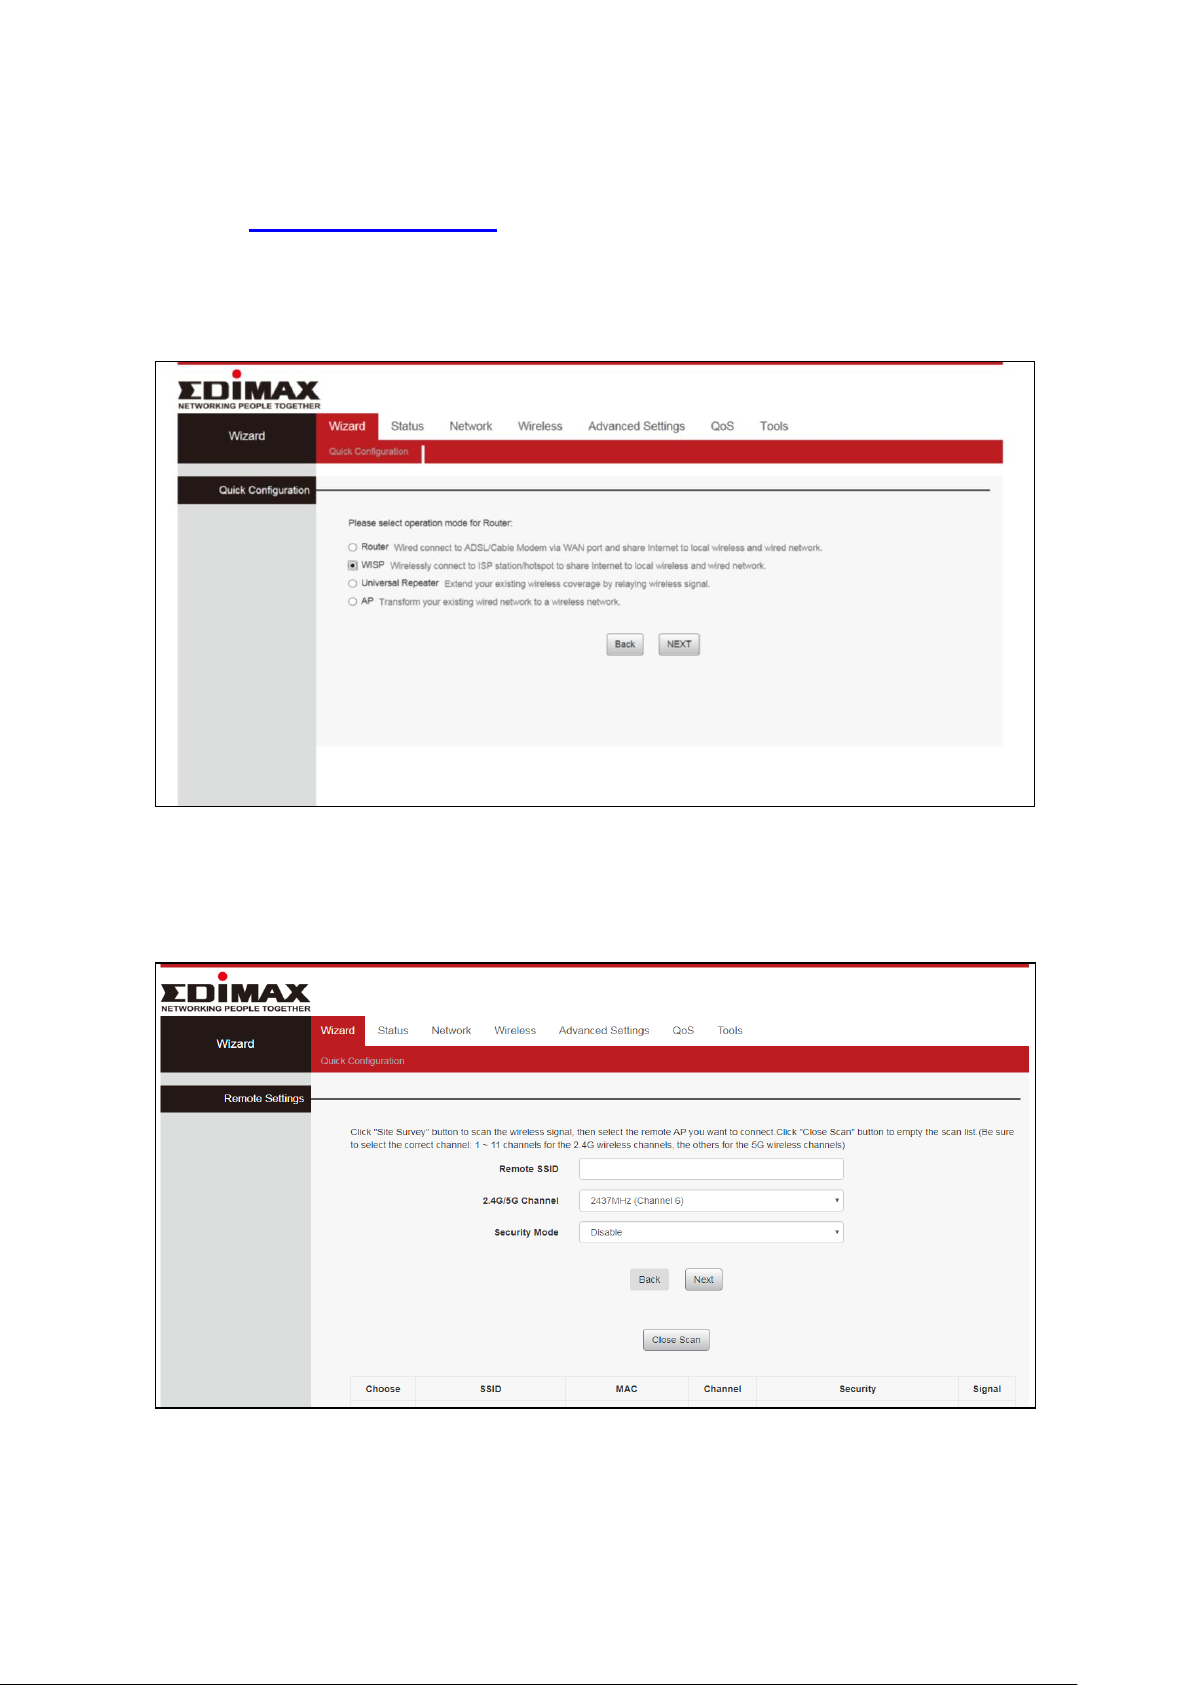
II-2. WISP Mode
1. Please ensure your BR-6476AC is within Wi-Fi range of your WISP network.
Log on to http://192.168.2.1 to configure your device.
2. Select WISP mode and click “NEXT”.
3. Click “Site Survey” to scan the wireless signals and connect to desired
device.
11

4. A summary of your wireless configuration will be displayed, as shown
below. Check that all of the details are correct and then click “NEXT” to
proceed.
5. Please click “Save” to reboot the device and activate the configuration.
12

6. Please wait a moment until the BR-6476AC is ready.
7. When the setup is complete, please close the browser window.
8. The BR-6476AC is working and ready for use. You can now connect to the
device’s new SSID. Please refer to IV-2. Connecting to a Wi-Fi network if
you require more guidance.
13

II-3. Universal Repeater Mode
1. Please ensure your BR-6476AC is within Wi-Fi range of your existing
wireless router. Log on to http://192.168.2.1 to configure your device.
2. Select Repeater Mode and click “NEXT”.
If the Wi-Fi network you wish to connect to does not appear, try
clicking “Refresh”.
14

3. The device will search for nearby wireless networks to connect to. If you
cannot find the access point you wish to connect to, click “Site Survey” to
refresh the list of wireless networks. Select the wireless network you wish
to connect to, and click “NEXT” to continue.
4. A summary of your wireless configuration will be displayed, as shown
below. Check that all of the details are correct and then click “NEXT” to
proceed. Click on Support Wireless Roaming to display the existing wireless
configuration.
The device will use the same wireless password/security key as
the existing wireless network.
15

5. Please click “Save” to reboot the device and activate the configuration.
6. Please wait a moment until the BR-6476AC is ready.
7. When the setup is complete. Please close the browser window.
8. The BR-6476AC is working and ready for use. You can now connect to the
device’s new SSID. Please refer to IV-2. Connecting to a Wi-Fi network if
you require more guidance.
16

II-4. Access Point Mode
1. Connect the yellow LAN port of your BR-6476AC to the LAN port of your
existing router using an Ethernet cable, and then log on to
http://192.168.2.1.
2. Select “AP” mode and click “NEXT”.
3. Confirm the configuration details for your wireless network, then click
“NEXT” to continue.
17

4. Please click “Save” to reboot the device and activate the configuration.
5. Please wait a moment until the BR-6476AC is ready.
18

6. When the setup is complete. Please close the browser window.
7. The BR-6476AC is working and ready for use. You can now connect to
the device’s new SSID. Please refer to IV-2. Connecting to a Wi-Fi network
if you require more guidance.
19

II-5. WPS Setup
If your wireless device supports WPS (Wi-Fi Protected Setup) then you can use this
method to connect to the BR-6476AC’s Wi-Fi network.
1. Press the WPS button on the BR-6476AC
for 1 – 3 seconds to activate WPS. The
WPS LED will flash for two minutes to
indicate that WPS is active.
2. Within two minutes, press the WPS
button on the wireless device/client to
activate its WPS.
3. The devices will establish a connection.
Repeat for additional wireless devices.
Please check the instructions for your wireless device for how long
you need to hold down its WPS button to activate WPS.
II-6. Reset to Factory Default Settings
If you experience problems with your BR-6476AC, you can reset the device
back to its factory settings. This resets all settings back to default.
1. Press and hold the WPS/Reset button found on the back panel for at least
10 seconds, until the LED begins to light out.
2. Release the button when the all LED are off.
3. Wait for the BR-6476AC to restart. The BR-6476AC is ready for setup when
the LED displays on.
20

III. Browser Based Configuration Interface
After you have setup the BR-6476AC as detailed in II. Installation or the
included Quick Installation Guide, you can use the browser based
configuration interface to configure advanced settings.
Please ensure that your computer is set to use a dynamic IP
address. Refer to IV-1. Configuring your IP address for more
information.
III-1. Login
1. To access the browser based configuration interface enter
http://192.168.2.1 into the URL bar of a browser on a network device
connected to the same Wi-Fi network as the BR-6476AC.
If you can not access http://192.168.2.1, connect the device to a
computer using an Ethernet cable and try again.
2. Please use your username and password to login.
21

3. Then click on the “Status” tab shown below. Use the top menu to navigate.
For more information, refer to following chapters.
22

III-2. Main Menu
1
Top menu
User can easily Select functions in the
navigation bar menu, Select the results
displayed in the configuration section.
2
Configuration zone
Configure and view area.
3
Status
Current status
1
2
3
Main menu is consisted of three areas. User can navigate and configure
BR-6476AC via the main menu.
23

III-2-1. Commonly used web elements
Common
elements
Description
Click “Save” to save the current settings.
Click “Cancel” to cancel the changes made.
Click “Release” to release information and data.
Click “Renew” to update the information.
Click “Refresh” to update the information.
Click “Clear” to clear/erase existing information.
Click “Restart” to restart the device.
Click “Upgrade” to update the firmware.
Click “Reset” to reset the device.
Click “Backup” to back up the router's configurations.
Click “Restore” to restore the router's configurations.
Click “Ping” to send ICMP Echo Request to a specified
interface on the network and waiting for a reply.
Click “Exit” to exit the current screen.
24

III-2-2. Setup Wizard
Wi-Fi Router
The device connects to your modem and enables
Internet (wireless and Ethernet) access on your
network devices.
WISP Mode
The device connects wirelessly to your Wireless
Internet Service Provider and provides 2.4GHz
and/or 5GHz Internet (wireless and Ethernet)
access for your network devices.
Universal Repeater
The device will act as a wireless range extender
that will help you to extend your Wi-Fi network. The
device acts as a client and AP at the same time. It
its client function to connect to a root AP, and uses
its AP function to service wireless clients within its
coverage.
Access Point
The device connects to an existing router via
Ethernet cable and provides Internet (wireless and
Ethernet) access for your network devices.
You can run the setup wizard again to reconfigure the basic
settings of the device, or you can run a wizard to help you
switch the device to a different operating mode. Select
“Wizard” then click on “Quick Configuration” to begin.
25

Switch to Router/AP/Universal Repeater/WISP
1. Follow the on-screen instructions to reset the device back to its factory
default settings.
2. Please wait for a few moments before the device is restarted.
3. After the device has reset, the log in page will appear. Enter the log in
information to proceed.
4. Follow the on-screen wizard to setup your device in a different mode.
26

III-2-3. Status
The “Status” page displays basic system information about the
device, arranged into four categories: System, LAN, Wireless
and WAN.
Screenshots displayed are examples. The information shown on your screen will
vary depending on your configuration.
27
 Loading...