

Page 1

00
MODE
ALARM
0/1
PAC8000S
Owner’s Manual
Page 2

Welcome
Welcome and thank you for purchasing this Koldfront Portable Air Conditioner.
We are glad you chose us. We take pride in knowing that, like our products,
our customer service will be just as dependable. Once you complete our easy
unit set up by following this manual, your portable air conditioner will provide you
years of great service.
Please save the original product packaging in case you need to safely transport
this portable air conditioner in the future.
For your reference:
Please write down the model and serial number here, as they are
needed to obtain service for your unit, if necessary. The two numbers
are on the label located on the back of your unit. You may also
want to staple your receipt to this manual. This will provide you with a
quick reference, as this information is needed for any service under
your warranty.
Model Number: ______________
Serial Number: _______________
Date Purchased: ______________
Need Assistance?
To better serve you, please do the following before contacting our customer service:
• Read this manual: it contains instructions to help you use and maintain
your portable air conditoner properly.
• If you received a damaged appliance: please contact the dealer that sold
you the appliance immediately.
• Read the section titled troubleshooting. This section will help you solve
common problems that might occur. If you do require service, our friendly and
efficient customer service representatives are available online via email at
service@edgestar.com or by telephone at 1-866-319-5473.
Page 3
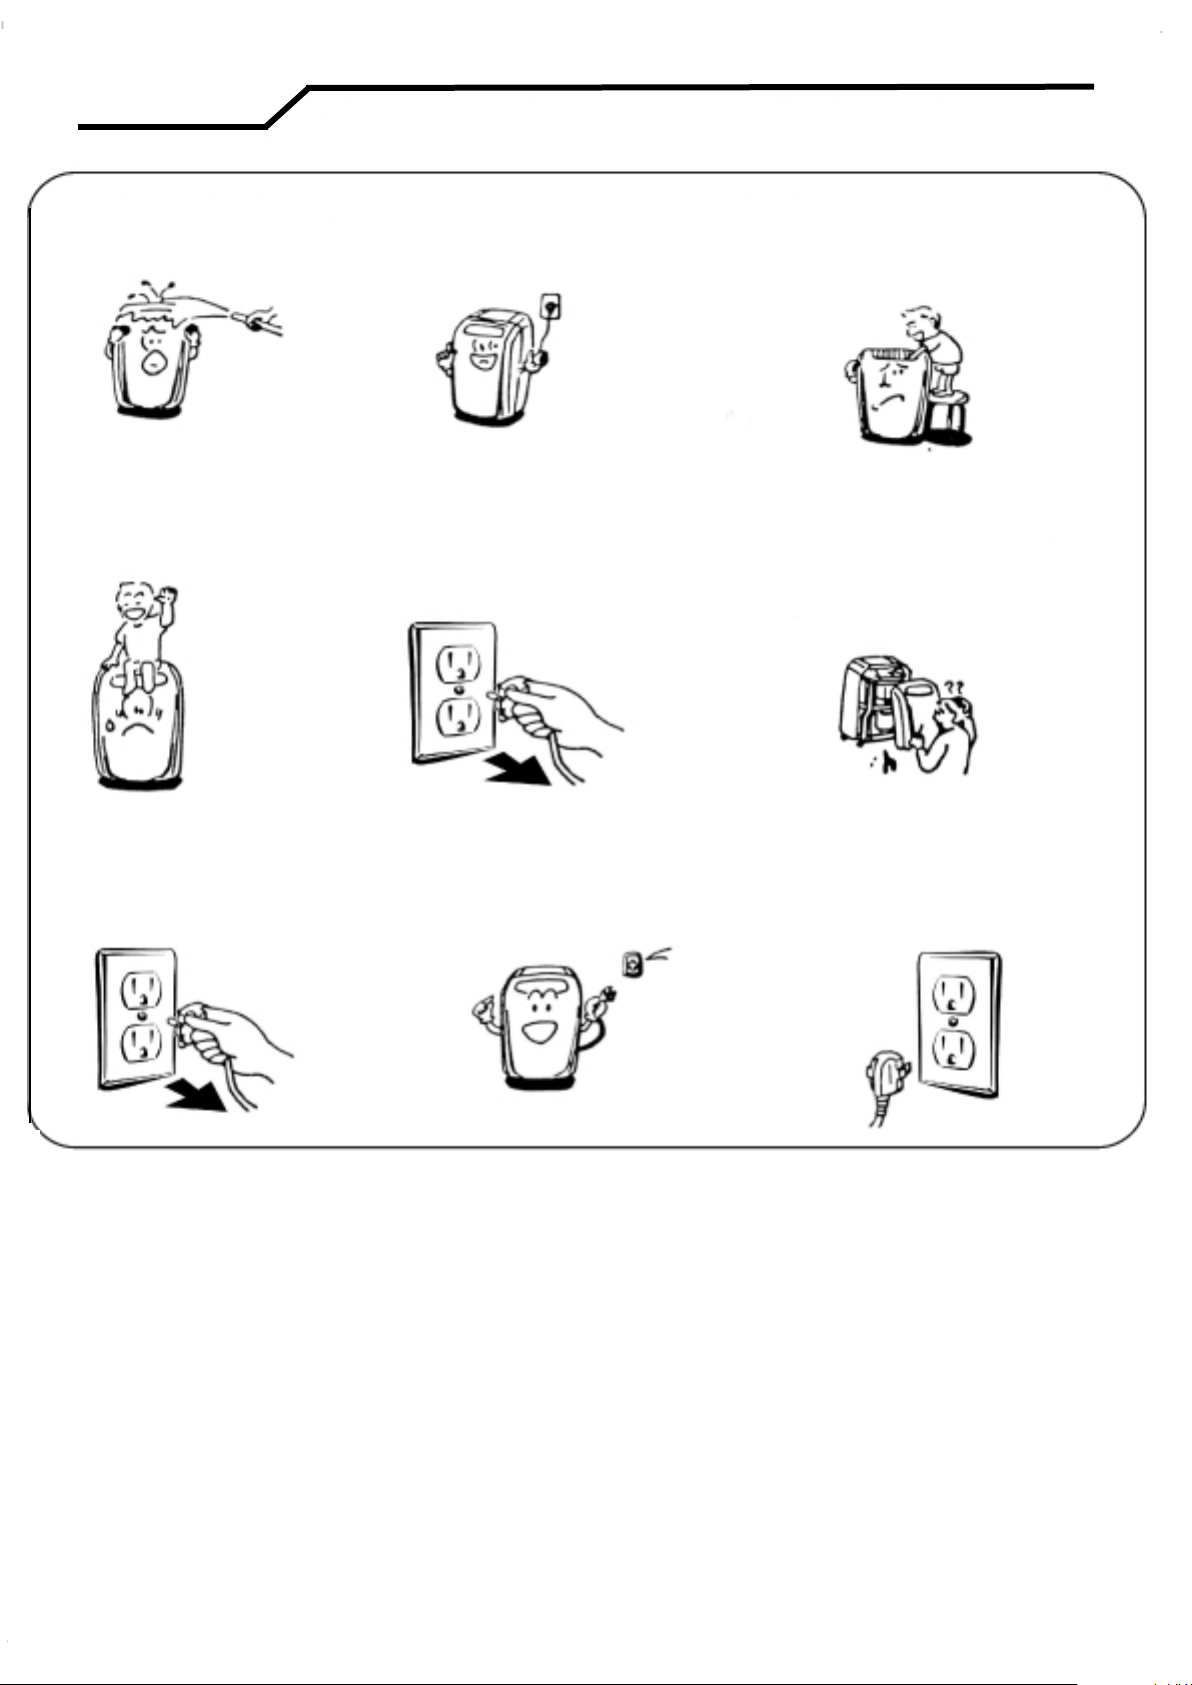
Warning
Improper handling may cause serious damage to the unit. Read this
manual carefully before operating the unit.
Do not wet the housing or
control panel.
Do not place objects or
let any person sit on top
of the unit.
Do not cover the air
outlet, while unit is in
use.
Always turn the unit off and
remove the power plug from
the socket when cleaning.
Do not allow children to play
with the controls or drop any
objects into the air outlet.
Do not attempt to remove any
part of the casing unless by an
authorized technician.
Remove the plug from
the socket if the unit is
not going be used for
p
a long period of time.
Make sure that the back of the unit is at least 4 inches or more away from a wall. Do not place
the unit in front of curtains or drapes to ensure they do not obstruct the air intake. Route the
power cord carefully to avoid a tripping hazard.
Use only the correct power
supply-AC115V/60Hz.
.
Do not operate the unit with a
damaged plug or loose outlet.
Warning
• If the power cord on this unit is damaged it must be replaced by the manufacturer, its service agent
• If the power cord on this unit is damaged it must be replaced by the manufacturer, its service agent or
or a qualified person.
qlified persons.
• This appliance is not intended for use by children.
• This appliance is not inte
• This appliance is intended for domestic use only.
• • nded for use by children.
• This appliance is intended for domestic use only. Any other use may invalidate the warranty and might
be dangerous.
could
Page 4
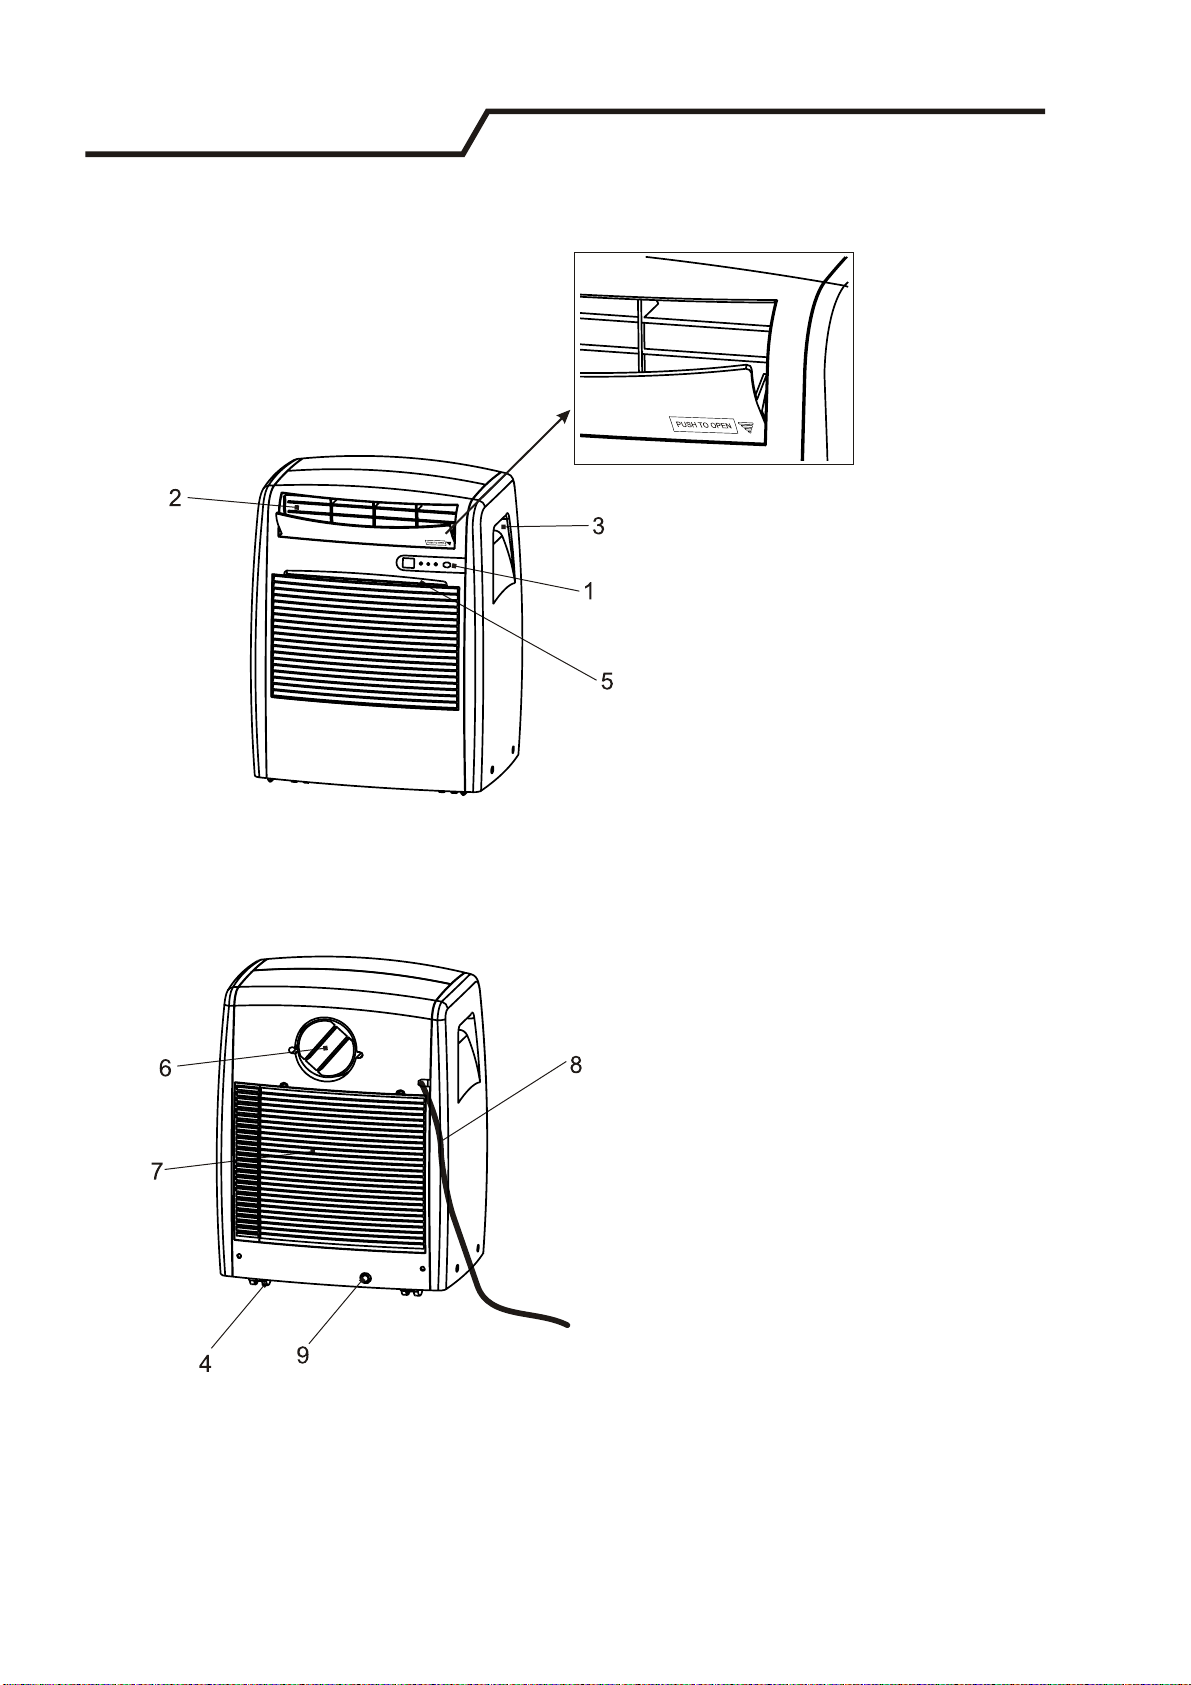
Parts
Parts
Figure 1
1. Control panel
2. Air outlet
3. Handle
4. Caster
5. Air filter
6. Air outlet (Exhaust)
7. Air intake (Condenser)
8. Power supply cord
9. Drain
Note: Please manually open the air outlet (Figure 1) to the desired position.
Page 5
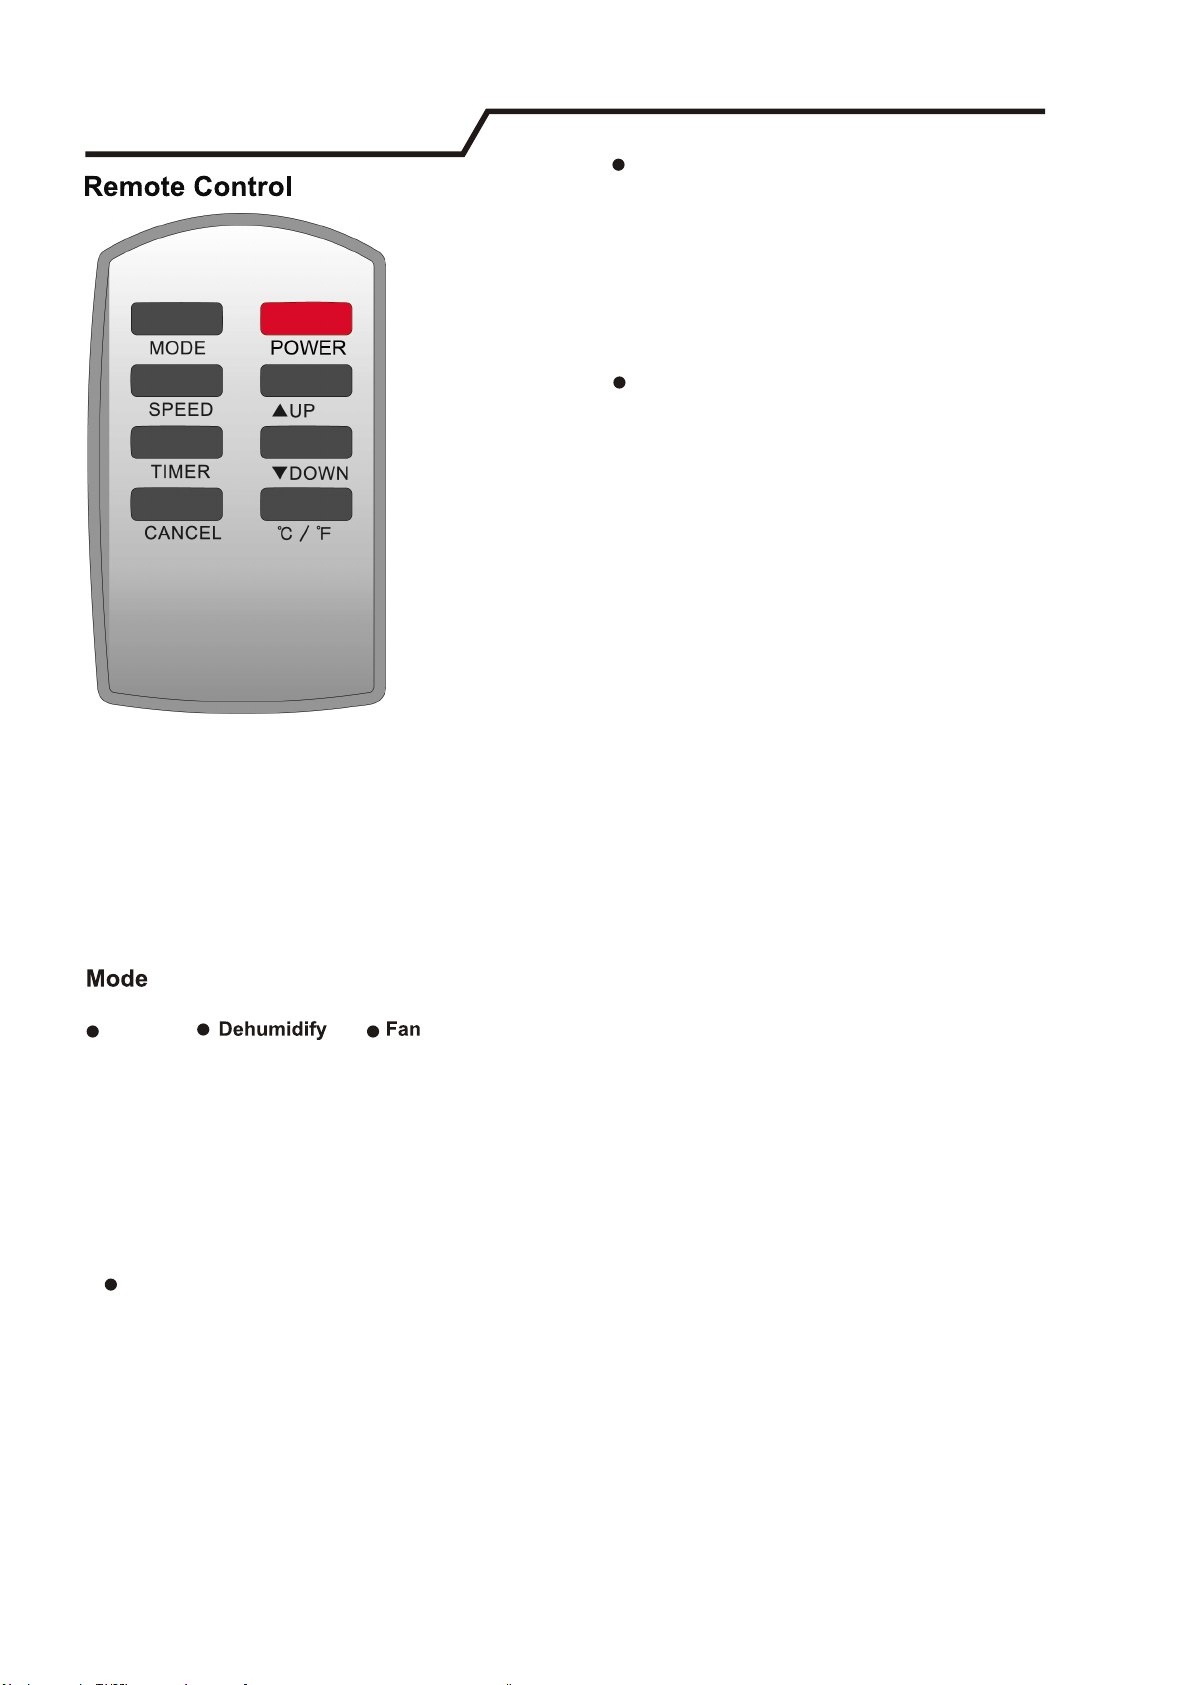
Operation
Dehumidifying Mode (Orange light)
The dehumidifying mode removes water from the
air without cooling the room. If the room temperature is below 77ºF, the fan speed will be locked on
“low;” above 77ºF, the fan speed is adjustable.
Note: The exhaust hose is not required in
dehumidifying mode. Note that the internal
water tray will fill with water in this mode.
Note: All functions on this portable air
conditioner are controlled by the
remote. This remote accepts AAA
batteries
Power control
The power button controls the
power to the unit.
Fan Mode (Green light)
Air is circulated throughout the room. The compressor
does not turn on, so no air conditioning takes place.
Note: The unit does not need to be vented in
fan mode.
Fan Speed
This unit has 3 fan speeds: High, Medium and
Low. Press the speed button to toggle the speeds.
Note: Fan speeds will not be displayed on the
control panel.
Temperature
To set the temperature in cooling mode, use the up
“▲” and down “▼” buttons. The temperature setting
°
range is from 61
Note: When in dehumidifying or fan mode,
temperature setting is not required or allowed.
F- 89°F.
Fahrenheit/Celsius
Pressing this button will switch the temperature
read-out between ºC and ºF.
°
Note: Inital setting is in °F
F
s
This unit has 3 settings:
Cooling
The settings are toggled by the mode button
Mode Light
The light on the display panel on the portable air conditioner
changes color to indicate the mode (see next page for
more information):
• Blue: When the light is blue, the unit is in cooling mode.
• Orange: When the light is orange, the unit is in dehumidifying
mode.
• Green: When the light is green, the unit is in fan mode.
Cooling Mode
In the cooling mode, room air is cooled and hot
air is exhausted to the outside through the air
exhaust hose. Adjust the fan speed and
temperature to suit your desired comfort level.
Note: The air exhaust hose must be vented
through a window when using the cooling mode
(see the page titled Installation for more detail).
(Blue light)
ing
Setting the Timer
If the unit is on:
• Press the timer button.
• Use the up “▲” and down “▼” buttons to select a
time (displayed in hours).
• After the selected time elapses, the unit will
automatically shut off.
If the unit is off:
• Press the timer button.
• Use the up “▲” and down “▼” buttons to select a
time (displayed in hours).
• Then select which mode you want the unit to
automatically start in and make the necessary
adjustments.
• After the selected time elapses, the unit will
automatically turn on.
Note: The timer setting range is between 1 and
24 hours.
Cancelling the Timer
You may cancel the timer setting at any time by
pressing the cancel button or by pressing the
power button.
Page 6

Operation
Mode
Power
Water
Display
Mode Light
Power
Water Light
Power
• The power button turns the unit on and off.
• When you first press the power button, the unit will
begin to operate in cooling mode. After you have
used the unit, and turned it off, it will default to the
last used mode/settings upon turning the unit on again.
If power to the unit is interrupted while the unit is running,
the air conditioner will restart itself in its last used
mode/settings once power is restored.
Note: This "auto restart" function will restart the
unit after power is restored. The compressor will
resume after 3 minutes, if in use.
Water Light
This portable air conditioner is designed to exhaust most or
all water condensed from the air (in cooling mode). In high
humidity situations, the internal water reservoir may fill. The
unit will automatically shut off and the water light will turn on.
Once the water is manually drained, the unit will operate as
normal.
Remote Control Sensor
WATER
Display
The unit will display the ambient room temperature while
in operation.
• Use the up “▲” and down “▼” buttons on the remote
to change the set temperature (cooling mode only).
• In cooling mode, once you have set the temperature,
the display will indicate your set temperature for 5
seconds then revert back to displaying the ambient
temperature.
• After setting the timer, the indicator will blink 5 times
before reverting back to displaying the ambient
temperature.
Note: the displayed range of the ambient
temperature is from 32°F to 122°F. Any temperature
above 122° F will be displayed as “HI” on the
indicator, and any temperature below 32°F will be
displayed as “LO.”
Mode Light
The light on the display panel on the portable air conditioner
changes color to indicate the mode.
• Blue: When the display panel is blue, the cooling mode is in use.
• Orange: When the display panel is orange, the dehumidifying
mode is in use.
• Green: When the display panel is green, the fan mode is in use.
Note: After turning the air conditioner off, wait 3 minutes before turning it back on again.
Page 7
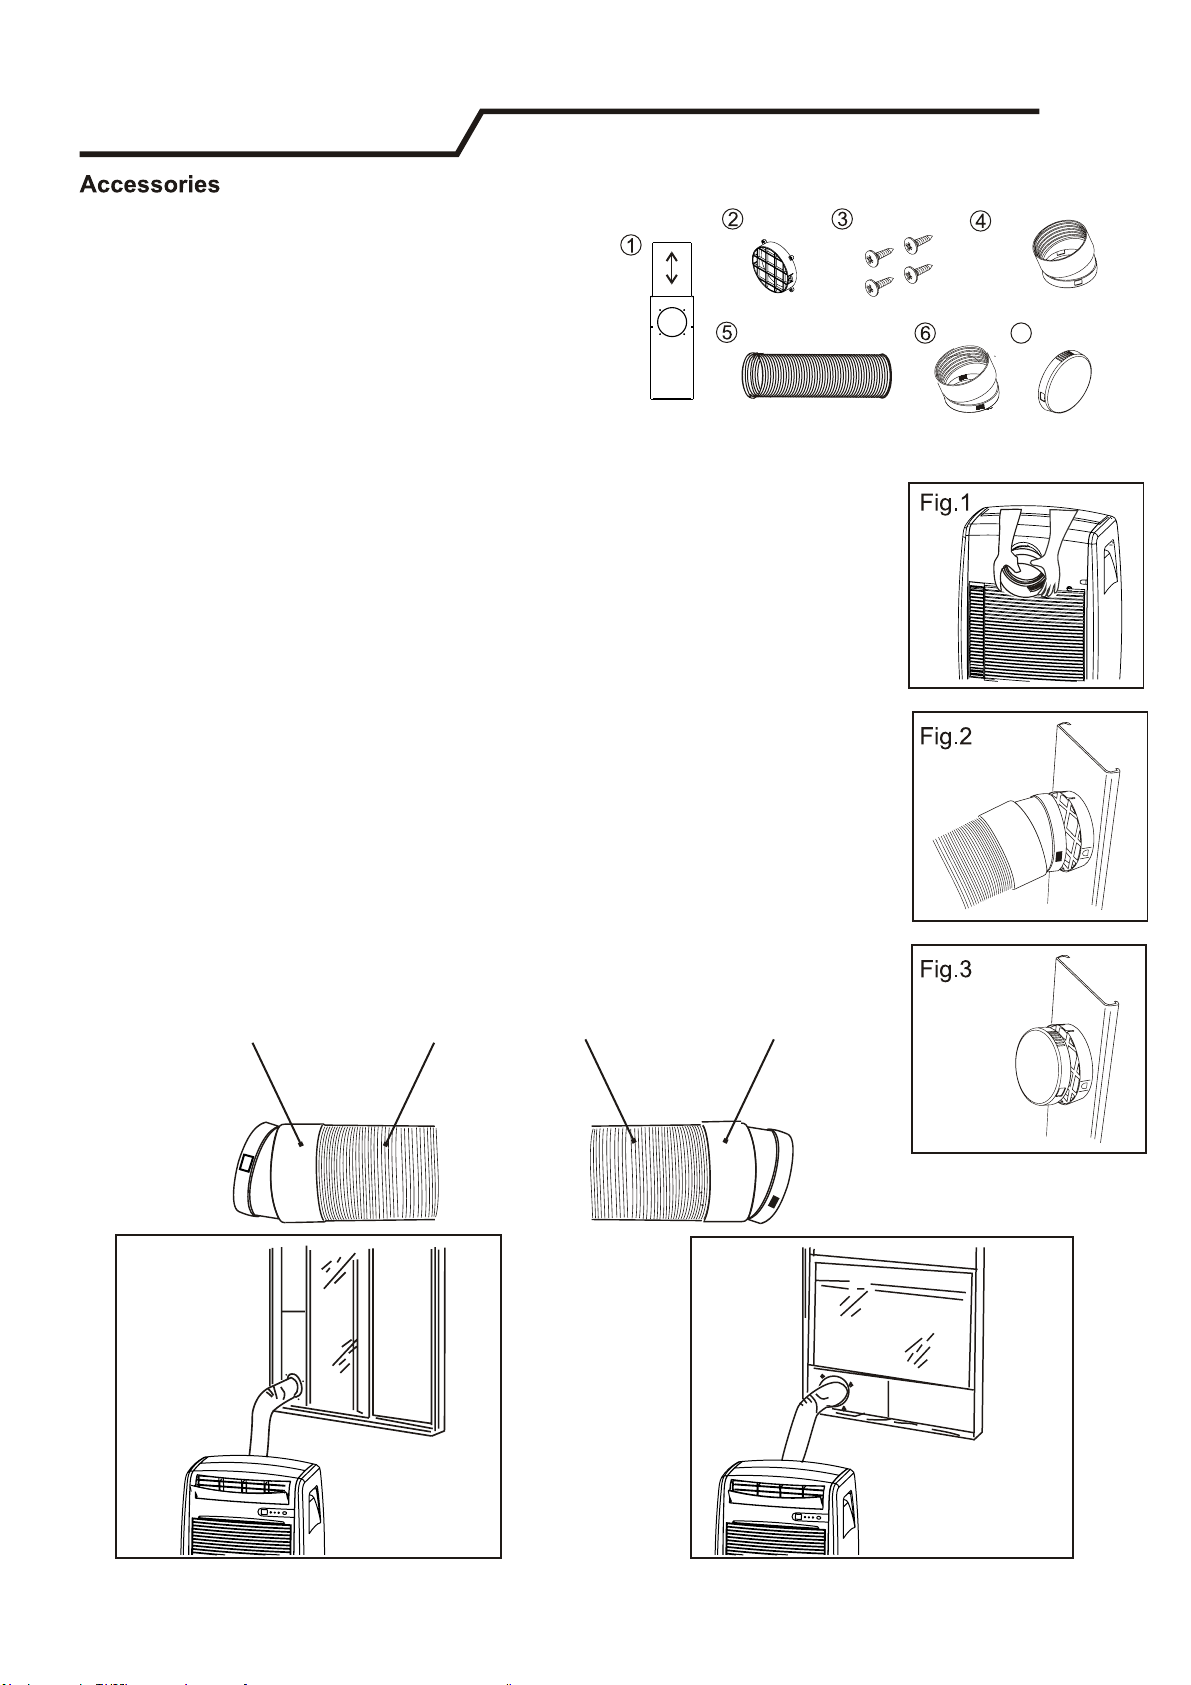
Installation
1. Plastic window kit.............................2 pieces
2. Grated adapter.................................1 piece
3. Screws..............................................4 pieces
4. Duct connector .................................1 piece
5. Exhaust hose....................................1 piece
6. Window kit connector........................1 piece
7. Vent cap............................................1 piece
1. Loosen the screws on the plastic window kit(1) and adjust the sliding kit to the width or height
of your window. Then tighten the screws to secure your adjustments to the window kit.
(See below images for setup examples)
2. Place the grated adapter(2) into the large hole on the flush side of the plastic window kit(1). Line up
the 4 holes in the grated adaptor(2) with the pilot holes in the plastic window kit and fasten them
togethe with a screw driver.
3. Install the plastic window kit(1) into your window. If necessary, use duct tape to better secure the window kit.
4. On the air conditioner, connect the duct connector(4) (the connector with the smaller slots) into the unit
by aligning the tabs inside the unit with the slots and snapping them together. (See Fig. 1).
Note: Once inserted, duct connectors cannot be removed.
5. Attach the window kit connector(6) (the connector with the larger slots) onto the exhaust hose(5) by
stretching the hose completely out and turning the window kit connector(6) clockwise, screwing it
into the exhaust hose(5).
6. Screw on the exhaust hose(5) to the duct connector(4) by turning it clockwise.
7. Move the air conditioner towards the window. Align the slots on the window kit connector(6) to the tabs
on the grated adapter(2) and snap them together. (See Fig. 2)
8. To remove the window kit connector(6) from the grated adaptor(2), push in the tabs on the grated
adaptor(2) and pull the window kit connector(6) away from the grated adaptor(2)
9. To remove the window kit connector(6) and duct connector from the exhaust hose, twist the
connections counterclockwise. To remove the grated adaptor(2) unscrew the 4 screws(3).
10. The vent cap(7) may be installed on the grated adapter(2) (by aligning the slots with tabs and snapping
them together) when the air conditioner is not in use. (See Fig. 3)
7
Duct Connector
Exhaust Hose
Window Kit Connector
Page 8

.
Maintenance
Maintenance and Storage
if
,
1. If you are not going to use this unit for a long time, be sure to drain the water from the
reservoir by removing the drain cap and the rubber plug.
2. Before storing the unit, run it in fan mode for a few hours to dry any moisture on the coils to
prevent mold.
3. Turn the unit off, clean the air filter and reinstall it.
4. Remove the exhaust hose and connectors and keep them in a safe place.
It is necessary to clean or replace
the air filters periodically.
Clean as follows:
Turn off the appliance
first before disconnecting
from the power supply.
Wipe with a soft
dry cloth.
Use lukewarm water
(below 104˚F) to clean
the appliance.
Stop the appliance and remove
the activated carbon filter and the
pre-filter.
The activated carbon
filter attaches to the
standard pre-filter. The
activated carbon filter
removes smoke, odors
and other harmful
particles, while the
pre-filter removes dust.
Never use volalile substances such
as gasoline or polishing powder to
clean the appliance.
Never spray water onto the main
unit.
Clean and reinstall the pre-filter
Dirt can be cleaned off the pre-filter
by cleaning it with a solution of soap in
lukewarm water. After cleaning the pre-filter,
allow it to air dry in shaded and cool place, then
reinstall. Clean the pre-filter
every two weeks if the air
conditioner operates in a
dusty environment.
Replace the activated carbon filter
The activated carbon filter cannot be cleaned
and needs to be disposed of when cleaning the
pre-filter. EdgeStar sells replacement activated carbon
filters. Contact customer service via email at
service@edgestar.com or by telephone at
1-866-319-5473 to purchase additional activated carbon
filters.
Page 9

Optimizing Performance
For Maximum Performance and Efficiency:
1. Do not cover the air outlet (exhaust) while in use.
2. Do not place the unit in front of curtains or drapes- to ensure they do not obstruct the air
intake.
3. Minimize the length of the exhaust hose.
4. Make sure the exhaust hose is as straight as possible.
5. Keep curtains, blinds or drapes closed during the sunniest part of the day.
6. Use the timer to operate the unit before it is needed. For example, set the timer to turn on
the unit in cooling mode for 3 or more hours to cool the room before you arrive. You may
want to operate the unit all day if you live in a warmer climate.
7. Minimize the heat sources (direct sunlight, computers, servers, people, etc.) in the room.
8. Close all windows and doors.
9. Use the unit in a contained room. For example, a room with four walls and a roof, instead
of a partitioned studio, or warehouse.
10. Make sure the unit is on a level surface.
11. Minimize the amount of humidity in the room. For example, adding a dehumidifier.
12. To prolong the compressor's life, please wait at least 3 minutes before turning the unit
back on after shutting it off.
13. Inspect and keep the pre-filters clean by cleaning regularly.
14. Inspect and replace the activated carbon filters regularly.
15. Perform routine maintenance.
Page 10

Troubleshooting
Why is my air conditioner not functioning at all?
o
The air conditioner may not be receiving electrical power. Press the test/reset buttons on the LCDI power
cord.
o Move the air conditioner to another outlet, and test the outlet with a voltage tester or another appliance
that is known to be non-defective. If the outlet is bad, contact an electrician and move the air conditioner to
another outlet.
o If the remote will not work, first, check the batteries. The control panel may be unplugged from the circuit board.
Contact customer service to repair.
Why is my air conditioner not cooling at all?
o The unit should be in a room where the ambient temperature is below 95˚F . If the ambient temperature is
above 95˚F, the unit will likely not blow cold air but is not defective. Follow the below steps to increase the
efficiency of your unit’s compressor:
o Minimize heat in the room.
o Minimize the size of the area to be cooled (close doors and windows).
o Close curtains or pull down blinds; minimize direct sunlight into the room.
o Remove additional heat sources such as computer equipment (servers), etc.
o Run the unit before it is needed (e.g., run the unit in the morning before the area gets hot, and
continue to run the unit all day long in order to maintain a low temperature).
o Use more than one unit or a larger unit to cool the area.
o Remove the exhaust hose and run the unit for 5 minutes. Stick your hand in front of the exhaust and then
in front of the internal air louvers. Is the exhaust noticeably hotter than the interior air? If so, the unit is not
defective; follow the above steps to maximize efficiency of your unit’s compressor.
o If your unit has a filter, the filter may be dusty or otherwise blocked. Clean the filter or contact customer
service to replace if necessary.
o Check to make sure the air intake or exhaust ports are not partially obstructed. If they are, remove the
obstruction.
My unit turns on, but one of the fans is not turning or makes a loud noise? (Exhaust and evaporator fan)
o If the fan spins freely while the unit is off, but does not spin when the unit is on, then the probable
cause is a loose wire from the fan motor to the circuit board, or a faulty fan motor. Contact customer
service to replace faulty wiring or fan motor.
o If the fan does not spin freely, then the probable cause is a broken fan, or a foreign object has
jammed the fan. Contact customer service if fan is broken, or unplug unit and attempt to remove
foreign object.
Page 11

Troubleshooting
Why are the control panel lights blinking randomly?
o Your air conditioner may have a minor electrical fault. Move the unit to another outlet or unplug the unit and
plug it in again.
o Your air conditioner may be plugged into an outlet that cannot supply the correct voltage to the unit. Move the
air conditioner to another outlet, and test the outlet with a voltage tester or another appliance that is known to
be non-defective. If the outlet is bad, contact an electrician and move the air conditioner to another outlet.
o If that is not the problem, the unit may have a faulty control panel. Contact customer service.
My unit runs for a little while (generally about 90 seconds) and then suddenly trips its power cord (and/or the
circuit breaker).
o Your air conditioner may need to be reset. Move the unit to another outlet or unplug the unit for 1 minute and
plug it in again.
o Your air conditioner may be plugged into an outlet that cannot supply the correct voltage to the unit. Move the
air conditioner to another outlet, and test the outlet with a voltage tester or another appliance that is known to
be non-defective. If the outlet is bad, contact an electrician and move the air conditioner to another outlet.
My air conditioner is too loud?
o Your air conditioner may be positioned on a hard or uneven floor causing your unit to vibrate. Move the unit
onto a level, carpeted surface.
o If the unit is level and a “knocking” noise is audible, the unit may have a faulty compressor. Contact customer
service.
Why is my air conditioner leaking?
o
Check for damage to the bottom of the unit. If damage is present, contact customer service.
o Make sure the unit on a level surface.
o Make sure you are running the unit with the drain plug installed. Make sure the drain cap as well as the rubber
drain plug is attached to the unit.
Both fans are blowing, but only room temperature air is coming out of both fans?
o
Make sure the unit is on “cooling” mode.
Note that the compressor may take up to 3 minutes to turn on.
o
o Check to see if there is any oily residue on the bottom of the unit or inside the unit on the panels, or
components. If this is the case, then the compressor has a cracked coil that is leaking oil and the unit must be
replaced. Contact customer service to replace.
Page 12

Specifications
Figures noted in the contents are for reference only; consult the label on your air conditioner
for precise information.
Description of product
Model
Voltage/Frequency
Input Power
Current
Dehumidifying capacity
Portable Air Conditioner
PAC8000S
AC 115V/60Hz
800W
6.7A
Silver
71 Pints/Day
Coolant
Timer
R-22
24 hours
Dimensions
(W) x (H) x (D)
Weight
Waste electrical products should not be disposed of with household waste.
Please recycle where facilities exist. Check with your local authority for
recycling advice.
19 1/4” x 24 3/4“ x 13 1/4”
55
53 lbs.
Page 13

Warranty
This EdgeStar product is warranted to be free from defective workmanship and materials for the first year following the date of original purchase. Replacement parts will be supplied free of charge for the first year following the
date of original purchase. Labor will be performed free of charge for the first 90 days following the date of original
purchase.
WHAT IS COVERED:
This warranty applies to the original purchaser only, and only covers defects in workmanship experienced during
operation of the product under normal service, maintenance, and usage conditions. This warranty applies to the
purchase and use of this product in residential settings within the United States of America.
WHAT IS NOT COVERED:
The following limitations apply to the coverage of this warranty:
Optional accessories, attachments, and appearance items are excluded from warranty coverage, as is shipping
damage, and any damage caused by improper voltage or any other misuse, including abnormal service, handling, or usage.
This warranty does not cover normal wear and tear on parts or replacement of parts designed to be replaced,
e.g. filters, etc.
This warranty does not cover service trips to deliver, pick-up, repair, or install the product, or to instruct in proper
usage of the product.
Damages or operating problems resulting from abuse, operation outside environmental specifications, uses contrary to instructions provided in the owner’s manual, accidents, vermin, fire, flood, improper installation, unauthor-
ized service, unauthorized installation or modification, or commercial use are excluded from warranty coverage.
This warranty does not cover labor incurred 91 days or more after the date of original purchase.
This warranty does not cover use of EdgeStar products in commercial settings.
DESCRIPTION OF WARRANTY SERVICE:
All defective product components covered by this warranty will be repaired or replaced, at EdgeStar’s option,
free of charge on a mail-in basis to EdgeStar’s authorized repair facility during the first 90 days from the date of
original purchase.
All defective product components covered by this warranty will be repaired or replaced, at EdgeStar’s option, on
a mail-in basis to EdgeStar’s authorized repair facility during the time period beginning on the 91st day from the
date of original purchase and ending one year from the date of original purchase. During this time period, parts
will be supplied free of charge, but labor charges will apply.
All replacement parts and units will be new, re-manufactured, or refurbished.
All products and components replaced by EdgeStar under warranty service become the property of EdgeStar.
OBTAINING WARRANTY SERVICE:
Contact EdgeStar for troubleshooting assistance and warranty service authorization at 1-866-319-5473. Please
have your order receipt available to confirm the date of purchase.
Once an EdgeStar authorized representative has confirmed that your product is eligible for warranty service, the
product must be returned to our EdgeStar repair facility.
The purchaser is solely responsible for prepaying all shipping related costs to and from the repair facility.
EdgeStar is not responsible for damage resulting from shipper mishandling or improper packaging.
Do not return defective product to the place of purchase.
THIS WARRANTY IS IN LIEU OF ANY OTHER WARRANTY, EXPRESS OR IMPLIED, INCLUDING WITHOUT
LIMITATION, ANY WARRANTY OF MERCHANTABILITY OR FITNESS FOR A PARTICULAR PURPOSE. TO
THE EXTENT ANY IMPLIED WARRANTY IS REQUIRED BY LAW, IT IS LIMITED IN DURATION TO THE EXPRESS WARRANTY PERIOD ABOVE. NEITHER THE MANUFACTURER NOR ITS DISTRIBUTORS SHALL
BE LIABLE FOR ANY INCIDENTAL, CONSEQUENTIAL, INDIRECT, SPECIAL, OR PUNITIVE DAMAGES OF
ANY NATURE, INCLUDING WITHOUT LIMITATION, LOST REVENUES OR PROFITS, OR ANY OTHER DAMAGE WHETHER BASED IN CONTRACT, TORT, OR OTHERWISE. SOME STATES DO NOT ALLOW THE
EXCLUSION OF INCIDENTAL OR CONSEQUENTIAL DAMAGES, SO THE ABOVE EXCLUSION MAY NOT
APPLY TO YOU. THIS WARRANTY GIVES YOU SPECIFIC LEGAL RIGHTS. YOU MAY HAVE OTHER RIGHTS
THAT VARY FROM STATE TO STATE.
4 in.
Page 14

For more information on EdgeStar and to view our
full line of products, please visit our website:
http://www.edgestar.com
 Loading...