

Page 1
r
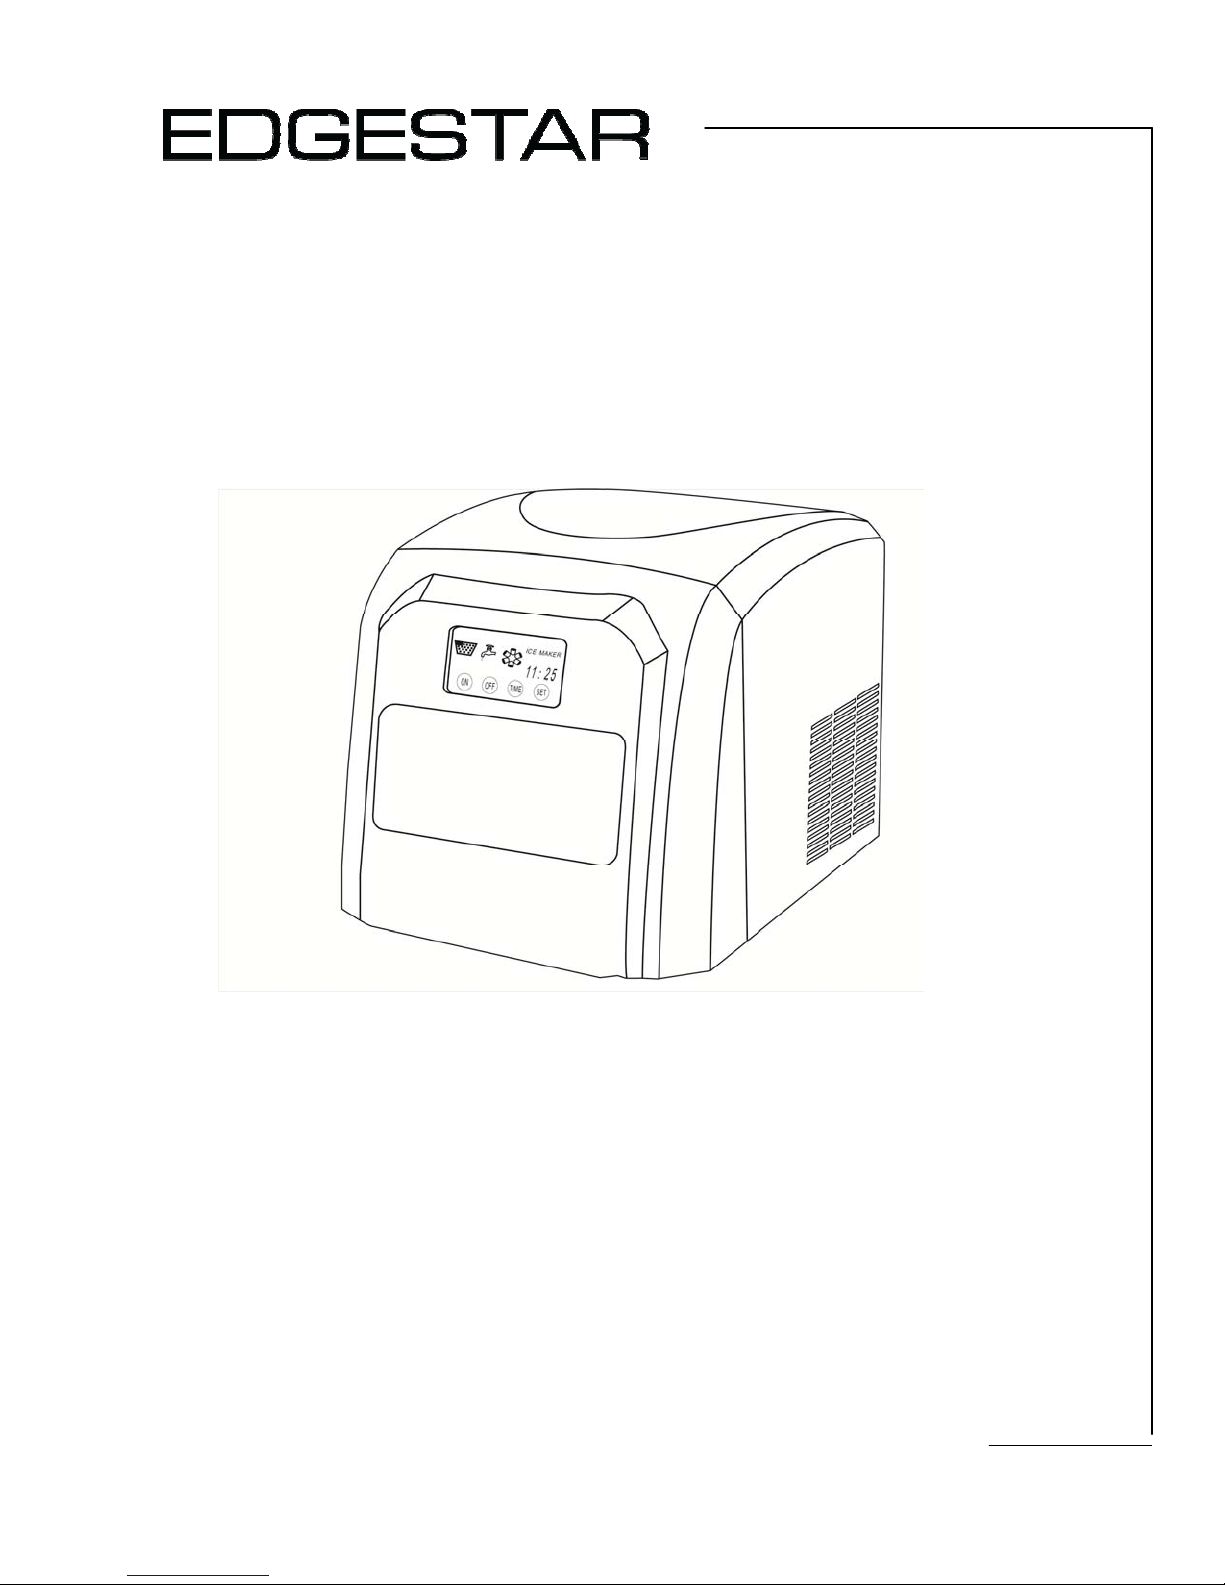
Portable Ice Make
IP310SS
Owner’s Manual
For more information on other great EdgeStar products on the web, go to http://www.edgestar.com
Page 2
Important Safety Information
Improper handling can cause serious damage to the EdgeStar ice maker and/or injury to the user. This ice maker is
designed for domestic indoor use only. Do not use the unit for industrial or commercial use. Any other use may
invalidate the warranty. Please review the ratings label located on the rear panel of the unit for electrical and other
technical data related to this unit. The unit must be used in a properly grounded wall outlet. Please read and follow
the safety information listed below to reduce the risk of fire, electric shock or
injury.
Electrical Safety
Do not exceed the power outlet ratings.
It is recommended that the ice maker be
connected on its own circuit.
A standard electrical supply (115 V, 60Hz), that
is properly grounded in accordance with the
National Electrical Code and local codes and
ordinances is required.
Use outlets that cannot be turned off by a
switch or pull chain.
Always turn the unit off and unplug it from the
outlet when cleaning.
Unplug the unit if it is not going to be used for
an extended period of time.
Do not operate the unit with a power plug that
is missing the ground plug, a damaged cord or
a loose socket.
Be sure the ice maker is properly grounded.
Never plug or unplug the unit with wet hands.
Do not bypass, cut or remove the grounding
plug.
Do not use extension cords or power strips with
this unit. You may need to contact your
electrician if it is necessary to use a longer cord
or if you do not have a grounded outlet. Do n ot
modify the power cord’s length or share the
outlet with other appliances. If you must use an
extension cord, use No.14AWG minimum size
and rated no less than 1875 watts.
Do not start or stop the unit by switching the
circuit’s power on and off.
If the power cord is damaged, it must be
replaced by the manufacturer or a qualified
technician.
Never repair the unit while it is plugged in.
Immediately unplug the unit if it makes strange
sounds, emits an odor or smoke comes out of it,
and contact customer service.
Do not remove any part of the casing unless
instructed by an authorized technician.
You should never attempt to repair the unit
yourself.
Contact EdgeStar Support if the unit needs
repair service.
Do not tip the unit over while it has water in the
reservoir.
General Safety
Use at least two people to move and install the
ice maker to prevent back and other types of
injuries.
Install the ice maker in a well ventilated area
where the ambient temperature is above 50°F
and below 90°F.
This unit is designed to be installed indoors, and
protected from rain, sleet, snow, etc. Do not use
your ice maker outdoors. Place the ice-maker
away from direct sunlight and make sure that
there is at least 4 inches of space between the
back of your unit and wall. Keep a minimum
distance of 4 inches on each side of your unit free.
This unit is not intended to be used by children
and should be supervised to ensure that they do
not play with this product.
Never allow children to crawl inside the ice maker.
Do not use this appliance near flammable gas or
combustibles, such as gasoline, benzene, thinner,
etc.
Do not place the unit near heat sources such as
ovens and grills.
Only use in an upright position on a flat, level
surface and provide proper ventilation.
Discard the first batch of cubes produced by the
ice maker.
If the unit has not been used for an extended
period, thoroughly clean it before using it.
Do not leave any cleaning solutions in or on the
unit
Do not use solvent-based cleaning agents or
abrasive solutions on the interior as they ma y
transmit taste to the ice cubes and damage the
interior.
Do not clean the unit with flammable fluids. The
fumes can create a fire hazard or cause an
explosion.
Other than water do not use other types of liquid
to make ice.
This appliance is not intended for use by persons,
including children, with reduced physical, sensory
or mental capabilities, unless they have been
given supervision or instruction concerning the use
of the appliance by the person(s) responsible for
their safety.
i
Page 3

Table of Contents
IMPORTANT SAFETY INFORMATION ...................................................................... I
INTRODUCTION ..................................................................................................... 1
PARTS IDENTIFICATION ......................................................................................... 2
REAR VIEW ........................................................................................................... 2
FRONT VIEW ......................................................................................................... 2
BEFORE YOU BEGIN: PREPARING THE ICE MAKER FOR USE ............................... 3
UNPACKING THE ICE MAKER ................................................................................... 3
CLEANING THE ICE MAKER ..................................................................................... 3
INSTALLATION REQUIREMENTS .................................................................................. 3
Clearance and Environment Requirements ............................................ 3
Water Requirements ................................................................................... 3
Electrical Requirements .............................................................................. 3
OPERATION ........................................................................................................... 4
USING YOUR ICE MAKER ........................................................................................ 4
USING THE CONTROL PANEL ................................................................................... 5
Power ............................................................................................................ 5
HOW THE PORTABLE ICE MAKER PRODUCES ICE ....................................................... 6
DRAINING THE UNIT ................................................................................................ 6
NORMAL SOUNDS ................................................................................................. 6
CLEANING AND MAINTENANCE ......................................................................... 7
TROUBLESHOOTING .............................................................................................. 8
SPECIFICATIONS ................................................................................................... 9
LIMITED WARRANTY ............................................................................................ 10
This owner’s manual is provided for reference use only. Specifications may
change without prior notice. Refer to the product label on the back of
your ice maker for the latest technical information.
EdgeStar Portable Ice Maker ii
Page 4

Introduction
Thank you for purchasing this EdgeStar ice maker. We are glad you chose
us. We believe that your purchase of this product opens a relationship
between you and EdgeStar. We will provide the customer support
needed to nurture that relationship.
This manual contains important information regarding the proper
installation, use and maintenance of your ice maker. Following this
manual will ensure that your product will work at its peak performance
and efficiency.
Please save the original product packaging in case you need to safely
transport your portable ice maker.
For Your Records:
Please write down the model number and serial number
below for future reference. Both numbers are located
on the ratings label on the back of your unit and are
needed to obtain warranty service. You may also want
to staple your receipt to this manual as it is the proof of
your purchase, and is also needed for service under
your warranty.
Model Number:
Serial Number:
Date of Purchase:
To better serve you, please do the following before contacting customer
service:
If you received a damaged product, immediately contact the
dealer that sold you the product.
Read and follow this instruction manual carefully to help you install,
use and maintain your ice maker.
Read the troubleshooting section of this manual as it will help you
diagnose and solve common issues.
Visit us on the web at http://www.edgestar.com to register your
product, download product manuals, and access additional
troubleshooting resources and up-to-date information.
If you need warranty service, our friendly customer service
representatives are available via email at [email protected]
or by telephone at 1 (866) 319-5473.
1
Page 5
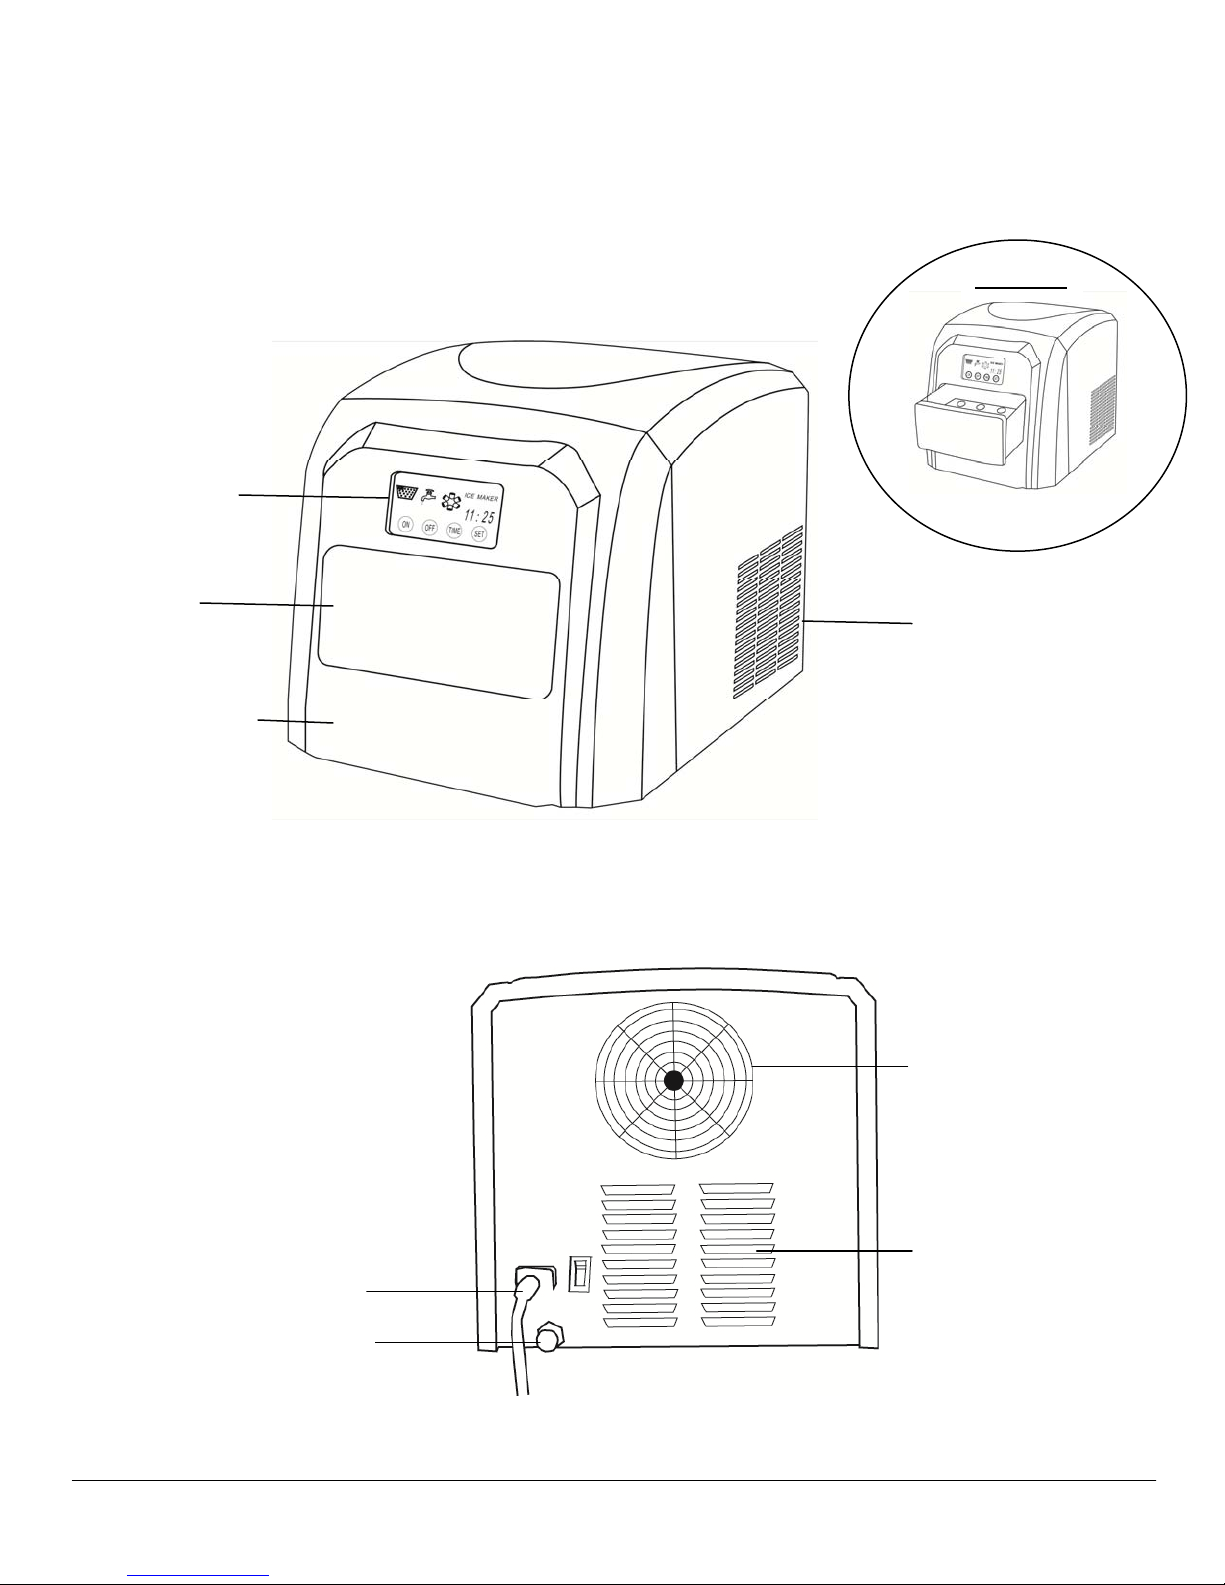
Front View
Parts Identification
Open View
Control Panel
Ice Basket
Water Resevoir
Rear View
Air Outlet
Air Outlet
Detachable Power Cord
Drain Plug
EdgeStar Portable Ice Maker 2
Fan
Air Outlet
Page 6
IMPORTANT: Do not remove any
safety, warning, or product
information labels from your ice
maker.
Before you Begin: Preparing the Ice Maker for Use
Before you plug the ice maker in to a power supply, be sure to let it stand
upright for at least 24 hours to allow the compressor’s oils to settle.
Unpacking the Ice Maker
Carefully remove the packaging materials. Remove any shipping tape and
glue from your ice maker before using. Do not use sharp instruments, rubbing
alcohol, flammable fluids, or abrasive cleaners to remove tape or glue. These
products can damage the surface of your icemaker. Check to make sure the
ice basket and ice scoop are included. If any parts are missing, please
contact our customer service. Put the ice maker on a level and flat surface
away from direct sunlight and other sources of heat such as a stove, furnace,
radiator, etc. The appliance must be positioned so that the power plug is
accessible.
Cleaning the Ice Maker
Follow the Cleaning and Maintenance section to clean the ice maker .
Installation Requirements
The ice maker has been designed for free-standing installati on which will allow
you to install the unit in almost any place you desire provided you level the
unit and follow the instructions for clearance, water and electrical
requirements.
Note: If the room temperature is
lower than 60°F, it is best to select
the small size setting; otherwise,
the ice cubes may stick together.
WARNING! Do not, under any
circumstances, cut or remove
the third (ground) prong from the
power cord.
3
Clearance and Environment Requirements
• Choose a well ventilated area with temperatures above 50°F and below
90°F. Operation outside these temperatures may result in lowered produ ction
or may cause other adverse effects.
• This unit MUST be installed in an area protected from the elements, e.g.,
wind, rain, water spray or drips. The icemaker should not be located next to
ovens, grills or other high heat sources .
• The unit should be located on a firm and level surface that is able t o support
the ice maker’s total weight with water.
• There must be at least 4 inches of space around the back and sides of the
unit for proper air circulation.
Water Requirements
• Only use potable water or water suitable for drinking.
• The temperature of the water should be between 51°F and 90°F.
• Change the water in the water reservoir every 24 hours to ensure a
reasonable hygiene level.
Note: The add water light uses an electronic sensor that may not detect
purified, filtered, reverse osmosis, or distilled water. You may need to add a
pinch of salt to the water to increase the mineral content.
Electrical Requirements
Read all safety precautions listed at the beginning of this manual. It is
recommended that a separate circuit serving only your ice maker be
provided. Use receptacles that cannot be turned off by a switch or pull chain.
The ice maker is equipped with a power supply cord having a 3-prong
grounding plug. To minimize possible shock hazard, the cord must be plugged
into a mating 3-pronged and grounding-type wall receptacle
providing 110120V, 60Hz, grounded in accordance with the National Electrical Code
and local codes and ordinances. If a mating wall receptacle is not
available, it is the personal responsibility of the customer to have a
properly grounded, 3-prong wall receptacle installed by a certified
electrician.
Page 7
CAUTION: Direct sunlight may
y
cause the ice full infrared sensor
to malfunction. If the unit
continues to produce ice even
though the basket is full, you may
need to move the unit awa
IMPORTANT: Discard the first
batch of ice produced by the
portable ice maker.
Operation
Using Your Ice Maker
Before using your ice maker it is strongly recommended to clean it thoroughly.
Read and follow the Cleaning and Maintenance secti on of the manual
before proceeding.
Follow the steps below to start using your ice maker.
1. Open the ice collecting drawer and remove any packaging and the ice
shovel.
2. Remove the ice collecting drawer which will serve as your ice basket.
3. Once ice drawer is removed clean internal water reservoir and ice shovel.
4. Pour water into the water reservoir. Keep the wa ter le vel be lo w the
“MAX” water mark.
5. Once reservoir has been filled insert the ice collecting drawer into water
resevoir.
5. Close the ice collecting drawer.
7. Plug the ice maker’s power plug in to a grounded outlet.
8. Press the On/Off button on the Control Panel.
Notes: If the water pump is unable to detect or pump water, the unit will stop
automatically, and the “Add Water” indicator will be lit. Add water to the unit
and restart the unit by pressing the On/Off button twice.
The ice maker will continue making ice until the ice basket is full. When the ice
basket is full “Ice Full” indicator will be lit.
EdgeStar Portable Ice Maker 4
Page 8
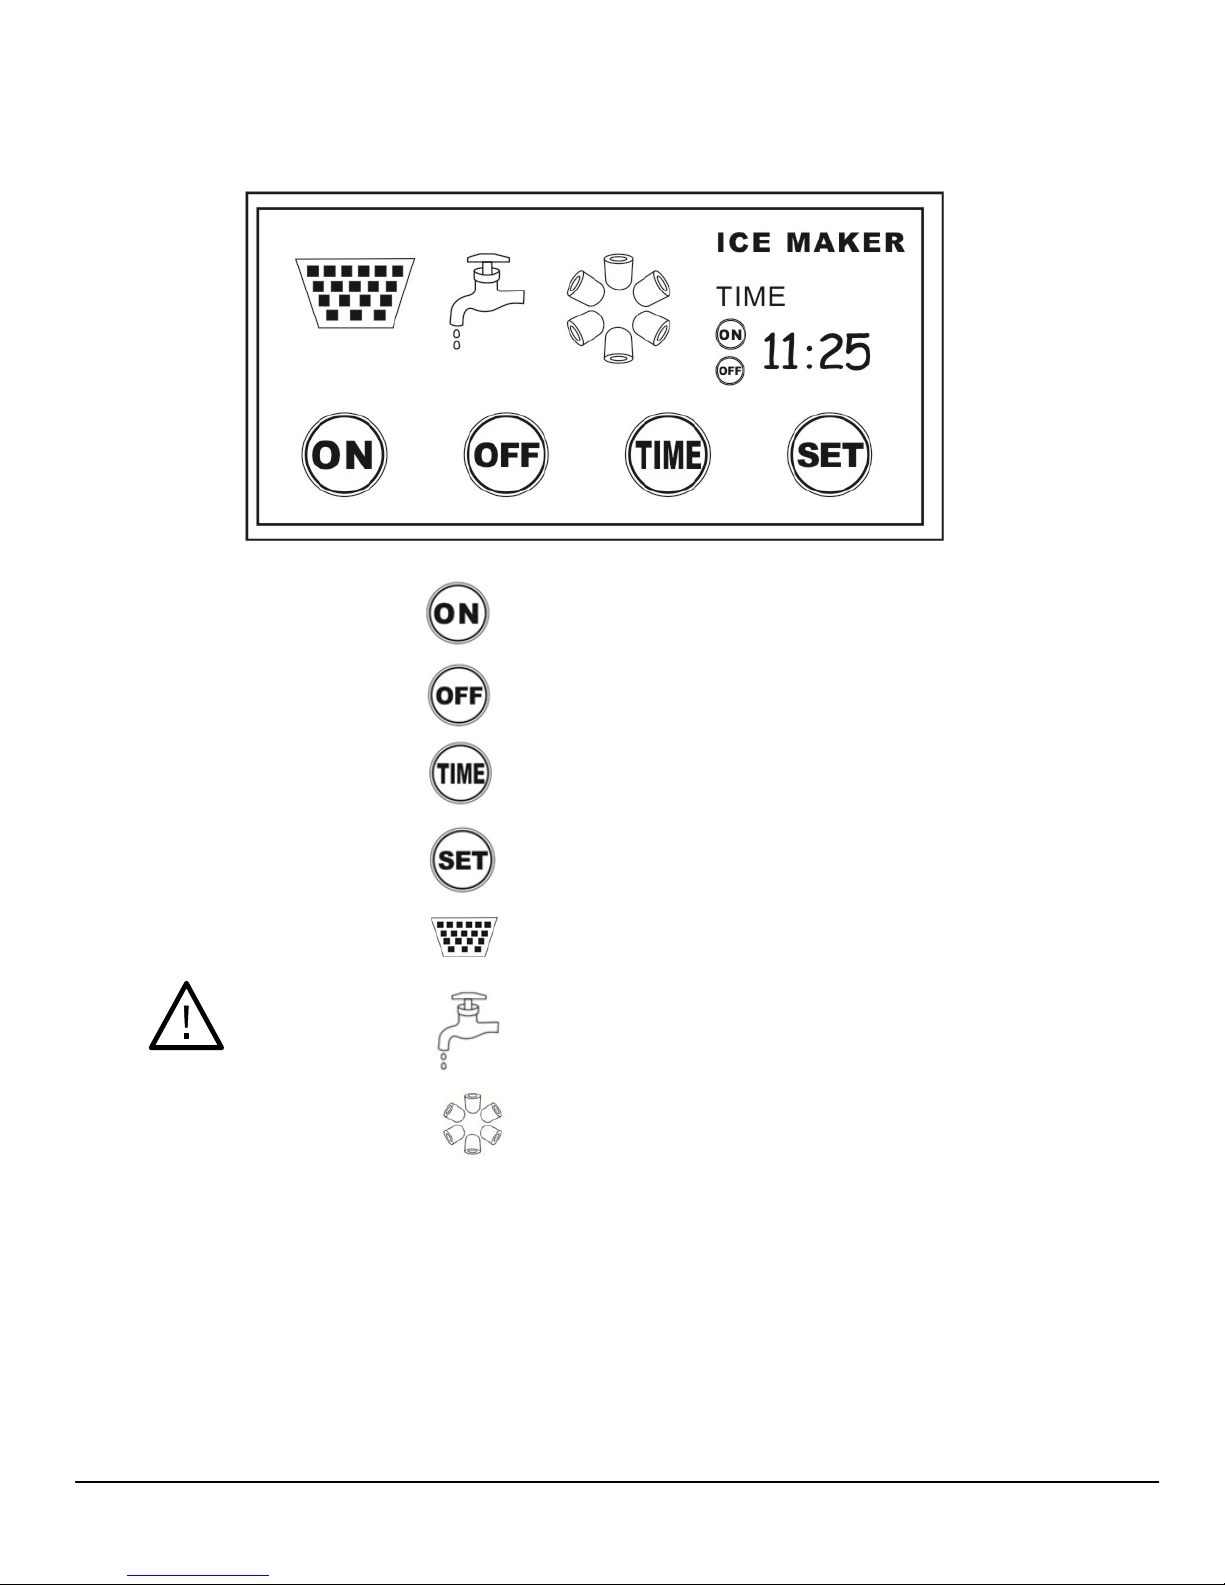
Using the Control Panel
Power
Press this button to turn machine on / timer on
Press this button to turn machine off / timer off
IMPORTANT: Do not
power on the unit
without any water.
Press this button to change time for desired setting
Press this button to set the time
Ice Full- The ice full light will turn on if the ice basket is full
Add Water- The add water light will turn on if the unit
Ice Making Mode- The ice making light will indicate the
unit is in process of making ice.
5
Page 9

WARNING! Do not tip the unit
over while there is water in the
reservoir.
How the Portable Ice Maker Produces Ice
After the unit is powered on, the ice maker begins with rotating the ice
case into a horizontal water fill position under the evaporator. The water
pump is engaged and fills the ice case with water. Water overflows for a
few seconds before the compressor turns on. The compressor then pumps
refrigerant and the fan will turn on autom atically after the condenser
heats up. The unit will be producing bullet shaped ice around the stainless
steel evaporator. When the batch of ice has been fully formed, the ice
maker stops the freeze cycle and begins the harvest cycle. A valve opens
diverting hot refrigerant gas into the evaporator. The gas heats the
evaporator causing the ice cube bullets to slide off the evaporator. The
ice shovel will automatically push the newly formed ice into the ice
basket, and will move the ice case back into the water fill position for the
next batch of ice. The ice maker will produce ice until ice reaches the ice
full sensor, or until the unit is out of water. The ice bin compartment is
insulated, but not refrigerated and the ice in the bin will slowly melt and
the water will be reused. Once enough of the ice has melted, the ice
maker will automatically start making more ice.
Draining the unit
Follow the steps below to drain the unit.
1. Carefully move the unit towards a sink or other suitable location for
draining.
2. Remove the rubber drain plug from the bottom of the water r eservoir to
drain all the water.
3. Firmly install the rubber drain plug into the drain port.
Normal Sounds
Your new ice maker may make sounds that are no t familiar to you. Most
of the new sounds are normal. Hard surfaces like the floor, walls can make
the sounds seem louder than they actually are. The following describes
the kinds of sounds that might be new to you and what may be making
them.
The ice case motor will make a whirling noise when the ice case and
shovel are moving.
Rattling noises may be produced from the flow of the refrigerant.
The compressor may make a pulsating or high-pitched sound.
The compressor may als o produce a low tone humming sound.
Water that is being pumped into the ice case will make trickling,
dripping or splashing sounds.
As each cycle ends, you may hear a gurgling sound due to the
refrigerant flowing.
You may hear fa n noise and air being forced over the condenser by
the condenser fan.
During the harvest cycle, you may hear the sound of ice cubes falling
into the ic e b asket.
If the ice maker is run without water, the water pump will make a
screeching noise. Note: Do not run the unit without water!
EdgeStar Portable Ice Maker 6
Page 10
The icemaker must be
thoroughly cleaned if it has
been left unused for a long
time. Follow carefully any
instructions provided for
cleaning or use of sanitizing
solution. Do not leave any
solution inside the icemaker
after cleaning.
CLEANING AND MAINTENANCE
Periodic cleaning and proper maintenance will ensure efficiency, top
performance, and long life.
Never use a solvent-based cleaning agent. These cleaners may transmit
taste to the ice cubes, or damage and discolor the interior.
Unplug the unit before cleaning the exterior and interior.
Before using your ice maker, you are strongly recommended to clean it
thoroughly. (This process should clean the unit of any impurities that may
have been left behind during the manufacturing process.)
1. Take out the ice collecting tray ( b asket).
2. Clean the interior with a diluted cleaning solution, warm water and a
soft cloth. (DO NOT use any caustic or abrasive solutions) (Do not clean
your ice maker with flammable fluids.)
3. The outside of the ice maker should be cleaned regularly with a mild
detergent and warm water.
4. Dry the interior and exterior with a soft cloth.
If the ice maker will not be
used for an extended period
of time, you should unplug the
unit from power, drain the
water from the reservoir and
dry the interior with a clean
soft cloth.
If the ice has a strange taste
If the ice has an unappealing taste, or the unit develops a musty odor, try
running a few cycles of the ice maker with a mild white vineg a r solution or
lemon juice. Then empty out all the vinegar or lemon j uice solution and
run a few cycles with plain water to eliminate all traces of the vinegar or
lemon juice.
If you find the bad taste remains after this procedure, use a solution of 2
tablespoons of baking soda to a full water reservoir of water left in the unit
overnight to absorb any remaining odors/tastes. Drain the solution, rinse
the water reservoir, and dry the interior.
Routine maintenance
1. Take out the ice basket.
2. Add a mild cleaning solution mixture to the water reservoir. Use a 10:1
ratio of water to either white vinegar or lemon juice.
3. Run the ice maker to make a couple of batches of ice (at least 2).
Discard the ice.
4. Drain the cleaning solution from the water reservoir.
5. Add fresh water to the water reservoir up to the water level mark.
6. Run the ice maker to make a few batches of ice. Di scard the ice.
7. Drain the water.
8. Add fresh water to the water reservoir to make ice, or dry the interior
and exterior with a clean soft cloth to store the machine.
9. The ice scoop should be washed regularly. Wash it just like any other
utensil.
• Do not touch the power plug when your hands are wet.
• Never unplug the unit by pulling on the plug.
7
Page 11

TROUBLESHOOTING
Before Calling for Service
If the unit appears to be malfunctioning, the issue could be solved by
following the suggestions in the “Solution” column.
Issue Possible Cause Solution
The ice maker is unplugged. Plug the ice maker in.
The ice maker power switch is OFF.
No Power
Power and ice size
indicators are on, but
the unit does respond
to the control panel.
Water is leaking out
the unit.
Noise during operation
Unit goes through the
ice making process,
but no ice is
produced, or ice
cubes are very thin
and small.
Ice case moves back
and forth repeatedly,
and the water pump
does not turn on.
The “Add Water” light
is on even though the
unit is full of water.
Power outlet does not work.
Insufficient power
Hardware malfunction Contact EdgeStar support
The unit is in standby mode and the
power light may be blinking on and
off.
The circuit board may need to be
reset.
If after resetting the unit the control
panel does not respond, you may
have a faulty control panel.
The bottom drain plug is not
attached.
An internal hose may have been
dislodged or disconnected.
The unit may not be level
Certain sounds are normal.
A loud knocking or metallic pinging
noise may be caused by a damaged
compressor.
The room temperature or water may
be too hot. The unit is desi gned to
work in a room that is above 50°F
and below 90°F
The fan may not be turning on to
cool down the condenser coils.
The unit may have a problem with a
micro-switch.
The type of water may not have
enough impurities, i.e., distilled,
reverse osmosis [RO], purified, etc.
The water filter may be clogged
Press the power button. The Power
Indicator light should be on.
Try a different power outlet. If the unit
works on a different circuit, you may need
to contact a certified electrician to resolve
the power issue.
Connect the ice maker on a circuit that is
able to provide enough power. Check the
product label for power requirements.
Press the On/Off button until the Power
light turns on and is no longer blinking.
Unplug the unit for one hour. Plug the unit
in and press the power button.
Contact EdgeStar support.
Make sure the drain plug is firmly attached.
If the drain plug has been lost, you may
need to contact EdgeStar to purchase a
replacement plug.
Contact EdgeStar support.
Make sure the unit is level and not at an
incline.
See the “Normal Sounds” section of this
owner’s manual.
Contact EdgeStar support
If the unit is run in a room that is particularly
warm such as a sunroom or laundry room,
please move the unit to a cooler room and
try again.
Contact EdgeStar support
Contact EdgeStar support.
Add a pinch of salt to the water. This will
add minerals to the water which will allow
the unit to detect the water.
Use a brush with plastic bristles to clean the
filter at the bottom of the water reservoir.
EdgeStar Portable Ice Maker 8
Page 12

Specifications
Description of product Portable Ice Maker
Model IP310SS
Voltage/Frequency AC 115V~60Hz
Rated Current 2.7A
Color Stainless Steel / Black
Ice-making capability 22 lbs / day *
Refrigerant R134a,
Dimensions
11 13/16” x 13 9/16” x 11 13/16”
(Width x Depth x Height)
Weight 33 lbs
Note: Technical data and performance information provided for
reference only.
Specifications are subject to change. Check the rating label on the ice
maker for the most accurate information.
* The actual quantity of ice produced in a 24hour period will vary with
room and water conditions.
Notes on ice storage
The ice maker will automatically shut off when the ice bin is full. The ice bin
compartment is insulated, but not refrigerated and the ice in the bin will
slowly melt and the water will be reused. Once enough of the ice has
melted, the ice maker w ill automatically start making more ice.
9
Page 13

Limited Warranty
One (1) Year Parts & Ninety (90) Days Labor
This product is warranted by EdgeStar to be free from defective workmanship and materials, subject to any conditions
set forth as follows:
WHAT IS COVERED:
LABOR: For a period of NINETY (90) DAYS from the date of original purchase, labor will be performed free of charge at
an authorized EdgeStar repair facility. At its option, EdgeStar will repair the product with new or remanufactured parts,
or exchange the defective product with a new, refurbished, or remanufactured product. If a product is replaced, it will
carry the remaining warranty of the original product. After the ninety (90) day period, EdgeStar will no longer be
responsible for labor charges incurred. All defective products and parts covered by this warranty will be repaired or
replaced on a mail-in basis to an EdgeStar authorized repair facility.
PARTS: For a period of ONE (1) YEAR from the date of original purchase, EdgeStar will supply new, rebuilt, or
refurbished parts free of charge. EdgeStar may request a defective part be returned in exchange for the replacement
part. All replacement parts or products will be new, remanufactured, or refurbished. All products and parts replaced by
EdgeStar under warranty service become the property of EdgeStar.
This warranty applies to the original purchaser only, and only covers defects in workmanship experienced during
operation of the product under normal service, maintenance, and usage conditions. This warranty applies to the
purchase and use of this product in residential settings within the United States of America.
WHAT IS NOT COVERED:
The following limitations apply to the coverage of this warranty. This warranty does not cover:
Labor charges for installation, setup or trainin g to use the product.
Shipping damage, and an y damage caused by improper packaging for shipment to an authorized service center, and any
damaged caused by improper voltage or any other misuse, including abnormal service, handling, or usage.
Cosmetic damage such as scratches and dents.
Normal wear and tear on parts or replaceme nt of parts designed to be replaced, e.g. filters, cartridges, batteries.
Service trips to deliver, pick-up, or repair, install the product, or to instruct in proper usage of the product.
Damages or operating problems resulting from misuse, abuse, operation outside environmental specifications, uses
contrary to instructions provided in the owner’s manual, accidents, acts of God, vermin, fire, flood, improper installation,
unauthorized service, maintenance negligence, unauthorized installation or modification, or commercial use.
Labor charges incurred 91 da ys or more after the date of original purchase.
The use of EdgeStar products in commercial settings.
Optional accessories, attachments, and appearanc e items.
Products that have been modified to perform outside of specifications without the prior written permission of EdgeStar.
Products lost in shipment, or theft.
Products sold AS IS or from an unauthorized reseller.
Products that have had their serial numbers removed or def aced. Prod ucts with serial numbers that have been invalidated.
OBTAINING WARRANTY SERVICE:
If you believe your product is defective, contact EdgeStar Customer Support for troubleshooting assistance and
warranty service at 1-866-319-5473. Please have your serial number and pro of of purchase available. Once an
EdgeStar authorized representative has confirmed that your product is defective and eligible for warranty service, the
product must be returned to an EdgeStar repair facility. The purchaser is solely responsible for prepaying all shipping
related costs to and from the repair facility. EdgeStar is not responsible for damage resulting from shipper mishandling
or improper packaging. Do not return a defective product to the place of purchase. Products received without a return
authorization number will be refused.
THIS WARRANTY IS IN LIEU OF ANY OTHER WARRANTY, EXPRESSED OR IMPLIED, INCLUDING WITHOUT LIMITATION,
ANY WARRANTY OF MERCHANTABILITY OR FITNESS FOR A PARTICULAR PURPOSE. TO THE EXTENT ANY IMPLIED
WARRANTY IS REQUIRED BY LAW, IT IS LIMITED IN DURATION TO THE EXPRESS WARRANTY PERIOD ABOVE. NEITHER
THE MANUFACTURER NOR ITS DISTRIBUTORS SHALL BE LIABLE FOR ANY INCIDENTAL, CONSEQUENTIAL, INDIRECT,
SPECIAL, OR PUNITIVE DAMAGES OF ANY NATURE, INCLUDING WITHOUT LIMITATION, LOST REVENUES OR PROFITS,
OR ANY OTHER DAMAGE WHETHER BASED IN CONTRACT, TORT, OR OTHERWISE. SOME STATES DO NOT ALLOW THE
EXCLUSION OF INCIDENTAL OR CONSEQUENTIAL DAMAGES, SO THE ABOVE EXCLUSION MAY NOT APPLY TO YOU.
THIS WARRANTY GIVES YOU SPECIFIC LEGAL RIGHTS. YOU MAY HAVE OTHER RIGHTS THAT VARY FROM STATE TO
STATE.
EdgeStar Portable Ice Maker 10
Page 14

EdgeStar Products
500 N. Capital of TX Hwy, Bldg 5
Austin, TX 78746
Toll Free: 1-866-319-5473
Web: http://www.edgestar.com
E-mail: [email protected]
Register your product, download owner’s manuals, access additional
troubleshooting resources, and obtain more information on other
great EdgeStar products on the web at: http://www.edgestar.com
Product contents and specifications may change without notice.
Copyright © 2011 Living Direct, Inc. All rights reserved.
 Loading...