

Page 1

© 2012 Edge Lighting. All Rights Reserved.
1718 W. Fullerton Ave
Chicago, IL 60614
Tel: 773-770-1195
Fax: 773-935-5613
www.edgelighting.com
info@edgelighting.com
SS2C-24V-_
Installation Instructions for Commercial Soft Strip LED
3 Watt 24 Volt
IMPORTANT INFORMATION
- This product is ETL listed for indoor locations.
SAVE THESE INSTRUCTIONS!
+24VDC +24VDC +24VDC
Install the Soft Strip
904-SS2C-24V-03
100147866CHI-004
SUITABLE FOR
UNDER-CABINET &
CLOSET APPLICATIONS
CLASS 2 WIRING
A
1
ALUMINUM HEAT
SINK TAPE (SS-HR-F)
2
PAPER BACKING
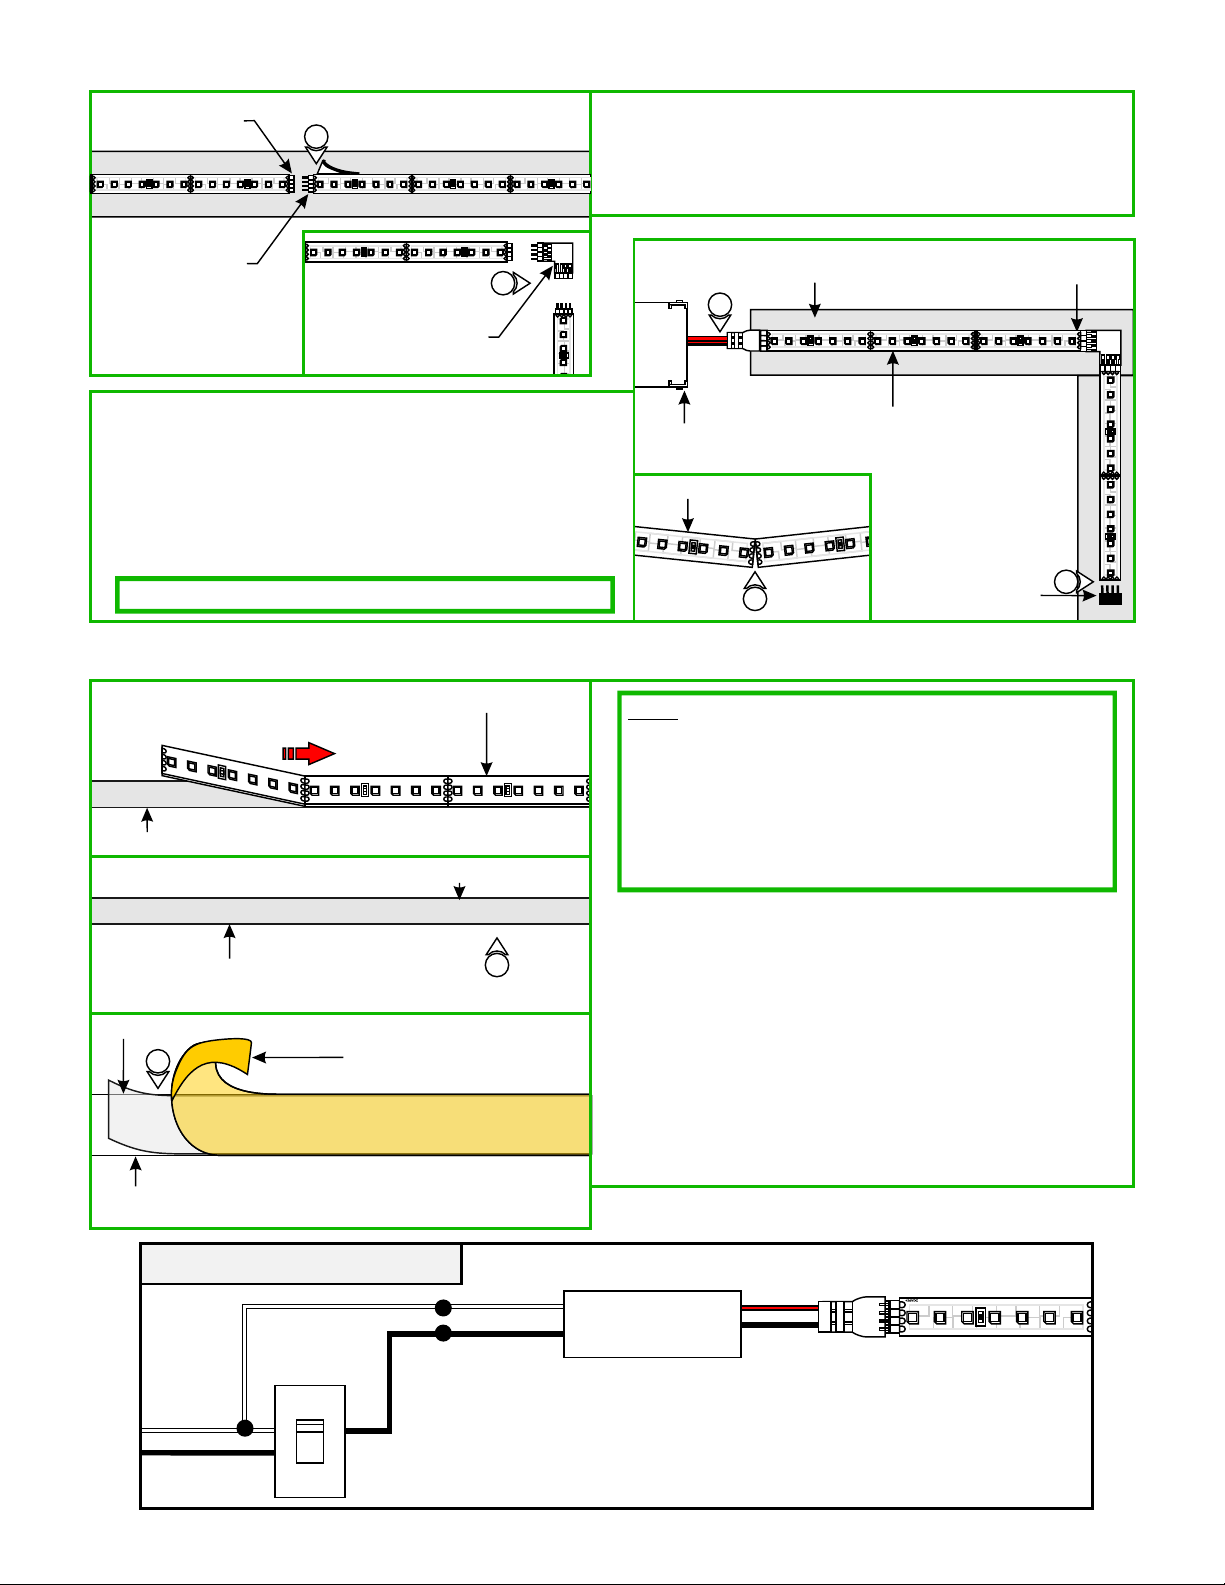
4: Align the LED soft strip power wires so that the solid red
wire (side of connector with dot) of the power feed pin
connects to 24VDC soft strip pin. The red/black wire will
automatically be connected to the other pins.
SURFACE
3
NOTE: The soft strip LEDs are rated for 40,000 hours when
using the aluminum heat sink tape (SS-HR-F).
NOTE: The adhesive tape of the aluminum heat sink needs to
be affixed on smooth clean surfaces (2" minimum). The
adhesiveness of the tape does not work well with porous,
textured, or unfinished wood surfaces, soft strip clips are
required (sold separately).
Clean the area thoroughly where LED soft strip will be
1:
installed. (Do not install it in an enclosed area)
2: For all surfaces other than aluminum, use the provided
aluminum heat sink tape (SS-HR-F) to avoid overheating
which may cause the LEDs to fail.
3: Remove the backing from the aluminum heat sink tape
(SS-HR-F) and firmly press it down where the LED soft
strip is going to be mounted.
B
SOFT STRIP POWER
WIRE FEMALE END
+24VDC
4
SOFT STRIP
C
SOFT STRIP POWER
WIRE FEMALE END
5
+24VDC
PAPER
BACKING
+24VDC +24VDC
LED SOFT STRIP
ALUMINUM HEAT
SINK TAPE (SS-HR-F)
6
NOTE: Avoid bending the soft strip in sharp vertical angles which
may damage the LEDs. Soft Strips do not bend horizontal. Use
proper directional connectors for horizontal turns.
5: Push the soft strip power wire female end onto the soft strip
male end connector.
6: Carefully remove the backing from the LED soft strip, make
sure not to remove the tape from the soft strip. Firmly press
down the adhesive portion of the soft strip onto the
aluminum surface while removing the rest of the backing,
making sure there are no air bubbles that can cause surface
irregularities.
1
Page 2
FEMALE END OF
D
SOFT STRIP
7: Add the other piece of soft strip by simply connecting female
7
end of the soft strip to the male end of the new soft strip
directly or with interfacing of the directional connectors.
8: The 4" long soft strips can be used for fine adjustments.
MALE END OF
SOFT STRIP
DIRECTIONAL
CONNECTOR
7
9: Use the optional end cap to cover the end of the soft strip.
10: The excess amount of soft strip can be cut by the indicated
sections of the run with a pair of scissors. Once the soft
strip is cut, it cannot be extended.
11: Install the power supply by referring to the instructions
provided with the power supply.
NOTE: SS2C soft strip consumes on average 2.5 Watt per foot.
Relocating Soft Strip (Optional)
F
ADHESIVE TAPE
APPLY ADHESIVE REMOVER
AND THEN BUFF OFF
REMOVE SOFT STRIP
TO RELOCATE
+24VDC
+24VDC
+24VDC +24VDC
+24VDC +24VDC
SOFT STRIP
ADHESIVE TAPE
1
END CAP
DIRECTIONAL
CONNECTOR
9
E
9
POWER
SUPPLY
SOFT STRIP
NOTE: If relocating the installed soft strip, make sure that the
adhesive tape on back of the soft strip covers the entire strip. The
adhesive tape on back of the soft strip isolates the strip from the
conductive heat sinks. Damaged or inconsistent adhesive tape may
cause the contacts on the back of the strip to come in contact with
the conductive heat sink which will cause the strip to short and
burn. Call Edge Lighting to get replacement adhesive tape and
aluminum heat sink tape (SS-HR-F)
ALUMINUM TAPE
11
LED SOFT STRIP
10
1: To remove the tape residue from back of the strip apply
moderate amount WD-40, or Goo Gone, or a mixture of
warm water and lemon oil to the corner of a clean, dry
towel. Gently buff the area containing the adhesive residue
with small circular motion until it is completely removed.
ADHESIVE
2
BACK SIDE OF
SOFT STRIP
Overall Wiring Diagram
120V INPUT
NEUTRAL
HOT (INPUT)
ADHESIVE BACKING
HOT (OUTPUT)
ELV
WHITE
BLACK
2: From one side of the tape gently remove a few inches of the
backing. Attach the adhesive tape to the back of the soft
strip and apply moderate pressure to affix the tape. Continue
this step a few inches at the time until the entire adhesive
tape is attached to back of the soft strip.
3: Refer to the steps on 1 through 11 to reinstall the soft strip.
RED
TEB-75L-24DC
BLACK
LED SOFT STRIP
2
 Loading...