

EDAN F6, F6 EXPRESS User Manual


I
About this Manual
P/N: 01.54.109276-15
Release Date: Apr. 2012
© Copyright EDAN INSTRUMENTS, INC. 2008 - 2012. All rights reserved.
Statement
This manual will help you understand the operation and maintenance of the product better. It is
reminded that the product shall be used strictly complying with this manual. User’s operation
failing to comply with this manual may result in malfunction or accident for which EDAN
INSTRUMENTS, INC. (hereinafter called EDAN) can not be held liable.
EDAN owns the copyrights of this manual. Without prior written consent of EDAN, any
materials contained in this manual shall not be photocopied, reproduced or translated into other
languages.
Materials protected by the copyright law, including but not limited to confidential information
such as technical information and patent information are contained in this manual, the user shall
not disclose such information to any irrelevant third party.
The user shall understand that nothing in this manual grants him, expressly or implicitly, any
right or license to use any of the intellectual properties of EDAN.
EDAN holds the rights to modify, update, and ultimately explain this manual.
Responsibility of the Manufacturer
EDAN only considers itself responsible for any effect on safety, reliability and performance of
the equipment if:
Assembly operations, extensions, re-adjustments, modifications or repairs are carried out by
persons authorized by EDAN, and
The electrical installation of the relevant room complies with national standards, and
The instrument is used in accordance with the instructions for use.
Upon request, EDAN may provide, with compensation, necessary circuit diagrams, and other
information to help qualified technician to maintain and repair some parts, which EDAN may
define as user serviceable.
Terms Used in this Manual
This guide is designed to give key concepts on safety precautions.
WARNING
A WARNING label advises against certain actions or situations that could result in personal
injury or death.

II
CAUTION
A CAUTION label advises against actions or situations that could damage equipment, produce
inaccurate data, or invalidate a procedure.
NOTE
A NOTE provides useful information regarding a function or a procedure.

III
Table of Contents
Chapter 1 Safety Guide ................................................................................................................1
1.1 Intended Use....................................................................................................................... 1
1.2 Features .............................................................................................................................. 2
1.3 Instruction for Safe Operation............................................................................................ 2
1.4 Ultrasound Safety Guide.................................................................................................... 3
1.5 Safety Precautions.............................................................................................................. 3
1.6 Definitions and Symbols.................................................................................................... 8
Chapter 2 Installation Guide......................................................................................................11
2.1 Opening and Checking Package....................................................................................... 11
2.2 Installing Battery.............................................................................................................. 11
2.3 Installing Monitor ............................................................................................................ 13
2.4 Connecting Power Cable.................................................................................................. 13
Chapter 3 Monitor and Accessories..........................................................................................14
3.1 Overview.......................................................................................................................... 14
3.1.1 Keys and Control Knob.......................................................................................... 15
3.1.2 Indicators................................................................................................................17
3.2 Accessories....................................................................................................................... 18
3.2.1 Ultrasound (US) Transducers................................................................................. 18
3.2.2 TOCO Transducers ................................................................................................ 18
3.2.3 Belt ......................................................................................................................... 19
3.2.4 Remote Event Marker ............................................................................................ 19
3.2.5 Fetal Stimulator...................................................................................................... 19
3.2.6 DECG Cable........................................................................................................... 20
3.2.7 Fetal Spiral Electrode............................................................................................. 20
3.2.8 IUP Cable............................................................................................................... 21
3.2.9 IUP Catheter........................................................................................................... 21
3.2.10 ECG Cable ........................................................................................................... 21
3.2.11 SpO2 Transducer .................................................................................................. 22
3.2.12 NIBP Cuff ............................................................................................................ 22
3.2.13 TEMP Transducer ................................................................................................ 22
3.3 Screen............................................................................................................................... 23
3.3.1 Main Interface ........................................................................................................ 23
3.3.2 Setup Interface ....................................................................................................... 25
3.4 Ordering Information ....................................................................................................... 26
Chapter 4 Alarms........................................................................................................................ 28
4.1 Alarm Classification......................................................................................................... 28
4.2 Audible Alarm.................................................................................................................. 28
4.3 Visual Alarm .................................................................................................................... 29
4.4 Choosing Alarm Display Form ........................................................................................ 29
4.5 Changing Alarm Volume ................................................................................................. 29
4.6 Choosing Alarm Silence Duration ................................................................................... 30
4.7 Choosing Signal Loss Delay ............................................................................................ 30
4.8 Reviewing Alarms............................................................................................................30
4.9 Alarm Treatment Measures.............................................................................................. 30

IV
4.10 Testing Alarms............................................................................................................... 31
4.11 Patient Alarm Defaults................................................................................................... 31
Chapter 5 Printing...................................................................................................................... 33
5.1 Function Description........................................................................................................33
5.2 Printing Configuration ..................................................................................................... 34
5.2.1 Switching Auto Start Printing On or Off ............................................................... 34
5.2.2 Choosing Paper Speed ........................................................................................... 34
5.2.3 Changing Print Timer............................................................................................. 34
5.2.4 Switching Print Self-Check On or Off................................................................... 35
5.2.5 Changing Printing End Volume............................................................................. 35
5.3 Understanding Recorder Paper Printout........................................................................... 35
Chapter 6 Pre-Monitoring Preparation.................................................................................... 37
6.1 Loading Recorder paper................................................................................................... 37
6.2 Switching On.................................................................................................................... 39
6.3 Checking Recorder Paper................................................................................................. 39
6.4 Adjusting Screen Angle ................................................................................................... 40
6.5 Setting Date and Time...................................................................................................... 41
6.6 Connecting Transducers................................................................................................... 41
6.7 Placing Accessories in the Holder.................................................................................... 42
6.8 Adjusting Volume ............................................................................................................43
Chapter 7 Fetal Monitoring ....................................................................................................... 44
7.1 Confirming Fetal Life ...................................................................................................... 44
7.2 Monitoring FHR with Ultrasound.................................................................................... 44
7.2.1 Parts Required ........................................................................................................ 44
7.2.2 FHR Monitoring Procedure.................................................................................... 45
7.2.3 Switching FHR Alarm On or Off........................................................................... 46
7.2.4 Changing FHR Alarm Limits................................................................................. 46
7.2.5 Changing FHR Alarm Delay.................................................................................. 47
7.3 Monitoring FHR with DECG (F6)................................................................................... 47
7.3.1 Contraindications ................................................................................................... 47
7.3.2 Parts Required ........................................................................................................ 47
7.3.3 Preparing Patient's Skin Prior to Placing Electrodes ............................................. 48
7.3.4 Switching DECG Beep On or Off.......................................................................... 48
7.3.5 Switching the Artifact Suppression On or Off....................................................... 48
7.3.6 Directions for Using Fetal Spiral Electrode........................................................... 49
7.3.7 DECG Monitoring Procedure ................................................................................ 50
7.3.7 Detaching Fetal Spiral Electrode ........................................................................... 50
7.4 Monitoring Twin FHRs.................................................................................................... 50
7.4.1 Monitoring Twins Externally................................................................................. 50
7.4.2 Monitoring Internally............................................................................................. 51
7.4.3 Signals Overlap Verification (SOV) ...................................................................... 51
7.4.4 Changing FHR2 Offset .......................................................................................... 51
7.5 Monitoring Uterine Activity Externally........................................................................... 52
7.5.1 Parts Required ........................................................................................................ 52
7.5.2 TOCO Monitoring Procedure ................................................................................ 52
7.5.3 Changing UA Baseline........................................................................................... 53
7.5.4 Testing TOCO Transducers ................................................................................... 53
7.6 Monitoring Uterine Activity Internally (F6).................................................................... 54

V
7.6.1 Parts Required ........................................................................................................ 54
7.6.2 Directions for Use of IUPC.................................................................................... 54
7.6.3 IUP Monitoring Procedure..................................................................................... 56
7.6.4 Checking Intrauterine Pressure Cable Function..................................................... 57
7.7 Monitoring Fetal Movement ............................................................................................ 57
7.7.1 Auto Fetal Movement Monitoring (AFM)............................................................. 57
7.7.2 Enabling or Disabling AFM Trace......................................................................... 58
7.7.3 Changing AFM Gain.............................................................................................. 58
7.7.4 Choosing AFM Mode ............................................................................................ 58
7.7.5 Changing AFM Threshold ..................................................................................... 58
7.7.6 Choosing FM Source ............................................................................................. 59
7.7.7 Manual Fetal Movement Monitoring (MFM)........................................................ 59
7.7.8 Changing MFM Volume........................................................................................ 59
7.8 Start Monitoring............................................................................................................... 59
7.9 Inputting Maternal Information (Mat. Info)..................................................................... 60
7.9.1 Auto ID...................................................................................................................60
7.9.2 Changing Maternal Information............................................................................. 60
7.9.3 Switching Mat. Info Inputting On or Off ............................................................... 61
Chapter 8 Fetal Monitoring Display (F6) ................................................................................. 62
8.1 Traces ............................................................................................................................... 62
8.1.1 Changing Time Scale ............................................................................................. 63
8.2 Trace Control Tools .........................................................................................................63
8.2.1 Data Saving ............................................................................................................ 64
8.2.2 Searching for a File ................................................................................................ 64
8.2.3 Reviewing .............................................................................................................. 65
8.2.4 CTG Analysis......................................................................................................... 66
8.2.5 Marking a Note ...................................................................................................... 68
8.3 Numerics .......................................................................................................................... 69
8.4 Fetal Monitoring Alarm Messages................................................................................... 70
8.4.1 Patient Alarm Messages......................................................................................... 70
8.4.2 Technical Alarm Messages .................................................................................... 70
Chapter 9 Maternal Monitoring (F6 Express) ......................................................................... 72
9.1 Maternal ECG Monitoring ............................................................................................... 72
9.1.1 Introduction............................................................................................................ 72
9.1.2 How to Place 3-lead ECG Cables .......................................................................... 73
9.1.3 ECG Monitoring Procedure ................................................................................... 74
9.1.4 Changing ECG Source ........................................................................................... 74
9.1.5 Changing ECG Gain .............................................................................................. 74
9.1.6 Enabling ECG Calibration ..................................................................................... 75
9.2 Maternal SpO2 Monitoring............................................................................................... 75
9.2.1 Introduction............................................................................................................ 75
9.2.2 SpO2 Monitoring Procedure .................................................................................. 77
9.2.3 Enabling SpO2 Trace Printing................................................................................ 78
9.2.4 Switching the SpO2 Alarm On or Off .................................................................... 78
9.2.5 Changing SpO2 Alarm Limits ................................................................................ 78
9.3 Maternal HR Monitoring.................................................................................................. 78
9.3.1 Introduction............................................................................................................ 78
9.3.2 Choosing HR Source.............................................................................................. 79
9.3.3 Changing HR Beep Volume................................................................................... 79

VI
9.3.4 Enabling HR Trace................................................................................................. 79
9.3.5 Switching the HR Alarm On or Off ....................................................................... 79
9.3.6 Changing HR Alarm Limits................................................................................... 80
9.3.7 Signals Overlap Verification.................................................................................. 80
9.4 Maternal NIBP Monitoring.............................................................................................. 80
9.4.1 Introduction............................................................................................................ 80
9.4.2 How to Apply NIBP Cuff ...................................................................................... 81
9.4.3 Preparation for NIBP Monitoring .......................................................................... 82
9.4.4 Auto Measurement................................................................................................. 82
9.4.5 Manual Measurement............................................................................................. 83
9.4.6 Correcting the Measurement.................................................................................. 84
9.4.7 Changing NIBP Unit.............................................................................................. 84
9.4.8 Switching the NIBP Alarm On or Off.................................................................... 84
9.4.9 Changing SYS Alarm Limits ................................................................................. 84
9.4.10 Changing DIA Alarm Limits ............................................................................... 84
9.4.11 Changing MAP Alarm Limits.............................................................................. 85
9.4.12 Choosing NIBP Printing Mode ............................................................................ 85
9.5 Maternal TEMP Monitoring ............................................................................................ 85
9.5.1 TEMP Monitoring Procedure................................................................................. 85
9.5.2 Changing TEMP Unit ............................................................................................ 86
9.5.3 Switching the TEMP Alarm On or Off.................................................................. 86
9.5.4 Changing TEMP Alarm Limits.............................................................................. 86
Chapter 10 Maternal Monitoring Display (F6 Express) .........................................................87
10.1 Display Mode................................................................................................................. 87
10.2 Maternal Monitoring Traces .......................................................................................... 89
10.3 Maternal Vital Sign List................................................................................................. 89
10.4 Numerics ........................................................................................................................ 90
10.5 Maternal Monitoring Alarm Messages .......................................................................... 91
10.5.1 Patient Alarm Messages....................................................................................... 91
10.5.2 Technical Alarm Messages .................................................................................. 92
Chapter 11 After Monitoring.....................................................................................................94
11.1 Completing Monitoring.................................................................................................. 94
11.2 Switching Off................................................................................................................. 94
Chapter 12 Maintenance and Cleaning.....................................................................................95
12.1 Maintenance ................................................................................................................... 95
12.1.1 Maintaining Inspection......................................................................................... 95
12.1.2 Maintenance of Monitor....................................................................................... 96
12.1.3 Maintenance of Transducers ................................................................................ 96
12.1.4 Storage of Recorder Paper ................................................................................... 96
12.1.5 Cleaning of Recorder ........................................................................................... 96
12.1.6 Maintaining the Battery........................................................................................ 97
12.2 Cleaning ......................................................................................................................... 97
12.2.1 Cleaning of Monitor............................................................................................. 97
12.2.2 Cleaning of Accessories....................................................................................... 98
12.3 Disinfecting.................................................................................................................. 100
12.4 Sterilizing ..................................................................................................................... 100
Chapter 13 Warranty and Service...........................................................................................101
13.1 Warranty....................................................................................................................... 101

VII
13.2 Contact information ..................................................................................................... 101
Appendix 1 Product Specifications.......................................................................................... 102
A1.1 Environmental Specifications ..................................................................................... 102
A1.2 Physical Specifications................................................................................................ 102
A1.3 Performance Specifications......................................................................................... 104
A1.4 Recorder Specifications............................................................................................... 107
A1.5 Rechargeable Lithium-ion Battery.............................................................................. 108
A1.6 Low Output Summary Table....................................................................................... 109
Appendix 2 Signal Input/Output Connector .......................................................................... 110
Appendix 3 Troubleshooting....................................................................................................112
A3.1 No Display................................................................................................................... 112
A3.2 Noise............................................................................................................................ 112
A3.3 Recorder Error............................................................................................................. 112
A3.4 Trouble with Ultrasound FHR Monitoring ................................................................. 113
A3.5 Troubles with DECG FHR Monitoring....................................................................... 113
A3.6 Troubles with Contractions Monitoring (External)..................................................... 114
A3.7 Troubles with Monitoring Contractions (Internal)...................................................... 114
A3.8 Big ECG Signal Interference or Thick Baseline ......................................................... 114
A3.9 NIBP and SpO2 No Results ........................................................................................ 115
A3.10 Blown Fuses .............................................................................................................. 115
Appendix 4 Abbreviation .........................................................................................................117
Appendix 5 EMC Information – Guidance and Manufacture’s Declaration...................... 118
A5.1 Electromagnetic Emissions – for all EQUIPMENT and SYSTEMS.......................... 118
A5.2 Electromagnetic Immunity – for all EQUIPMENT and SYSTEMS .......................... 119
A5.3 Electromagnetic Immunity – for EQUIPMENT and SYSTEM that are not
LIFE-SUPPORTING ........................................................................................................... 121
A5.4 Recommended Separation Distance............................................................................ 123
Appendix 6 Limitations of Ultrasonic Monitoring.................................................................124
A6.1 How Does Ultrasound Work....................................................................................... 124
A6.2 Artifacts in Fetal Heart Monitoring............................................................................. 124
A6.3 Audio Output and Screen Reading.............................................................................. 126
Appendix 7 Connection of T840 Telemetry System............................................................... 127
A7.1 Connecting T840 Telemetry System........................................................................... 127
A7.2 FHR Monitoring with Cordless Transducers .............................................................. 128

F6 and F6 Express Fetal & Maternal Monitor User Manual Safety Guide
- 1 -
Chapter 1 Safety Guide
CAUTION
Federal (U.S.) Law restricts this device to sale by or on the order of a physician.
NOTE:
1 In order to ensure the operator and patient’s safety, read through this chapter before
using this monitor.
2 This user manual is written to cover the maximum configuration. Therefore, your
model may not have some of the parameters and functions described, depending on
what you have ordered.
1.1 Intended Use
F6 Fetal & Maternal Monitor (hereinafter called F6):
The F6 Fetal & Maternal Monitor is intended for non-invasive and invasive monitoring of fetus
during antepartum examination, labor and delivery. It is intended to be used only by trained and
qualified personnel in antepartum examination rooms, labor and delivery rooms.
F6 Fetal & Maternal Monitor provides Non-Stress testing for pregnant women from the 28th week
of gestation. It can externally monitor the FHRs using ultrasound and uterine activity via a TOCO
transducer. Alternatively, it can internally monitor one of the FHRs with DECG and uterine
activity with an IUPC.
F6 Express Fetal & Maternal Monitor (hereinafter called F6 Express):
F6 Express Fetal & Maternal Monitor is intended for monitoring physiological parameters of
pregnant women during antepartum examination, labor and delivery. It is intended to be used
only by trained and qualified personnel in antepartum examination rooms, labor and delivery
rooms.
F6 Express Fetal & Maternal Monitor is intended for providing Non-Stress testing or fetal
monitoring for pregnant women from the 28th week of gestation. In addition, it provides a
solution for maternal vital signs monitoring.
Contraindications:
They are not intended for use in intensive care units, operating rooms or for home use.

F6 and F6 Express Fetal & Maternal Monitor User Manual Safety Guide
- 2 -
1.2 Features
The following table lists the measurements that F6 and F6 Express support.
Model
Measurement
F6
F6 Express
Dual-FHR √ √
TOCO √ √
FM √ √
AFM √ √
DECG/IUP Opt ×
MECG × √
NIBP × √
MSpO2 × √
TEMP × √
NOTE: √ = Standard Opt = Optional × = Not Available
1.3 Instruction for Safe Operation
NOTE:
In this manual, Monitor refers to both F6 and F6 Express, and is used where the
information applies to both models.
The monitor is designed to comply with the international safety requirements IEC/EN
60601-1 for medical electrical equipment. It is class I equipment.
The monitor operates within specifications at ambient temperatures between +5ºC (+41ºF)
and +40ºC (+104ºF). Ambient temperatures that exceed these limits could affect the
accuracy of the instrument and cause damage to the modules and circuits. Allow at least 2
inches (5 cm) clearance around the instrument for proper air circulation.
You must check that the equipment, cables and transducers do not have visible evidence of
damage that may affect patient safety or monitoring capability before use. If damage is
evident, replacement is recommended before use.
The monitor must be serviced only by authorized and qualified personnel. The manufacturer
does not accept responsibility for safety compliance, reliability and performance if
modifications or repairs are carried out by unauthorized personnel. Identical replacement
parts must be used.
The protective categories against electric shock of the patient connections are:
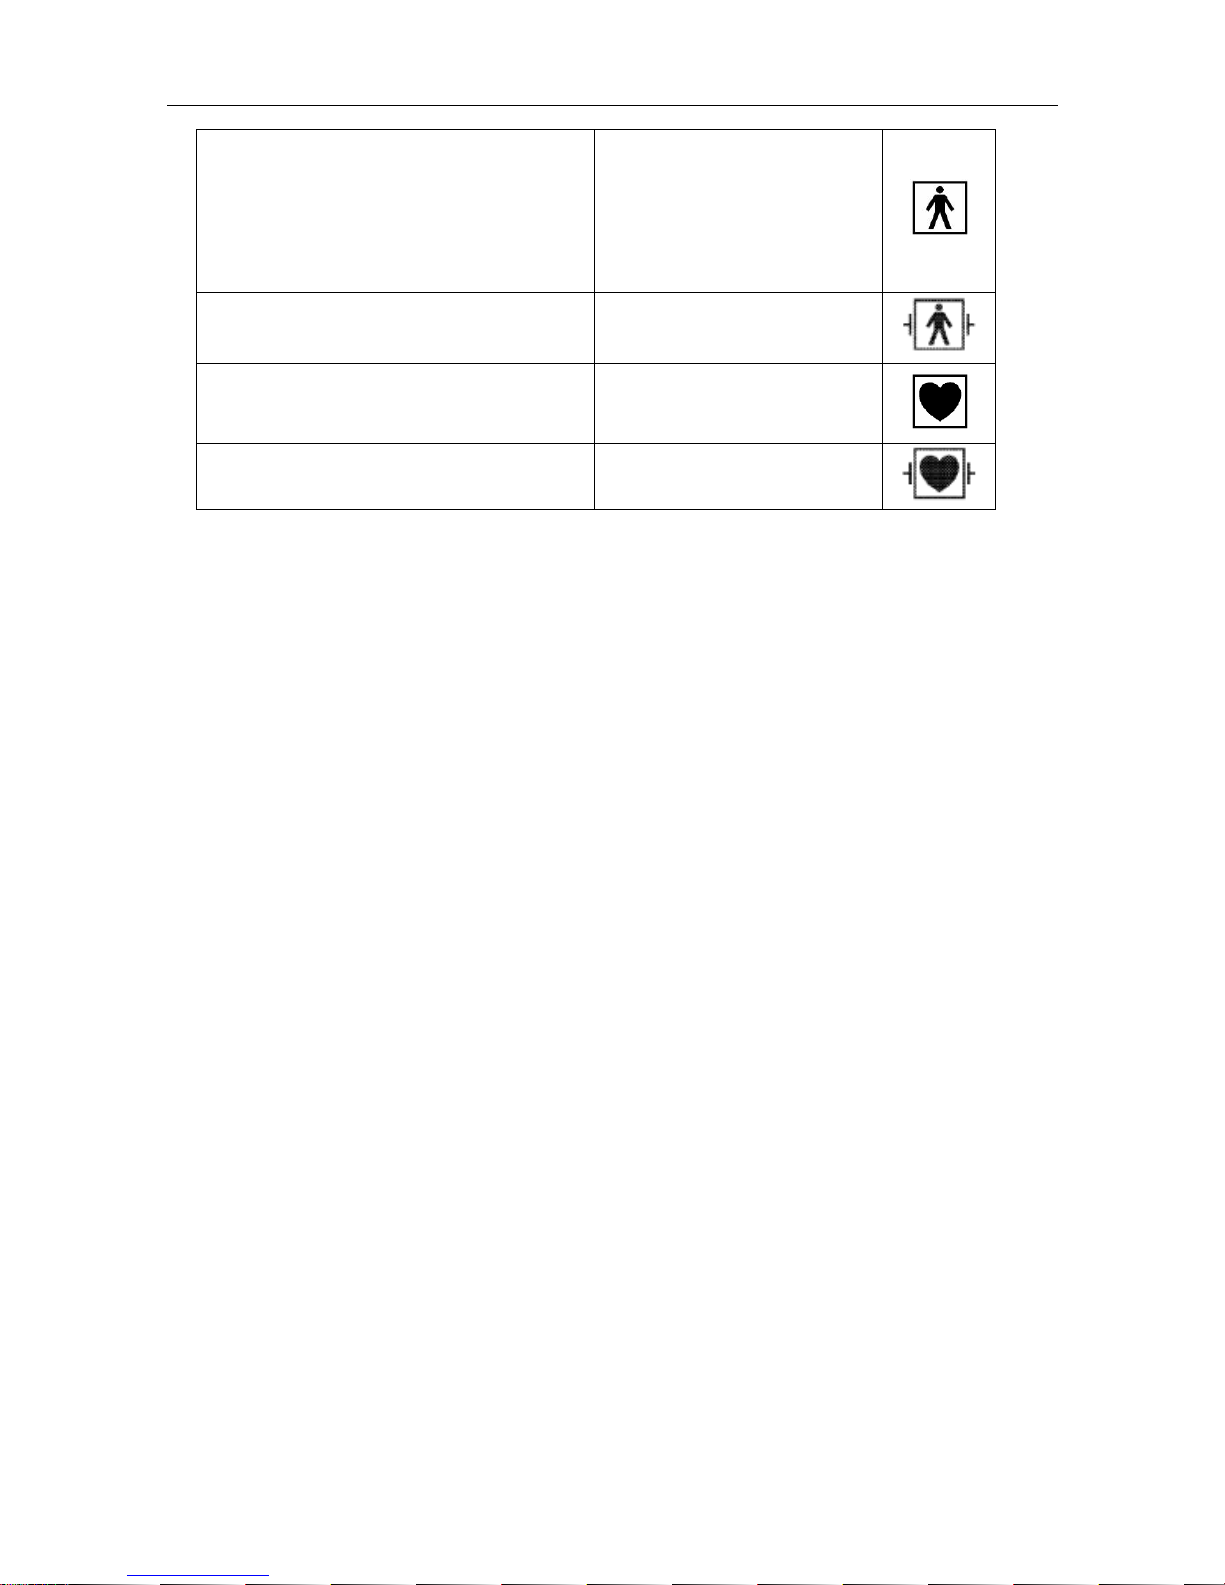
F6 and F6 Express Fetal & Maternal Monitor User Manual Safety Guide
- 3 -
Ultrasound (FHR1, FHR2)
External TOCO
Fetal Movement Mark (FM)
Fetal Stimulator ((FS)
Intrauterine Pressure (IUP)
Type BF
Non-invasive Blood Pressure (NIBP)
Arterial Oxygen Saturation (SpO2)
Type BF, defibrillation-proof
Direct Electrocardiography (DECG) Type CF
Electrocardiography (ECG)
Temperature (TEMP)
Type CF, defibrillation-proof
The monitor described in this user manual is not protected against:
a) The effects of high frequency currents.
b) The interference of electrosurgery equipment.
1.4 Ultrasound Safety Guide
Fetal Use
The monitor is designed for continuous fetal heart rate monitoring during pregnancy and labor.
Clinical interpretation of fetal heart rate traces can diagnose fetal and/or maternal problems and
complications.
Instructions for Use in Minimizing Patient Exposure
The acoustic output of the monitor is internally controlled and can not be varied by the operator
in the course of the examination. The duration of exposure is, however, fully under the control of
the operator. Mastery of the examination techniques described in the User Manual will facilitate
obtaining the maximum amount of diagnostic information with the minimum amount of exposure.
The exercising of clinical judgment in the monitoring of low risk patients will avoid unnecessary
insonation.
1.5 Safety Precautions
WARNING and CAUTION messages must be observed. To avoid the possibility of injury,
observe the following precautions during the operation of the instrument.

F6 and F6 Express Fetal & Maternal Monitor User Manual Safety Guide
- 4 -
WARNING
For using safety:
1 The monitor is provided for the use of qualified physicians or personnel
professionally trained. They should be familiar with the contents of this user manual
before operation.
2 Installation and service should only be performed by qualified service engineers
authorized by the manufacturer.
3 The monitor is not intended for use in intensive care units (ICU), operating rooms or
for home use.
4 EXPLOSION HAZARD - Do not use the monitor in the presence of flammable
anesthetics or other materials.
5 SHOCK HAZARD - the power receptacle must be a three-wire grounded outlet.
Never try to adapt the three-prong plug to fit a two-slot outlet. A hospital grade outlet
is required. If the outlet has only two slots, make sure that it is replaced with a
three-slot grounded outlet before attempting to operate the monitor.
6 Any non-medical equipment (such as the external printer) is not allowed to be used
within the patient vicinity (1.5m/6ft.).
7 Do not use the additional multiple portable socket-outlet or extension cord in the
medical electrical system, unless it’s specified as part of the system by manufacturer.
And the multiple portable socket-outlets provided with the system shall only be used
for supplying power to equipment which is intended to form part of the system.
8 If multiple instruments are connected to a patient, the sum of the leakage currents
may exceed the limits given in the IEC/EN 60601-1 and may pose a safety hazard.
Consult your service personnel.
9 Multiple portable socket-outlets shall not be placed on the floor.
10 Make sure that the power is turned off and the power cord is disconnected from the
AC socket before connecting or disconnecting equipment. Otherwise, the patient or
operator may receive electrical shock or other injury.
11 Do not connect any equipment or accessories that are not approved by the
manufacturer or that are not IEC 60601-1 approved to the monitor. The operation or
use of non-approved equipment or accessories with the monitor is not tested or
supported, and monitor operation and safety are not guaranteed.
12 SHOCK HAZARD - Don’t connect non-medical electrical equipment, which has been
supplied as a part of the system, directly to the wall outlet when the non-medical
equipment is intended to be supplied by a multiple portable socket-outlet with an
isolation transformer.
13 SHOCK HAZARD - Don’t connect electrical equipment, which has not been supplied
as a part of the system, to the multiple portable socket-outlets supplying the system.

F6 and F6 Express Fetal & Maternal Monitor User Manual Safety Guide
- 5 -
WARNING
14 Do not use the additional multiple portable socket-outlet or extension cord in the
medical electrical system, unless it’s specified as part of the system by manufacturer.
And the multiple portable socket-outlets provided with the system shall only be used
for supplying power to equipment which is intended to form part of the system.
15 Do not exceed the maximum permitted load when using multiple portable
socket-outlets to supply the system.
16 Do not touch accessible parts of non-medical electrical equipment and the patient
simultaneously.
17 Do not apply this monitor and other ultrasonic equipment simultaneously on a same
patient, in case of possible hazard caused by leakage current superposition.
18 Do not apply this monitor simultaneously with other PATIENT-connected equipment,
such as, a cardiac pacemaker or other electrical stimulators, on the same patient.
19 The monitor can only be used on one patient at a time.
20 Do not switch on the monitor until all cables have been properly connected and
verified.
21 Do not touch the signal input or output connector and the patient simultaneously.
22 Equipment and devices that connect to the monitor should form an equipotential
body to ensure effective grounding.
23 Disconnect the power cord before changing fuses. Replace them with those of the
same specifications only.
24 SHOCK HAZARD - Do not attempt to connect or disconnect a power cord with wet
hands. Make certain that your hands are clean and dry before touching a power
cord.
25 SHOCK HAZARD - Do not remove the top panel cover during operation or while
power is connected.
26 Do not apply the monitor during electro-surgery or MRI; otherwise it might result in
harming the patient or the operator.
27 Only MECG, SpO2, NIBP and TEMP applied parts of the monitor are
defibrillation-proof. When a defibrillator is applied, keep other accessories away from
the patient. Otherwise it may result in damaging the monitor or harming the patient.
28 Only connect accessories supplied or recommended by the manufacturer to the
device.
29 Accessory equipment connected to the analog and digital interfaces must be
certified according to the respective IEC/EN standards (e.g. IEC/EN 60950 for data
processing equipment and IEC/EN 60601-1 for medical equipment). Furthermore all
configurations shall comply with the valid version of the system standard IEC/EN
60601-1-1. Anybody who connects additional equipment to the signal input
connector or signal output connector to configure a medical system must ensure that
the system complies with the requirements of the valid version of the system
standard IEC/EN 60601-1-1. If in doubt, consult our technical service department or
your local distributor.

F6 and F6 Express Fetal & Maternal Monitor User Manual Safety Guide
- 6 -
WARNING
30 Parts and accessories used must meet the requirements of the applicable IEC 601
series safety standards, and/or the system configuration must meet the
requirements of the IEC 60601-1-1 medical electrical systems standard.
31 Connect the grounding wire to the equipotential grounding terminal in the main
system. If it is not evident from the instrument specifications whether a particular
instrument combination is hazardous or not, for example due to summation of
leakage currents, you should consult the manufacturer or an expert in the field, to
ensure that the necessary safety of all instruments concerned will not be impaired by
the proposed combination.
For proper monitoring:
32 Clinical decision making based on the output of the device is left to the discretion of
the provider.
33 The disposable accessories are intended to be used only once. Dispose of them
properly after use and do not reuse them.
34 The IUPC is neither intended nor approved for measuring intrauterine pressure
extraovularly; attempting to do so may lead to maternal discomfort or injury.
35 Alarms must be set up according to different situations of patients. Make sure that
audio sounds can be activated when an alarm occurs.
36 Do not put the sensor on extremities with arterial catheter or venous syringe.
37 Do not perform NIBP measurements on patients with sickle-cell disease or under
any condition where the skin is damaged or expected to be damaged.
38 Do not apply the cuff to a limb that has an intravenous infusion or catheter in place.
This could cause tissue damage around the catheter when infusion is slowed or
blocked during cuff inflation.
For using the battery:
39 Before using the rechargeable lithium-ion battery (hereinafter called battery), be sure
to read the user manual and safety precautions thoroughly.
40 Unplug the monitor before installing and removing the battery.
41 Do not short-circuit the battery by connecting the battery cable connector or battery
socket with metal objects or solder.
42 Do not connect the battery directly to an electric outlet or cigarette lighter charger.
43 Do not heat or throw the battery into a fire.
44 Do not use or leave battery close to fire or other places where temperatures may be
above +60 ºC (+140 ºF).
45 Do not immerse, throw or wet the battery in water/ seawater.
46 Do not destroy the battery: Do not pierce battery with a sharp object such as a
needle; Do not hit with a hammer, step on or throw or drop to cause strong shock;
Do not disassemble or modify the battery.

F6 and F6 Express Fetal & Maternal Monitor User Manual Safety Guide
- 7 -
WARNING
47 Use the battery only in the F6 or F6 Express monitor.
48 If the liquid leak from the battery gets into eyes, do not rub the eyes. Wash them well
with clean water and see a doctor immediately.
49 If the liquid leak from the battery spills onto your skin or clothes, wash well with fresh
water immediately.
50 Keep the battery away from fire immediately when leakage or foul odor is detected.
51 Stop using the battery if abnormal heat, odor, discoloration, deformation or abnormal
condition is detected during use, charge, or storage. Keep it away from the monitor.
52 Do not use a battery with serious scar or deformation.
53 Batteries have life cycles. If the time that the monitor using battery becomes much
shorter than usual, the battery life is at an end. Replace the battery with a new one
of the same specification as the one provided or recommended by the manufacturer.
54 Remove the battery and store it at a cool and dry environment if the monitor is not
used for a long time.
55 If the battery is stored alone and not used for a long time, we recommend that the
battery should be charged at least once every 6 months to prevent overdischarge.
CAUTION
1 Refer servicing to qualified personnel.
2 Keep the environment clean. Avoid vibration. Keep it far from corrosive medicine,
dust area, high-temperature and humid environment.
3 When installing the unit into a cabinet, allow for adequate ventilation, accessibility for
servicing, and room for adequate visualization and operation.
4 Do not operate the unit if it is damp or wet because of condensation or spills. Avoid
using the equipment immediately after moving it from a cold environment to a warm,
humid location.
5 Only the sensor and cable of US/TOCO transducers are watertight. Pay attention not
let any liquid enter the transducer plug.
6 Sterility can not be guaranteed if package of the fetal spiral electrode is broken or
opened.
7 The fetal spiral electrode has been sterilized by gamma radiation. Do not re-sterilize.
8 Do not sterilize the monitor or any accessory with autoclave or gas.
9 Switch off the system power before cleaning. Cleaning consists of removing all dust
from the exterior surface of the equipment with a soft brush or cloth.
10 Electromagnetic Interference - Ensure that the environment in which the monitor is
installed is not subject to any source of strong electromagnetic interference, such as
CT, radio transmitters, mobile phone base stations, etc.

F6 and F6 Express Fetal & Maternal Monitor User Manual Safety Guide
- 8 -
CAUTION
11 Do not use mobile phones nearby in the process of monitoring.
12 The device and reusable accessories could be sent back to the manufacturer for
recycling or proper disposal after their useful lives.
13 If the terminals of the battery become dirty, wipe with a dry cloth before using the
battery.
14 For information on installing and removing the battery from the monitor, thoroughly
read the user manual.
15 The device and accessories are to be disposed of according to local regulations after
their useful lives. Alternatively, they can be returned to the dealer or the
manufacturer for recycling or proper disposal.
16 The device and accessories are to be disposed of according to local regulations after
their useful lives. Alternatively, they can be returned to the dealer or the
manufacturer for recycling or proper disposal. Batteries are hazardous waste. Do
NOT dispose them together with house-hold garbage. At the end of their life hand
the batteries over to the applicable collection points for the recycling of waste
batteries. For more detailed information about recycling of this product or battery,
please contact your local Civic Office, or the shop where you purchased the product.
1.6 Definitions and Symbols
Socket for ultrasound transducer 1 ( Type BF applied part)
Socket for ultrasound transducer 2 ( Type BF applied part)
Socket for DECG cable ( Type CF applied part)
Socket for TOCO transducer or IUP cable (Type BF applied part)
Socket for Remote Event Marker ( Type BF applied part)
Socket for Fetal Stimulator ( Type BF applied part)

F6 and F6 Express Fetal & Maternal Monitor User Manual Safety Guide
- 9 -
Socket for NIBP Cuff ( Type BF applied part)
Socket for SpO2 Transducer ( Type BF applied part)
Socket for Maternal ECG Cable ( Type CF applied part)
Socket for TEMP Transducer ( Type CF applied part)
RS232 Interface (DB9 or D-Sub)
RJ45 Interface
Equipotential Grounding Terminal
Charge Indicator
Alternating Current (a.c.)
Stand-by
Caution
Consult instructions for use
Type BF Applied Part Symbol
Type CF Applied Part Symbol
The symbol indicates that the device complies with the European Council
Directive 93/42/EEC concerning medical devices.
The symbol indicates that the device should be sent to the special agencies
according to local regulations for separate collection after its useful life.

F6 and F6 Express Fetal & Maternal Monitor User Manual Safety Guide
- 10 -
Part Number
Serial Number
Date Of Manufacture
Manufacturer
Authorized Representative in the European Community
Recyclable
Federal (U.S.) Law restricts this device to sale by or on the order of a
physician
F6 and F6 Express Fetal & Maternal Monitor User Manual Installation Guide
- 11 -
Chapter 2 Installation Guide
NOTE:
Installation must be carried out by qualified personnel authorized by the manufacturer.
2.1 Opening and Checking Package
Visually examine the package prior to unpacking. If any signs of mishandling or damage are
detected, contact the carrier to claim for damage.
Open the package; take out the monitor and accessories carefully. Keep the package for possible
future transportation or storage. Check the components according to the packing list.
Check for any mechanical damage.
Check all the cables and accessories.
If there is any problem, contact us or your local distributor immediately.
2.2 Installing Battery
WARNING
Switch off the monitor and unplug it before installing or removing the battery.
If your monitor has been configured with a rechargeable lithium-ion battery, follow these steps to
install the battery:
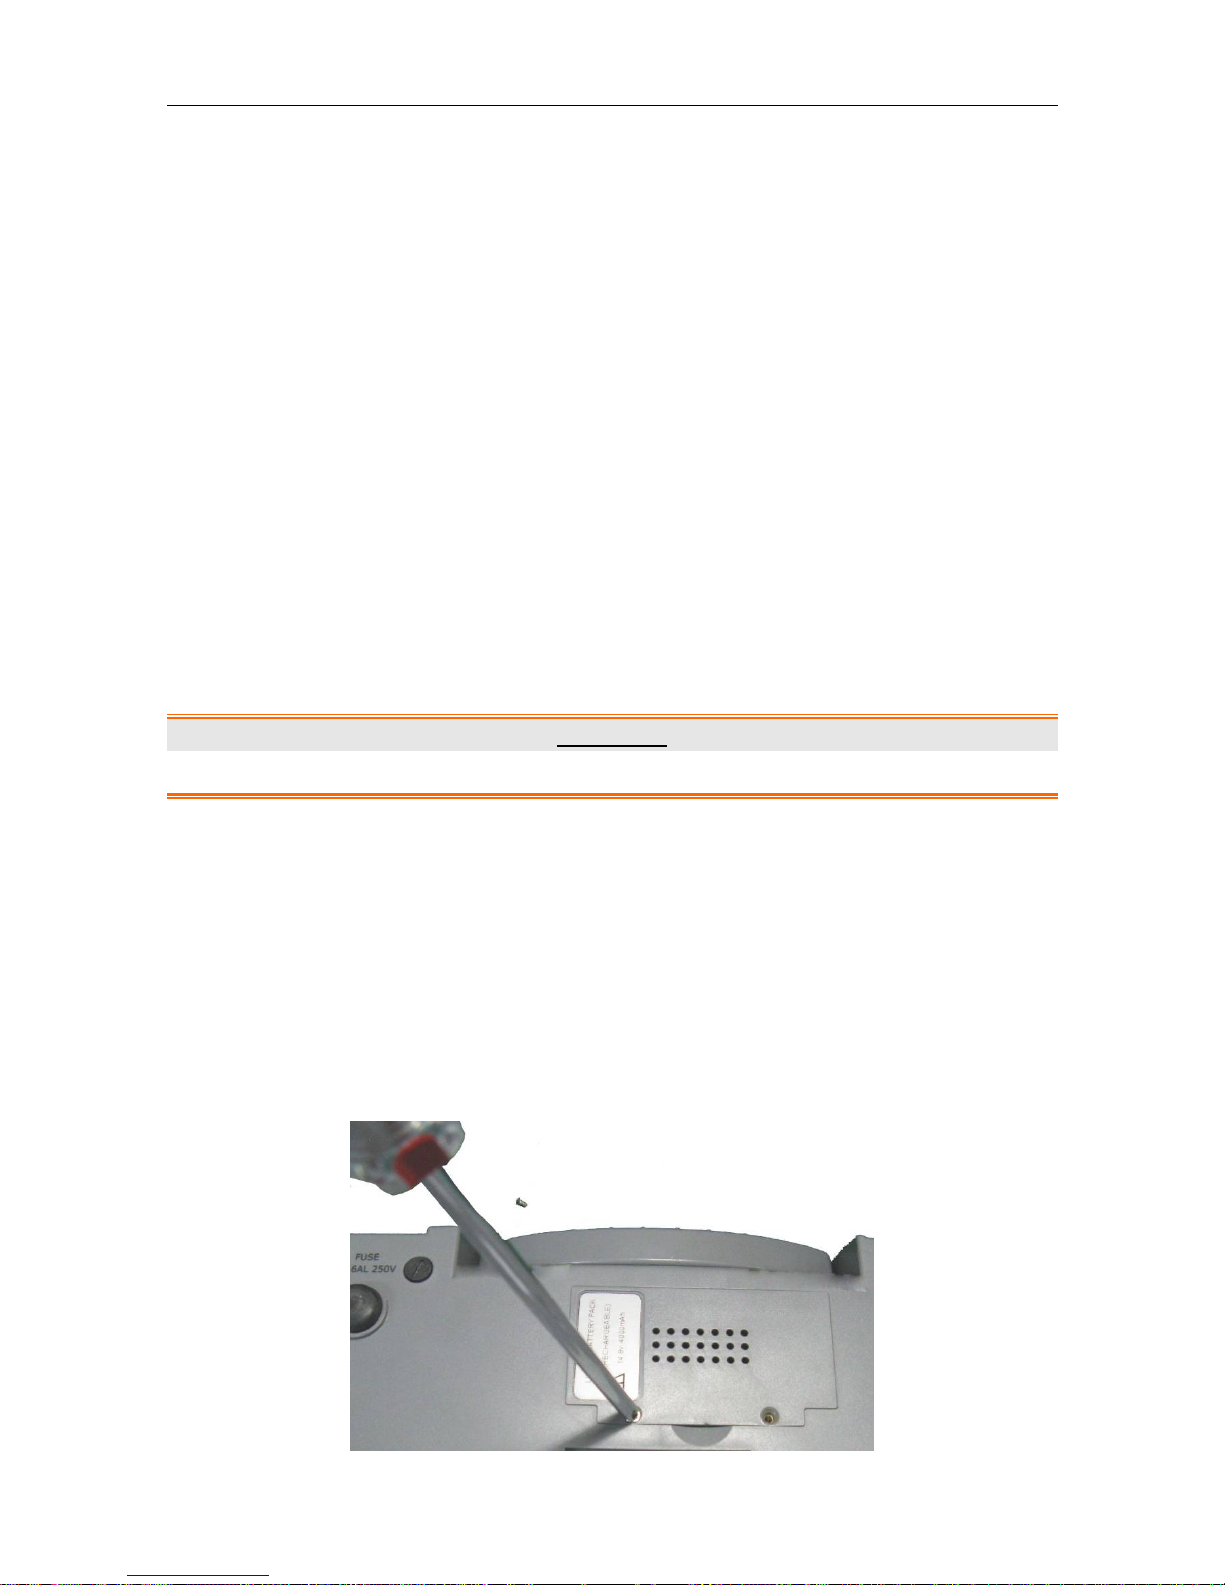
(1) Battery Installation
1) Carefully place the monitor upside down on a flat surface covered with cloth or other type of
protecting pad.
2) Remove the screws of the battery compartment using a cross-head screw driver. Remove the
battery compartment cover.
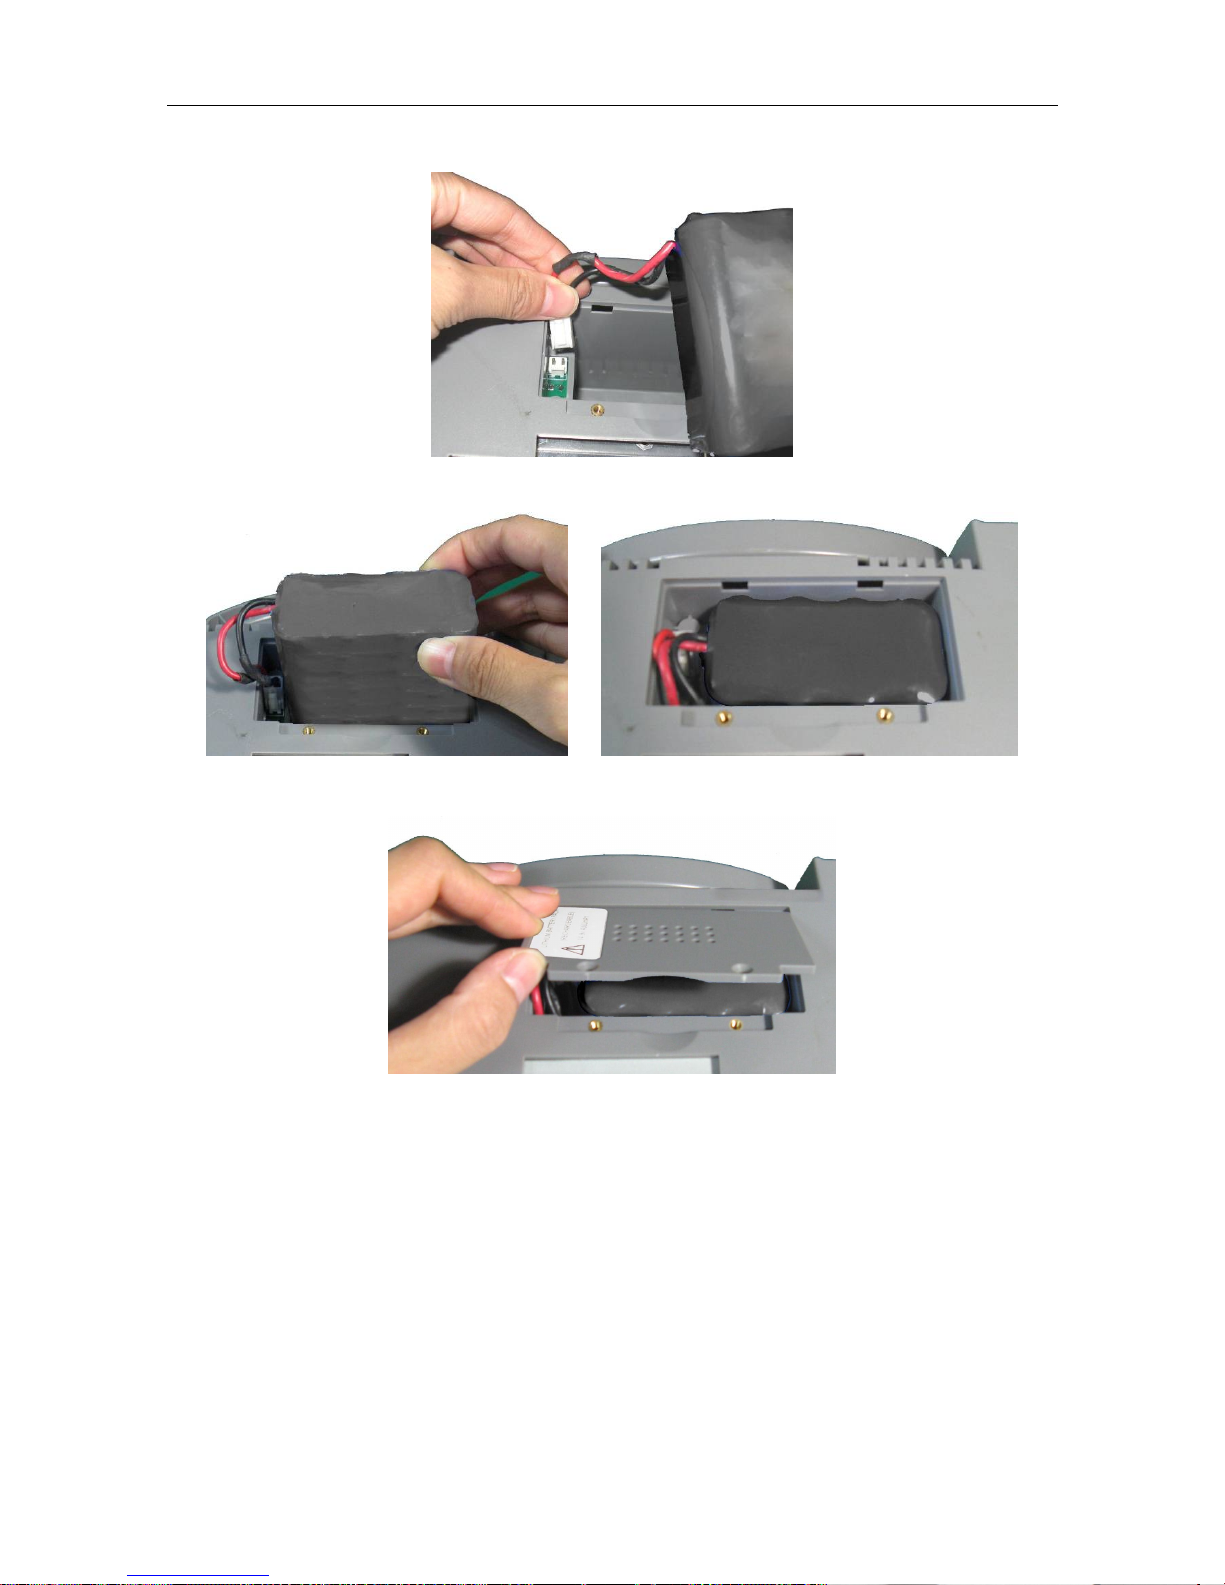
F6 and F6 Express Fetal & Maternal Monitor User Manual Installation Guide
- 12 -
3) Take the battery out from package. Insert the cable connector into the socket.
4) Put the battery and the cables into the battery compartment.
5) Shut the battery compartment cover and fix the screws.
(2) Battery Removal
Fold the LCD display completely flat before turning the monitor upside down. Remove the
battery in reverse order.
NOTE:
1 If a rechargeable battery is outfitted, charge it fully each time after using the device to
ensure the electric power is enough.
2 When the battery configuration is provided, after the device is transported or stored,
the battery must be charged. Connecting to power supply will charge the battery no
matter if the monitor is powered on.

F6 and F6 Express Fetal & Maternal Monitor User Manual Installation Guide
- 13 -
2.3 Installing Monitor
The monitor can be placed on a flat surface, or be installed on a wall or a trolley. The service
engineer should install the monitor properly.
2.4 Connecting Power Cable
Make sure the AC power supply of the monitor complies with the following specification:
100V-240V~, 50Hz/60Hz.
Apply the power cable provided with the monitor. Plug one end of the power cable to the
power socket of the monitor. Connect the other end to a three-slot power output special for
hospital usage.
The equipotential grounding terminal is provided for the connection of a potential
equalization conductor. Therefore, it is recommended to connect the grounding terminal of
the monitor and the power outlet with the grounding wire, making sure the monitor is
grounded.
WARNING
If the protective grounding (protective earth) system is doubtful, the power of the monitor
must be supplied by inner power only.
NOTE:
1 Make sure the monitor and the power outlet are placed at a place where it is easy to
connect and disconnect the power cord.
2 When the supply mains is interrupted, the device switches to inner power and
operates normally if the battery is installed. If the battery is not installed, the monitor
shuts down and resumes the previous settings at the subsequent operation.

F6, F6 Express Fetal & Maternal Monitor User Manual Monitor and Accessories
- 14 -
Chapter 3 Monitor and Accessories
3.1 Overview
NOTE:
The pictures and interfaces in this manual are for reference only.
Figure 3-1 Appearance (for reference only)
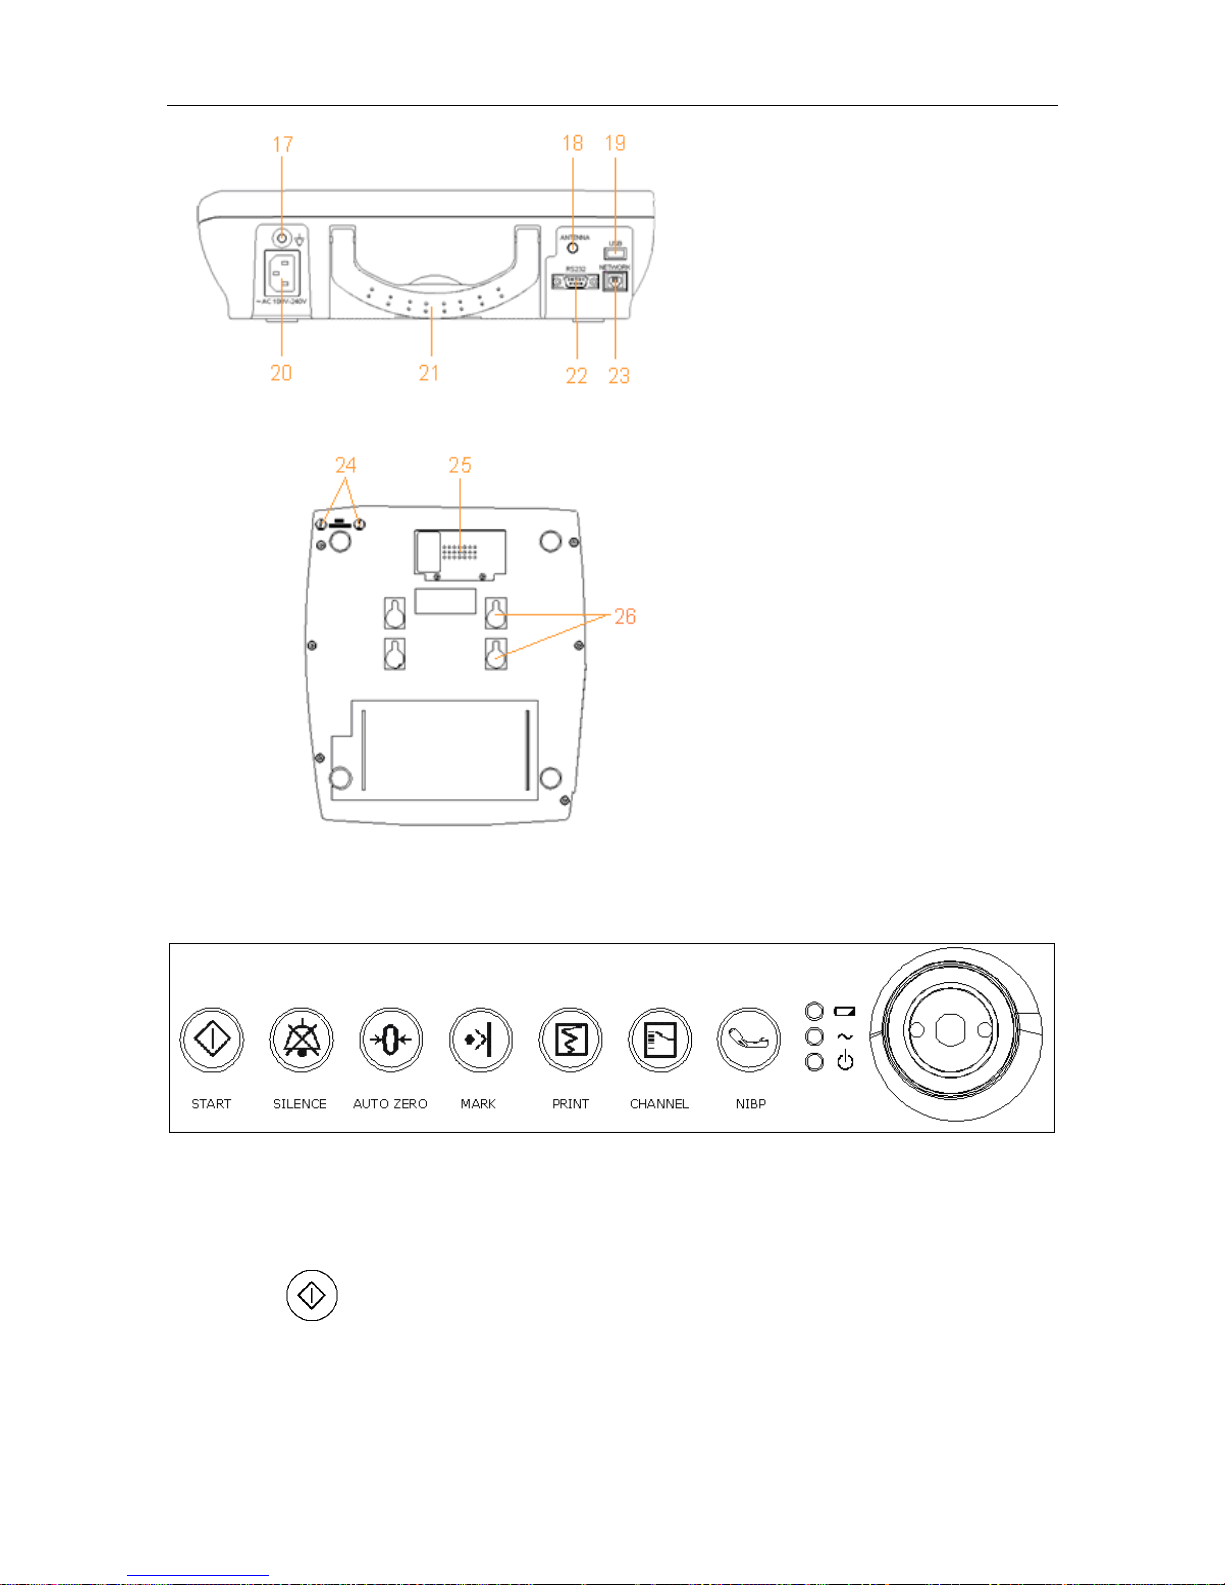
Figure 3-2 Left Panel
Figure 3-3 Right Panel
1 Keys
2 Transducer
3 Sockets
4 Alarm Indicator
5 Display Screen
6 Control Knob
7 Charge, AC, Power
Indicator
8 Paper Drawer
16 POWER Switch
9 Transducer Holder
10 DECG Socket
11 US2 Socket
12 EXT.1 Socket
13 TOCO/IUP Socket
14 US1 Socket
15 MARK Socket
27 MECG Socket
28 NIBP Socket
29 TEMP Socket
30 SpO2 Socket
F6, F6 Express Fetal & Maternal Monitor User Manual Monitor and Accessories
- 15 -
Figure 3-4 Rear Panel
Figure 3-5 Bottom Panel
3.1.1 Keys and Control Knob
Figure 3-6 Keys and Control Knob
The Monitor is a user-friendly device with operation conducted by a few keys on the front panel
and the control knob. Their functions are as follows:
(1) START
Function: Start monitoring or return to the main interface
Press this key to start monitoring (on the main interface) or return to main interface (in maternal
information inputting menu or setup menus).
17 Equipotential
Grounding Terminal
18 Antenna
19 USB Socket
20 Power Socket
21 Handle
22 DB9 Socket
23 RJ45Socket
24 Fuses
25 Battery Compartment
26 Wall-mounting Holes

F6, F6 Express Fetal & Maternal Monitor User Manual Monitor and Accessories
- 16 -
(2) SILENCE
Function: Silence/reset
Press this key to disable the current auditory alarm manifestation, and re-enable the monitor’s
response to new abnormal patient condition.
(3) AUTO ZERO
Function: TOCO zero
Adjust the external TOCO contractions trace/value to preset unit (external monitoring
contractions) or the IUP trace/value to reference point 0 (internal monitoring contractions).
(4) MARK
Function: Record an event.
Press this key to make an event mark.
(5) PRINT
Function: Start / stop printing
Press this key to toggle between starting and stopping printing.
(6) CHANNEL
Function: Switch the channels
Press this key to toggle the FH sound between US1 channel and US2 channel.
(7) NIBP
Function: Start or stop a NIBP measurement.
Press this key to inflate the cuff and start a NIBP measurement. During the measuring process, press
this key to cancel the measurement and deflate the cuff.
This function is only available on F6 Express.
(8) CONTROL KNOB
Function: Adjust volume, setup and review control.
It can be pressed like other keys and be rotated clockwise or counterclockwise. All the operations
on the screen or in the menu are completed by using the control knob.
The highlighted rectangular mark on the screen that moves with the rotation of the control knob is
called “cursor”. Operations can be performed in the position on the screen where the cursor stays.
When the cursor is located on a certain item, you can press the control knob to open its submenu
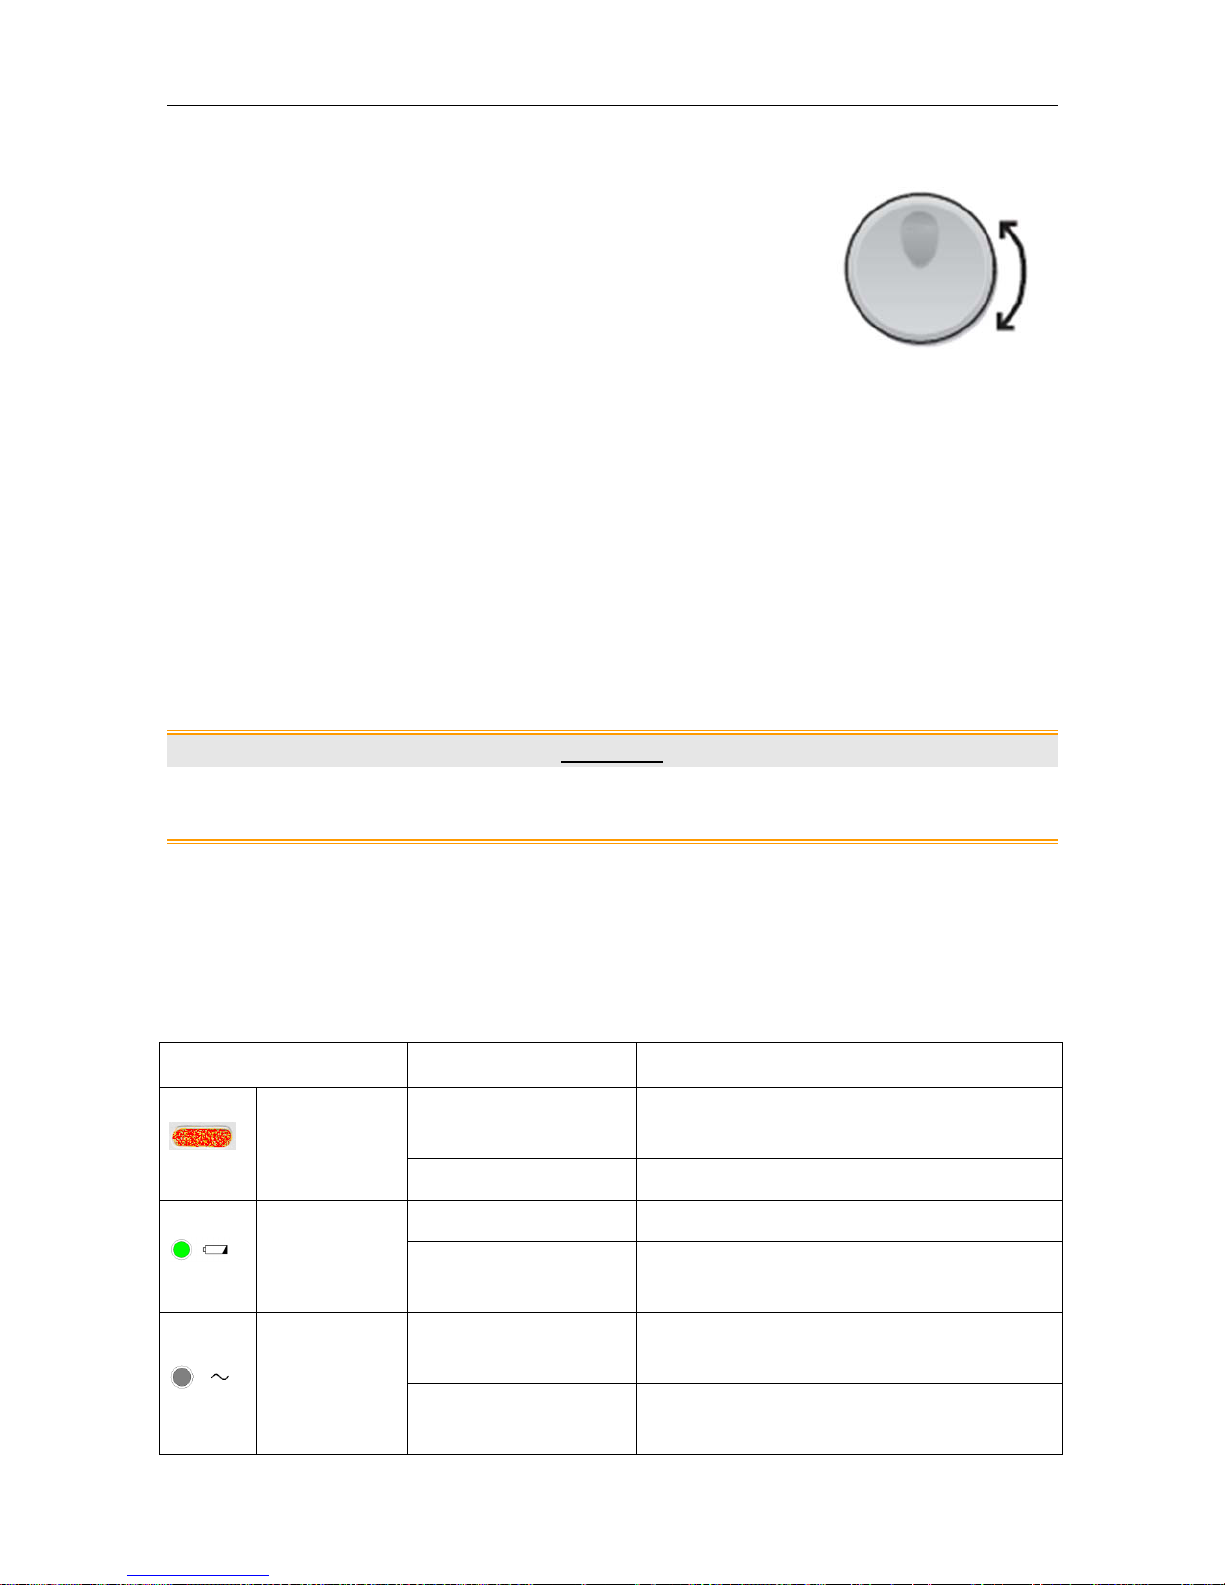
F6, F6 Express Fetal & Maternal Monitor User Manual Monitor and Accessories
- 17 -
or confirm the operation. Press the control knob again, and the cursor will be able to move around
on the interface/menus.
Operation Procedure:
a) Rotate the control knob to move the cursor to the item you want;
b) Press the control knob;
c) One of the following three results will be achieved:
A menu pops up on the screen, or the menu is replaced by a new one;
A submenu with several options appears on the right of the item. If this item has more
than 8 options, they will be displayed in more than one page. Select PREV to switch to
the previous page, or select NEXT to switch to the next page.
The function operates immediately.
NOTE:
1 The word “select” hereinafter stands for rotating the control knob cursor to an item
and then pressing the knob.
2 If the key sound is enabled, the monitor gives a normal key sound when the operation
is valid, and gives a sharp “Di” sound when the operation is invalid.
CAUTION
This monitor is a normal medical device. Please avoid violent operations such as
continuously pressing the keys or control knob.
3.1.2 Indicators
There are four groups of indicator on top of the screen and the front panel. From the top down
they are: alarm indicator, CHARGE indicator, AC indicator and Power indicator.
Indicator Status of Indicator Meaning
Flash or light up in
yellow
An alarm is active.
Alarm
Indicator
Off No alarm is active.
On The battery is being charged.
Charge
Indicator
Off
No battery or the battery is fully
charged.
On
The monitor is connected to AC power
supply.
AC Indicator
Off
The monitor is not connected to AC
power supply.

F6, F6 Express Fetal & Maternal Monitor User Manual Monitor and Accessories
- 18 -
On The monitor is powered on.
Power
Indicator
Off The monitor is powered off.
3.2 Accessories
The accessories should be connected to the monitor via the sockets on the left side panel. Each
accessory has a tab on the connector housing to ensure proper insertion into the appropriate
socket on the monitor.
3.2.1 Ultrasound (US) Transducers
Figure 3-7 US Transducers
3.2.2 TOCO Transducers
Figure 3-8 TOCO Transducers
3
1
2
1 TOCOS Transducer Sensor
(Blue Labeled)
2 Transducer Cable
3 Transducer Connector
3
1
2
1 US Transducer Sensor
(Pink Labeled)
2 Transducer Cable
3 Transducer Connector

F6, F6 Express Fetal & Maternal Monitor User Manual Monitor and Accessories
- 19 -
3.2.3 Belt
Figure 3-9 Belt
3.2.4 Remote Event Marker
Figure 3-10 Remote Event Marker
3.2.5 Fetal Stimulator
FS-1 Fetal Stimulator is a hand-held device. In order to reduce the time required for the NST
when the fetus is asleep, it can be used to give a mild vibrating stimulation to the fetus through
the maternal abdomen.
During NST, the vibrating operation marks can be displayed /printed on CTG trace when the fetal
stimulator is connected to the monitor by an audio cable.
Figure 3-11 Fetal Stimulator
1
2
1 Marker Plug
2 Press Key
F6, F6 Express Fetal & Maternal Monitor User Manual Monitor and Accessories
- 20 -
1 Operating Switch 2 Vibration Rhythm Adjusting Wheel
3 Marker Socket 4 Mode Selecting Switch
5 Vibrating Head 6 Battery Compartment
7 Audio Cable
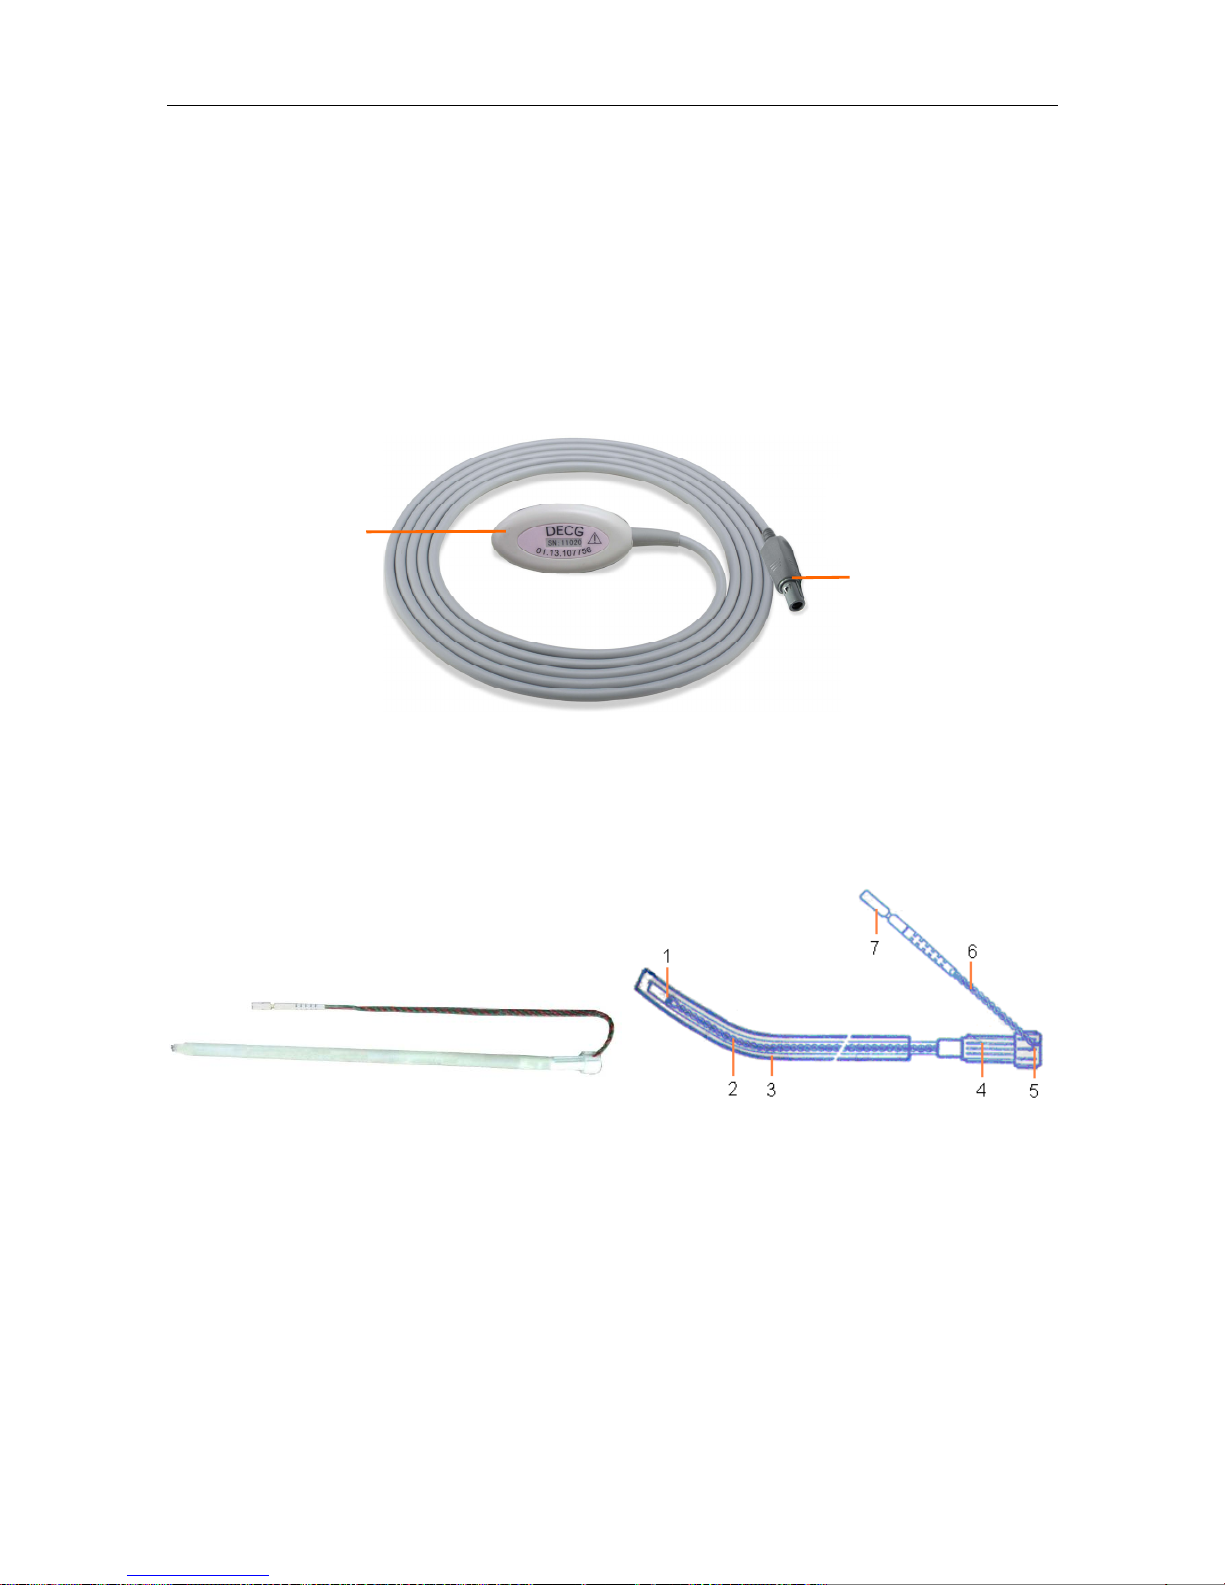
3.2.6 DECG Cable
Figure 3-12 DECG Cable
3.2.7 Fetal Spiral Electrode
Figure 3-13 Fetal Spiral Electrode
1 Reference Electrode 2 Drive Tube 3 Guide Tube 4 Drive Handle
5 Handle Notch 6 Electrode Wire 7 Safety Cap
1
2
1 DECG Cable Plug
2 DECG Cable Connector
F6, F6 Express Fetal & Maternal Monitor User Manual Monitor and Accessories
- 21 -
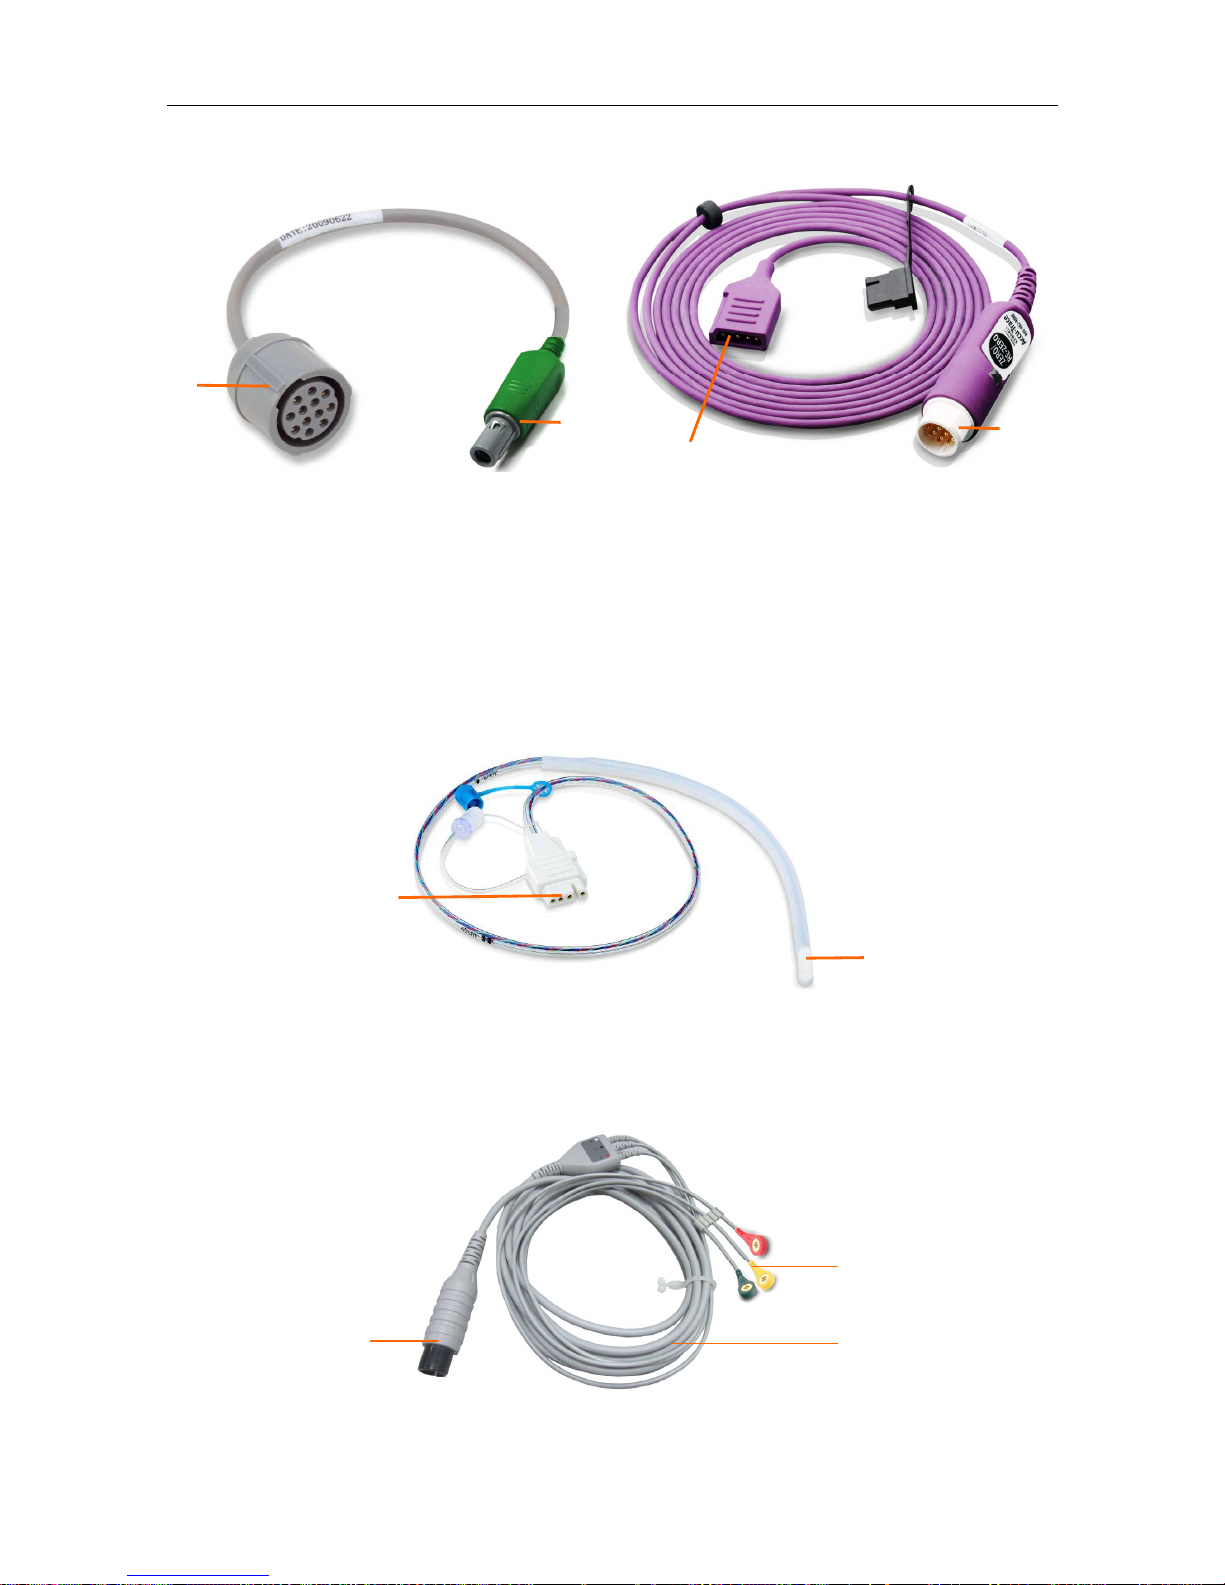
3.2.8 IUP Cable
Figure 3-14 IUP Connecting Cable Figure 3-15 IUP Cable
1 Interface to IUP Cable 2 Connecting plug
3 Interface to IUP Catheter 4 Interface to Connecting Cable
3.2.9 IUP Catheter
Figure 3-16 IUP Catheter
3.2.10 ECG Cable
Figure 3-17 3-Lead ECG Cable
1
2
1 Interface to Connecting
Cable
2 Catheter
1 ECG Connector
2 ECG Fastener
3 Lead Wire
2
1 3
1
2
3
4
F6, F6 Express Fetal & Maternal Monitor User Manual Monitor and Accessories
- 22 -
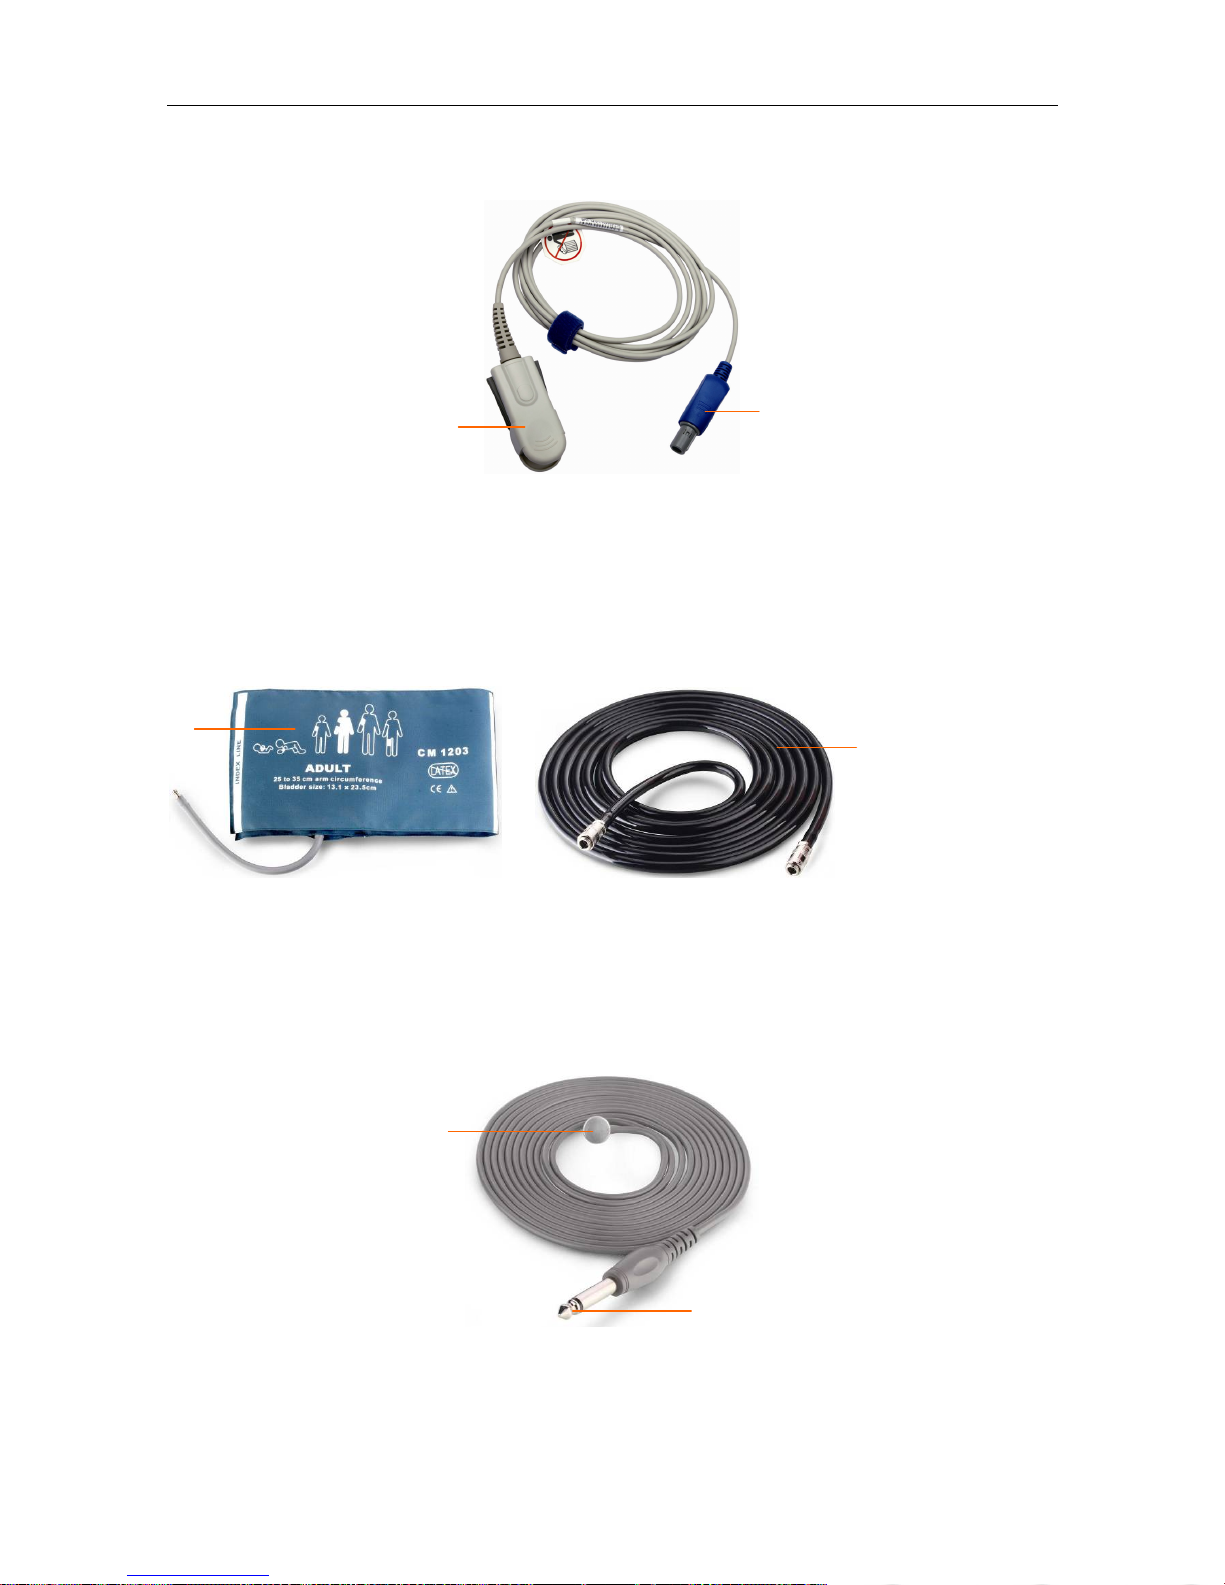
3.2.11 SpO2 Transducer
Figure 3-18 SpO2 Transducer
3.2.12 NIBP Cuff
Figure 3-19 NIBP Cuff Figure 3-20 Cuff Extension Tube
3.2.13 TEMP Transducer
Figure 3-21 TEMP Transducer
1 TEMP Sensor
2 TEMP Connector
1
2
1
2
1 NIBP Cuff
2 Cuff Extension Tube
1 SpO2 Sensor
2 SpO
2
Connector
1
2
 Loading...