

Page 1

ECTACO Partner® ES B-3 User Manual
CONTENTS
INTRODUCTION ---------------------------------------------------------------------3
GETTING STARTED ----------------------------------------------------------------5
General View ------------------------------------------------------------------------5
Display --------------------------------------------------------------------------------5
Power Supply------------------------------------------------------------------------ 7
MultiMedia Card --------------------------------------------------------------------7
Initialization---------------------------------------------------------------------------9
Control Pad ------------------------------------------------------------------------ 10
Control Wheel --------------------------------------------------------------------- 13
Opening and Closing Programs----------------------------------------------- 14
Natural Handwriting -------------------------------------------------------------- 14
Writing Punctuation -------------------------------------------------------------- 15
Writing Functions ----------------------------------------------------------------- 15
Deleting Characters-------------------------------------------------------------- 15
Writing Accented Characters -------------------------------------------------- 16
Hints for Successful Handwriting --------------------------------------------- 16
On-screen Keyboard------------------------------------------------------------- 17
APPLICATIONS -------------------------------------------------------------------- 17
Dictionary--------------------------------------------------------------------------- 17
English Idioms--------------------------------------------------------------------- 21
Flash Cards ------------------------------------------------------------------------ 22
Hangman --------------------------------------------------------------------------- 24
Irregular Verbs -------------------------------------------------------------------- 24
Phrasebook ------------------------------------------------------------------------ 25
Spanish Verbs--------------------------------------------------------------------- 25
Address Book---------------------------------------------------------------------- 26
Calculator--------------------------------------------------------------------------- 30
1
Page 2

ECTACO Partner® ES B-3 User Manual
Currency Conversion ------------------------------------------------------------ 30
Date Book -------------------------------------------------------------------------- 31
Memo Book ------------------------------------------------------------------------ 34
Metric Conversion ---------------------------------------------------------------- 36
Music Player ----------------------------------------------------------------------- 36
ToDo Book ------------------------------------------------------------------------- 38
Voice Memo------------------------------------------------------------------------ 40
English Grammar----------------------------------------------------------------- 42
Local Time-------------------------------------------------------------------------- 42
Spanish Grammar---------------------------------------------------------------- 43
U.S. Interview---------------------------------------------------------------------- 43
World Time------------------------------------------------------------------------- 44
SETUP -------------------------------------------------------------------------------- 44
Interface Language -------------------------------------------------------------- 44
Select Date------------------------------------------------------------------------- 45
Select Time ------------------------------------------------------------------------ 45
Volume ------------------------------------------------------------------------------ 45
Password --------------------------------------------------------------------------- 45
Sounds ------------------------------------------------------------------------------ 46
Pen Language--------------------------------------------------------------------- 46
Shutoff Time ----------------------------------------------------------------------- 46
Time Format ----------------------------------------------------------------------- 46
Date Format------------------------------------------------------------------------ 47
Numbers ---------------------------------------------------------------------------- 47
Week Starts------------------------------------------------------------------------ 47
Double-click------------------------------------------------------------------------ 47
PC COMMUNICATION ----------------------------------------------------------- 47
2
Page 3

ECTACO Partner® ES B-3 User Manual
INTRODUCTION
Congratulations on purchasing ECTACO Partner® ES B-3! This product is the
result of combined efforts of Ectaco staff of linguists, engineers, and programmers.
You are now the owner of the versatile, handheld electronic device which will serve
you as a comprehensive EnglishÙSpanish dictionary, personal organizer, and a
music player.
ECTACO Partner
English-Spanish bidirectional dictionary containing over 450,000 words,
including idioms, medical, technical, legal, and business terms, as well as
slang and general expressions
Advanced English and Spanish speech synthesis
Transcription
Vector Ultima™ Spell Checker
Look-up function
User's Dictionary
Bilingual interface
English and Spanish Grammar guide
U.S. citizenship exam preparation guide
Most popular English and Spanish idioms
English irregular verbs
Spanish verbs
Flash Cards
Word game
Instant Reverse Translation
The MorphoFinder™ function
Over 1,100 useful phrases in the English
Currency and metric converters
Local and World time with a map
Address Book
ToDo Book
Date Book with audio reminders
Memo Book
Music Player
®
ES B-3 features:
Ù
Spanish phrasebook
3
Page 4

ECTACO Partner® ES B-3 User Manual
Calculator
Voice Memo
High-speed data exchange and synchronization with PC
Password protection
Slang Lock
High resolution touch screen
MMC slot
USB port
Headphone jack
The latest speech technology employed by ECTACO Partner
®
ES B-3 allows you
to listen to clearly pronounced English and Spanish words and phrases.
This model features a break-through combination of two input methods − a well-
designed on-screen keyboard and a high-resolution touch-sensitive handwriting
area which makes character input simple, fast and accurate.
♦ Note: As continuous efforts are made by the manufacturer to ensure better
quality and performance of the ECTACO Partner
®
products, some
characteristics or the design of the actual device you purchased may slightly
differ from their description in this manual.
®
ECTACO Partner
Enjoy your ECTACO Partner
ES B-3 gives you the freedom of speech and communication.
®
ES B-3 and make it your companion!
4
Page 5
ECTACO Partner® ES B-3 User Manual
GETTING STARTED
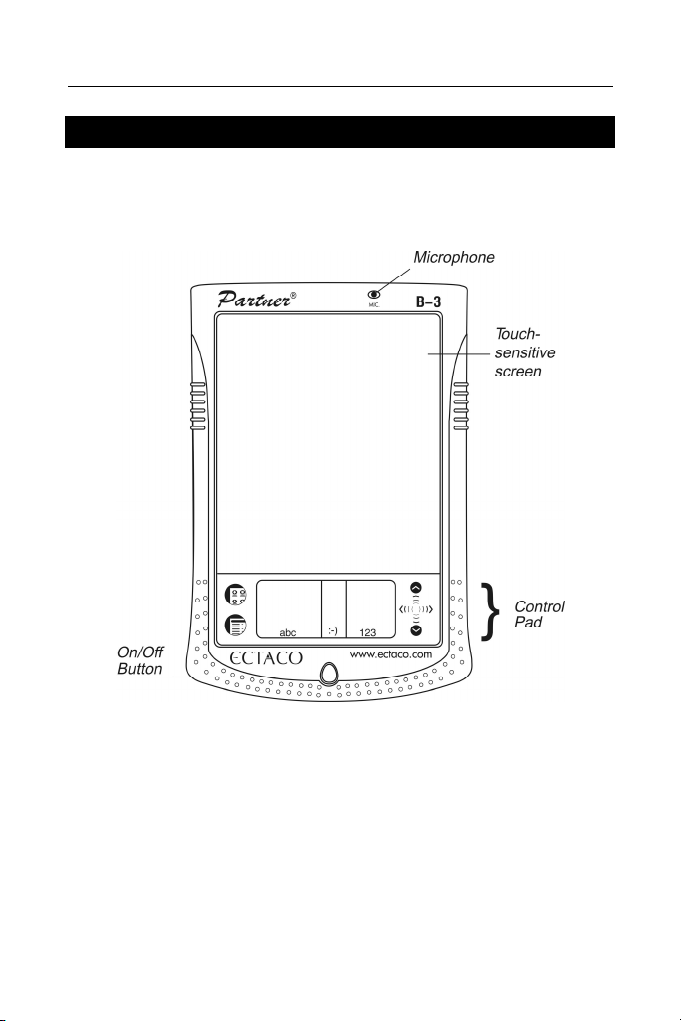
General View
The general view and external appliances of ECTACO Partner® ES B-3 are shown
below.
Display
ECTACO Partner® ES B-3 features a large-size touch screen with efficient
windows-driven graphic interface.
Touch-screen elements
By tapping certain types of screen items – a push-button or pre-highlighted text –
you perform an action associated with this item. In most windows or dialog boxes,
tap Done to accept changes or Cancel to exit without saving any changes.
5
Page 6
ECTACO Partner® ES B-3 User Manual
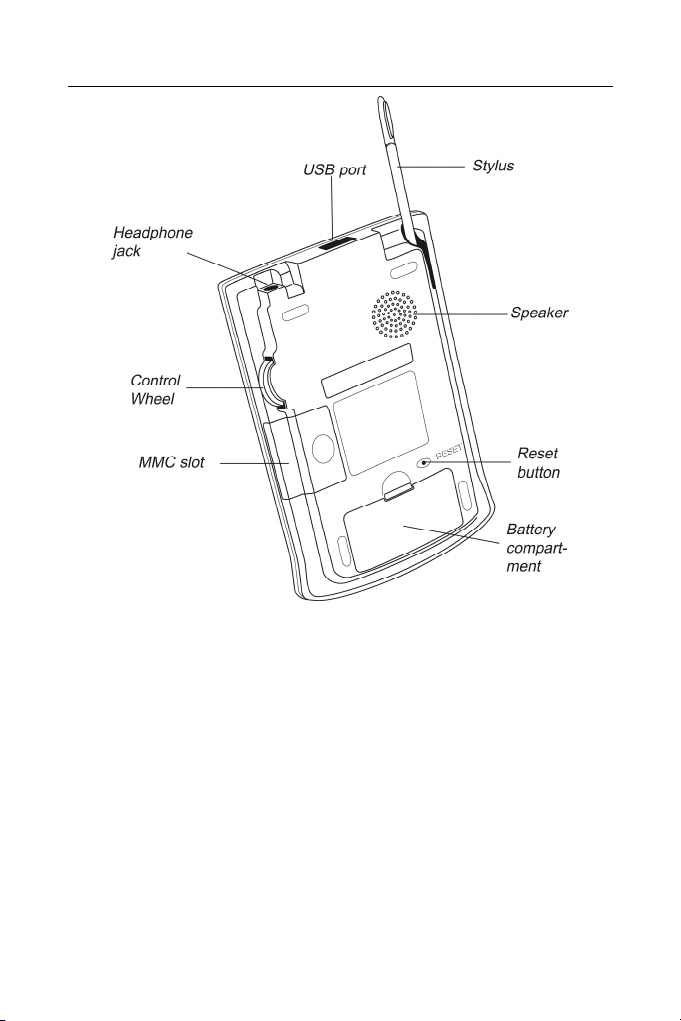
Stylus
Tap the screen with the supplied pointing device called the stylus which, when not
in use, is conveniently kept in a special slot at the side of the device’s back panel.
The stylus is especially useful for operations which cannot be performed by the
control wheel, for example, highlighting an arbitrary text fragment or a multi-word
translation in a dictionary entry.
♦ Note: If, for some reason, using the stylus does not provide the desired effect,
you may need to recalibrate the screen (see page 12).
Cover
ECTACO Partner® ES B-3 comes with a hard plastic cover to protect the screen
when the device is not in use. To attach the cover, insert the pegs on the cover into
the holes on either side of the device. To detach the cover, gently snap the pegs
6
Page 7

ECTACO Partner® ES B-3 User Manual
out of the holes. We recommend that you keep the cover attached when you are
not using your ECTACO Partner
®
ES B-3.
Power Supply
ECTACO Partner® ES B-3 is powered by two AAA (LR03) batteries. Please insert
the batteries before connecting your device to a PC. Use the universal indicator to
check the current condition of the batteries (see page 11). Replace the batteries
when the indicator runs low.
♦ Note: If the battery power runs too low, the unit will start up when you press the
On/Off button but will then shut off automatically. When this happens, please
replace the batteries immediately to avoid the risk of losing user data.
How to replace the batteries
• Press the On/Off button to turn the device off.
• Make sure the device is not on a hard surface – if the On/Off button is pressed
accidentally, user data may be lost.
♦ Note: To avoid data loss, never try to remove the batteries from the device
when the power is on. If you experience difficulties turning the device off,
press the RESET button on the back of the device and restart the system.
• Remove the battery compartment cover by sliding it away from the device.
• Remove the used batteries and replace them with new ones.
♦ Note: Do not mix old and new batteries.
• Make sure to place the batteries according to the polarity marks (+ -) inside the
battery compartment.
• Put back the battery compartment cover by sliding it toward the device. Make
sure the cover sits in place properly.
♦ Note: You have one minute to replace the batteries without risk of losing the
data stored in RAM. Do not exceed the one-minute limit! Neither the
manufacturer nor the dealer may be held responsible for the loss of user data.
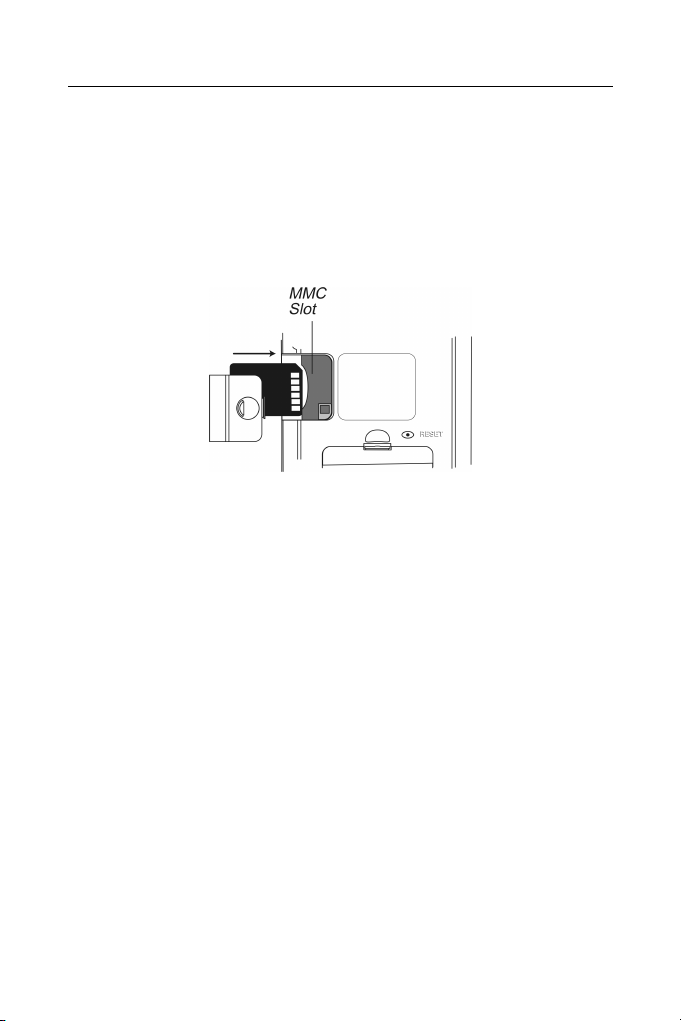
MultiMedia Card
ECTACO Partner® ES B-3 MultiMedia Card is included in the standard package.
The card contains the operating system and a set of applications described in the
Applications chapter (see page 17).
7
Page 8
ECTACO Partner® ES B-3 User Manual
• Please insert ECTACO Partner
before you turn the device on.
♦ Note: Always make sure the device is turned off before installing or removing
the MMC. Never insert or remove the card when the device is on. Use the
On/Off button to turn the device off.
®
ES B-3 MultiMedia Card into the MMC slot
Installing MMC
• Put your thumb on the MMC slot cover and slide it off.
• Slide the MMC into the compartment with the contacts facing up and the label
facing down. Push the card gently until it clicks into place.
• Snap the cover back on.
• Turn the device on.
The operating system and program files will be installed on your ECTACO Partner
ES B-3. This will take about 2.5 minutes. When the installation procedure is
completed and the screen is calibrated, the Setup application will be shown.
• Set the desired preferences (see page 44 for details) and tap Done.
If the MMC is not installed, a brief tour will be shown.
♦ Note: The tour appears only after the device is left without battery power for
more than five minutes or when a hard reset is performed.
• Tap the introductory sentence in the language you want to view the tour.
• To skip pages in the tour, tap anywhere on the screen.
• Turn the device off and insert the MMC as described above.
®
Removing MMC
• Turn the device off by using the On/Off button.
8
Page 9

ECTACO Partner® ES B-3 User Manual
• Remove the MMC slot cover.
• Push the MMC in slightly.
You will hear a click and the card will pop out.
• Slide it out and snap the cover back on.
Initialization
The initialization routine is started:
• when ECTACO Partner
®
ES B-3 is turned on for the first time;
• when you remove the batteries (e.g. when replacing them) for longer than
five minutes;
• after the system has been reset with the RESET button – see Soft Reset
and Hard Reset below.
Soft Reset
Occasionally, ECTACO Partner® ES B-3 may need to be reset to clear its memory.
In most cases, a soft reset is sufficient. The soft reset does not affect programs or
user data.
• Tap to go to the Main Menu.
• Tap to open the Launcher Menu.
• Tap Restart system on the Launcher Menu.
• In the Ready for Restart screen, tap Restart now.
♦ Note: On completion of the reboot, you will be prompted to conduct the touch-
screen calibration, which configures the proper spacing and alignment of the
touch-sensitive screen elements (see page 12).
If the Launcher Menu is not accessible, use the blunt end of a paperclip to gently
press the RESET button located on the back of the device.
♦ Note: The RESET button is located on the back of the device and can be
accessed with any thin object like a paper clip. Never use a needle or a pin
since it can damage the device.
Hard Reset
In the rare event that the data on the screen is corrupted, a program is not
responding properly, or you forgot your password, you will need to perform a hard
9
Page 10
ECTACO Partner® ES B-3 User Manual
reset. After a hard reset all user data will be lost. Synchronize your data often so
that you always have a copy on your PC.
• To perform the hard reset, keep the On/Off button pressed while pressing the
RESET button.
After a completed system initialization, or when using the device for the first time,
the interface language is set to English. Users who prefer to see menus and
messages in Spanish please see page 44 for instructions.
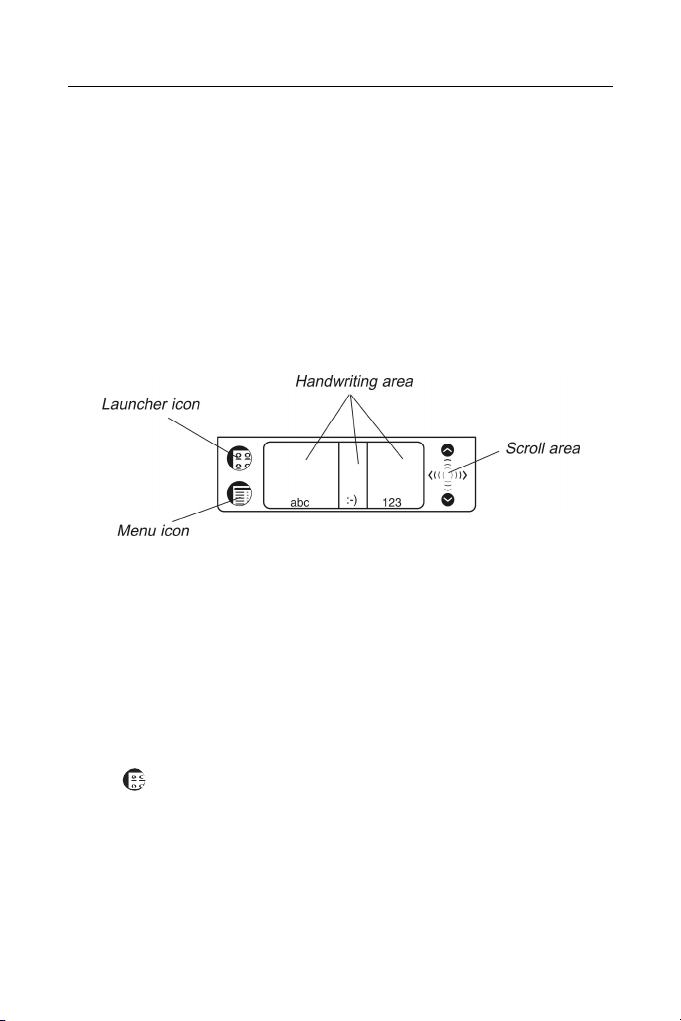
Control Pad
The Control Pad is the area below the touch-sensitive screen where you can tap
icons, write characters, or use the scroll area to control your ECTACO Partner
B-3.
Control Pad Elements and Their Functions
Launcher icon Switch to the Main Menu.
Menu icon Show the available menus. Menus shortcuts, where
available, are shown to the right of the menu items.
Handwriting area Input letters (in the Letter input area), input punctuation
marks (in the Punctuation input area), input numbers (in
the Number input area).
Scroll area Scroll the screen content.
®
ES
Main Menu
• Tap to switch to the Main Menu.
All programs and some content files in RAM and on MultiMedia Card (MMC) are
represented by icons on this screen. Program and content icons of an MMC have
an M on the bottom right corner. ECTACO Partner
row of three tabs at the bottom of the screen and the universal indicator. The tabs
are named as follows: Dictionary, Organizer, and Extras.
10
®
ES B-3 Main Menu contains a
Page 11
ECTACO Partner® ES B-3 User Manual
Dictionary
• Use the Dictionary tab to access the following applications: Dictionary, English
Idioms, Flash Cards, Hangman, Irregular Verbs, Phrasebook, and Spanish
Verbs.
Organizer
• Use the Organizer tab to access the following applications: Address Book,
Calculator, Currency Conversion, Date Book, Memo Book, Metric Conversion,
Music Player, ToDo Book, and Voice Memo.
Extras
• Use the Extras tab to access the following applications: Setup, English
Grammar, Local Time, Spanish Grammar, U.S. Interview, and World Time.
Universal Indicator
This is a graphic item located in the lower right corner of the Main Menu. By
default, it shows the current time.
• Tap the universal indicator a few times to successively display the current date,
percent of remaining battery power, battery graphic power, and the amount of
available memory in the device.
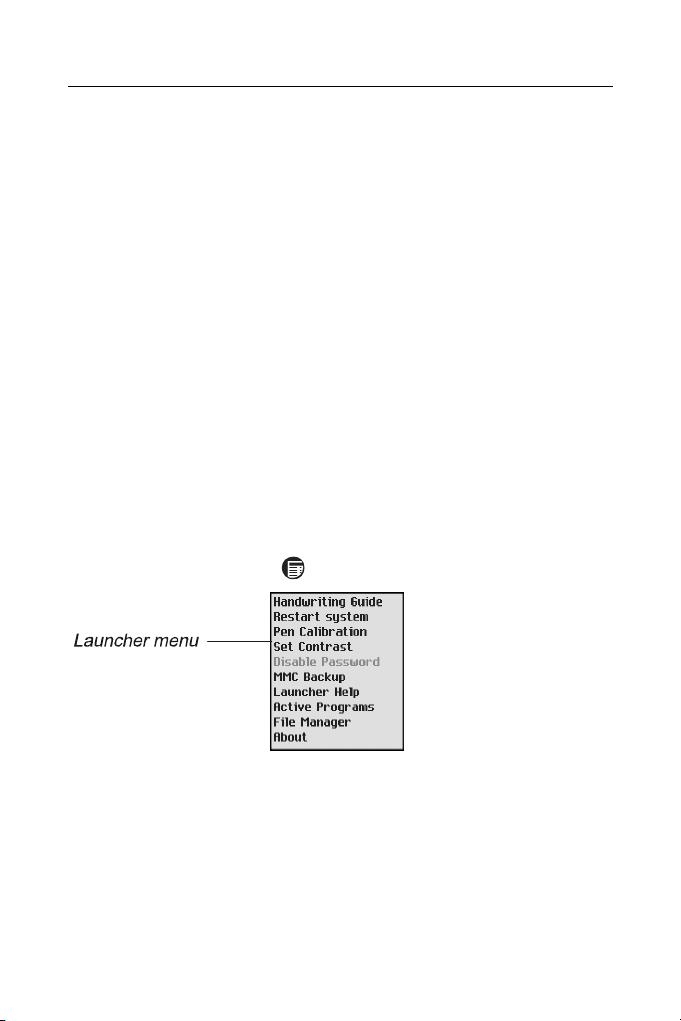
Launcher Menu
• When in the Main Menu, tap to invoke the Launcher Menu.
The options available on the Launcher Menu are described below.
Handwriting Guide
Provides a quick, on-screen reference for natural handwriting input. It shows all
supported letter styles. For more information about handwriting, see page 14.
Restart System
Closes programs and then restarts the system.
11
Page 12

ECTACO Partner® ES B-3 User Manual
Pen Calibration
Displays the Calibration screen and allows you to re-calibrate your ECTACO
Partner® ES B-3.
• To perform the calibration, tap the center of the target with the stylus. Repeat
the process with three more targets, which will appear one after another.
Set Contrast
Allows you to adjust the screen contrast level.
Disable Password
Allows you to turn your password off or on. When no password is set, the menu
item is grayed and inactive. When you set a password, Disable Password becomes
active. Tap this menu item to temporarily disable the password. The menu item
becomes Enable Password. To turn your password on again, tap Enable
Password. For more information, see page 45.
MMC Backup
Allows you to copy all files from your ECTACO Partner
files from MMC to your ECTACO Partner
®
ES B-3, or erase MMC content. The
menu item is grayed (inactive) when no MMC is installed.
Launcher Help
Displays on-screen help for the Launcher.
Active Programs
Allows you to view and manage currently open applications. Programs can be
closed quickly from this location to allocate memory for other programs.
File Manager
Displays the name and size of all program and content files stored in RAM. Also
allows you to move files into categories or remove files from your ECTACO
®
ES B-3.
Partner
About
®
Displays ECTACO Partner
ES B-3 ID, the operating system version number, the
unique device identifier, and other information.
®
ES B-3 to MMC, restore
Handwriting Area
Natural handwriting is the recognition system used by the device allowing data
entry through writing. It makes character input simple, fast and accurate by
supporting multiple ways of writing most characters. All writing must be entered in
12
Page 13
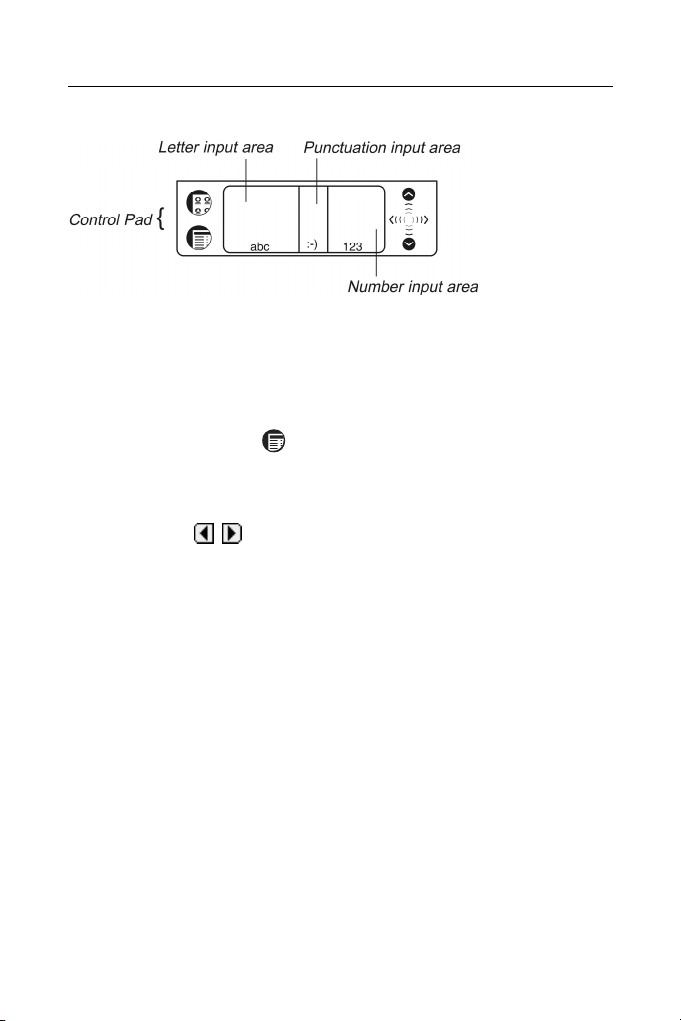
ECTACO Partner® ES B-3 User Manual
the appropriate section of the Handwriting area, located at the center of the Control
Pad.
The Handwriting area is divided into the Letter input area, Number input area and
Punctuation input area. Write letters in the Letter input area "abc", punctuation in
the Punctuation input area ":-)", and numbers in the Number input area "123".
Handwriting Guide
To open the Handwriting Guide, please follow the steps below.
• From the Main Menu, tap .
• Tap Handwriting Guide.
The first screen of the Handwriting Guide will be displayed.
• Tap the arrows , at the top right corner to scroll through each screen of
the Handwriting Guide.
♦ Note: Before you input accented characters, please make sure you have
selected the appropriate Pen Language (see Pen Language on page 46).
Control Wheel
The round control in the rear of ECTACO Partner® ES B-3 functions as an "Enter"
key, a scrolling mechanism, or volume control.
• In a program, turn or push the control wheel to select or open the desired item.
• Turn the control wheel to scroll one page when reading.
♦ Note: The control wheel turns up and down; it does not spin. Please do not
put excessive force on the control wheel.
• Hold the control wheel up or down to scroll continuously.
• Turn the control wheel to control the volume when listening. Hold the wheel up
or down to change volume continuously.
13
Page 14
ECTACO Partner® ES B-3 User Manual
Opening and Closing Programs
•
To open a program or file, tap its corresponding icon.
• When a program is running, you can return to the Main Menu without closing
the program – just tap
.
• Tap once again to return to the program immediately.
ECTACO Partner
you return to the Main Menu.
You can close a program using one of the following options:
®
ES B-3 features multitasking. Each time you close a program,
• In most programs, appears in the top right corner. Tap to exit.
• From the Launcher Menu by using Active Programs.
• In some programs, you can exit by using the File menu. From the program, tap
then select File / Exit.
Natural Handwriting
Entering data with natural handwriting takes some practice. Please follow the steps
below to enter a sentence in the Memo Book.
• From the Main Menu, tap an icon for a program allowing data entry. For
example, Memo Book.
• Locate a field for data entry. For example, tap New to go to the Edit screen.
A blinking cursor appears in all fields where data can be entered. If the blinking
cursor does not appear, the field is not active.
• Place the pointed end of the stylus at the center of the Letter input area and
draw a line straight up to write the following letter in uppercase (Shift mode).
A single dot appears in the cursor to indicate shift.
• In the center of the Letter input area, write the letter "a". Start the stroke where
indicated by the point and draw it as it appears in the Handwriting Guide. Write
the characters left to right.
• Take the stylus off the screen, and the character will appear in the data entry
field.
14
Page 15

ECTACO Partner® ES B-3 User Manual
Natural handwriting also recognizes simple strokes for Backspace, Return and
Space, as well as Shift and Cap Lock.
♦ Note: Always write in lowercase, as shown in the Handwriting Guide. If you
want to enter letters in uppercase, first write the stroke for Shift or Caps Lock.
• To enter a space, place the pointed end of the stylus in the center or left side of
the Letter input area and draw a horizontal straight line to the right.
If the character is composed of more than one stroke, you may see interim results
on the screen. For example, when you write "k," an "l" may show on the screen
before the "k" appears.
♦ Note: If a character is not recognized, you will hear a beep.
Writing Punctuation
Please follow these guidelines when entering punctuation marks:
Period and
Comma
Apostrophe Write in the upper part of the appropriate input area.
Write in the lower part of the appropriate input area.
Writing Functions
Simple strokes make it easy to write functions, such as Backspace, Space, Shift,
and Caps Lock.
Stroke Function
Delete the previous character (Backspace).
Insert a space.
Insert a line break (Enter).
Write the next letter in uppercase (Shift).
Switch to uppercase (Caps Lock). When it is necessary to return
to lowercase, draw the Shift key symbol, as shown above.
Deleting Characters
The deletion of characters in the data entry field is performed by writing the
Backspace symbol.
15
Page 16

ECTACO Partner® ES B-3 User Manual
• To delete one character, place the cursor to the right of the character you want
to delete and write the Backspace function in the Letter input area.
To delete several characters at once, do the following:
• Drag the stylus over the characters to highlight them.
• Write the Backspace function in the Letter input area.
Writing Accented Characters
Natural handwriting supports accented character recognition for Spanish,
Portuguese, French, German, Italian, and Dutch. To enable accented characters,
first set the desired Pen Language (see page 46).
♦ Note: The following special characters can only be written in the Punctuation
input area:
French << >>
Spanish ¡ ¿
The table below lists the accented characters available for each language.
Spanish á é í ñ ó ú ü ¡ ¿
Dutch à á ä â è é ë ê ì í ï î ò ó ô ö ù ú ü û ñ ç
French à â ç ë è é ê ï î ô œ ü ù û
German ä ö ü ß
Italian à è é ì ò ù
Portuguese ã á â ç è é ê í ò ó ô õ ü ú
Hints for Successful Handwriting
• Write characters as they appear in the Handwriting Guide.
• Always write in lower case.
• For an initial capital letter, use the Shift symbol.
• Write the characters large enough in the appropriate input area.
• For a series of capital letters, use the Caps Lock function. Double dots appear
in the cursor to indicate Caps Lock.
16
Page 17

ECTACO Partner® ES B-3 User Manual
On-screen Keyboard
The on-screen keyboard offers an alternative way of entering data in your
ECTACO Partner
and punctuation marks. The keyboard is available in most programs in every
screen allowing data entry.
®
ES B-3. It supports all English and Spanish letters, numerals,
• To invoke the on-screen keyboard, draw a line straight up outside the
Handwriting area or tap
The on-screen keyboard will appear. The basic layout contains the letters of the
respective alphabet and a set of symbols. The control key images have the
following legend:
Touch key Function
, where available.
Backspace
Enter
Shift
Caps Lock
Access Spanish accented letters
Switch back to English layout
• To delete more than one character, drag the stylus across the characters you
want to delete to highlight them and start entering new data. The highlighted
portion will be overwritten.
• Tap ENTER to save your text and hide the keyboard.
• Tap to hide the keyboard without saving.
APPLICATIONS
This chapter describes work in a variety of applications recorded on ECTACO
®
ES B-3 MultiMedia Card.
Partner
♦ Note: Before turning on your ECTACO Partner® ES B-3, please make sure the
supplied MultiMedia Card is inserted into the MMC slot.
Dictionary
The Dictionary application includes English-Spanish and Spanish-English
dictionaries containing a total of over 450,000 words. The pronunciation of English
17
Page 18

ECTACO Partner® ES B-3 User Manual
headwords in the English-Spanish dictionary is illustrated by means of the
International Phonetic Alphabet (IPA).
• Tap the Dictionary icon from the Dictionary tab to launch the application.
The English-Spanish dictionary is selected by default.
• To view a word translation, enter it either from the Handwriting area or from the
on-screen keyboard.
The headword closest in spelling to the entered letter combination will be displayed
under the input line. It is possible to retrieve a translation or explanation for word
forms entered in the input line. The source word entry for the requested word will
be displayed. For example, if you enter "rains" and there is not such an entry in the
dictionary, you will get the "rain" entry, as it is the headword for "rains". The
MorphoFinder™ function helps you find source words (headwords) of English past
participles, gerunds, plural forms, and of Spanish forms of various parts of speech.
• Tap the requested entry or highlight it and push the control wheel to look up its
translation(s).
Spell-checker Vector Ultima
The multilingual spell-checker Vector Ultima is one of the most advanced on the
market. When you are unsure of the spelling of a word, Vector Ultima allows you
to enter the word as you hear it and choose a spelling version from a list of
suggestions.
For example:
• Type the word "board" as you hear it: bord.
18
Page 19

ECTACO Partner® ES B-3 User Manual
• Tap to open the Variants list.
• Tap the desired variant to look up its translation(s).
Pronunciation of Words and Phrases
One of the most exciting features of ECTACO Partner® ES B-3 is the TTS (Text-toSpeech) technology allowing you to listen to the pronunciation of English and
Spanish words and phrases.
• Open an entry in the Dictionary.
• Tap to listen to the pronunciation of the headword.
• Highlight any portion of the translation by using the stylus and tap to listen
to its pronunciation.
Changing Font Size
There are three font sizes in the Dictionary.
• Tap twice to reduce the screen font size and see more translations of the
given headword on the screen without scrolling.
• Tap once again to restore the initial font size.
Instant Reverse Translation
• Tap the word to highlight it.
• Tap to make the reverse translation.
You can make up to five successive reverse translations (without closing windows).
The message Last translation is displayed if the limit is reached.
• Tap to close the reverse translation windows successively.
Touch Buttons
The following touch buttons are available in the Dictionary:
Button Function
Check spelling
Open the User Dictionary
Change font size
19
Page 20

ECTACO Partner® ES B-3 User Manual
Change the direction of translation
Hide / unhide slang words and phrases. The default password
is showslan.
Invoke the on-screen keyboard
Make a reverse translation
Open a new record template in the User Dictionary
Save a record to the User Dictionary
Delete a record from the User Dictionary
Go to the previous entry
Go to the next entry
Pronounce a headword or a highlighted portion of translation
Parts of Speech, Gender Labels, Abbreviations
Translations of a headword are listed in alphabetical order of parts of speech. A –
adjective, NPR – proper noun, ABBR – abbreviation, NUM – numeral, ADV –
adverb, PART – particle, ART – article, PHR – phrase, AUX – auxiliary, PREF –
prefix, CONJ – conjunction, PREP – preposition, ID – idiom, PRON – pronoun,
INTRJ – interjection, SUFF – suffix, N – noun, V – verb.
Spanish nouns are marked with gender and number labels.
F – feminine, M – masculine, N – neuter, MPL – masculine plural, FPL – feminine
plural, MF – masculine or feminine, MFPL – masculine or feminine plural.
Certain words and expressions in the dictionary are marked with the following
Spanish abbreviations: [bot.] for botany, [dep.] for sport, [sl.] for slang, [téc.] for
technical, [vulg.] for vulgarism, and [zool.] for zoology.
User Dictionary
ECTACO Partner® ES B-3 allows you to create your own vocabulary which
automatically links to the main dictionary.
• Set the desired direction of translation by tapping .
• Tap to open the User Dictionary.
• Tap to open a new record template.
20
Page 21

ECTACO Partner® ES B-3 User Manual
• Type in an English and Spanish word(s) or expression(s).
You can also specify a part of speech by tapping ▼ in the Part of speech field and
choosing an appropriate abbreviation from the list.
• Tap to save your record.
• Use , to go the previous or next entry respectively.
• Tap to delete the displayed record.
English Idioms
Here you can find over 200 widely used idioms with their equivalents or
translations. The idioms are listed in alphabetical order.
• Tap the English Idioms icon from the Dictionary tab to launch the application.
• Set the desired source language by tapping .
• Search the idioms by typing or by scrolling the list.
• Use to change font size (see page 19).
• Tap the desired idiom to see its equivalent(s) or translation(s).
• Use , to go the previous or next entry respectively.
To obtain a translation of the desired word:
• Tap on the word to select it.
• Tap to obtain the reverse translation.
• Tap to close the Dictionary window and return to English Idioms.
To listen to the pronunciation of an idiom:
• Open the desired entry.
• Tap .
• Tap on the translation and then tap to listen to its pronunciation.
• Use to hide / unhide slang words and phrases. The default password is
showslan.
21
Page 22

ECTACO Partner® ES B-3 User Manual
Flash Cards
This fascinating program will help you enlarge your vocabulary quickly and
advance considerably in learning a foreign language. Our method is simple: you
learn foreign words while playing Flash Cards.
• Tap the Flash Cards icon from the Dictionary tab to launch the application.
If there are no sets of flash cards have been created, the Edit Set screen will be
shown.
• Select the desired language by tapping .
• Tap to go to the Set setup screen.
From the Set setup screen, use:
• to create a new set,
• to delete the selected set,
• to rename the selected set.
♦ Note: You can create up to 100 sets.
By default, the first set is named my set (eng,0). A number in the non-editable part
of set name (in parentheses) indicates how many entries are currently stored in the
set. The eng label is assigned to the sets containing English words while the spa
label is intended to mark out the Spanish sets.
• Once you have created a set, tap to close the Set setup screen and return
the Edit set screen.
• Choose the desired set by tapping ▼ in the upper part of the screen, next to
Current set.
From the Edit set screen, use:
• to select the desired language.
• to change font size (two font sizes available).
• to add the highlighted word to the Current set.
• to create a set of 50 randomly chosen words.
• to go to the Set setup screen.
To fill the desired set with words from the Dictionary:
• Move the highlight to the desired word by entering it or by scrolling.
22
Page 23

ECTACO Partner® ES B-3 User Manual
• Tap .
♦ Note: You can store up to 50 flash cards in a set.
When you have filled the desired set, you are ready to start learning.
• Tap to close the Edit set screen.
The Flash Cards screen will be shown.
From the Flash Cards screen use:
• to reset statistics for the currently viewed set.
• to listen to the pronunciation of the source word.
• to go to the Edit set screen.
• to display the List of sets. Finished sets will be marked out in this list.
The number of unlearned cards in a set is recorded for each game.
information is displayed on the screen. For example, Left: 10 means you have 10
cards unlearned.
This
• Tap the Drop button to set a card apart.
• To go to the next card, tap Next >>.
• Select the Always show translation option to have the program show you
translation in each card.
• Alternatively, tap on the Show Translation message to see the translation of the
word. To hide the translation, just tap on it.
23
Page 24

ECTACO Partner® ES B-3 User Manual
Your goal is to learn all the cards in your set. You may quit the game and resume
playing at any time. Just launch Flash Cards to start playing beginning from where
you left off.
Hangman
ECTACO Partner® ES B-3 features the learning game Hangman, which improves
your spelling skills and enhances your personal vocabulary.
• Tap the Hangman icon from the Dictionary tab to launch the application.
• Enter letters from the displayed touchpad, trying to guess the word before the
picture on the left is complete.
The used letters are highlighted on the touchpad. The letters guessed correctly
appear in place of question marks in their actual positions in the word. The number
shows the remaining number of tries. After the game ends, a translation of the
hidden word is shown.
Use:
• to start a new game;
• to change the difficulty level;
• to change the language and start a new game;
• to listen to the pronunciation of the hidden word (counts as one try).
• to display the translation of the hidden word (count as one try).
Irregular Verbs
All commonly used English irregular verbs are stored in alphabetical order in the
Irregular Verbs application.
• Tap the Irregular Verbs icon from the Dictionary tab to launch the application.
• Set the desired source language by tapping .
• Search the verbs by typing or by scrolling the list.
• Use to change font size (see page 19).
• Tap the desired verb to look up its translation(s).
• Use , to go the previous or next entry respectively.
To obtain a translation of the desired word:
24
Page 25

ECTACO Partner® ES B-3 User Manual
• Tap on the word to highlight it.
• Tap to obtain the translation.
• Tap to close the Dictionary window and return to the Irregular Verbs
window.
To listen to the pronunciation of a verb:
• Open the desired entry.
• Tap .
• Tap on the translation and then tap to listen to its pronunciation.
• Use to hide / unhide slang words and phrases. The default password is
showslan.
Phrasebook
The phrasebook contains over 1,100 phrases in the English and Spanish
languages. The phrases are divided into 10 conversational topics: Everyday
Conversation, Traveling, Local transport, Driving, Hotel, Restaurant, Shopping,
Bank, Health, and Housekeeper.
• Tap the Phrasebook icon from the Dictionary tab to launch the application.
• Set the desired source language by tapping .
• Tap the desired topic to see its content.
• Use to change font size (see page 19).
• Tap the desired phrase to look up its translation.
• Use , to go the previous or next entry respectively.
To listen to the pronunciation of a topic or a phrase:
• Highlight the desired topic or phrase.
• Tap .
• Tap on the phrase translation and then tap to listen to its pronunciation.
Spanish Verbs
Over 50 commonly used Spanish verbs with their translations and grammatical
forms are presented in alphabetical order in the Spanish Verbs application. You
25
Page 26

ECTACO Partner® ES B-3 User Manual
can easily conjugate a desired verb in the following grammatical categories:
Presente, Pretérito Imperfecto, Pretérito Perfecto, Subjuntivo Presente, Imperativo,
Gerundio, and Participio.
• Tap the Spanish Verbs icon from the Dictionary tab to launch the application.
• Search the verbs by typing in or by scrolling down the list.
• Use to change font size (see page 19).
• Tap the desired verb to view its English translation followed by Spanish
grammatical forms in Presente.
• Select a grammatical category by tapping ▼ in the upper left corner of the
screen.
• Use , to go to the previous or the next verb respectively.
• Use to hear a verb pronounced. You can also highlight the translation and
to hear it pronounced.
tap
Address Book
Your ECTACO Partner® ES B-3 includes Address Book, a standard organizer
program for storing names, telephone numbers, street and electronic addresses.
• Tap the Address Book icon from the Organizer tab to launch the application.
You will see the Contacts List (if entries have been made), a New button, and a
Search field.
26
Page 27

ECTACO Partner® ES B-3 User Manual
Creating a Record
• Tap New.
You will see the Edit Address screen. It includes four buttons for the available
views: Personal, Address, Misc and Note. You will see Personal selected, as the
Personal view is the first one to appear when you tap New. Each view contains
data fields for specific information. There are two columns – Label and Data entry.
The Data entry column has a data field for each item in the Label column. A
blinking cursor appears in the active field. There are three buttons at the bottom of
the screen: Done, Details, and Delete.
• Tap in the data entry column next to the desired label.
To see additional labels, tap the button for the desired view and then tap in the
data entry column next to the desired label. When ▼ appears next to a label, you
can select a different name for that field. Tap ▼ to see the drop-down list and
select the name you want. The name will appear in the label column.
• Enter your information in every view and field you want.
• In Personal View, tap Details to select the phone number you want displayed in
the Contacts List.
• Tap Done or to save your changes and return to the Contacts List.
The contact you entered appears in alphabetical order in the Contacts List.
• To exit the Edit Address screen without saving the entry, tap Delete.
• Tap OK to confirm or tap Cancel to exit the dialog box without deleting the
entry.
Views
Personal View
By default, this is the view you see when you access the Edit Address screen. It
allows you to see and enter names, phone numbers, job information and electronic
addresses.
Address View
At this screen, you can enter work and home addresses. For both Work Address
and Home Address, you can enter the street name, city, state, zip code, and
country.
27
Page 28

ECTACO Partner® ES B-3 User Manual
Misc View
At this screen, you can enter additional personal information. The labels include
Spouse, Children, and Birthday. You can also add custom labels. By default, the
custom fields are named Custom1, Custom2, Custom3, and Custom4.
Note View
At this screen, you can enter additional comments or reminders regarding the
current contact. When a note is attached to a contact,
Contacts List.
appears next to it in the
Editing Entries
To go to the Edit Address screen from the Contacts List, follow the steps below:
• 1) Tap the desired entry.
• Tap in the data field you want to change.
• Enter or edit information in any view and field.
• Tap Done or to save your changes and return to the Contacts List.
• 2) Or, hold your stylus down on the entry.
You will see a pop-up menu which offers you 3 choices: Edit, Delete, and
Duplicate.
• To edit the entry, tap Edit.
• To remove the entry, tap Delete.
• To create a copy of the entry, tap Duplicate.
Custom Fields
To create a custom field in Misc view, please follow these steps.
• From the Contacts List, tap and then tap File / Custom Fields.
• Tap in the field of the label you want to edit.
• Drag your stylus across the current label to highlight it.
• Enter the desired label name. Tap OK.
Preferences
You can sort the Contacts List by last name, first name or company name.
28
Page 29

ECTACO Partner® ES B-3 User Manual
• From the Contacts List, tap and then select File / Preferences.
• Tap ▼ to see the Sort drop-down list.
• Select the desired option and tap OK.
Searching for an Entry
In the Contacts List, do the following to find an entry.
• Tap on the line next to Search in the Contacts List.
• Use the Handwriting area or the on-screen keyboard to enter the first letter or
letters of the entry you want to find.
The first entry matching the input letters is highlighted. You can add more letters
and the highlight moves to the next matching entry. When you enter a letter for
which there is no match, the highlight disappears.
Deleting Entries
• In the Contacts List, hold your stylus down on the entry you want to delete.
• Tap Delete on the pop-up menu. You will see a dialog box asking you to
confirm the deletion. Tap OK to delete. Tap Cancel to exit without deleting.
Menus
The File menu is available in the Contacts List and the Edit menu is available in
each of the four views when the cursor is blinking.
• When the program is running, tap to display the available menus described
below.
File
Menu Item Function
About Display the application version number.
Preferences Select a sort order for the Contacts List.
Custom Fields Create labels for the custom fields.
Help Display Help.
Exit Exit the application.
29
Page 30

ECTACO Partner® ES B-3 User Manual
Edit
Menu Item Function
Cut Remove any selected text. A copy is retained on the
clipboard.
Copy Place a copy of any selected text on the clipboard.
Paste Place text from the clipboard into the selected location.
Keyboard Invoke the on-screen keyboard.
Handwriting Guide Display the input character libraries.
Calculator
ECTACO Partner® ES B-3 includes a standard calculator with memory features.
The screen has 10-digit display capacity.
• Tap the Calculate icon from the Organizer tab to launch the application.
• Use this program as a standard pocket calculator.
Currency Conversion
The Currency Conversion application allows you to instantly calculate cross rates
for combinations of over 19 currencies.
• Tap the Currency Conversion icon from the Organizer tab to launch the
application.
Setting and Checking Rates
• Tap on the currency name to open the Currency setup window.
• Change/specify the Currency name and/or Currency rate.
• Tap Save.
To add user-defined currencies to the list:
• Tap to open the Currency setup window.
• Input the desired data into the Currency name and Currency rate fields. Tap
Save.
Use:
• to delete the selected currency from the list,
30
Page 31

ECTACO Partner® ES B-3 User Manual
• , to scroll the currencies list.
Conversion
• Set the cursor position to the desired field in the right column of the table.
• Enter specified amount.
The conversion is performed while you are typing.
Date Book
ECTACO Partner® ES B-3 includes Date Book, a standard organizer program for
scheduling. Once you enter appointments, you can view them by day, by week, or
by month.
• Tap the Date Book icon from the Organizer tab to launch the application.
Each time you open Date Book, you will see the Daily View for the current day. The
data entry fields in Daily View are divided into two columns – the time column on
the left and a corresponding data entry column on the right. There are default time
slots for every hour from 12 a.m. to 11 p.m.
Adding Appointments
You can add appointments for the default times or you can create custom time
slots.
• Tap Go To and select the desired month and day.
• Tap Select.
You go to the Daily View for that day.
♦ Note: You must be in the Daily View to add appointments to your schedule.
• Tap on the line in the data entry column for the desired time and enter your
appointment.
• Tap the time approximate slot for your appointment to set a start and end time.
The Select Time window will appear.
• Tap the down arrows and then select the times you want. To set an all day
event, tap the All Day Event check box.
• Tap OK to save changes.
To add an appointment for a custom time slot:
31
Page 32

ECTACO Partner® ES B-3 User Manual
• Tap New.
• Enter your data.
• Tap in the empty time column.
• Tap the check box to deselect an all day event. Set a start and end time for this
appointment.
• Tap the down arrows and then tap the times you want.
• Tap OK to save your changes.
Editing Appointments
• Tap to place the cursor in the appointment you want to edit, and add or delete
text.
• Use the Handwriting area or the on-screen keyboard to make your changes.
The edited information is saved automatically.
You can also enter the location of an appointment, set an appointment to repeat,
set an alarm and attach a note in the Edit dialog box.
• Tap in the data entry column of an appointment to select it.
• Tap Edit.
Repeating Appointments
• In the Edit dialog box, tap to display the Recurrence screen.
• Tap the check box next to Daily, Monthly, Weekly, or Yearly.
• Set an interval for your appointment to automatically repeat it.
• Tap a button (S M T W T F S) to select the day for the recurring event.
• Set an end date.
• Tap OK to save your changes and return to the Edit dialog box.
At the Daily View, indicates that an appointment repeats.
Setting Alarms
• Tap the Remind me check box to activate an alarm for your appointment.
• Tap to set the time when you want the alarm to sound.
32
Page 33

ECTACO Partner® ES B-3 User Manual
• Tap ▼ to see the time drop-down list and tap the item you want to select:
minutes, hours, days, or weeks.
• Enter the interval number for when you want to be alerted.
• Tap OK to accept your changes and return to the Edit dialog box.
At the Daily View, indicates that an alarm has been set for an appointment.
Views
Daily View
The Daily View displays the schedule for the selected day. It is the first screen you
see when you enter Date Book.
• To return to this view from another screen, tap .
• Tap or to go to the previous or next calendar week.
• Tap to return to the current date from another location.
Weekly View
This view displays the schedule for a single week.
• Tap to go to the Weekly View.
• Tap or to go to the previous or next calendar week.
• To return to the current week, tap .
You can view your weekly appointments as a list or as a grid.
• Tap at the bottom of the screen to see the week’s schedule as a list.
• Tap at the bottom of the screen to see the week’s schedule as a grid.
Monthly View
This view displays the schedule for any single month. If you are viewing the month
containing the current date, it will be highlighted. Days for which you have entered
appointments are marked with a bar. The bar appears to the top right for a.m.
appointments and to the bottom right for p.m. appointments.
• Tap to go to the Monthly View.
33
Page 34

ECTACO Partner® ES B-3 User Manual
• Tap or to go to the previous or next calendar month.
• To return to the current month, tap .
Menus
There are two menus in Date Book: File and Edit. The File menu is available in the
Weekly and Monthly Views and both menus are available in Daily View.
• When the program is running, tap to display the available menus described
below.
File
Menu Item Function
About Display the application version number.
Preferences Select the alarm signal.
Help Display Help.
Exit Exit the application.
Edit
Menu Item Function
Cut Remove any selected text. A copy is retained on the
clipboard.
Copy Place a copy of any selected text on the clipboard.
Paste Place text from the clipboard into the selected location.
Keyboard Invoke the on-screen keyboard.
Handwriting Guide Display the input character libraries.
Memo Book
The Memo Book application provides you with a handy storage place for all kinds
of memoranda, notes, and messages.
• Tap the Memo Book icon from the Organizer tab to launch the application.
Adding Memos
• To add a memo, tap New.
34
Page 35

ECTACO Partner® ES B-3 User Manual
• Enter your memo.
• Tap Done to save your memo or Delete to exit without saving.
Viewing Memos
Memos are numbered in the order they are entered. You can change the order to
view your memos in alphabetical order.
• Tap ▼ to see the Sort drop-down list.
• Tap Alphabetically to view your memos in alphabetical order.
• Tap by Entry to return to the default view.
• To view the whole memo, tap the number of the desired memo.
Editing Memos
• Tap the memo you want to edit.
• Tap on a line to place the cursor where you want to edit.
• Add or delete text.
• Tap Done to save your changes.
Menus
There are two menus in Memo Book: File and Edit. The File menu is available in
the Memo List and both menus are available in the Edit screen.
• When the program is running, tap to display the available menus described
below.
File
Menu Item Function
About Display the application version number.
Help Display Help.
Exit Exit the application.
35
Page 36

ECTACO Partner® ES B-3 User Manual
Edit
Menu Item Function
Cut Remove any selected text. A copy is retained on the
clipboard.
Copy Place a copy of any selected text on the clipboard.
Paste Place text from the clipboard into the selected location.
Keyboard Invoke the on-screen keyboard.
Handwriting Guide Display the input character libraries.
Metric Conversion
With ECTACO Partner® ES B-3 you may easily convert units of measure from
British-American system into the metric system commonly used in Europe and vice
versa, as well as do unit conversions within each system.
• Tap the Metric Conversion icon from the Organizer tab to launch the
application.
• Choose a subsection by tapping ▼ in the upper left corner of the screen.
• Set focus to the desired field by tapping in it.
• Input the value.
The conversion is being performed while you are typing.
Music Player
ECTACO Partner® ES B-3 includes Music Player, a program allowing you to play
music. The program supports MP3 files. When you download an MP3 file to the
device, ECTACO Partner
one recognized by Music Player.
♦ Note: If the source MP3 file is in a wrong encoding, Music Player may not be
able to recognize it or even may stop responding. Use the Active Programs
menu to stop the program in this case.
®
ES B-3 Desktop Manager converts the MP3 format to
• Tap the Music Player icon from the Organizer tab to launch the application.
Please use the following buttons and menus to operate the program:
36
Page 37

ECTACO Partner® ES B-3 User Manual
Buttons
Button Function
Play.
Pause playing.
Stop playing.
Fast forward.
Rewind.
Menus
• When the program is running, tap to display the available menus described
below.
File
Menu Item Function
Help Display Help.
About Display the copyright information for the program.
Program Info
Exit Exit the application.
Edit
Menu Item Function
Preferences Display the left-handed controls.
Control
Menu Item Function
Display general information about the current title:
name, author, and file size.
Play Single Play the selected music title.
Play All Play all music titles in the order listed.
Repeat Single Play the selected music title repeatedly.
37
Page 38

ECTACO Partner® ES B-3 User Manual
Repeat All Play all music titles in the order listed and repeat the
entire list.
ToDo Book
ECTACO Partner® ES B-3 includes ToDo Book, a standard organizer program for
entering your tasks and keeping track of them.
• Tap the ToDo Book icon from the Organizer tab to launch the application.
When you open the program for the first time, you see a screen with three buttons
at the bottom: New, Edit, and Show. When entries exist, the ToDo List displays all
the entries.
Adding Entries
To create a new entry, please follow these steps.
• Tap New and enter a todo text.
• Tap the Priority icon and select Low ( ), Normal ( ), or High ( ).
• Tap Edit to add settings. See "Editing Entries" below for more information.
• Tap OK to exit the Edit dialog box.
• Tap in the empty completion check box to mark the todo as completed.
Editing Entries
You can change the text of a todo right in the ToDo List.
• Tap to place the cursor in a todo where you want to edit.
• Use the Handwriting area or the on-screen keyboard to make your changes.
The edited information is saved automatically.
• Hold the stylus down on the task you want to edit.
You will see a pop-up menu which offers you 3 choices: Edit, Delete, and
Duplicate.
• To go to the Edit screen, tap Edit.
• To remove the todo, tap Delete.
• To create a copy of the todo, tap Duplicate.
38
Page 39

ECTACO Partner® ES B-3 User Manual
Entering Settings
• To enter or edit settings for a todo, tap in the line of the todo to select it, then
tap Edit.
• Tap ▼ to display the Priority drop-down list and select the desired option.
• Tap the Due Date box to set a due date.
• Tap the Active date box to select an activation date.
• Tap Note to add additional comments or information regarding this todo.
• Tap Done to save the note. appears next to the todo on the ToDo List. To
delete the note, tap Delete.
• Tap in the empty completion check box to mark your todo as complete.
• Tap OK to save your changes. Tap Cancel to exit the Edit dialog box without
saving your changes or settings.
Selecting a Date
When you select the Active or Due Date options in the Edit dialog box, the Select
Date screen is displayed.
• Tap or to select the current year.
• Tap the current month and day. To return to the current date from a different
location, tap Today.
• Tap Select to save changes.
Changing ToDo List View
The default view has the completion check box and the priority icon to the right of
the todo.
• Tap Show to change the way you view your todo's.
• Tap the check box next to the options you want to see in your ToDo List.
• Tap OK to confirm your changes.
39
Page 40

ECTACO Partner® ES B-3 User Manual
Menus
There are two menus in ToDo Book: File and Edit. The File menu is available when
no todo is selected in the ToDo List. When a todo is selected, both menus are
available.
• When the program is running, tap to display the available menus described
below.
File
Menu Item Function
About Display the application version number.
Purge Delete all completed todo's from the list.
Help Display Help.
Exit Exit the application.
Edit
Menu Item Function
Cut Remove any selected text. A copy is retained on the
clipboard.
Copy Place a copy of any selected text on the clipboard.
Paste Place text from the clipboard into the selected location.
Keyboard Invoke the on-screen keyboard.
Handwriting Guide Display the input character libraries.
Voice Memo
ECTACO Partner® ES B-3 includes Voice Memo, a program allowing you to record
memos and play them back.
• Tap the Voice Memo icon from the Organizer tab to launch the application.
Please use the following buttons and menus to operate the program:
40
Page 41

ECTACO Partner® ES B-3 User Manual
Buttons
Button Function
Record a memo. This button changes to Stop when you
are recording or listening.
Stop the memo recording or playing.
Play the memo.
Pause playing.
Fast forward.
Rewind.
Menus
• When the program is running, tap to display the available menus described
below.
File
Menu Item Function
Help Display Help.
About Display the application version number.
Memo info Display information about the memo.
Delete Delete the selected memo.
Exit Exit the application.
Edit
Menu Item Function
Preferences Display the left-handed controls and change the prefix
name of all newly recorded memos.
Control
Menu Item Function
Play Single Play the selected memo.
41
Page 42

ECTACO Partner® ES B-3 User Manual
Play All Play all memos in the order listed.
Repeat Single Play the selected memo repeatedly.
Repeat All Play all memos in the order listed and repeat the entire
list of memos.
English Grammar
ECTACO Partner® ES B-3 provides a well-structured English Grammar guide. The
Grammar is shown in English, regardless of the selected interface language.
• Tap the English Grammar icon from the Extras tab to launch the application.
• To open an article, just tap on its title.
Use:
• to go one level up,
• , to page up and down respectively,
• to change font size (see page 19).
Local Time
The Local Time application shows: the name of the city and country representing
the local time zone and a map of the corresponding continent, the current date, and
the current time.
• Tap the Local Time icon from the Extras tab to launch the application.
• Tap to the left of the city or country name to open the list of cities or
counties respectively.
You can specify a city for your local time zone in one of the following ways:
• Directly from the list of cities by tapping the desired city name.
• Through a country name – the first city listed alphabetically for this country will
appear.
• Specifying a new city name – its time zone settings will be based on the
currently displayed city.
To add a new city to the list:
• Tap to open the New city template,
• Enter the desired data in the City and Country fields,
42
Page 43

ECTACO Partner® ES B-3 User Manual
• Choose the appropriate Continent and Time zone. Tap OK.
Use:
• , to go to the previous or next city respectively in alphabetical order.
• to hear the announcement of the displayed time.
• to turn Daylight Saving Time (DST) on or off.
♦ Note: Turning DST on or off sets the time one hour forward or back,
respectively.
Spanish Grammar
This application is intended to be your quick reference on various aspects of
Spanish grammar.
• Tap the Spanish Grammar icon from the Extras tab to launch the application.
• To open an article, just tap its title.
Use:
• to go one level up,
• , to page up and down respectively,
• to change font size (see page 19).
U.S. Interview
This is the ultimate preparation guide to the U.S. citizenship exam. This application
can translate each question, thus helping you grasp the broader meaning of key
words and important phrases contained in the questions and answers.
• Tap the U.S. Interview icon from the Extras tab to launch the application.
The first question of the first chapter will be displayed.
• Tap ▼ to the left of the chapter heading to pull down the chapters menu.
• Select the desired chapter to open its first question.
• To see the answer to a displayed question, tap . Close the answer window
to return to the question.
♦ Note: No answers are available for some questions; for example, the names of
current government officials.
• To see the Spanish version of questions, tap .
43
Page 44
ECTACO Partner® ES B-3 User Manual
Use:
• to change font size (see page 19).
• to listen to the pronunciation of a question.
• , to move between questions in the current chapter.
World Time
Using ECTACO Partner® ES B-3, you may view current times in cities around the
globe, along with appropriate map illustrations.
• Tap the World Time icon from the Extras tab to launch the application.
• Tap to the left of the city or country name to open the list of cities or
counties respectively.
You can specify a city to see its current time in one of the ways described on page
42.
Use:
• , to go to the previous or next city respectively in alphabetical order.
• to hear the announcement of the displayed time.
• to turn Daylight Saving Time (DST) on or off.
SETUP
Personalize your ECTACO Partner® ES B-3 and ensure good upkeep of your
personal records with the options of the Setup application.
• Tap the Setup icon from the Extras tab to launch the application.
The list of the setup options will be displayed.
Interface Language
The default interface language of ECTACO Partner® ES B-3 is English.
• Tap ▼ next to Interface and select English or Spanish.
The device will be rebooted and you will be prompted to conduct the touch-screen
calibration (see page 12). After you have calibrated the screen, the messages and
menus will appear in the chosen language.
44
Page 45

ECTACO Partner® ES B-3 User Manual
Select Date
Shows the date and lets you edit it.
• Tap anywhere on the date field to change the date or view another date.
Select Time
Shows the time and lets you edit it.
• Tap the up and down arrows to change the hour and minute.
• When 12-hour format is set, tap AM or PM to toggle between AM and PM.
Volume
Allows you to set the volume for the device.
• To increase or decrease the volume, drag the slider to the right or left, or tap
the slider arrows.
• When listening to music, or voice memo, turn the control wheel up or down to
adjust the volume.
Password
A password can be set up in the system to make it possible for you to protect your
personal records and lock up the PC communication function.
Setting the Password
• Tap to open the Enter password screen.
• Specify a password up to 8 characters in length. Tap OK.
• Retype the password for confirmation. Tap OK.
♦ Note: Always remember your password. If you forget it, you will have to reset
the system, which may cause irrevocable loss of user data.
Changing the Password
• Tap to open the Enter password screen.
• Input the current password. Tap OK.
• Specify a new password. Tap OK.
• Retype the password for confirmation. Tap OK.
45
Page 46

ECTACO Partner® ES B-3 User Manual
Clearing the Password
• Tap to open the Enter password screen.
• Input the current password. Tap OK.
• Don’t input any characters into the next two fields, just tap OK twice.
Disabling the Password
• Tap .
• Tap Disable Password.
The password becomes disabled. You can re-enable the password by tapping
and then choosing Enable Password.
Sounds
Allows you to turn the device sounds off.
• Select the Quiet Mode check box to turn the device sounds off.
♦ Note: Music files, and the Date Book alarm are not affected by this option.
Pen Language
Allows you to activate character recognition for different languages. The options
are as follows: Dutch, English, French, German, Italian, Portuguese, Spanish and
Western European. Select Western European (W. European) to access all the
supported characters.
Shutoff Time
Allows you to set the time that elapses before the device automatically turns off. By
default, the shutoff time is 2 minutes.
• Tap ▼ to change the shutoff time to 1 minute or 5 minutes.
Time Format
Allows you to set the time format. By default, the time format is HH:MM AM/PM,
where HH is the hour and MM is the minute. To change the time format, tap ▼ and
then select the desired format. HH:MM is a 24-hour clock with a colon delimiter.
HH.MM AM/PM is a 12-hour clock with a period delimiter. HH.MM is a 24-hour
clock with a period delimiter.
46
Page 47

ECTACO Partner® ES B-3 User Manual
Date Format
Allows you to set the date format. By default, the date format is MM/DD/YY, where
MM is the month, DD is the date, and YY is the year. To change the date format,
tap ▼ and select the desired format: DD/MM/YY, DD.MM.YY, or YY/MM/DD.
Numbers
Allows you to set the number format. By default, the number format is 1,000.00. To
change the number format, tap ▼ and select the desired format: 1.000,00, 1
000.00, or 1 000,00.
Week Starts
Allows you to select either Sunday or Monday as the start of the week. By default,
the start of the week is Sunday. To change it, tap ▼ and select Monday.
Double-click
Allows you to set the speed at which the screen recognizes taps from the stylus. By
default, the setting is Fast. To change the speed, tap ▼ and select the desired
speed: Slow or Medium.
• Tap Done to save your changes.
PC COMMUNICATION
Using the USB cable (included in the standard package) and ECTACO Desktop
Manager software (provided in the standard package on a CD-ROM) you may
exchange data between your ECTACO Partner
This feature will allow you to keep a backup copy of user data.
♦ Note: The latest version of ECTACO Desktop Manager can be downloaded
from Ectaco's web site at www.ectaco.com.
®
ES B-3 and a personal computer.
Toolbar
The ECTACO Desktop Manager toolbar buttons perform the following functions:
Button Function
Move files from the Contents pane to the Device pane and
synchronize data between your PC and ECTACO Partner
47
®
ES B-3.
Page 48

ECTACO Partner® ES B-3 User Manual
Go to the upper folder
Display files in the Contents folder.
Display files from the Library folder in the Contents pane.
Switch from the Connection view to the Contents view.
Switch from the Contents view to the Connection view.
Views
Connection View
If ECTACO Desktop Manager detects ECTACO Partner
screen will show the connection. If ECTACO Desktop Manager does not detect
ECTACO Partner
your PC.
Contents View
The Contents view uses two list panes to organize and display files stored on your
PC (Contents pane) and content stored in the device (Device pane).
®
ES B-3, the image will show that the device is not connected to
®
ES B-3, the image on the
• Right-click on a file or folder to access its context menu.
The available options are as follows: Open, Send to device, Copy to Library Folder,
Copy to Contents Folder, Unpack, Delete, Properties.
Menus
Please use the following menus to operate the program:
File
Menu Item Function
Synchronize Synchronize all files between the current Contents
directory and the device.
Send to device Move a highlighted file from the Contents pane to the
Device pane.
Send to PC Move a highlighted file from the Device pane to the
Contents pane.
Copy to Library Folder Copy a highlighted file to the Library folder.
Copy to Contents
Folder
Copy a highlighted file to the Contents folder.
48
Page 49

ECTACO Partner® ES B-3 User Manual
Unpack Expand a zipped seb file.
Delete Remove a highlighted file or folder.
Properties Display the properties of the highlighted file: name,
type, size, publisher, and security.
Open Open a highlighted folder.
Change to Contents
Folder
Change to Library
Folder
Change the directory in the Contents pane to the
Contents folder.
Change the directory in the Contents pane to the
Library folder.
Change Folder Change the folder displayed in the Contents pane.
Change Sync Folder Change the folder from which content is synchronized
to the device.
Exit Close the ECTACO Desktop Manager.
View
Menu Item Function
Device Info Show the device information dialog box.
Toolbar Display or hide the toolbar. By default, the toolbar is
displayed.
Switch Panes Switch the Contents and Device panes.
Refresh Reload the active pane.
♦ Note: Due to a difference in the file systems of ECTACO Partner
®
ES B-3 and
PC, file sizes shown in the Contents pane may slightly differ from those shown
in the Device pane.
♦ Note: It is recommended that you set English as interface language prior to
data transfer (see page 44).
49
 Loading...