

Page 1
ThermFacFig
ECS
TRW-1
INSTALLATION AND OPERATING INSTRUCTIONS
IF YOU CANNOT READ OR UNDERSTAND THESE INSTALLATION INSTRUCTIONS DO NOT
ATTEMPT TO INSTALL OR OPERATE
INTRODUCTION
This ECS’s remote control system was developed to provide a safe, reliable, and user-friendly remote control system for gas heating
appliances. The system can be operated thermostatically or manually from the transm itter. The system operates on radi o fr equencies
(RF) withi n a 20'’range using non-directional signals. The system operat es one of 1,048,576 security codes that are programmed into
the transmit ter at the factory; the remote recei ver’s code must be matched to that of the transmitter prior to initi al use.
Review COMMUNICATION SAFETY SECTION under TRANSMITTER section and THERMO SAFETY SECTION under REMOTE
RECEIVER section. These signal /temperature safety feat ures shut down the fireplace syst em when a potent ially unsafe condition exists.
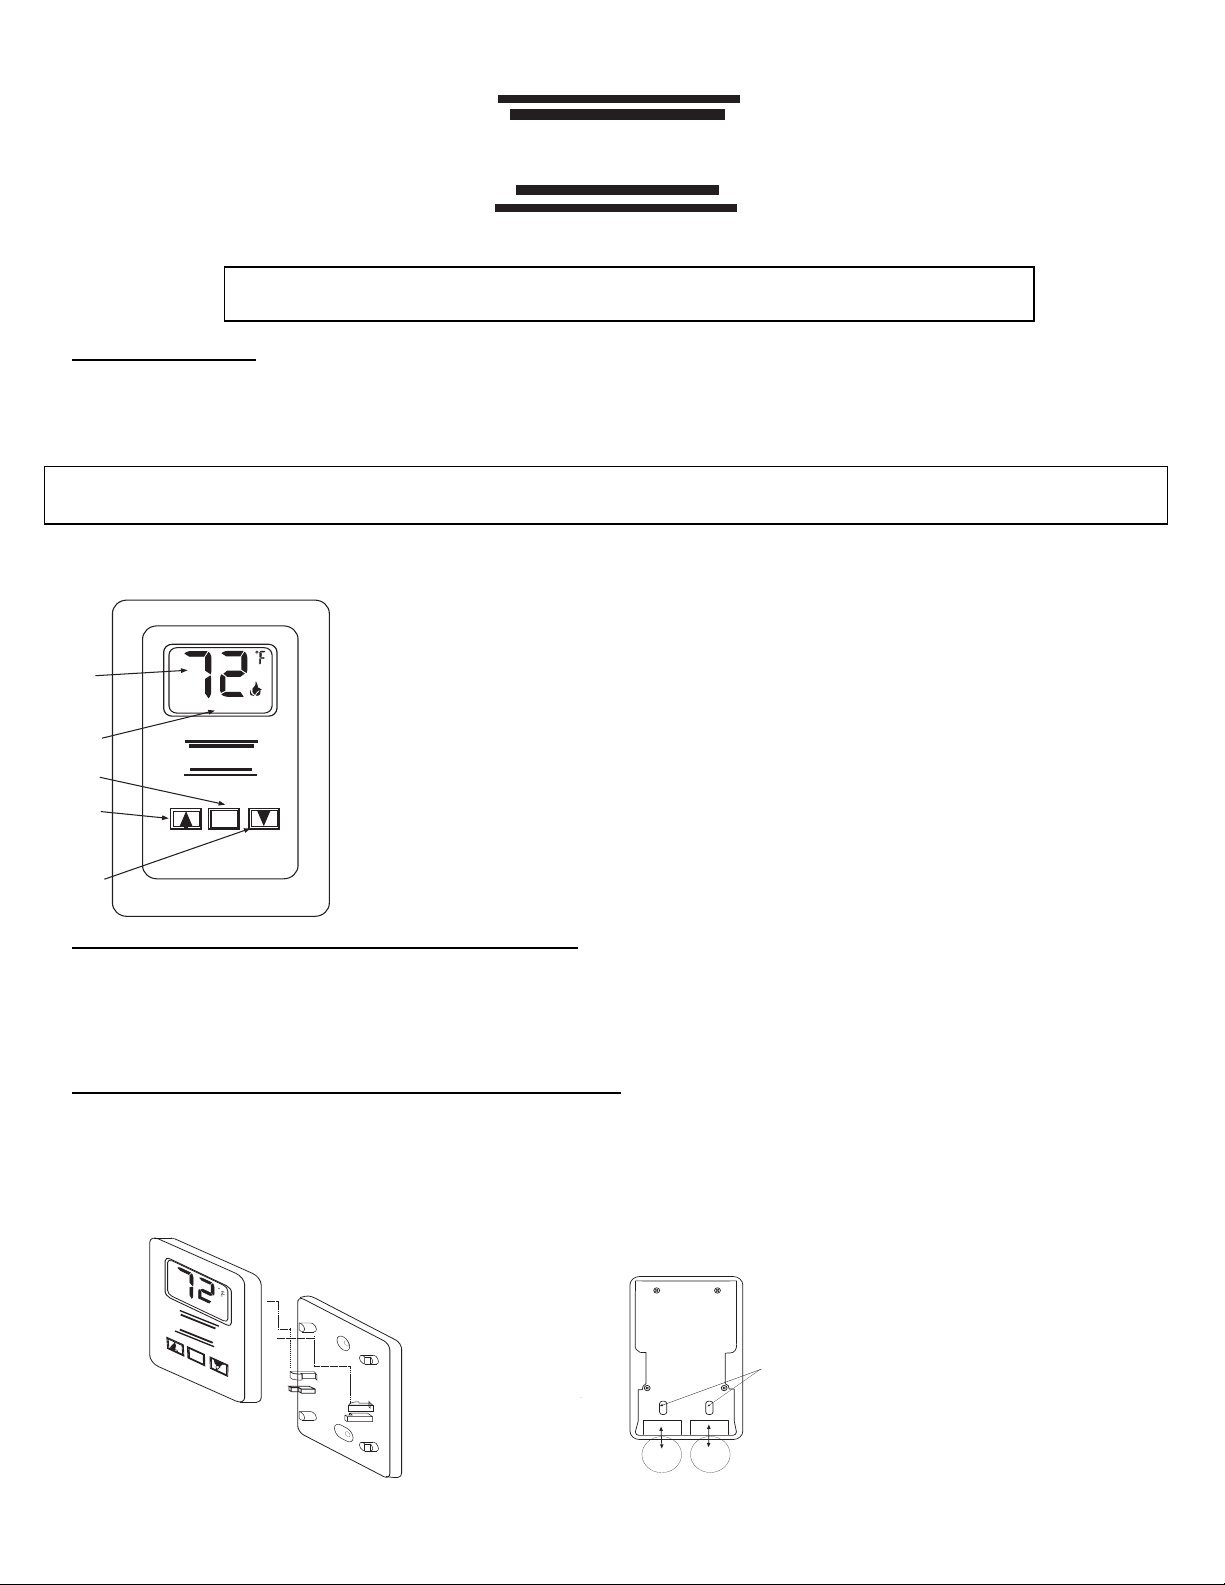
WALL MOUNT THERMOSTAT
The wall/transmitter operates on (2) 3V Button Cell (I ncluded) which powers the LCD screen and
powers the RF signal. These batteries are made specifi cally for remote control s and elect ronic
LCD
DISPLAY
THERMO
MODE
SET
BUTTON
ON/UP
BUTTON
OFF/DOWN
BUTTON
ROOM
ON
“SET”
ECS
SET
TEMP
OFF
lighter s. Bef ore using the transmitter the 3V batteries must be installed into the battery
compartments.
It is recommended t hat CR2032 l it hium batteries always be used for longer battery life and
maximum operational performance.
Upon initial use, there may be a delay of five seconds before the rem ote receiver will respond to
the transmit ter. This is part of the system’s design. If the LCD screen will not come on, check the
3V Button Cell battery.
TO INSTALL BATTERIES IN THE WIRELESS THERMOSTAT
1. Remove face from backing pl ate this is done by sliding t he face up about 1/2” then pull the face off the base plate. As shown in
Figure #1
2. Locate the (2) holders for the 3V button cell batteries.
3. Slide the button cell batteries into the battery holders. (Make sure that the batteries are installed with the (+) plus side facing
you or up.
TO REMOVE THE BATTERIES IN THE WIRELESS THERMOSTAT
1. Remove face from backing pl ate this is done by sliding t he face up about 1/2” then pull the face off the base plate. As shown in
Figure #1
2. Locate the (2) holders for the 3V button cell batteries.
3. Insert a small screwdriver into the slot above the button cell battery and push the batt ery out. AS shown in Figure #2
Figure #1 Figure #2
ROOM
TEMP
ECS
SET
ON
OFF
BACK OF UNIT
+
Plus
Side
(2) 3 Volt Button
Cell Batteries
Battery Removal
Slots
+
Plus
Side
REV.9/28/05 Page 1 of 8 Part #17810
Page 2
WALL MOUNTING THE THERMOSTAT
1. The wireless Therm ostat must be located within 20’ of the r eceiver , this is
the normal operational distance.
2. Remove face from backing pl ate as shown in Figure #1 then locate the ( 2)
two holes that mount the pl ate to the wall.
3. After locating the (2) two mounting holes and mark the holes on the wall.
ROOM
TEMP
ECS
SET
ON
OFF
WALL
4. Use the (2) two dry wall anchor s and screws (that are supplied) t o mount
the base plate to the wall as shown.
5. Thermostat can also be mounted onto an existing (Pl asti c) electrical box.
6. Base plate should be m ounted level on the wall for best operation.
GENERAL INFORMATION
WALL MOUNT THERMOSTAT OPERATION
FUNCTIONS
1
SET
ROOM
2
3
TEMP
1. ROOM TEMP – Current room temperature.
2. F – Degrees Fahr enheit (C Indicates degrees Celsius)
3. FLAME ICON – Indicates APPLIANCE IS ON.
4. SET- Indicat es tr ansm itter is in thermostat mode.
5
SET
TEMP
4
ROOM
5. DASHES – Indicate thermostat mode is being disabled. When
transmitter is not in the thermostat mode. The word (SET) will not appear.
SET
1. This TS/R-2- A Wall/transmitter has ON, OFF, and SET functions that are activated by pressing
the buttons on t he face of the transmitter.
ON
OFF
2. Upon initial use, there may be a delay of five seconds before the rem ote receiver will respond
to the transmitter. This is part of the system’s design. If the LCD will not come on, check the
3V-button cell battery.
SETTING MANUAL OPERATION
1. When the ON button on the wall/transmitter is pressed a flame icon on the LCD screen will
appear when the appliance is ON.
2. When the appli ance is OFF the flame icon will not appear.
ROOM
TEMP
SETTING THERMOSTAT OPERATION
1. If the transmitt er is in the thermostat mode the word (SET) will appear on the LCD screen.
2. When the SET button is pressed the temperatur e digi ts will begin to flash.
3. While the temperature digit s are flashing use the ON button to increase the set
temperature or
SET
TEMP
4. When the desired temperature setting is reached press the SET butt on, again and the
ROOM
use the OFF button to decrease the set t em perature to your desired temper ature.
word SET will appear on the LCD screen and now t he transmitter will automati cally send
an ON or OFF signal to the receiver.
5. To disengage the ther m ostat mode push the OFF button or push and hold the SET button
ROOM
SET
TEMP
until (2) dashes appear on t he LCD screen. When you release the SET button this will
disengage the ther mostat mode and the word SET will disappear from the LCD screen.
SETTING
The factory set ti ng for temperature is degrees Fahrenheit (
0
F / 0 C SCALE
0
F ) . To change this setting to Centigrade (0 C ), you must press and hold
both the ON and OFF buttons on the transmi tt er at the same time until the LCD displays the change. If you want to convert back,
repeat the above pr ocedure.
REV.9/28/05 Page 2 of 8 Part #17810
Page 3
THERMO UPDATING FEATURE –TRANSMITTER – (T/S –TX)
This ECS remote control has a THERMO UPDATING Feature buil t into its software. The THERMO UPDATING Feature operates in the
following manner, but only in the THERMO MODE
The transmitter normally reads the ROOM temperat ure every 2 minutes checking the ROOM temperat ure against the SET temperature
and then sends a signal to the receiver.
COMMUNICATION – SAFETY – TRANSMITTER – (C/S – TX)
This ECS remote control has a COMMUNICATION –SAFETY funct ion built into its software. It provides an extra margin of safety when
the TRANSMITTER is out of the normal 20 foot oper ati ng range of the receiver.
The COMMUNICATION – SAFETY feature operates in the followi ng manner, in all OPERATING MODES
At all times and in all OPERATIN G MODES, the wall tr ansm itter sends an RF signal every fift een (15) minutes, to the receiver,
Should the receiver NOT receive a transmitter signal ever y 15 minut es, the IC software, in the RECEIVER, will begin a 2HOUR (120-minute) countdown timing function. If during this 2-hour period, the receiver does not receive a signal from the
wall transmitt er, the receiver will shut down the appliance being controlled by the receiver. The RECEIVER will then emit a
series of rapid “beeps” for a period of 10 seconds. Then after 10 seconds of rapid beeping, the RECEIVER will continue to
emit a single “beep” every 4 seconds until the ON button on the wall tr ansm itter is pressed to reset the receiver. The
intermittent 4 second beeping will go on for as long as the receiver’s batteries last which could be in excess of one year.
To “reset” the RECEIVER and operat e the appl iance, you must press ON button on the wall transm itter. The flame icon must
be display on the LCD screen. By turning the system to ON, the COMMUNICATION -SAFETY operation is overr idden and the
system will return to normal operation depending on the MODE selected at the wall transmitter. The COMMUNICATION –
SAFETY feature will r eacti vate if the transmitt er’ s batteries fail or be removed.
:
– Manual ON and THERMO.
REMOTE RECEIVER
The remote receiver operates on 4 AA-size 1.5V batteries. It is recommended that ALKALINE batteries be used for longer battery life
and maximum microprocessor performance. IMPORTANT: New or full y charged batteries are essenti al for proper operation of the
remote re c e iv e r.
The remote receiver houses the microprocessor t hat responds to commands from the transmi tter to control system operation. It emits
one beep when it receives an ON or OFF command manually, but no beep when cycling on and off automatically in THERMO mode.
The remote receiver has a 3-position slide switch for selecting the MODE of operati on: ON/REMOTE/OFF
• With the sli de swit ch in the ON position (toward the LEARN button) , the system will
remain on until the sl ide switch is placed in the OFF or REMOTE position.
• With the slide switch in the REMOTE position (center ed), the system will only operate if
the remote recei ver receives commands from the tra n s mitter.
• With the slide switch in the OFF position (away from the LEARN
off.
• It is suggested that the slide switch be placed in the off position if you will be away from
your home for an extended per iod of time. If the remote receiver is mounted out of
children’s reach, placing the slide swi tch in the OFF position also funct ions as a safety
“lock-out” by bot h turning the system off and rendering the remote recei ver
inoperative.
THERMO- SAFETY FEATURE – RECEIVER (T/S –RX)
This ECS remote control has a THERM O- SAFETY feat ure that is built into the system’s RECEIVER. Thi s feat ure is temperatureactivated and pr ovides an extra margin of safety when the RECEIVER i s operat ing where ambient temperatures exceed 130
degrees inside t he receiver case.
The THERMO-SAFETY feature, in the RECEIVER, operat es in t he following manner, when the appliance i s in operation.
The receiver is thermally protected from extrem e heat conditions. Heat can have negati ve eff ect on the operation of the
receiver’ s microprocessors.
For REMOTE RECEIVERS that operate on BATTERY POWER, these heat conditi ons can cause batteries to discharge when
temperatures exceed 115
lose up to 50% of their operat ing power. When the battery cools down, it will partially recharge it self , but constant heating and
cooling will r educe the battery’s normal life expectancy.
0
F. Studies show that alkaline batteries, when exposed to a constant temperature of 1200 F, can
button), the system is
0
F
REV.9/28/05 Page 3 of 8 Part #17810
Page 4

When the ambient temperature at the THERMISTOR, inside the receiver case, reaches 1300 F, the THERMISTOR will automatically
shut the appliance down and the RECEIVER will begin emitting a series of 2 “beeps” , ever y 4 seconds. When the ambient
temperatur e, at the RECEIVER, dr ops between 120
on the transmitter. The word ON must display on the LCD screen. When the ON
0
F and 1300 F, the user can reactivate the appliance by pushing the MODE button
button is pressed, the wall THERMISTOR “r esets”
itself and the fireplace will begin operat ing again. However, the “beeping” will conti nue, if the ambient temperature remains between
1200 F and 1300 F. This “beeping” alerts the user that the RECEIVER should be reposi tioned so the ambient temperature drops below
0
F.
120
When the temperature drops below 120
pushing the MODE button t o ON to operate the appliance, either manuall y or t hermally. Allow sufficient time for the receiver to
cool below 120
0
F, and then press MODE button to stop beeping.
0
F, the “beeping” will cease, providing the user has “reset” the THERMISTOR by
INSTALLATION INSTRUCTIONS
This remote contr ol system must be install ed exactly as outlined in these i nstructions. Read all instructions completel y before
attempting installation. Foll ow instr uctions carefully during installation. Any modif ications of the ECS remote control or any of its
components will void the warranty and may be pose a fire hazard.
Do not connect any gas valve or electronic module directly to 110-120VAC power. Consult gas appliance manufacturer’s instructions
and wiring schemat ics for proper placement of all wires. All electronic modules are t o be wired to manufacturer’s specifications.
The following wiri ng diagrams are for illustration purpose only. Follow instructions from manufacturer of gas valve and/or electronic
module for corr ect wi ring procedures. Improper inst allation of electr ic components can cause damage to electr onic module, gas valve
and remote receiver.
WARNING
INSTALLATION
The remote receiver can be eit her wall-mounted in a standard plastic switch box or placed on or near the fi replace hearth. Preferably,
the remote recei ver should be wall-mounted in a plastic switch box, as this will protect its electronic components from both the heat
produced by the gas appliance and potential damage or abuse that can occur if it is left exposed on t he heart h. PROTECTION FROM
EXTREME HEAT IS VERY IMPORTANT. Like any piece of electronic equipment, the remote receiver should be kept away from
temperatures exceeding 130
temperatures.
Make sure the remote recei ver switch is in the OFF position. It is r ecom m ended that 18 gauge stranded or solid wir es (i ncluded) be
used to make connections bet ween the terminal wiring block on the millivolt gas valve or electronic module and the wire terminal s on
the remote recei ver. For the best results, use 18 gauge str anded or solid wire, with no splices and measuring no longer than 20 ft.
WALL MOUNTING
Install 4 AA-size 1.5 ALKALINE batteries in the remote r eceiver. For best performance, rem ote receiver batteries should be factory
fresh when inst all ed. Very little battery power is required to operate the remote receiver, but the electronics ar e tuned to operate best
when battery out put i s great er than 5.3 volts. Four new AA batteries should provide an output voltage of 6.0 t o 6.2 volt s. Be sure
batteries ar e installed with the (+) and (-) ends facing the correct direction.
To attach wall cover plate to receiver box:
1. Position the receiver as shown in diagram to the left with lower tab on
wall cover plate into groove of receiver (Make sure ADJ hole
and LEARN hole on cover plate properly aligns with remote receiver)
2. Pull receiver up and snap i nto top tab of cover plate.
3. Position the wall cover plate so the word ON is facing up.
4. Install the r em ote recei ver into the plastic swi tch box using the two
long screws provi ded. Push the slide Button over the receiver slide
switch only after making sure the remote receiver has LEARNED the
transmitter ’s security code (see MATCHING SECURITY CODES). NOTE: slide
button covers both ADJ and Learn holes when properly installed.
0
F inside the receiver case. Batt ery life is also significantly shortened if batteries are exposed to high
Cover Plate
(Rear View)
Receiver
Slide
Button
LEARN
.
ADJ
Cover Plate
ON
R
E
M
O
T
E
OFF
ON
LEARN
REMOTE
OFF
ADJ.
Remote Receiver
Remote Receiver
WALL
Plastic Switch Box
REV.9/28/05 Page 4 of 8 Part #17810
Page 5

MILLIVOLT
NOTE: The remote receiver wil l onl y respond to the transmitter when the 3-posi tion
slide button on the remote receiver is in the REMOTE position. If the syst em does not
Remote Receiver
VALVE
respond to the batter y transmit ter on initial use, see MATCHING SECURITY CODES,
and recheck batter y positions in the remote receiver.
HEARTH MOUNT
ADJ.
OFF
Frequency adjusting
access hole
REMOTE
LEARN
ON
Learning
button
The remote receiver can be placed on the fireplace hearth or under t he fireplace, behind the cont rol access panel. Position where the
ambient temperature inside the receiver case does not exceed 130
0
F.
NOTE: Black Slide Button is used for Hearth Mount applications.
WIRING INSTRUCTIONS
A qualified elect rician or a gas technician who is famil iar with the gas appliance and gas valves that wil l be operated by this remote
should install the remote control system . Incorrect wiring connections WILL cause damage to the gas valve or electronic module
operating t he gas appliance and may also damage the remote receiver.
WIRING MILLIVOLT VALVES
The remote receiver is connected to the millivolt valve using the TH (thermostat) terminals on the terminal block on the mill ivolt gas
valve. Connect 18 gauge stranded or solid wires from the remote receiver to the gas valve.
Operation of the rem ote receiver is similar to that of a thermostat in that both turn the gas val ve on
and off based on input signals. A thermostat’s input si gnals are different temperatures. The remote
receiver’ s input signals come from the transmi tter.
Connect each of the two wires l eading from the TH and TH/TP terminals on the millivolt gas valve to
either of the two wir e ter minals on the remote receiver. Normally it does not matter which wires go to
which terminal.
WIRING ELECTRONIC SPARK IGNITIONS
The remote control recei ver can be connected, in series, to a 24VAC transformer to the TR
(transformer) terminal on the ELECTRONIC MODULE. Connect the hot wire from the 24VAC
transfor m er to either of the wire terminals on the remote receiver. Connect another wire (Not included)
between the other receiver wire terminal and the TH (thermostat) terminal on the ELECTRONIC
MODULE.
SYSTEM CHECK
MILLIVOLT VALVES
Light your gas appliance following the lighti ng instructions that came wit h the appliance. Confirm that the pilot f lame is on; it must be in
operation f or t he main gas valve to operate.
• Slide the 3-position button on the remote receiver t o the ON posit ion. The main gas flame (i.e., the fire) should ignite.
• Slide the button t o OFF. The flame shoul d extinguish (the pilot fl ame will remain on).
• Slide the button to REMOTE (the center position), and then press the O N
button on the transmitter to change the system to ON.
The main gas flame should i gnite.
• Press the ON
button on the wall transmitter to change t he system to OFF. The flame should extinguish (the pilot flame will remain
on).
• Press the ON
to a temperatur e of a least 2
normal thermostatic cycle is overridden and the system flame will ignite. Set the SET temper ature to at least 2
button on the wall transmitter to change t he system to THERMO. Advance the SET temperature on the transmi tter
0
F (10 C) above the ROOM temperature displ ayed on the LCD scr een. With this manual setting, the
0
F (10 C) below the
room temperature and the system flame will extinguish in a few seconds. Thereafter, it should continue to cycle t o on and off
thermostatically approximat ely every two minutes as the ROOM temperatur e changes, but only when the temperature differ ential
between ROOM and SET temperatures di ff er at least 2
0
F (10 C). The 20 F differential is the factory setting.
REV.9/28/05 Page 5 of 8 Part #17810
Page 6

ELECTRONIC IGNITION SYSTEMS
• Slide the 3-position button on the remote receiver to the ON position. The spark electrode should begin sparking to igni te the pilot
(the pilot may igni te after only one spark). After the pilot flame is lit, the main gas valve should open and the main gas flame
should ignite.
• Slide the button t o OFF. The main gas fl am e and pil ot flame should BOTH extinguish.
• Slide the button to REMOTE (the center position), and then press the O N
ON. The spark electr ode should begin sparking to ignit e the pilot. After the pilot is lit, the main gas valve should open and the main
gas flame should i gnit e.
• Press the ON
• Press the ON
to a temperatur e of at least 2
normal thermostatic cycle is overridden and the system flame will ignite. Set the SET temper ature to at least 2
room temperature and the system flame will extinguish in a few seconds. Thereafter, it should continue to cycle t o on and off
thermostatically approximat ely every two minutes as the ROOM temperatur e changes, but only when the temperature differ ential
between ROOM and SET temperatures di ff er at least 2
button on the wall transmitter to OFF. The main gas flame and pil ot flame should BOTH extinguish.
button on the wall transmitter to change t he system to THERMO. Advance the SET temperature on the transmi tter
0
F (10 C) above the ROOM temperature di splayed on the LCD screen. With this manual setting the
0
F (10 C). (The 20 F differential is the f actory setting).
button on the wall transmitter to change the system to
0
F (10 C) below the
GENERAL INFORMATION
MATCHING SECURITY CODES
Each transmitt er can use one of 1,048,576 unique security codes. It may
security code of the transmitter upon initial use
or the factory. When matching security codes, be sure sl ide button on the receiver is in the REMOTE position; the code will NOT
“LEARN” if the slide swit ch is i n the ON or OFF posit ion. Program the remote receiver to LEARN a new security code by pushing in the
LEARN button on the top of the remot e recei ver and then pressing the ON
pattern, at the receiver, indicat es the transm itter’s code has been programm ed into the receiver. When an existing recei ver is matched
to a new transmitter, the new security code will override the old one.
The microprocessor that controls the secur ity code matching procedure is cont rolled by a timing functi on. If you are unsuccessful in
matching the secur ity code on the first attempt, wai t 1-2 minutes before trying again – thi s delay allows the microprocessor to reset its
timer cir cuit ry – and try up to two or three more times.
THERMO FUNCTION
When the transmitt er is in the THERMO mode, it should be kept away from direct sources of heat such as fireplaces, i ncandescent
lighting, and di rect sunlight. Leaving t he transmitter in direct sunlight, for example, will cause its heat-sensing diode to read the room
temperature higher than it actually is; if in THERMO mode, it may not turn on the appliance even if the ambient ROOM temperature is
below the SET temperature.
BATTERY LIFE
Life expectancy of alkaline batteri es in t he ECS TRW-1 should be at l east 12 months. Check and replace all batteries annually. When
the Wall Transmitter no longer operates or the remot e receiver does not function at all, the batteries should be checked. I t is important
that the remot e recei ver batteries are fully charged, providing a combined output voltage of at least 5.3 volts. The length of the wire
between the remote r eceiver and the gas valve directly affects the operating perf ormance of the remote system. The longer the wire,
the more batter y power i s requi red to deliver signals between the remote receiver and the gas valve. The Wall Tr ansm it ter should
operate wit h as littl e as 2.4 volts of battery power, measuring at each of the 3-volt button cell batteries.
TROUBLE SHOOTING
Should you encounter pr oblems with your fireplace system , the problem may be with the fireplace itself or it could be with the ECS
remote control. Review the fireplace manufacturer’s operation manual to make sure all connections are properl y m ade. Then check
the operation of t he ECS remote i n the following manner:
1. Make sure receiver batteries are install ed properly. If one battery is installed backward, receiver wi ll not oper ate in remote mode.
Be sure battery output is 5.3 volts or more. (Slide switch is i ndependent of battery condition.)
2. Be sure the wall transmit ter’s batteries ar e properly installed and that the battery output is 2.4 volts each or m ore.
3. The wall transmitt er has (2) 3 volt button cell batter ies (1) button cell operates the LCD scr een and the other button cell operates
sending the RF signal. If the button cell batter y that controls sending the RF signal is low or def ecti ve the LCD screen may work but
the RF signal may not be sending (Check each button cell battery)
4. Check to make sure the tr ansm it ter is communicating with the receiver.
be necessary to program the remote receiver to LEARN the
, if batteri es are repl aced, or if a replacement transmitter is purchased from your dealer
button on the wall transmitter. A change in the beeping
REV.9/28/05 Page 6 of 8 Part #17810
Page 7

• If the receiver beeps when t he O N butt on is depressed on the wall transmit ter they are communicating.
• If the receiver does not beep when the ON
code of the transmitter. This is done by holding the LEARN
the LEARN access hole when installed), and at the same time depress the ON button on the wall transmitter. A change in the
beeping patter n, at the receiver indicates the transmitter’s code has been program m ed into the receiver.
5. Make sure the wall transmitter is within the 15’-20’ r ange of the receiver.
6. Positioning of the receiver is important. If the receiver is “enclosed” in a metal surround, the operation of the receiver may be
affected as not ed below. Reposition the receiver to im prove operat ing range. It is suggested that a heat shi eld be installed to
protect t he receiver from extreme heat. If the recei ver is “enclosed”
• Cause the RF signal to get lost and not comm unicate with the receiver.
• Cause the working distance to be shorter than normal.
: A receiver located i n an area, wher e the ambient temperature insi de the case exceeds 130 0F, will cause THERMO-
NOTE
SAFETY feature to cut in, requiring you to reposition the receiver to stop the warning beeps, and t o “reset” the receiver’s operation.
7. Due to handling and shipping of the unit, handling or droppi ng of t he wall transmitter by the customer, and heat conditions to the
receiver, som e unit s m ay need an occasional frequency adjustment. This adjustment is made to impr ove the communication and
operating distance between the transmitt er and t he recei ver. See RECEIVER ADJUSTMENT.
RECEIVER ADJUSTMENT – RECOMMENDED ADJUSTMENT
button is depressed on the wall transmitter, you will need to teach the receiver the
button down on the receiver (NOTE: The black slide Button covers
in a metal surround, this can:
A. To adjust at the receiver, use a small slotted screwdri ver. Turn the adjustment screw count er-clockwise
B. If that does not correct the problem, return adjustment screw to original position and then turn adjustment
This adjustment is like tuning your radio. If you keep turning the adjustment screw, in eit her direction, you will go past t he proper setting
(tuning).
NOTE: The black slide button covers the ADJ access hole when install ed.
about 5 degrees or a maximum of 1/8 turn. This should correct the di stance problem.
screw clockwise.
SPECIFICATIONS
BATTERIES: Wall Transmitt er 6 – 2ea. (CR2032) 3.0 vol t l ithium button cell batteries
Remote Receiver 6V –4ea. AA 1.5 Alkaline FCC ID No.’s: transmitter –(K9L TS-R-2A); receiver – (K9L 3301RX)
Operating Fr equency: 303.8MHZ Canadian IC ID No.’s: transmitter – (2439A-TSR2A) r eceiver – 2439A-3301RX
NOTE: THE MANUFACTURER IS NOT RESPONSIBLE FOR ANY RADIO OR TV INTERFERENCE CAUSED BY
UNAUTHORIZED MODIFICATIONS TO THIS EQUIPMENT. SUCH MODIFICATIONS COULD VOID THE USER’S
AUTHO RITY T O O PERATE THE EQ UIPM ENT.
This REMOTE CONTROL SYSTEM is warranted for 12 months from the date of purchase or installation to the original
purchaser to be free from defects in materials and workmanship. Damage to the SYSTEM caused by accident, misuse,
abuse, or installation error whether performed by a contractor, service company, or owner, is not covered by this
warranty. Seller will not be responsible for labor charges and/or damage incurred in installation, repair, and replacement
or for incidental or consequential damages. Batteries and any damage caused by them are not covered by this warranty.
Some states, provinces, and nations do not allow exclusion or limitations of incidental or consequential damages, so the
above limitations or exclusions may not apply. This warranty gives you specific legal rights. You may have other rights
that vary by state, province or nation.
FOR TECHNICAL U.S. INQUIRIES
SERVICE, CALL: 888/672-8929 or 877-472-3923
260/459-1703
Website: skytechsystem.com
FCC REQUIREMENTS
Limited Warranty
CANADIAN INQUIRIES
MANUFACTURED EXCLUSIVELY BY SKYTECH II, INC
REV.9/28/05 Page 7 of 8 Part #17810
Page 8

REMOTE WALL THERMOSTAT RECEIVER
INSTALLATION INSTRUCTIONS
16660
EFFECTIVE DATE JUNE 2004
INSTRUCTIONS MUST BE LEFT WITH THE OWNER FOR FUTURE REFERENCE AFTER INSTALLATION.
Remote Wall Thermostat Receiver - Cast Iron Series
Use the following steps to attach the remote receiver to the cast iron stoves:
1. Attach, from left to right, the slide-on cover plate onto the remote receiver. ON will be to the to p a n d OFF will be to the bottom on the
slide-on cover plate.
2. Push the receiver slide button onto the receiver slide switch. Reverse installation of the slide button if it is off center.
3. Attach velcro loop on the left side of the val ve cover support.
4. Attach velcro hook onto remote receiver. The word TOP on the remote receiver should be to the top when installed onto valve cover
support.
5. Attach velcro hook on remote receiver onto velcro loop on valve cover support.
Remote Wall Thermostat Recei ver - Dir ect Vent Fireplaces and Vent-Free Fireplaces
Use the following steps to place the remote receiver in the bott om of t he inner casing assembly, adjacent to the gas valve.
1. The remote receiver can not be placed behind the gas valve.
2. When facing the appliance, the remot e receiver must be placed to the right of the gas valve.
Remote Wall Thermostat Recei ver - Vent-Free Log Sets (Millivolt System)
Use the following steps to place the remote receiver adjacent to the gas valve.
1. The remote receiver cannot be placed behind the gas valve and burner assembly.
2. When facing the appliance, the remote receiver can be placed to the right of the gas valve and burner assembly or under burner
pan left of gas valve.
Remote Wall Thermostat Recei ver - DV- 210 and DV-215
Attention: Do not install remote receiver inside furnace.
Use the following steps to attach remote receiver.
1. Attach remote receiver at bottom of either side on outer casing.
2. If furnace is installed hi gh enough above fl oor, attach remote receiver on the underside of furnace.
Remote Wall Thermostat Recei ver - DV- 25 and DV-35
Attention: Do not install remote receiver inside furnace.
Use the following st ep to att ach remote receiver.
1. Attach remote receiver to the underside of the furnace, adjacent to the right of piezo igniter.
Remote Wall Thermostat Receiver - DVC-35, DV-55, FAW-40 and FAW-55
Use the following st ep to att ach remote receiver.
1. Attach remote receiver in the interior, bottom of furnace, adj acent t o gas valve.
Remote Wall Thermostat Recei ver - GW T-25, GWT-35 and GWT-50
Use the following st ep to att ach remote receiver.
1. Attach remote receiver to wall sill or floor plate.
Remote Wall Thermostat Receiver - DV-20E, DV-40E and DV-55E
Use the following st ep to att ach remote receiver.
Attention: Velcro loop and hook are not necessary for all installations.
1. Attach remote receiver in the interior of the furnace, adjacent to the right of pressure switch.
REV.9/28/05 Page 8 of 8 Part #17810
 Loading...