

Page 1

User Guide
For Windows 8.1 Tablet-laptop TL10RE1
Page 2

Regulatory Compliance
Information
MODEL: TL10REx
Federal Communication Commission Interference
Statement
This equipment has been tested and found to comply with the
limits for a Class B digital device, pursuant to Part 15 of the FCC
Rules. These limits are designed to provide reasonable
protection against harmful interference in a residential
installation. This equipment generates, uses and can radiate
radio frequency energy and, if not installed and used in
accordance with the instructions, may cause harmful
interference to radio communications. However, there is no
guarantee that interference will not occur in a particular
installation. If this equipment does cause harmful interference to
radio or television reception, which can be determined by
turning the equipment off and on, the user is encouraged to try
to correct the interference by one of the following measures:
Reorient or relocate the receiving antenna.
Increase the separation between the equipment and
receiver.
Connect the equipment into an outlet on a circuit different
from that to which the receiver is connected.
Consult the dealer or an experienced radio/TV technician
for help.
Caution:
Any changes or modifications not expressly approved by the
party responsible for compliance could void the user's authority
to operate this equipment. This device complies with Part 15 of
the FCC Rules. Operation is subject to the following two
conditions:
(1) This device may not cause harmful interference, and
(2) This device must accept any interference received,
including interference that may cause undesired operation
Page 3

RF Exposure Information (SAR)
This device meets the government’s requirements for exposure
to radio waves.
This device is designed and manufactured not to exceed the
emission limits for exposure to radio frequency (RF) energy set
by the Federal Communications Commission of the U.S.
Government, Industry Canada, and other national regulatory
agencies.
Equipment Authorization has been granted to this model with all
reported SAR levels evaluated as in compliance with the FCC
RF exposure guidelines. SAR information on this device is on
file with the FCC and can be found under the Display Grant
section of www.fcc.gov/oet/ea/fccid after searching the FCC ID:
TX2-RTL8723BS.
This device meets the government’s requirements for exposure
to radio waves. This device is designed and manufactured not
to exceed the emission limits for exposure to radio frequency
(RF) energy set by the Federal Communications Commission
of the U.S. Government. The exposure standard employs a unit
of measurement known as the Specific Absorption Rate, or
SAR. The SAR limit set by the FCC is 1.6 W/kg. Tests for SAR
are conducted using standard operating positions accepted by
the FCC with the EUT transmitting at the specified power level
in different channels. The highest SAR value for the device as
reported to the FCC is 1.28 W/kg when placed next to the body.
For questions related to the EMC performance of this product,
contact:
Elitegroup Computer Systems Co., Ltd
No.239, Sec. 2, Ti Ding Blvd., Taipei, Taiwan 11493
886-2162-1177
Canadian Department of Communications Compliance
Statement
This digital apparatus does not exceed the Class B limits for
radio noise emissions from digital apparatus set out in the Radio
Interference Regulations of the Canadian Department of
Communications. This device complies with Industry Canada
licence-exempt RSS standard(s). Operation is subject to the
following two conditions: (1) this device may not cause
Page 4
interference, and (2) this device must accept any interference,
including interference that may cause undesired operation of
the device.
Le présent appareil numerique német pas de bruits radio
électriques dépassant les limites applicables aux appareils
numériques de la classe B prescrites dans le Réglement sur le
broullage radioélectrique édicté par le ministére des
Communications du Canada. Le présent appareil est conforme
aux CNR d’Industrie Canada applicables aux appareils radio
exempts de licence. L’exploitation est autorisée aux deux
conditions suivantes : (1) l’appareil ne doit pas produire de
brouillage, et (2) l’utilisateur de l’appareil doit accepter tout
brouillage radioélectrique subi, même si le brouillage est
susceptible d’en compromettre le fonctionnement.
CE mark. Declaring compliance to all the applicable
European Union (EU) directives. For CE mark related
questions:
Elitegroup Computer Systems Co., Ltd
No.239, Sec. 2, Ti Ding Blvd., Taipei, Taiwan 11493
886-2162-1177
French SAR/DAS
Votre ordinateur tablette a un DAS. Pour plus d'informations,
voir le portail radiofréquences-sante-environnement:
www.radiofrequences.gouv.fr
In the European Union, this symbol indicates that
this product including battery must not be disposed
of with household waste. It is your responsibility to
hand it over to a designated collection point for the
recycling of waste electrical and electronic
equipment. For more information, please contact
your local waste collection center or the point of
purchase of this product.
Japan VCCI Statement
この装置は、情報処理装置等電波障害自主規制協議会 (VCCI) の基準
に基づくクラス B 情報技術装置です。この装置は、家庭環境で使用するこ
とを目的としていますが、この装置がラジオやテレビジョン受信機に近接
して使用されると、受信障害を引き起こすことがあります。
取扱説明書に従って正しい取り扱いをして下さい。
Page 5

Taiwan battery recycling:
Translation – please recycle batteries
Page 6
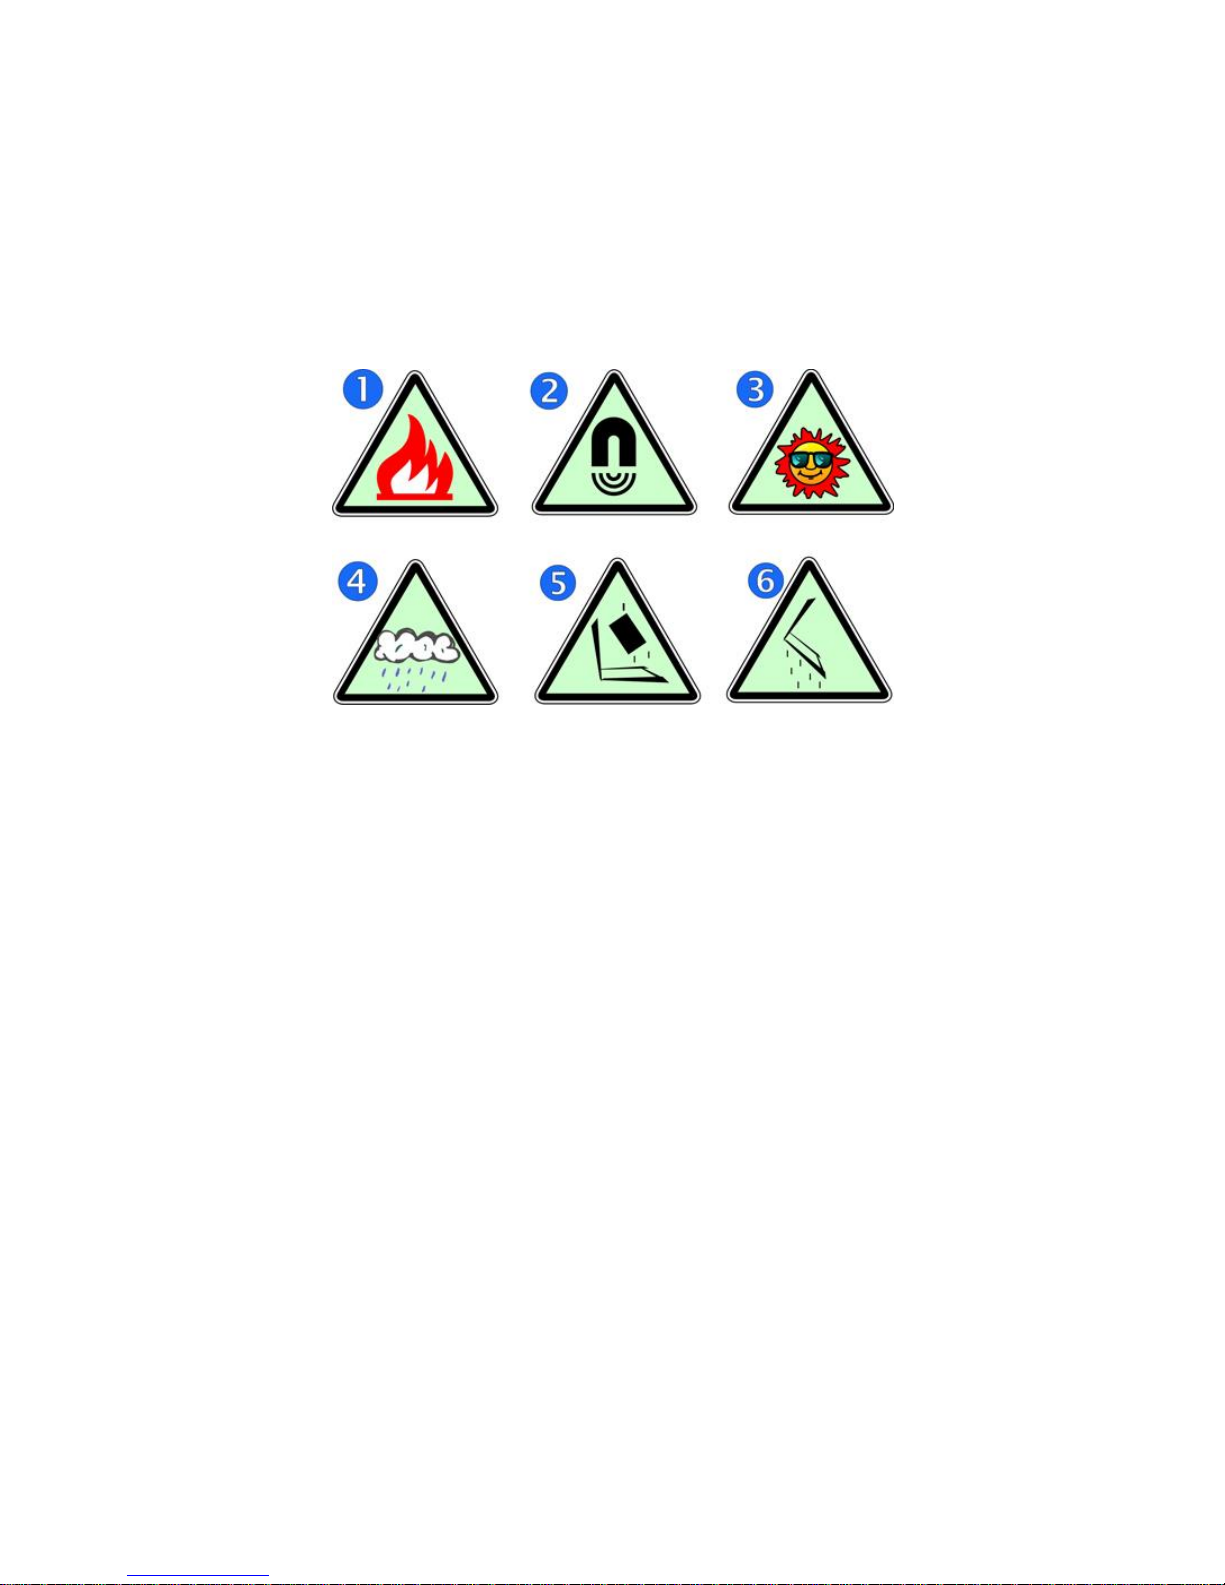
Safety Precautions
The following are lists of precautionary measures the students
must understand before using this computer inside the
classroom or home environment:
1. Do not place near the fire or other sources of heat.
2. Do not expose to magnetic fields.
3. Do not expose to direct sunlight.
4. Do not expose to rain or moisture.
5. Do not place heavy objects to add heavy pressure on
the computer.
6. Do not drop the computer.
CAUTION
RISK OF EXPLOSION IF BATTERY IS REPLACED BY AN INCORRECT
TYPE. DISPOSE OF USED BATTERIES ACCORDING TO THE
INSTRUCTIONS.
ATTENTION
RISQUE D'EXPLOSION SI LA BATTERIE EST REMPLACÉE PAR UN
TYPE INCORRECT. RECYCLEZ LES BATTERIES USAGÉES SELON LES
INSTRUCTIONS.
Page 7

Contents
1. Getting to know your computer ................................................. 1
Package contents .............................................................................................................. 1
Separating your tablet-laptop ...................................................................................... 2
Docking your tablet ........................................................................................................... 3
Layout ...................................................................................................................................... 4
Tablet Views ............................................................................................................. 4
Front .......................................................................................... 4
Back ........................................................................................... 5
Left (I/O cabinet) ................................................................. 6
Bottom ...................................................................................... 6
Keyboard Duck Views ......................................................................................... 7
Shortcut keys ........................................................................ 8
2. Using your computer .................................................................. 9
Powering ON/OFF ............................................................................................................ 9
Powering on your computer ............................................................................. 9
Powering off your computer ............................................................................. 9
Putting your tablet into sleep mode ........................................................... 11
Waking up your computer ............................................................................... 11
Basic touch screen operations ................................................................................. 12
Digital pen operations ................................................................................................... 14
3. Windows Interface .........................................................................15
Start Screen ....................................................................................................................... 15
Desktop ................................................................................................................................. 16
If you want to start your computer to skip the Start screen and to
directly open the Desktop, see p.24. ......................................................... 16
Adding Desktop to the Start screen ........................................................... 17
Customizing your taskbar ................................................................................ 17
The Charms menu .......................................................................................................... 18
All Apps ................................................................................................................................. 20
Switching back to Start screen ................................................................................. 21
Page 8

Start button ......................................................................................................................... 21
Start menu – Power user menu ................................................................... 21
4. Setup and Connection .................................................................23
Setup Your Microsoft Account ................................................................................... 23
Setup your Start screen ............................................................................................... 24
Adding an App ....................................................................................................... 24
Removing an App ................................................................................................ 24
How to Boot to the Desktop directly ...................................................................... 25
Wireless LAN ..................................................................................................................... 26
Enabling wireless connection ........................................................................ 26
Connecting to a wireless LAN ....................................................................... 26
Micro SD Card Slot ......................................................................................................... 27
To insert your micro SD card ......................................................................... 27
To remove your memory card ....................................................................... 27
Installing the SIM card .................................................................................................. 27
Connecting an External Device ............................................................................... 28
Connecting a USB drive ................................................................................... 28
Disconnecting a USB drive or storage device ...................................... 29
Connecting to the HDMI port ......................................................................... 30
5. Battery....................................................................................31
Charging your battery.................................................................................................... 31
Inspecting your battery status ................................................................................... 31
By opening the Charms .................................................................................... 31
By inspecting the taskbar ................................................................................ 32
Approximate status of your battery ........................................................................ 32
6. Windows Help and Troubleshooting .....................................34
Windows Help ................................................................................................................... 34
Troubleshooting ................................................................................................................ 34
7. Specification ....................................................................................39
Page 9
1
1. Getting to know your
computer
This chapter provides an overview of the tablet, including the locations of
the connectors and controls, tablet features, and accessories.
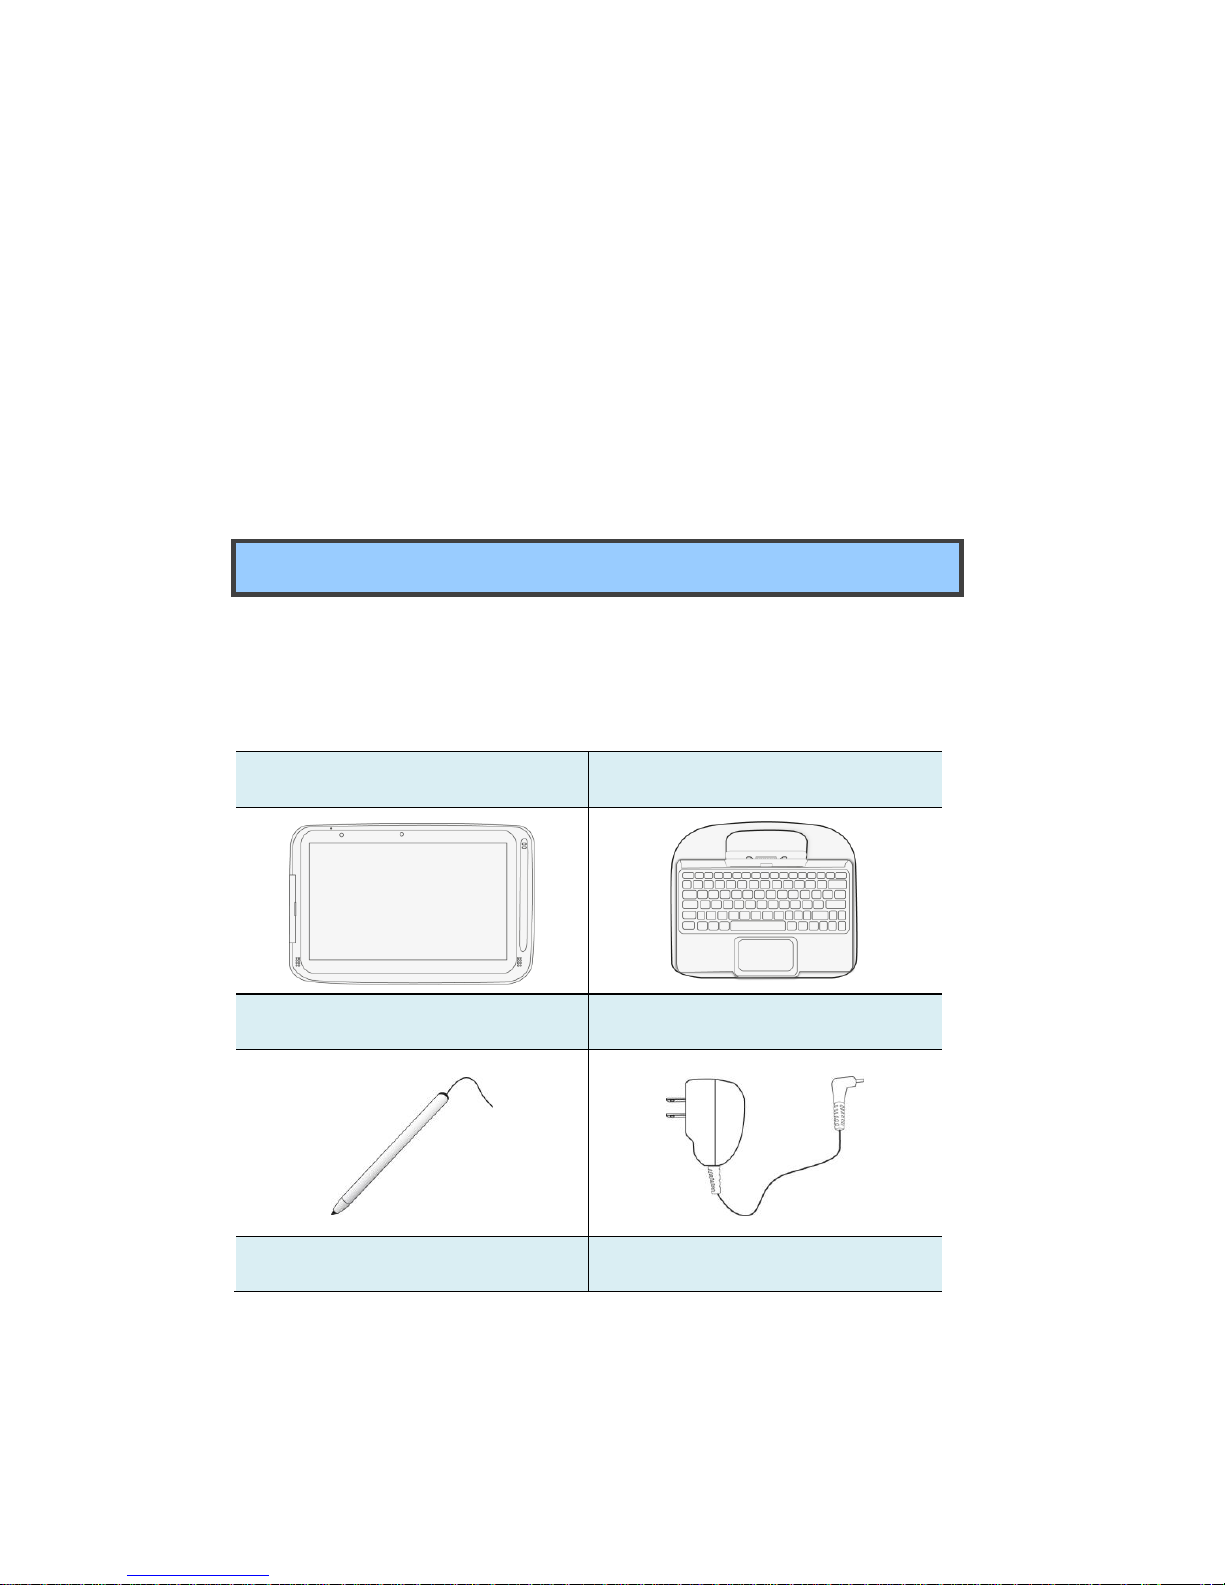
Package contents
Carefully unpack your box and take out the items listed as below. If any
of the items is missing or damaged, contact your dealer immediately:
• One tablet
• One keyboard docking
• One stylus
• One AC adapter
• This manual
Page 10

2
Separating your tablet-laptop
Attention: The Docking feature described in here is for use only with
UL Listed I.T.E. Tablet PC. ELITEGROUP COMPUTER
SYSTEMS CO LTD, Model: TL10REx (x=0~9, A~Z, "-", any
characteristic or blank) that have Installation Instructions
detailing user installation of docking accessory.
Note:
Before undocking your tablet
Make sure you have safely disconnected your USB devices
from the USB ports on the dock and tablet. Please refer to the
device’s manual on how to do so.
It is recommended to undock your tablet after turning off your
tablet and then waiting at least 10 seconds. By doing so, you
can protect the USB HDD installed in the dock against
accidental data loss
1. Set your tablet laptop on a stable surface.
2. See page 29 to eject the HDD optionally
installed in your keyboard dock (the
D-drive, in default); or, simply just turn off
your tablet.
3. Hold the screen and push down the latch.
4. Detach the screen by pulling it upward
Page 11
3
Note: The Docking is for use only with UL Listed
I.T.E. Tablet PC. ELITEGROUP COMPUTER
SYSTEMS CO LTD, Model: TL10REx (x=0~9, A~Z,
"-", any characteristic or blank) that have Installation
Instructions detailing user installation of docking
accessory.
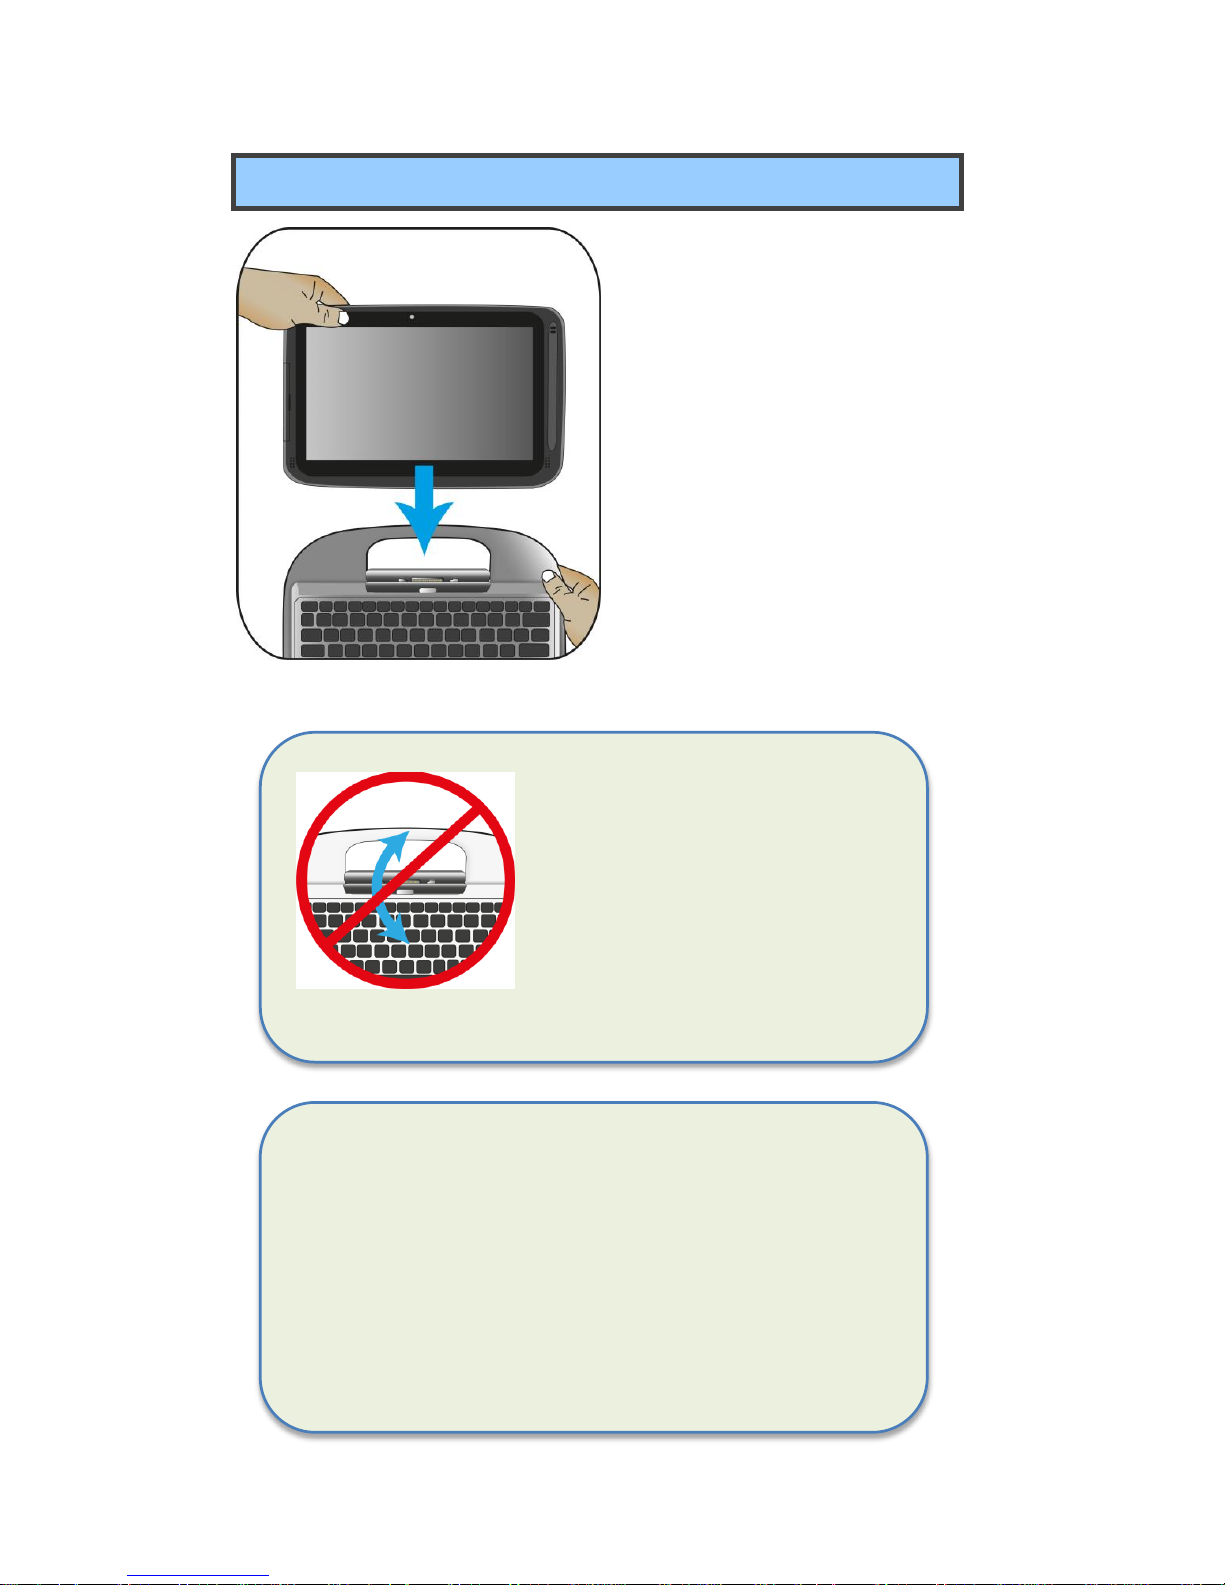
Docking your tablet
1. Hold your tablet with the
button side facing the dock.
2. Gently press and insert the
tablet into the docking
connector on the dock.
3. When you hear a click sound,
it means the tablet is
successfully docked.
Note: The tablet connector on
the dock will be locked at the
position where you undock
your tablet. Do not try to turn
the connector, or you might
break it. It can be unlocked
only by docking your tablet.
Page 12

4
Layout
Tablet Views
Front
No.
Name
Function
1
Microphone
Mainly for sound and speech recording.
2
Front facing
camera
Often for taking self-portraits as well as for video
conferencing.
3
I/O cabinet
See page 6 for details..
4
Digital pen
slot
This is where you can rest and charge the
attached digital pen (optional)
5
Speaker
The sound system has two speakers for playing
music, notification sounds, and other audio data.
6
Touchscreen
It is a see-touch device: You look at it and also
touch it with your fingers to control the tablet.
Page 13
5
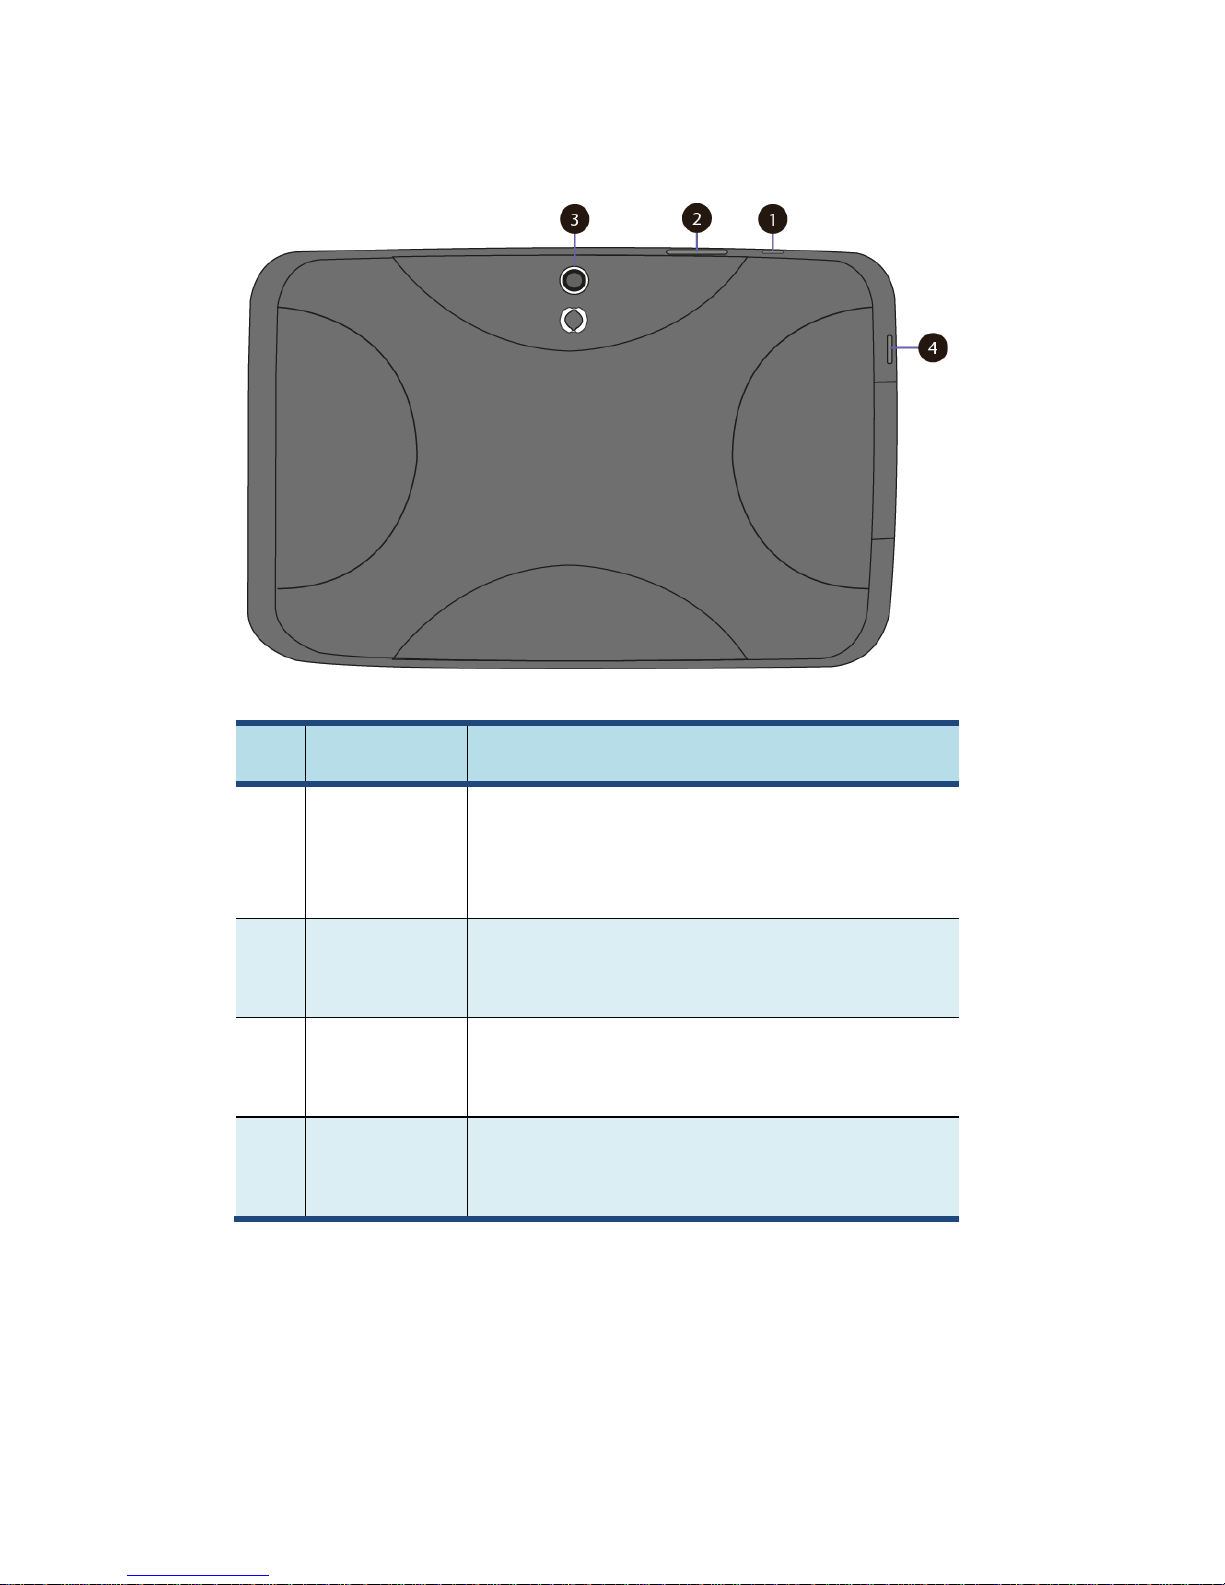
Back
No.
Name
Function
1
Power/sleep
button
Push here to power on/off your tablet. Pushing
this button when the tablet in sleep mode will
resume to normal operation.
2.
Volume up/
down
Press here to increase or decrease the sound
volume.
3
Rear facing
camera
The camera is mainly used when you are taking
photos or recording videos.
4
Windows
button
Switches the screen between the Start screen
and the previously opened app/program.
Page 14

6
Left (I/O cabinet)
No.
Name
Function
1
Combo jack
Here you can plug in a standard headphone set.
2
Micro SD card
slot
This is where you can insert a Micro SD memory
card.
3
Micro USB
port
Here you can plug in a USB device.
4
Micro HDMI
port
This is where you can connect your HDMI
external screen.
5
DC-in jack
This is where you plug in the adapter to charge
your tablet.
6
Micro SIM
card slot
This is where you plug in your SIM card.
Bottom
No.
Name
Function
1
Pogo pin
A connector to the keyboard dock
Page 15
7
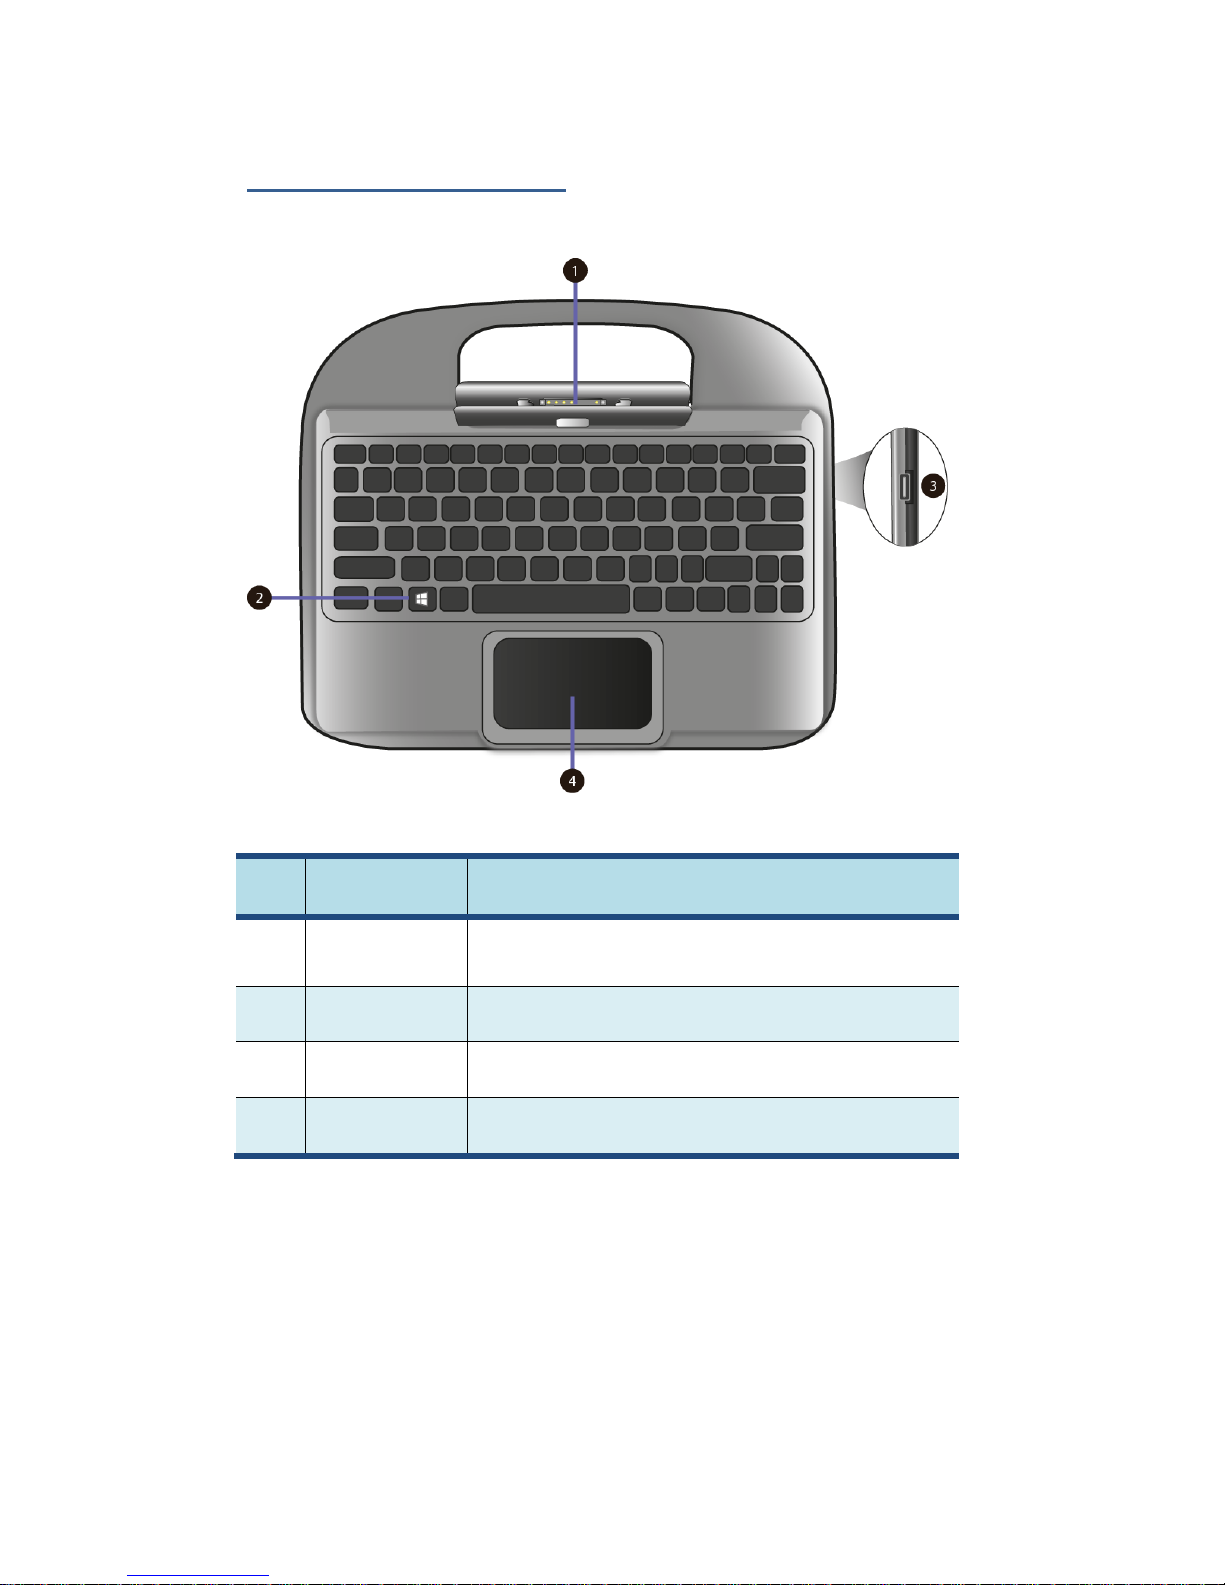
Keyboard Dock Views
No.
Name
Function
1
Docking
Connector
A connector where you docking your tablet.
2
Windows key
Switches the screen between the Start screen
and the previously opened app/program.
3.
USB 2.0 port
Here you can plug in a USB device.
4
Touchpad
Here is the touchpad that you can use it as you
are using a traditional mouse
Page 16

8
Shortcut keys
You can access certain system settings quickly by pressing the
appropriate function keys.
Press both the Fn key and One of the following shortcut key at the same
time to perform your desired function.
+
Enable/disable the
Airplane mode to turn
off/on all wireless
communication.
Increases the volume
level
Puts your computer
into sleep mode.
Allows you to select your
display mode (an
external monitor
required).
Mutes/unmutes the
audio output.
Decreases the display
brightness.
Decreases the volume
level.
Increases the display
brightness.
Page 17

9
2. Using your
computer
Powering ON/OFF
Powering on your computer
1. If this is the first time you turn this
computer on, connect the AC
adapter and fully charge the
battery.
2. Press the power button.
3. A logo will appear when the
system is powered on.
Powering off your computer
• Save all your data before powering your computer off.
To power off your system, you can do one of the following:
A. By Charms
1. Slightly swipe from the right edge of the screen. This opens the
Charms menu. (For more about the Charms menu, see page 18)
2. Click Settings from the menu, and
you will see a menu as shown on the
left.
3. Click Power icon, and select Shut
down.
Page 18

10
B. Using the power button
Press and hold the power button for at least four seconds, and you
will see an instruction appear in the middle of the screen, which is
as shown below.
Slide your finger on the screen downward, and the system will
power off itself. If you want to cancel it, just slide your finger
upward
C. Using the Start button
In the Start
screen and
Desktop, you
can move
your cursor
to the low left
corner. The
Start button
will shows
itself. Right
click the
button, and
the start menu will pop out
Page 19

11
From the lower part the menu, select <Shut down or sign out> and
then <Shut down>
Putting your tablet into sleep mode
When you will be away from your computer for a short time, put the
computer to sleep.
Do one of the following:
• When the keyboard is attached, close the display panel or press
Fn + F2.
• Press the power button.
• Open the Charms and then select <Settings> → <Power> → <Sleep>.
• Right click the start button and then select <Shut down or sign out> →
<Sleep>
Waking up your computer
Note: It is recommended that you put your computer to sleep
before you move it. Moving your computer while the hard disk is
spinning can sometimes damage the hard disk, causing loss of
data.
Do one of the following:
• Press the power button.
• Press the Windows button on your keyboard or tablet.
Page 20

12
Basic touch screen operations
The monitor is not only a touch screen, but actually also is a tablet. You
can use your fingers or a touch pen to perform many actions on it.
• Don’t use sharp objects to touch the screen. Or, the screen may be
damaged or scratched.
• Don’t touch the touch screen with a conductive material. It may cause a
malfunction.
• The supporting functions are application dependent.
Gesture name
Explanation
Tap
Touch once on an item to start an app, open a
link, or perform an optional function. This is
similar to a left-click with a mouse.
Double-tap
Slightly press twice with your finger to select
an item.
Press and hold
Press and leave your finger on an item. This
brings up detailed information or opens a
menu with more options for the item. This is
similar to a right-click with a mouse.
Page 21

13
Pinch
or
Move two fingers together or apart while
touching the screen. This is to zoom in and out
on visual apps, such as pictures and maps.
Rotate
Place two or more fingers on an item and then
turn your hand.
This enables you to turn an object. (Note:
Not all items can be rotated, depending upon
the app.)
Slide
Drag your finger across the screen.
This can scroll through lists and pages, and
can also move an object or be used to draw or
write, depending upon your apps.
Two-finger-slide
Moves up/down, left/right. This is the same
function as scrolling your mouse.
Swipe
Start from any edge of the screen, and then
swipe toward the center of the screen.
Page 22

14
Digital pen operations
Your tablet is provided with a touch pen or a
digital pen. With the touch pen, as the one
shown on the left, you can perform all the
one-finger gestures shown in the previous
section.
.
Page 23

15
3. Windows
Interface
Start Screen
When you turn on the computer, the Start screen is displayed,
which allows you to access many features and installed
applications (also referred to as apps) at one glance.
1
Apps
These bricks are the shortcuts for respective
applications.
2
User Account
The currently used user account.
3
Charms
See page 18 for detailed information.
1 2
3
Page 24

16
Desktop
In Windows 8.1, the Desktop is treated as an app. You can find and
activate it from your Start screen and All Apps screen.
If you want to start your computer to skip the Start screen and to
directly open the Desktop, see page 25.
1
Taskbar
Allows you to add toolbars that hold extra
buttons and menus.
2
Notification
area
Shows you the current system status and
notifications
3
Program area
This is where you can place a shortcut icon
for your desired application.
4
Charms
See page 18 for detailed information.
3
2
1
4
Page 25

17
Adding Desktop to the Start screen
If the Desktop tile cannot be found in your start screen, you can add it to
the start screen by following steps:
1. Open the All Apps screen, as described in the section “All Apps” of
this Chapter.
2. Long touch or right click the desktop app icon.
3. A command bar appears at the bottom of the screen.
Click the “Pin to Start” option to add your Desktop tile to
the Start screen.
Customizing your taskbar
Right-click (or press and
hold using your finger) on a
blank part of the taskbar, a
pop-up menu leaps out. In
the menu, select Toolbars
and offer and you can see
following five toolbar
options:
Address
By choosing this, part of your taskbar becomes a
place for typing website addresses where you want to
visit.
Links
This adds quick access to your favorite websites listed
in your Internet Explorer's Favorites menu.
Page 26

18
Touch
Keyboard
This is for tablet owners and can add a button that
brings a keyboard to the forefront for touch-typing on
the screen.
Desktop
This adds quick access to all your PC's resources,
allowing you to browse through files, folders, libraries,
network locations, and Control Panel menus without
opening any menus.
New Toolbar
This lets you create a toolbar from any folder's
contents.
The Charms menu
This menu consists of five options that are called charms and provide
quick access to various aspects of Windows 8.1.
To display the Charms, do one of the following:
Move the pointer to the upper-right or lower-right corner;
Use one finger to swipe in from the right edge of the screen; or
Press Windows key + C.
Page 27

19
The five charms are:
Search
Search for a program or file. Simply enter a keyword in
the Search charm and start search.
It also enables you to perform a search within an app
or on the Web.
Share
This charm is for you to transfer and share a picture or
file with another user.
Start
If you are not in the Start screen, this allows you
to return to the Start screen.
If you are in the Start screen, this allows you to
return to the previously screen, which could be
an app or the Desktop.
Device
This enables you to operate directly a desired device.
You can import pictures from a digital camera, stream
a video to your TV, or transfer files to a device listed
on the screen.
Settings
This charm enables you to perform basic tasks such
as adjusting the volume, turning off the PC, etc.
Page 28

20
All Apps
In the Start screen, touch any blank area and slightly drag upward.
Or
Once you move the cursor, a downward arrow appears in the low left
area of the screen, as shown below. Click the arrow.
Then
The All Apps screen will appear similar to what is as shown below.
Page 29

21
Switching back to Start screen
For switching back to the Start screen, do one of the following:
Move the mouse cursor to the lower-left corner, and click the
Windows icon.
Once you move the cursor, an upward arrow will appear. Click the
upward arrow.
Press the Windows key on your keyboard.
Press the Windows button on your tablet
Click the Windows icon in the Charms bar.
Start button
In the Start screen, move your cursor to the low left corner (or swipe in
from the left edge of the screen if you don’t use the dock keyboard), a
windows icon will show up. It is the start button. A right click on the icon
will open the Start menu (sometimes called the Expert Menu, Power
User Menu, or Admin Menu)
In the Desktop, the Windows icon in the low left corner is the start button,
and a right click on it can open the Start menu.
Start menu – Power user menu
Followings are some of these items that are especially useful to have at
your mouse-tip:
• System: opens a window that provides every possible detail about
your machine.
Page 30

22
• Control Panel: This is the quickest known method to get to the
desktop Control Panel.
• Search: Having the option to choose Search here saves you a trip
into TileWorld and its Charms menu.
• Shut down or sign out: Now shutting down, signing out, or
restarting is a single step — and it doesn’t require leaving the
Desktop. In its submenu, you can find commands for “Sign out,”
“Sleep,” “Shut down,” and “Restart.”
Page 31

23
4. Setup and
Connection
Setup Your Microsoft Account
To share files or settings with other devices running Windows 8, you
need to setup a Microsoft Account.
Furthermore, if you want to download or purchase apps from the
Microsoft Store, such Microsoft Account is required.
To setup a Microsoft account
1. Open the Charms and click Settings > Change PC Settings.
2. Click Account > Your account >Connect to a Microsoft account.
3. Follow the instruction to register your account information.
Page 32

24
Setup your Start screen
Adding an App
To add an app:
1. Open the All Apps screen.
2. Drag the top or bottom of
the screen inward, and an
option menu appears at
the bottom of the screen.
3. Touch the icon named Customize in the menu.
4. Touch the app that you want to add to your Start screen. The
available options will appear in the right side of the option menu.
5. Click “Pin to Start” to add the app to your Start screen.
Removing an App
To remove an app:
1. In the Start screen or All Apps screen, drag the top or bottom of the
screen inward. An option menu is activated at the bottom of your
screen.
2. Touch the icon named Customize in the menu.
3. Touch the app that you want to remove from the Start screen. The
available options will appear in the right side of the option menu
4. Click “Unpin from Start” to remove it from the Start screen.
Page 33

25
How to Boot to the Desktop directly
If you want to start your computer to skip the Start screen and to directly
open the Desktop, here is how:
1. From the Apps screen, open the Control Panel.
If you're using the dock keyboard and are already on the
Desktop, right-click on the taskbar and choose
Properties, then skip to Step 4.
2. With the Control Panel open, touch or click Appearance and
Personalization.
3. On the Appearance and Personalization screen, touch or click
Taskbar and Navigation.
4. Touch or click the Navigation tab along the top of the Taskbar and
Navigation window that is open.
5. Check the box
next to < When I
sign in or close all
apps on a screen,
go to the desktop
instead of Start>.
6. Touch or click the
OK button to
confirm the
change.
From now on, after
powering on your tablet
or closing your open
apps, the Desktop will open instead of the Start screen
Page 34

26
Wireless LAN
Enabling wireless connection
To do this, do one of the following:
• Press Fn+F1 to activate the wireless networking function.
• Open the Charms and select Settings to open the Network
configuration page, and then toggle the Airplane mode switch to Off.
To confirm that Airplane mode is disabled, go
to the desktop and check the notification area.
If you see an airplane icon displayed on the
lower right, then Airplane mode is on.
Otherwise, wireless function is enabled.
Connecting to a wireless LAN
Once the wireless has been enabled, the computer
automatically scans for available wireless networks
and displays them in the wireless LAN network list.
To connect to your desired wireless network, click
the network’s name in the list, and then click
Connect.
Note: Some networks require a network security key or password for
connection. If necessary, ask the network administrator or the Internet
service provider (ISP) for the required information.
Page 35

27
Micro SD Card Slot
You can utilize your micro SD cards as removable disks and conveniently
exchange data with digital devices such as a digital camera, digital
camcorder, MP3, etc.
To insert your micro SD card
1. Insert the micro SD card into the
card slot as shown below.
2. Follow the message appeared on
the screen, and choose to open
and view files.
3. A Windows Explorer runs and shows all the folders and files in the
micro SD cards, and you can save, move and delete data as you are
handling a storage device.
To remove your memory card
1. Press the card and release. The card will pop up.
2. Pull the card out by holding the end of the card.
Installing your micro SIM card
Attention: When installing or removing the SIM card, do not touch the
SIM card metal connectors. As a precaution, always hold
your tablet in your hand before you install or remove the
SIM card to avoid electrostatic discharges.
Page 36

28
To install your micro SIM card, do the following:
1. Turn off the system
2. Open the cover of the I/O slot
3. Locate the SIM card slot. To locate the SIM card slot, see “Tablet
layout” on page 6.
4. Hold the SIM card with the metal
contacts facing up, and then
insert it firmly into the SIM card
slot until you hear a click.
5. Close the cover back.
To remove the SIM card, after you turn off the tablet, just pull the SIM
card out of the slot.
Connecting an External Device
Connecting a USB drive
The Windows system will automatically detect a USB storage device,
and will provide you the options on how to explore the files.
Note: If your USB device uses a power cord, connect the device to
a power source before connecting it.
Page 37

29
Disconnecting a USB drive or storage device
Before disconnecting a USB drive or storage device, make sure the data
transfer between your computer and that device has finished.
Follow following steps to disconnect the device:
1. In Desktop, click the in the
notification area. If you don’t see such
icon, click the small triangle icon instead
to display all hidden icons, as shown on
the right.
.
2. A list of removable
devices (similar to
the one on the right)
will show up. Click
the device that you want to remove.
3. The system will show you a notification telling you it's safe to
remove the device.
4. If the device is the D-drive, you can safely separate the tablet from
the keyboard dock now. If the device is connected to the USB port
on the dock, you can disconnect its USB connection now.
Page 38

30
Connecting to the HDMI port
You can connect an external display
device such as a monitor, TV, projector,
etc., only if such device has a HDMI
port. By doing so, you have a wider
view when you give a presentation or
watch a video or movie.
1. Power off the external device.
2. Locate the micro-HDMI port on
your computer.
3. Connect the small end of the
HDMI cable to the port, and the
other end to the HDMI port on the
external device.
4. Power on the external device.
When connecting a TV, you may
need to configure your TV to external device mode.
5. Select Charms menu > Devices > Second Screen. An option menu
appears as shown on the right.
6. Select a desired monitor mode.
Page 39

31
5. Battery
Charging your battery
You can charge your tablet directly by connecting the adapter to
the DC jack on your tablet and to a wall socket.
In the left corner of your tablet, an indicator
will light up in blue. When the battery is fully
charged, the indicator will be off.
While system is off, it takes at least 5 hours to
fully charge the battery.
Inspecting your battery status
There are mainly two ways to view your battery status.
By opening the Charms
In the Start screen or Desktop, open the Charms menu. A popup window
shows up at the down-left corner of your screen, as shown below.
Page 40

32
In the lower-left corner is the battery status icon.
By inspecting the taskbar
In Desktop, move the cursor to the battery icon in the taskbar. A pop-up
dialog box appears and shows you the remaining battery percentage, as
shown below.
Approximate status of your battery
The battery icon reveals the approximate status of your battery, which
described as below.
Page 41

33
Battery is fully charged
Battery is starting to drain
Battery is about to completely
drain, and you should stop using your
tablet and charge it at once.
Battery is being charged.
A battery is an expendable supply, so when using it over a long time, the
capacity/battery life is shortened. If the battery life is reduced to under
half of its initial time, we recommend purchasing a new battery.
When not using the battery for a long time, store the battery after
charging it to 30-40% of its capacity. This extends the battery life time.
Page 42

34
6. Windows Help and
Troubleshooting
To know how to use Windows 8.1 properly, it is better to learn how to
use Windows by utilizing Windows Help.
Windows Help
Move the pointer on the screen to the top or bottom right edge of the
screen to view the Charm menu.
Alternatively, drag the right edge inward with your finger to view the
Charm menu.
Select Charm menu > Settings > Help.
For accessing to the most recent online Help, you need to connect
your computer to the Internet.
Troubleshooting
This section describes some common problems and suggested
solutions, and ways to recover your computer from a crash.
Be aware that the problems and solutions described here are meant
only as a guide. They are not definitive problem solving techniques.
For certain problems, you might need help from your reseller or your
service provider.
When you observe a problem, stop operation immediately, because
taking further action might result in data loss or damage. Take a note
of what the system is doing and what actions you performed before
Page 43

35
the problem occurred. Provide detailed information to your service
provider for quicker problem resolution.
For about any problem, follow these steps:
1. Restart your tablet.
2. Check your Wi-Fi connection.
3. Reset your Wi-Fi connection.
4. Plug your tablet to a wall socket to charge it for at least one
hour.
Display problems
When I turn on the
computer, nothing appears
on the screen.
• If the screen is blank, make sure that:
- The AC adapter is connected to the
computer and the power cord is plugged
into a working electrical outlet.
- The computer power is on. (Press the
power button again for confirmation.)
• If these items are properly set, and the
screen remains blank, have the computer
serviced.
The screen is unreadable or
distorted.
• Make sure that:
- The screen resolution and color quality
are correctly set.
- The monitor type is correct.
Incorrect characters appear
on the screen.
• Are the operating system or programs
installed correctly? If they are installed
and configured correctly, have the
computer serviced.
Page 44

36
My screen goes blank while
the computer is on.
• Your power management is enabled. Do
one of the following to resume from sleep
mode:
- Press any key on the keyboard. (Cannot
be used in Tablet mode.)
- Press the power button.
- Press the Windows button.
Sleep problems
The critical low-battery error
message appears, and the
computer turns off
• The battery power is getting low.
Connect the AC adapter to the computer.
The computer enters sleep
mode immediately after
Power-on.
• Make sure that the battery is charged.
- The operating temperature may be too
hot. Move to a cooler environment and try
to wake the computer.
The computer does not
return from sleep mode and
the computer does not
work.
• Connect the AC adapter, then press the
Windows button or the power button.
• If your computer is powered-off, connect
the AC adapter first, and then press the
power button to resume operation.
Page 45

37
Keyboard problems
After docking the tablet, the
keyboard has no response.
• Do the followings:
1. Separate your tablet from the dock.
(See page 2 for details)
2. Dock your tablet again. You shall
hear a click sound when you push
the tablet into the dock.
• If the keyboard still has no response,
please contact your local dealer.
Sound problems
No sound can be heard
from the speaker even
when the volume is turned
up.
• Make sure that:
- The Mute function is off.
- The combo audio jack is not being used.
- Speakers are selected as the playback
device.
Other problems
Your computer does not
respond.
• To turn off your computer, press and hold
the power button for 6 seconds or more. If
the computer still does not respond,
remove the AC adapter.
• Your computer might lock when it enters
sleep mode during a communication
operation. Disable the sleep timer when
you are working on the network.
Page 46

38
The connected external
device does not work.
• Do not connect or disconnect any
external device cables other than USB
while the computer power is on.
Otherwise, you might damage your
computer.
• When using a high power consumption
external device such as an external USB
optical disk drive, use an external device
power adapter. Otherwise, the device may
not be recognized, or the system may
shut down as a result.
Page 47

39
7. Specification
Processor
Intel® Bay Trail‐T-CR (2M Cache, 1.33
GHz~1.83 GHz)
Memory
1GB/2GB
DDR3L one- channel, 1333MT/s (max.)
Storage
Tablet
16GB/32GB NAND flash
eMMC Version 4.51 interface
Keyboard dock (Optional)
One SATA II/III 2.5" 7mm HDD
Dimension
284.6 x 237.7 x16.6 mm (Tablet)
284.6 x 237.7 x13.5mm (Keyboard
Dock)
Weight
1266 g (Tablet + Keyboard dock)
Wireless
IEEE 802.11 b/g/n Wireless LAN
Bluetooth 4.0
Touchscreen
10.1”, 1280 x 800
TFT Color LCD, TN
5-point touch
Cameras
Front facing camera: 1.2M (HD)
Rear facing camera: 5M (without VCM
function)
Battery
Tablet
1S3P 8100mAh or 6300mAh
Model No.
TCL: TZ10-1S6300-T1T2,
TL10RE1-1S8100-T1T2
SIMPLO: TZ10-1S6300-S1C1,
Page 48

40
TL10RE1-1S8100-S1C1
GLW: TZ10-1S6300-G1O1,
TL10RE1-1S8100-G1O1
SUNWODA : TZ10-1S6300-S4L8,
TL10RE1-1S8100-S4L8
Input/Output
Tablet
1 x DC-in jack
1 x micro USB 2.0 port
1 x Mic/head phone jack combo
1 x micro HDMI port
1 x micro SD card slot
1 x micro SIM card slot (3G)
Keyboard Dock
1 x USB 2.0 port
Gyroscope
Gaming and virtual reality input devices
GPS navigation systems
I2C/SPI digital output interface
Magnetometer/
Accelerometer
sensor
Compensated compass
Map rotation
I2C serial interface
Speaker &
Mic
Speaker :
Build-in 2 Speakers
0.8W x 4 ohm
Mic:
Internal analog MIC
Language
Arabic
Brazil Portuguese
English
French
German
Greek
Hebrew
Hungarian
Italian
Page 49

41
Latin Spanish
Portuguese
Russian
Simplified Chinese
Spanish
Thai
Traditional Chinese
Turkish
AC-Adapter
DC Output: 5V/15W
Input Voltage: 100–240VAC Nominal
Input Frequency: 50–60Hz.
Model No :
Asian Power WA-15I05Fy(y can be
A,B,C,G,K,N,S,T or U) , WA-15I05R
Certification
EMC
CE /FCC
RF
FCC&SAR /
R&TTE&SAR
Safety&
Environment
UL / CB
WEEE
RoHS
HDMI (D type)
Others
Energy Star 6.0
 Loading...