

Page 1
Quick Installation Guide
Travel Router SKINNY
Thank you for purchasing this mini Travel Router.
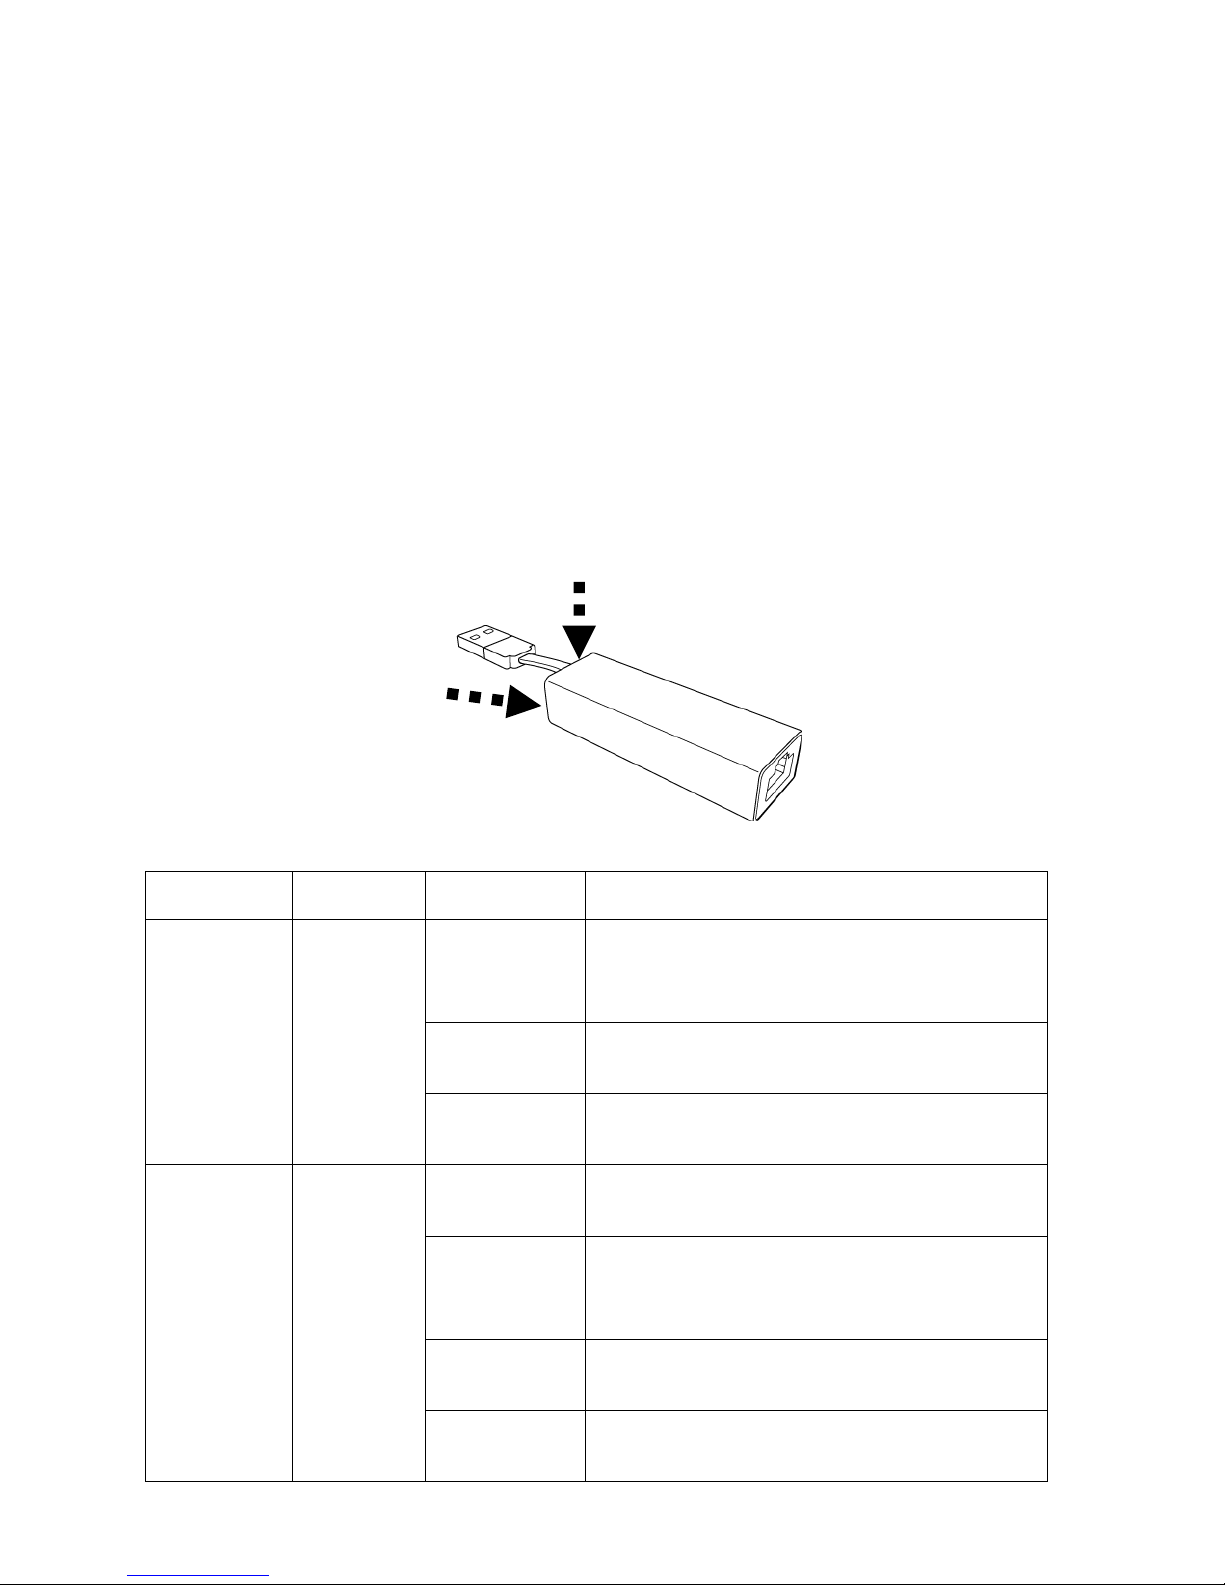
Be familiar with this device:
1. USB Cable and connector
2. LAN port (RJ45 Ethernet port)
3. WPS/Reset button (Press to activate WPS pairing mode or Reset to factory default)
4. LED indicator
LED status:
LED
Color
LED Status
Description
Internet
Blue
Blinking
System is under booting up.
Or device ready for “Reset to factory
default”.
Steady On
Successfully connect to internet (On
internet)
Off
No internet connection
WPS
Green
Steady ON
When WPS connection is successful, turn
on for 5 minutes.
Blinking
WPS is in progress, blinking (0.2 second
on, 0.1 second off) for 2 minutes (waiting
for WPS connection)
Quick blinking
WPS error, blinking (0.1 second on, 0.1
second off)
off
No power/No WPS in progress
3 4 1
2
Page 2
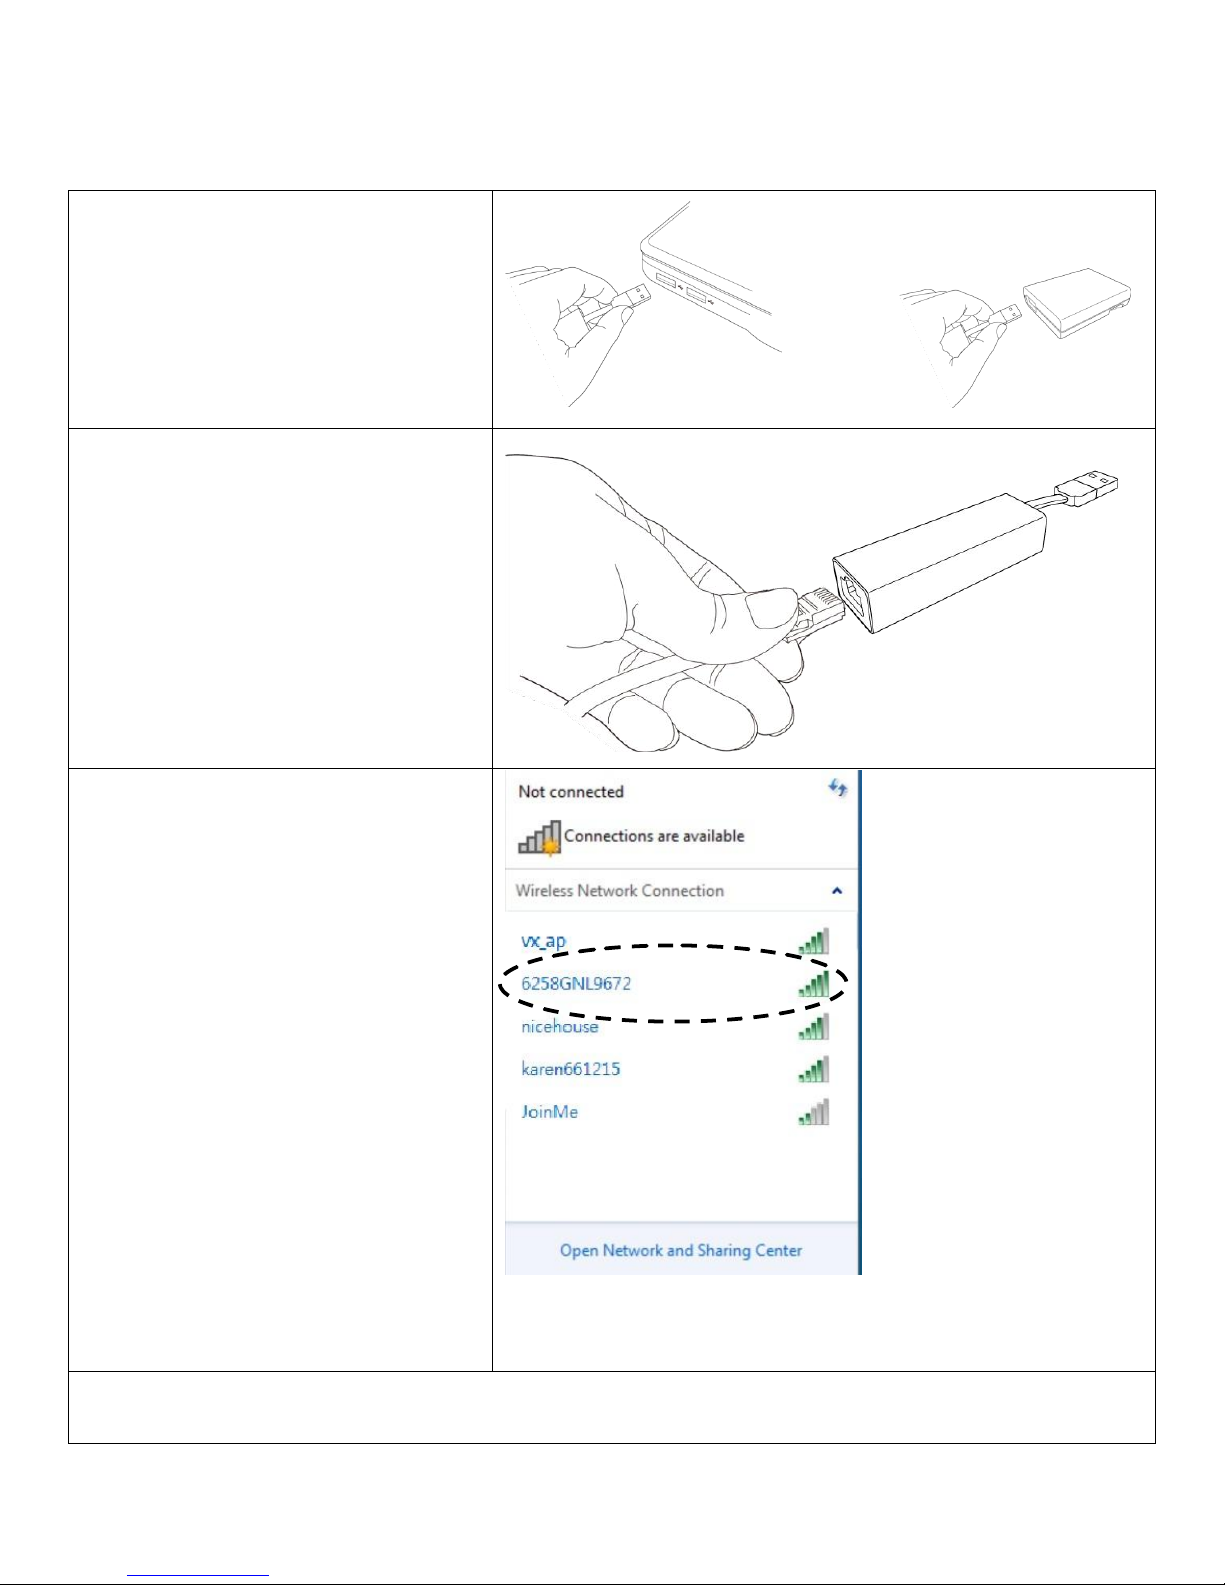
Quick Installation:
Before you can use this Travel Router to access Internet, please make sure your computer is set to
DHCP client (obtain IP automatically from DHCP server) and follow the following steps to setup this
Travel Router device.
Insert the USB cable of Travel Router
into an available USB port on your
computer or USB power adapter.
or
Insert LAN cable into LAN port of
Travel Router, to connect Travel
Router to LAN connection (ISP, or
home / hotel / corporate network
with DHCP enabled).
Please wait 2 minutes for device
booting up, the blue LED is blinking.
After blue LED turn off, connecting
your computer to Travel Router
through wireless connection by
searching the available wireless
network. Searching for
‘6258GNLxxxx’ access point, where
‘xxxx’ is the last 4 digit of Travel
Router’s MAC address, like
‘6258GNL9672’ in the example on
the right.
When ‘6258GNLxxxx’ access point is
found, click to select it and then click
‘Connect’ to establish connection.
TIP: The default SSID of this Travel Router can be found on the sticker labeled on the side of Travel
Router.
Page 3
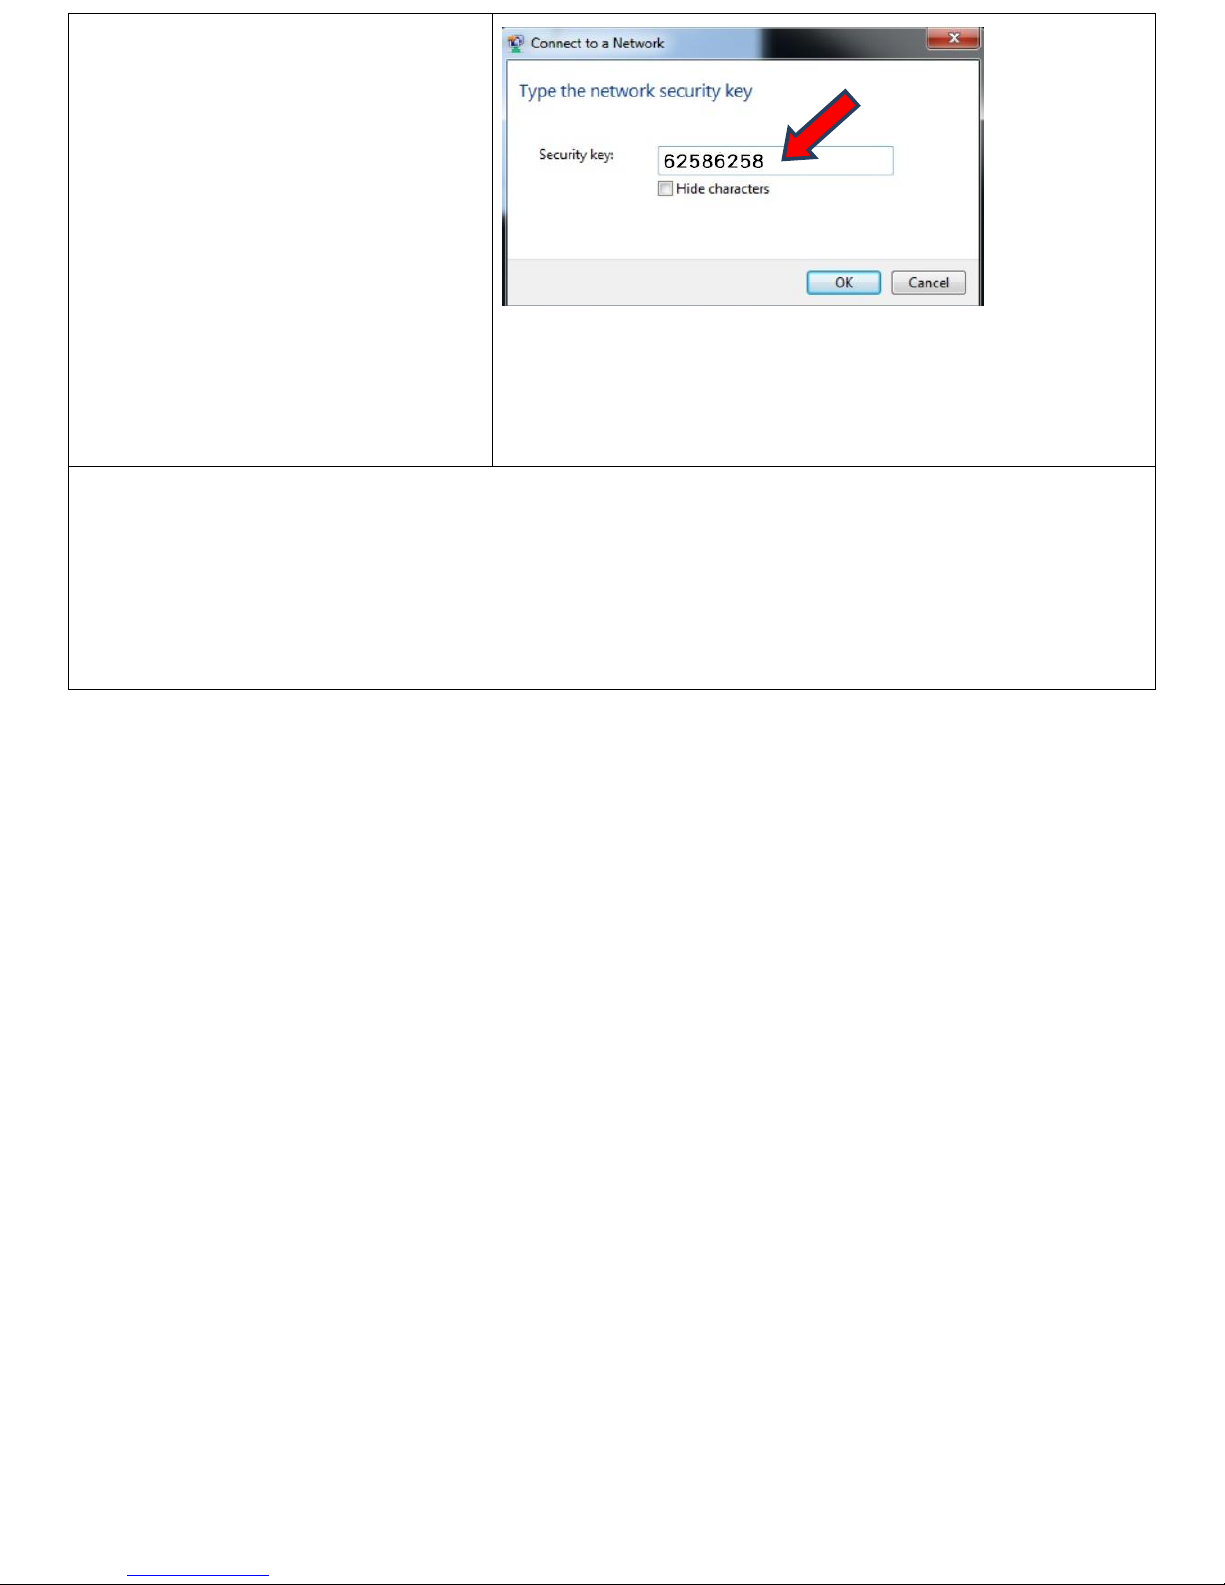
Next, input password and then click
‘OK’. Default password is ‘62586258’
as shown on the right. Please note
that you have to enter correct
password if you changed it.
If the password you entered is wrong,
you’ll be asked to input password
again.
Congratuations! You should be able to access Internet now if the LAN cable you connected to
Travel Router is Internet-accessible. You can open web browser and go to website you wish to go.
If not, your broswer will be forwarded to Travel Router’s firmware setup page (see next page for
troubleshooting).
Page 4

Login Web UI:
After wireless connection is
sucessfully linked to this Travel
Router but you see this page when
you try to access internet , it means
internet connection has a problem.
(Blue LED of Travel Router is off).
You can select to login Router
firmware to setup it or select another
to close message window.
After your selection, click ‘Next’ to
continue.
Note:
Anytime you want to setup Travel
Router, type the default SSID of Travel
Router in address bar of web browser
like shown on the right.
Default SSID Example
http://6258GNL9672 (found it on the
sticker label, the last 4 digits is
different on each device)
When you are prompted to input
username and password, input
default ‘admin’ as username and
‘1234’ as password, and then click
‘OK’ to continue.
Page 5

Click ‘Quick Setup’
Please select working mode of this
travel router:
Travel router mode: This travel
router will connect to Internet by
wired network, and client uses
wireless connection to access
Internet.
Wireless ISP mode: This travel router
will connect to Internet by wireless
network, and client also uses
wireless connection to access
Internet.
Page 6

Travel Router Mode:
Please setup wireless security of this
Travel Router here if you want to
change.
Or you can use default value and click
‘NEXT’ button to continue.
SSID: Input the Service-Set IDentifier (a name used to
identify this device for wireless network) here, you can use
any words which will help you to identify your own Travel
Router. When you change this SSID, you must reconnect
your computer to new SSID of Travel Router through
wireless connection by searching the available wireless
network
Channel Number: Select wireless channel number, or you
can select ‘Auto’ and Travel Router will select a channel for
you automatically.
Encryption: Select wireless encryption mode:
Disable: No security at all, everyone can establish
connection.
WEP: WEP encryption, less security and more compatiblity.
WPA pre-shared key: WPA encryption, safer encrytion.
WPA RADIUS: Select this option only when you have RADIUS
server.
When you select WEP encryption:
Please select key length (64 or 128-bit) and key format
(ASCII or Hex), select Default Tx Key (Select ‘Key 1’ in most
cases), and then input encryption key characters in
‘Encryption Key’ field (If you select ‘Hex’ key format, only
use number 0-9 and alphabet A-F).
When you select WPA pre-shared key encryption:
Please select one WPA Unicast Cipher Suite. WPA(TKIP) for
more compatibility and WPA2/WPA2 Mixed for more
Page 7

security, and then select Pre-shared Key Format (Passphrase
or Hex characters), and then input passphrase characters in
‘Pre-shared Key’ field.
When you’re ready, click ‘NEXT’ button.
If you see this message, please use
Ethernet cable to connect the LAN
port of Travel Router and Internet
gateway (i.e. the network device
provided by your ISP, or the network
port of your home, company, or
hotel)
Next, system will start verifying
internet connection, please be
patient.
This message indicates Internet
connection has been confirmed,
please click ‘NEXT’ button to
continue.
Or shows failed connection, you
should click ‘BACK’ button to redo
previous settings.
Recommend you to add the firmware
web address of this Travel Router for
future use, please select ‘Yes’ to add
bookmark (Other browser than IE
and Firefox, please copy URL and
save it to your bookmark).
You can also recheck these basic
settings of Travel Router. Click ‘Apply’
when everything’s ok, or click ‘BACK’
to go back to previous setup page.
Page 8

If you select ‘Yes’ in last step to add
bookmark, you can define the name
of bookmark here. Click ‘Add’ to add
bookmark or ‘Cancel’ to abort.
(Recommend you to add it)
Please be patient while Travel Router
is applying new settings.
Congratulations! The Quick Setup is completely done, now you can start to enjoy this travel router.
Page 9

Wireless ISP Mode
Travel Router will perform wireless
site survey. Please check the list and
see if the access point(Wireless ISP)
you wish to connect is listed here. If
not, please click ‘Refresh’ button and
/ or move Travel Router closer to
access point you with to connect.
In most cases you only have to select
an access point and Travel Router will
detect encryption type for you, you
only have to input the correct WEP
key or WPA passphrase of your
access point. Click ‘NEXT’ button to
continue.
If the SSID of the access point you wish to connect is
hidden, check ‘Setup manually’ box and input access point’s
parameters manually.
Next, system will start verifying
wireless key and connection between
Travel Router and WISP device within
2 minutes, please be patient when
you see this message.
This message indicates that
WEP/WPA key is verified. Otherwise,
you have to recheck WEP/WPA key
you input in last step.
Click ‘NEXT’ to continue.
Page 10

Please input the wireless security
settings for your wireless client here
or you can use all default values
without change. Then click ‘Apply’
button.
(Refer to ‘Security Setting’ in ‘Travel
Router Mode’)
In the last step of Quick Setup, you
can recheck all settings and select to
add web address of this Travel Router
for future use, please select ‘Yes’ to
add bookmark (IE and Firefox only).
Click ‘Apply’ when everything’s ok, or
click ‘BACK’ to go back to previous
setup page.
If you select ‘Yes’ in last step, you can
define the name of bookmark here.
Click ‘Add’ to add bookmark or
‘Cancel’ to abort.
(Other than IE/Firefox, it will pop up a
message for asking to add bookmark
manually)
Please be patient while Travel Router
is applying new settings.
Congratulations! The Quick Setup is completely done, now you can start to enjoy this travel router.
If your WISP requires WAN setting, please login firmware and go to advanced setup page for more
settings.
Note:
If you want to reset device to factory default, please hold on ‘WPS’ button for 10 seconds until
‘Internet’ blue LED blinking, you can release button then device will start to reset.
For instructions of advanced settings, please refer to user manual in supplied CD-ROM.
 Loading...