

Page 1
E-COMPLY
Page 2

Version
User Manual
1.19.011
e-Comply
e-Comply
E N D U S E R L I C E N S E A G R E E M E N T
IMPORTANT- READ BEFORE COPYING, INSTALLING OR USING.
Copyright 2014 ECOM America Ltd. (ECOM). All rights reserved. e-Comply is a registered trademark of ECOM. All other product brand names are trademarks or
registered trademarks of their respective companies.
Your license, as set forth below, to use the e-Comply software (the “Software Program”) is granted by ECOM America Ltd. (ECOM).
1. License: You have the limited non-exclusive right and license to use this Software under the terms and conditions contained in this Agreement. You may
physically transfer the Software Program from one computer to another provided that the Software Program is installed and used on only one computer at a time.
You may not provide copies of the Software Program to others and you may not assign, sublicense, rent, sell or otherwise transfer the Software Program to others,
but you may permanently transfer the Software Program to another user provided that you retain no copies and the recipient agrees to the terms of this
Agreement. You may not install the Software Program on a network server for use on multiple client computers.
2. Copies and Modifications: You may make one copy of the Software Program solely for back-up purposes. You must reproduce and include on the backup copy all
copyright and other proprietary notices included in the Software Program. You may not copy the Software Program except for the back-up copy. You may not
modify the Software Program, and you may not reverse engineer, decompile or disassemble the Software Program.
3. Ownership: All rights, including but not limited to copyrights and trade secret rights, to and in each Software Program (including the content thereof) belong to
ECOM. Your use of the Software Program (including the content and items printed incorporating content) is subject to U.S. and other applicable copyright and
trademark laws, and nothing in this Agreement constitutes a waiver of the rights of ECOM, under such laws.
4. Term: This license is effective from the day you install this software until terminated. If you fail to comply with any term of this Agreement, this Agreement shall
terminate without notice to you and you must then promptly return the Software Program. In addition, ECOM may enforce their other legal rights.
5. Limited Warranty and Limitation of Liability: It is your responsibility to choose, maintain and match the hardware and software components of your computer
system. Thus, ECOM does not guarantee uninterrupted service or correction of errors or that the functions or performance of the Software Program will meet
your requirements. THE SOFTWARE PROGRAM IS LICENSED ON AN "AS IS" BASIS AND WITHOUT WARRANTY OF ANY KIND.
NO EXPRESS OR IMPLIED WARRANTY (OR CONDITION)* AS TO THE QUALITY OR PERFORMANCE OF THE SOFTWARE PROGRAM IS GIVEN FOR THE SOFTWARE
PROGRAM. No other warranty or guaranty given by any person, firm or corporation with respect to the Software Program shall bind ECOM production or distribution
of the Software Program.
IN NO EVENT SHALL ECOM OR ANY OTHER PERSON, FIRM OR CORPORATION BE RESPONSIBLE FOR ANY EXPENSE OR INCONVENIENCE INCURRED, ANY REVENUE OR
PROFITS LOST, OR ANY OTHER DIRECT, SPECIAL, INCIDENTAL, CONSEQUENTIAL OR EXEMPLARY DAMAGES ARISING OUT OF THE USE OR MISUSE OF, INABILITY TO
USE, OR NONPERFORMANCE OF, THE SOFTWARE PROGRAM.
Some states or provinces do not allow the exclusion of implied warranties or limitations of how long implied warranties last, and do not allow the exclusion or
limitation of damages, so the above limitations may not apply to you. The limited warranty granted herein shall not extend to anyone other than the original user of
the Software Program. This limited warranty gives you specific legal rights, and you may also have other rights which may vary from country to country. To the
extent permissible, any implied warranties are limited to thirty (30) days.
6. Legal Restrictions: You agree that you shall not use the Software Program for any unlawful purpose. The Software Program and the underlying information and
technology may not be exported, directly or indirectly (i) into (or to a national or resident of) any country to which the U.S. has embargoed goods; or (ii) to anyone
on the U.S. Treasury Department's list of Specialty Designated Nationals or the U.S. Commerce Department's Table of Deny Orders. By using the Software
Program, you are agreeing to the foregoing and you represent and warrant that you are not located in, under the control of, or a national or resident of any such
country or on any such list.
7. Notice to Government End Users: The Software Program and related documentation are "Commercial Items," as that term is defined at 48 C.F.R. §2.101,
consisting of "Commercial Computer Software" and "Commercial Computer Software Documentation," as such terms are used in 48 C.F.R. §12.212 or 48 C.F.R.
§227.7202, as applicable. Consistent with 48 C.F.R. §12.212 or 48 C.F.R. §§227.7202-1 through 227.7202-4, as applicable, the Commercial Computer Software and
Commercial Computer Software Documentation are being licensed to U.S. Government end users (a) only as Commercial Items and (b) with only those rights as
are granted to all other end users pursuant to the terms and conditions herein. Unpublished-rights reserved under the copyright laws of the United States.
Page 1
Page 3

e-Comply
Operating System:
Windows 7 (32bit and 64bit) and Windows 8 (64bit)
Connectivity:
USB, Bluetooth and Wi-Fi
Hard Drive Space:
60 MB for installation and appropriate space for data storage
Analyzer:
ecom-J2KNpro Series, ecom-EN2F, ecom-D
Accessories:
Bluetooth signal enhancer (UD100 antenna) or Wi-Fi antenna
8. Governing Law: This Agreement is governed by the laws of the State of Georgia, United States of America, without giving effect to the conflicts of laws principles
thereof.
9. Acknowledgment: YOU ACKNOWLEDGE THAT YOU HAVE READ THIS AGREEMENT, UNDERSTAND IT, AND AGREE TO BE BOUND BY ITS TERMS AND
CONDITIONS. IF YOU DO NOT AGREE WITH THE TERMS AND CONDITIONS OF THIS AGREEMENT, DECLINE WHERE INSTRUCTED, AND YOU WILL NOT BE ABLE TO USE
THE SOFTWARE PROGRAM. YOU ALSO AGREE THAT THIS AGREEMENT IS THE COMPLETE AND EXCLUSIVE STATEMENT OF AGREEMENT BETWEEN THE PARTIES AND
SUPERSEDES ALL PROPOSALS OR PRIOR AGREEMENTS, VERBAL OR WRITTEN, AND ANY OTHER COMMUNICATIONS BETWEEN THE PARTIES RELATING TO THE SUBJECT
MATTER OF THIS AGREEMENT.
S O F T WA R E & H A R D WA R E R E Q U I R E M E N T S
Note: Anti-Virus Software might interfere with the software and might need to be disabled
Page 2
Page 4

TA B L E O F C O N T E N T S
H O W T O I N S T A L L T H E S O F T W A R E....................................................................................... 4
To install the Application from the ECOM Homepage ......................................................................... 4
To install the Application from your USB Stick ..................................................................................... 8
e-Comply
Q U I C K S T A R T G U I D E ..................................................................................................................... 9
Connecting to your Analyzer via Wi-Fi.................................................................................................. 9
Windows 7...........................................................................................................................................9
Windows 8.........................................................................................................................................10
Connecting to your Analyzer via Bluetooth ...........................................................................................9
Windows 7 .........................................................................................................................................10
Windows 8 …...................................................................................................................................10
Connecting to your Analyzer via USB...................................................................................................12
Windows 7 ......................................................................................................................................12
Windows 8 ......................................................................................................................................13
Set up Personal Data ...........................................................................................................................13
Setting Up Customer Data and Site(s)/Equipment(s) ......................................................................... 14
Setting up Theme/Font .......................................................................................................................18
Establishing Settings ............................................................................................................................20
Pre-Test Calibration .............................................................................................................................23
Running an Emission Test.....................................................................................................................26
Post-Test Drift Check............................................................................................................................27
Hybrid and Graph Tab .........................................................................................................................29
H O W T O L A U N C H T W O E - C O M P L Y S O F T W A R E A P P L I C A T I O N S
S I M U L T A N E O U S L Y .................................................................................................................. 30
Setting up the Software....................................................................................................................30
Running an Emissions Test ...............................................................................................................30
B A S I C T R O U B L E S H O O T I N G..............................................................................………………….31
Interrupted Bluetooth or Wi-Fi Connection .....................................................................................31
Bluetooth........................................................................................................................................31
Wi-Fi............................................................................................................................................... 32
Continual Wi-Fi connection drops……………………………………………………………………………………………..32
Page 3
Page 5
e-Comply
e-Comply
H O W T O I N S TA L L T H E S O F T WA R E
To install the Application from the ECOM Homepage
Please ensure that you have Administrative rights to install software on your computer.
1. Open a web browser window and type ecomusa.com into the address field, then click on the “Enter” key on your keyboard
2. Click on “Client Login” on the top menu of the webpage
3. Enter your “E-Mail” and “Password” and then click on “Login” (please create an account should you not have login permissions)
4. Go to the Software menu, select “e-Comply” and click the appropriate e-Comply link, the file will begin downloading to your computer. Save the zip folder
to your hard drive (it might take several minutes to download the file)
5. Locate the file folder on your hard drive (e-Comply_x64_1.15.000 for 64bit or e-Comply_x32_1.15.000for 32 bit), right-click on and select
“Extract All…”
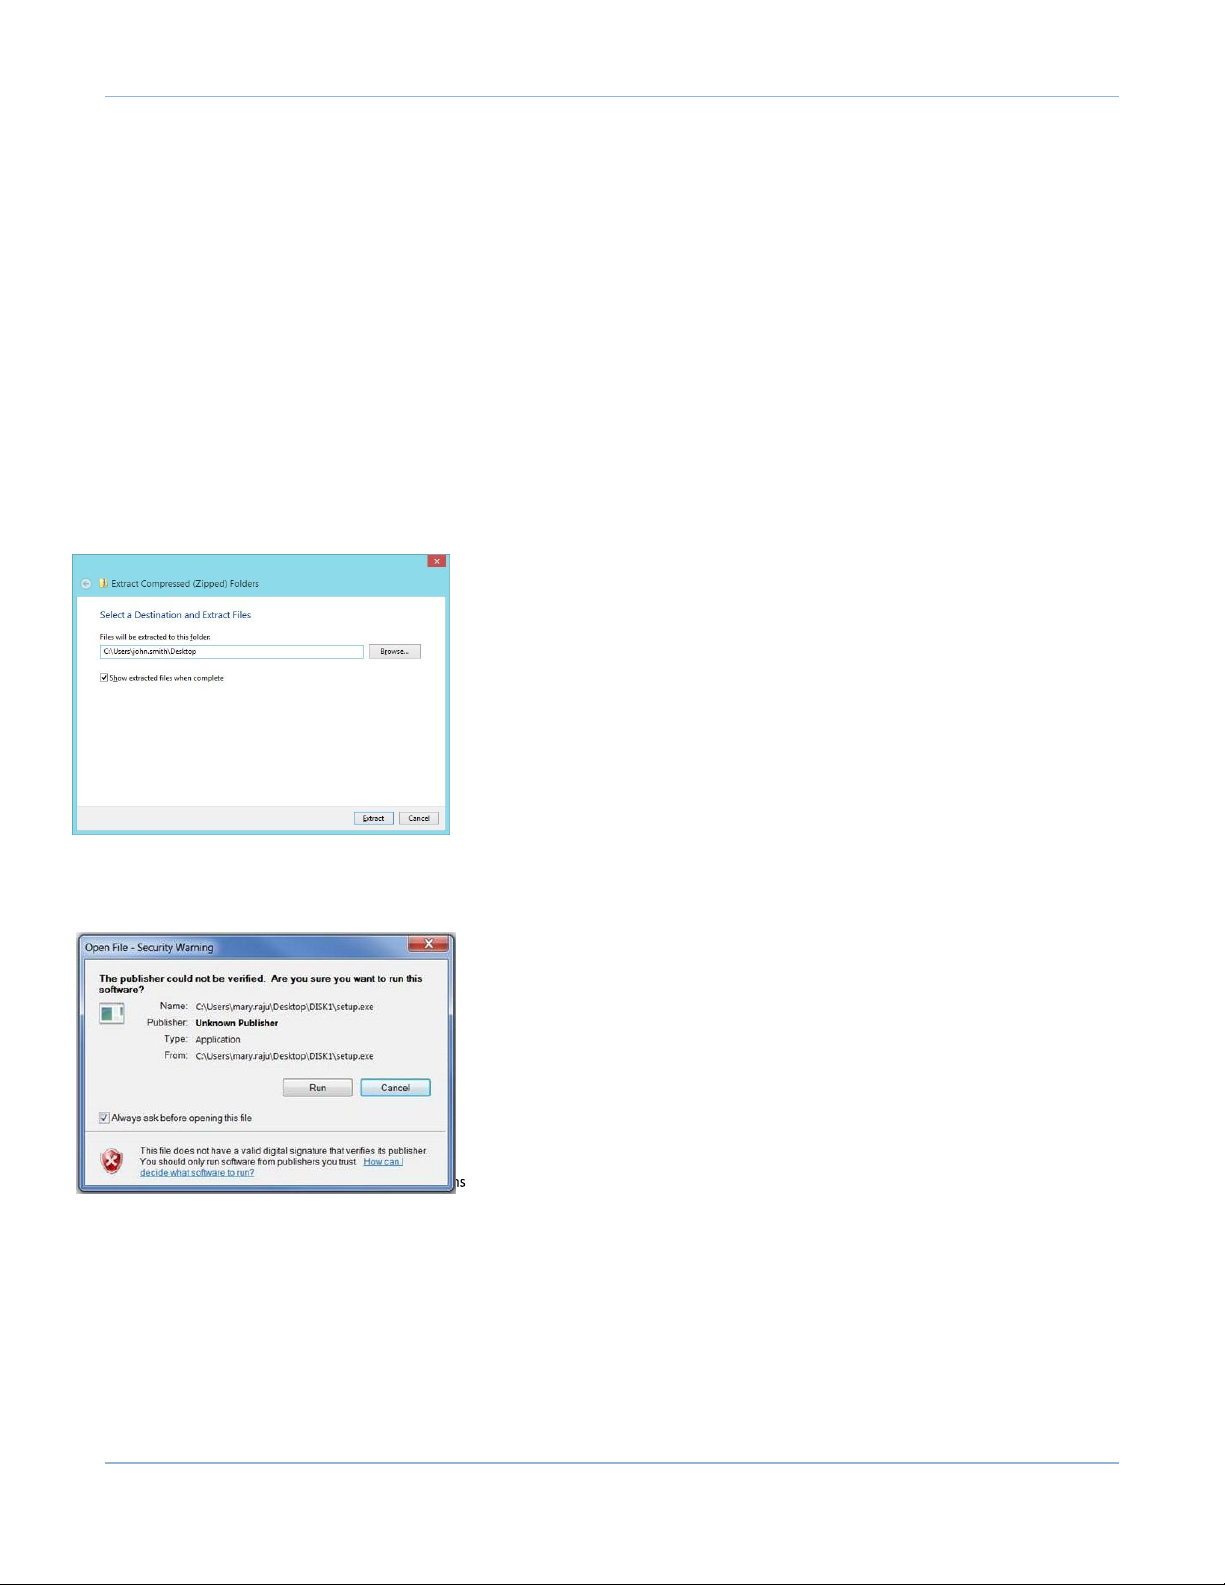
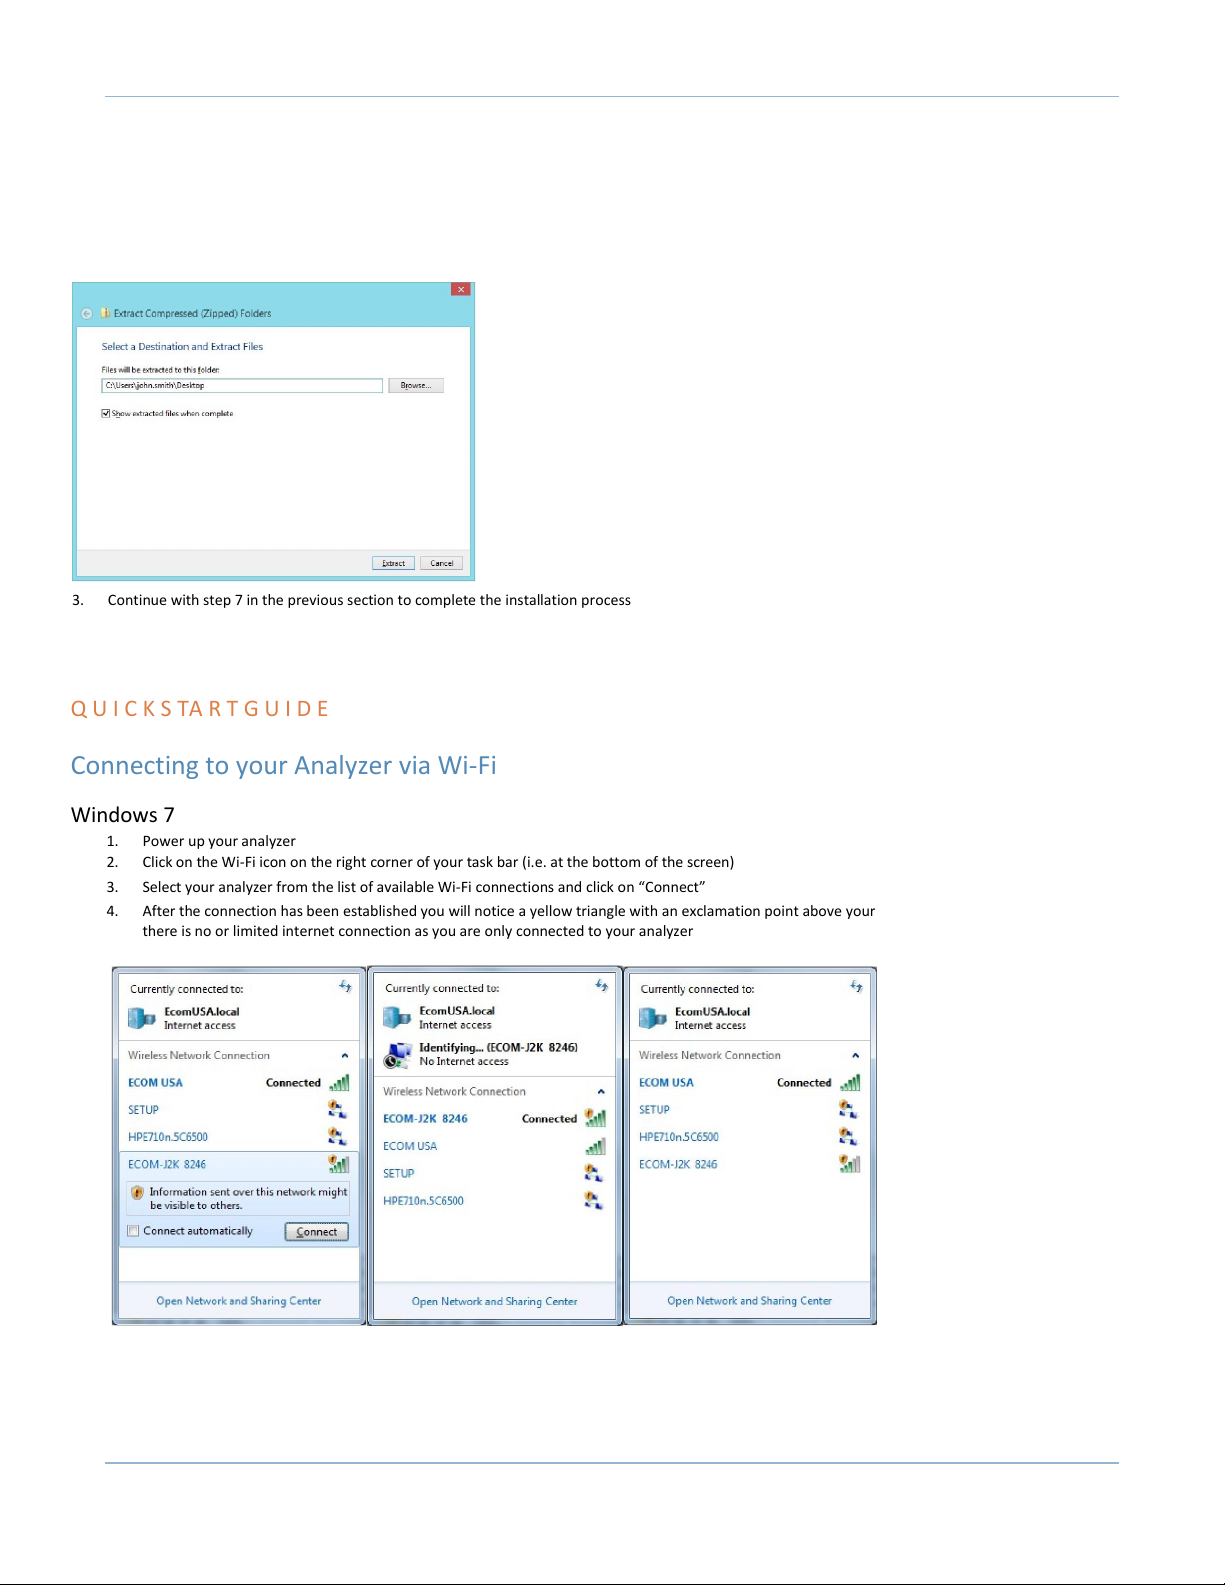
6. Select the location to extract the file to:
7. Locate the folder “DISK1”, open it and then open the file named “setup”
8. Double-click on the “setup” file to initiate the installation process on the upcoming security warning window click on “Run”
Page 4
Page 6
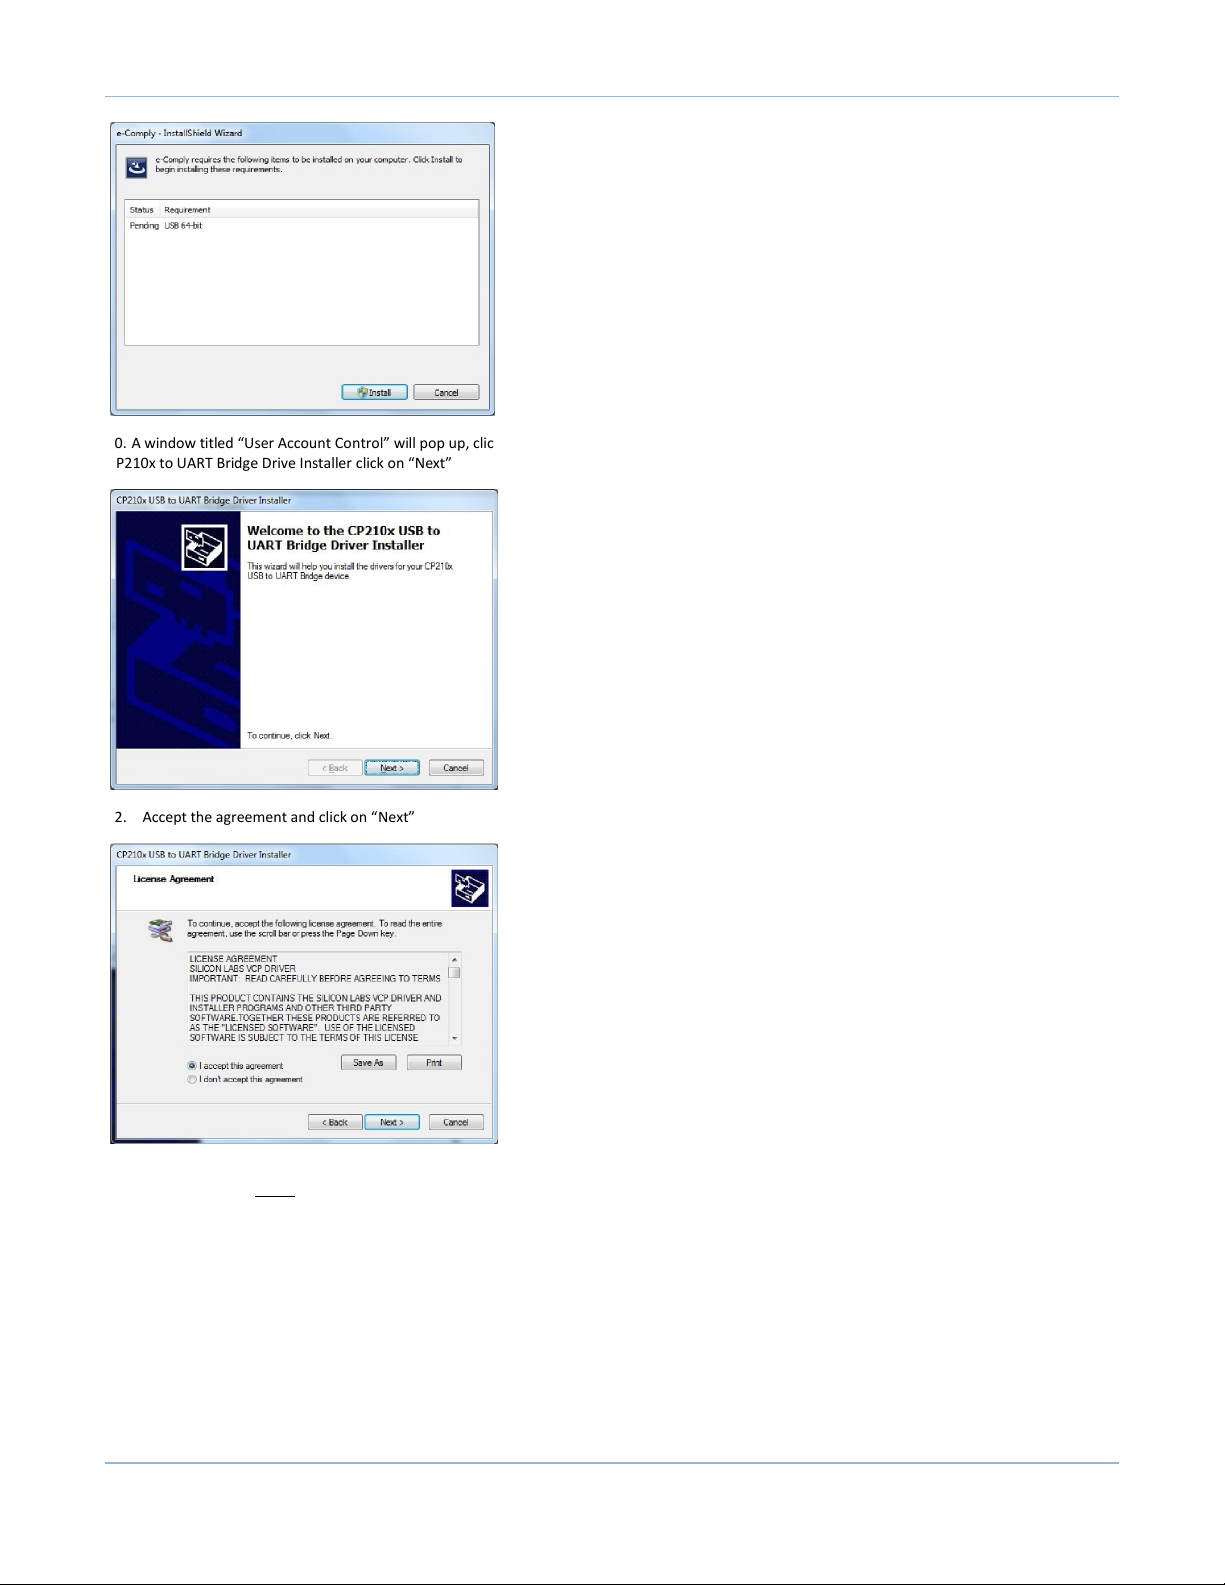
10. A window titled “User Account Control” will pop up, click on “Install” 11. On the
CP210x to UART Bridge Drive Installer click on “Next”
e-Comply
12. Accept the agreement and click on “Next”
13. Click on “Finish.” Note: If you have previously installed this driver, you may get a message that says your driver is up-to-date.
Page 5
Page 7
e-Comply
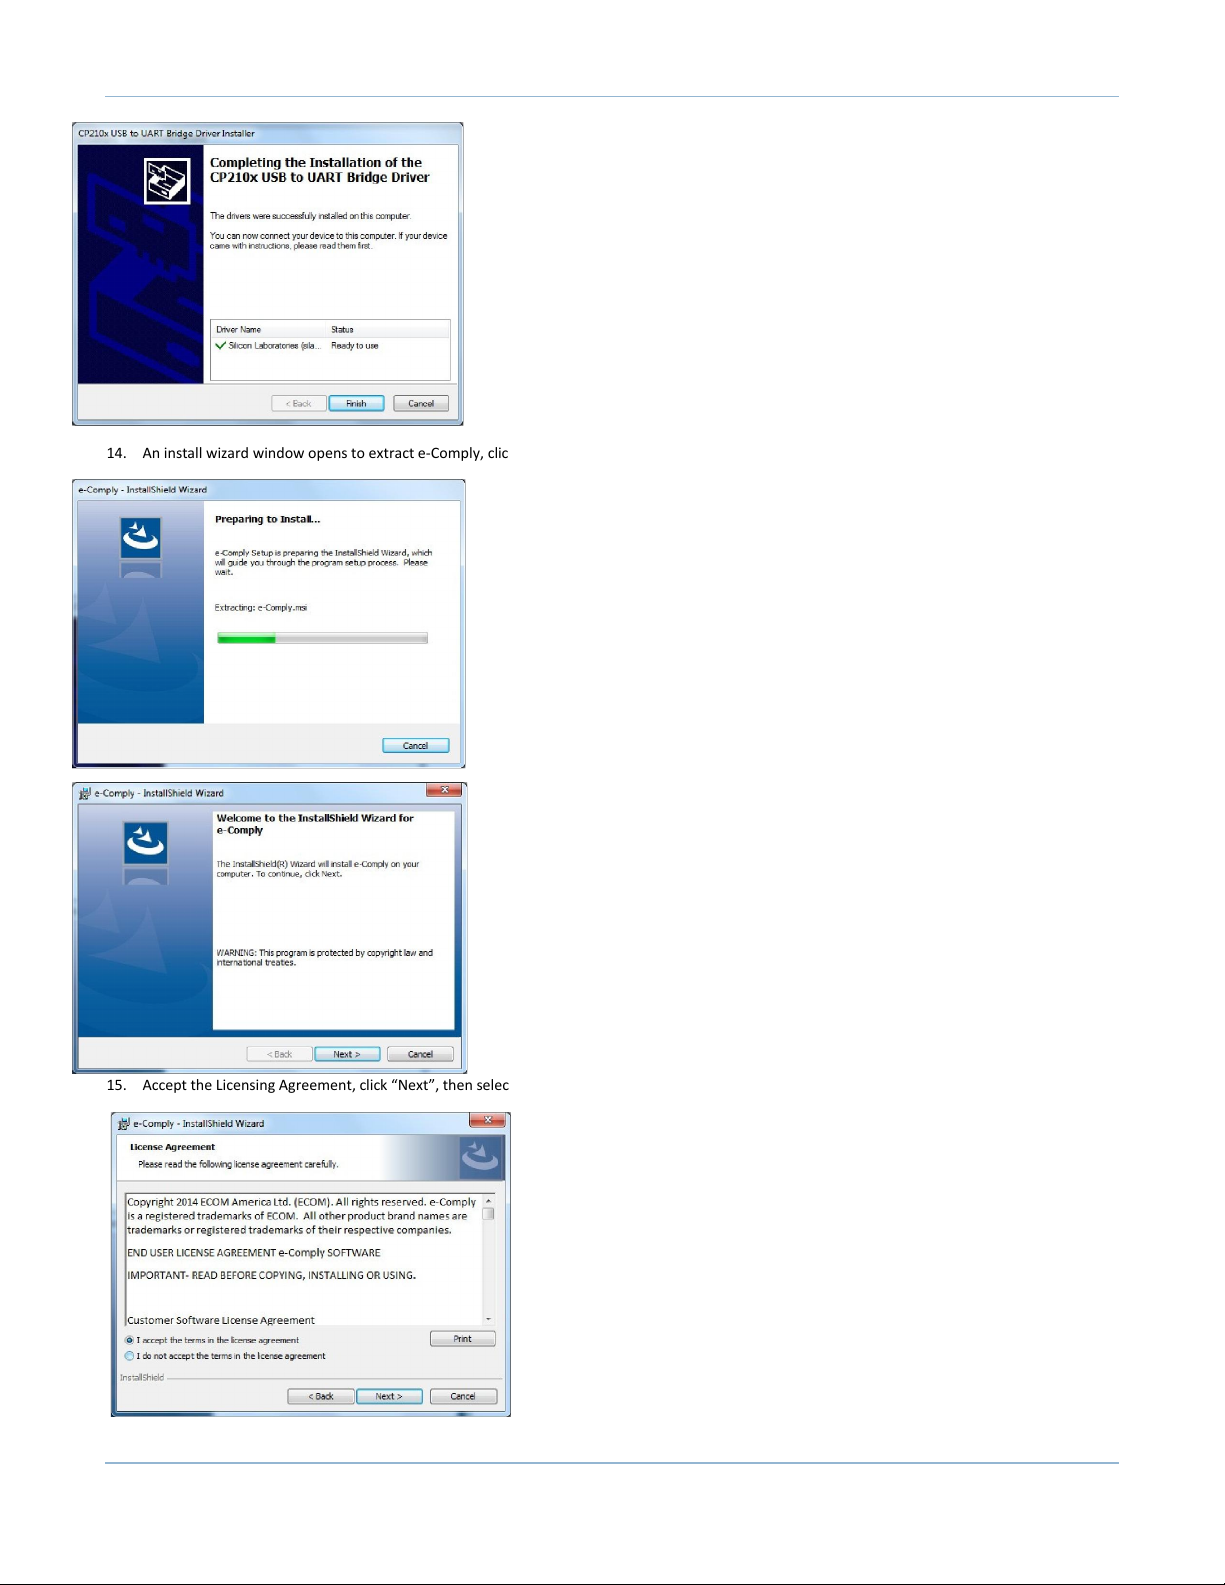
14. An install wizard window opens to extract e-Comply, click on “Next” on the following window:
15. Accept the Licensing Agreement, click “Next”, then select or confirm the destination folder location and then click “Next”:
Page 6
Page 8
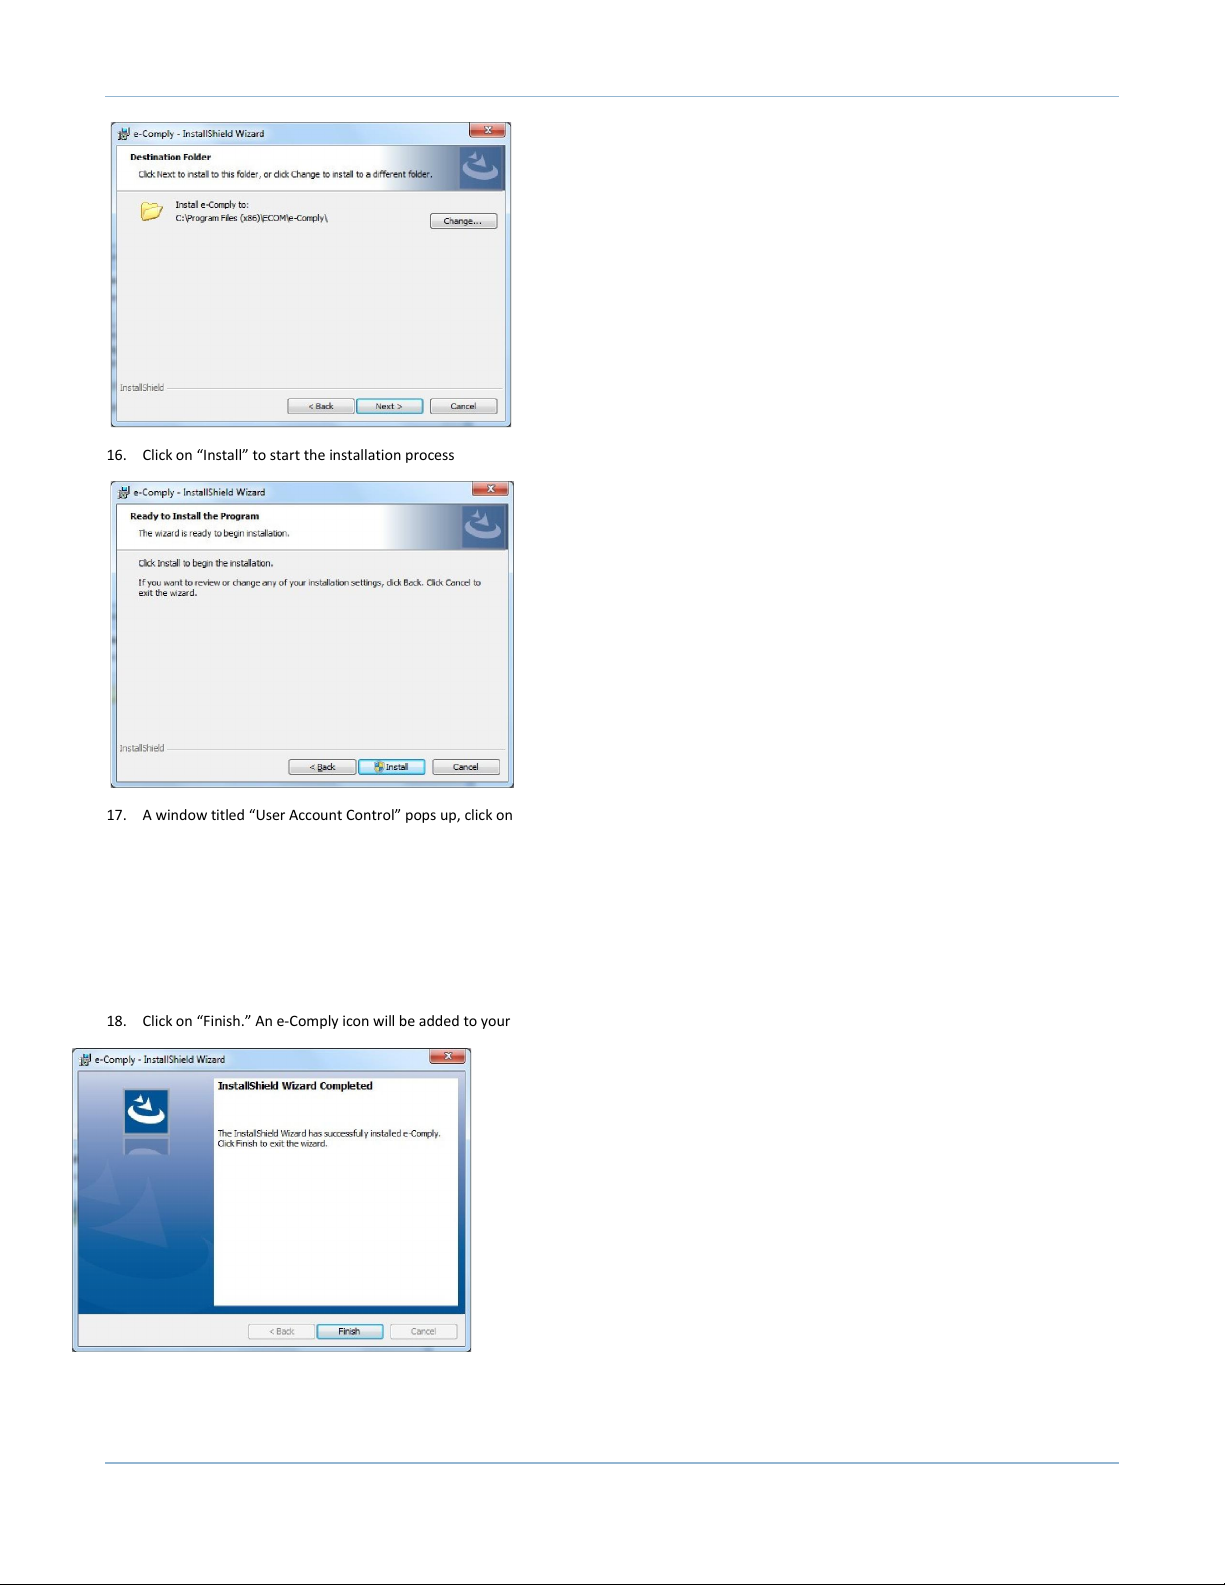
16. Click on “Install” to start the installation process
e-Comply
17. A window titled “User Account Control” pops up, click on “Yes”
18. Click on “Finish.” An e-Comply icon will be added to your desktop
Page 7
Page 9
e-Comply
To install the Application from your USB Stick
Please assure that you have Administrative rights to install software on your computer.
1. Insert the USB stick supplied by ECOM into your computers USB port and view its content
2. Depending if your operating system is 32bit or 64bit (Note: Windows 8 is 64bit) right-click the on the file e-Comply_x64_1.19.011 (for 64bit) or
eComply_x32_1.19.011 (for 32 bit), right-click on and select to “Extract All…”, then select to extract the file to a location on your hard drive (e.g. your desktop)
3. Continue with step 7 in the previous section to complete the installation process
Q U I C K S TA R T G U I D E
Connecting to your Analyzer via Wi-Fi
Windows 7
1. Power up your analyzer
2. Click on the Wi-Fi icon on the right corner of your task bar (i.e. at the bottom of the screen)
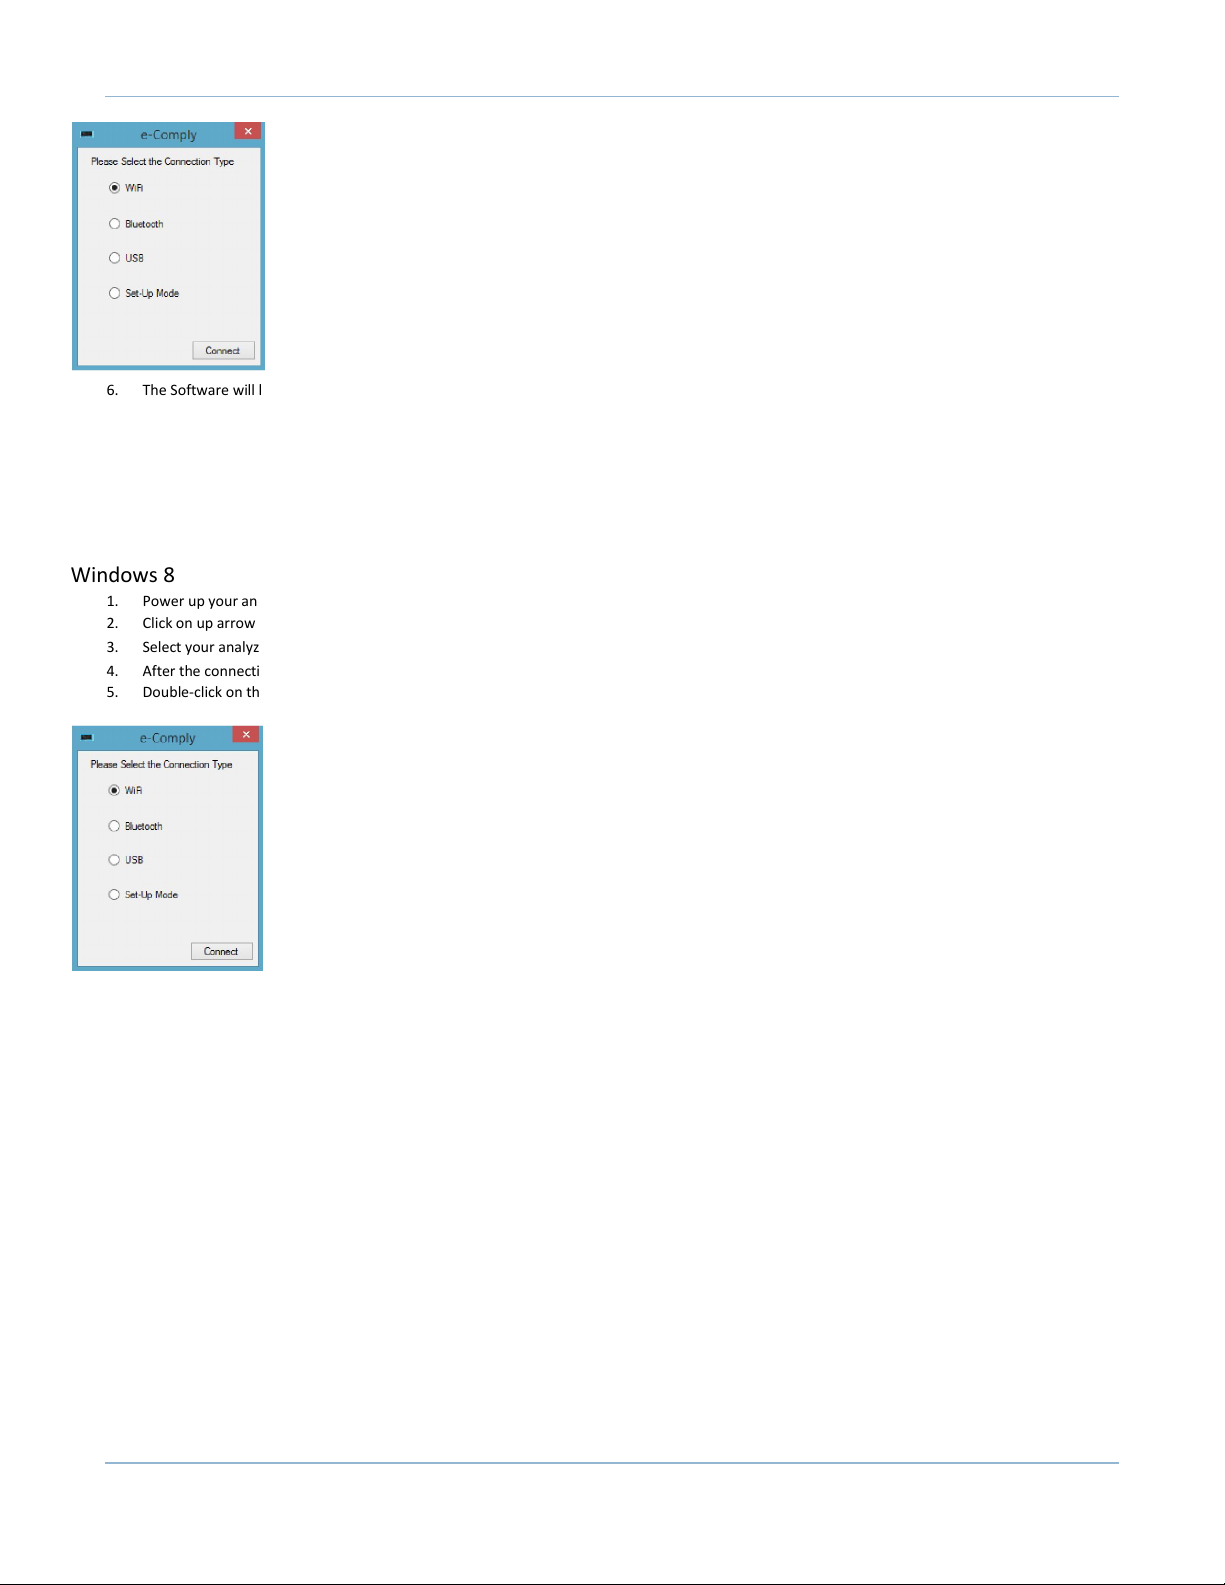
3. Select your analyzer from the list of available Wi-Fi connections and click on “Connect”
4. After the connection has been established you will notice a yellow triangle with an exclamation point above your Wi-Fi icon. Note: This indicates that
there is no or limited internet connection as you are only connected to your analyzer
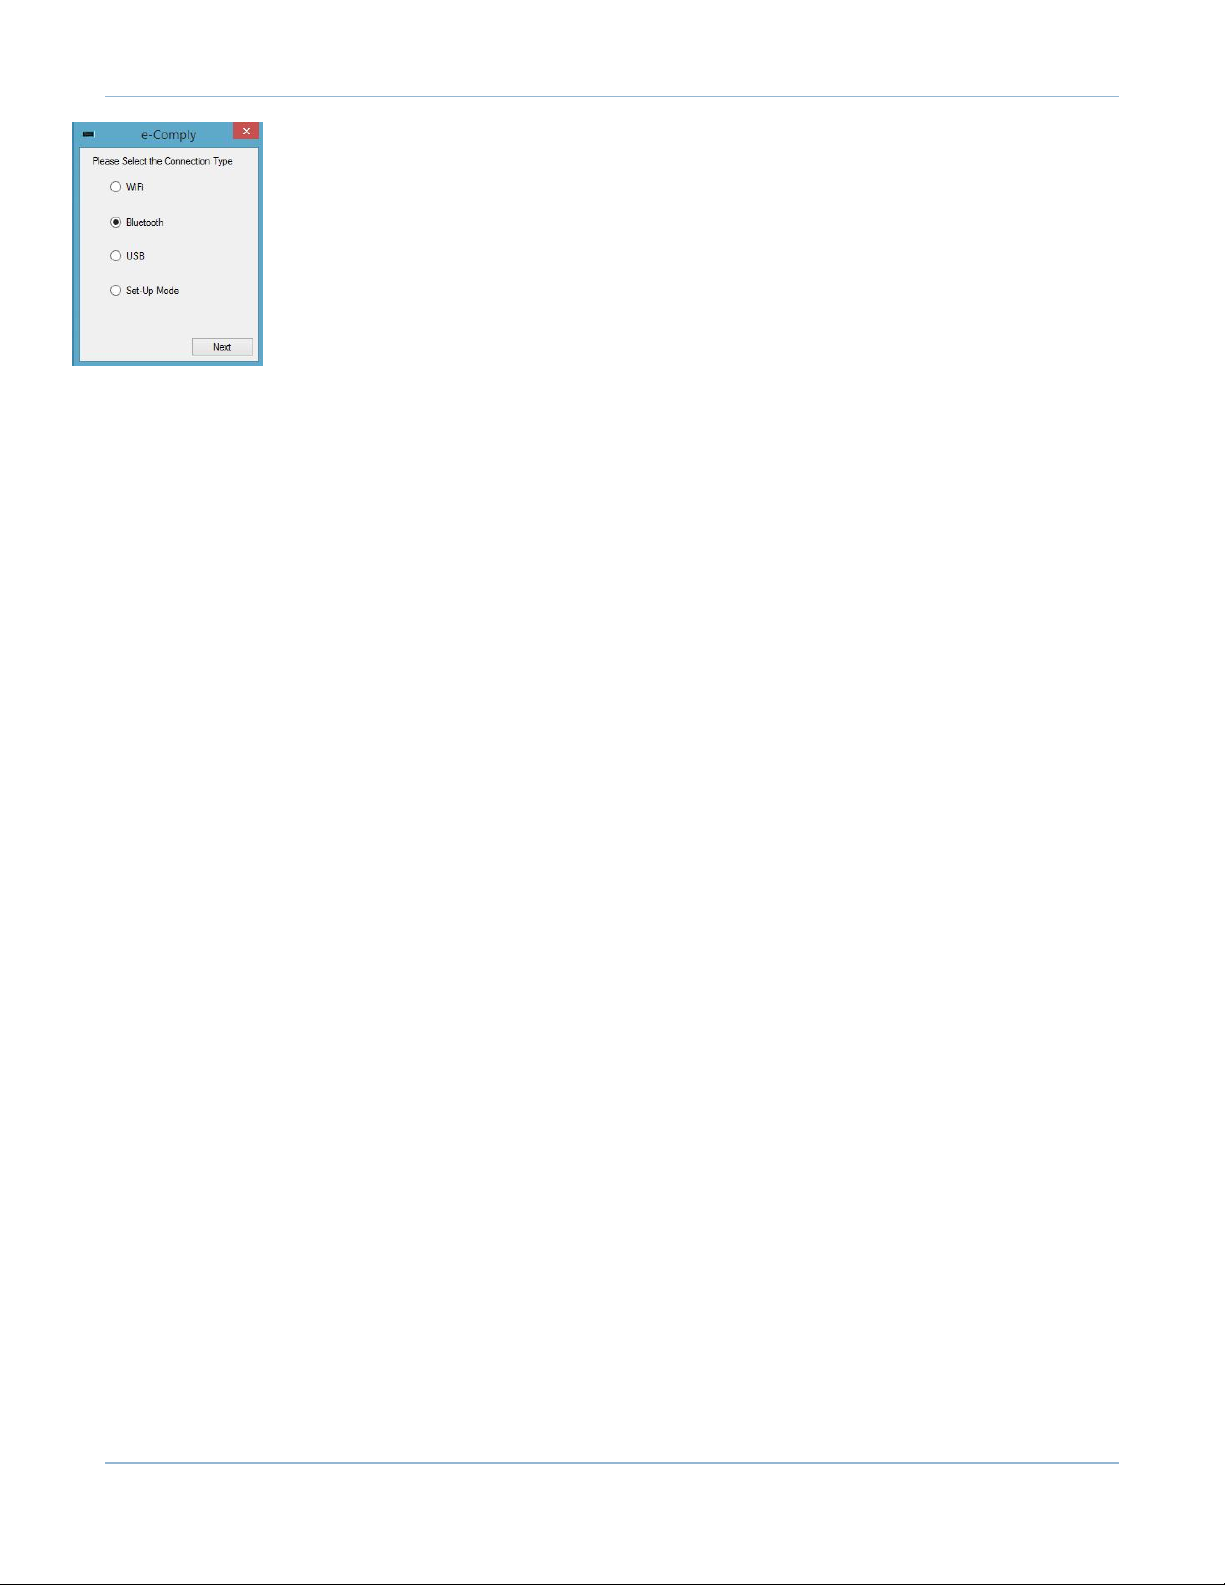
5. Double-click on the e-Comply icon on your desktop, on the pop-up window select “Wi-Fi” and click on “Connect”
Page 8
Page 10
6. The Software will launch
e-Comply
Windows 8
1. Power up your analyzer
2. Click on up arrow on the right corner of your task bar (i.e. at the bottom of the screen) and click on the network symbol (five bars)
3. Select your analyzer from the list of available Wi-Fi connections and click on “Connect”
4. After the connection has been established it will say “Connected” next to your analyzer
5. Double-click on the e-Comply icon on your desktop, on the pop-up window select “Wi-Fi” and click on “Connect”
6. The Software will launch
Connecting to your Analyzer via Bluetooth
Windows 7
Note: If your computer is not equipped with Bluetooth you will first need to install a Bluetooth adapter. ECOM can supply a PENA UD100a Class1
Bluetooth adapter
1. Power up your analyzer
2. Right-click on the Bluetooth icon on the right corner of your task bar (i.e. at the bottom of the screen) and click on “Add a Device”. Your computer will scan
for Bluetooth devices within range and should detect your analyzer (e.g. ECOM-J2K 1234)
3. Double click on your analyzer to establish the Bluetooth connection
Note: If the computer asks you how you would like to pair the analyzer, select “Enter the device’s pairing code” and input 1234. Should the computer displays a
6-digit code and ask you to “Compare pairing between codes between your computer and this device,” click “Yes”. Your computer and analyzer are now paired
4. Double-click on the e-Comply icon on your desktop, on the pop-up window select Bluetooth and click on “Next”
Page 9
Page 11
e-Comply
5. Click on “Scan”, select your analyzer and then click on “Connect”
Page 10
Page 12
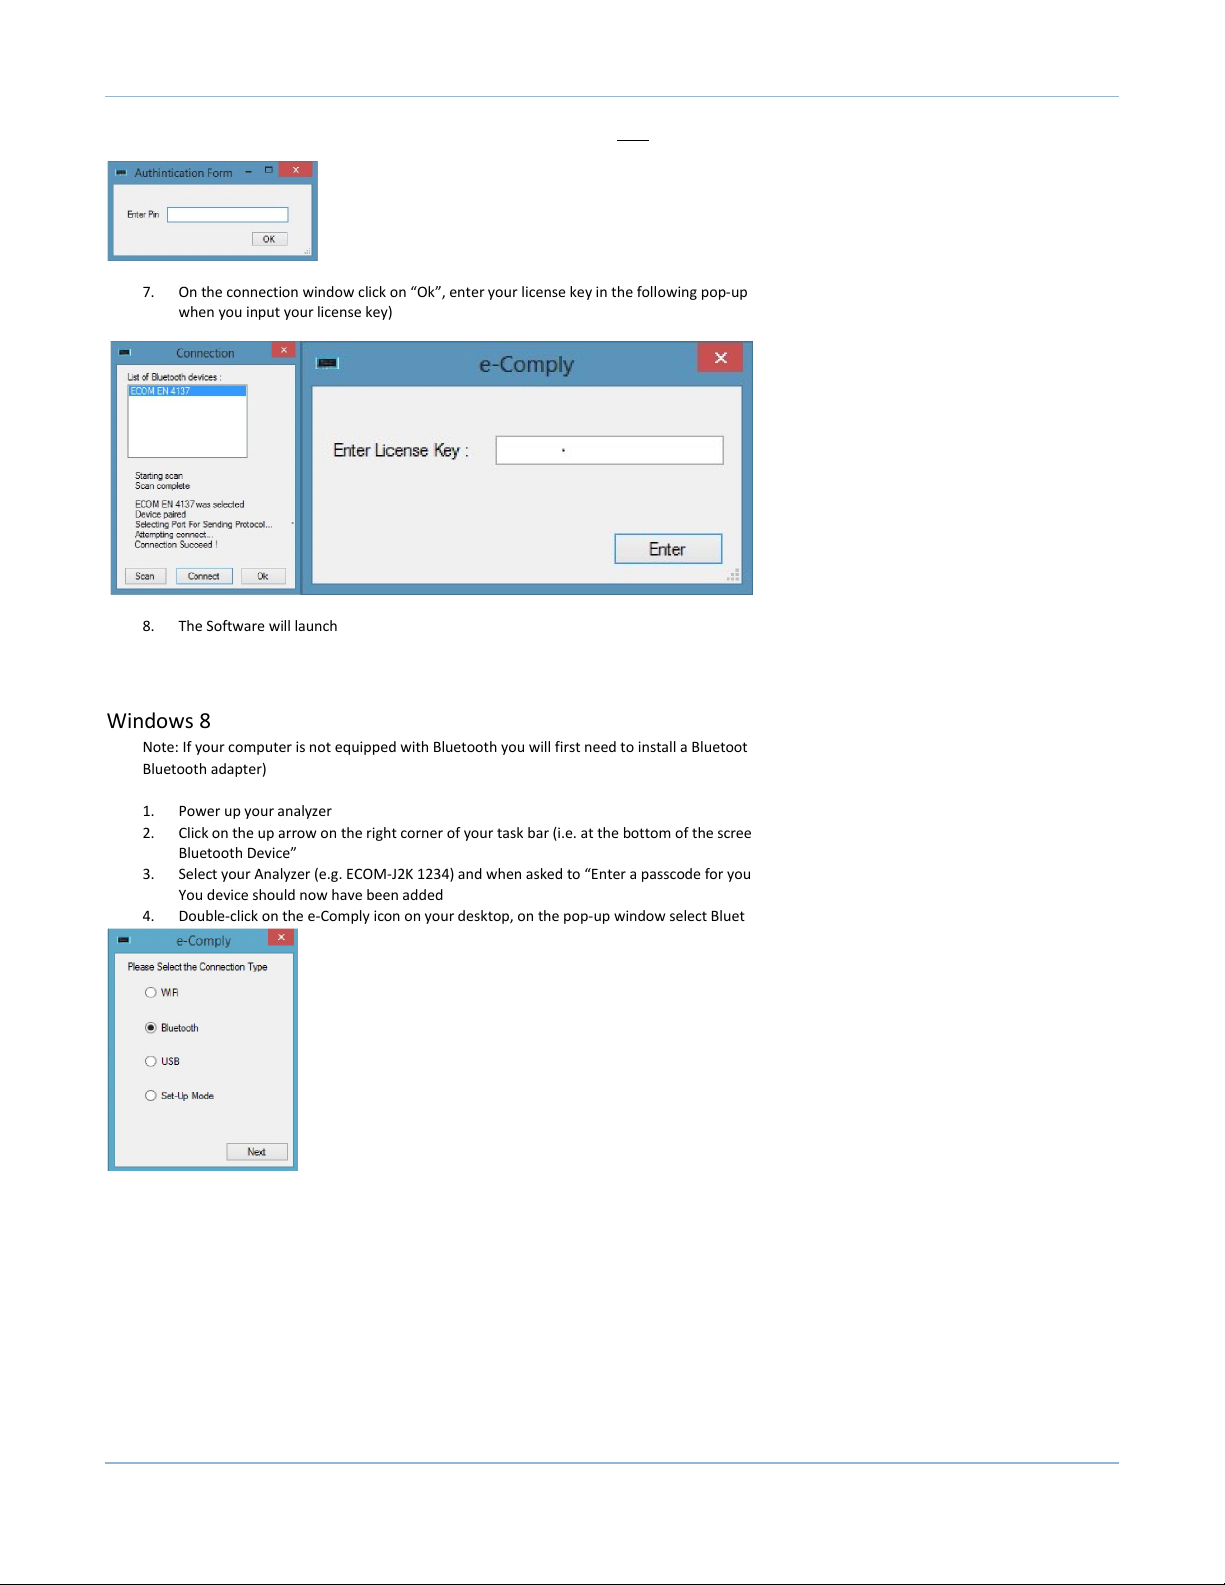
6. On the authentication pop-up window, enter 1234 and click on OK. Note: This will not pop up if you have already paired your analyzer
7. On the connection window click on “Ok”, enter your license key in the following pop-up and click on “Enter” (make sure to include the dashes
when you input your license key)
8. The Software will launch
e-Comply
Windows 8
Note: If your computer is not equipped with Bluetooth you will first need to install a Bluetooth adapter. ECOM can supply a PENA UD100a Class1
Bluetooth adapter)
1. Power up your analyzer
2. Click on the up arrow on the right corner of your task bar (i.e. at the bottom of the screen) and click on the Bluetooth icon and select “Add a
Bluetooth Device”
3. Select your Analyzer (e.g. ECOM-J2K 1234) and when asked to “Enter a passcode for your device” click “Next” or enter 1234 and click “Next”.
You device should now have been added
4. Double-click on the e-Comply icon on your desktop, on the pop-up window select Bluetooth and click on “Next”
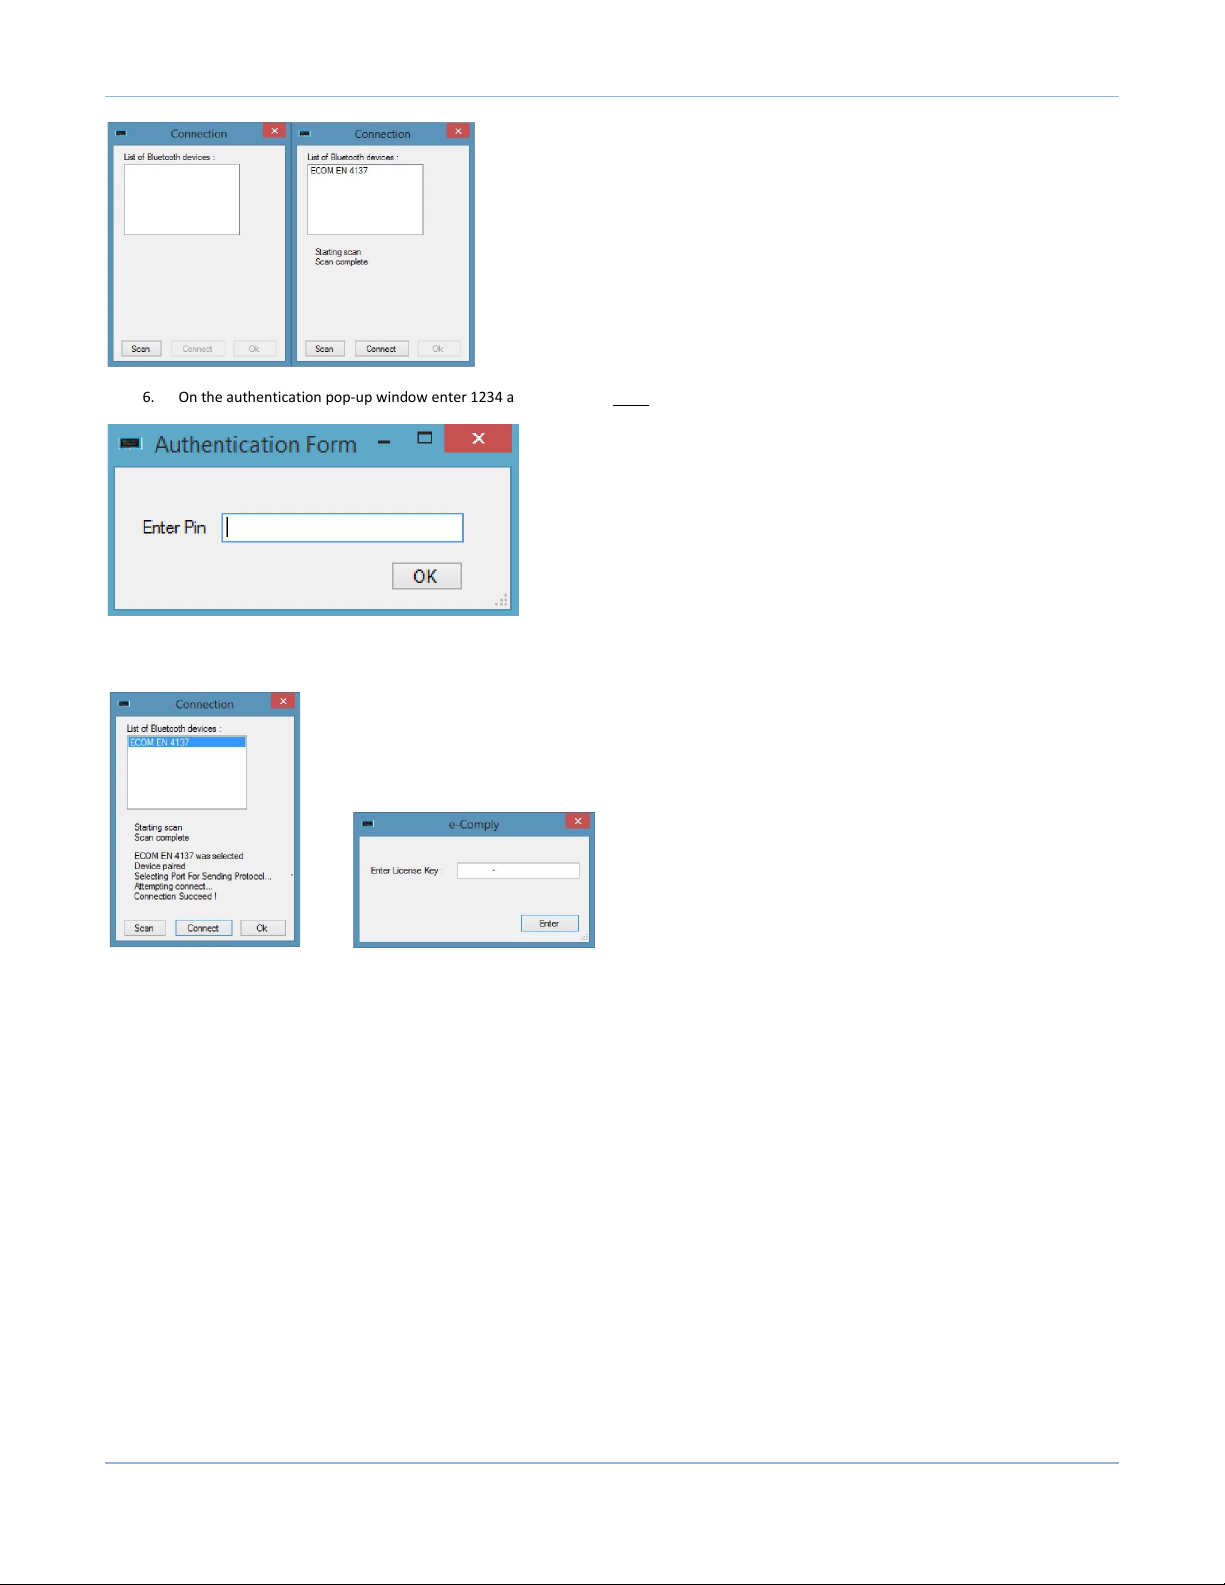
5. Click on “Scan”, select your analyzer and then click on “Connect”
Page 11
Page 13
e-Comply
6. On the authentication pop-up window enter 1234 and click on OK. Note: This will not pop up if you have already paired your analyzer
7. On the connection window click on “Ok”, enter your license key in the following pop-up and click on “Enter” (make sure to include the dashes
when you input your license key)
8. The Software will launch
Connecting to your Analyzer via USB
Windows 7
1. Power up your analyzer
2. Using a USB cable connect your computer to your analyzer
3. Double-click on the e-Comply icon on your desktop, on the pop-up window select USB and click on “Connect”
Page 12
Page 14
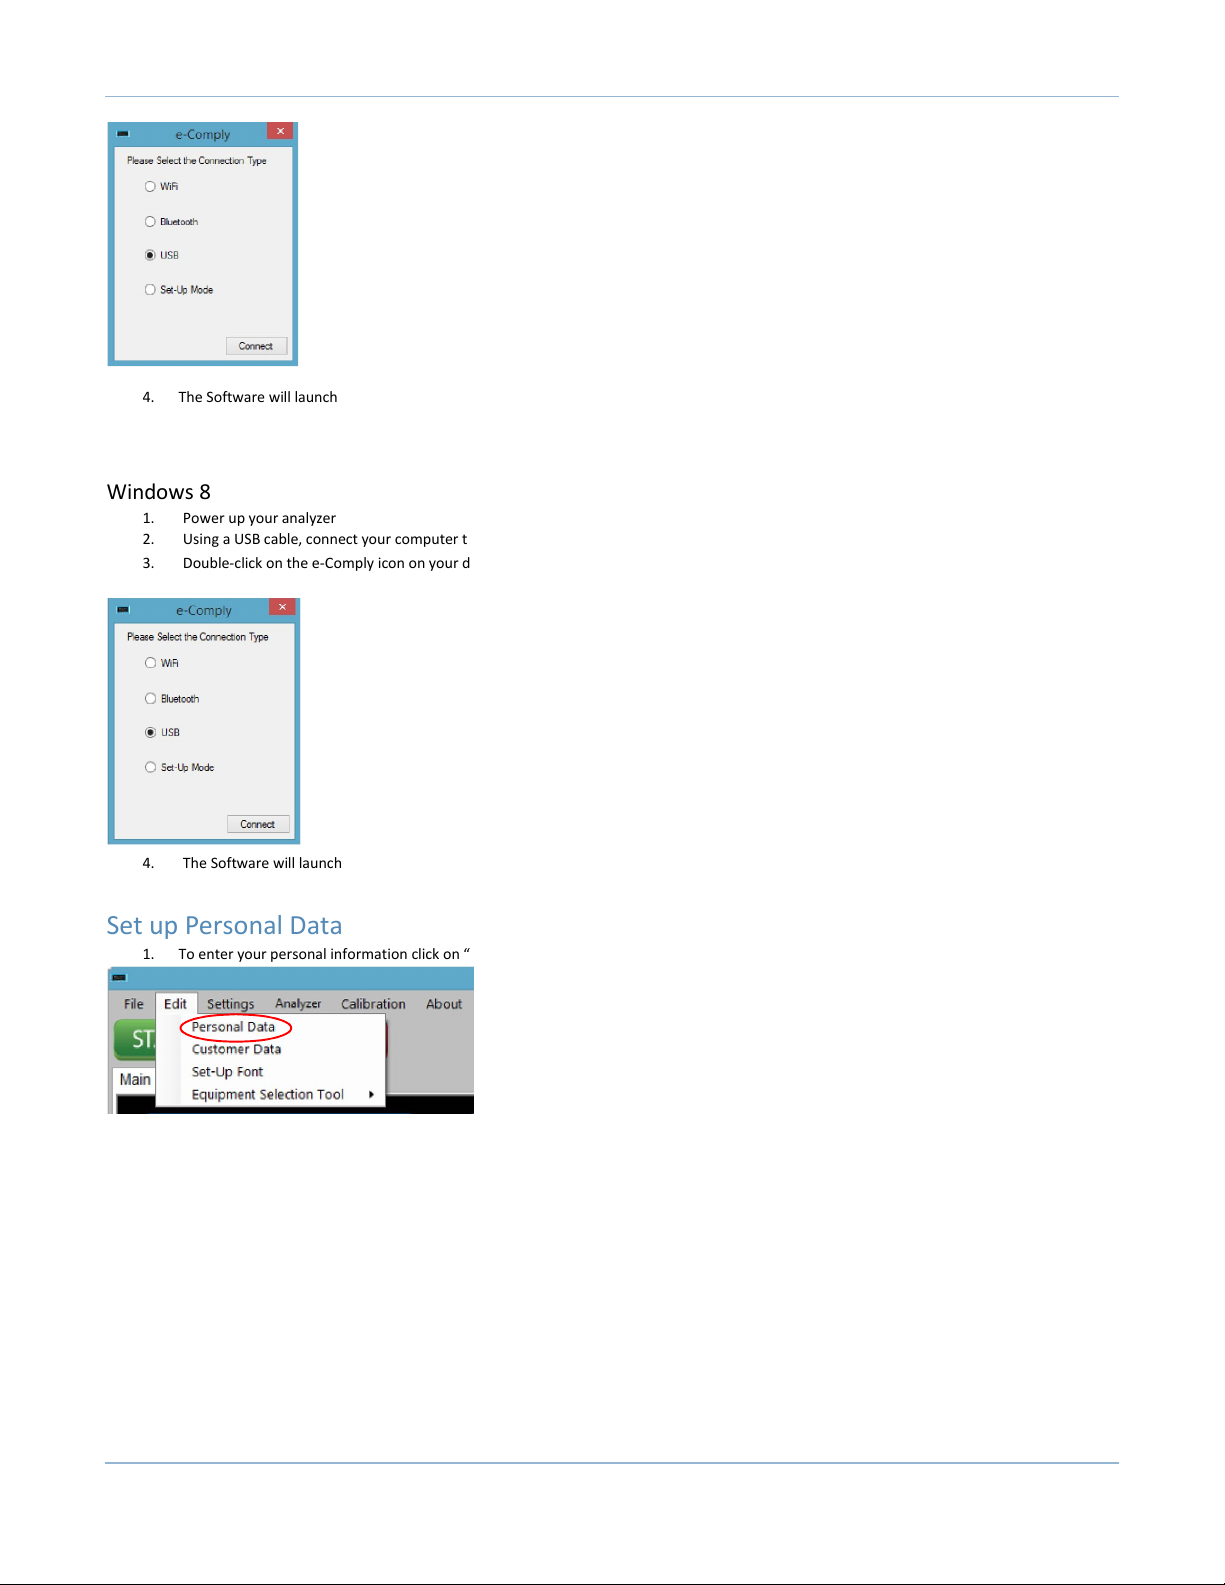
4. The Software will launch
Windows 8
1. Power up your analyzer
2. Using a USB cable, connect your computer to your analyzer
3. Double-click on the e-Comply icon on your desktop, on the pop-up window select USB and click on “Connect”
e-Comply
4. The Software will launch
Set up Personal Data
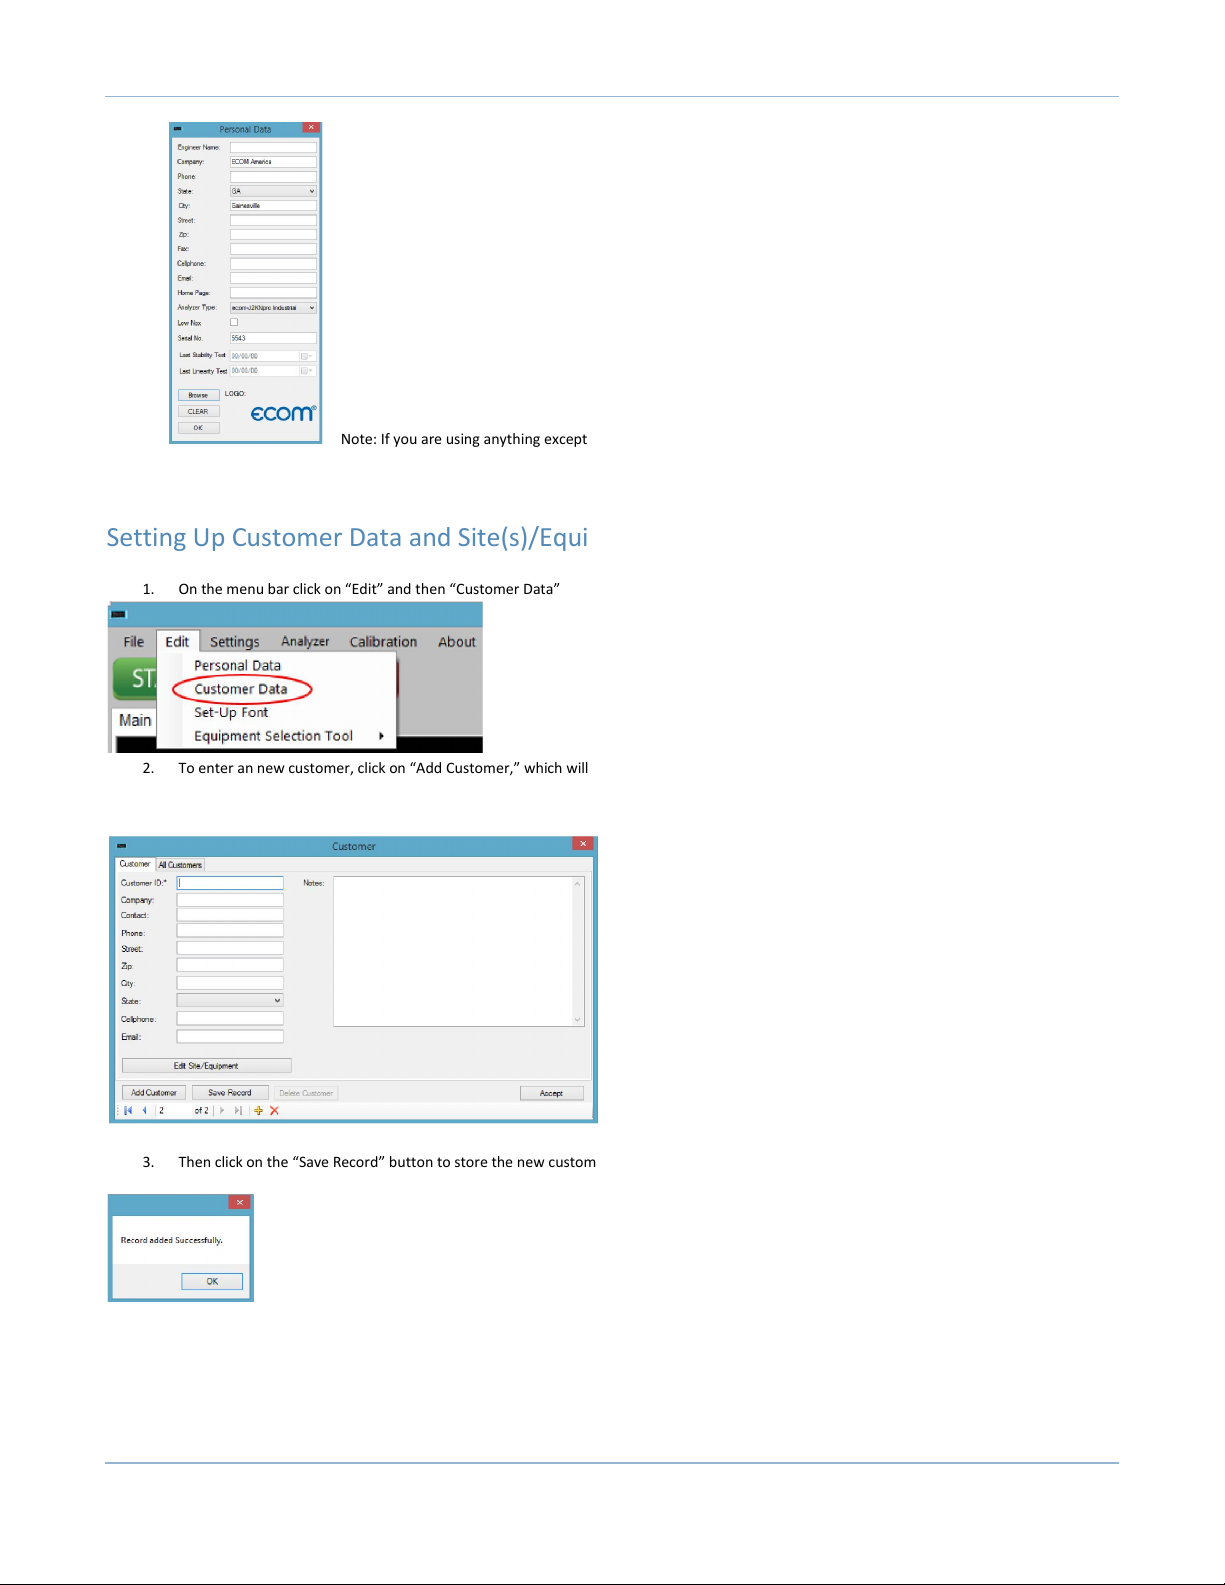
1. To enter your personal information click on “Edit” and select “Personal Data”
2. On the “Personal Data” window enter your information, select your analyzer model, upload your company’s logo, then click on “OK”
Page 13
Page 15
e-Comply
Note: If you are using anything except a J2KN Pro Industrial, you will be instructed that you have to purge manually.
Setting Up Customer Data and Site(s)/Equipment(s)
1. On the menu bar click on “Edit” and then “Customer Data”
2. To enter an new customer, click on “Add Customer,” which will clear the window, enter the customer information
3. Then click on the “Save Record” button to store the new customer. You will be notified that the record was added successfully.
4. Now click the “Edit Site/Equipment” button, which will bring up the “Setup Equipment & Site” window
Page 14
Page 16
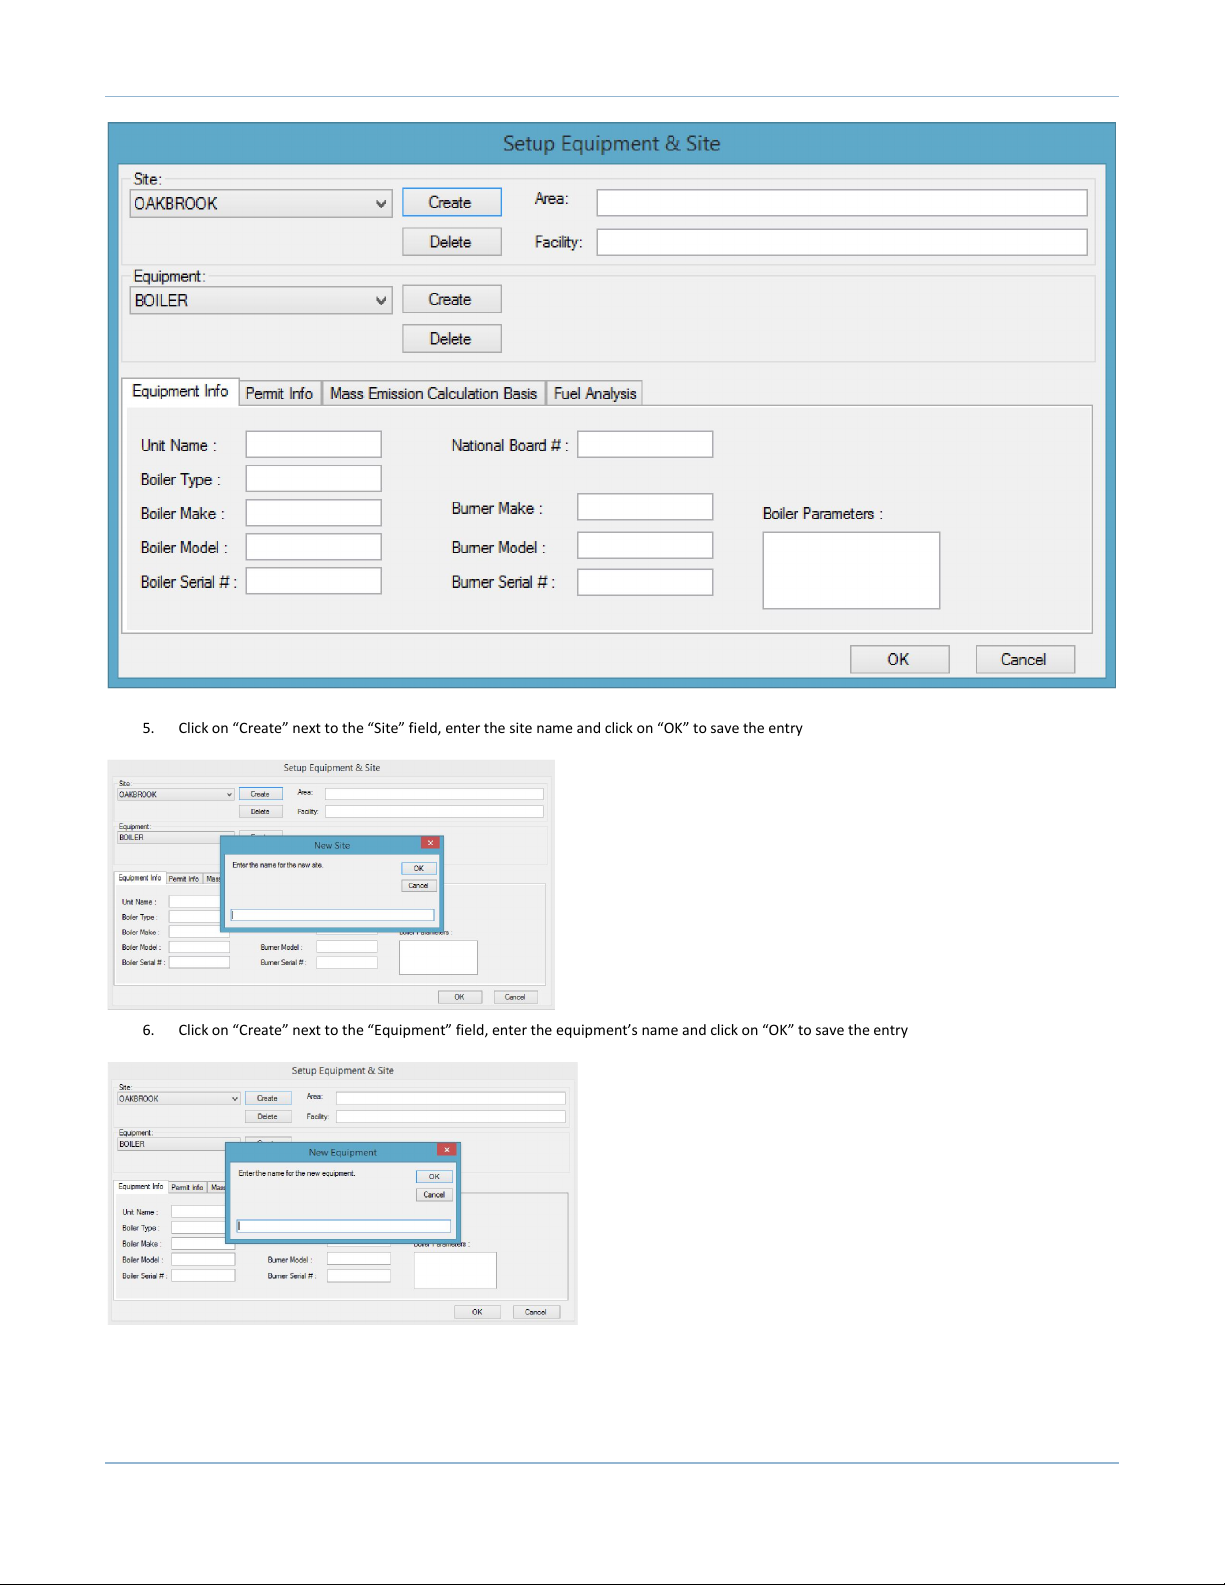
5. Click on “Create” next to the “Site” field, enter the site name and click on “OK” to save the entry
e-Comply
6. Click on “Create” next to the “Equipment” field, enter the equipment’s name and click on “OK” to save the entry
7. Now, you can enter the detailed equipment information on the “Equipment Info” tab
Page 15
Page 17
e-Comply
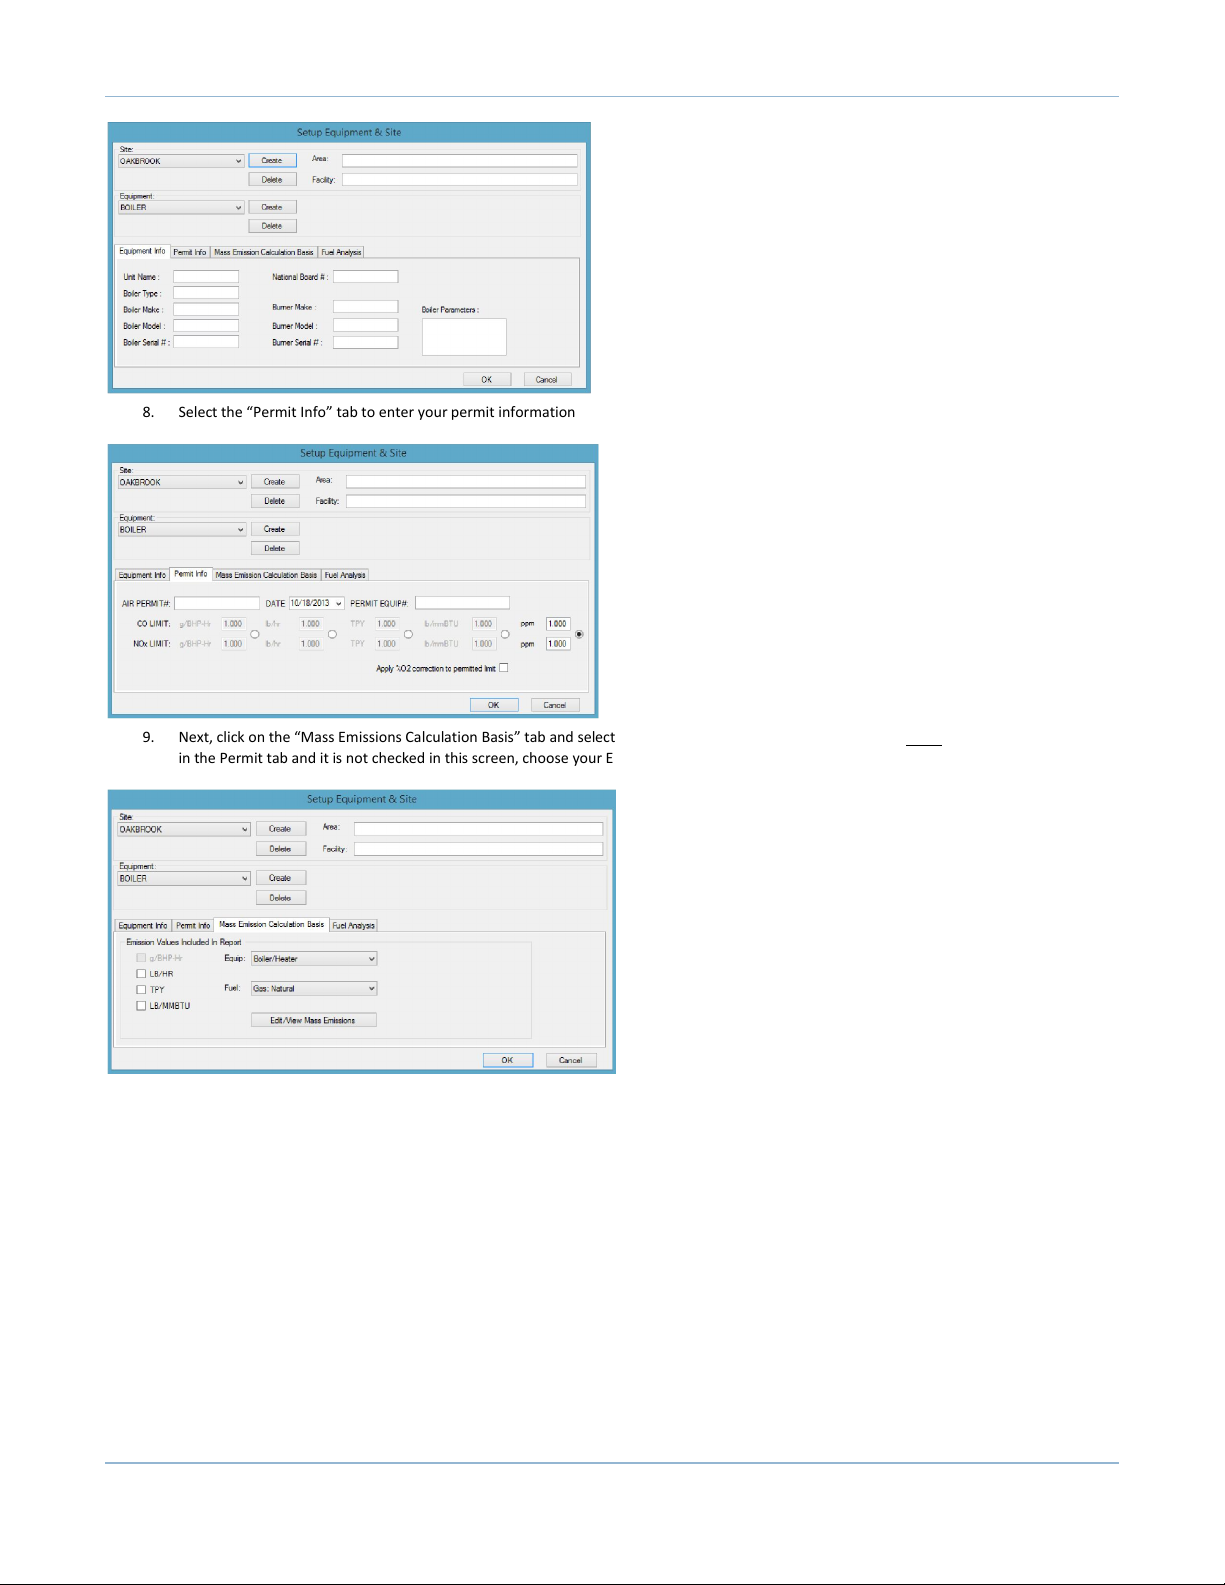
8. Select the “Permit Info” tab to enter your permit information
9. Next, click on the “Mass Emissions Calculation Basis” tab and select the emissions values included in the report. Note: If you selected g/bhp-hr
in the Permit tab and it is not checked in this screen, choose your Equip and Fuel Type first, then it should appear.
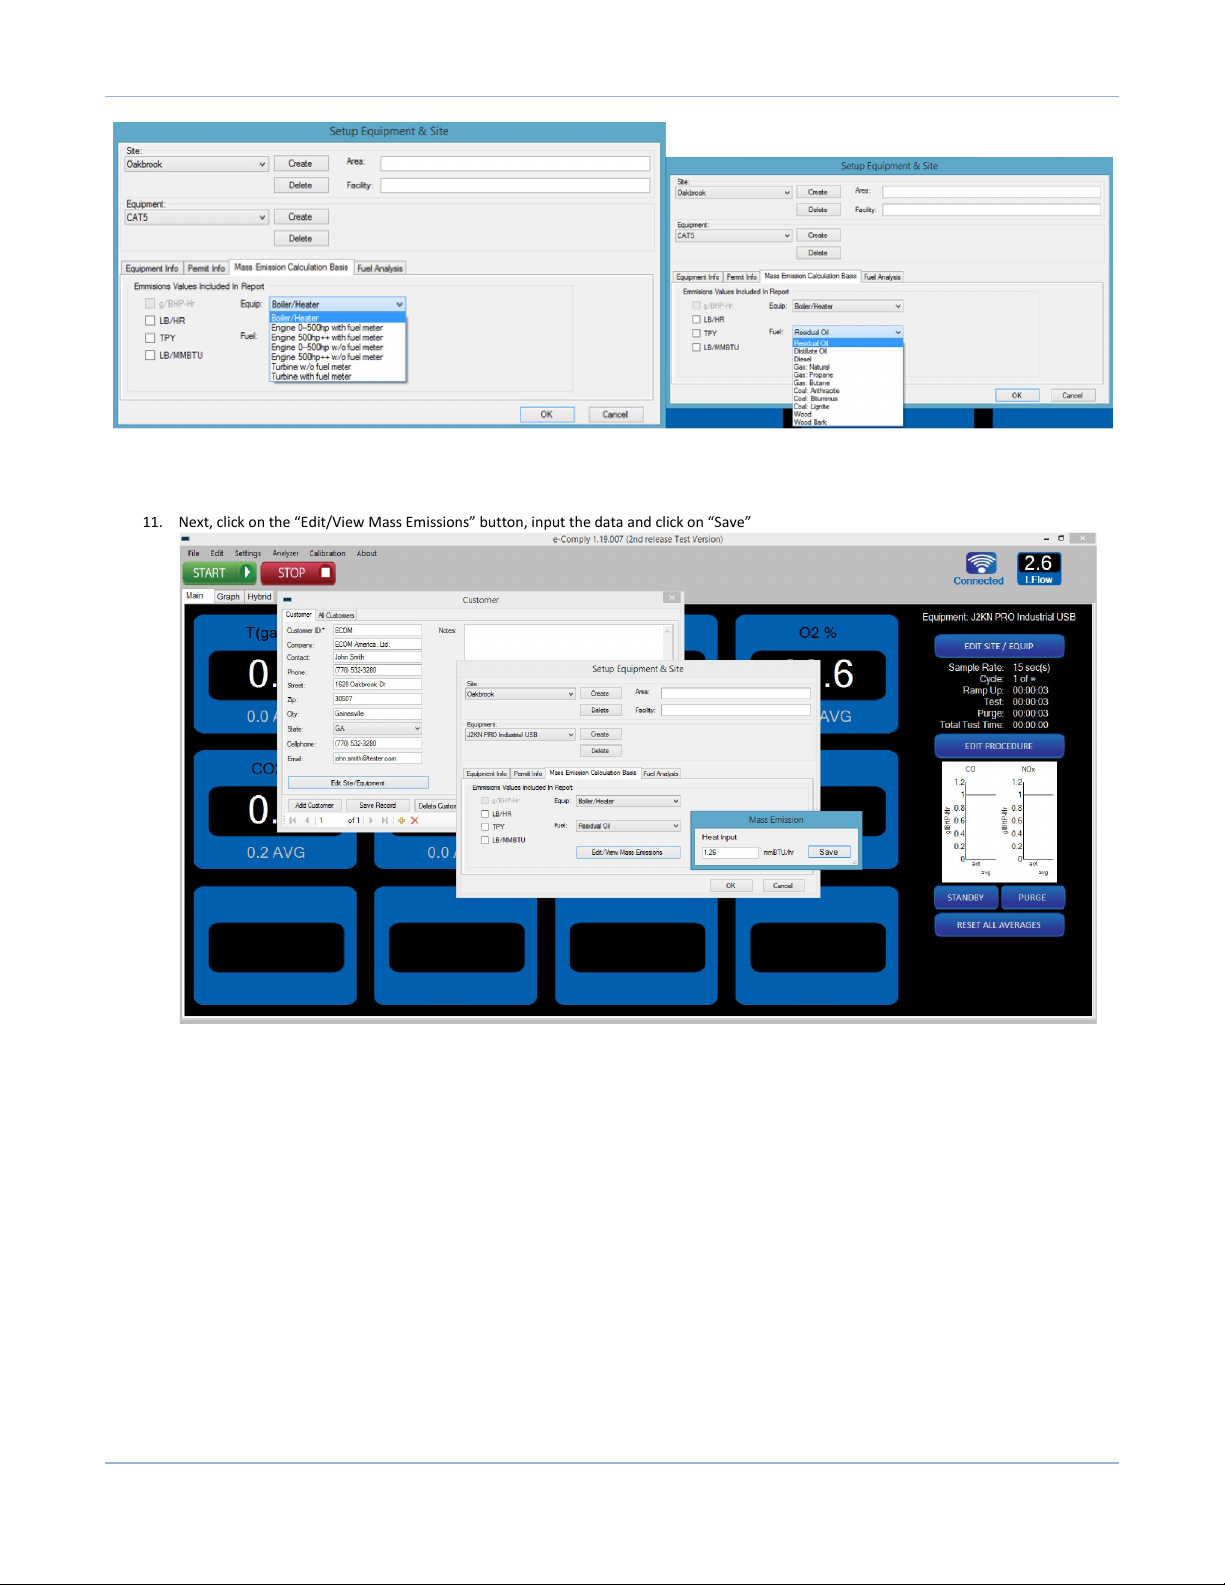
10. Then select the equipment and fuel type
Page 16
Page 18
e-Comply
11. Next, click on the “Edit/View Mass Emissions” button, input the data and click on “Save”
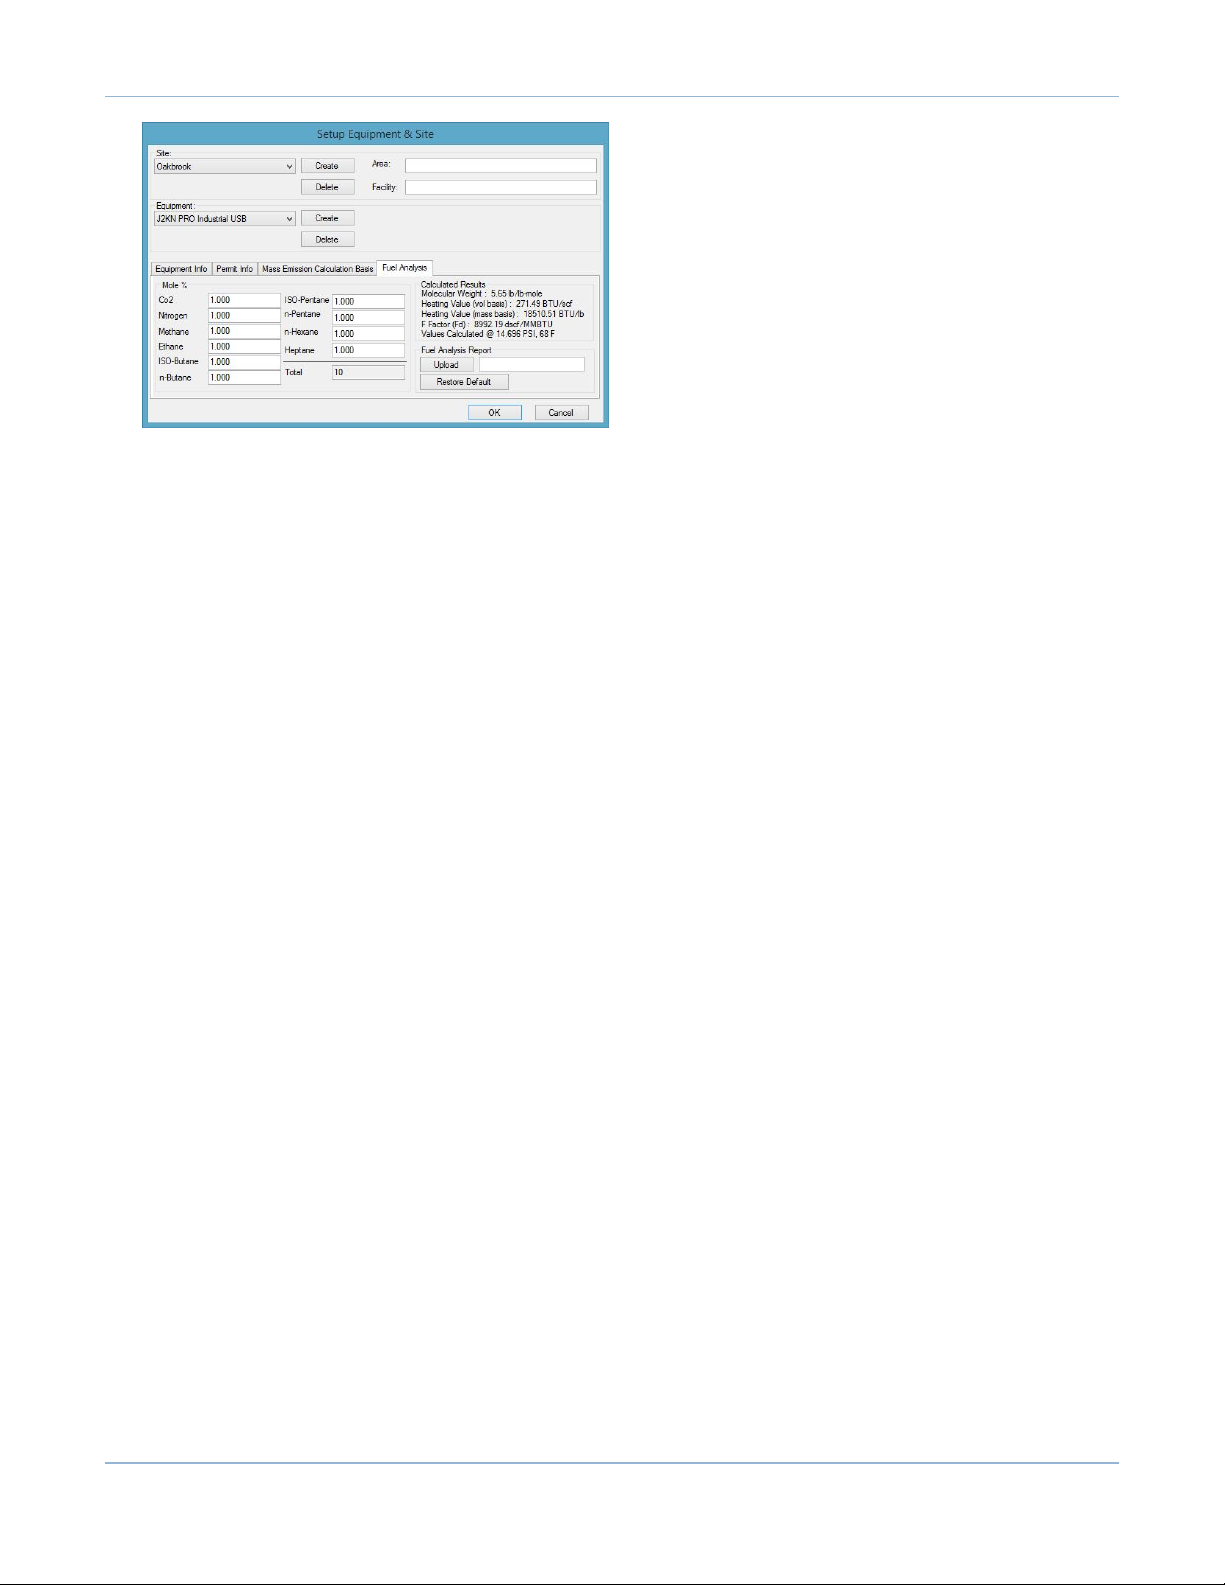
12. Next, click on the “Fuel Analysis” tab and input the fuel content or select the Upload button to load a Fuel Analysis Report.
Page 17
Page 19
e-Comply
Page 18
Page 20
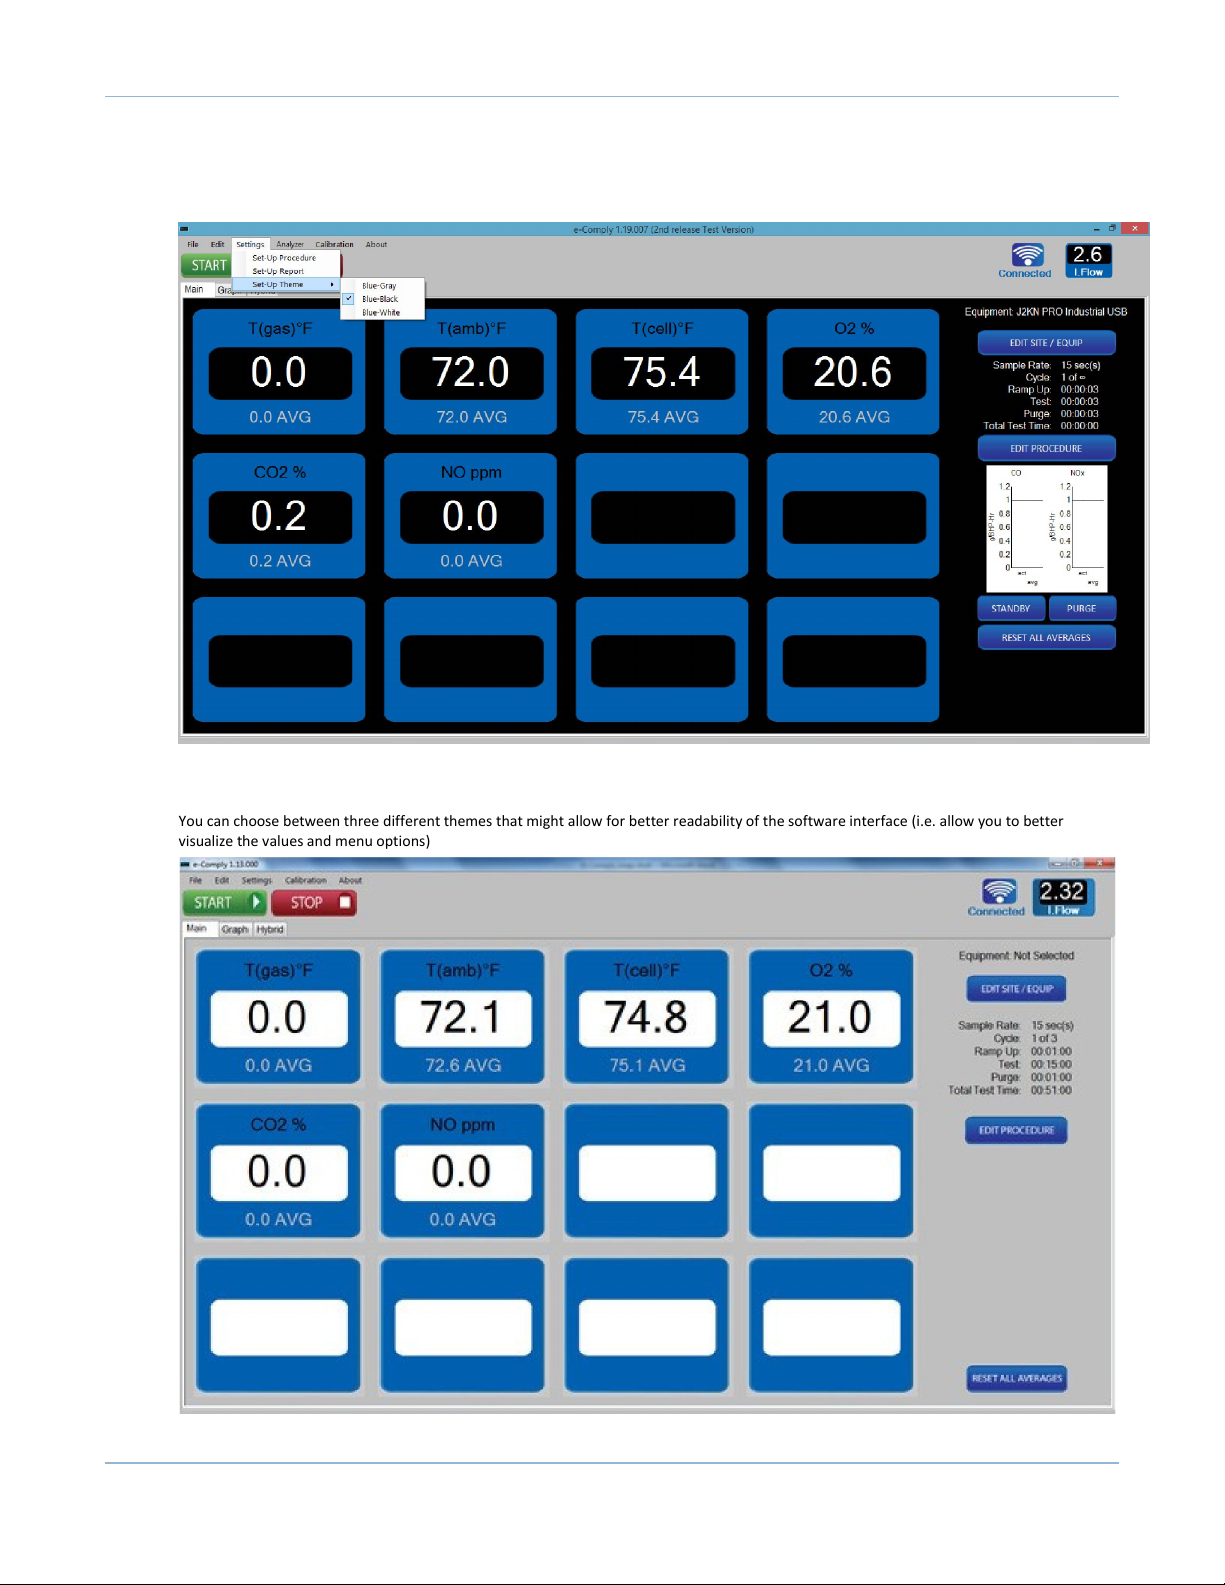
Setting up Theme/Font
1. On the menu bar click on “Settings” and “Set-Up Theme”
e-Comply
2. You can choose between three different themes that might allow for better readability of the software interface (i.e. allow you to better
visualize the values and menu options)
Page 19
Page 21
e-Comply
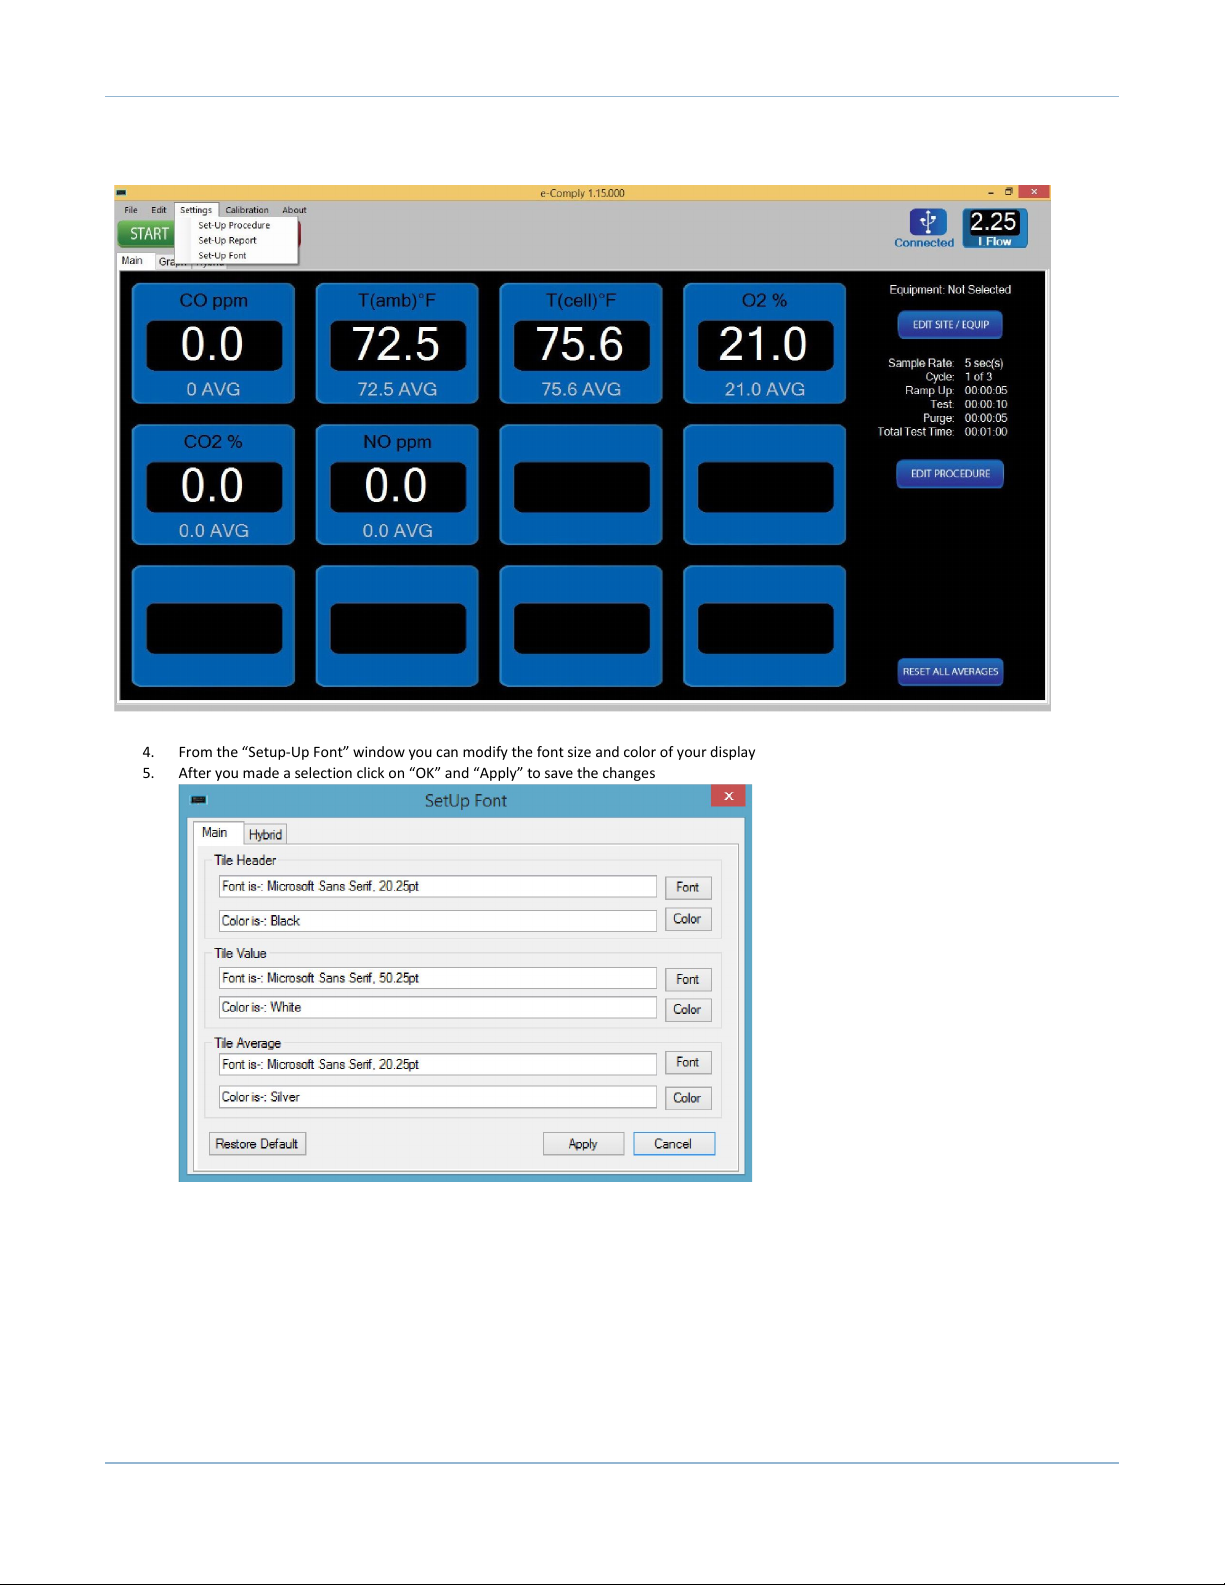
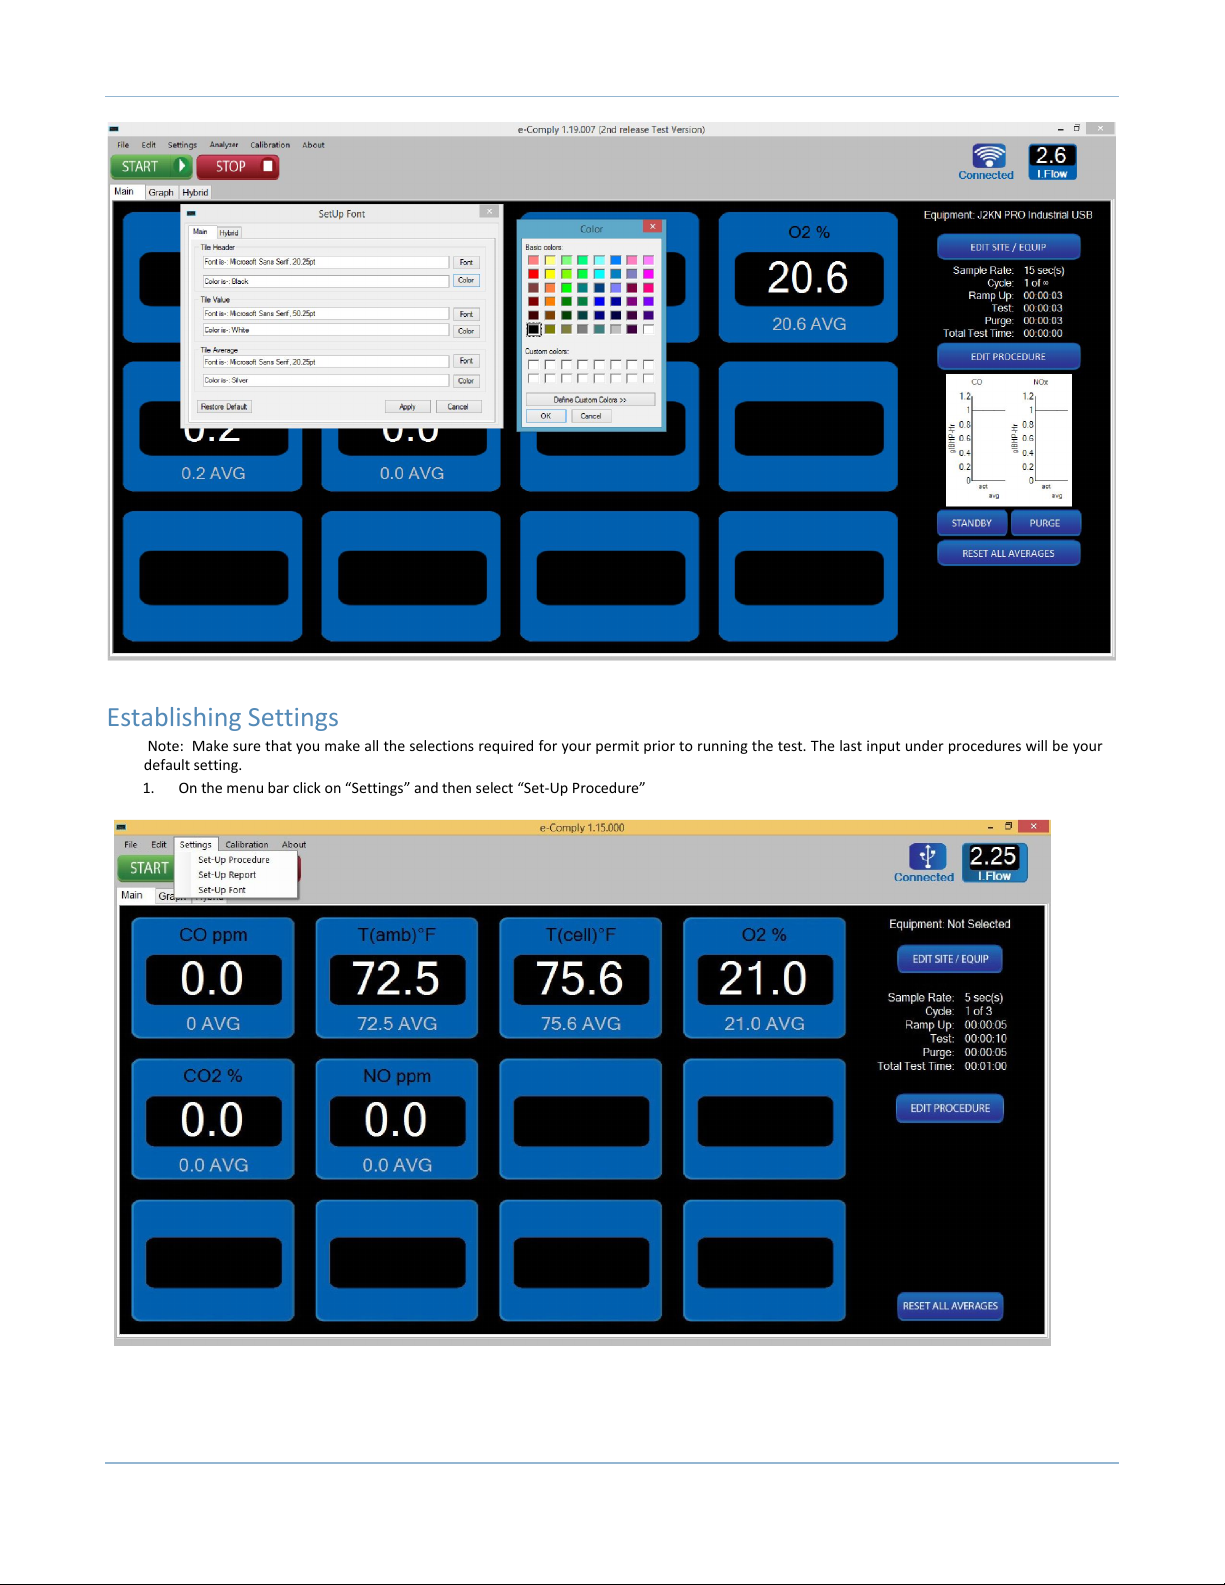
3. On the menu bar click on “Settings” and “Set-Up Font”
4. From the “Setup-Up Font” window you can modify the font size and color of your display
5. After you made a selection click on “OK” and “Apply” to save the changes
Page 20
Page 22
e-Comply
Establishing Settings
Note: Make sure that you make all the selections required for your permit prior to running the test. The last input under procedures will be your
default setting.
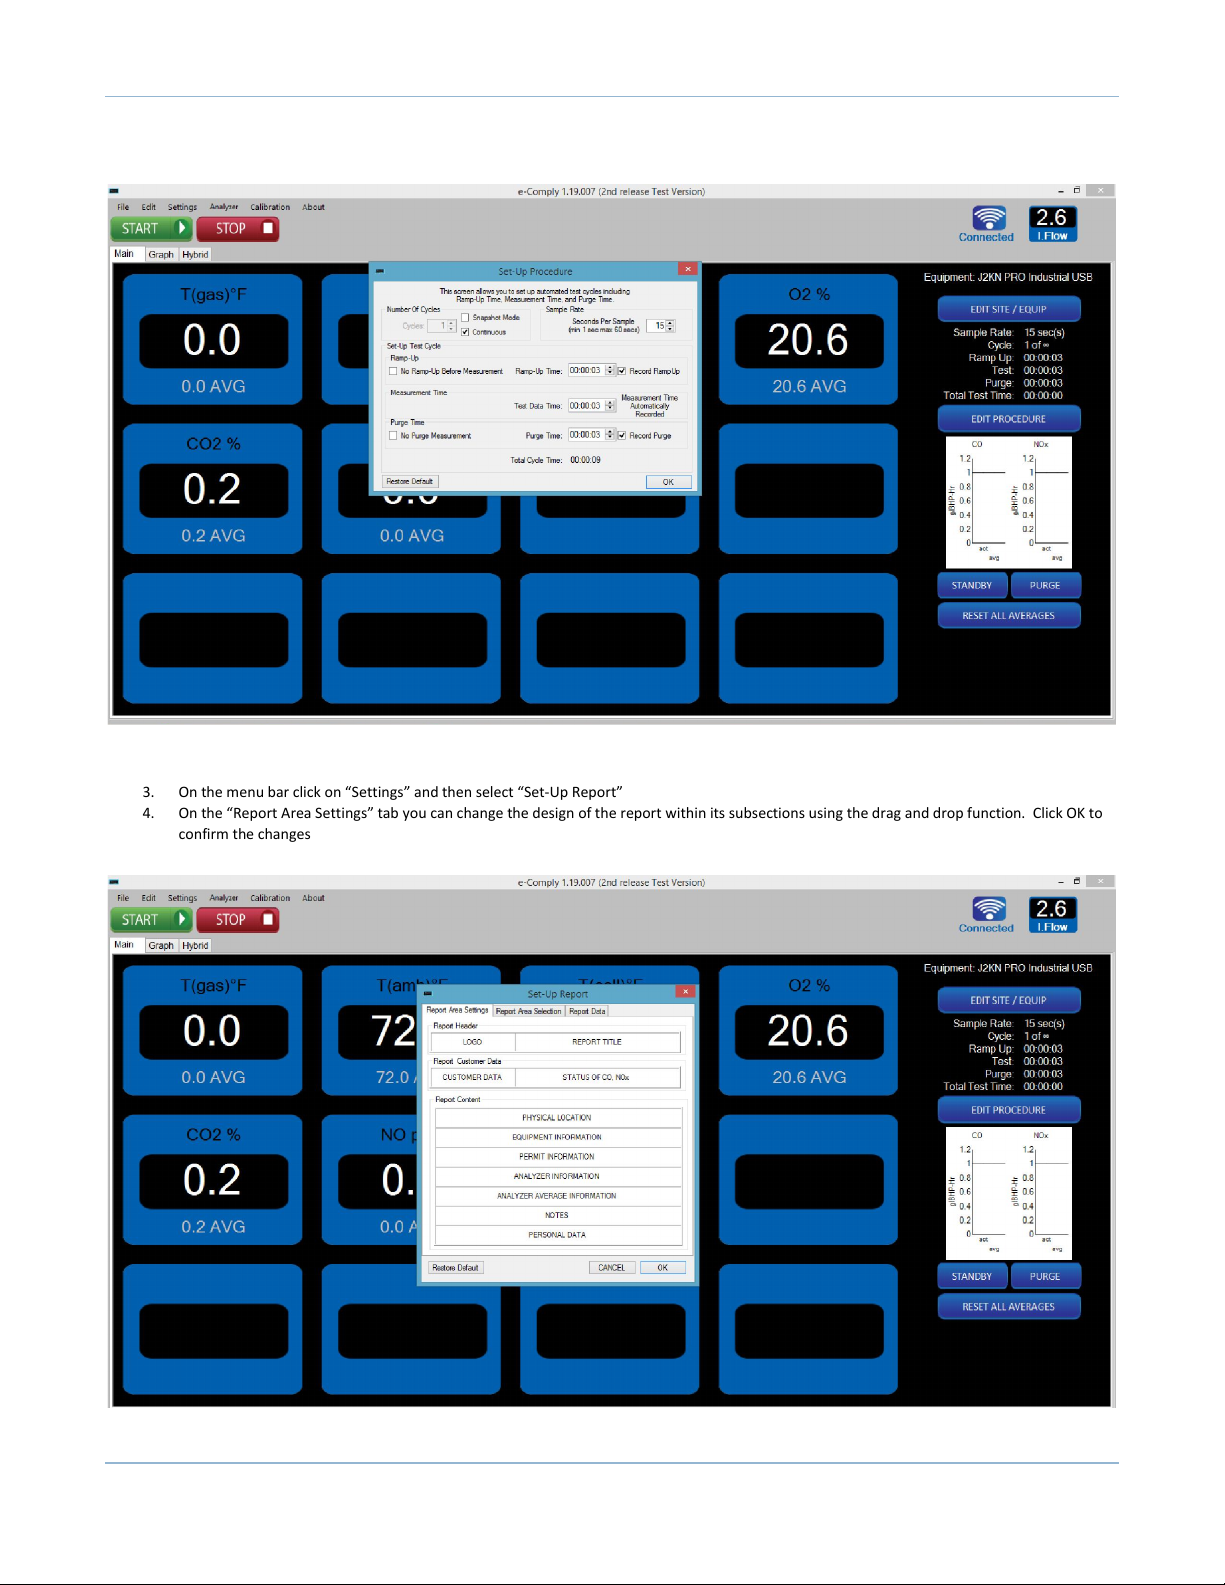
1. On the menu bar click on “Settings” and then select “Set-Up Procedure”
Page 21
Page 23
e-Comply
2. On the “Set-Up Procedure” make the selection that is required by your testing protocol and then click on “OK” to save the entries (Snapshot
mode is available to record continuously with no Ramp-Up/Test Data/Purge input values needed.
3. On the menu bar click on “Settings” and then select “Set-Up Report”
4. On the “Report Area Settings” tab you can change the design of the report within its subsections using the drag and drop function. Click OK to
confirm the changes
Page 22
Page 24
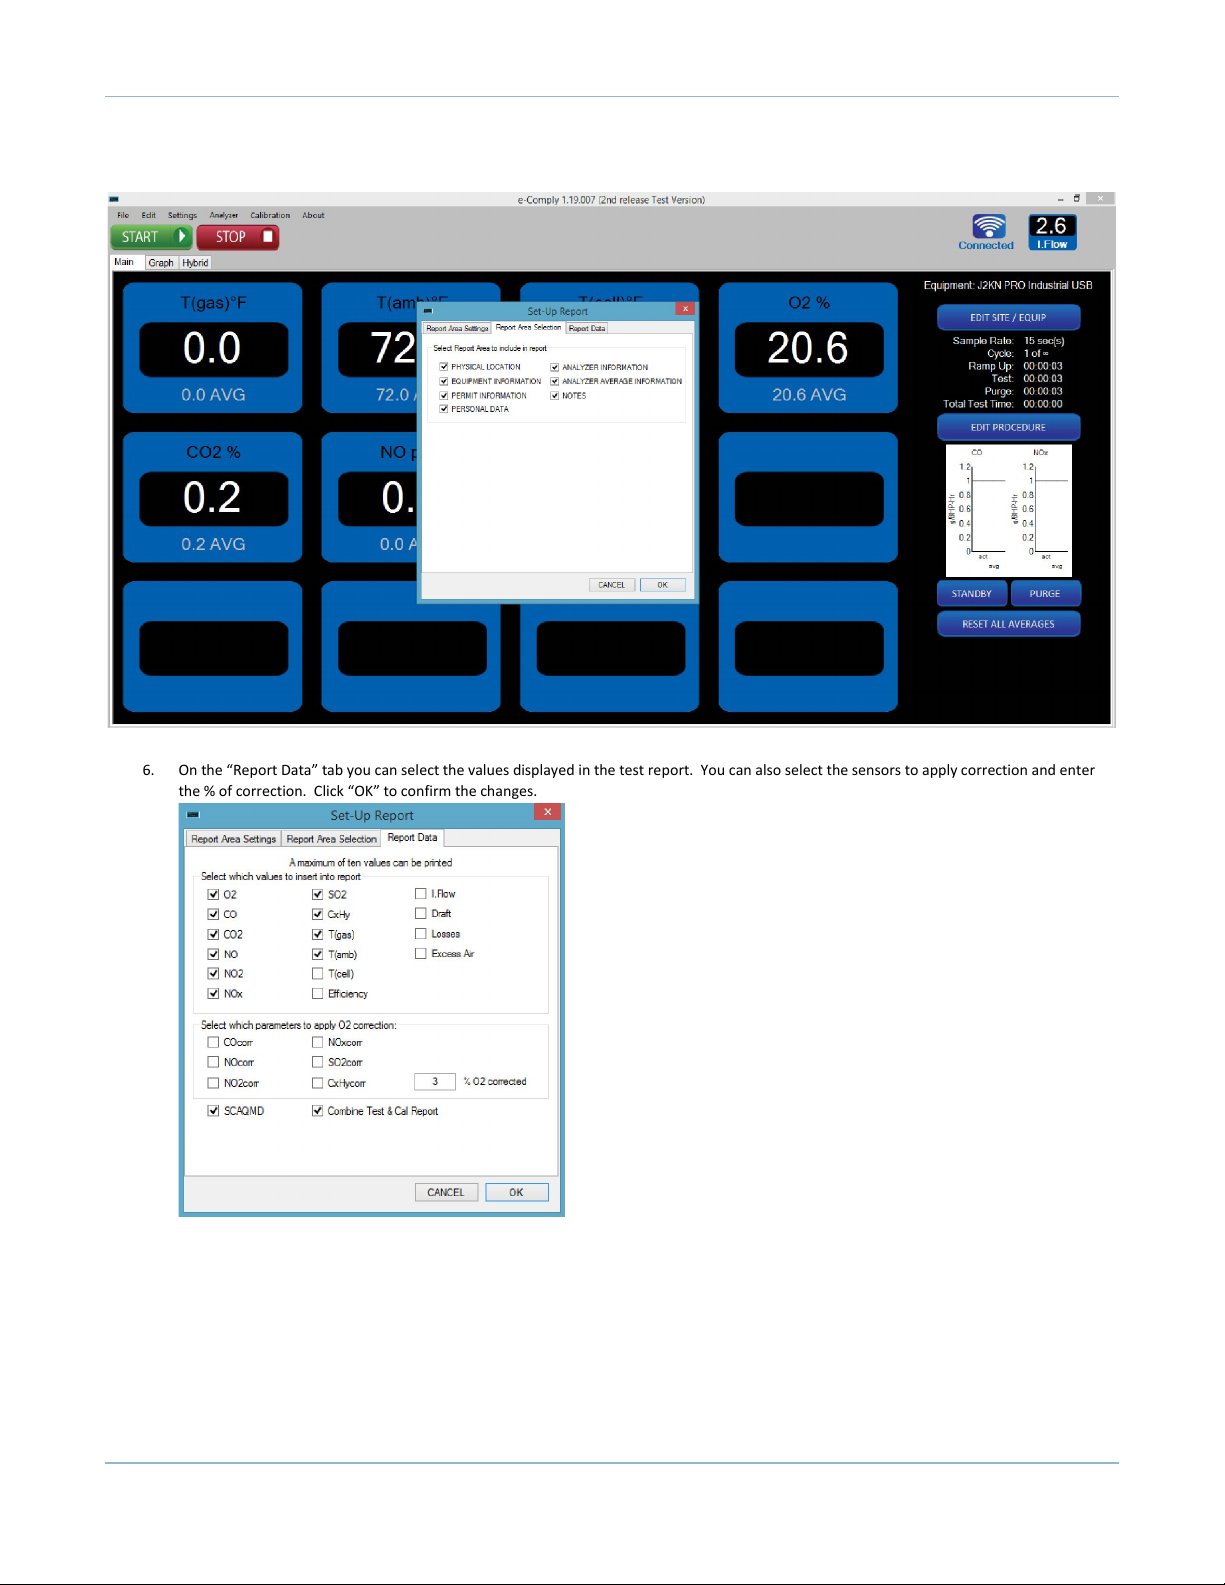
5. On the “Report Area Selection” tab you can select the sections to include in the test report. Click “OK” to confirm the changes
e-Comply
6. On the “Report Data” tab you can select the values displayed in the test report. You can also select the sensors to apply correction and enter
the % of correction. Click “OK” to confirm the changes.
7. (Optional) If under South Coast Air Quality Management District jurisdiction, check the box for “SCAQMD” to replace mass emissions with
volumetric on reports.
8. Check “Combine Test & Cal Report to print Emission Test and Calibration Test on the same report.
Page 23
Page 25
e-Comply
Pre-Test Calibration
1. On the menu bar click on “Calibration”
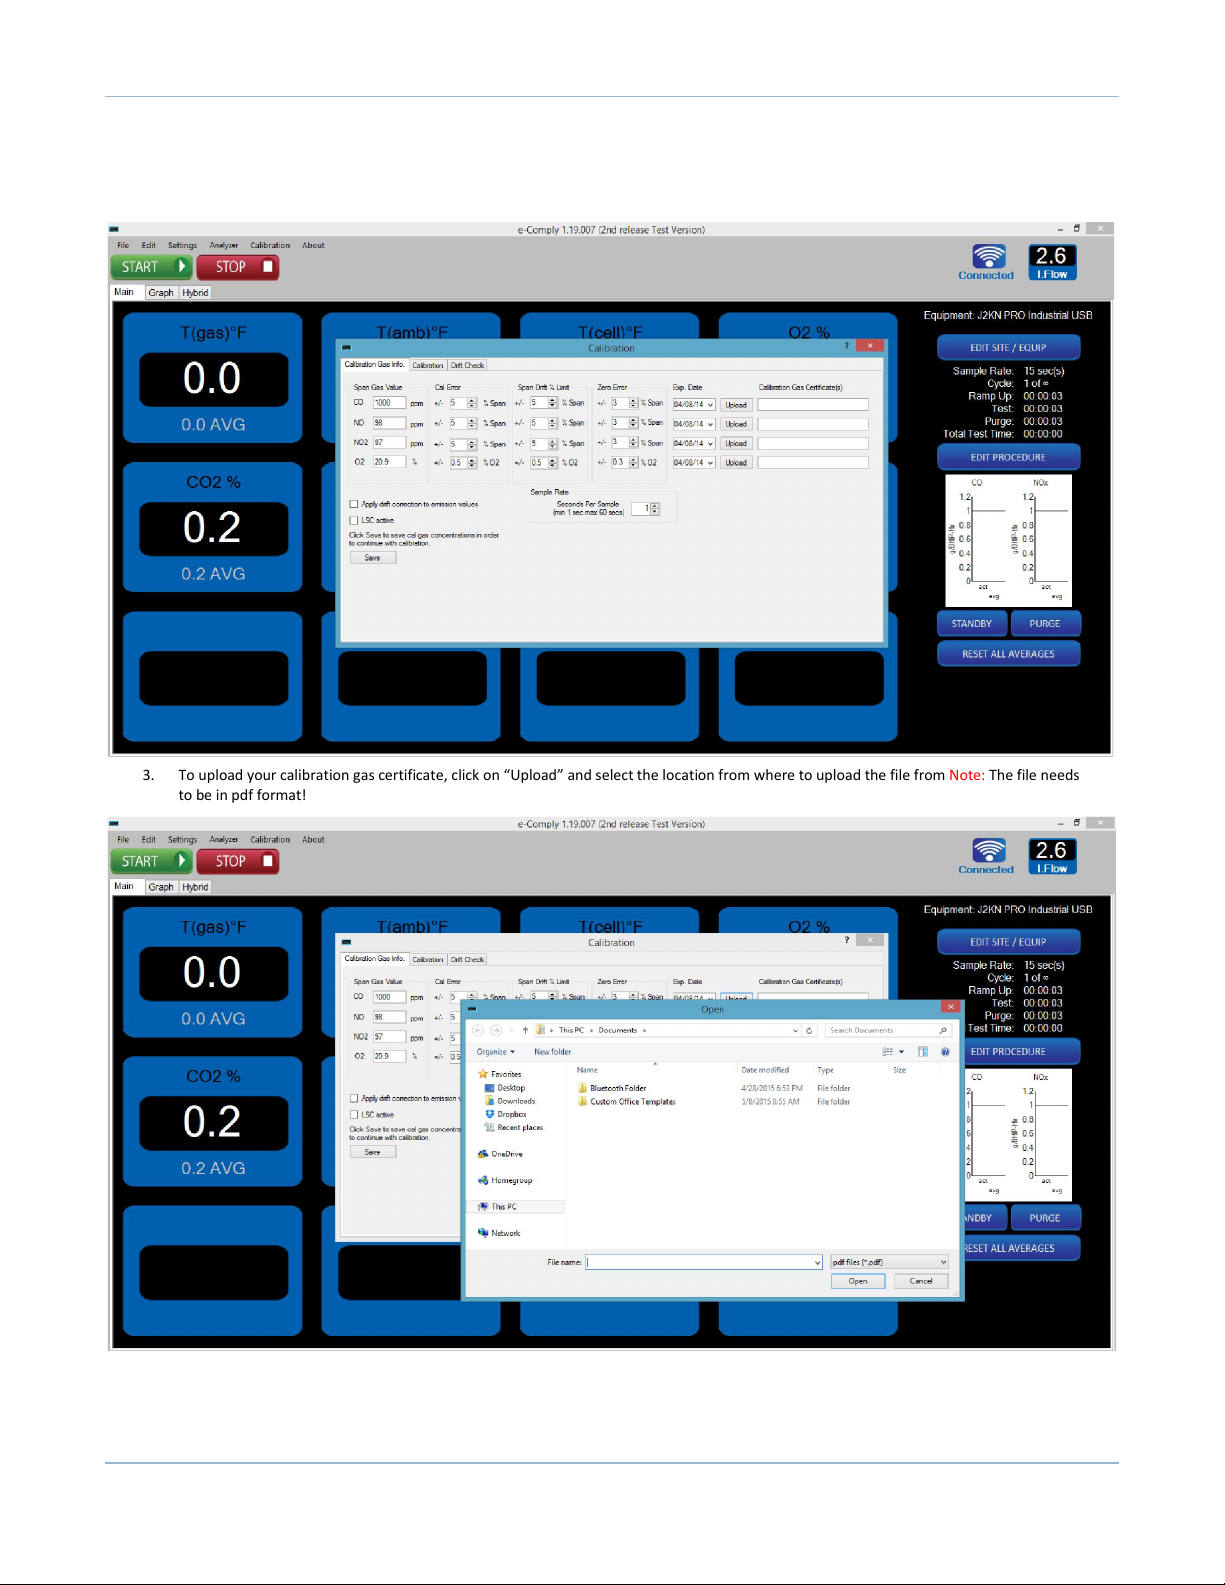
2. On the “Calibration Info Tab” enter your span gas value, your calibration error range, span drift % limit, zero error and expiration date
3. To upload your calibration gas certificate, click on “Upload” and select the location from where to upload the file from Note: The file needs
to be in pdf format!
4. Then select the sample rate, click on the “Save” button to store the data and then on “OK”
Page 24
Page 26
Pre-Test Calibration Procedure
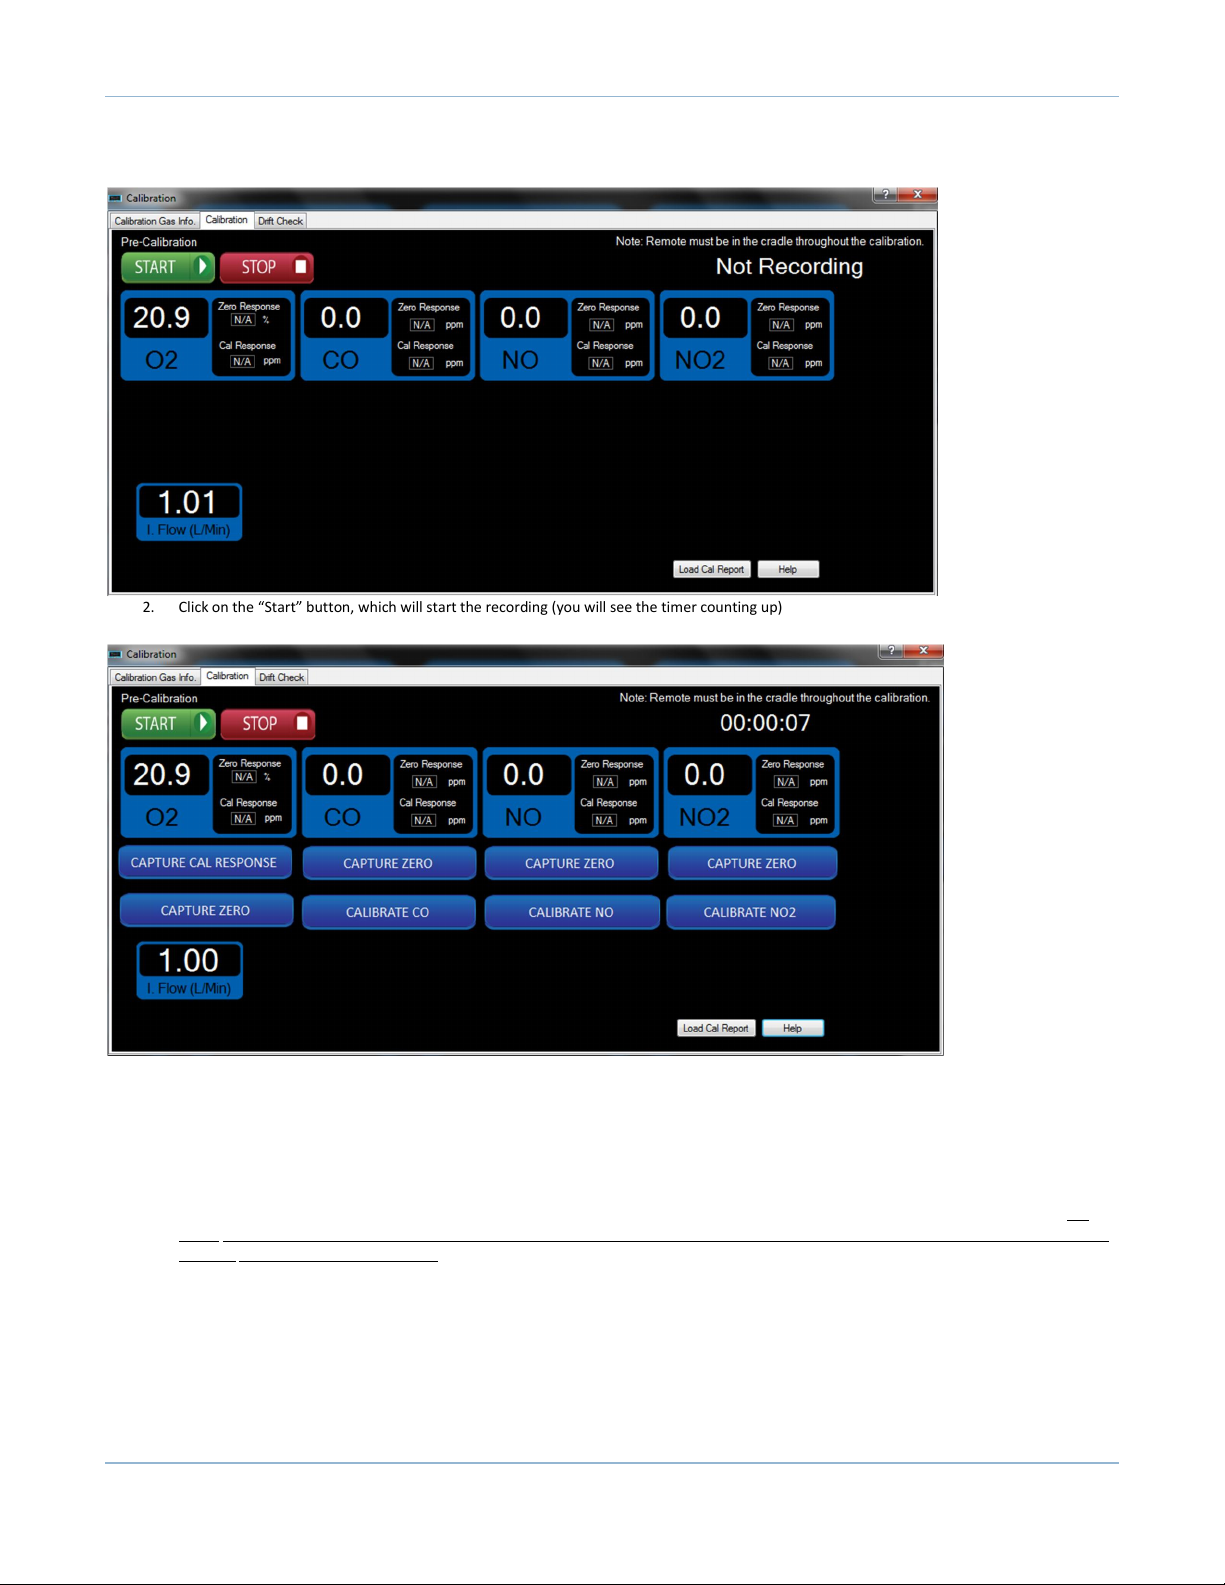
1. On the menu bar, go to “Calibration”, to open the calibration tab and then select the “Calibration” tab
e-Comply
2. Click on the “Start” button, which will start the recording (you will see the timer counting up)
3. While the analyzer is pulling fresh air, capture the zero responses for CO, NO, and NO2 by clicking on the “CAPTURE ZERO” button. The “Zero
Response” reading will appear in green font if the reading is within the Zero Error Limit
4. Next you will need to prove that you do not have an air leak. This is accomplished by applying a calibration gas with no O2 present.
5. Allow the O2 reading to go down to 0.0% (or very close to 0.0%) and then capture the zero response for the O2 sensor
6. Now that you have captured all of your zero responses, you can calibrate each sensor to the target gas as per your testing protocol
7. Apply the gas for the target sensor (e.g. the CO sensor). After the reading has stabilized, calibrate by clicking on the “CALIBRATE CO” button.
Note: If you are not required to calibrate your NO2 sensor (e.g. Oklahoma), you can bypass the calibration by right-clicking on the CALIBRATE
button and selecting “Bypass Calibration.” You will still need to click CAPTURE CAL RESPONSE for this sensor to complete the calibration. For
this to work, you must input 100 into the Cal Error column and 100 into the Span Drift % column. It does not matter what number you input for
the Span Gas Value as long as it is not 0.
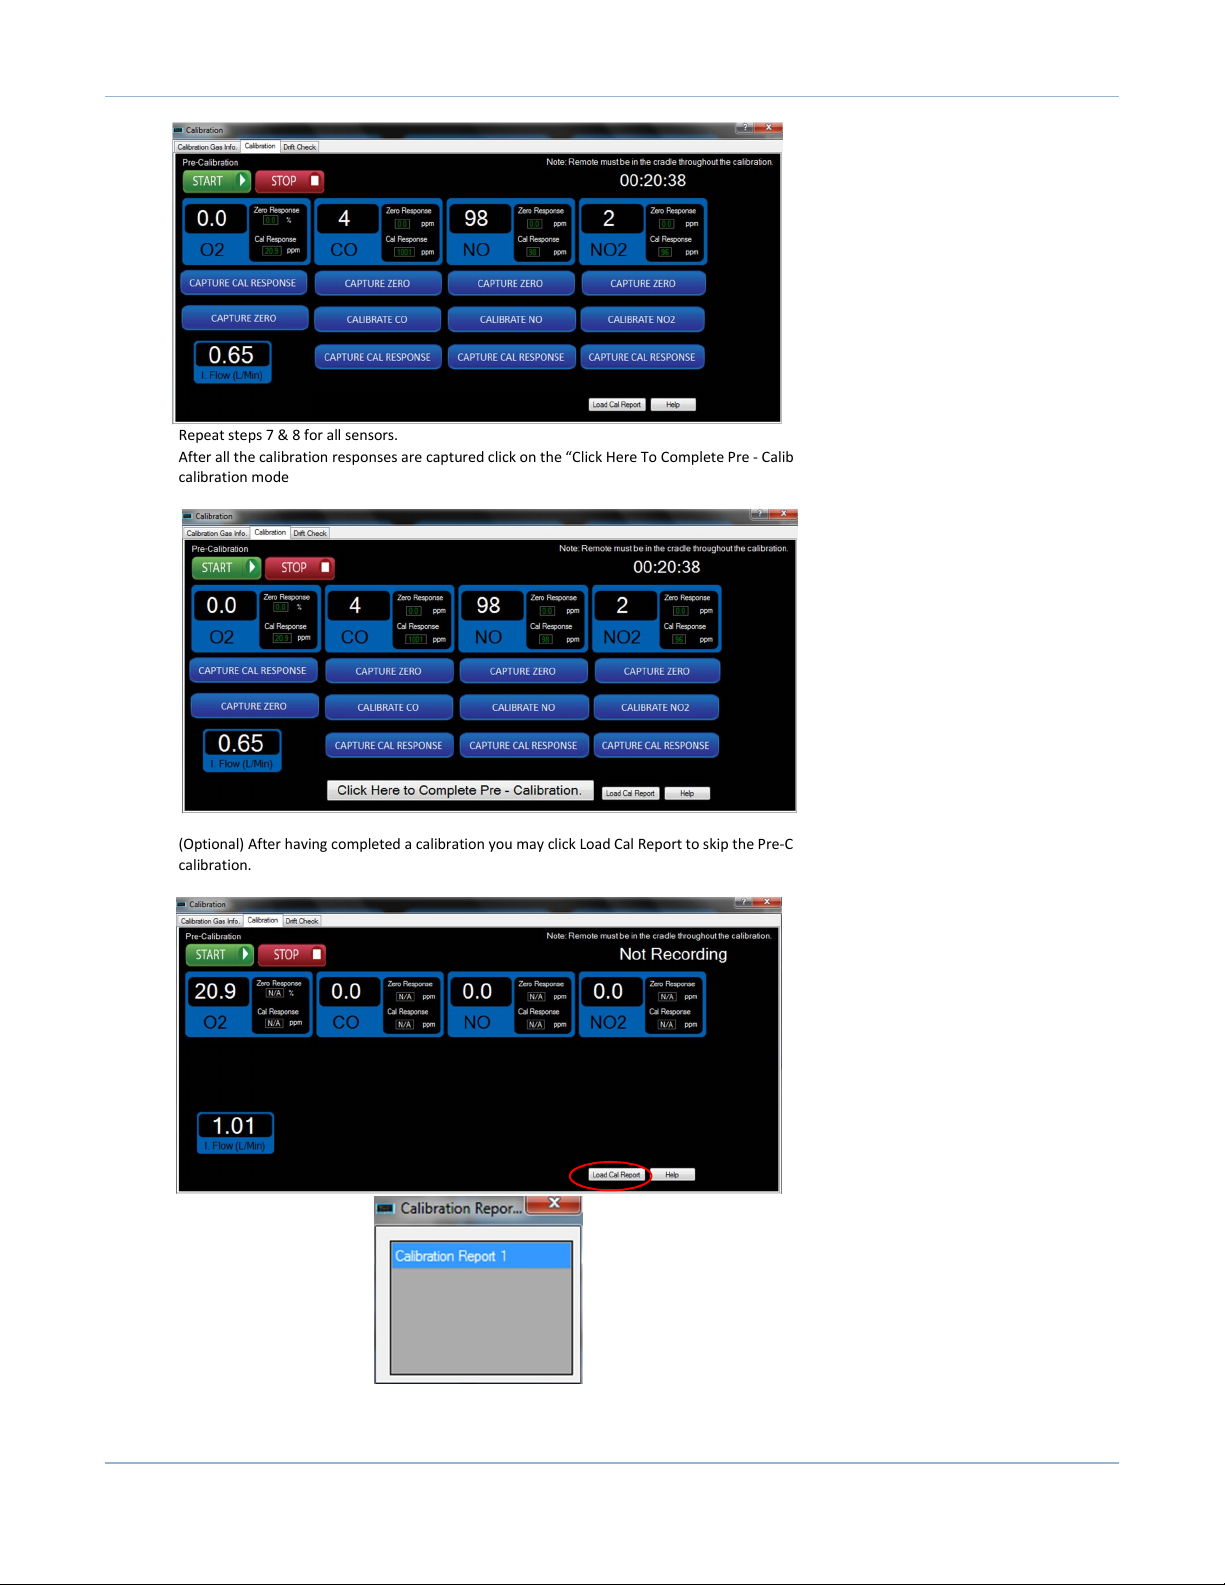
8. After the target sensor is calibrated, capture the calibration response (e.g. CAPTURE CAL RESPONSE). The reading will appear in green font if it is
within the Cal Error Limit.
Page 25
Page 27
e-Comply
9. Repeat steps 7 & 8 for all sensors.
10. After all the calibration responses are captured click on the “Click Here To Complete Pre - Calibration” to complete the recording and to exit the
calibration mode
11. (Optional) After having completed a calibration you may click Load Cal Report to skip the Pre-Calibration process by uploading a previous
calibration.
(The last 5 Calibration Reports will be saved)
Page 26
Page 28
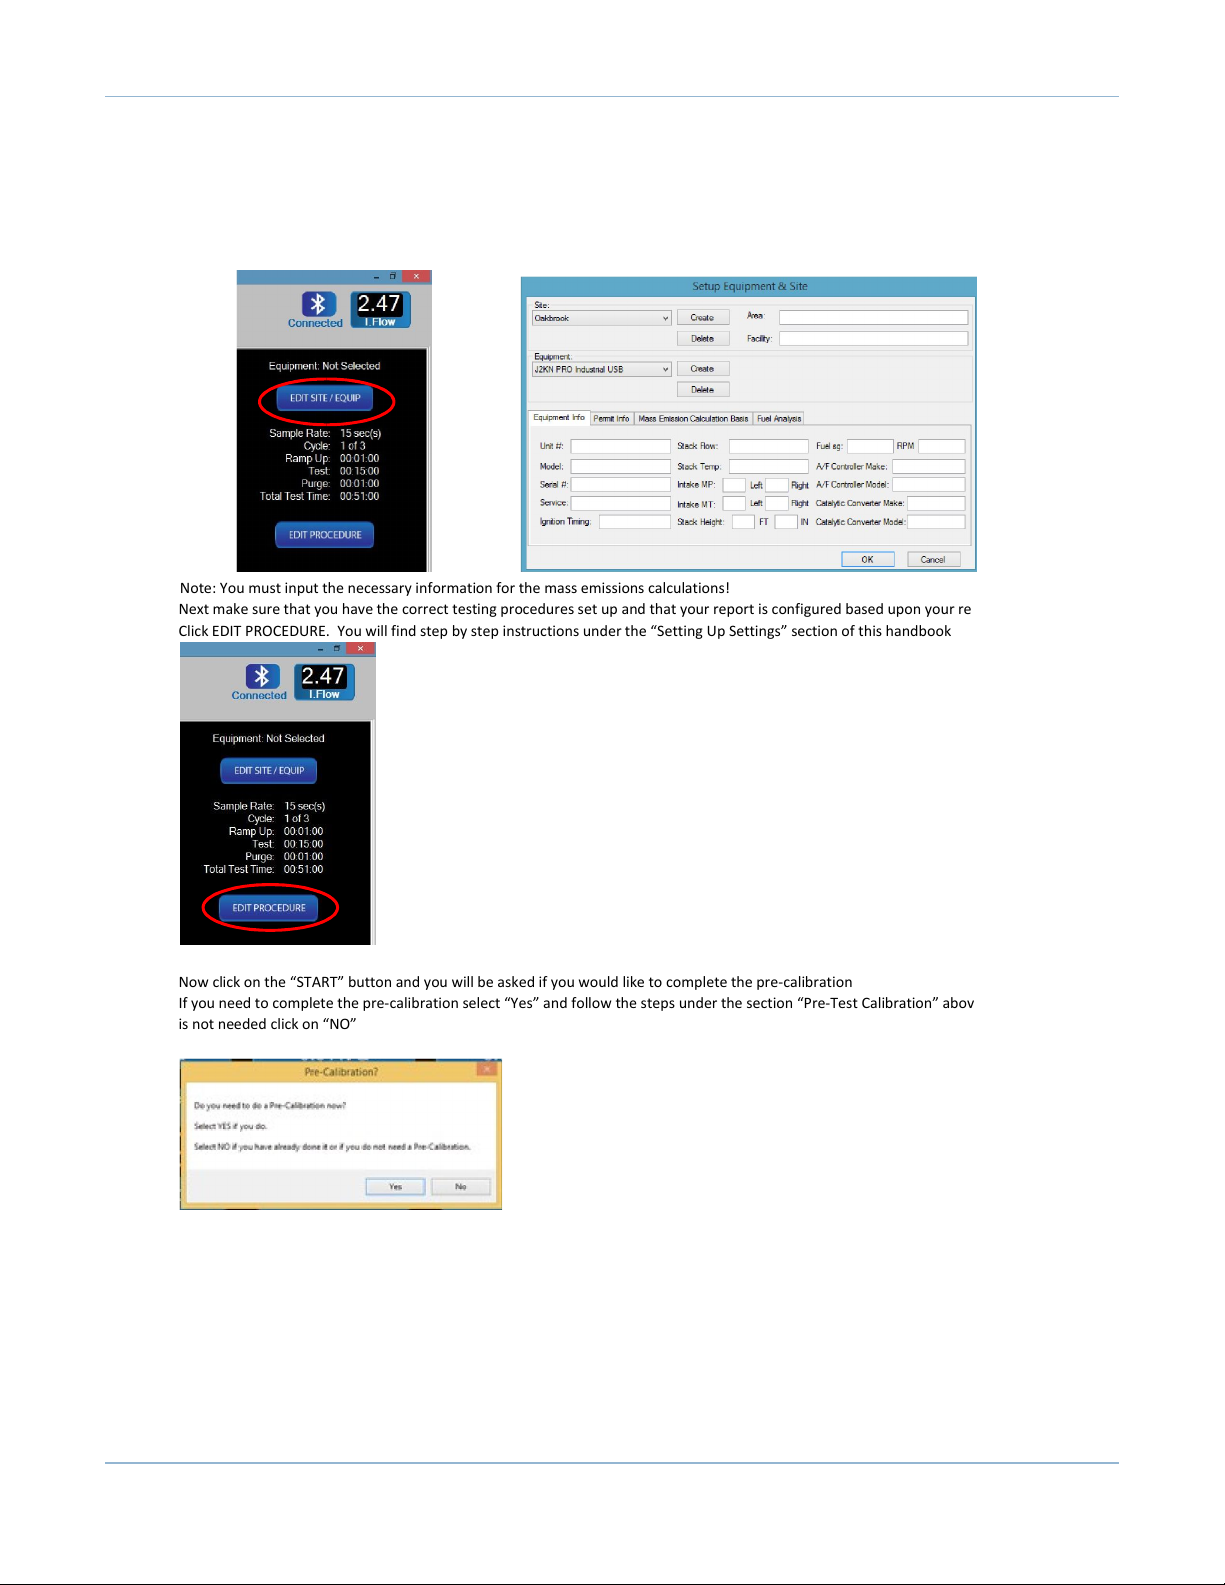
Running an Emission Test
Note: Prior to starting an emissions test, you will need to select your site and equipment by clicking on the “EDIT SITE/EQUIP” button on the right side
of your main screen. Do not make this selection through the menu bar as it will revert to the default site selection!
1. On the main screen, click EDIT SITE/EQUIP
e-Comply
Note: You must input the necessary information for the mass emissions calculations!
2. Next make sure that you have the correct testing procedures set up and that your report is configured based upon your requirements
3. Click EDIT PROCEDURE. You will find step by step instructions under the “Setting Up Settings” section of this handbook
4. Now click on the “START” button and you will be asked if you would like to complete the pre-calibration
5. If you need to complete the pre-calibration select “Yes” and follow the steps under the section “Pre-Test Calibration” above. If pre-calibration
is not needed click on “NO”
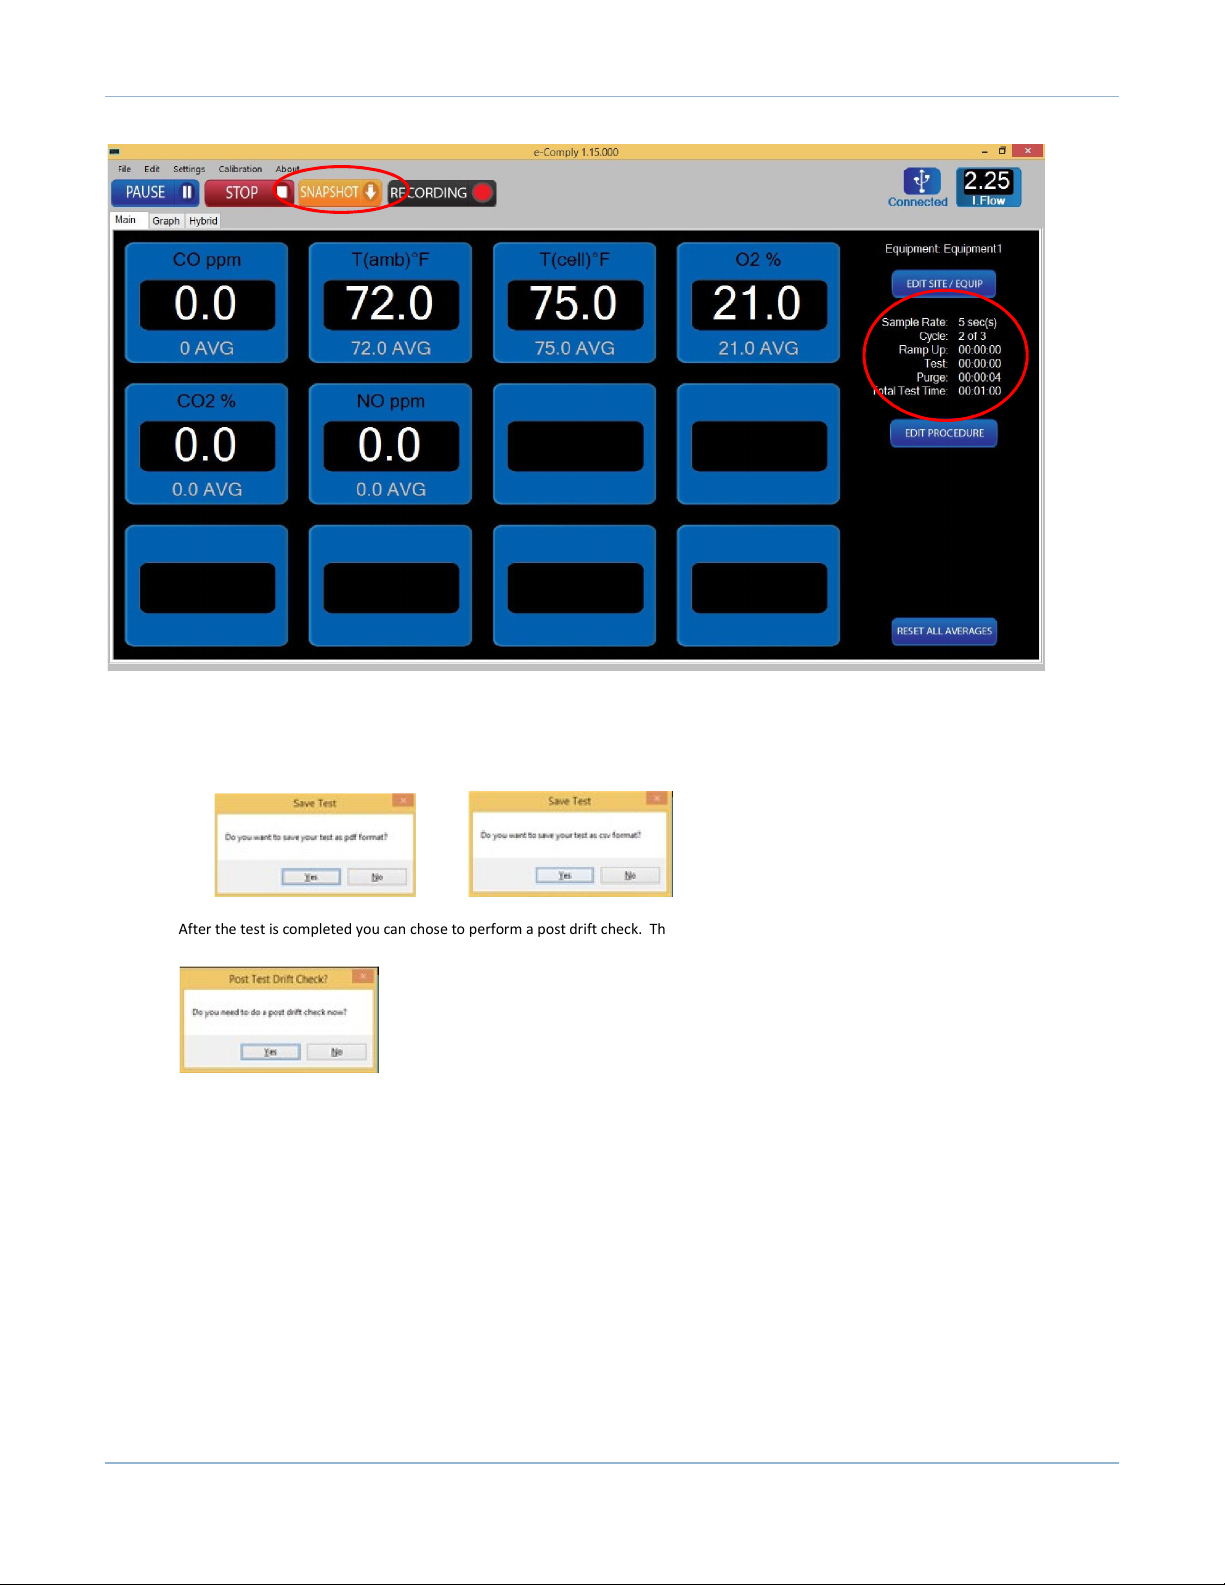
6. The emissions test will now start (the “RECORDING” button only displays if the test is in progress) and you can see the progress on the right side
of the window
Note: Clicking the “SNAPSHOT” button allows you to add notes to a particular data point during the test (e.g. CO spike)
Note: If you are using an EN2F or J2KN Pro Easy analyzer, you must purge manually. The software will pause the test and prompt you to remove the
sample line before the purge phase begins. However, the software does not pause the test after the purge phase, so you will have to be attentive to
the timing of the purge phase so you can re-insert the sample line at the proper time.
Page 27
Page 29
e-Comply
7. After the test is completed you can chose to save the test in pdf or csv format and to include notes (Windows 8 Note: When saving a PDF the
report will pop up immediately on screen. Tabbing down the report to see e-Comply software will not bring up secondary save pop up box. To
return to e-Comply you must click alt + tab to bring up the csv save pop up.)
8. After the test is completed you can chose to perform a post drift check. The instructions for the Post-Test Drift Check are in the next section.
Post-Test Drift Check
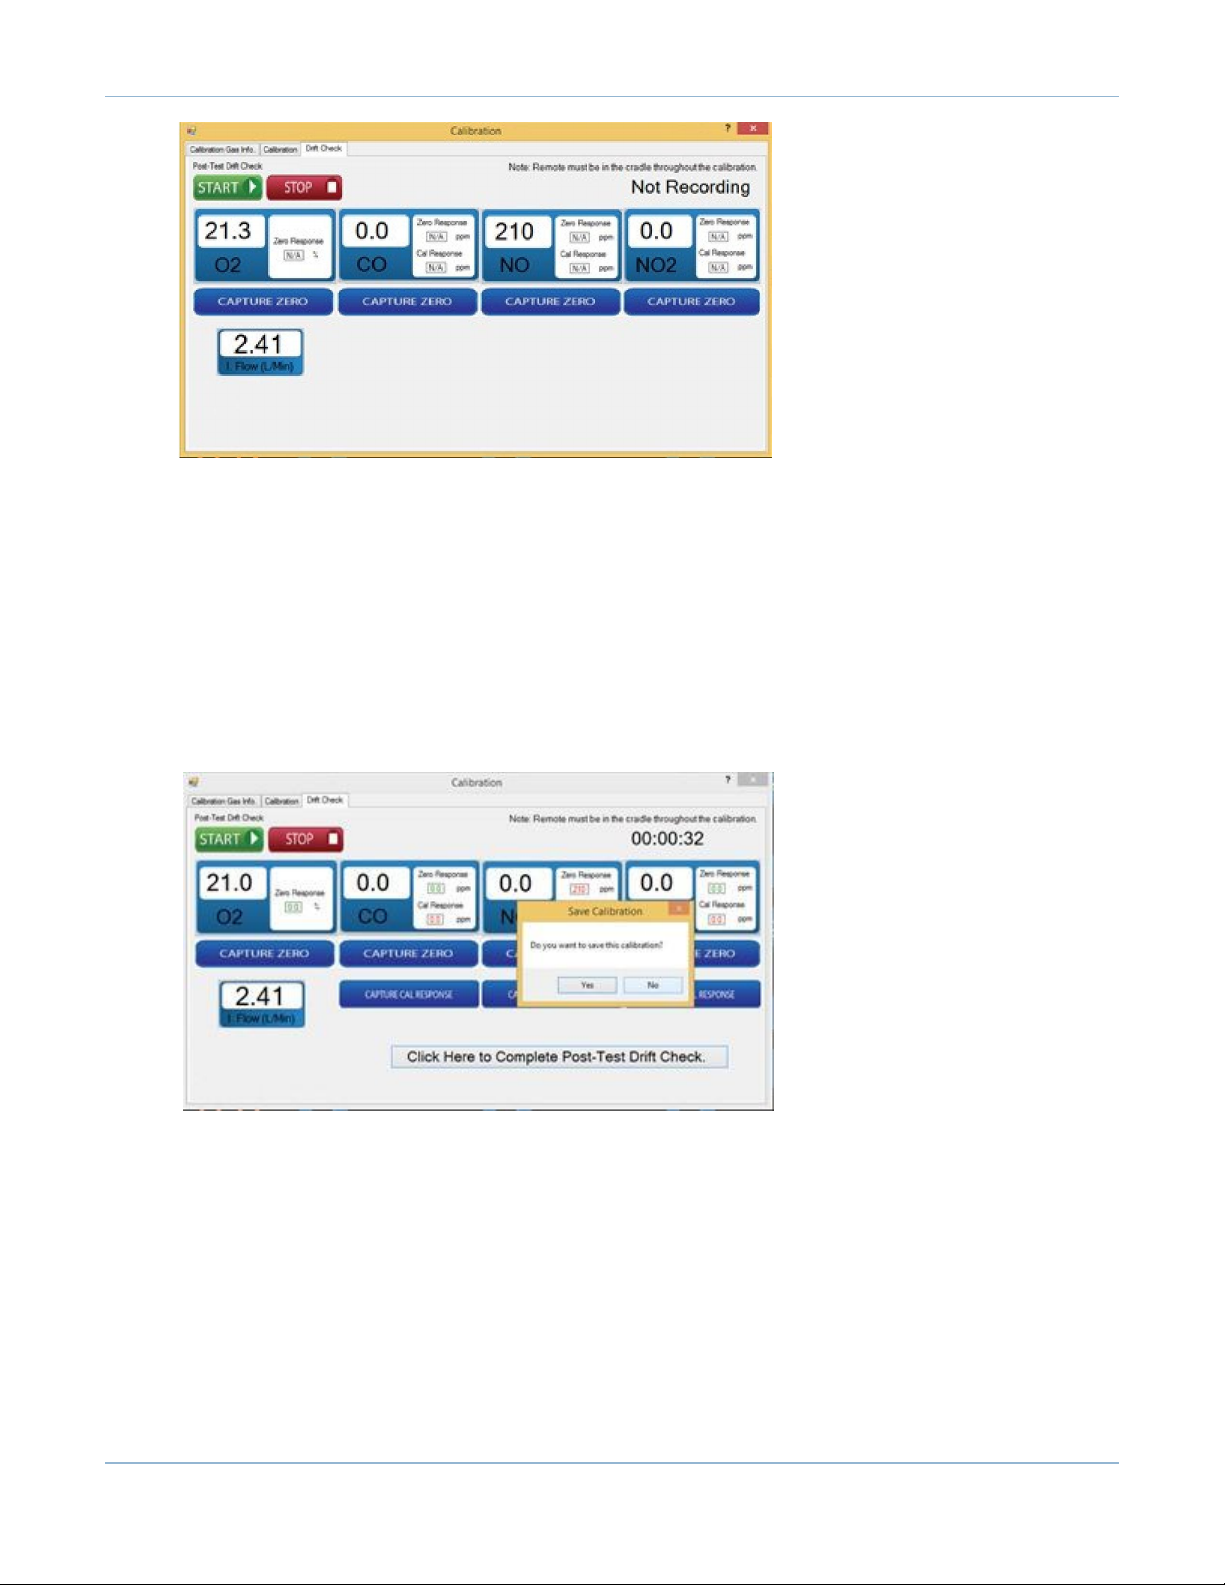
1. On the menu bar, go to “Calibration” to open the calibration tab and then select Drift Check.
Page 28
Page 30
e-Comply
2. Click on the “Start” button, which will start the recording (you will see the timer counting up)
3. While the analyzer is pulling fresh air, capture the zero responses for CO, NO, and NO2 by clicking on the “CAPTURE ZERO” button. The “Zero
Response” reading will appear in green font if the reading is within the Zero Error Limit
4. Next you will need to prove that you do not have an air leak. This is accomplished by applying a calibration gas with no O2 present.
5. Allow the O2 reading to go down to 0.0% (or close to 0.0%) and then capture the zero response for the O2 sensor
6. Now that you have captured all of your zero responses, you can capture the response of each sensor to the target gas
7. Apply the gas for the target sensor. After the reading has stabilized, capture the calibration response by clicking on the “CAPTURE CAL
RESPONSE” button. The reading will appear in green font if it is within the Span Drift % Limit.
8. Repeat step 7 for all sensors
Note: Do not recalibrate as this will nullify your test!
9. After you have captured all the calibration responses click on the “Click Here To Complete Post-Drift Check”, to complete the recording and exit
Calibration mode. This will bring up a window asking you to save the calibration. Click on “Yes”
10. A notes window will open up, enter any required notes and then click on “OK”
11. A window will open up to allow you to select the name and location to save your calibration report in pdf format. Make your selection and click
on “Save”
12. After completing a Post-Test Drift Check you will need to perform a new Pre-Test calibration or you may load a previous calibration with the
Load Cal Report button
Page 29
Page 31
e-Comply
Hybrid and Graph Tab
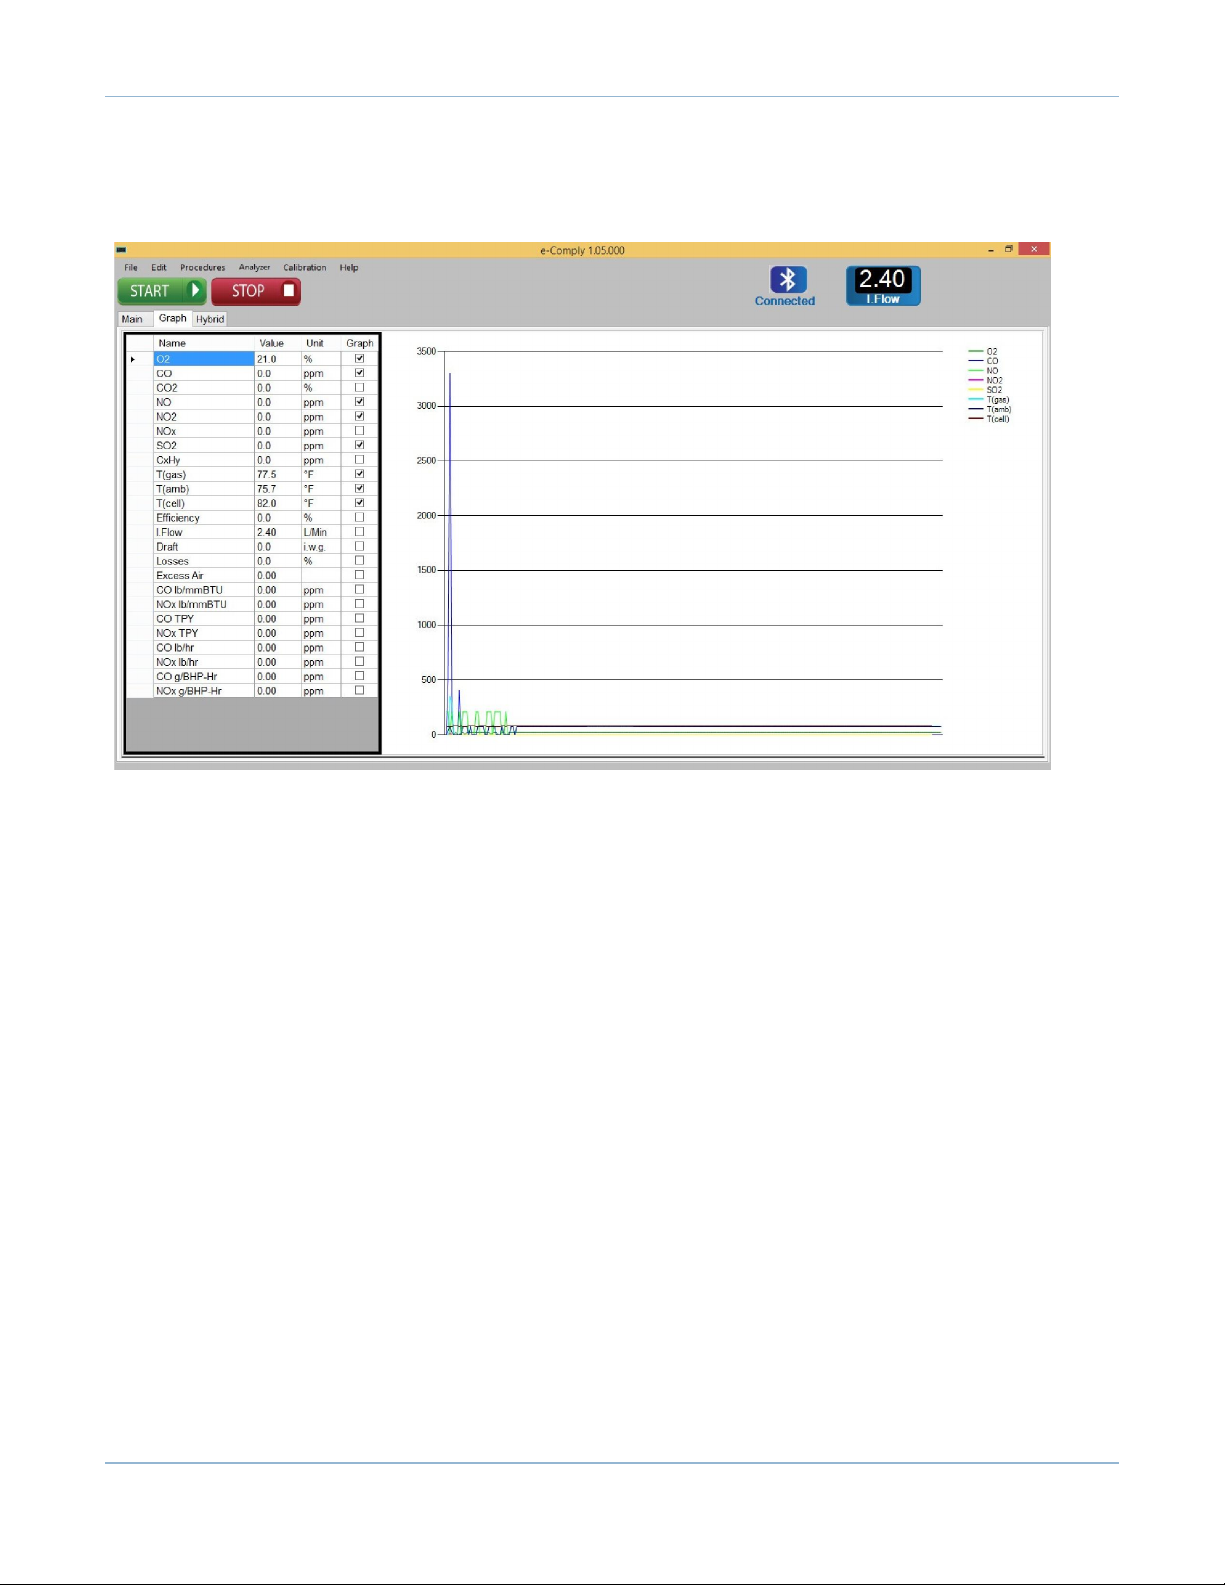
To allow for a graphical view of the sensor readings, e-Comply has a “Graph” tab. Here you can select which readings you would like to display.
Up to ten values can be selected
The “Hybrid” tab will allow you to read the a digital display of the readings you have selected to display as well as a display of the graphical sensor readings
you can choose on the “Graph” tab
1. To customize the digital sensor readings, right-click on the display filed
2. Then select the value to be displayed or to blank out any value
Page 30
Page 32
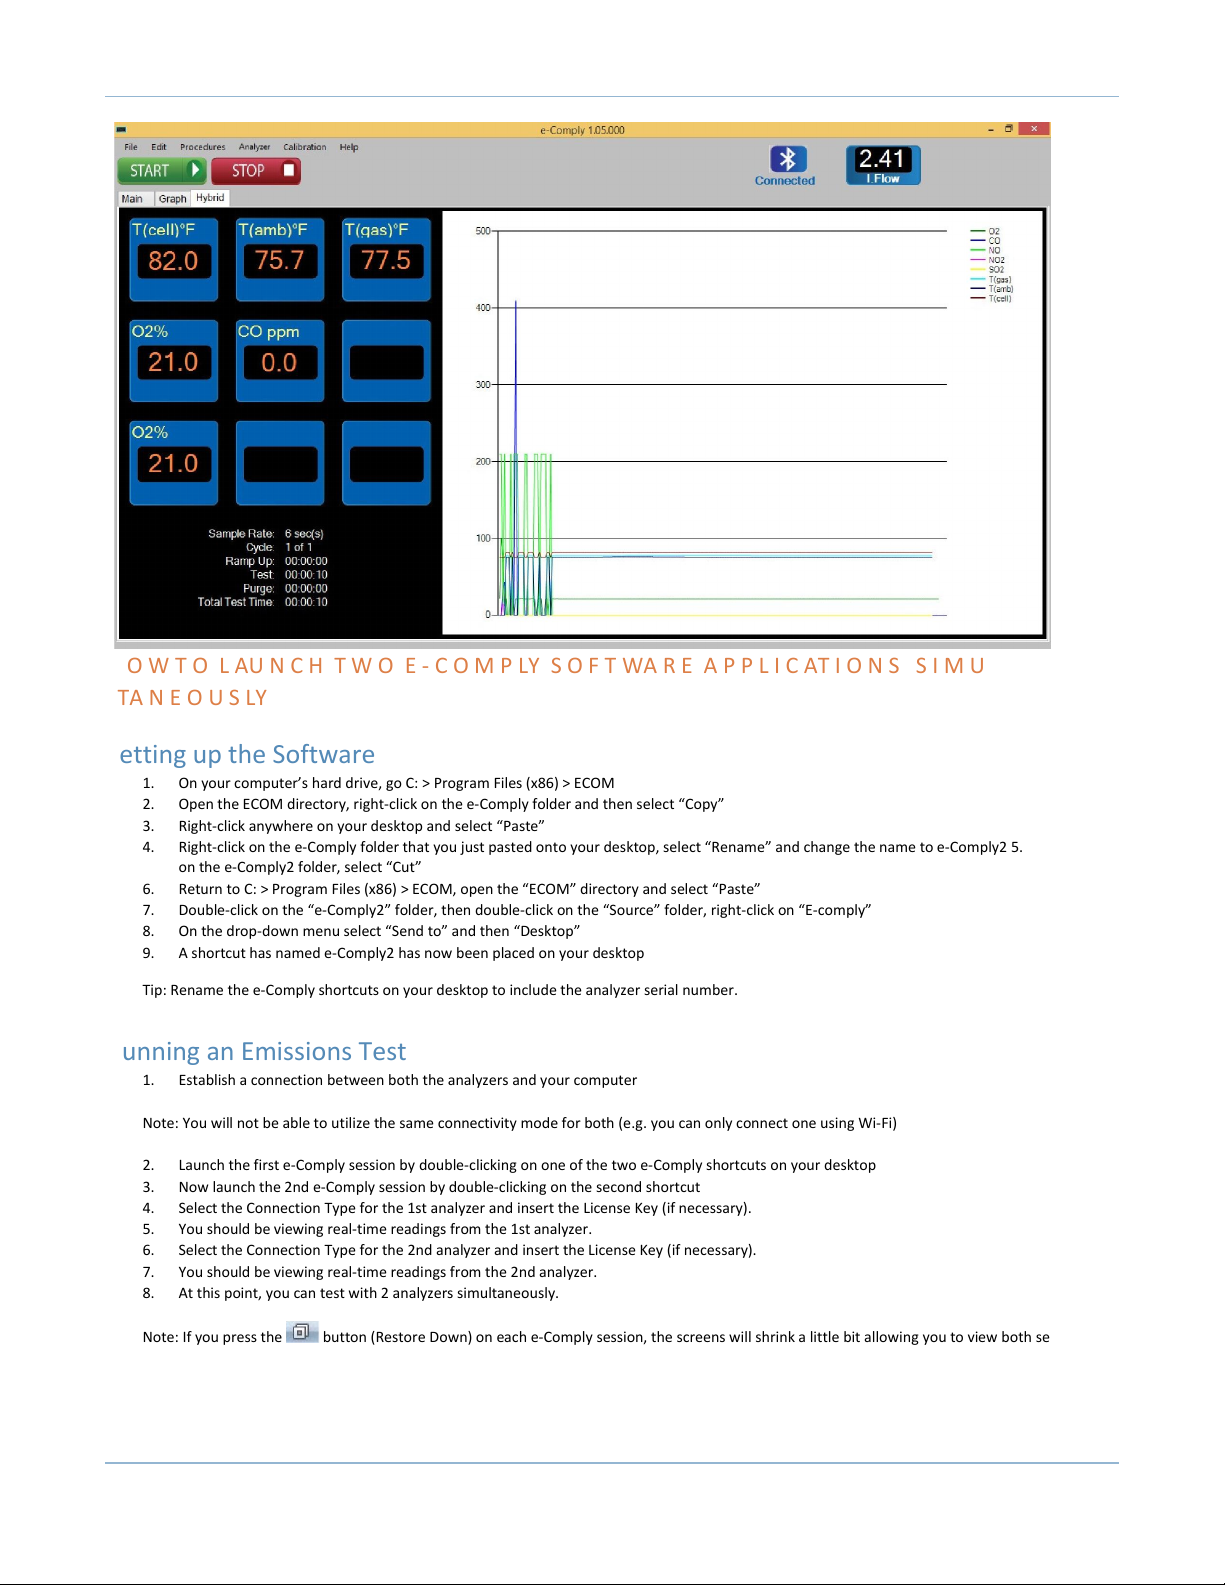
H O W T O L AU N C H T W O E - C O M P LY S O F T WA R E A P P L I C AT I O N S S I M U
LTA N E O U S LY
e-Comply
Setting up the Software
1. On your computer’s hard drive, go C: > Program Files (x86) > ECOM
2. Open the ECOM directory, right-click on the e-Comply folder and then select “Copy”
3. Right-click anywhere on your desktop and select “Paste”
4. Right-click on the e-Comply folder that you just pasted onto your desktop, select “Rename” and change the name to e-Comply2 5. Right-click
on the e-Comply2 folder, select “Cut”
6. Return to C: > Program Files (x86) > ECOM, open the “ECOM” directory and select “Paste”
7. Double-click on the “e-Comply2” folder, then double-click on the “Source” folder, right-click on “E-comply”
8. On the drop-down menu select “Send to” and then “Desktop”
9. A shortcut has named e-Comply2 has now been placed on your desktop
Tip: Rename the e-Comply shortcuts on your desktop to include the analyzer serial number.
Running an Emissions Test
1. Establish a connection between both the analyzers and your computer
Note: You will not be able to utilize the same connectivity mode for both (e.g. you can only connect one using Wi-Fi)
2. Launch the first e-Comply session by double-clicking on one of the two e-Comply shortcuts on your desktop
3. Now launch the 2nd e-Comply session by double-clicking on the second shortcut
4. Select the Connection Type for the 1st analyzer and insert the License Key (if necessary).
5. You should be viewing real-time readings from the 1st analyzer.
6. Select the Connection Type for the 2nd analyzer and insert the License Key (if necessary).
7. You should be viewing real-time readings from the 2nd analyzer.
8. At this point, you can test with 2 analyzers simultaneously.
Note: If you press the button (Restore Down) on each e-Comply session, the screens will shrink a little bit allowing you to view both sessions.
You will have to play around with the tiles so you can view the simultaneous readings that you need. In other words, you can’t view all 12 tiles on
both e-Comply sessions at the same time because the screens will overlap. You will have to adjust your tiles as necessary. You may also have to
change the font settings.
Page 31
Page 33
e-Comply
B A S I C T RO U B L E S H O O T I N G
Interrupted Bluetooth or Wi-Fi Connection
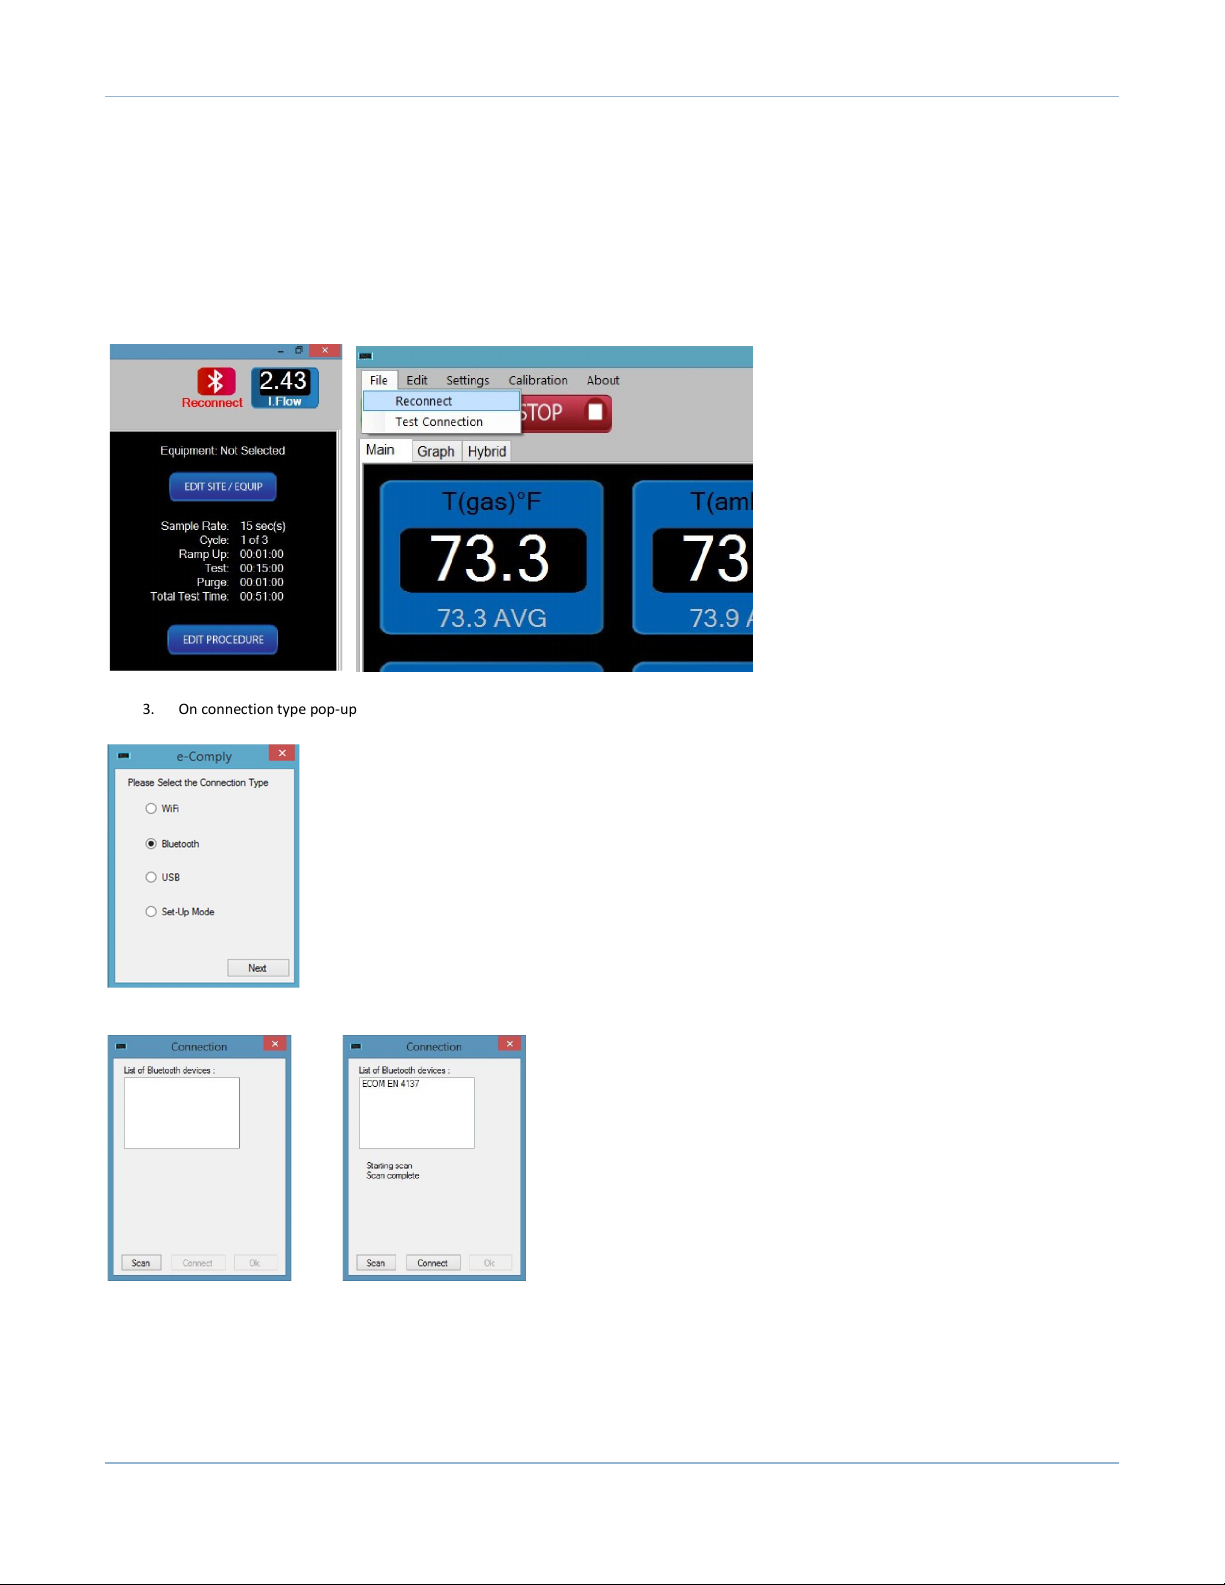
When your Bluetooth or Wi-Fi connection is interrupted or lost their respective icon, a Reconnect icon will appear. To reconnect follow these steps:
Bluetooth
1. Make sure that your computer recognizes your analyzer in the chosen connection mode
2. On the menu bar click on “File” and on the dropdown menu select “Reconnect”
3. On connection type pop-up window click on “Next”
4. Click on “Scan”, select your analyzer and then click on “Connect”
5. On the connection window click on “Ok” and you will be reconnected
Page 32
Page 34
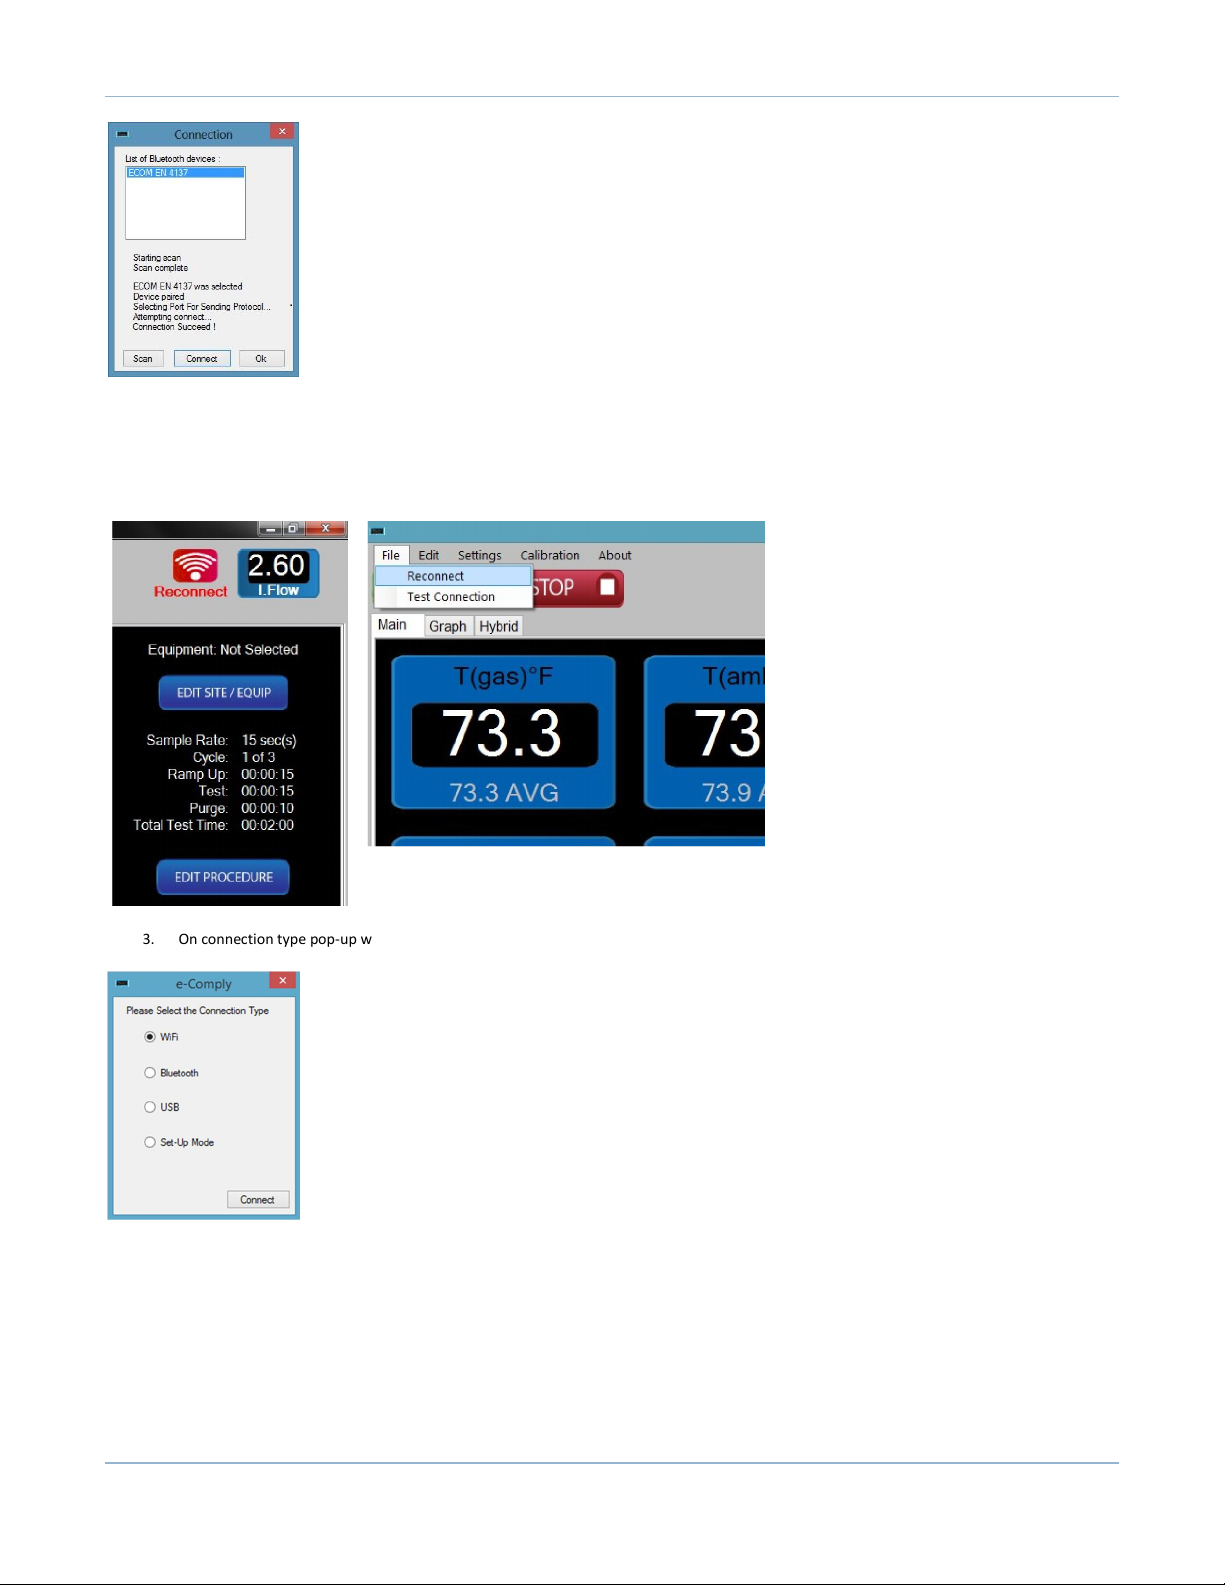
Wi-Fi
1. Make sure that your computer recognizes your analyzer in the chosen connection mode
2. On the menu bar click on “File” and on the dropdown menu select “Reconnect”
e-Comply
3. On connection type pop-up window click on “Connect” and you will be reconnected
Wi-Fi connection drop
The analyzers are able to change their Wi-Fi channel to reduce interference that causes drops.
1. Starting at the main menu on your analyzer go to Adjustments > Internal > WLAN > Channel
2. Enter a new channel (Channels 1,6,11 have the least interference of the selectable channels. As most of the Analyzers ship with the default
channel 1, we recommend switching to channel 6 or 11)
Page 33
 Loading...