

Eclipse AVN5435 Reference Guide

Read the following prior
to using this device
1
For the safe usage of this device
The symbols described below are found in this instruction manual as
well as on the device itself to insure its proper and safe usage and to
prevent injury or damage to property. Make sure you understand the
meaning of these symbols before reading the rest of this manual.
This sign indicates a situation in which incorrect handling
through disregard of a sign might result in death or serious
personal injury.
This sign indicates a situation in which incorrect handling
through disregard of a sign might result in personal injury or
may result solely in damage to property.
The following symbols will precede information useful for preventing
damage to the device as well as for its smooth operation.
Follow this advice to prevent malfunctions or damage to the
device. Perform the indicated action in the event of a
malfunction.
Useful information for smooth operation
Facts to keep in mind when operating
• Please read all materials such as manuals and warranties that have come with
the product.
• Fujitsu Ten will not be responsible for unsatisfactory product performance due to
failure to follow these instructions.
• Changes to product specifications may result in differences between content of
the manual and features of the product.
Please use care in handling the manual.
Forcefully spreading or pulling on pages may result in falling out of the binding.
Use the manual carefully.
2

Read the following prior
e
to using this device
2 Safety precautions
• This device was made for vehicles equipped with a 12V battery. Do not use in
a large truck, cold area vehicle or any other vehicle that uses a 24V battery.
Otherwise, fires may result.
• Make sure to follow the actual traffic regulations when driving even during
route guidance. Driving your vehicle while only following route guidance
instructions may lead to traffic violations and cause accidents.
• For the sake of safety, the driver should avoid operating the unit while driving.
Operation while driving can lead to unforeseen accidents such as losing control of the vehicle. Stop the vehicle before operating the unit. When viewing
screens while driving, spend the minimum possible time with your eyes off the
road. This will distract you from the road ahead, potentially causing an accident.
• You should never register geographical points or perform memory settings
while driving the vehicle. This will distract you from the road and cause accidents. Park the vehicle in a safe area before operating the device.
• Make sure to park the vehicle in a safe place and set the parking brake before
watching DVDs or videos. For safety reasons, only the sound of DVDs or videos will be emitted while the vehicle is in motion.
• Do not insert foreign objects into the disc insert slot. This may cause fires or
shocks.
• Do not disassemble or rebuild this product. Doing so may cause an accident,
fire or electrical shock.
• Do not pour water or insert foreign objects into the device. This may cause
smoke emissions, fires or shocks.
• Do not operate the product in a malfunctioning condition, for instance, when
the audio does not play. Doing so may cause an accident, fire or electrical
shock.
• When it is necessary to replace the fuse, always use a fuse of the correct rat-
ing (number of amperes). Use of fuses with higher amperage ratings may
cause a fire.
• If an abnormal situation occurs, such as foreign matter entering or liquid
splashing on the product, or smoke or a strange odor emitting from the unit,
shut off the product immediately and consult the dealer from whom you purchased it. Continued operation may cause an accident, fire or electrical shock.
• Do not touch the antenna wire or the device itself whenever you hear thunder.
There is a danger of electrocution due to lightning.
• Do not park your vehicle in an unauthorized area to operate the device.
Read the following prior to using this devic
Go to the next page
3

Read the following prior
to using this device
• This device can be used when the engine switch is either at ON or ACC, how-
ever, to avoid depleting the battery, operate it with the engine running.
• This product must be operated only as on-board equipment, or it may cause
electrical shock or injury.
• Play the audio at a moderate volume level that permits you to hear sounds from
outside the car. Driving without being able to hear outside sounds may result in
an accident.
• Check the volume prior to turning the device ON. If the volume is turned up
when turning the switch ON, a loud sound will emit which may damage your
hearing.
• Do not put your fingers into the disc insert slot. Otherwise, injury may result.
• Exercise caution as to avoid getting your fingers caught when closing the dis-
play or adjusting its angle. Otherwise, injury may result.
• Do not touch heated parts of the device. Otherwise, burns may result.
• For safety reasons when moving the device, have a specialist at the store of
purchase reinstall it for you. Specialized techniques are necessary to uninstall
or install the device.
• Do not use the device in the event it emits a distorted sound or other such
abnormality. Otherwise, fires may result.
• The device's liquid crystal display is equipped with a fluorescent tube. Check
your local rules and regulations regarding its proper disposal.
• Using the device at extremely high or low temperatures may lead to improper
operation and malfunctions. Lower your windows in order to bring down the
temperature before using the device especially during the hot summer months.
• Letting water or metal objects go into the device or exposing it to strong
shocks may cause malfunctions. Exercise caution.
• Take note of the following when ejecting a disc or setting the display tilt position:
For vehicles with an automatic transmission
• When removing each disc, switch to Neutral in the event of interference when
• When setting the tilt, make sure there is no interference generated from your
For vehicles with a manual transmission
• When removing each disc, if interference is generated when in 1st, 3rd, 5th
• When setting the tilt, make sure there is no interference generated from your
in Park and proceed. (For a column automatic transmission, perform this
operation when in either Park or Neutral.) Prior to this operation, the parking
brake should be set and the foot brake should be properly depressed to prevent the vehicle from moving which may cause damage to property and/or
injury.
hand or other obstructions when setting either in Park, Reverse or Neutral. (If
there is interference when in Drive, do not set the tilt.)
or (Reverse) gear, switch to Neutral and proceed. However, do not perform this operation while driving. Prior to this operation, the parking brake
should be set and the foot brake should be properly depressed to prevent
the vehicle from moving which may cause damage to property and/or injury.
hand or other obstructions when either in 1st, 3rd, 5th or (Reverse) gear.
(Do not set the tilt if there is interference.)
4

e
• When there is a lot of vibration – when driving on a bad road for example – the
unit may become unable to operate normally because it cannot read data from
the disc.
• Condensation may accumulate on the lens, with the function requiring reading
of CDs and DVDs, immediately after turning ON the heater in cold temperatures. Wait about 1 hour for the condensation to evaporate and the device will
operate normally. Contact the store of purchase if normal operation does not
resume after several hours.
• If using this device immediately after having purchased it or after having
stored it disconnected from the vehicle battery, the present location may not
be accurately displayed. Wait a moment and the GPS positioning will correct
the displayed position.
• This device is precision equipment and the information that you record on it
after purchase can be lost as a result of static electricity, electrical noise,
vibration and other influences. You are recommended to keep a separate
record of the information you store in the unit.
• Note that the following events are not covered by the warranty.
1 Corruption or loss of the data stored in the unit by the purchaser resulting
from failure or incorrect operation of the unit or trouble with it, or due to the
effects of electrical noise or other influences.
2 Corruption of loss of the data stored in the unit by the purchaser resulting
from misuse of the unit by the purchaser or a third party.
3 Corruption of loss of the data stored in the unit by the purchaser on failure /
repair of the unit.
* Please note that by installing or using this unit, you are regarded as having
consented to the points above.
Read the following prior to using this devic
5
Read the following prior
to using this device
3
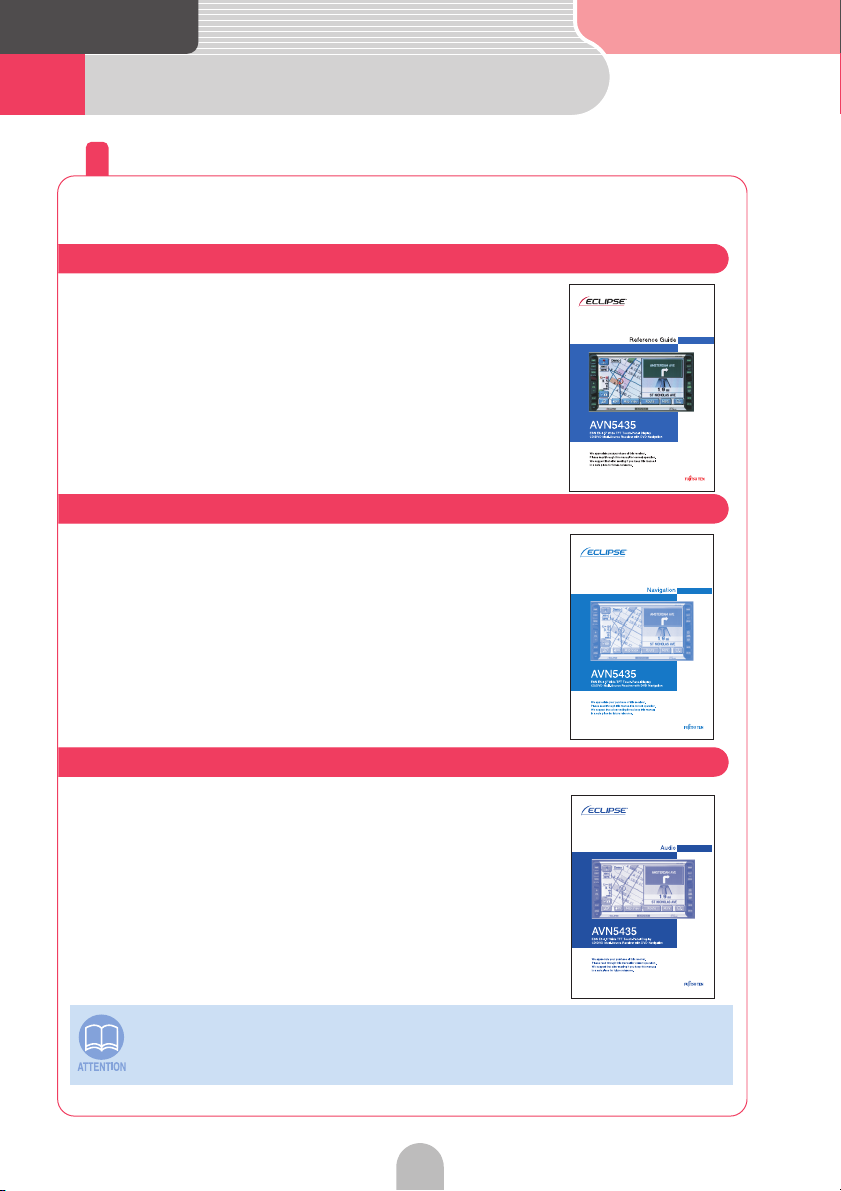
How the instruction manuals are organized
Use each instruction manual in the following order.
The AVN5435 comes with 3 instruction manuals.
Use each manual separately depending on how you are using the device.
Until you are completely comfortable with all of the device's basic functions:
Read the "Reference Guide".
Only basic operations and most frequently used functions
are described.
When wanting to master all navigation functions:
Read the "OWNER'S MANUAL/Navigation".
All navigation functions are described.
When wanting to master all audio functions:
Read the "OWNER'S MANUAL/Audio".
All audio functions are described.
The screens used in the instruction manuals may differ from the actual screens
appearing on the device depending on the type of database and when it was
compiled. Also, the GPS mark does not appear on the navigation screens.
6

Read the following prior to using this devic
e
7
Read the following prior
to using this device
4 How to use this manual
Item title
A number and title is
assigned for each item.
Operation title
A title is assigned for each
operation purpose.
Detailed operation title
A title is assigned for each
detailed operation purpose.
Operation procedure
Describes the operation.
Proceed with the operation as
per the numerical order.
Section title
A title is assigned for each section.
ADVICE
Additional points regarding
the operations are given here.
8
e
Operation examples
Each operational description is given here.
Operation switch
Switches needed to perform
operations are displayed.
Section side heading
Only the section side heading
will appear.
Operation screen
A screen showing the
operation will appear.
Read the following prior to using this devic
Go to the next page
9
The operation procedures
are continued on the next
page.

Read the following prior
to using this device
5 Table of Contents
For the safe usage of this device . . . . . . . . . . . . . . . . . . . . . . . . . . . . . . . .2
Safety precautions . . . . . . . . . . . . . . . . . . . . . . . . . . . . . . . . . . . . . . . . . . . . .3
How the instruction manuals are organized . . . . . . . . . . . . . . . . . . . . . .6
Use each instruction manual in the following order. . . . . . . . . . . . . . . . . . . . . . 6
How to use this manual . . . . . . . . . . . . . . . . . . . . . . . . . . . . . . . . . . . . . . . .8
Table of Contents . . . . . . . . . . . . . . . . . . . . . . . . . . . . . . . . . . . . . . . . . . . . 10
Name of parts . . . . . . . . . . . . . . . . . . . . . . . . . . . . . . . . . . . . . . . . . . . . . . . 14
Panel buttons . . . . . . . . . . . . . . . . . . . . . . . . . . . . . . . . . . . . . . . . . . . . . . . . . . . . 14
Touch switches . . . . . . . . . . . . . . . . . . . . . . . . . . . . . . . . . . . . . . . . . . . . . . . . . . . 15
When using for the first time . . . . . . . . . . . . . . . . . . . . . . . . . . . . . . . . . . 16
Loading the program into the device . . . . . . . . . . . . . . . . . . . . . . . . . . . . . . . . 16
Turning the power ON or OFF . . . . . . . . . . . . . . . . . . . . . . . . . . . . . . . . . 18
How to turn the power ON or OFF . . . . . . . . . . . . . . . . . . . . . . . . . . . . . . . . . . . 18
Inserting the disc . . . . . . . . . . . . . . . . . . . . . . . . . . . . . . . . . . . . . . . . . . . . 19
How to insert or eject a CD or DVD . . . . . . . . . . . . . . . . . . . . . . . . . . . . . . . . . . 19
Display angle adjustment . . . . . . . . . . . . . . . . . . . . . . . . . . . . . . . . . . . . . 24
Adjust the angle of the display . . . . . . . . . . . . . . . . . . . . . . . . . . . . . . . . . . . . . . 24
Modes . . . . . . . . . . . . . . . . . . . . . . . . . . . . . . . . . . . . . . . . . . . . . . . . . . . . . . 25
Get to know each mode . . . . . . . . . . . . . . . . . . . . . . . . . . . . . . . . . . . . . . . . . . . 25
Operational conditions . . . . . . . . . . . . . . . . . . . . . . . . . . . . . . . . . . . . . . . 26
Each operation condition for device functions . . . . . . . . . . . . . . . . . . . . . . . . . 26
Switching modes . . . . . . . . . . . . . . . . . . . . . . . . . . . . . . . . . . . . . . . . . . . . 27
Get to know how to switch modes . . . . . . . . . . . . . . . . . . . . . . . . . . . . . . . . . . . 27
Map operation . . . . . . . . . . . . . . . . . . . . . . . . . . . . . . . . . . . . . . . . . . . . . . . 28
Check the positioning of your vehicle . . . . . . . . . . . . . . . . . . . . . . . . . . . . . . . . 28
Move the map (one-touch scroll) . . . . . . . . . . . . . . . . . . . . . . . . . . . . . . . . . . . . 29
Change the map reduction scale . . . . . . . . . . . . . . . . . . . . . . . . . . . . . . . . . . . 30
Change the orientation of the map . . . . . . . . . . . . . . . . . . . . . . . . . . . . . . . . . . . 31
Change the map display method . . . . . . . . . . . . . . . . . . . . . . . . . . . . . . . . . . . 32
Display various points of interest on the map . . . . . . . . . . . . . . . . . . . . . . . . . . 33
10

e
Registering places . . . . . . . . . . . . . . . . . . . . . . . . . . . . . . . . . . . . . . . . . . . .34
Register your home . . . . . . . . . . . . . . . . . . . . . . . . . . . . . . . . . . . . . . . . . . . . . . . . 34
Register favorite places . . . . . . . . . . . . . . . . . . . . . . . . . . . . . . . . . . . . . . . . . . . . 41
Route guidance . . . . . . . . . . . . . . . . . . . . . . . . . . . . . . . . . . . . . . . . . . . . . . .46
How to start route guidance . . . . . . . . . . . . . . . . . . . . . . . . . . . . . . . . . . . . . . . . . 46
Route Search (indicate destination) . . . . . . . . . . . . . . . . . . . . . . . . . . . .47
Decide on a destination and start a route search . . . . . . . . . . . . . . . . . . . . . . . 47
How to search after moving the map . . . . . . . . . . . . . . . . . . . . . . . . . . . . . . . . . 48
How to return home . . . . . . . . . . . . . . . . . . . . . . . . . . . . . . . . . . . . . . . . . . . . . . . . 49
When searching using the freeway entrance/exit name . . . . . . . . . . . . . . . . . 50
Searching using the latitude/longitude coordinates . . . . . . . . . . . . . . . . . . . . . 52
Route setting . . . . . . . . . . . . . . . . . . . . . . . . . . . . . . . . . . . . . . . . . . . . . . . . .54
Set the desired route . . . . . . . . . . . . . . . . . . . . . . . . . . . . . . . . . . . . . . . . . . . . . . . 54
Check the progression of your journey . . . . . . . . . . . . . . . . . . . . . . . . . . . . . . . . 56
Select a different route . . . . . . . . . . . . . . . . . . . . . . . . . . . . . . . . . . . . . . . . . . . . . 58
Add stops along the route . . . . . . . . . . . . . . . . . . . . . . . . . . . . . . . . . . . . . . . . . . 59
Start route guidance . . . . . . . . . . . . . . . . . . . . . . . . . . . . . . . . . . . . . . . . . .61
Route guidance . . . . . . . . . . . . . . . . . . . . . . . . . . . . . . . . . . . . . . . . . . . . . . . . . . . 61
Start driving following the route guidance . . . . . . . . . . . . . . . . . . . . . . . . . . . . . 63
Stop and restart guidance while in progress . . . . . . . . . . . . . . . . . . . . . . . . . . . 64
Delete the destination . . . . . . . . . . . . . . . . . . . . . . . . . . . . . . . . . . . . . . . . . . . . . . 65
Other settings . . . . . . . . . . . . . . . . . . . . . . . . . . . . . . . . . . . . . . . . . . . . . . . .67
How to display a clock on the navigation screen . . . . . . . . . . . . . . . . . . . . . . . 67
How to turn off the navigation screen . . . . . . . . . . . . . . . . . . . . . . . . . . . . . . . . . 68
How to correct the present location . . . . . . . . . . . . . . . . . . . . . . . . . . . . . . . . . . 69
Read the following prior to using this devic
11

Read the following prior
to using this device
Switch the audio source (mode) . . . . . . . . . . . . . . . . . . . . . . . . . . . . . . . 74
AM/FM radio operation . . . . . . . . . . . . . . . . . . . . . . . . . . . . . . . . . . . . . . . 76
HD RADIO (IBOC) operation . . . . . . . . . . . . . . . . . . . . . . . . . . . . . . . . . . 78
SIRIUS satellite radio operation . . . . . . . . . . . . . . . . . . . . . . . . . . . . . . . 80
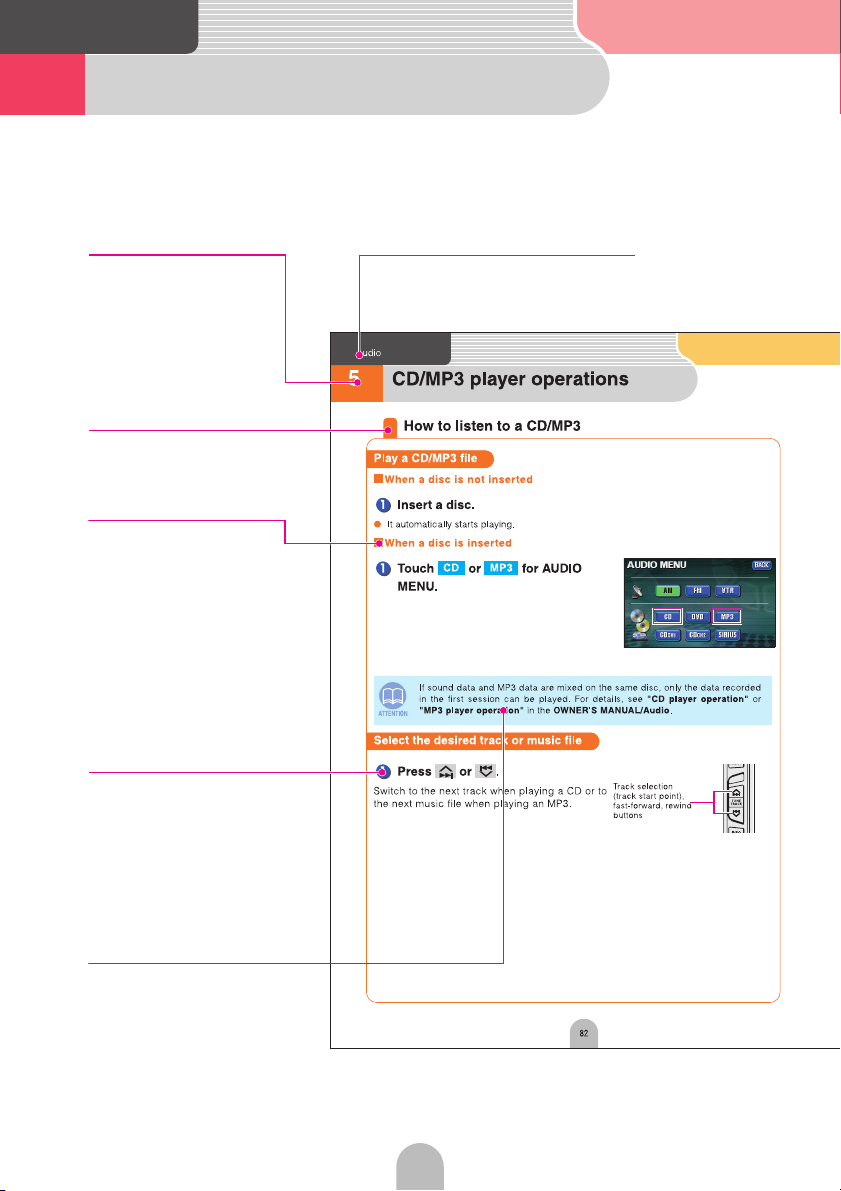
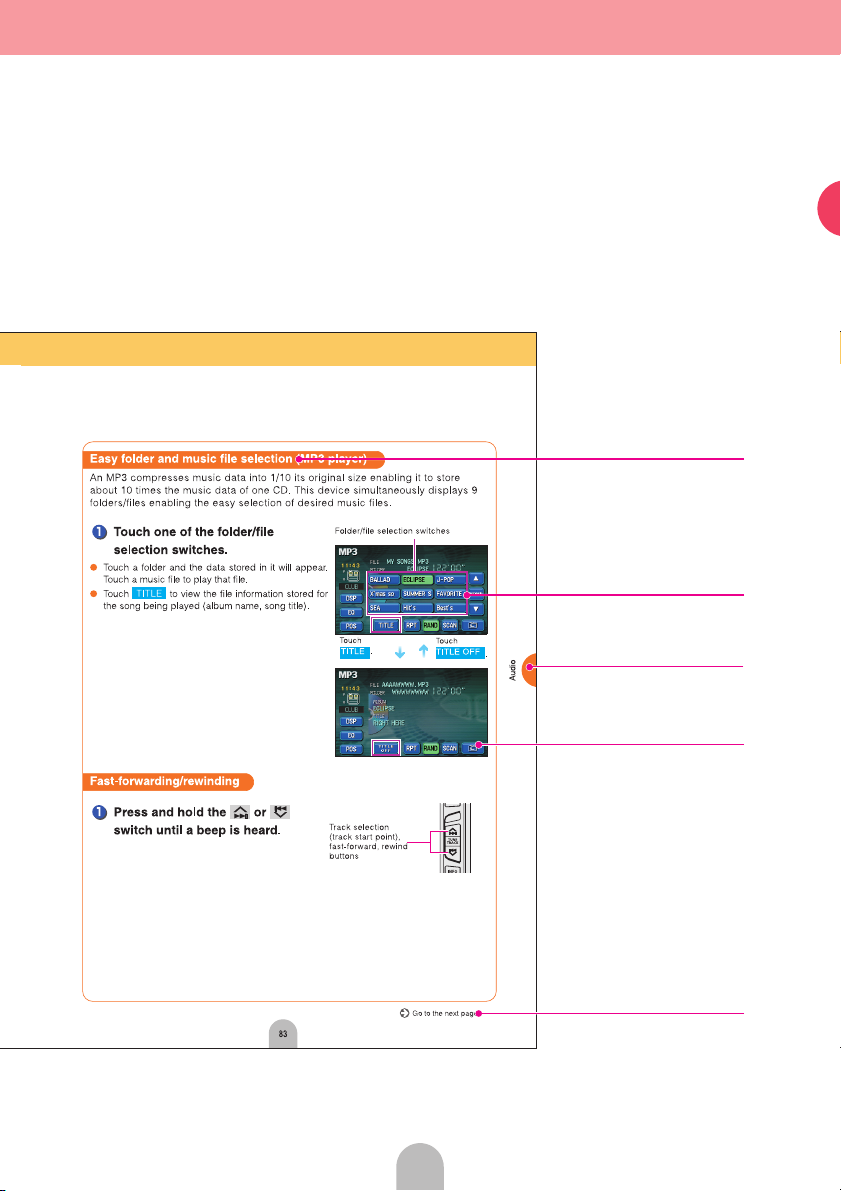
CD/MP3 player operations . . . . . . . . . . . . . . . . . . . . . . . . . . . . . . . . . . . . 82
DVD player operation . . . . . . . . . . . . . . . . . . . . . . . . . . . . . . . . . . . . . . . . 85
Adjusting sound quality . . . . . . . . . . . . . . . . . . . . . . . . . . . . . . . . . . . . . . 88
ESN (Key CD security) operation . . . . . . . . . . . . . . . . . . . . . . . . . . . . . . 92
Other settings . . . . . . . . . . . . . . . . . . . . . . . . . . . . . . . . . . . . . . . . . . . . . . . 97
Specifications . . . . . . . . . . . . . . . . . . . . . . . . . . . . . . . . . . . . . . . . . . . . . . 100
Switching the audio source (mode) . . . . . . . . . . . . . . . . . . . . . . . . . . . . . . . . . . 74
How to listen to the AM/FM radio . . . . . . . . . . . . . . . . . . . . . . . . . . . . . . . . . . . . 76
How to listen to the HD RADIO (IBOC) . . . . . . . . . . . . . . . . . . . . . . . . . . . . . . . 78
How to listen to the SIRIUS satellite radio . . . . . . . . . . . . . . . . . . . . . . . . . . . . . 80
How to listen to a CD/MP3 . . . . . . . . . . . . . . . . . . . . . . . . . . . . . . . . . . . . . . . . . . 82
How to view a DVD video . . . . . . . . . . . . . . . . . . . . . . . . . . . . . . . . . . . . . . . . . . 85
Adjusting sound quality . . . . . . . . . . . . . . . . . . . . . . . . . . . . . . . . . . . . . . . . . . . . 88
Setting ESN security . . . . . . . . . . . . . . . . . . . . . . . . . . . . . . . . . . . . . . . . . . . . . . . 92
Cancel the "beep" sound made when operating the switches . . . . . . . . . . . 97
Switch the screen display size . . . . . . . . . . . . . . . . . . . . . . . . . . . . . . . . . . . . . . 98
12

Read the following prior to using this devic
e
13

Introduction
1 Name of parts
The unit can be operated by pressing buttons on the frame of the panel (panel buttons) and by touching buttons displayed on the screen (touch switches). This deck
supports use of a remote control. The remote control is sold separately and can be
purchased at your local retailer.
Panel buttons
Press the panel buttons found on either side of the screen to operate the device.
PWR button Press to turn the DVD or audio ON or OFF.
1
CONT button Press to display the audio or DVD operation screens.
2
(SOURCE) MENU
3
Button
ESN INDICATOR
4
VOL buttons Press to adjust the DVD or audio volume.
5
DISP button Press to adjust the screen image quality or screen brightness.
6
OPEN/TILT button Calls up the TILT/EJECT screen.
7
NAVI button Press to display the navigation screen and present location.
8
DEST button Press to set the destination determined by the navigation system.
9
(NAVI) MENU button Press to display the navigation menu screen.
10
TUNE/TRACK buttons Press to select radio stations, CD audio tracks and DVD chapters.
11
INFO button Press to operate each navigation information function.
12
MUTE button Press to temporarily mute or take audio volume to no sound.
13
■ Press the button.
MENU
Press to display the audio menu screen that enables the switching of audio
modes.
After ESN security setting, the lamp will flash when the ignition key is turned to ACC OFF.
A menu screen appears.
14
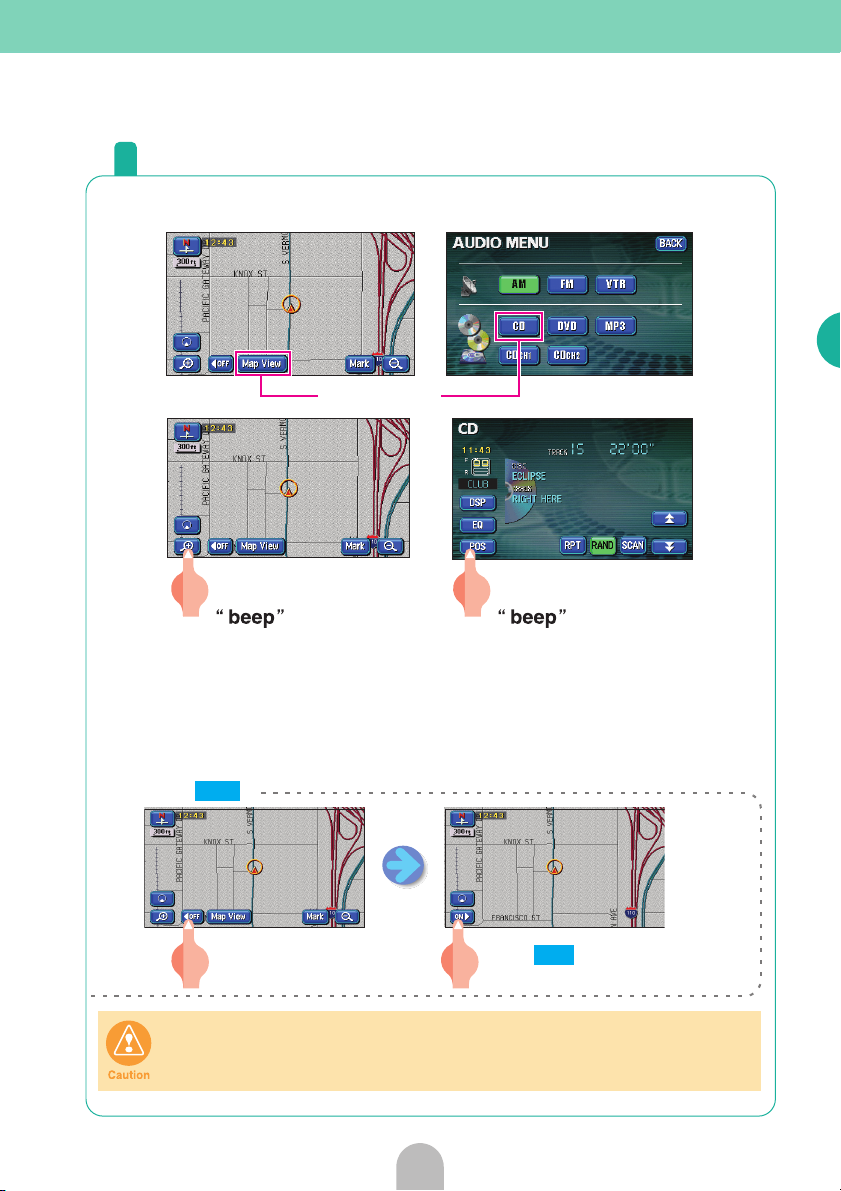
Touch switches
Unit can be operated by touching buttons on screen.
Touch switch
[About operation of touch switch]
• Touch the buttons until a beep sound is emitted.
• Touch the buttons lightly to prevent damage to the screen.
• If a button does not respond, remove your finger and touch it again.
• An unavailable button is shaded.
• When the switch function is activated, the touch switch for that function will appear green.
■ Touch
OFF
Introduction
The touch switch displays will disappear.
Touch to display the touch
ON
switches.
Touch these switches with your fingers.
Using a pen, pencil or other object with a hard or sharp tip to touch on the
screen may cause damage.
15

Introduction
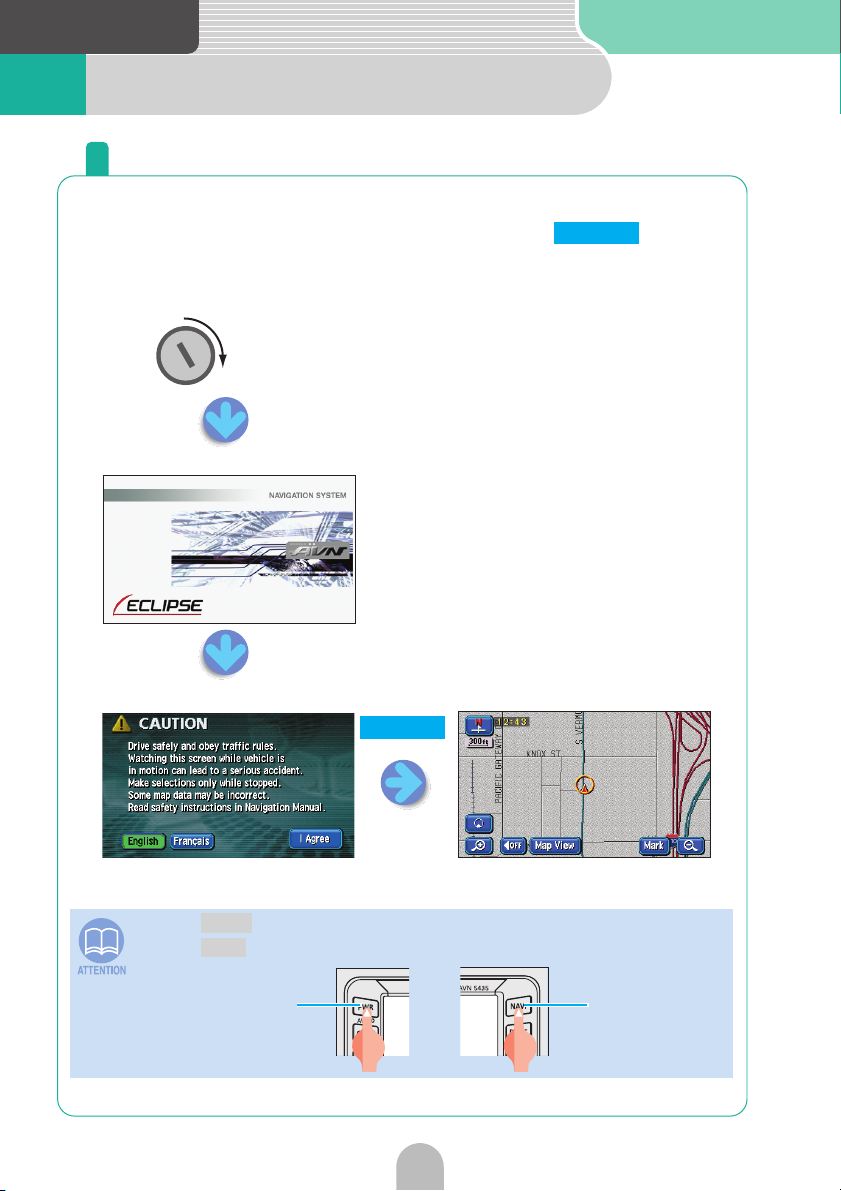
2 When using for the first time
Loading the program into the device
After purchasing the device and using it for the first time, load the map
disc program into the device.
1
Turn the engine ON.
Screen after turning the power ON
2
Touch to
DISPLAY OPEN/CLOSE
Progress bar
open the display and insert the
map disc into the map disc slot.
• The device will start reading the program.
• A progress bar will appear as the program is being
read.
• On completion of program reading, the opening
screen is displayed.
While program loading is in progress, do not turn the engine OFF or operate any
other switch.
Program reading in progress screen (approx. 70 seconds)
Opening screen (approx. 10 seconds)
16

3
Select the language.
• Touch to use English.
• Touch and then to use
4
• Press to display the map screen.
5
6
I Agree
Françis I Agree
French.
Wait approx. 30 seconds.
NAVI
Turn the engine OFF.
Turn the engine ON and start the device.
Map screen
Introduction
• The same operation is necessary when starting the device for the first time
after having replaced the vehicle battery or fuses.
• When inserting the map disc for the first time and the program is read after
having cut the power from the vehicle battery, the following message may
appear "DVD check in process".
After program reading is complete, the device will start reading the map data
from the program approx. 30 seconds after the map screen appears. Attempting
to operate the device during this time may result in improper operation. Do not
operate the switches during this time.
17
Introduction
y
3 Turning the power ON or OFF
How to turn the power ON or OFF
When the engine is turned ON, the DVD/audio power will automatically
turn ON and the Caution screen will appear. Touch to switch
to the Navigation screen. The power will turn OFF when turning off the
engine.
Engine ke
<Opening screen>
I Agree
<Caution screen>
I Agree
• Press if the navigation screen does not appear.
• Press if the audio or DVD does not turn ON.
NAVI
PWR
18
<Navigation screen>
NAVI buttonPWR button
Introduction
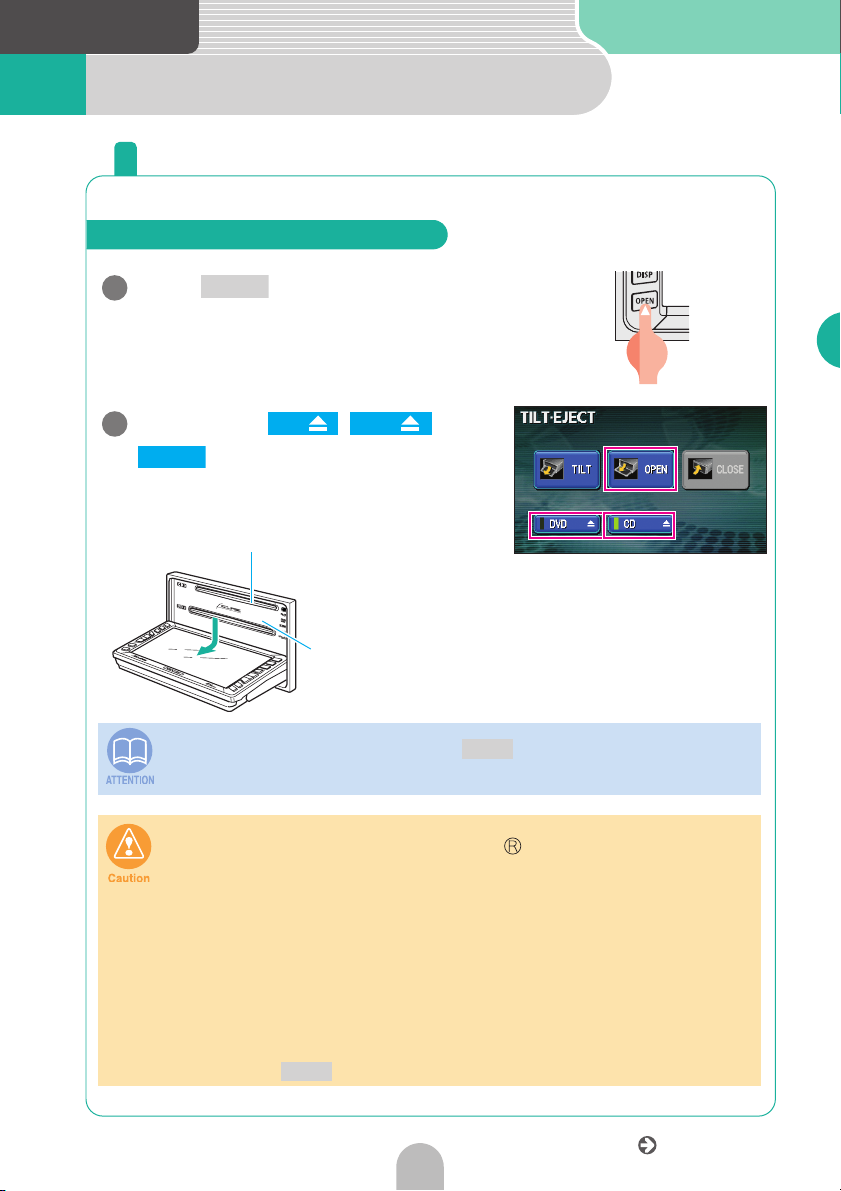
4 Inserting the disc
How to insert or eject a CD or DVD
Insert an audio CD when wanting to listen to music.
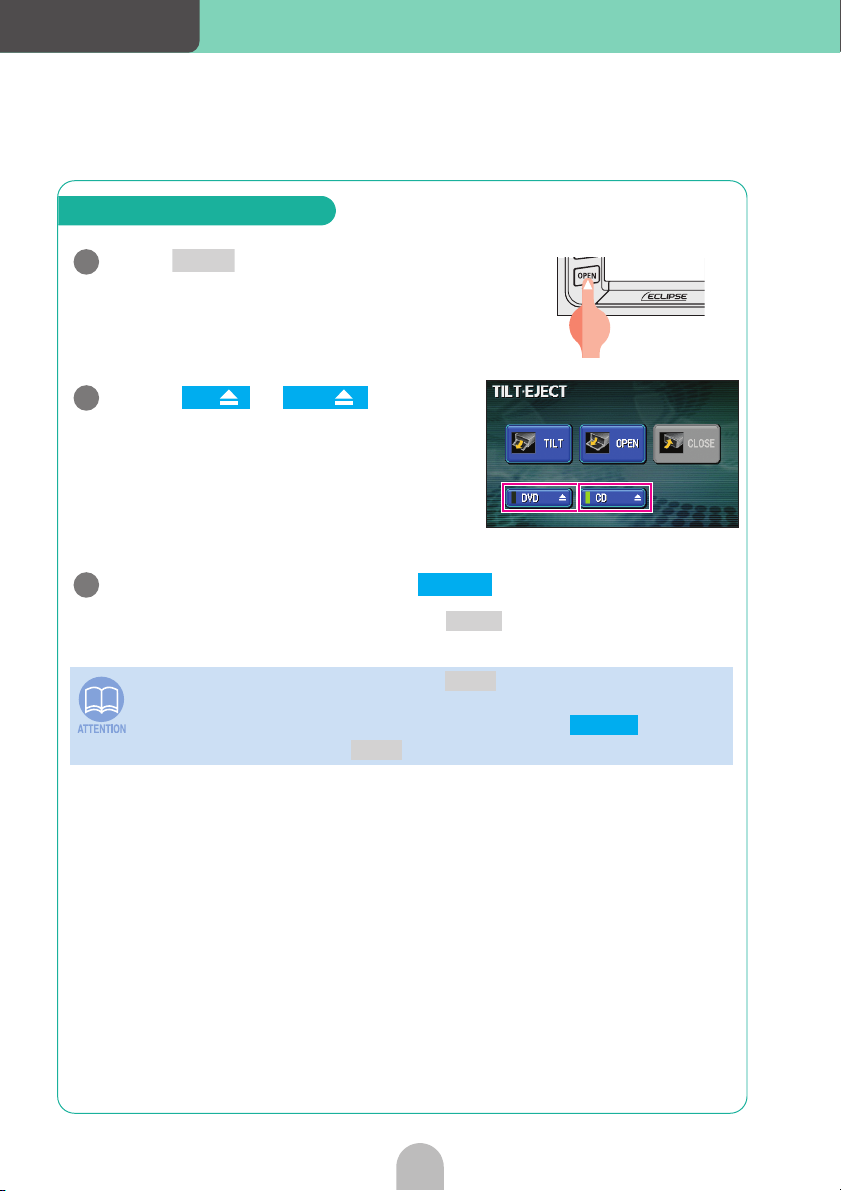
How to insert or eject a CD or DVD
Press .
1
Touch either , or
2
OPEN
OPEN
CD DVD
.
The display opens and the disc slots become
accessible.
CD insert slot
Map disc and DVD video
insert slot
The display can be opened by pressing for approx. 1 second until a
"beep" sound is heard.
• If the vehicle's automatic transmission shift lever is in the "P" position or
manual transmission lever is in the 1, 3, 5 or position, or if a bottle or other
container is in the cup holder, this could interfere with the opening and closing
of the display. When it is safe to do so, move the shift lever to the "N" or
"Neutral" position or remove the container from the cup holder before opening
or closing the display. Prior to this operation, the parking brake should be set
and the foot brake should be properly depressed to prevent the vehicle from
moving which may cause damage to property and/or injury.
• Do not place cups or cans on the display when it is opened. The display may
be damaged.
• Quickly wipe away any liquid spilled on the display. Otherwise, damage may
result.
• To protect the display from heat or dust, keep it closed at all times except
when inserting or ejecting a disc.
• Do not press while inserting a disc.
OPEN
Introduction
OPEN
19
Go to the next page
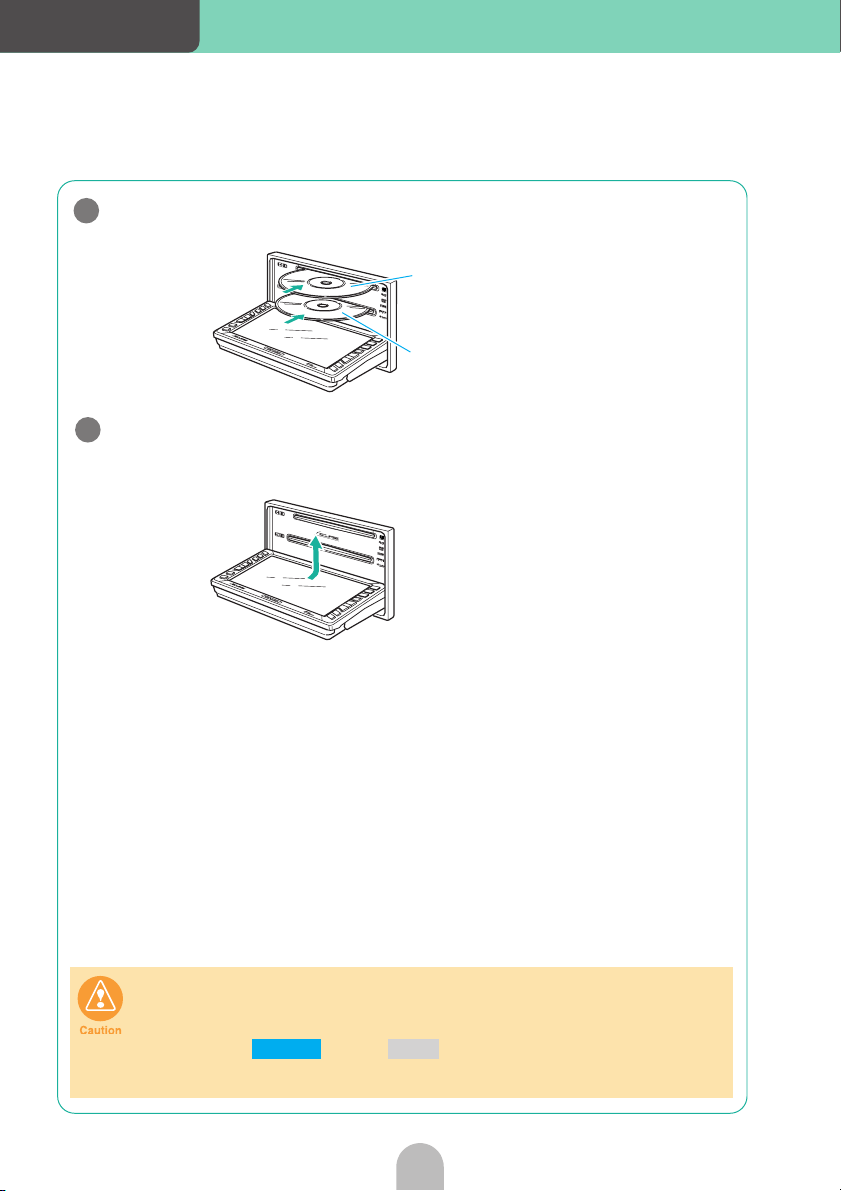
Introduction
3
4
Insert the desired disc into the slot.
CD
Map disc, DVD video
When the CD or DVD is fully inserted, the display closes
automatically.
• As soon as an audio CD is inserted, playback starts.
• As soon as a map disc is inserted, the navigation screen is displayed.
• As soon as a DVD is inserted, playback starts.
• Only insert one audio CD or DVD and wait for playback and then open the
display again and then insert the next CD or DVD in its proper slot.
• Do not insert a CD and DVD at the same time. This may cause damage to the
device and/or property.
• Do not touch or press while a disc is being inserted.
• Do not use an adapter when inserting 8cm CDs. Ejecting may be rendered
impossible.
CLOSE OPEN
20
■Map disc (DVD-ROM)
• Only use a specially made DVD navigation disc (For details, contact the store
of purchase).
■DVD
• DVDs labeled with the marks shown in the
right can be used with this device. When
using DVDR/RW (DVD-Recordable/
ReWritable) and DVD+R/RW
(DVD+Recordable/ReWritable) discs, note
that only those whose contents were
recorded in the video mode can be played. Discs whose contents were
recorded in the video recording (VR) mode cannot be played.
• Some functions cannot be used depending on the type of DVD.
• When handling a DVD, hold it by pressing one finger on its center rim and
another finger on its end with the label up.
• It is possible that a DVD-R/RW (DVD-Recordable/ReWritable) or DVD+R/RW
(DVD+Recordable/ReWritable) disc will not play on the unit due to the
circumstances of the recording, special disc characteristics, scratches, dirt or
deterioration caused by long storage in the vehicle. DVD-R/RW or DVD+R/RW
discs that have not been finalized will not play on the unit. It may not be
possible to play a disc that has been recorded on a personal computer,
depending on the application setting and the environment.
■CD
• Audio CDs, CD-Rs (CD-Recordable)
and CD-RWs (CD-Rewritable)
labeled with the marks shown in the
right can be used with this device.
(For details, see "Before using the
deck" in the OWNER'S MANUAL/Audio.)
• It is possible that a CD-R (CD-Recordable) or CD-RW (CD-ReWritable) disc will
not play on the unit due to the circumstances of the recording, special disc
characteristics, scratches, dirt or deterioration caused by long storage in the
vehicle. CD-R/RW discs that have not been finalized will not play on the unit. It
may not be possible to play a disc that has been recorded on a personal
computer, depending on the application setting and the environment.
• The CD-TEXT function can be used only with the CD-TEXT-compatible
compact discs available on the market. If it is used with CD-R or CD-RW
discs, characters may not be displayed normally.
• Since the CCCD (Copy Control CD) does not comply with
regular CD specifications, it may not be possible to play it.
• Do not use discs with transparent or semi-transparent
portions within the recording area, or C-thru discs, since
they may not be accepted and ejected properly and may not
play properly.
Introduction
21
Introduction
How to eject a CD or DVD
Press .
1
Touch or to eject
2
OPEN
CD DVD
either disc.
The display will open and the disc(s) are
ejected.
After removing the disc, touch .
3
The display can be closed even after pressing for approx. 1 second until a
"beep" sound is heard.
• The display can be opened by pressing for approx. 1 second until a
"beep" sound is heard.
• If the disc cannot be removed (e.g. if it is trapped), touch to close
the display and then press for at least 5 seconds.
OPEN
CLOSE
OPEN
OPEN
CLOSE
22

• If the vehicle's automatic transmission shift lever is in the "P" position or
manual transmission lever is in the 1, 3, 5 or position, or if a bottle or other
container is in the cup holder, this could interfere with the opening and closing
of the display. When it is safe to do so, move the shift lever to the "N" or
"Neutral" position or remove the container from the cup holder before opening
or closing the display. Prior to this operation, the parking brake should be set
and the foot brake should be properly depressed to prevent the vehicle from
moving which may cause damage to property and/or injury.
• Be careful of the following items while a disc is being ejected.
<Automatic transmission vehicle>
If the shift lever in the "P" position causes interference with disc
ejection, switch the lever to the "N" position to eject discs.
(Steering column mounted shift levers allow unit operation while
lever is in either "P" or "N" position.)
<Manual transmission vehicle>
If the shift lever in the 1, 3, 5 or position causes interference
with disc ejection, switch the lever to the Neutral position to eject
discs.
• Do not close the display by hand. This could damage the display.
• Do not place cups or cans on the display when it is opened. This could
damage the display.
• Quickly wipe away any liquid spilled on the display. Otherwise, damage may
result.
• To protect the display from heat or dust, keep it closed at all times except
when inserting or ejecting a disc.
• If the ignition key is turned to the ACC OFF position while the display is open, a “pip
pip” warning will sound. Close the display.
Introduction
23
Introduction
5 Display angle adjustment
Adjust the angle of the display
The screen viewing angle can be adjusted to any of 6 stepped
positions when light from outside the vehicle makes viewing difficult.
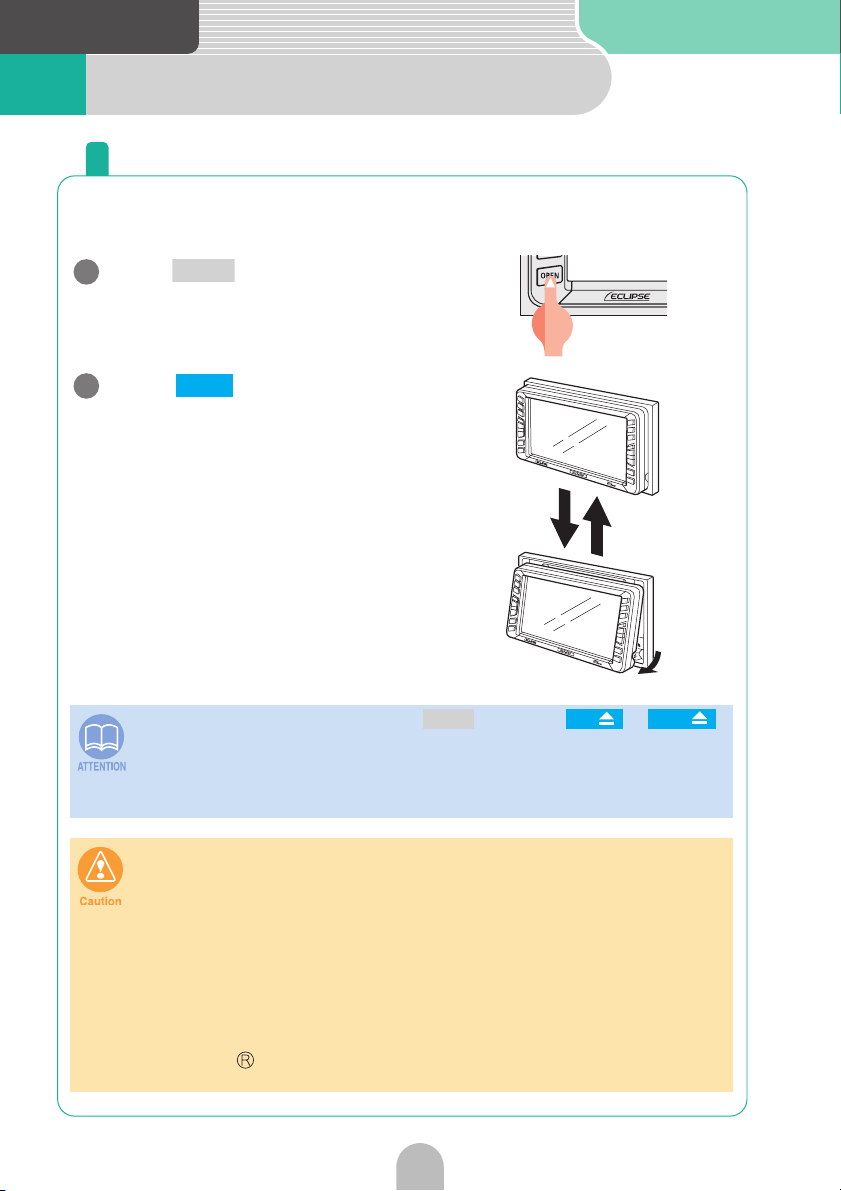
Press .
1
OPEN
The TILT/EJECT screen is displayed.
Touch .
2
TILT
The display will tilt upwards by one step (5°).
Each touch of the switch tilts the panel by
another step.
Pressing the switch when the display is tilted
to the 6th level (30°) will bring it back up to
its original position (0°).
• The display will open when pressing or touching or
even when tilted. When closed again, it will return to its tilted position.
• If the display is in an adjusted angle position when the vehicle ignition is
turned off, the display will automatically return to the original position (0°). If
the ignition switch is then turned to ACC or ON, the display will return to the
adjusted angle position.
• Be careful not to pinch your hands or other objects when adjusting the angle of
the display. This could cause an injury or damage to the display.
• When the display is in the TILT status, do not insert a disc or anything else into
the gap at the top. This may damage the unit and the disc.
• Observe the following cautions when adjusting the angle of the display.
<Automatic transmission vehicle>
<Manual transmission vehicle>
When setting the tilt, make sure there is no interference generated
from your hand or other obstructions setting when either in Park,
Reverse or Neutral. (If there is interference when in Drive, do not
set the tilt.)
When setting the tilt, make sure there is no interference generated
from your hand or other obstructions when either in 1st, 3rd, 5th or
(Reverse) gear. (If there is interference, do not set a tilt
position.)
OPEN
CD
DVD
24
Introduction
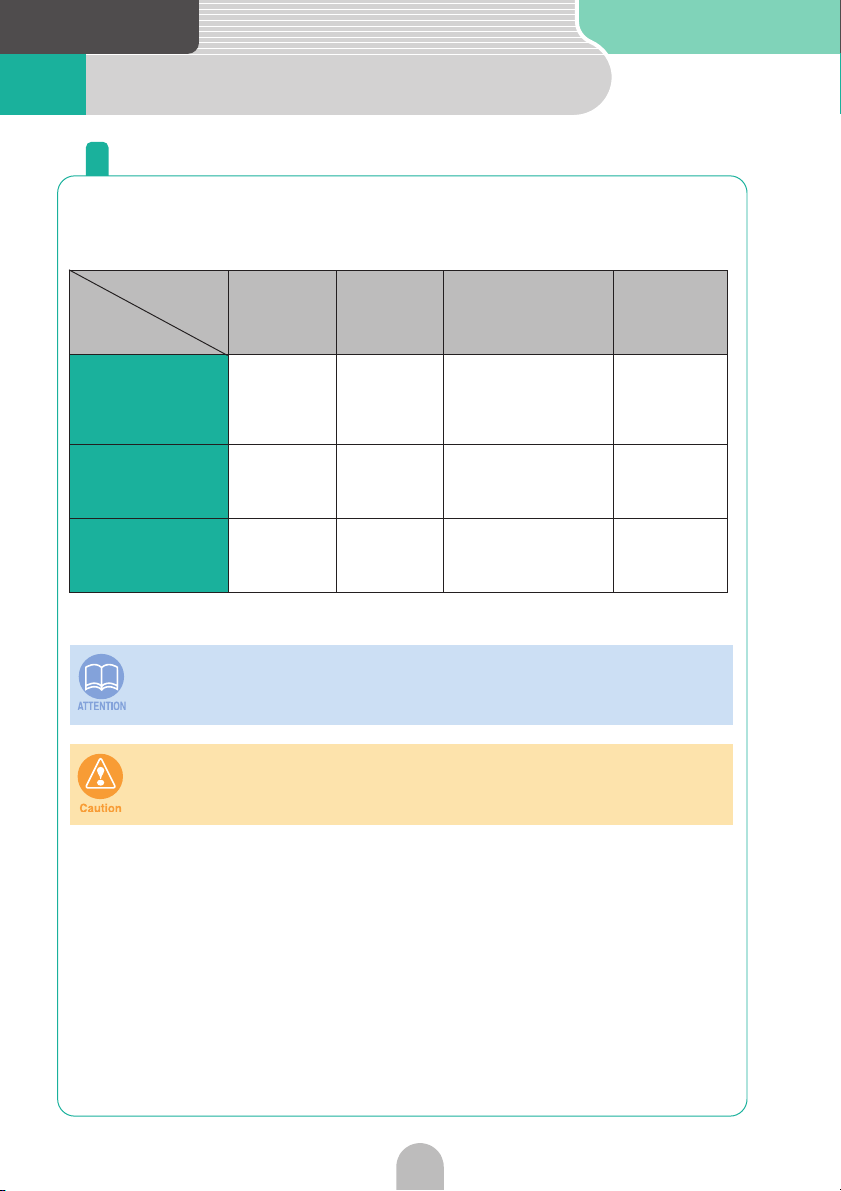
6 Modes
Get to know each mode
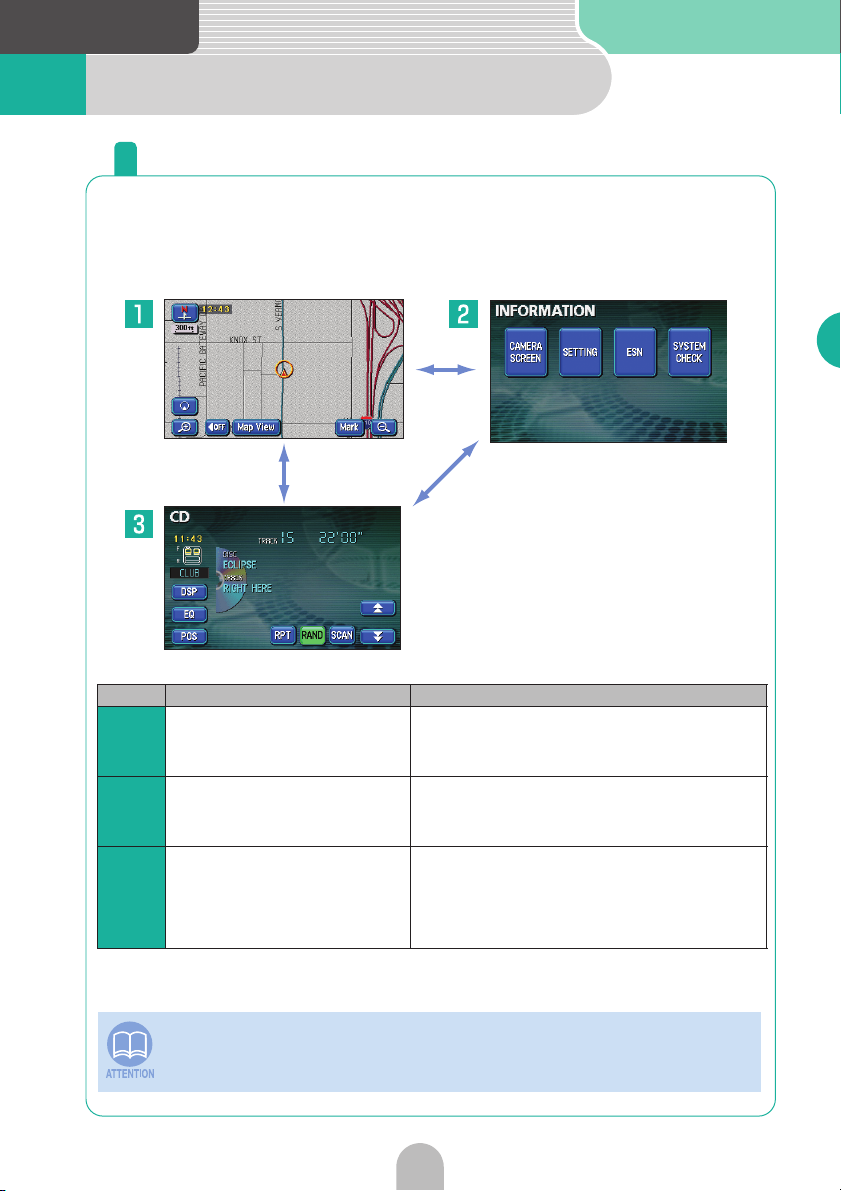
This device has three main modes: "Navigation", "Information" and
"Audio/DVD".
You can switch from any mode to any mode.
Introduction
Mode Main functions
● Present location display
Navigation
1
Information
2
Audio/DVD
3
CAMERA SCREEN button is available when backeye camera (BEC104) is connected.
● Instructions to destination
● Geographical point registration (home and
memory points)
● Rear View Camera function (optional)
● Displaying the setting screen
● ESN security setting
● Displaying the system check screen
● AM/FM broadcast reception
● HD RADIO broadcast reception
● SIRIUS broadcast reception
● CD player operation
● MP3 player operation
● DVD player operation
25
Introduction
7 Operational conditions
Each operation condition for device functions
Depending on the following conditions (engine switch position), the
device functions may or may not be operable.
{: Operable ×: Inoperable
Engine
switch
Each
function
GPS voice
Navigation/
Information
Audio × {
DVD × {
*Only the sound of DVD will be played while driving for safety reasons.
OFF
(LOCK)
× {
ACC/ON
With parking
brake set
ACC/ON With park-
ing brake released
Some functions are
inoperable for safety
reasons.
Some functions are
inoperable for safety
reasons.
For safety reasons,
only the voice
guidance is emitted.
Display opened
×
Route and
voice
guidance
continue.
×
Voice
guidance
continues.
×
Voice
guidance
continues.
Inoperable switches fade and are disabled while driving. Pressing inoperable
switches while driving will display a message on the screen prohibiting
operation.
When installing this device to vehicles, please be sure to connect a parking
brake signal. If the parking brake signal is not connected, this device will not
operate normally.
26
Introduction
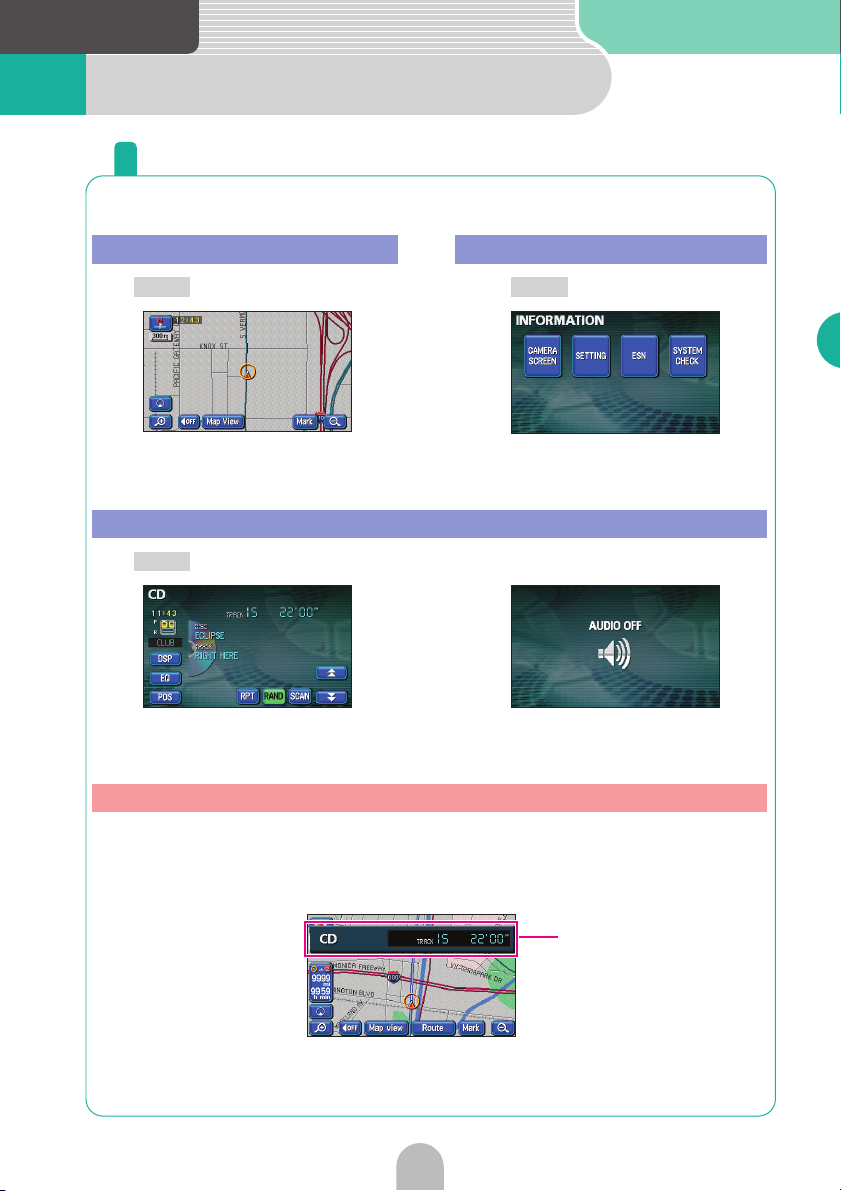
8 Switching modes
Get to know how to switch modes
Press the switches below to switch modes.
Navigation screen Information screen*
NAVI
Press .
INFO
Press .
*: CAMERA SCREEN button is available
when backeye camera (BEC104) is
connected.
Audio operation screen
CONT
Press . (Operation time)
*1: Appears when the audio or DVD functions are in operation. See the "OWNER'S MANUAL/
Audio " for audio and DVD operations.
*2: Appears when the audio or DVD functions are turned OFF.
*1
(OFF screen)
*2
Screen display
Turn on the audio or DVD (selecting a track or chapter) when the screen is showing the navigation display or is turned off. This screen will appear.
The screen will disappear automatically in a moment.
Introduction
27
Screen display
Navigation
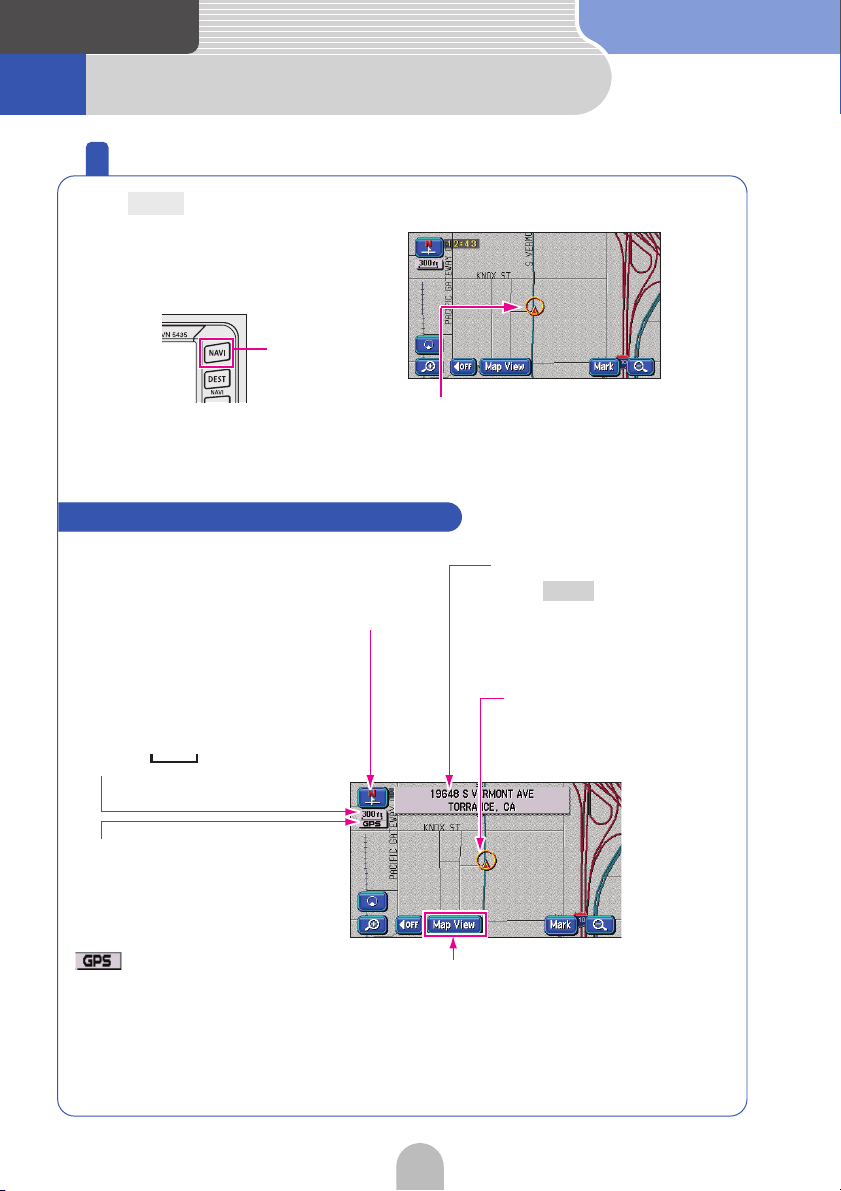
1 Map operation
Check the positioning of your vehicle
Press to display the area in which your vehicle is located.
NAVI
NAVI button
Vehicle position mark
The present location and the vehicle
direction are displayed. The mark will
move automatically as per the
movements of the vehicle.
How to view the present location screen
Orientation mark
Indicates the
orientation of the map.
Scale display
The reduction scale of the map
being displayed is indicated.
In this case, the length of the line
segment ( ) is 300ft.
Name of present location
NAVI
Press to display it in
the present location screen.
Vehicle position mark
GPS mark
This mark will appear when
utilizing the absolute
positioning data from the GPS
satellite.
Indicates GPS signal
is being received
Touch switch
Each function switch is
displayed depending on the
screen.
28
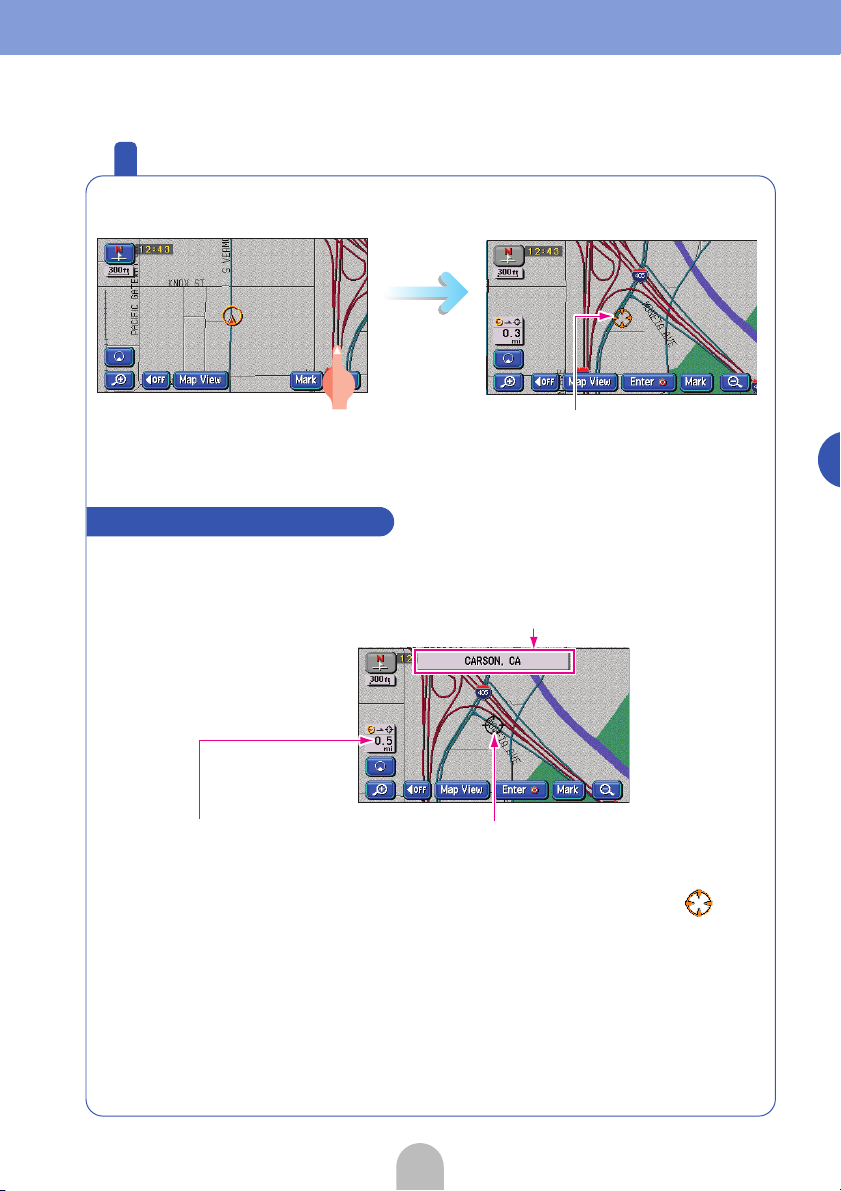
Move the map (one-touch scroll)
Touch the screen directly to move the map.
While scrolling
How to view the scroll screen
Position name
After moving the map, the name of the cursor
position will appear for approx. 6 seconds.
Cursor mark
Touch the map and the cursor
mark will appear in the middle of
the screen.
Navigation
Straight line distance display
The distance in a straight line
from the vehicle position mark
to the center of the cursor mark
is shown.
Cursor mark
Touch the cursor mark
continuously and it will change
color from black to yellow .
29
Navigation
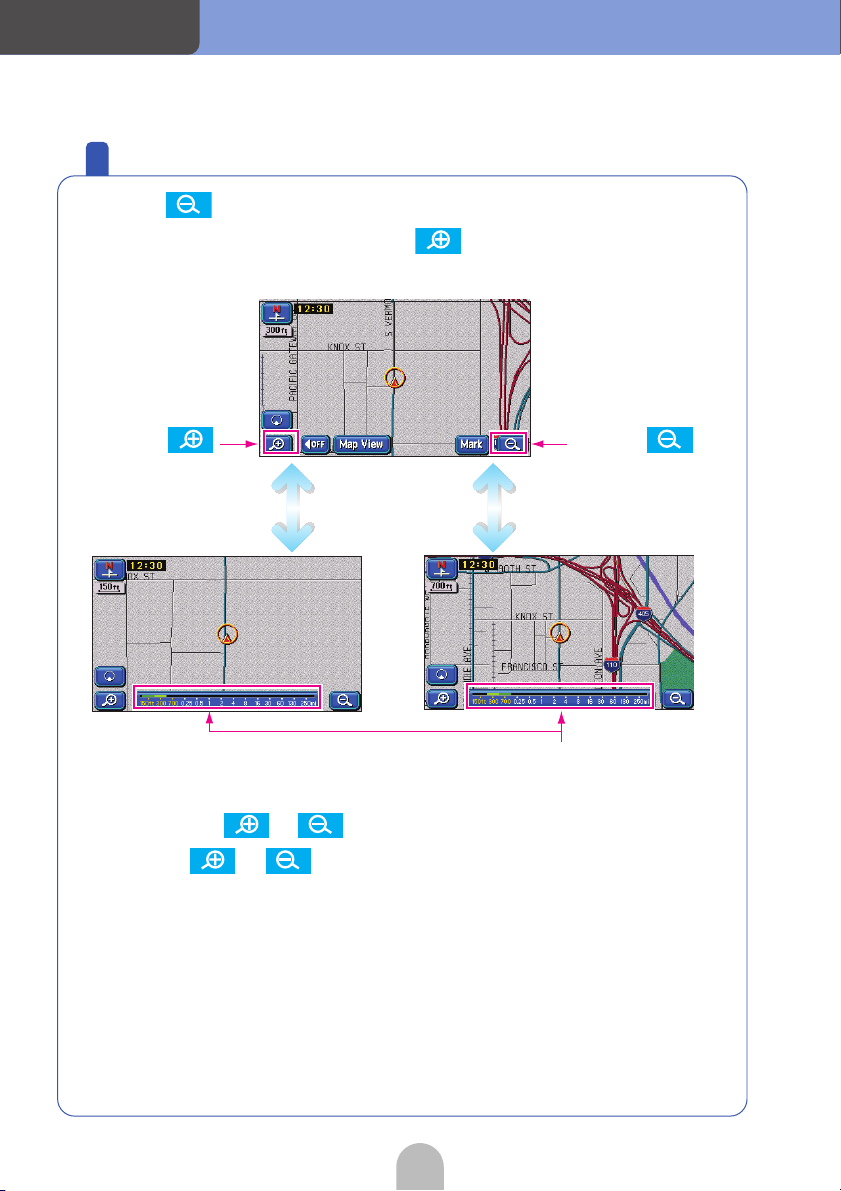
Change the map reduction scale
Touch the switch and the map reduction scale increases making
for a wider range display. Touch the switch and the map
reduction scale decreases for a more detailed map display.
Touch .
Scale bar
Touch a number to switch
the scale to that number.
Touch .
Every time either or is pressed, the scale changes one level.
Touch either or continuously for over 1 second to change
the scale without going though each level.
30
 Loading...